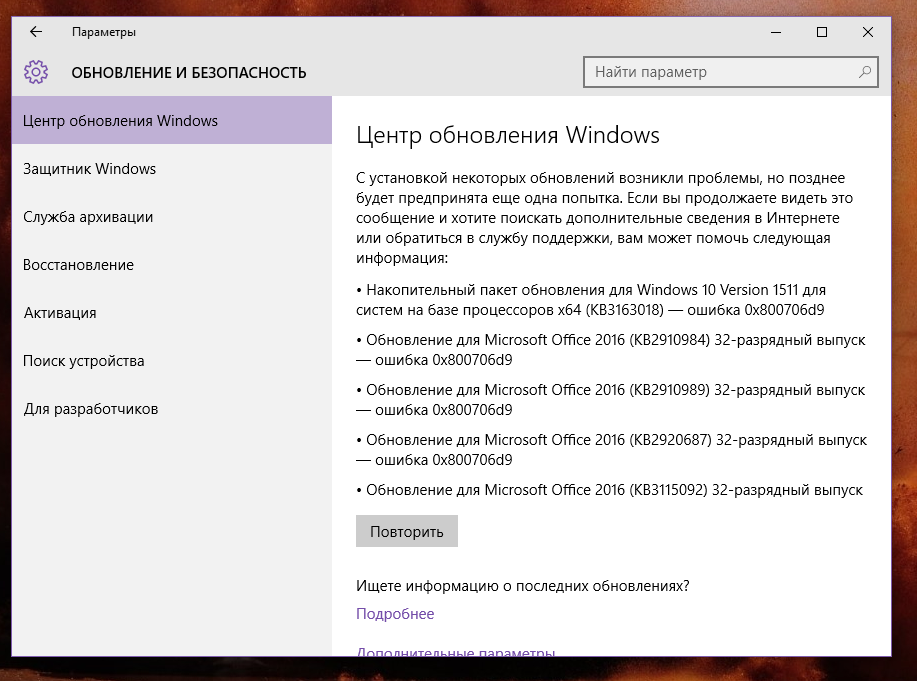
Код ошибки 0x800706d9 возникает в Microsoft Store Windows 11/10 при обновлении или скачивании игр и приложений. Иногда можно получить и уведомление брандмауэра с кодом 0x6D9.

Виновником, когда появляется ошибка 0x800706d9 в Mcirosoft Store при обновлении игр или программ может являться блокировка сторонним антивирусом или нужные службы для правильной работы Store настроены не правильно или некоторые из них отключены.
В данной инструкции разберем, что делать и как исправить, когда пользователь столкнулся с кодом ошибки 0x800706d9 в Microsoft Store Windows 11/10 при обновлении приложений.
1. Проверка работы служб
Чтобы исправить ошибку 0x800706d9 в Microsoft Store для Windows 11 и 10, выполните ниже действия:
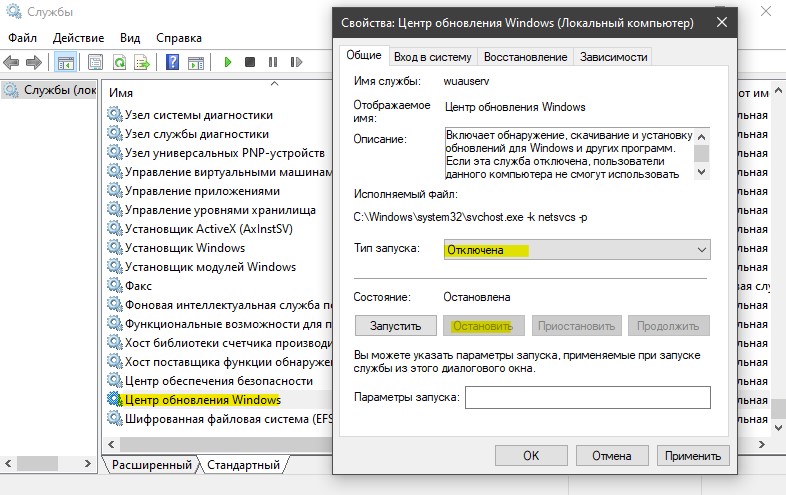
- Нажмите сочетание кнопок Win+R и введите services.msc
- Найдите службу Центр обновления Windows и щелкните по ней дважды
- Выберите Тип запуск: Автоматический и нажмите Запустить, если остановлена
- Проделайте тоже самое для служб Брандмауэр защитника Windows, Служба хранилища и Служба Windows License Manager
- Проверьте устранена ли ошибка 0x800706d9, если нет, то перезагрузите ПК
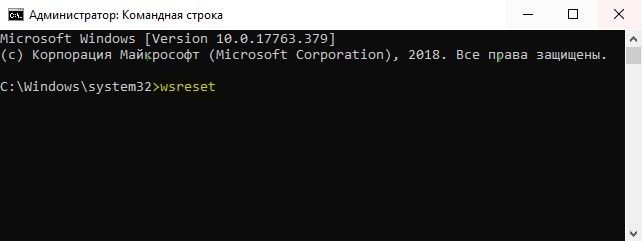
2. Очистить кэш Store
Со временем кэш Microsoft Store может быть поврежден или новые файлы могут работать не правильно и выдавать код ошибки 0x800706d9.
- Запустите командную строку от имени администратора
- Введите команду
wsresetи нажмите Enter - Дождитесь окончание процесса, когда Store запустится сам
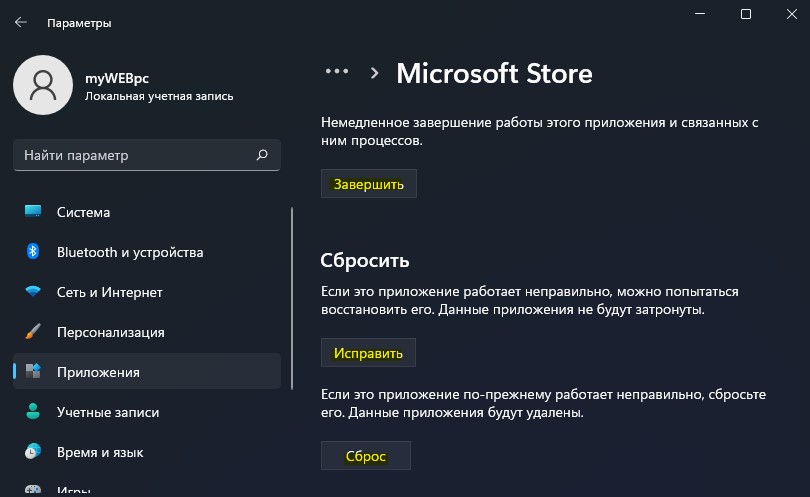
3. Сброс Microsoft Store
- Откройте Параметры > Приложения > Установленные приложения
- Найдите Microsoft Store и выберите Дополнительные параметры
- Нажмите по порядку Завершить, Исправить и Сброс
4. Переустановить Microsoft Store
Запустите PowerShell от имени администратора и введите ниже апплет
Get-AppXPackage *Microsoft.WindowsStore* | Foreach {Add-AppxPackage -DisableDevelopmentMode -Register “$($_.InstallLocation)AppXManifest.xml”}

Если выше команда не помогла исправить ошибку 0x800706d9 в Microsoft Store Windows 11/10, то скопируйте и вставьте ниже целый скрипт и нажмите Enter, после чего перезагрузите ПК:
# Get all the provisioned packages
 $Packages = (get-item 'HKLM:SoftwareMicrosoftWindowsCurrentVersionAppxAppxAllUserStoreApplications') | Get-ChildItem
 # Filter the list if provided a filter
 $PackageFilter = $args[0]
 if ([string]::IsNullOrEmpty($PackageFilter))
{
  echo "No filter specified, attempting to re-register all provisioned apps."
 }
 else
 {
  $Packages = $Packages | where {$_.Name -like $PackageFilter}

  if ($Packages -eq $null)
   {
  echo "No provisioned apps match the specified filter."
  exit
  }
  else
  {
  echo "Registering the provisioned apps that match $PackageFilter"
 }
 }
  ForEach($Package in $Packages)
 {
  # get package name & path
  $PackageName = $Package | Get-ItemProperty | Select-Object -ExpandProperty PSChildName
  $PackagePath = [System.Environment]::ExpandEnvironmentVariables(($Package | Get-ItemProperty | Select-Object -ExpandProperty Path))
  # register the package
  echo "Attempting to register package: $PackageName"
  Add-AppxPackage -register $PackagePath -DisableDevelopmentMode
 }
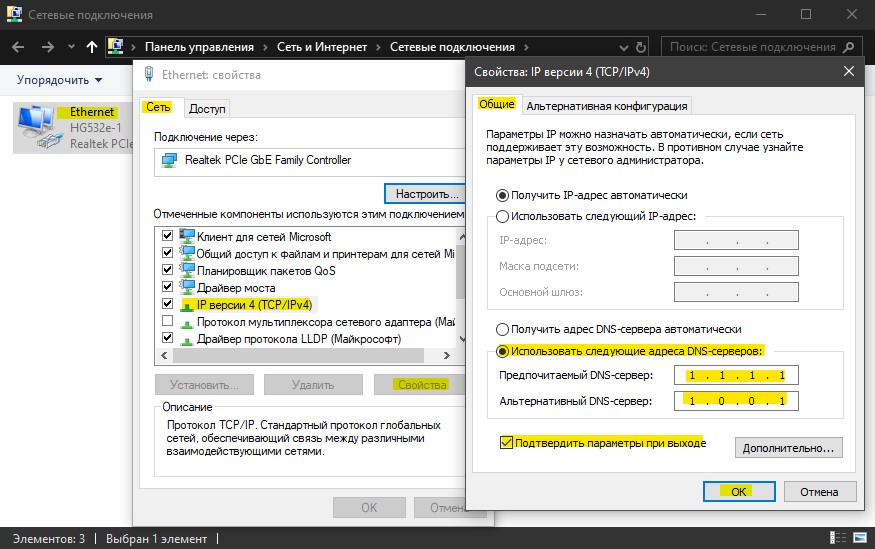
5. Изменить DNS сервера
Местные провайдеры предоставляют не стабильные и не безопасные DNS-сервера, и нужно изменить их на более быстрые и безопасные. Для этого:
- Нажмите Win+R и введите ncpa.cpl
- Щелкните правой кнопкой мыши по сетевому адаптеру, который имеет доступ в Интернет
- Выберите Свойства
- Выделите IP версии 4 (TCP/IPv4) и ниже нажмите на Свойства
- Установите Использовать следующие адреса DNS-серверов
- И пропишите предпочтительный 1.1.1.1 и альтернативный 1.0.0.1
Смотрите еще:
- Как настроить DNS сервер в Windows 10
- Как изменить DNS сервера в Windows 11
- Не удается открыть приложение Microsoft Store
- Не работает Microsoft Store в Windows 11 — Что делать?
- Не работает Магазин в Windows 10 (Microsoft Store)
[ Telegram | Поддержать ]
Многие пользователи сообщают о возникновении кода ошибки 0x800706d9 при попытке войти в приложение Магазина Windows, используя учетные данные учетной записи Microsoft. Отображаемое сообщение об ошибке выглядит следующим образом:
Что-то пошло не так
Пожалуйста, повторите попытку позже.
0x800706d9
Из сопоставителя конечных точек больше нет доступных конечных точек.
Если вы один из них, столкнувшись с той же проблемой, значит, вы нашли нужную статью, которая поможет вам решить эту проблему.
1. Нажмите Windows + R, чтобы открыть «Выполнить».
2. Введите ms-settings: appsfeatures, чтобы открыть «Приложения и функции».
3. Введите Microsoft Store в поле поиска под списком приложений.
4. Щелкните три вертикальные точки, связанные с Microsoft Store.
5. В открывшемся меню выберите Дополнительные параметры.
6. На странице «Дополнительные параметры» найдите раздел «Сброс» и нажмите кнопку «Сброс».
7. Снова нажмите «Сброс» в запросе подтверждения.
8. Перезапустите приложение Store и проверьте, устранена ли проблема.
Исправление 2 — изменение настроек DNS-сервера
1. Откройте «Выполнить» с помощью клавиш Windows и R на клавиатуре.
2. Введите ncpa.cpl, чтобы открыть сетевые подключения.
3. Щелкните правой кнопкой мыши на сетевом адаптере и выберите Свойства.
4. В окне «Свойства» выберите «Протокол Интернета версии 4 (TCP / IPv4)».
5. Теперь нажмите кнопку «Свойства» ниже.
6. Установите переключатель, связанный с параметром Использовать следующие адреса DNS-серверов.
7. В поле рядом с Предпочтительным DNS-сервером введите значение 1.1.1.1.
8. Установите для альтернативного DNS-сервера значение 1.0.0.1.
9. Нажмите ОК, чтобы сохранить изменения.
10. Теперь проверьте, устранена ли ошибка входа в учетную запись Microsoft.
Исправление 3 — Очистить кеш MS Store
1. Нажмите клавишу Windows и введите wsreset в поле поиска.
2. Щелкните wsreset.exe, чтобы начать процесс сброса.
3. Дождитесь восстановления Магазина Windows и сброса его кеша.
4. После завершения процесса откроется MS Store.
5. Закройте Магазин. Перезагрузите компьютер.
6. Проверьте, помогло ли это вам преодолеть ошибку.
Исправление 4 — Выполнение кода с помощью PowerShell
1. Нажмите одновременно клавиши Windows и R, чтобы открыть диалоговое окно «Выполнить».
2. Введите powershell и нажмите Ctrl + Shift + Enter, чтобы открыть PowerShell от имени администратора.
3. Нажмите Да, когда будет предложено Управление учетными записями пользователей.
4. Скопируйте приведенный ниже код.
 # Get all the provisioned packages
 $Packages = (get-item 'HKLM:SoftwareMicrosoftWindowsCurrentVersionAppxAppxAllUserStoreApplications') | Get-ChildItem
 # Filter the list if provided a filter
 $PackageFilter = $args[0]
 if ([string]::IsNullOrEmpty($PackageFilter))
{
  echo "No filter specified, attempting to re-register all provisioned apps."
 }
 else
 {
  $Packages = $Packages | where {$_.Name -like $PackageFilter}

  if ($Packages -eq $null)
   {
  echo "No provisioned apps match the specified filter."
  exit
  }
  else
  {
  echo "Registering the provisioned apps that match $PackageFilter"
 }
 }
  ForEach($Package in $Packages)
 {
  # get package name & path
  $PackageName = $Package | Get-ItemProperty | Select-Object -ExpandProperty PSChildName
  $PackagePath = [System.Environment]::ExpandEnvironmentVariables(($Package | Get-ItemProperty | Select-Object -ExpandProperty Path))
  # register the package
  echo "Attempting to register package: $PackageName"
  Add-AppxPackage -register $PackagePath -DisableDevelopmentMode
 }
5. Вернитесь в PowerShell и вставьте скопированный код. Нажмите Enter, чтобы выполнить код.
6. Дождитесь завершения выполнения.
7. Закройте PowerShell и перезагрузите систему.
8. После запуска проверьте, можете ли вы войти в свою учетную запись Microsoft в Магазине.
Вот и все!
Мы надеемся, что эта статья была достаточно информативной, чтобы помочь вам устранить ошибку входа в учетную запись Microsoft с кодом 0x800706d9. Прокомментируйте и дайте нам знать, какое исправление сработало для вас.
Во время обновления ПК на базе Windows 10 некоторые пользователи могут сталкиваться с ошибкой 0x800706d9. Самая частая причина за этой неполадок — деактивированный брандмауэр Windows. Впрочем, иногда она может возникать из-за проблем с компонентами Центра обновления.
Содержание
- Как исправить ошибку 0x800706d9?
- Метод №1 Включение брандмауэра Windows
- Метод №2 Проверка параметров служб брандмауэра и Центра обновления
- Метод №3 Запуск средства устранения неполадок Центра обновления
- Метод №4 Сброс компонентов Центра обновления
Как исправить ошибку 0x800706d9?
Прежде всего, создайте точку восстановления на вашем компьютере. Она поможет вам в случае того, если что-то пойдет не так. Нажмите Win+S и пропишите в поисковую строку запрос «Создание точки восстановления». В появившемся окошке выполните все необходимые действия и создайте точку на одном из разделов диска. Как только закончите, переходите к методам ниже.
Метод №1 Включение брандмауэра Windows
Ошибка 0x800706d9 может возникать в процессе обновления Windows, если в вашей системе отключен брандмауэр. Чтобы включить его, сделайте следующее:
- нажмите Win+S для вызова поисковой строки;
- пропишите запрос «Брандмауэр Защитника Windows»;
- кликните на ссылку «Включение и выключение брандмауэра Защитника Windows» в левой части окошка;
- выберите опции по включению брандмауэра и сохраните внесенные изменения;
- перезагрузите компьютер и попробуйте запустить апдейт ОС Windows еще раз.
Метод №2 Проверка параметров служб брандмауэра и Центра обновления
Возможно, параметры служб брандмауэра и Центра обновления были изменены, вследствие чего те перестали нормально функционировать. Вот что вам нужно сделать:
- нажмите комбинацию Win+R;
- пропишите в пустой строчке services.msc и нажмите Enter;
- найдите в списке службу «Центр обновления Windows» и дважды кликните на нее ЛКМ;
- выставьте в типе запуске значение «Автоматически»;
- сохраните выставленные настройки и закройте окно свойств службы;
- сделайте все вышеописанное для службы «Брандмауэр Защитника Windows»;
- перезагрузите компьютер и проверьте наличие ошибки 0x800706d9.
Метод №3 Запуск средства устранения неполадок Центра обновления
В некоторых случаях приходится положиться на системное средство устранения неполадок. Оно не всегда помогает, но попробовать все же стоит. Сделать это можно вот так:
- нажмите Win+S;
- пропишите «Устранение общих проблем» и выберите результат;
- выберите пункт «Центр обновления Windows» и нажмите на кнопку «Запустить средство устранения неполадок»;
- следуйте инструкциям, которые предлагает вам средство;
- перезагрузите компьютер, если в этом будет необходимость.
Как только зайдете в Windows, запустите процесс обновления и проверьте, была ли решена ошибка 0x800706d9.
Метод №4 Сброс компонентов Центра обновления
Если ничего из вышеуказанного не помогло, предлагаем вам заняться сбросом компонентом Центра обновления. Да, звучит сложно, но на деле процедура крайне простая. Вот что вам нужно сделать:
- нажмите Win+R;
- напишите notepad.exe и нажмите Enter;
- вставьте в окно Блокнота следующие команды:
:: Run the reset Windows Update components.
:: void components();
:: /*************************************************************************************/
:components
:: —— Stopping the Windows Update services ——
call :print Stopping the Windows Update services.
net stop bitscall :print Stopping the Windows Update services.
net stop wuauservcall :print Stopping the Windows Update services.
net stop appidsvccall :print Stopping the Windows Update services.
net stop cryptsvccall :print Canceling the Windows Update process.
taskkill /im wuauclt.exe /f
:: —— Checking the services status ——
call :print Checking the services status.sc query bits | findstr /I /C:»STOPPED»
if %errorlevel% NEQ 0 (
echo. Failed to stop the BITS service.
echo.
echo.Press any key to continue . . .
pause>nul
goto :eof
)call :print Checking the services status.sc query wuauserv | findstr /I /C:»STOPPED»
if %errorlevel% NEQ 0 (
echo. Failed to stop the Windows Update service.
echo.
echo.Press any key to continue . . .
pause>nul
goto :eof
)call :print Checking the services status.
sc query appidsvc | findstr /I /C:»STOPPED»
if %errorlevel% NEQ 0 (
sc query appidsvc | findstr /I /C:»OpenService FAILED 1060″
if %errorlevel% NEQ 0 (
echo. Failed to stop the Application Identity service.
echo.
echo.Press any key to continue . . .
pause>nul
if %family% NEQ 6 goto :eof
)
)call :print Checking the services status.
sc query cryptsvc | findstr /I /C:»STOPPED»
if %errorlevel% NEQ 0 (
echo. Failed to stop the Cryptographic Services service.
echo.
echo.Press any key to continue . . .
pause>nul
goto :eof
):: —— Delete the qmgr*.dat files ——
call :print Deleting the qmgr*.dat files.del /s /q /f «%ALLUSERSPROFILE%Application DataMicrosoftNetworkDownloaderqmgr*.dat»
del /s /q /f «%ALLUSERSPROFILE%MicrosoftNetworkDownloaderqmgr*.dat»:: —— Renaming the softare distribution folders backup copies ——
call :print Deleting the old software distribution backup copies.cd /d %SYSTEMROOT%
if exist «%SYSTEMROOT%winsxspending.xml.bak» (
del /s /q /f «%SYSTEMROOT%winsxspending.xml.bak»
)
if exist «%SYSTEMROOT%SoftwareDistribution.bak» (
rmdir /s /q «%SYSTEMROOT%SoftwareDistribution.bak»
)
if exist «%SYSTEMROOT%system32Catroot2.bak» (
rmdir /s /q «%SYSTEMROOT%system32Catroot2.bak»
)
if exist «%SYSTEMROOT%WindowsUpdate.log.bak» (
del /s /q /f «%SYSTEMROOT%WindowsUpdate.log.bak»
)call :print Renaming the software distribution folders.
if exist «%SYSTEMROOT%winsxspending.xml» (
takeown /f «%SYSTEMROOT%winsxspending.xml»
attrib -r -s -h /s /d «%SYSTEMROOT%winsxspending.xml»
ren «%SYSTEMROOT%winsxspending.xml» pending.xml.bak
)
if exist «%SYSTEMROOT%SoftwareDistribution» (
attrib -r -s -h /s /d «%SYSTEMROOT%SoftwareDistribution»
ren «%SYSTEMROOT%SoftwareDistribution» SoftwareDistribution.bak
if exist «%SYSTEMROOT%SoftwareDistribution» (
echo.
echo. Failed to rename the SoftwareDistribution folder.
echo.
echo.Press any key to continue . . .
pause>nul
goto :eof
)
)
if exist «%SYSTEMROOT%system32Catroot2» (
attrib -r -s -h /s /d «%SYSTEMROOT%system32Catroot2»
ren «%SYSTEMROOT%system32Catroot2» Catroot2.bak
)
if exist «%SYSTEMROOT%WindowsUpdate.log» (
attrib -r -s -h /s /d «%SYSTEMROOT%WindowsUpdate.log»
ren «%SYSTEMROOT%WindowsUpdate.log» WindowsUpdate.log.bak
):: —— Reset the BITS service and the Windows Update service to the default security descriptor ——
call :print Reset the BITS service and the Windows Update service to the default security descriptor.sc.exe sdset wuauserv D:(A;;CCLCSWLOCRRC;;;AU)(A;;CCDCLCSWRPWPDTLOCRSDRCWDWO;;;BA)(A;;CCDCLCSWRPWPDTLCRSDRCWDWO;;;SO)(A;;CCLCSWRPWPDTLOCRRC;;;SY)S:(AU;FA;CCDCLCSWRPWPDTLOCRSDRCWDWO;;WD)
sc.exe sdset bits D:(A;;CCLCSWLOCRRC;;;AU)(A;;CCDCLCSWRPWPDTLOCRSDRCWDWO;;;BA)(A;;CCDCLCSWRPWPDTLCRSDRCWDWO;;;SO)(A;;CCLCSWRPWPDTLOCRRC;;;SY)S:(AU;FA;CCDCLCSWRPWPDTLOCRSDRCWDWO;;WD)
sc.exe sdset cryptsvc D:(A;;CCLCSWLOCRRC;;;AU)(A;;CCDCLCSWRPWPDTLOCRSDRCWDWO;;;BA)(A;;CCDCLCSWRPWPDTLCRSDRCWDWO;;;SO)(A;;CCLCSWRPWPDTLOCRRC;;;SY)S:(AU;FA;CCDCLCSWRPWPDTLOCRSDRCWDWO;;WD)
sc.exe sdset trustedinstaller D:(A;;CCLCSWLOCRRC;;;AU)(A;;CCDCLCSWRPWPDTLOCRSDRCWDWO;;;BA)(A;;CCDCLCSWRPWPDTLCRSDRCWDWO;;;SO)(A;;CCLCSWRPWPDTLOCRRC;;;SY)S:(AU;FA;CCDCLCSWRPWPDTLOCRSDRCWDWO;;WD):: —— Reregister the BITS files and the Windows Update files ——
call :print Reregister the BITS files and the Windows Update files.cd /d %SYSTEMROOT%system32
regsvr32.exe /s atl.dll
regsvr32.exe /s urlmon.dll
regsvr32.exe /s mshtml.dll
regsvr32.exe /s shdocvw.dll
regsvr32.exe /s browseui.dll
regsvr32.exe /s jscript.dll
regsvr32.exe /s vbscript.dll
regsvr32.exe /s scrrun.dll
regsvr32.exe /s msxml.dll
regsvr32.exe /s msxml3.dll
regsvr32.exe /s msxml6.dll
regsvr32.exe /s actxprxy.dll
regsvr32.exe /s softpub.dll
regsvr32.exe /s wintrust.dll
regsvr32.exe /s dssenh.dll
regsvr32.exe /s rsaenh.dll
regsvr32.exe /s gpkcsp.dll
regsvr32.exe /s sccbase.dll
regsvr32.exe /s slbcsp.dll
regsvr32.exe /s cryptdlg.dll
regsvr32.exe /s oleaut32.dll
regsvr32.exe /s ole32.dll
regsvr32.exe /s shell32.dll
regsvr32.exe /s initpki.dll
regsvr32.exe /s wuapi.dll
regsvr32.exe /s wuaueng.dll
regsvr32.exe /s wuaueng1.dll
regsvr32.exe /s wucltui.dll
regsvr32.exe /s wups.dll
regsvr32.exe /s wups2.dll
regsvr32.exe /s wuweb.dll
regsvr32.exe /s qmgr.dll
regsvr32.exe /s qmgrprxy.dll
regsvr32.exe /s wucltux.dll
regsvr32.exe /s muweb.dll
regsvr32.exe /s wuwebv.dll:: —— Resetting Winsock ——
call :print Resetting Winsock.
netsh winsock reset:: —— Resetting WinHTTP Proxy ——
call :print Resetting WinHTTP Proxy.if %family% EQU 5 (
proxycfg.exe -d
) else (
netsh winhttp reset proxy
):: —— Set the startup type as automatic ——
call :print Resetting the services as automatics.
sc.exe config wuauserv start= auto
sc.exe config bits start= delayed-auto
sc.exe config cryptsvc start= auto
sc.exe config TrustedInstaller start= demand
sc.exe config DcomLaunch start= auto:: —— Starting the Windows Update services ——
call :print Starting the Windows Update services.
net start bitscall :print Starting the Windows Update services.
net start wuauservcall :print Starting the Windows Update services.
net start appidsvccall :print Starting the Windows Update services.
net start cryptsvccall :print Starting the Windows Update services.
net start DcomLaunch:: —— End process ——
call :print The operation completed successfully.echo.Press any key to continue . . .
pause>nul
goto :eof
:: /*************************************************************************************/
- нажмите на пункт «Файл» в строке меню и выберите «Сохранить как…»;
- задайте файлу имя «WinUpdReset.cmd» (обязательно укажите расширение CMD в конце!) и сохраните его в удобное для вас место;
- дважды кликните ЛКМ на созданный WinUpdReset.cmd и следуйте инструкциям в окошке Командной строки;
- перезагрузите компьютер по окончанию сброса компонентов Центра обновления.
После выполнения этого процесса ошибка 0x800706d9 не должна вас больше донимать.
- 13.05.2020
Если у Вас при попытке загрузки или установке обновлений в системе, или при активации (либо обновлении системы с «Домашней» версии до Pro) возникает ошибка с кодом — 0x800706d9. Есть несколько вариантов как это исправить.
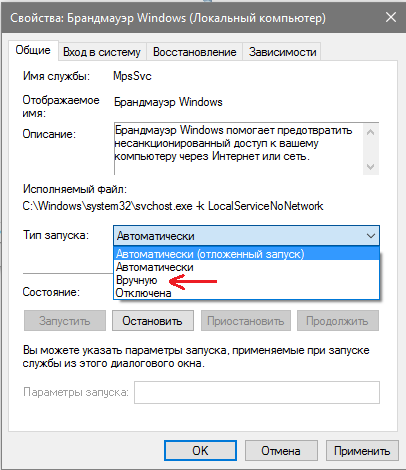
1) Заходим в меню «Службы», сделать это можно путем вызова горячих клавиш Win + R => В поле ввода введите services.msc => Находите в списке окна «Службы» пункт «Брандмауэр Защитника Windows» => Щелкаем на него дважды и переводим в ручной режим. Далее применить. Помимо всего, рекомендуем отключить антивирус на время обновления, или активации, если он у Вас установлен. Т.к антивирус может блокировать исходящие и входящие соединения с серверами Microsoft.
Теперь можете повторить активацию системы, либо ее обновление.
2) Если Вам нужна активации системы, либо к примеру обновление Windows 10 Домашняя до Windows 10 Pro, при наличии у Вас ключа активации Windows 10 Pro. То Вы можете попробовать активировать альтернативным способом через терминал, по следующей инструкциии.
3) Помимо всего мы рекомендуем использовать только оригинальные дистрибутивы Windows 10. Скачать их можете с сайта Microsoft по инструкции, либо из нашего каталога.
Various problems have been reported with Microsoft Store, and the code 0x800706D9 is one of them. Focusing on the Windows Store error 0x800706D9, MiniTool Partition Wizard develops this guide where you can learn about some workarounds to fix the issue.
Microsoft Store, or Windows Store, is a digital distribution platform that allows users to download, update, and manage various applications on Windows computer easily. However, it may run into certain problems for odd reasons. Error codes like 0x800706D9 may appear and restrict certain operations within Store.
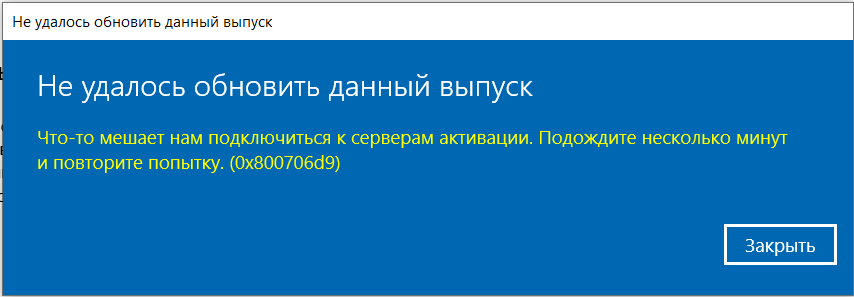
The Windows Store error 0x800706D9 could come up while you are trying to download new apps or update the existing apps via MS Store, giving you the error message:
Something unexpected happened
Reporting this problem will help us understand it better. You can wait a bit and try again or restart your device. That may help.
Code: 0x800706D9
When you come across the problem, you should first try the operation again or restart your device as the error message prompts. But if this Microsoft Store error appears again, you might need to try the following methods to troubleshoot the problem.
Method 1: Run Windows Store Apps Troubleshooter
Windows provides users with a useful troubleshooter for Windows Store to fix problems that may prevent Windows Store Apps from working properly. If you are facing the code 0x800706D9 in Windows Store, try using this troubleshooter.
Step 1: Press Windows + I to open Settings quickly.
Step 2: Choose the Update & Security category and click Troubleshoot from the left pane.
Step 3: In the right pane, scroll down to select Windows Store Apps and then click Run the troubleshooter.
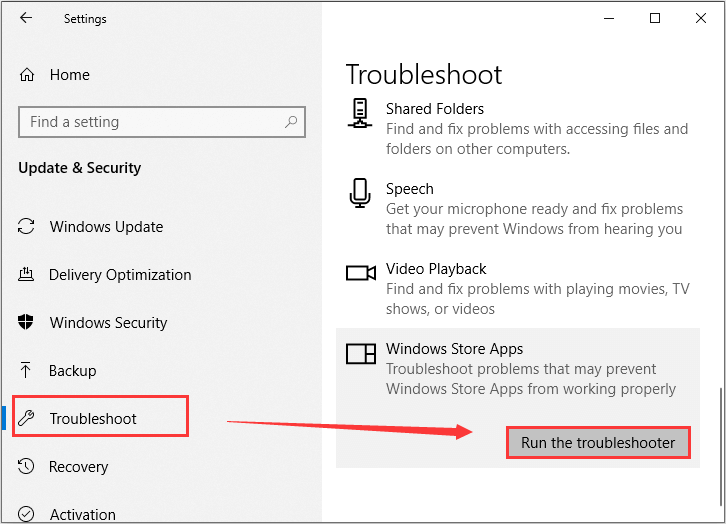
Then, this tool will start detecting problems related to Windows Store Apps. If any fix strategies are found, click Apply the fix to continue. After that, you can go to download or update apps again to check if the error code 0x800706D9 has been resolved.
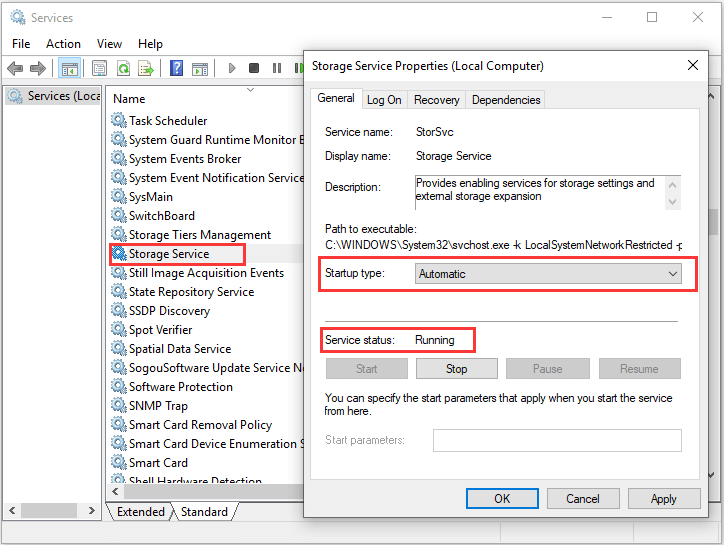
Method 2: Enable the Storage Service
Sometimes, users may disable the Storage Service to avoid Windows writing hidden files on USB devices. But as it turns out, the Windows Store error 0x800706D9 may appear if the Storage Service is disabled. So, you need to make sure the service is enabled.
Here’s what you should do:
Step 1: Press Windows + R to invoke the Run window.
Step 2: Input services.msc and press Enter to open the Services app. Double-click the Storage Service to open its Properties.
Step 3: In the pop-up window, make sure the Service status is Running and set the Startup type to Automatic. If it’s not running, click Start to enable it.
Step 4: Click Apply and OK to save changes.
Method 3: Disable Antivirus Temporarily
To protect your computer from any possible threats, your antivirus will block some apps that seem suspicious from downloading or updating, which could also trigger the error code 0x800706D9 in Microsoft Store.
To solve the problem, you might need to disable your installed antivirus temporarily and then try downloading or updating again. To disable the Windows built-in antivirus, you can follow the steps below:
Step 1: Open Settings and go to Update & Security > Windows Security.
Step 2: In the right pane, click Virus & threat protection to open the Windows Security page.
Step 3: Under the Virus & threat protection settings section, click Manage settings.
Step 4: Now, toggle off the button below the Real-time protection to disable Windows Defender antivirus.

Then, you can check if the Windows Store error 0x800706D9 disappears. If this method doesn’t help to fix the issue, please re-enable your antivirus and move on to the next solution.
Method 4: Reset Windows Store
Another effective method to fix problems with Windows Store is resetting it. You can also complete the operation in Settings.
Step 1: Open Settings and navigate to Apps > App & features.
Step 2: In the right pane, select Microsoft Store and click Advanced options.
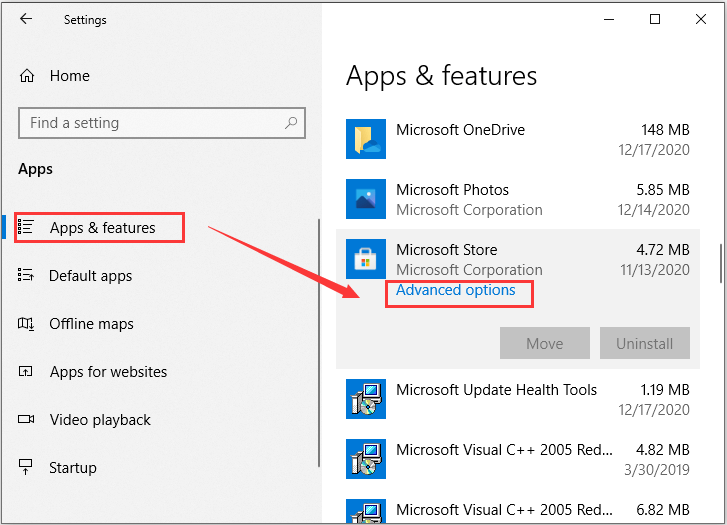
Step 3: On the next page, scroll down to the Reset section and click the Reset button. Then, click Reset again to confirm the operation.
In this way, the Microsoft Store app will be reinstalled and revert to its default settings without affecting your documents. Now, you should be able to download or update apps in Microsoft Store without the error code 0x800706D9.
Method 5: Re-registry Microsoft Store
If all the above methods fail to fix the problem for you, perhaps some essential components of MS Store get lost and you might need to re-register the app by following the steps below.
Step 1: Right-click the Start button.
Step 2: Click Windows PowerShell (Admin) to launch Windows PowerShell as an administrator.
Step 3: Input the following command and press Enter:
Get-AppXPackage -AllUsers | Foreach {Add-AppxPackage -DisableDevelopmentMode -Register «$($_.InstallLocation)AppXManifest.xml»}
After that, restart your computer. Hopefully, the Windows Store error 0x800706D9 has been resolved successfully.
Various problems have been reported with Microsoft Store, and the code 0x800706D9 is one of them. Focusing on the Windows Store error 0x800706D9, MiniTool Partition Wizard develops this guide where you can learn about some workarounds to fix the issue.
Microsoft Store, or Windows Store, is a digital distribution platform that allows users to download, update, and manage various applications on Windows computer easily. However, it may run into certain problems for odd reasons. Error codes like 0x800706D9 may appear and restrict certain operations within Store.
The Windows Store error 0x800706D9 could come up while you are trying to download new apps or update the existing apps via MS Store, giving you the error message:
Something unexpected happened
Reporting this problem will help us understand it better. You can wait a bit and try again or restart your device. That may help.
Code: 0x800706D9
When you come across the problem, you should first try the operation again or restart your device as the error message prompts. But if this Microsoft Store error appears again, you might need to try the following methods to troubleshoot the problem.
Method 1: Run Windows Store Apps Troubleshooter
Windows provides users with a useful troubleshooter for Windows Store to fix problems that may prevent Windows Store Apps from working properly. If you are facing the code 0x800706D9 in Windows Store, try using this troubleshooter.
Step 1: Press Windows + I to open Settings quickly.
Step 2: Choose the Update & Security category and click Troubleshoot from the left pane.
Step 3: In the right pane, scroll down to select Windows Store Apps and then click Run the troubleshooter.
Then, this tool will start detecting problems related to Windows Store Apps. If any fix strategies are found, click Apply the fix to continue. After that, you can go to download or update apps again to check if the error code 0x800706D9 has been resolved.
Method 2: Enable the Storage Service
Sometimes, users may disable the Storage Service to avoid Windows writing hidden files on USB devices. But as it turns out, the Windows Store error 0x800706D9 may appear if the Storage Service is disabled. So, you need to make sure the service is enabled.
Here’s what you should do:
Step 1: Press Windows + R to invoke the Run window.
Step 2: Input services.msc and press Enter to open the Services app. Double-click the Storage Service to open its Properties.
Step 3: In the pop-up window, make sure the Service status is Running and set the Startup type to Automatic. If it’s not running, click Start to enable it.
Step 4: Click Apply and OK to save changes.
Method 3: Disable Antivirus Temporarily
To protect your computer from any possible threats, your antivirus will block some apps that seem suspicious from downloading or updating, which could also trigger the error code 0x800706D9 in Microsoft Store.
To solve the problem, you might need to disable your installed antivirus temporarily and then try downloading or updating again. To disable the Windows built-in antivirus, you can follow the steps below:
Step 1: Open Settings and go to Update & Security > Windows Security.
Step 2: In the right pane, click Virus & threat protection to open the Windows Security page.
Step 3: Under the Virus & threat protection settings section, click Manage settings.
Step 4: Now, toggle off the button below the Real-time protection to disable Windows Defender antivirus.
Then, you can check if the Windows Store error 0x800706D9 disappears. If this method doesn’t help to fix the issue, please re-enable your antivirus and move on to the next solution.
Method 4: Reset Windows Store
Another effective method to fix problems with Windows Store is resetting it. You can also complete the operation in Settings.
Step 1: Open Settings and navigate to Apps > App & features.
Step 2: In the right pane, select Microsoft Store and click Advanced options.
Step 3: On the next page, scroll down to the Reset section and click the Reset button. Then, click Reset again to confirm the operation.
In this way, the Microsoft Store app will be reinstalled and revert to its default settings without affecting your documents. Now, you should be able to download or update apps in Microsoft Store without the error code 0x800706D9.
Method 5: Re-registry Microsoft Store
If all the above methods fail to fix the problem for you, perhaps some essential components of MS Store get lost and you might need to re-register the app by following the steps below.
Step 1: Right-click the Start button.
Step 2: Click Windows PowerShell (Admin) to launch Windows PowerShell as an administrator.
Step 3: Input the following command and press Enter:
Get-AppXPackage -AllUsers | Foreach {Add-AppxPackage -DisableDevelopmentMode -Register «$($_.InstallLocation)AppXManifest.xml»}
After that, restart your computer. Hopefully, the Windows Store error 0x800706D9 has been resolved successfully.
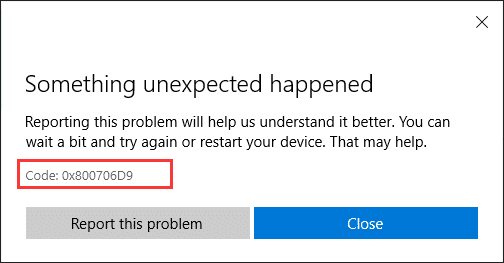
Если при попытке войти в Магазин Windows под своей учетной записью Microsoft вы столкнетесь с кодом ошибки 0x800706d9, то этот пост предназначен для того, чтобы вам помочь. В этом посте мы определим возможные причины, а также предложим соответствующие решения, которые вы можете попробовать, чтобы помочь вам исправить эту проблему.
Когда вы столкнетесь с этой проблемой, вы получите следующее сообщение об ошибке;
Что-то пошло не так
Пожалуйста, повторите попытку позже.
0x800706d9
Из сопоставителя конечных точек больше нет доступных конечных точек.
Поврежденные компоненты Магазина Windows — одна из возможных причин, почему это ошибка 0x800706d9 происходит.
Если вы столкнулись с этой проблемой, попробуйте наши следующие предложения и посмотрите, поможет ли это решить проблему.
- Сбросить кеш Microsoft Store
- Создать новую учетную запись пользователя
- Запустите сканирование SFC и DISM
- Сбросить настройки брандмауэра по умолчанию
- Выполните восстановление системы
- Выполните новый запуск, обновление на месте или сбросьте настройки облачного хранилища.
Давайте посмотрим на описание процесса, связанного с каждым из перечисленных решений.
1]Сброс кеша Microsoft Store
Это решение требует, чтобы вы очистили / сбросили кеш Microsoft Store, а затем повторите попытку входа с помощью своей учетной записи Microsoft. Если ошибка 0x800706d9 все еще не устранена, перейдите к следующему решению.
2]Создайте новую учетную запись пользователя
У вас может быть поврежденная учетная запись пользователя, и это может вызывать ошибка 0x800706d9. В этом случае вы можете попробовать создать новую учетную запись пользователя, а затем использовать ее для входа в Магазин Windows и посмотреть, сохранится ли проблема.
3]Запустите сканирование SFC и DISM.
Если у вас есть ошибки в системных файлах, вы можете столкнуться с Ошибка входа в учетную запись Microsoft 0x800706d9.
SFC / DISM — это служебная программа в Windows, которая позволяет пользователям сканировать системные файлы Windows на наличие повреждений и восстанавливать поврежденные файлы.
Для простоты и удобства вы можете запустить сканирование, используя описанную ниже процедуру.
- Нажмите клавишу Windows + R, чтобы вызвать диалоговое окно «Выполнить».
- В диалоговом окне «Выполнить» введите блокнот и нажмите Enter, чтобы открыть Блокнот.
- Скопируйте и вставьте приведенный ниже синтаксис в текстовый редактор.
@echo off date / t & time / t echo Dism / Online / Cleanup-Image / StartComponentCleanup Dism / Online / Cleanup-Image / StartComponentCleanup echo … date / t & time / t echo Dism / Online / Cleanup-Image / RestoreHealth Dism / Online / Cleanup-Image / RestoreHealth echo … дата / t и время / t echo SFC / scannow SFC / scannow дата / t и время / t пауза
- Сохраните файл с именем и добавьте расширение файла .bat — например; SFC_DISM_scan.bat.
- Несколько раз запустите командный файл с правами администратора (щелкните сохраненный файл правой кнопкой мыши и выберите Запустить от имени администратора из контекстного меню), пока он не сообщит об отсутствии ошибок.
- Перезагрузите компьютер.
Попробуйте войти еще раз и посмотрите, решена ли проблема. Если нет, переходите к следующему решению.
4]Сбросить настройки брандмауэра по умолчанию
Сбросьте настройки брандмауэра до значений по умолчанию и попробуйте еще раз.
5]Выполните восстановление системы
Если вы заметили, что ошибка начала возникать недавно, вполне возможно, что проблема была вызвана недавним изменением в вашей системе.
Если вы не знаете, что изменилось, что могло привести к нарушению функции печати ваших приложений Office, вы можете использовать Восстановление системы (любые изменения, такие как установка приложения, пользовательские настройки и все остальное, сделанное после того, как точка восстановления будет потеряна), чтобы вернуться к дата, когда вы уверены, что принтер работал правильно.
Чтобы выполнить восстановление системы, сделайте следующее:
- Нажмите клавишу Windows + R.
- В диалоговом окне «Выполнить» введите rstrui и нажмите Enter, чтобы открыть мастер восстановления системы.
- Когда вы попадете на начальный экран восстановления системы, нажмите «Далее», чтобы перейти к следующему окну.
- На следующем экране начните с установки флажка, связанного с Показать дополнительные точки восстановления.
- После того, как вы это сделаете, выберите точку, у которой более старая дата, чем та, в которой вы впервые начали замечать ошибку.
- Щелкните Далее, чтобы перейти к следующему меню.
- Нажмите Готово и подтвердите в последнем запросе.
При следующем запуске системы состояние вашего старого компьютера будет принудительным.
Если проблема все еще не решена, попробуйте следующее решение.
6]Выполните «Новый запуск», «Восстановление на месте» или «Облако сброса».
На данный момент, если проблема все еще не решена, скорее всего, это связано с каким-то повреждением системы, которое нельзя решить традиционным способом. В этом случае вы можете попробовать «Новый запуск», восстановление на месте при обновлении, чтобы сбросить все компоненты Windows. Кроме того, если вы используете Windows 10 версии 1909 или более поздней, вы можете попробовать Cloud Reset и посмотреть, поможет ли это.
Любое из этих решений должно работать на вас!
.