BSOD или синий экран смерти DRIVER OVERRAN STACK BUFFER с цифровым стоп-кодом 0x000000F7 возникает на всех сборках Windows, начиная от Windows 7 и заканчивая Windows 10. По официальной версии Microsoft ошибка 0x000000F7: DRIVER OVERRAN STACK BUFFER появляется по причине драйвера подключенного оборудования. Однако, как показывает анализ зарубежных источников, синий экран DRIVER_OVERRAN_STACK_BUFFER может быть вызван конфликтом видеокарты с подключенным оборудованием или программным обеспечением. Также в ряде случаев такая ошибка появляется при проблемах с жестким диском и оперативной памятью, при заражении системы вирусами, а также при неверных настройках BIOS.
Поскольку единой и точной причины неполадки на официальном сайте Майкрософт не названо, то рекомендуем включить малый дамп памяти и проанализировать его с помощью программы BlueScreenView, а далее воспользоваться следующими рекомендациями.
Читайте также: Методы исправления синего экрана смерти 0x000000F6: PCI VERIFIER DETECTED VIOLATION
Как исправить ошибку 0x000000F7: DRIVER_OVERRAN_STACK_BUFFER?
Если вы используете Windows 10, то при появлении синего экрана смерти 0x000000F7: DRIVER OVERRAN STACK BUFFER, разработчики Майкрософт рекомендуют установить все обновления, а также обновить саму сборку до следующей версии.
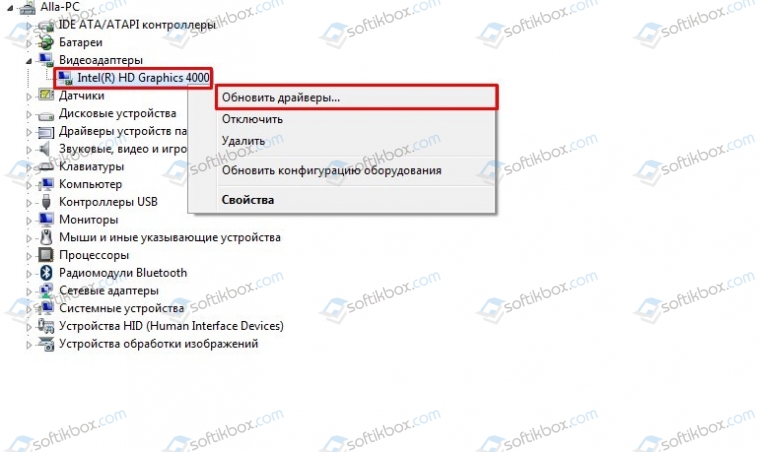
Также для Windows 10 нужно обновить видеодрайвера. Достаточно часто на новую операционную систему криво ложатся драйвера от встроенных видеоускорителей. Поэтому стоит открыть «Диспетчер устройств» (Win+R, devmgmt.msc) и развернуть ветку «Видеоадаптеры» и нажать на названии встроенной видеокарты правой кнопкой мыши и выбрать «Обновить драйвера».
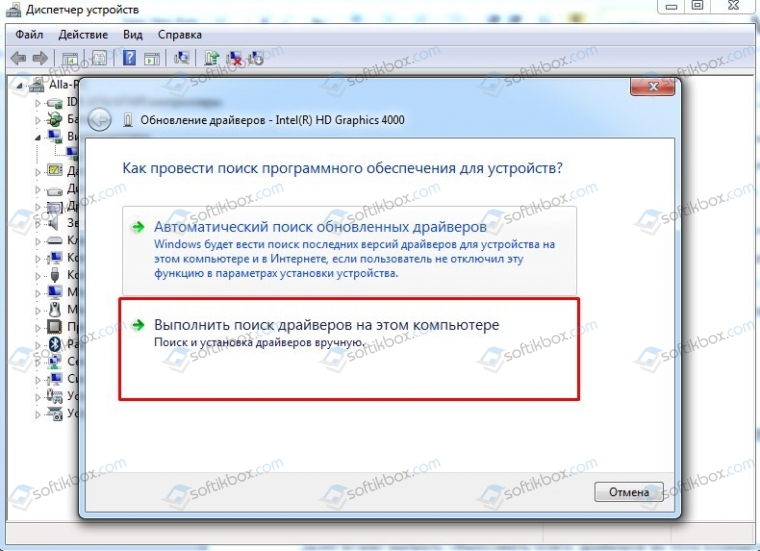
Далее нужно выбрать «Выполнить поиск драйверов на этом компьютере».
Указываем путь к ранее загруженному драйверу.
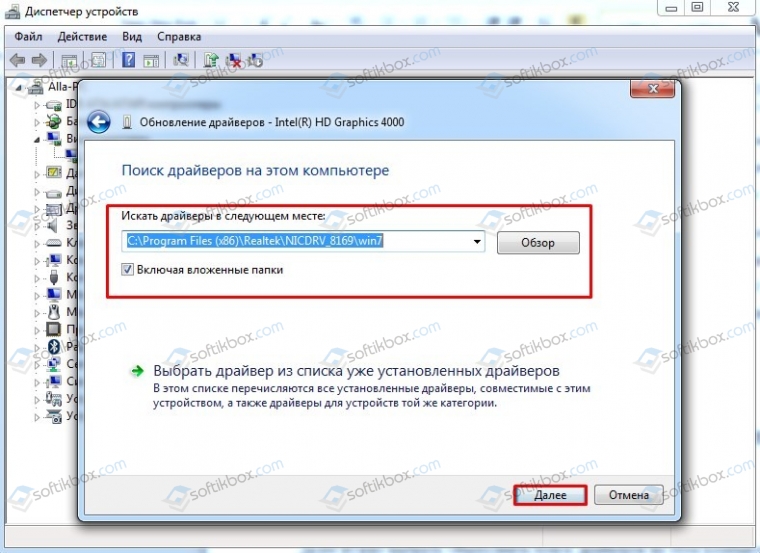
ВАЖНО! Драйвер нужно скачать с официального сайта производителя видеокарты или материнской платы (ноутбука). Не рекомендуем загружать ПО со сторонних ресурсов, так как драйвера могут быть заражены, не подходить под версию и разрядность операционной системы.
В случае, если у вас установлено несколько видеокарт, то нужно отключить одну из них и проверить ПК на BSOD. Возможно, видеокарты конфликтуют между собой. Тогда придется обновить драйвера к обоим устройствам, или же отключить один из ускорителей.
В случае, если ошибка 0x000000F7 появляется на Windows 7 и других сборках, то кроме обновления ОС и переустановки драйверов для видеокарты, стоит выполнить еще и ряд следующих действий:
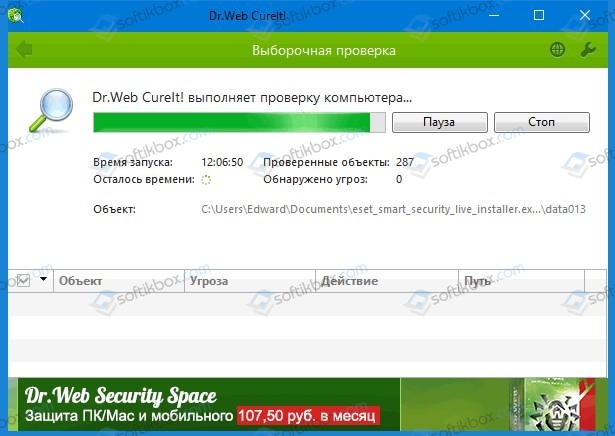
• Проверяем Windows на вирусы и вредоносные программы. Для этого стоит скачать лечащую утилиту Dr.Web Curelt или воспользоваться платным антивирусом, который имеет обновленные вирусные базы.
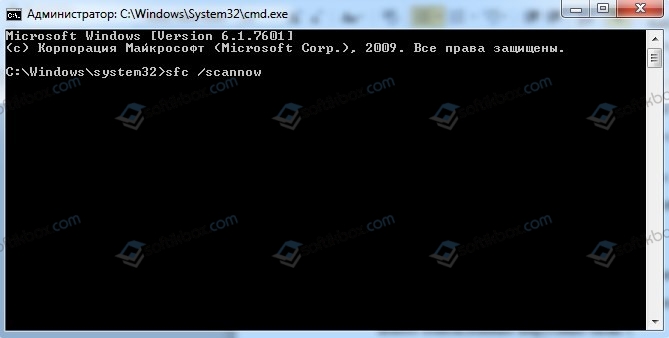
• После нужно просканировать систему на целостность системных файлов. Для этого нужно запустить командную строку с правами Администратора и ввести sfc /scannow.
• После проверки Windows 7 и выше на целостность системных файлов, стоит проверить на актуальность все установленные драйвера. Для этого нужно развернуть все древовидное меню в «Диспетчере устройств» и проверить, нет ли возле какого-то элемента значка с восклицательным или вопросительным знаком, который указывает на проблемы с ПО или самим устройством. Если таков значок имеется, то нужно нажать на элементе правой кнопкой мыши и выбрать «Удалить».
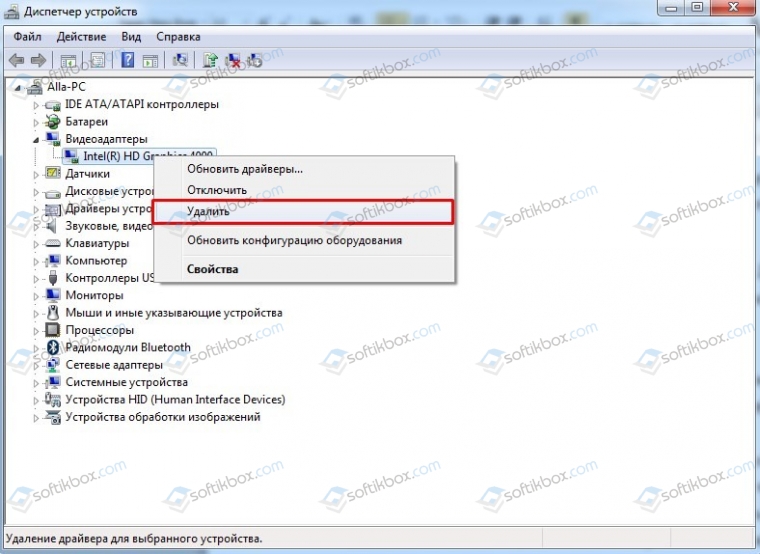
• Далее перезагружаем ПК. Система должна самостоятельно обнаружить устройство и подтянуть к нему драйвера.
Важно отметить, что если в «Диспетчере устройств» ошибка драйвера не отображается, то стоит обновить все установленные драйвера. Для этого можно использовать специальные программы, на подобие Driver Booster, DriverPack Solution, Driver Hub и т д или же по очереди вручную обновить ПО.
Если обновление драйверов не помогло исправить неполадку, то рекомендуем проверить, какая программа была установлена последней. Возможно, проблема в софте. Для этого нужно открыть «Панель управления», «Программы и компоненты» и отсортировать софт по дате установки.
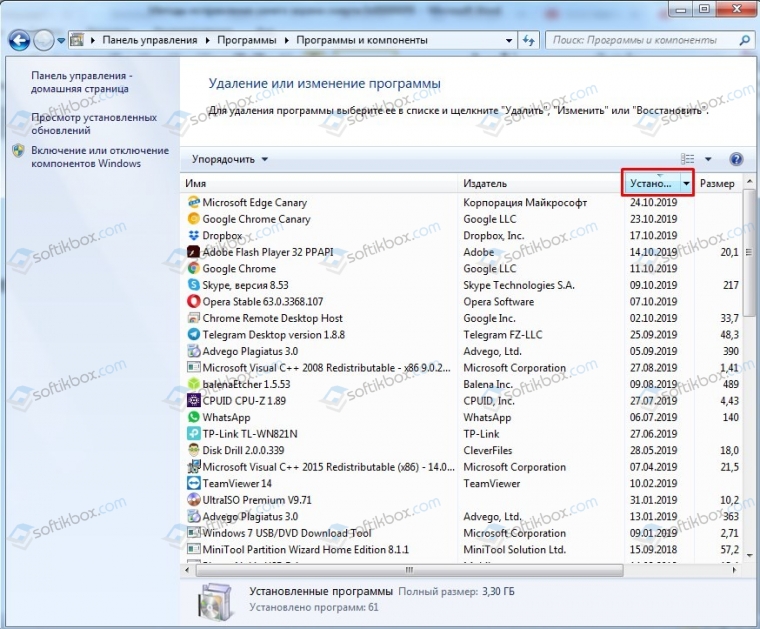
Удаляем последнюю установленную программу или ту, которая была обновлена последней.
ВАЖНО! Если какая-то программа для вас очень важна, то нужно её переустановить с правами Администратора и в режиме совместимости (если это старый софт). Также exe-файл нужно скачать с официального сайта разработчика программы или игры.
На некоторых зарубежных форумах пользователи отмечали, что ошибка 0x000000F7: DRIVER OVERRAN STACK BUFFER может появиться по причине повреждения жесткого диска. Проверить накопитель на ошибки можно с помощью командной строки с правами Администратора, ввел команду chkdsk /?, а далее ввел букву для проверки или исправления ошибки.
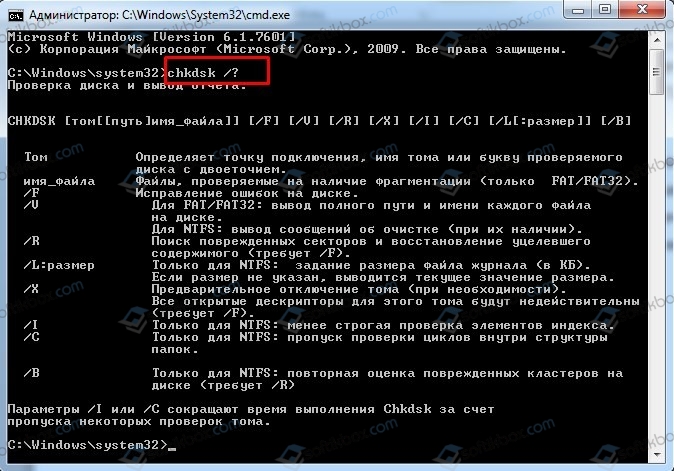
Однако кроме этой стандартной команды мы рекомендуем выполнить глубокую проверку накопителя на предмет бэдов (битых секторов). Для этого стоит скачать программу Victoria HDD, которую стоит запускать с правами Администратора (без прав выдает ошибку).

Программа проверит жесткий диск на битые и медленно читающиеся сектора. Если ошибки есть, придется либо программно отсечь участок с бэдами в ущерб месту на жестком диске, но сохранить накопитель, либо приобрести новый жесткий диск.
Также некоторые пользователи отмечали, что синий экран смерти появляется по причине сбоев в работе оперативной памяти. Первое, что можно сделать, это переставить модули местами. Для этого нужно выключить ПК, отключить от сети и на некоторое время зажать кнопку питания, чтобы снять остатки заряда с конденсаторов. После открываем боковую крышку системного блока и с помощью защелок отключаем модули. Стоит ОЗУ держат за боковые ребра, не касаясь чипов памяти и элементов распайки.
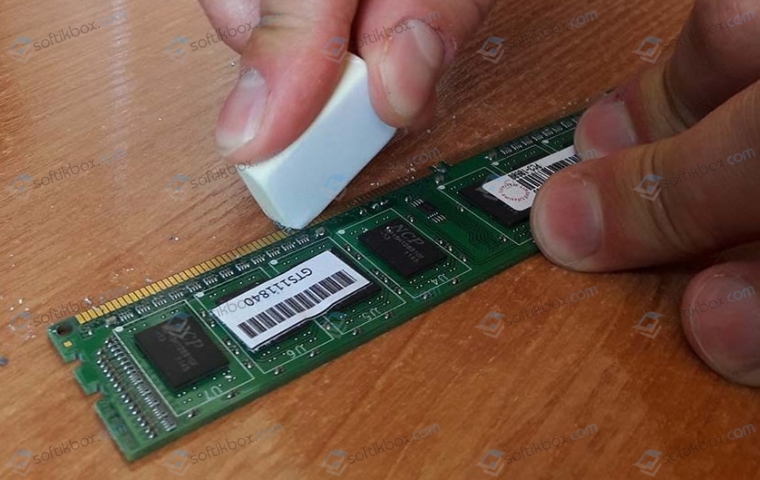
После чистим контакты ОЗУ канцелярским ластиком. Вставляем модули на место и включаем ПК. Некоторое время тестируем систему. Далее модули стоит поменять местами и также протестировать.
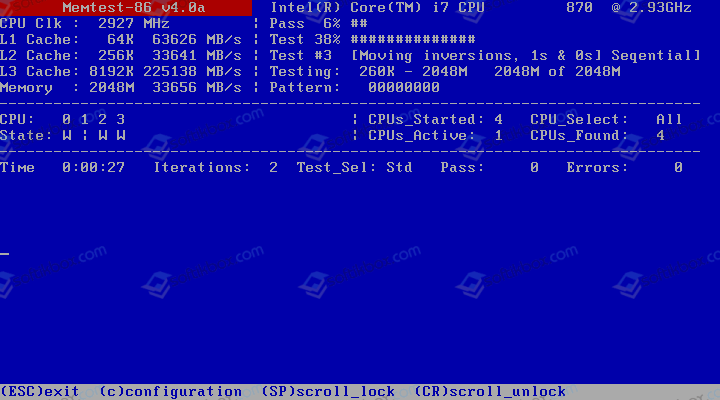
Для более глубокой проверки модулей оперативной памяти стоит скачать и записать на флешку или диск программу MemTest86. После выставляем в BIOSе приоритетность загрузки с носителя, а не жесткого диска. Запускаем ПК, появится окно программы. Нажимаем на кнопку «Старт» и тестируем модули несколько проходов. Желательно прогнать ОЗУ до 8 раз.
ВАЖНО! Если вы до появления ошибки 0x000000F7: DRIVER_OVERRAN_STACK_BUFFER разгоняли планки ОЗУ, то все настройки стоит сбросить до заводских. Возможно, ваш ПК не тянет или возникает конфликт между устройствами.
Если же избавиться от вышеуказанной ошибки описанными способами не удаётся, то стоит воспользоваться точками восстановления системы или вовсе переустановить Windows, предварительно провел полную диагностику установленного оборудования.
| title | description | keywords | ms.date | topic_type | api_name | api_type | ||
|---|---|---|---|---|---|---|---|---|
|
Bug Check 0xF7 DRIVER_OVERRAN_STACK_BUFFER |
The DRIVER_OVERRAN_STACK_BUFFER bug check has a value of 0x000000F7. This indicates that a driver has overrun a stack-based buffer. |
|
05/23/2017 |
apiref |
DRIVER_OVERRAN_STACK_BUFFER |
NA |
Bug Check 0xF7: DRIVER_OVERRAN_STACK_BUFFER
The DRIVER_OVERRAN_STACK_BUFFER bug check has a value of 0x000000F7. This indicates that a driver has overrun a stack-based buffer.
[!IMPORTANT]
This topic is for programmers. If you are a customer who has received a blue screen error code while using your computer, see Troubleshoot blue screen errors.
DRIVER_OVERRAN_STACK_BUFFER Parameters
| Parameter | Description |
|---|---|
|
1 |
The actual security check cookie from the stack |
|
2 |
The expected security check cookie |
|
3 |
The bit-complement of the expected security check cookie |
|
4 |
0 |
Cause
A driver overran a stack-based buffer (or local variable) in a way that would have overwritten the function’s return address and jumped back to an arbitrary address when the function returned.
This is the classic «buffer overrun» hacking attack. The system has been brought down to prevent a malicious user from gaining complete control of it.
Resolution
Use the kb (Display Stack Backtrace) command to get a stack trace.
The last routine on the stack before the buffer overrun handlers and bug check call is the one that overran its local variable.
| Error Number: | Error 0xF7 | |
| Error Name: | DRIVER_OVERRAN_STACK_BUFFER | |
| Error Description: | The DRIVER_OVERRAN_STACK_BUFFER bug check has a value of 0x000000F7. This indicates that a driver has overrun a stack-based buffer. | |
| Hexadecimal: | 0x000000F7 | |
| Developer: | Microsoft Corporation | |
| Software: | Windows Operating System | |
| Applies to: | Windows XP, Vista, 7, 8, 10, 11 |
0xF7 problems with 0x000000F7 that result in a bluescreen error (BSOD) most often stem from corrupt or missing Windows 10 device drivers, or the result of defective or faulty hardware. File replacement is typically the best and easiest way to resolve errors related to 0xF7 files.
Classic DRIVER_OVERRAN_STACK_BUFFER Problems
DRIVER_OVERRAN_STACK_BUFFER problems are also known as Blue Screen of Death (BSOD) errors:
- «Problem detected: DRIVER_OVERRAN_STACK_BUFFER has caused a problem and Windows shutdown to prevent damage.»
- «:( Sorry, your computer encountered a problem with DRIVER_OVERRAN_STACK_BUFFER and needs to restart now.»
- «0x000000D1: IRQL_NOT_LESS_EQUAL – DRIVER_OVERRAN_STACK_BUFFER»
- «STOP 0x0000001E: KMODE_EXCEPTION_NOT_HANDLED – DRIVER_OVERRAN_STACK_BUFFER»
- «STOP 0×00000050: PAGE_FAULT_IN_NONPAGED_AREA – DRIVER_OVERRAN_STACK_BUFFER»
In most cases, you will experience DRIVER_OVERRAN_STACK_BUFFER blue screen errors after you’ve installed new hardware or software. Mostly, DRIVER_OVERRAN_STACK_BUFFER-related errors are experienced during the Windows install process, while a Microsoft Corporation-related software or hardware is loaded, during a Windows-related device driver load sequence, or Windows shutdown/startup. Recording Blue Screen DRIVER_OVERRAN_STACK_BUFFER errors associated with Windows is crucial to locating faults and relaying back to Microsoft Corporation for repair options.
Root of DRIVER_OVERRAN_STACK_BUFFER Problems
Blue Screen DRIVER_OVERRAN_STACK_BUFFER errors are often caused by related hardware, software, device driver, or firmware problems. They can be related to Windows or Microsoft Corporation hardware, but not always.
Specifically, DRIVER_OVERRAN_STACK_BUFFER issues caused by:
- Outdated, misconfigured, or corrupted Windows device drivers.
- Invalid (corrupt) DRIVER_OVERRAN_STACK_BUFFER registry entries related to DRIVER_OVERRAN_STACK_BUFFER / Windows.
- Malware or virus infection corrupting DRIVER_OVERRAN_STACK_BUFFER.
- DRIVER_OVERRAN_STACK_BUFFER error from Microsoft Corporation hardware conflicts after new install.
- Removed or damaged system (DRIVER_OVERRAN_STACK_BUFFER) files after Windows or driver install.
- Disk drive corruption causing DRIVER_OVERRAN_STACK_BUFFER STOP error.
- DRIVER_OVERRAN_STACK_BUFFER STOP error created from RAM memory corruption.
Product by Solvusoft
Download Now
WinThruster 2022 — Scan your PC for computer errors.
Compatible with Windows 11, 10, 8, 7, Vista, XP and 2000
Optional Offer for WinThruster by Solvusoft | EULA | Privacy Policy | Terms | Uninstall
Blue Screen Errors Knowledgebase
Article ID:
120343
Article Author:
Last Updated:
Popularity:
star rating here
Download Now (Error Fix)
The debugger output isn’t particularly useful for this bugcheck because
it is due to memory corruption. This means that the actual error could
occur long after the corruption actually happens. The best way to start
will be to analyze dumps with the driver verifier enabled,
If you are interested in how these files are analyzed,
Here is what the debugger picked up,
0: kd> !analyze -v
*******************************************************************************
*
*
* Bugcheck Analysis *
*
*
*******************************************************************************
DRIVER_OVERRAN_STACK_BUFFER (f7)
A driver has overrun a stack-based buffer. This overrun could potentially
allow a malicious user to gain control of this machine.
DESCRIPTION
A driver overran a stack-based buffer (or local variable) in a way that would
have overwritten the function’s return address and jumped back to an arbitrary
address when the function returned. This is the classic «buffer overrun»
hacking attack and the system has been brought down to prevent a malicious user
from gaining complete control of it.
Do a kb to get a stack backtrace — the last routine on the stack before the
buffer overrun handlers and bugcheck call is the one that overran its local
variable(s).
Arguments:
Arg1: ffffb3e8, Actual security check cookie from the stack
Arg2: 2530afd7, Expected security check cookie
Arg3: dacf5028, Complement of the expected security check cookie
Arg4: 00000000, zero
Debugging Details:
——————
*** WARNING: Unable to verify timestamp for klif.sys
*** ERROR: Module load completed but symbols could not be loaded for klif.sys
GSFAILURE_FUNCTION: nt!ObInsertObjectEx
GSFAILURE_RA_SMASHED: TRUE
GSFAILURE_MODULE_COOKIE: 2530afd7 nt!__security_cookie [ 82f39a48 ]
GSFAILURE_FRAME_COOKIE: ffffffff
SECURITY_COOKIE: Expected 2530afd7 found ffffb3e8
GSFAILURE_ANALYSIS_TEXT: !gs output:
Corruption occurred in nt!ObInsertObjectEx or one of its callers
Analyzing __report_gsfailure frame (2)…
LEA usage: Function @0xFFFFFFFF830331B8-0xFFFFFFFF8303358F is NOT using LEA
Module canary at 0xFFFFFFFF82F39A48 (nt!__security_cookie): 0x2530AFD7
Complement at 0xFFFFFFFF82F39A4C: 0xDACF5028 (matches OK)
couldn’t disassemble
Stack buffer overrun analysis completed successfully.
BUGCHECK_STR: STACK_BUFFER_OVERRUN
DEFAULT_BUCKET_ID: GS_FALSE_POSITIVE_PROBABLY_NOT_USING_GS
CUSTOMER_CRASH_COUNT: 1
PROCESS_NAME: winlogon.exe
CURRENT_IRQL: 0
STACK_TEXT:
8df7d644 82ee0501 000000f7 ffffb3e8 2530afd7 nt!KeBugCheckEx+0x1e
8df7d664 8303358f 00000000 00000000 8f743178 nt!__report_gsfailure+0x24
8df7d7d4 830331af 00000000 000f001f 00000000 nt!ObInsertObjectEx+0x3d7
8df7d7f0 83033154 8f743178 00000000 000f001f nt!ObInsertObject+0x1e
8df7d85c 9234627b 8df7d984 000f001f 8df7da08 nt!NtCreateSection+0x1df
WARNING: Stack unwind information not available. Following frames may be wrong.
8df7d8ac 82e4d1fa 8df7d984 000f001f 8df7da08 klif+0x3027b
8df7d8ac 82e4adf5 8df7d984 000f001f 8df7da08 nt!KiFastCallEntry+0x12a
8df7d940 9d7a8641 8df7d984 000f001f 8df7da08 nt!ZwCreateSection+0x11
8df7d964 9d7a5c6f 8df7d9d8 000f001f 8df7da08 win32k!ZwWin32CreateSection+0x21
8df7da34 9d7d5bf0 ffbbe000 8df7da58 00000000 win32k!bCreateSection+0x204
8df7daa4 9d767047 ffa15bd8 ffa8b3e0 ffa8b3e4 win32k!EngMapFontFileFDInternal+0xd3
8df7dacc 9d77701c 00000001 fff8a7f0 ffa8b3e0 win32k!MapFontFiles+0x36
8df7daf8 9d776c27 8df7dc58 00000020 ffa15bd0 win32k!vLoadFontFileView+0xeb
8df7db80 9d76630a 8df7dc58 00000020 00000001 win32k!PUBLIC_PFTOBJ::bLoadFonts+0x1e9
8df7dbc8 9d76730a 8df7dc58 00000020 00000001 win32k!GreAddFontResourceWInternal+0xad
8df7dd14 82e4d1fa 00128488 00000020 00000001 win32k!NtGdiAddFontResourceW+0x15e
8df7dd14 776770b4 00128488 00000020 00000001 nt!KiFastCallEntry+0x12a
00aff930 00000000 00000000 00000000 00000000 0x776770b4
STACK_COMMAND: kb
FOLLOWUP_IP:
nt!ObInsertObjectEx+3d7
8303358f 8be5 mov esp,ebp
SYMBOL_STACK_INDEX: 2
SYMBOL_NAME: nt!ObInsertObjectEx+3d7
FOLLOWUP_NAME: MachineOwner
MODULE_NAME: nt
IMAGE_NAME: ntkrpamp.exe
DEBUG_FLR_IMAGE_TIMESTAMP: 4e02a389
FAILURE_BUCKET_ID: STACK_BUFFER_OVERRUN_MISMATCH_GSCOOKIE_nt!ObInsertObjectEx+3d7
BUCKET_ID: STACK_BUFFER_OVERRUN_MISMATCH_GSCOOKIE_nt!ObInsertObjectEx+3d7
Followup: MachineOwner
———
— Mike Burr
Technology
Если вы пользователь Windows, возможно, вы слышали о «Синем экране смерти». Есть даже шансы, что вы или кто-то из ваших знакомых получили такую ошибку. Ошибка «Синий экран смерти» иногда может стать кошмаром для тех, кто не понимает, что происходит.
Но для тех, кто знает, вы уже знаете, что каждая ошибка синего экрана всегда будет отображать тип ошибки, которая только что произошла. Самая известная ошибка — это ошибка Driver Overran Stack Buffer. Итак, сегодня мы рассмотрим различные исправления, которым вы можете следовать, чтобы решить эту ошибку «синий экран смерти» из-за переполнения буфера стека драйвера.
Могут быть разные причины, по которым эта ошибка могла быть вызвана. Иногда это может быть связано с обновлением программного обеспечения, которое запускает несколько служб на вашем ПК. Иногда это также может быть проблема с драйвером устройства, или, если на то пошло, это также может быть связано с тем, что какое-то оборудование выходит из строя или не может быть правильно прочитано ОС.
Поскольку эта ошибка может представлять собой ряд проблем, было бы целесообразно попробовать различные решения, которые мы перечислили, чтобы решить проблему, выполнив хотя бы одно из решений, упомянутых ниже. Читайте дальше, чтобы узнать, как исправить ошибку синего экрана Driver Overran Stack Buffer на ПК с Windows.
Исправить ошибку буфера стека драйвера
Проверить наличие обновлений
Обновления важны для работы любой ОС. Он не только добавляет новые функции, но также включает функции оптимизации и безопасности. Всякий раз, когда вы получаете сообщение об ошибке «Синий экран», рекомендуется проверить наличие обновлений на ПК с Windows 10 или Windows 11. Наличие последних обновлений всегда важно. Чтобы проверить наличие обновлений на ПК с Windows, выполните следующие действия.
- Подключите свой компьютер к Интернету через Wi-Fi или Ethernet.
- Теперь запустите приложение «Настройки».
- Нажмите на опцию «Обновить» в приложении «Настройки». (Метод одинаков для Windows 10, а также для ПК с Windows 11)
- Теперь нажмите кнопку «Проверить наличие обновлений».
- Центр обновления Windows теперь начнет искать и загружать любые обновления, если они доступны.
- После установки обновлений может потребоваться перезагрузить компьютер.
- Перезагрузите компьютер и продолжайте использовать его в обычном режиме.
- Если вы не видите ошибку синего экрана, это означает, что проблема устранена.
- По какой-то причине, если проблема все еще не устранена, вы можете попробовать другие методы, упомянутые ниже.
- Также обратите внимание, что причиной синего экрана может быть какая-то другая проблема.
Удаляйте программы правильно
Существует множество способов удаления программ, и они работают безупречно. Однако, когда дело доходит до удаления антивирусных программ, рекомендуется удалять их правильно и правильно. Когда эти программы удаляются неправильно, некоторые следы этих программ могут вызвать проблемы с вашей ОС, что может привести к ошибке «синий экран».
Итак, что вы делаете, чтобы правильно удалить эти программы? Вы используете инструменты удаления. Не просто какие-либо инструменты для удаления программ, а настоящие инструменты, выпущенные антивирусной компанией. Эти инструменты — лучший способ удалить антивирусную программу из вашей системы. Использование этих легкодоступных инструментов важно и помогает избежать случайного появления ошибки в вашей системе.
Обновите драйверы устройств
Чтобы ваше оборудование работало и взаимодействовало с ОС, для него требуются драйверы. Они действуют как основное средство связи между вашим оборудованием и ОС. Устаревшие драйверы иногда могут приводить к тому, что устройство не работает должным образом, и, следовательно, появляется ошибка синего экрана. Выполните следующие действия, чтобы проверить наличие обновлений драйверов.
- Откройте меню «Пуск» и введите «Диспетчер устройств».
- Теперь выберите оборудование, для которого вы хотите обновить драйвер.
- Щелкните его правой кнопкой мыши и выберите параметр «Обновить драйвер» в контекстном меню.
- Выберите параметр «Автоматический поиск драйвера».
- Эта опция теперь начнет поиск последних доступных версий драйвера для конкретного оборудования.
- Если какой-либо драйвер был найден, он сразу же начнет загрузку и установку драйвера в вашу систему.
- После того, как вы обновили оборудование, которое, по вашему мнению, могло вызывать синий экран, перезагрузите систему.
- После перезапуска системы просто используйте систему и посмотрите, появляется ли ошибка синего экрана.
- Если вы не получаете сообщение об ошибке, это означает, что проблема устранена. Если нет, возможно, вам придется выполнить следующие шаги.
Запустить сканирование жесткого диска
Иногда высока вероятность того, что жесткий диск вызывает проблемы в системе. Это может быть связано со многими факторами, такими как поврежденные файлы, отсутствующие файлы или даже проблемы с образом системы. Есть несколько командных строк, которым вы можете следовать, чтобы решить и исправить эту ошибку синего экрана, вызванную жестким диском или, возможно, даже из-за поврежденных файлов.
- В меню «Пуск» введите «Командная строка».
- Когда вы найдете его, выберите его и обязательно запустите от имени администратора.
- Теперь вы можете ввести sfc/scannow.
- Что делает эта команда, так это начинает сканировать, а также исправлять любые поврежденные файлы операционной системы.
- После завершения процесса вы можете перезагрузить систему.
Вы также можете использовать командную строку DISM для получения исправлений для различных файлов образа Windows и файлов утилиты Full flash. Просто запустите командную строку от имени администратора. Просто введите следующее:
- DISM / Online / Cleanup-Image / RestoreHealth
- Это начнет очищать любые поврежденные файлы изображений или обновления, которые могут быть причиной этого синего экрана. После завершения очистки вам необходимо проверить наличие обновлений, если они доступны, и установить их, чтобы устранить проблему.
Используйте встроенные параметры устранения неполадок
В Windows 10 есть множество вариантов устранения неполадок, которые вы можете выбрать. Одним из важных является средство устранения неполадок синего экрана. Использование этого средства устранения неполадок поможет определить, какие проблемы возникают, и, в конечном итоге, даже попытаться решить проблему. Обратите внимание, что средство устранения неполадок с синим экраном на данный момент доступно только для ПК под управлением Windows 10.
- Запустите приложение «Настройки» на своем ПК и убедитесь, что вы подключены к Интернету.
- Теперь нажмите «Обновление и безопасность» в приложении «Настройки».
- Выберите «Устранение неполадок» в меню слева.
- Под заголовком «Найти и устранить проблемы» вы увидите параметр «Синий экран».
- Выберите его и нажмите кнопку «Запустить средство устранения неполадок».
- Теперь средство устранения неполадок начнет показывать различные варианты, из которых вам нужно будет щелкнуть и выбрать.
- После того, как средство устранения неполадок выполнит поиск проблем, вы сможете увидеть решения, которые можно применить для немедленного устранения проблемы.
- Если вы все еще сталкиваетесь с ошибкой синего экрана на ПК с Windows, попробуйте другие методы, описанные ниже.
Выполните сброс системы
Теперь, если вы все еще не можете решить проблему с синим экраном, было бы целесообразно просто выполнить сброс настроек на вашем ПК с Windows. Вы должны знать, что выполнение сброса к заводским настройкам приведет к полному удалению всех ваших данных, файлов и установленных программ из системы. Поэтому убедитесь, что вы сделали резервную копию всех своих данных, прежде чем приступать к перезагрузке компьютера.
Для Windows 10
- Нажмите кнопку «Пуск» на ПК с Windows 10.
- Теперь запустите приложение «Настройки» на своем ПК.
- Выберите параметр «Обновление и безопасность» в приложении «Настройки».
- Теперь выберите Восстановление.
- Вы увидите опцию «Сбросить этот компьютер». Нажмите кнопку «Начать».
- Выберите опцию «Удалить все».
- Сейчас начнется остальной процесс. Завершение процесса может занять некоторое время, но сброс будет выполнен до заводских настроек. Тем временем убедитесь, что ваша система подключена к сети до завершения сброса и настройки.
Для Windows 11
- Запустите меню «Пуск» и запустите приложение «Настройки».
- Выделив параметр «Система», прокрутите и выберите параметр «Восстановление».
- Под заголовком «Параметры восстановления» вы найдете параметр «Сбросить этот компьютер».
- Нажмите кнопку «Сбросить ПК».
- Теперь выберите опцию «Удалить все».
- Процесс сброса начнется сразу
- После завершения сброса перейдите к экрану начальной настройки и используйте систему.
- Теперь вы не должны сталкиваться с ошибкой «синий экран» на ПК с Windows.
Проверьте свое оборудование
Если вы, возможно, недавно обновили свою систему, установив новую оперативную память или накопители, есть вероятность, что новое оборудование вызывает некоторые проблемы с вашей ОС, что приводит к ошибке «Синий экран». Было бы лучше удалить недавно установленное оборудование, чтобы проверить, решает ли это проблемы. Иногда новое оборудование требует, чтобы на нем были установлены последние версии драйверов, поэтому рекомендуется проверять наличие обновлений драйверов для нового оборудования.
Заключение
И это важные шаги, которые вы должны выполнить, когда у вас возникнет какая-то проблема, такая как синий экран смерти Driver Overrun Stack Buffer. Вы также должны понимать, что иногда это также может быть результатом вируса, поэтому рекомендуется использовать Защитник Windows для сканирования ваших систем или, возможно, даже использовать стороннее антивирусное программное обеспечение, такое как Malware bytes, для сканирования и исправления чего-либо неправильного. это могло произойти на вашем ПК.
Easy Guide to Fix Driver Overran Stack Buffer
Almost everyone has their computer and while using it many have encountered a Blue Screen of death (BSOD) error called “Driver Overran stack buffer. As we know drivers play the role of a bridge between the Operating system and its hardware. Windows need drivers to perform with hardware. In case any driver gets corrupted, outdated, or missing, this will lead to a problem called “Driver overran stack buffer”. Many reasons are responsible for this issue, some of them are mentioned below.
- Maybe a particular program is using the entire stack. May the program is on infinite repetitiveness.
- Some external devices might be the reason behind it. Prefer disconnecting all the external devices like USB etc.
- There might be a compatibility issue between hardware and the system which is a confusing driver. Also an outdated driver can cause this problem by behaving abnormally.
Driver Overran stack buffer: Problem Overview
Many users are facing issues related to stack while using their system. We all know Memory is an essential asset of any system. For example, your systems parameter is 32 bit but your system’s driver sent you a 64-bit value, in this case you will get a BSOD driver_overran_stack_buffer error
Like here the problem can be with Driver, system, or maybe both. This can also cause your system crash and lead to a BSOD issue. Driver Overran stack buffer is a common issue faced by many users. We have written this blog after extensive research. Do follow all the steps to resolve your issue.
Driver Overran stack buffer: Related & Common Problems
- Unstable behavior of programs occurs in the system.
- A system crash might happen to lead to the BSOD error.
- The data loss issue occurs as the memory will not behave properly.
- Driver overran stack buffer overclock
- Driver overran stack buffer Nvidia, Ryzen, etc
- Code overriding can happen, which occupies more space in the system then the allocated memory for the program.
- Driver overran stack buffer undervolt
- An unauthorized attack can happen, which will lead to the theft of your data.
- Driver overran stack buffer on startup
- Driver overran stack buffer while gaming
Steps to Fix Driver Overran stack buffer Error
When you encounter any BSOD error you get stuck with a blue screen and you would not be able to perform even any troubleshooting steps. In this situation Windows has a Safe Mode feature is meant for troubleshooting. You need to enter in safe mode to perform suggested most of the fixes. To enter Safe Mode, follow the steps below.
- Step-1 : Update the system with the latest updates
- Step-2 : Check on Systems Driver and Update it
- Step-3 : Use Systems Blue screen Trouble-shooter
- Step-4 : Disable Systems fast Start-up setting
- Step-5 : Perform System File Checker scan
- Step-6 : Check on your Systems Hard Drive and Master Boot block
- Step-7 : Check for the Programs causing Problem
- Step-8 : Use Systems Memory Diagnostic tool
- Step-9 : Ultimate solution: Resetting the windows
-
Step 1
Update the system with the latest updates
An outdated window is behind many problems faced by users. You need to check on your windows update. Make sure you are using a licensed window. An outdated window can interrupt in the working of Drivers which will cause an error message Driver Overran stack buffer in the system. Do follow up on the steps given below to update your window.
- Press the windows key and latter I key together.
- A screen will pop up on your screen, just select “Update and Security”.

- Now choose “Windows update” and tap over “Check for update” option.

- Just wait for the updates getting downloaded and installed automatically.
- As the installation is finished, restart your system and check if the error still occurs.


-
Step 2
Check on Systems Driver and Update it
A driver plays an essential role in this stack Management. As a system entirely depends on the driver to work with hardware, so it is very important to have all the drivers up to date to avoid the problem Driver Overran the stack buffer. Do follow the following steps to update respective drivers as per the systems need.
- Search ‘Device Manager” in the search bar and tap on.

- Look for the related drivers which are outdated and tap on it.
- After right click on the selected driver; go for the option “Update Drivers software”.

- A pop up with “Search automatically for updated driver software” option, just select it.
- Now restart your System to apply these changes successfully.


We are making this best laptops list after spending hours in research so that you can find the best laptop as per your liking.
-
Step 3
Use Systems Blue screen Trouble-shooter
The best thing about Windows is it has inbuilt troubleshoot tools. It gives an option to troubleshoot blue screen error using Windows troubleshooter. Do follow the following steps to run this troubleshooter.
- click on the start menu and go to the settings.
- Now look for the “Update and Security” option.
- Go to the “Troubleshoot” section, available on the left side.

- Look for the option “Blue Screen” and tap on it.
- You will see “Run the trouble-shooter” tab, tap on it to start the troubleshooting process.

Once it is started, it will detect problems if there. In case any problem is discovered by Trouble-shooter, simply follow up on the on-screen instructions to fix it.
-
Step 4
Disable Systems fast Start-up setting
There is an option available in windows called “fast start-up”. This advantage is given to reduce the start-up time. This advantage can be dangerous for your computer’s health. As in many cases this feature has occurred issues like Driver overran stack buffer.
- search the “control panel” in the search box on the bottom.
- Tap to ope the control panel from the search result.
Note:- Make sure view by large Icon on the right top corner of the page. - Now select “Power Option”.

- Look for “Choose what the powers button do” option available in the sidebar.

- Go for “Change setting that are. currently unavailable” option.
- Look for “Turn on fast start-up (recommended)” option and unmark it.

- After finishing, tap on the “Save Changes” toggle given below to apply it.


Go for the next step, in case it doesn’t work for you.
-
Step 5
Perform System File Checker scan
System File Checker (SFC) is a facility in Windows which deals with the corrupted system files. SFC can scan and restore the corrupted files of the system with a normal one. Do follow the following steps given below to perform this.
- Look for “Command Prompt” in the search bar of your computer.
- Click on it and choose run as administrator option.

- Write statement “sfc/scannow” on the screen and tap Enter to execute.

- Scan will get started automatically.
- Once it is over, restart the computer and check if the issue persists.

Note: In case the error is still there, follow the following steps further.
- Now write following statement “i.e.DISM/Online/Cleanup-Image/RestoreHealth” and tap Enter to execute.

- Once the process is over, restart your computer and once again go for an SFC scan by following the above 5 steps.


This process will repair the corrupted files of your computer. This will be beneficial in terms of eliminating the error.
-
Step 6
Check on your Systems Hard Drive and Master Boot block
Well Random Access Memory (RAM) is an essential part of the system, so the MBB or sector zero is. Sector Zero is responsible for the information being booted in systems storage or RAM. You can say Sector Zero is the first section of hard drive occupied with necessary coding and files which are responsible for starting the OS. Now in case, any file of sector zero gets corrupt, it will lead to the issue of Driver overran stack buffer.
- Simply restart computer and continuously press “Shift” key. This will take you to the advanced start-up interface.
- Select the option “Troubleshoot” and then go for “Advanced Option”.

- A screen will pop up with options. Look for “Command Prompt” and click on it to open.
- Now to fix Master Boot block, type these 3 statements i.e. “exe/rebuildbcd” ; “exe/fixmbr” ; “exe/fixboot”, following the Enter key after each input.

After finishing the above, you need to perform one more task called “Check disk”. This will check on the files associated with the hard-drive. To perform, go ahead with the following steps.
- Simply type “chkdsk/C” (Here, use the alphabet your hard disk is named as) and just tap Enter. Do this for each partition one by one.
- Once you are done, just restart the computer and look whether the issue is resolved or not.
![]()
Note: Under this procedure, use the command prompt under advance start-up. Do this using the provided steps.
-
Step 7
Check for the Programmes causing problem
Pre-installed software’s can also be the reason behind the issue Driver overran. Like many times because of their party applications, the system faces the issue. Find out the particular software you have installed recently after which you faced the issue and uninstall it. Do follow the following steps to do so.
- Look for “Control Panel” in your search bar and tap on it to open.
- Navigate to find the option “Programs” and click on it.
- A screen will pop up; look for the option “Program and Feature”.

- you will see all the installed applications there. Now select the recent ones after which you started facing the issue and uninstall it.

If any faulty programme is there, after uninstalling the issue will get resolved. In case it doesn’t that means programmes are not causing issue. Go for the other methods mentioned in this blog.
-
Step 8
Use Systems Memory Diagnostic tool
Well computer memory is directly related to this buffer overrun. It is important to check on hardware and motherboard compatibility. If these are not compatible then you may face problems related to stack overflow which will lead you to Blue-screen error as well. Do follow the following steps.
- Tap on the “Windows key” with the alphabet “R” on the keyboard.

- A dialogue box named “RUN” will appear on your screen. Now write statement “mdsched.exe” then press “OK”.
- Now a new screen will pop up i.e. “windows memory Diagnostic” containing two options.
- Select option first i.e. Restart now and check for problems (Recommended) and tap on it.


This procedure will automatically restart the system. It will check on the errors related to Memory. Be patient until the process gets over successfully. In case the issue is related to this, it will get resolved by this method.

You must consider to pick up some accessories for your laptop to get the best out of your laptop & make it power pack.
-
Step 9
Ultimate solution: Resetting the windows
After trying the entire method, in case nothing worked for you. Just go for this option and reset your computer. This option will work for you until or unless there is any severe technical fault.
![]()
Note: This method can delete all the files saved in the systems partition. Please back up important files to avoid any loss.
Please follow the following steps to reset.
- At first turn your computer off, complete power cut for a few minutes.
- Now, power your computer and start it while pressing the “Shift” key continuously.
Note: For Laptop users, under Step 1 just remove the battery of the laptop and connect it directly with power using your laptop charger and turn it on pressing the shift key continuously. This would be more effective.
- An interface will pop up on your screen, choose “Troubleshoot”.
- Now go for “Reset this PC” option.

- Now select “Remove everything’s” option.
- After this go for the option i.e. “only the drive where Window is installed”, appeared on your systems screen.
- Then tap on “Just remove my file” option and finally press “Reset” toggle.

This method is the ultimate way to resolve this issue. This takes the computer in its default mode.
Users FAQ: To Understand the issue better
-
Define stack-based buffer overran in the system?
Under this condition, data sent by the particular thread or program is more than the space allocated to a particular buffer. It is a condition of malfunction, which shows the issue “Driver overran stack buffer”.
-
What are stack overflow and heap overflow?
Basically, these two are the types of Driver overran stack buffer.
Stack-based buffer overflows – Under this error can be observed at the time of execution of a particular program. It is the most common buffer issue.
Heap-based attacks overflow- It causes overuse of memory i.e. more than the allocated space, for the particular program.
-
What is the reason behind the blue-screen issue in the system?
This issue is directly related to hardware and Driver software. In case either of these is outdated or corrupted, the computer will encounter the “Stop Error”. This situation leads to windows crash. In this situation windows can only shut or restart it.
-
Can replacing a RAM can resolve the issue related with Stack overran?
Yes, it can resolve the error based on the Driver overran stack buffer. Make sure that your RAM is compatible with the other components of your computer. This will surely not cause any issue as long as compatibility is there.
Tips to avoid Driver Overran stack buffer Error
- Do not over-lock your computer. Many users over-lock their computers to experience maximum performance. But this can cause issues related to Driver overran.
- Check on windows updates regularly.
- Keep system driver update.
- Check on your RAM, is it working properly or not. Many times RAM is the reason behind this error.
- Make sure you are using a good antivirus, to protect the system from various viruses. This can corrupt important files.
Contact Official Support
As the above steps are examined, just follow it once. In case the issue “Driver overran stack buffer” is persisting, do contact official support. Sometimes there are some deep technical faults, which can only be accessed by Officials. Do contact official support for further support. You can refer Windows help page as well, you may find suitable suggestions for this error.
Final words: Conclusion
Finally we wish our blog will not disappoint you for the issue “Driver Overran stack buffer”. These methods are pre-tested, do follow all the steps as per given instructions. In case you face any issue while applying it, do mention us in the comment box given below.
We would like to know your valuable feedback via the comment box. Your feedback always encourages us in writing more customer-oriented blogs.