Содержание
- Включение и отключение компонентов Windows 10
- Работаем с Windows Features
- Управление Features on Demand (FOD)
- Установка и переустановка пакетов языков (Language Interface Packs, LIP)
- question
- Enable User Interface & Infrastructure feature by powershell in windows server 2019
- 2 Answers
- Как в Powershell установить роли и компоненты используя Install-WindowsFeature и Add-WindowsCapability
- Типы команд устанавливающие роли с Powershell
- Получение списка ролей и их установка с Powershell Install-WindowsFeature
- Установка компонентов с Enable-WindowsOptionalFeature
- Установка компонентов с Add-WindowsCapability
- Install or Uninstall Roles, Role Services, or Features
- Install roles, role services, and features by using the Add Roles and Features Wizard
- To install roles and features by using the Add Roles and Features Wizard
- Install roles, role services, and features by using Windows PowerShell cmdlets
- To install roles and features by using the Install-WindowsFeature cmdlet
- Remove roles, role services, and features by using the Remove Roles and Features Wizard
- To remove roles and features by using the Remove Roles and Features Wizard
- Remove roles, role services, and features by using Windows PowerShell cmdlets
- To remove roles and features by using the Uninstall-WindowsFeature cmdlet
- Install roles and features on multiple servers by running a Windows PowerShell script
- To install roles and features on multiple servers
- Configure alternate sources for feature files in Group Policy
- To configure a default alternate source path in Group Policy
Включение и отключение компонентов Windows 10
Как известно, Windows 10 отличается набором компонентов от предыдущих версий операционных систем Windows. Зачастую требуется их включить или выключить, чтобы они не потребляли системные ресурсы, да и просто не мешали. В этой статье мы рассмотрим как это сделать быстрее и эффективнее.
Начнем с того, что существует два основных способа работы с компонентами (они еще называются features) — утилита DISM и командлеты Powershell. И то и другое встроено в Windows 10, в отличие от Windows 7, где dism можно было добавить или установив пакет Windows ADK, или руками скопировав dism.exe с другого компьютера.
Сразу отмечу, что утилиту dism и среду powershell для работы с системой необходимо запускать от имени администратора, даже если ваш аккаунт уже находится в группе локальных админов. Итак, вы или находите cmd или windows powershell в меню и, кликнув правой кнопкой мышки, выбираете «Запуск от имени администратора«.
Capabilities — это дополнительные возможности, которые расширяют возможности интерфейса и увеличивают удобство пользователя. Среди них — Language packs, наборы шрифтов. Да, Microsoft удалил часть нестандартных шрифтов, которые теперь вынесены в опциональные компоненты. Скачать эти компоненты можно в виде ISO файла с сайта Volume Licensing Service Center или напрямую через Internet и графический интерфейс Windows. Такую концепцию Microsoft назвала Features on Demand (FOD). Их в более ранних версия Windows не было.
Работаем с Windows Features
Итак, список установленных компонентов можно посмотреть командой
Dism /online /Get-Features
Вот как в Powershell можно получить список всех компонентов командлетами Get-WindowsFeature (для Windows Server) или Get-WindowsOptionalFeature (Windows 10):
Чтобы получить список отключенных компонентов, введите:
Этот список также можно вывести в файл (для windows Server):
Посмотрев список названий и их состояние, можно использовать эти названия для того, чтобы компоненты включить или выключить:
Dism /online /Enable-Feature /FeatureName:TFTP /All
ключ /All позволяет включить также все дочерние компоненты;
Установка компонентов через Powershell выполняется командой Enable-WindowsOptionalFeature.
Dism /online /Disable-Feature /FeatureName:TFTP
Обратите внимание, некоторые фичи имеют разные названия в Windows 7 и Windows 10. Например, RSAT в Windows 7 — это RemoteServerAdministrationTools, а в Windows 10 — RSATclient.
Управление Features on Demand (FOD)
Если вы устанавливаете их через графический интерфейс, то вам необходимо пройти “System –> App & features –> Manage optional features” и нажать знак + напротив необходимых компонентов.
Чтобы сделать это автоматизированно через командную строку, наберите чтобы получить список доступных компонентов:
DISM.EXE /Online /Get-Capabilities
DISM.EXE /Online /Add-Capability /CapabilityName:NetFx3
Если же у вас нет доступа в Интернет, то есть выход. Итак, вы скачиваете ISO образ диска с FOD компонентами с сайта Volume Licensing Service Center. Файлы будут разные для разных релизов Windows 10 — 1511, 1607, 1703, 1709. Важно помнить, что компоненты одного релиза не подходят к другому. Если вы сделаете in-place upgrade (установка одного релиза поверх другого через обновление), то несовместимые установленные компоненты будут удалены без вашего желания! Да, Microsoft удаляет то, что считает несовместимым при обновлении.
Так вот, ISO файл содержит набор неизвестных и сложных для понимания файлов с расширением cab. Вот чудесный файлик на сайта Microsoft, который обясняет назначение каждого файла. Итак, существуют следующие типы FOD:
Итак, для добавления таких FOD компонентов, используйте команды вида (замените имя компонента):
Dism /Online /Add-Capability /CapabilityName:Language.Basic
Dism /Online /Remove-Capability /CapabilityName:Language.Basic
Установка и переустановка пакетов языков (Language Interface Packs, LIP)
Язык интерфейса Windows можно поменять, установив так называемые LIP. ранее они назывались MUI (Multi user interface). Файлы LIP выглядят так: Microsoft-Windows-Client-Language-Pack_x64_es-es.cab для испанского языка. Выглядеть установка будет примерно так:
Dism /Add-Package /online /PackagePath:»C:LanguagesMicrosoft-Windows-Client-Language-Pack_x64_fr-fr.cab»
Dism /Remove-Package /online /PackageName:Microsoft-Windows-Client-LanguagePack-Package
В следующей статье мы поговорим как с помощью DISM и Powershell управлять так называемыми Modern-приложениями AppX.
Источник
question
Enable User Interface & Infrastructure feature by powershell in windows server 2019
Hi I created new Windows Server 2019 server for SharePoint 2016 and i want to enable Open with Explorer option from Document libraries
from windows server ‘m trying to add the «User Interface & Infrastructure» feature on my Windows Server 2019 Standard OS.
I’m going through the «Add Roles and Feature Wizard» but cannot see the «User Interface & Infrastructure» feature.
2 Answers
==
In windows 2019 standard, you can install the WebDAV Redirector feature.
Go to server manager->add roles and features->install the WebDAV Redirector feature->restart the server.
And then go to start->search “services”->start the “WebClient” service.
After that, you could go to the document library and click “open with explorer” in the ribbon, it will open the document library in the windows explorer.
==
In Old versions-
Log in as an administrator.
Start Server Manager.
Select Add roles and features.
On the Select Installation Type page, select Role-based or feature-based installation.
On the Select Destination Server page, select a server.
On the Select Server Roles page, accept the default selection and click Next.
On the Select Features page, under User Interfaces and Infrastructure, select Desktop Experience.
Follow the prompts and finish the installation
(If this reply was helpful please don’t forget to upvote and/or accept as an answer, Thank You)
Disclaimer: This posting is provided «AS IS» with no warranties or guarantees, and confers no rights.
Источник
Как в Powershell установить роли и компоненты используя Install-WindowsFeature и Add-WindowsCapability

Для установки ролей и компонентов в Powershell есть 3 основные команды Install-WindowsFeature, Enable-WindowsOptionalFeature и Add-WindowsCapability. Каждая из этих команд имеет свое применение и может отличаться в разных релизах Windows. В этой статье будет рассмотрен процесс установки ролей и компонентов используя обе команды на примерах.
Навигация по посту
Типы команд устанавливающие роли с Powershell
Командлеты, которые относятся только к Powershell разделяются на 3 типа:
Вывести все командлеты можно посмотреть так:

Если вы пользуетесь старыми версиями ОС, то какие-то модули могут быть не доступны. 2019 сервер одинаков с 2016:

Буква А обозначает алиас. Add-WindowsFeature, в 2016+ эта та же команда, что и Install-WondowsFeature.
Сама установка ролей не обозначает и ее настройку. После установки, обычно, появляется множество команд для настройки роли.
Получение списка ролей и их установка с Powershell Install-WindowsFeature
Что бы получить список ролей можно использовать Get-WindowsFeature. Эта команда, как и все ‘WindowsFeature’, может работать локально и удаленно. По умолчанию она возвращает роли и компоненты. Несколько примеров выполнения командлета:


Сам пакет WindowsFeature (модуль ServerManager) может быть установлен на Windows 10 с RSAT.
Базовая установка роли, но не совсем верная, на примере Active Directory Domain Services, будет следующей:

Перед использованием командлета обратите внимание на 2 параметра, которые вы можете указать:
Если вы забудете указать параметры указанные выше, то команду можно будет выполнить повторно с их включением.
Так же доступны следующие параметры:
Если бы я устанавливал Active Directory на обычный GUI сервер, удаленно, то это бы выглядело так:

Если удаленный сервер работает под другими учетными данными, то передать их можно использовав команду ‘Get-Credential’. В ‘ComputerName’ можно указывать как DNS имя, так и IP адрес.
Пример установки нескольких ролей подряд, удаленно и под другими учетными данными:

Удалить роль можно так:
Если добавить параметр ‘Remove’, то роль будет удалена еще и с папки ‘WinSxS’. Остальные параметры аналогичны.
Установка компонентов с Enable-WindowsOptionalFeature
Список компонентов, с которыми можно работать команда группы ‘WindowsOptionalFeature’ аналогичны следующем окну:

Учитывая, что это окно уже является наследием более старых систем (до Windows 10), вы можете не найти все компоненты. Например RSAT, который раньше можно было найти в этом окне, теперь доступен через интерфейс ‘Приложения и возможности’ Windows 10. Команды в этих случаях тоже отличаются.
Для получения всех компонентов нужно выполнить следующую команду:

Параметр ‘-Online’ говорит, что пакеты будут искаться на этом же компьютере. Можно поставить ‘-Path’, с указанием пути до образа Windows, что бы увидеть какие компоненты доступны там.
Несколько вариантов выполнения команды:

Учитывая, что команды относятся к модулю ‘DISM’, мы можем работать с образами используя параметры ‘PackagePath’ и ‘Path’. Такая возможность есть во всех командах ‘WindowsOptionalFeature’.
Для того, что бы включить компонент нужно выполнить следующую команду:
В следующей команде указано, что нам нужно собрать все логи (а не только ошибки) и сохранить их по указанному пути:

Отключение приложения выполняется следующим образом:
WindowsOptionalFeature так же используется для подготовки Nano сервера т.к. там нет WindowsFeature и пакеты с ролями сначала импортируются, а затем включаются.
Установка компонентов с Add-WindowsCapability
В предыдущем разделе было упомянуто о переезде многих компонентов в интерфейс Windows 10. Командлеты ‘WindowsCapability’ работают именно с ними. Если мы выполним следующую команду, которая очень похожа на предыдущую, то мы увидим совершенно разные пакеты:

Эти компоненты соответствуют следующему окну в Windows 10:

Некоторый варианта выполнения программы:

Источник
Install or Uninstall Roles, Role Services, or Features
Applies To: Windows Server 2012, Windows Server 2012 R2
In Windows ServerВ® 2012 R2 and Windows ServerВ® 2012, the Server Manager console and Windows PowerShellВ® cmdlets for Server Manager allow installation of roles and features to local or remote servers, or offline virtual hard disks (VHDs). You can install multiple roles and features on a single remote server or offline VHD in a single Add Roles and Features Wizard or Windows PowerShell session.
Server Manager cannot be used to manage a newer release of the Windows Server operating system. Server Manager running on Windows Server 2012 or Windows 8 cannot be used to install roles, role services, and features on servers that are running Windows Server 2012 R2.
You must be logged on to a server as an administrator to install or uninstall roles, role services, and features. If you are logged on to the local computer with an account that does not have administrator rights on your target server, right-click the target server in the Servers tile, and then click Manage As to provide an account that has administrator rights. The server on which you want to mount an offline VHD must be added to Server Manager, and you must have Administrator rights on that server.
For more information about what roles, role services, and features are, see Roles, Role Services, and Features.
This topic contains the following sections.
Install roles, role services, and features by using the Add Roles and Features Wizard
In a single session in the Add Roles and Features Wizard, you can install roles, role services, and features on the local server, a remote server that has been added to Server Manager, or an offline VHD. For more information about how to add a server to Server Manager to manage, see Add Servers to Server Manager.
If you are running Server Manager on Windows Server 2012 or Windows 8, you can use the Add Roles and Features Wizard to install roles and features only on servers and offline VHDs that are running Windows Server 2012. If you are running Server Manager on Windows Server 2012 R2 or Windows 8.1, you can use the Add Roles and Features Wizard to install roles and features only on servers and offline VHDs that are running Windows Server 2012 R2.
To install roles and features by using the Add Roles and Features Wizard
If Server Manager is already open, go on to the next step. If Server Manager is not already open, open it by doing one of the following.
On the Windows desktop, start Server Manager by clicking Server Manager in the Windows taskbar.
On the Windows Start screen, click the Server Manager tile.
On the Manage menu, click Add Roles and Features.
On the Before you begin page, verify that your destination server and network environment are prepared for the role and feature you want to install. Click Next.
On the Select installation type page, select Role-based or feature-based installation to install all parts of roles or features on a single server, or Remote Desktop Services installation to install either a virtual machine-based desktop infrastructure or a session-based desktop infrastructure for Remote Desktop Services. The Remote Desktop Services installation option distributes logical parts of the Remote Desktop Services role across different servers as needed by administrators. Click Next.
On the Select destination server page, select a server from the server pool, or select an offline VHD. To select an offline VHD as your destination server, first select the server on which to mount the VHD, and then select the VHD file. For information about how to add servers to your server pool, see Add Servers to Server Manager. After you have selected the destination server, click Next.
Select roles, select role services for the role if applicable, and then click Next to select features.
As you proceed, the Add Roles and Features Wizard automatically informs you if conflicts were found on the destination server that can prevent selected roles or features from installation or normal operation. You are also prompted to add any roles, role services, or features that are required by the roles or features that you have selected.
Additionally, if you plan to manage the role remotely, either from another server, or from a Windows client-based computer that is running Remote Server Administration Tools, you can opt not to install management tools and snap-ins for roles on the destination server. By default, in the Add Roles and Features Wizard, management tools are selected for installation.
On the Confirm installation selections page, review your role, feature, and server selections. If you are ready to install, click Install.
You can also export your selections to an XML-based configuration file that you can use for unattended installations with Windows PowerShell. To export the configuration you specified in this Add Roles and Features Wizard session, click Export configuration settings, and then save the XML file to a convenient location.
You can specify a WIM file as an alternate feature file source when you are installing roles, role services, and features on a running, physical server. The source path for a WIM file should be in the following format, with WIM as a prefix, and the index in which the feature files are located as a suffix: WIM:e:sourcesinstall.wim:4. However, you cannot use a WIM file directly as a source for installing roles, role services, and features to an offline VHD; you must either mount the offline VHD and point to its mount path for source files, or you must point to a folder that contains a copy of the contents of the WIM file.
After you click Install, the Installation progress page displays installation progress, results, and messages such as warnings, failures, or post-installation configuration steps that are required for the roles or features that you installed. In Windows Server 2012 R2 and Windows Server 2012, you can close the Add Roles and Features Wizard while installation is still in progress, and view installation results or other messages in the Notifications area at the top of the Server Manager console. Click the Notifications flag icon to see more details about installations or other tasks that you are performing in Server Manager.
Install roles, role services, and features by using Windows PowerShell cmdlets
The Server Manager deployment cmdlets for Windows PowerShell function similarly to the GUI-based Add Roles and Features Wizard and Remove Roles and Features Wizard, with an important difference. In Windows PowerShell, unlike in the Add Roles and Features Wizard, management tools and snap-ins for a role are not included by default. To include management tools as part of a role installation, add the IncludeManagementTools parameter to the cmdlet. If you are installing roles and features on a server that is running the Server Core installation option of Windows Server 2012 R2 or Windows Server 2012, you can add a role’s management tools to an installation, but GUI-based management tools and snap-ins cannot be installed on servers that are running the Server Core installation option of Windows Server. Only command-line and Windows PowerShell management tools can be installed on the Server Core installation option.
To install roles and features by using the Install-WindowsFeature cmdlet
Do one of the following to open a Windows PowerShell session with elevated user rights.
If you are installing roles and features on a remote server, you do not need to run Windows PowerShell with elevated user rights.
On the Windows desktop, right-click Windows PowerShell on the taskbar, and then click Run as Administrator.
On the Windows Start screen, right-click the tile for Windows PowerShell, and then on the app bar, click Run as Administrator.
In Windows PowerShell 3.0 and later releases of Windows PowerShell, there is no need to import the Server Manager cmdlet module into the Windows PowerShell session before running cmdlets that are part of the module. A module is automatically imported the first time you run a cmdlet that is part of the module. Also, neither Windows PowerShell cmdlets nor the feature names used with the cmdlets are case-sensitive.
Type Get-Help Install-WindowsFeature, and then press Enter to view the syntax and accepted parameters for the Install-WindowsFeature cmdlet.
Type the following, and then press Enter, where feature_name represents the command name of a role or feature that you want to install (obtained in step 2), and computer_name represents a remote computer on which you want to install roles and features. Separate multiple values for feature_name by using commas. The Restart parameter automatically restarts the destination server if required by the role or feature installation.
To install roles and features on an offline VHD, add both the ComputerName parameter and the VHD parameter. If you do not add the ComputerName parameter, the cmdlet assumes that the local computer is mounted to access the VHD. The ComputerName parameter contains the name of the server on which to mount the VHD, and the VHD parameter contains the path to the VHD file on the specified server.
Example:В В The following cmdlet installs the Active Directory Domain Services role and the Group Policy Management feature on a remote server, ContosoDC1. Management tools and snap-ins are added by using the IncludeManagementTools parameter, and the destination server is to be restarted automatically, if installation requires that the servers be restarted.
Remove roles, role services, and features by using the Remove Roles and Features Wizard
You must be logged on to a server as an administrator to uninstall roles, role services, and features. If you are logged on to the local computer with an account that does not have administrator rights on your uninstallation target server, right-click the target server in the Servers tile, and then click Manage As to provide an account that has administrator rights. The server on which you want to mount an offline VHD must be added to Server Manager, and you must have Administrator rights on that server.
To remove roles and features by using the Remove Roles and Features Wizard
If Server Manager is already open, go on to the next step. If Server Manager is not already open, open it by doing one of the following.
On the Windows desktop, start Server Manager by clicking Server Manager in the Windows taskbar.
On the Windows Start screen, click the Server Manager tile.
On the Manage menu, click Remove Roles and Features.
On the Before you begin page, verify that you have prepared for removing roles or features from a server. Click Next.
On the Select destination server page, select a server from the server pool, or select an offline VHD. To select an offline VHD, first select the server on which to mount the VHD, and then select the VHD file.
For information about how to add servers to your server pool, see Add Servers to Server Manager. After you have selected the destination server, click Next.
You can use the Remove Roles and Features Wizard to remove roles and features from servers that are running the same release of Windows Server that supports the version of Server Manager that you are using. You cannot remove roles, role services, or features from servers that are running Windows Server 2012 R2, if you are running Server Manager on Windows Server 2012 or Windows 8. You cannot use the Remove Roles and Features Wizard to remove roles and features from servers that are running Windows Server 2008, Windows Server 2008 R2, or Windows Server 2003.
Select roles, select role services for the role if applicable, and then click Next to select features.
As you proceed, the Remove Roles and Features Wizard automatically prompts you to remove any roles, role services, or features that cannot run without the roles or features that you are removing.
Additionally, you can opt to remove management tools and snap-ins for roles on the destination server. By default, in the Remove Roles and Features Wizard, management tools are selected for removal. You can leave management tools and snap-ins if you plan to use the selected server to manage the role on other remote servers.
On the Confirm removal selections page, review your role, feature, and server selections. If you are ready to remove the roles or features, click Remove.
After you click Remove, the Removal progress page displays removal progress, results, and messages such as warnings, failures, or post-removal configuration steps that are required, such as restarting the destination server. In Windows Server 2012 R2 and Windows Server 2012, you can close the Remove Roles and Features Wizard while removal is still in progress, and view removal results or other messages in the Notifications area at the top of the Server Manager console. Click the Notifications flag to see more details about removals or other tasks that you are performing in Server Manager.
Remove roles, role services, and features by using Windows PowerShell cmdlets
The Server Manager deployment cmdlets for Windows PowerShell function similarly to the GUI-based Remove Roles and Features Wizard, with an important difference. In Windows PowerShell, unlike in the Remove Roles and Features Wizard, management tools and snap-ins for a role are not removed by default. To remove management tools as part of a role removal, add the IncludeManagementTools parameter to the cmdlet. If you are uninstalling roles and features from a server that is running the Server Core installation option of Windows Server 2012 R2 or Windows Server 2012, this parameter removes command-line and Windows PowerShell management tools for the specified roles and features.
To remove roles and features by using the Uninstall-WindowsFeature cmdlet
Do one of the following to open a Windows PowerShell session with elevated user rights.
If you are uninstalling roles and features from a remote server, you do not need to run Windows PowerShell with elevated user rights.
On the Windows desktop, right-click Windows PowerShell on the taskbar, and then click Run as Administrator.
On the Windows Start screen, right-click the Windows PowerShell tile, and then on the app bar, click Run as Administrator.
In Windows PowerShell 3.0 and later releases of Windows PowerShell, there is no need to import the Server Manager cmdlet module into the Windows PowerShell session before running cmdlets that are part of the module. A module is automatically imported the first time you run a cmdlet that is part of the module. Also, neither Windows PowerShell cmdlets nor the feature names used with the cmdlets are case-sensitive.
Type Get-Help Uninstall-WindowsFeature, and then press Enter to view the syntax and accepted parameters for the Uninstall-WindowsFeature cmdlet.
Type the following, and then press Enter, where feature_name represents the command name of a role or feature that you want to remove (obtained in step 2), and computer_name represents a remote computer from which you want to remove roles and features. Separate multiple values for feature_name by using commas. The Restart parameter automatically restarts destination servers if required by the role or feature removal.
To remove roles and features from an offline VHD, add both the ComputerName parameter and the VHD parameter. If you do not add the ComputerName parameter, the cmdlet assumes that the local computer is mounted to access the VHD. The ComputerName parameter contains the name of the server on which to mount the VHD, and the VHD parameter contains the path to the VHD file on the specified server.
Example:В В The following cmdlet removes the Active Directory Domain Services role and the Group Policy Management feature from a remote server, ContosoDC1. Management tools and snap-ins are also removed, and the destination server is to be restarted automatically, if removal requires that the servers be restarted.
Install roles and features on multiple servers by running a Windows PowerShell script
Although you cannot use the Add Roles and Features Wizard to install roles, role services, and features on more than one target server in a single wizard session, you can use a Windows PowerShell script to install roles, role services, and features on multiple target servers that you are managing by using Server Manager. The script that you use to perform batch deployment, as this process is called, points to an XML configuration file that you can create easily by using the Add Roles and Features Wizard, and clicking Export configuration settings after advancing through the wizard to the Confirm installation selections page of the Add Roles and Features Wizard.
All target servers that are specified in your script must be running the release of Windows Server that matches the version of Server Manager you are running on the local computer. For example, if you are running Server Manager on WindowsВ® 8, you can install roles, role services, and features on servers that are running Windows Server 2012. If GUI-based management tools are added to the installation, the installation process automatically converts target servers that are running the Server Core installation option of Windows Server to the full installation option (server with a full GUI). The script provided in this section is an example of how batch deployment can be performed by using the Install-WindowsFeature cmdlet and a Windows PowerShell script. There are other possible scripts and methods of performing batch deployment to multiple servers. To search for or provide other scripts for deploying roles and features, search the Script Center Repository.
To install roles and features on multiple servers
If you have not already done so, create an XML configuration file that contains the roles, role services, and features that you want installed on multiple servers. You can create this configuration file by running the Add Roles and Features Wizard, selecting roles, role services, and features that you want, and clicking Export configuration settings after advancing through the wizard to the Confirm installation selections page. Save the configuration file to a convenient location. You do not need to click Install or complete the wizard if you are running it only to create a configuration file.
Do one of the following to open a Windows PowerShell session with elevated user rights.
On the Windows desktop, right-click Windows PowerShell on the taskbar, and then click Run as Administrator.
On the Windows Start screen, right-click the Windows PowerShell tile, and then on the app bar, click Run as Administrator.
Copy and paste the following script into your Windows PowerShell session.
Target servers are automatically restarted if required by the roles and features that you select.
Run the function by doing the following.
Do one of the following to open a Windows PowerShell session with elevated user rights.
If you are installing roles and features from a remote server, you do not need to run Windows PowerShell with elevated user rights.
On the Windows desktop, right-click Windows PowerShell on the taskbar, and then click Run as Administrator.
On the Windows Start screen, right-click the Windows PowerShell tile, and then on the app bar, click Run as Administrator.
On a server that is running the Server Core installation option of Windows Server 2012 R2 or Windows Server 2012, type powershell into a command prompt, and then press Enter.
Type the following command, and then press Enter. In the following example, the source files are located in a side-by-side store (abbreviated to as SxS) in installation media on drive D.
If you want the command to use Windows Update as a source for missing feature files, or if a default source has already been configured by using Group Policy, you do not need to add the Source parameter unless you want to specify a different source.
On the Manage menu in Server Manager, click Add Roles and Features.
Select a destination server that is running Windows Server 2012 R2 orWindows Server 2012.
On the Select features page of the Add Roles and Features Wizard, select .NET Framework 3.5.
If the local computer is allowed to do so by Group Policy settings, the installation process attempts to get missing feature files by using Windows Update. Click Install; you do not need to go on to the next step.
Provide a path to a side-by-side store (referred to as SxS) in installation media, or to a WIM file. In the following example, installation media is located on drive D.
D:SourcesSxS
To specify a WIM file, add a WIM: prefix, and add the index of the image to use in the WIM file as a suffix, as shown in the following example.
WIM:\server_nameshareinstall.wim:3
Click OK, and then click Install.
Do one of the following to open a Windows PowerShell session with elevated user rights.
If you are installing roles and features from a remote server, you do not need to run Windows PowerShell with elevated user rights.
On the Windows desktop, right-click Windows PowerShell on the taskbar, and then click Run as Administrator.
On the Windows Start screen, right-click the Windows PowerShell tile, and then on the app bar, click Run as Administrator.
On a server that is running the Server Core installation option, type powershell into a command prompt, and then press Enter.
Run one of the following DISM commands.
If the computer has access to Windows Update, or a default source file location has already been configured in Group Policy, run the following command.
If the computer has access to installation media, run a command similar to the following. In the following example, the operating system installation media is located on drive D. The LimitAccess parameter prevents the command from attempting to contact Windows Update or a server that is running WSUS.
The DISM command is case-sensitive.
Configure alternate sources for feature files in Group Policy
You must be a member of the Administrators group to change Group Policy settings on the local computer. If Group Policy settings for the computer you want to manage are controlled at the domain level, you must be a member of the Domain Administrators group to change Group Policy settings.
To configure a default alternate source path in Group Policy
In Local Group Policy Editor or Group Policy Management Console, open the following policy setting.
Computer ConfigurationAdministrative TemplatesSystemSpecify settings for optional component installation and component repair
Select Enabled to enable the policy setting, if it is not already enabled.
In the Alternate source file path text box in the Options area, specify a fully qualified path to a shared folder or a WIM file. To specify a WIM file as an alternate source file location, add the prefix WIM: to the path, and add the index of the image to use in the WIM file as a suffix. The following are examples of values that you can specify.
Path to a shared folder: **\server_nameshare**folder_name
Path to a WIM file, in which 3 represents the index of the image in which the feature files are found: WIM:\server_nameshareinstall.wim:3
If you do not want computers that are controlled by this policy setting to search for missing feature files in Windows Update, select Never attempt to download payload from Windows Update.
If the computers that are controlled by this policy setting typically receive updates through WSUS, but you prefer to go through Windows Update and not WSUS to find missing feature files, select Contact Windows Update directly to download repair content instead of Windows Server Update Services (WSUS).
Click OK when you are finished changing this policy setting, and then close the Group Policy editor.
Источник
Для установки ролей и компонентов в Powershell есть 3 основные команды Install-WindowsFeature, Enable-WindowsOptionalFeature и Add-WindowsCapability. Каждая из этих команд имеет свое применение и может отличаться в разных релизах Windows. В этой статье будет рассмотрен процесс установки ролей и компонентов используя обе команды на примерах.
Типы команд устанавливающие роли с Powershell
В Windows есть множество команд, с помощью которых можно установить роль или компонент. Если учесть все команды, которые можно использовать в Powershell — получится следующий список:
- Add-WindowsCapability;
- Enable-WindowsOptionalFeature;
- Install-WindowsFeature;
- Add-WindowsFeature;
- dism.exe;
- pkgmgr.exe.
Командлеты, которые относятся только к Powershell разделяются на 3 типа:
- WindowsFeature — относится к модулю ServerManager. Имеет возможности относящиеся только Windows Server и установке и удалению ролей и компонентов;
- WindowsOptionalFeature — относится к модулю DISM, который наследует функционал аналогичной cmd утилиты. Основное предназначение — работа с компонентами Windows. Компоненты доступные через эти команды можно увидеть в GUI «Включение или отключение компонентов Windows». Это старый функционал и его компоненты переезжают в интерфейс Windows 10;
- WindowsCapability — так же относятся к DISM. Команда, которая постепенно заменяет ‘WindowsOptionalFeature’. Имеет возможность установки компонентов из Windows Update. Если какие-то компоненты не получается найти через предыдущую команду, используйте эту.
Вывести все командлеты можно посмотреть так:
Get-Command -Noun 'WindowsFeature'
Get-Command -Noun 'WindowsOptionalFeature'
Get-Command -Noun 'WindowsCapability'
Если вы пользуетесь старыми версиями ОС, то какие-то модули могут быть не доступны. 2019 сервер одинаков с 2016:

Буква А обозначает алиас. Add-WindowsFeature, в 2016+ эта та же команда, что и Install-WondowsFeature.
Сама установка ролей не обозначает и ее настройку. После установки, обычно, появляется множество команд для настройки роли.
Получение списка ролей и их установка с Powershell Install-WindowsFeature
Что бы получить список ролей можно использовать Get-WindowsFeature. Эта команда, как и все ‘WindowsFeature’, может работать локально и удаленно. По умолчанию она возвращает роли и компоненты. Несколько примеров выполнения командлета:
# получаем список всех ролей
Get-WindowsFeature

# получаем список только установленных ролей
Get-WindowsFeature | where Installed -eq $True

# вывод подробной информации о роли на примере Active Directory
Get-WindowsFeature -Name 'AD-Domain-Services' | select *

# вывод ролей с удаленного компьютера
Get-WindowsFeature -ComputerName 'localhost'

# получение списка компонентов (Features)
Get-WindowsFeature | where FeatureType -eq 'Feature'

# получение только ролей (roles)
Get-WindowsFeature | where FeatureType -eq 'Role'

# получаем роли содержащие AD в названии
Get-WindowsFeature -Name '*AD*'
Имена для установки роли берутся из колонки ‘Name’. Если вы до сих пор плохо понимаете что именно получает и устанавливает эта команда — откройте ‘Server Manager’ на ‘Windows Server’ и посмотрите меню установки:


Сам пакет WindowsFeature (модуль ServerManager) может быть установлен на Windows 10 с RSAT.
Базовая установка роли, но не совсем верная, на примере Active Directory Domain Services, будет следующей:
Install-WindowsFeature -Name 'AD-Domain-Services'
Перед использованием командлета обратите внимание на 2 параметра, которые вы можете указать:
- IncludeManagementTools — добавляет к установке модули Powershell и панели администрирования;
- IncludeAllSubFeature — подразумевает, что вы устанавливаете не одну роль, а всю вложенную ветку.
Если вы забудете указать параметры указанные выше, то команду можно будет выполнить повторно с их включением.
Так же доступны следующие параметры:
- LogPath — путь до файла, в который вы хотите сохранить лог установки;
- Restart — перезагрузить компьютер если это понадобится после установки;
- Source — внешний источник для установки роли;
- Vhd — установка на vhd диск;
- ConfigurationFilePath — перед установкой роли в Server Manager он предлагает сохранить конфигурацию. Это конфигурацию можно использовать здесь.
Если бы я устанавливал Active Directory на обычный GUI сервер, удаленно, то это бы выглядело так:
Install-WindowsFeature -Name 'AD-Domain-Services' -ComputerName 'AD1' -IncludeManagementTools -LogPath 'C:ad1.log'
Если удаленный сервер работает под другими учетными данными, то передать их можно использовав команду ‘Get-Credential’. В ‘ComputerName’ можно указывать как DNS имя, так и IP адрес.
Пример установки нескольких ролей подряд, удаленно и под другими учетными данными:
$cred = Get-Credential
'XPS-Viewer', 'AD-Domain-Services' | Install-WindowsFeature -ComputerName 'AD1' -IncludeManagementTools -Credential $cred
Удалить роль можно так:
Uninstall-WindowsFeature -Name 'DNS' -IncludeManagementTools
'DNS', 'AD-Domain-Services' | Uninstall-WindowsFeature -IncludeManagementTools
Если добавить параметр ‘Remove’, то роль будет удалена еще и с папки ‘WinSxS’. Остальные параметры аналогичны.
Установка компонентов с Enable-WindowsOptionalFeature
Список компонентов, с которыми можно работать команда группы ‘WindowsOptionalFeature’ аналогичны следующем окну:
Учитывая, что это окно уже является наследием более старых систем (до Windows 10), вы можете не найти все компоненты. Например RSAT, который раньше можно было найти в этом окне, теперь доступен через интерфейс ‘Приложения и возможности’ Windows 10. Команды в этих случаях тоже отличаются.
Для получения всех компонентов нужно выполнить следующую команду:
Get-WindowsOptionalFeature -Online
Параметр ‘-Online’ говорит, что пакеты будут искаться на этом же компьютере. Можно поставить ‘-Path’, с указанием пути до образа Windows, что бы увидеть какие компоненты доступны там.
Несколько вариантов выполнения команды:
# получение списка всех включенных компонентов
Get-WindowsOptionalFeature -Online | where state -eq 'Enabled'

# получаем компоненты в которых встречается 'hyper'
Get-WindowsOptionalFeature -Online -FeatureName '*hyper*'
Учитывая, что команды относятся к модулю ‘DISM’, мы можем работать с образами используя параметры ‘PackagePath’ и ‘Path’. Такая возможность есть во всех командах ‘WindowsOptionalFeature’.
Для того, что бы включить компонент нужно выполнить следующую команду:
Enable-WindowsOptionalFeature -FeatureName "TelnetClient" -OnlineВ следующей команде указано, что нам нужно собрать все логи (а не только ошибки) и сохранить их по указанному пути:
Enable-WindowsOptionalFeature -FeatureName "TelnetClient" -Online -LogLevel 'WarningsInfo' -LogPath 'C:feature.log'
Отключение приложения выполняется следующим образом:
Disable-WindowsOptionalFeature -FeatureName "TelnetClient" -OnlineWindowsOptionalFeature так же используется для подготовки Nano сервера т.к. там нет WindowsFeature и пакеты с ролями сначала импортируются, а затем включаются.
Установка компонентов с Add-WindowsCapability
В предыдущем разделе было упомянуто о переезде многих компонентов в интерфейс Windows 10. Командлеты ‘WindowsCapability’ работают именно с ними. Если мы выполним следующую команду, которая очень похожа на предыдущую, то мы увидим совершенно разные пакеты:
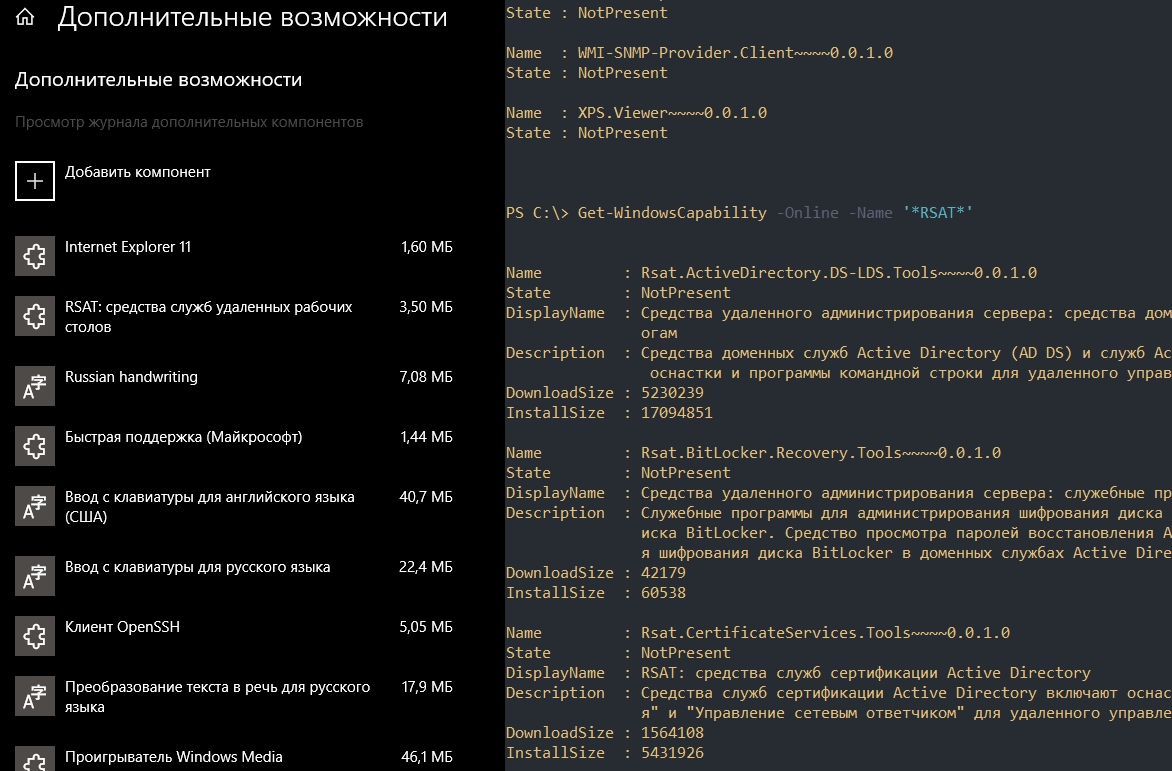
Get-WindowsCapability -Online
Эти компоненты соответствуют следующему окну в Windows 10:
Некоторый варианта выполнения программы:
# получение списка всех установленных компонентов
Get-WindowsCapability -Online | where State -eq 'Installed'

# получаем компоненты в которых встречается 'RSAT'
Get-WindowsCapability  -Online -FeatureName '*RSAT*'
В отличие от предыдущей команды — эта программа может устанавливать компоненты из Windows Update. Поэтому в ней можно увидеть значения ‘DownloadSize’ и ‘InstallSize’. В остальном это одинаковые команды.
Установка:
Add-WindowsCapability -Name 'Rsat.WSUS.Tools~~~~0.0.1.0' -OnlineУУдаление:
Remove-WindowsCapability -Name 'Rsat.WSUS.Tools~~~~0.0.1.0' -Online
…
Теги:
#powershell
Table of Contents
- Introduction
- Windows Server platform support
- With GUI
- Without GUI
- The PowerShell cmdlets
- Installing a Windows Role/Feature with Server Manager
- Installing a Windows Role/Feature with Windows Admin Center
- Installing a Windows Feature with PowerShell
- Method 1 — Install-WindowsFeature
- Method 2 — Enable-WindowsOptionalFeature
- Installing a Windows Feature with DISM
- See Also
Introduction
There’s a lot of roles and features for Windows Server, but there are also many different ways of installing these.
It’s good to know the different ways of installing these roles or features, because if you’re using an operating system without a Graphical User Interface (GUI) there will be no Server Manager to perform the simple «next-next-next» installation.
Sometimes even the Server Manager GUI might be giving errors for various reasons, then these other ways of installing the Windows Server roles or features might come in handy.
Windows Server platform support
There are five (5) different ways of installing Windows Server roles and features, three (3) of them are from the command line or PowerShell.
With GUI
- Server Manager
- Windows Admin Center (WAC)
Without GUI
- Install-WindowsFeature (replaces Add-WindowsFeature)
- Enable-WindowsOptionalFeature
- DISM
| Server 2008 R2 | Server 2012 | Server 2012 R2 | Server 2016 | Server 2019 | Server Nano | Source | |
| Enable-WindowsOptionalFeature | ✔ | ✔ | ✔ | DISM Module | |||
| Install-WindowsFeature | ✔ | ✔ | ✔ | Server Manager Module | |||
| DISM.exe | ✔ | ✔ | ✔ | ✔ | ✔ | ✔ | %SystemRoot%System32 |
The PowerShell cmdlets
Let’s take a look at the different PowerShell cmdlets for installing Windows Server roles and features:
Enable-WindowsOptionalFeature

Install-WindowsFeature

What are the differences between these different methods of installing the Windows Server roles and features?
| Install Method | Remote Support |
| Enable-WindowsOptionalFeature | ✔ |
| Install-WindowsFeature | ✔ |
| DISM.exe | ✖ |
The Server Manager PowerShell cmdlets, Enable-WindowsOptionalFeature and Install-WindowsFeature can both work against remote computers, while DISM only works locally.
Installing a Windows Role/Feature with Server Manager
To install a Windows Server role or feature by using a Graphical User Interface (GUI), we can achieve this with the builtin Server Manager.
1. Open the Server Manager on the Windows Server.

2. Click on Add roles and features which can be found in the center of Server Manager.

Another way is to go to Manage which can be found in the upper right corner, then click on Add Roles and Features.

3. In the Add Roles and Features Wizard, leave the check mark on the Role-based or feature-based installation and click Next.

4. Leave the check mark on the Select a server from the server pool and then click Next.

5. Select a role from the Server Roles pane, or a feature from the Features pane that we want to install, by checking the check box next to the role/feature, then click Next.

6. In the Confirmation step, we will see which roles / features we have selected to be installed. Click Install to start installing the role / feature.

7. Once the role / feature has been installed, we should see a Installation succeeded message at the top, click Close to close the Add Roles and Features Wizard.

Installing a Windows Role/Feature with Windows Admin Center
Windows Admin Center (WAC) is the new management tool for Windows Server, it is a very efficient tool that basically eliminates the need of having many different management consoles. Installing Windows roles/features with WAC is very easy, we will go through
the steps below.
Windows Admin Center can be downloaded from
here.
1. Open a browser on the computer where Windows Admin Center is installed.

2. We should now see all the computers that we have added in WAC,
click on the computer to connect to it.
Note: If there are no computers added, we can add them by clicking on the
+ Add button in the upper left corner.

3. Once we are connected to the computer, under the Tools pane, go to
Roles & Features by clicking on it.

4. Locate the role/feature that we want to install.

5. As we mouse hoover over the role/feature, we notice a check box appearing next to the name of the role/feature,
click the check box next to the role/feature name to select the role/feature that we want to install.

6. Once the role/feature is selected we can see a check mark next to the name of the role/feature, we can also see the selected items in the upper right corner.

7. To install the role/feature, click on the + Install button at the top.

8. Windows Admin Center will now start calculating the dependencies of the role/feature.

9. Once the calculation is done, click Yes to start installing the role/feature.

10. We can view the progress of the installation in Windows Admin Center by clicking on the
bell at the upper right corner.

11. Once the role/feature has been installed, we should see the following:

12. We should now also see in under the Roles and Features that the role/feature has the state marked as Installed.

Installing a Windows Feature with PowerShell
Installing Windows Server features with PowerShell is very quick and efficient, this can also be automated with scripts.
Method 1 — Install-WindowsFeature
1. Go to Start and search for «PowerShell«, right-click Windows PowerShell and choose Run as administrator.

2. Type the PowerShell command below to get all the available roles and features:


If we don’t know the entire name of the role/feature, we can simply use wildcards to search for them:
Get-WindowsFeature -Name Telnet*

3. Take note of the Name field, this is what we need to install the role / feature, select the role or feature by copying the name of it.
4. Now type the command below to install the role / feature:
Install-WindowsFeature -Name Telnet-Client

5. Once the role/feature installation has completed, we should see the following:

6. To verify that the role/feature got installed, we can run the command below:
Get-WindowsFeature -Name Telnet*

Method 2 — Enable-WindowsOptionalFeature
1. In the elevated PowerShell window, type the command below to retrieve the available optional Windows features:
Get-WindowsOptionalFeature -Online

This list is very long and it’s difficult to find the feature that we want, so we can use wildcards to easily find the feature that we want.
Get-WindowsOptionalFeature -Online -FeatureName Telnet*

Note: The state of the Windows feature is marked as Disabled.
2. Now that we know the name of the feature that we want to install, we can run the command below to enable the Windows feature:
Enable-WindowsOptionalFeature -Online -FeatureName TelnetClient

3. Once the Windows feature has been enabled, we should see the following:

4. To verify that the feature is enabled, we can run the command below again:
Get-WindowsOptionalFeature -Online -FeatureName Telnet*

The Windows feature state is now marked as Enabled.
Installing a Windows Feature with DISM
1. In the elevated PowerShell window, type the command below to retrieve the list of all available Windows features:
Dism /Online /Get-Features

2. Locate the Windows feature that we want to install:

The list is very long and it might be time consuming to find the feature that we want to install.
If we want to do this in another way we can print out the list of roles and features to a text file by using the > C:TempFeatureList.txt at the end of the command, then simply perform a search for the role in the text file to identify
the exact name of the Windows feature.
Dism /Online /Get-Features > C:TempFeatureList.txt

The FeatureList.txt file has now been created under C:Temp.

Open the FeatureList.txt file and search for the feature that we want to install.

We should then find the feature, make note of the Feature name:

3. Now that we know the name of the feature that we want to install, we can run the command below to get more information about it:
Dism /Online /Get-FeatureInfo /FeatureName:TelnetClient

Note: The state of the feature is marked as Disabled.
3. Type the command below to enable the Windows feature:
Dism /Online /Enable-Feature /FeatureName:TelnetClient

4. Let’s verify that the Windows feature has been enabled by running the command below once more:
Dism /Online /Get-FeatureInfo /FeatureName:TelnetClient

See Also
- Install or Uninstall Roles, Role Services, or Features
- Enable or Disable Windows Features Using DISM
- Features on Demand
- Windows Admin Center
Как известно, Windows 10 отличается набором компонентов от предыдущих версий операционных систем Windows. Зачастую требуется их включить или выключить, чтобы они не потребляли системные ресурсы, да и просто не мешали. В этой статье мы рассмотрим как это сделать быстрее и эффективнее.
Начнем с того, что существует два основных способа работы с компонентами (они еще называются features) — утилита DISM и командлеты Powershell. И то и другое встроено в Windows 10, в отличие от Windows 7, где dism можно было добавить или установив пакет Windows ADK, или руками скопировав dism.exe с другого компьютера.
Сразу отмечу, что утилиту dism и среду powershell для работы с системой необходимо запускать от имени администратора, даже если ваш аккаунт уже находится в группе локальных админов. Итак, вы или находите cmd или windows powershell в меню и, кликнув правой кнопкой мышки, выбираете «Запуск от имени администратора«.
В Windows 10 есть понятие Features и Capabilities. Первое — это привычные нам компоненты, которые можно найти в Панели управления -> Программы и компоненты -> Включение и отключение компонентов Windows. То есть это встраиваемые модули, которые выполняют определенный сервисный функционал.
Capabilities — это дополнительные возможности, которые расширяют возможности интерфейса и увеличивают удобство пользователя. Среди них — Language packs, наборы шрифтов. Да, Microsoft удалил часть нестандартных шрифтов, которые теперь вынесены в опциональные компоненты. Скачать эти компоненты можно в виде ISO файла с сайта Volume Licensing Service Center или напрямую через Internet и графический интерфейс Windows. Такую концепцию Microsoft назвала Features on Demand (FOD). Их в более ранних версия Windows не было.
Работаем с Windows Features
Итак, список установленных компонентов можно посмотреть командой
Dism /online /Get-Features
Вот как в Powershell можно получить список всех компонентов командлетами Get-WindowsFeature (для Windows Server) или Get-WindowsOptionalFeature (Windows 10):
Чтобы получить список отключенных компонентов, введите:
Get-WindowsOptionalFeature -Online | ? state -eq 'disabled' | select featurename
Этот список также можно вывести в файл (для windows Server):
Get-WindowsFeature | Where-Object {$_.Installed -match “True”} | Select-Object -Property Name | Out-File C:TempWindowsFeatures.txt
Посмотрев список названий и их состояние, можно использовать эти названия для того, чтобы компоненты включить или выключить:
Dism /online /Enable-Feature /FeatureName:TFTP /All
ключ /All позволяет включить также все дочерние компоненты;
Установка компонентов через Powershell выполняется командой Enable-WindowsOptionalFeature.
Enable-WindowsOptionalFeature -Online -FeatureName RSATClient-Roles-AD-Powershell
Параметр -All включает все дочерние компоненты.
Dism /online /Disable-Feature /FeatureName:TFTP
Аналогично, через Powershell это можно сделать командой Disable-Windowsoptionalfeature -online -featureName [feature name].
Обратите внимание, некоторые фичи имеют разные названия в Windows 7 и Windows 10. Например, RSAT в Windows 7 — это RemoteServerAdministrationTools, а в Windows 10 — RSATclient.
Управление Features on Demand (FOD)
Если вы устанавливаете их через графический интерфейс, то вам необходимо пройти “System –> App & features –> Manage optional features” и нажать знак + напротив необходимых компонентов.
Чтобы сделать это автоматизированно через командную строку, наберите чтобы получить список доступных компонентов:
DISM.EXE /Online /Get-Capabilities
или на Powershell:
Get-WindowsCapability -Online
Как и прежде, запомните название необходимых вам компонентов, чтобы включить их командой (на примере .Net Framework 3):
DISM.EXE /Online /Add-Capability /CapabilityName:NetFx3~~~~
или на Powershell:
Add-WindowsCapability –Online -Name NetFx3~~~~
Если же у вас нет доступа в Интернет, то есть выход. Итак, вы скачиваете ISO образ диска с FOD компонентами с сайта Volume Licensing Service Center. Файлы будут разные для разных релизов Windows 10 — 1511, 1607, 1703, 1709. Важно помнить, что компоненты одного релиза не подходят к другому. Если вы сделаете in-place upgrade (установка одного релиза поверх другого через обновление), то несовместимые установленные компоненты будут удалены без вашего желания! Да, Microsoft удаляет то, что считает несовместимым при обновлении.
Так вот, ISO файл содержит набор неизвестных и сложных для понимания файлов с расширением cab. Вот чудесный файлик на сайта Microsoft, который обясняет назначение каждого файла. Итак, существуют следующие типы FOD:
- Microsoft-Windows-LanguageFeatures-Basic — проверка правописания для различных языков и раскладок клавиатуры;
- Microsoft-Windows-LanguageFeatures-Fonts — национальные шрифты, например, азиатские
- Microsoft-Windows-LanguageFeatures-OCR — средства для распознавания шрифтов
- Microsoft-Windows-LanguageFeatures-Handwriting — средства для распознавания рукописного ввода
- Microsoft-Windows-LanguageFeatures-TextToSpeech — средства преобразования текста в голос, используемые подсказчиком Cortana
- Microsoft-Windows-LanguageFeatures-Speech — распознавание голоса
- Microsoft-Windows-InternationalFeatures — пакеты национальных настроек, например, для Тайваня
Итак, для добавления таких FOD компонентов, используйте команды вида (замените имя компонента):
Dism /Online /Add-Capability /CapabilityName:Language.Basic~~~en-US~0.0.1.0
Для удаления FOD:
Dism /Online /Remove-Capability /CapabilityName:Language.Basic~~~en-US~0.0.1.0
Установка и переустановка пакетов языков (Language Interface Packs, LIP)
Язык интерфейса Windows можно поменять, установив так называемые LIP. ранее они назывались MUI (Multi user interface). Файлы LIP выглядят так: Microsoft-Windows-Client-Language-Pack_x64_es-es.cab для испанского языка. Выглядеть установка будет примерно так:
Dism /Add-Package /online /PackagePath:"C:LanguagesMicrosoft-Windows-Client-Language-Pack_x64_fr-fr.cab"
А удаление так:
Dism /Remove-Package /online /PackageName:Microsoft-Windows-Client-LanguagePack-Package~31bf3856ad364e35~amd64~en-US~10.0.10120.0
В следующей статье мы поговорим как с помощью DISM и Powershell управлять так называемыми Modern-приложениями AppX.
 [Посещений: 19 982, из них сегодня: 10]
In this tutorial you’ll learn how to install Group Policy Management Console in Windows 10/11.
The Group Policy Management Console (GPMC) is an advanced administrative tool for managing Group Policy and other settings in Active Directory environments. The GPMC tool is available to administrators of domain-based networks to easy manage the following objects:
- Active Directory Users and Computers
- Active Directory Sites and Services
- Resultant Set of Policy
- ACL Editor
- GPMC Delegation Wizard
In practice, the Group Policy Management Console is a central management tool used to deploy, manage, and automate policies in domains, sites, users and computers and can be installed as an additional feature on Windows Servers* or in workstations running Windows 10/11 Professional, Enterprise & Education editions. **
* Notes:
1. To install GPMC on Windows Server 2016 and above:
-
- Open the Server Manager and go to Manage -> Add Roles and Features.
- In Add Roles and Features Wizard dialog that opens, click Next and then select Role Based or feature-based installation -> Next.
- Select the Server from the server pool -> Next -> Next.
- At Features options select the Group Policy Management and click Next to install it.
2. The Group Policy Management Console cannot be installed on Windows 10 Home devices.
How to Install RSAT Group Policy Management Console on Windows 11/10.
Group Policy Management Console is part or Remote Server Administrator Tools (RSAT) and can be installed only on computers that are running Windows 10/11 Professional, Enterprise or Education editions, by using one of the methods below:
- Install GPMC from Optional features.
- Install GPMC using PowerShell.
- Download and Install GPMC.
Method 1: How to Install Group Policy Management Console from Optional features in Windows 10/11.*
* Note: Use this method only if you’re running Windows 11 or Windows 10 1809 or higher. For lower versions of Windows 10 use the instructions in method-3 below.
1. Open the Search box and type Optional Features.
2. Click Add an optional feature from the list.

2. Then select Add a feature.

3a. In search type Group Policy Management.
3b. Select the RSAT: Group Policy Management Tools and click Install.

4. Once the installation is complete, press the Windows + R keys to open the Run dialog box, type gpmc.msc and hit Enter to open Group Policy Management Console .

Method 2. How to Install Group Policy Management Console using PowerShell.
* Note: Use this method only if you’re running Windows 11 or Windows 10 1809 or higher. For lower versions of Windows 10 use the instructions in method-3 below.
1. On the Search type Powershell and then click Run as Administrator.

2. Copy and paste the command below in PowerShell window and press Enter.
- DISM.exe /Online /add-capability /CapabilityName:Rsat.GroupPolicy.Management.Tools~~~~0.0.1.0

3. Once the installation process is complete, close PowerShell and type gpmc.msc in the Run command box to open the Group Policy Management Console.
Method 3: How to Download & Install Group Policy Management Console in Windows v1803 or lower.
An alternative way to install GPMC is to download the Remote Server Administration Tools and, after installing them, enable GPMC in Windows Features.
* Note: This method is recommended only for PC’s running Windows 10 versions 1803 or lower.
1. Download Remote Server Administration Tools.

2. From the page with Choose the download you want message, tick the filename with x64.msu (64-bit) or x86.msu (32-bit), depending on the version of Windows installed (64 or 32-bit). Then select Next to begin download.

3. Open the downloaded package and Accept the license terms.

4. Once the installation completes, reboot the PC.
5a. After restart, press the Windows + R keys to open the Run dialog box.
5b. Type appwiz.cpl and hit Enter.

6. In Programs and Features, click Turn Windows Features on or off from the left.

8. Expand the Remote Server Administration Tools and the Feature Administration tools and then check the Group Policy Management Tools checkbox.
9. Finally click OK to enable the Group Policy Management Console on your device.
That’s it! Which method worked for you?
Let me know if this guide has helped you by leaving your comment about your experience. Please like and share this guide to help others.
If this article was useful for you, please consider supporting us by making a donation. Even $1 can a make a huge difference for us in our effort to continue to help others while keeping this site free:

If you want to stay constantly protected from malware threats, existing and future ones, we recommend that you install Malwarebytes Anti-Malware PRO by clicking below (we
do earn a commision from sales generated from this link, but at no additional cost to you. We have experience with this software and we recommend it because it is helpful and useful):