Windows provides command line utilities to manager user groups. In this post, learn how to use the command net localgroup to add user to a group from command prompt’
Add user to a group
Run the steps below –
- Open elevated command prompt
- Run the below command
net localgroup group_name UserLoginName /add
For example to add a user ‘John’ to administrators group, we can run the below command.
net localgroup administrators John /add
Few more examples:
To add a domain user to local users group:
net localgroup users domainnameusername /add
This command should be run when the computer is connected to the network. Otherwise you will get the below error.
H:>net localgroup users domainuser /add
System error 1789 has occurred.
The trust relationship between this workstation and the primary domain failed.
To add a domain user to local administrator group:
net localgroup administrators domainnameusername /add
To add a user to remote desktop users group:
net localgroup "Remote Desktop Users" UserLoginName /add
To add a user to debugger users group:
net localgroup "Debugger users" UserLoginName /add
To add a user to Power users group:
net localgroup "Power users" UserLoginName /add
This command works on all editions of Windows OS i.e Windows 2000, Windows XP, Windows Server 2003, Windows Vista and Windows 7. In Vista and Windows 7, even if you run the above command from administrator login you may still get access denied error like below.
C:> net localgroup administrators techblogger /add
System error 5 has occurred.
Access is denied.
The solution for this is to run the command from elevated administrator account. See How to open elevated administrator command prompt
When you run the ‘net localgroup’ command from elevated command prompt:
C:>net localgroup administrators techblogger /add
The command completed successfully.
To list the users belonging to a particular group we can run the below command.
net localgroup group_name
For example to list all the users belonging to administrators group we need to run the below command.
net localgroup administrators
Related posts:
Add new user account
Delete user account
Net User command-line tool used to add or modify user accounts, manage user groups in Windows. I will explain how to create local user account using the net user command-line tool using the cmd prompt on Windows computer.

In this article, I will explain using net user in cmd prompt to create local user account with a password in window computer.
Net User Create Account with Password
If you want to create local user account with a password from the command line, follow the below steps:
Open Command Prompt
Click Start –> Search cmd –> open Command Prompt with Run as Administrator
Type Net User command
net user syntax to add new user with password as below
net user /add username passwordTo add new user account with password, type the above net user syntax in the cmd prompt
net user /add adam [email protected]
The command completed successfully.
If you want to add new user account with a password but without displaying a password on the screen, use the below syntax
net user /add username *In the above net user the command-line tool, * after username prompt for a user to type password and retype the password for confirmation.
Let’s see with below example,
net user /add nathan *
Type a password for the user:
Retype the password to confirm:
The command completed successfully.
Cool Tip: How to fix the trust relationship between workstation and primary domain!
Net User Show all Users
If you want to display all users of a local computer system, use net user the command-line tool to show all users as below
C:Windowssystem32>net user

User accounts for \ENGG-PRO

-------------------------------------------------------------------------------
adam                     chrisd                   ErickJ
garyw                    Guest                    krbtgt
Tesadmin                 nathan                   toms
The command completed successfully.
Cool Tip: How to use Get-AdDomainController to get domain controller in PowerShell!
Net User Add Full Name
We have seen above to create new user in window computer using net user. If you want to add full name for a user account, use the below syntax
net user username /fullname:"add full name"
In the above syntax, net user command used to manage user account on windows computer.
/FullName – Use this net user switch to provide full name for user account
Run the below command to add user full name using net user /fullname
net user adam /fullname:"Adam Strauss"
The command completed successfully.
If you want to create a local admin user or add an existing user to the local administrator group, use the below syntax
net localgroup groupname user /adduse net localgroup to add user to specified groupname
For example, if you want to add user ‘adam’ created above to the administrator group, run the below command
net localgroup administrators adam /add
The command completed successfully.
In the above example, net user add user to the administrator group.
Cool Tip: How to find active directory groups I m in using PowerShell!
Net User to Add Domain User to Local Group
If you have a requirement to add a domain user to local group of administrators, use below net user syntax
net localgroup users domainnameusername /addFor example, if you have a computer connected to a network system and have a requirement to add domain user to local group of administrators, run the below command
net localgroup administrators SHELLPROadam /add
the above command will add a domain user to local administrator group.
If you want to add a user to the remote desktop users group, run the below command
net localgroup "Remote Desktop Users" adam /add
above net user the command will add user adam to the “Remote Desktop Users” group using /add option.
If you want to add a user to the Power Users group, run the below command
net localgroup "Power Users" adam /add
above the net user command will add user ‘adam’ to the “Power Users” group.
If you want to display all local group administrators on a local computer system, run the below command
net localgroup administrators
above net user administrators command will display the list of all users belonging to the administrator group as below
C:Windowssystem32>net localgroup administrators
Alias name     administrators
Comment        Administrators have complete and unrestricted access to the computer/domain

Members

-------------------------------------------------------------------------------
adam
Domain Admins
Enterprise Admins
admin
The command completed successfully.
Cool Tip: How to get-aduser in the active directory using PowerShell!
Conclusion
In the above article using a net user to create a new user account with a password, the net user adds the full name of the user account and manages user accounts on the local computer.
Cool Tip: How to command prompt restart the windows using cmd!
You can find more topics about PowerShell Active Directory commands and PowerShell basics on the ShellGeek home page.
Net is a Windows command used to view and modify network settings. These activities will show you how to use the net localgroup command.
Note: To complete this activity, you must have an administrative user account or know the username and password of an administrator account you can enter when prompted.
Preparation[edit | edit source]
To prepare for this activity:
- Start Windows.
- Log in if necessary.
View Local Groups[edit | edit source]
To view local groups on your computer:
- Open an elevated/administrator command prompt.
- Type net localgroup and press Enter.
- Observe the list of local groups on your computer.
View Users in a Local Group[edit | edit source]
To view users in a local group:
- Type net localgroup groupname, where groupname is the name of the group you want to list. For example, if the group name is Administrators, you would type net localgroup Administrators. Then press Enter.
- Observe the list of users in the local group.
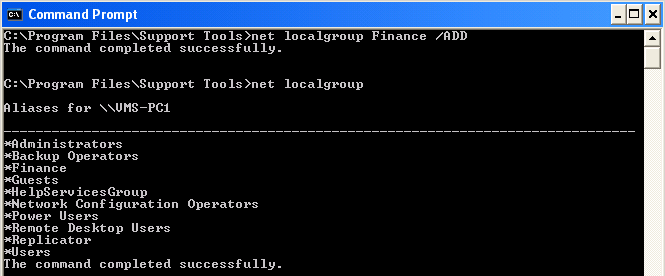
Add a Local Group[edit | edit source]
To add a local group to your computer:
- Type net localgroup groupname /add, where groupname is the name of the group you want to add. For example, if the group name is Accounting, you would type net localgroup Accounting /add. Then press Enter.
- Type net localgroup and press Enter to confirm the group has been added.
Add a User to a Local Group[edit | edit source]
To add a user to a local group:
- Type net user and press Enter to view a list of user accounts on your computer.
- Type net localgroup groupname username /add, where username is the name of the existing user you want to add and groupname is the name of the group you want to add them to. For example, if the group name is Accounting and the username is Bill, you would type net localgroup Accounting Bill /add. Then press Enter.
- Type net localgroup groupname, where groupname is the name of the group you added the user to, and press Enter to confirm the user has been added to the group.
Add an AzureAD User to a Local Group[edit | edit source]
To add an AzureAD user to a local group:
- Type net localgroup groupname AzureADemail /add, where email is the email-address of the existing user you want to add and groupname is the name of the group you want to add them to. For example, if the group name is Administrators and the email is Bill@company.org, you would type net localgroup Administrators AzureADBill@company.org /add. Then press Enter.
- Type net localgroup groupname, where groupname is the name of the group you added the user to, and press Enter to confirm the user has been added to the group.
Remove a User from a Local Group[edit | edit source]
To remove a user from a local group:
- Type net localgroup groupname username /delete, where username is the name of the user you want to remove and groupname is the name of the group you want to remove them from. For example, if the group name is Accounting and the username is Bill, you would type net localgroup Accounting Bill /delete. Then press Enter.
- Type net localgroup groupname, where groupname is the name of the group you removed the user from, and press Enter to confirm the user has been removed from the group.
Remove an AzureAD User from a Local Group[edit | edit source]
To remove a user from a local group:
- Type net localgroup groupname AzureADemail /delete, where email is the email-address of the user you want to remove and groupname is the name of the group you want to remove them from. For example, if the group name is Administrators and the email is Bill@company.org, you would type net localgroup Administrators Bill@company.org /delete. Then press Enter.
- Type net localgroup groupname, where groupname is the name of the group you removed the user from, and press Enter to confirm the user has been removed from the group.
Delete a Local Group[edit | edit source]
To delete a local group from your computer:
- Type net localgroup and press Enter to view local groups on your computer.
- Type net localgroup groupname /delete, where groupname is the name of the group you wish to delete. For example, if the groupname is Accounting, you would type net localgroup Accounting /delete. Then press Enter.
- Type net localgroup and press Enter to confirm the local group has been deleted.
- Close the command prompt to complete this activity.
Readings[edit | edit source]
- Wikipedia: Net localgroup
References[edit | edit source]
- Microsoft TechNet: Net localgroup
In the Groups folder, located in the Local Users and Groups snap-in in the Microsoft Management Console (MMC), both the default local groups and the user-created local groups are displayed. Local default groups are automatically created when you install the operating system. Belonging to a local group gives the user rights and capabilities to perform various tasks on the local computer.
Local user accounts, domain user accounts, computer accounts, and group accounts can be added to local groups.
Learn how to add user to a group from windows command line. You need to run the below steps.
1. Open Command Line as Administrator
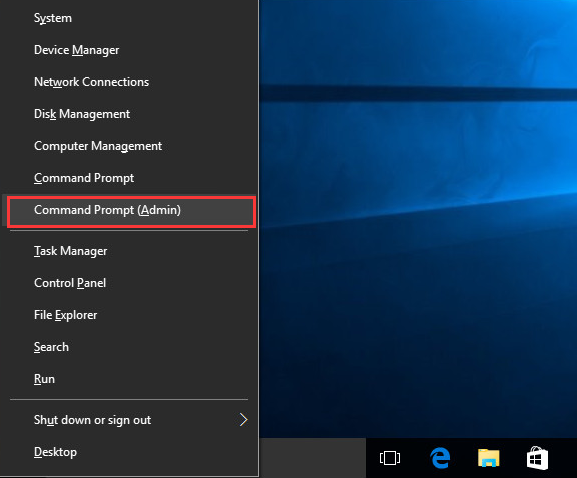
Right-click on the Start button (or the key combination WIN + X) and select Command Prompt (Administrator) in the menu that opens.
2. Run This Command to Add User to Local Group
In command line type following code:
net localgroup group_name UserLoginName /add
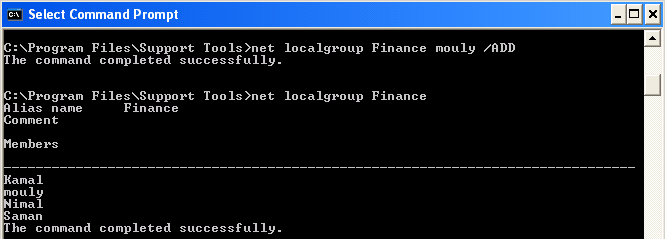
For example to add a user ‘mouly’ to Finance group, we can run the below command:
net localgroup Finance mouly /add
3. Command to Add a Domain User to Local Users Group
In command prompt input this:
net localgroup users domainnameusername /add
This command should be run when the computer is connected to the network. Otherwise, you will get the below error.
H:>net localgroup users domainuser /add
System error 1789 has occurred.
The trust relationship between this workstation and the primary domain failed.
4. Ways to Add User to Different Local Groups
To add a domain user to local administrator group:
net localgroup administrators domainnameusername /add
To add a user to remote desktop users group:
net localgroup “Remote Desktop Users” UserLoginName /add
To add a user to debugger users group:
net localgroup “Debugger users” UserLoginName /add
To add a user to Power users group:
net localgroup “Power users” UserLoginName /add
5. To List the Users Belonging to a Particular Group
If you need to get a list of users belonging to a group we can run this command:
net localgroup group_name
6. Manage Local Users and Groups Using Powershell
Recently, Microsoft has added a standard PowerShell module to Windows for managing local users and groups called Microsoft.PowerShell.LocalAccounts. Previously, this cmdlet had to be downloaded and imported separately into PowerShell. In Windows Server 2016 and Windows 10, the LocalAccounts module is now available by default, because It is included with PowerShell 5.1. In earlier versions of Windows, you must install the Windows Management Framework 5.1 to use the local account management module. The module includes 15 cmdlets. The full list of cmdlets in the LocalAccounts module can be displayed as follows:
Get-Command -Module Microsoft.PowerShell.LocalAccounts
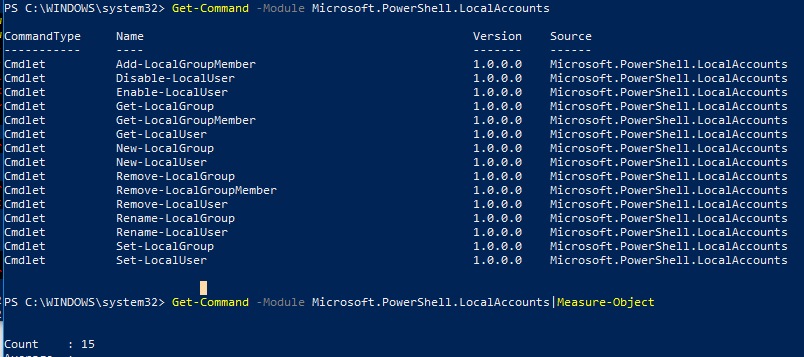
Add-LocalGroupMember— add user to local groupDisable-LocalUser— disable local accountEnable-LocalUser— enable account (unlock)Get-LocalGroup— get information about a local groupGet-LocalGroupMember— get a list of users in a local groupGet-LocalUser— get local user informationNew-LocalGroup— create a new local groupNew-LocalUser— create userRemove-LocalGroup— remove groupRemove-LocalGroupMember— remove member from groupRemove-LocalUser— remove local userRename-LocalGroup— Rename GroupRename-LocalUser— rename userSet-LocalGroup— change groupSet-LocalUser— change user
Next, we consider several typical tasks for managing local users and groups on a computer with Windows 10 using PowerShell cmdlets that are part of the LocalAccounts module.
7. Managing Local Windows Users with Powershell
List the local Windows users on the computer:
Get-LocalUser
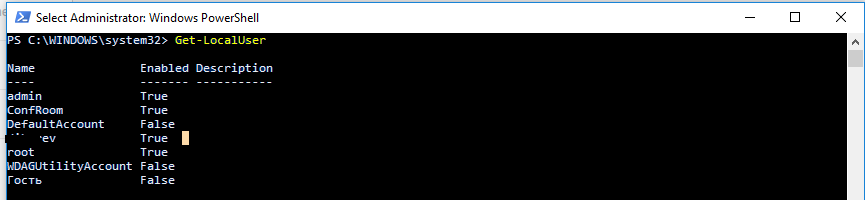
As you can see, there are 7 local accounts on the computer, 3 of which are disabled (Enabled = False).
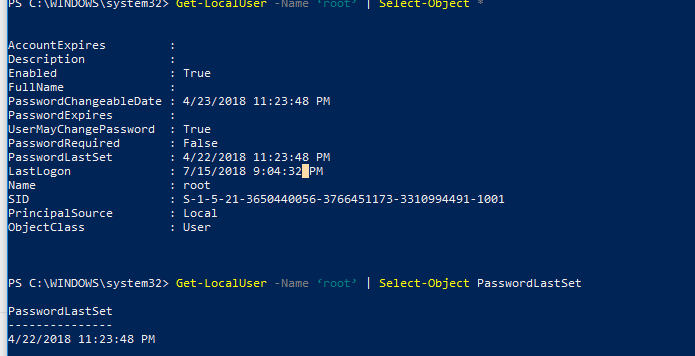
To display all the properties of a specific local account run:
Get-LocalUser -Name ‘root’ | Select-Object *
- AccountExpires :
- Description :
- Enabled : True
- FullName :
- PasswordChangeableDate : 4/23/2018 11:23:48 PM
- PasswordExpires :
- UserMayChangePassword : True
- PasswordRequired : False
- PasswordLastSet : 4/22/2018 11:23:48 PM
- LastLogon : 7/15/2018 9:04:32 PM
- Name : root
- SID : S-1-5-21-3650440056-3766451173-3310994491-1001
- PrincipalSource : Local
- ObjectClass : User
To get a specific user attribute, for example, the last time the password was changed, run:
Get-LocalUser -Name ‘root’ | Select-Object PasswordLastSet
Create a new local user using the New-LocalUser cmdlet. This cmdlet allows you to create the following types of accounts:
- Local Windows Accounts
- Microsoft accounts
- Azure AD accounts
When creating a user account using New-LocalUser, you cannot specify its password as an Open Password argument. Preliminarily, the password must be converted to a safe string by requesting a password online:
$UserPassword = Read-Host –AsSecureString
Or by entering the password directly in the PoSh console:
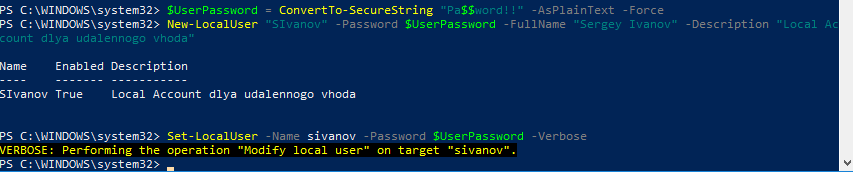
$UserPassword = ConvertTo-SecureString “Pa$$word!!” -AsPlainText -Force
New-LocalUser “SIvanov” -Password $UserPassword -FullName “Sergey Ivanov” -Description “Local Account remote local account”
To create a user in the AD domain, use the New-ADUser cmdlet.
To change the user’s password, use the Set-LocalUser command (we assume that you have already converted the new password to SecureString):
Set-LocalUser -Name sivanov -Password $UserPassword –Verbose
To set the flag “Password never expires” (“Password never expired”), run:
Set-LocalUser -Name sivanov –PasswordNeverExpires $False
As you can see, you do not need to convert the UserAccountControl value, as when managing account properties in AD.
As you remember, you can log in to Windows 10 as Microsoft accounts. If you need to create a new user associated with a Microsoft account, run the following command (note that you do not need to specify an account password, because it is stored in Microsoft).
New-LocalUser -Name “MicrosoftAccount[email protected]” -Description “This is Microsoft account”
To create a local account that is associated with your account in Azure AD (for example, you are using Office 365), run the command:
New-LocalUser -Name “AzureAD[email protected]” -Description “This is AzureAD account”
To remove this local user, run:
Remove-LocalUser -Name sivanov -Verbose
8. Manage Windows Local Groups with Powershell
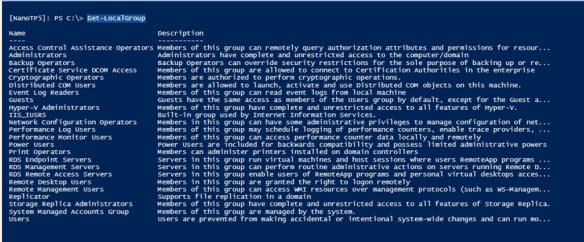
Now we will display a list of local groups on the computer:
Get-LocalGroup
Create a new group:
New-LocalGroup -Name 'RemoteSupport' -Description 'Remote Support Group'
Now we will add several local accounts and a group of local administrators to the new group:
Add-LocalGroupMember -Group 'RemoteSupport' -Member ('SIvanov','root', 'Administrators') –Verbose
If your computer is in a domain, you can add groups and domain accounts or groups to the local group. To do this, they must be specified in the format DomainName user2 or DomainName ’domain admins’.
You can also add a user to groups using the following pipeline (we will add a user to local administrators):
Get-Localuser -Name 'sivanov' | Add-LocalGroupMember -Group 'Administrators'
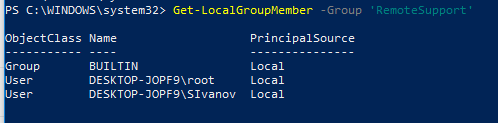
Let’s list the users in the local group:
Get-LocalGroupMember -Group 'RemoteSupport'
As you can see, we use only local accounts (PrincipalSource – Local). However, there may be domain accounts (domain), Microsoft accounts (MicrosoftAccount) and accounts from Azure (AzureAD)
To display the list of groups in which a particular user is a member, you will have to go through all the local groups on the computer:
foreach ($LocalGroup in Get-LocalGroup){if (Get-LocalGroupMember $LocalGroup -Member 'sivanov' –ErrorAction SilentlyContinue){$LocalGroup.Name}}
To remove a user from a group, run:
Remove-LocalGroupMember -Group 'RemoteSupport' –Member 'sivanov'
To manage local users on a remote computer, you must first connect to it via WinRM with Invoke-Command or Enter-PSSession cmdlets.
For example, we need to collect a list of accounts in a local group on remote computers:
$s = new-pssession -computer pc01,pc02,pc03invoke-command -scriptblock {Get-LocalGroupMember -Group 'RemoteSupport'} -session $s -hidecomputername | select * -exclude RunspaceID | out-gridview -title “LocalAdmins”
Consider Using Action1 to Add Local Group Member if:
- You need to perform an action on multiple computers simultaneously.
- You have remote employees with computers not connected to your corporate network.
Action1 is a cloud-based platform for remote IT management and encompasses tools such as patch management, software deployment, remote desktop, software/hardware inventory, endpoint management and endpoint configuration reporting.
When you create a new account, that account is part of a group. If this is the first account after a clean OS installation, then that user account will be part of the Administrators group by default. If this is not the first account, it will be assigned to the Users group.
Regardless of which default groups, you can change which users are part of which groups. There are multiple methods to add them to a group, as well as remove them. Moreover, an account can be part of more than one user group.
This article discusses several methods to add a user account to any user group, and how to remove it as well.
Table of contents
- Local vs Global Users and Groups
- Purpose of User Groups
- How to Add a User Account to a Group
- From the Local Users and Groups/Computer Management Console
- From the Users Folder
- From the Groups Folder
- From Command Prompt
- From Windows PowerShell
- From the Local Users and Groups/Computer Management Console
- Closing Words
Local vs Global Users and Groups
Local Users and Groups are the user accounts and then groups on a local PC whose privileges are only limited to that computer. Whereas Global Users and Groups are user accounts and groups whose rights and privileges are valid through a domain.
Global Users and Groups are created in the Active Directory Users and Computers on a Windows Server, which are defined for the entire domain. A global user account is usually part of a global user group that can be used to sign into any PC as long as it is part of the domain. However, a local user account can only be used to log into the same PC.
But what is the purpose of these groups?
Purpose of User Groups
Groups are used to define and manage the rights and privileges of the user accounts within them. You can add or remove a user account from a group to grant or revoke certain access, implement certain policies, define their roles, etc.
The following categories briefly describe the different types of groups usually created:
- Groups to segregate different departments within an organization.
- Groups to grant limited access to applications and tools.
- Groups to assign certain roles to individual user accounts.
These types of groups are usually global groups that cover the entire organization’s work domain.
However, in the case of local groups, the following groups can be found by default on a Windows 10/11 PC right out of the box:
- Access Control Assistance Operators
- Administrators
- Backup Operators
- Cryptographic Operators
- Device Owners
- Distributed COM Users
- Event Log Readers
- Guests
- Hyper-V Administrators
- IIS_IUSRS
- Network Configuration Operators
- Performance Log Users
- Performance Monitor Users
- Power Users
- Remote Desktop Users
- Remote Management Users
- Replicator
- System Managed Accounts Group
- Users
Each of the local user groups assigned different privileges to the user accounts inside of them.
Let us now discuss how to add a user account to a group.
From the Local Users and Groups/Computer Management Console
Microsoft Management Consoles come preinstalled in Windows to control and manage the different OS components. 2 of these are the Local Users and Groups Console and the Computer Management Console. Both of these can be used to add a user to a group.
Before we proceed, let us inform you that these consoles have a folder where all users are listed, and another folder where the groups are listed. You can add a user account to a group from the users folder as well as through the groups folder.
-
To begin, open either the Local Users and Groups Console or the Computer Management Console by typing either of the following in the Run Command box:
For Local Users and Groups Console:
lusrmgr.msc

Open Local Users and Groups Console For Computer Management Console:
compmgmt.msc

Open Computer Management Console -
Now you must choose whether you want to add a user account to a group from the Users folder or the Groups folder.
-
From the Users Folder
-
Navigate to the following:
From Local Users and Groups:
Users
From Computer Management:
Local Users and Groups >> Users
-
Here, double-click on the user account that you want to add to a group from the middle pane.

Open user from Users folder -
From the Popup Properties window, switch to the Member of tab, then click Add.
Add to group -
In the popup, type in the name of the user group and then click Check names.
Check names -
You will now see the Fully Qualified Domain Name (FQDN) of the user account. Once confirmed, click OK.
Confirm complete group name -
Back in the Properties window, you will see that the user account is now a member of the new group. Click Apply and OK.
Apply changes
The account has been added to a group successfully.
If you wish to remove this account from the group, simply click on the group in the Member of tab in the Properties window, then click Remove, and apply the changes.
Remove account from group -
-
From the Groups Folder
-
Navigate to the following:
From Local Users and Groups:
Groups
From Computer Management:
Local Users and Groups >> Groups
-
Here, double-click on the group you want to add the user to from the middle pane.
Open group from Groups folder -
From the Popup Properties window, click Add.
Add new user -
Now enter the name of the user account you want to add and click Check names.
Check name of account -
You will now see the FQDN of the account. Click Ok.
Confirm account name -
Now back in the Properties window, you will see that the user account has been added to the group. Click Apply and Ok to save the changes
Apply changes
The account will now be added to the group.
If you wish to remove an account, simply select the account and click Remove, then apply the changes.
Remove account from group -
-


From Command Prompt
If you prefer the Command Line Interface (CLI), here are the steps to add a user account to a group in Windows:
-
Open Command Prompt with elevated privileges.
-
Now use the following cmdlet to add a user account to a group while replacing Group and User with the name of the group you want to add the user to, and the user account name you want to add, respectively.
net localgroup "Group" "User" /add
User added successfully

The user will now be added to the stated group.
You can also remove a user account from the group using the Command Prompt. Simply use the following cmdlet to do so while replacing Group and User as when adding the account to the group:
net localgroup "Group" "User" /delete
From Windows PowerShell
Perform these steps to add a user account to a group using Windows PowerShell:
-
Launch PowerShell with administrative rights.
-
Now use the following cmdlet to add a user account to a group while replacing “Group” and “User” with the name of the group you want to add the user to, and the user account name you want to add, respectively.
Add-LocalGroupMember -Group "Group" -Member "User"
User added successfully

The user will now be added to the stated group.
You can also remove a user account from the group using PowerShell. Simply use the following cmdlet to do so while replacing “Group” and “User” as when adding the account to the group:
Remove-LocalGroupMember -Group "Group" -Member "User"
Closing Words
As we already mentioned, the groups define what roles and privileges each user within has. Groups can control whether a user is allowed access to any specific apps or tools, whether they are allowed to initiate Remote Desktop protocols, which shared folders they have access to and which are blocked, etc.
Therefore, regardless if a user account is local or global, we suggest that you add them to groups very carefully, and do not give them permissions more than they desire.
Also see:
Subhan Zafar is an established IT professional with interests in Windows and Server infrastructure testing and research, and is currently working with Itechtics as a research consultant. He has studied Electrical Engineering and is also certified by Huawei (HCNA & HCNP Routing and Switching).
NET LOCALGROUP — управление локальными группами компьютера
Команда NET LOCALGROUP преназначена для добавления, отображения и изменения локальных групп компьютера в операционной системе Windows. Ввод команды NET LOCALGROUP без параметров выводит имя сервера и имена локальных групп компьютера.
Для управления учетными записями пользователей используется команда NET USER, а для управления учетныеми данными пользователей NET ACCOUNTS.
Синтакис команды NET LOCALGROUP
net localgroup [имя_группы [/comment:»текст»]] [/domain]
net localgroup [имя_группы {/add [/comment:»текст»] | /delete} [/domain]]
net localgroup [имя_группы имя [ …] {/add | /delete} [/domain]], где
- имя_группы — Имя локальной группы для добавления, удаления или раскрытия. При запуске команды net localgroup имя_группы без дополнительных параметров выводится список пользователей или глобальных групп, входящих в локальную группу.
- /comment:»текст» — Добавление комментария для новой или существующей группы. Длина комментария может составлять до 48 знаков. Текст следует заключать в кавычки.
- /domain — Выполнении операции на основном контроллере текущего домена. В противном случае операция осуществляется на локальном компьютере.
- имя [ …] — Список из одного или нескольких имен пользователей или групп для добавления или удаления из локальной группы.
- /add — Добавление глобальной группы или пользователя в локальную группу. Для пользователей или глобальных групп группы, добавляемых в локальную группу, должны иметься учетные записи.
- /delete — Удаление группы или пользователя из локальной группы.
- net help localgroup — Отображение справки для указанной команды net.
Примеры команды NET LOCALGROUP
- Чтобы вывести список всех локальных групп на локальном сервере, введите: net localgroup;
- Чтобы добавить локальную группу «Group1» в локальную базу учетных записей пользователей, введите: net localgroup Group1 /add;
- Чтобы добавить локальную группу «Group1» в базу учетных записей пользователей домена, введите: net localgroup Group1 /add /domain;
- Чтобы добавить учетные записи существующих пользователей «User1», «User2» и «User3» в группу «Group1» домена, введите: net localgroup Group1 User1 User2 Use3 /add /domain;
- Чтобы вывести список пользователей локальной группы «Group1», введите: net localgroup Group1;
- Чтобы добавить комментарий к локальной группе «Group1», введите: net localgroup Group1 /comment:»Руководящий персонал».
Видео — Работа с утилитой NET LOCALGROUP
На чтение 6 мин. Просмотров 1.5k. Опубликовано 18.01.2021
Windows предоставляет утилиты командной строки для управления группами пользователей. В этом посте вы узнаете, как использовать команду net localgroup для добавления пользователя в группу из командной строки ‘
Содержание
- Добавить пользователя в группу
- Еще несколько примеров:
- Добавить или удалить пользователя из группы в Windows 10
- Добавить пользователей в группу с помощью инструмента NET
- Добавьте пользователей в группу с помощью PowerShell
Добавить пользователя в группу
Выполните следующие шаги –
- Откройте командную строку с повышенными привилегиями
- Выполните следующую команду
net localgroup group_name UserLoginName/ add
Например, чтобы добавить пользователя John в группу администраторов, мы можем выполнить следующую команду.
net localgroup administrators John/add
Еще несколько примеров:
Чтобы добавить пользователя домена в группу локальных пользователей:
net localgroup users имя домена имя пользователя /add
Эту команду следует запускать, когда компьютер подключен к сети. В противном случае вы получите ошибку, указанную ниже.
H: > net localgroup users domain user/addSystem error 1789. Произошла ошибка доверия между этой рабочей станцией и сбой основного домена.
Чтобы добавить пользователя домена в группу локальных администраторов:
net localgroup administrators имя домена имя пользователя/добавить
Чтобы добавить пользователя в группу пользователи удаленного рабочего стола :
net localgroup "Пользователи удаленного рабочего стола" UserLoginName/add
Чтобы добавить пользователь в группу пользователей отладчика :
net localgroup "Пользователи отладчика" UserLoginName/add
Чтобы добавить пользователя в группу Опытные пользователи :
net localgroup "Опытные пользователи" UserLoginName/add
Эта команда работает во всех выпусках ОС Windows, т.е. Windows 2000, Windows XP, Windows Server 2003, Windows Vista и Windows 7 . В Vista и Windows 7, даже если вы запустите указанную выше команду из входа администратора, вы все равно можете получить ошибку отказа в доступе, как показано ниже.
C: > net localgroup administrators произошла ошибка techblogger/addSystem 5. В доступе отказано.
Решением для этого является запуск команды из учетной записи администратора с повышенными правами. См. Раздел Как открыть командную строку администратора с повышенными привилегиями
При запуске команды ‘ net localgroup’ из командной строки с повышенными привилегиями:
C : > net localgroup administrators techblogger/addКоманда успешно завершена.
Чтобы вывести список пользователей, принадлежащих к определенной группе, мы можем выполнить следующую команду.
net localgroup group_name
Например, чтобы вывести список всех пользователей, принадлежащих к группе администраторов, нам нужно выполнить следующую команду.
net localgroup administrators
Похожие сообщения :
Добавить новую учетную запись пользователя
Удалить учетную запись пользователя
Добавить или удалить пользователя из группы в Windows 10
1 ответ
‘);
В Windows 10 вы можете добавить или удалить учетную запись пользователя из группа, чтобы предоставить или отозвать доступ к определенным функциям Windows, папкам файловой системы, общим объектам и т. д.. Есть несколько способов сделать это. Давайте рассмотрим их.
Реклама
Групповые учетные записи используются для управления привилегиями для нескольких пользователей. Учетные записи глобальной группы для использования в домене создаются в Active Directory – пользователи и компьютеры , в то время как учетные записи локальных групп для использования в локальной системе создаются в Локальные пользователи и группы . Как правило, групповые учетные записи создаются для облегчения управления подобными типами пользователей. Типы групп, которые могут быть созданы, включают следующие:
- Группы для отделов внутри организации: как правило, пользователи, которые работают в одной отделу нужен доступ к аналогичным ресурсам. Благодаря этому можно создавать группы, организованные по отделам, например по развитию бизнеса, продажам, маркетингу или проектированию.
- Группы для пользователей определенных приложений: Часто пользователям требуется доступ к приложению и ресурсам, связанным с приложением. Группы для конкретных приложений могут быть созданы, чтобы пользователи получали надлежащий доступ к необходимым ресурсам и файлам приложений.
- Группы для ролей в организации: группы также могут быть организована ролью пользователя в организации. Например, руководителям, вероятно, нужен доступ к другим ресурсам, чем руководителям и обычным пользователям. Таким образом, создавая группы на основе ролей внутри организации, пользователям, которым он нужен, предоставляется надлежащий доступ.
Локальная группа пользователей создается локально. Это группы, которые вы можете использовать непосредственно на компьютере с Windows 10, не добавляя компьютер в домен Active Directory. Вот список групп, обычно доступных в Windows 10.
- Администраторы
- Операторы резервного копирования
- Операторы криптографии
- Пользователи распределенного COM
- Читатели журнала событий
- Гости
- IIS_IUSRS
- Операторы конфигурации сети
- Пользователи журнала производительности
- Пользователи монитора производительности
- Опытные пользователи
- Пользователи удаленного рабочего стола
- Replicator
- Пользователи
Чтобы добавить учетную запись пользователя в локальную группу в Windows 10 вы можете использовать либо MMC, консольный инструмент net.exe , либо PowerShell. Давайте посмотрим, как это можно сделать.
Чтобы добавить пользователей в группу в Windows 10 , выполните следующие действия.
- Нажмите сочетания клавиш Win + R на клавиатуре и введите следующее в поле выполнения:
lusrmgr.msc
 Откроется приложение “Локальные пользователи и группы”.
 - Нажмите “Группы” слева.
- Дважды щелкните группу, в которую вы хотите добавить пользователей. список групп.
- Нажмите кнопку «Добавить», чтобы добавить одного или нескольких пользователей..
- Или же вы можете щелкнуть папку Users слева.
- Дважды щелкните учетную запись пользователя справа.
- Перейдите на вкладку Член и щелкните Добавить кнопку, чтобы выбрать группу, в которую вы хотите добавить учетную запись пользователя.
 Откроется приложение “Локальные пользователи и группы”.


Примечание: Вы можете использовать оснастку «Локальные пользователи и группы», если ваша версия Windows поставляется с этим приложением. В противном случае вы можете использовать один из методов, описанных ниже.
Добавить пользователей в группу с помощью инструмента NET
- Откройте командную строку с повышенными привилегиями.
- Введите следующую команду:
net localgroup "Group" "User"/add
Замените часть группы фактическим именем группы. Укажите желаемую учетную запись пользователя вместо части «Пользователь». Например,
- Чтобы удалить пользователя из группы, выполните следующую команду:
net localgroup "Group" "User"/delete
См. следующий снимок экрана:


Добавьте пользователей в группу с помощью PowerShell
- Откройте PowerShell от имени администратора. Совет: вы можете добавить контекстное меню «Открыть PowerShell от имени администратора».
- Введите или скопируйте и вставьте следующую команду:
Add-LocalGroupMember -Group "Group" -Member "User"
Замените часть «Группа» фактическим именем группы. Укажите желаемую учетную запись пользователя вместо части «Пользователь».
- Чтобы удалить учетной записи пользователя из группы, используйте командлет Remove-LocalGroupMember следующим образом:
Remove-LocalGroupMember -Group "Group" -Member "User"


Командлет Add-LocalGroupMember добавляет пользователей или группы в местная группа безопасности. Все права и разрешения, назначенные группе, назначаются всем членам этой группы.
Командлет Remove-LocalGroupMember удаляет участников из локальной группы.
Вот и все.