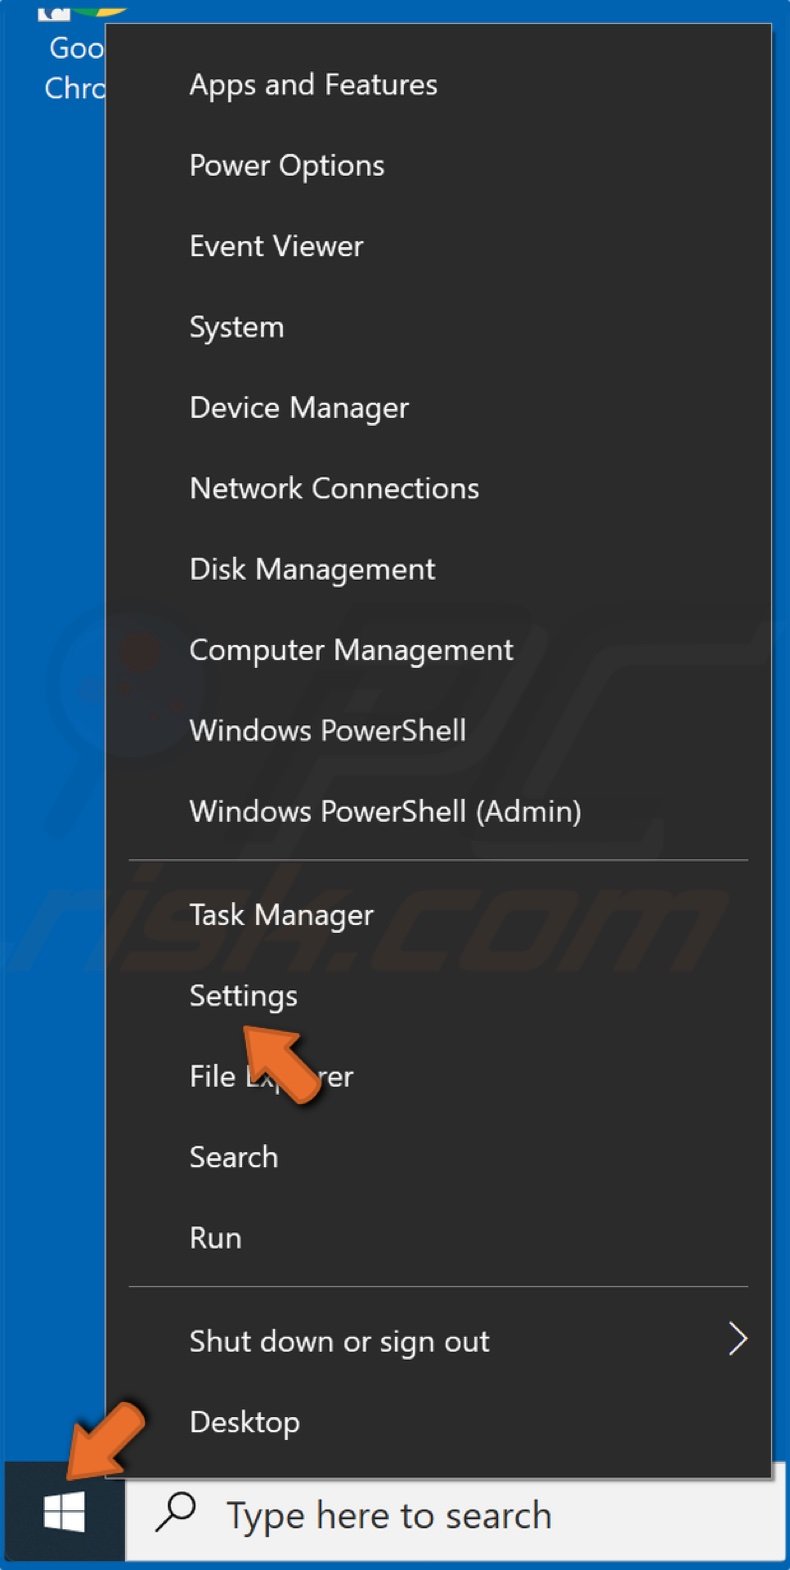
The simplest solution is to change the permissions
by Vladimir Popescu
Being an artist his entire life while also playing handball at a professional level, Vladimir has also developed a passion for all things computer-related. With an innate fascination… read more
Updated on December 16, 2022
Reviewed by
Vlad Turiceanu

Passionate about technology, Windows, and everything that has a power button, he spent most of his time developing new skills and learning more about the tech world. Coming… read more
- This problem often occurs after installing Windows 10 updates and sometimes because of account permissions.
- The simplest solution is to change the permissions, since most of the time, some changes in permissions can make a folder read-only.
- Note that your virus and threat settings may also trigger this issue in the Windows OS.
XINSTALL BY CLICKING THE DOWNLOAD FILE
- Download Restoro PC Repair Tool that comes with Patented Technologies (patent available here).
- Click Start Scan to find Windows 10 issues that could be causing PC problems.
- Click Repair All to fix issues affecting your computer’s security and performance
- Restoro has been downloaded by 0 readers this month.
You have found this article because your folder reverts to read-only constantly; here is all you should know.
Windows keep file and folder attributes in the file system. They are stored in the respective location with the file and folder name, extension, date and time stamp, and other information.
If you right-click on any given time on a folder and go to its proprieties, you’ll see a Read-Only check mark.
Many users reported that the folder reverts to the Read-Only status after they clear the check mark.
This problem occurs after installing Windows 10 updates, sometimes because of account permissions.
Why have all my files changed to read-only?
If your folder constantly reverses to read-only, there could be a few factors responsible, including:
- A recent OS upgrade – This can happen due to your system’s recent update to Windows 10 since your account rights may have been changed.
- Your account permissions – Without your knowledge, the problem may sometimes be caused by nothing more complicated than your account permissions, which is the most frequent reason.

NOTE
A shared folder keeps resetting to read-only.
Speaking about updates, shared folders are more prone to be impacted by this erratic behavior than others.
Thus, if a shared folder keeps resetting to read-only after installing a Windows update, you might want to revert that problematic file.
In addition, running SFC and DISM scans to ensure you address any potential signs of corruption can prove very useful.
An issue like this is very annoying and must be dealt with. Many users wonder: How do I stop a folder from being read-only?
The simplest solution is to change the permissions. Most of the time, some changes in permissions can make a folder read-only.
Additionally, you can log in as an administrator or change the attribute of the folders. For more info on how to do that, check the steps below.
Some PC issues are hard to tackle, especially when it comes to corrupted repositories or missing Windows files. If you are having troubles fixing an error, your system may be partially broken.
We recommend installing Restoro, a tool that will scan your machine and identify what the fault is.
Click here to download and start repairing.
Moreover, here are some error variations that you may encounter, but nonetheless, fix with the solutions below:
- Windows read-only folder cannot be changed
- Windows 10 read-only attribute keeps coming back
- Uncheck read-only but comes back
- Unset read only not working
- Folder keeps reverting to read-only Windows 10, Windows 11, Windows 7
- Folder keeps reverting to read-only Windows server 2016, 2012
- This folder is read-only, you cannot select it
- All folders are read-only
Without further ado, let’s jump right into the list of solutions!
How do I get my folder out of read-only mode?
- Why have all my files changed to read-only?
- How do I get my folder out of read-only mode?
- 1. Change permissions
- 1.1 For single users on the PC
- 1.2 For multiple users on the PC
- 2. Change the attributes
- 3. Disable controlled access
- How do I reset permissions in Windows 10?
1. Change permissions
1.1 For single users on the PC
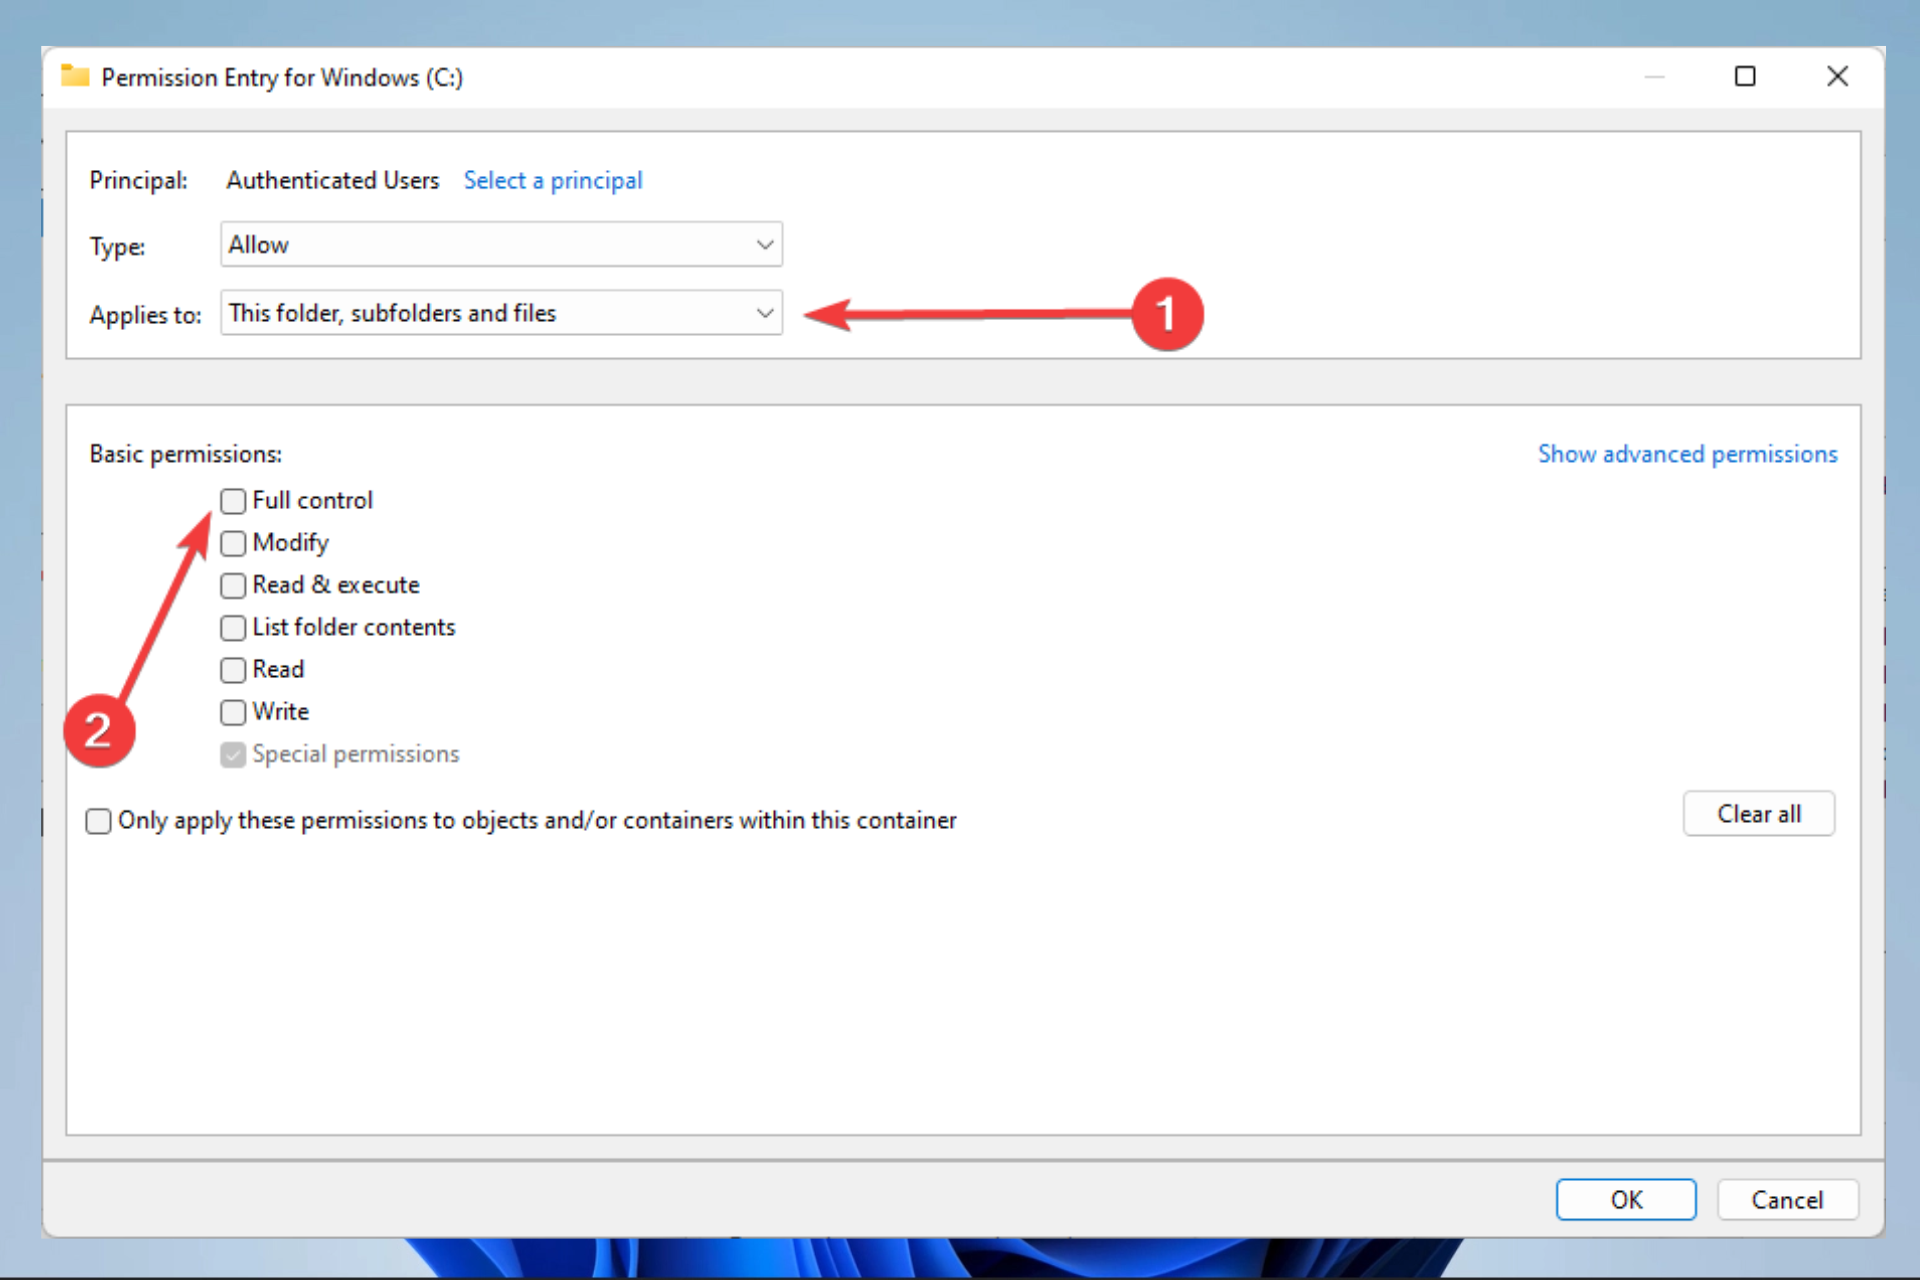
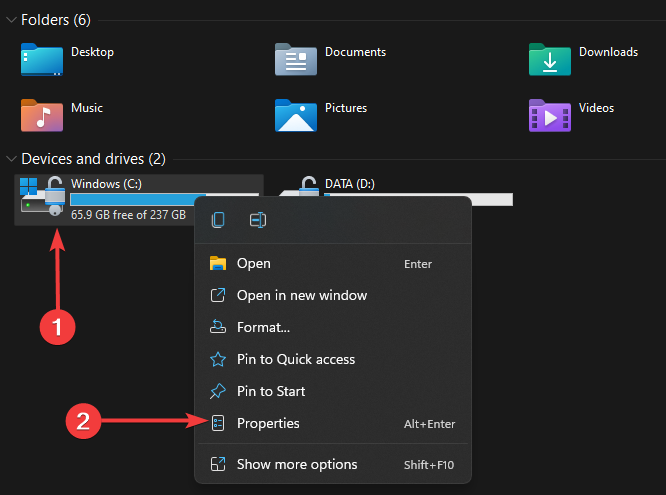
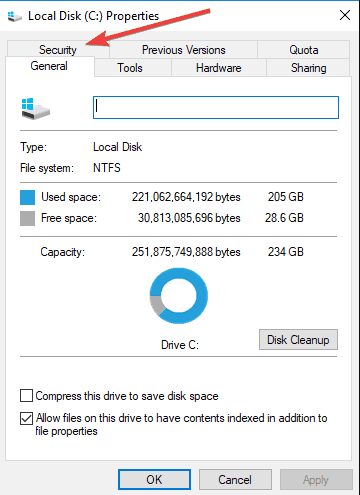
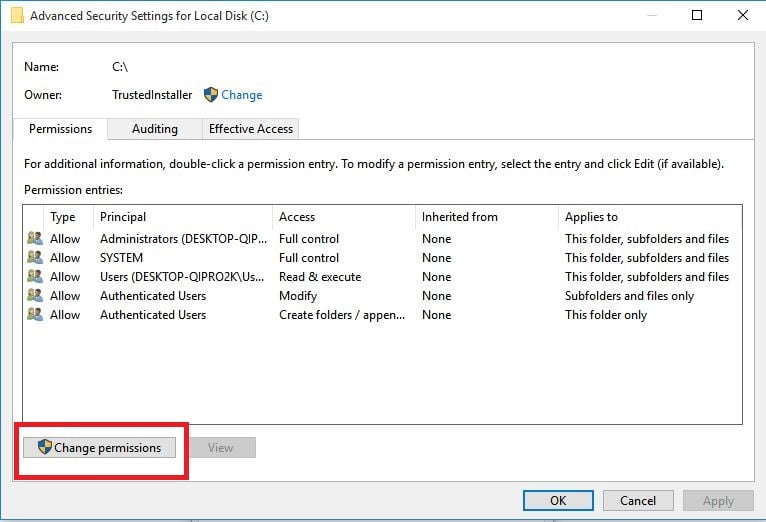
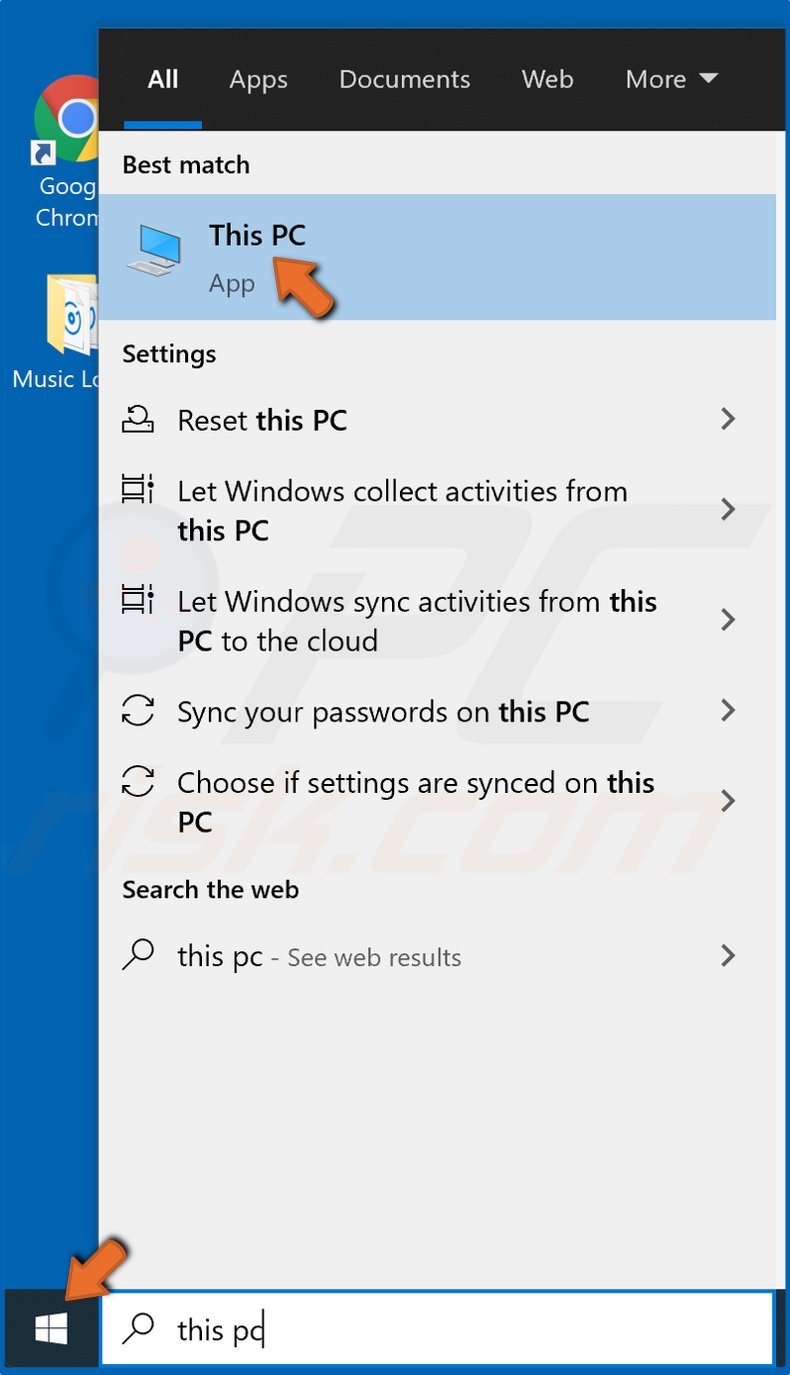
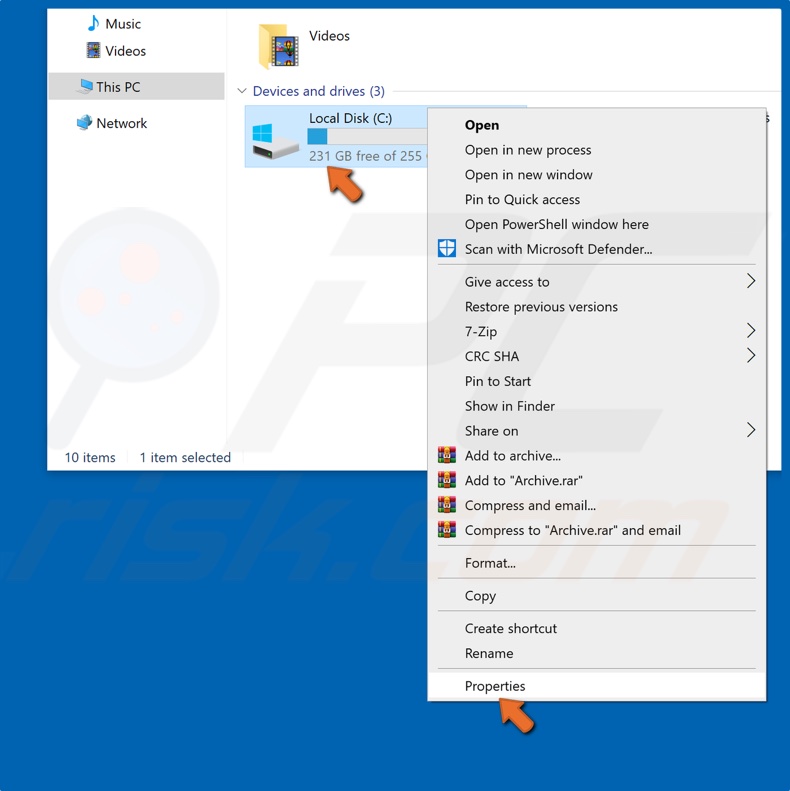
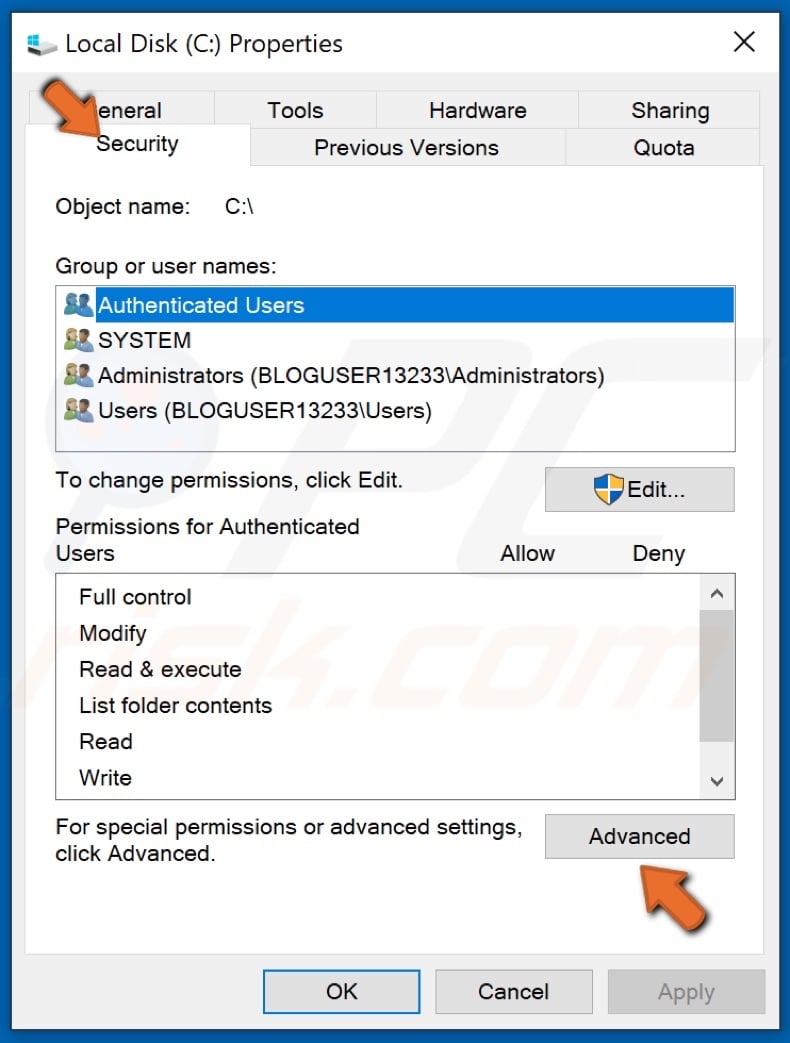
- Find your C Drive, right-click it, and then choose Properties.

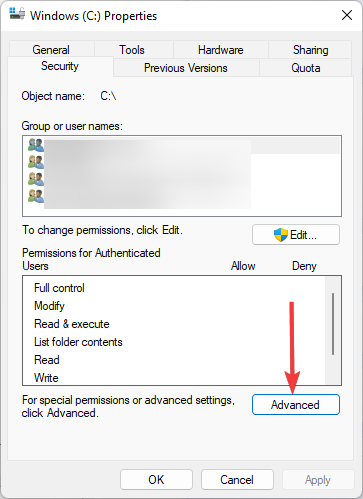
- A new window will appear; click on the Security tab.

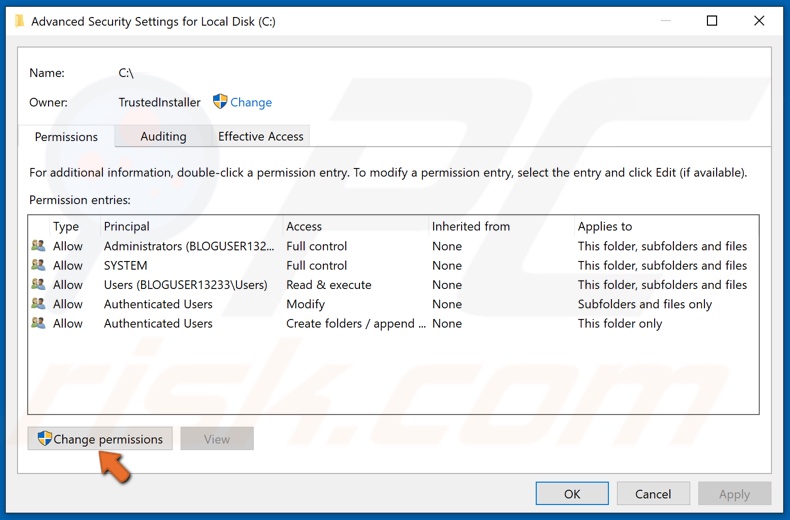
- In the bottom right, click Advanced.

- Then, click on Change permissions.

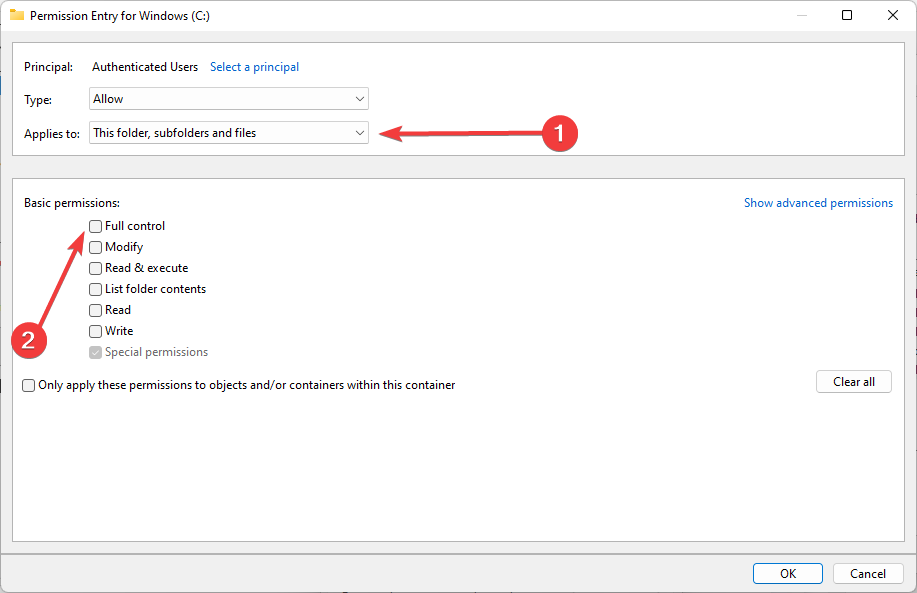
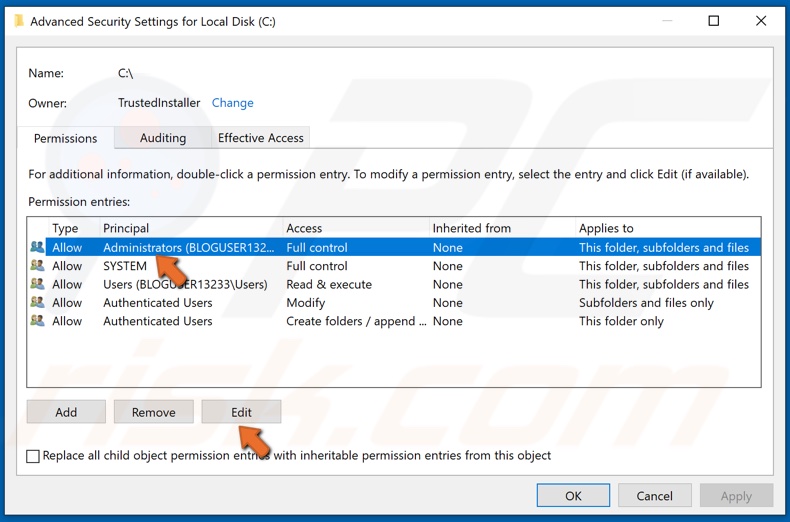
- Choose the user that interests you, and then click Edit.

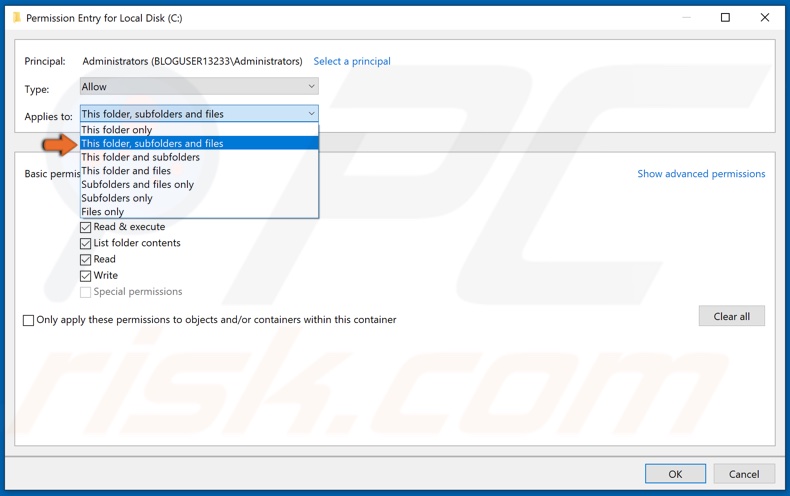
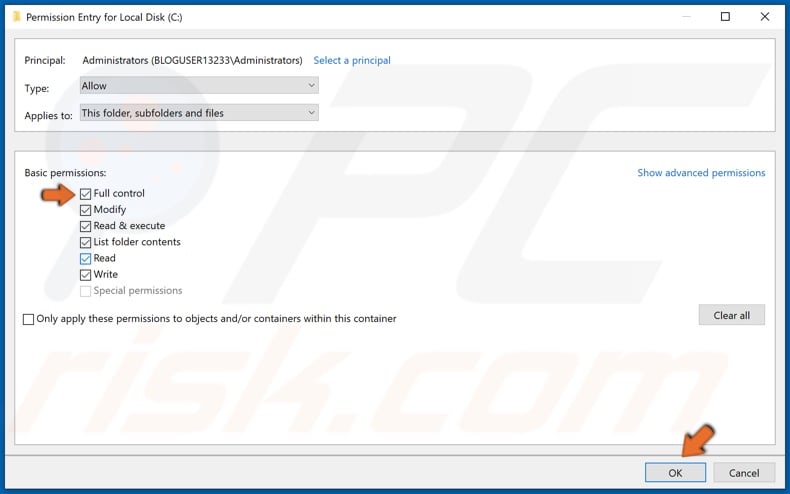
- Under Applies to: drop-menu, choose This folder, subfolders and files, then under Basic permissions, check Full control and click OK.

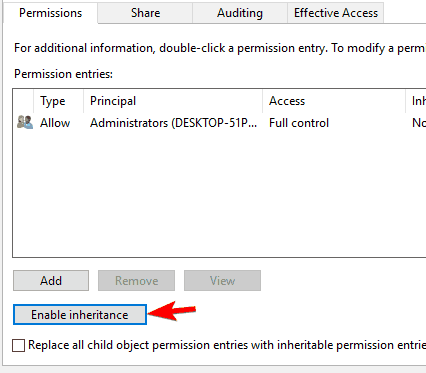
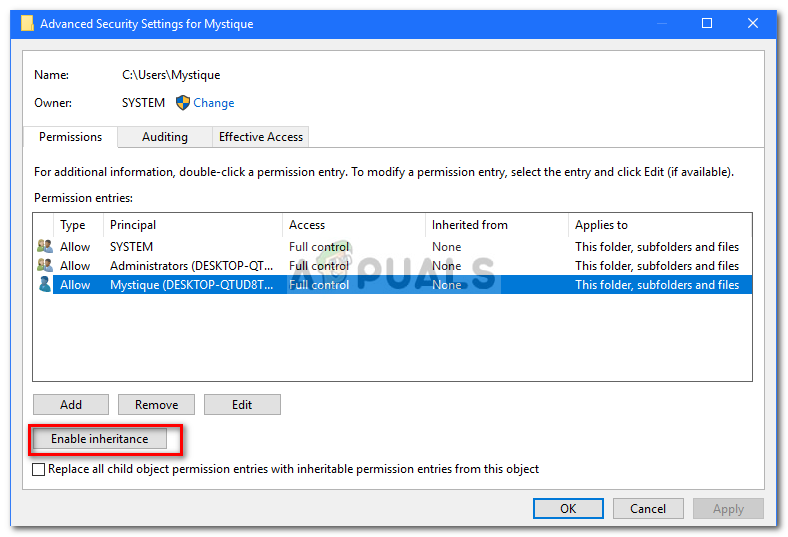
1.2 For multiple users on the PC
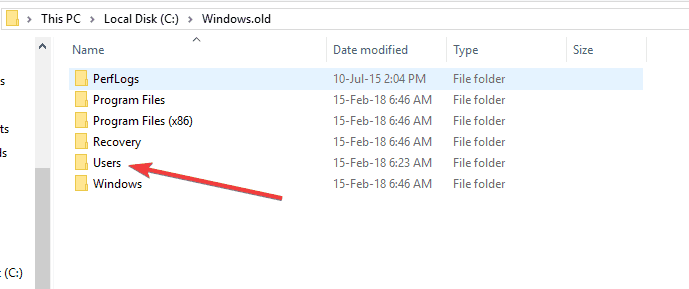
- Find your C Drive and double-click on it.
- You will see a Users folder, double-click on it.

- Now you should see your user name, right-click it and choose Proprieties.
- Go to the Security tab, and in the bottom-right, click Advanced.

- In the new window, at the bottom-left should see an Enable inheritance button. Click it.


After changing the permissions, the issue should be gone; if you still have problems, go to the next solution.
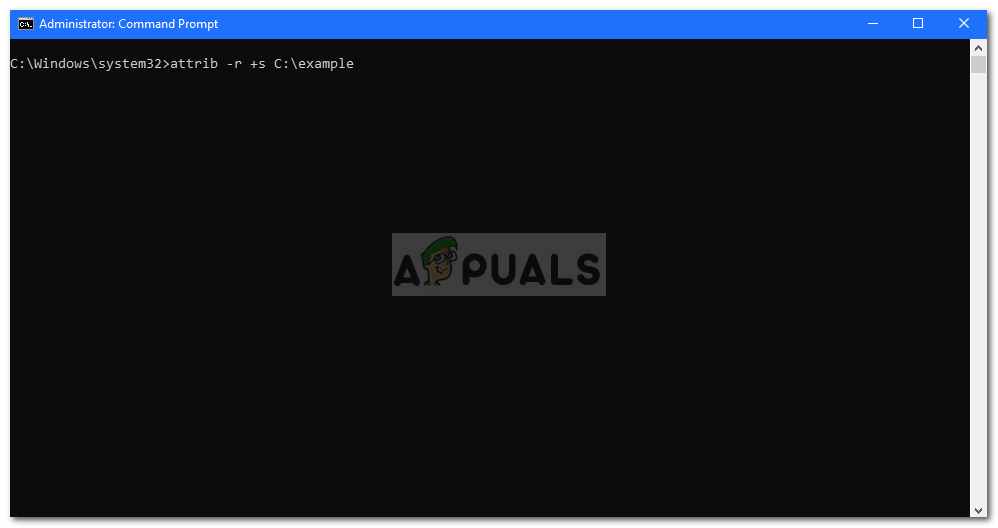
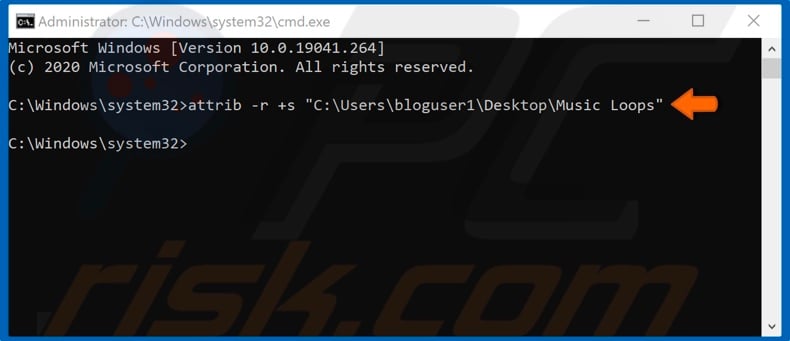
2. Change the attributes
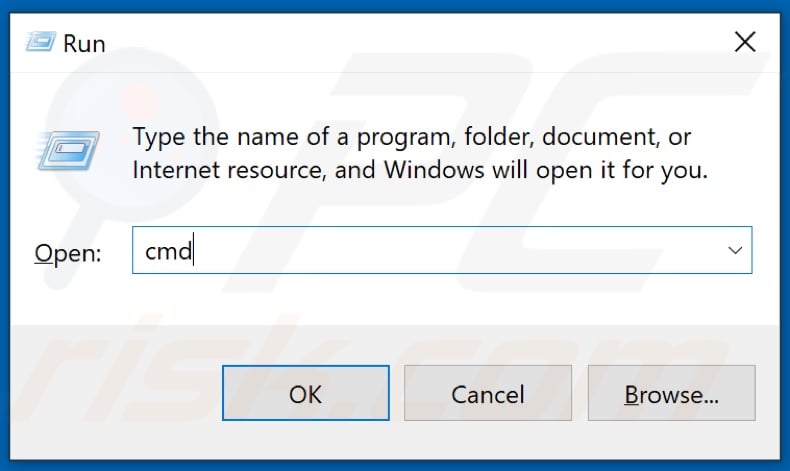
- In the Windows search box, type cmd, right-click the result, and choose Run as administrator.

- Type in the following command to remove the Read-only attribute and set the System attribute.
attrib -r +s drive:<path><foldername> - Customize folders as some programs may not operate correctly with folders that have these attributes. To remove them, type the command below.
attrib -r -s c:<foldername>

A program can’t save files or make changes if a particular folder has the Read-only attribute.
Keep in mind that removing the Read-only or the System attribute of a folder can cause some customization loss. Still, it’s not particularly important unless you have something specific in mind.
- Unable to display current owner on Windows 10/11
- File is open in another program error [Full Guide]
- Fix disappearing files and folders in Windows 10/11
- You don’t have permission to save in this location
- Fix: Exception Access Violation Error on Windows 10/11
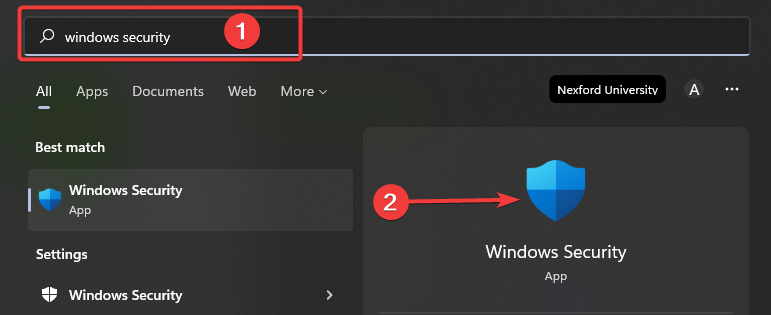
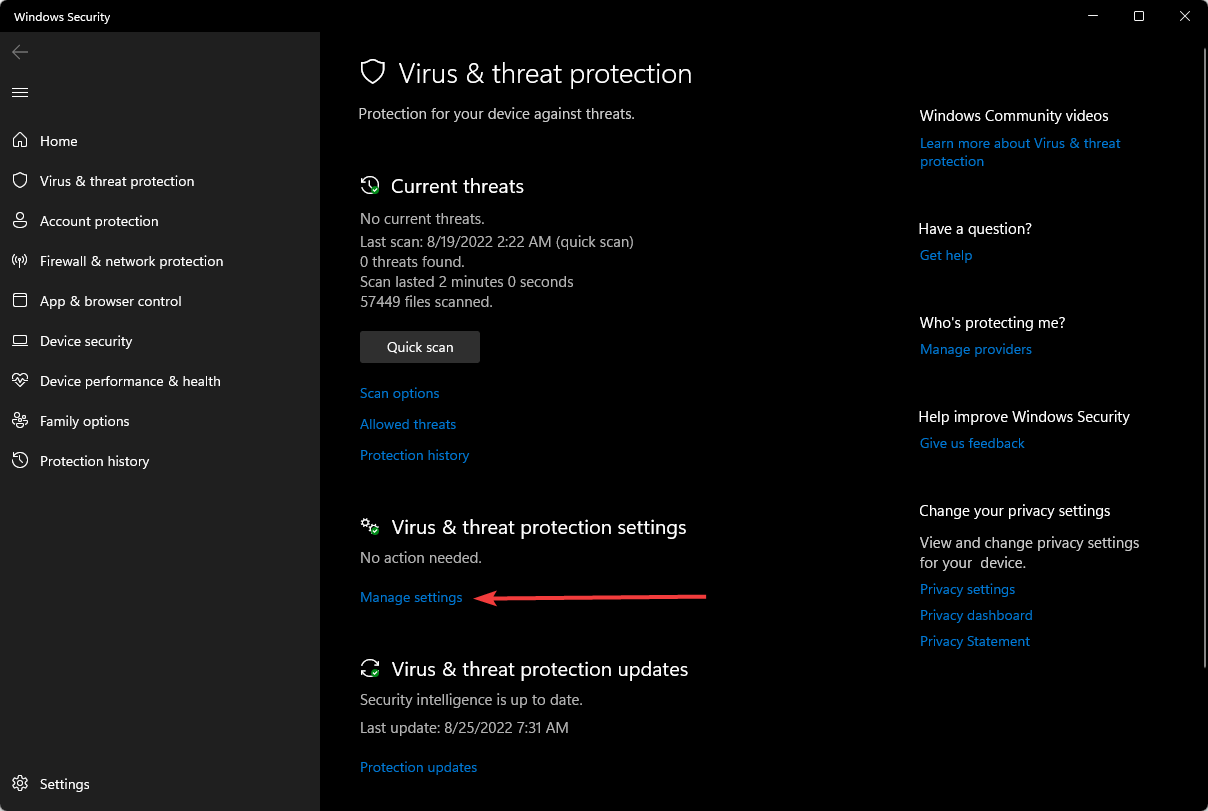
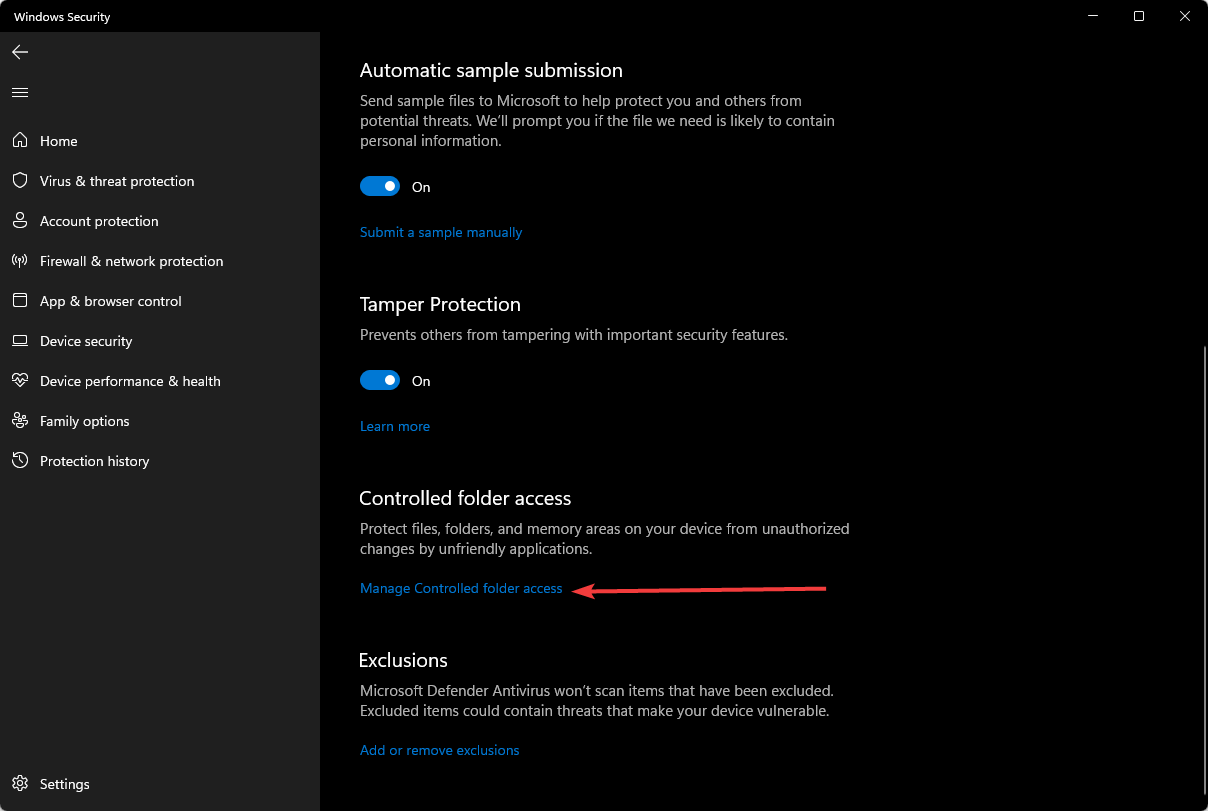
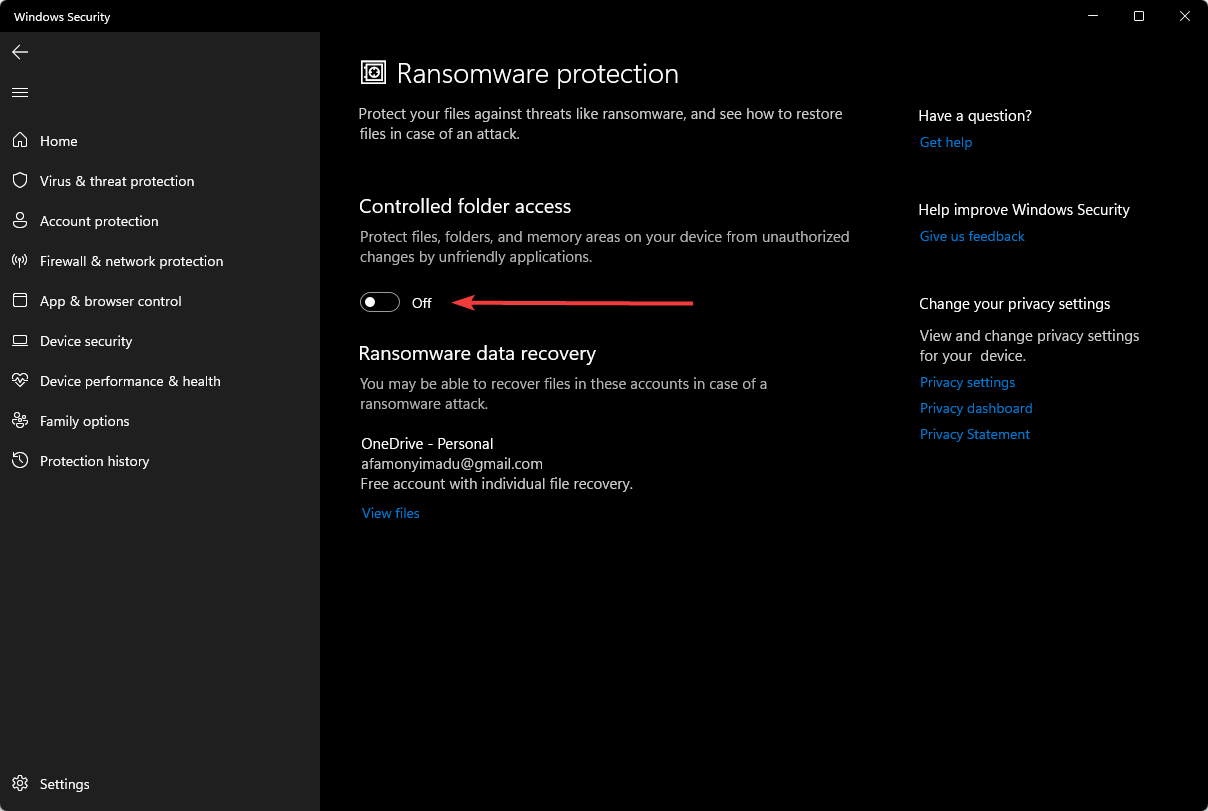
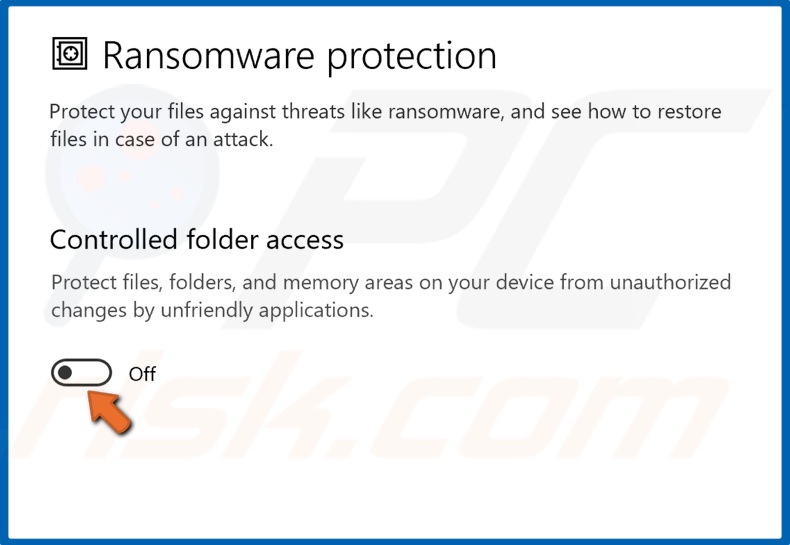
3. Disable controlled access
- Open the Search menu, type windows security, then click on the Windows Security app.

- On the left pane, click on Manage Settings.

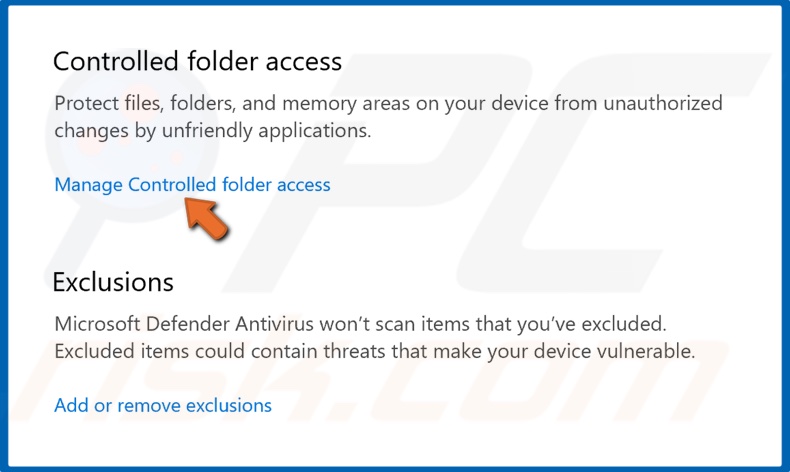
- Scroll down and click on Manage Controlled folder access.
- Finally, turn off Controlled folder access.
How do I reset permissions in Windows 10?
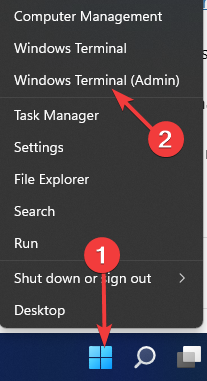
- Right-click on the Start menu and select Windows Terminal (Admin).

- Type in the script below and hit
Enter. Replacing the full path to your file with the file path.icacls full path to your file /reset - Check that the file permission is reset.
In our guide, you can learn more about resetting external drive permission issues in Windows 10.
If you are still experiencing issues with permission to open files, this guide may help you fix the problem.
We hope these solutions worked for you, as many other Windows 10 users confirmed them. Also, note that the issue is not unique to Windows 10, and users have noticed that the folder keeps reverting to read-only in Windows Server 2012.
Don’t forget to leave any other questions you may have in the comments section below, and we’ll be sure to take a look.
Still having issues? Fix them with this tool:
SPONSORED
If the advices above haven’t solved your issue, your PC may experience deeper Windows problems. We recommend downloading this PC Repair tool (rated Great on TrustPilot.com) to easily address them. After installation, simply click the Start Scan button and then press on Repair All.
![]()
Newsletter
If your folder keeps reverting to read-only it could be due to a recent Windows 10 upgrade. Many users have reported that when upgrading their system to Windows 10, they encountered this error. Read-only is a file/folder attribute that lets only a specific group of users read or edit the files or folder. This can get infuriating, however, the fix is quite simple and easy but may differ depending on the scenario that caused it.
Generally, when you encounter such an issue, you can easily overcome it by unchecking the read-only attribute box found in the properties of the file/folder. However, this case is not that simple. You won’t be able to change the read-only attribute of the file/folder which gets annoying. Nevertheless, this article will teach you how to access your files/folders again — just follow through with the instructions.

What causes the folder to revert to read-only on Windows 10?
This might be happening to you due to various reasons, nonetheless, the most generic ones are —
- Windows upgrade. If you’ve recently upgraded your system to Windows 10, this might be occurring due to that as your account permissions may have been altered.
- Account permissions. Sometimes, the error could be simply because of your account permissions which is the most common cause without you realizing it.
The possible and effective solutions for this problem are: –
Disable Controlled Access
Before we try other technical solutions, we will first try to disable the Controlled Folder Access in your settings. This is a hotfix and you may proceed with other solutions if this doesn’t work for you.
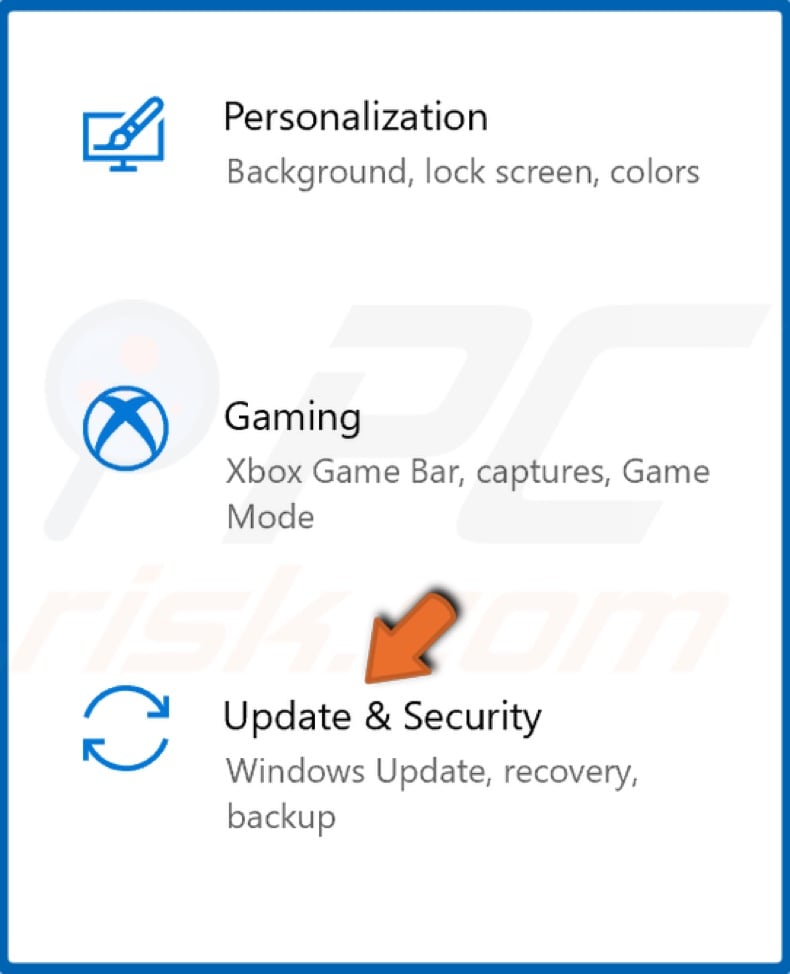
- Press and hold the “Windows Key + I” button to launch Windows Settings.
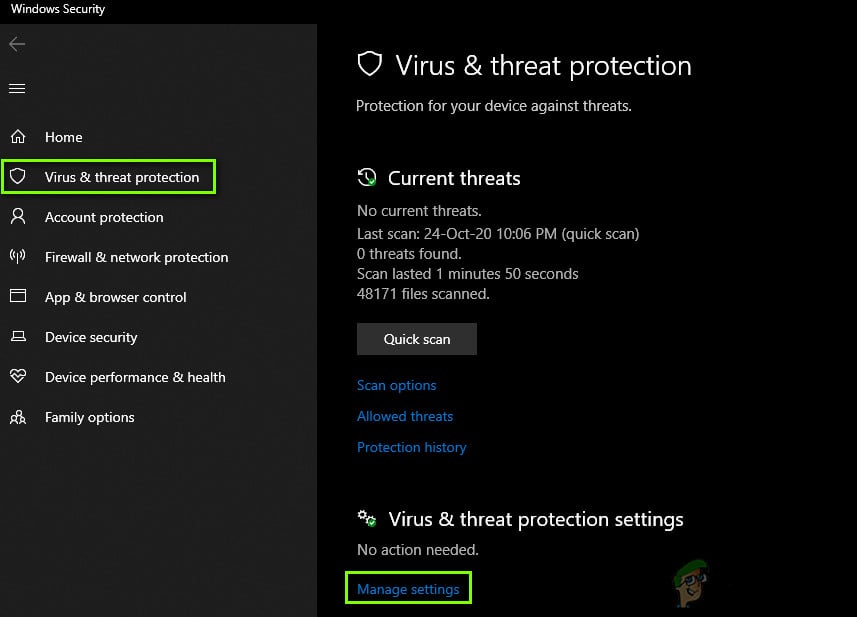
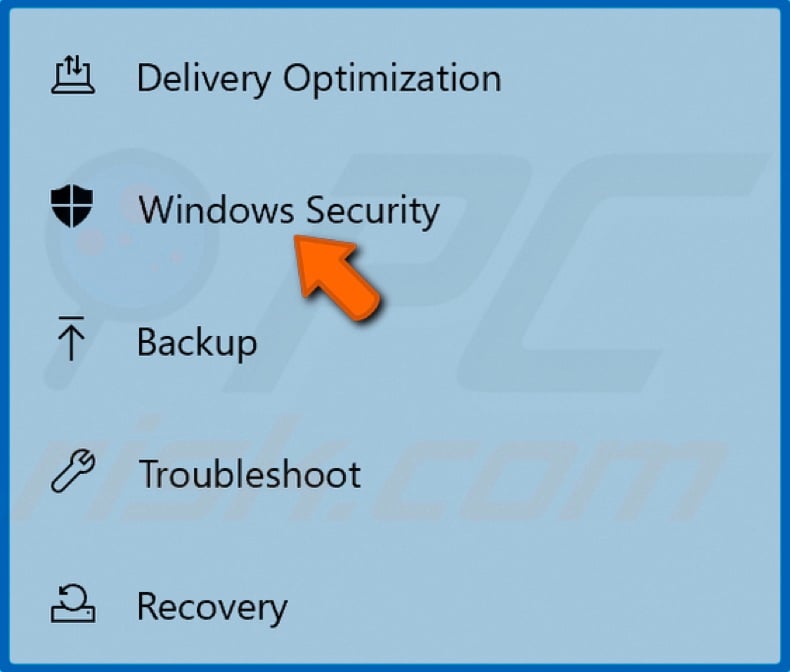
- Once the Settings are opened, navigate to Update & Security and then click on Windows Security.
- Now, under the Virus & threat protection settings, click on Manage settings.

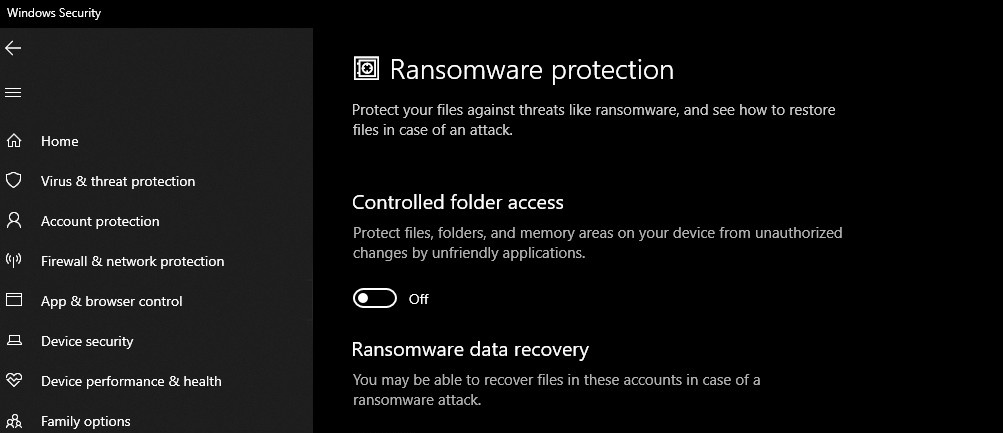
Virus & threat protection settings - Under Controlled folder access, select Manage Controlled folder access and switch the access to Off.

Manage Controlled folder access to Off - Restart your computer completely and then check if the issue is resolved.
Log in as an Administrator
To start with the common mistake, if you have created multiple accounts on your system, make sure you are signed in as an administrator while accessing the file. The reason you are not able to read or edit the file/folder could be that the file/folder was created using an administrator account and you are trying to access it using a guest account or any other. Hence, before you move into the solutions mentioned below, make sure you are using the administrative account.
Change the Attribute of the Folder
If you are logged in as an administrator and still unable to access the files, then in such a case, you’ll have to change the attribute of the file using the command prompt. To do this, follow the given instructions:
- Press Winkey + X and select Command Prompt (Admin) from the list.
- To remove the read-only attribute and set a new attribute, use the following command:

Enter the command to remove Read-only Attribute
attrib -r +s drive:<path><foldername>
- The above command will remove the read-only attribute of the file and change it to a system attribute. However, some files/folders do not operate properly in the system attribute so use the following command if you want to remove the system attribute:
attrib -r -s drive:<path><foldername
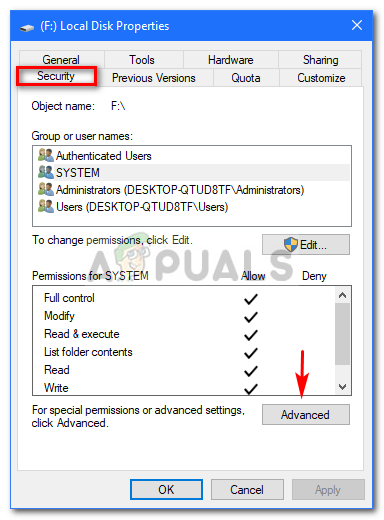
Change Permissions of the Drive
If you are facing this issue after upgrading your system to Windows 10, then changing the permissions of the drive could fix your problem. There have been several reports according to which the issue has been solved via this method. Here’s how to do it:
- Right-click on the drive where your files/folders are located.
- Select Properties.
- Navigate to the Security tab.

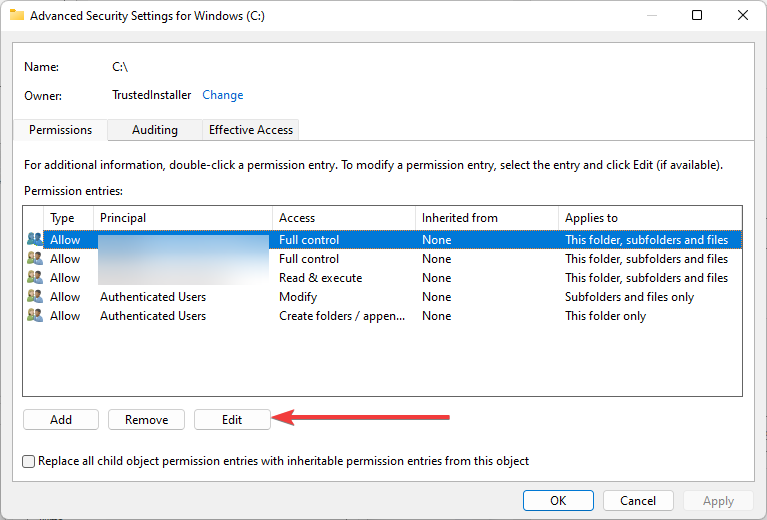
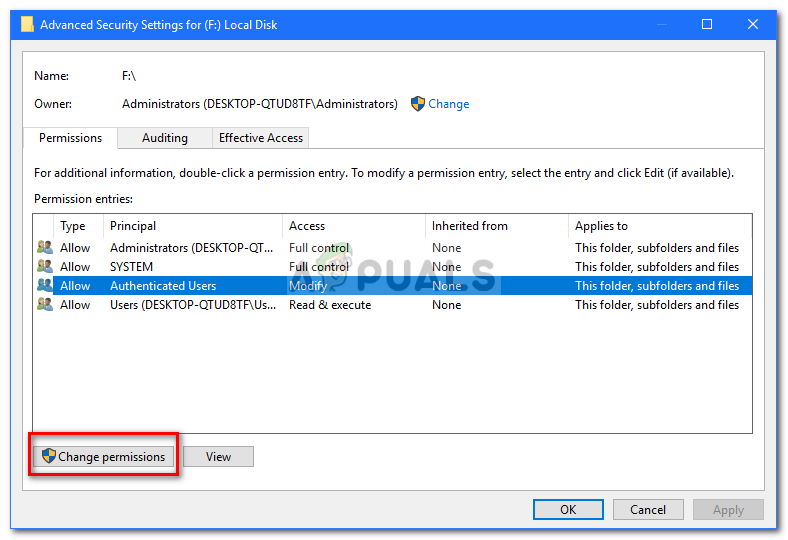
Local Disk Properties (Security) - Click Advanced and then select Change Permissions.

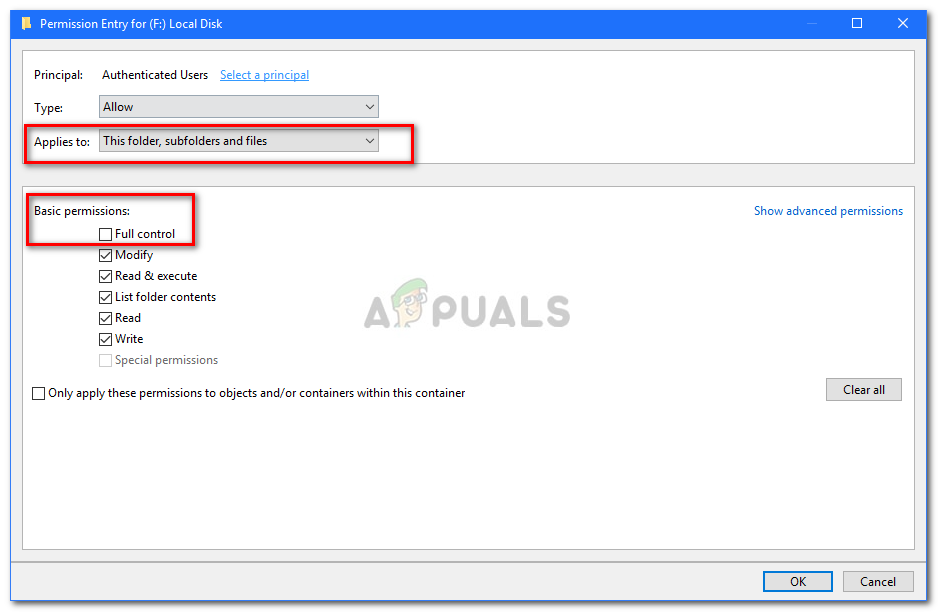
Select change permissions - Highlight your user and then click Edit.

Highlight your user and click Edit - Select This folder, subfolders, and files from the drop-down list.
- Check the Full Control box under Basic Permissions.

Check the Full Control Box - Click OK.

If you have more than one account on the system, then you’ll have to enable inheritance first. Here’s how to do it:
- Go to your System drive (where your Windows is installed).
- Go to the Users folder.
- Right-click on your username and click Properties.
- In the Security tab, click Advanced.
- Hit Enable Inheritance.

Highlight your user and click Enable Inheritance
Disable your Third-party antivirus
If the error persists whenever your system restarts, it could be due to your third-party antivirus software. Your antivirus might be detecting the files as a threat and consequently, stopping you from accessing them. In such a case, you’ll have to disable your antivirus software, change the attributes of the files/folders as mentioned above and restart your system to see if the files/folders still revert to read-only. If they don’t, this means your antivirus is causing the issue and you should probably uninstall it.

Kevin Arrows
Kevin is a dynamic and self-motivated information technology professional, with a Thorough knowledge of all facets pertaining to network infrastructure design, implementation and administration. Superior record of delivering simultaneous large-scale mission critical projects on time and under budget.
 Несколько раз на сайте и по другим каналам ко мне обращались с вопросом: Как снять атрибут «Только для чтения» с папки в Windows? Обычно следовало пояснение: «Я убираю отметку только для чтения, применяю настройки, снова открываю свойства папки — вижу, что папка снова только для чтения — что делать?».
В этой статье для начинающих пользователей подробно об отметке «Только для чтения» в атрибутах папки в Windows, можно ли её снять, о том, почему она возвращается после того, как была убрана и дополнительная информация на тему.
Атрибут «Только для чтения» в свойствах папки в графическом интерфейсе Windows
Вопрос о том, как снять «Только для чтения» с папки в Windows 11, Windows 10 или другой версии ОС возникает из-за непонимания назначения этой отметки в атрибутах свойствах папки.

Несмотря на то, что прямо в окне свойств указано «Применимо только к файлам в папке», пользователи ошибочно делают одно из следующих предположений, увидев там стандартный «квадрат» или слегка изменившуюся отметку в Windows 11:
- Установленная отметка сообщает о том, что папка только для чтения.
- Отметка «Только для чтения» говорит о том, что какое-то содержимое в папке имеет атрибут «Только для чтения».
В действительности, любая, даже только что созданная и полностью пустая папка в Windows 11/10/8.1/7 будет иметь установленную отметку (квадрат или минус), если открыть её свойства и посмотреть раздел «Атрибуты», при этом важно знать:
- Когда вы открываете свойства папки, имеющиеся в ней файлы никак не анализируются на наличие тех или иных атрибутов — отметка не несёт информации о наличии в папке файлов «Только для чтения» или об атрибутах самой папки.
- Назначение отметки — снять атрибут «Только для чтения» с имеющихся внутри папки файлов, или, наоборот, установить его. При этом, когда вы повторно откроете свойства папки, там снова будет та же отметка — независимо от того, есть ли внутри что-то «Только для чтения» или нет.
- Если вы убирали «Только для чтения» и применяли изменение атрибутов ко всем вложенным элементам, при этом никаких ошибок в процессе не было — значит в папке не осталось элементов «Только для чтения», а любые проблемы с изменением или удалением как папки, так и файлы, вероятнее всего связаны с правами доступа.


Как снять атрибут «Только для чтения» с папки
Папка в Windows всё-таки может иметь установленный атрибут «Только для чтения», но в окне свойств вы его не увидите. Вместо этого можно использовать командную строку:
- Запустите командную строку (от имени Администратора, если папка требует прав администратора для её изменения).
- Введите команду
attrib путь_к_папке
и нажмите Enter. Если результат выглядит как на изображении ниже, у папки нет атрибута «Только для чтения».

- Если вы видите «R» в результате выполнения команды — атрибут «Только для чтения» установлен.
- Чтобы снять его, можно использовать команду
attrib -R путь_к_папке


Надеюсь, инструкция как-то прояснила ситуацию и помогла разобраться.
Remove read-only attribute
- Open File Explorer. My preferred way is to press the key combination Win+E.
- Go to the folder where you are seeing the issue.
- Right click in any empty area and click Properties.
- In the General tab, un-check the Read-only attribute. …
- Now click the Ok button.
How do I remove read only from a folder?
To change the read-only attribute, follow these steps:
- Right-click the file or folder icon.
- Remove the check mark by the Read Only item in the file’s Properties dialog box. The attributes are found at the bottom of the General tab.
- Click OK.
Why can’t I remove Read Only attribute Windows 10?
Navigate to the Security tab and click on Advanced button. Step 3. In the pop-up window, click on the Enable inheritance button. After changing the permissions, you can check if the “can’t remove read-only from folder Windows 10” is resolved or not.
How do I permanently turn off read only?
Here’s how:
- On File Explorer, right-click on OneDrive, and then select Properties.
- On the General tab under Attributes, uncheck Read-only, and then click OK.
- There will be a prompt asking if you want to apply changes to all folders, subfolders, and files. Click OK.
Why are all my folders read only Windows 10?
A folder is reverting back to the Read-Only status. This problem most often occurred after installing Windows 10 updates, and in some cases, because of account permissions. The simplest solution is to change the permissions. Most of the time, some changes in permissions can make a folder read-only.
Why is my file read only?
A file that’s marked as read-only usually implies that the file shouldn’t be altered or that great caution should be taken before making changes to it. Other things besides files can also be read-only like particularly configured flash drives and other solid state storage devices like SD cards.
How do I change a file from read only to edit?
Read-only Files
- Open Windows Explorer and navigate to the file you want to edit.
- Right-click the file name and select “Properties.”
- Select the “General” tab and clear the “Read-only” check box to remove the read-only attribute or select the check the box to set it.
Why does my folder keep going back to read only?
If your folder keeps reverting to read-only it could be due to a recent Windows 10 upgrade. Many users have reported that when upgraded their system to Windows 10, they encountered this error. Read-only is a file/folder attribute which lets only a specific group of users read or edit the files or folder.
How do I change a Word document from read only to edit?
Restrict editing
- Click Review > Restrict Editing.
- Under Editing restrictions, check Allow only this type of editing in the document, and make sure the list says No changes (Read only).
- Click Yes, Start Enforcing Protection.
How do I change read only permissions in Windows 10?
If so, you can follow the steps listed below:
- Right-click on your C Drive, and choose Properties.
- Go to Security tab.
- Click Advanced, then Change Permissions.
- Highlight the user, and click Edit.
- Choose This folder, subfolders and files under Applies to.
- Choose Full Control under Basic Permissions.
- Hit OK.
How do I know if I have administrator rights Windows 10?
Method 1: Check for administrator rights in Control Panel
Open Control Panel, and then go to User Accounts > User Accounts. 2. Now you will see your current logged-on user account display on the right side. If your account has administrator rights, you can see the word “Administrator” under your account name.
How do I change a read only drive in Windows 10?
Method 1. Manually Remove Read-only with DiskPart CMD
- Click on your “Start Menu”, type cmd in the search bar, then hit “Enter”.
- Type command diskpart and hit “Enter”.
- Type list disk and hit “Enter”. (
- Type the command select disk 0 and hit “Enter”.
- Type attributes disk clear readonly and hit “Enter”.
Атрибуты файлов и папок хранятся в Windows в файловой системе. Они хранятся в соответствующем месте вместе с именем файла и папки, расширением, отметкой даты и времени и любой другой доступной информацией.
Если вы щелкнете правой кнопкой мыши в любой момент времени на папке и перейдете к ее свойствам, вы увидите галочку Только для чтения. Похоже, многие пользователи сообщали, что после снятия флажка папка возвращается в состояние «Только чтение».
Эта проблема чаще всего возникала после установки обновлений Windows 10 , а в некоторых случаях из-за разрешений учетной записи. Тем не менее, такая проблема очень раздражает и требует решения.
Что я могу сделать, если в Windows 10 папка возвращается только для чтения? Самое простое решение — изменить права доступа. В большинстве случаев некоторые изменения в разрешениях могут сделать папку доступной только для чтения. Кроме того, вы можете войти в систему как администратор или изменить атрибут папок.
Для получения дополнительной информации о том, как это сделать, проверьте шаги ниже.
Как удалить «Только чтение» из папки в Windows 10:
- Изменить разрешения
- Изменить атрибуты
Если на вашем ПК с Windows 10 имеется более одной учетной записи, убедитесь, что вы пытаетесь получить доступ к файлу или папке из учетной записи администратора .
Поскольку папка была создана учетной записью администратора, и вы пытаетесь получить к ней доступ из гостевой , вы не сможете вносить в нее какие-либо изменения. Итак, сначала подключитесь к вашему компьютеру, используя учетную запись администратора.
Решение 1 — Изменить разрешения
Многие пользователи сообщили об этой проблеме. Поскольку большинство из них подтвердили, что решили эту проблему, изменив разрешения, мы рекомендуем сначала попробовать это.
Если вы являетесь единственным пользователем на ПК с Windows 10, выполните следующие действия, чтобы изменить разрешения:
- Найдите свой диск C , щелкните его правой кнопкой мыши и выберите « Свойства» .
- Появится новое окно. Нажмите на вкладку Безопасность .

- В правом нижнем углу нажмите « Дополнительно» . Затем нажмите « Изменить разрешения» .
- Выберите интересующего вас пользователя и нажмите « Изменить» .
- В раскрывающемся меню Применимо к: выберите Эта папка, подпапки и файлы .
- В разделе « Основные разрешения» выберите « Полный доступ» и нажмите « ОК» .


Если на этом компьютере несколько пользователей, выполните следующие действия:
- Найдите свой диск C и дважды щелкните по нему.
- Вы увидите папку « Пользователи ». Дважды щелкните по нему.
- Теперь вы должны увидеть вашу папку пользователей. Щелкните правой кнопкой мыши и выберите « Приоритеты» .
- Перейдите на вкладку « Безопасность » и в правом нижнем углу нажмите « Дополнительно» .
- В новом окне слева внизу должна появиться кнопка « Включить наследование» . Нажмите на это.


После изменения разрешений проблема должна исчезнуть. Если у вас все еще есть проблемы, тогда переходите к следующему решению.
- Читайте также: Как стать владельцем файла или папки в Windows 10
Решение 2 — Изменить атрибуты
Если определенная папка имеет атрибут «Только чтение», программа не может сохранять файлы или вносить в них изменения. Чтобы изменить атрибут «Только чтение» на «Система» с помощью команды Attrib в cmd, выполните следующие действия:
- В поле поиска Windows введите cmd . Щелкните правой кнопкой мыши результат и выберите « Запуск от имени администратора» .
- Чтобы удалить атрибут «Только для чтения» и установить системный атрибут, введите attrib -r + s drive: <путь> <имя_фолдера> .
- Некоторые программы могут работать неправильно с папками, имеющими эти атрибуты. Чтобы удалить их, введите attrib -r -sc: <имя_фолдера> .

Помните, что удаление атрибута «Только чтение» или «Системный» из папки может привести к некоторой потере настроек, но это не особенно важно, если вы не имеете в виду что-то конкретное.
- Читайте также: не удается получить доступ к общей папке в Windows 10 [Super Guide]
Надеюсь, что эти решения сработали для вас, как подтвердили многие другие пользователи Windows 10.
Не забудьте оставить любые другие вопросы, которые могут у вас возникнуть, в разделе комментариев ниже, и мы обязательно рассмотрим.
Folder Keeps Reverting to Read-Only? Find Out How to Fix That
Windows has a read-only option that a user can set or is set automatically by the system to protect file integrity. Many users have complained that they can’t remove the read-only attribute because the files and folders revert to read-only. Fortunately, you can fix it using the methods we have provided below.
Why Files Keep Reverting to Read-Only?
The first reason your files/folder may revert to read-only is if you upgraded to Windows 10 from Windows 8.1 or Windows 7. During the upgrade, your account permissions may have been altered, which prevents you from disabling the read-only attribute. You may also experience the read-only bug after updating Windows 10.
The second reason is account permissions alone. If your account permissions were somehow changed, unchecking the read-only attribute will cause it to revert back to read-only. If that’s the case, you have to change your account’s permissions to those that grant you administrator privileges.
The third reason may have something to do with your third-party antivirus software. If a third-party antivirus program detects a file as a threat, it may set the read-only attribute. A third-party antivirus program may also set the read-only attribute for your folders and files without reason. If that’s the case, then you should try to disable the antivirus software and try removing the read-only attribute.
Video Guide on How to Fix Folders Reverting to Read-Only on Windows 10
Table of Contents:
- Introduction
- Method 1. Run DISM (Deployment Image Servicing and Management) and SFC (System File Checker) Scans
- Method 2. Disable Controlled Folder Access
- Method 3. Modify the Attribute of the Folder
- Method 4. Change the Permissions of the Drive
- Video Guide on How to Fix Folders Reverting to Read-Only on Windows 10
Method 1. Run DISM (Deployment Image Servicing and Management) and SFC (System File Checker) scans
By far, the easiest fix for the read-only bug is to run DISM and System File Checker commands in the Command Prompt. These commands will check your computer for corrupted files and will attempt to repair them.
1. Simultaneously hold down Windows+R keys to open Run.
2. In the Run dialog box, type in CMD and hold down Shift+Ctrl+Enter keys to open the elevated Command Prompt.
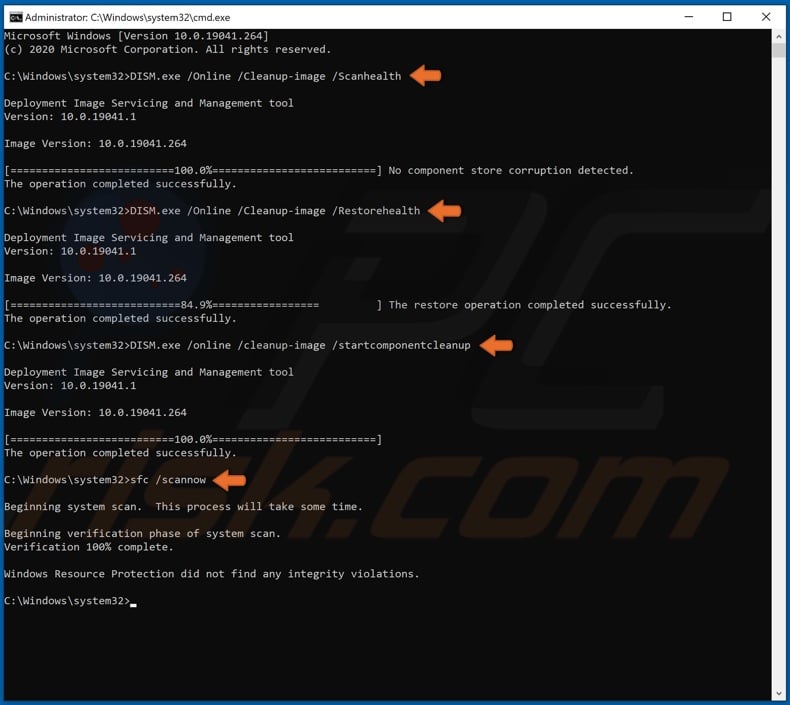
3. In the Command Prompt, enter the following commands.
• DISM.exe /Online /Cleanup-image /Scanhealth
• DISM.exe /Online /Cleanup-image /Restorehealth
• DISM.exe /online /cleanup-image /startcomponentcleanup
• SFC /ScanNow
4. Restart your PC.
[Back to Table of Contents]
Method 2. Disable Controlled Folder Access
If you’re struggling with the read-only bug, the first and easiest thing to do is disable Controlled folder access. However, we want to stress that disabling it might not be enough, so we recommend using this method along with other methods found below.
1. Right-click the Start Menu button and select Settings.
2. Once in the Settings window, select Update & Security.
3. On the left pane, select Windows Security.
4. Then, click Virus & threat protection.

5. Click Manage settings.
6. Under Controlled folder access, click Manage Controlled folder access.
7. Toggle the slider off to disable Controlled folder access.
8. Restart your PC.
[Back to Table of Contents]
Method 3. Modify the Attribute of the Folder
If you’re logged in as an administrator but still can’t edit or modify the files, then you can try changing the attribute of the problematic file using the Command prompt. The solution is to change the file attribute to System using the Attrib command in the Command prompt. To do that, follow the steps below.
1. Simultaneously hold down Windows+R keys to open Run.
2. In the Run dialog box, type in CMD and hold down Shift+Ctrl+Enter keys to open the elevated Command prompt.
3. In the Command prompt, type in attrib -r +s «drive:{path}{foldername}» (indicating the correct drive, full path, and folder name), and hit the Enter key.

Running this command will remove the read-only attribute of the file, changing it to a system attribute. However, be warned that some files and folders may not work properly in the system attribute.
4. To remove the system attribute, type in attrib -r -s «drive:{path}{foldername}» in the command prompt and hit the Enter key.
[Back to Table of Contents]
Method 4. Change the Permissions of the Drive
If the read-only bug started to occur after updating Windows, you should try changing the permissions of the Drive. Getting the appropriate permissions for your computer’s Drive may fix the issue. Here is how you can change the permissions:
1. Open the Start Menu, type in This PC, and click the result.
2. Right-click the Drive where the files/folders affected by the read-only bug are located and click Properties.
3. Select the Security tab and click Advanced.
4. In the Advanced Security Settings window, select Change permissions.
5. Select your user and click Edit.
6. From the drop-down list, click This folder, subfolders and files.
7. Under the Basic Permissions section, tick the Full Control checkbox.
8. Click OK to save the new settings.
[Back to Top]
Do folders on your computer periodically revert to read-only mode, making it impossible to make changes? It can be frustrating, especially when you have to make final edits to your submission and the deadline is fast approaching.
In this article, we’ll explain why your folders revert to read-only mode and what you can do to prevent it.
Why Are Your Folders Reverting to Read-Only Mode?
Your folders revert to read-only mode for various reasons, including restrictions imposed by your administrator, an issue with a recent Windows update, or changes you make to Windows Defender or your antivirus settings. It can also happen due to possible restrictions from the security software you use to lock your folders.
As you now understand why folders in your computer are reverting to read-only mode, let’s look at some ways to fix it.
1. Turn Off Folder Protection
Do you use folder lock software to protect your data, but some of those protected folders become read-only at random? If so, the restrictions are likely imposed by the folder lock software. Thus, by turning off the security limitations for those folders, you might be able to fix the problem right away.
If you don’t use any folder lock software or turning off the protection doesn’t help, move on to the next solution.
2. Rule Out a Folder-Specific Issue
Is only one folder reverting to read-only mode? If so, follow the below steps to remove the read-only attribute manually for that folder:
- Go to the folder that is going read-only.
- Right-click on it and select Properties.
- In the General tab, uncheck the box for Read-only.
- Click Apply and hit OK.


If removing the attribute this way does not solve the problem, or if the problem involves multiple files, keep applying the remaining fixes.
If you have encountered the issue on a work computer, you may not be able to apply a few fixes mentioned below. Thus, if you encounter an error saying you don’t have permission to make any changes, it’s best to let your IT admin handle it.
3. Ensure an Administrator Hasn’t Imposed Any Restrictions
In Windows, administrators can restrict access to confidential data for specific users working on the same computer. If you see some files and folders in read-only mode, verify the administrator hasn’t changed their permissions. Here’s how you can find out:
- Right-click the file or folder you see in read-only mode and select Properties.
- In the Properties window, click the Security tab.
- Choose your username from the available options.
- Check the Permissions for Users section after selecting your account.

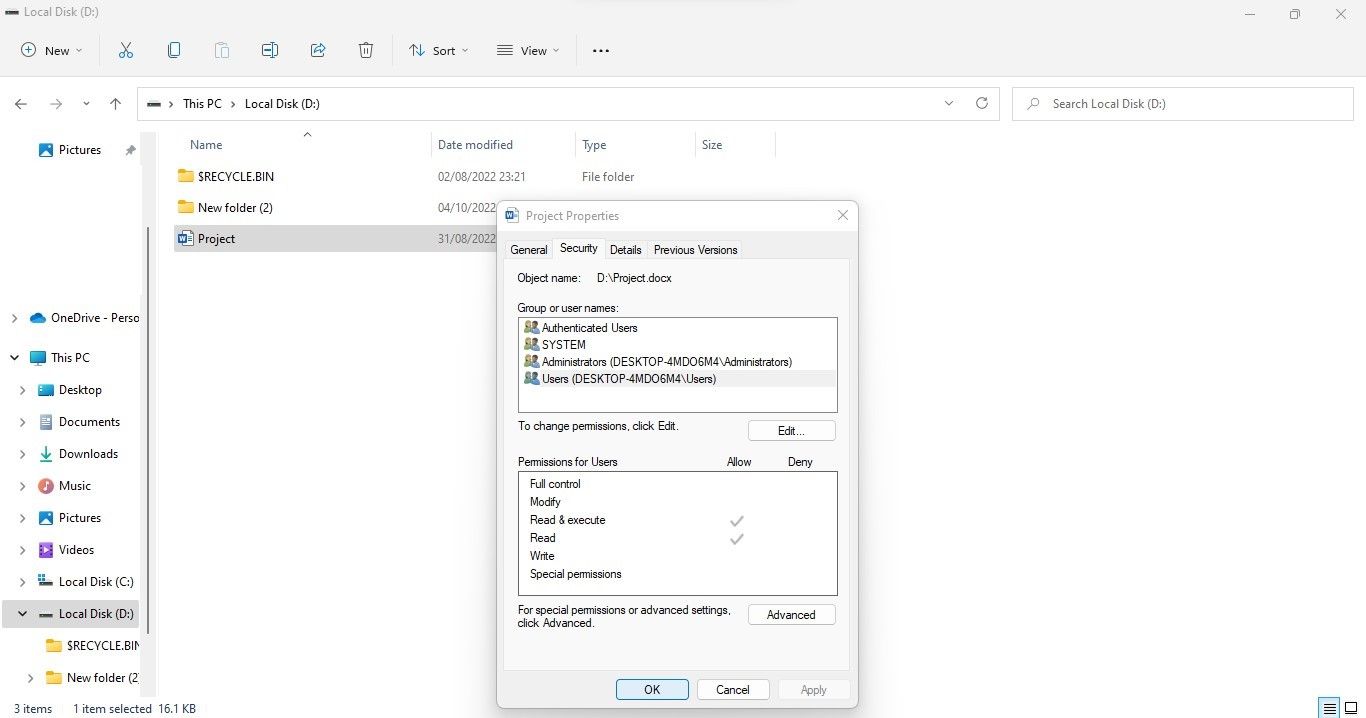
You can’t make changes to the files if you only have read-only permissions. If you believe the access was restricted by mistake, ask the administrator to grant you access.
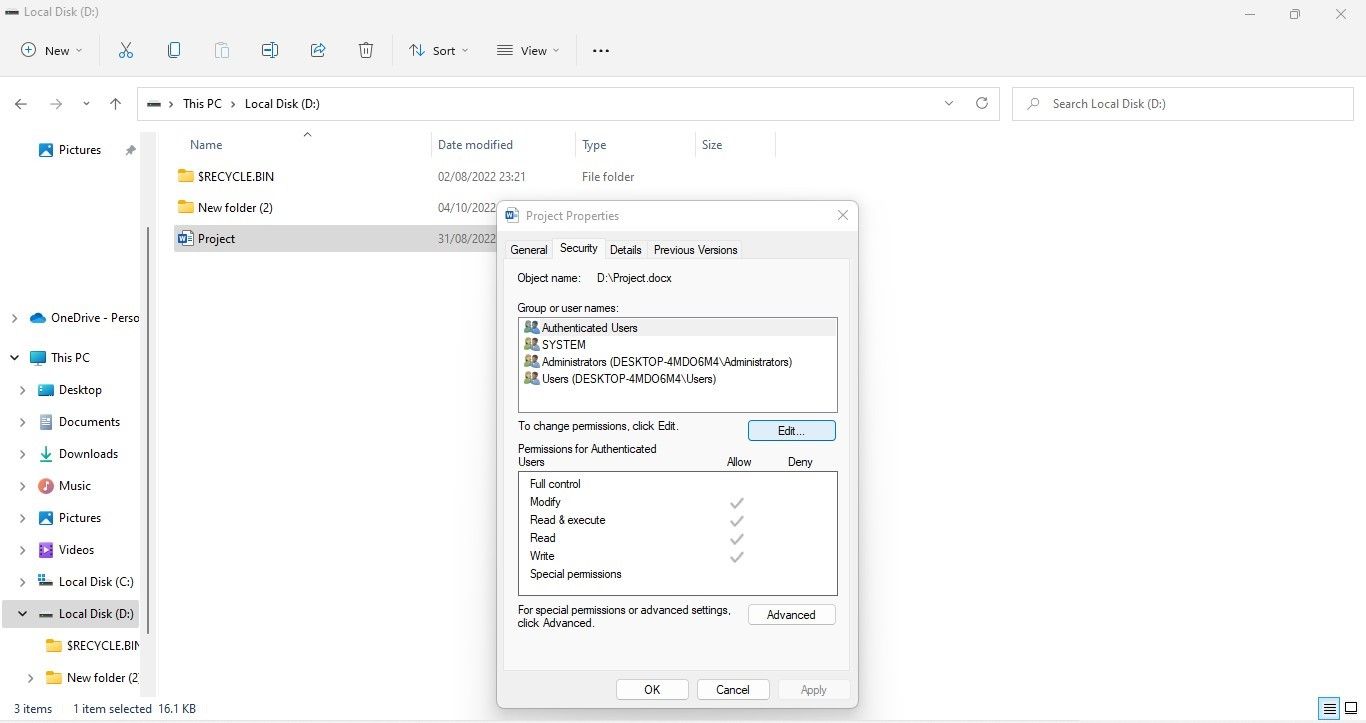
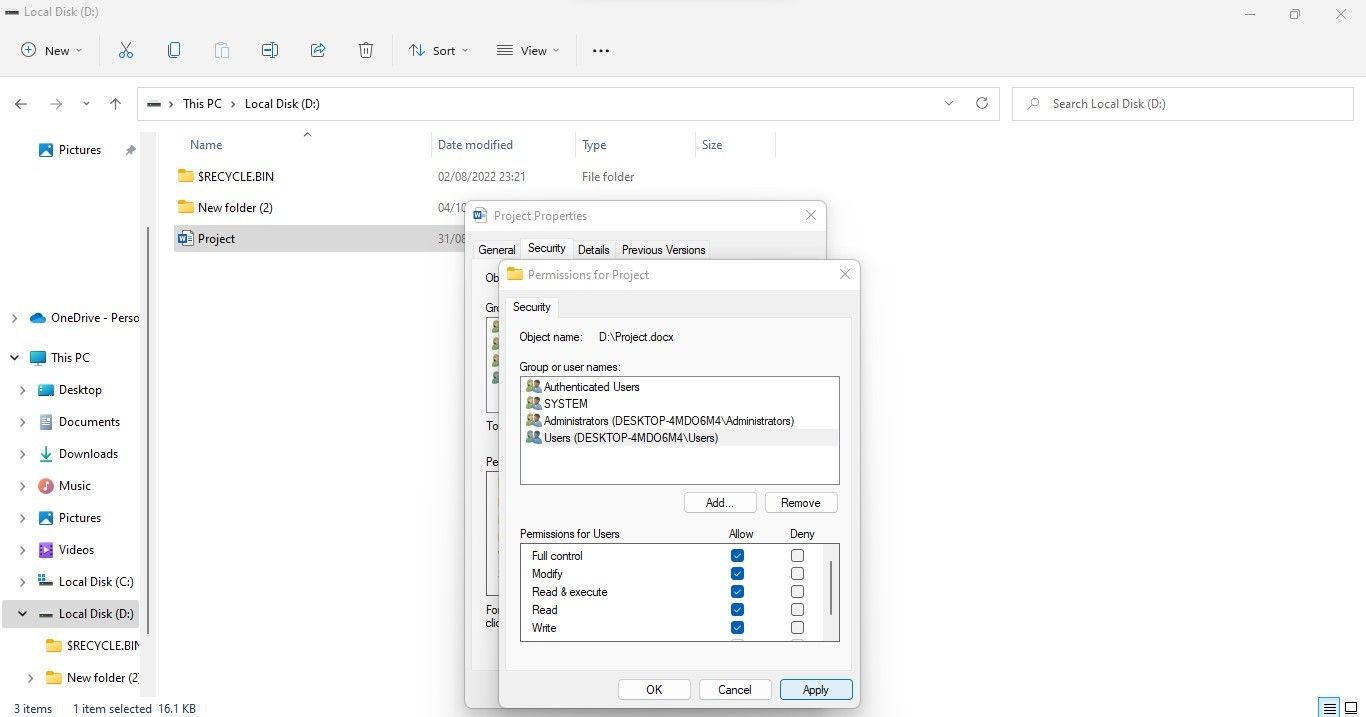
If you’re an administrator, here’s how you can change the access permissions of other users:
- Log in with your administrator account.
- Right-click the file or folder you see in read-only mode and select Properties.
- In the Properties window, go to the Security tab.
- Click the Edit button.

- Choose the user you want to grant access to.
- In the Permissions for Users window, check the box next to Full control under Allow column.

- After clicking Apply, hit OK.
If you have multiple personal accounts on your computer, you can change permissions for each account using the administrator account similarly.
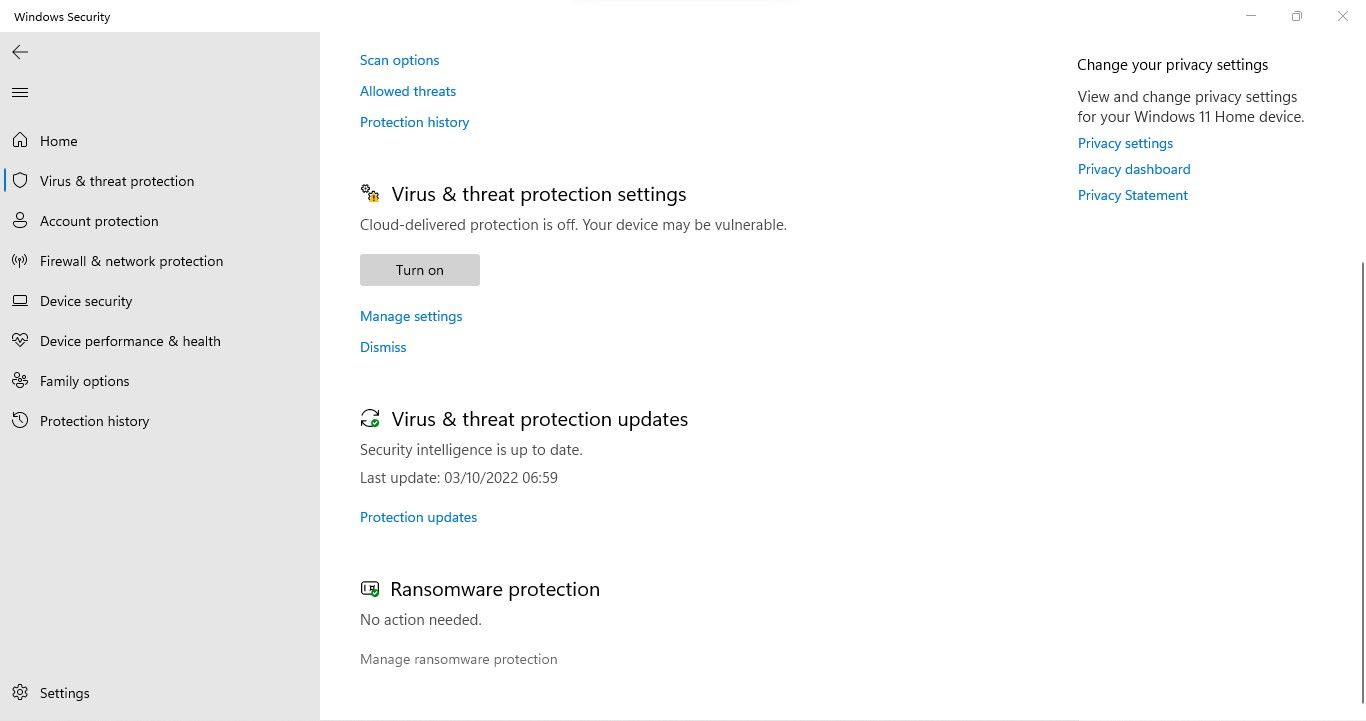
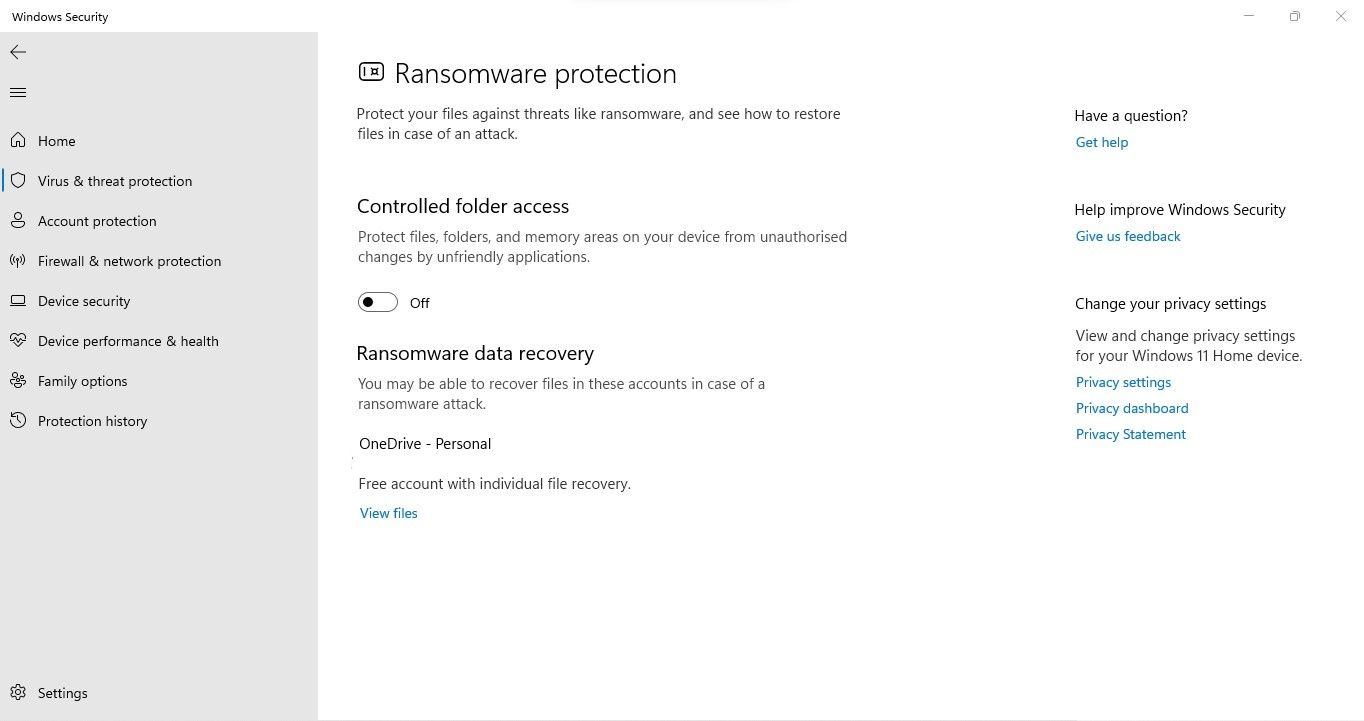
4. Disable Ransomware Protection in the Windows Security Settings
To combat ransomware threats and safeguard users’ data, Microsoft has introduced a ransomware protection feature. By using this feature, users can prevent third-party apps from changing their files and folders without their permission.
Although it’s handy, it has a history of messing up file permissions. Therefore, if you’ve encountered the issue under discussion after enabling this feature, disabling it may help you fix it. The following steps will help you do that:
- Open the Windows Security app by searching for «Windows Security» in Windows Search.
- Go to Virus and threat protection.
- Click on Manage ransomware protection.
- Turn off the toggle under Controlled folder access.

If disabling this feature doesn’t resolve the problem, you may need to reset the entire Windows Defender Firewall settings.
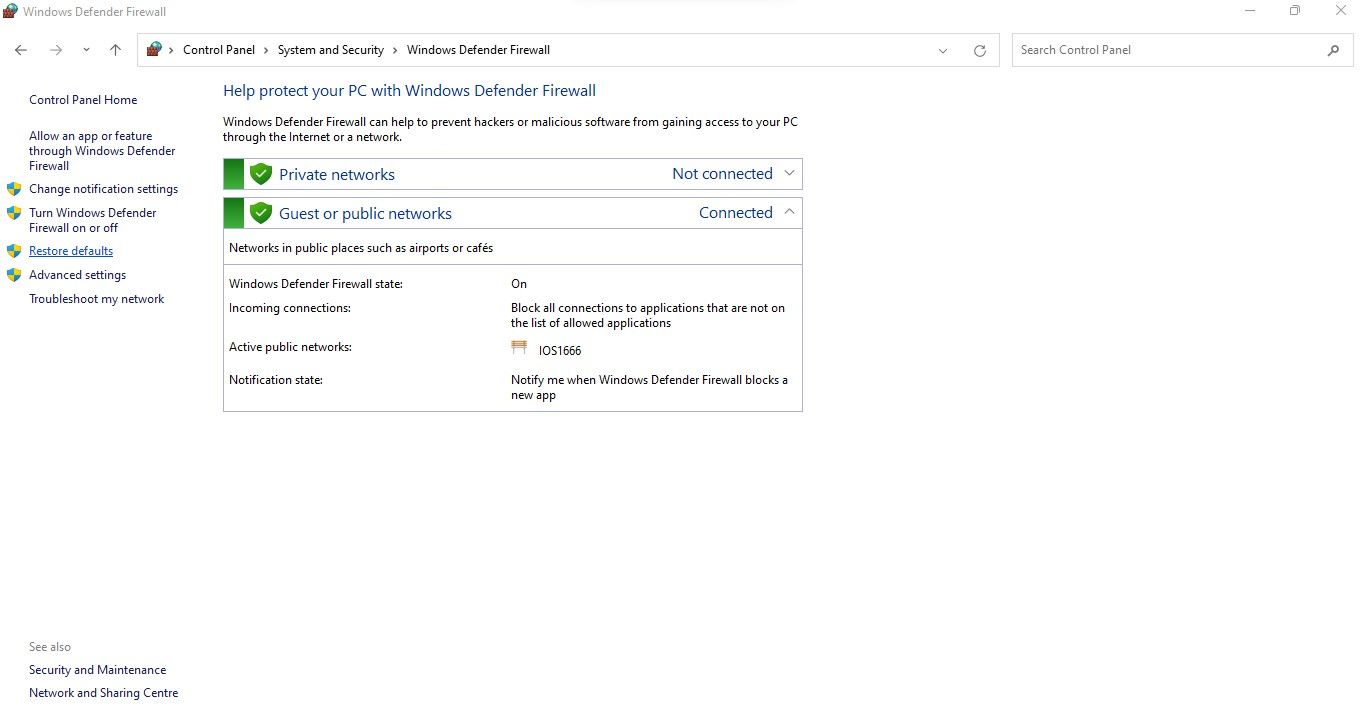
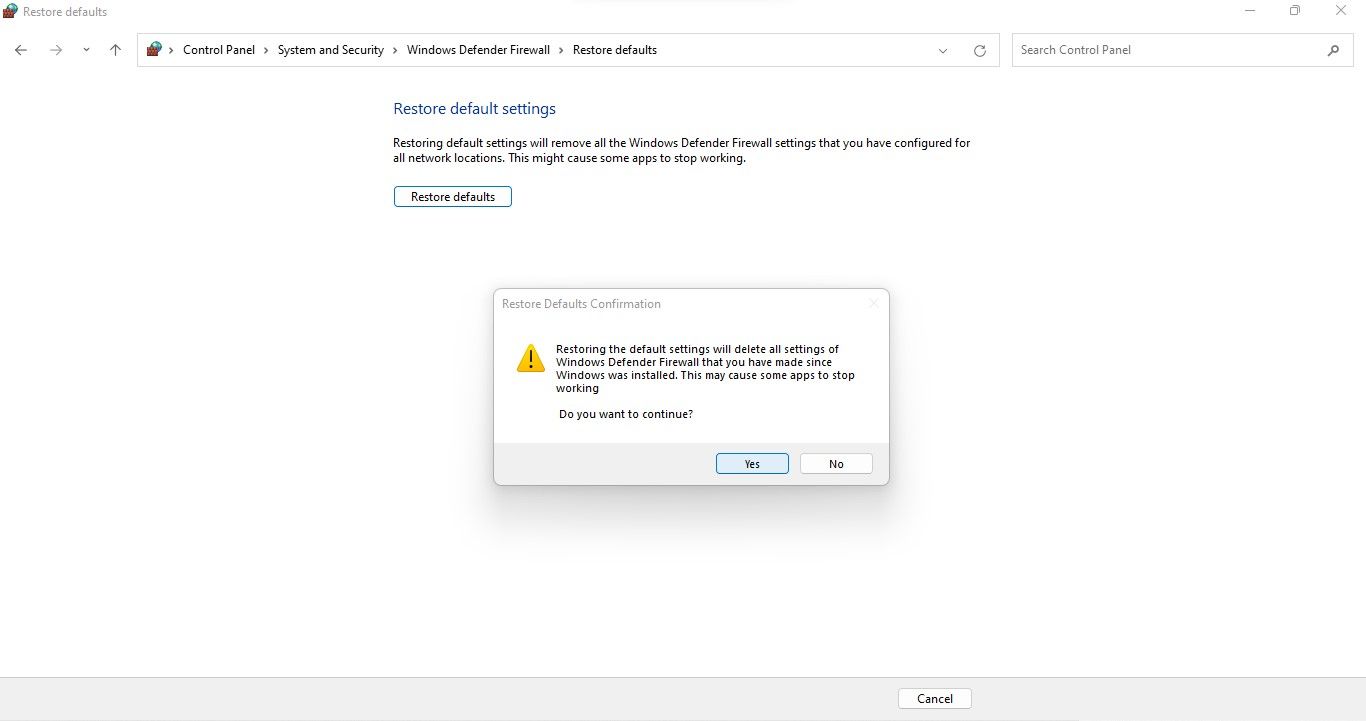
5. Reset the Windows Defender Firewall Settings
Have you recently made changes to your Windows Defender Firewall settings and encountered this problem? If so, there’s a good chance you’ve done something wrong. Therefore, resetting them may help you resolve the issue. Follow the below steps to reset Windows Defender Firewall settings:
- Open the Control Panel app by searching for «Control Panel» in Windows Search.
- Click System and Security.
- Click Windows Defender Firewall.
- In the left sidebar, click Restore defaults.

- Click Restore defaults button.
- When the confirmation pop-up appears, select Yes.
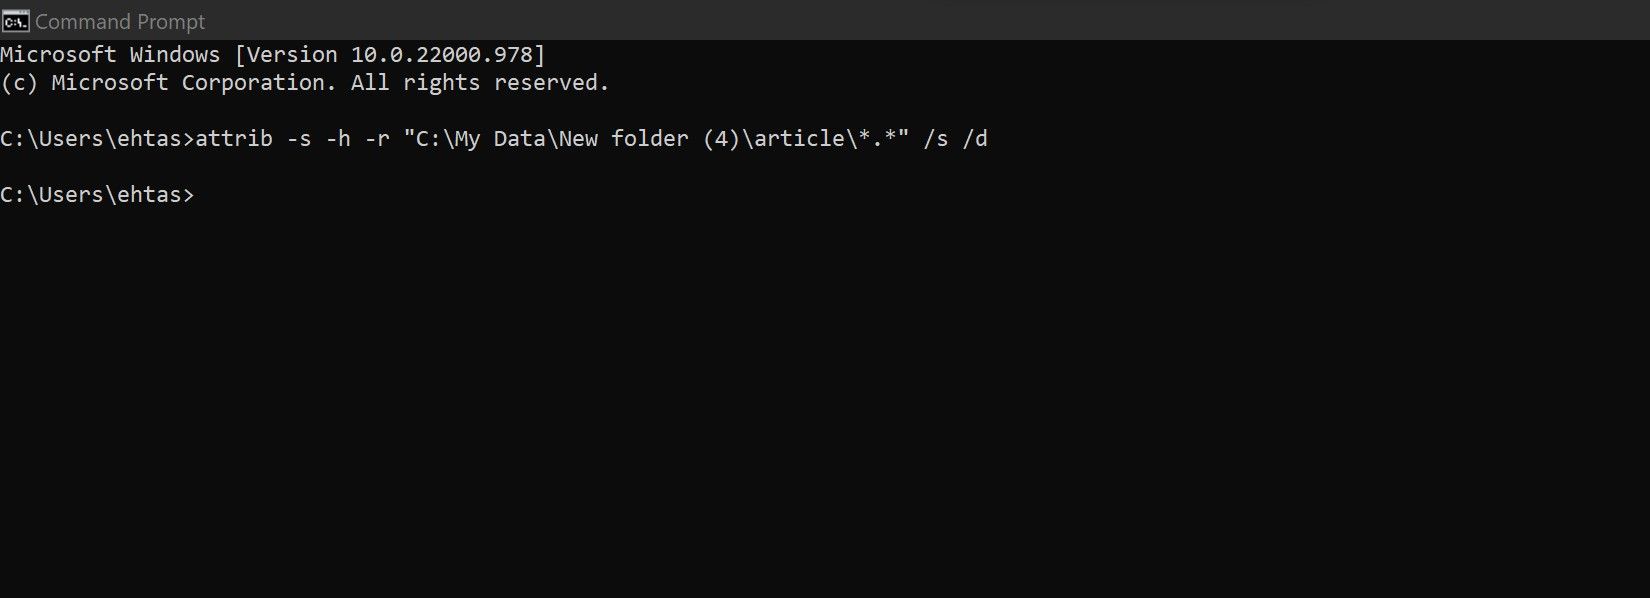
6. Forcefully Remove the Read-Only Attribute
If none of the fixes have resolved the issue of folders reverting to read-only mode, you should remove the read-only attribute forcibly using Command Prompt. Here’s how:
- Search for «Command Prompt» in Windows Search and open the Command Prompt app.
- Enter the following command by specifying the drive and pasting the path to the read-only folder.
attrib -s -h -r "Drive:path_to_folder*.*" /s /d - Hit Enter.

7. Uninstall Any Recent Windows Updates
If the issue under discussion occurred after installing a Windows update, you should uninstall it and revert to the previous version of Windows. Check out our article on manually uninstalling Windows 10 and 11 updates if you’re unfamiliar with the process.
8. Go to Previous Restore Point
A System Restore allows Windows users to restore their system to its current state if they accidentally mess something up in the future. It’s a quick way to undo changes that mess up your system.
Thus, if uninstalling the Windows update also doesn’t work, apply the restore point you created previously. This will undo any system changes that may have resulted in the issue under discussion and return your device to its original state.
If you’re unfamiliar with the process, check out our article that explains how to perform a system restore in Windows 11. For Windows 10, the process is nearly the same.
Keep Your Files and Folders Editable
Hopefully, applying the fixes mentioned in the article will help you prevent your folder from reverting to read-only mode.
Moreover, to stop files from opening in read-only mode in a specific app, such as OneNote, you’ll have to change the app settings.
Вы пытаетесь отключить атрибут «Только чтение» в папках Windows 10? Если ваш ответ утвердительный, прочитайте до конца, чтобы узнать о различных приемах решения этой проблемы.
Что такое функция только для чтения?
Только для чтения — это атрибут файла / папки, который позволяет только определенной группе пользователей изменять эти файлы и папки. Эта функция не позволяет другим пользователям изменять эти файлы / папки, доступные только для чтения, без вашего явного разрешения.
Вы можете оставить одни файлы в системном режиме, а другие в режиме только для чтения, в соответствии с вашими потребностями. Вы можете включить / отключить атрибут только для чтения, когда захотите.
К сожалению, несколько пользователей сообщили, что после обновления до Windows 10 их файлы и папки продолжают возвращаться в режим только для чтения.
Почему в Windows 10 для папок сохраняется разрешение только на чтение?
Более общие причины этой проблемы следующие:
1. Обновление Windows: если операционная система вашего компьютера недавно была обновлена до Windows 10, разрешения учетной записи могли быть изменены, что вызвало проблему.
2. Разрешения учетной записи: ошибка может быть связана с изменением разрешений учетной записи без вашего ведома.
Метод 1: отключить контролируемый доступ к папкам
Выполните следующие действия, чтобы отключитьконтролируемый доступ к папкам, что могло вызвать эту проблему.
1. Найдите в строке поиска строку «Безопасность Windows». Откройте его, щелкнув по нему.
2. Затем щелкните Защита от вирусов и угроз на левой панели.
3. В правой части экрана выберите Управление параметрами, отображаемыми в разделе Параметры защиты от вирусов и угроз.
4. В разделе «Управляемый доступ к папкам» щелкните «Управление контролируемым доступом к папкам».
5. Здесь установите для входа значение Выкл.
6. Перезагрузите компьютер.
Откройте папку, к которой вы пытались получить доступ ранее, и проверьте, можете ли вы открыть и отредактировать папку. Если не получается, попробуйте следующий метод.
Метод 2: войдите как администратор
Если на вашем компьютере было создано несколько учетных записей пользователей, вам нужно будет войти в систему как администратор и как гость. Это позволит вам получить доступ к любым файлам или папкам и внести любые изменения, которые вы хотите. Для этого выполните следующие действия:
1. Поиск Командная строка в строке поиска. В результатах поиска щелкните его правой кнопкой мыши и выберите Запуск от имени администратора.
2. В окне командной строки введите следующую команду и нажмите Enter:
сетевой администратор пользователя / активный: да
3. После успешного выполнения команды вы по умолчанию войдете в систему с учетной записью администратора.
Теперь попробуйте получить доступ к папке и посмотрите, помогло ли решение навсегда отключить атрибут «Только чтение» для папок Windows 10.
Метод 3: изменить атрибут папки
Если вы вошли в систему как администратор и по-прежнему не можете получить доступ к определенным файлам, ошибка связана с атрибутом файла или папки. Выполните следующие действия, чтобы удалить атрибут только для чтения из командной строки папки с помощью командной строки:
1. Запустите командную строку с правами администратора, как показано в предыдущем методе.
2. В окне командной строки введите следующую команду и нажмите Enter:
attrib -r + s диск: <путь> <имя папки>
Например, команда будет выглядеть так для определенного файла с именем Test.txt:
attrib -r + s C: Users Vik Pictures Новая папка Test.txt
3. После успешного выполнения команды атрибут файла, доступный только для чтения, изменится на системный атрибут.
4. Откройте файл, чтобы увидеть, продолжает ли он возвращаться в режим только для чтения в Windows 10.
5. Если файл или папка, для которых был изменен атрибут, работает некорректно, удалите системный атрибут, введя в командной строке следующее и после этого нажав Enter:
attrib -r -s диск: <путь> <имя папки
6. Это отменит все изменения, сделанные на шаге 2.
Если удаление атрибута только для чтения из командной строки папки не помогло, попробуйте изменить разрешения диска, как описано в следующем методе.
Метод 4: изменение разрешений для диска
Если вы испытываете такие трудности после обновления до операционной системы Windows 10, вы можете изменить разрешения диска и изменить атрибут «Только чтение» для папок Windows 10.
1. Щелкните правой кнопкой мыши файл или папку, которые по-прежнему остаются доступными только для чтения. Затем выберите «Свойства».
2. Затем щелкните вкладку «Безопасность». Выберите свое имя пользователя и нажмите «Изменить», как показано ниже.
3. В новом окне, которое открывается с заголовком «Разрешения для <имя папки», установите флажок «Полный доступ», чтобы предоставить разрешение на просмотр, изменение и запись в вышеупомянутый файл / папку.
4. Щелкните OK, чтобы сохранить эти настройки.
Как включить наследование
Если в системе создано более одной учетной записи пользователя, вам необходимо включить наследование, выполнив следующие действия:
1. Перейдите на диск C, на котором установлена Windows.
2. Затем откройте папку «Пользователи».
3. Теперь щелкните правой кнопкой мыши свое имя пользователя и выберите «Свойства».
4. Перейдите на вкладку «Безопасность» и нажмите «Дополнительно».
5. Наконец, нажмите «Включить наследование».
Включение этого параметра позволит другим пользователям получать доступ к файлам и папкам на вашем компьютере. Если вам не удается удалить папку на ноутбуке с Windows 10, доступную только для чтения, попробуйте следующие методы.
Метод 5: отключите стороннее антивирусное программное обеспечение
Стороннее антивирусное программное обеспечение может обнаруживать файлы на вашем компьютере как угрозу каждый раз, когда вы перезагружаете компьютер. Возможно, поэтому папки продолжают возвращаться только для чтения. Чтобы исправить это, вам необходимо отключить сторонний антивирус, установленный в вашей системе:
1. Щелкните значок антивируса и перейдите в «Настройки».
2. Отключите антивирус.
3. Теперь следуйте одному из методов, упомянутых выше, а затем перезагрузите компьютер.
Проверьте, возвращаются ли файлы или папки в режим только для чтения даже сейчас.
Метод 6: выполните сканирование SFC и DSIM
Если в вашей системе есть поврежденные файлы, вам необходимо запустить сканирование SFC и DSIM, чтобы проверить и восстановить эти файлы. Следуйте инструкциям ниже, чтобы выполнить сканирование:
1. Выполните поиск в командной строке для запуска от имени администратора.
2. Затем выполните команду SFC, набрав sfc / scannow в окне командной строки en и нажав клавишу Enter.
3. После завершения сканирования выполните сканирование DISM, как описано в следующем шаге.
4. Теперь скопируйте и вставьте следующие три команды одну за другой в командную строку и каждый раз нажимайте клавишу Enter, чтобы выполнить их:
DISM.exe / Online / Cleanup-image / Scanhealth DISM.exe / Online / Cleanup-image / Restorehealth DISM.exe / Online / Cleanup-image / startcomponentcleanup
Мы надеемся, что это руководство было полезным, и вы смогли устранить неполадки с папкой, все еще доступной только для чтения в Windows 10. Если у вас есть какие-либо вопросы / комментарии по поводу этой статьи, не стесняйтесь размещать их в разделе комментариев.