| title | description | ms.custom | ms.date | ms.topic | ms.devlang | author | ms.author | manager | ms.technology | dev_langs | ms.workload |
|---|---|---|---|---|---|---|---|---|---|---|---|
|
Create a Windows Forms app with C# |
Learn how to create a Windows Forms app in Visual Studio with C#, step-by-step. |
vs-acquisition, get-started |
1/24/2023 |
tutorial |
CSharp |
anandmeg |
meghaanand |
jmartens |
vs-ide-general |
CSharp |
multiple |
Create a Windows Forms app in Visual Studio with C#
[!INCLUDE Visual Studio]
In this tutorial, you’ll create a simple C# application that has a Windows-based user interface (UI).
::: moniker range=»vs-2019″
If you haven’t already installed Visual Studio, go to the Visual Studio downloads page to install it for free.
[!NOTE]
Some of the screenshots in this tutorial use the dark theme. If you aren’t using the dark theme but would like to, see the Personalize the Visual Studio IDE and Editor page to learn how.
::: moniker-end
::: moniker range=»vs-2022″
If you haven’t already installed Visual Studio, go to the Visual Studio 2022 downloads page to install it for free.
::: moniker-end
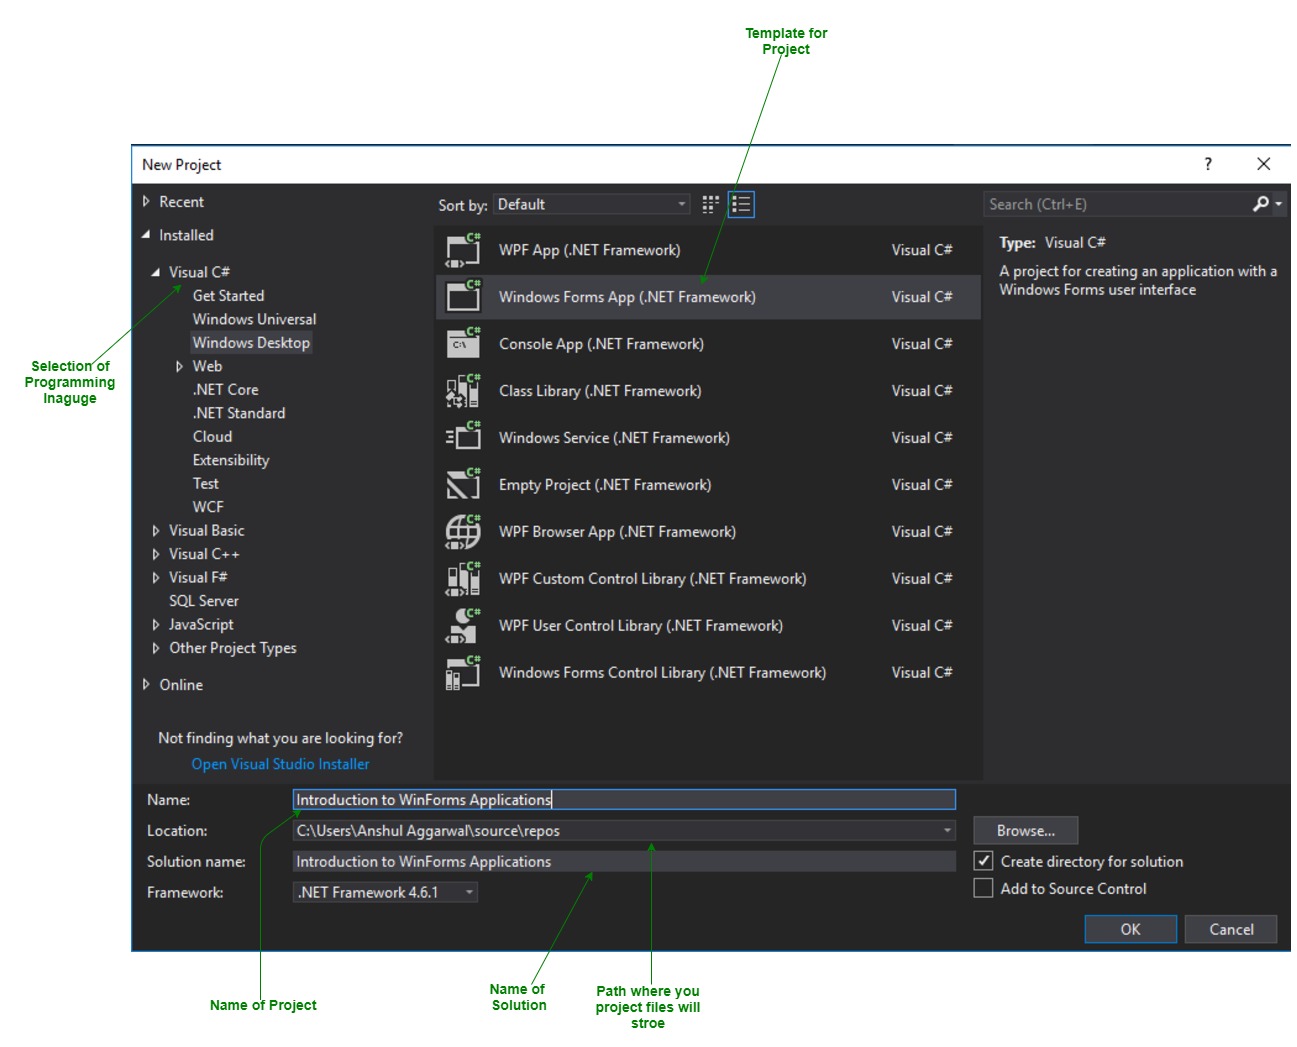
Create a project
First, you’ll create a C# application project. The project type comes with all the template files you’ll need, before you’ve even added anything.
::: moniker range=»vs-2019″
-
Open Visual Studio.
-
On the start window, choose Create a new project.

-
On the Create a new project window, choose the Windows Forms App (.NET Framework) template for C#.
(If you prefer, you can refine your search to quickly get to the template you want. For example, enter or type Windows Forms App in the search box. Next, choose C# from the Language list, and then choose Windows from the Platform list.)
[!NOTE]
If you do not see the Windows Forms App (.NET Framework) template, you can install it from the Create a new project window. In the Not finding what you’re looking for? message, choose the Install more tools and features link.Next, in the Visual Studio Installer, choose the .NET desktop development workload.
After that, choose the Modify button in the Visual Studio Installer. You might be prompted to save your work; if so, do so. Next, choose Continue to install the workload. Then, return to step 2 in this «Create a project» procedure.
-
In the Configure your new project window, type or enter HelloWorld in the Project name box. Then, choose Create.
Visual Studio opens your new project.


::: moniker-end
::: moniker range=»>=vs-2022″
-
Open Visual Studio.
-
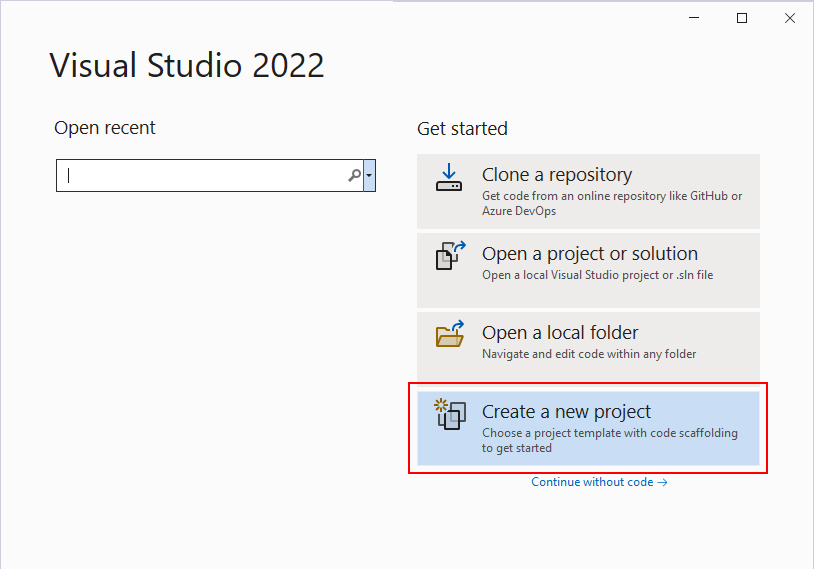
On the start window, select Create a new project.
:::image type=»content» source=»media/vs-2022/create-new-project-dark-theme.png» alt-text=»Screenshot to show the Create a new project window.»:::
-
On the Create a new project window, select the Windows Forms App (.NET Framework) template for C#.
(If you prefer, you can refine your search to quickly get to the template you want. For example, enter or type Windows Forms App in the search box. Next, select C# from the Language list, and then select Windows from the Platform list.)
:::image type=»content» source=»media/vs-2022/csharp-winform-create-a-new-project.png» alt-text=»Screenshot to select the C# template for the Windows Forms App (.NET Framework).»:::
[!NOTE]
If you do not see the Windows Forms App (.NET Framework) template, you can install it from the Create a new project window. In the Not finding what you’re looking for? message, select the Install more tools and features link.:::image type=»content» source=»../get-started/media/vs-2019/not-finding-what-looking-for.png» alt-text=»Screenshot to show the The ‘Install more tools and features’ link from the ‘Not finding what you’re looking for’ message in the ‘Create a new project’ window.»:::
Next, in the Visual Studio Installer, select the .NET desktop development workload.
:::image type=»content» source=»media/vs-2022/install-dot-net-desktop-env.png» alt-text=»Screenshot to show the .NET Core workload in the Visual Studio Installer.»:::
After that, select the Modify button in the Visual Studio Installer. You might be prompted to save your work; if so, do so. Next, select Continue to install the workload. Then, return to step 2 in this «Create a project» procedure.
-
In the Configure your new project window, type or enter HelloWorld in the Project name box. Then, select Create.
:::image type=»content» source=»media/vs-2022/csharp-winform-configure-new-project.png» alt-text=»Screenshot to show the ‘Configure your new project’ window and name your project ‘HelloWorld’.»:::
Visual Studio opens your new project.
Create the application
After you select your C# project template and name your file, Visual Studio opens a form for you. A form is a Windows user interface. We’ll create a «Hello World» application by adding controls to the form, and then we’ll run the app.
Add a button to the form
-
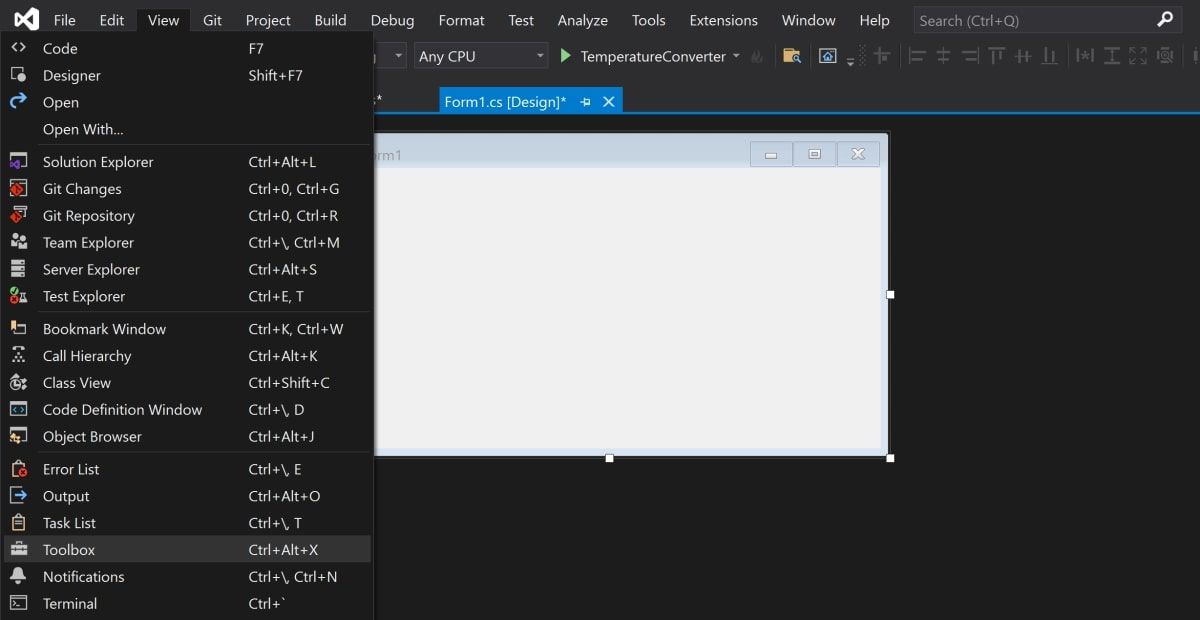
Select Toolbox to open the Toolbox fly-out window.
:::image type=»content» source=»media/vs-2022/csharp-winform-hello-world-project-toolbox.png» alt-text=»Screenshot to select the Toolbox to open the Toolbox window.»:::
(If you don’t see the Toolbox fly-out option, you can open it from the menu bar. To do so, View > Toolbox. Or, press Ctrl+Alt+X.)
-
Expand Common Controls and select the Pin icon to dock the Toolbox window.
:::image type=»content» source=»media/vs-2022/csharp-winform-toolbox-flyout-pin.png» alt-text=»Screenshot to select the Pin icon to pin the Toolbox window to the IDE.»:::
-
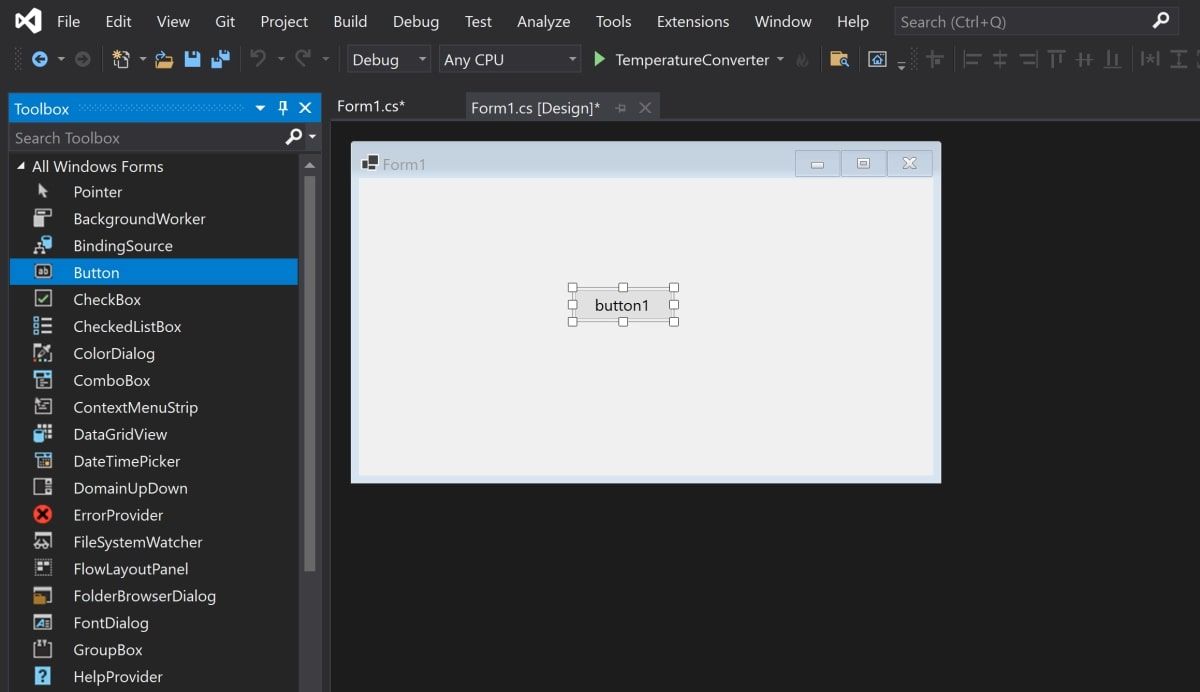
Select the Button control and then drag it onto the form.
:::image type=»content» source=»media/vs-2022/csharp-winform-add-button-on-form.png» alt-text=»Screenshot to add a button to the form.»:::
-
In the Properties window, locate Text, change the name from button1 to
Click this, and then press Enter.:::image type=»content» source=»media/vs-2022/csharp-winform-button-properties-text.png» alt-text=»Screenshot to add text to the button on the form by using the Properties window.»:::
(If you don’t see the Properties window, you can open it from the menu bar. To do so, select View > Properties Window. Or, press F4.)
-
In the Design section of the Properties window, change the name from button1 to
btnClickThis, and then press Enter.:::image type=»content» source=»media/vs-2022/csharp-winform-button-properties-design-name.png» alt-text=»Screenshot to add a function to the button on the form by using the Properties window.»:::
[!NOTE]
If you’ve alphabetized the list in the Properties window, button1 appears in the (DataBindings) section, instead.
Add a label to the form
Now that we’ve added a button control to create an action, let’s add a label control to send text to.
-
Select the Label control from the Toolbox window, and then drag it onto the form and drop it beneath the Click this button.
-
In either the Design section or the (DataBindings) section of the Properties window, change the name of label1 to
lblHelloWorld, and then press Enter.
Add code to the form
-
In the Form1.cs [Design] window, double-click the Click this button to open the Form1.cs window.
(Alternatively, you can expand Form1.cs in Solution Explorer, and then choose Form1.)
-
In the Form1.cs window, after the private void line, type or enter
lblHelloWorld.Text = "Hello World!";as shown in the following screenshot::::image type=»content» source=»media/vs-2022/csharp-winform-button-click-code.png» alt-text=»Screenshot to add code to the form»:::
Run the application
-
Select the Start button to run the application.
:::image type=»content» source=»media/vs-2022/csharp-winform-visual-studio-start-run-program.png» alt-text=»Screenshot to select Start to debug and run the app.»:::
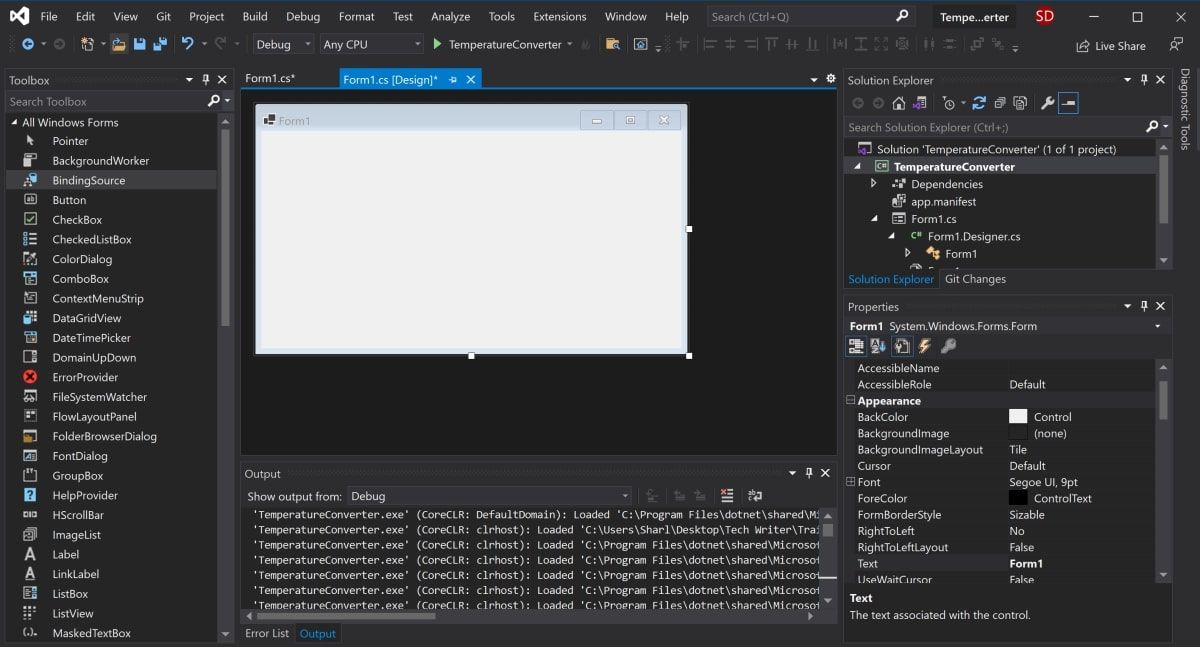
Several things will happen. In the Visual Studio IDE, the Diagnostics Tools window will open, and an Output window will open, too. But outside of the IDE, a Form1 dialog box appears. It will include your Click this button and text that says label1.
-
Select the Click this button in the Form1 dialog box. Notice that the label1 text changes to Hello World!.
:::image type=»content» source=»media/vs-2022/csharp-winform-form.png» alt-text=»Screenshot to show a Form1 dialog box that includes label1 text.»:::
-
Close the Form1 dialog box to stop running the app.
::: moniker-end
::: moniker range=»<=vs-2019″
Create the application
After you select your C# project template and name your file, Visual Studio opens a form for you. A form is a Windows user interface. We’ll create a «Hello World» application by adding controls to the form, and then we’ll run the app.
Add a button to the form
-
Choose Toolbox to open the Toolbox fly-out window.
(If you don’t see the Toolbox fly-out option, you can open it from the menu bar. To do so, View > Toolbox. Or, press Ctrl+Alt+X.)
-
Choose the Pin icon to dock the Toolbox window.
-
Choose the Button control and then drag it onto the form.
-
In the Properties window, locate Text, change the name from Button1 to
Click this, and then press Enter.(If you don’t see the Properties window, you can open it from the menu bar. To do so, choose View > Properties Window. Or, press F4.)
-
In the Design section of the Properties window, change the name from Button1 to
btnClickThis, and then press Enter.[!NOTE]
If you’ve alphabetized the list in the Properties window, Button1 appears in the (DataBindings) section, instead.


Add a label to the form
Now that we’ve added a button control to create an action, let’s add a label control to send text to.
-
Select the Label control from the Toolbox window, and then drag it onto the form and drop it beneath the Click this button.
-
In either the Design section or the (DataBindings) section of the Properties window, change the name of Label1 to
lblHelloWorld, and then press Enter.
Add code to the form
-
In the Form1.cs [Design] window, double-click the Click this button to open the Form1.cs window.
(Alternatively, you can expand Form1.cs in Solution Explorer, and then choose View Code(or press F7) from the right-click menu on Form1.cs.)
-
In the Form1.cs window, after the private void line, type or enter
lblHelloWorld.Text = "Hello World!";as shown in the following screenshot:

Run the application
-
Choose the Start button to run the application.
Several things will happen. In the Visual Studio IDE, the Diagnostics Tools window will open, and an Output window will open, too. But outside of the IDE, a Form1 dialog box appears. It will include your Click this button and text that says Label1.
-
Choose the Click this button in the Form1 dialog box. Notice that the Label1 text changes to Hello World!.
-
Close the Form1 dialog box to stop running the app.


::: moniker-end
Next steps
Congratulations on completing this tutorial. To learn more, continue with the following tutorial:
[!div class=»nextstepaction»]
Tutorial: Create a picture viewer
See also
- More C# tutorials
- Visual Basic tutorials
- C++ tutorials
Последнее обновление: 11.11.2022
Для создания графических приложений на C# можно использовать .NET CLI, но также можно
использовать бесплатную и полнофункциональную среду разработки — Visual Studio Community 2022, которая в ряде случаев облегчает проектирование
приложения. Так, загрузим установщик Visual Studio по адресу:
https://www.visualstudio.com/en-us/downloads.

Чтобы добавить в Visual Studio поддержку проектов для Windows Forms и C# и .NET 7, в программе установки среди рабочих нагрузок нужно
выбрать только пункт Разработка классических приложений .NET. Можно выбрать и больше опций или вообще все опции, однако стоит
учитывать свободный размер на жестком диске — чем больше опций будет выбрано, соответственно тем больше места на диске будет занято.
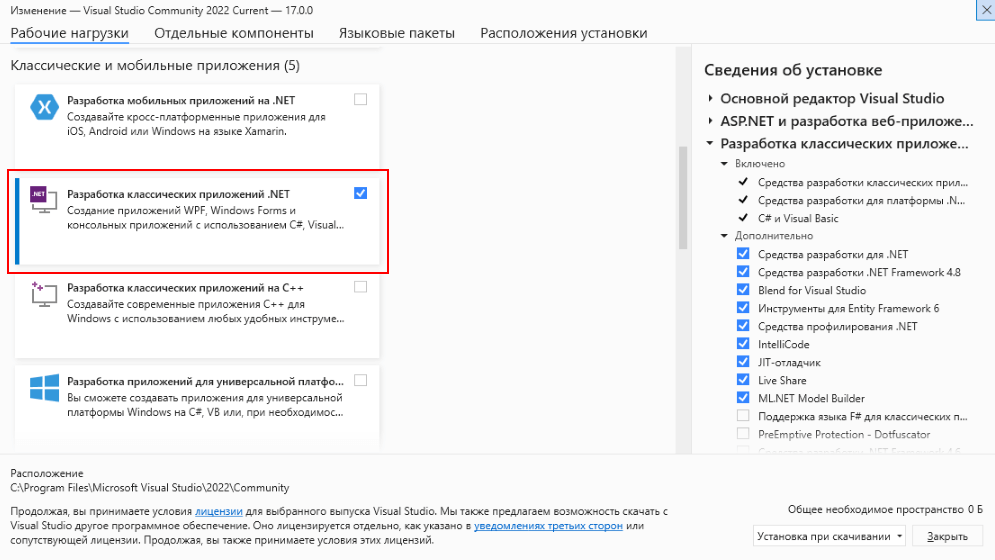
После установки среды и всех ее компонентов, запустим Visual Studio и создадим проект графического приложения.
На стартовом экране выберем Create a new project (Создать новый проект)
На следующем окне в качестве типа проекта выберем Windows Forms App:

Стоит отметить, что среди шаблонов можно увидеть еще тип Windows Forms App (.NET Framework) — его НЕ надо выбирать, необходим именно тип
Windows Forms App.
Далее на следующем этапе нам будет предложено указать имя проекта и каталог, где будет располагаться проект.
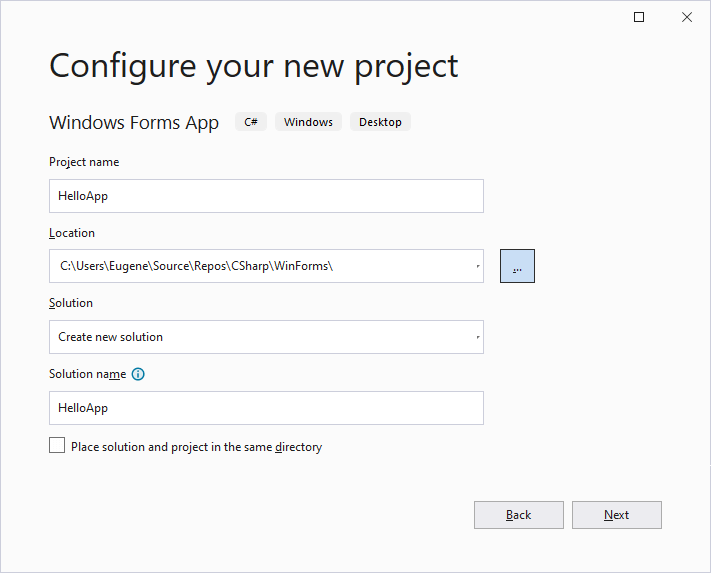
В поле Project Name дадим проекту какое-либо название. В моем случае это HelloApp.
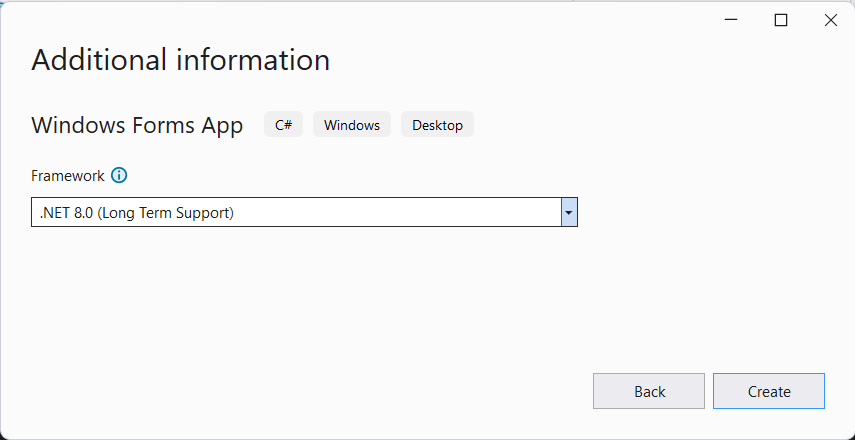
На следующем окне Visual Studio предложит нам выбрать версию .NET, которая будет использоваться для проекта. Выберем последнюю на данный момент версию — .NET 7.0 и нажмен на кнопку Create (Создать) для создания проекта.
После этого Visual Studio откроет наш проект с созданными по умолчанию файлами:
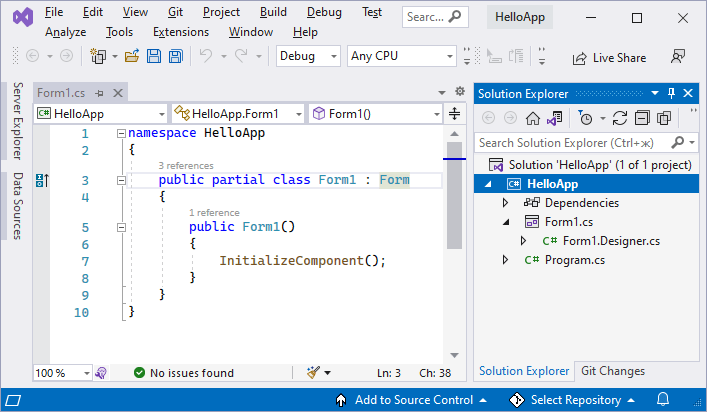
Справа находится окно Solution Explorer, в котором можно увидеть структуру нашего проекта. Практически этот тот же проект, который создается с
помощью .NET CLI:
-
Dependencies — это узел содержит сборки dll, которые добавлены в проект по умолчанию.
Эти сборки как раз содержат классы библиотеки .NET, которые будет использовать C# -
Form1.Designer.cs: он содержит определение компонентов формы, добавленных
на форму в графическом дизайнере -
Далее идет файл единственной в проекте формы — Form1.cs, который по умолчанию открыт в центральном окне.
-
Program.cs определяет точку входа в приложение
Запуск приложения
Чтобы запустить приложение в режиме отладки, нажмем на клавишу F5 или на зеленую стрелочку на панели Visual Studio.
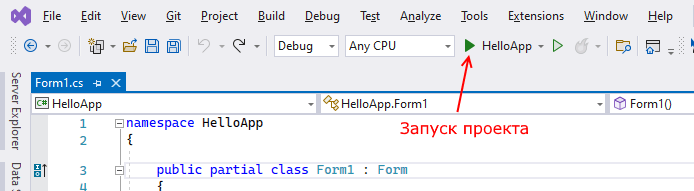
После этого запустится пустая форма Form1 по умолчанию.

После запуска приложения студия компилирует его в файл с расширением exe. Найти данный файл можно, зайдя в папку проекта и далее в каталог
binDebugnet7.0-windows
Рассмотрев вкратце создание проекта графического приложения, мы можем перейти к обзору основных компонентов и начнем мы с форм.
На чтение 7 мин Просмотров 2.8к. Опубликовано 07.04.2022
Освойте Microsoft Visual Studio и разрабатывайте собственные приложения с помощью Windows Forms практически без написания кода.
Windows Forms — это платформа, доступная в Visual Studio, которая позволяет создавать настольные приложения с помощью графического пользовательского интерфейса. Это позволяет вам щелкать и перетаскивать виджеты, такие как кнопки или метки, прямо на холст и управлять свойствами каждого виджета, такими как размер шрифта, цвет или граница.
В этой статье простой конвертер градусов Цельсия в градусы Фаренгейта будет использоваться в качестве примера для изучения основ настройки приложения Windows Form. В этом руководстве используется Visual Studio 2019 Community Edition.
Содержание
- Как создать проект Windows Forms в Visual Studio
- Как добавить элементы на холст проекта
- Как обрабатывать события и писать код в коде программной части
- Как запускать и отлаживать программу Windows Forms
- Отладка программы Windows Forms
- Запуск программы с помощью исполняемого файла
- Добавление дополнительных элементов в форму Windows
Как создать проект Windows Forms в Visual Studio
Сначала создайте проект в Visual Studio.
- Откройте Visual Studio и выберите Создать новый проект.
- Visual Studio предоставит вам список шаблонов проектов, из которых вы можете выбрать.
- Чтобы создать приложение Windows Forms, найдите приложение Windows Formи выберите его из списка шаблонов. Как только это будет выбрано, нажмите » Далее».

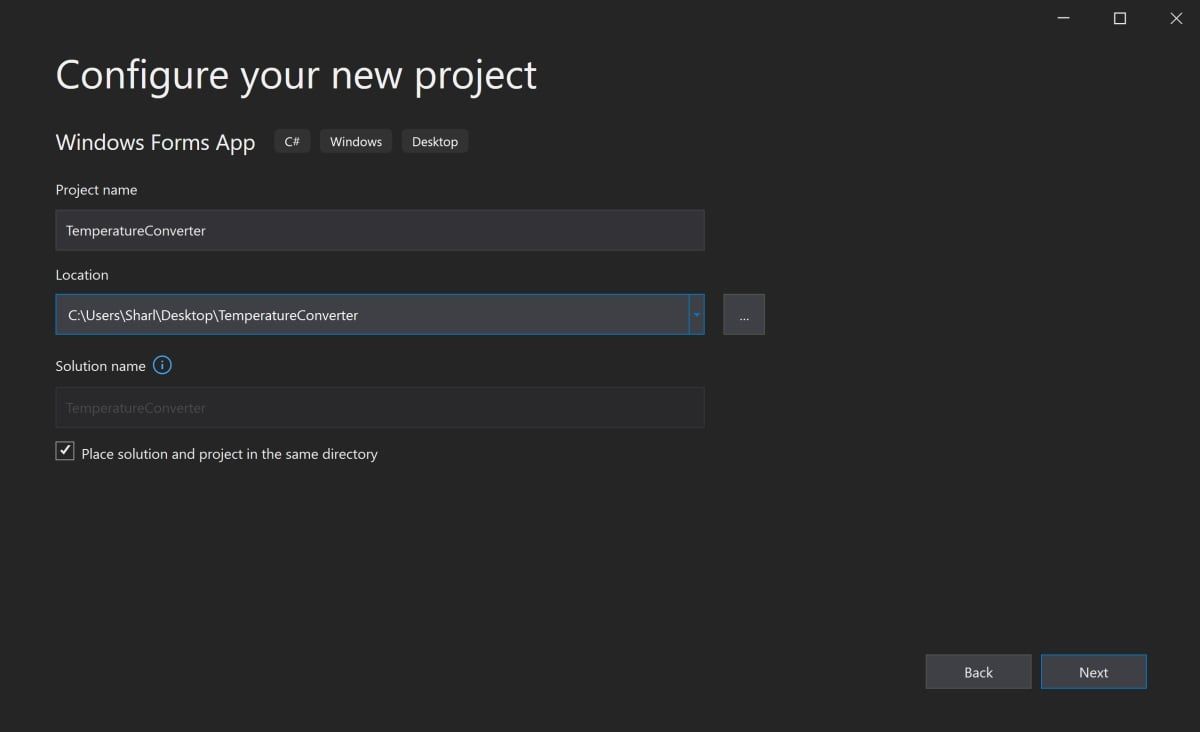
- Добавьте имя и местоположение для проекта и нажмите » Далее». Расположение — это каталог, в котором будут храниться файлы кода.
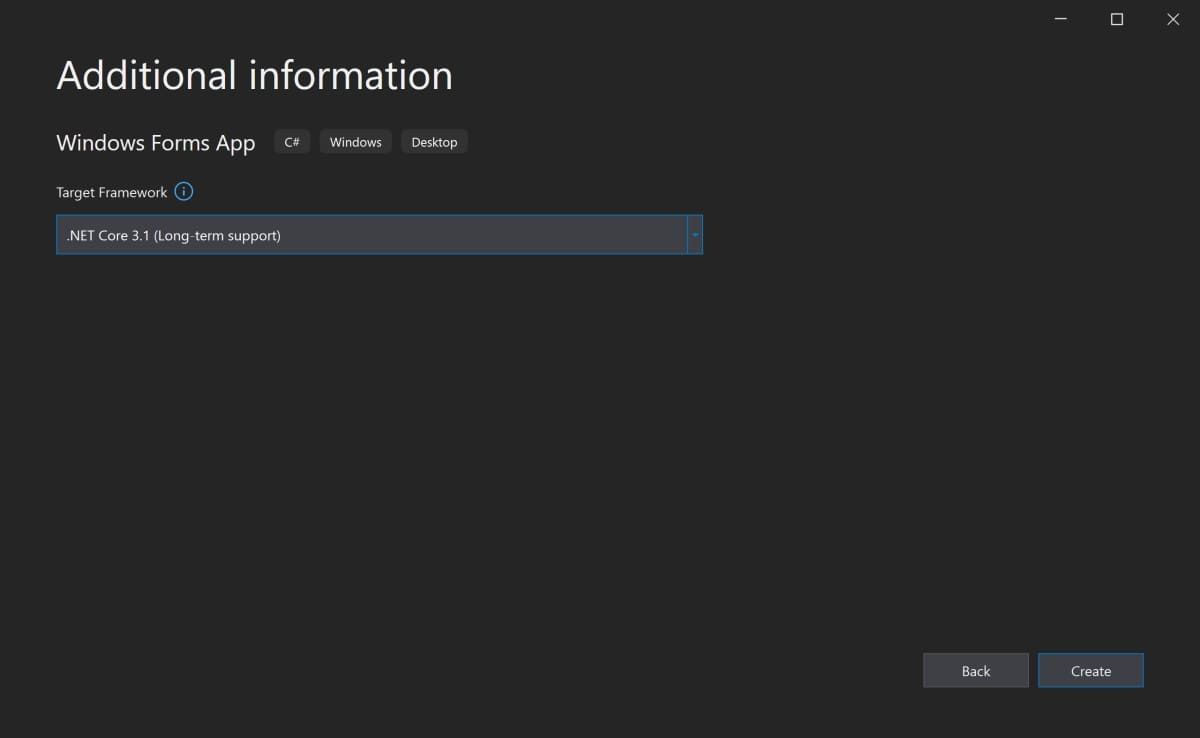
- На следующем экране сохраните выбор по умолчанию.NET Core 3.1.
- Щелкните Создать.
- Когда Visual Studio завершит создание проекта, он откроется.


Как добавить элементы на холст проекта
Холст — это белая область, расположенная в верхнем левом углу экрана. Нажмите и перетащите точки в нижней, правой или нижней правой части холста, чтобы изменить его размер, если это необходимо.
Чтобы создать пользовательский интерфейс приложения, добавьте на холст такие виджеты, как кнопки или текстовые поля.
- Откройте вкладку «Вид» в верхней части окна и выберите » Панель инструментов «.

- Это добавит панель инструментов в левую часть приложения. Выберите значок булавкив правом верхнем углу панели инструментов, чтобы закрепить его там навсегда.
- Здесь вы можете перетащить любой виджет из панели инструментов на холст. Выделите кнопку на панели инструментов и перетащите ее на холст.

- Перетащите на холст еще два текстовых поля вместе с тремя метками (две метки для каждого текстового поля и одна метка для заголовка в верхней части приложения).

- Каждый виджет на холсте имеет связанные с ним свойства. Выделите виджет, чтобы отобразить окно свойствв правом нижнем углу Visual Studio, в котором перечислены все свойства этого виджета. Эти свойства могут включать текст, имя, размер шрифта, границу или выравнивание выделенного виджета.
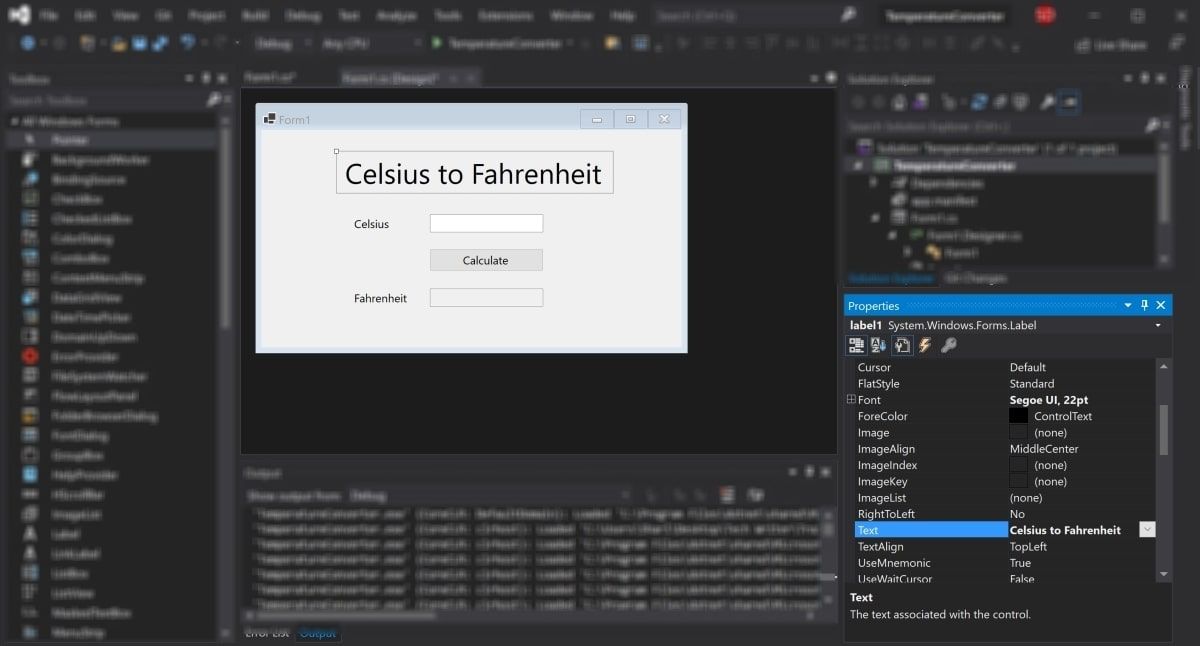
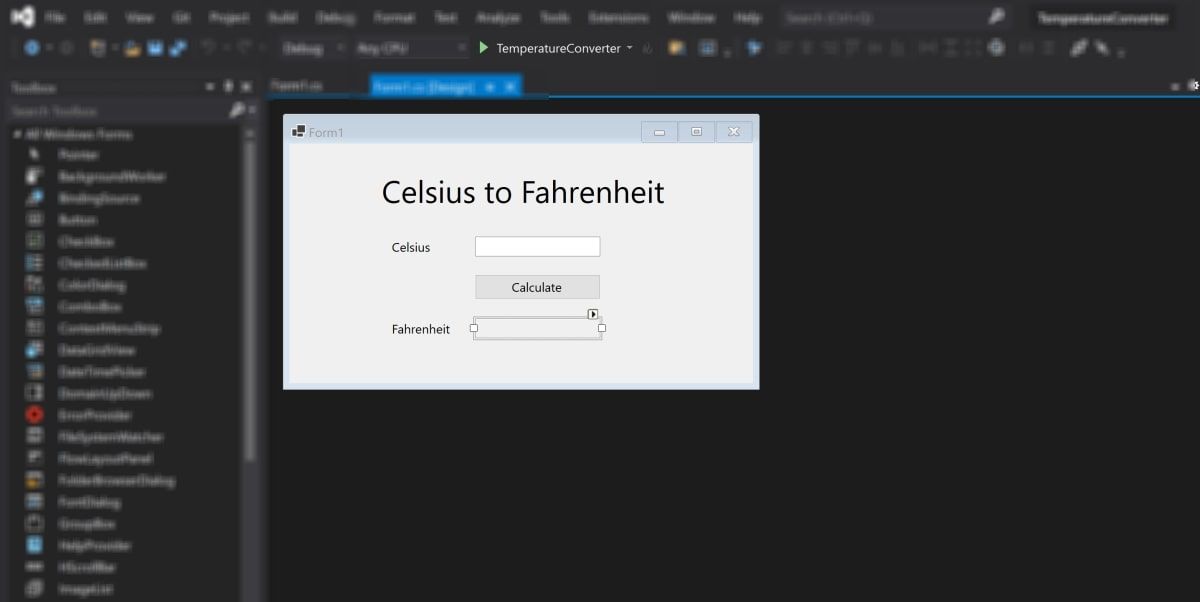
- На данный момент текст этих виджетов по-прежнему говорит label1, label2или button1. Выберите виджет label1и отредактируйте свойство Text в окне свойств, указав «Цельсий в Фаренгейт». Измените размер шрифта на 22pt.

- Аналогичным образом отредактируйте свойства других виджетов на холсте, чтобы они были следующими:


|
Виджет |
Имущество |
Новое значение |
| метка2 | Текст | Цельсия |
| этикетка3 | Текст | по Фаренгейту |
| кнопка | Текст | Рассчитать |
| Текстовое поле Фаренгейта | Только для чтения | Истинный |
Как обрабатывать события и писать код в коде программной части
Виджеты на холсте можно привязывать к событиям. События могут включать в себя такие вещи, как нажатие кнопки, изменение текста внутри текстового поля или выбор определенного переключателя. Когда происходят эти события, это может привести к срабатыванию части кода в программном коде.
C# — это язык, используемый при создании Windows Forms. Если вы еще не использовали C#, есть много практических причин для изучения программирования на C#.
Для этого конкретного приложения добавьте событие к кнопке » Рассчитать «, чтобы инициировать выполнение части кода при нажатии этой кнопки.
1. Дважды щелкните кнопку » Рассчитать«, чтобы автоматически открыть Form1.cs с новым методом Event:
private void calculateButton_Click(object sender, EventArgs e)
2. Здесь вы добавите код, который будет выполнять расчет градусов Цельсия по Фаренгейту и отображать результат в текстовом поле Фаренгейта. Для этого вам нужно иметь возможность прочитать значение из текстового поля Цельсия и изменить текстовое поле Фаренгейта, чтобы отобразить результат.
3. Вернитесь на холст и повторно отредактируйте свойства, как показано ранее. На этот раз отредактируйте свойство Nameдля текстовых полей Цельсия и Фаренгейта. Эти имена можно использовать для ссылки на текстовые поля в коде.
| Виджет | Имущество | Новое значение |
| Текстовое поле Цельсия | Имя | ЦельсияTextBox |
| Текстовое поле Фаренгейта | Имя | по ФаренгейтуTextBox |
4. Вернитесь к функции calculateButton_Click в Form1.cs.
5. Теперь на текстовое поле Celsius можно ссылаться в коде, используя имя «celsiusTextBox». Введенное пользователем значение Цельсия сохраняется в его свойстве Text. Однако, поскольку это строка, разберите ее на двойную, чтобы включить ее в будущие расчеты по Фаренгейту.
 private void calculateButton_Click(object sender, EventArgs e)
{
    // Get the value that the user entered in the Celsius Text Box
   double celsiusValue = Double.Parse(celsiusTextBox.Text);
}
6. Переменная celsiusValue теперь хранит значение, введенное пользователем в текстовом поле Celsius. Формула для преобразования градусов Цельсия в градусы Фаренгейта: (celsiusValue * 9 / 5) + 32.Таким образом, результат теперь можно рассчитать и сохранить в текстовом поле Фаренгейта.
 private void calculateButton_Click(object sender, EventArgs e)
{
    // Get the value that the user entered in the Celsius Text Box
    double celsiusValue = Double.Parse(celsiusTextBox.Text);   // Apply the calculation
   double result = (celsiusValue * 9 / 5) + 32;   // Store the result in the Fahrenheit Textbox
   fahrenheitTextBox.Text = result.ToString();
}
Как запускать и отлаживать программу Windows Forms
Запуск программы Windows Forms в Visual Studio
Теперь, когда пользовательский интерфейс и логика кода настроены, запустите программу, чтобы увидеть, как она работает.
1. Чтобы запустить программу, выберите зеленую стрелку вверху панели инструментов в Visual Studio. 
2. После загрузки проекта добавьте значение в текстовое поле Цельсия и нажмите кнопку » Рассчитать». Это добавит результат в текстовое поле по Фаренгейту. 
3 Если программа размыта во время выполнения, вероятно, ваше приложение не поддерживает DPI. Это может вызвать проблемы с масштабированием и разрешением, поэтому его необходимо включить.
4. Щелкните правой кнопкой мыши проект TemperatureConverterв обозревателе решений. Выберите Добавить, затем выберите Новый элемент.
5. Найдите файл манифеста приложения и нажмите » Добавить «. 
6. Скопируйте следующий код в новый файл app.manifest как дочерний элемент тега сборки (если код уже сгенерирован, просто раскомментируйте его).
<application xmlns=»urn:schemas-microsoft-com:asm.v3″>
<windowsSettings>
<dpiAware xmlns=»http://schemas.microsoft.com/SMI/2005/WindowsSettings«>true</dpiAware>
<longPathAware xmlns=»http://schemas.microsoft.com/SMI/2016/WindowsSettings«>true</longPathAware>
</windowsSettings>
</application>
7. Чтобы это изменение вступило в силу, перезапустите программу. Нажмите красную кнопку остановки в верхней части панели инструментов, затем снова нажмите зеленую кнопку воспроизведения.
Отладка программы Windows Forms
Вы можете отладить программу, если логика вашего приложения Windows Forms не работает должным образом.
- Вернитесь к функции calculateButton_Click в Form1.cs и щелкните в любом месте серой полосы в крайнем левом углу экрана. Это добавит точку останова, которая обозначена красным кружком.
- Нажмите кнопку «Рассчитать» еще раз, чтобы запустить этот метод. Программа приостановится, когда достигнет точки останова, чтобы показать все значения, хранящиеся в переменных в этой точке.
- Чтобы продолжить работу программы, нажмите зеленую стрелку » Продолжить» в верхней части панели инструментов.

Запуск программы с помощью исполняемого файла
Если вы не хотите запускать свою программу через Visual Studio, используйте автономный исполняемый файл для программы. Это автоматически генерируется.
Перейдите к исполняемому файлу, который можно найти здесь:
<your-project-folder>/bin/Debug/netcoreapp3.1/TemperatureConverter.exe
Нажмите на исполняемый файл, чтобы запустить программу напрямую.
Добавление дополнительных элементов в форму Windows
Надеюсь, теперь у вас есть общее представление об основной структуре приложения Windows Form. Вы можете продолжить изучение дополнительных функций Windows Forms, поэкспериментировав с новыми виджетами и углубившись в другие различные события, которые можно обрабатывать.
Как только вы лучше познакомитесь с Windows Forms, вы сможете приступить к созданию более сложных приложений. Вы также можете изучить многие другие способы создания приложений на рабочем столе Windows.
Windows Forms is a framework available in Visual Studio that allows you to build desktop applications with the assistance of a graphical user interface. This allows you to click and drag widgets such as buttons or labels directly onto a canvas, and manipulate the properties of each widget such as its font-size, color or border.
In this article, a simple Celsius to Fahrenheit Converter will be used as an example to go through the basics of how to set up a Windows Form Application. Visual Studio 2019 Community Edition is the edition used for this tutorial.
How to Create the Windows Forms Project in Visual Studio
First, create the project in Visual Studio.
- Open Visual Studio and select Create a New Project.
- Visual Studio will provide you with a list of project templates you can choose from.
- To create a Windows Forms Application, search for Windows Form App and select it from the list of templates. Once this is selected, click on Next.

If the Windows Form App option is not available on the list, modify your installed version of Visual Studio. In Visual Studio Installer, add the .NET desktop development workload for Desktop and Mobile, and re-launch Visual Studio.
- Add a name and location for the project, and click on Next. The location is the directory where the code files will be stored.

- On the next screen, keep the default selection of .NET Core 3.1.
- Click Create.

- Once Visual Studio has finished creating the project, the project will open.


How to Add Elements to the Project Canvas
The canvas is the white area located at the top-left of the screen. Click and drag the points on the bottom, right, or bottom-right of the canvas to resize it if needed.
To create the UI of the application, add widgets such as buttons or text boxes onto the canvas.
- Open the View Tab at the top of the window, and select Toolbox.

- This will add a toolbox to the left side of the application. Select the pin icon in the top-right of the toolbox to pin it there permanently.
- This is where you can drag any widget from the toolbox onto the canvas. Highlight a button from the toolbox, and drag it onto the canvas.

- Drag two more text boxes onto the canvas, along with three labels (two labels for each text box, and one label for the title at the top of the application).

- Every widget on the canvas has properties associated with them. Highlight a widget to display the Properties window in the bottom-right of Visual Studio, which lists all the properties that widget has. These properties can include the text, name, font size, border, or alignment of the highlighted widget.
- At the moment, the text on these widgets still say label1, label2, or button1. Select the label1 widget and edit the Text property in the properties window to say «Celsius to Fahrenheit». Change the font size to be 22pt.

- Similarly, edit the properties of the other widgets on the canvas to be the following:
Widget
Property
New Value
label2
Text
Celsius
label3
Text
Fahrenheit
button
Text
Calculate
Fahrenheit text box
ReadOnly
True

How to Handle Events and Write Code in the Code-Behind
Widgets on the canvas can be tied to events. Events can include things like clicking on a button, changing the text inside a text box, or selecting a particular radio button. When these events happen, it can cause a section of code in the Code-Behind to trigger.
C# is the language used when creating Windows Forms. If you haven’t already used C#, there are many practical reasons to learn C# programming.
For this particular application, add an event to the Calculate button, to trigger a section of code to run when this button is pressed.
- Double-click the Calculate button to automatically open Form1.cs with a new Event method:
private void calculateButton_Click(object sender, EventArgs e) - This is where you will add the code that will perform the Celsius to Fahrenheit calculation, and display the result in the Fahrenheit text box. To do this, you need to be able to read the value from the Celsius text box, and modify the Fahrenheit text box to display the result.
- Go back to the canvas, and re-edit the properties as shown before. This time, edit the Name property for both the Celsius and Fahrenheit text boxes. These names can be used to reference the text boxes in the code.
Widget
Property
New Value
Celsius Text Box
Name
celsiusTextBox
Fahrenheit Text Box
Name
fahrenheitTextBox
- Go back to the calculateButton_Click function in Form1.cs.
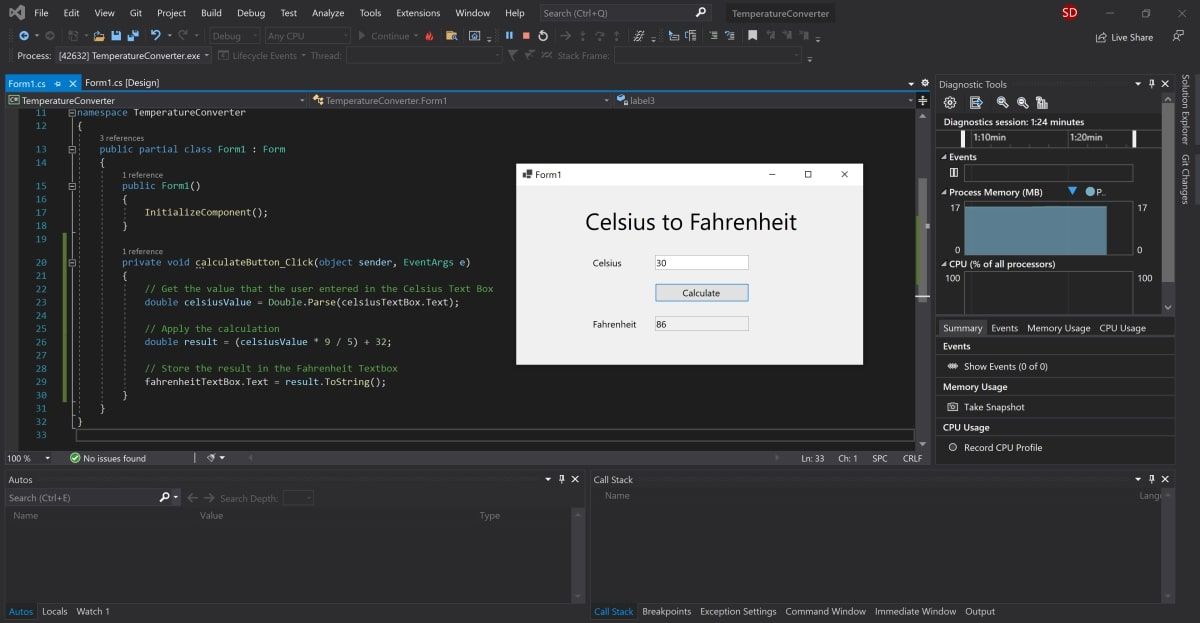
- Now, the Celsius text box can be referred to in the code using the name «celsiusTextBox». The Celsius value the user entered is stored in its Text property. However, since it’s a string, parse this into a double in order to include it in the future Fahrenheit calculations.
private void calculateButton_Click(object sender, EventArgs e)
{
// Get the value that the user entered in the Celsius Text Box
double celsiusValue = Double.Parse(celsiusTextBox.Text);
} - The celsiusValue variable now stores the value that the user entered in the Celsius Text Box. The formula for converting Celsius to Fahrenheit is (celsiusValue * 9 / 5) + 32. Therefore, the result can now be calculated and stored in the Fahrenheit Text Box.
private void calculateButton_Click(object sender, EventArgs e)
{
// Get the value that the user entered in the Celsius Text Box
double celsiusValue = Double.Parse(celsiusTextBox.Text);// Apply the calculation
double result = (celsiusValue * 9 / 5) + 32;// Store the result in the Fahrenheit Textbox
fahrenheitTextBox.Text = result.ToString();
}
How to Run and Debug the Windows Forms Program
Running the Windows Forms Program in Visual Studio
Now that the UI and code logic is set up, run the program to see it working.
- To run the program, select the green arrow at the top of the toolbar in Visual Studio.

- Once the project has loaded, add a value into the Celsius text box and press the Calculate button. This will add the result into the Fahrenheit text box.

- If the program is blurry at runtime, it is likely your application is not DPI aware. This can cause scaling and resolution issues, so this will need to be enabled. You can also read more about configuring display scaling on Windows 10 for High-DPI monitors.
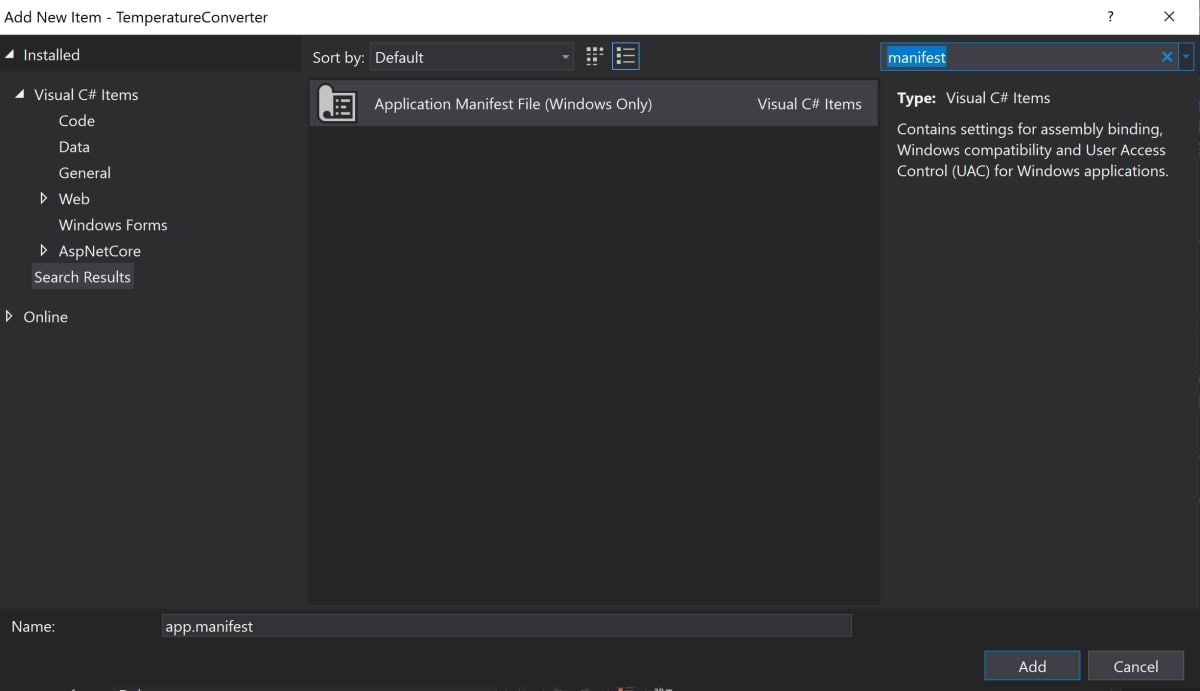
- Right-click on the TemperatureConverter Project in the Solutions Explorer. Select Add, then select New Item.
- Search for the Application Manifest File, and click Add.

- Copy the following code into the new app.manifest file, as a child of the assembly tag (if the code is already generated, just un-comment it).
 <application xmlns="urn:schemas-microsoft-com:asm.v3">
 <windowsSettings>
   <dpiAware xmlns="http://schemas.microsoft.com/SMI/2005/WindowsSettings">true</dpiAware>
   <longPathAware xmlns="http://schemas.microsoft.com/SMI/2016/WindowsSettings">true</longPathAware>
 </windowsSettings>
</application> - For this change to take effect, re-run the program. Select the red stop button at the top of the toolbar, then select the green play button again.
Debugging the Windows Forms Program
You may want to debug the program if the logic of your Windows Forms application is not working as expected.
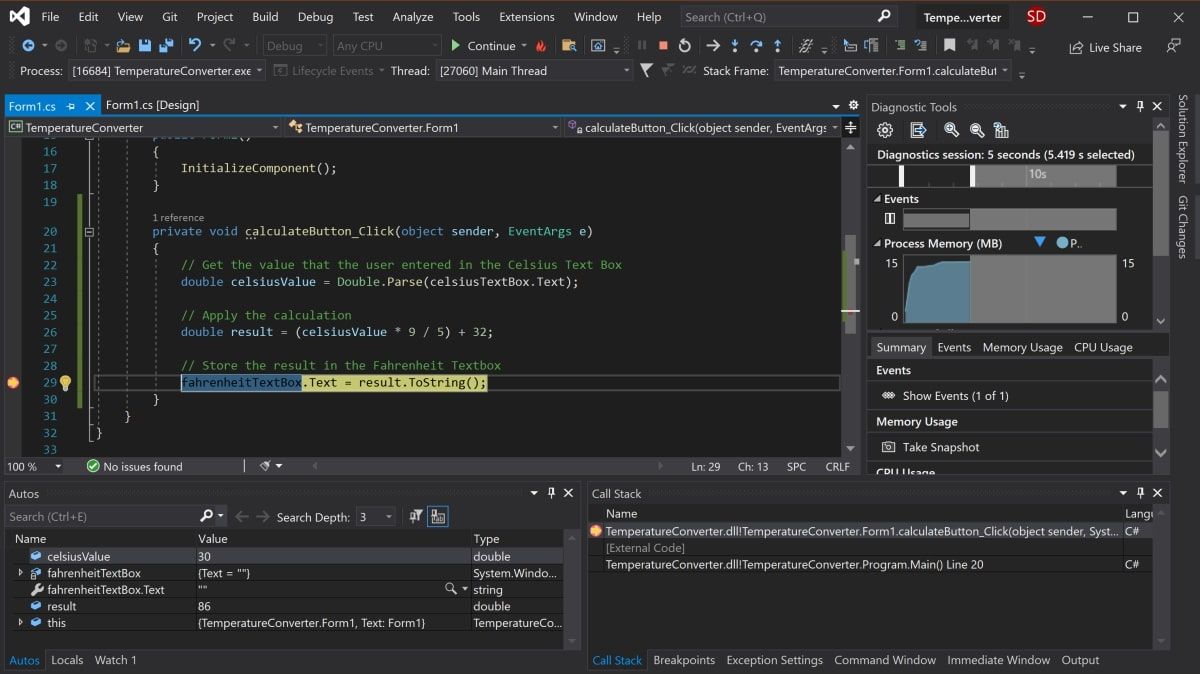
- Navigate back to the calculateButton_Click function in Form1.cs and click anywhere on the gray bar in the far-left of the screen. This will add a breakpoint, which is indicated by a red circle.
- Press the «Calculate» button again to trigger this method to execute. The program will pause when it hits the breakpoint to show all the values stored in the variables at that point.
- To continue the program, click the green Continue arrow at the top of the toolbar.

Running the Program Using an Executable File
If you don’t want to run your program through Visual Studio, use the standalone executable file for the program. This is automatically generated.
- Navigate to the executable file, which can be found here:
<your-project-folder>/bin/Debug/netcoreapp3.1/TemperatureConverter.exe - Click on the executable file to directly run the program.
Adding More to Your Windows Form
Hopefully you now have a basic understanding of the basic structure of a Windows Form Application. You can continue exploring additional Windows Forms features by experimenting with new widgets, and taking a deeper dive into the other various events that can be handled.
Once you are more familiar with Windows Forms, you can start creating more complex applications. You can also explore many of the other ways you can create applications on Windows desktop.
Improve Article
Save Article
Improve Article
Save Article
Windows Forms is a Graphical User Interface(GUI) class library which is bundled in .Net Framework. Its main purpose is to provide an easier interface to develop the applications for desktop, tablet, PCs. It is also termed as the WinForms. The applications which are developed by using Windows Forms or WinForms are known as the Windows Forms Applications that runs on the desktop computer. WinForms can be used only to develop the Windows Forms Applications not web applications. WinForms applications can contain the different type of controls like labels, list boxes, tooltip etc.
Creating a Windows Forms Application Using Visual Studio 2017
- First, open the Visual Studio then Go to File -> New -> Project to create a new project and then select the language as Visual C# from the left menu. Click on Windows Forms App(.NET Framework) in the middle of current window. After that give the project name and Click OK.
Here the solution is like a container which contains the projects and files that may be required by the program.
- After that following window will display which will be divided into three parts as follows:
- Editor Window or Main Window: Here, you will work with forms and code editing. You can notice the layout of form which is now blank. You will double click the form then it will open the code for that.
- Solution Explorer Window: It is used to navigate between all items in solution. For example, if you will select a file form this window then particular information will be display in the property window.
- Properties Window: This window is used to change the different properties of the selected item in the Solution Explorer. Also, you can change the properties of components or controls that you will add to the forms.
You can also reset the window layout by setting it to default. To set the default layout, go to Window -> Reset Window Layout in Visual Studio Menu.
- Now to add the controls to your WinForms application go to Toolbox tab present in the extreme left side of Visual Studio. Here, you can see a list of controls. To access the most commonly used controls go to Common Controls present in Toolbox tab.
- Now drag and drop the controls that you needed on created Form. For example, if you can add TextBox, ListBox, Button etc. as shown below. By clicking on the particular dropped control you can see and change its properties present in the right most corner of Visual Studio.
In the above image, you can see the TextBox is selected and its properties like TextAlign, MaxLength etc. are opened in right most corner. You can change its properties’ values as per the application need. The code of controls will be automatically added in the background. You can check the Form1.Designer.cs file present in the Solution Explorer Window.
- To run the program you can use an F5 key or Play button present in the toolbar of Visual Studio. To stop the program you can use pause button present in the ToolBar. You can also run the program by going to Debug->Start Debugging menu in the menubar.


In this article, we’ll achieve numerous goals. First of all, we’ll learn through a step-by-step process to create the project in Visual Studio 2019 and create a windows form application. Within the application, we’ll use the features of the drag and drop low code approach supported for the Designer in Visual Studio 2019. A small part of gamification has been creatively put in to make it interesting for beginners. Later, we run the application and look at the prospective possibilities with the windows from the application.
The previous article, C# Connect to MySQL in Visual Studio 2019 will help you connect to the database for applications in C# and the .NET framework from Visual Studio itself.
Step 1
Let us start with the installation of Visual Studio 2019. The Community edition is free for use. Once installed, the following screen will pop up. Click on Launch.
Step 2
To start a new project, click on Create a new project.
Step 3
Now, as we are making a Windows Forms App, we choose the Windows Forms App (.NET Framework).
If you don’t find the options available, it’s probably not installed yet. You can select the Install more tools and features and then choose the .NET desktop development workload which supports console application building, windows forms application, and WPF.
Step 4
Fill in the project name, the location where the solutions repository will be saved, the solution name, and the .NET framework of your choice. After that, Click on Create.
Step 5
The Visual Studio Solution will be created and the window will look similar to as shown below.
Step 6
In caset he Toolbox is not there, you can opt for it from the View section in Menu.

Step 7
The Toolbox should look similar to the following image.
Now, let us start our project. Choose the Button and then drag and top on the Designer.
I’ve created three buttons here, button1, button2, and button3.
The properties of the button can be seen in the Properties section. The Text shows the displayed name of the button — the first button.
Let us change the text to Press Here.
Moreover, the Name of the Design is the one that will call functions for in the program. Here, we name it btnPresshere.
Step 8
Let us go back to Toolbox and search for labels by typing in the search bar. Select the Label and drag and drop one in the designer.
Step 9
The new label i.e. label1 is placed below the button Press Here.
The reason for the label is to call an action while pressing the Press Here button.
Step 10
Let us change the name of the label to labelPressHere. A good convention is to create label names as per the action it operates to.
Step 11
Now double click the Press Here button from the Designer.
A class will be created automatically in the Form1.cs file that would look similar to the one below.
Now, let us add the following code to create action while pressing the Press Here button.
labelPresshere.Text = “Welcome to C# Corner” Let us test what the program can do now. You can run the program, by clicking the Start button.
Let us see, what happens when we click the Press Here button.
See, label1 changes to Welcome to C# Corner now.
Step 12 — ROCK PAPER SCISSOR
Let us get creative now with button2. Let’s create a small Rock Paper Scissor game.
Let us rename the button to Rock Paper Scissor and the label to labelRPS and create another label called labelDYW.
Double Clicking the Rock Paper Scissor button, new classes are created.
Add the following code for button2_Click action.
private void button2_Click(object sender, EventArgs e) {
    string[] game = {
        "Rock",
        "Paper",
        "Scissor"
    };
    Random rand = new Random();
    int index = rand.Next(game.Length);
    labelRockPaperScissor.Text = game[index];
    labelDYW.Text = "Did you win?";
}
An array of strings named game is created. The random function is called and with randomness for the possible outcome for Rock, Paper, and Scissor – this is now a legit game you can play when you are bored.
Step 13
When we run the program, we can see, how every time we press the Rock Paper Scissor button, the new Round comes out with a different answer. So, Did You Win?
Step 14
Let us go, and change the label text to white spaces. This will make the User Interface of the App, cleaner as follows.
Step 15
Think of something creative of your own and making something out of the button3 from the lessons you learned above.
Conclusion
Thus, in this article, we learned about creating the Windows Form Application in C# using Visual Studio 2019. All the tools and resources in this article are freemium versions. So, you can try it without any payment requirement. Here, we went through a step-by-step procedure to create windows form app, design a simple app, call actions when clicking a button and with a pinch of creativity, literally made a game. I wanted to showcase; how powerful programming is. With this bit of learning, you have now entered a huge possibility of creation. You can now make an app, you might in the future make a fun game. Find out problems that can be solved, and with the stepping stone of today, their possibilities of creation are endless for you in days to come.