BIOS/UEFI Utilities for Aptio® and AMIBIOS
Custom UEFI and BIOS utilities for Aptio and AMIBIOS simplify the development and debug experience. AMI’s Aptio firmware offers an easy transition to the Unified Extensible Firmware Interface (UEFI) specification, giving developers all the advantages of UEFI – modularity, portability, C-based coding – while retaining easy-to-use tools that facilitate manufacturing and enhance productivity. AMI’s rich set of utilities for BIOS ROM image customization without rebuilding the firmware provide a clear advantage in reducing both time and cost.
AMI Firmware Update (AFU)
AMI Firmware Update (AFU) is a scriptable command-line utility for DOS, Microsoft Windows®, Linux, FreeBSD and the UEFI shell. Utilized for factory or field BIOS updates, AFU is flexible enough to update the entire Flash part or only a portion. It programs the main BIOS image, boot block or OEM configurable ROM regions.

AMI BIOS Configuration Program (AMIBCP)
The AMI BIOS Configuration Program (AMIBCP) for Aptio enables customers to modify parameters in a BIOS ROM without rebuilding from source. Developers can modify default values for BIOS setup parameters, modify default boot order in BIOS setup, view and edit sign-on and setup strings, and edit SMBIOS string data.

AMI Setup Data Extraction (AMISDE)
AMISDE is a command-line tool for exporting setup data from an Aptio ROM image, including spreadsheet applications such as Microsoft Excel®. It generates a helpful summary report of BIOS setup parameters and default values that enhances productivity in testing and manufacturing.
AMISLP
AMISLP allows the insertion of Microsoft System Locked Pre-Installation (SLP) key files into the BIOS image. SLP keys are used for OEM activation of Microsoft Windows® 7 and Vista®. For Windows® 8.1 and Windows® 10, the OEM Activation 3.0 eModule is used in conjunction with AFU v2.35 or greater.
Change Logo
Change Logo allows developers to easily change logos displayed by Aptio at boot. The full screen “splash” logo and small logos appearing on the main screen during POST can be replaced with custom logos. Change Logo also allows logos to be extracted from existing Aptio ROM files.

AMI Utility Configuration Program (AMIUCP)
AMIUCP is a utility that is used to pre-configure the Aptio Flash Utility (AFU). Users can insert and exchange the default command string and ROM image used in AFU to create a customized version of the utility. AMIUCP supports AFU v2.35 or AFUWINGUI v1.12 or later.
Desktop Management Interface Edit (DMIEdit)
DMIEdit is a scriptable command-line utility for DOS, Microsoft Windows®, Linux and the UEFI shell. The Desktop Management Interface Editor for Aptio enables developers to modify strings associated with platform SMBIOS tables (System, Base Board, Chassis, OEM string, etc). In manufacturing, use DMIEdit to embed platform serial numbers, UUID and license keys into the SMBIOS table, which identifies platforms to management software.

Module Management Tool (MMTool)
Aptio’s Module Management Tool (MMTool) allows developers to manage firmware file modules contained within an Aptio firmware ROM image. Use MMTool to extract, replace and insert binary components such as modules, Option ROMs, microcode patches and ROM holes using its graphical or command line interface. With MMTool, developers can also create reports on the contents of an opened ROM image.
AMI UEFI ROM Dissect Tool (AMIRDT)
The AMIRDT utility makes it easy for developers to dissect a UEFI ROM and produce related reports on ROM status and size. This powerful tool can dissect ROMs down to section level, dissect NVRAM Variables, compare two ROMs and search the GUIDs of a given FFS to provide a summary of their sizes from ROM.
Get to know AMI
Support Links For Developers
Customer Portal
AMI’s Customer Portal for security advisories and other announcements. For assistance with access issues, please contact your AMI Sales Representative using the form at the bottom of this webpage.
ACCESS CUSTOMER PORTAL →
Support Portal
AMI’s support portal, hosted on EIP. For assistance with access issues, please contact your AMI Sales Representative using the form at the bottom of this webpage.
ACCESS EIP →
Training Services
AMI offers custom training at customer sites and AMI offices worldwide. Courses are designed around customers’ current projects for maximum effectiveness.
Aptio TRAINING BROCURE →
Technical Support
Support services from AMI are dependent on your sales agreement. Please contact your AMI Sales Representative using the form.
In the News
See AMI events, media coverage, and press releases.
Contact Us
Reach out to our team for any sales or business inquiries.
Free instant access to BIOS tips!
Fill in your name and email and receive our ebook ‘How to update your PC BIOS in 3 easy steps’ (15$ value), free BIOS tips and updates about Wim’s BIOS!
Fast, Scalable and Secure Webhosting
Are you currently having hosting problems? Do you feel that your site slowlyness is killing sales or traffic?
Our book Fast, Scalable and Secure Webhosting for Web Developers will give you the knowledge to run your site on a speedy, scalable and secure server!
Start learning about Linux, Nginx, MariaDB, PHP-FPM, Java, IPv6, HTTPS, WordPress and much more!
Tip: Receive your free Chapter Secure your site with HTTPS by joining our mailing list!
AMI Flasher is a utility program that helps you to update your BIOS — the code that runs the first moment you boot your PC. It was created by AMI to support flashing AMI BIOS based data files.
The BIOS code is stored on the motherboards on Flash chips since its introduction in 1993.
Over the years AMI has released DOS, Windows and Linux based flashers for different versions of AMI BIOS and AMI UEFI BIOS.
The DOS based versions can’t be run from Windows or other operating systems. You’ll need to create a bootable DOS disk.
Please read our How to flash your bios FAQ to correctly use the AMI Flashers.
AMI AFUDOS Flasher — DOS based AMI BIOS Firmware Update flasher
The following AMI Flasher tools can be used on AMI BIOS Core releases Aptio 3, 4, 4.5, and 5
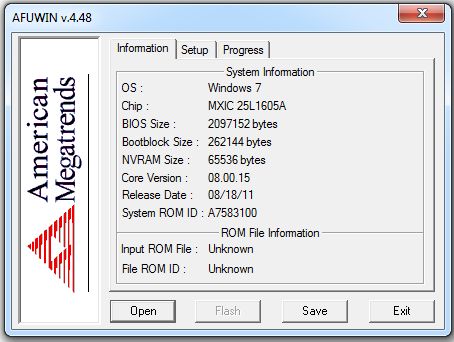
AMI AFUWIN Flasher — Windows based AMI BIOS Firmware Update flasher
The following AMI Flasher tools can be used on AMI BIOS Core releases Aptio 3, 4, 4.5, and 5
AMI AFUWIN Flasher — Windows based AMI BIOS Firmware Update flasher
| AMI AFUWIN Flasher version | Notes |
|---|---|
| AFUWIN Flasher 3.05.04 | Windows 32 & 64 bit supported |
| AFUWIN Flasher 4.48 | Windows 32 & 64 bit supported / compatible with AMIBIOS8 |
| AFUWIN Flasher 5.05.04 | Windows 32 & 64 bit supported / compatible with APTIO 3, 4, 4.5, and 5 |
AMI AFULNX Flasher — Linux based AMI BIOS Firmware Update flasher
The following AMI Flasher tools can be used on AMI BIOS Core releases Aptio 3, 4, 4.5, and 5
AMI AFULNX Flasher — Linux based AMI BIOS Firmware Update flasher
| AMI AFULNX Flasher version | Notes |
|---|---|
| AFULNX Flasher 5.05.04 | 32 bit and 64 bit Linux supported / compatible with APTIO 3, 4, 4.5, and 5 |
AMI AFUEFI Flasher — EFI shell based AMI BIOS Firmware Update flasher
The following AMI Flasher tools can be used on AMI BIOS Core releases Aptio 3, 4, 4.5, and 5
AMI Flasher — DOS based AMI BIOS flasher
The following AMI Flasher tools can be used on AMI BIOS Core release 6.31 or earlier.
AMI Winflash — AMI Flasher (Windows based)
The following AMI Flasher tools can be used on AMI BIOS Core release 6.31 or earlier.
The Flasher utilities are copyrighted by their respective owners.
Need help? Ask your question here!
(Examples: how to update your BIOS, how to identify your motherboard)
Содержание
- Обновление AMI BIOS
- Этап 1: Определение типа материнской платы и версии микропрограммы
- Этап 2: Загрузка обновлений
- Этап 3: Установка обновлений
- Заключение
- Вопросы и ответы
Несмотря на большое количество выпускаемых материнских плат, поставщиков чипов BIOS для них существует немного. Один из самых популярных – компания American Megatrends Incorporated, более известная под аббревиатурой AMI. Сегодня мы хотим рассказать, как следует обновлять БИОС такого типа.
Перед тем как мы приступим к описанию процедуры, отметим важный момент – обновление БИОС требуется лишь в редких случаях. Они описаны ниже, в следующей статье.
Подробнее: Когда требуется обновить BIOS
Теперь переходим непосредственно к инструкции. Обратите внимание, что она рассчитана на владельцев настольных ПК, тогда как обладателям ноутбуков рекомендуем изучить отдельные руководства.
Урок: Обновление BIOS на лэптопах ASUS, Acer, Lenovo, HP
Этап 1: Определение типа материнской платы и версии микропрограммы
Важный нюанс, который следует знать перед апгрейдом системного ПО – определяющую роль играет не тип БИОС, а производитель материнской платы. Поэтому первый этап и заключается в определении модели «материнки», а также версии уже установленной в неё микропрограммы. Самый простой вариант – задействовать программу для определения комплектующих компьютера. Одним из лучших решений является AIDA64.
Скачать AIDA64
- Загрузите пробный дистрибутив программы и установите его на компьютер, затем запустите с ярлыка на «Рабочем столе».
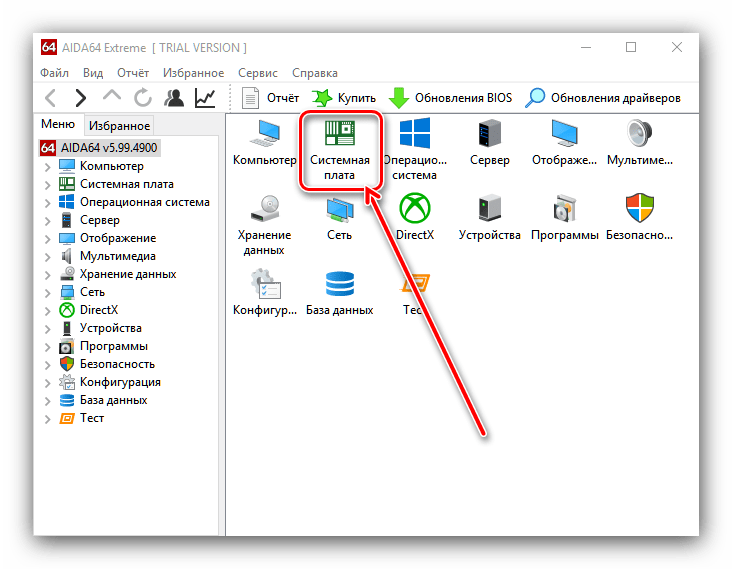
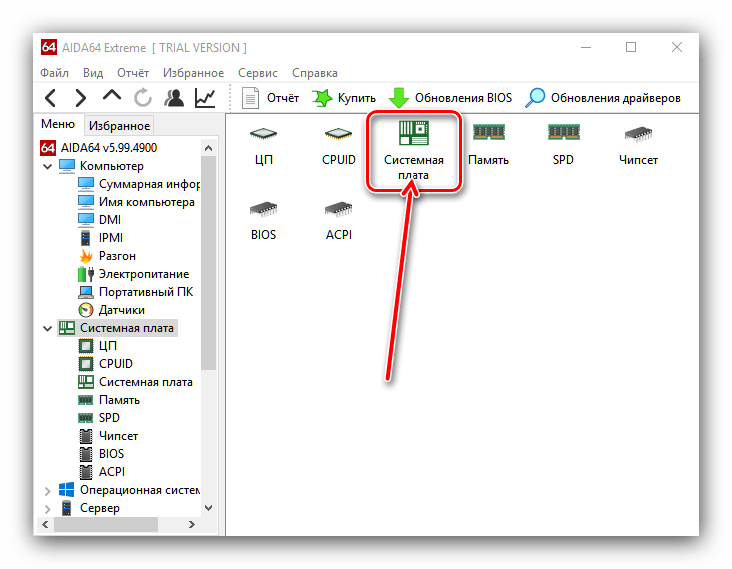
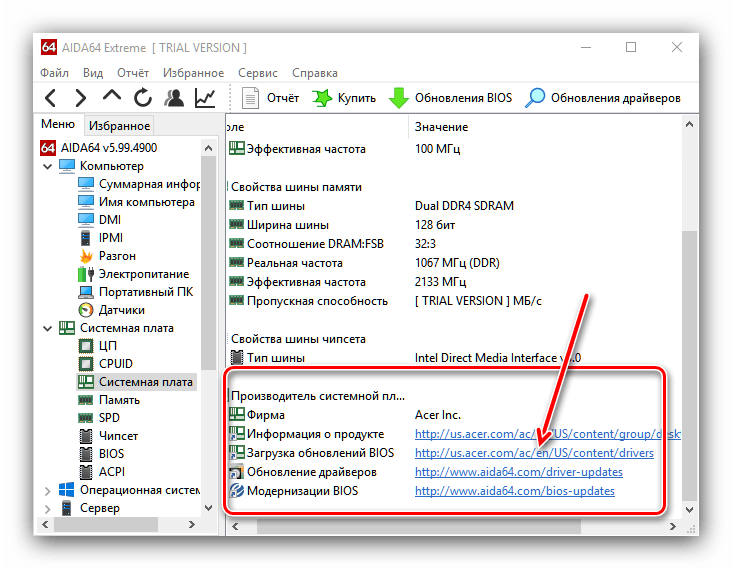
- В основной вкладке кликните по пункту «Системная плата».
Повторите действие в следующем окне. - Обратите внимание на раздел «Свойства системной платы» – в строке «Системная плата» написано точное наименование модели.
Прокрутите введения вниз, до блока «Данные о системной плате» – здесь будут размещены ссылки, нужные для обновления BIOS. Они пригодятся нам на следующем этапе.
Этап 2: Загрузка обновлений
Самый важный этап – загрузка подходящих обновлений.
Напоминаем, что AMI BIOS сам по себе не имеет значения, а важны производитель, модельный ряд и ревизия материнской платы!
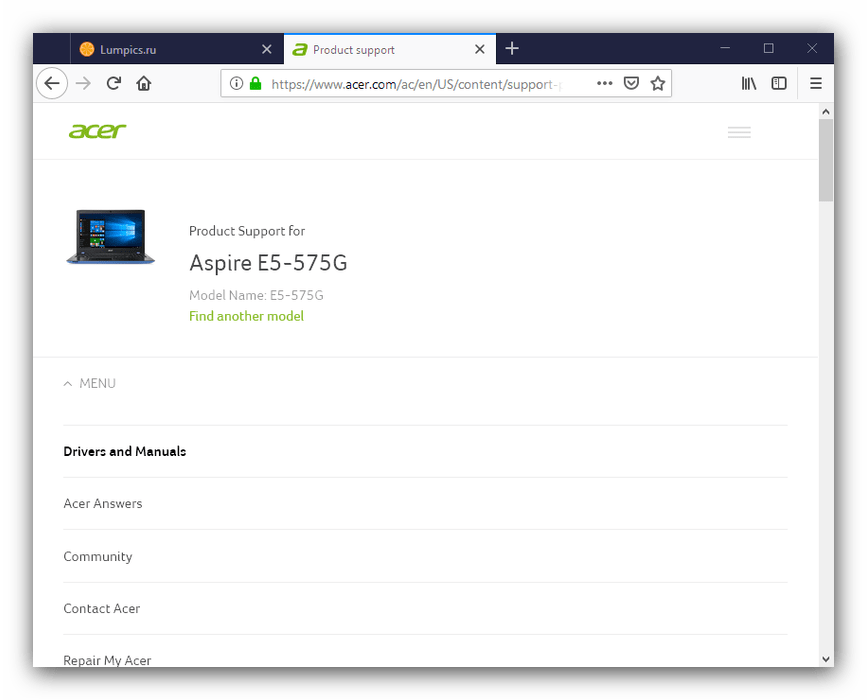
- Откройте браузер и воспользуйтесь ссылками из AIDA64, полученными на предыдущем этапе, или же перейдите к сайту производителя вашей платы самостоятельно.
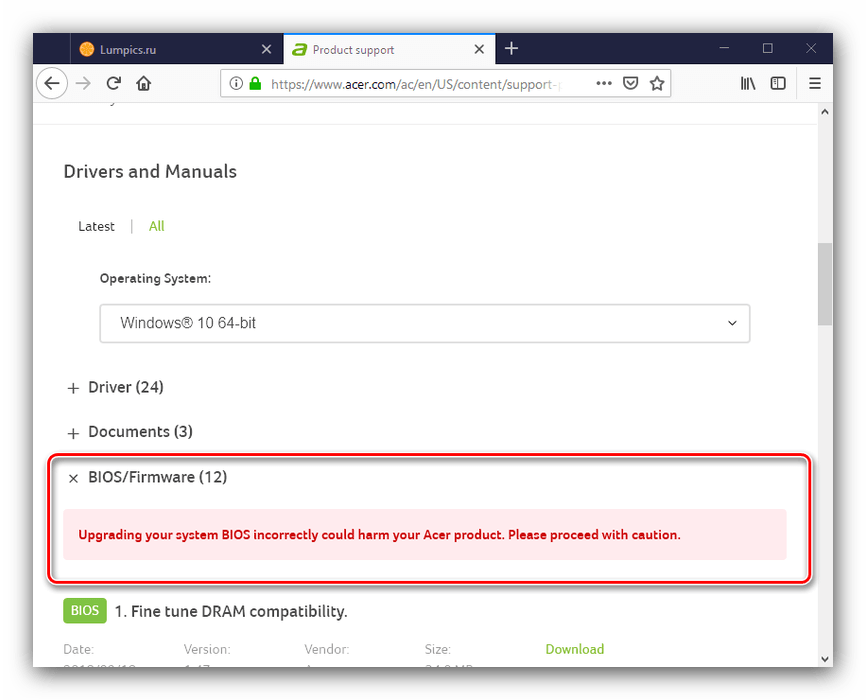
- Найдите страницу поддержки устройства и поищите пункты, в названии которых фигурируют слова «BIOS» или «Firmware». Именно в этих разделах находятся обновления для микропрограммы платы.
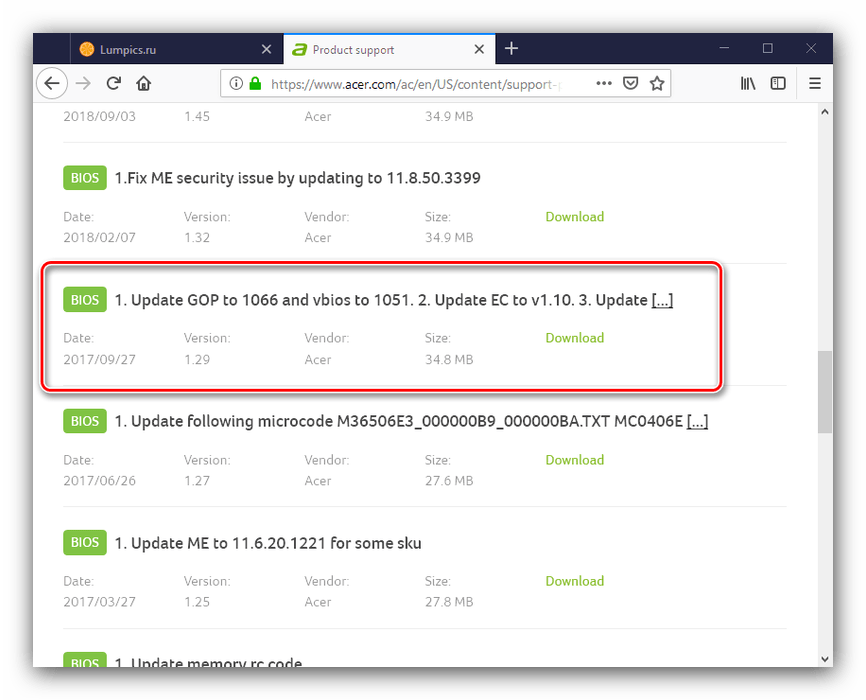
- Найдите свежую версию прошивки и загрузите на компьютер.
Обратите внимание! Многие варианты AMI BIOS не поддерживают кумулятивные обновления: не рекомендуется устанавливать версию 1.4 на BIOS 1.0, если есть версии 1.2, 1.3 и так далее!
Этап 3: Установка обновлений
Непосредственно установить новый BIOS можно несколькими разными способами. Рассмотреть их все в пределах одной статьи невозможно, поэтому сосредоточимся на варианте с установкой через DOS-оболочку.
- Перед началом процедуры стоит подготовить носитель. Возьмите подходящую флешку, объёма до 4 Гб, и отформатируйте её в файловой системе FAT32. Затем скопируйте на неё файлы прошивки, после чего извлеките носитель.
Подробнее: Как отформатировать флешку
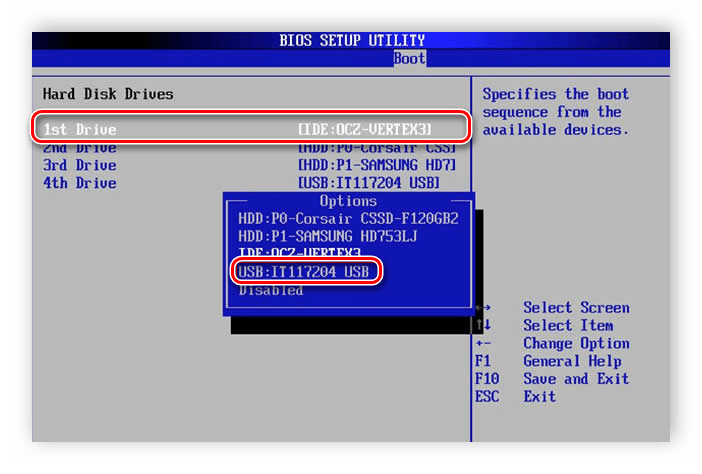
- Зайдите в БИОС и выберите загрузку с флешки.
Подробнее: Настраиваем BIOS для загрузки с флешки
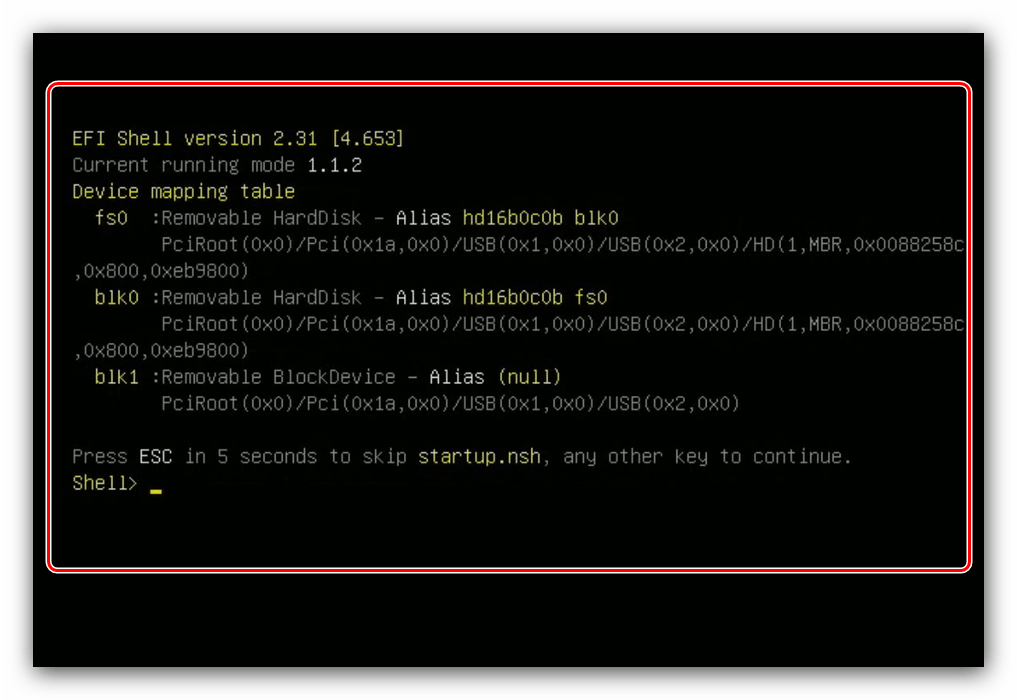
- Выключите компьютер, подключите к нему USB-накопитель, и снова включите. Появится интерфейс оболочки.
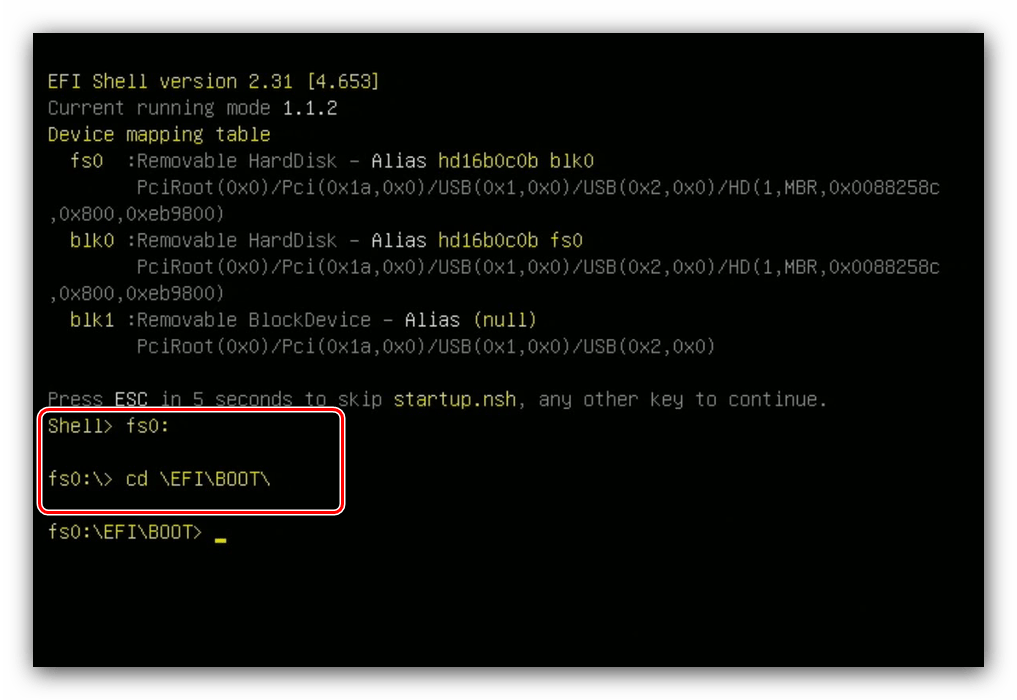
- Для выбора корневого каталога введите следующие команды (не забывайте нажимать Enter после каждой):
fs0:

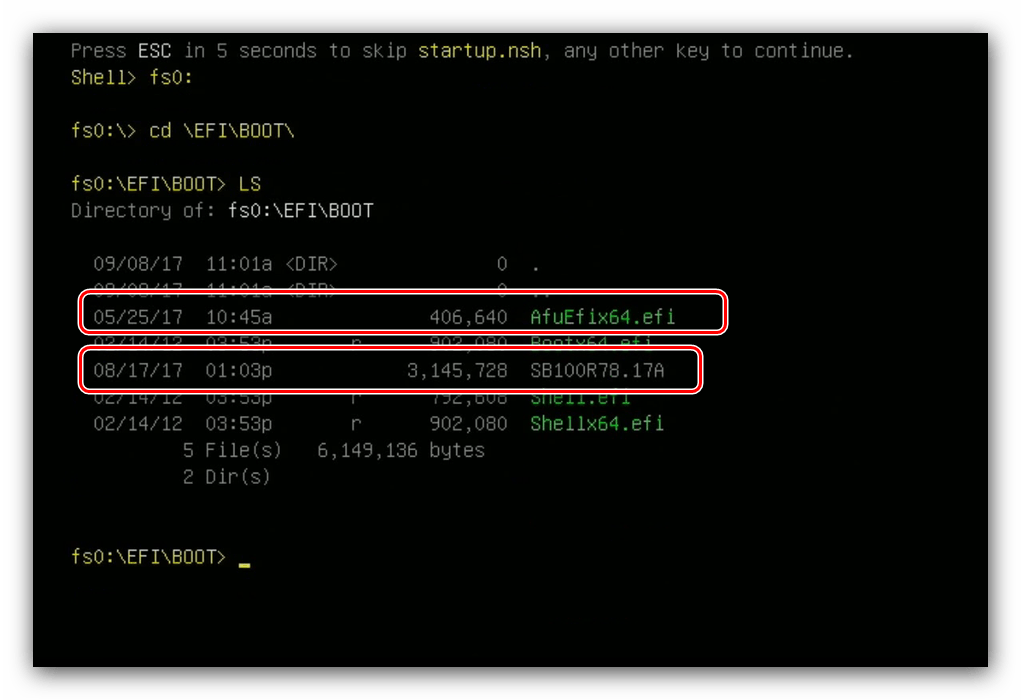
fs0: cd EFIBOOT - Далее введите команду ls для отображения списка файлов. Найдите в нём файл прошивки и утилиту-прошивальщик (для каждого варианта AMI BIOS названия будут разными!).
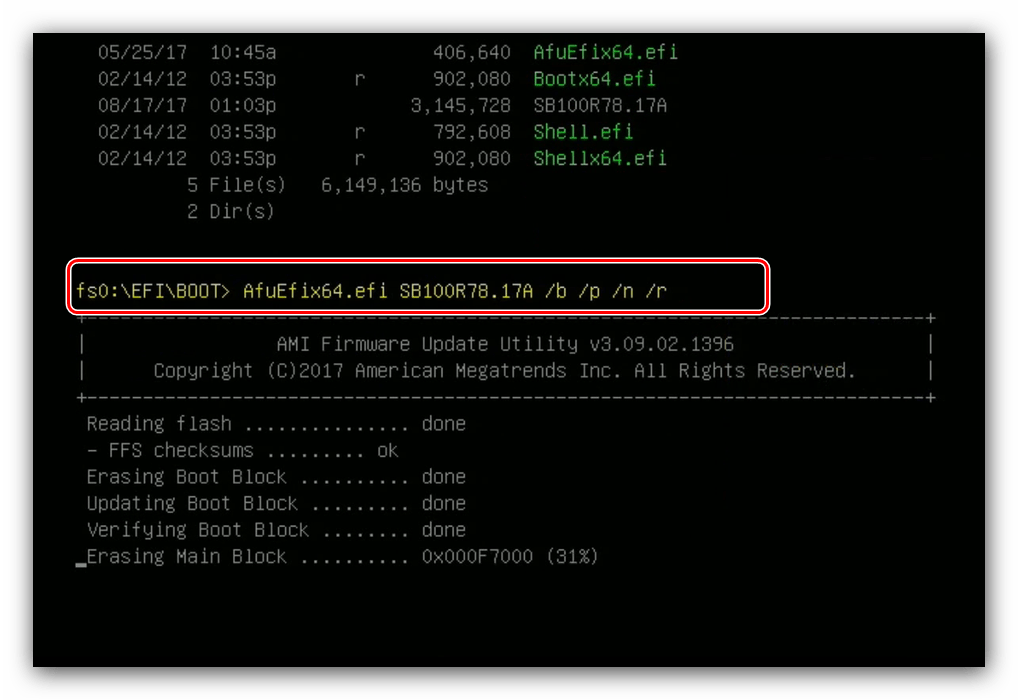
- Далее введите команду следующего вида:
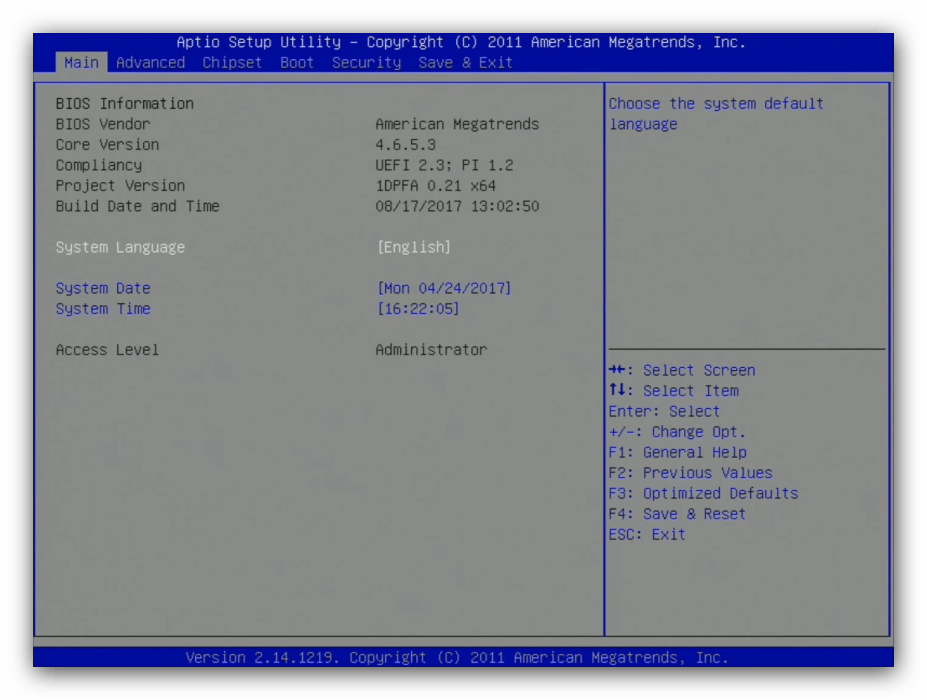
*имя утилиты-прошивальщика* *имя файла прошивки* /b /p /n /r - Дождитесь окончания процедуры (она не должна занять много времени), после чего выключите компьютер, а затем отключите от него флешку. Загрузитесь в BIOS и проверьте его версию – если всё сделано правильно, будет установлен обновлённый вариант.
Заключение
Процедура обновления AMI BIOS имеет свои особенности, поскольку отличается для каждого из вендоровских вариантов.
Еще статьи по данной теме:
Помогла ли Вам статья?
На чтение 4 мин. Просмотров 72 Опубликовано 15.12.2019

Несмотря на большое количество выпускаемых материнских плат, поставщиков чипов BIOS для них существует немного. Один из самых популярных – компания American Megatrends Incorporated, более известная под аббревиатурой AMI. Сегодня мы хотим рассказать, как следует обновлять БИОС такого типа.
Содержание
- Обновление AMI BIOS
- Этап 1: Определение типа материнской платы и версии микропрограммы
- Этап 2: Загрузка обновлений
- Этап 3: Установка обновлений
- Заключение
- Короткий гайд по основному интерфейсу
Обновление AMI BIOS
Перед тем как мы приступим к описанию процедуры, отметим важный момент – обновление БИОС требуется лишь в редких случаях. Они описаны ниже, в следующей статье.
Теперь переходим непосредственно к инструкции. Обратите внимание, что она рассчитана на владельцев настольных ПК, тогда как обладателям ноутбуков рекомендуем изучить отдельные руководства.
Урок: Обновление BIOS на лэптопах ASUS, Acer, Lenovo, HP
Этап 1: Определение типа материнской платы и версии микропрограммы
Важный нюанс, который следует знать перед апгрейдом системного ПО – определяющую роль играет не тип БИОС, а производитель материнской платы. Поэтому первый этап и заключается в определении модели «материнки», а также версии уже установленной в неё микропрограммы. Самый простой вариант – задействовать программу для определения комплектующих компьютера. Одним из лучших решений является AIDA64.
- Загрузите пробный дистрибутив программы и установите его на компьютер, затем запустите с ярлыка на «Рабочем столе».
- В основной вкладке кликните по пункту «Системная плата».
Повторите действие в следующем окне.
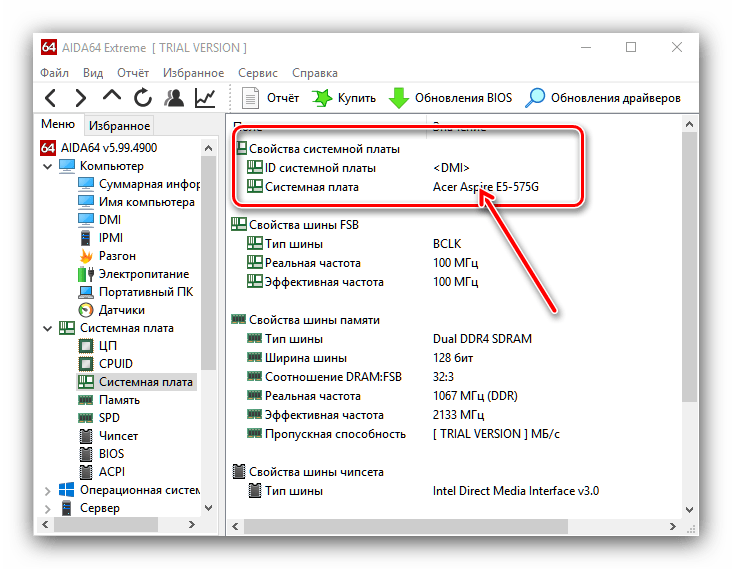
Прокрутите введения вниз, до блока «Данные о системной плате» – здесь будут размещены ссылки, нужные для обновления BIOS. Они пригодятся нам на следующем этапе.
Этап 2: Загрузка обновлений
Самый важный этап – загрузка подходящих обновлений.
Напоминаем, что AMI BIOS сам по себе не имеет значения, а важны производитель, модельный ряд и ревизия материнской платы!
- Откройте браузер и воспользуйтесь ссылками из AIDA64, полученными на предыдущем этапе, или же перейдите к сайту производителя вашей платы самостоятельно.
Обратите внимание! Многие варианты AMI BIOS не поддерживают кумулятивные обновления: не рекомендуется устанавливать версию 1.4 на BIOS 1.0, если есть версии 1.2, 1.3 и так далее!
Этап 3: Установка обновлений
Непосредственно установить новый BIOS можно несколькими разными способами. Рассмотреть их все в пределах одной статьи невозможно, поэтому сосредоточимся на варианте с установкой через DOS-оболочку.
-
Перед началом процедуры стоит подготовить носитель. Возьмите подходящую флешку, объёма до 4 Гб, и отформатируйте её в файловой системе FAT32. Затем скопируйте на неё файлы прошивки, после чего извлеките носитель.
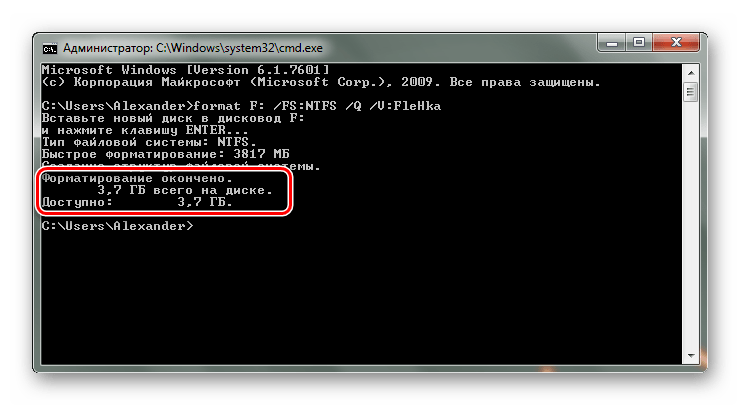
Подробнее: Как отформатировать флешку
Зайдите в БИОС и выберите загрузку с флешки.
Подробнее: Настраиваем BIOS для загрузки с флешки
Выключите компьютер, подключите к нему USB-накопитель, и снова включите. Появится интерфейс оболочки.
Для выбора корневого каталога введите следующие команды (не забывайте нажимать Enter после каждой):
fs0:
fs0: cd EFIBOOT
Далее введите команду ls для отображения списка файлов. Найдите в нём файл прошивки и утилиту-прошивальщик (для каждого варианта AMI BIOS названия будут разными!).
Далее введите команду следующего вида:
*имя утилиты-прошивальщика* *имя файла прошивки* /b /p /n /r
Заключение
Процедура обновления AMI BIOS имеет свои особенности, поскольку отличается для каждого из вендоровских вариантов.
Отблагодарите автора, поделитесь статьей в социальных сетях.
Скачать бесплатно для материнской платы Asus P5E
Вы находитесь на странице скачивания прошивок и Биосов. Данный файл — «Утилита обновления биоса AMI BIOS flash (AMI BIOS flash Utility)». Для того, чтобы скачать Биос, необходимо выбрать один из представленных ниже серверов нажав на вкладку «Бесплатно скачать этот Биос, утилиту, файл», а затем на один из серверов в раскрывшемся списке — «Скачать файл с сервера №…». Загрузка начнется сразу или через несколько секунд, в зависимости от загруженности выбранного FTP сервера. В случае, если загрузка не началась в течение нескольких секунд – попробуйте выбрать другую ссылку из этого же списка.
AMIBCP (AMI BIOS Configuration Program) — программа для редактирования настроек биосов, произведенных American Megatrends. Версия 4.53 успешно справляется с большинством биосов китайских плат на сокетах 2011, 1356 и некоторых других.
Для китайских плат на сокете 2011-3 подойдет версия AMIBCP 5.02.
Короткий гайд по основному интерфейсу

Красным контуром обозначено иерархическое древо навигации Вашего BIOS, здесь Вы можете перейти к любым его областям.
Оранжевым контуром обозначено название конкретных опций Вашего BIOS, что бы Вы знали, что меняете.
Зелёным контуром обозначено состояние «Показать/Скрыть» конкретных функций BIOS.
Синим контуром обозначен уровень доступа для каждой опции вашего BIOS.
Главная » Видео » Зачем нужно обновление AMI BIOS и как правильно обновить AMI биос? Узнай тут!
Если Вас интересует то, как обновить AMI BIOS (БИОС), то следует рассмотреть подобную задачу более подробно. Может возникнуть вопрос о том, для каких целей следует выполнять подобные процедуры. Основной задачей является улучшение работы устройства. Предусматривается не только ускорение загрузки операционной системы, но и появление новых функций. Нельзя забывать про определенные опасности подобного процесса. Выполняет его необходимо строго в соответствии с инструкциями.
Подготовка
Начинать работы необходимо с определения того, какая именно системная плата используется на конкретном устройстве. Дополнительно, происходит уточнение версии БИОС. Имеется несколько способов выполнить поставленную задачу:
- Посмотреть модель платы можно непосредственно на её корпусе. Происходит вскрытие системного блока и осматривается место на плате между PCI разъемами.
- При загрузке необходимо оставить процесс и найти строку наподобие «A7380MS v1.8 133101». Расшифровка говорит об использовании платы модели MS-7380 с версией БИОС 1.8.
- Скачивается программа Everest. На скриншоте продемонстрировано, по какому пути следует пройти. Дополнительным преимуществом является предоставление сведений о том, где скачать обновленияBIOS (БИОС).
Как провести обновление
Когда все подготовительные действия завершены, необходимо провести загрузку. Один из способов поиска обновлений представлен выше. Можно найти нужные файлы на сайте производителя материнской платы. Самый удобный подход заключается в скачивании специализированных программ. В данном случае, это Live Update 5 или более поздняя версия (если на момент прочтения Вами статьи она выпущена. Программа используется для изделий MSI и не предназначается для моноблоков или ноутбуков. В любом случае, найти аналог не составит труда.
1. Запускаем сканирование с целью обнаружить обновление AMI BIOS.
2. Будет выдан перечень результатов. Среди предложенного списка требуется найти пункт, содержащий в своём названии слово «BIOS».
3. Указываем, куда именно должен быть сохранён скачиваемый файл. Теперь, когда всё готово, можно приступать к непосредственному выполнению поставленной задачи.
4. Требуется запустить исполняемый файл и просто нажимать «Next» на выдаваемых окнах. Это наглядно продемонстрировано на скриншотах.
5. Далее можно выполнить обновление БИОС АМИ непосредственно из Windows или выполнить запись на внешний носитель (флешку). Будем рассматривать первый вариант действий. Выдаётся предложение о закрытии всех работающих приложений.
6. Появится окно, в котором будет прописываться текущий ход установки. Когда она завершится, поступит предложение нажать любую кнопку. После этого осуществляется перезагрузка операционной системы.
Таким образом, процесс обновления является достаточно простым. Появляется окно с предложением нажать F1 для выполнения настройки BIOS или F2 для использования оптимальных параметров. Если у Вас нет соответствующих познаний, выбирайте второй вариант.
Обновление AMI BIOS
Перед тем как мы приступим к описанию процедуры, отметим важный момент – обновление БИОС требуется лишь в редких случаях. Они описаны ниже, в следующей статье.
Теперь переходим непосредственно к инструкции. Обратите внимание, что она рассчитана на владельцев настольных ПК, тогда как обладателям ноутбуков рекомендуем изучить отдельные руководства.
Урок: Обновление BIOS на лэптопах ASUS, Acer, Lenovo, HP
Этап 1: Определение типа материнской платы и версии микропрограммы
Важный нюанс, который следует знать перед апгрейдом системного ПО – определяющую роль играет не тип БИОС, а производитель материнской платы. Поэтому первый этап и заключается в определении модели «материнки», а также версии уже установленной в неё микропрограммы. Самый простой вариант – задействовать программу для определения комплектующих компьютера. Одним из лучших решений является AIDA64.
- Загрузите пробный дистрибутив программы и установите его на компьютер, затем запустите с ярлыка на «Рабочем столе».
- В основной вкладке кликните по пункту «Системная плата».
Повторите действие в следующем окне.

Прокрутите введения вниз, до блока «Данные о системной плате» – здесь будут размещены ссылки, нужные для обновления BIOS. Они пригодятся нам на следующем этапе.
Этап 2: Загрузка обновлений
Самый важный этап – загрузка подходящих обновлений.
Напоминаем, что AMI BIOS сам по себе не имеет значения, а важны производитель, модельный ряд и ревизия материнской платы!
- Откройте браузер и воспользуйтесь ссылками из AIDA64, полученными на предыдущем этапе, или же перейдите к сайту производителя вашей платы самостоятельно.
Обратите внимание! Многие варианты AMI BIOS не поддерживают кумулятивные обновления: не рекомендуется устанавливать версию 1.4 на BIOS 1.0, если есть версии 1.2, 1.3 и так далее!
Этап 3: Установка обновлений
Непосредственно установить новый BIOS можно несколькими разными способами. Рассмотреть их все в пределах одной статьи невозможно, поэтому сосредоточимся на варианте с установкой через DOS-оболочку.
-
Перед началом процедуры стоит подготовить носитель. Возьмите подходящую флешку, объёма до 4 Гб, и отформатируйте её в файловой системе FAT32. Затем скопируйте на неё файлы прошивки, после чего извлеките носитель.

Подробнее: Как отформатировать флешку
Зайдите в БИОС и выберите загрузку с флешки.
Подробнее: Настраиваем BIOS для загрузки с флешки
Выключите компьютер, подключите к нему USB-накопитель, и снова включите. Появится интерфейс оболочки.
Для выбора корневого каталога введите следующие команды (не забывайте нажимать Enter после каждой):
fs0:
fs0: cd EFIBOOT
Далее введите команду ls для отображения списка файлов. Найдите в нём файл прошивки и утилиту-прошивальщик (для каждого варианта AMI BIOS названия будут разными!).
Далее введите команду следующего вида:
*имя утилиты-прошивальщика* *имя файла прошивки* /b /p /n /r
Заключение
Процедура обновления AMI BIOS имеет свои особенности, поскольку отличается для каждого из вендоровских вариантов.
American Megatrends
BIOS Update
The American Megatrends BIOS Update process is the second part in the series on the AMIBIOS.
I strongly advise reading through this how to article first, before attempting a BIOS update.
If you are still unsure, please DO NOT attempt to update. Contact your local computer repair shop, or call your computer makers support line for advice.
Part 1 introduces you to the AMIBIOS , the beep codes if there is a fault, and the BIOS Setup Utility.
There are 3 Steps in the AMIBIOS update process. Listed below is a link to each part.
Step 5 gives you the opportunity to share your expertise of BIOS updates. Is it a good idea or not? Do you know of a better way to update computer BIOS programs? Share your knowledge!
Step 6 enables you to jump directly to the thoughts and views of other visitors to this web page. Take a look. You may find out something new!
Products of Interest
Are you unable to view because of an enabled Ad Blocker in your browser? No problem! Just to let you know there are computer related adverts, or adverts personal to you, on my site, that you may find useful. If you wish to see them you can whitelist my site. Thank you for your time.
Table of Contents
- Introduction
- Motherboard Identification
- AMIBIOS ROM And Flash Utility
- American Megatrends BIOS Update Final Thoughts
- Share Your Knowledge
- Visitors Pages
Introduction
An American Megatrends BIOS Update is sometimes necessary because, like any other software, improvements are made to improve stability and performance.
You should really update your computer’s BIOS when a newer version is released.
This is easier to do these days (20+ years ago it was a nightmare!). AMI and other computer manufacturers provide free Flash BIOS Utilities which update your BIOS for you when you run the program (more on this later).
However, I think the AMI instructions are not very clear for typical home computer users. This tutorial aims to make the process as clear as possible for you.
There are a few things to do first before updating your computer’s BIOS.
Motherboard Identification
There are different AMIBIOS products on different computer systems. Most computer makers change the AMIBIOS code to suit their own computer models.
Modern computers now come with a new type of BIOS, called Unified Extensible Firmware Upgrade (UEFI). Click here for more details.
The image below is from the AMI web site, and shows you how to identify whether your home computer has a native AMI approved motherboard or not.
Where it says ‘BIOS from 1991-Present’, there is a reference to AMI and the motherboard type, if it is a AMI approved motherboard.
This reference looks something like: AMIS875-P, signifying an Series S875 AMI Motherboard (it actually says AMI123-P on the image above as an example).
If you computer does not have an AMI reference, refer to your computer providers web site for guidance. If you require more details on this step, go to the AMI BIOS (Opens New Window) web page.
If you don’t understand this step. Don’t worry! Download the AMIBID (Opens New Window) motherboard identification tool. Simply install and run on your computer.
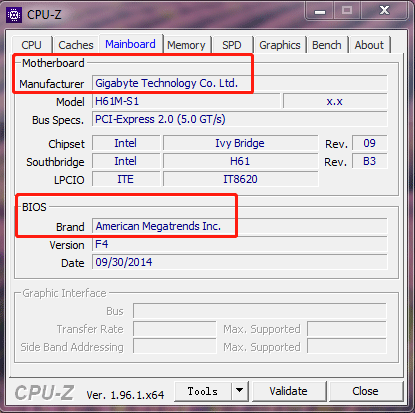
If the AMIBID utility fails, go to the CPUID (Opens New Window) web page, download and install the CPU-Z tool. This is another motherboard identification utility.
From the example above, this computer has an AMIBIOS, but it is not an AMI motherboard . In this instance, the home computer user must visit the ASRack web site and search for the BIOS update for the ALive motherboard.
This is Very Important! You must always use the BIOS update made available by your motherboards manufacturer.
AMIBIOS ROM And Flash Utility
If you determine you have an AMI motherboard, download the AMI Firmware Update Tool (Opens New Window) .
Unzip the American Megatrends BIOS Update utility. Go to the AFUWIN folder (under the AMIBIOS parent folder), then either the 32-bit or 64-bit sub-folder. Left click AFUWIN.EXE.
Click OK if this disclaimer appears.
Click the Open Button to search for and select the ROM file you downloaded from your motherboard manufacturers web site.
Click SAVE to take a copy of your existing BIOS Settings. If anything goes wrong you have an option to restore!
Click the Flash Button. The Process tab will be displayed to show you the update BIOS process in action.
When the process is complete, exit the Flash Utility and Restart Your Computer (if it doesn’t restart for you).
Your BIOS is now updated to the latest version. Refer to the AMIBIOS Support web page if further support is required.
American Megatrends BIOS Update
Final Thoughts
The American Megatrends BIOS Update process is a little complicated. I hope the information provided on this web page is useful. Good luck with your BIOS update.
A very useful link is to the AMI FAQ (Opens New Window) . It explains common questions and issues very clearly.
Don’t forget to take a look at part 1 of this tutorial series, which introduces you to the BIOS concept, AMIBIOS beep error codes and the BIOS Setup Utility.
Top Trending Related Pages
Latest Tablet News
Find the latest Tablet news from around the world here
Support
Since 1985, AMI has been known for its class-leading support services for both Developer Partners and End Users of AMI’s BIOS, remote management, Android and data storage products.
End Users of AMI products seeking Technical Support are encouraged to use the Technical Support Contact form below. If possible, please include some details of the request / issue in the «Message» box.
For Developer Customers and Partners, AMI offers a mix of support options that are dependent on the terms of your specific sales agreement. Please contact your AMI Sales Representative at 1-800-828-9264 to review your sales agreement. You may also fill out the form below or call our main Technical Support hotline at (770) 246-8645 during our normal business hours — from 9 AM to 6 PM Eastern Time, Monday through Friday.
5555 Oakbrook Parkway
Building 200
Norcross, Ga 30093-2286
Sales: (800) 828-9264
Main: (770) 246-8600
Fax: (770) 246-8790
Support: (770) 246-8645
AMI Sales Terms and Conditions
Limited Hardware Warranty
This Limited Warranty is extended by AMI only to the original purchaser of the accompanying AMI microcomputer hardware product (the «Product») and is not assignable to any other person.
AMI offers a thirty (30) day warranty on all hardware products, excluding battery packs and keyboard controllers unless otherwise documented in a legal contract with the customer or warranty card accompanying the product. AMI warrants that the Product will be free from defects in materials and workmanship, under normal use and service and will perform substantially in accordance with the description of the Product in the AMI User’s Guide for this product. Warranty will be void if serial number labels on the AMI hardware are tampered with.
ALL WARRANTIES ARE SUBJECT TO THE TERMS AND CONDITIONS ON THE AMI WARRANTY REGISTRATION CARD.
You are solely responsible for any failure of the Product which results from accident, abuse, misapplication or alteration of the Product and AMI assumes no liability as a consequence of such events under the terms of this Limited Warranty. While AMI has made every effort to provide clear and accurate technical information about the application of the Product, AMI assumes no liability for any events arising out of the use of this technical information.
The sole and exclusive remedy for failure of the Product to conform to this Limited Warranty shall be for AMI, at its option, to repair or replace the Product, to whatever extent deems necessary to restore the Product to proper operating condition. AMI may make replacements hereunder with new or functionally equivalent products of equal value.
To obtain warranty service, you must first call AMI technical support at 770-246-8645. If tech support cannot resolve the problem you are encountering, you will be directed to submit a return materials authorization form. You must complete the form in its entirety. This form can be found on our website: ami.com under RMA Procedures or the form can be faxed to you. Upon receipt of the RMA request form, an RMA number will be processed and issued to you. Please allow at least 24 hours for a response. An RMA number will be communicated to you via email or phone call with notification of the status of your board, i.e. warranty or non-warranty.
Remember, non-warranty boards will incur a minimum charge of $100.00 plus parts and shipping. Please retain a copy of your notification for your files and future references. Upon receipt of the RMA number, return the Product, together with (a) the return authorization number, (b) proof and date of purchase, (C) a description of the problem with the Product and (d) your name and mailing address, postage prepaid to: AMI, 5555 Oakbrook Parkway, Building 200, Norcross, GA 30093. Mark the outside of your box with the RMA number. Failure to do so will delay receiving and processing your Product.
AMI requires that the Product be packed in an anti-static material and packaged adequately for shipping and be insured when shipped. AMI shall not be responsible for damage to the Product in transit. The product will be returned to you by method and carrier chosen by AMI to any destination within the United States of America. If you desire some other specific form of conveyance or shipment beyond the USA border or if the product is out of warranty, you must bear the cost of return shipment.
Please note that if you return the Product without proof of purchase or after expiration of the applicable period of coverage for this Limited Warranty, AMI will, at its option, repair or replace the Product and charge you the then effective AMI recommended Retail Price for the repair or replacement of the Product. Any such repair or replacement of out of warranty products is contingent upon the commercial availability of the required components. If AMI has discontinued the manufacture or redistribution of such Product because of technical obsolescence the product shall be held for no longer than thirty (30) days awaiting your instructions.
If Product is out of warranty, you will be contacted for billing information. Charges are based on a $100.00 minimum fee, plus parts and shipping. Should the repair costs exceed $200.00, you will be notified for prior approval before repairs are complete. Average cost of repair is $150.00. For non-warranty or out-of-warranty repairs, AMI will accept: company purchase orders, credit cards (American Express, VISA, MasterCard, & Discover) and cashier’s checks.
Please allow at least ten (10) days before inquiring about the status of your product. Upon receipt, please inspect and test your products. There is a thirty (30) day warranty on all repairs.
Software Limited Warranty
AMI grants a limited warranty only to the original licensee that the SOFTWARE will perform substantially in accordance with the accompanying written documentation prepared by AMI for a period of 30 days from the date of receipt by the original licensee unless otherwise documented in a superseding legal contract with the customer or warranty card accompanying the product.
AMI’s entire liability and the original licensee’s exclusive remedy for breach of the limited warranty above shall be at AMI’s option, either: (a) return of the price paid by the licensee solely for the SOFTWARE, or (b) repair or replacement of the SOFTWARE, which does not meet AMI’s limited warranty and which is returned to AMI and determined by AMI not to be in compliance. The limited warranty is void if failure of the SOFTWARE has resulted from accident, abuse, negligence, misapplication, or failure to use the SOFTWARE in accordance with the AMI DOCUMENTATION. Any replacement SOFTWARE WILL BE WARRANTED TO THE ORIGINAL LICENSEE FOR THE REMAINDER OF THE ORIGINAL WARRANTY PERIOD, OR 30 DAYS, WHICHEVER IS LONGER. This limited warranty gives you specific legal rights. You may have others which vary from state to state. Some states allow limitations of duration of an implied warranty, so the above limitations may not apply to you.
In no event shall AMI or its suppliers be liable for any special, indirect, consequential, exemplary, or incidental damages whatsoever, Including, without limitation, damage for loss of business profits, business interruption, loss of business information, loss of goodwill, or other pecuniary loss) whether based in contract, tort, negligence, strict liability, or otherwise, arising out of the use or inability to use the SOFTWARE, even if AMI has been advised of the possibility of such damages. Because some states do not allow the exclusion or limitation of liability for consequential and incidental damages, the above limitations may not apply to you. OTHER THAN AS SPECIFIED IN THIS LIMITED WARRANTY ABOVE, THERE ARE NO WARRANTIES, EXPRESSED OR IMPLIED, WHETHER OF MERCHANTABILITY, FITNESS FOR A PARTICULAR PURPOSE, OR OTHERWISE.
Since 1985, AMI has designed, created and manufactured key hardware and software solutions for the global computer marketplace, providing the highest quality and compatibility necessary to build today’s advanced computing systems.
Blog Posts
Twitter Feed
- Jun 16, 2020
AMI opens new East Asia Regional Headquarters Office in Hong Kong: - May 29, 2020
AMI announces the new AMI DevNet Firmware Source Code Development and Distribution Environment for AMI OEM and ODM custo.
Copyright © 2020 AMI, All Rights Reserved. Contents of this website are subject to change without notice. Products mentioned herein may be trademarks or registered trademarks of their respective companies. No warranties are made, either expressed or implied, with regard to the contents within, its merchantability or fitness for a particular use.
Фирма american megatrends inc обновить биос
1. C помощью загрузочной дискеты и прошивки (*.awd, *.bin, *.001, etc) с прошивальщиком (Award, Uniflash, AMIFlash) из под DOS. Образ загрузочной дискеты можно взять здесь, либо по ссылке в теме — Определение материнской платы , либо изготовить самостоятельно штатными средствами Windows.
2. Использовать специализированную программу от производителя материнской платы (ASUS LiveUpdate & etc).
Другие прошивальщики Подробнее.
Сохранение текущей версии BIOS — BIOS Backup TooKit
Утилиты для работы с биосами различных производителей.
Всего записей: 15 | Зарегистр. 31-10-2003 | Отправлено: 11:25 01-11-2003 | Исправлено: Neon2, 14:00 15-08-2011
| Snif1
Advanced Member |
Редактировать | Профиль | Сообщение | Цитировать | Сообщить модератору Перечитал инструкцию по обновлению биоса. Обратил внимание, что обновление должно было ставиться с жёсткого с раздела FAT Взял старый жёсткий, отформатировал (создал активный раздел 1Гб) Создал на нём папку «test» и закинул в корень досовские системные файлы скопировал в неё файл прошивки и обновлялку (мсишные) Подключил жёсткий к компу Код: NWIDIA RAID IDE ROM v.4.81 Очень быстро пробежали какието строки (текст разглядеть неуспел) Код: NWIDIA RAID IDE ROM v.4.81 Попросило нажать F10 и загрузить рейд драйвера Перезагрузил комп, зашёл в биос (теперь уже без проблем) После, попробовал подключить 1,5 Тб жёсткий, ради которого всё затевалось. Цитата: victoria/MHDD (паспорт диска). На данный момент показания такие: Крайне напрягает пункт выдленный красным |
| Всего записей: 1847 | Зарегистр. 29-03-2006 | Отправлено: 15:00 19-10-2009 |
| Snif1
Advanced Member |
Редактировать | Профиль | Сообщение | Цитировать | Сообщить модератору Обратил внимание: Если после выключения компьютера попытаться войти в настройки биоса То перед открытием экрана настроек вываливается это сообщение Скриншот 
Что это? Если комп перезагрузить ресетом, то после экрана биоса появляется чёрный экран, с мигающим курсором, и никаких надписей Если компьютер выключить кнопкой «Power» на передней панели. То загружается нормально |
| Всего записей: 1847 | Зарегистр. 29-03-2006 | Отправлено: 17:29 19-10-2009 |
| Kilomant351
Newbie |
Редактировать | Профиль | Сообщение | Цитировать | Сообщить модератору Я хочу обновить BIOS, но постоянно получаю вот эту ошибку: (To ensure that no other program interferes with the BIOS update process, it is highly recommended to close all other programs before continue. Перевожу на русский язык:Чтобы гарантировать, что никакая другая программа не сталкивается с процессом обновления BIOS, высоко рекомендуется закрыть все другие программы прежде, чем продолжатся.) Нажимаю ОК, и выскакивает следующая ошибка: (Error: Loading driver). У меня на панели задач, Internet, Realtek, USB! Других программ нету. Компьютер: Тип компьютера ACPI компьютер на базе x86 Операционная система Microsoft Windows Vista Ultimate Пакет обновления ОС Service Pack 1 DirectX DirectX 10.0 Системная плата: Системная память 3072 Мб (DDR2-800 DDR2 SDRAM) Коммуникационный порт Последовательный порт (COM1) Видеоадаптер NVIDIA GeForce 9800 GT (1024 Мб) Монитор HP w1907 [19″ LCD] (3CQ9063ND6) Свойства BIOS: Производитель BIOS: Motherboard 64-0100-000001-00101111-091108-MCP73$A7399216_THIS BIOS IS EXCLUSIVELY FOR ACER ONLY R01-B4 BIOS DATE: 09/11/08 10:58:15 VER: 08.00.15 Помогите, пожалуйста, обновить Bios. Заранее спасибо. |
| Всего записей: 3 | Зарегистр. 18-10-2009 | Отправлено: 18:06 19-10-2009 |
| Akam1
Комса |
Редактировать | Профиль | Сообщение | ICQ | Цитировать | Сообщить модератору Kilomant351 Цитата: Свойства BIOS: Что Вы хотите обновить если у Вас и так стоит самый последний. Snif1 ———- |
| Всего записей: 26294 | Зарегистр. 20-04-2006 | Отправлено: 03:08 20-10-2009 |
| Snif1
Advanced Member |
Редактировать | Профиль | Сообщение | Цитировать | Сообщить модератору Akam1
Цитата: RAID Config и выставьте там все в Disabled Рейд выключен . |
| Всего записей: 1847 | Зарегистр. 29-03-2006 | Отправлено: 10:02 20-10-2009 | Исправлено: Snif1, 10:07 20-10-2009 |
| Akam1
Комса |
Редактировать | Профиль | Сообщение | ICQ | Цитировать | Сообщить модератору Snif1 Хм. вроде если он выключен, то надпись не должна появляться. В смысле — «Detecting Array. » и т.п. ———- |
| Всего записей: 26294 | Зарегистр. 20-04-2006 | Отправлено: 11:04 20-10-2009 | Исправлено: Akam1, 11:05 20-10-2009 |
| Snif1
Advanced Member |
Редактировать | Профиль | Сообщение | Цитировать | Сообщить модератору Akam1 В биосе, в настройках рейда стоит Дизаблед. Может какраз дело в надписи белым текстом? |
| Всего записей: 1847 | Зарегистр. 29-03-2006 | Отправлено: 12:33 20-10-2009 |
| RW3DVK
Advanced Member |
Редактировать | Профиль | Сообщение | Цитировать | Сообщить модератору Snif1 Может как раз Цитата: Был случай, когда диск SATAII создали разделы в USB боксе, ни в какую не захотел работать на напрямую к МВ с SATAI. Удалил все разделы, установил перемычку, подключил к МВ создал разделы, всё работает как положено и в боксе, и напрямую к МВ. Забыл USB и Пользовался я мордами иеее и Сата |
| Всего записей: 981 | Зарегистр. 14-02-2003 | Отправлено: 13:49 20-10-2009 | Исправлено: RW3DVK, 13:52 20-10-2009 |
| Snif1
Advanced Member |
Редактировать | Профиль | Сообщение | Цитировать | Сообщить модератору Провёл эксперимент
Отключил от компа все устройства (USB) Сообщение об ошибке «белым тексом» никуда не делось. Зашёл в настройки биоса. Зайдите в BIOS: Integrated Peripherals — Onboard Device — RAID Config и выставьте там все в Disabled. рейд был отключен. Перезагрузил Включил рейд, перезагрузил. К сообщению об ошибке, добавилось уведомление что к рейду ничего не подключено (скриншот делать нестал) Вернул всё как было (настройки, подключил всё обратно) Adblock |
In most cases BIOS cores were made by Award Software, American Megatrends Inc. (AMI) or sometimes by Phoenix Technologies. So it’s not too complicated to figure out which BIOS update utility you need to flash your BIOS. There are also non commercial tools, like UniFlash and flashrom, which are suitable for all brands of BIOSes.
Note: This page doesn’t cover EFI/UEFI, all tools and recommendations are for classic BIOS.
prerequisites and precautions
- Be sure to have the right BIOS update file / image for your mainboard
- Your system components shouldn’t be overclocked
- Your system must run really stable
- If you’re going to flash on Windows, close all applications
It is highly recommended to flash on DOS as flashing the BIOS on Windows is more risky.
Flashing the BIOS happens on your own risk — be sure to download the right BIOS file and the suitable flash utility. This website and it’s owner is not responsible if you brick your motherboard!
how to flash the motherboard BIOS
Just download the appropriate zipped BIOS file, unpack it, rename it to something simple like bios.bin (Award, Phoenix — Award) or bios.rom (AMI, Phoenix) and use the suitable flash tool listed below.
After updating the BIOS successfully shut down the PC, disconnect the A/C power cable (or switch off power supply) and make a Clear CMOS. Reconnect to A/C, turn on the PC, enter the BIOS setup (mostly via «del» or «F2»), chose «Load Optimized Defaults» (or similar) and save/exit setup.
AMI BIOS update utilities
The following utilities are recommended to update BIOSes with AMI core (.rom files). UEFI/Aptio 4/Aptio V are not supported, go to ami.com to download the appropriate flash tool.
| tool/download | system | description |
|---|---|---|
| AMI aminf342 | DOS | for AMIBIOS Core 6.31 or earlier (.rom) |
| AMI amiflash 8.95 | DOS | for AMIBIOS Core 6.31 or earlier (.rom) |
| AMI WinSFI — AMI WinFLASH 3.0.0.6 | Win32 | for AMIBIOS Core 6.31 or earlier (.rom) |
| AMI AFUBSD 3.12 (changelog|manual) | BSD | for AMIBIOS Core 7.xx or AMIBIOS8 (.rom) |
| AMI AFUDOS 4.40 (changelog|manual) | DOS | for AMIBIOS Core 7.xx or AMIBIOS8 (.rom) |
| AMI AFULNX 4.27 (changelog|manual) | Linux | for AMIBIOS Core 7.xx or AMIBIOS8 (.rom) |
| AMI AFUWIN 4.48 (changelog|manual) | Win32 | for AMIBIOS Core 7.xx or AMIBIOS8 (.rom) |
| AMI AFUWINx64 4.48 (changelog|manual) | Win64 | for AMIBIOS Core 7.xx or AMIBIOS8 (.rom) |
Award / Phoenix-Award BIOS update utilities
Recommended utilities to update BIOSes with Award and Phoenix-Award core (.bin files)
| tool/download | system | description |
|---|---|---|
| Phoenix-Award AWDFLASH v8.99 (aka AwardBIOS Flash Utility V8.99) |
DOS | for flashing Award BIOSes (.bin) |
| Phoenix-Award WinFlash 1.94 (changelog) (aka AwardBIOS WinFlash Utility Version 1.94) |
Win32/64 | for flashing Award BIOSes (.bin) |
Usually you can see one of the following strings on the boot screen or inside the BIOS setup if your board has an Award respectively a Phoenix-Award BIOS:
- Award Modular BIOS v4.50G
- Award Modular BIOS v4.50PG
- Award Modular BIOS v4.51G
- Award Modular BIOS v4.51PG
- Award Modular BIOS v4.51PGM
- Award Modular BIOS v4.60PGA
- Award Modular BIOS v4.60PGMA
- Award Modular BIOS v6.00PG
- Award Modular BIOS v6.00PGN
- Phoenix-Award BIOS v6.00PG
- Phoenix — AwardBIOS v6.00PG
- Phoenix — Award WorkstationBIOS v6.00PG
Phoenix BIOS update utilities
The following utilities are recommended to update BIOSes with Phoenix core (.rom/.wph files).
| tool/download | system | description |
|---|---|---|
| Phoenix Phlash 4.0 Release 1.82 | DOS | for flashing older Phoenix BIOSes (.rom) |
| Phoenix Phlash16 1.7.0.41 | DOS | for flashing Phoenix BIOSes (.wph) |
| Phoenix WinPhlash 1.7.44.0 | Win32 | for flashing Phoenix BIOSes (.wph) |
| Phoenix WinPhlash64 1.0.76 | Win64 | for flashing Phoenix BIOSes (.wph) |
universal BIOS update utilities
The following utilities can be used to update BIOSes with all cores.
| tool/download | system | description |
|---|---|---|
| flashrom (open source, GPLv2) | all OS | universal flasher (Linux, BSD, …) |
| UniFlash 1.40 (source [GPLv2]) | DOS | universal flasher by Rainbow Software |
| UniFlash 1.47re.09 (changes) | DOS | universal flasher by rom.by |
| UniFlash v2.00.SPI.RC03 (source) | DOS | universal flasher by rom.by |
related links
- tools section — more useful utilities
- ROM.by — Art of BIOS flashing
- La taverne de John-John — Le BIOS (French)
Содержание
- Ami bios update utility windows 10 64 bit
- Обновление BIOS типа American Megatrends Inc.
- Обновление AMI BIOS
- Этап 1: Определение типа материнской платы и версии микропрограммы
- Этап 2: Загрузка обновлений
- Этап 3: Установка обновлений
- Заключение
- AMI Flasher utility AFUDOS, AFUWIN, AFULNX, AFUEFI downloads
- Free instant access to BIOS tips!
- Fast, Scalable and Secure Webhosting
- AMI AFUDOS Flasher — DOS based AMI BIOS Firmware Update flasher
- AMI AFUDOS Flasher — DOS based AMI BIOS Firmware Update flasher
- AMI AFUWIN Flasher — Windows based AMI BIOS Firmware Update flasher
- AMI AFUWIN Flasher — Windows based AMI BIOS Firmware Update flasher
- AMI AFULNX Flasher — Linux based AMI BIOS Firmware Update flasher
- AMI AFULNX Flasher — Linux based AMI BIOS Firmware Update flasher
- AMI AFUEFI Flasher — EFI shell based AMI BIOS Firmware Update flasher
- AMI AFUEFI Flasher — EFI shell based AMI BIOS Firmware Update flasher
- AMI Flasher — DOS based AMI BIOS flasher
- AMI Flasher — DOS based AMI BIOS flasher
- AMI Winflash — AMI Flasher (Windows based)
- Download AMI Winflash
- Need help? Ask your question here!
- About
- Free instant access to BIOS tips!
- AFU (AMI Firmware Update) Utility for M10JNP2SB
- Available Downloads
- intelafu.zip
- Detailed Description
- Download Documentation
- This download is valid for the product(s) listed below.
- Intel Software License Agreement
Ami bios update utility windows 10 64 bit
Afuwingui — это простая утилита для прошивки биос из под Windows поможет, когда Ваш биос невозможно прошить программой FPT, или при прошивке через AFUDOS у Вас по каким либо причинам не работает клавиатура (например после неудачной прошивки, или кривого мод биоса).
Программа предназначена для биосов производства American Megatrends.
Версия 5.12 подходит для биосов на Aptio 5, использующихся в большинстве китайских материнских плат на сокете 2011-3.
Сначала делаем бэкап родного биоса — запускаем утилиту AFUWINGUIx64.EXE, нажимаем «Save» и сохраняем файл.
Если программа не совместима с Вашим чипом Вы увидите соответствующее сообщение с ошибкой
Таким образом перед прошивкой биоса мы можем проверить совместимость программы с нашим чипом биоса, если процесс бэкапа прошёл удачно, значит чип биоса совметим с программой.
Далее нажимаем кнопку «Open», выбираем файл биоса для прошивки, во вкладке Setup ставим галочки как на скриншоте и нажимаем кнопку «Flash».
По завершению процесса прошивки, система перезагрузится уже с обновлённым биосом.
Прошить биос через Afuwin можно и без графического интерфейса, для этого создайте в папке с программой .bat файл с параметрами:
Не прошивайте файл дампа биоса, если не уверены, что он предназначен для Вашей платы.
После прошивки биоса рекомендуется сбросить настройки по умолчанию.
Скачать AFUWINGUI v5.12.03.2074: AfuWin64, AfuWin32 (поддержка Aptio 5)
Скачать AFUWINGUI v3.09.03.1462: AfuWin64, AfuWin32 (поддержка Aptio 3, 4, 4.5)
Официальный сайт утилиты
Чтобы оставить комментарий, авторизуйтесь или зарегистрируйтесь.
1″ :pagination=»pagination» :callback=»loadData» :options=»paginationOptions»>
Обновление BIOS типа American Megatrends Inc.
Обновление AMI BIOS
Перед тем как мы приступим к описанию процедуры, отметим важный момент – обновление БИОС требуется лишь в редких случаях. Они описаны ниже, в следующей статье.
Теперь переходим непосредственно к инструкции. Обратите внимание, что она рассчитана на владельцев настольных ПК, тогда как обладателям ноутбуков рекомендуем изучить отдельные руководства.
Урок: Обновление BIOS на лэптопах ASUS, Acer, Lenovo, HP
Этап 1: Определение типа материнской платы и версии микропрограммы
Важный нюанс, который следует знать перед апгрейдом системного ПО – определяющую роль играет не тип БИОС, а производитель материнской платы. Поэтому первый этап и заключается в определении модели «материнки», а также версии уже установленной в неё микропрограммы. Самый простой вариант – задействовать программу для определения комплектующих компьютера. Одним из лучших решений является AIDA64.
- Загрузите пробный дистрибутив программы и установите его на компьютер, затем запустите с ярлыка на «Рабочем столе».
- В основной вкладке кликните по пункту «Системная плата».
Повторите действие в следующем окне.

Прокрутите введения вниз, до блока «Данные о системной плате» – здесь будут размещены ссылки, нужные для обновления BIOS. Они пригодятся нам на следующем этапе.
Этап 2: Загрузка обновлений
Самый важный этап – загрузка подходящих обновлений.
Напоминаем, что AMI BIOS сам по себе не имеет значения, а важны производитель, модельный ряд и ревизия материнской платы!
- Откройте браузер и воспользуйтесь ссылками из AIDA64, полученными на предыдущем этапе, или же перейдите к сайту производителя вашей платы самостоятельно.
Обратите внимание! Многие варианты AMI BIOS не поддерживают кумулятивные обновления: не рекомендуется устанавливать версию 1.4 на BIOS 1.0, если есть версии 1.2, 1.3 и так далее!
Этап 3: Установка обновлений
Непосредственно установить новый BIOS можно несколькими разными способами. Рассмотреть их все в пределах одной статьи невозможно, поэтому сосредоточимся на варианте с установкой через DOS-оболочку.
- Перед началом процедуры стоит подготовить носитель. Возьмите подходящую флешку, объёма до 4 Гб, и отформатируйте её в файловой системе FAT32. Затем скопируйте на неё файлы прошивки, после чего извлеките носитель.

Подробнее: Как отформатировать флешку
Зайдите в БИОС и выберите загрузку с флешки.
Подробнее: Настраиваем BIOS для загрузки с флешки
Выключите компьютер, подключите к нему USB-накопитель, и снова включите. Появится интерфейс оболочки.
Для выбора корневого каталога введите следующие команды (не забывайте нажимать Enter после каждой):
fs0:
fs0: cd EFIBOOT
Далее введите команду ls для отображения списка файлов. Найдите в нём файл прошивки и утилиту-прошивальщик (для каждого варианта AMI BIOS названия будут разными!).
Далее введите команду следующего вида:
*имя утилиты-прошивальщика* *имя файла прошивки* /b /p /n /r
Заключение
Процедура обновления AMI BIOS имеет свои особенности, поскольку отличается для каждого из вендоровских вариантов.
AMI Flasher utility AFUDOS, AFUWIN, AFULNX, AFUEFI downloads
Free instant access to BIOS tips!
Fill in your name and email and receive our ebook ‘How to update your PC BIOS in 3 easy steps’ (15$ value), free BIOS tips and updates about Wim’s BIOS!
Fast, Scalable and Secure Webhosting
Are you currently having hosting problems? Do you feel that your site slowlyness is killing sales or traffic?
Our book Fast, Scalable and Secure Webhosting for Web Developers will give you the knowledge to run your site on a speedy, scalable and secure server!
Tip: Receive your free Chapter Secure your site with HTTPS by joining our mailing list!
AMI Flasher is a utility program that helps you to update your BIOS — the code that runs the first moment you boot your PC. It was created by AMI to support flashing AMI BIOS based data files.
The BIOS code is stored on the motherboards on Flash chips since its introduction in 1993.
Over the years AMI has released DOS, Windows and Linux based flashers for different versions of AMI BIOS and AMI UEFI BIOS.
The DOS based versions can’t be run from Windows or other operating systems. You’ll need to create a bootable DOS disk.
Please read our How to flash your bios FAQ to correctly use the AMI Flashers.
AMI AFUDOS Flasher — DOS based AMI BIOS Firmware Update flasher
The following AMI Flasher tools can be used on AMI BIOS Core releases Aptio 3, 4, 4.5, and 5
AMI AFUDOS Flasher — DOS based AMI BIOS Firmware Update flasher
| AMI AFUDOS Flasher version | Notes |
|---|---|
| AFUDOS Flasher 3.05.04 | |
| AFUDOS Flasher 4.12 | |
| AFUDOS Flasher 4.40 | compatible with AMIBIOS8 |
| AFUDOS Flasher 5.05.04 | compatible with APTIO 3, 4, 4.5, and 5 |
AMI AFUWIN Flasher — Windows based AMI BIOS Firmware Update flasher
The following AMI Flasher tools can be used on AMI BIOS Core releases Aptio 3, 4, 4.5, and 5
AMI AFUWIN Flasher — Windows based AMI BIOS Firmware Update flasher
| AMI AFUWIN Flasher version | Notes |
|---|---|
| AFUWIN Flasher 3.05.04 | Windows 32 & 64 bit supported |
| AFUWIN Flasher 4.48 | Windows 32 & 64 bit supported / compatible with AMIBIOS8 |
| AFUWIN Flasher 5.05.04 | Windows 32 & 64 bit supported / compatible with APTIO 3, 4, 4.5, and 5 |
AMI AFULNX Flasher — Linux based AMI BIOS Firmware Update flasher
The following AMI Flasher tools can be used on AMI BIOS Core releases Aptio 3, 4, 4.5, and 5
AMI AFULNX Flasher — Linux based AMI BIOS Firmware Update flasher
| AMI AFULNX Flasher version | Notes |
|---|---|
| AFULNX Flasher 5.05.04 | 32 bit and 64 bit Linux supported / compatible with APTIO 3, 4, 4.5, and 5 |
AMI AFUEFI Flasher — EFI shell based AMI BIOS Firmware Update flasher
The following AMI Flasher tools can be used on AMI BIOS Core releases Aptio 3, 4, 4.5, and 5
AMI AFUEFI Flasher — EFI shell based AMI BIOS Firmware Update flasher
| AMI AFUEFI Flasher version | Notes |
|---|---|
| AFUEFI Flasher 3.05.04 | for EFI shell |
| AFUEFI Flasher 5.05.04 | for EFI shell |
AMI Flasher — DOS based AMI BIOS flasher
The following AMI Flasher tools can be used on AMI BIOS Core release 6.31 or earlier.
AMI Flasher — DOS based AMI BIOS flasher
AMI Winflash — AMI Flasher (Windows based)
The following AMI Flasher tools can be used on AMI BIOS Core release 6.31 or earlier.
Download AMI Winflash
The Flasher utilities are copyrighted by their respective owners.
Need help? Ask your question here!
(Examples: how to update your BIOS, how to identify your motherboard)
About
My name is Wim Bervoets and I’m the founder of Wim’s BIOS Page. The history of this site goes back to 1996 when I was taking my first steps on the internet. Gradually the site grew to what it is now — an authority site about BIOS update information — with an active forum.
Free instant access to BIOS tips!
Fill in your name and email and receive our ebook ‘How to update your PC BIOS in 3 easy steps’ (15$ value), free BIOS tips and updates about Wim’s BIOS!
AFU (AMI Firmware Update) Utility for M10JNP2SB
Available Downloads
intelafu.zip
Detailed Description
AFU (AMI firmware update) is a package of utilities used to update the system BIOS under various operating systems. AFU only works for APTIO with SMI FLASH support.
Download Documentation
This download is valid for the product(s) listed below.
Intel Software License Agreement
The terms of the software license agreement included with any software you download will control your use of the software.
INTEL SOFTWARE LICENSE AGREEMENT
IMPORTANT — READ BEFORE COPYING, INSTALLING OR USING.
Do not use or load this software and any associated materials (collectively,
the «Software») until you have carefully read the following terms and
conditions. By loading or using the Software, you agree to the terms of this
Agreement. If you do not wish to so agree, do not install or use the Software.
LICENSES: Please Note:
— If you are a network administrator, the «Site License» below shall
— If you are an end user, the «Single User License» shall apply to you.
— If you are an original equipment manufacturer (OEM), the «OEM License»
shall apply to you.
SITE LICENSE. You may copy the Software onto your organization’s computers
for your organization’s use, and you may make a reasonable number of
back-up copies of the Software, subject to these conditions:
1. This Software is licensed for use only in conjunction with Intel
component products. Use of the Software in conjunction with non-Intel
component products is not licensed hereunder.
2. You may not copy, modify, rent, sell, distribute or transfer any part
of the Software except as provided in this Agreement, and you agree to
prevent unauthorized copying of the Software.
3. You may not reverse engineer, decompile, or disassemble the Software.
4. You may not sublicense or permit simultaneous use of the Software by
more than one user.
5. The Software may include portions offered on terms in addition to those
set out here, as set out in a license accompanying those portions.
SINGLE USER LICENSE. You may copy the Software onto a single computer for
your personal, noncommercial use, and you may make one back-up copy of the
Software, subject to these conditions:
1. This Software is licensed for use only in conjunction with Intel
component products. Use of the Software in conjunction with non-Intel
component products is not licensed hereunder.
2. You may not copy, modify, rent, sell, distribute or transfer any part
of the Software except as provided in this Agreement, and you agree to
prevent unauthorized copying of the Software.
3. You may not reverse engineer, decompile, or disassemble the Software.
4. You may not sublicense or permit simultaneous use of the Software by
more than one user.
5. The Software may include portions offered on terms in addition to those
set out here, as set out in a license accompanying those portions.
OEM LICENSE: You may reproduce and distribute the Software only as an
integral part of or incorporated in Your product or as a standalone
Software maintenance update for existing end users of Your products,
excluding any other standalone products, subject to these conditions:
1. This Software is licensed for use only in conjunction with Intel
component products. Use of the Software in conjunction with non-Intel
component products is not licensed hereunder.
2. You may not copy, modify, rent, sell, distribute or transfer any part
of the Software except as provided in this Agreement, and you agree to
prevent unauthorized copying of the Software.
3. You may not reverse engineer, decompile, or disassemble the Software.
4. You may only distribute the Software to your customers pursuant to a
written license agreement. Such license agreement may be a «break-the-
seal» license agreement. At a minimum such license shall safeguard
Intel’s ownership rights to the Software.
5. The Software may include portions offered on terms in addition to those
set out here, as set out in a license accompanying those portions.
NO OTHER RIGHTS. No rights or licenses are granted by Intel to You, expressly
or by implication, with respect to any proprietary information or patent,
copyright, mask work, trademark, trade secret, or other intellectual property
right owned or controlled by Intel, except as expressly provided in this
OWNERSHIP OF SOFTWARE AND COPYRIGHTS. Title to all copies of the Software
remains with Intel or its suppliers. The Software is copyrighted and
protected by the laws of the United States and other countries, and
international treaty provisions. You may not remove any copyright notices
from the Software. Intel may make changes to the Software, or to items
referenced therein, at any time without notice, but is not obligated to
support or update the Software. Except as otherwise expressly provided, Intel
grants no express or implied right under Intel patents, copyrights,
trademarks, or other intellectual property rights. You may transfer the
Software only if the recipient agrees to be fully bound by these terms and if
you retain no copies of the Software.
LIMITED MEDIA WARRANTY. If the Software has been delivered by Intel on
physical media, Intel warrants the media to be free from material physical
defects for a period of ninety days after delivery by Intel. If such a defect
is found, return the media to Intel for replacement or alternate delivery of
the Software as Intel may select.
EXCLUSION OF OTHER WARRANTIES. EXCEPT AS PROVIDED ABOVE, THE SOFTWARE IS
PROVIDED «AS IS» WITHOUT ANY EXPRESS OR IMPLIED WARRANTY OF ANY KIND
INCLUDING WARRANTIES OF MERCHANTABILITY, NONINFRINGEMENT, OR FITNESS FOR A
PARTICULAR PURPOSE. Intel does not warrant or assume responsibility for the
accuracy or completeness of any information, text, graphics, links or other
items contained within the Software.
LIMITATION OF LIABILITY. IN NO EVENT SHALL INTEL OR ITS SUPPLIERS BE LIABLE
FOR ANY DAMAGES WHATSOEVER (INCLUDING, WITHOUT LIMITATION, LOST PROFITS,
BUSINESS INTERRUPTION, OR LOST INFORMATION) ARISING OUT OF THE USE OF OR
INABILITY TO USE THE SOFTWARE, EVEN IF INTEL HAS BEEN ADVISED OF THE
POSSIBILITY OF SUCH DAMAGES. SOME JURISDICTIONS PROHIBIT EXCLUSION OR
LIMITATION OF LIABILITY FOR IMPLIED WARRANTIES OR CONSEQUENTIAL OR INCIDENTAL
DAMAGES, SO THE ABOVE LIMITATION MAY NOT APPLY TO YOU. YOU MAY ALSO HAVE
OTHER LEGAL RIGHTS THAT VARY FROM JURISDICTION TO JURISDICTION.
TERMINATION OF THIS AGREEMENT. Intel may terminate this Agreement at any time
if you violate its terms. Upon termination, you will immediately destroy the
Software or return all copies of the Software to Intel.
APPLICABLE LAWS. Claims arising under this Agreement shall be governed by the
laws of California, excluding its principles of conflict of laws and the
United Nations Convention on Contracts for the Sale of Goods. You may not
export the Software in violation of applicable export laws and regulations.
Intel is not obligated under any other agreements unless they are in writing
and signed by an authorized representative of Intel.
GOVERNMENT RESTRICTED RIGHTS. The Software is provided with «RESTRICTED
RIGHTS.» Use, duplication, or disclosure by the Government is subject to
restrictions as set forth in FAR52.227-14 and DFAR252.227-7013 et seq. or its
successor. Use of the Software by the Government constitutes acknowledgment
of Intel’s proprietary rights therein. Contractor or Manufacturer is Intel
2200 Mission College Blvd., Santa Clara, CA 95052.
Your file download has started. If your download did not start, please click here to initiate again.
Когда-то BIOS обновлялся исключительно с помощью дискет, но дисководы давно канули в прошлое. Сейчас универсальным инструментом стала флэшка — с ее помощью выполняют аварийную загрузку, установку ОС и даже обновление БИОС.
Обновление БИОС с флэшки будем осуществлять при помощи утилиты AFUDOS, которая обычно находится в архиве с прошивкой — файл AFUDOS.exe. Файл самой прошивки имеет расширение .ROM
Для создания загрузочной флэшки с DOS воспользуемся программой Rufus. Скачать ее можно здесь http://rufus.akeo.ie .
Выбираем метод загрузки MS-DOS и жмем СТАРТ.
Все файлы с архива прошивки переносим на загрузочную флэшку.
В моем примере будет BIOS American Magatrends — AMIBIOS
Нажимаем DEL для входа в BIOS
Переходим в раздел «Advanced Chipset Features» и переключаем опцию «Legacy USB Support» в Enabled
При загрузке компьютера нажимаем клавишу «F11» для вызова загрузочного меню.
На других материнских платах, для вызова загрузочного меню, может служить другая функциональная клавиша, например F8
После загрузки DOS в командной строке набираем следующую команду для запуска утилиты AFUDOS для обновления BIOS
Запомните. Файл прошивки BIOS всегда имеет расширение ROM
У меня файл прошивки называется 070607s.rom. Поэтому я набираю такую команду
Не выключайте и не перезагружайте компьютер во время прошивки BIOS иначе рискуете убить систему.
После того как утилита обновит BIOS вернется командная строка DOS или компьютер перезагрузится автоматически.
Волзвращаемся в меню BIOS и выбраем настройки BIOS по-умолчанию (оптимальные настройки) «Load Default Settings» или названия пункта может быть «Load Optimum Settings«
1. Резервное копирование и обновление BIOS из под Windows — AMI EFI BIOS (3 способа)
2. Прошивка из под MS-DOS
Переходим в центр загрузки официального сайта ZOTAC. Скачайте архив с прошивкой для Вашей материнской платы. Распакуйте архив и скопируйте папку BIOS на С диск: С:BIOS. Название папки не изменяйте. Перед тем как обновить BIOS, убедитесь что системные часы показывают правильное время. Желательно отключить антивирус и прочие программы, так как они могут повлиять на корректный процесс прошивки.
В скачанной папке запустите файл update.bat от имени администратора. Откроется командная строка с меню с опциями:
После закачки все файлы разархивируйте
Подготавливаем флешку. На ней не должно содержаться багов и ошибок. Чтобы убедиться в этом можно выполнить проверку накопителя, зайдя в свойства съёмного диска, вкладка сервис » Проверить.
Запускаем утилиту HP USB Disk Storage FormatTool 2.2.3. Выставляем галочки как показано на картинке. Путь к папке загрузочного устройства MS-DOS прописываем то место куда скачали файлы MS-DOS. (у меня например это диск С, папка usbdos. И кнопку начать. На вопрос об уничтожении файлов, нажимаем Да.
По завершению процесса копируем на флешку скачанный файл с прошивкой и утилиту afudos (сам файл без папки). И не вытаскивая флешку с USB — порта, перезагружаем компьютер.
Выставляем приоритет загрузки с флешки, загрузится DOS. Введите команду ZAFUDOS.EXE
После прошивки перезагрузите компьютер и сбросьте настройки BIOS по умолчанию.
Добавлено: 21.7.2016 • : 11634
Способы обновить AMI BIOS или правильное обновление AMI биос!
Если Вас интересует то, как обновить AMI BIOS (БИОС), то следует рассмотреть подобную задачу более подробно. Может возникнуть вопрос о том, для каких целей следует выполнять подобные процедуры. Основной задачей является улучшение работы устройства. Предусматривается не только ускорение загрузки операционной системы, но и появление новых функций. Нельзя забывать про определенные опасности подобного процесса. Выполняет его необходимо строго в соответствии с инструкциями.
Подготовка
Начинать работы необходимо с определения того, какая именно системная плата используется на конкретном устройстве. Дополнительно, происходит уточнение версии БИОС. Имеется несколько способов выполнить поставленную задачу:
- Посмотреть модель платы можно непосредственно на её корпусе. Происходит вскрытие системного блока и осматривается место на плате между PCI разъемами.
- При загрузке необходимо оставить процесс и найти строку наподобие «A7380MS v1.8 133101». Расшифровка говорит об использовании платы модели MS-7380 с версией БИОС 1.8.
- Скачивается программа Everest. На скриншоте продемонстрировано, по какому пути следует пройти. Дополнительным преимуществом является предоставление сведений о том, где скачать обновленияBIOS (БИОС).
Как провести обновление
Когда все подготовительные действия завершены, необходимо провести загрузку. Один из способов поиска обновлений представлен выше. Можно найти нужные файлы на сайте производителя материнской платы. Самый удобный подход заключается в скачивании специализированных программ. В данном случае, это Live Update 5 или более поздняя версия (если на момент прочтения Вами статьи она выпущена. Программа используется для изделий MSI и не предназначается для моноблоков или ноутбуков. В любом случае, найти аналог не составит труда.
1. Запускаем сканирование с целью обнаружить обновление AMI BIOS.
2. Будет выдан перечень результатов. Среди предложенного списка требуется найти пункт, содержащий в своём названии слово «BIOS».
3. Указываем, куда именно должен быть сохранён скачиваемый файл. Теперь, когда всё готово, можно приступать к непосредственному выполнению поставленной задачи.
4. Требуется запустить исполняемый файл и просто нажимать «Next» на выдаваемых окнах. Это наглядно продемонстрировано на скриншотах.
5. Далее можно выполнить обновление БИОС АМИ непосредственно из Windows или выполнить запись на внешний носитель (флешку). Будем рассматривать первый вариант действий. Выдаётся предложение о закрытии всех работающих приложений.
6. Появится окно, в котором будет прописываться текущий ход установки. Когда она завершится, поступит предложение нажать любую кнопку. После этого осуществляется перезагрузка операционной системы.
Таким образом, процесс обновления является достаточно простым. Появляется окно с предложением нажать F1 для выполнения настройки BIOS или F2 для использования оптимальных параметров. Если у Вас нет соответствующих познаний, выбирайте второй вариант.
ОБНОВЛЕНИЕ BIOS (BNKBL357.86A)
Обновляйте ваши драйверы автоматически
Идентифицируйте ваши продукты и получите обновления драйверов и программного обеспечения для ваших аппаратных средств Intel.
Доступные загрузки
BNKBL357.86A.0080.EB.msi
Windows 10, 64-разрядная версия*
Независимо от ОС
BNKBL357.86A.0080.BI.zip
Независимо от ОС
BNKBL357.86A.0080.UEFI.zip
Независимо от ОС
Подробное описание
Цель
Эта запись загрузки предоставляет варианты для обновления BIOS этих Intel® NUC NUC7i7BNH, NUC7i7BNB, NUC7i5BNH, NUC7i5BNK, NUC7i5BNB, NUC7i3BNH, NUC7i3BNK, NUC7i3BNB. Вам нужно только скачать один.
Какой файл я должен выбрать?
- Экспресс-биос обновление (BNKBL357.86A.0080.EB.msi) — Самоизвеяющийся файл обновления на базе Windows, предназначенный для использования в системах Windows.
- Восстановление BIOS обновление »BN0080.bio» — A . Файл BIO, который будет использоваться для метода обновления F7 BIOS или процесса восстановления BIOS. В маловероятном случае, если обновление BIOS будет прервано, возможно, ЧТО BIOS может быть оставлен в непригочном состоянии. Используйте обновление восстановления BIOS, чтобы восстановиться после этого состояния. Для этого требуется USB флэш-устройство или cd.
- Обновление iflash BIOS (BNKBL357.86A.0080.BI.zip) — Утилита на основе DOS для обновления BIOS независимо от операционной системы. Для этого требуется USB флэш-устройство или cd.
- Обновление UEFI BIOS —BNKBL357.86A.0080.UEFI.zip— Позволяет обновлять BIOS из оболочки EFI. Для этого требуется USB флэш-устройство.
Что нового в этом выпуске?
Смотрите примечания к выпуску дополнительных исправлений и новых функций в этой версии BIOS.
Примечание
- Файл чтения включает в себя инструкции по обновлению BIOS для продвинутых пользователей. Если вам нужны полные пошаговые инструкции по использованию каждого из этих методов обновления BIOS, обратитесь к инструкциям обновления BIOS.
- При начале процесса обновления BIOS может отображаться до 30 секунд, чтобы сообщения появлялись на экране. Как только процесс обновления начался, не отключите систему до завершения обновления. Процесс обновления займет до 3 минут.
Похожая тема
Загрузка документации
Данный файл для загрузки также подходит для перечисленных ниже видов продукции.
Лицензия на использование программного обеспечения Intel
Использование Вами программного обеспечения регулируется условиями лицензионного соглашения, входящего в комплект всех загружаемых программ.
EXPRESS BIOS UPDATE
INTEL END USER SOFTWARE LICENSE AGREEMENT
DO NOT DOWNLOAD, INSTALL, ACCESS, COPY, OR USE ANY PORTION OF THE SOFTWARE UNTIL YOU HAVE READ AND ACCEPTED THE TERMS AND CONDITIONS OF THIS AGREEMENT. BY INSTALLING, COPYING, ACCESSING, OR USING THE SOFTWARE, YOU AGREE TO BE LEGALLY BOUND BY THE TERMS AND CONDITIONS OF THIS AGREEMENT. If You do not agree to be bound by, or the entity for whose benefit You act has not authorized You to accept, these terms and conditions, do not install, access, copy, or use the Software and destroy all copies of the Software in Your possession.
This SOFTWARE LICENSE AGREEMENT (this ?Agreement?) is entered into between Intel Corporation, a Delaware corporation (?Intel?) and You. ?You? refers to you or your employer or other entity for whose benefit you act, as applicable. If you are agreeing to the terms and conditions of this Agreement on behalf of a company or other legal entity, you represent and warrant that you have the legal authority to bind that legal entity to the Agreement, in which case, «You» or «Your» shall be in reference to such entity. Intel and You are referred to herein individually as a ?Party? or, together, as the ?Parties?.
The Parties, in consideration of the mutual covenants contained in this Agreement, and for other good and valuable consideration, the receipt and sufficiency of which they acknowledge, and intending to be legally bound, agree as follows:
LICENSE. You have a license under Intel?s copyrights to reproduce Intel?s Software only in its unmodified and binary form, (with the accompanying documentation, the ?Software?) for Your personal use only, and not commercial use, in connection with Intel-based products for which the Software has been provided, subject to the following conditions:
- You may not disclose, distribute or transfer any part of the Software, and You agree to prevent unauthorized copying of the Software.
- You may not reverse engineer, decompile, or disassemble the Software.
- You may not sublicense the Software.
- The Software may contain the software and other intellectual property of third party suppliers, some of which may be identified in, and licensed in accordance with, an enclosed license.txt file or other text or file.
- Intel has no obligation to provide any support, technical assistance or updates for the Software.
OWNERSHIP OF SOFTWARE AND COPYRIGHTS. Title to all copies of the Software remains with Intel or its licensors or suppliers. The Software is copyrighted and protected by the laws of the United States and other countries, and international treaty provisions. You may not remove any copyright notices from the Software. Except as otherwise expressly provided above, Intel grants no express or implied right under Intel patents, copyrights, trademarks, or other intellectual property rights. Transfer of the license terminates Your right to use the Software.
DISCLAIMER OF WARRANTY. The Software is provided ?AS IS? without warranty of any kind, EITHER EXPRESS OR IMPLIED, INCLUDING WITHOUT LIMITATION, WARRANTIES OF MERCHANTABILITY OR FITNESS FOR ANY PARTICULAR PURPOSE.
LIMITATION OF LIABILITY. NEITHER INTEL NOR ITS LICENSORS OR SUPPLIERS WILL BE LIABLE FOR ANY LOSS OF PROFITS, LOSS OF USE, INTERRUPTION OF BUSINESS, OR INDIRECT, SPECIAL, INCIDENTAL, OR CONSEQUENTIAL DAMAGES OF ANY KIND WHETHER UNDER THIS AGREEMENT OR OTHERWISE, EVEN IF INTEL HAS BEEN ADVISED OF THE POSSIBILITY OF SUCH DAMAGES.
LICENSE TO USE COMMENTS AND SUGGESTIONS. This Agreement does NOT obligate You to provide Intel with comments or suggestions regarding the Software. However, if You provide Intel with comments or suggestions for the modification, correction, improvement or enhancement of (a) the Software or (b) Intel products or processes that work with the Software, You grant to Intel a non-exclusive, worldwide, perpetual, irrevocable, transferable, royalty-free license, with the right to sublicense, under Your intellectual property rights, to incorporate or otherwise utilize those comments and suggestions.
TERMINATION OF THIS LICENSE. Intel or the sublicensor may terminate this license at any time if You are in breach of any of its terms or conditions. Upon termination, You will immediately destroy or return to Intel all copies of the Software.
U.S. GOVERNMENT RESTRICTED RIGHTS. The Software is a commercial item (as defined in 48 C.F.R. 2.101) consisting of commercial computer software and commercial computer software documentation (as those terms are used in 48 C.F.R. 12.212), consistent with 48 C.F.R. 12.212 and 48 C.F.R 227.72021 through 227.7202-4. You will not provide the Software to the U.S. Government. Contractor or Manufacturer is Intel Corporation, 2200 Mission College Blvd., Santa Clara, CA 95054.
EXPORT LAWS. You agree that neither You nor Your subsidiaries will export/re-export the Software, directly or indirectly, to any country for which the U.S. Department of Commerce or any other agency or department of the U.S. Government or the foreign government from where it is shipping requires an export license, or other governmental approval, without first obtaining any such required license or approval. In the event the Software is exported from the U.S.A. or re-exported from a foreign destination by You, You will ensure that the distribution and export/re-export or import of the Software complies with all laws, regulations, orders, or other restrictions of the U.S. Export Administration Regulations and the appropriate foreign government.
APPLICABLE LAWS. This Agreement and any dispute arising out of or relating to it will be governed by the laws of the U.S.A. and Delaware, without regard to conflict of laws principles. The Parties to this Agreement exclude the application of the United Nations Convention on Contracts for the International Sale of Goods (1980). The state and federal courts sitting in Delaware, U.S.A. will have exclusive jurisdiction over any dispute arising out of or relating to this Agreement. The Parties consent to personal jurisdiction and venue in those courts. A Party that obtains a judgment against the other Party in the courts identified in this section may enforce that judgment in any court that has jurisdiction over the Parties. Your specific rights may vary from country to country.
1. PRIVACY. YOUR PRIVACY RIGHTS ARE SET FORTH IN INTEL?S PRIVACY NOTICE, WHICH FORMS A PART OF THIS AGREEMENT. PLEASE REVIEW THE PRIVACY NOTICE AT HTTPS://WWW.INTEL.COM/PRIVACY TO LEARN HOW INTEL COLLECTS, USES AND SHARES INFORMATION ABOUT YOU.
Загрузка файла начата. Если загрузка не началась, нажмите здесь для повторной инициации загрузки.
Прошивка БИОС из под Windows
Развитие вычислительной техники проявляется не только в росте мощностей. Изменение базовой системы ввода-вывода на UEFI прошло незаметно для большинства пользователей. Теперь чтобы обновить БИОС, не нужны «танцы с бубном» и загрузка в DOS. Все действия пользователь может выполнять в привычной графической среде Windows. Производители материнских плат встраивают механизмы обновления непосредственно в оболочку UEFI или размещают необходимые утилиты на диске с драйверами.
Версия BIOS/UEFI
Решив обновить БИОС на компьютере, пользователь должен сначала узнать его текущую версию. Владельцам ноутбуков и моноблоков этого будет достаточно. Пользователям сборных ПК дополнительно требуется узнать модель материнской платы. Выяснить эти данные можно непосредственно в Windows. Вызовем диалоговое окно «Выполнить» и введем указанную на скриншоте команду.
В результате ее выполнения откроется окно сведений о системе. Здесь мы найдем текущую версию BIOS и режим его использования.
Аналогичную информацию можно получить, использовав командную строку.
Пользователи, больше полагающиеся на сторонние утилиты и не доверяющие встроенным инструментам ОС, могут воспользоваться программой CPU-Z. Если загрузить ее в виде архива, не потребуется даже установка. Достаточно просто запустить EXE-файл нужной разрядности и перейти на вкладку Mainboard.
Как видите, данные, полученные с ее помощью, совпадают с системными.
Обновление ASUS UEFI BIOS из-под Windows
Дальнейшие операции мы будем рассматривать применительно к материнским платам производства ASUSTeK Computer. Обновление BIOS ASUS из-под Windows 10 можно выполнить несколькими утилитами производителя.
BIOS Flash Utility
Программа поставляется в комплекте с материнскими платами и разработана непосредственно для работы в графической среде ОС. Windows BIOS Flash Utility позволяет сохранить текущую версию в файл и выполнить обновление через интернет или из готового файла прошивки.
При выборе сетевого обновления с сайта производителя программа предложит несколько «зеркал» для загрузки.
Проверка доступных версий выполняется полностью в автоматическом режиме. Обнаружив прошивки более свежие, чем используемая, программа предложит выбрать подходящий вариант.
После загрузки отмеченного ПО проводится его тестирование на целостность. Успешное завершение проверки сопровождается информационным сообщением.
Прошивка БИОС ASUS из-под Windows выполняется в три этапа. Стирается старая версия, устанавливается и проверяется новая.
Весь процесс отображается графически и занимает несколько минут. Новая прошивка еще раз тестируется. На этот раз проверяется правильность записи и корректность работы с оборудованием.
В поле уведомлений программа сообщает об успешном завершении и предлагает выполнить перезагрузку компьютера.
ASUS Manager
Данная утилита имеет более широкое предназначение. С ее помощью можно не только обновить БИОС через «Виндовс», но и проверить наличие свежих версий драйверов и прикладного ПО ASUS.
Программа может работать в ручном и автоматическом режимах.
Если файл с прошивкой уже загружен с сайта ASUS, его можно установить самостоятельно. Переключить на вкладку «From File» и указать путь к нему.
Процесс обновления неинформативный и не сопровождается графиками. Программа делает свою работу и, завершив полный цикл операций, предлагает перезагрузку.
Обе рассмотренные утилиты также позволяют выполнять обновление BIOS ASUS из-под Windows 7. Действия пользователя в графической оболочке обоих ОС полностью идентичны.
Обновление ASUS UEFI BIOS через встроенное меню
Теперь, когда вы знаете, что существуют утилиты для обновления BIOS напрямую из Windows, рассмотрим еще один вариант смены прошивки. Он не требует загрузки в DOS, но все операции выполняются из меню UEFI.
Подготовка носителя
Для обновления мы используем флешку. Размер прошивки обычно не превышает десятка мегабайт, поэтому объем накопителя значения не имеет. Вставив ее в USB-порт, вызываем контекстное меню проводника и в нем находим обозначенный пункт.
Выбранный нами носитель нужно отформатировать в FAT32 и удалить с него метку тома.
Копируем прошивку и можем выходить из операционной системы.
Стоит отметить, что расширения у используемых файлов могут быть разные. На скриншоте цифрой «1» обозначена прошивка для материнской платы, а цифрой «2» для ультрабука ASUS ZenBook. Комплексные обновления UEFI для ноутбуков получают в качестве расширения номер версии прошивки.
Вход в BIOS
Вход в меню настройки BIOS на компьютерах с Windows 7 выполняется привычным способом. В момент перезагрузки зажимается или быстро нажимается функциональная клавиша. ASUS, как и многие производители, использует для этой цели DEL или F2. В Windows 10 применена технология быстрой загрузки, и использовать функциональные клавиши стало невозможно.
Отправляемся в параметры ОС и выбираем отмеченный пункт.
В области быстрого перехода находим пункт «Восстановление», а в нем блок «Особые варианты». Нажимаем на отмеченную виртуальную кнопку, чтобы выполнить перезагрузку ОС.
Запустившись, компьютер покажет нам меню выбора дополнительных действий. Выбираем в нем отмеченный пункт.
Открываем дополнительные параметры.
Здесь нам доступен отмеченный рамкой пункт, позволяющий напрямую запустить UEFI.
Таким образом, мы зашли в меню начальных настроек и готовы обновить БИОС с флешки.
Использование ASUS EZ Flash
В последних моделях материнских плат ASUS используется программа для обновления БИОСа EZ Flash 3 Utility. На старых моделях применяется ее вторая версия. Отличие между ними заключается в появившейся возможности сетевого обновления.
Чтобы приступить к обновлению, перейдем в меню Tool ASUS UEFI BIOS.
Подключаем к ПК приготовленную флешку с прошивкой и выбираем вариант использования внешнего носителя.
На скриншоте видно определившийся носитель и размещенный на нем файл с расширением CAP. Все готово к тому, чтобы обновить BIOS материнской платы.
Запускается процесс нажатием кнопки Enter на клавиатуре. После появления уведомления о завершении операции установки и проверки выполняем перезагрузку ПК. В большинстве случаев ранее выполнявшиеся настройки система сбрасывает. Перед использованием ОС Windows проверьте и установите заново необходимые параметры работы аппаратной конфигурации.
Вторая иконка в меню выбора отвечает за сетевое обновление.
Выбрав подходящий вариант подключения, запускаем мастер соединения с сетью.
Отвечаем на его вопросы и настраиваем интернет непосредственно в BIOS.
Восстановление BIOS
Необходимым условием, которое должно соблюдаться при прошивке UEFI, является стабильная подача электропитания. Сбой в момент обновления не даст операции завершиться. На этот случай в состав ПО системного диска с драйверами входит утилита ASUS CrashFree. Выключите ПК и, установив флешку с BIOS, выполните загрузку с фирменного DVD-носителя. EZ Flash запустится самостоятельно и восстановит версию базового ПО до первой обнаруженной.
В заключение
Несмотря на регулярный выход прошивок и предельно упростившуюся процедуру ее выполнения, производители оборудования не рекомендуют проводить обновление без необходимости. Посетите сайт ASUS и предварительно изучите перечень внесенных изменений. Если ПК стабильно работает и новые функции использоваться не будут, в работу системы вмешиваться не стоит.
-
Partition Wizard
-
Partition Manager
- 2 Ways to Update American Megatrends BIOS
2 Ways to Update American Megatrends BIOS [Partition Manager]
By Linda | Follow |
Last Updated February 02, 2023
Are you using American Megatrends BIOS? Sometimes, you need to update BIOS. In this post, MiniTool Partition Wizard shows you how to perform American Megatrends BIOS update.
Founded in 1985, American Megatrends, Inc. (AMI for short) is an American hardware and software company whose products are mainly PC hardware and firmware. The company started as a motherboard manufacturer. With the rise of motherboard manufacturers in Taiwan, AMI began to develop BIOS firmware for motherboard manufacturers.
Currently, the most popular motherboard BIOS versions on the market are mainly from Award, AMI, and Phoenix. These BIOS versions are applied in motherboards from many manufacturers. Therefore, it’s very possible that the PC tells you that the BIOS is from American Megatrends, Inc. while is the motherboard is manufactured by other brands.
Press Windows key + R key, type «msinfo32«, and press Enter. This will open System Information window, which will tell you these information.
How to Update American Megatrends BIOS
Sometimes, you may need to update BIOS. Updating BIOS will fix some bugs, improve PC compatibility, and optimize PC performance and stability. If you find your PC is using AMI BIOS, there are two cases for you.
- The motherboard is not from American Megatrends.
- The motherboard is an AMI motherboard.
You can check which case you are in by using System Information. But if you think the BIOS and motherboard information offered by this tool is not very clear. You can then CPU-Z, a free program for checking most PC hardware information. You just need to:
- Download CPU-Z and run it.
- Skip to Mainboard tab and check motherboard manufacturer and BIOS brand
If you are in Case 1, to update BIOS, you should download the latest BIOS file from the motherboard manufacturer’s website and use the BIOS utility from the motherboard manufacturer.
Only when you are in Case 2, you can perform the American Megatrends BIOS update. To complete American Megatrends BIOS update, please refer to the following guide:
- Check the motherboard model and serial number. And then download the corresponding BIOS file from AMI website.
- Extract the BIOS file and then place it into a USB drive. Please note that the BIOS file shouldn’t be placed in a folder, otherwise it can’t be recognized.
- Insert the USB drive to PC and restart the PC.
- During POST, press F12 to enter BIOS POST Flash.
- Select the USB drive containing BIOS file.
- Choose the BIOS file for updating. Please make sure the model information is correct.
- Click Yes to confirm that you want to flash BIOS.
- Click Yes to confirm that you are sure to erase DMI date.
- Wait until the American Megatrends BIOS update process is completed. Then, restart the PC.
How to Update BIOS Windows 10 | How to Check BIOS Version
There is another way to perform American Megatrends BIOS update. That is, using AMI Firmware Update Utility.
This tool is a scriptable command-line utility for DOS, Microsoft Windows, Linux, FreeBSD and the UEFI shell. It supports x86, x64 and ARM architectures. With this tool, you can update the entire Flash part or only a portion. It programs the main BIOS image, boot block or OEM configurable ROM regions.
To perform American Megatrends BIOS update using APU, please refer to the following steps:
- Download the BIOS file and unzip it.
- Download the AMI Firmware Utility Tool and unzip it.
- Go to the AFUWIN folder.
- Choose 32 bit or 64 bit.
- Run the AFUWIN.EXE.
- Click the Open Button to search for and select the BIOS file you downloaded from your motherboard manufacturers website.
- Click the Flash button. The Process tab will be displayed to show you the update BIOS process in action.
- When the process is complete, exit the Flash Utility and restart your computer.
About The Author
Position: Columnist
Author Linda has been working as an editor at MiniTool for 1 year. As a fresh man in IT field, she is curious about computer knowledge and learns it crazily. Maybe due to this point, her articles are simple and easy to understand. Even people who do not understand computer can gain something.
By the way, her special focuses are data recovery, partition management, disk clone, and OS migration.

