-

Open SourceAccess the open-source software you need for projects in any field, from data visualization to robotics.
-
User-friendlyWith our intuitive platform, you can easily search and install packages and create, load, and switch between environments.
-
TrustedOur securely hosted packages and artifacts are methodically tested and regularly updated.


Features
Anaconda Repository
Our repository features over 8,000 open-source data science and machine learning packages, Anaconda-built and compiled for all major operating systems and architectures.

Conda
Conda is an open-source package and environment management system that runs on Windows, macOS, and Linux. Conda quickly installs, runs, and updates packages and their dependencies. It also easily creates, saves, loads, and switches between environments on your local computer. It was created for Python programs, but it can package and distribute software for any language.
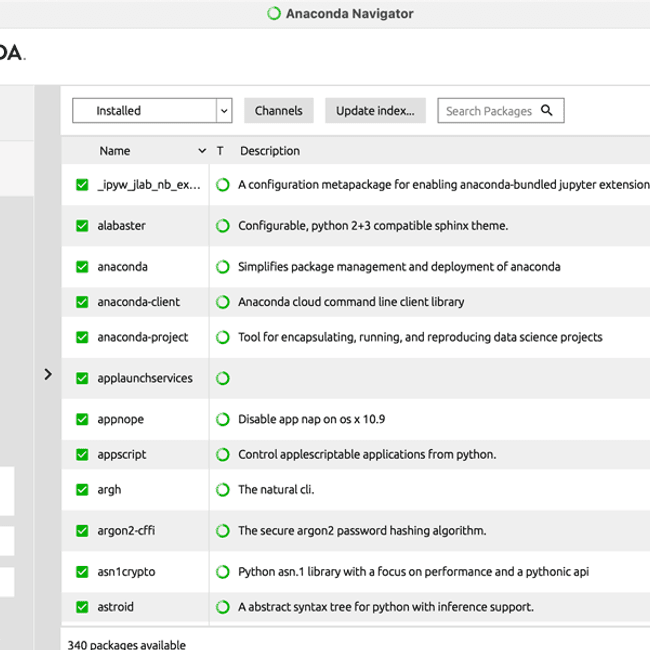
Anaconda Navigator
Our desktop application lets you easily manage integrated applications, packages, and environments without using the command line.
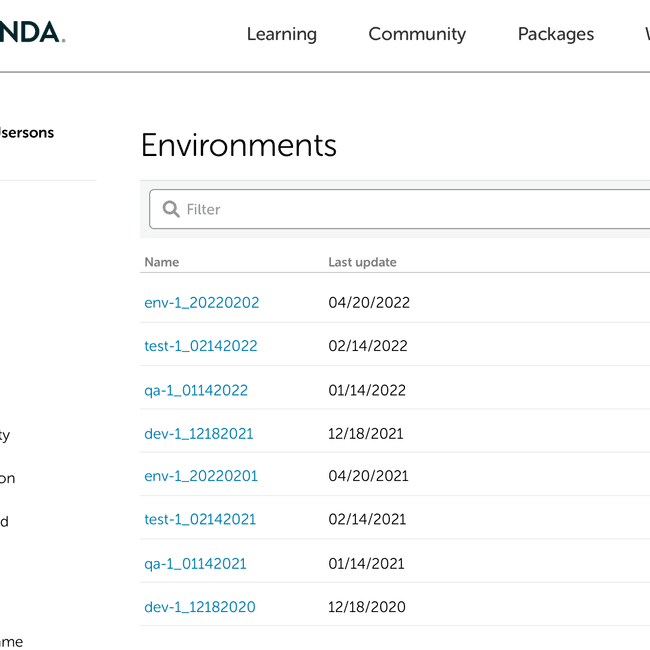
Cloud Environment Backup
Connect Anaconda Navigator to our community portal, Anaconda Nucleus, to securely store your local environments in the cloud.
Anaconda Distribution equips individuals to easily search and install thousands of Python/R packages and access a vast library of community content and support.
-
Students and Academics
Quickly get started with a no-cost, easy-to-use Python package and environment manager for educational and research use.
-
Practitioners and Hobbyists
Navigate unique challenges with a robust open-source package repository and toolkit supported with technical documentation and content from our community on Nucleus.
One in three of the G2000 use Anaconda
Anaconda Installers
Windows
Python 3.9
MacOS
Python 3.9
Linux
Python 3.9
Additional Installers
The archive has older versions of Anaconda Distribution installers. The Miniconda installer homepage can be found here.
This tutorial will cover step by step instructions to install Anaconda on Windows. You will also learn how to update, write your first program and uninstall Anaconda. This is going to be awesome learning, in case you are a developer or exploring Anaconda and Python.
Let’s deep dive in with these topics —
Table of Contents
- 1 What is Anaconda
- 2 System requirement to Install Anaconda on Windows
- 3 Download Anaconda Python 3
- 4 How to install Anaconda on Windows 10 (with Python)
- 5 How to run Anaconda in Windows using CLI and GUI
- 6 How to update Anaconda in Windows 10
- 7 How to Uninstall Anaconda on Windows 10
- 8 Video
- 9 Conclusion
What is Anaconda
Anaconda {a.ka. Anaconda Python} is a Python and R programming language distribution for scientific computing. All predictive analytics, data science, machine learning and big data falls under scientific computing.
It’s helps to simplify package management and deployment. Anaconda is available for all platforms like Windows, macOS and Linux.
There are two version available to install Anaconda in Windows —
- Anaconda distribution or Individual edition, which are open source and free
- Anaconda Team Edition and Anaconda Enterprise Edition are paid
In this tutorial, I will cover the Anaconda individual edition. It comes with more than 250 packages automatically installed and over 7500 packages available in the PyPI repository.
Conda is an open-source, language-agnostic and cross-platform package manager. It helps to manage and deploy packages using the command line while Anaconda navigator is a GUI alternative to Conda.
System requirement to Install Anaconda on Windows
- Internet connection
- Windows 10 machine
- Approx. 2.7GB free disks pace.
** You don’t need python to be pre-installed because Python 3.8 automatically get install with Anaconda3.
Download Anaconda Python 3
Follow these steps to download Anaconda3 for Windows 10.
Step1.1- Visit Anaconda installers section on Anaconda.com
- Visit https://www.anaconda.com/products/individual > Scroll down on the page to the Anaconda installers section
- Select your Operating system
Step1.2- Download Installer «Anaconda» for Windows 10 ( 64-bit)
- Click on 64-bit Graphical installer (457 MB) to download Anaconda. If your system supports 32 bit only, then go for a 32-bit Graphical installer (403 MB) Anaconda download.
- Default Python 3.8 comes with it as a bundle. Later in this post, I will let you know, how to get the latest Python version 3.9 using Anaconda.

Alternatively, Just Click on below mentioned «Download buttons» to avoid all hassles.
Depending upon your internet speed, within couple of minutes, you will get «Anaconda3-2020.11-Windows-x86_64.exe» in your Download folder.

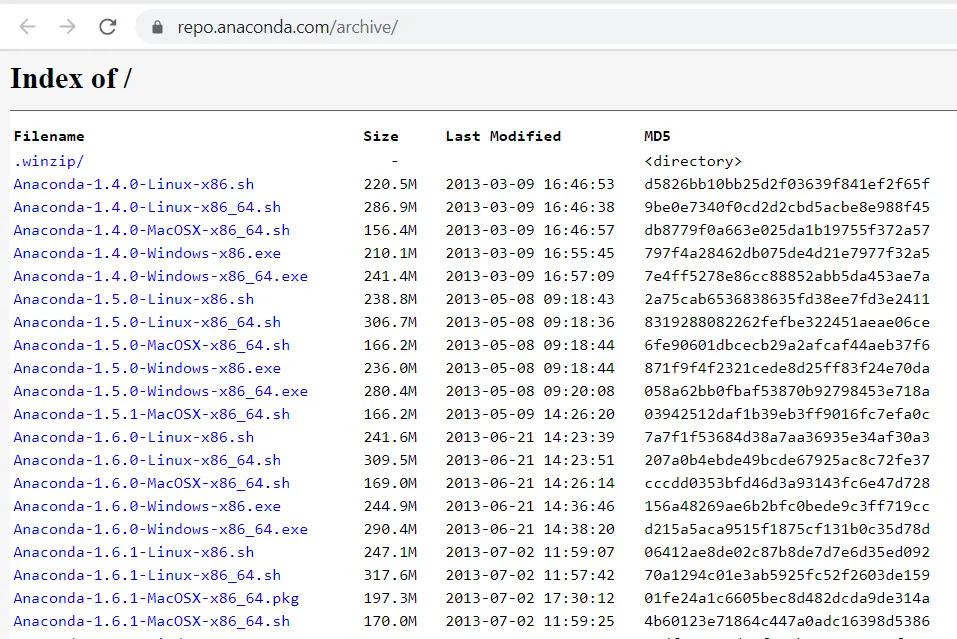
If you are in search of Old or Archive version of Anaconda installer for Windows 10, Then visit «https://repo.anaconda.com/archive/».
Step1.3- Verify MD5 Checksum Keys for Anaconda installer
You need to perform this step to make sure you have a legitimate copy of Anaconda.
- Visit «https://repo.anaconda.com/archive/» and search for your Anaconda installer.exe, which you just downloaded.
- Look for the MD5 checksum Key written in the 4th column against your exe file.
For example, I will show MD5 Key for «Anaconda3-2020.11-Windows-x86_64.exe» in the image for reference.

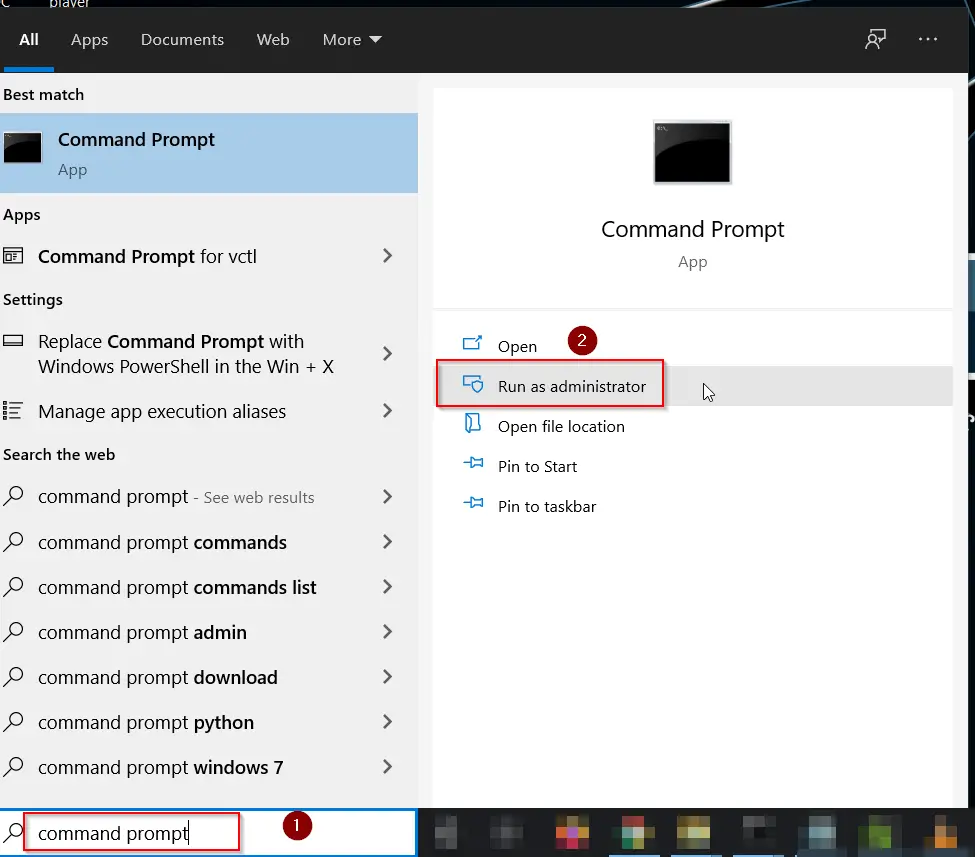
- Now Type «Command prompt» in Windows search bar and open it as administrator.
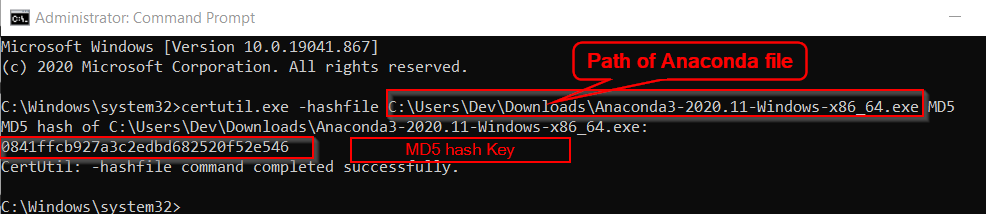
- Run the Certutil.exe command and provide the full path to your download file.
- Add MD5 in the last of your command. You will get a series of number.
- Match it with the key you got in Step1.3 from the Anaconda website. If all matches, you are good to proceed further.
C:Windowssystem32>certutil.exe -hashfile "path to your anaconda file" MD5
For example, I have added «C:UsersDevDownloadsAnaconda3-2020.11-Windows-x86_64.exe» as the file path in the command.
Then I got 0841ffcb927a3c2edbd682520f52e546 MD5 Key. And If you will look closely, it matches with the key we noted in Step1.3.
> certutil.exe -hashfile "C:UsersDevDownloadsAnaconda3-2020.11-Windows-x86_64.exe" MD5

#Output#
MD5 hash of C:UsersDevDownloadsAnaconda3-2020.11-Windows-x86_64.exe:
0841ffcb927a3c2edbd682520f52e546
CertUtil: -hashfile command completed successfully.
Now we know, that our Anaconda installer file is a genuine copy. Let’s go ahead with the installation steps.
Installing Anaconda on Windows 10 is pretty straightforward. You just need to decide on few options carefully.
Let’s deep dive into Anaconda installation steps —
Step2.1- Run Anaconda3 (Python) installer
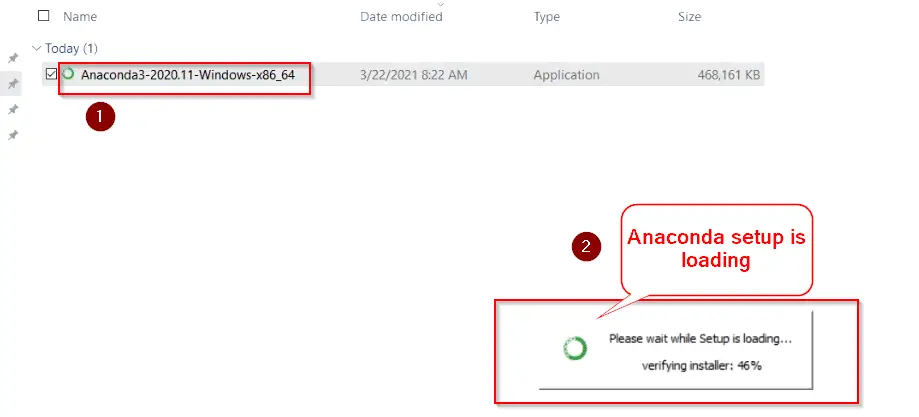
- Go to your «Download» directory, where the Anaconda installer exists.
- <Double click> on the Anaconda installer file to run the setup.
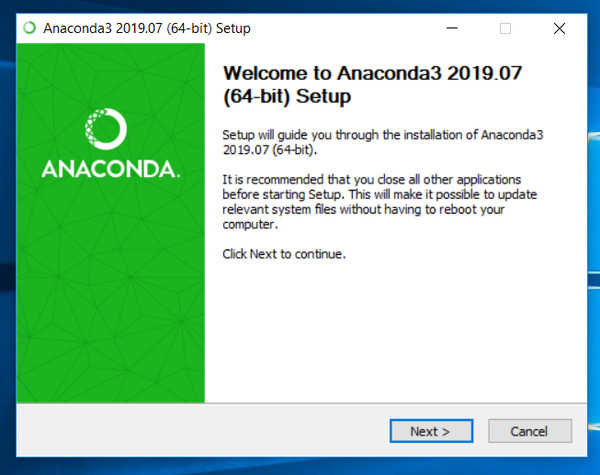
Step2.2- click Next on «Anaconda Welcome Screen»
Click Next on the «Welcome to Anaconda3 2020.11 (64-bit) setup» screen.
Make sure you have close all other applications before starting this setup. Because it may avoid updating important relevant system files. A system reboot will become mandatory in that case.

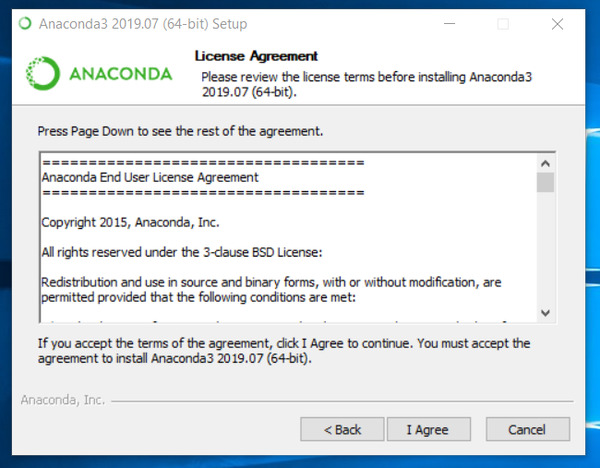
Step2.3- Accept End User License Agreement (EULA)
Select «I Agree» on End user license agreement page.

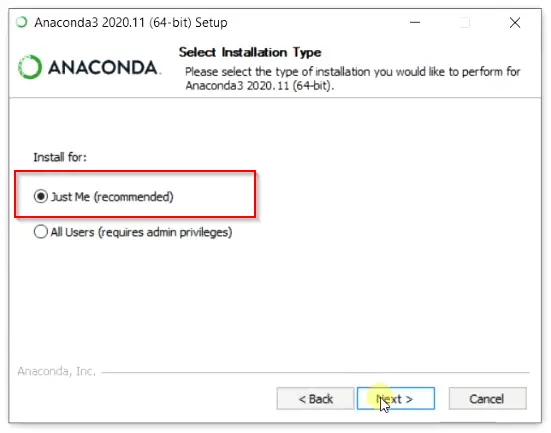
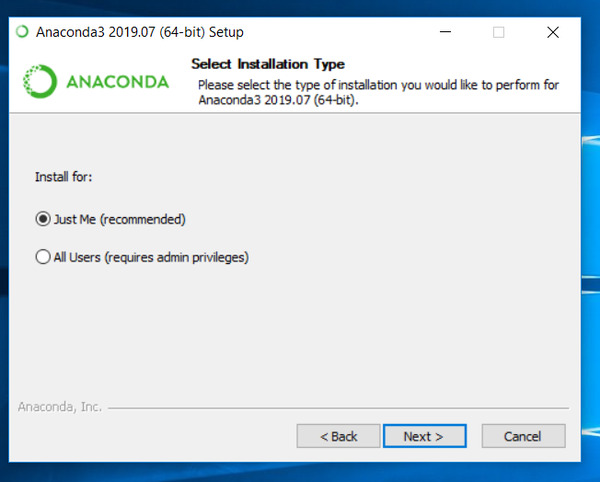
Step2.4- Select Anaconda installation type
On this screen you will get two options —
- Just me — It’s the recommended option. If you will select this option, you can install Anaconda on Windows without admin rights. But if your system is used by more than one user or developer. He or She will not be able to access it. I will go with the «Just me» option.
- All users — If you have a system, where more than one user will use Anaconda to develop scientific programs. You should select this option. Although you will require Admin rights on this system.
Also take a look on couple of extra steps, if you want to install Anaconda on Windows for multiple users.
Click Next —
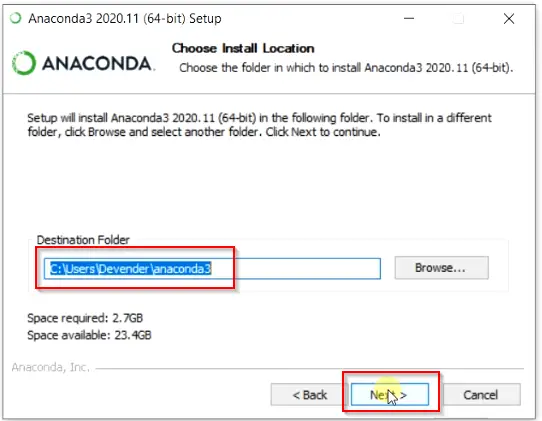
Step2.5- Choose Anaconda install location
Select Destination folder, where you want to install Anaconda on Windows 10 system. By default, Anaconda3 will get install in the «Users home directory«. For example, it is in C:usersDevenderanaconda3 in my case.
If you want to select different folder, then click Browse and choose your preferred folder.
I will go with default installation folder.
Hit Next, once you are ready.
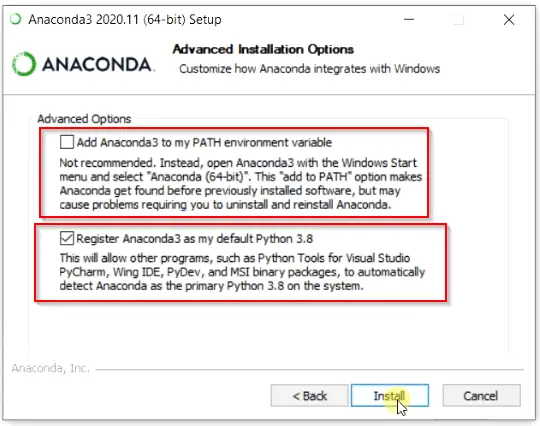
Step2.6- Choose Advance installation options
You have flexibility to customize your Anaconda integration with Windows. There are two options available —
a. Add Anaconda3 to my PATH variable — I will not recommend you to select this option. Because setting up the Anaconda PATH variable can mess up with your previously installed software. Alternatively, you can open Anaconda Shell or Navigator using the Windows start menu. Let’s don’t tick this check box.
b. Register Anaconda3 as my default Python 3.8 — You can go with this option because it helps other software to detect Python 3.8 as primary. If you don’t want to set Python 3.8 as default, in case you are using some other python version. You can uncheck this option also.
I don’t have any other software or Python installed. So I will leave «Register Anaconda3 as my default Python 3.8» selected.
Click on «Install» button to move further.
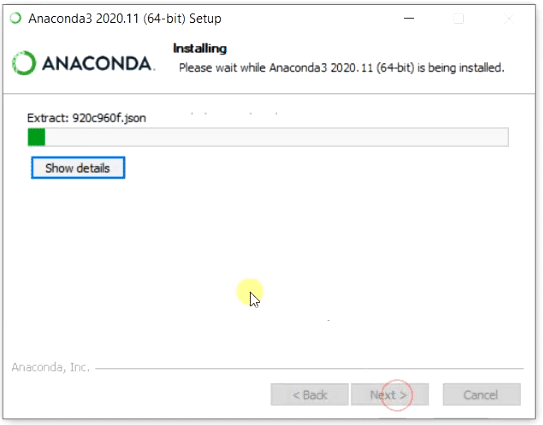
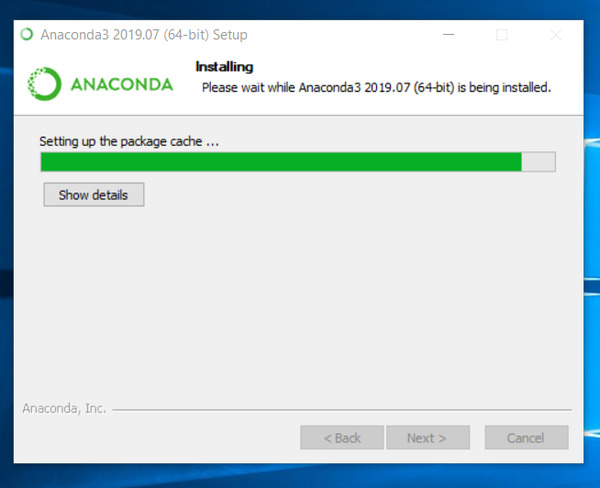
Step2.7- Let Anaconda installation complete
Now you can relax and get a cup of coffee. This setup will take few mins to install Anaconda on Windows 10.
You can tap on «Show details» to check the details of actions happening during installation.
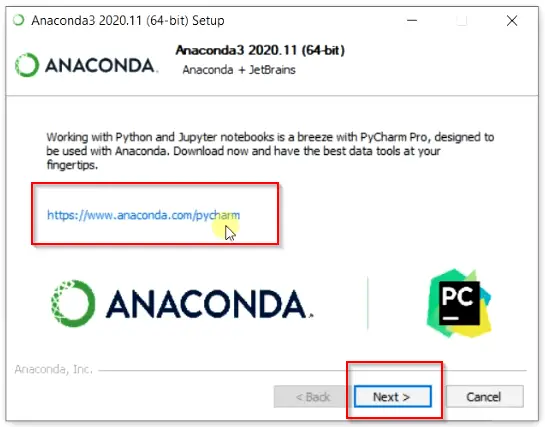
Step2.8- Install PyCharm Pro with Anaconda (Optional)
On this screen, Anaconda setup suggests you installing the PyCharm Pro editor. Actually, PyCharm is an IDE (integrated development environment) designed especially for Python programming by Jet Brains.
Let’s talk about PyCharm later in some other tutorial.
Click Next —
Step2.9- Finish Anaconda Installation Wizard
As soon as you will Finish completing the Anaconda3 setup. You will be redirected to the «Anaconda tutorial and the «Getting started» website of Anaconda.
Uncheck these two options on final screen to avoid redirection to Anaconda website for tutorial.
- Anaconda Individual Edition Tutorial
- Getting Started with Anaconda
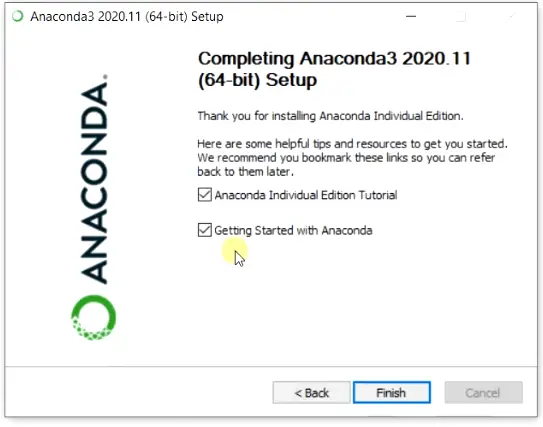
Congrats!! you are done with latest Anaconda installation in Windows.
How to run Anaconda in Windows using CLI and GUI
When you install Anaconda on Windows, you get a lot of bundled scientific packages with it like Spyder, Python and Jupyter notebook.
There are two methods to run Anaconda in Windows. If you are a CLI (Command Line Interface) fan, you can use Conda to run on the prompt.
In the case of GUI (Graphical User Interface), an Anaconda navigator can be used to manage packages, environment and launch applications.
I will show you both methods (Conda and Navigator) to create your first program. Just follow along :—
Step3.1 (CLI Method) — Create and Activate Anaconda environment
Let’s create our first test environment and run our first program in Python3.
Step3.1 (CLI Method) — Create and Activate Anaconda environment
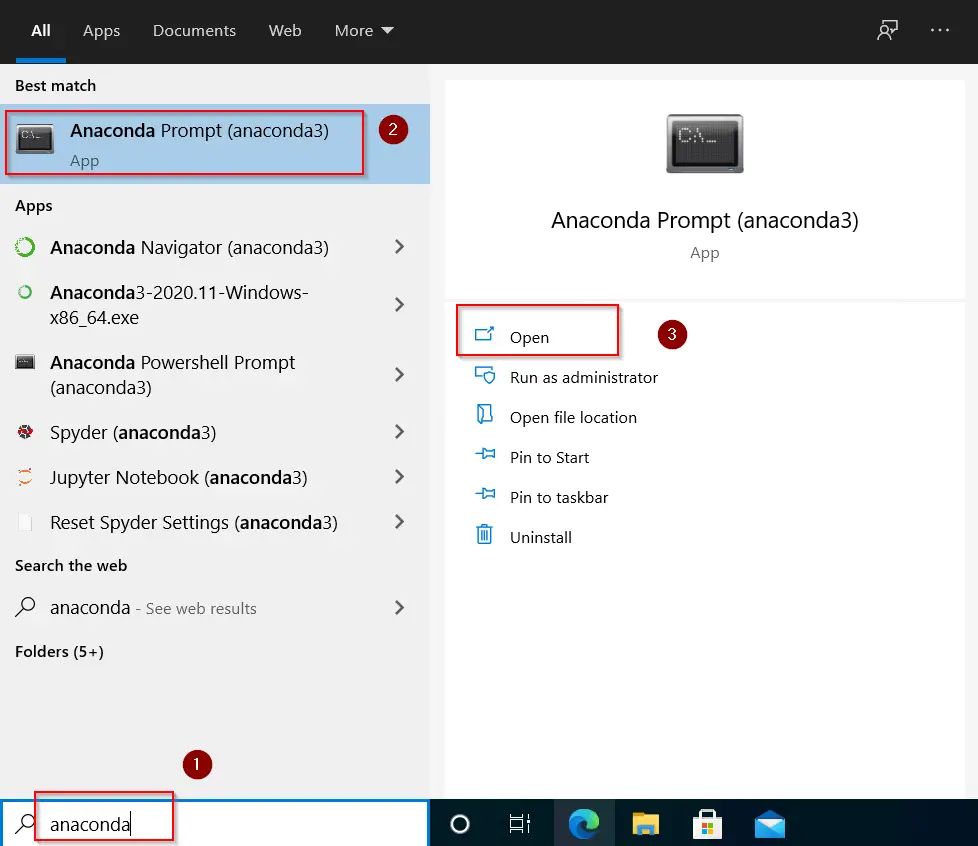
To create your first environment, you need to launch Anaconda3 prompt application.
- Type «Anaconda» in Windows search bar > Select Anaconda prompt application > Click Open
Step3.1.2 — Activate conda environment
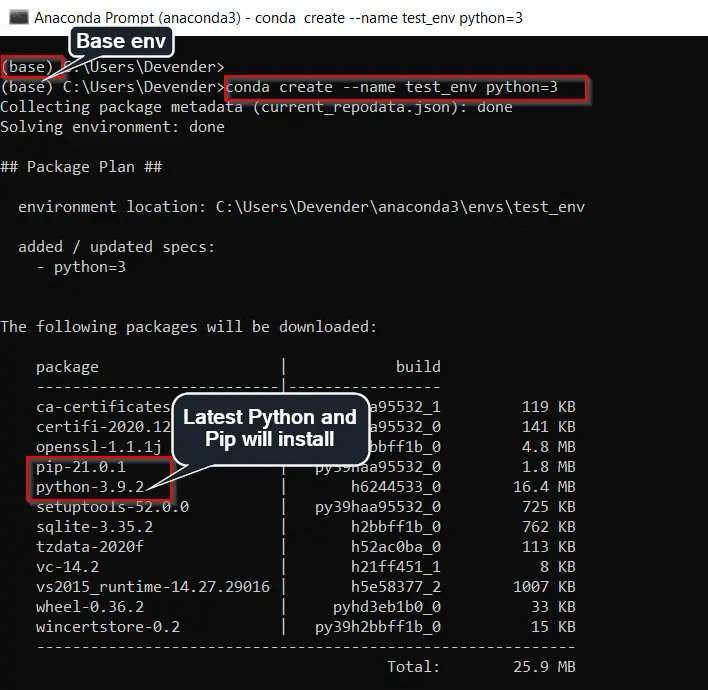
By-default, you will get base(root) environment in Anaconda shell prompt.
Run the «conda create» command to set up our first test environment (test_env) with Python3. It will also install the latest Python 3.9 and Pip 21.0 packages.
(base) C:UsersDevender>conda create --name test_env python=3
Please make a note, every environment is individual in Anaconda. You need to install required packages for each environment individually.
Press «y» to install packages.
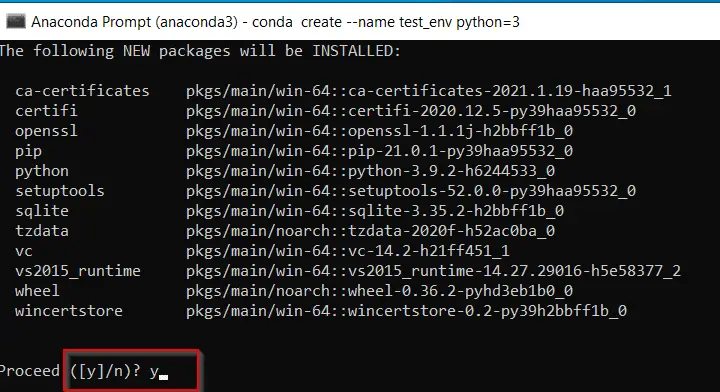
Anaconda will download, extract and install packages required. Once done, you can activate your environment with Conda activate command.
For example, test_env is the name of our newly create environment. So I will run this command —
(base) C:UsersDevender>conda activate test_env
It will switch from base(root) environment to «test_env» environment as shown in image.

** Please make a note running conda activate command without an environment name argument, drops you in the base environment. So make sure you give your environment name.
Step3.1.3 — Run your first python program
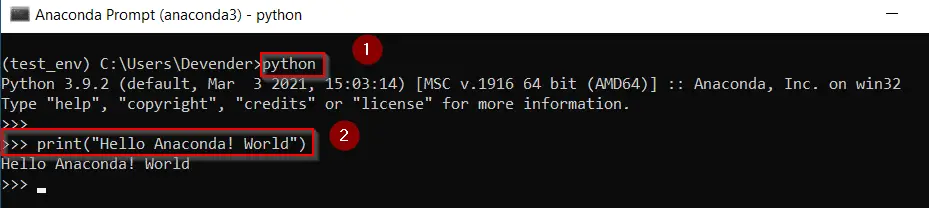
Now run Python and Type print(«your first program«) and check the output.
(test_env) C:UsersDevender>python
You will get «>>>» prompt. Type print(«Hello Anaconda! World») from your keyboard and press Enter.
# Type your first program code"
>>> print("Hello Anaconda! World")
Output should be «Hello Anaconda! World» as shown in image.
Type exit() to come out from Python prompt.
Hurray!! You have run your first python program in Anaconda successfully.
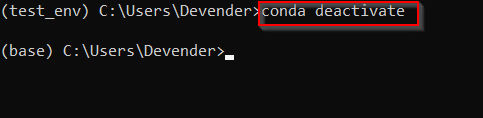
Step3.1.4 — Deactivate Conda environment
If you want to exit or want to deactivate any environment. You just need to run conda deactivate command.
For example, If I will run conda deactivate command inside my test_env environment. It will drop me to the default base environment as shown in the image.
(test_env) C:UsersDevender>conda deactivate
Step3.2 (GUI Method)- How to start Anaconda navigator and Launch Jupyter
Just to make things interesting, I will show you how to Launch the Anaconda navigator. Also, how to install and launch Jupyter notebook using Anaconda in your newly created test environment.
So follow these easy steps —
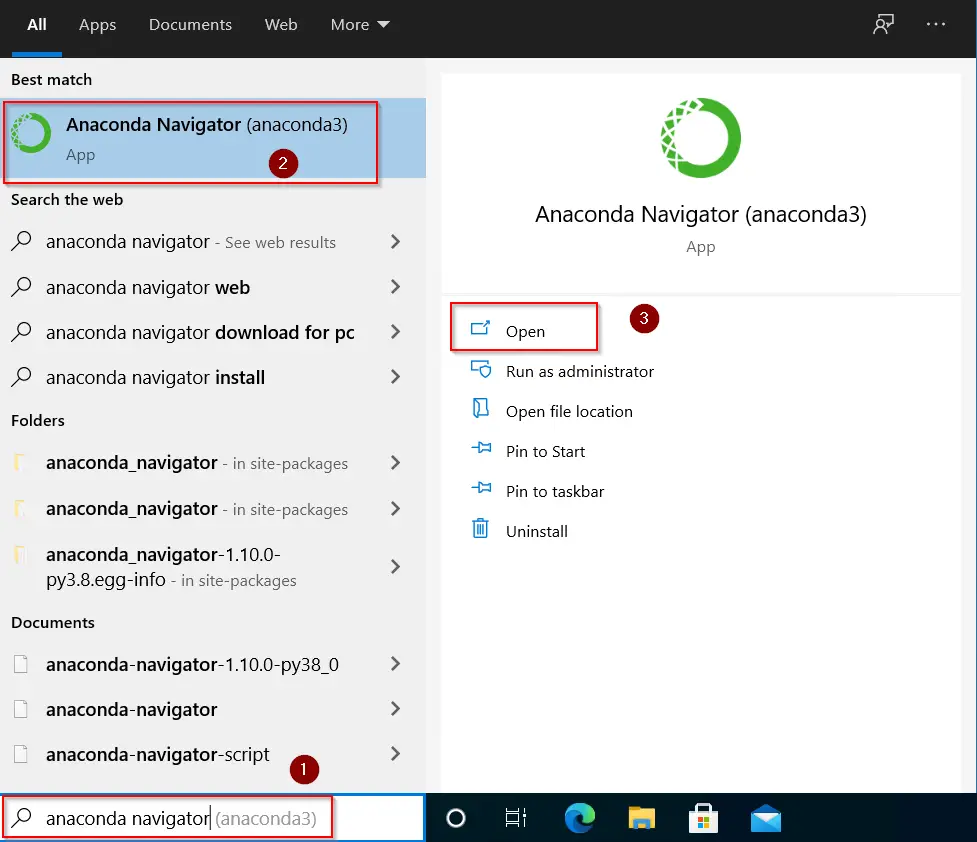
Step3.2.1 — Launch Anaconda Navigator in Windows 10
- Type «Anaconda Navigator» in Windows search bar > Select Anaconda Navigator > click Open.
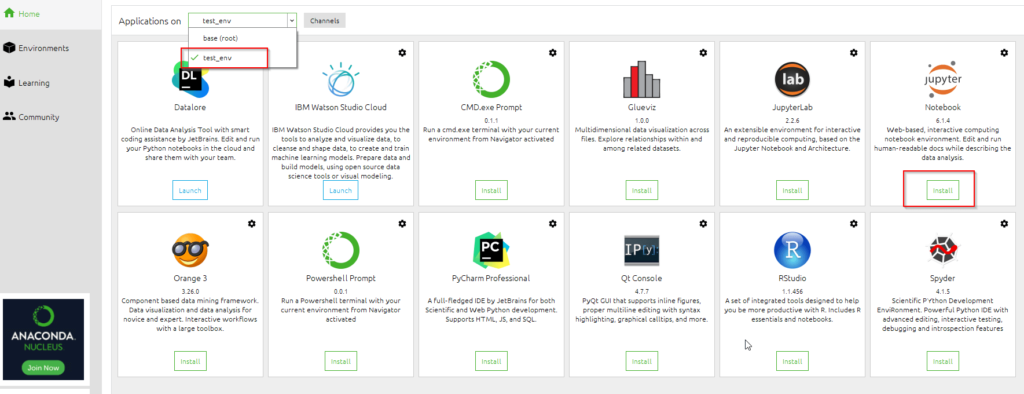
Step3.2.2 — Select your test environment (test_env) and install Jupyter notebook
Jupyter notebook is a web based tool to interactively develop and present data science projects.
You can launch Jupyter notebook from <start menu> or search bar also. But It will get launch from base(root) environment by-default.
Here I will show, how you can install and launch Jupyter notebook in your custom environment. For example, test_env in my case.
- Select your environment from drop down > click on the «install» button in Jupyter Notebook application.
- Please wait and let Jupyter notebook installation complete. You can monitor the progress in Navigator task bar.

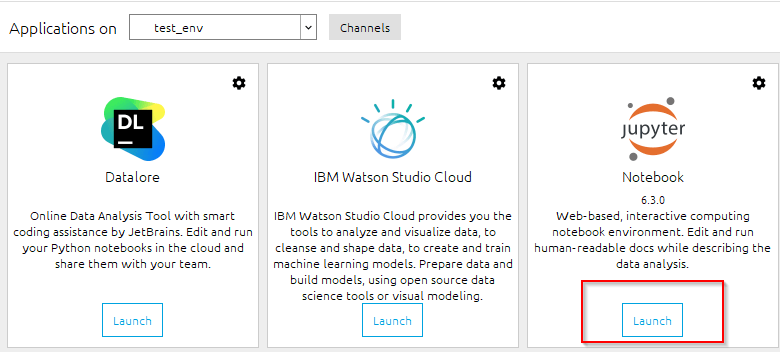
Step3.2.3 — Launch Jupyter Notebook in Anaconda navigator
Click on Launch button of Jupyter notebook.
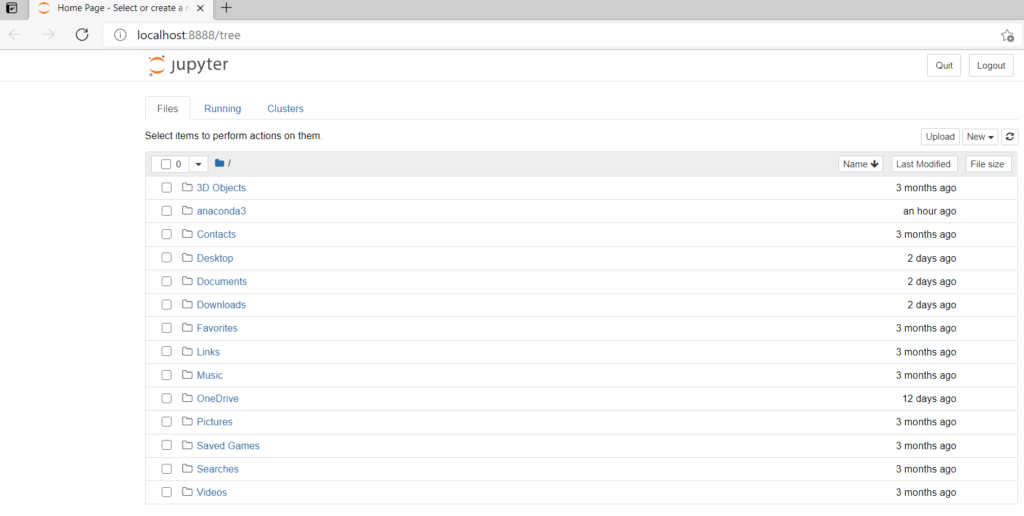
You will see a Jupyter home page in your default web browser. The default URL path of Jupyter notebook will be http://localhost:8888/tree.
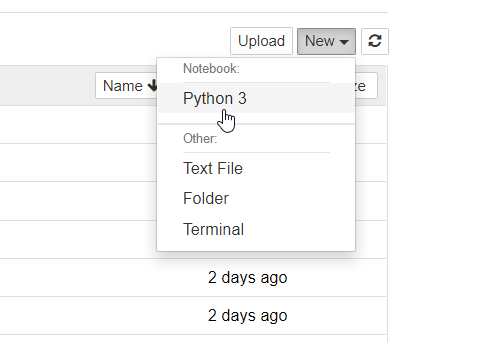
Step3.2.4 — Create your first Jupyter Notebook with Python3
Select New > Python3 notebook.
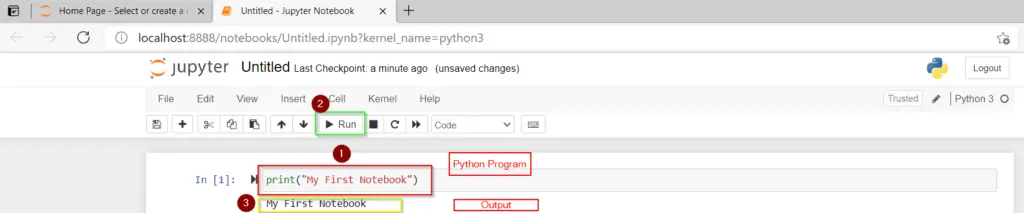
Step3.2.5 — Run first python program using Jupyter command cell
To run your first sample python program in Jupyter notebook. Follow these 3 steps —
- Type «print(«My First Notebook») in Jupyter command cell
- Click on Run button as shown in image
- You will see output as «My First Notebook«.
You can also save this file. Go to File > save as > provide the file name (path) and you are done. This was just the basic, For more details, checkout Jupyter documentation.
Enjoy! Anaconda and Jupyter in your development journey.
How to update Anaconda in Windows 10
You can update Anaconda in Windows 10 by 3 simple steps —
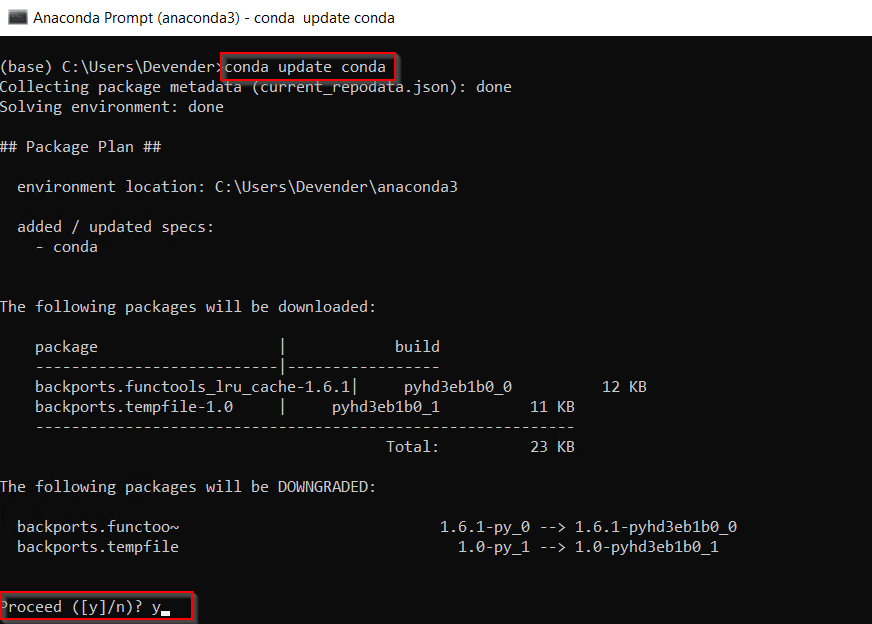
Step4.1- Update conda utility
First you need to update conda utility before upgrading Anaconda package in windows 10. To achieve this-
- Type «Anaconda» in Windows search bar > Select Anaconda prompt application > Click Open
- Run conda update command.
(base) C:UsersDevender>conda update conda
Press «y» to proceed
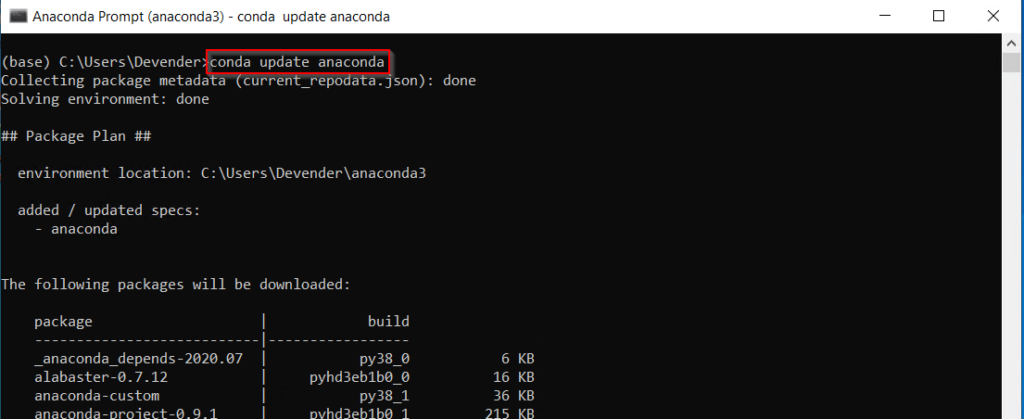
Step4.2- Update Anaconda package
Run this command to update Anaconda packages to latest version —
(base) C:UsersDevender>conda update anaconda
Press «y» to install packages.
To update Anaconda to specific version, Run below mentioned command —
> conda update anaconda=VersionNumber
For example, to upgrade it to Anaconda 2020.11 version, type
> conda update anaconda=2020.11
How to Uninstall Anaconda on Windows 10
Till this point, We know how to install Anaconda on Windows 10 and how to update it to latest version.
Now I will show you how to remove Anaconda from Windows10 completely. Follow along with these simple steps —
Step5.1- Go to Add remove programs
**** First of all take backup of all your projects, you created using Anaconda to be on safer side.
Then type «Add remove programs» in Windows search bar and click Open.

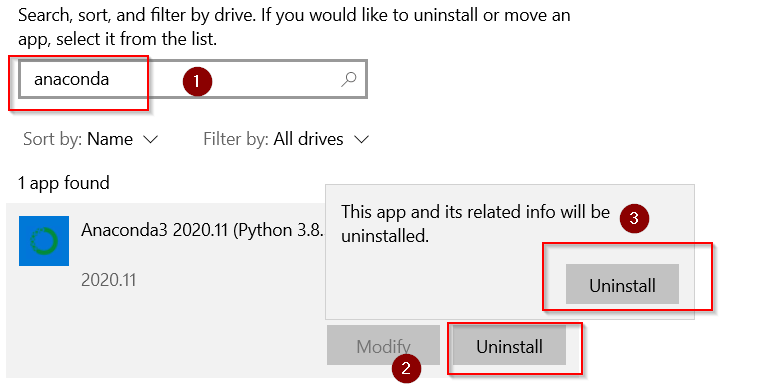
Step5.2- Uninstall Anaconda and Python completely
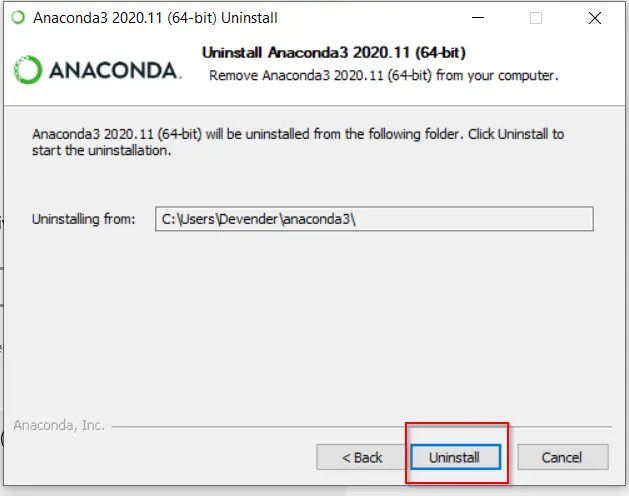
- In the «Apps and feature» window. Search for the «Anaconda» program > click Uninstall > then Uninstall again.
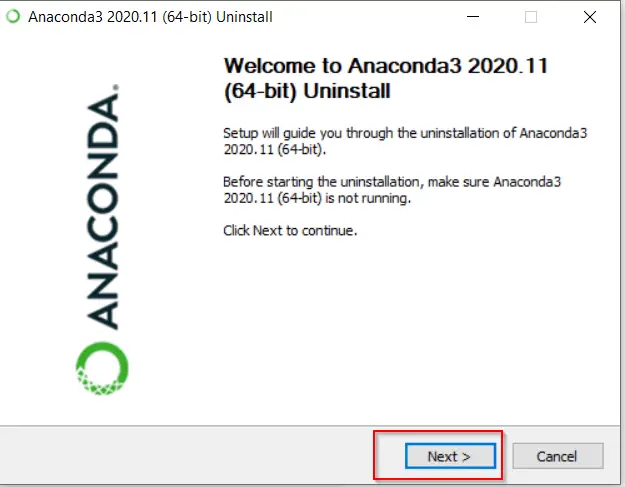
- Press Next on Anaconda welcome screen
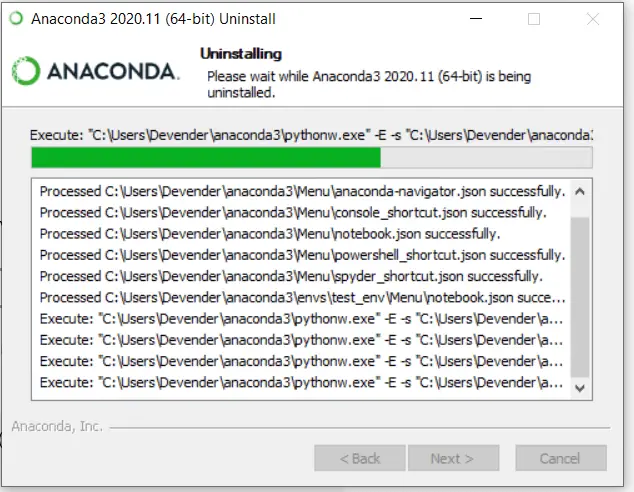
- Click «Uninstall«.
It will take a couple of minutes to uninstall anaconda and python 3.8.5 from your windows system.
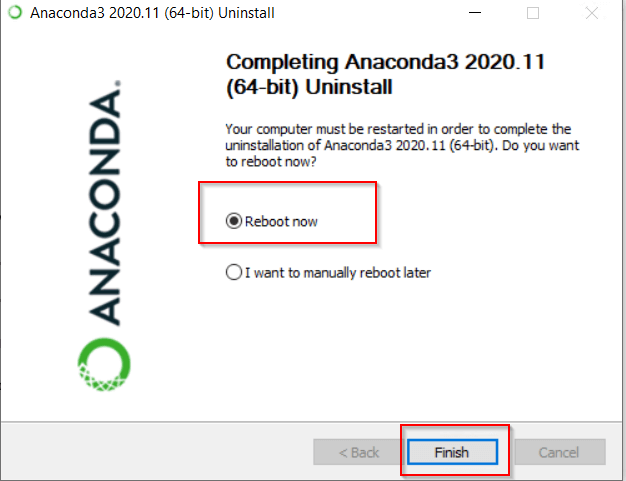
Click Next and then select Reboot Now or «I want to manually reboot later» as per your preference.
I will select reboot now and then Finish to complete uninstallation of Anaconda.
Important Tip
In a few rare cases, you may find the Anaconda3 folder, where you installed Anaconda. For example, in my case, it will reside in «C:usersDevenderanaconda3«. You can manually delete it if you find it after uninstallation of Anaconda.
You must be a happy soul now!!
Video
Check out this informative video on «How to Install Anaconda on Windows 10«. In case, you don’t like reading text or something is not clear in text instructions.
Conclusion
If you follow each and every instruction of this tutorial, You can install Anaconda on Windows 10 very easily. Even if you are a novice in the development world.
I wish you all the good luck for your future learnings. You can also download Anaconda cheat sheet to keep it handy.
Let me know, in case you have any feedback or suggestions for me.
Each software is released under license type that can be found on program pages as well as on search or category pages. Here are the most common license types:
Freeware
Freeware programs can be downloaded used free of charge and without any time limitations. Freeware products can be used free of charge for both personal and professional (commercial use).
Open Source
Open Source software is software with source code that anyone can inspect, modify or enhance. Programs released under this license can be used at no cost for both personal and commercial purposes. There are many different open source licenses but they all must comply with the Open Source Definition — in brief: the software can be freely used, modified and shared.
Free to Play
This license is commonly used for video games and it allows users to download and play the game for free. Basically, a product is offered Free to Play (Freemium) and the user can decide if he wants to pay the money (Premium) for additional features, services, virtual or physical goods that expand the functionality of the game. In some cases, ads may be show to the users.
Demo
Demo programs have a limited functionality for free, but charge for an advanced set of features or for the removal of advertisements from the program’s interfaces. In some cases, all the functionality is disabled until the license is purchased. Demos are usually not time-limited (like Trial software) but the functionality is limited.
Trial
Trial software allows the user to evaluate the software for a limited amount of time. After that trial period (usually 15 to 90 days) the user can decide whether to buy the software or not. Even though, most trial software products are only time-limited some also have feature limitations.
Paid
Usually commercial software or games are produced for sale or to serve a commercial purpose.
Improve Article
Save Article
Improve Article
Save Article
Anaconda is an open-source software that contains Jupyter, spyder, etc that are used for large data processing, data analytics, heavy scientific computing. Anaconda works for R and python programming language. Spyder(sub-application of Anaconda) is used for python. Opencv for python will work in spyder. Package versions are managed by the package management system called conda.
To begin working with Anaconda, one must get it installed first. Follow the below instructions to Download and install Anaconda on your system:
Download and install Anaconda:
Head over to anaconda.com and install the latest version of Anaconda. Make sure to download the “Python 3.7 Version” for the appropriate architecture.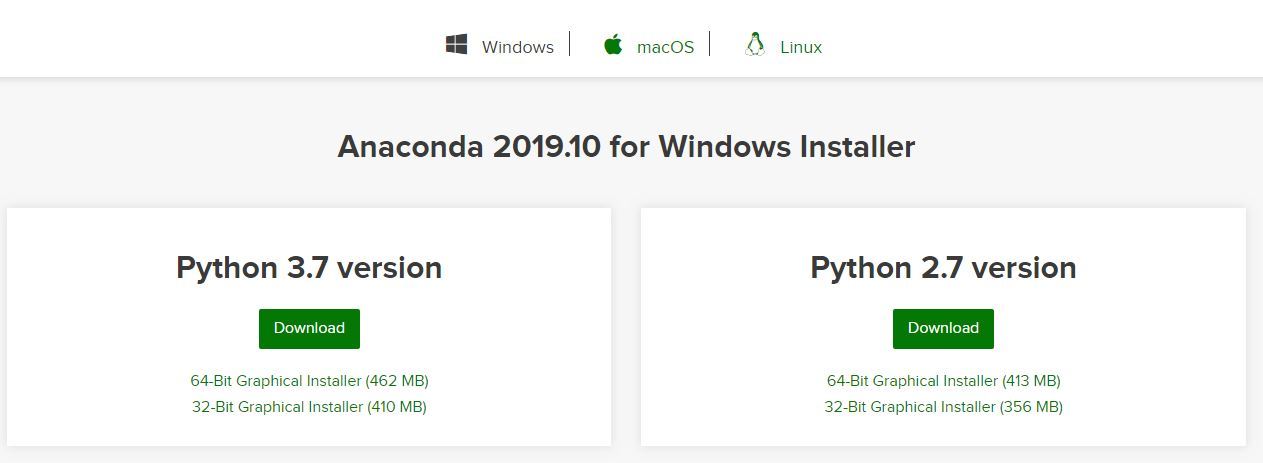
Begin with the installation process:
Working with Anaconda:
Once the installation process is done, Anaconda can be used to perform multiple operations. To begin using Anaconda, search for Anaconda Navigator from the Start Menu in Windows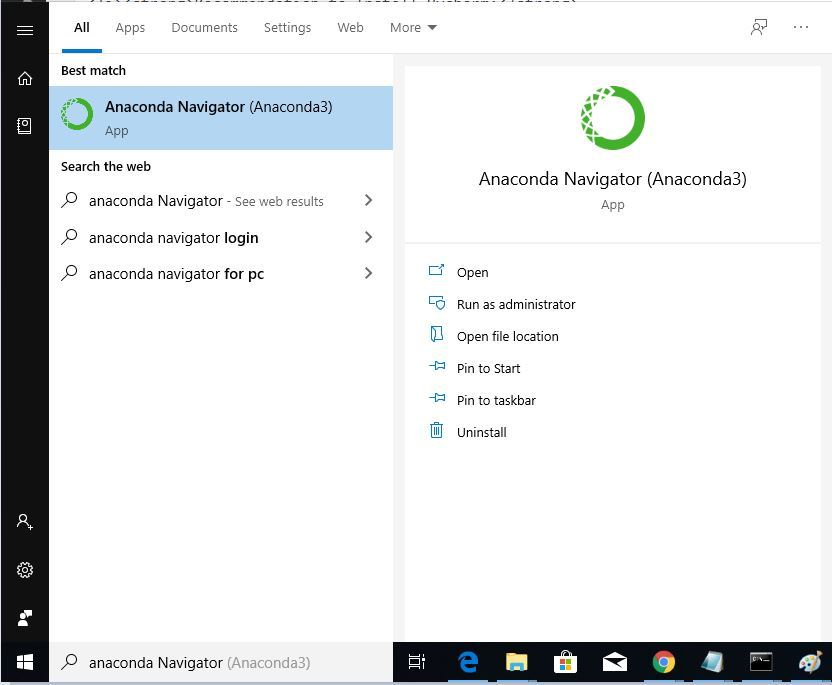
In this guide I have a look at installing the Anaconda Python Distribution which contains Python and the most commonly used Data Science Libraries Distribution on Windows 11. Instructions should be equally applicable to a modern build of Windows 10. I go through the installation in some detail, highlighting the installation and adding conda to the path in the Windows Terminal. I then look at use of the conda package manager syntax as well as a reference to physical file locations. I look at using the Anaconda Navigator, Spyder IDE, JupyterLab IDE and Visual Studio Code IDE. I also discuss the difference between the official conda channel and the community conda-forge channel and go through instructions for installing the latest community version of Spyder and JupyterLab using conda environments.
I recommend using Mambaforge opposed to Anaconda as it uses the mamba package manager and has been updated to specifically address much of the issues highlighted in this guide.
This guide is also equally applicable to Miniconda. Miniconda is a stripped more lightweight version of Anaconda. It is essentially the same installation as Anaconda but gives a more or less empty conda base environment. The Anaconda Individual Edition is designed for only Individual use and has Commercial restrictions, while Miniconda is exempt from these Commercial restrictions. As the (base) conda environment is empty in Miniconda, you will need to create your own conda environments to install the Spyder 5 and JupyterLab 3 IDEs respectively. These steps are covered in this guide.
Table of contents
- System Requirements
- Uninstalling and Purging an Old Anaconda Installation
- Uninstalling
- Purging Old Configuration Files
- Old Start Menu Shortcuts
- Show Hidden Items
- User Profile or C:ProgramData Configuration Files
- AppData Configuration Files
- Hide Hidden Items
- Old Start Menu Shortcuts
- Removing Old Entries from the Path
- Uninstalling
- Installing Anaconda
- winget Command Line Based Installation
- Adding the Anaconda (base) env to the Windows Env Path
- The General User Interface Installer
- winget Command Line Based Installation
- The conda package manager
- Syntax
- conda list
- conda update
- conda install
- Syntax
- The Anaconda Navigator
- Anaconda Navigator Preferences
- Anaconda Navigator Preferences
- Spyder
- Spyder Preferences
- Spyder Preferences
- JupyterLab
- JupyterLab Preferences File
- JupyterLab Preferences File
- Visual Studio Code
- winget Command Line Based Installation
- Installing the Python Extension
- Selecting the Python Interpreter
- The General User Interface Installer
- winget Command Line Based Installation
- conda and conda-forge channels
- conda environments
- Install Latest Spyder 5 to New conda env
- Install Latest JupyterLab 3 to New conda env
- Install Latest Spyder 5 to New conda env
- Spyder 5 IDE Tutorial
- Spyder Preferences
- File Menu
- Syntax Highlighting
- Run Script
- Variable Explorer
- Script Editor and Console
- Kernel
- Cells
- Importing DataScience Libraries
- Files
- Plotting
- Spyder Preferences
- JupyterLab 3 IDE Tutorial
- File Explorer
- Text File
- Markdown File
- Headings
- Formatted Text
- Escape Characters
- Spacing
- Bullet Points
- Tables
- Links and Images
- Code
- Equations (Latex)
- Headings
- Notebook File
- Markdown and Code Cells
- Code Completion
- Cell Output
- Plotting
- Opening JupyterLab Files
- Kernel
- Shortcut Keys
- Markdown and Code Cells
- File Explorer
- Visual Studio Code IDE Tutorial
- File Explorer
- Python Script .py Files
- Markdown File .md
- Notebook Files .ipynb
- Microsoft Intelligence Code Completion
- Terminal
- File Explorer
- Using Python
System Requirements
To install Anaconda or Miniconda you will need a PC that satisfies the following system requirements:
- Windows OS: Windows 8.1, 10 or 11
- 6th Generation Intel i5 Processor or Later
- 8 GB DDR3 RAM or Superior
- 250 GB SSD or Superior
Performance will be very poor if these system requirements are not satisfied.
Anaconda and Miniconda can also be installed on a modern Linux Kernel. I have a separate installation guide for Ubuntu 22.04 LTS here:
Uninstalling and Purging an Old Anaconda Installation
Skip this if this is a clean Installation of Windows and no previous Anaconda, Miniconda, Spyder or Python have previously been installed.
Uninstalling
Right click the Start Button to get to the Powers User Menu and select Apps and Features:

Search for Anaconda3 and then select options:

Select Uninstall:

Select Next:

Select Uninstall:

Select Next:

Select Finish:

Uninstall Miniconda, Python, Spyder and Kite if these have previously been seperately installed.
Purging Old Configuration Files
Skip this if this is a clean Installation of Windows and no previous Anaconda, Miniconda, Spyder or Python have previously been installed.
The Anaconda uninstaller does not appear to remove Desktop Shortcuts to Uninstalled conda environments. These need to be manually removed.
Go to the Start Menu and look for any Anaconda folder.

Right click one of the icons and select More and then Open File Location:

Go up a level (pressing [Alt] and [ ↑ ]):

Delete the Anaconda folder:

Show Hidden Items
Open up File Explorer and select Options, Show and check Hidden Items:

User Profile or C:ProgramData Configuration Files
If Anaconda was installed for a single user it would be installed in the User Profile which can be accessed by going to the address bar and typing in:
%UserProfile%

Delete the Anaconda3 folder if present (this should have been removed when you Uninstalled Anaconda). Delete the .conda, .continuum, .ipython, .jupyter, .matplotlib, .spyder-py3folders and the .condarc file. Delete the .kite or kite folder if present:

If Anaconda was installed for All Users it would have been installed in:
C:ProgramData

Delete the Anaconda3 folder if present (this should have been removed when you Uninstalled Anaconda). Delete the .conda, .continuum, .ipython, .jupyter, .matplotlib, .spyder-py3folders and the .condarc file if present here. Delete also the jupyter folder. Delete the .kite or kite folder if present:

AppData Configuration Files
The App Data Roaming folder can be accessed by typing in:
%AppData%

The .anaconda and jupyter folders should be deleted. Delete the .kite or kite folder if present:

Press Alt and ↑ to go up a level and then select the Local folder:

Delete the conda, Jedi, pip and Spyder folders and kite folder if present:

Hide Hidden Items
The old configuration files are removed. Open up File Explorer and select Options, Show and uncheck Hidden Items:

Removing Old Entries from the Path
If an old installation of Python or Anaconda has been added to the Windows Environmental Variables Path, they should be removed. To do this right click the Start Button and select System:

Select Advanced System Settings:

Select Environmental Variables:

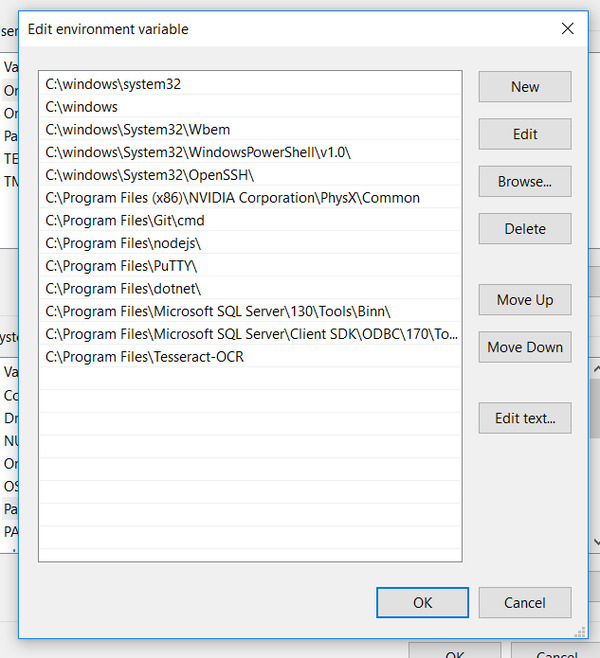
Highlight Path and select Edit:

Delete any entries which contain Python, Anaconda, Miniconda or other previous Python environments you created:

Installing Anaconda
Anaconda or Miniconda can be installed in the traditional way by downloading the installer and launching it and following the GUI setup or it can be installed using winget, the Windows Terminal based installation. I will cover the installation using both methods although recommend the command line based installation as you are going to be using Anaconda for Python programming.
Miniconda is a stripped more lightweight version of Anaconda. It is essentially the same installation as Anaconda but gives a more or less empty conda base environment. The Anaconda Individual Edition is designed for only Individual use and has Commercial restrictions. Miniconda doesn’t have these Commercial restrictions.
winget Command Line Based Installation
The Windows Terminal can be accessed from the Power Users Menu which is accessed by right clicking the Start Button.

We want to use the Windows Terminal. This will install Anaconda for a single user i.e. is equivalent of selecting the Just Me (recommended) option in the GUI setup. This option will install Anaconda in:
%UserProfile%/anaconda3

In general we do not want to select Windows Terminal (Admin). This is equivalent to selecting the All Users option in the GUI setup and would install Anaconda in:
C:/ProgramData/anaconda3

The Windows command line package tool winget should be directly accessible from the Windows Terminal on a modern Windows build. Type in:
winget

This should display the following list of command line arguments:

If the command is not found, you may need to open up the Microsoft Store:

To the bottom left, select your Library and then select Get Updates:

Make sure App Installer is listed in your library (and if not install it):

The five commands search, list, install, upgrade and uninstall are the most commonly used. We will use search to search for the search term anaconda:
winget search anaconda

The search term reveals the App ID as Anaconda.Anaconda3, we can use this App ID to install Anaconda:
winget install Anaconda.Anaconda3
For Miniconda instead use:
winget install Anaconda.Miniconda3

winget will download Anaconda3 and silently install it using all the default options of the GUI.
Adding the Anaconda (base) env to the Windows Env Path
The GUI installer gives an option to «Add Anaconda3 to my PATH environment variable». This is «not recommended» as the Anaconda Powershell Prompt is more optimised for managing and switching between conda environments than the Windows Terminal directly. Despite not being recommended, it can be useful for the Windows Terminal to be able to access the conda base environment as it gives flexibility to use Python in external programs.
At current winget doesn’t have any flags to enable such advanced options so the default option, not to «Add Anaconda3 to my PATH environmental variable» is mandated.

We can manually add the conda base environment to the PATH environmental variables. Right click the Start Button and select System:

Select Advanced System Settings:

Select Environment Variables:

Select Edit:

Select New:

For an Anaconda installation in your user profile use:
%UserProfile%anaconda3
%UserProfile%anaconda3Librarymingw-w64bin
%UserProfile%anaconda3Libraryusrbin
%UserProfile%anaconda3Librarybin
%UserProfile%anaconda3Scripts
For a Miniconda installation in the user profile use:
%UserProfile%miniconda3
%UserProfile%miniconda3Librarymingw-w64bin
%UserProfile%miniconda3Libraryusrbin
%UserProfile%miniconda3Librarybin
%UserProfile%miniconda3Scripts
For an Anaconda installation in ProgramData (All Users) use:
C:ProgramDataanaconda3
C:ProgramDataanaconda3Librarymingw-w64bin
C:ProgramDataanaconda3Libraryusrbin
C:ProgramDataanaconda3Librarybin
C:ProgramDataanaconda3Scripts
For an Minicondainstallation in ProgramData (All Users) use:
C:ProgramDataminiconda3
C:ProgramDataminiconda3Librarymingw-w64bin
C:ProgramDataminiconda3Libraryusrbin
C:ProgramDataminiconda3Librarybin
C:ProgramDataminiconda3Scripts

Move the items up to the top and then close:

Now close any open Windows Terminal and reopen to refresh the changes. You should be able to use the following commands directly from the Windows Terminal which will be discussed later:
conda
python
spyder
jupyter-lab
Note that the conda activate envname command where envname is the name of your conda environment will not work. When using the Windows Terminal, the conda environment specified in your Environment Variables path will always be selected which is the (base) conda environment:
conda activate envname
The General User Interface Installer
If you have already installed Anaconda using winget, skip this section as Anaconda is already installed.
The Anaconda or Miniconda installers are accessible from their perspective software download pages:

Double click the installer to begin:

Select Next:

Select I Agree:

Select Just Me (recommended) and then next:

Install in the default location:
%UserProfile%/anaconda3

You can optionally Add Anaconda3 to my PATH Environmental Variable which allows the Windows Terminal to access your (base) conda environment which is useful if you plan to use Python in external programs. Details about manually doing this post-installation are in the previous section.
Once you have made your option select Install.

You can then Finish the Installation:

The conda package manager
In the Start Menu, you will now see an Anaconda folder with the Anaconda Powershell Prompt which is essentially the same as Windows Powershell but optimised for using conda environments.
There is also the Anaconda Prompt but this is based on the old Windows CMD and should be depreciated.

Note that the command is prefixed with (base) this means the (base) conda environment is selected and any programs launched will therefore be launched from the (base) conda environment or any changes made will be made to the (base) conda environment. By default (base) is the only conda environment, other environments will be discussed later:

Note the similarity to the Windows Terminal:

The Windows Terminal does not have (base) prefixed. The only conda environment it will use is the one added to the Windows Environmental Variable path. The Windows Terminal cannot be used to launch programs from other conda environments or make changes to other conda environments.

We will stick to the Anaconda Powershell Prompt from here on. You have just installed Anaconda or Miniconda and this includes the conda package manager. To use it type in:
conda

This will display a number of subcommands you can use with it:

Syntax
The most important are:
conda list
conda search packagename
conda install packagename
conda remove packagename
conda update packagename
Where packagename is replaced by the package name that you are interested in. Like the Linux Terminal, the conda command can use options which have the form of a dash followed by one to two letters such as -n or -c and flags which have the form of two dashes and a full word such as –name or –channel.
The option -c and flag –channel refer to the same thing. The option is faster to type but the flag is more readable.
conda list
We can use conda list to list all the packages installed:
conda list

Since Anaconda is installed, the conda base environment has a large list of the most commonly used datascience libraries.

For simplicity I will mention only 7 of these packages which you are more likely to have some familiarity with:
python 3.9.7
numpy 1.20.3
matplotlib 3.4.3
pandas 1.3.4
seaborn 0.11.2
spyder 5.1.5
jupyterlab 3.2.1
Let’s use these to understand how the conda package manager works a bit more under the hood. Let’s go to the anconda3 folder. This is found in:
%UserProfile%

%UserProfile%/anaconda3

You’ll notice a conda-meta subfolder:
%UserProfile%/anaconda3/conda-meta

This folder contains a collection of json files detailing all the packages installed in the base conda environment:

We can open up the Python one in Notepad++:

This tells us the package is installed in:
%UserProfile%/anaconda3/pkgs
If we open this folder:

We see the python.exe

There is also a lib sub-folder:

In the lib subfolder there is an email subfolder, this is the email module:

In this folder there is an __init__.py and when we type:
import email
We are referring to this inbuilt Python module in the email folder with the name __init__.py

A simpler inbuilt Python module is the datetime module and we reference the datatime.py file directly when we type in:
import datetime

The Data Science libraries are not «standard» Python modules and are stored in a different folder. If we have a look at their json files in conda-meta:

We see they have their own folders in pkgs:

If we have a look at the numpy base, we get a lib subfolder:

A site packages subfolder:

And a numpy subfolder:

This contains the __init__.py file and when we type:
import numpy as np
we are referencing this file.
There are also the linalg and random folders. So when we type:
import numpy.linalg as linalg
import numpy.random as random
we are referring to the __init__.py file in the linalg and the __init__.py in the random subfolders respectively.

Likewise if we have a look in conda-meta at matplotlib:

We see a matplotlib and matplolib base folder in pkgs:

If we have a look at the lib subfolder of matplotlib base:

Then the site-packages subfolder:

And matplotlib subfolder:

Here we normally type:
import matplotlib.pyplot as plt
And we reference the pyplot.py file opposed to the __init__.py and the dot in matplotlib.pyplot means the pyplot file is in the matplotlib folder i.e. in the same location as the __init__.py file of this folder.


conda update
We can use conda update with the flag –all to look for any updates for the packages within the conda base environment from the official conda channel:
conda update --all

Here multiple updates are found and one of these is the anaconda-navigator:

To proceed we need to input:
y

The packages will then download and install:

If we now go to the conda-meta folder and take Anaconda Navigator as an example. We see the json file now references version 2.1.2 and the older version referencing 2.1.1 is gone:

In the pkgs folder however both versions are available;

Only the latest version is available.
If we type in conda list followed by the flag revision, we will see the initial revision rev0 and the new revision rev1:
conda list --revision


conda install
The conda install command can be used to install a conda package (which will be discussed in more detail) when managing conda environments. The conda install command however can be used to rollback a revision which is useful if an update causes a problem:
conda install --revision 0
The Anaconda Navigator
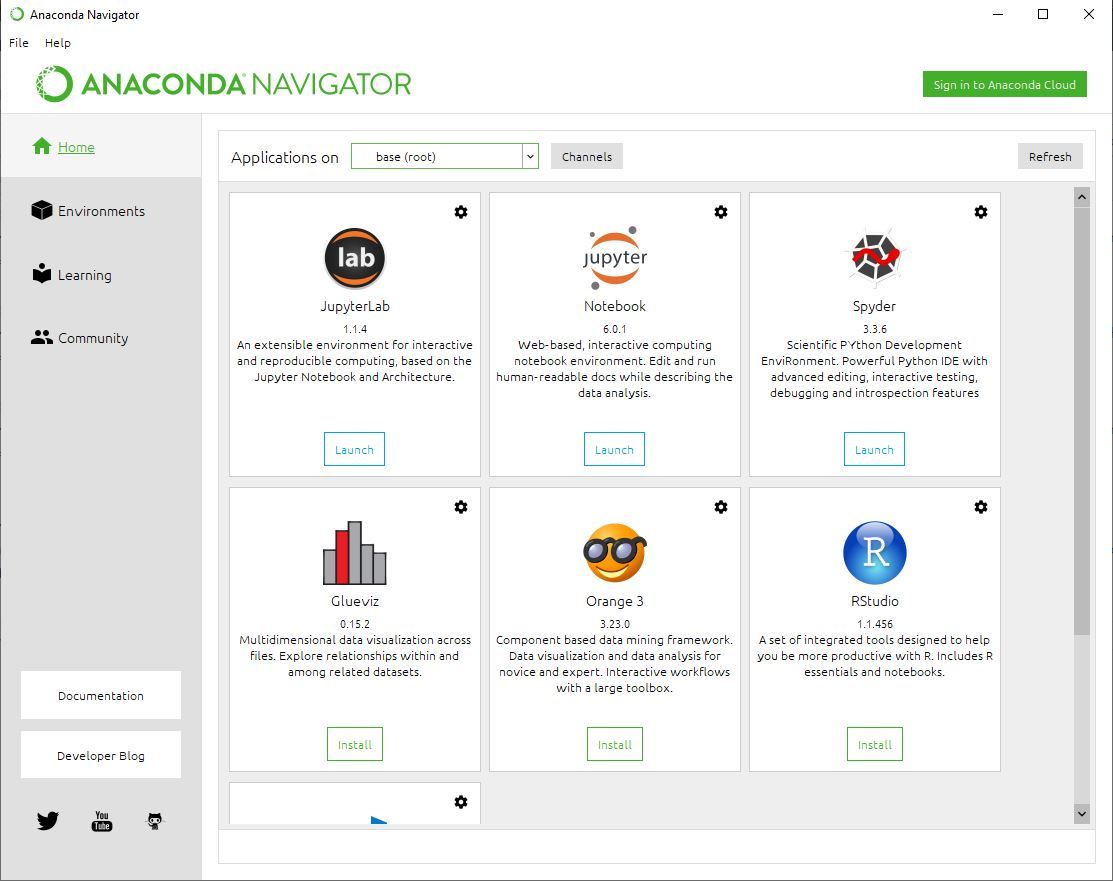
The Anaconda Navigator is a GUI version of the conda package manager although it is somewhat limited compared to its command line based equivalent. It also contains a series of tiles for launch installed Python Development Environments.
It can be launched from the Start Menu or by use of the Anaconda Powershell prompt by typing in:
anaconda-navigator

The Anaconda Navigator shows a series of tiles for launching Python Integrated Development Environments such as Spyder and JupyterLab:

The Environments tab is essentially a GUI version of the conda package manager, think of it as a GUI version of conda list:
Anaconda Navigator Preferences
Some preferences can be changed by selecting File→Preferences:


These preferences are saved to a configuration file within:
%AppData%

There is a .anaconda subfolder and within this a navigator subfolder and within that an anaconda subfolder and within that a navigator subfolder…


The anaconda-navigator.ini file can be edited in a program like Notepad++. If there is a display issue, changing the enable_high_dpi_scaling setting to False normally resolves it:


Spyder
The Spyder IDE can be launched from, the Start Menu, its tile in the Anaconda Navigator or by using the command:
spyder

Spyder will launch and prompt you for a tour of the IDE:

Spyder Preferences
The preferences can be changed by going to Tools and then Preferences:


These preferences are found within a hidden folder within:
%UserProfile%

Called .spyder-py3:

There is a config subfolder:

And a Spyder configurations settings file which can be opened in Notepad++:


JupyterLab
JupyterLab is a browser based IDE and can be launched from its tab in the Anaconda Navigator or by using the command:
jupyter-lab
This is the only place where a dash is used within the middle of the word jupyterlab.

JupyterLab will open in the web browser as expected:

Note to close JupyterLab you need to close the tab in your web browser. This will normally keep it active in the Powershell. You will need to close the command by using the shortcut key [Ctrl] + [ c ]

The new prompt will display when closed:

JupyterLab Preferences File
A JupyterLab preference file can be generated using the command:
jupyter notebook --generate-config

This will tell you the location of the preferences file:

You can go to this location:


And edit some of the settings by uncommenting out the respective setting and changing the value to your desired preference:

Visual Studio Code
Visual Studio Code is not preinstalled with Anaconda but can easily be installed by use of winget or downloading and installing it using the GUI installer.
winget Command Line Based Installation
Right click the Start Button and select Windows Terminal:

To install Visual Studio Code input:
winget install Microsoft.VisualStudioCode
It will download and install:

You can launch Visual Studio Code from its shortcut in the Start Menu, its Tile in the Anaconda Navigator or by typing the following in the Anaconda Powershell prompt:
code


Installing the Python Extension
To use Python we must install the Python extension. To the right hand side select the Extensions Tab and then select the Python Extension and select Install:

The extension should now be installed:

Selecting the Python Interpreter
Python is inbuilt into Linux but the inbuilt Python has no Data Science libraries. Visual Studio Code uses the inbuilt Python by default meaning you’ll get a module not found error if you attempt to use a Data Science library. We’ll need to select the Python interpreter to use the conda (base) environment.
Press [Ctrl] + [⇧] + [ p ] to open the Command Palette:

Search for interpreter and use your mouse click on the Python: Select Interpreter:

Change to the Python 3.9.7 (base) if not already selected:

The General User Interface Installer
If you have already installed Visual Studio Code using winget, skip this section as Visual Studio Code is already installed.
The Visual Code 64 Bit installer is accessible from the Visual Studio software download pages:

Double click the setup:

Accept the License Agreement and select Next:

Select Next:

Select Next:

Use the default options and select Next:

Select Install:

Select Finish:

Install the Python extension (see the section above).
conda and conda-forge channels
There are two «official» conda channels conda and conda-forge.
conda is maintained by the Anaconda team who spend time putting a collection of Python packages together and assessing their compatibility with one another. The conda team tend to only update most their packages once to twice a year.
conda-forge is the developer channel. This is where the developers of each package submit their packages. In many cases the packages made by small developers are available on conda-forge but not the conda channel.
This can be demonstrated for example with python-docx which is a Python library used to create a Word Document from a Python script. There are no search results on the conda channel:
conda search python-docx

To search another channel we use the option -c followed by the name of the channel:
conda search -c conda-forge python-docx

Larger more well-known packages such as Spyder are available on both conda and conda-forge. Spyder has far more frequent updates than once to twice a year and therefore there are differences between what both channels display as the latest version:
conda search spyder

conda search -c conda-forge spyder


As a result sometimes there can be a fix or improvement made to Spyder for example that will take about 6 months-1 year to be updated by the Anaconda team.
conda-forge packages can be added to your conda (base) environment when the package is relatively small and has only a handful of dependencies.
conda install -c conda-forge python-docx

The conda package manager will be able to «solve» the environment and ask you to confirm the changes. Input:
y

The package will successfully be added:

conda environments
On the other hand for packages with a huge number of dependencies… The conda package manager will likely enter an infinite loop attempting to solve your environment. This issue is common when trying to update Spyder to the latest version available on conda-forge. There is a subfolder within anaconda3 called envs:
%UserProfile%/anaconda3/envs


This is empty by default as there is only one environment the base environment:

Install Latest Spyder 5 to New conda env
Let’s create a new environment called spyder.
If you had an old environment called spyder e.g. from an older version use the following to remove it:
conda remove -n spyder5
To create a new environment use:
conda create -n spyder

After inputting:
y
A spyder subfolder appears:

Note up until now all commands begin with (base) meaning the base conda environment is selected:

If we type in:
conda activate spyder

We now see that (spyder) is in place of (base). This means the (spyder) conda environment is selected. If we use conda list, conda update, conda install or conda remove it will make changes to the conda (spyder) environment and not (base). Note when the terminal is closed and opened it defaults to (base) however we can change back to (base) without closing the terminal by using:
conda activate base
Now let’s install spyder from the conda-forge channel:
conda install -c conda-forge spyder

Here we see the huge number of mandatory dependencies for the latest version of the Spyder 5 IDE:

To install them input:
y

To launch spyder from the (spyder) conda env input:
spyder

We can see we are using the newer Spyder by going to Help→About:


If we go to Help→Dependencies, we can see that the optional dependencies are not installed, meaning we’ll get module not found errors if we attempt to use a Data Science library:


To rectify this we can use:
conda install -c conda-forge cython seaborn sympy openpyxl xlrd xlsxwriter lxml sqlalchemy scikit-learn

Input:
y
to proceed.

We now have the mandatory and optional dependencies installed for Spyder.

You can add other packages to this conda environment if you need them using a similar install command to the above.
Ensure you remember to activate the environment before launching spyder.
To periodically check for updates for this spyder conda environment from the conda-forge channel, activate the spyder conda environment and use:
conda activate spyder
conda update -c conda-forge --all
Install Latest JupyterLab 3 to New conda env
The procedure to install the latest version of JupyterLab in a conda environment is similar.
Remove an old conda env if present:
conda remove -n jupyterlab3
Install JupyterLab plus optional dependencies:
conda create -n jupyterlab
conda activate jupyterlab
conda install -c conda-forge jupyterlab
conda install -c conda-forge cython seaborn sympy openpyxl xlrd xlsxwriter lxml sqlalchemy scikit-learn
conda install -c conda-forge nodejs ipywidgets
jupyter-lab
Install optional JupyterLab extensions such as the variable inspector, interactive matplotlib, plotly and drawio:
conda install -c conda-forge jupyterlab-variableinspector ipympl plotly jupyterlab-drawio
To periodically check for updates for this jupyterlab conda environment from the conda-forge channel, activate the jupyterlab conda environment and use:
conda activate jupyterlab
conda update -c conda-forge --all
Spyder 5 IDE Tutorial
Spyder 5 is one of the best IDEs for learning Python and one of the most popular for DataScience.
Spyder Preferences
The Spyder Preference can be altered by going to Tools and Preferences:

In the Appearance Tab, the syntax highlighting theme can be changed from Spyder Dark to Spyder:

In the Editor, Indent Guides and Blank Spaces can be shown:

Select Apply and then Yes:

Spyder will restart using the Spyder Syntax highlighting scheme:
Spyder has a file menu to save and open script files. Each script displays in its own tab. The current directory (the directory the last script is run) shows at the top:

We can save our script file in Documents for example:

In this case I will call it spyder_script

Now it displays at the top and changes aren’t saved so it is indicated with a *
Syntax Highlighting
Syntax highlighting is carried out by default. Numeric values on line 2 and 3 are highlighted in brown. strs on line 7, 14, 15 and 16 are highlighted in green.
Note the matching bracket for the bracket selected on line 16 is highlighted in line 14.
There is a typo in the code and this is marked by an x on line 16 as the variable boll_num isn’t defined:


Once this is fixed, there is no error:

Run Script
We can put some test code to create fundamental numeric variables and text variables. We can also create collections using the inbuilt classes:
#%% Fundamental Numeric Datatypes
full_num = 5
dec_num = 10.5
bool_num = True

#%% String
string = "Hello"

#%% Collections
list_col = [full_num, dec_num, bool_num, string]
tuple_col = (full_num, dec_num, bool_num, string)
dict_col = {"full": full_num, "dec": dec_num, "bool": "bool_num", "string": string}
Upon first launch we are prompted for the run settings which we can leave as default (these can later be changed in preferences if desired):

Variable Explorer
Spyder has a Variable Explorer which can be used to explore these variables. Each variable type is listed, alongside its size. In the case of a string, this is the number of characters and in the case of a list, this is the number of items in the list. Collections of variables for example this dict can be expanded to view in more detail:

Script Editor and Console
Spyder has a script editor and a console. The console keeps a track of the number of executions sent to the kernel. For example if the script is run to create the variable full_num, the value of full_num is shown in the variable explorer and we are informed in the console that we have run the script file:
full_num = 5

If we modify the script to print full_num and run it again:
full_num = 5
print(full_num)
The number of execution is now 2 and we are informed the script is run. The value 5 also displays below this as we used the print function:

Operations can be carried out in the console. For example this single line operation was the third execution to take place:

The console is often used to test out a quick line or two of code before adding it to a script.
Kernel
Restarting the Kernel will clear all variables from the Variable Explorer, clear the Console and close any imported modules. The number of executions will return back to 0.
The Kernel can be Restarted by going to Consoles → Restart Kernel:

Select Yes to Proceed:

The Kernel is now clear:

Cells
Comments can be added to the script by beginning with #. If a line begins with #%% it will create a new cell and the currently selected cell is highlighted in yellow.
We can run a single cell by selecting run cell:

Notice only the variables defined in the first cell display in the variable explorer and the first cell is still highlighted:

We can restart the Kernel and instead, select the next button. Run the cell and move onto the next cell:

Notice how the second cell is highlighted after the first cell is executed:

Finally we can use the 4th Run button to run only the highlighted selection:

Importing DataScience Libraries
Supposing we want to record some dependent y data values with respect to independent x values. We could use two lists to create two equally sized numeric vectors, a nested list or a dictionary:
x = [1, 2, 3, 4, 5]
y = [2, 4, 6, 8, 10]

xy = [[1, 2, 3, 4, 5], [2, 4, 6, 8, 10]]

xy2 = {"x": [1, 2, 3, 4, 5], "y": [2, 4, 6, 8, 10]}
Note however that each of these objects is 1 dimensional. i.e. xy is a list of lists.

Moreover the datatype of each item in the list can be independent which offers the most flexibility but it is not particularly useful in some cases where one is trying to plot the data to see a trend for example.
Finally the operators available for a collection such as a list are not optimised for numeric data. The + operator for example will concatenate a two lists, making a longer list, in a similar manner to the + operator being setup between two strings. It is not setup like the + operator between two ints which perform numeric addition.
We have two Python libraries based upon additional datatypes, numpy which is based numeric python arrays (which can be visualised as a mathematical matrix) and pandas which is based upon a DataFrame (which can be visualised as an Excel spreadsheet). These datatypes have a number of methods and operators, for example in the case of a numeric array, will carry out matrix operations.
Let’s first examine numpy. Note the import line should be highlighted and ran which will execute it as shown in the console:

As numpy is imported into the kernel, code-completion for numpy will be accessible. In the case of np. a selection of objects which can be called from the numpy library:

We can use the function array to create a new numpy array. When this function is typed with parenthesis, details about the functions input arguments are shown.

Spyder has a Help Pane. Highlighting a function or class and pressing Ctrl + i will inspect it:

And attempt to retrieve the documentation:

For functions or classes from the DataScience libraries this can sometimes be quite limited and only give details about the library and not the specific function or class:

Usually a more detailed docstring can be accessed directly from the console by typing in a ? followed by the function or class to be investigated:
? np.array

Use the mouse wheel to scroll through the documentation and press q to quit the pager:


This will take you to the next line in the console:

We need the object which is usually a list or a list of lists. Everything else shown is optional and the datatype will be automatically determined:
import numpy as np
x = np.array([1, 2, 3, 4, 5])
y = np.array([2, 4, 6, 8, 10])
xy = np.array([[1, 2, 3, 4, 5], [2, 4, 6, 8, 10]])
xy2 = np.transpose(xy)
If we run the code above we can see all the objects in the variable explorer. Since the datatype is constant for each cell in a numpy array, this is just shown on the Variable Explorer:

We can now look at the pandas. Once again the import line should be ran in order to allow the code-completion to work:

In pandas we use the DataFrame (CamelCaseCapitalization) class to create an instance (our variable name xy):

We need to supply the data. This is provided in the form of a dictionary where they keys are strings of the column names and the values are lists. Notice how the dataframe xy looks like a matrix but each column is clearly labelled as «x» and «y» respectively:

Files
Notice the dataframe is in the form of an excel sheet and closely resembles the one below:

We can use the read_excel function to read this data and create a new instance of a dataframe.

This Excel File has the title «Book1.xlsx» and is in the same folder as the spyder_script.py file. These can be seen by using the Files Tab. Each column has a name and the default Sheet name Sheet1 is used. Therefore we don’t need to override the default values of any of the keyword input arguments in the read_excel function.

This reads in the data as a dataframe:

Plotting
Now we’ve got data, we can have a look at plotting it. There are a number of Python plotting libraries. The most frequently used one is matplotlib. It is frequently used with seaborn which acts like a wrapper around matplotlib to consistently change the styles of the plots and add some additional plot types (commonly used in data science).
We can now look at matplotlib. Once again the import line should be ran in order to allow the code-completion to work:

We can use the function plot to create a basic line plot:

For the args, we need to provide the x and y data. We can access a column from a dataframe as an attribute:

import pandas as pd
import matplotlib.pyplot as ply

xy = pd.read_excel("Book1.xlsx")

plt.plot(xy.x, xy.y)
Spyder by default, displays the plots as inline in the plots pane:

To change this and instead use automatic plotting to create each plot in its dedicated window select Tools → Preferences:

Select IPython Console. Then to the left select Graphics and change the setting to Automatic. The select Apply and Restart the Kernel:

Now relaunching the script shows an Automatic plot in its own dedicated Window:

We can also import seaborn and run the selection to allow code-completion to take place:

We can then change the style of the plots using set_style:

In this example, I am using whitegrid:

seaborn includes additional plot types that are used particularly in science. Some of these are duplicates with matplotlib but the syntax is a bit more geared towards dataframes.
We can use the function figure to create a new plot and assign the figure number. We will use figure 1 to create a line plot using matplotlib and figure 2 to create a lineplot with seaborn:
import pandas as pd
import matplotlib.pyplot as plt
import seaborn as sns
sns.set_style("whitegrid")

xy = pd.read_excel("Book1.xlsx")

plt.figure(1)
plt.plot(xy.x, xy.y)
plt.xlabel("x (units)")
plt.ylabel("y (units)")

plt.figure(2)
sns.lineplot(data=xy, x="x", y="y")
plt.xlabel("x (units)")
plt.ylabel("y (units)")


JupyterLab 3 IDE Tutorial
Recall that there is no start menu shortcut to JupyterLab and it needs to be launched via the Anaconda Navigator or Anaconda PowerShell Prompt.
File Explorer
JupyterLab is browser based. To the left handside is the file explorer alongside a File Menu which can be used to save files:

To the right hand side is the launcher. There are three common used files, the text file, markdown file and Notebook file:

Text File
The text file is essentially a plain text file and has the same capabilities of notepad. i.e. you can write text with no formatting capabilities:

The file can be renamed,by renaming the tab to the top or the file name in the JupyterLab file explorer to the left hand side:

In this case, I can rename it as textfile.txt:

This file can be viewed in Windows Explorer and opened in Notepad:


Markdown File
We can use the + button in the top if the JupyterLab file explorer to open a new Launcher as a new tab to the right hand side.

We can then create a new Markdown file:

We can rename it, similar to the text file:


Markdown has basic formatting capabilities. We can see the Markdown Preview by right clicking on some blank space and selecting Show Markdown Preview:


Headings
We can use a series of # to markdown the heading level:
# Heading 1
## Heading 2
### Heading 3
#### Heading 4
JupyterLab has a navigation pane and the headings will auto-populate this as they are created.

Formatted Text
We can enclose text in * or ~ to format it. One set of * makes text italic, two sets of * makes it bold and three sets of * makes it bold-italic. Two sets of ~ make it strike-through:
Let's make a sentence with *italic text*, **bold text**, ***bold-italic*** and ~~strike-through~~ text.

Escape Characters
When we don’t one to use one of the formatting characters to format the text but rather include it in the text, we can prepend it with to insert an escape character. If we want to insert we use \ where the first denotes insertion of an escape character and the second denotes the escape character to be inserted is
Let's make a sentence with *italic text*, **bold text**, ***bold-italic*** and ~~strike-through~~ text.

\

Spacing
For convenience a long sentence written over multiple lines is formatted as a single sentence:
She sells
seashells
on the
seashore

If we want to deliberately separate it out into different lines, we must doubly space it:
She sells

seashells

on the

seashore

Bullet Points
We can easily create bullet points by prepending each line with * or 1., 2. and so on.
Bullet Point List:

* one
* two
* three

Bullet Point List (spaced):

* one

* two

* three

Numeric List:

1. one
2. two
3. three

Numeric List (spaced):

1. one

2. two

3. three

Tables
We can use the pipe to create a table, row by row. The first row is the column names and the second row is the column formats (which can be changed to normal, left aligned, right aligned, left-aligned with title centred):
|num|number|
|---|---|
|1|one|
|2|two|
|3|three|
|num|number|
|---|:-|
|1|one|
|2|two|
|3|three|
|num|number|
|---|-:|
|1|one|
|2|two|
|3|three|
|num|number|
|---|:-:|
|1|one|
|2|two|
|3|three|

Links and Images
We can create a link by enclosing the link name in square brackets [ ] followed by the link enclosed in ( ) brackets. If the link is an image it can be displayed by prepending with !
[Anaconda Individual Edition](https://www.anaconda.com/products/individual) [Spyder Image Wikipedia](https://upload.wikimedia.org/wikipedia/commons/thumb/1/1b/Spyder-windows-screenshot.png/300px-Spyder-windows-screenshot.png)  

Code
If we want to include code we can begin and end the code with 3 back-quotes ` and we can use «` on a new line to begin and end a code-block:
The first line of code is ```print("Hello World")```.

The code block is:
```
print("Hello World")
print("Goodbye World")
```
It prints.

Equations (Latex)
$ can be used to enclose an inline Latex equation. 2 $ can be used for a display equation.
The inline equation is $ $

The display equation is:
$$ $$

Use of latex is out of scope for this guide. However I will demonstrate using an equation created in Microsoft Word:


Notebook File
Now that we have an overview of markdown we can now create a JupyterLab notebook file.

Markdown and Code Cells
Unlike Spyder where the use of Code Cells were optional, in a JupyterLab notebook file Cells are mandatory. Each Cell can be ran as either a Code Cell or Markdown Cell.

In a markdown cell, we can use markdown syntax:

When we run the cell it will show the equivalent as seen in the markdown preview:

We can type in Python code in an almost identical way to how we would input it in Spyder. In this case we are going to import our DataScience libraries (so we can use them and their code-completion in later cells):

Note the number 1 displays which indicates it is the first cell run on this current kernel:

We can now create another markdown cell and run it as before:


Code Completion
If we type in an object such as an imported library followed by a dot . and then tab ↹ we can view the objects we can use from it:

When this second code cell is ran, it has the number 2, indicating it is the 2nd code block run on the current kernel:

To get details about the input arguments for example in a function or class. We can type the function name or class name with open parenthesis and then press shift ⇧ and tab ↹ together to display the documentation as a pop-up balloon:

We can also append the object we are interested in with a ? and display its docstring in the cell output:

Cell Output
If the docstring is long, we can right click the cell and optionally select Enable Scrolling for Output:

Note the cell is the third code cell that is run in the active kernel. If we change its contents to markdown and run it again. The number at the side of the cell starts:


We can use the read_excel function that we used before to read a file in the same folder as the notebook file:

Note that the cell number is now 4 (cell 3 has been modified to markdown but it was still run in the past so this cell displays 4). The contents of the cell have been assigned to a variable and therefore there is no output to the cell:

If we remove the assignment to the left hand side and rerun the cell, we will instead see the dataframe in the cell output. Because this cell is rerun, it now displays 5.

If we assign it instead to the variable data we can see the cell output is once again empty:

If we type data in another cell, we will view the contents of data as the cell output isn’t assigned to a new variable name. Alternatively we can use the print statement in the cell which we create the variable data in to view it in the cell output:


There is no Variable Explorer in JupyterLab by default. A Variable Inspector can be added to the latest JupyterLab from conda-forge but this is still way behind in functionality with respect to the Variable Explorer found in Spyder.
Plotting
We can create a plot using almost identical code to in Spyder. By default inline plotting is used and the plot is shown as a static image in the cell output:


We can use the JupyterLab specific syntax %matplotlib auto to configure matplotlib to use automatic plotting instead. This will create an interactive plot in its own window:


Typically we would assign a figure number and put all the code for a plot in a single cell. We would take a new cell for a second plot:

Opening JupyterLab Files
Once again we can use JupyterLab’s file explorer to right click and Rename the Notebook File:


We can use the File Menu to save it:

One thing that sometimes confuses people getting started with JupyterLab is that they try and open the file within Windows Explorer and expect it to launch JupyterLab. Instead you are prompted for an application to open it:

We can view the notebooks contents in Notepad++ and see Python code in the cell enclosed by Javascript code which instructs the browser how to display the notebook file:

To open the file, JupyterLab should be launched and the file should be opened using JupyterLabs file explorer:

Kernel
When a notebook file is opened, you will see the cell numbers indicating the order they were run in, last time the file was opened. This refers to the last kernel used when the file was opened. This kernel is no longer active:

To continue to edit the file we need to restart the kernel. We can either use Restart Kernel and Clear All Outputs:

Then select Restart:

Which means we will need to manually run each cell again:

Or we can Restart Kernel and Run All Cells:

Then select Restart:

This will run each cell from top to bottom, in this case there are 5 code cells and the plots are generated:

Shortcut Keys
Code cells are the default new cell. To toggle from a code cell to a markdown cell use the shortcut key Esc + m

To toggle back to a code cell use Esc + y:

To run a cell press ⇧ and ⏎:

This will take you to the next cell or a new empty cell if it is the bottom cell:

If instead Alt + ⏎ is used, the cell is run and a blank cell will be inserted below:

Ctrl + s will save the notebook file.
Visual Studio Code IDE Tutorial
File Explorer
The file explorer can be opened to the left hand side. Select Open Folder:

In this case, I am going to create a new project folder called Project1, once created select, Select Folder:

Select, Select Folder again:

You will get a Security dialog, select Yes, I trust the authors. You can optionally Trust the Authors of all Files in the Parent folder Documents:

Python Script .py Files
Select Create New File:

If you use a .py extension, it will automatically be recognised as a Python script file:

When the file is open, you will see the main window looks very similar to the script editor in Spyder:

Syntax highlighting will also automatically be applied to the file. You also have a run button. To the bottom, your selected Python environment will display:

This Script file runs as shown in the Terminal. In this case, it is correctly using the base conda environment and all the data science libraries. If instead you get a module not found error, you may need to change the Python Interpreter (discussed below):

However when running a Python Script Visual Code has no Variable Explorer so you cannot explore the variables that have been created. For plots, Visual Studio Code does not display a plot unless specifically instructed. This can be done by assigning each figure to an object name and then using the function show. We must also call a plt.show(). For example:
import pandas as pd
import matplotlib.pyplot as plt
import seaborn as sns
sns.set_style("whitegrid")
xy = pd.read_excel("Book1.xlsx")
fig1 = plt.figure(1)
plt.plot(xy.x, xy.y)
plt.xlabel("x (units)")
plt.ylabel("y (units)")
fig1.show()
fig2 = plt.figure(2)
sns.lineplot(data=xy, x="x", y="y")
plt.xlabel("x (units)")
plt.ylabel("y (units)")
fig2.show()
plt.show()

Now when the script is run, the plots display:

Note the script will not finish executing until all plot Windows are closed which can be seen by the new prompt in the terminal:

If cells are created using and Run Cell or Run Below is selected, instead of running in a Terminal, the script will run in Interactive Mode and the plots will be displayed as inline:

There is a basic Variable Explorer in interactive mode but it widely inferior to the Variable Explorer within Spyder.

Markdown File .md
A Markdown File can be opened and previewed within Visual Studio Code:

To preview it, right click the tab the file is open in and select, Open Preview:

You can optionally split the view:

And drag and drop the Markdown preview to the right pane:


You can close the Terminal and File Explorer Views in order to have more screen space:


Notebook Files .ipynb
Visual Studio Code can also open Interactive Python Notebook files and you can run each cell individually by highlighting the cell or Run All by selecting the Run All Button.

The plots by default are static inline.

This can be toggled to automatic using:
%matplotlib auto
%matplotlib inline
The notebook extension for interactive inline plots is sadly not supported in Visual Studio Code and displays blank plots.
A similar Variable Explorer is available for the interactive Python notebook file which again seriously lacks in functionality with respect to the Variable Explorer in Spyder.

Microsoft Intelligence Code Completion
Once all the libraries used are loaded in the Python terminal:

We’ll notice as we type we see a far more seamless dialog with code completion suggestions:


To view the docstring for a function or class we can press [Ctrl] + [ i ] to inspect the docstring. By default, this displays on the right so we can view our code alongside the docstring. Pressing [Ctrl] + [ i ] again will close the docstring:

If we press [Ctrl] + [ k ] you’ll see at the bottom [Ctrl] + [ k } was pressed. Waiting for second key of chord. This keyboard shortcut can essentially be though as a way to toggle the second functionality of each keyboard shortcut.

So if we press the [Ctrl] + [ i ] shortcut now, we get a centred docstring:

Terminal
One thing to also note is that within Visual Studio Code we can run both a Python Terminal and a PowerShell Terminal:

And in the PowerShell Terminal we can use the conda package manager to list, update, search, install and uninstall packages as we demonstrated previously:

Using Python
For more details about using Python and the data science libraries see my Python programming guides:
In this post, I will show you how to set up Anaconda. Anaconda is a free, open-source distribution of Python (and R). The goal of Anaconda is to be a free “one-stop-shop” for all your Python data science and machine learning needs. It contains the key packages you need to build cool machine learning projects.
Requirements
Here are the requirements:
- Set up Anaconda.
- Set up Jupyter Notebook.
- Install important libraries.
- Learn basic Anaconda commands.
Directions
Install Anaconda
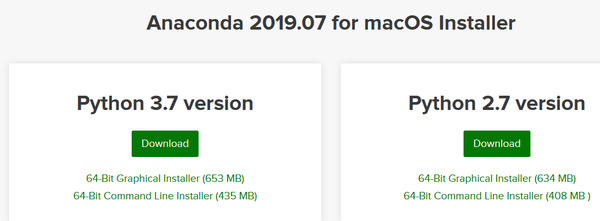
Go to the Anaconda website and click “Download.”

Choose the latest version of Python. In my case, that is Python 3.7. Click “Download” to download the Anaconda installer for your operating system type (i.e. Windows, macOS, or Linux).
Follow the instructions to install the program:
- Installing on Windows (this is what I’m using)
- Installing on macOS
- Installing on Linux
Verify Anaconda is installed by searching for “Anaconda Navigator” on your computer.
Open Anaconda Navigator.

Follow the instructions here for creating a “Hello World” program. You can use Spyder, Jupyter Notebooks, or the Anaconda Prompt (terminal). If you use Jupyter Notebooks, you will need to open the notebooks in Firefox, Google Chrome or another web browser.
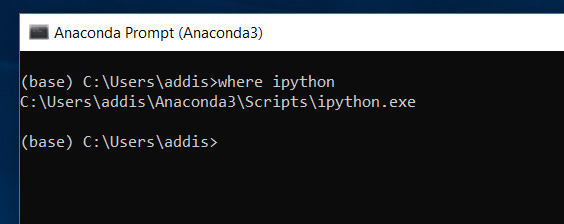
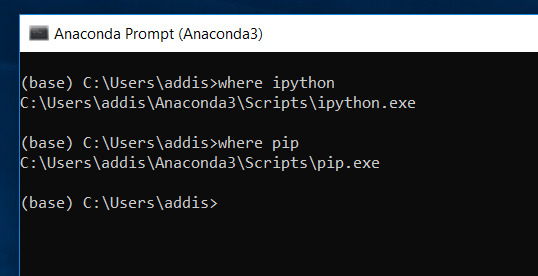
Check to make sure that you have IPython installed. Use the following command (in an Anaconda Prompt window) to check:
where ipython
Make sure that you have pip installed. Pip is the package management system for Python.
where pip
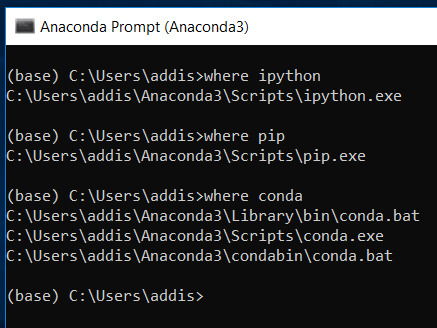
Make sure that you have conda installed. Conda is Anaconda’s package management system.
where conda
Install Some Libraries
Install OpenCV
To install OpenCV, use the following command in the Anaconda Prompt:
pip install opencv-contrib-python
Type the following command to get a list of packages and make sure opencv-contrib-python is installed.
conda list
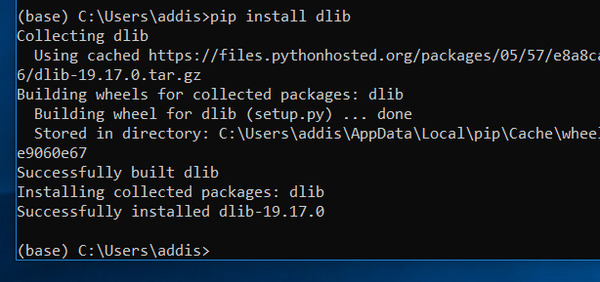
Install dlib
Install cmake.
pip install cmake
Install the C++ library called dlib.
pip install dlib
Type the following command and take a look at the list to see if dlib is successfully installed:
conda list
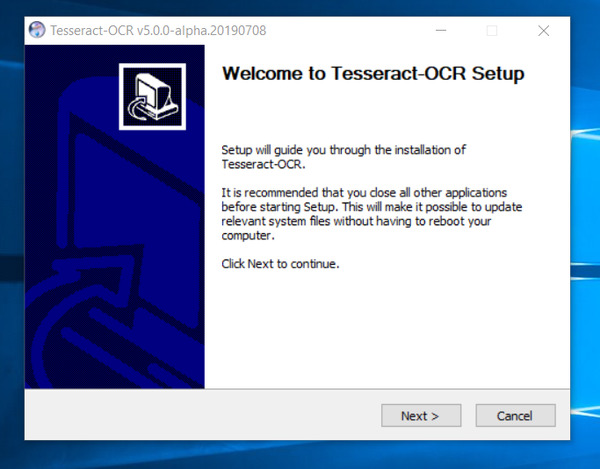
Install Tesseract
Go to Tesseract at UB Mannheim.
Download the Tesseract for your system.
Set it up by following the prompts.
Once Tesseract OCR is downloaded, find it on your system.
Copy the name of the file it is located in. In my case, that is:
C:Program FilesTesseract-OCR
Search for “Environment Variables” on your computer.
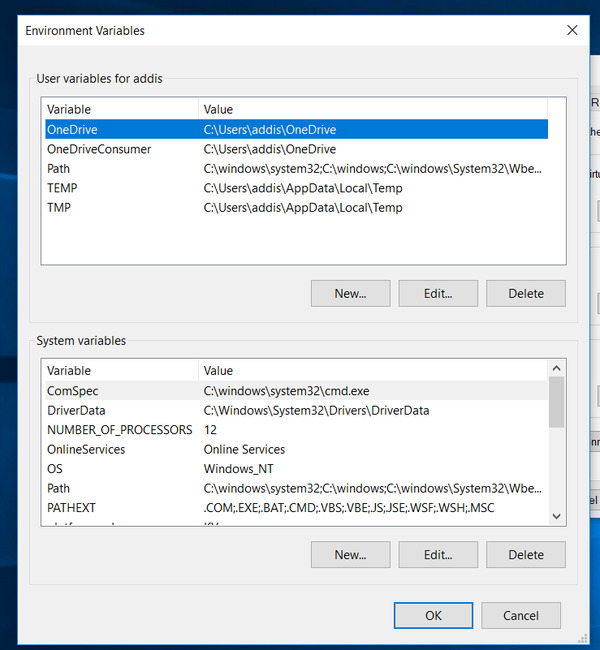
Under “System Variables,” click “Path,” and then click Edit.
Add the path: C:Program FilesTesseract-OCR
Click OK a few times to close all windows.
Open up the Anaconda Prompt.
Type this command to see if tesseract is installed on your system.
where tesseract
Now, apply the Python binding to the packages using the following commands:
pip install tesseract
pip install pytesseract
Install TensorFlow
Type the following command in the Anaconda Prompt:
pip install tensorflow
Install TensorFlow hub using this command:
pip install tensorflow-hub
Now install tflearn.
pip install tflearn
Now, install the Keras neural network library.
pip install keras
Install the Rest of the Libraries
Type the following commands to install the rest of the libraries:
pip install pillow
pip install SimpleITK
Learn Basic Anaconda Commands
Changing Directories
If you ever want to change directories to the D drive instead of the C drive, open Anaconda Prompt on your computer and type the following commands, in order
D:
cd D:XXXXXXXXXXXXXXXX
where D:XXXXXXXXXXXXXXXX is the file path.
Listing Directory Contents
Type the dir command to list the contents of a directory.
dir
Creating a Jupyter Notebook
Open Anaconda Prompt on your computer and type the following command:
jupyter notebook
Converting a Jupyter Notebook into Python Files
If you want to convert a Jupyter Notebook into Python files, change to that directory and type the following command:
jupyter nbconvert --to script *.ipynb
Congratulations if you made it this far! You have all the libraries installed that you need to do fundamental image processing and computer vision work in Python.