-

Open SourceAccess the open-source software you need for projects in any field, from data visualization to robotics.
-
User-friendlyWith our intuitive platform, you can easily search and install packages and create, load, and switch between environments.
-
TrustedOur securely hosted packages and artifacts are methodically tested and regularly updated.


Features
Anaconda Repository
Our repository features over 8,000 open-source data science and machine learning packages, Anaconda-built and compiled for all major operating systems and architectures.

Conda
Conda is an open-source package and environment management system that runs on Windows, macOS, and Linux. Conda quickly installs, runs, and updates packages and their dependencies. It also easily creates, saves, loads, and switches between environments on your local computer. It was created for Python programs, but it can package and distribute software for any language.
Anaconda Navigator
Our desktop application lets you easily manage integrated applications, packages, and environments without using the command line.
Cloud Environment Backup
Connect Anaconda Navigator to our community portal, Anaconda Nucleus, to securely store your local environments in the cloud.
Anaconda Distribution equips individuals to easily search and install thousands of Python/R packages and access a vast library of community content and support.
-
Students and Academics
Quickly get started with a no-cost, easy-to-use Python package and environment manager for educational and research use.
-
Practitioners and Hobbyists
Navigate unique challenges with a robust open-source package repository and toolkit supported with technical documentation and content from our community on Nucleus.
One in three of the G2000 use Anaconda
Anaconda Installers
Windows
Python 3.9
MacOS
Python 3.9
Linux
Python 3.9
Additional Installers
The archive has older versions of Anaconda Distribution installers. The Miniconda installer homepage can be found here.
General purpose programming language
-
Conda
- Files
- Labels
- Badges
-
License: PSF-2.0 -
Home: https://www.python.org/ -
Development: https://devguide.python.org/ -
Documentation: https://www.python.org/doc/versions/ -
10735010 total downloads -
Last upload: 16 days and 21 hours ago
Installers
-
linux-ppc64le
v3.11.0 -
osx-arm64
v3.11.0 -
linux-64
v3.11.0 -
win-32
v3.10.4 -
linux-aarch64
v3.11.0 -
linux-s390x
v3.11.0 -
osx-64
v3.11.0 -
linux-32
v3.7.1 -
win-64
v3.11.0
conda install
To install this package run one of the following:
conda install -c anaconda python
Description
Python is a widely used high-level, general-purpose, interpreted, dynamic
programming language. Its design philosophy emphasizes code
readability, and its syntax allows programmers to express concepts in
fewer lines of code than would be possible in languages such as C++ or
Java. The language provides constructs intended to enable clear programs
on both a small and large scale.
Each software is released under license type that can be found on program pages as well as on search or category pages. Here are the most common license types:
Freeware
Freeware programs can be downloaded used free of charge and without any time limitations. Freeware products can be used free of charge for both personal and professional (commercial use).
Open Source
Open Source software is software with source code that anyone can inspect, modify or enhance. Programs released under this license can be used at no cost for both personal and commercial purposes. There are many different open source licenses but they all must comply with the Open Source Definition — in brief: the software can be freely used, modified and shared.
Free to Play
This license is commonly used for video games and it allows users to download and play the game for free. Basically, a product is offered Free to Play (Freemium) and the user can decide if he wants to pay the money (Premium) for additional features, services, virtual or physical goods that expand the functionality of the game. In some cases, ads may be show to the users.
Demo
Demo programs have a limited functionality for free, but charge for an advanced set of features or for the removal of advertisements from the program’s interfaces. In some cases, all the functionality is disabled until the license is purchased. Demos are usually not time-limited (like Trial software) but the functionality is limited.
Trial
Trial software allows the user to evaluate the software for a limited amount of time. After that trial period (usually 15 to 90 days) the user can decide whether to buy the software or not. Even though, most trial software products are only time-limited some also have feature limitations.
Paid
Usually commercial software or games are produced for sale or to serve a commercial purpose.
Anaconda 5.0.1 For macOS
Python 3.6 version
64-Bit Graphical Installer (569 MB)
https://repo.continuum.io/archive/Anaconda3-5.0.1-MacOSX-x86_64.pkg
64-Bit Command-Line Installer (491 MB)
https://repo.continuum.io/archive/Anaconda3-5.0.1-MacOSX-x86_64.sh
Python 2.7 version
64-Bit Graphical Installer (563 MB)
https://repo.continuum.io/archive/Anaconda2-5.0.1-MacOSX-x86_64.pkg
64-Bit Command-Line Installer (487 MB)
https://repo.continuum.io/archive/Anaconda2-5.0.1-MacOSX-x86_64.sh
Anaconda 5.0.1 For Windows
Python 3.6 version
64-Bit Graphical Installer (515 MB)
https://repo.continuum.io/archive/Anaconda3-5.0.1-Windows-x86_64.exe
32-Bit Graphical Installer (420 MB)
https://repo.continuum.io/archive/Anaconda3-5.0.1-Windows-x86.exe
Python 2.7 version
64-Bit Graphical Installer (500 MB)
https://repo.continuum.io/archive/Anaconda2-5.0.1-Windows-x86_64.exe
32-Bit Graphical Installer (403 MB)
https://repo.continuum.io/archive/Anaconda2-5.0.1-Windows-x86.exe
Anaconda 5.0.1 For Linux
Python 3.6 version
64-Bit (x86) Installer (525 MB)
https://repo.continuum.io/archive/Anaconda3-5.0.1-Linux-x86_64.sh
64-Bit (Power8) Installer (310 MB)
https://repo.continuum.io/archive/Anaconda3-5.0.0-Linux-ppc64le.sh
32-Bit Installer (431 MB)
https://repo.continuum.io/archive/Anaconda3-5.0.1-Linux-x86.sh
Python 2.7 version
64-Bit (x86) Installer (508 MB)
https://repo.continuum.io/archive/Anaconda2-5.0.1-Linux-x86_64.sh
64-Bit (Power8) Installer (296 MB)
https://repo.continuum.io/archive/Anaconda2-5.0.0-Linux-ppc64le.sh
32-Bit Installer (413 MB)
https://repo.continuum.io/archive/Anaconda2-5.0.1-Linux-x86.sh
This tutorial will cover step by step instructions to install Anaconda on Windows. You will also learn how to update, write your first program and uninstall Anaconda. This is going to be awesome learning, in case you are a developer or exploring Anaconda and Python.
Let’s deep dive in with these topics —
Table of Contents
- 1 What is Anaconda
- 2 System requirement to Install Anaconda on Windows
- 3 Download Anaconda Python 3
- 4 How to install Anaconda on Windows 10 (with Python)
- 5 How to run Anaconda in Windows using CLI and GUI
- 6 How to update Anaconda in Windows 10
- 7 How to Uninstall Anaconda on Windows 10
- 8 Video
- 9 Conclusion
What is Anaconda
Anaconda {a.ka. Anaconda Python} is a Python and R programming language distribution for scientific computing. All predictive analytics, data science, machine learning and big data falls under scientific computing.
It’s helps to simplify package management and deployment. Anaconda is available for all platforms like Windows, macOS and Linux.
There are two version available to install Anaconda in Windows —
- Anaconda distribution or Individual edition, which are open source and free
- Anaconda Team Edition and Anaconda Enterprise Edition are paid
In this tutorial, I will cover the Anaconda individual edition. It comes with more than 250 packages automatically installed and over 7500 packages available in the PyPI repository.
Conda is an open-source, language-agnostic and cross-platform package manager. It helps to manage and deploy packages using the command line while Anaconda navigator is a GUI alternative to Conda.
System requirement to Install Anaconda on Windows
- Internet connection
- Windows 10 machine
- Approx. 2.7GB free disks pace.
** You don’t need python to be pre-installed because Python 3.8 automatically get install with Anaconda3.
Download Anaconda Python 3
Follow these steps to download Anaconda3 for Windows 10.
Step1.1- Visit Anaconda installers section on Anaconda.com
- Visit https://www.anaconda.com/products/individual > Scroll down on the page to the Anaconda installers section
- Select your Operating system
Step1.2- Download Installer «Anaconda» for Windows 10 ( 64-bit)
- Click on 64-bit Graphical installer (457 MB) to download Anaconda. If your system supports 32 bit only, then go for a 32-bit Graphical installer (403 MB) Anaconda download.
- Default Python 3.8 comes with it as a bundle. Later in this post, I will let you know, how to get the latest Python version 3.9 using Anaconda.

Alternatively, Just Click on below mentioned «Download buttons» to avoid all hassles.
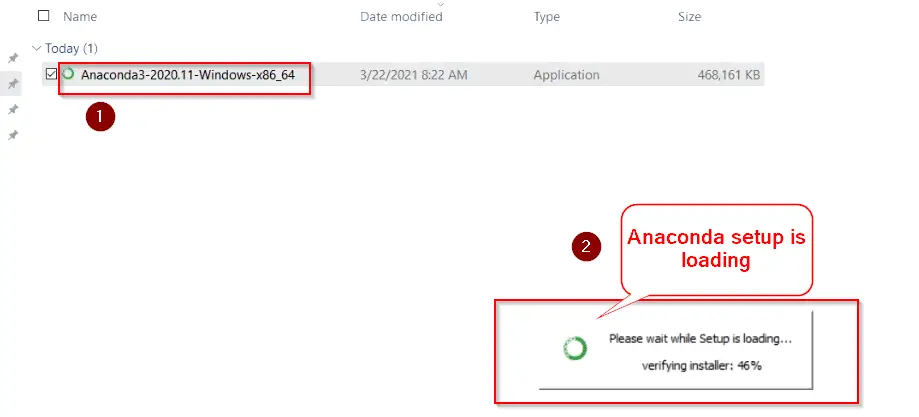
Depending upon your internet speed, within couple of minutes, you will get «Anaconda3-2020.11-Windows-x86_64.exe» in your Download folder.

If you are in search of Old or Archive version of Anaconda installer for Windows 10, Then visit «https://repo.anaconda.com/archive/».
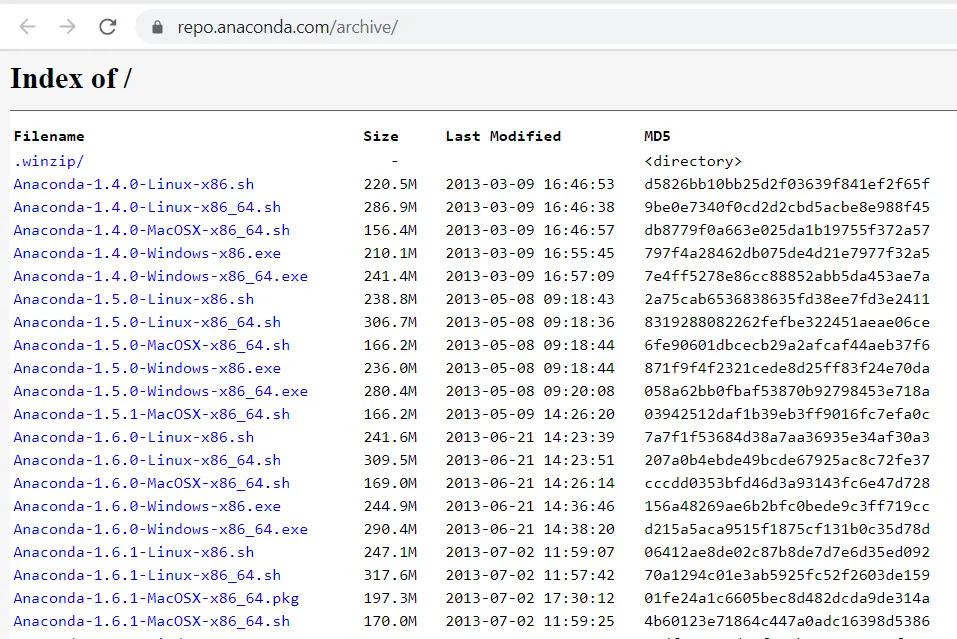
Step1.3- Verify MD5 Checksum Keys for Anaconda installer
You need to perform this step to make sure you have a legitimate copy of Anaconda.
- Visit «https://repo.anaconda.com/archive/» and search for your Anaconda installer.exe, which you just downloaded.
- Look for the MD5 checksum Key written in the 4th column against your exe file.
For example, I will show MD5 Key for «Anaconda3-2020.11-Windows-x86_64.exe» in the image for reference.

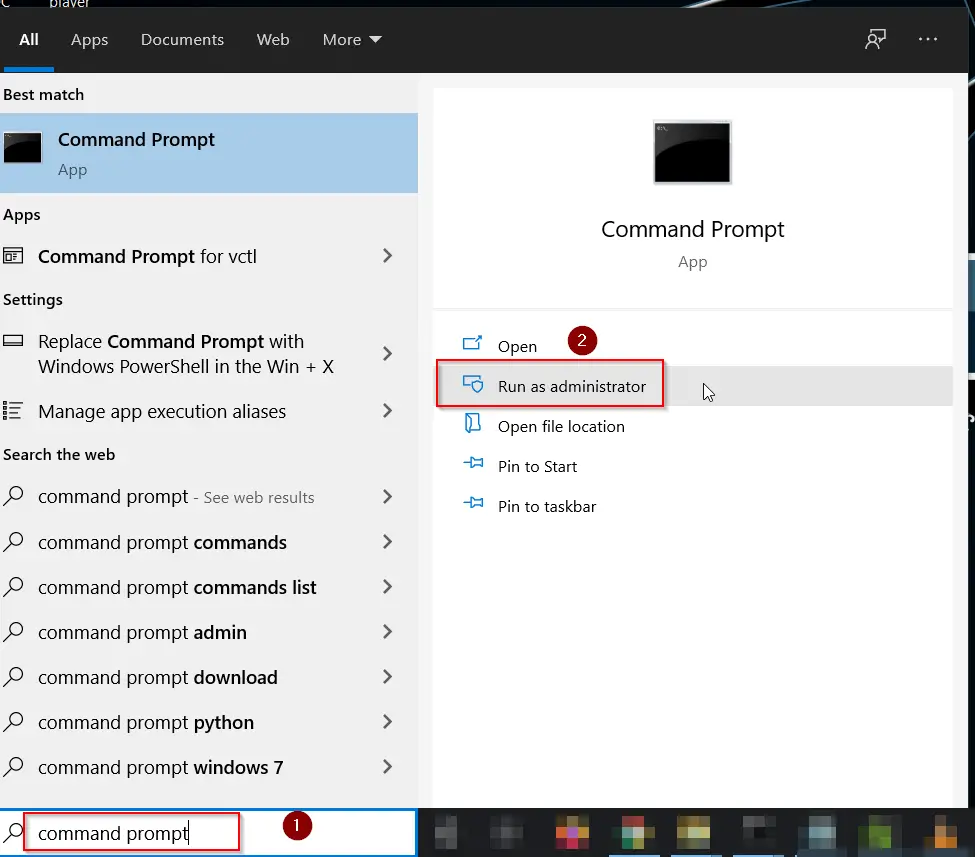
- Now Type «Command prompt» in Windows search bar and open it as administrator.
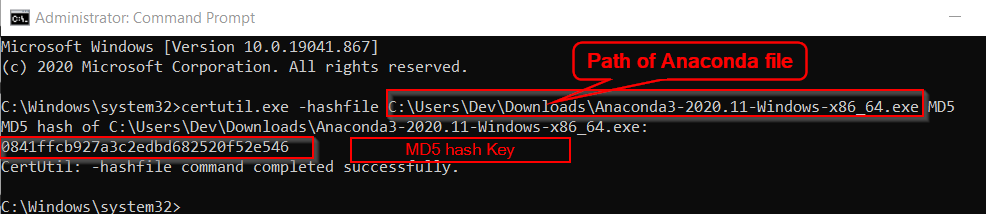
- Run the Certutil.exe command and provide the full path to your download file.
- Add MD5 in the last of your command. You will get a series of number.
- Match it with the key you got in Step1.3 from the Anaconda website. If all matches, you are good to proceed further.
C:Windowssystem32>certutil.exe -hashfile "path to your anaconda file" MD5
For example, I have added «C:UsersDevDownloadsAnaconda3-2020.11-Windows-x86_64.exe» as the file path in the command.
Then I got 0841ffcb927a3c2edbd682520f52e546 MD5 Key. And If you will look closely, it matches with the key we noted in Step1.3.
> certutil.exe -hashfile "C:UsersDevDownloadsAnaconda3-2020.11-Windows-x86_64.exe" MD5

#Output#
MD5 hash of C:UsersDevDownloadsAnaconda3-2020.11-Windows-x86_64.exe:
0841ffcb927a3c2edbd682520f52e546
CertUtil: -hashfile command completed successfully.
Now we know, that our Anaconda installer file is a genuine copy. Let’s go ahead with the installation steps.
Installing Anaconda on Windows 10 is pretty straightforward. You just need to decide on few options carefully.
Let’s deep dive into Anaconda installation steps —
Step2.1- Run Anaconda3 (Python) installer
- Go to your «Download» directory, where the Anaconda installer exists.
- <Double click> on the Anaconda installer file to run the setup.
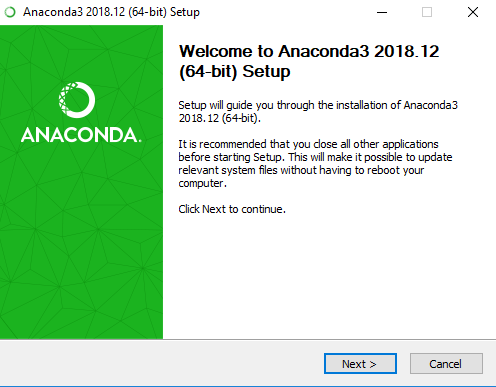
Step2.2- click Next on «Anaconda Welcome Screen»
Click Next on the «Welcome to Anaconda3 2020.11 (64-bit) setup» screen.
Make sure you have close all other applications before starting this setup. Because it may avoid updating important relevant system files. A system reboot will become mandatory in that case.

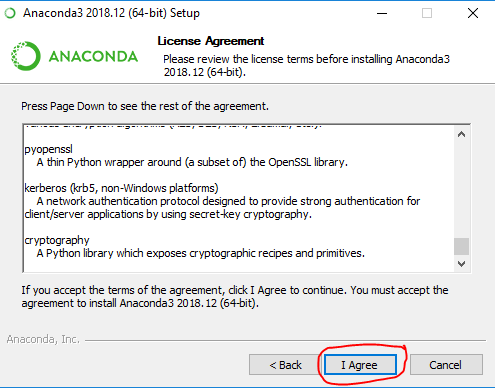
Step2.3- Accept End User License Agreement (EULA)
Select «I Agree» on End user license agreement page.

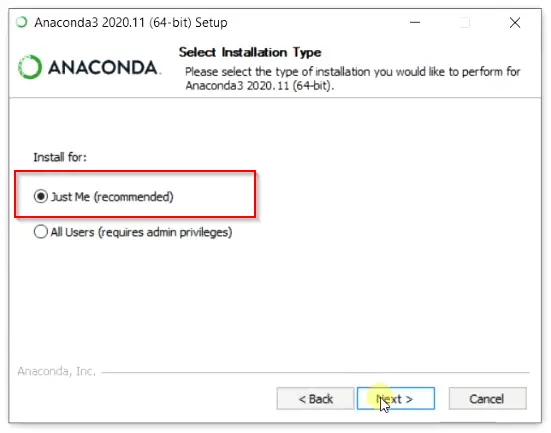
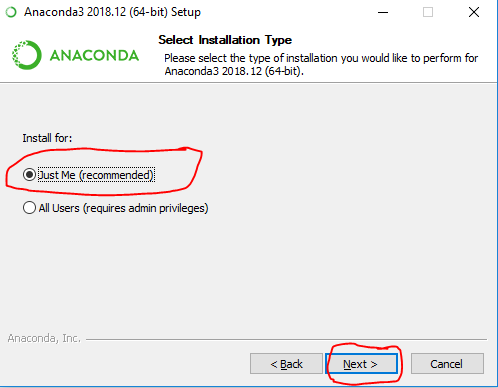
Step2.4- Select Anaconda installation type
On this screen you will get two options —
- Just me — It’s the recommended option. If you will select this option, you can install Anaconda on Windows without admin rights. But if your system is used by more than one user or developer. He or She will not be able to access it. I will go with the «Just me» option.
- All users — If you have a system, where more than one user will use Anaconda to develop scientific programs. You should select this option. Although you will require Admin rights on this system.
Also take a look on couple of extra steps, if you want to install Anaconda on Windows for multiple users.
Click Next —
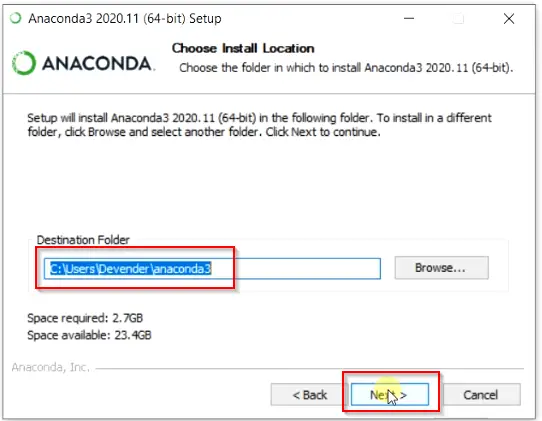
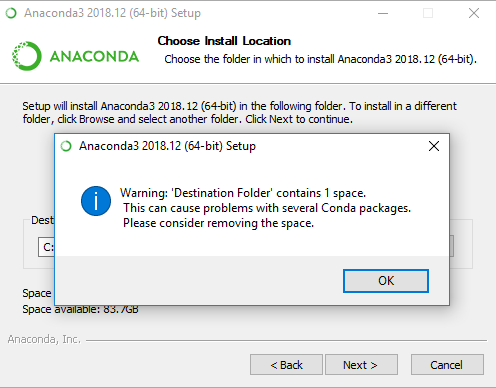
Step2.5- Choose Anaconda install location
Select Destination folder, where you want to install Anaconda on Windows 10 system. By default, Anaconda3 will get install in the «Users home directory«. For example, it is in C:usersDevenderanaconda3 in my case.
If you want to select different folder, then click Browse and choose your preferred folder.
I will go with default installation folder.
Hit Next, once you are ready.
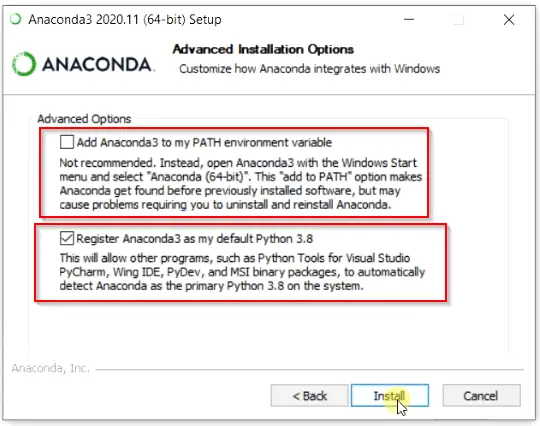
Step2.6- Choose Advance installation options
You have flexibility to customize your Anaconda integration with Windows. There are two options available —
a. Add Anaconda3 to my PATH variable — I will not recommend you to select this option. Because setting up the Anaconda PATH variable can mess up with your previously installed software. Alternatively, you can open Anaconda Shell or Navigator using the Windows start menu. Let’s don’t tick this check box.
b. Register Anaconda3 as my default Python 3.8 — You can go with this option because it helps other software to detect Python 3.8 as primary. If you don’t want to set Python 3.8 as default, in case you are using some other python version. You can uncheck this option also.
I don’t have any other software or Python installed. So I will leave «Register Anaconda3 as my default Python 3.8» selected.
Click on «Install» button to move further.
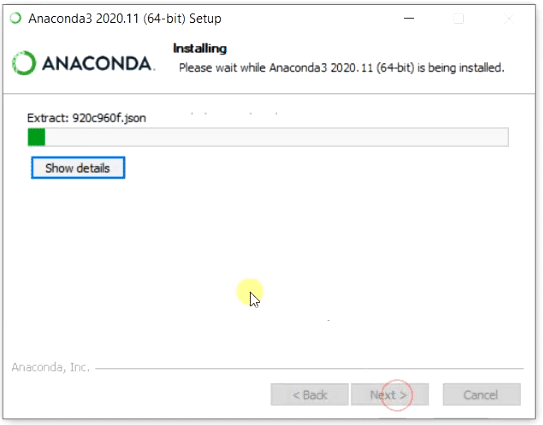
Step2.7- Let Anaconda installation complete
Now you can relax and get a cup of coffee. This setup will take few mins to install Anaconda on Windows 10.
You can tap on «Show details» to check the details of actions happening during installation.
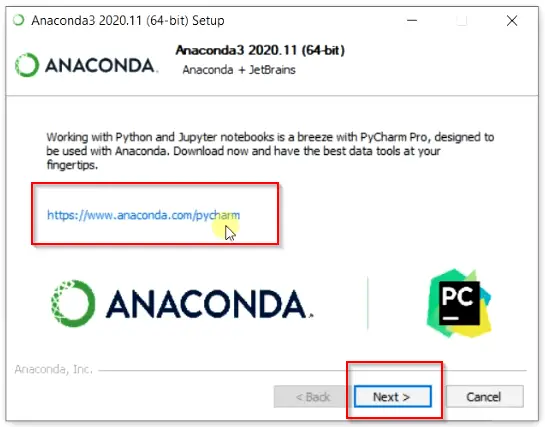
Step2.8- Install PyCharm Pro with Anaconda (Optional)
On this screen, Anaconda setup suggests you installing the PyCharm Pro editor. Actually, PyCharm is an IDE (integrated development environment) designed especially for Python programming by Jet Brains.
Let’s talk about PyCharm later in some other tutorial.
Click Next —
Step2.9- Finish Anaconda Installation Wizard
As soon as you will Finish completing the Anaconda3 setup. You will be redirected to the «Anaconda tutorial and the «Getting started» website of Anaconda.
Uncheck these two options on final screen to avoid redirection to Anaconda website for tutorial.
- Anaconda Individual Edition Tutorial
- Getting Started with Anaconda
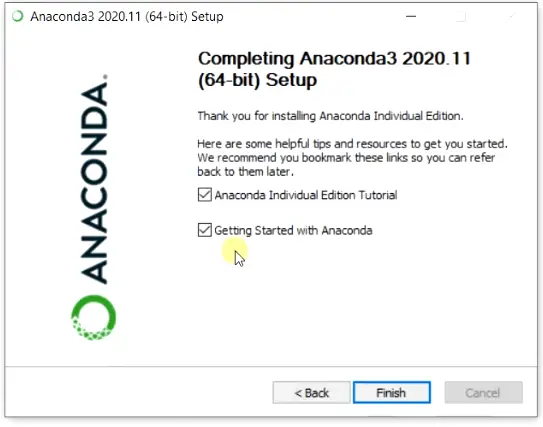
Congrats!! you are done with latest Anaconda installation in Windows.
How to run Anaconda in Windows using CLI and GUI
When you install Anaconda on Windows, you get a lot of bundled scientific packages with it like Spyder, Python and Jupyter notebook.
There are two methods to run Anaconda in Windows. If you are a CLI (Command Line Interface) fan, you can use Conda to run on the prompt.
In the case of GUI (Graphical User Interface), an Anaconda navigator can be used to manage packages, environment and launch applications.
I will show you both methods (Conda and Navigator) to create your first program. Just follow along :—
Step3.1 (CLI Method) — Create and Activate Anaconda environment
Let’s create our first test environment and run our first program in Python3.
Step3.1 (CLI Method) — Create and Activate Anaconda environment
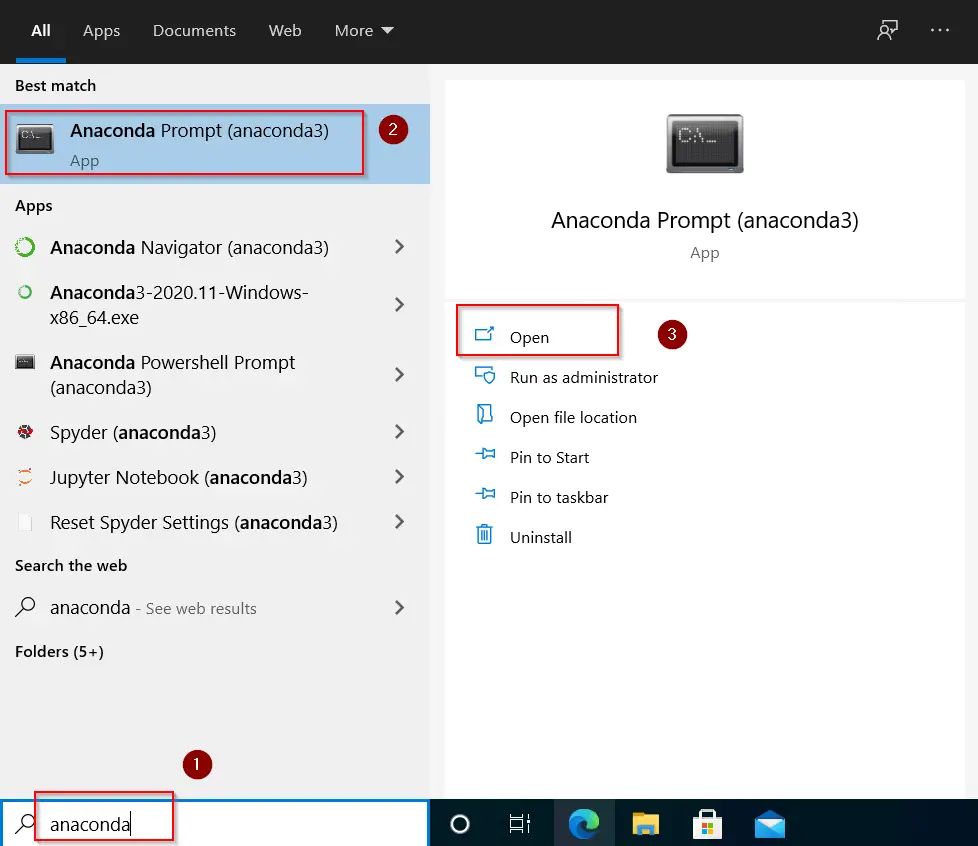
To create your first environment, you need to launch Anaconda3 prompt application.
- Type «Anaconda» in Windows search bar > Select Anaconda prompt application > Click Open
Step3.1.2 — Activate conda environment
By-default, you will get base(root) environment in Anaconda shell prompt.
Run the «conda create» command to set up our first test environment (test_env) with Python3. It will also install the latest Python 3.9 and Pip 21.0 packages.
(base) C:UsersDevender>conda create --name test_env python=3
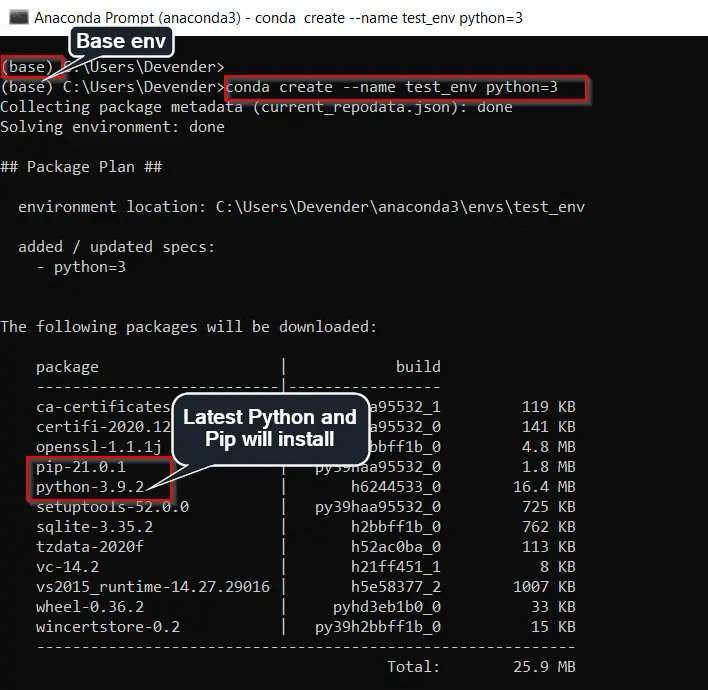
Please make a note, every environment is individual in Anaconda. You need to install required packages for each environment individually.
Press «y» to install packages.
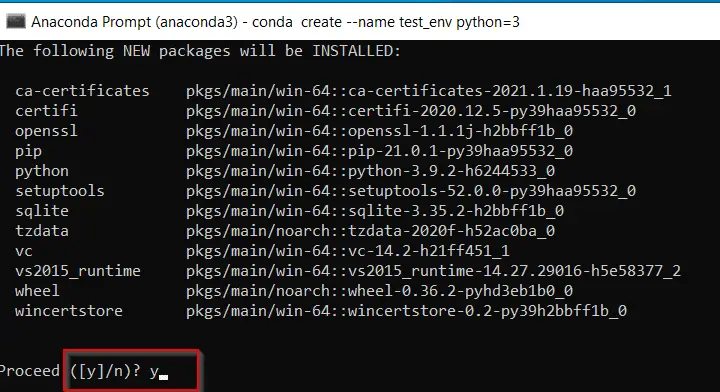
Anaconda will download, extract and install packages required. Once done, you can activate your environment with Conda activate command.
For example, test_env is the name of our newly create environment. So I will run this command —
(base) C:UsersDevender>conda activate test_env
It will switch from base(root) environment to «test_env» environment as shown in image.

** Please make a note running conda activate command without an environment name argument, drops you in the base environment. So make sure you give your environment name.
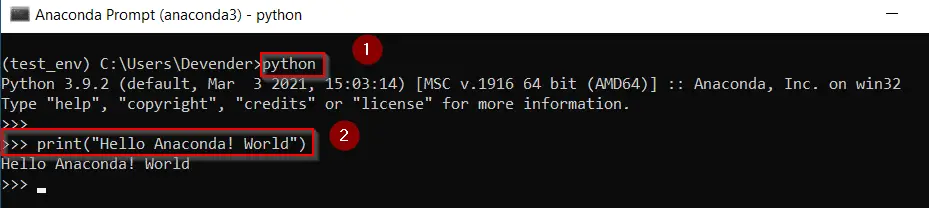
Step3.1.3 — Run your first python program
Now run Python and Type print(«your first program«) and check the output.
(test_env) C:UsersDevender>python
You will get «>>>» prompt. Type print(«Hello Anaconda! World») from your keyboard and press Enter.
# Type your first program code"
>>> print("Hello Anaconda! World")
Output should be «Hello Anaconda! World» as shown in image.
Type exit() to come out from Python prompt.
Hurray!! You have run your first python program in Anaconda successfully.
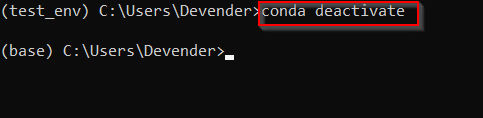
Step3.1.4 — Deactivate Conda environment
If you want to exit or want to deactivate any environment. You just need to run conda deactivate command.
For example, If I will run conda deactivate command inside my test_env environment. It will drop me to the default base environment as shown in the image.
(test_env) C:UsersDevender>conda deactivate
Step3.2 (GUI Method)- How to start Anaconda navigator and Launch Jupyter
Just to make things interesting, I will show you how to Launch the Anaconda navigator. Also, how to install and launch Jupyter notebook using Anaconda in your newly created test environment.
So follow these easy steps —
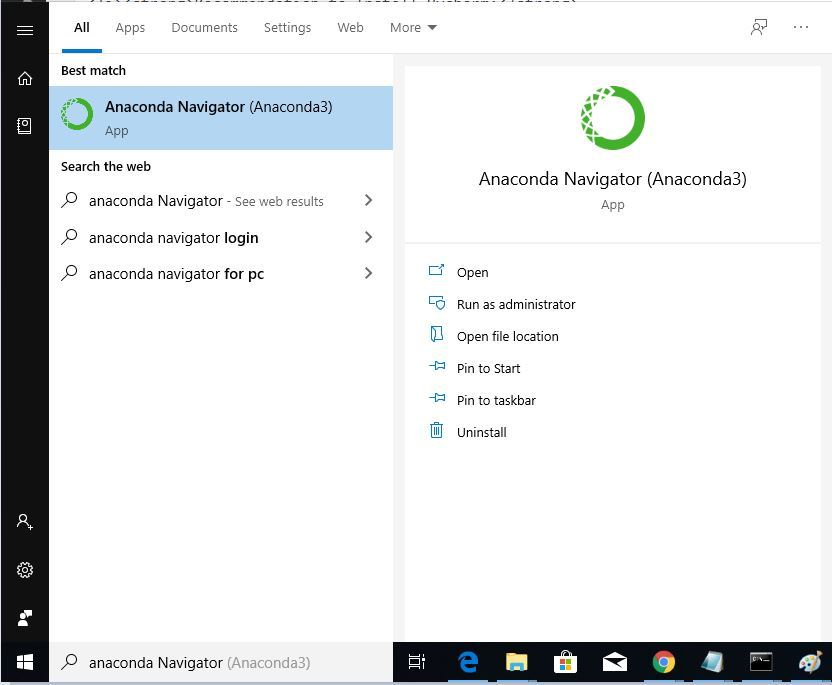
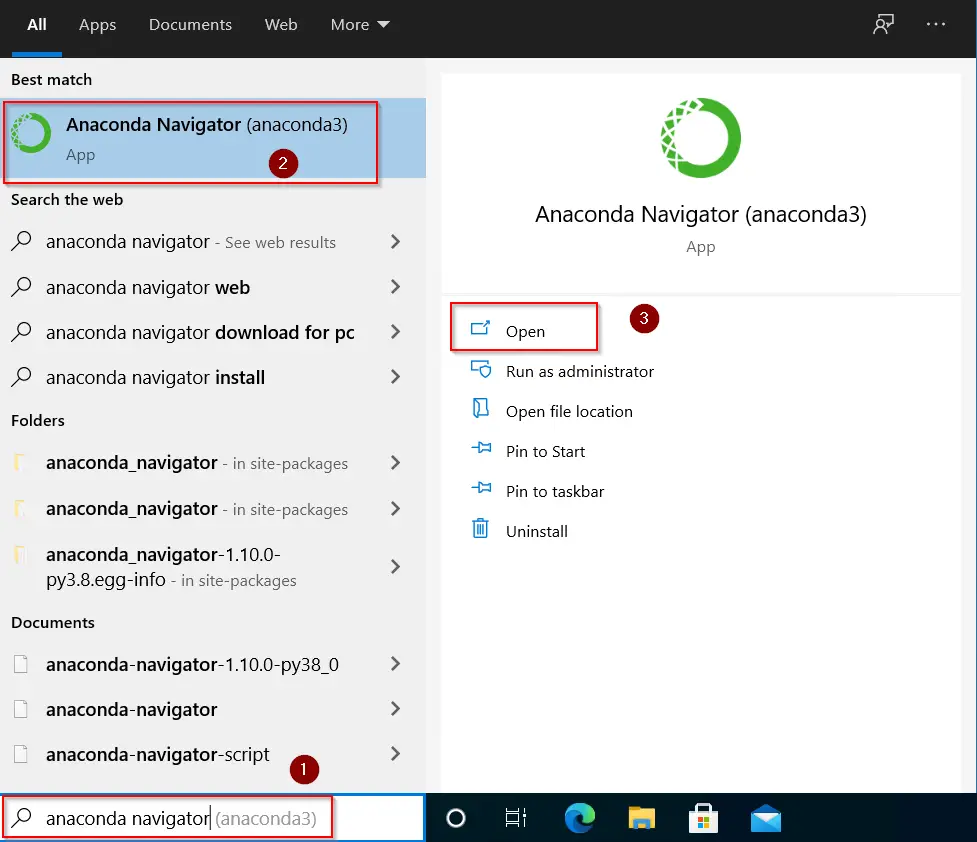
Step3.2.1 — Launch Anaconda Navigator in Windows 10
- Type «Anaconda Navigator» in Windows search bar > Select Anaconda Navigator > click Open.
Step3.2.2 — Select your test environment (test_env) and install Jupyter notebook
Jupyter notebook is a web based tool to interactively develop and present data science projects.
You can launch Jupyter notebook from <start menu> or search bar also. But It will get launch from base(root) environment by-default.
Here I will show, how you can install and launch Jupyter notebook in your custom environment. For example, test_env in my case.
- Select your environment from drop down > click on the «install» button in Jupyter Notebook application.
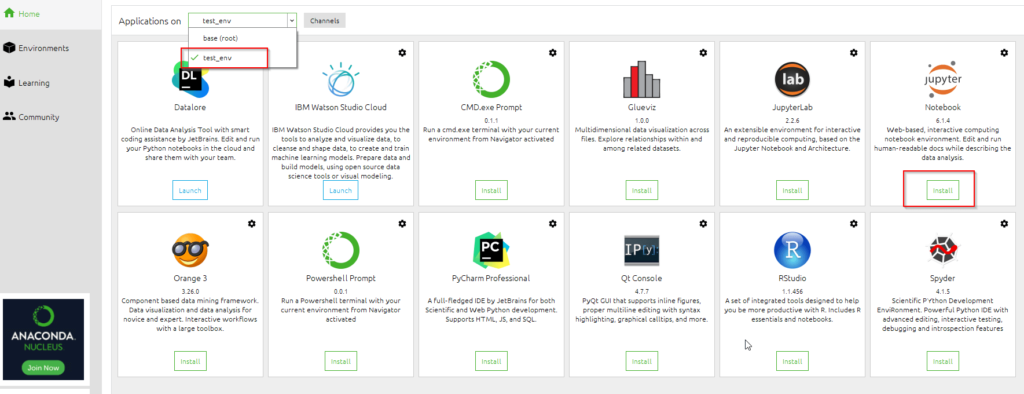
- Please wait and let Jupyter notebook installation complete. You can monitor the progress in Navigator task bar.

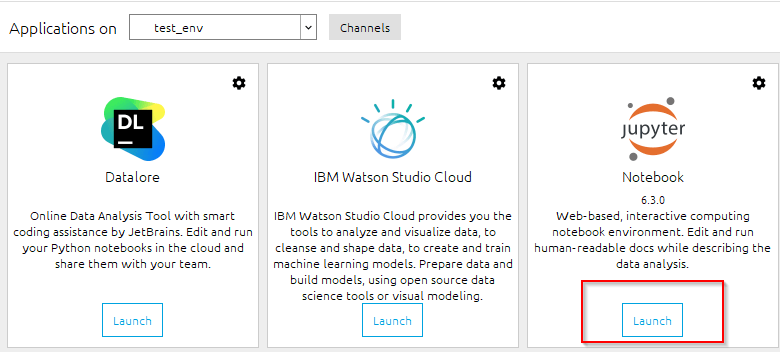
Step3.2.3 — Launch Jupyter Notebook in Anaconda navigator
Click on Launch button of Jupyter notebook.
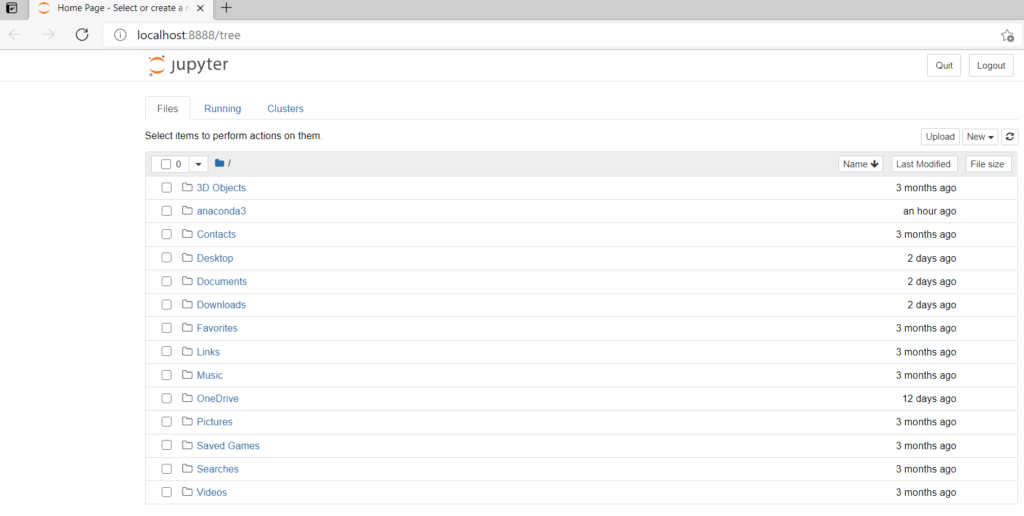
You will see a Jupyter home page in your default web browser. The default URL path of Jupyter notebook will be http://localhost:8888/tree.
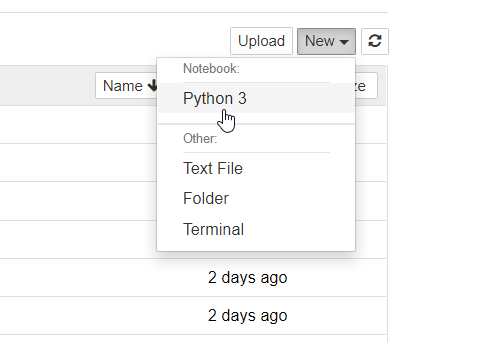
Step3.2.4 — Create your first Jupyter Notebook with Python3
Select New > Python3 notebook.
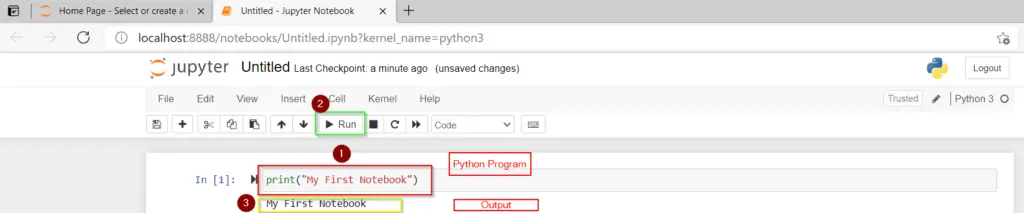
Step3.2.5 — Run first python program using Jupyter command cell
To run your first sample python program in Jupyter notebook. Follow these 3 steps —
- Type «print(«My First Notebook») in Jupyter command cell
- Click on Run button as shown in image
- You will see output as «My First Notebook«.
You can also save this file. Go to File > save as > provide the file name (path) and you are done. This was just the basic, For more details, checkout Jupyter documentation.
Enjoy! Anaconda and Jupyter in your development journey.
How to update Anaconda in Windows 10
You can update Anaconda in Windows 10 by 3 simple steps —
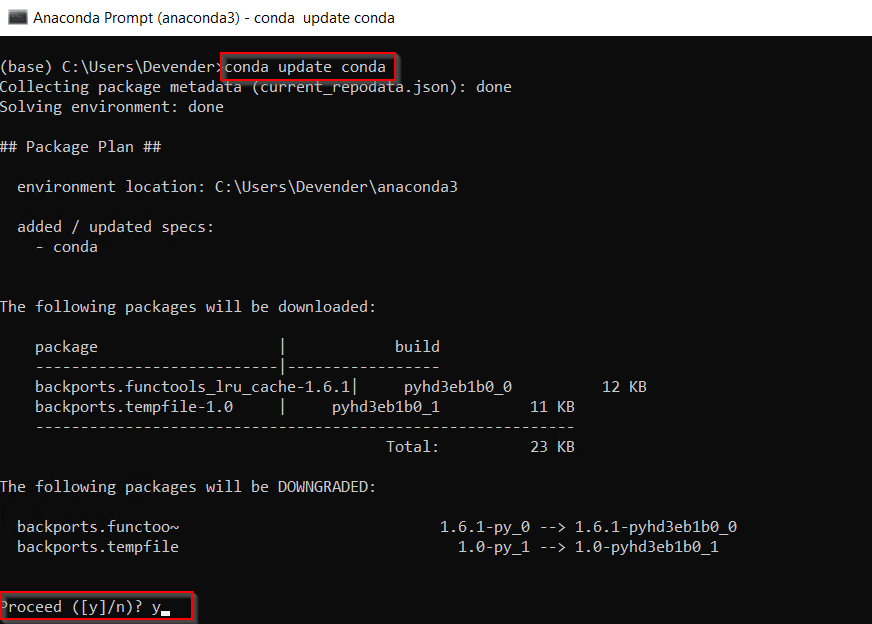
Step4.1- Update conda utility
First you need to update conda utility before upgrading Anaconda package in windows 10. To achieve this-
- Type «Anaconda» in Windows search bar > Select Anaconda prompt application > Click Open
- Run conda update command.
(base) C:UsersDevender>conda update conda
Press «y» to proceed
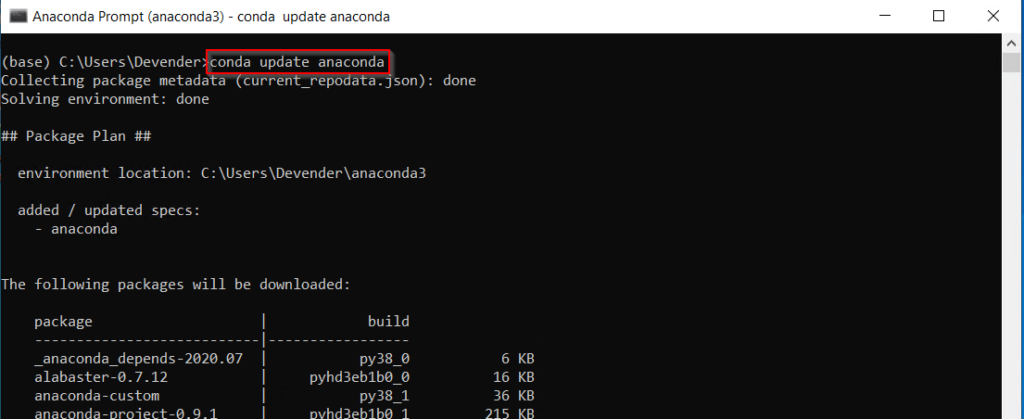
Step4.2- Update Anaconda package
Run this command to update Anaconda packages to latest version —
(base) C:UsersDevender>conda update anaconda
Press «y» to install packages.
To update Anaconda to specific version, Run below mentioned command —
> conda update anaconda=VersionNumber
For example, to upgrade it to Anaconda 2020.11 version, type
> conda update anaconda=2020.11
How to Uninstall Anaconda on Windows 10
Till this point, We know how to install Anaconda on Windows 10 and how to update it to latest version.
Now I will show you how to remove Anaconda from Windows10 completely. Follow along with these simple steps —
Step5.1- Go to Add remove programs
**** First of all take backup of all your projects, you created using Anaconda to be on safer side.
Then type «Add remove programs» in Windows search bar and click Open.

Step5.2- Uninstall Anaconda and Python completely
- In the «Apps and feature» window. Search for the «Anaconda» program > click Uninstall > then Uninstall again.
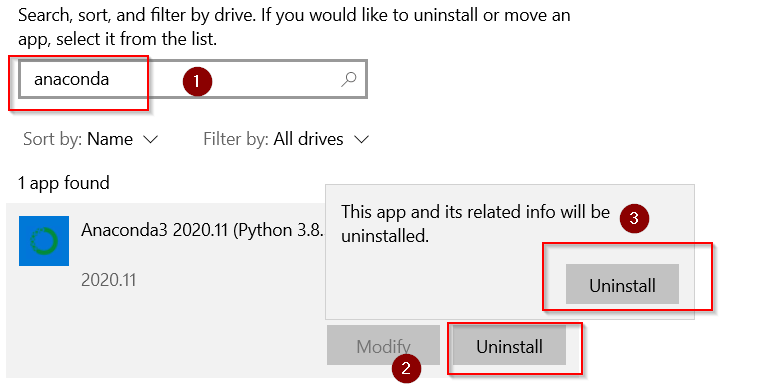
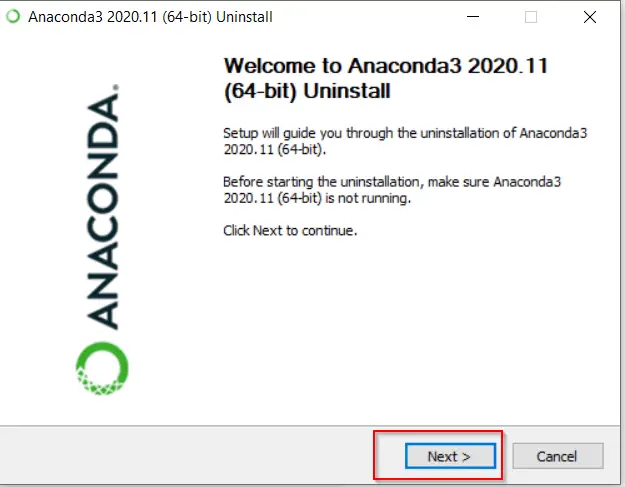
- Press Next on Anaconda welcome screen
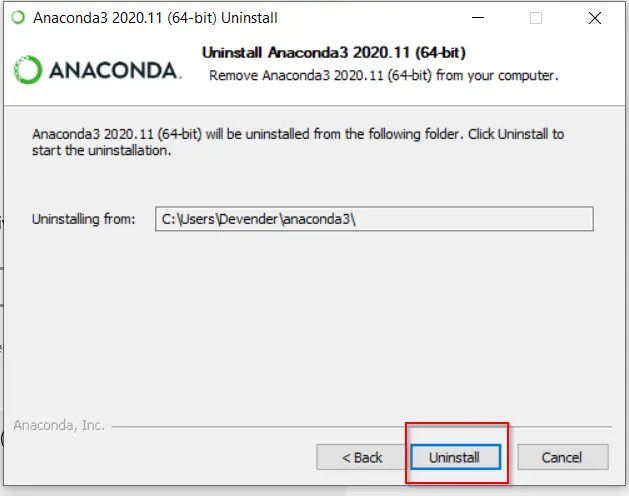
- Click «Uninstall«.
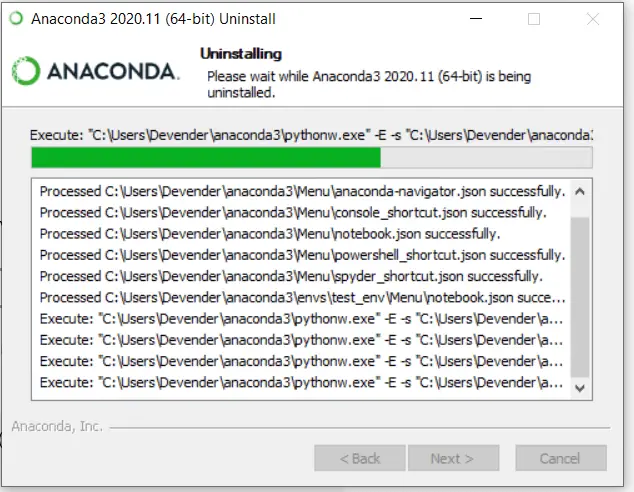
It will take a couple of minutes to uninstall anaconda and python 3.8.5 from your windows system.
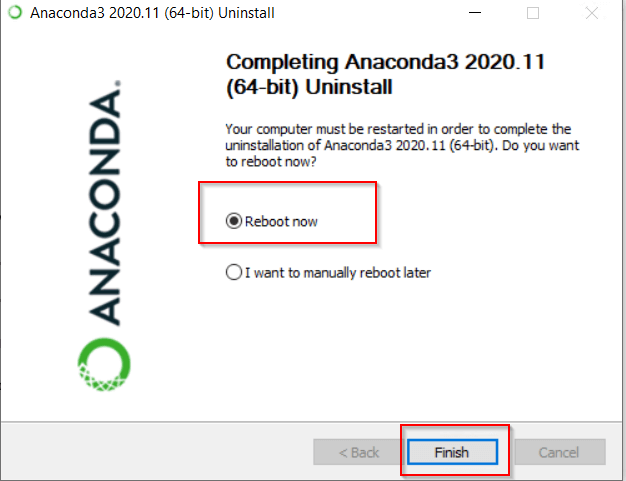
Click Next and then select Reboot Now or «I want to manually reboot later» as per your preference.
I will select reboot now and then Finish to complete uninstallation of Anaconda.
Important Tip
In a few rare cases, you may find the Anaconda3 folder, where you installed Anaconda. For example, in my case, it will reside in «C:usersDevenderanaconda3«. You can manually delete it if you find it after uninstallation of Anaconda.
You must be a happy soul now!!
Video
Check out this informative video on «How to Install Anaconda on Windows 10«. In case, you don’t like reading text or something is not clear in text instructions.
Conclusion
If you follow each and every instruction of this tutorial, You can install Anaconda on Windows 10 very easily. Even if you are a novice in the development world.
I wish you all the good luck for your future learnings. You can also download Anaconda cheat sheet to keep it handy.
Let me know, in case you have any feedback or suggestions for me.
19 июня 2022 г. 16:36
Русский
BSD
Интегрированная среда разработки для научного программирования на языке Python и R. Дистрибутив Anaconda имеет открытый исходный код и является самым простым способом выполнения в Python / R научных данных и машинного обучения на Linux, Windows и Mac OS X. Насчитывается более чем 15 миллионов пользователей по всему миру. Переведена на русский язык.
Дистрибутив Anaconda
Среда разработки Anaconda является доступным для скачивания дистрибутивом языков программирования Python и R для научных вычислений (научные данные, приложения машинного обучения, крупномасштабная обработка данных, прогнозная аналитика и т.д.), что направлено на упрощение управления пакетами и их развертывания. Версии пакетов управляются системой управления пакетами conda. Дистрибутив Anaconda включает в себя пакеты data-science, подходящие для Windows, Linux и MacOS.
Дистрибутив Anaconda поставляется с более чем 1500 пакетами, а также пакетом conda и менеджером виртуальной среды. Он также включает в себя графический интерфейс, Anaconda Navigator, в качестве графической альтернативы интерфейсу командной строки (CLI).


Отличия от базовых инструментов в среде разработки Python
Большая разница между conda и менеджером пакетов pip заключается в том, как управляются зависимости пакетов, что является проблемой для научных данных в Python и причиной существования conda.
Когда pip устанавливает пакет, он автоматически устанавливает все зависимые пакеты Python, не проверяя, конфликтуют ли они с ранее установленными пакетами. Он установит пакет и любые его зависимости независимо от состояния существующей сборкой. Из-за этого пользователь с рабочей сборкой, например, Google Tensorflow, может обнаружить, что она перестает работать, используя pip для установки другого пакета, который требует другой версии зависимой библиотеки numpy, чем та, которая используется Tensorflow. В некоторых случаях может показаться, что пакет работает, но дает различные результаты в деталях.
Напротив, conda анализирует текущую среду, включая все установленные в настоящее время, и вместе с любыми указанными ограничениями версии (например, пользователь может пожелать иметь версию Tensorflow 2,0 или выше), разрабатывает способ установки совместимого набора зависимостей и показывает предупреждение, если это невозможно сделать.
Пакеты с открытым исходным кодом могут устанавливаться отдельно из репозитория Anaconda, Anaconda Cloud, или собственного частного репозитория или зеркала, используя команду conda install. Anaconda Inc компилирует и собирает все пакеты в репозитории Anaconda, а также предоставляет двоичные файлы для Windows 32/64 бит, Linux 64 бит и macOS 64-бит. Все, что доступно на PyPI, может быть установлено в среду conda с помощью pip, и conda будет отслеживать, что он установил сам и что pip установил.
Сборка Anaconda2 по умолчанию включает Python 2.7, а Anaconda3 — Python 3.7. Тем не менее, можно создать новые среды, которые включают в себя любую версию Python, упакованную с conda.
Графический интерфейс Navigator
Anaconda Navigator — это графический пользовательский интерфейс (GUI) среды разработки python, включенный в дистрибутив Anaconda, который позволяет пользователям запускать приложения и управлять пакетами conda, средами и каналами без использования команд командной строки. Anaconda Navigator может искать пакеты в облаке Anaconda или в локальном репозитории Anaconda, устанавливать их в среде, запускать пакеты и обновлять их. Он доступен для Windows, macOS и Linux.
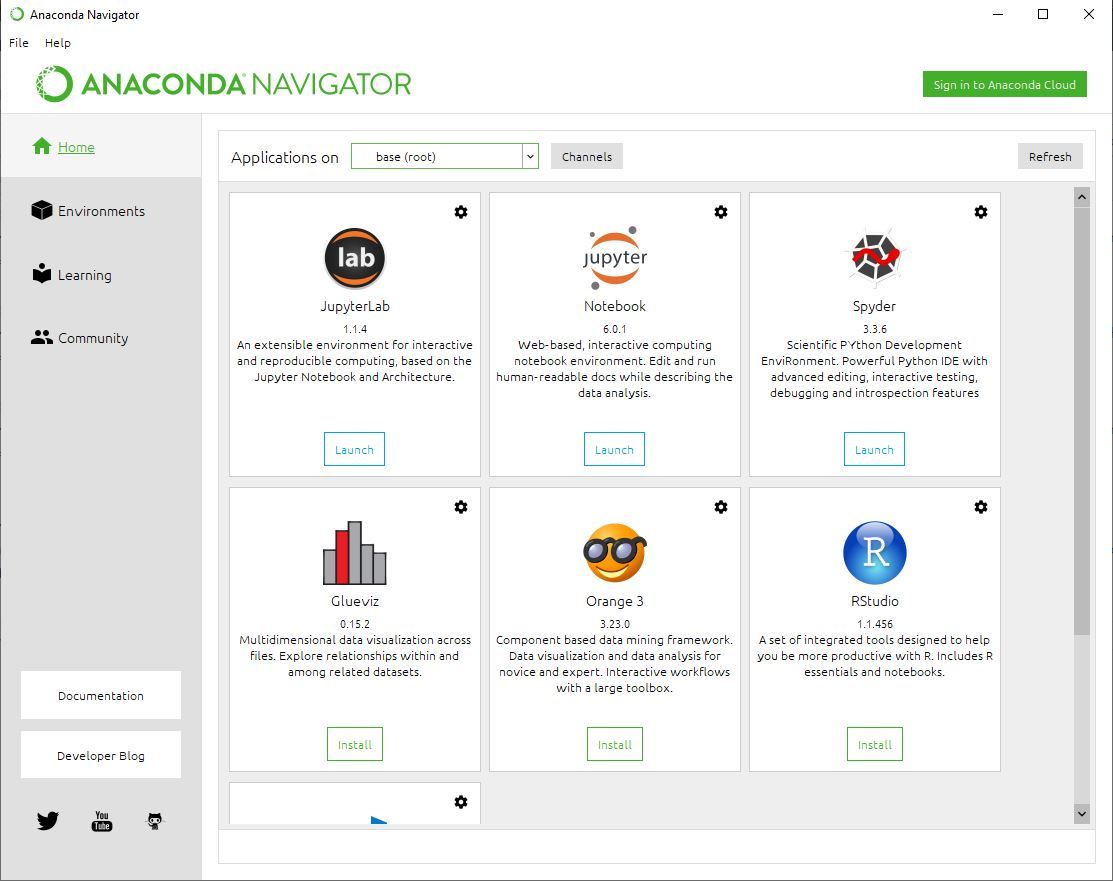
По умолчанию в Anaconda Navigator доступны следующие приложения:
- JupyterLab;
- Jupyter Notebook;
- QtConsole;
- Spyder;
- Glueviz;
- Orange;
- RStudio;
- Visual Studio Code.
Менеджер пакетов Conda
Conda является менеджером пакетов и системой управления средой разработки языков программирования Python и R, которая устанавливает, запускает и обновляет пакеты и их зависимости. Он был создан для программ Python, но он может упаковывать и распространять программное обеспечение для любого языка (например, R ), включая многоязычные проекты. Пакет conda и менеджер среды включены во все версии Anaconda, Miniconda, и Anaconda Repository.
Обновление установленных в среде разработки пакетов для Python
Обновить пакеты среды разработки для Python можно с помощью conda. Просто запустите «Anaconda Prompt» и там напишите «conda update anaconda», будет задан вопрос действительно ли хотите обновить и ответ да или нет, если да вводим y, если нет n. Для обновления Spyder необходимо там же написать «conda update spyder». Также можно написать и «conda update python». Однако, после двух последних команд, не помешало бы еще раз использовать первую, то есть вновь проверить обновления дистрибутива anaconda.
ВНИМАНИЕ!!! После обновления некоторые приложения могут стать на английском языке, включая основную рабочую зону среды разработки — Spyder.
Облако Anaconda Cloud
Anaconda Cloud — это служба управления пакетами компании Anaconda, в которой можно найти, получить доступ, хранить и совместно использовать общедоступные и частные записи, среды и пакеты conda и PyPI. Облако содержит полезные пакеты Python, записи и среды для широкого спектра приложений.
Перевод интерфейса Anaconda на русский язык
После того, как была скачана Анаконда, для перевода языка её интерфейса, необходимо открыть настройки (точнее среды разработки Spyder) доступные в меню Tools / Preferences и далее вкладку Advances Settings. Если в пункте Language нет русского языка, значит он был отключен из-за низкого процента перевода. Включить русский язык можно отредактировав файл base.py, который находится Anaconda3Libsite-packagesspyderconfig или Anaconda3pkgsspyder-4.1.4-py38_0Libsite-packagesspyderconfig, где spyder-4.1.4-py38_0 может отличаться, если используется более новая версия. Там необходимо найти строку DISABLED_LANGUAGES = [‘hu’, ‘ru’, ‘pl’] и убрать из неё ru.
Ссылки, позволяющие скачать Анакоду приведены ниже в блоке «Характеристики».
05 Mar 2019
🔖
python
tutorials
windows
salesforce
beginner
💬 EN
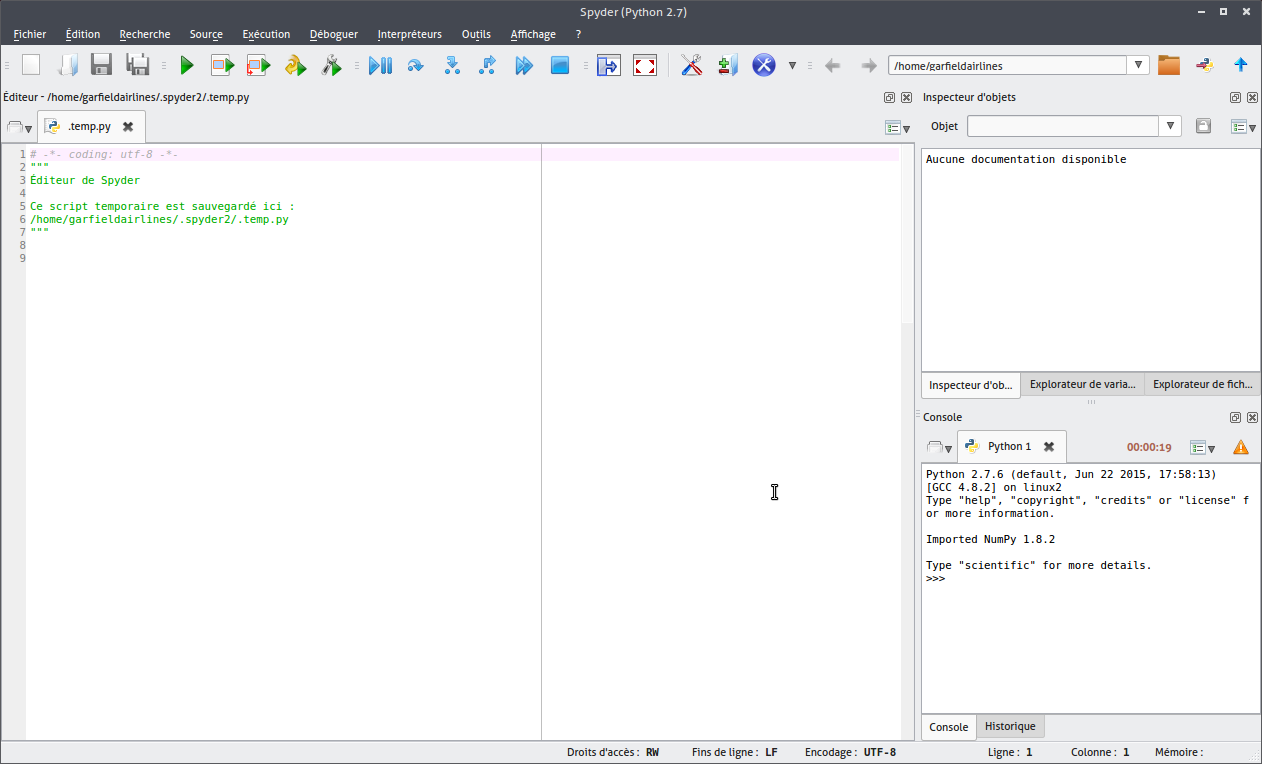
Table of Contents
- Installing Anaconda & running a Python program
- Download
- Run the Anaconda installer
- Choose “just me” or “all users”
- Installation folder
- Options
- While it runs
- Finishing
- Write your first Python program
- Modules
- Checking whether “modules” are installed
- Yay, it exists!
- Boo, it doesn’t exist!
- Installing a “module”
- Checking whether “modules” are installed
- Write your second Python program
- Happy Programming
I keep warning students not to use real, corporate CSV files in Python with online “IDEs” like Repl.it or CodeBunk, and to install Python on your local machine instead.
Finally, I’ve written a tutorial to walk you through it!
These screenshots document the simplest approach I know of for installing Python on a Windows machine.
Seriously – THIS IS SO SIMPLE. You just download software, double-click the installer, let it run, open up the code editor, and execute your first print('Hello World') like magic.
But I’m here to walk you through every step and explain what’s going on in the background.
If things don’t work and you can handle something a bit more complicated, see my instructions on setting up “miniconda” on Windows.
(Alternatively, I wrote a tutorial on installing the Windows Store version of Python.)
Did you get Anaconda installed?
Yay! I’m thrilled I could help.
If you’d like, I’d love a Ko-Fi. (Chai for me!) 🥰

Installing Anaconda & running a Python program
Download
First, download an appropriate installer file for “Anaconda”.
It’s not very smart about detecting that you’re on Windows, so explicitly click the “Windows” option just above the downloads.
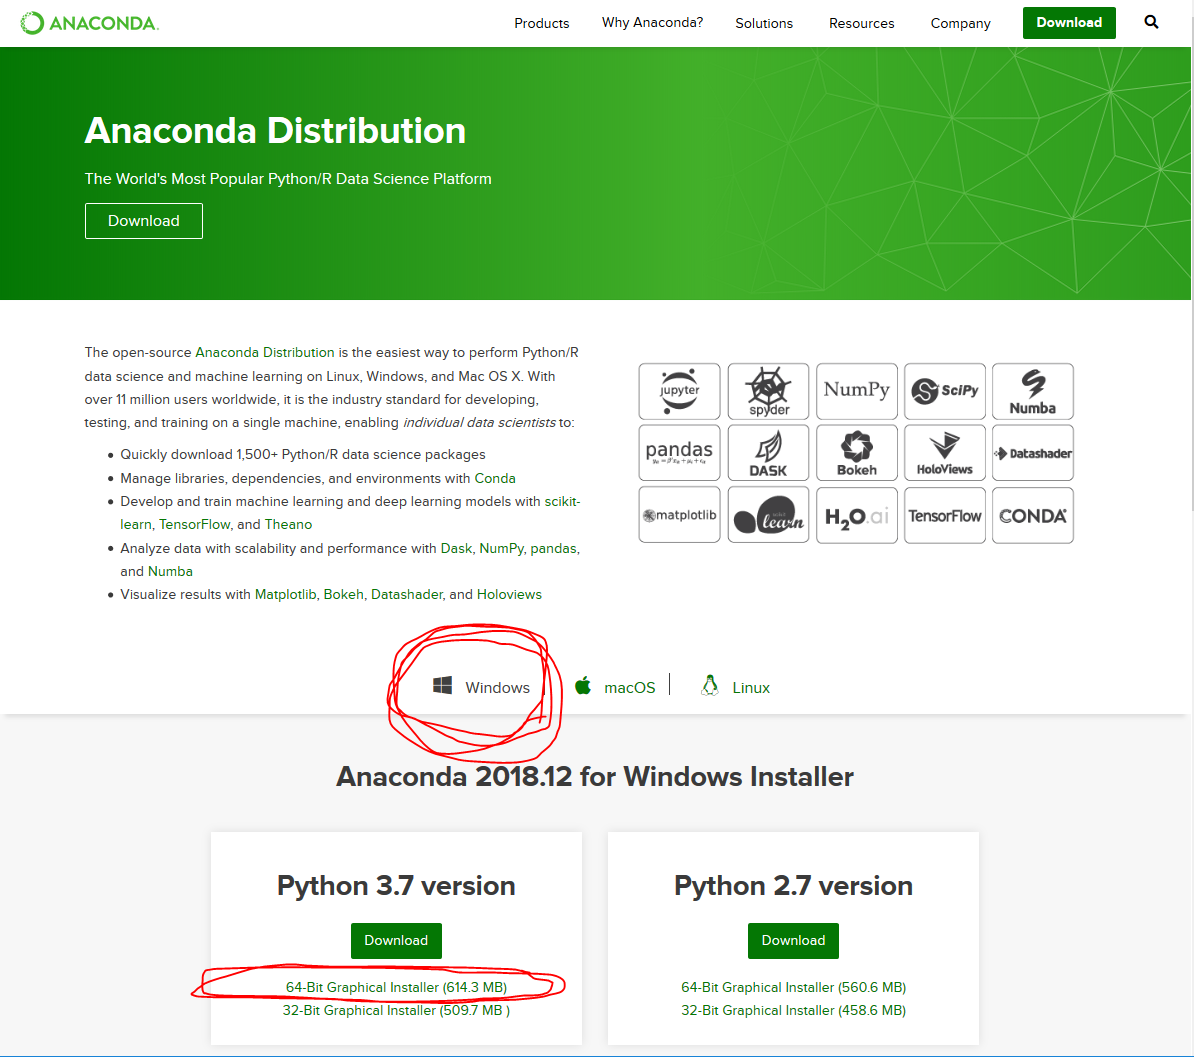
I recommend getting a 64-bit version, as long as your computer is 64-bit.
The only reason I can think of to have a 32-bit version on your computer is if, say, you’re going to be connecting to an Oracle database using “Oracle Client” software already installed on your computer, with that software being 32-bit (e.g. because the database itself requires 32-bit clients).
Or, I suppose, if for some weird reason you have a 32-bit computer. But then you’re probably worried about “bloat” in things you install and would want to follow the more difficult miniconda instructions anyway.
If what I just said didn’t make any sense, do 64-bit.
You want one for “Python 3.something,” not “Python 2.something.”
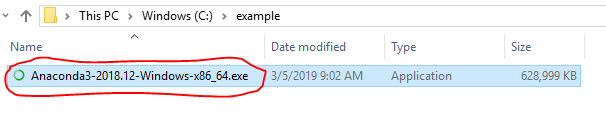
Run the Anaconda installer
Double-click the “.exe” file to run setup. Click “Next,” then click “I Agree” on the following screen.
Choose “just me” or “all users”
I’m going to install this for “just me,” because I don’t have admin rights to install software on my corporate PC.
My choice here influences whether the installer suggests installing the program under:
C:UsersMY_USERNAMEAppDataLocalContinuumanaconda3(just me), orC:Program FilesAnaconda3(all users)
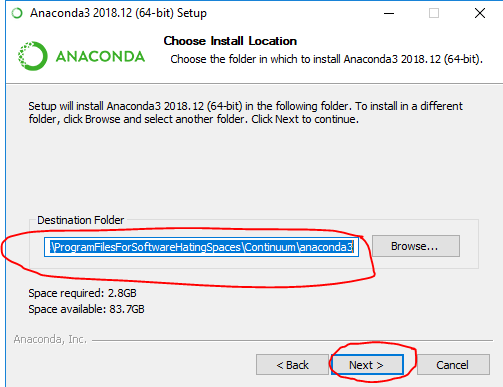
Installation folder
It bothers me to forget when software is installed in my AppDataLocal hidden folders, so I am going to manually change the installation path on the next screen to C:UsersMY_USERNAMEDocumentsProgFilesContinuumanaconda3.
(Yes, in the screenshot, which I reused from an earlier tutorial, I called that folder “ProgramFilesForSoftwareHatingSpaces” instead of “ProgFiles” – I was feeling a bit pouty when Anaconda complained about my “Program Files” folder I’d set up under “My Documents.”)
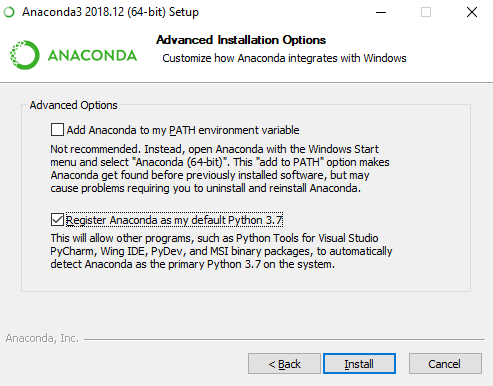
Options
Next, the installer is going to ask me whether I want to do either of two things.
- Add “Anaconda” to my “PATH” environment variable. It says not to do it right in the installer text, so I’m going to leave it un-checked.
- Register “Anaconda” as my “default Python 3.7” environment. This comes checked, and they recommend it, and hey … let’s do it. I did.
Now I’ll click “Install.”
While it runs
The installer takes a few minutes while it dumps thousands of small files onto your hard drive.
Q: Why so many files?
A: Your computer doesn’t naturally understand Python commands.
At a really low level, it understand commands in its “assembly language” (which you wouldn’t want to have to write by hand).
All Windows computers are shipped understanding a language called “C” (which, if you don’t want to become a professional programmer, you probably still wouldn’t want to have to write by hand).
Lots of support programs written in “C” teach your Windows computer how to understand commands written in “Python” (presuming you, or a program like an “IDE” acting on your behalf, tell Windows where exactly you installed your software that can help parse these commands – for me, that would be C:UsersMY_USERNAMEDocumentsProgFilesContinuumanaconda3python.exe).
Furthermore, the full version of Anaconda comes with a lot of Python “libraries” / “packages” / “modules” (extensions to the base set of Python commands you can program with), all of which also have to have files on your computer so that your computer can understand what they mean.
If you don’t want so many of these, you could always follow the more difficult instructions on setting up “miniconda” on Windows instead.

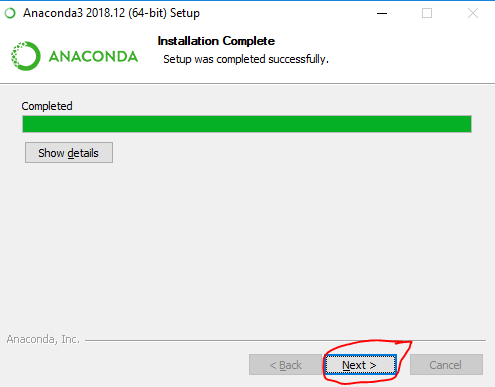
Finishing
When it says “Completed”, click “Next.”
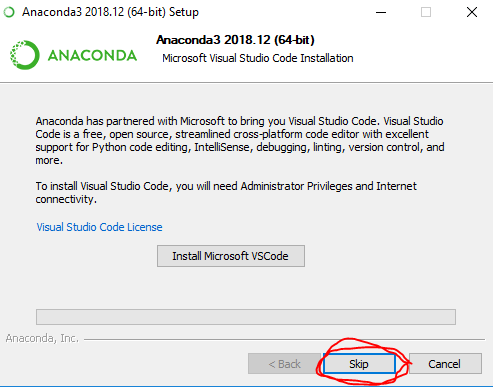
Don’t bother to install VSCode – it’s an “IDE” (code editor), but you’re already getting another one called “Spyder” with this installation, and that will do you just fine. Click “Skip.”
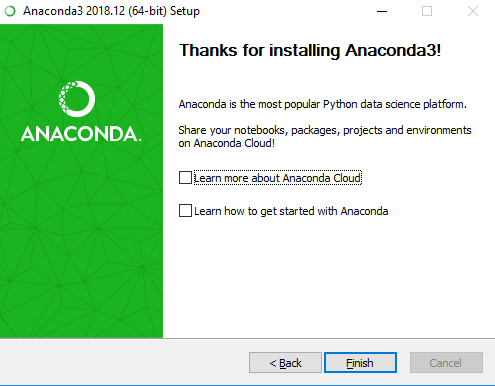
Leave the “learn more” boxes checked, or un-check them, as you prefer, and click “Finish.”
(The second checkbox brings you here; the first just brings you to Anaconda’s website.)
Write your first Python program
If you’ve practiced coding in an online “IDE” like Repl.it or CodeBunk, you know that coding can be as easy as clicking a big “run” button every time you type enough text that you wonder what it does.
You have the same thing on your hard drive now! It’s called Spyder.
Anaconda’s installer installed it for you.
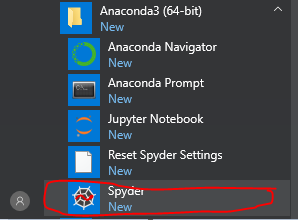
If you look at your “Start” menu (the thing that pops up when you click the Windows icon in the bottom left corner of your screen), you may also notice a new folder called “Anaconda3 (64-bit)” with several icons beneath it.
Click the one that says “Spyder.”
The splash screen while it starts up looks like this:

And in your taskbar, once it’s up and running, its icon looks like this:

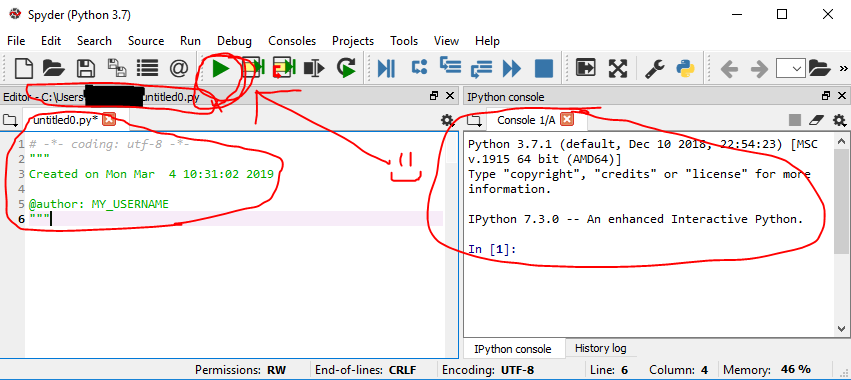
When it’s fully open, it’ll typically look something like this:
- On the left will be a place for you to edit code, with a new file called “untitled.py” (tentatively proposing you save it in
C:usersYOUR_USERNAMEuntitled0.py) whose contents are:
# -*- coding: utf-8 -*-
"""
Created on SOME_TIMESTAMP

@author: YOUR_USERNAME
"""
On the right, or at the bottom right, will be some sort of “console” where you can watch code execute every time you hit the big green “run” button near the top of the screen (it’s a right-facing green triangle).
In the top menu, click “File” -> “Save As.”
Pick a nice folder for your program (personally, I’m going to save mine under C:example, but you might want to put it on your desktop) and save it there with a filename of “hello.py”.
(Spyder’s “run” button complains if you try to run code before giving it a proper spot on your hard drive. You could just do file->save, but I personally can’t stand cluttering my c:usersMY_USERNAME with files like “untitled0.”)
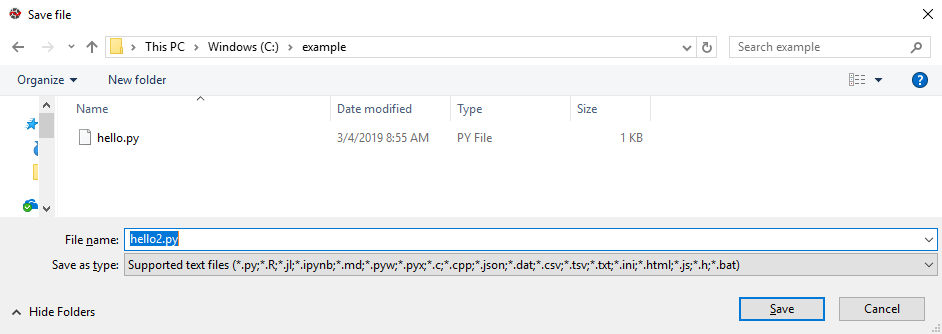
(Note that in the photo, mine is called “hello2.py” because I reused a screenshot from a different tutorial with 2 steps!)
Now erase the entire contents of the file, and on line 1, type:
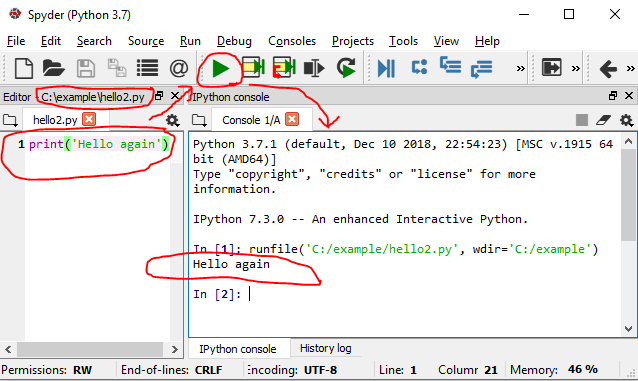
Then click the big green “run” button.
You may see a pop-up dialog with all sorts of options about executing code consoles or interpreters and such.
Just click “cancel” on the pop-up dialog box and then click the play button again.
The pop-up box was giving you a chance to highly customize where you want to see any output from running your code.
Clicking “cancel” and trying again seems to tell Spyder, “you figure out where to display the output of this code, don’t bother me with all these options.”
(Unfortunately, I didn’t catch this dialog box with a screenshot – Spyder seemed to remember my settings from my previous usage of it with “big Anaconda.”)
Your output should look something like this – somewhere at the right-hand side of the screen, probably in a console called “Console 1/A,” you’ll see confirmation of the filepath of “hello.py,” followed by a new line with the text “Hello World”.
(Note that in the photo, mine says “Hello again” because I reused a screenshot from a different tutorial with 2 steps!)
🎉🎊🙌
Congratulations – you’ve written and run a Python program!
🎈🎆👍🏾
In the top menu, click “File” -> “Save” because why not be proud of this working code? It’s good to get used to saving your work as soon as you like it.
But before we write a bigger program, let’s take a little diversion to learn about “modules.” They’re pretty important in Python.
Modules
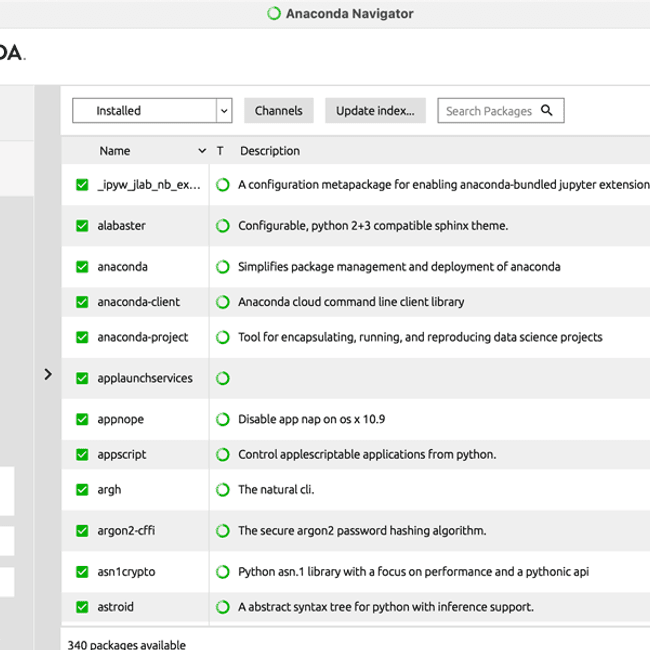
Checking whether “modules” are installed
Now you need to learn what it looks like when a given extension to the Python language, also known as a “library” or “package” or, particularly in Python, a “module,” is installed.
Backspace out the entirety of your code and on line 1, type:
- Trivia: the orange warning triangle to the left of the line numbers in your code is telling you that you “imported” a package that your program doesn’t actually use anywhere else in the program. That’s Spyder trying to help you write better, more efficient code.
- Red circles with “x” in them to the left of the line numbers means a line doesn’t even contain legitimate Python to begin with. Those, you’ll want to care about, or your program won’t run.
Yay, it exists!
Click the “run” button.
If you do have the “pandas” module installed, nothing special happens.
You should have it installed – it comes with the “big”/mainstream version of Anaconda. Modules like Pandas is why Anaconda took so long to install!
If you have “pandas” installed, when you run this code, you just get another command prompt (“In[SomeNumber]”) in the box at the right where the number in square brackets is 1 bigger than it was before.
(Note: in the screenshot above, things look a slightly different because I’m still sooooo lazy and reusing screenshots from a different tutorial – sorry!)
Boo, it doesn’t exist!
Let’s try “importing” a module you probably don’t have, because it doesn’t come with Anaconda.
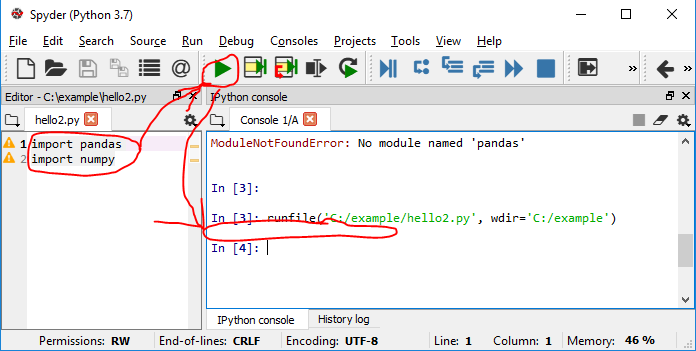
Backspace out the entirety of your code and on line 1, type:
Click the “run” button.
If you get a huge dump of colorful text in your console, with the last few lines of the big error message saying the following, you now know that you don’t have the module called “simple_salesforce” installed:
    exec(compile(f.read(), filename, 'exec'), namespace)

  File "C:/example/hello.py", line 1, in <module>
    import simple_salesforce

ModuleNotFoundError: No module named 'simple_salesforce'
Installing a “module”
Anaconda comes with just about everything you need as a total beginner, so don’t bother installing extra “modules” on your computer just yet.
However, if you ever need any, see the “modules” section of my instructions on setting up “miniconda” on Windows – people who install “miniconda” have to install all their own “modules” by hand, so I went over it step-by-step in those instructions!
Write your second Python program
Backspace out the entirety of your code.
Copy and paste the following code into your code editor and run it:
import pandas
pandas.set_option('expand_frame_repr', False)
filepath = 'https://raw.githubusercontent.com/pypancsv/pypancsv/master/docs/_data/sample1.csv'
df = pandas.read_csv(filepath)
print(df)
You should see the following output in your console at right:
Now you’ve opened a CSV spreadsheet file with Python – you’re off to the races!
Head here to learn new skills and put them in action on your computer.
Happy Programming
You now have a working environment for editing CSV files in Python!
- You have an “IDE,” or as I like to think of it, a “text editor with a run button,” called Spyder, that runs code you type into it as you see fit.
- You know where to look to learn to install & update “modules” that you hear might be useful.
(Be careful and don’t trust any old module you find on the internet. It’s nothing more than “someone else’s code that you’re choosing to run on your computer.” Make sure it’s not from someone sketchy.)
Improve Article
Save Article
Improve Article
Save Article
Anaconda is an open-source software that contains Jupyter, spyder, etc that are used for large data processing, data analytics, heavy scientific computing. Anaconda works for R and python programming language. Spyder(sub-application of Anaconda) is used for python. Opencv for python will work in spyder. Package versions are managed by the package management system called conda.
To begin working with Anaconda, one must get it installed first. Follow the below instructions to Download and install Anaconda on your system:
Download and install Anaconda:
Head over to anaconda.com and install the latest version of Anaconda. Make sure to download the “Python 3.7 Version” for the appropriate architecture.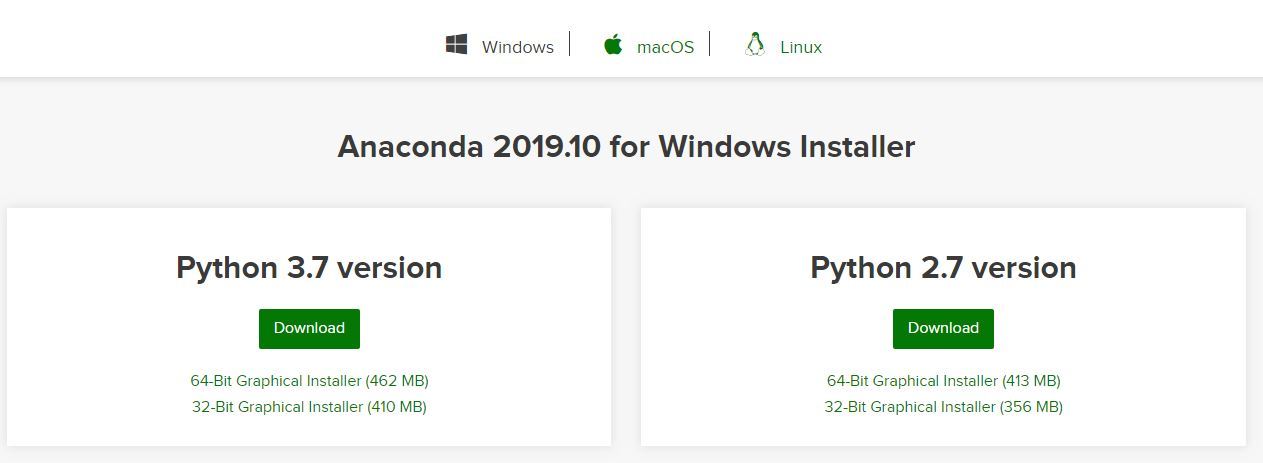
Begin with the installation process:
Working with Anaconda:
Once the installation process is done, Anaconda can be used to perform multiple operations. To begin using Anaconda, search for Anaconda Navigator from the Start Menu in Windows