На чтение 5 мин. Просмотров 3.7k. Опубликовано 25.06.2019
Содержание
- Примеры, переключатели и многое другое
- Доступность команды Net Send
- Синтаксис команды Net Send
- Примеры команд Net Send
- Net Send связанные команды
- Дополнительная справка по команде Net Send
Примеры, переключатели и многое другое
Команда net send – это команда командной строки, используемая для отправки сообщений пользователям, компьютерам и псевдонимам сообщений в сети.
Windows XP была последней версией Windows, которая включала команду net send. Команда msg заменяет команду net send в Windows 10, Windows 8, Windows 7 и Windows Vista.
Команда net send является одной из многих команд net.
Доступность команды Net Send
Команда net send доступна из командной строки в Windows XP, а также в более старых версиях Windows и в некоторых операционных системах Windows Server.
Доступность некоторых переключателей команд net send и другого синтаксиса команд net send может отличаться в разных операционных системах.
Синтаксис команды Net Send
net send /users message [/help ] [ /? ]
См. Как читать синтаксис команды, если вы не уверены, как читать синтаксис команды net send, как написано выше или показано в таблице ниже.
Параметры команды Net Send
| Item | Объяснение |
| имя | Этот параметр указывает имя пользователя, имя компьютера или имя сообщения (определяется с помощью команды net name), которому вы хотите отправить сообщение . |
| * | Используйте звездочку, чтобы отправить сообщение каждому пользователю в вашем текущем домене или рабочей группе. |
| /домен | Этот параметр можно использовать отдельно для отправки сообщения всем именам в текущем домене. |
| имя_домена | Используйте эту опцию с /domain , чтобы отправить сообщение всем пользователям в указанном доменном имени . |
| /пользователей | Этот параметр отправляет сообщение всем пользователям, подключенным к серверу, с которого выполняется команда net send. |
| сообщение | Этот параметр команды net send, очевидно, необходим и указывает точный текст сообщения, которое вы отправляете. сообщение может содержать не более 128 символов и должно быть заключено в двойные кавычки, если оно содержит косую черту. |
| /помощь | Используйте этот переключатель для отображения подробной информации о команде net send. Использование этого параметра аналогично использованию команды net help для команды net send: net help send . |
| /? | Переключатель справки также работает с командой net send, но отображает только основной синтаксис команды. Выполнение net send без параметров равнозначно использованию переключателя /? . |
Вы можете сохранить выходные данные команды net send в файле, используя оператор перенаправления с командой.
Примеры команд Net Send
net send * Пожалуйста, немедленно переходите к CR103 для обязательного собрания
В этом примере net send используется для отправки . Пожалуйста, немедленно перейдите к CR103 для сообщения об обязательном собрании всем членам * текущей рабочей группы или домена.
net send/users "Будет ли человек с открытым клиентским файлом A7/3 сохранить свою работу и закрыть ее? Спасибо!"
Здесь команда net send используется для отправки всем членам текущего сервера /users сообщения Будет ли человек с открытым клиентским файлом A7/3 сохранить свою работу и закрыть ее? Спасибо! . Сообщение в кавычках, потому что был использован слеш.
net send smithm Тебя уволили!
Хотя это совершенно непрофессиональный способ уволить кого-то, в этом примере net send команда используется для отправки Майку Смиту с именем пользователя smithm сообщения, которое он, вероятно, не хотел слышать: Ты уволен! .
Net Send связанные команды
Команда net send является подмножеством команды net и, таким образом, аналогична ее родственным командам, таким как net use, net time, net user, net view и т. Д.
Дополнительная справка по команде Net Send
Если команда net send не работает, вы можете увидеть следующую ошибку в командной строке:
'net' не распознается как внутренняя или внешняя команда, работающая программа или командный файл.
Есть два способа исправить эту ошибку, но только один – постоянное решение …
Вы можете переместить текущий рабочий каталог, указав путь к файлу cmd.exe , чтобы командная строка знала, как выполнить команду net send.Сделайте это с помощью команды cd (она обозначает изменение каталога):
cd c: windows system32
Оттуда вы можете запустить команду net send, не увидев этой ошибки. Однако это только временное решение, которое вам придется делать постоянно для каждой команды. Реальная проблема заключается в том, что текущая переменная среды не была правильно настроена.
Вот как восстановить правильную переменную среды, необходимую для командной строки, чтобы понять ваши команды в Windows XP:
-
Откройте меню Пуск и нажмите правой кнопкой мыши Мой компьютер .
-
Выберите Свойства .
-
Перейдите на вкладку Дополнительно .
-
Нажмите кнопку Переменные среды .
-
Выберите Путь из списка переменных в разделе Системные переменные .
-
Нажмите Изменить в разделе Системные переменные .
-
В текстовом поле Значение переменной найдите все пути, которые читаются точно , например:
<До> C: Windows system32
или же…
<До>% SystemRoot% system32

-
У вас должно быть только одно, но если у вас нет ни того, ни другого, перейдите в самый конец текста, введите точку с запятой, а затем введите верхний путь сверху, например:
; C: Windows system32
Один уже там? Если это так, то, скорее всего, это второй, который читает «% SystemRoot%» в начале. Если это так, измените эту часть пути на «C: Windows system32» (если ваша установка Windows находится на диске C:, что, скорее всего, верно).
Например, вы должны изменить % SystemRoot% system32 на C: Windows system32 .
Не редактируйте другие переменные. Если в этом текстовом поле нет переменных, вы можете ввести указанный выше путь без точки с запятой , поскольку это единственная запись.
Если это поможет, вы можете скопировать весь текст в Блокнот и сделать там редактирование. Когда вы закончите, просто вставьте отредактированное значение переменной обратно в это текстовое поле, чтобы перезаписать существующий текст.
-
Нажмите ОК несколько раз, чтобы сохранить изменения и выйти из окна «Свойства системы».
-
Перезагрузите компьютер.

Если команды net send работают в командной строке с «успешным» сообщением, но всплывающее окно не отображается на компьютерах, на которые отправлено сообщение, убедитесь, что на принимающих компьютерах включена служба Messenger.
Вы можете включить службу Messenger в Windows XP через Службы. Для этого перейдите в раздел Пуск > Выполнить , введите services.msc , дважды нажмите Messenger , измените Тип запуска – Автоматический , нажмите Применить , а затем нажмите Пуск .
The net send command is a Command Prompt command used to send messages to users, computers, and messaging aliases on the network. It’s one of many net commands.
Windows XP was the last version of Windows to include the net send command. The msg command replaces this command in Windows 11, Windows 10, Windows 8, Windows 7, and Windows Vista.
Net Send Command Availability
The net send command is available from within the Command Prompt in Windows XP, as well as in older versions of Windows and in some Windows Server operating systems.
The availability of certain net send command switches and other net send command syntax may differ from operating system to operating system.
Net Send Command Syntax
net send {name | * | /domain[:domainname] | /users} message [/help] [/?]
See How to Read Command Syntax if you’re not sure how to read the command syntax as it’s written above or shown in the table below.
| Net Send Command Options | |
|---|---|
| Item | Explanation |
| name | This option specifies the username, computer name, or messaging name (defined with the net name command) that you want to send the message to. |
| * | Use the asterisk to send the message to every user in your current domain or workgroup. |
| /domain | This switch can be used alone to send the message to all the names in the current domain. |
| domainname | Use this option with /domain to send the message to all the users in the specified domainname. |
| /users | This option sends the message to all the users connected to the server that the net send command is being executed from. |
| message | This net send command option is obviously required and specifies the exact text of the message you’re sending. The message can be a maximum of 128 characters and must be wrapped in double quotes if it contains a slash. |
| /help | Use this switch to display detailed information about the net send command. Using this option is the same as using the net help command with net send: net help send. |
| /? | The help switch also works with the net send command but only displays the basic command syntax. Executing net send without options is equal to using the /? switch. |
You can store the output of the net send command in a file using a redirection operator with the command.
Net Send Command Examples
Here are some examples that show how to use the net send command:
Send to All Workgroup Users
net send * Please proceed to CR103 immediately for a mandatory meeting
In this example, net send is used to send the Please proceed to CR103 immediately for a mandatory meeting message to all the members * of the current workgroup or domain.
Send to All Server Users
net send /users "Will the person with the A7/3 client file open please save your work and close it? Thank you!"
Here, the command is used to send all the members of the current server /users the message Will the person with the A7/3 client file open please save your work and close it? Thank you!. The message is in quotes because a slash was used.
Send to Specific User
net send smithm You're Fired!
While it’s a completely unprofessional way to terminate someone’s employment, in this net send example, it’s used to send Mike Smith, with the username smithm, a message he probably didn’t want to hear: You’re Fired!.
Net Send Related Commands
The net send command is a subset of the net command and so is similar to its sister commands like net use, net time, net user, net view, etc.
More Help With the Net Send Command
If this command isn’t working, you might see the following error in Command Prompt:
'net' is not recognized as an internal or external command, operable program or batch file.
There are two ways to fix this, but only one is a permanent solution…
You can move the current working directory to be System32, the path where the cmd.exe file is located, so that Command Prompt knows how to run the net send command. Do this with the cd command (it stands for change directory):
cd c:windowssystem32
From there, you can run the command without seeing that error. However, this is only a temporary solution that you’ll have to do all the time for every command. The real problem is that the current environment variable hasn’t been set up correctly.
Here’s how to restore the proper environment variable necessary for Command Prompt to understand your commands in Windows XP:
-
Open the Start menu and right-click My Computer.
-
Choose Properties.
-
Select the Environment Variables button from the Advanced tab.
-
Select Path from the list of variables in the System Variables section.
-
Choose Edit below the System Variables section.
-
In the Variable value text box, look for any paths that read exactly like this:
C:Windowssystem32or…
%SystemRoot%system32 -
You should only have one in there, but if you have neither, then go to the very end of the text, type a semicolon, and then enter the top path from above, like this:
;C:Windowssystem32Is one already in there? If so, it’s most likely the second one that reads «%SystemRoot%» at the beginning. If so, change that part of the path to be «C:Windowssystem32» (so long as your Windows installation is on the C: drive, which is most likely true).
For example, you’d change %SystemRoot%system32 to C:Windowssystem32.
If it helps, copy all the text into Notepad and do the editing there. When you’re done, just paste the edited variable value back into that text box to overwrite the existing text.
Don’t edit any other variables. If there happens to be no variables in this text box, then you can enter the above path without the semicolon since it’s the only entry.
-
Select OK a few times to save the changes and exit the System Properties window.
-
Restart your computer.
If net send commands appear to work in Command Prompt with a «successful» message, but the pop-up doesn’t show up on the computers the message is sent to, check that the receiving computers have the Messenger service enabled.
You can enable the Messenger service in Windows XP through Services: go to Start > Run, enter services.msc, double-click Messenger, change Startup type to Automatic, and then go to Apply > Start.
Thanks for letting us know!
Get the Latest Tech News Delivered Every Day
Subscribe
Microsoft Windows provides an effortless method for sending messages to other computers on the local network, called Net Send. In this article we will show you how to make the most of this feature.
How to send a message to another PC on a local network?
If you wish to send a message to another computer in your network, follow these steps:
- Start command prompt (cmd) – type cmd in the searchbox and run the app
- Type the following command as:
msg /SERVER:DestinationPC * /TIME:60 “This is the message to be sent to a PC named DestinationPC and closes in 60 seconds."
- You will need to replace DestinationPC with the name of the desired PC (you can find this in the list of computers that are currently sharing your network, if you don’t already know the PC name).
- Now, replace the value for TIME with how long you want the message to appear on the other screen for. For example TIME:30 for 30seconds
- Then replace the text between the quotation marks and the message you want to send.
- Finally, you can hit enter, and the message will be sent.
What are the alternatives for older versions of Windows?
Alternative 1
Here is the first alternative way of sending messages that may work if you have an older version of Windows. Here’s how:
- Click Start > Run.
- Type cmd, and press Enter.
- In the window that opens, type Net send followed by the computer’s name to which you wish to send the message.
- Next, enter the message. For example, the format should resemble «Net send PC01 can you read this message?»
Alternative 2
It is easy to send messages through cmd prompt to other systems here is the answer first we have to set our systems messenger ACTIVE. For it, follow these steps:
- 1. Go to RUN
- 2. Type
services.msc
- 3. Scroll down and right click on MESSENGER
- 4. Select PROPERTIES
- 5. Then for enabling it go to STARTUP TYPE and select AUTOMATIC
- 6. Then OK
And this should be performed on both sides (SENDER & RECEIVER). After that if you want to send message then do the following steps:
- 1. Go to cmd prompt
- 2. Type syntax as follows:
net send <ipaddress of reciever> <message to be send>
Ex:
net send 172.16.6.99 "hello"
Do you need more help with Windows XP? Check out our forum!
|
1 / 1 / 0 Регистрация: 07.04.2016 Сообщений: 30 |
|
|
1 |
|
|
09.12.2016, 11:59. Показов 56319. Ответов 3
Всем привет!
__________________
0 |

|
Programming Эксперт 94731 / 64177 / 26122 Регистрация: 12.04.2006 Сообщений: 116,782 |
09.12.2016, 11:59 |
|
Ответы с готовыми решениями: Аналог net send net send Net send на C++ Команда NET SEND Добавлено через 1 час 23 минуты 3 |
|
252 / 253 / 36 Регистрация: 14.08.2012 Сообщений: 1,274 |
|
|
09.12.2016, 13:03 |
2 |
|
А чем cmdшный net send не подходит?
0 |
|
1 / 1 / 0 Регистрация: 07.04.2016 Сообщений: 30 |
|
|
09.12.2016, 14:05 [ТС] |
3 |
|
Популярный ранее, а с развитием интернета — почти забытый способ общения по сети с помощью консольного приложения Net send — может быть использован только в следующих версиях Windows: 95, 98, Me, NT, 2000, 2003, XP. )))
0 |
|
252 / 253 / 36 Регистрация: 14.08.2012 Сообщений: 1,274 |
|
|
09.12.2016, 14:11 |
4 |
|
0 |
How would I send a message, for example, to all the hosts on my LAN ? In windows XP, one would use net send: net send * Hello Wold !
How is that possible in Windows 10 ? I can see that they removed this command, so is there an equivalent ?
Moreover, if I try to use msg.exe as an alternative, I get the error-message:
msgis not recognized as an internal or external command, operable
program or batch file.
asked Jun 3, 2017 at 22:03
![]()
SoutzikevichSoutzikevich
9813 gold badges13 silver badges29 bronze badges
This was already removed in Vista, but you can use msg.exe instead:
msg.exe /server:brad-dc-01 console "Your machine needs to be rebooted."
![]()
answered Jun 4, 2017 at 5:56
![]()
magicandre1981magicandre1981
27.4k5 gold badges83 silver badges124 bronze badges
5
MSG — отправка сообщений по сети: Windows 7, 8, 10
Для того, чтобы отправить сообщение по сети, на компьютеры под управлением Windows 7,8,10 используется встроенная команда msg. Ранее, в windows 2000, XP, 2003, сообщения отправляли с помощью команды net send <comp> «TEXT»
В Windows 7,8,10 net send не поддерживается, поэтому формат отправки изменился:
По умолчанию, возможность принимать сообщения от удаленного компьютера, в Windows 7,8,10 отключена. Для того, чтобы включить возможность принимать удаленные сообщения, нужно изменить параметр в реестре ПК. Открываем ветку реестра на ПК, куда будем отправлять сообщение. На Windows Server этот параметр уже включен. Также, менять реестр можно удаленно, для этого нужно включить службу «Удаленный реестр» в управлении компьютером.
! net_send
Расширение ! net_send отправляет сообщение по локальной сети.
сендингмачине
Указывает компьютер, который будет обрабатывать команду. Рекомендуется использовать это имя компьютера, на котором работает отладчик, поскольку конфигурация сети может отказаться от отправки сообщения в противном случае. Сендингмачине не должно включать начальные символы обратной косой черты ().
таржетмачине
Указывает компьютер, на который будет отправлено сообщение. Таржетмачине не должно включать начальные символы обратной косой черты ().
Отправителя
Указывает отправителя сообщения. Рекомендуется, чтобы отправитель совпадал с сендингмачине, так как конфигурация сети может отказаться от отправки сообщения в противном случае. При отображении сообщения Эта строка будет идентифицирована как отправитель сообщения.
Сообщение
Указывает само сообщение. Весь текст после параметра sender будет рассматриваться как часть сообщения, включая пробелы и кавычки, хотя точка с запятой будет завершать сообщение и начинать новую команду.
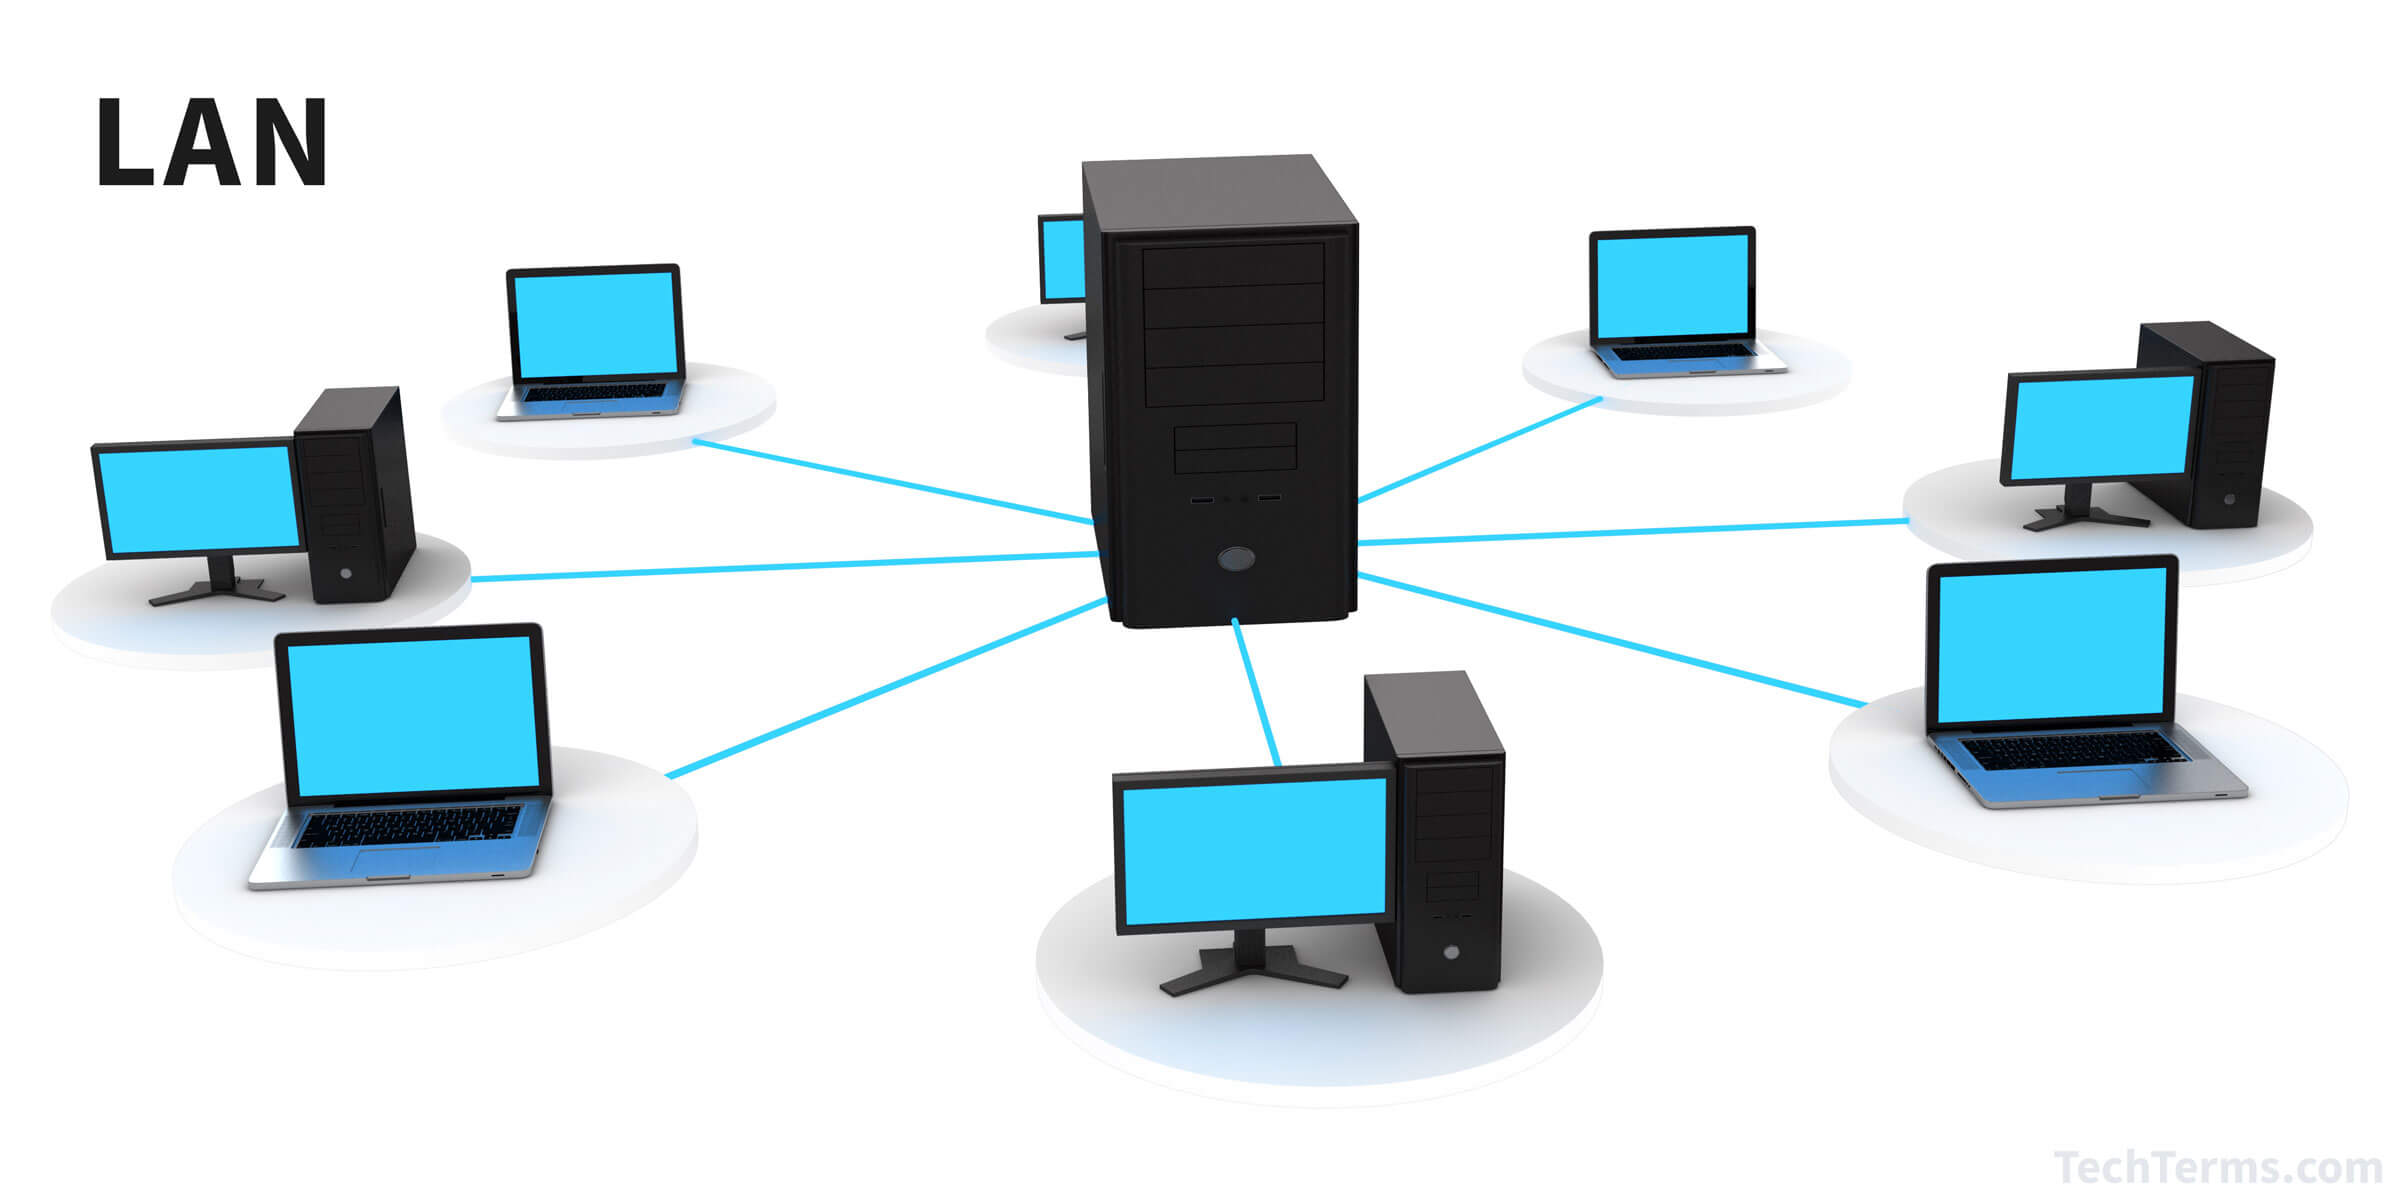
Всякий раз, когда мы работаем в нескольких системах, отправка файлов через соединение — это то, что мы предпочитаем больше всего. После того, как подключение к локальной сети делает нашу работу проще, передача файлов — это то, что усложняет наши задачи. Большую часть времени мы заканчиваем тем, что делимся файлами с самим собой по почте, так как большинство рабочих областей запрещают использование флэш-накопителей.
Совместное использование файлов по локальной сети легко, но не задача ребенка. В этой статье мы расскажем о некоторых основных методах, с помощью которых вы можете легко обмениваться файлами между системами через подключение по локальной сети.
Теперь это подключение к локальной сети может быть вашей домашней или офисной сетью, эти методы будут работать на них. Общий доступ к файлам по сети хранит файлы между пользователями общего доступа и рабочей группой. Более того, подключение внешних дисков снова и снова к разным компьютерам очень проблематично.
Для выполнения этого метода мы предлагаем вам использовать кабель Ethernet/LAN по разным причинам. Использование кабельного соединения является одним из самых старых и быстрых способов безопасной передачи данных. Использование кабеля Ethernet является очевидным выбором, самый дешевый кабель Ethernet поддерживает скорость передачи до 1 Гбит/с. Даже если для передачи данных используется USB 2.0, соединение Ethernet будет быстрым, поскольку USB 2.0 поддерживает скорость только до 480 Мбит/с.
Обмен файлами между компьютерами с использованием локальной сети
Чтобы иметь возможность передавать или обмениваться файлами между компьютерами, вам необходимо подключить их напрямую через кабель Ethernet или маршрутизатор/модем. Единственное, что вы должны иметь в виду, это то, что обе системы должны быть в одной сети. Вы можете изменить среду соединения, но метод работает на каждом соединении, если вы выполните следующие действия.
Шаги, необходимые для передачи файлов между компьютерами под управлением Windows 10 по локальной сети:
- Подключите обе системы.
- Включите и настройте общий доступ к сети в обеих системах.
- Настройте соединение LAN
- Передача файлов.
1] Подключите обе системы
Подключите обе системы к любой сети LAN или используйте кабель LAN / Ethernet для их подключения. Убедитесь, что кабели локальной сети находятся в хорошем состоянии. Если вы предпочитаете использовать беспроводную локальную сеть или беспроводную локальную сеть, убедитесь, что сила соединения хорошая.
2] Включите и настройте общий доступ к сети в обеих системах.
Выполните этот метод на обоих компьютерах, обязательно следуйте каждому шагу.
Нажмите клавиши Win + R, введите control и нажмите ввод. Панель управления откроется.
Измените вид на Большие значки и нажмите на Центр управления сетями и общим доступом.
Теперь на левой панели нажмите «Изменить дополнительные параметры общего доступа». Имейте в виду, что этот метод работает как в частной, так и в публичной сети.
В Частной сети, раздел Включение обнаружения сети и общего доступа к файлам и принтерам.
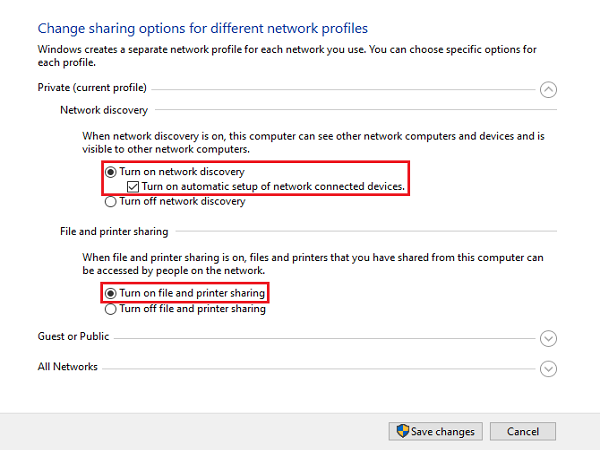
Выполните вышеуказанный шаг для гостевой или общедоступной сети, если для вашей сети установлено значение «Публичная».
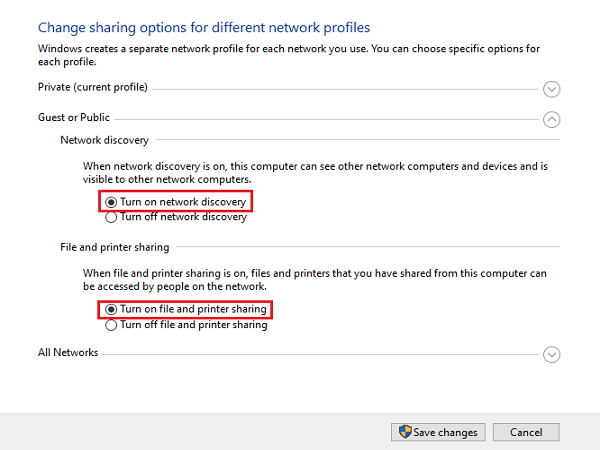
Чтобы проверить, к какому типу подключения вы подключены, ваша система отображает «текущий профиль» перед типом подключения, к которому вы подключены.
Теперь в разделе «Все сети» в разделе «Подключение к файлу» выберите 128-битное шифрование.
Вы можете включить или отключить защиту паролем в соответствии с вашими предпочтениями.
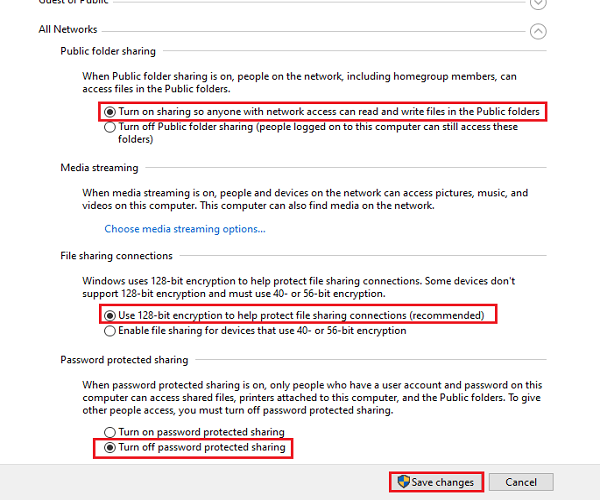
Теперь нажмите Сохранить изменения.
3] Настройка подключения к локальной сети
Настройка локальной сети не имеет большого значения, если вы понимаете, как устанавливать IP-адреса. В этом методе мы не собираемся устанавливать какие-либо IP-адреса, но мы выберем их получение автоматически. Установка этих IP-адресов вручную требует базового понимания того, как они работают.
Нажмите клавиши Win + R, введите control и нажмите ввод. Панель управления откроется.
Измените вид на Большие значки и нажмите на Центр управления сетями и общим доступом.
Теперь на левой панели нажмите «Изменить настройки адаптера».
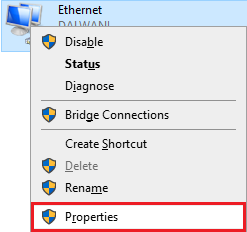
Щелкните правой кнопкой мыши сеть, к которой вы в данный момент подключены, затем выберите Свойства. Если соединение осуществляется через кабель, выберите Ethernet или, если подключение беспроводное, выберите беспроводное.
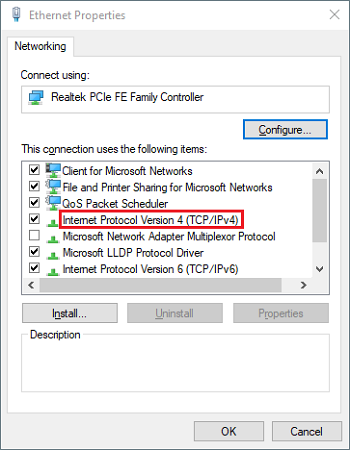
Теперь прокрутите вниз и дважды щелкните по интернет-протоколу версии 4 (TCP / IPv4).
На вкладке Общие выберите Получить IP-адрес автоматически. Теперь выберите Получить адрес DNS-сервера автоматически.
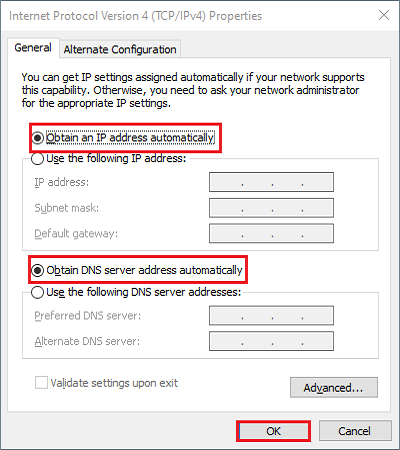
Нажмите OK и закройте свойства соединения.
Примечание. Если вы работаете в организации, где сети настраиваются любым уполномоченным лицом, вы можете воспользоваться его / ее помощью.
4] Передача файлов
Теперь для передачи или обмена файлами между компьютерами вы можете сделать это довольно легко.
Соберите все файлы, которые вы хотите поделиться в папке.
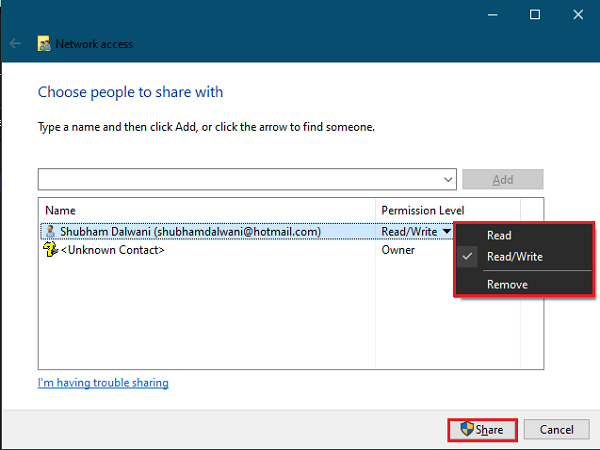
Щелкните правой кнопкой мыши по папке и выберите «Предоставить доступ».
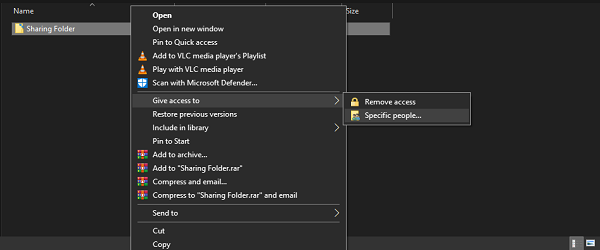
Теперь нажмите на конкретных людей.
Выберите пользователя, которому вы хотите поделиться файлами, измените уровень разрешений в соответствии с вашими требованиями и нажмите «Поделиться».
Перейдите в систему, с которой вы только что поделились папкой. В системе откройте этот компьютер и перейдите к сети с левой панели, чтобы увидеть нет. подключенных сетевых устройств.
Выберите устройство, с которого вы только что поделились файлами, и вы увидите папку с файлами, к которой вы предоставили общий доступ.
Совет: Использование кабелей Ethernet для этого типа общего доступа гораздо предпочтительнее по сравнению с беспроводной сетью. Колебания сигналов Wi-Fi могут привести к невозможности обнаружения устройства.