master-20221109063121-8fdfc5e: Merge pull request #101 from nelenkov/renovate/gradle-7.x
chore(deps): update dependency gradle to v7.5
master-20221009063057-8fdfc5e: Merge pull request #101 from nelenkov/renovate/gradle-7.x
chore(deps): update dependency gradle to v7.5
master-20220909063044-8fdfc5e: Merge pull request #101 from nelenkov/renovate/gradle-7.x
chore(deps): update dependency gradle to v7.5
master-20220809063558-8fdfc5e: Merge pull request #101 from nelenkov/renovate/gradle-7.x
chore(deps): update dependency gradle to v7.5
master-20220809062938-33a2f6c: Merge pull request #99 from nelenkov/renovate/github-codeql-action-2.x
chore(deps): update github/codeql-action action to v2
master-20220709062836-33a2f6c: Merge pull request #99 from nelenkov/renovate/github-codeql-action-2.x
chore(deps): update github/codeql-action action to v2
master-20220609062817-33a2f6c: Merge pull request #99 from nelenkov/renovate/github-codeql-action-2.x
chore(deps): update github/codeql-action action to v2
master-20220517081023-33a2f6c: Merge pull request #99 from nelenkov/renovate/github-codeql-action-2.x
chore(deps): update github/codeql-action action to v2
master-20220509062753-07bb660: Merge pull request #98 from nelenkov/renovate/gradle-7.x
chore(deps): update dependency gradle to v7.4.2
master-20220409062712-07bb660: Merge pull request #98 from nelenkov/renovate/gradle-7.x
chore(deps): update dependency gradle to v7.4.2
License
Apache License V2.0

Bidlogix provide auction software to auction houses around the globe.
We offer timed auction software, webcast auction software along with an optional invoicing management system.
Our software is embedded on your site with fully customisable styling.
Based in Brighton, UK Bidlogix started providing auction software in 2013. Our 2 in-house development teams are constantly evolving the product with in excess of 10 auctions per day being run using our software.
Our software can cater for the largest of auctions, all in real-time and can support multiple languages.
User Ratings
4.9
out of 5 stars
★★★★★
★★★★
★★★
★★
★
ease
1 of 5
2 of 5
3 of 5
4 of 5
5 of 5
4 / 5
features
1 of 5
2 of 5
3 of 5
4 of 5
5 of 5
4 / 5
design
1 of 5
2 of 5
3 of 5
4 of 5
5 of 5
4 / 5
support
1 of 5
2 of 5
3 of 5
4 of 5
5 of 5
4 / 5
User Reviews
- All
- ★★★★★
- ★★★★
- ★★★
- ★★
- ★
-
Great project — thanks so much for posting it — works perfectly.
-
Very good program. One remark though, please make sure users do not need to provide their passwords in the command line, which makes it visible to everybody…
Read more reviews >
Additional Project Details
User Interface
Console/Terminal, Command-line
Programming Language
Unix Shell, Perl, Java
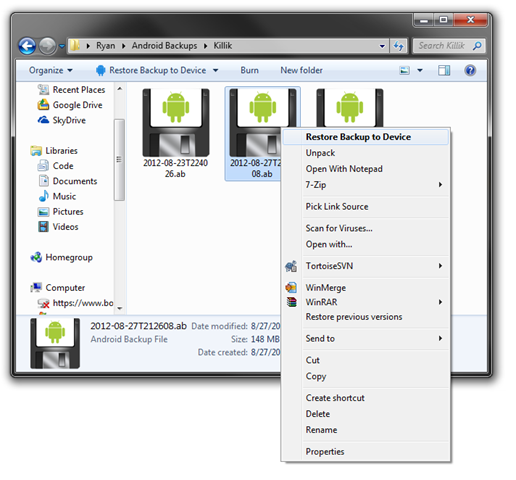
Utility to extract and repack Android backups created with adb backup (ICS+). Largely based on BackupManagerService.java from AOSP.
Requires Java 11. Handling encrypted backups requires the JCE unlimited strength jurisdiction policy (not needed if using current Java 9 release).
With Eclipse:
Download the latest version of Bouncy Castle Provider jar (bcprov-jdk15on-*.jar) from here:
Drop the latest Bouncy Castle jar in lib/, import in Eclipse and adjust build path if necessary. Use the abe script to start the utility.
With Maven (requires at least JDK11):
To create a self-executable all-in-one jar: mvn clean package and then:
java -jar target/abe.jar pack|unpack|pack-kk ...
With Ant:
Use the bundled Ant script to create an all-in-one jar and run with: (you still need to put the Bouncy Castle jar in lib/; modify the bcprov.jar property accordingly)
java -jar abe.jar pack|unpack|pack-kk ...
(Thanks to Jan Peter Stotz for contributing the build.xml file)
With Gradle:
Use gradle to create an all-in-one jar: ./gradlew and then:
java -jar build/libs/abe-all.jar pack|unpack|pack-kk ...
Syntax:
- unpack:
abe unpack <backup.ab> <backup.tar> [password] - pack:
abe pack <backup.tar> <backup.ab> [password] - pack for 4.4:
abe pack-kk <backup.tar> <backup.ab> [password](creates version 2 backups, compatible with Android 4.4.3)
If the filename is -, then data is read from standard input or written to standard output.
If the password is not given on the command line, then the environment variable ABE_PASSWD is tried. If you don’t specify a password the backup archive won’t be encrypted but only compressed.
Packing tar archives
- Android is very particular about the order of files in the tar archive. The format is described here.
- Incompatible tar archives lead to errors or even system crashes.
- Apps with the
allowBackupflag set tofalseare not backed up nor restored.- (you can try restoring manually via
adb pushandadb shell)
- (you can try restoring manually via
- Errors are only printed to logcat, look out for
BackupManagerService.
The safest way to pack a tar archive is to get the list of files from the original backup.tar file:
tar tf backup.tar | grep -F "com.package.name" > package.list
And then use that list to build the tar file. In the extracted backup directory:
tar cf restore.tar -T package.list
You can now pack restore.tar and try adb restore restore.ab
Я выполнял резервное копирование своего Nexus 7 с помощью adb backupрезервного копирования всех файлов в зашифрованную резервную копию. Я вижу, что вы можете восстановить из резервной копии с помощью adb restore, но это сотрет все мои существующие данные на устройстве.
Как именно я могу извлечь данные одного приложения из этого зашифрованного файла резервной копии?
Ответы:
Просто для справки других, вот некоторые сведения о формате файла .ab.
Файл Android Backup (* .ab) представляет собой сжатый файл TAR . Он сжимается с использованием алгоритма DEFLATE . Кроме того, может быть использовано шифрование AES . Это определяется при создании резервной копии, если вы вводите пароль, то резервная копия шифруется, в противном случае; нет шифрования, оно только сжато.
ЗАГОЛОВОК файла немного отличается от обычного архива DEFLATE. Он содержит информацию о резервной копии и выглядит следующим образом:
ANDROID BACKUP
1
1
none
Первая строка — это «Волшебная» строка . Следующая строка — версия формата файла Android Backup. Следующая строка — логическое значение (true или false, 1 или 0), указывающее, сжат ли файл. Последняя строка — это тип шифрования. Этот пример не использует шифрование. Если был пароль, в строке было бы написано «AES-256». После этого идет шифрование. Если пароля нет, то запускается «архив» DEFLATE.
Он сжимается с помощью Java Deflater . Что, с точки зрения разработчика, вызывает проблемы, если вы хотите использовать что-то кроме Java для его извлечения. Я не смог найти ничего, что могло бы спустить это с помощью того же алгоритма, хотя все, что я нашел (например, C #), должно следовать «SPEC».
С учетом вышесказанного , существует проект с открытым исходным кодом под лицензией Apache 2.0, написанный Николаем Еленковым , который позволит вам извлечь .ab в файл tar.
Использование:
java -jar abe.jar unpack <backup.ab> <backup.tar> <password>
Если вы не уверены, как на самом деле использовать это (что выходит за рамки этого ответа), следующая версия Droid Explorer v0.8.8.7 ( доступна здесь ) позволит вам сделать именно это, и даже больше, прямо из Explorer. Вы можете прочитать больше о функциях в моем блоге (да, я знаю, бесстыдный плагин. Я делаю это, когда это соответствует вопросу)
Или с одним вкладышем:
( printf "x1fx8bx08x00x00x00x00x00" ; tail -c +25 backup.ab ) | tar xfvz -
Еще один вариант заключается в использовании bash, catи gunzip( gzip).
Полный процесс может быть таким ( с незашифрованной резервной копией ):
-
резервное копирование данных одного приложения (например, « Переопределить DNS для KitKat »):
$ adb backup -f net.mx17.overridedns.ab -noapk net.mx17.overridedns Now unlock your device and confirm the backup operation. -
извлечь сжатые данные
$ dd if=net.mx17.overridedns.ab bs=1 skip=24 > compressed-data 1285+0 records in 1285+0 records out 1285 bytes (1,3 kB) copied, 0,00745877 s, 172 kB/s -
распаковать сжатые данные
$ printf "x1fx8bx08x00x00x00x00x00" | cat - compressed-data | gunzip -c > decompressed-data.tar gzip: stdin: unexpected end of file -
«распаковать» файл tar
$ tar xf decompressed-data.tar
Другой вариант — использование Perl AdbBackupRoutines из этого потока XDA . У них есть несколько требований, хотя: Perl , очевидно, плюс libterm-readkey-perl, libcrypt-cbc-perlи libcrypt-pbkdf2-perl(если ваши резервные копии в незашифрованном виде, вы можете пропустить последнюю зависимость просто закомментировать строки 103 , backupdecrypt.plгде он включен — работал нормально для меня).
Использование довольно просто:
./backupdecrypt.pl [options] <backupfile.ab> <outfile.tar>
Полученный .tarфайл затем может быть исследован, как и любой другой архив. Его структура весьма интересна, по крайней мере, в одном аспекте: она не отражает реальные пути, откуда были взяты файлы (например, нет /data/data/com.app.name/databases/whatever.db, но вместо этого apps/com.app.name/db/whatever.db), что указывает на то, что резервная копия приложения на одном устройстве / ПЗУ может быть восстановлена в Любое другое устройство / ПЗУ без проблем, так как сам adb restoreдолжен выяснить реальные пути.
Основываясь на информации, полученной от других, теперь я знаю, что файл резервной копии является просто потоком с префиксом Deflated (GZip), на основе этой информации эта простая программа может распаковать его для вас:
import java.io.*;
import java.util.zip.*;

/** Run: javac unab.java && java unab backupfile.ab */
public class unab {
    private static final int BACKUP_HEADER_LENGTH = 24;
    public static void main(String[] args) throws IOException {
        InputStream in = new FileInputStream(args[0]);
        try {
            OutputStream out = new FileOutputStream(args[0] + ".tar");
            try {
                if (in.skip(BACKUP_HEADER_LENGTH) != BACKUP_HEADER_LENGTH) {
                    throw new IOException("Unexpected end of file while skipping backup header.");
                }
                byte[] buffer = new byte[100 * 1024];
                int count;
                InputStream zip = new InflaterInputStream(in);
                while ((count = zip.read(buffer)) > 0) {
                    out.write(buffer, 0, count);
                }
            } finally {
                out.close();
            }
        } finally {
            in.close();
        }
    }
}
Я написал это, потому что у меня нет ни одного из инструментов Unix, упомянутых выше, и это было проще, чем установить Cygwin или другие инструменты.
Преимущества :
- кросс-платформенный
- простой (без эзотерических параметров)
- нет необходимости в инструментах для обвязки
Недостатки :
- нужен JDK (который у вас, вероятно, уже есть, потому что вы возитесь с Android SDK)
- нет поддержки зашифрованных резервных копий
- нужно что-то, чтобы извлечь полученный файл tar (я использую Total Commander)
Для этого создайте инструмент командной строки unab.batс содержимым: java -cp "%~dp0." unab %*и каталогом PATH.
25 August 2017
Following on from last weeks post, this post is going to look
at extracting backup files using dd and Android backup
extractor.
Using dd for unencrypted backups
If the file is not encrypted dd can and be used to extract the data. You can
quickly verify if the file is encrypted by checking the header. The header of
unencrypted files will look similar to the following:
ANDROID BACKUP
1
1
none
The first line indicates the file is an Android backup, the second line is the
backup format version, the third line indicates if the backup is compressed,
and finally the last line is the type of encryption used. As long as the last
line is none and not AES-256 the following steps should work:
-
Extract the data from the backup using
dd:dd if=backup.ab bs=1 skip=24 of=data -
If the file was compressed use
opensslto decompress the data:openssl zlib -d -in data -out data.tarNote: if you don’t have
opensslinstalled, or if it was not
compiled withzlibsupport, gzip can be used instead:printf "x1fx8bx08x00x00x00x00x00" | cat - data | gzip -dc > data.tarAlternatively you can use the
zlibmodule in Python:python -c "import zlib;open('data.tar','wb').write(zlib.decompress(open('data', 'rb').read()))" -
Finally the files in the backup can be extracted using tar:
tar xvf data.tar
The steps above can be run in one go with a command similar to the following:
dd if=backup.ab bs=1 skip=24 | openssl zlib -d | tar xvf -
Android backup extractor
More recent versions of Android use encryption when creating backups. As a
result the method above using dd doesn’t work. There is however a tool called
Android backup extractor which can be used
to unpack encrypted backups.
Installation
Android backup extractor can be installed with the following steps:
-
Install
java,antandgit, on CentOS this can be done withyum:sudo yum install -y java ant git -
Clone the source from GitHub:
git clone https://github.com/nelenkov/android-backup-extractor.git -
Switch to the
android-backup-extractordirectory:cd android-backup-extractor -
Download the latest version of the Bouncy Castle
library:curl -L https://www.bouncycastle.org/download/bcprov-jdk15on-158.jar -o lib/bcprov-jdk15on-158.jar -
Update
build.xmlto use the correct version of the Bouncy Castle library:sed -i 's/bcprov-jdk15on-150.jar/bcprov-jdk15on-158.jar/' build.xml -
Run
antto build the source code:antIf everything went well the output of
antshould look similar to the following:$ ant Buildfile: /home/user/android-backup-extractor/build.xml build: [javac] Compiling 2 source files to /home/user/android-backup-extractor/build [javac] warning: [options] bootstrap class path not set in conjunction with -source 1.7 [javac] 1 warning jar: [jar] Building jar: /home/hmm/android-backup-extractor/abe.jar all: BUILD SUCCESSFUL Total time: 3 seconds
Unpacking files
Once Android backup extractor is installed, backup files can be unpacked with
the following command:
abe unpack <backup.ab> <backup.tar> [password]
This will write the data to a tar file and produce output similar to the
following:
$ ./abe unpack backup.ab output.tar secret_password
Calculated MK checksum (use UTF-8: true): E612441F07EABF08AA761C3EC0C75EB102E3D36B8CC1ED54CC7F5E56A049C838
0% 1% 2% 3% 4% 5% 6% 7% 8% 9% 10% 11% 12% 13% 14% 15% 16% 17% 18% 19% 20% 21% 22% 23% 24% 25% 26% 27% 28% 29% 30% 31% 32% 33% 34% 35% 36% 37% 38% 39% 40% 41% 42% 43% 44% 45% 46% 47% 48% 49% 50% 51% 52% 53% 54% 55% 56% 57% 58% 59% 60% 61% 62% 63% 64% 65% 66% 67% 68% 69% 70% 71% 72% 73% 74% 75% 76% 77% 78% 79% 80% 81% 82% 83% 84% 85% 86% 87% 88% 89% 90% 91% 92% 93% 94% 95% 96% 97% 98% 99% 100%
1730560 bytes written to output.tar.
Note: you can also run abe indirectly using java and the -jar option:
java -jar abe.jar unpack backup.ab output.tar secret_password