In this tutorial, we will discuss all the steps required to install Android Platform Tools and SDK Manager on Windows 10. This tutorial provides the steps for Windows 10, though the steps should be the same on other versions of Windows.
This post is useful for the developers using Android Platform Tools and SDK manager without installing Android Studio for the use cases including hybrid app development using Ionic. It also assumes that a valid JAVA_HOME environment variable exists pointing to the installation directory of Java.
You can follow How To Install Java 8 On Windows 10, How To Install Java 11 On Windows, How To Install Java 15 On Windows, or How To Install OpenJDK 15 On Windows to install Java on Windows. In case you are interested in developing Android applications using Android Studio, you can also follow How To Install Android Studio On Windows.
Step 1 — Download SDK Tools
Open the download tab of Android Studio and scroll down to the Command line tools only section. This section shows various options to download the SDK tools as shown in Fig 1.

Fig 1
Click the first link having the download option for Windows as highlighted in Fig 1. It will ask to accept to terms and conditions as shown in Fig 2.

Fig 2
Go through the details, agree on the terms and conditions and click the Download Button to start the download.
Step 2 — Install Command Line Tools
In this step, we will install the Android Command Line Tools on Windows 10. Create the directory android-sdk at your preferred location and extract the content of the downloaded SDK Tools zip to this directory. Make sure that the extracted content is available within the android-sdk directory created by us as shown in Fig 3.

Fig 3
Step 3 — Install Platform Tools
In this step, we will install the Android Platform Tools on Windows 10. Follow the same steps similar to Android SDK Tools to install Android Platform Tools using the download link as shown in Fig 4, Fig 5, and Fig 6.

Fig 4

Fig 5

Fig 6
Step 4 — Configure Environment Variable
Right-click the My Computer or This PC on the desktop and click the Properties Option. Now click the Advanced system settings. It will show the System Properties dialog having Advanced Tab options as shown in Fig 7.

Fig 7
Click the Environment Variables Button and click the New Button in the first section. Set the Variable Name field to ANDROID_HOME and Variable Value to the android-sdk directory created by us in the previous step.
Similarly, also configure the environment variable ANDROID_SDK_ROOT to the android-sdk directory.
Also, make sure that the JAVA_HOME environment variable is set to the JDK installation directory. It must not end with the bin as we do with the system path variable.

Fig 8
Step 5 — Configure Commands
In previous steps, we have downloaded and extracted the Command Line Tools and Platform Tools to the android-sdk directory. Both the tools provide several command-line utilities which we need to run by going to the appropriate directory having the executable files.
We can make these commands available at the system level without going to these directories by adding the path to tools, toolsbin, and platform-tools to the system path as shown in Fig 9. Make sure that these executables do not break other commands having the same name before adding these paths to the PATH environment variable.

Fig 9
Now open the Command Prompt and check the ADB and SDK Manager versions as shown in Fig 10. You might be required to restart the system to apply the environment variables set by us.
# Check adb version
adb --version# It must show the installed adb version
Android Debug Bridge version 1.0.41
Version 31.0.0-7110759
Installed as E:toolsjavaandroid-sdkplatform-toolsadb.exe# Check sdkmanager version
sdkmanager --version# It will show the error as shown below
Error: Could not determine SDK root.
Error: Either specify it explicitly with --sdk_root= or move this package into its expected location: <sdk>cmdline-toolslatest
We can see that the ADB command works well and shows the version details, but the sdkmanager shows an error — «error: could not determine sdk root. error: either specify it explicitly with —sdk_root= or move this package into its expected location: <sdk>cmdline-toolslatest» since it expects the Command Line Tools in a version-specific directory. Now open the source.properties file from the cmdline-tools directory to check the version. It will show the version details as shown below.
Pkg.Revision=3.0
Pkg.Path=cmdline-tools;3.0
Pkg.Desc=Android SDK Command-line Tools
Now move all the files to the directory cmdline-tools/3.0 as shown in Fig 10.

Fig 10
Also, update the system path as shown in Fig 11.

Fig 11
Now close and open the Command Prompt. Also, check the ADB and SDK Manager versions as shown in Fig 12.

Fig 12
Step 6 — Using the SDK Manager
List — We can list the installed and available packages and images using the list command as shown below.
// List all the installed and available platforms, system images and other resources
sdkmanager --list// Output should look like
Installed packages:=====================] 100% Computing updates...
  Path           | Version | Description                   | Location
  -------        | ------- | -------                       | -------
  platform-tools | 31.0.0  | Android SDK Platform-Tools 31 | platform-toolsAvailable Packages:
  Path                                                                                     | Version      | Description
  -------                                                                                  | -------      | -------
  add-ons;addon-google_apis-google-15                                                      | 3            | Google APIs
...
...// We can see that it shows the tools and platform-tools installed by us
Install Platform — Use the below-mentioned command to install the Android 10 (API level 30) using the SDK manager.
# Go to the SDK Tools bin directory to access sdkmanager
# Start download the most recent package
sdkmanager "platforms;android-30"
It will ask to accept the terms and conditions as shown in Fig 13. Enter y and hit Enter Key to accept the terms and conditions. This command creates the directory platforms within android-sdk and installs the package android-30 having all the required files to run the emulator for Android 10.

Fig 13
If we again check the installed packages, the list command shows the installed options as shown below.
sdkmanager --list
Installed packages:=====================] 100% Computing updates...
  Path                 | Version | Description                   | Location
  -------              | ------- | -------                       | -------
  platform-tools       | 31.0.0  | Android SDK Platform-Tools 31 | platform-tools
  platforms;android-30 | 3       | Android SDK Platform 30       | platformsandroid-30Available Packages:
  Path                                                                                     | Version      | Description
  -------                                                                                  | -------      | -------
  add-ons;addon-google_apis-google-15                                                      | 3            | Google APIs
  add-ons;addon-google_apis-google-16                                                      | 4            | Google APIs
...
...
Update SDK Manager — Update the SDK manager using the below-mentioned command.
sdkmanager --updateAdd System Image — We can add system images from available images shown by the list command using the SDK manager as shown below. We are adding the most recent default 64-bit system image.
// Install default system image for platform android-30
sdkmanager "system-images;android-30;google_apis;x86_64"
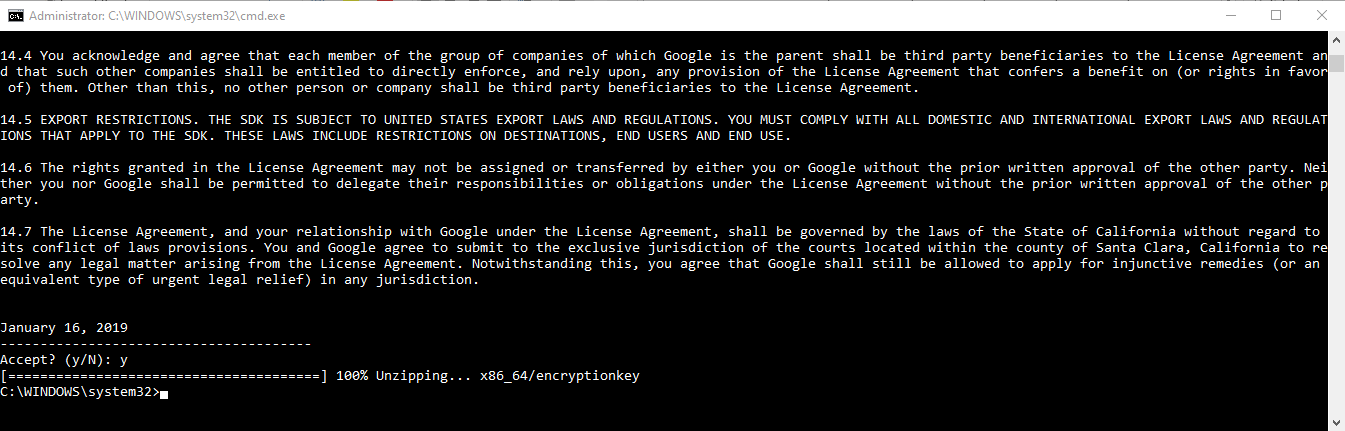
Accept the License Agreement to complete the download.
There are several projects which need Google Play Services. We need system images specific to Google Play Services as shown below.
// Install Google Play Services system image
sdkmanager "system-images;android-30;google_apis_playstore;x86_64"
Accept the License Agreement to complete the download.
Install Emulator — We need to install the emulator before creating the AVD using SDK Manager.
// Install Emulator
sdkmanager --channel=3 emulator
Accept the License Agreement to complete the download.
Install Build Tools — Install the most recent build tool listed by the list command.
// Install Build Tools
sdkmanager "<build tools version>"// Example
sdkmanager "build-tools;30.0.3"
Step 7 — Using the Emulator and AVD Manager
Create Android Emulator — Create the emulator using the system image downloaded in the previous step as shown below. Replace <emulator name> with the actual name preferred by you.
// Create the emulator using default system image
avdmanager create avd -n <emulator name> -k "system-images;android-30;google_apis;x86_64" -g "google_apis"// Example:
avdmanager create avd -n emulator30 -k "system-images;android-30;google_apis;x86_64" -g "google_apis"// Create emulator using Google Play Services system image
avdmanager create avd -n <emulator name> -k "system-images;android-30;google_apis_playstore;x86_64"// Example:
avdmanager create avd -n emulator30ps -k "system-images;android-30;google_apis_playstore;x86_64"
The above commands ask a bunch of questions to configure the AVD if we choose the custom hardware profile option. We have excluded the details of these options from this tutorial since these configuration details depend on the actual needs. After completing all the configurations, it creates the AVD using the name provided by us while configuring it.
Similarly, we can also install the AVD of older versions as shown below.
// Create the emulator using default system image
avdmanager create avd -n <emulator name> -k "system-images;android-29;default;x86_64" -g "default"// Example:
avdmanager create avd -n emulator29 -k "system-images;android-29;default;x86_64" -g "default"// Create emulator using Google Play Services system image
avdmanager create avd -n <emulator name> -k "system-images;android-29;google_apis_playstore;x86_64"// Example:
avdmanager create avd -n emulator29ps -k "system-images;android-29;google_apis_playstore;x86_64"
List Android Emulators — Now go to the tools directory on the command line and check the installed platform as shown below.
Notes: Add Emulator to the system path as shown in Fig 14.

Fig 14
Close and re-open the Command Prompt to check the AVDs created by us in the previous steps.
// List the available emulators
emulator -list-avds// Output
default28
emulator30
emulator30ps
It will list all the AVDs installed by us.
Run Emulator — We can run the emulator created by us as shown below.
// Run Emulator
emulator -avd <emulator name>// Example
emulator -avd emulator30
The emulator will take some time to completely launch the AVD. The final results should look similar to Fig 15.

Fig 15
Delete Emulator — We can also delete an existing emulator as shown below.
// Delete Emulator
avdmanager delete avd -n <emulator name>
Summary
This tutorial provided all the steps required to install Android Platform Tools and Android SDK Manager on Windows 10. It also provided the steps required to create and launch the AVDs using the Emulator.
Setup Android Cmd-line Tools in Windows
The purpose of this article is to help a system administrator in setting up Android command-line tools on a Windows computer so that anyone can use Android emulator and other command-line tools without having to install complete Android Studio SDK. This will save the disk space on a system if the user need to use cmdline tools only and does not need a full-blown android studio development environment.
Downloading and installing Java JDK
- Download and install the latest version of Java JDK using following link:
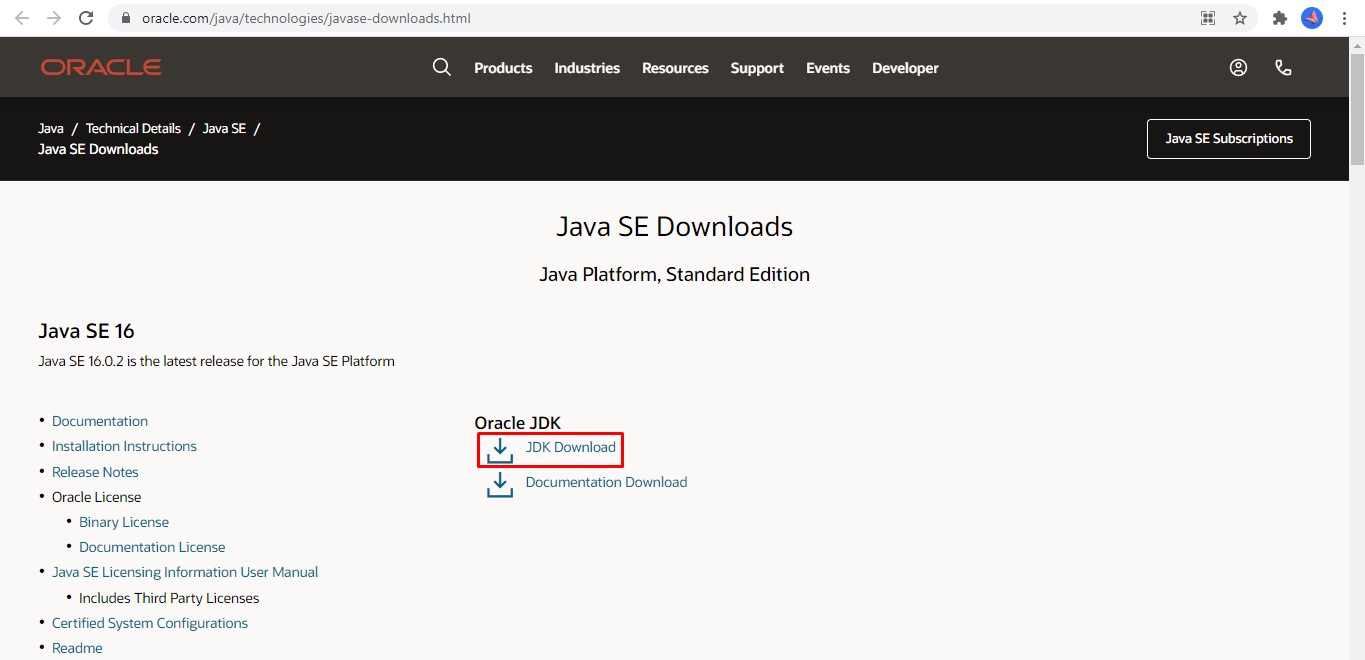
https://www.oracle.com/java/technologies/javase-downloads.html
- Click on JDK Download
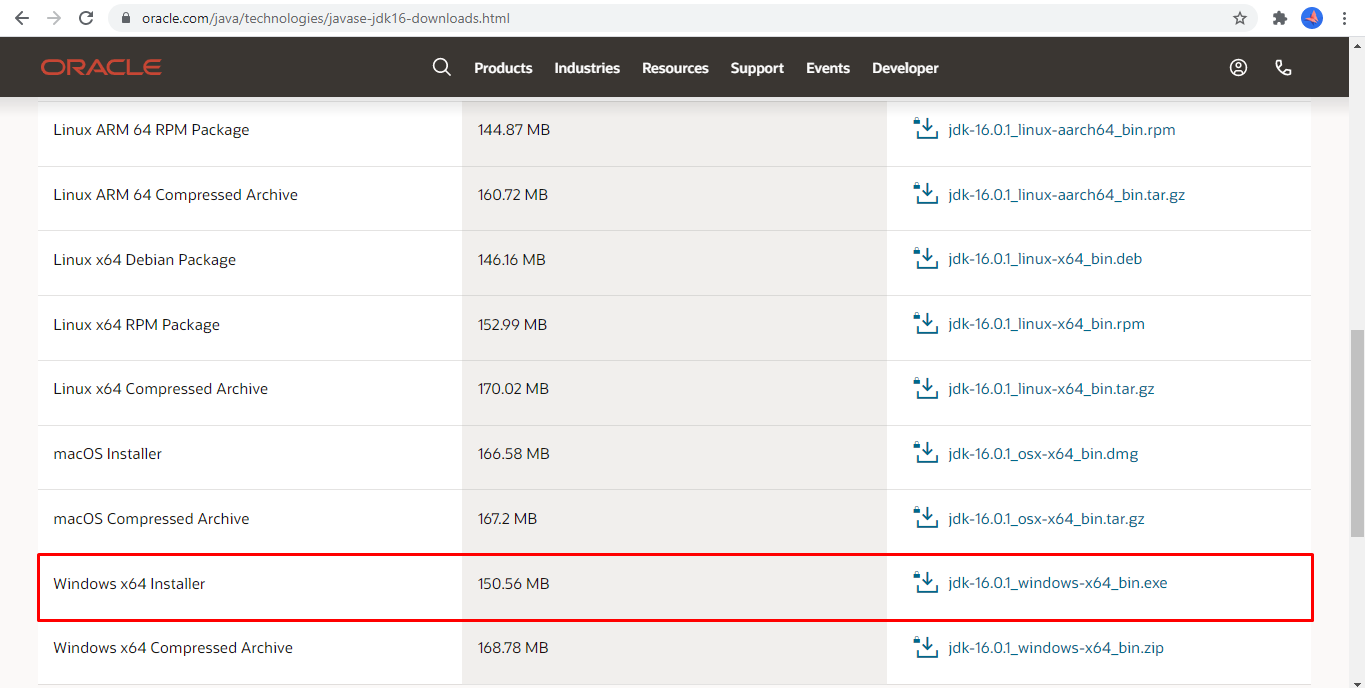
- On downloads page, scroll down and click on download link next to Windows x64 Installer.
- This will open a popup with a checkbox and a download button. You need to check the box but do not directly click the download button here since this will take you to a login page. Instead, right click on the button and select Copy link option from context menu.
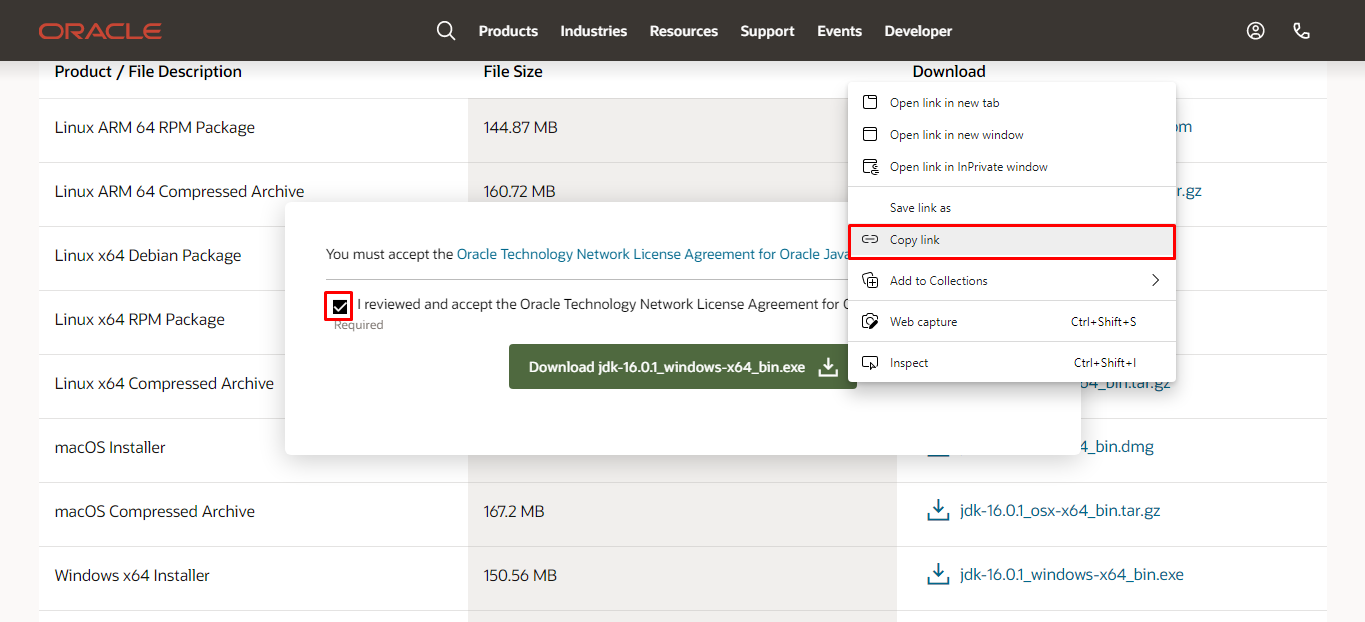
- Open a text editor, paste the copied link, and change the download link as shown in following image.

You just need the URL highlighted in red and then modify the text where it says “otn” to “otn-pub” and then paste the modified link (highlighted green) in browser address bar. This will start the download.
Please note that the commercial use of Oracle JDK may require a valid license to be purchased. If you don’t want to purchase a license, you could use OpenJDK as discussed in this article.
- When the download is completed, install the JDK to default location.

Downloading and installing Android command-line tools
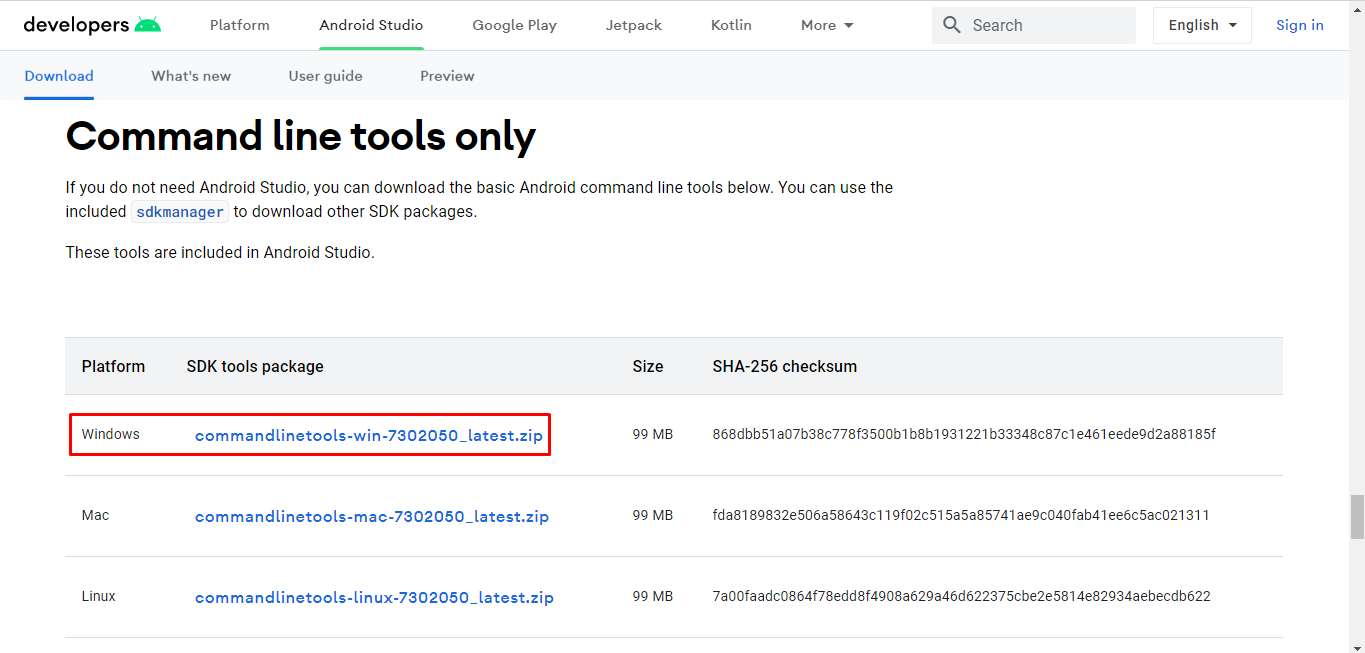
- Open the following link in browser and click on Download Options button:
https://developer.android.com/studio

- Scroll down to Command line tools only section and click on the download link next to Windows. This will download a zip file.
- The latest version of cmdline-tools has some issues and it is rarely documented how to fix these issues. So please follow the next steps exactly the same way as mentioned:
- Open run dialog (press windows logo key + R), type the following path and hit enter:
C:UsersSurenderAppDataLocal
Make sure you change your username.
- Now create a new folder named Android and inside that create another folder named cmdline-tools and inside that create another folder named tools. So, in the end you will have:
C:UsersSurenderAppDataLocalAndroidcmdline-toolstools
- Now open the zip file downloaded in step 2 with 7-zip. Many users reported the issues when used inbuilt zip utility of windows to extract the downloaded zip file. So, we will use 7-zip (a free tool) to extract the zip file. You can download the 7-zip utility from https://www.7-zip.org/download.html
- In 7-zip manager, you will see a folder named cmdline-tools.
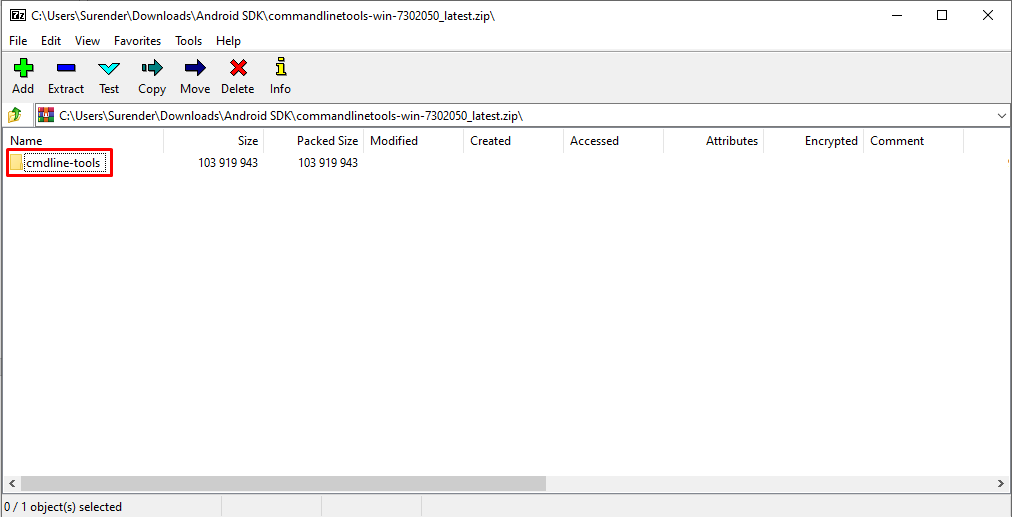
- Double click on cmdline-tools folder to go inside. Now you will see 4 items (bin, lib, NOTICE.txt, and source.properties).
Click on the extract button and paste the “C:UsersSurenderAppDataLocalAndroidcmdline-toolstools” path in Copy to field and click OK. Again, make sure you change your username.
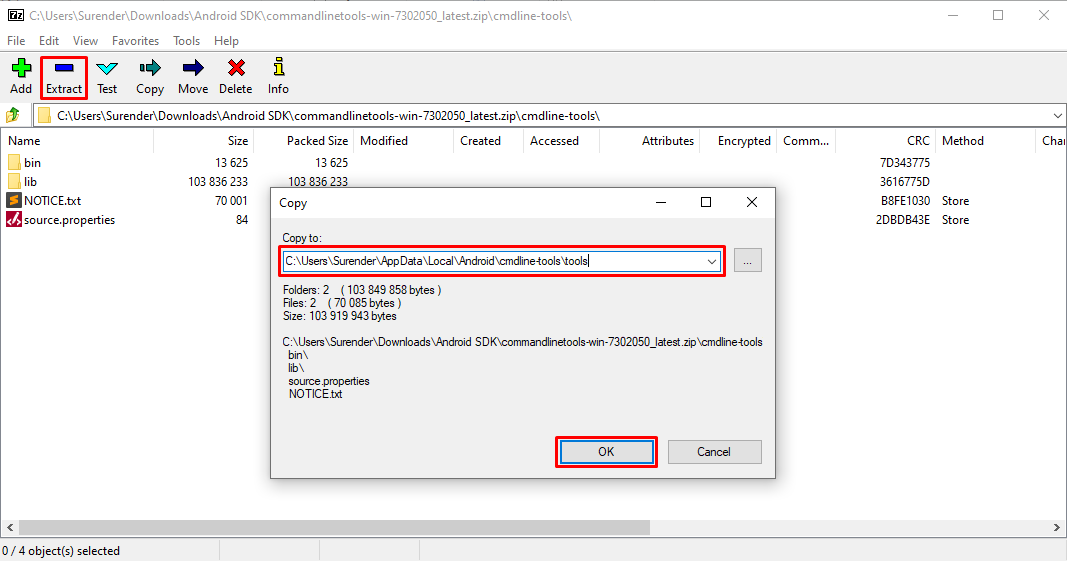
- Open the directory where you extracted the files. Now rename the folder named “bin” to “latest”. So, in the end you will have directory structure as shown in following image:
C:UsersSurenderAppDataLocalAndroidcmdline-toolstoolslatest

- You can copy this path as you will need this in next section while setting up environment variables.
Setting up environment variables
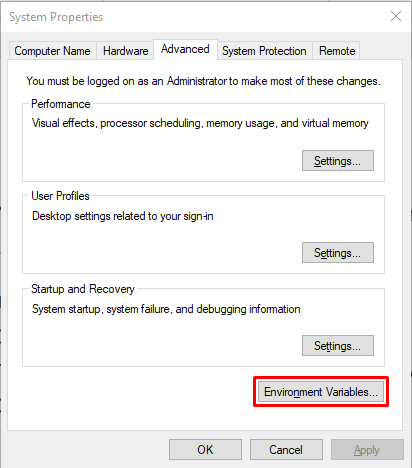
- Open run dialog (press windows logo key + R).
- Type “sysdm.cpl ,3” without quotes to open advanced system properties.
- Click on Environment Variables
-
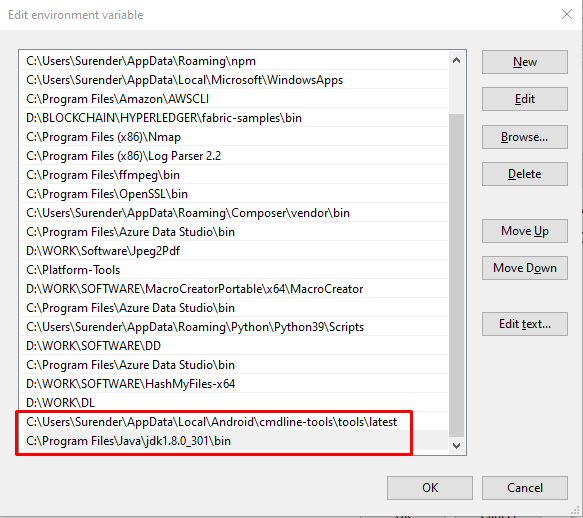
- Under User variables section, select Path and click on Edit
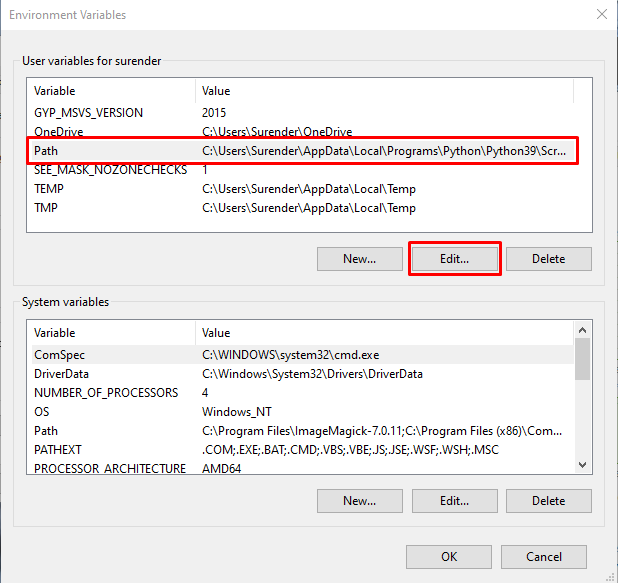
- Now click on New and paste the path that you copied from step 10 from previous section.
C:UsersSurenderAppDataLocalAndroidcmdline-toolstoolslatest
-
- Repeat step 5 again to add the environment variable for Java JDK you installed initially. For your reference, on my PC JDK was installed in C:Program FilesJavajdk1.8.0_301bin, So, I will copy this path.
- Now click on OK twice and you are good to go to next section.
Updating and running SDK manager
If everything you have done so far is correct, you will not run into any issues. To update the SDK manager command-line tool, follow these steps:
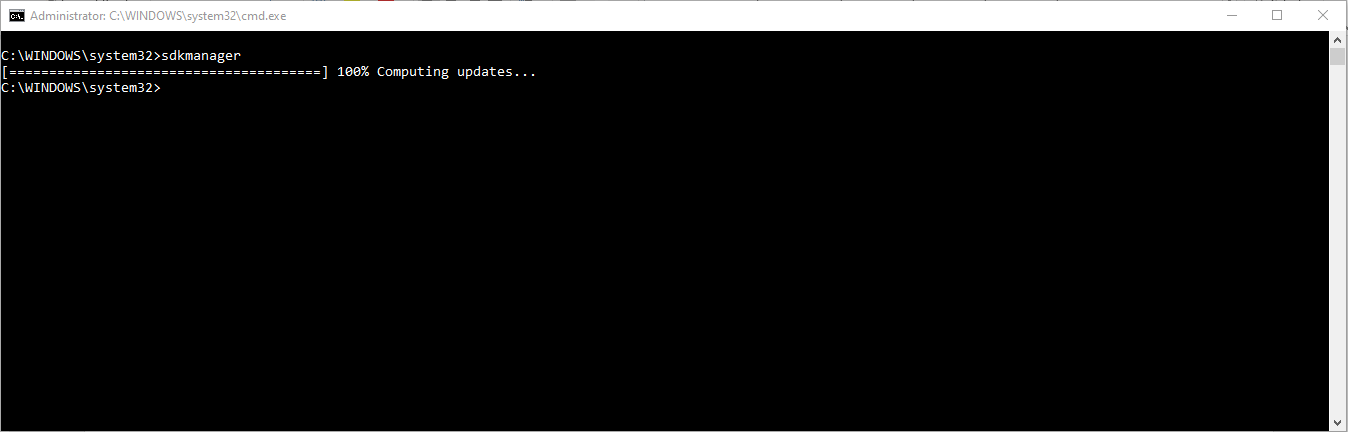
- Open run dialog, type cmd, and hold Ctrl + Shift keys and hit Enter. Press YES on the popup. This will launch an elevated command prompt.
- Now type “sdkmanager” without quotes and hit enter. If you do not get any error, that’s a success.
Common Problems
Problem 1
You see an error that says “sdkmanager is not recognized as an internal or external command, operable program or batch file.”
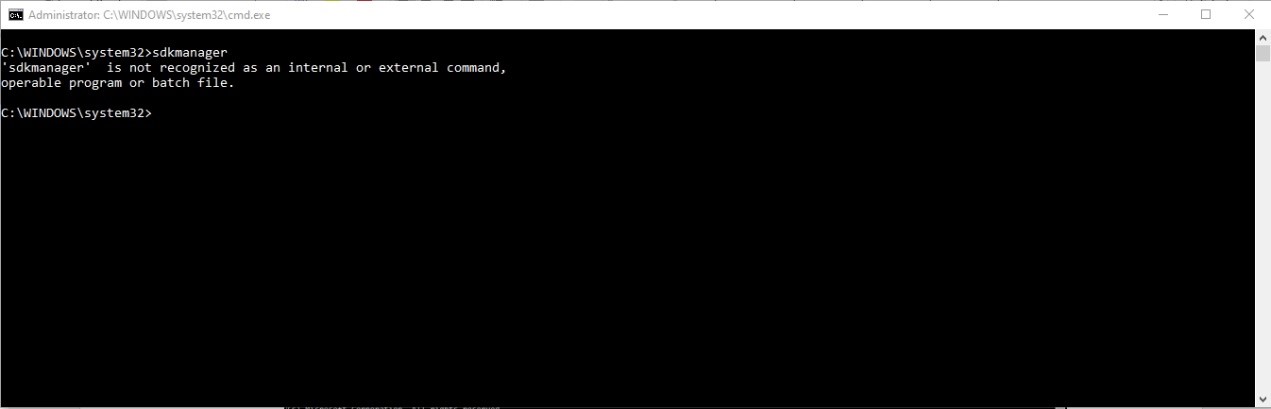
Solutions:
You need to revisit the Setting up environment variables section and see if you correctly added the environment variable and copied the correct path for android cmdline-tools. Checkout this video to learn how to setup environment variables in Windows
Problem 2
You see an error that says “Error: Could not find or load main class”.
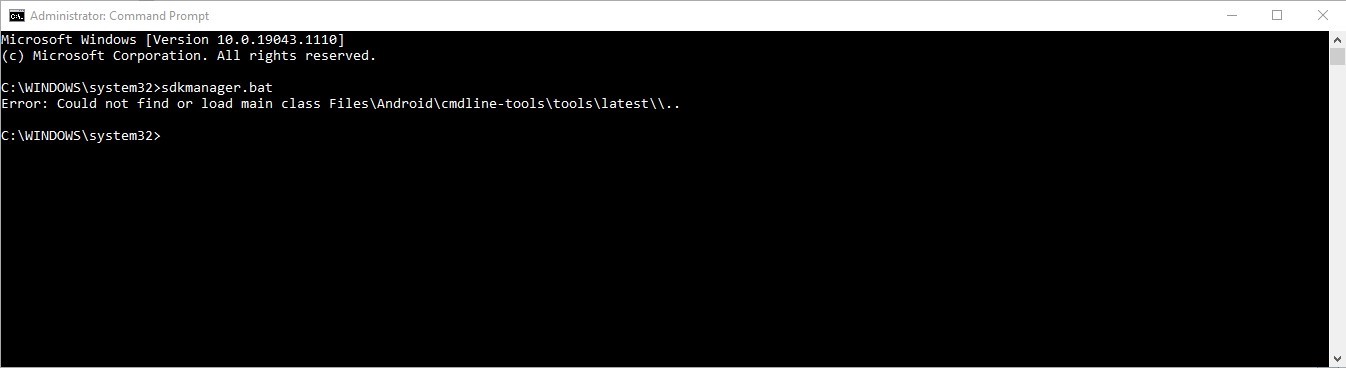
Solutions:
You need to make sure you extracted the android cmdline-tools in AppData directory inside your user profile. If you extracted it inside the Program Files directory, you might run into this error.
Another thing you need to do is to revisit the Setting up environment variables section and see if you correctly added the environment variables.
Problem 3
You see a warning that says “Warning: Failed to download any source lists!” OR “Warning: IO exception while downloading manifest” OR “Warning: Still waiting for package manifests to be fetched remotely”
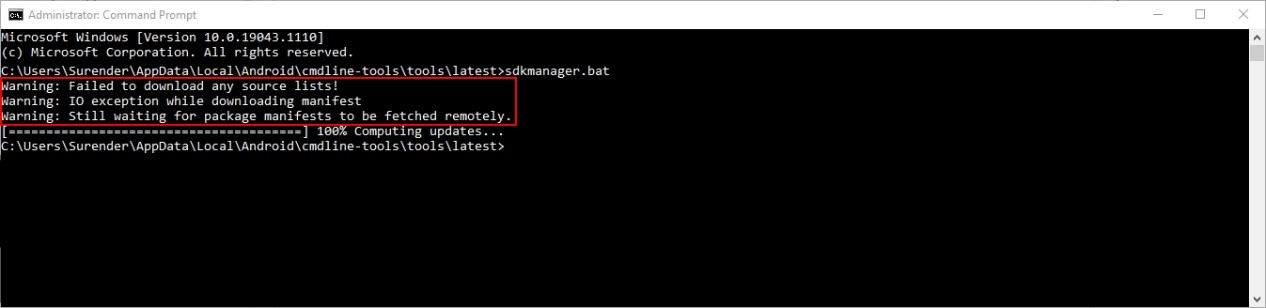
Solutions:
You need to see if something is blocking your connection. Most probably it will be your Antivirus software. You could temporarily disable it or at least disable scanning of encrypted connections.
Installing Platform Tools, System images and APIs
Now we can install the platform tools, system images, emulator, google API levels etc directly from command line. To do this, follow these steps:
- Open run dialog, type cmd, and hold Ctrl + Shift keys and hit Enter. Press YES on the popup. This will launch an elevated command prompt.
- Type the following command and hit enter:
sdkmanager "platform-tools" "platforms;android-29" "system-images;android-29;google_apis;x86_64"
In above command, “android-29” means Android version 10. If you want to download and try Android 11, you can replace “android-29” with “android-30”. You can install multiple android versions simultaneously but make sure your PC has enough storage space.
- You will be prompted with a license agreement. Type Y to agree and hit enter to continue.
This command will take a while to complete since it will download a lot of packages from internet. Make sure you are connected to an unmetered connection where data charges do not apply.
- Once the above command is complete, you will see multiple directories got created inside C:UsersSurenderAppDataLocalAndroid
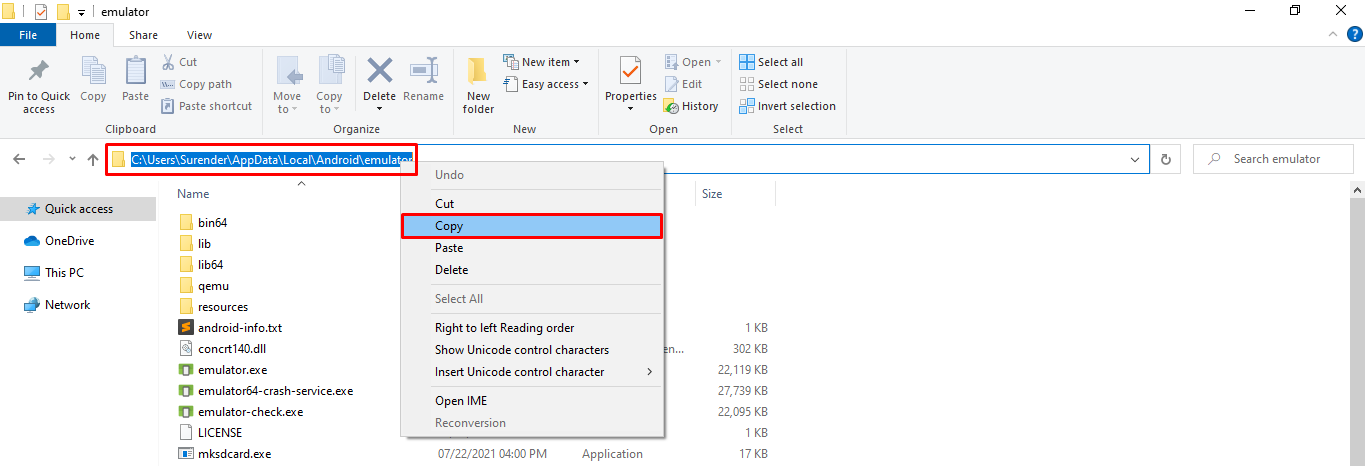
- Next, we will add an environment variable for emulator directory. Go inside emulator directory, click on address bar of file explorer and copy its path.
- Repeat the steps 1 through 5 from Setting up environment variables section to add emulator directory to Path.
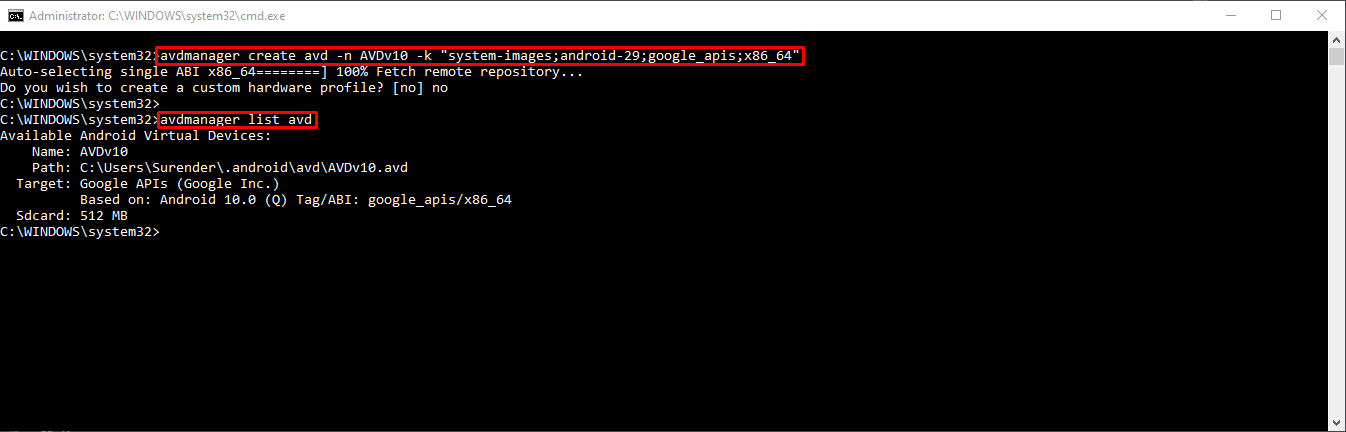
- Now we will create our first android virtual device (aka AVD). To create an AVD, type the following command and hit enter:
avdmanager create avd -n AVDv10 -k "system-images;android-29;google_apis;x86_64"
You can specify the name for AVD with -n switch. I chose AVDv10 since it will be an Android 10 device.
- You can use “avdmanager list avd” command to view the created AVDs.
Launching your android virtual device (AVD)
To launch your first android virtual device, follow these steps:
- Open run dialog, type cmd, and hold Ctrl + Shift keys and hit Enter. Press YES on the popup. This will launch an elevated command prompt.
- Type the following command and hit enter:
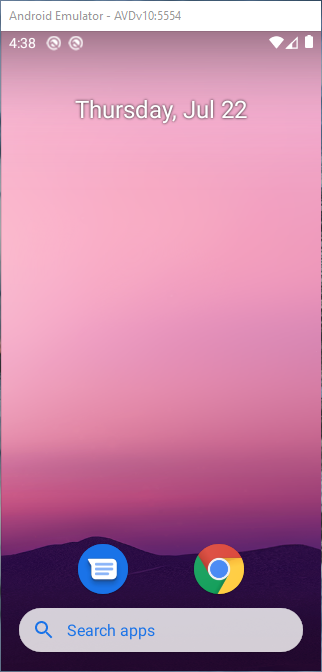
emulator @AVDv10
This command will start showing some output and you will see your first AVD launching in new window.
If you see an error that says “emulator is not recognized as an internal or external command, operable program or batch file.”, you need to make sure you have correctly added the emulator directory to Path variable (see steps 5 and 6 from Installing Platform Tools, System images and APIs section).
Deleting your android virtual device (AVD)
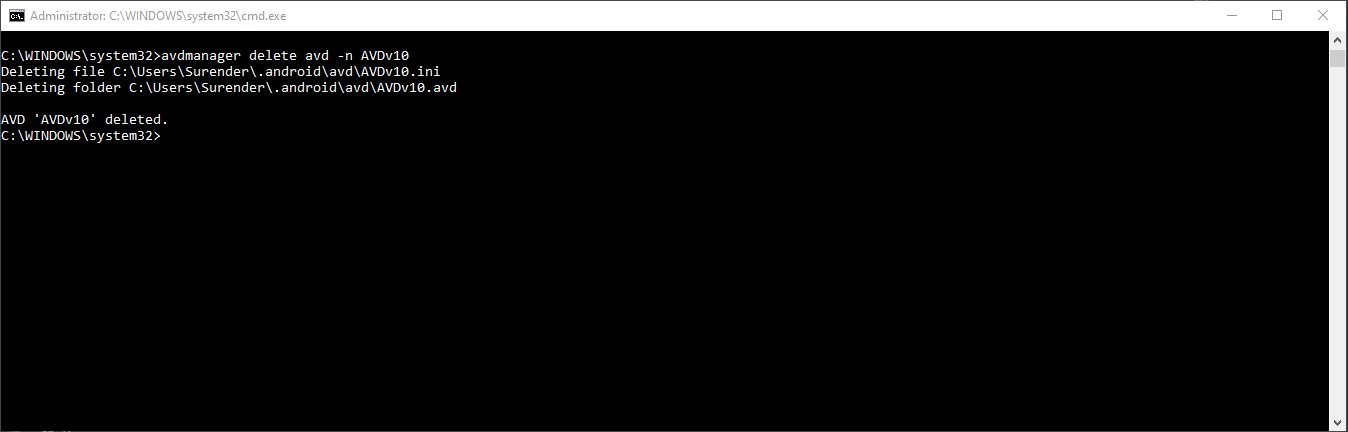
To delete the AVD you just created, you can use the following command:
avdmanager delete avd -n AVDv10
Using Android Debug Bridge (ADB)
Android Debug Bridge (adb) is a command-line tool that lets you communicate with an android device. The adb command facilitates a variety of device actions, such as installing and debugging apps, transferring data to/from android device, running shell commands on android device etc.
If you are following along this guide since start, you have already installed the adb tool. You only need to add it to environment variable so that you can start it from anywhere in command prompt. To add the environment variable, do the following:
- Open the following path in file explorer:
C:UsersSurenderAppDataLocalAndroidplatform-tools
Make sure you change your user name. If you cannot find the “platform-tools” directory in your PC, run the following command in an elevated cmd prompt:
sdkmanager "platform-tools"
- Copy “C:UsersSurenderAppDataLocalAndroidplatform-tools” directory path from explorer’s address bar.
- Add the copied path to environment variable. For more information on how to do it, see steps 1 through 5 in Setting up environment variables section.
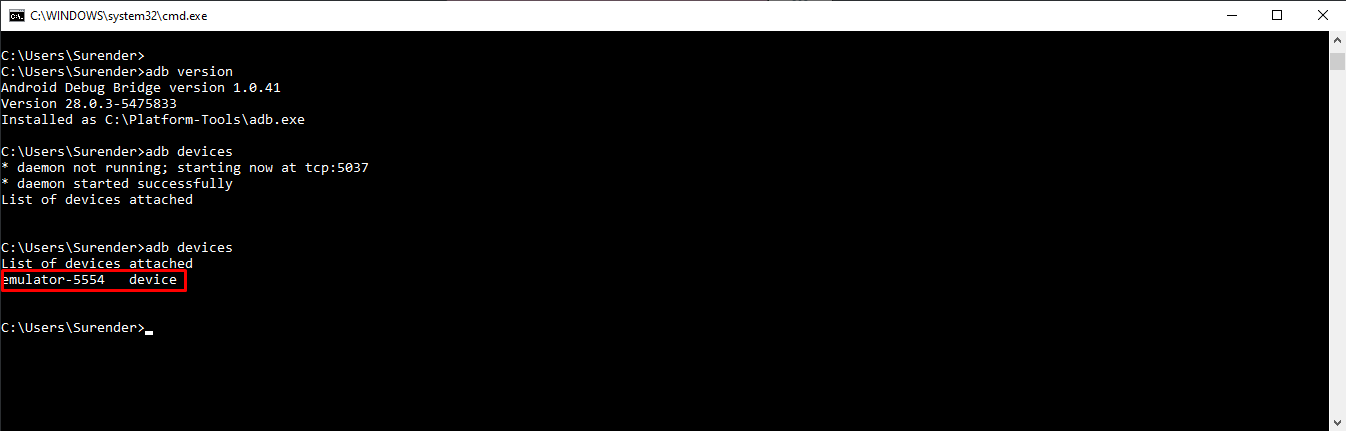
- Once the environment variable is set, open a command prompt, type “adb version” and hit enter.
- If you do not see any error, you are good to go to next step. If you see an error that says “adb is not recognized as an internal or external command, operable program or batch file.”, please check you have correctly followed steps 1 through 3 in this section.
- To see a list of devices connected, you can use “adb devices” command without quotes.
- To install an app using apk file, you can use “adb install apk_name” command without quotes.
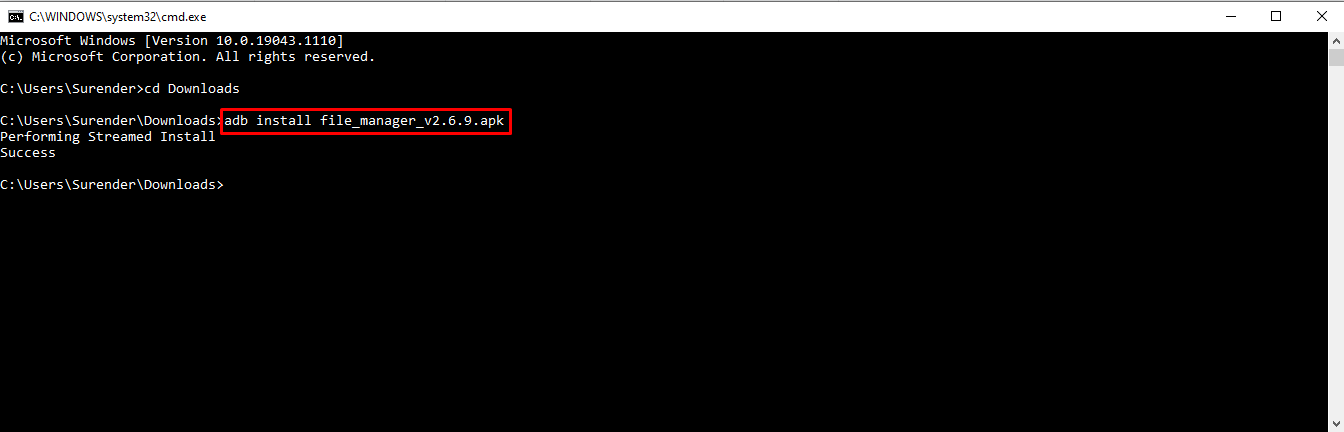
- To launch a shell to run commands on connected android device or AVD, you can use “adb shell” command without quotes.
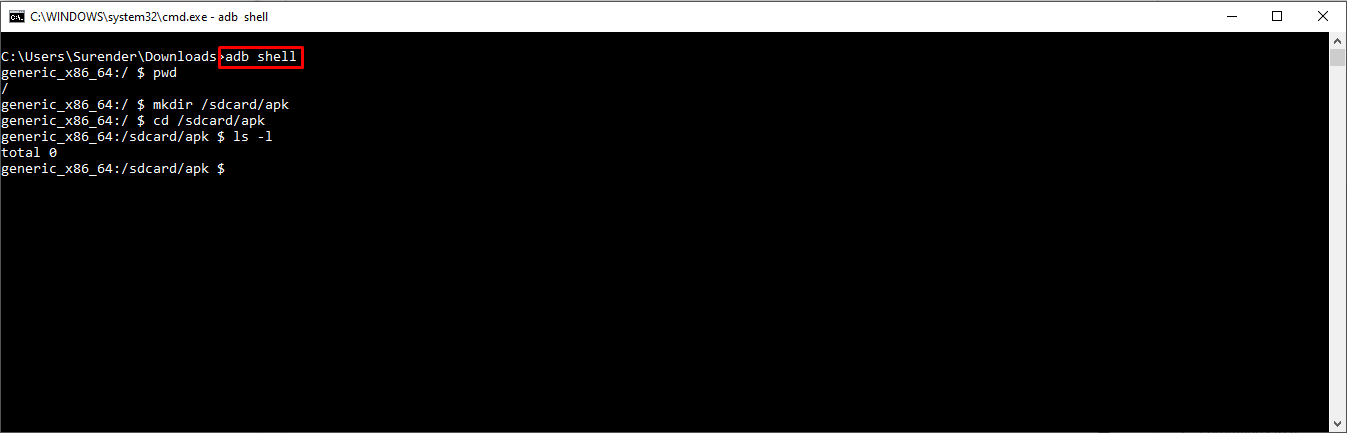
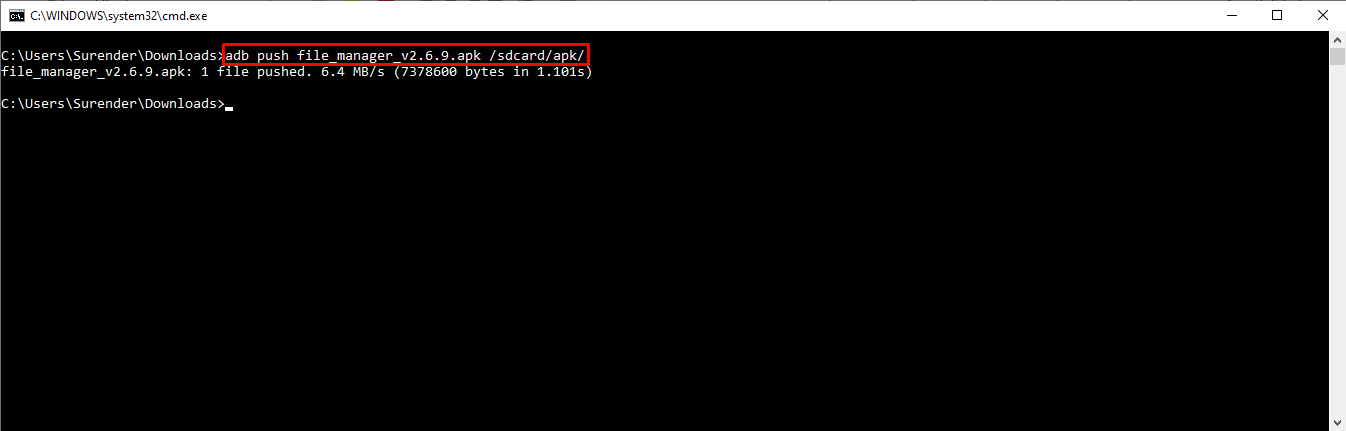
- To transfer a file to connected android device or AVD, you can use “adb push source destination”.
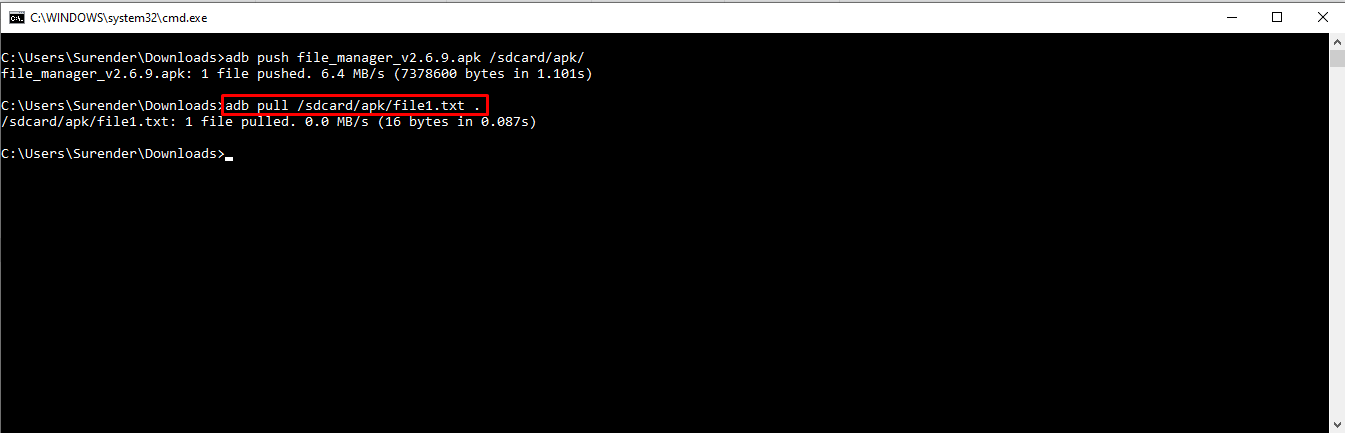
- To transfer a file from the connected android device or AVD to your computer, you can use “adb pull source destination”.
- To shutdown the connected android device or AVD from your computer, you can use “adb shell reboot -p” command (-p stands for -poweroff).

This is just a glimpse of what you can do with adb. There is a lot more to this but you got the idea anyway.
If you like this post, please share this with your family and friends.
- 1 1. Install Java for Windows 10
- 2 2. Install Android SDK Command Line tools
- 2.1 2.1 Download Android SDK Command Line tools
- 2.2 2.2 Setting environment variables
- 2.3 2.3 Check if Android command line tools work
- 2.4 2.3 Install Android SDK
This post was completed with the help of my friend NamNV, who pointing out the way to install Android SDK on Ubuntu without install Android Studio
Thanks to my friend
Welcome to my blog, today I write this post to guide you installing Android SDK on Windows 10 without installing Android Studio. You may wonder why we need it?
For most cases, we just need to install Android Studio and it will do all the necessary works include installing Android SDK. In other cases, you just need the Android SDK rather than install Android Studio to get the Android SDK. For example, if you are a Web/Backend developer and want to try Flutter for Desktop, so installing Android Studio is not necessary. Flutter for Desktop is a new technology, it helps to develop a Desktop app as same as what you do when developing a mobile app with Flutter. For the time being, even if you are developing Windows Desktop app you still have to install Android SDK, otherwise, you have to switch to another programming language.
Let’s going into the installation process.
1. Install Java for Windows 10
The first thing we need is to install Java, Android is based on Java, so Java is a must have thing before we do any works relative to Android development.
Because we don’t want to use Android Studio and just want the Android SDK command line version, so we don’t need to install Java SE Development Kit
Go to Java Windows 10 download page and click Download button: https://java.com/en/download/win10.jsp


2. Install Android SDK Command Line tools
This part is the most important thing in this tutorial. Android Studio help us on doing every works through it’s GUI, sometime we don’t want to use it’s GUI but using command line to interact with it’s core functions, so Android SDK Command Line tool will help us archive this
2.1 Download Android SDK Command Line tools
Go to Android Studio downloads page and select the right package: https://developer.android.com/studio/#downloads
Scroll to Command line tools only and click on the download link from Windows platform, accept the license and click on Download button

The downloaded file is not an installation file, it is a zip file that contains Android SDK tools, so we have to extract and place it in a convenient place that we will use later. Let’s place it in this location C:Android
Create folder Android at drive C and extract the downloaded file here

2.2 Setting environment variables
Open Edit the system environment variables windows by following these steps:
- On windows search box (at the task bar), type “env” and wait for it to run
- Click to open “Edit the system environment variables” program
- After “System Properties” opened at tab “Advanced“, click on “Environment Variables” button

Now we have to setting the “ANDROID_HOME” environment variable to “C:Android“
When the “Environment Variables” windows is opened, click on “New” button at “User variables for…” section. Fill ANDROID_HOME at the “Variable name:” input and fill C:Android at “Variable value:” input. Then click OK button

We will need to use Android tools binary, so let’s modify the PATH variable to add C:Androidtoolsbin to it

2.3 Check if Android command line tools work
Open Windows Power Shell in Administrator mode

type this command and check the result
sdkmanager --helpIf the result is something like the bellow, then you are ready for the next step. If not, please re-check above steps or try restarting your computer
Usage:
  sdkmanager [--uninstall] [<common args>] [--package_file=<file>] [<packages>...]
  sdkmanager --update [<common args>]
  sdkmanager --list [<common args>]
  sdkmanager --licenses [<common args>]
  sdkmanager --version

With --install (optional), installs or updates packages.
    By default, the listed packages are installed or (if already installed)
    updated to the latest version.
With --uninstall, uninstall the listed packages.

    <package> is a sdk-style path (e.g. "build-tools;23.0.0" or
             "platforms;android-23").
    <package-file> is a text file where each line is a sdk-style path
                   of a package to install or uninstall.
    Multiple --package_file arguments may be specified in combination
    with explicit paths.

With --update, all installed packages are updated to the latest version.

With --list, all installed and available packages are printed out.

With --licenses, show and offer the option to accept licenses for all
     available packages that have not already been accepted.

With --version, prints the current version of sdkmanager.
2.3 Install Android SDK
Open Windows Power Shell in Administrator mode and run this command to install Android SDK 29, you can change this number to your desired version
sdkmanager --install "platform-tools" "platforms;android-29" "build-tools;29.0.2"For the first time running the installation, you will be asked for reading and accept the license, type y and press enter key

Congratulation, you have just installed the Android SDK on Windows 10 without installing Android Studio, if you have any problems or questions regrading this tutorial, please let me know. Thank you!
The Android SDK is composed of modular packages that you can download separately using the Android SDK Manager. For example, when the SDK Tools are updated or a new version of the Android platform is released, you can use the SDK Manager to quickly download them to your environment. Simply follow the procedures described in Adding Platforms and Packages.
The Android SDK Platform-Tools is a component for the Android SDK. It includes tools that interface with the Android platform, such as adb, fastboot, and systrace. These tools are required for Android app development. They’re also needed if you want to unlock your device bootloader and flash it with a new system image.
Although some new features in these tools are available only for recent versions of Android, the tools are backward compatible, so you need only one version of the SDK Platform-Tools.
If you do not need Android Studio, you can download the basic Android command line tools. You can use the included sdkmanager to download other SDK packages.
What’s New
adb
- Don’t retry adb root if first attempt failed.
- Fix track-devices duplicate entry.
- Add receive windowing (increase throughput on high-latency connections).
- More specific error messages in the «more than one device» failure cases.
- Reject unexpected reverse forward requests.
- Fix install-multi-package on Windows.
fastboot
- Remove e2fsdroid as part of SDK platform-tools.
- Print OemCmdHandler return message on success.
Previous release notes
SDK Platform Tools Windows 33.0.0
adb
- Fixes the issue introduced in 32.0.0 of crashes when run without any arguments.
- Disable compression on pull by default.
- Improve performance of adb push when pushing many files over a high-latency connection.
- Improve adb push/pull performance on Windows.
- Fix adb push —sync with multiple inputs.
- Improve performance of incremental apk installation.
- Improve error handling for incremental apk installation.
30.0.4
adb
- Fix fallback to non-incremental apk installation on pre-Android 11 devices.
- Fix adb install-multi-package.
- Fix some more crashes related to adb wireless pairing.
- Improve some error messages.
fastboot
- Improve console output on fastboot oem commands.
- Fix fastboot flashall on Nexus 7.
30.0.4 Command-line tools:
adb
- Fix installation of APKs signed with v4 signature scheme on pre-Android 11 devices.
- Fix crash when authenticating without ADB_VENDOR_KEYS.
- Fix crash when using adb -H.
Previous release notes:
- A command-line version of the Apk Analyzer has been added in tools/bin/apkanalyzer. It offers the same features as the Apk Analyzer in Android Studio and can be integrated into build/CI servers and scripts for tracking size regressions, generating reports, and so on.
- ProGuard rules files under tools/proguard are no longer used by the Android Plugin for Gradle. Added a comment to explain that.
- When creating an AVD with avdmanager, it is no longer necessary to specify —tag if the package specified by —package only contains a single image (as is the case for all images currently distributed by Google).
There are several different packages available for the Android SDK. The table below describes most of the available packages and where they’re located once you download them.
29.0.5 (October 2019) Command-line tools:
adb
- Slight performance improvement on Linux when using many simultaneous connections.
- Add —fastdeploy option to adb install, for incremental updates to APKs while developing.
Available Packages:
- SDK Tools
- Contains tools for debugging and testing, plus other utilities that are required to develop an app. If you’ve just installed the SDK starter package, then you already have the latest version of this package. Make sure you keep this up to date.
- SDK Platform-tools
- Contains platform-dependent tools for developing and debugging your application. These tools support the latest features of the Android platform and are typically updated only when a new platform becomes available. These tools are always backward compatible with older platforms, but you must be sure that you have the latest version of these tools when you install a new SDK platform.
- Documentation
- An offline copy of the latest documentation for the Android platform APIs.
- SDK Platform
- There’s one SDK Platform available for each version of Android. It includes an android.jar file with a fully compliant Android library. In order to build an Android app, you must specify an SDK platform as your build target.
- System Images
- Each platform version offers one or more different system images (such as for ARM and x86). The Android emulator requires a system image to operate. You should always test your app on the latest version of Android and using the emulator with the latest system image is a good way to do so.
- Sources for Android SDK
- A copy of the Android platform source code that’s useful for stepping through the code while debugging your app.
- Samples for SDK
- A collection of sample apps that demonstrate a variety of the platform APIs. These are a great resource to browse Android app code. The API Demos app in particular provides a huge number of small demos you should explore.
- Google APIs
- An SDK add-on that provides both a platform you can use to develop an app using special Google APIs and a system image for the emulator so you can test your app using the Google APIs.
- Android Support
- A static library you can include in your app sources in order to use powerful APIs that aren’t available in the standard platform. For example, the support library contains versions of the Fragment class that’s compatible with Android 1.6 and higher (the class was originally introduced in Android 3.0) and the ViewPager APIs that allow you to easily build a side-swipeable UI.
- Google Play Billing
- Provides the static libraries and samples that allow you to integrate billing services in your app with Google Play.
- Google Play Licensing
- Provides the static libraries and samples that allow you to perform license verification for your app when distributing with Google Play.
Download links for previous version Android SDK 25.2.3:
- Android SDK 25.2.3 for Windows
- Android SDK 25.2.3 for macOS
- Android SDK 25.2.3 for Linux

Утилиты ADB и Fastboot входят в состав комплекта разработки Android SDK (не стоит путать с Android Studio и уж тем более скачивать ее громоздкий установочный файл, если вы, конечно, не собираетесь заниматься разработкой под Android). ADB является инструментом для отладки, который позволяет получить доступ к консоли Андроид с компьютера (подробнее →) подключив гаджет к ПК по USB. При этом должна быть включена отладка. Fastboot предназначена для работы с устройством, когда то загружено в одноименном режиме (если такой есть на вашем аппарате).
Содержание — Как установить ADB, Fastboot и драйвера:
- Как установить ADB и Fastboot: инструкция
- Устанавливаем драйверы ADB и Fastboot под Windows
- Как начать работать с Fastboot и ADB
При помощи ADB можно управлять смартфоном/планшетом с компьютера: сделать бэкап приложений, сбросить графический пароль, записать скринкаст, перевести смартфон в режим Recovery и многое другое. Кроме того с ADB можно работать и через Wi-Fi. Для этого на вашем устройстве должны быть получены root-права, а также понадобится специальное приложение, осуществляющее подключение к компу по сети. Например, ADB Wireless либо WiFi ADB. Но это уже материал для отдельной статьи.
Используя Fastboot, вы сможете устанавливать прошивки, кастомные Рекавери (TWRP или CWM), разблокировать Bootloader (на аппаратах HTC, Motorola, Sony, Nexus, Huawei, последних LG он заблокирован), очищать разделы системы.
Как установить ADB и Fastboot: инструкция
1. Первым делом переходим на официальный сайт, откуда можно скачать Android SDK: https://developer.android.com. Спускаемся вниз страницы к разделу «Command line tools only» и выбираем загрузку архива для Windows.

2. Установите галочку в чекбоксе «I have read and agree with the above terms and conditions» и нажмите кнопку «Download Android Command Line Tools for Windows». Начнется загрузка архива.

3. Скачайте его и разархивируйте в корень Диска «C:».
4. Также необходимо загрузить Java Development Kit с официальной страницы. Перейдите на сайт, согласитесь с условиями лицензионного соглашения, отметив пункт «Accept License Agreement», и скачайте версию JDK, соответствующую разрядности вашей системы.

После этого установите скачанный пакет. Дальше описаны несколько вариантов установки Fastboot и ADB – пользуйтесь тем, который для вас проще.
Первый способ
Вернитесь к папке c Android SDK, откройте «tools» и запустите «android».

Отметьте пункт «Android SDK Platform-tools» (а также «Google USB driver», если у вас устройство Nexus) и нажмите «Install Packages».

Про установку драйверов для других аппаратов читайте ниже.
Выберите «Accept License» и нажмите «Install».

Мой лог показал, что в процессе установки возникла ошибка. Но в итоге все завершилось успешно.

По завершении выполнения вышеописанных действий в папке «tools_версия-windows» появится «platform-tools», а в ней будут интересующие нас «ADB» и «Fastboot».


Второй способ
Перейдите в папку «sdk-tools-windows-версия» → «tools» → «bin» и, зажав клавишу «Shift», щелкните правой кнопкой мышки по пустой области. Выберите «Открыть окно команд» либо «Открыть окно PowerShell здесь», если на ПК или ноутбуке установлена одна из последних сборок Windows 10.

Вставьте команду в PowerShell или командную строку (в PowerShell добавьте ./ вначале):
sdkmanager platform-tools

Щелкните «Enter», чтобы выполнить команду. Произойдет загрузка файлов и появится запрос на установку:
Accept? (y/N)
")
Чтобы разрешить, введите y, то есть «yes», и нажмите «Enter», после чего начнется установка «platform-tools».

В конце в командной строке отобразится сообщение, что процедура завершилась успешно. А папка «platform-tools» с ADB и Fastboot внутри появится в «sdk-tools-windows-version».
(!) Если по какой-либо причине не удается установить ADB и Fastboot предыдущими способами, воспользуйтесь третьим вариантом – просто скачайте архив «platform-tools» и разархивируйте на диск «C:».
Устанавливаем драйверы ADB и Fastboot под Windows
Чтобы компьютер корректно распознавал смартфон либо планшет, необходимо загрузить драйвер USB:
- Samsung – драйвер входит в состав утилиты Kies: https://www.samsung.com либо же его можно скачать отдельно, выбрав нужную модель: https://www.samsung.com
- HTC – в составе HTC Sync Manager: https://www.htc.com
- Nexus – драйвер Android устанавливается вместе с Android SDK, о чем писалось выше.
- Huawei – совместно с утилитой HiSuite: https://consumer.huawei.com
- LG – установите LG PC Suite: https://www.lg.com
- Motorola – смотрите на этой странице: https://motorola-global-portal.custhelp.com
- Sony Xperia – драйверы FastBoot для всех моделей находятся здесь: https://developer.sonymobile.com
- Xiaomi – Mi PC Suite: https://pcsuite.mi.com
- MTK – для китайских аппаратов на чипах MediaTek: https://online.mediatek.com
- Lenovo – выберите модель смартфона, планшета и загрузите ADB драйвер: https://support.lenovo.com
- Решения для девайсов других производителей ищите на их официальных сайтах.
Существуют различные универсальные установщики ADB драйверов (к примеру, этот: https://adbdriver.com) – ими тоже можно пользоваться, например, когда по какой-то причине не удалось установить официальное решения.
Если для вашей модели идет драйвер без установщика, придется выполнить следующие действия:
1. Зайдите в «Панель управления» → «Диспетчер устройств». В Windows 10 достаточно нажать правой кнопкой мышки по меню «Пуск» и выбрать «Диспетчер устройств».

2. Найдите в списке девайс для которого нужно установить драйверы. Клацните правой кнопкой мышки и нажмите «Обновить драйверы».

Как видите, компьютер корректно распознает мой планшет Nexus 7. Если ваш ПК определяет смартфон неправильно или напротив устройства стоит желтый треугольник с восклицательным знаком внутри, «ручная» установка драйверов Android для вас обязательна.
3. Выберите пункт «Выполнить поиск драйверов на этом компьютере».

4. Укажите путь к папке с драйверами на ПК.

Дождитесь завершения установки и затем заново подключите гаджет к компьютеру по USB.
Как начать работать с Fastboot и ADB
Работа с ADB или Fastboot осуществляется из командной строки, зайти можно двумя способами:
Способ 1: Правой клавишей мышки клацните на «Пуск» и выберите «Командная строка (администратор)». Далее при помощи команд нужно перейти к папке с ADB и Fastboot (после ввода каждой нажимайте «Enter»).
Чтобы вернуться в корень диска «C:», используйте:
cd /Благодаря этой команде открываем нужную папку:
cdВ моем случае получилось так:
cd tools_версия-windowsplatform-tools
У вас выйдет (разработчики Google изменили название архива уже после написания первоначальной редакции этой инструкции):
cd sdk-tools-windows-versionplatform-tools
Путь к Fastboot и ADB указан, теперь работаем с ними из консоли.
Чтобы не выполнять эти действия каждый раз, добавьте путь к «platform-tools» в переменную «Path». Сначала зайдите в папку, в строке навигации щелкните правой кнопкой мыши по «platform-tools» и выберите «Копировать адрес».

Перейдите в «Панель управления». Для этого нажмите «Win» + «R» и в поле «Открыть:» вставьте control. Нажмите «ОК».

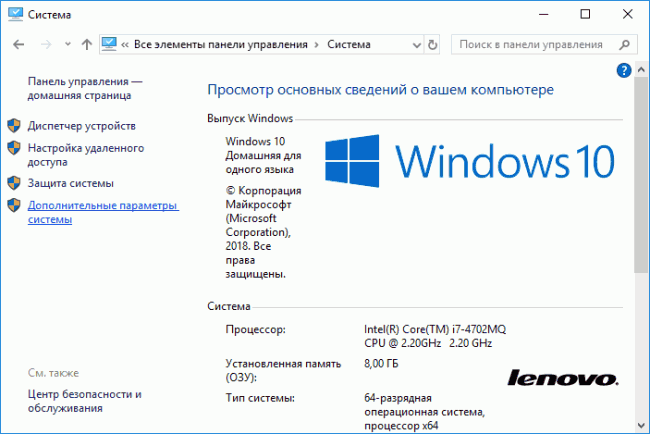
Выберите «Система» → «Дополнительные параметры системы» → «Переменные среды…».

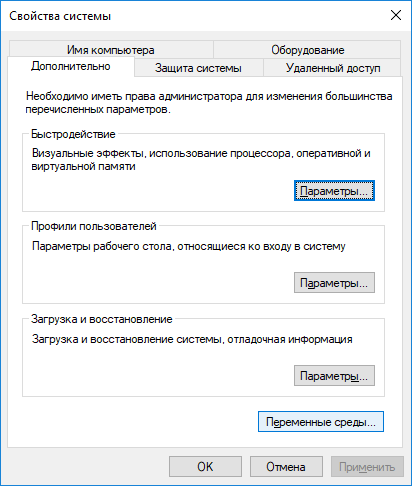
Найдите перемененную «Path», выделите ее и выберите «Изменить…».

Нажмите «Создать», вставьте путь к папке «platform-tools» и щелкните «ОК».

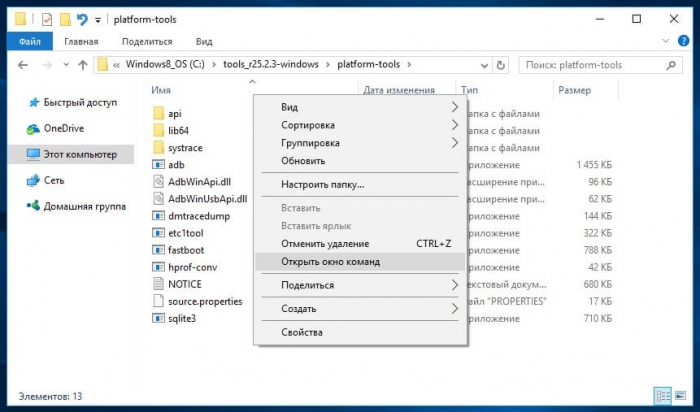
2: Зайдите в «sdk-tools-windows-version» → «platform-tools», затем, удерживая «Shift», щелкните правой кнопкой мыши по пустому месту и выберите пункт «Открыть окно команд» или «Открыть окно PowerShell здесь».
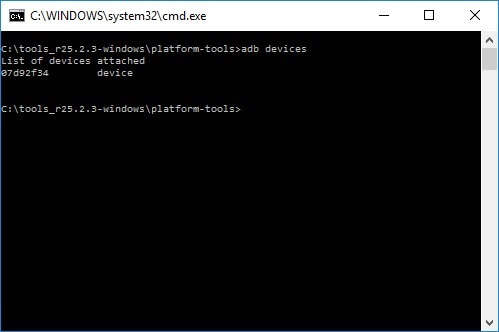
Введите следующее, чтобы проверить как ПК видит Android (в Windows PowerShell вставьте ./ перед командой):
adb devices
Не забывайте, что для работы с ADB должна быть включена отладка по USB! Больше полезных команд вы найдете в прошлой статье, ссылка есть в начале данного поста.
The Android SDK (Software Development Kit) is a large and powerful tool that’s essential if you’re looking to get into Android app development. It serves a number of other purposes, too, such as using the command line to sideload apps onto your Android phone.
There are quite a few details and things to consider when installing the Android SDK on your Windows PC. The following guide should help you wade through the process.
Content
- Install the Latest Version of Java
- Install SDK Command Line
- Getting Started With SDK Command Line
- Install Android Studio
- Frequently Asked Questions
Install the Latest Version of Java
If you don’t want to use Android Studio and just want the Android SDK command line version, then you’ll need to first download and install Java.
- On the official Java Downloads page, scroll down and click on the “Windows” tab.

- The available downloads will now come into view. Select and download the “x64 MSI Installer.”
- Go ahead and install the latest Java version on your PC. You’ll be able to find it in C:Program FilesJavajdk-18.0.1.1 (or whatever version number you’ve installed – 18.0.1.1 being the number version).

Install SDK Command Line
Android Studio is a space-consuming app, and while we think its UI (user interface) makes it a very accessible way of managing your development tools and packages, some people prefer the command-line route.
- On the Android Studio download page, pick the Windows option under “Command line tools only.”

- The SDK tool package will download to your PC as a .zip file. Extract the zip file. You should see a “cmdline-tools” within the extracted folder.
- In your C: drive, create a new “Android” folder.
- Within the Android folder, create a new folder “cmdline-tools”. And within this “cmdline-tools” folder, create a “tools” folder.
- Lastly, move the content of the extracted file to the “Tools” folder.
Getting Started With SDK Command Line
- Run Command Prompt as Administrator.
- Next,
cdto the “bin” folder:
cd C:Androidcmdline-toolstoolsbin
- Type the following command, which will show you a list of installed, valid packages, as well as those that can be updated.

- To install the platform tools, type the command:
sdkmanager "platform-tools" "platforms;android-33"
After the installation, you should find new “platform-tools” folder in the “Android” folder. Within this folder contains the adb.exe, fastboot.exe and several other executables.

This will give you access to the adb and fastboot commands, which are great if you enjoy sideloading things onto Android and dabbling in the recovery options.
Alternatively, if you want to enjoy all the modern features, conveniences and UI elements of Android Studio, then it’s pretty simple.
- On the Android Studio download page, select “Download Android Studio,” and follow the instructions. During installation, however, there are a couple of things to consider.

- The installer will offer to install an extra feature called Android Virtual Device, which creates an emulated environment to test various features and apps. Confirm whether you want to install this feature. (You’ll be asked again later whether you want to install this, so it doesn’t matter if you skip it here.)

- Once you do this and select an install directory, Android Studio will begin installing. It’s a big program so may take a while, depending on your hardware.
- Once Android Studio is installed, open it. It will ask whether you want to import your existing Android Studio settings.

- After that, click “Next” to follow the wizard, then “Custom” to install custom components (if you want that).
- In case you need Java with your Android Studio projects, go to your Java directory when prompted. In our case, it’s “C:Program FilesJavajdk-18.0.1.1”.

- Select your theme, then pick any extra components you want to install. We recommend checking the “Performance” box to improve Android emulation based on your processor, and you can again pick Android Virtual Device if you think you’ll be using it.

- Keep clicking “Next,” then “Finish” when you’re done.

- Once Android Studio is fully installed, open it and you’re away.
- Click “Create New Project,” and feast your eyes on the great selection of templates.

- Or click on “More Actions” of the main Android Studio screen.

- This will open a drop-down menu with options like SDK Manager and Virtual Device Manager. Below, you can take a look at SDK Manager.

Frequently Asked Questions
How can I check my current Java version?
You might not need to install the latest Java version on your PC prior to installing your command line tools. Checking your Java version is easy, just type the following command into Command Prompt: java -version. Cmd will immediately display the version you’re running.
I’m getting an «sdkmanager is not recognized as an internal or external command, operable program or batch file» error. How can I fix it?
You need to revisit the part of the tutorial where you set up environmental variables. Make sure you follow the steps of where to unzip the command-line tool. It’s important. Double check if you copied the correct path from the source folder and if you’ve pasted it in the right place.
My Android Studio download got stuck. What can I do?
If you’re experiencing your download freezing, it could be due to high CPU usage or internet issues, which might have caused the download to get interrupted. To counter the latter, we recommend closing all the programs/apps that are running at that point to prevent the internet being consumed by other processes. In the case of high CPU usage, here’s a list of fixes to help you deal with this problem.
Image credit: Zain Ali via Pexels

Alexandra Arici
Alexandra is passionate about mobile tech and can be often found fiddling with a smartphone from some obscure company. She kick-started her career in tech journalism in 2013, after working a few years as a middle-school teacher. Constantly driven by curiosity, Alexandra likes to know how things work and to share that knowledge with everyone.
Subscribe to our newsletter!
Our latest tutorials delivered straight to your inbox
Well the folks who are trying to download either on *ix or Ec2 machine would suggest to clean approach in below steps:
$ mkdir android-sdk
$ cd android-sdk
$ mkdir cmdline-tools
$ cd cmdline-tools
$ wget https://dl.google.com/android/repository/commandlinetools-linux-*.zip
$ unzip commandlinetools-linux-*.zip
The king — sdkmanager lives inside
cmdline-tools/tools/bin
, you’d better set in PATH environment variable.
but cmdline-tools should not be set as ANDROID_HOME. Because later, when updating Android SDK, or installing more packages, the other packages will be placed under ANDROID_HOME, but not under cmdline-tools.
The final, complete ANDROID_HOME directory structure should look like below, consist of quite a few sub-directories:
build-tools, cmdline-tools, emulator, licenses, patcher, platform-tools, platforms, tools.
You can easily point out that build-tools and cmdline-tools are siblings, all resides inside the parent ANDROID_HOME.
Add SDK tools directory in PATH environment variable to make executable available globally. Add below line either in ~/.bashrc or ~/.profile file to make it permanent.
In order to edit the ~/.bashrc simply can be editable in vim mode
$ vim .bashrc
Now set your preferred ANDROID_HOME in .bashrc file :
export ANDROID_HOME=/home/<user>/android-sdk
export PATH=${PATH}:$ANDROID_HOME/cmdline-tools/tools/bin:$ANDROID_HOME/platform-tools
here strange thing that we haven’t download the platform-tools directory as of now but mentoning it under path but let it be as it will help you avoid remodification on the same file later.
Now go inside the same directory:
$ cd android-sdk
NOTE: well in first attempt sdkmanager command didnt found for me so I close the terminal and again created the connection or you can also refresh the same if it works for you.
after that use the sdkmanager to list and install the packages needed:
$ sdkmanager "platform-tools" "platforms;android-27" "build-tools;27.0.3"
Hence Sdkmanager path is already set it will be accessible from anywhere:
$ sdkmanager --update


$ sdkmanager --list
Installed packages:=====================] 100% Computing updates...
  Path                 | Version | Description                    | Location
  -------              | ------- | -------                        | -------
  build-tools;27.0.3   | 27.0.3  | Android SDK Build-Tools 27.0.3 | build-tools/27.0.3/
  emulator             | 30.0.12 | Android Emulator               | emulator/
  patcher;v4           | 1       | SDK Patch Applier v4           | patcher/v4/
  platform-tools       | 30.0.1  | Android SDK Platform-Tools     | platform-tools/
  platforms;android-27 | 3       | Android SDK Platform 27        | platforms/android-27/