Connecting a 3D printer to a PC, which is also named as online 3D printing, becomes quite popular because of its obvious advantages comparing to printing directly on a 3D printer which has limited access to detailed 3D print settings. Printing through PC could be separate into two sections, 3D printer on-line print driver installation and on-line printing settings. Today, we’ll list detailed steps of on-line printing on Anet A8 3D printer.
What Are the Benefits of 3D Printing Through PC?
From a connected PC, we can see errors, make settings and send commands to a 3D printer. And we’d able to log into a LAN website and monitor your computer in real time from another location via webcam. Today, we’ll step by step connect the Anet A8 3D printer to a PC via USB.
I – Install On-line 3D Printing CH340 Driver on Computer
1. The CH340 on-line printing driver could be found on the SD card on the Anet A8.
SD card: .A8A8资料SoftwareCH340G Drive
If you lost the A8 SD card, you could download the driver on the following site:
Download driver file for your Mac or Windows PC from below links:
Driver for Mac: http://www.wch-ic.com/downloads/CH341SER_MAC_ZIP.html
Driver for windows PC: http://www.wch-ic.com/downloads/CH341SER_EXE.html
2. Unzip the downloaded file and click on the “pkg” format file. Click on “Install” and follow the wizard to complete driver installation. For a windows PC, the procedures can be clicking on the downloaded file and then clicking on “Open”, and following the wizard to proceed.
3. When installation completes, click on “Restart” to restart your PC.
II – Connect A8 3D Printer to the PC
- Connect the PC to your A8 3D printer with the USB cable in the package of your Anet A8.
- Power on the printer.
- Click the “Computer” icon on the desktop of your PC and then select “Device Manager” and then “Ports” to check if CH340 port is already there; if not, you could try to re-install the driver.
After the pc printing driver, CH340 well installed, we then need a software to talk to the computer at a bit transfer rate the printer understands. Cura , Repetierhost and Mattercontroll just to name a few.. We introduce two most commonly used software, Repetier and Cura.
III – Do on-line 3D printing with Repetier
- Download right version of Repetier-Host for your PC from repetier.com.
- Install Repetier to your PC.
- Click on the installed Repetier and select “config” and then “Printer Settings”.

4. Select the right port and baud rate for your A8 3D printer.

Port: which port connects your printer
Baud Rate: how fast Repetier talks to the printer
The correct baud rate of 115200 for Anet A8. It won’t communicate through the COM port unless you do the value right.
Note: if baud rate is incorrect, you’ll see unreadable characters; reduce baud rate until we can read.
5.Set right values for your A8 3D printer.

6.Select Gcode files to do online printing with Repetier.
IV- Do on-line 3D printing with Cura
- Install Cura to your PC and click on “Monitor”on the top.

2. We can see Anet A8 3D printer is already connected to Cura.

3. Click on control button and preheat settings to check if the printer is correctly connected.
4. Click on “Prepare”to upload stl or g-code files.
5. Slice stl files or directly select “Print via USB”to print g-code files.
That’s all the steps to install online 3D printing drivers into a Mac or Windows PC and make 3D prints with Anet A8 3D printer on Repetier or Cura. Have a try and surely you’ll enjoy the convenience of 3D printing on a PC.
A fully signed drivers for Windows can be found below:
- 2011 Driver version 3.3.2011.11 for Windows 7
- 2014 Driver version 3.4.2014.8 for Windows 8+
Mac OS-X
Sierra
(Added: October, 2016)
The Version 1.3 of the driver available on the vendor’s website causes a crash on Mac OS-X Sierra. Thankfully, Adrian Mihalko patched the driver, and made it available to the public.
- The updated and patched Sierra Mac Driver can be downloaded here — CH34x_Install_V1.3.zip (174 Kb).
El Capitan
(Added: Nov 22, 2015)
Many instructions down below were written for the old driver, which was not signed, and therefore was not working out of the box on OS-X Yosemite and El Capitan. The latest driver appears to be signed, and should work out the box. The new driver is here: CH34x_Install.zip (111Kb).
Inside the driver is a brief README with the following instructions:
Driver README
CH34X USB-SERIAL DRIVER INSTALLATION INSTRUCTIONS Version: V1.0 Copyright (C) Jiangsu Qinheng Co., Ltd. Support System: OSX 10.9 and above
Installation Process: * Extract the contents of the zip file to a local installation directory * Double-click CH34x_Install.pkg * Install according to the installation on procedure * Restart after finishing installing
After the installation is completed, you will find serial device in the device list(/dev/tty.wchusbserial*), and you can access it by serial tools.
If you can’t find the serial port then you can follow the steps below:
- Open terminal and type ‘ls /dev/tty*’ ande see is there device like tty.wchusbserial;
- Open ‘System Report’->Hardware->USB, on the right side “USB Device Tree” there will be device named “Vendor-Specific Device” and check if the Current is normal. If the steps upper don’t work at all, please try to install the package again.
Note: Please enter System Preferences ➜ Security & Privacy ➜ General, below the title “Allow apps downloaded from:” you should choose the choice 2 ➜ “Mac App Store and identified developers” so that our driver will work normally.
Older Driver
This older version requires some hacking in order to get it to work. I am leaving instructions just in case someone needs it, or the new driver does not work for someone.
Download The Driver
There are two main sites that people mention in the discussions about the driver:
- Chinese company that developed it: http://www.wch.cn/downloads.php?name=pro&proid=178
- This driver appears newer than on the second link, and is from Dec 2013.
- Note: for me that site took a long long time to load, and then it took forever to download this tiny driver, so I put up a copy here CH341SER_MAC.ZIP (256Kb), so that you don’t have to wait. Hopefully they won’t go after me for mirroring their driver 🙂
- Second site is the Russian company that sells the USB programmer based on this chip: http://www.5v.ru/ch340g.htm but this site only has an older version of the driver, from 2012, so I do not recommend downloading it.

Pre-Installation
Note: the following pre-installation steps are only required on the two most recent versions of OS-X Yosemite and El Capitan. It is because the driver is not signed properly from Apple’s perspective. We are waiting on the developer to update the driver so that these pre-installation steps are no longer needed.
OS-X El Capitan Steps (Only For The Older Driver!)
These are not needed for the newer driver above.
- Reboot and press ⌘-R immediately after the chime to enter Recovery Mode
- Open Terminal from the recovery mode
- run the command
csrutil enable --without kext - Reboot.
Thanks to this post for these instructions.
OS-X Yosemite Steps
- Open Terminal Application (it’s located in /Application/Utilities) and type this command once you see a prompt:
sudo nvram boot-args="kext-dev-mode=1"- Reboot.
see this post if you wish to know more details.
Installation
- Download the driver from here: CH341SER_MAC.ZIP (256Kb)
- Double click the ZIP file do unzip it
- Open the folder ~/Downloads/CH341SER_MAC
- Run installer found in that folder
- Restart when asked.
Usage
If the driver properly loaded, you should see the device in you /dev folder (this is for advanced command-line users of OSX only). On my machine it was called /dev/cu.wchusbserial1441140
This port is showing up correctly in Arduino 1.0.6 and Arduino 1.5.8.
However, if you are using the Eclipse Plugin, it is not smart enough to list this port in the list of available serial ports (either in project properties, or in the serial monitor). You will have to type the entire thing yourself: /dev/cu.wchusbserial1441140 and then Eclipse can upload your sketch.
That’s it! You should be ready to use the drivers and the board.
References
- Arduino Forums
- http://www.5v.ru/ch340g.htm
- http://www.wch.cn/downloads.php?name=pro&proid=178
- http://www.cindori.org/enabling-trim-on-os-x-yosemite/
- http://www.arduined.eu/ch340-windows-8-driver-download/
- http://catalog.update.microsoft.com/v7/site/ScopedViewRedirect.aspx?updateid=032a878e-8ca0-40d2-b7b1-936640b0eecb
Source:
http://kig.re/2014/12/31/how-to-use-arduino-nano-mini-pro-with-CH340G-on-mac-osx-yosemite.html
")
Некоторое время назад мне захотелось добавить на принтер автовыравнивание стола перед печатью, но родная прошивка Анетов этого не позволяет, а ковыряться с портированием Мерлина мне было ну очень лень. И тогда в сети была найдена уже портированная версия мерлина — SkyNet3D. Я ее скачал, прошил, изменил какие-то параметры под себя и долгое время пользовался ею, все было вполне удобно. Правда, автовыравниванием я быстро перестал пользоваться 
Но Мерлин развивается, а Скайнет прекратил свое существование. По прекрасной причине — теперь Мерлин сам поддерживает Анеты, вобрав в себя результаты работы автора Скайнета
Итак, установка Мерлина на Анет А8. На А6 тоже ставится, только некоторые значения в конфиге, возможно, придется изменить под свои требования. А можно ничего не менять, оставить по умолчанию.
Что для этого нужно:
1. Среда Arduino с настройками для платы Anet. Я не силен в ардуинах и их настройках, просто у меня осталась эта среда от Скайнета со всеми нужными настройками. Выкладываю — https://drive.google.com/open?id=1uE3Nb6RBP6NJoI5q0udWFwj4l65OoAKy (установка не требуется, просто распаковать).
2. Драйвер для платы Anet. Я его положил в папку drivers ардуины, это исполняемый файл CH341SER.EXE. На Windows 7 x32/x64 он точно работает, на десятке — не знаю, не проверял. Если что — просто ищите драйвер для USB-чипа CH340.
3. Сам Мерлин. Качается с официального сайта — http://marlinfw.org/meta/download/ . Или можете скачать мой вариант со всеми внесенными изменениями — https://drive.google.com/open?id=1AHrjKjkdDCrw0e_sYMsCcGfAPaskJPkT.
Итак, распаковали в отдельные папки Ардуину и Мерлина, что дальше?
Устанавливаем драйвер для платы Anet — запускаем файл CH341SER.EXE из папки drivers ардуины и соглашаемся со всеми предупреждениями об установке драйвера.
Если Вы скачали Мерлина с официального сайта, то необходимо сделать это: заходим в папку Мерлина и копируем файлы Configuration.h и Configuration_adv.h из папки Marlinexample_configurationsAnetA8 (или A6 если у Вас этот принтер) в папку Marlin. Соглашаемся с заменой файлов при запросе.
Если Мерлин скачан в моем варианте, то копировать конфиги не нужно.
1. Подключаем принтер к компьютеру (питание на принтер должно быть подано), убеждаемся, что он нормально виден в системе (в диспетчере устройств в разделе ‘Порты (COM и LPT)’ должен появиться пункт ‘USB-SERIAL CH430 (COMxx)’, где xx — это присвоенный ему номер порта).
2. Запускаем Ардуину файлом arduino.exe и в ней открываем файл Marlin.ino из папки Marlin. У Вас откроется скетч прошивки. Заходим в меню Инструменты->Плата и выбираем тем плату Anet V1.0 если она не выбрана. Потом меню Инструменты->Порт и выбираем тот COM-порт, который присвоен принтеру (см. п. 1).
Все, теперь прошивку можно скомпилировать (меню Скетч->Проверить/Компилировать или Control+R) и залить в принтер (меню Скетч->Загрузка или Control+U). В процессе компиляции и загрузки внизу будет отображаться ход процесса. После загрузки принтер автоматически перезагрузится и будет готов к работе.
При желании Вы можете изменить различные параметры прошивки и заново скомпилировать и загрузить ее, но в оригинальном Мерлине с конфигами для Анетов по умолчанию все настроено в рабочем варианте, можно загружать и пользоваться как есть.
Опишу какие параметры были изменены мной и которые, возможно, захотите изменить Вы сами под свои нужды.
В файле Configuration.h:
— раскомментировал CUSTOM_MACHINE_NAME и внес в него название принтера Anet A8. Это просто отображение названия при включении принтера.
— изменил значение HEATER_0_MAXTEMP на 300 — максимальная температура сопла.
— изменил значение BED_MAXTEMP на 150 — максимальная температура стола.
— закомментировал родные значения PID для экструдера:
#define DEFAULT_Kp 21.0
#define DEFAULT_Ki 1.25
#define DEFAULT_Kd 86.0
и вставил свои, полученные от калибровки:
// ANET A8 Standard Extruder at 220 Degree Celsius and 100% Fan
#define DEFAULT_Kp 20.40
#define DEFAULT_Ki 1.62
#define DEFAULT_Kd 64.35
— раскомментировал PIDTEMPBED и закомментировал BED_LIMIT_SWITCHING , однако это можно делать только если нагрев стола подключен не через реле. В оригинальной конструкции принтера — можно
— закомментировал родные значения PID для стола:
#define DEFAULT_bedKp 10.00
#define DEFAULT_bedKi .023
#define DEFAULT_bedKd 305.4
и вставил свои, полученные от калибровки:
//12V 120W aluminium + 12V 200W silicone with tempered glass Anycubic Ultrabase
//from autocalibrate at 120 degree
#define DEFAULT_bedKp 158.57
#define DEFAULT_bedKi 12.92
#define DEFAULT_bedKd 486.48
ВНИМАНИЕ: на оригинальном столе лучше оставить родные значения. У меня в дополнение к родному столу наклеена еще 300-ваттная силиконовая грелка, поэтому значения PID потребовали изменений.
— изменил значение Z_MIN_ENDSTOP_INVERTING на false, но у меня родной концевик заменен на оптический, в оригинальном принтере это делать не нужно.
— заменил значение DEFAULT_TRAVEL_ACCELERATION на 400
— раскомментировал PROBE_MANUALLY
— закомментировал MIN_SOFTWARE_ENDSTOPS
— раскомментировал MESH_BED_LEVELING — эта опция и PROBE_MANUALLY нужны для возможности время от времени выставить автовыравнивание в полуавтоматическом режиме, когда принтер двигает сопло к очередной из 9 точек, а пользователь кнопками ‘вверх’ и ‘вниз’ подгоняет сопло к столу. Затем результаты выравнивания можно сохранить в EPROM.
— изменил значение MESH_INSET на 20 — это отступ от краев стола для крайних точек авто выравнивания
— раскомментировал LCD_BED_LEVELING — для тех же целей, что и предыдущий пункт.
— изменил значение HOMING_FEEDRATE_XY на (30*60) , а то уж больно резво он мчится к концевикам по X и Y
— заменил блок
#define PREHEAT_1_TEMP_HOTEND 190
#define PREHEAT_1_TEMP_BED 60
#define PREHEAT_1_FAN_SPEED 0 // ANET A6 Default is 255
#define PREHEAT_2_TEMP_HOTEND 240
#define PREHEAT_2_TEMP_BED 90
#define PREHEAT_2_FAN_SPEED 0 // ANET A6 Default is 255
на
#define PREHEAT_1_TEMP_HOTEND 180
#define PREHEAT_1_TEMP_BED 60
#define PREHEAT_1_FAN_SPEED 0 // ANET A6 Default is 255
#define PREHEAT_2_TEMP_HOTEND 220
#define PREHEAT_2_TEMP_BED 105
#define PREHEAT_2_FAN_SPEED 0 // ANET A6 Default is 255
просто мне так удобнее. Первая группа — это установки преднагрева (включаемого через меню принтера) для PLA, вторая — для ABS.
— раскомментировал INDIVIDUAL_AXIS_HOMING_MENU — это позволяет из меню хомить оси по отдельности, а не только все скопом, иногда бывает удобно.
Все, сохраняем изменения, компилируем и загружаем в принтер, все работает, радуемся
Что заметил из плюсов по сравнению со Скайнетом 2.3.2:
— гораздо быстрее стал реагировать на нажатие кнопок, уже почти нормальная реакция, а не как было — жать надо было вдумчиво, не торопясь
— ось Z теперь можно двигать через меню не только по 0.1 и 1 мм, но и по 10. В Скайнете я для этого специально ковырялся в исходниках, делал эту возможность.
— при длительном удержании кнопки на изменение какого-то значения (температуры, координаты, скорости вентилятора и т.п.) после 10 изменений обычным шагом начинаются изменение с шагом х10, после 10 этих — с шагом по х100. Например, нужно увеличить скорость вентилятора через меню — захожу в соответствующий пункт и нажимаю кнопку ‘вверх’, значение вентилятора начинает расти с шагом 1, но после 10 таких шагов оно начинает увеличиваться уже с шагом 10, а после 10 этих больших шагов начинает расти с шагом 100. Очень стало удобно, потому что раньше был только минимальный шаг со скорость его изменения 2 шага в секунду.
— в меню преднагрева теперь можно выбрать три варианта — нагрев сопла, нагрев стола и нагрев их обоих. Раньше отдельно нагрева сопла не было. Тоже добавляет удобства.
Больше явных плюсов/минусов не заметил, но сам только сегодня прошился, еще не успел повозиться плотно
Установка программного обеспечения
Для работы 3D принтера необходимо скачать и установить следующее программное обеспечение:
- Драйвер виртуального COM-порта
- Управляющая программа Repetier-Host
- Настройки слайсеров и принтера
Некоторые антивирусные программы могут ложно срабатывать на файлы из сети. В таком случае выключите антивирус на время установки.
Последовательность установки
- Сначала установите драйвер — скачайте и запустите от имени Администратора (правая кнопка мыши «запуск от имени Администратора») файл serial_install.exe (примечания и установка на 64 битные системы ниже)
После установки драйвера подключите принтер к USB порту компьютера, он найдет устройство и определит ему COM-порт.
— - Скачайте и установите программу Repetier Host. Вместе с ней установятся необходимые программы, в том числе и программы-слайсеры.
Во время установки рекомендуем отключить установку «Server», т.к. для работы он не нужен и может помешать нормальной работе.
—
- Установите настройки для Вашего принтера.
Вместе с настройками будет установлен исправленный русский интерфейс, скрипты и ссылка на раздел помощи.- Magnum Creative 2 UNI
- Magnum Creative 2 PRO
- Magnum Creative 2 PLA
- Magnum Education
- Magnum Modus A
- Magnum TT
Обратите внимание! Профили слайсинга «Magnum 3D» и «Magnum 3D Vase» будут перезаписаны! Если Вы делали изменения в них и хотите их сохранить, то просто переименуйте их в слайсере перед установкой.
- После установки настроек при первом запуске программы Repetier-Host выберите COM-порт к которому подключен Ваш 3D принтер, т.к. по умолчанию инсталятор прописывает COM3 (подробнее).
— - Обновите скрипты по инструкции (эти обновления будут внесены в следующую версию инсталятора).
Установка на 64-х системы Windows 7 и выше
Установка на такие системы требует подписанного драйвера.
Перезагрузите компьютер, при загрузке нажмите F8 и выберите вариант
Отключить принудительное подписание драйверов
Установите драйвер как написано в пункте №1. Перезагрузитесь в обычный режим.
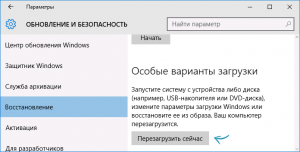
Установка на 64-х системы Windows 10
Зайдите меню пуск в «Параметры» — «Обновление и безопасность» — «Восстановление». Затем, в разделе «Особые варианты загрузки» нажмите «Перезагрузить сейчас».
После перезагрузки, пройдите по следующему пути: «Диагностика» — «Дополнительные параметры» — «Параметры загрузки» и нажмите кнопку «Перезагрузить». После перезагрузки появится меню выборов параметров, которые будут использоваться в этот раз в Windows 10.
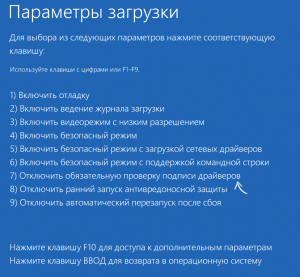
Для того, чтобы отключить проверку цифровой подписи драйверов, выберите соответствующий пункт, нажав клавишу 7 или F7. Готово, Windows 10 загрузится с отключенной проверкой, и вы сможете установить неподписанный драйвер.
Альтернативный способ установки драйвера
Этот способ рекомендуется при подключении к 64 битным системам, если у Вас не получилось установить драйвер по инструкции выше.
При подключении принтера к компьютеру для неизвестного устройства USB Serial надо выбрать драйвер самому — в разделе Модемы выбрать Compaq а потом устройство Ricochet Wireless USB Modem.
![]()
I can’t get my Anet to anything but the test stuff.. I load the STL files, Hit print.. Nothing.. Same with gcode stuff, save as g code or STL, try to print.. Nothing.. Tried cura from the SD card I got with it, and 3d builder from my PC. Still Nothing.. What am I doing wrong?

A printer can only load gcode files. Gcode is machine line code with instructions for the printer. An STL file is a textual representation of a graphical model.
The process is:
- Create a model in one of the 3D design programs (or skip this if you download something from this site)
- Save the model you created as an STL file (skip this if STL is donloaded)
- Now double click the STL file or open it in Cura or Repetier.
- Slice the STL model using Cura slicer or the slicer Slic3r in Repetier to generate gcode
- save gcode to a .gcode file
- upload the gcode onto the SD
- load gcode file in printer from SD card
and off you go!
Note you can skip the whole SD card when the printer is connected to your computer using Cura/Repetier/OctoPrint/Astroprint, etc.
![]()
Got Anet A8 from gearbest SD card goes crazy when you try to use buttons can find no help so far. down loaded driveer ,cura. and repetier and still no help . watched utube but cant find any on set up of firmware. please help if u can. thank you Denny
So why hijack an old topic while you could have started a new one where more people can help you?
Please open a new topic and describe in more detail what happens and what you tried.
![]()

No drivers needed on Win10. It’s plug and play. But I have heard if you have issues, there are drivers on the original MicroSD that came with the printer.

Download Repetier-Host, its free & its way better than printing from the SD Card. you have complete control of the printer while its printing & can even change the flow rate, feed rate, fan speed, bed temp, & extruder temp, during the printing process. it even has its own slicer which uses the cura engine but the print take way less time to print than if you used the actual cura program. hope this helps & goodluck.
Until your PC decides to go to sleep, restart or crash, SD card printing is far more reliable. Otherwise put Repetier server (or OctoPrint which is totally free) on a Raspberry Pi that is connected to your network and your 3D printer.
@Beljum Nice you disabled everything, but an operating system can crash, whatever precautions you have taken. SD printing just is more reliable, using Repetier is more convenient for options.
that’s why i turned off sleep/hibernate mode or screensaver, & to not restart without permissions. also i have a reliable laptop so i don’t worry myself about it crashing. being able to make all those different adjustments mid-print with the click of a mouse & not having to navigate the tedious menu of the printer itself outweighs using the sd card method. but that’s just my opinion, which doesn’t matter, because i’m just a nobody. anywho, give it a try, if repetier ends up not tickling your fancy just trash it & go back to the sd card or some other method. ohh Simplify3D is really really awesome buuuut unfortunately not everyone wants to pay its hefty pricetag to get it…
![]()
I had a similar problem and a friend fixed it for me by, I think, setting the baud (baut?) rate for the applicable COM port to 11xxx (not sure exactly).
There is a CH340G driver on the SD card under the software folder.
![]()
I have an anet A8 and it should be plug and play with windows 10. What happens when you plug it into your windows 10 machine? Don’t have a mac so I can’t help with mac.
I was messing around with cura 2.3 and was avoiding cura 15.4.6 so I found these drivers: http://www.arduined.eu/files/windows8/CH341SER.zip
don’t remember where I got that, but its from another website as far as I remember
![]()
3 years on and these drivers are still saving lives 
For anyone looking for a windows driver, this it’s the one! It even works for my old 32bit Windows XP lappy.
Thanks for sharing the link
![]()
Thank you for that driver! This is the only way I can print on my a8. I use cura 15.04
![]()

You need a host program. Download Repetier-Host to utilize your USB.
Keep in mind, SD cards are the most reliable way to print. When printing from your computer, the computer feeds signal the entire time of the print. If something glitches with your computer, like an automatic update, your print is screwed. Also, you won’t be able to websurf while it prints, because buffering can glitch your print when printing from the computer too.
The least amount of connections the better. I use SD cards.

Fun thing I discovered the other day, if you have the USB cable connected between the printer and the PC, the printer will reboot spontaneously if you happen to reboot the PC for any reason. even in the middle of a print, FROM THE SD CARD. (capslock to emphasize my annoyance)
better to leave the usb cable unplugged when printing.

Alright thanks, the ultimate goal is to run octoprint i just want to make sure the ports work before starting that project.

Octoprint runs good. I’ve ran it with the OEM software and Skynet which is what I upgraded to for the bed level sensor. If you are planning to use a Raspberry Pi make sure you direct connect (not Wifi) to you router. Otherwise you will have issues.

Hi.
I have problems connecting directly with my macmini. Installed the portdrivers that came with the printer. But no luck so far. Did try to uppdaterad firmware on the a8. But Arduino IDE cant find the printer.
Think the problem is the port driver.
So, I installed octoprint on a pi last night. Connects via webinterface. So there is no problem connecting that way. Im a noob in the field of arduino and pi. Have some left to do with the config.
That Said. Sd card is very trouble free. I will use octoprint as a way to check and accsess long prints at distance.

Octoprint runs stable with my A8 , i also use Nautilus to remote control it via iPad/ iPhone
Try to become familiar with host like Repetier or Cura first.
Я полный нуб, когда дело доходит до мира 3d-печати. Я только что закончил сборку принтера и подключил его к компьютеру с помощью прилагаемого USB-кабеля, и ничего не произошло. Мой компьютер распознает подключаемый принтер, но на нем просто написано «непризнанное устройство в com 4». Больше ничего, кроме этого. Кто-нибудь, пожалуйста, помогите мне со следующими шагами, которые необходимо предпринять, чтобы мой процессор разговаривал с моим принтером.
, 👍4
Обсуждение
3 ответа
Лучший ответ:
Ваш вопрос касается подключения компьютера (USB), поэтому этот вопрос будет рассмотрен в этом ответе. Для подключения к принтеру вам понадобятся 2 вещи (помимо очевидных вещей, таких как компьютер, принтер и кабель):
- Рабочий драйвер CH340,установленный на компьютере для связи по USB с платой,
- часть программного обеспечения для связи с компьютером со скоростью передачи битов, понятной принтеру.
Дешевые платы на базе Arduino основаны на чипе CH340 для USB-связи. Вам следует проверить, правильно ли вы установили этот драйвер. Эти драйверы являются ошибочными и могут вызвать проблемы. Когда-то проводилась повторная установка, однажды она сработала для меня.
SD — карта, поставляемая Anet, содержит папку (на моей SD-карте: .A8a8资料 Программное обеспечение Диск CH340G) с файлом установщика драйвера. После правильной установки вы сможете подключать различные приложения к A8 при условии, что вы используете правильную скорость передачи данных 115200.
Все это говорит о том, задаете ли вы правильный вопрос? Зачем вам нужно подключаться к компьютеру, так как вы можете печатать просто отлично, поместив нарезанные файлы .stl (файлы.gcode) на SD-карту (при вставке в компьютер с помощью адаптера) и снова вставьте карту в принтер, чтобы выбрать файл с помощью кнопок меню принтера. Печать с SD-карты считается более безопасной, чем печать с компьютера через USB, так как печать прекратится при выключении или сбое компьютера.
8 мая 18,
@0scar
Попробуйте использовать прилагаемую SD-карту и адаптер SD с Cura, чтобы ввести g-код принтера. Если ваш компьютер неправильно взаимодействует с принтером, вы можете просто загрузить Cura 14 (он поставляется на SD-карте) и загрузить файл конфигурации (также на SD-карте). Затем вы можете подключить SD-карту к основной плате и получить доступ к ней с помощью ЖК-экрана.
8 мая 18,
@TECTEC3 Studios
Большинство новейших систем Windows 10 с высокоскоростным USB (USB3.0) не распознают последовательный разъем USB (который находится здесь: CH430).
Попробуйте использовать приличный концентратор USB 2.0 с автономным питанием, который, как было замечено, устраняет большинство проблем с портом USB 3.0, или попробуйте отключить принудительное использование подписи драйвера на Win10.
2 сен 19,
@VAIRAMUTHU
Your question addresses (USB) computer connection, so that will be addressed in this answer. For connection to the printer, you need 2 things (apart from the apparent things as computer, printer and cable):
- A working CH340 driver installed on the computer for USB communication with the board,
- a piece of software to talk to the computer at a bit transfer rate the printer understands.
The cheap Arduino based boards rely on the CH340 chip for USB communication. You should check whether you have correctly installed this driver. These drivers are erroneous and prone to cause problems. Sometime re-installation works, once did work for me.
The SD card supplied by Anet contains a folder (on my SD card: .A8A8资料SoftwareCH340G Drive) with the installer file of the driver. Once installed properly, you should be able to connect various applications to the A8, provided you use the correct baud rate of 115200.
All this said, are you asking the correct question? Why do you need to connect to a computer, as you can print just fine by putting sliced .stl files (.gcode files) onto the SD card (when inserted in the computer using the adapter) and reinsert the card again in the printer to select the file using the menu buttons of the printer. Printing from SD card is considered safer then printing via the computer over USB as the print will stop when the PC is shut down or crashes.
anet_a8.7z
|
Имя файла: anet_a8.7z Размер файла: 96.84 MB Файл загружен: 20/06/2018 21:54:44 Файл скачали: 360 Поделиться этой ссылкой |
<a href=»https://wdfiles.ru/5qwp» target=»_blank» title=»Download from загрузить файл»>Скачать anet_a8.7z — загрузить файл</a>
[url]https://wdfiles.ru/5qwp[/url]
подойдёт для вставки в документы или презентации.
Или получить файл на мобильное устройство, отсканировав QR-код программой с мобильного устройства
Приветствуем Вас на файлообменнике WdFiles.ru!
Ресурс WDfiles.RU был задуман как бесплатный файлообменник. Согласитесь, удобно с его помощью делиться файлами, или перемещать их с одного устройства на другое!
Всем спасибо за использование нашего ресурса!
Преимущества:
Прямые загрузки. Без ожидания.
Отсутствие рекламы.
Неограниченное количество загрузок.
Максимальная скорость загрузки.
Техподдержка (support@wdfiles.ru).
Неограниченная файловая зона.
Файлы в премиум-аккаунте хранятся вечно.
Загрузка файла размером свыше 10.00 GB .
Отсутствие ограничения на загрузки.
Низкая цена в сутки.
Отсутствие подписок.