Welcome to Apache Tomcat!
What Is It?
The Apache Tomcat® software is an open source implementation of the Java
Servlet, JavaServer Pages, Java Expression Language and Java WebSocket
technologies. The Java Servlet, JavaServer Pages, Java Expression Language and
Java WebSocket specifications are developed under the
Java Community Process.
The Apache Tomcat software is developed in an open and participatory
environment and released under the
Apache License version 2. The Apache Tomcat
project is intended to be a collaboration of the best-of-breed developers from
around the world. We invite you to participate in this open development
project. To learn more about getting involved,
click here or keep reading.
Apache Tomcat software powers numerous large-scale, mission-critical web
applications across a diverse range of industries and organizations. Some of
these users and their stories are listed on the
PoweredBy wiki page.
Apache Tomcat, Tomcat, Apache, the Apache feather, and the Apache Tomcat
project logo are trademarks of the Apache Software Foundation.
Get It
For every major Tomcat version there is one download page containing
links to the latest binary and source code downloads, but also
links for browsing the download directories and archives:
- Tomcat 11
- Tomcat 10
- Tomcat 9
- Tomcat 8
- Tomcat 7
To facilitate choosing the right major Tomcat version one, we have provided a
version overview page.
Documentation
The documentation available as of the date of this release is
included in the docs webapp which ships with tomcat. You can access that webapp
by starting tomcat and visiting http://localhost:8080/docs/ in your browser.
The most up-to-date documentation for each version can be found at:
- Tomcat 11.0
- Tomcat 10
- Tomcat 9
- Tomcat 8
Installation
Please see RUNNING.txt for more info.
Licensing
Please see LICENSE for more info.
Support and Mailing List Information
-
Free community support is available through the
tomcat-users email list and
a dedicated IRC channel (#tomcat on
Freenode). -
If you want freely available support for running Apache Tomcat, please see the
resources page here. -
If you want to be informed about new code releases, bug fixes,
security fixes, general news and information about Apache Tomcat, please
subscribe to the
tomcat-announce email
list. -
If you have a concrete bug report for Apache Tomcat, please see the
instructions for reporting a bug
here.
Contributing
Please see CONTRIBUTING for more info.
Each software is released under license type that can be found on program pages as well as on search or category pages. Here are the most common license types:
Freeware
Freeware programs can be downloaded used free of charge and without any time limitations. Freeware products can be used free of charge for both personal and professional (commercial use).
Open Source
Open Source software is software with source code that anyone can inspect, modify or enhance. Programs released under this license can be used at no cost for both personal and commercial purposes. There are many different open source licenses but they all must comply with the Open Source Definition — in brief: the software can be freely used, modified and shared.
Free to Play
This license is commonly used for video games and it allows users to download and play the game for free. Basically, a product is offered Free to Play (Freemium) and the user can decide if he wants to pay the money (Premium) for additional features, services, virtual or physical goods that expand the functionality of the game. In some cases, ads may be show to the users.
Demo
Demo programs have a limited functionality for free, but charge for an advanced set of features or for the removal of advertisements from the program’s interfaces. In some cases, all the functionality is disabled until the license is purchased. Demos are usually not time-limited (like Trial software) but the functionality is limited.
Trial
Trial software allows the user to evaluate the software for a limited amount of time. After that trial period (usually 15 to 90 days) the user can decide whether to buy the software or not. Even though, most trial software products are only time-limited some also have feature limitations.
Paid
Usually commercial software or games are produced for sale or to serve a commercial purpose.
Обновлено
2019-06-11 12:08:58
Совместимость
Windows XP, Windows Vista, Windows 7, Windows 8, Windows 10
Описание
Apache Tomcat — это веб-сервер, написанный на Java и предоставляющий возможность исполнять Java-код и запускать соответствующие веб-приложения на сервере.
Описание:
Веб-сервер, разработанный на Java. Он предоставит вам чистую среду Java, что позволит запускать соответствующий код и веб-приложения на сервере, вместо браузеров посетителей сайта. Это позволит значительно улучшить надежность работы веб-приложений, а также их время отклика.
Apache Tomcat может использоваться как в качестве самостоятельного веб-сервера, так и в сочетании с веб-сервером Apache HTTP Server, либо в качестве контейнера сервлетов в серверах JBoss и GlassFish.
Версии
Introduction
Apache Tomcat is an open-source web server and servlet container for Java code. Tomcat executes programs written in the Java programming language, and it implements many Java EE specifications, including Jakarta Servlet, Jakarta Server Pages, and others.
In this tutorial, you will learn to install the Apache Tomcat server on Windows.
Prerequisites:
- Java JRE installed and configured
- Administrator privileges
In this section, we will cover two ways of installing the Tomcat web server:
- Via Windows Service Installer.
- From a zip archive.
Follow the steps below to download and install Tomcat.
Step 1: Download Tomcat for Windows
To download the Tomcat installation file, follow the steps below:
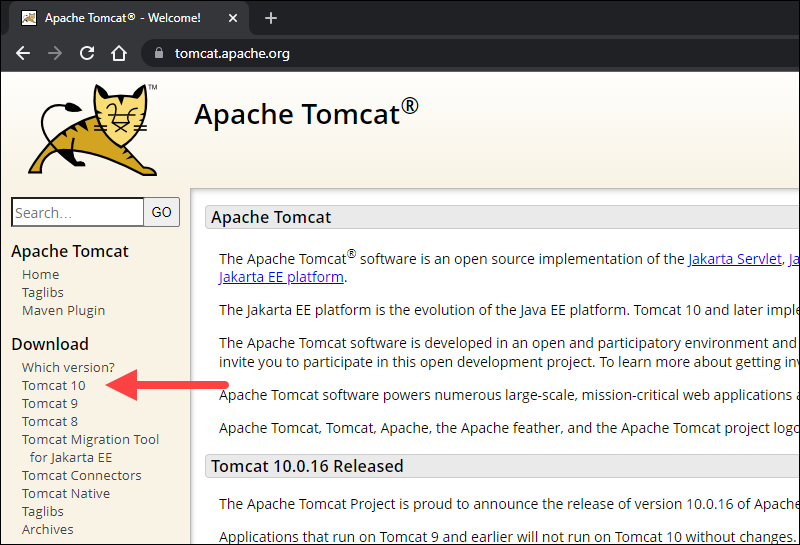
1. Browse to the official Apache Tomcat website. Locate the Download section and click the latest Tomcat version available. At the time of writing this article, the latest Tomcat version was version 10.
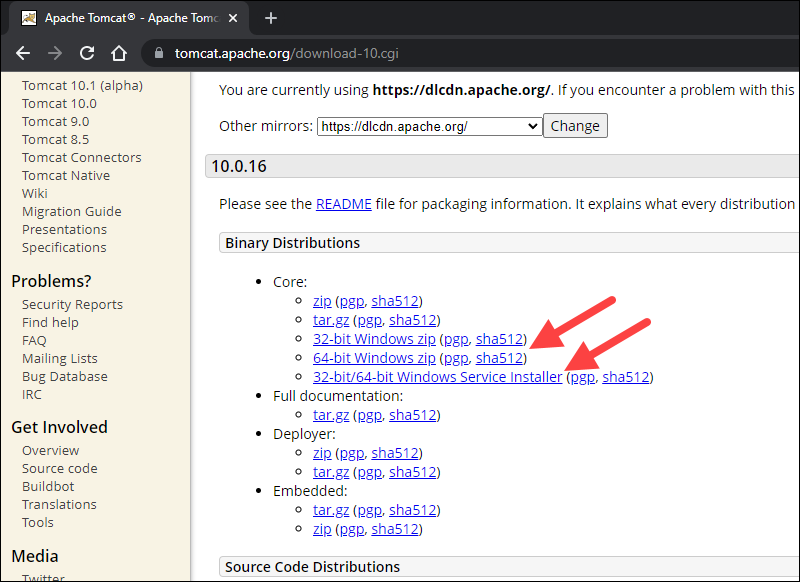
2. On the Download page, scroll down and locate the Binary Distributions area.
In the Core list, depending on the installation type you prefer, click the download link for the Windows Service Installer or the 32bit/64bit Windows zip file.
Step 2: Install Tomcat
Install Tomcat via the Windows Service Installer for an automated and wizard-guided experience. The service installer installs the Tomcat service and runs it automatically when the system boots.
For a portable experience, install Tomcat using the zip file and avoid installing the service. Easily uninstall Tomcat when it is no longer needed by deleting the Tomcat directory, or move it around when necessary.
Note: Take a look at our list of 13 best Java IDEs, which help write, debug, and test Java code.
Method 1: Install Tomcat Using the Windows Service Installer
Follow the steps below to install Tomcat using the Windows Service Installer.
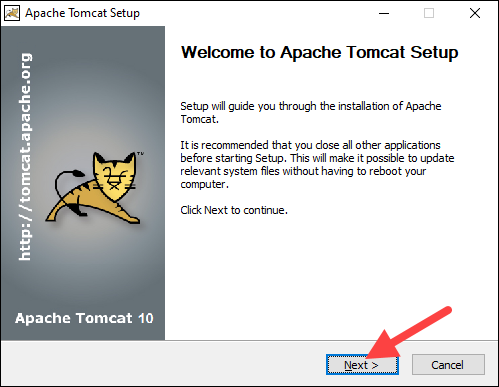
1. Open the downloaded Windows Service Installer file to start the installation process.
2. In the Tomcat Setup welcome screen, click Next to proceed.
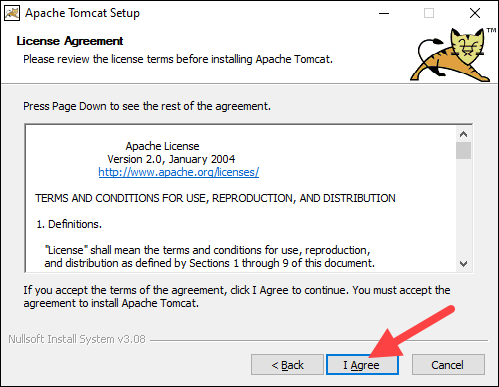
3. Read the License Agreement and if you agree to the terms, click I Agree to proceed to the next step.
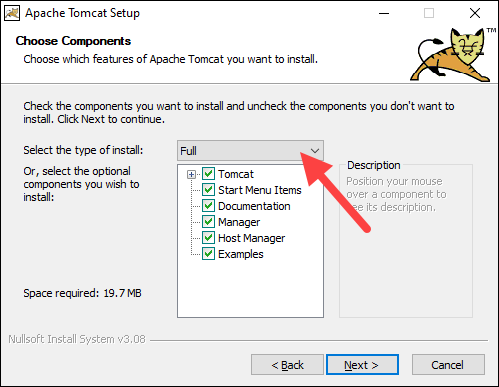
4. In the Tomcat component selection screen, choose Full in the dropdown menu to ensure the wizard installs the Tomcat Host Manager and Servlet and JSP examples web applications. Alternatively, keep the default Normal installation type and click Next.
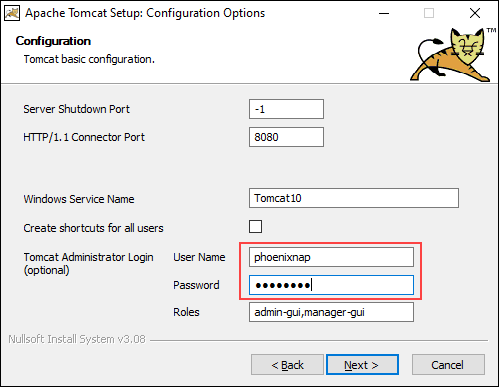
5. The next step configures the Tomcat server. For instance, enter the Administrator login credentials or choose a different connection port. When finished, click Next to proceed to the next step.
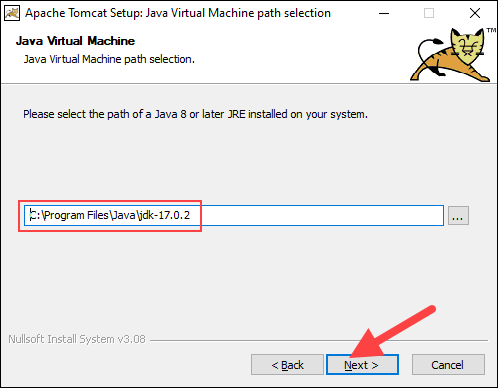
6. The next step requires you to enter the full path to the JRE directory on your system. The wizard auto-completes this if you have previously set up the Java environment variables. Click Next to proceed to the next step.
7. Choose the Tomcat server install location or keep the default one and click Install.

8. Check the Run Apache Tomcat box to start the service after the installation finishes. Optionally, check the Show Readme box to see the Readme file. To complete the installation, click Finish.
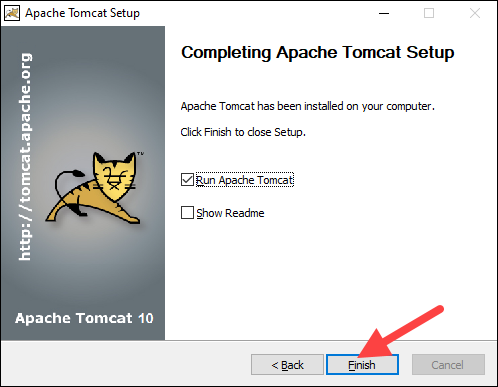
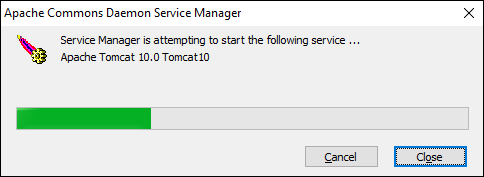
9. A popup window appears that starts the Tomcat service. After the process completes, the window closes automatically. The Apache Tomcat web server is now successfully installed .
Method 2: Install Tomcat Using the zip Archive
Follow the steps below to set up the Tomcat server using the zip archive.
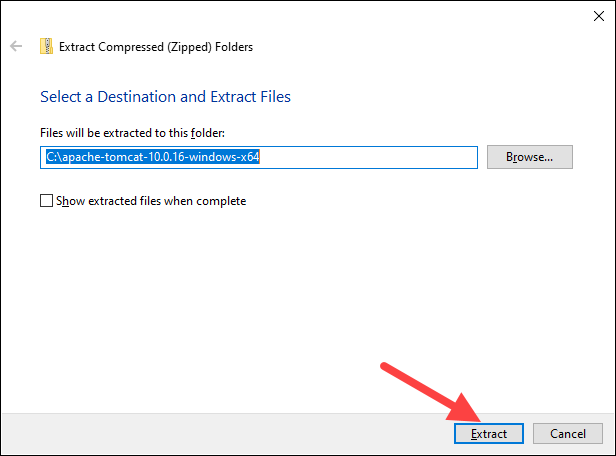
1. After downloading the 32bit/64bit Windows zip file, depending on your Windows version, unzip the downloaded file. Right-click the file and select Extract all…
2. Choose where to extract the archive contents. For easier navigation, we recommend extracting it to the hard drive’s root. Optionally, give the directory a shorter name to facilitate server configuration later. Click Extract to start the process.
3. Navigate to the conf sub-directory within the extracted directory and locate the server.xml file.
Important: Back up the .xml files before making any changes.
4. The default connection port is 8080. To choose a different port, edit the server.xml file with a text editor, such as Notepad++, and locate the following lines:
<Connector port="8080" protocol="HTTP/1.1"
           connectionTimeout="20000"
           redirectPort="8443" />
Change the connector port number to any number between 1024 and 65535.
5. To enable directory browsing, locate the web.xml file in the conf directory and edit the file with a text editor. Directory browsing helps when testing the system, and sometimes it may be the solution for a 403 forbidden error.
Locate the following lines and change the listings value from false to true:
<servlet>
  <servlet-name>default</servlet-name>
  <servlet-class>org.apache.catalina.servlets.DefaultServlet</servlet-class>
  <init-param>
    <param-name>debug</param-name>
    <param-value>0</param-value>
  </init-param>
  <init-param>
    <param-name>listings</param-name>
    <param-value>false</param-value>
  </init-param>
  <load-on-startup>1</load-on-startup>
</servlet>
6. Implement an auto-reload feature by editing the context.xml file. Above all, auto-reload is useful in development to prevent restarting the server manually each time a change is made.
Using a text editor, open the context.xml file. Locate the following line and change the value from false to true in each instance:
<Context reloadable="false" crossContext="false" parallelAnnotationScanning="false">
   ......
   ......
</Context>
7. After making the changes, start the server. Press the Windows key and type cmd. Press Enter to open a Command Prompt window.
8. Move to the bin directory of your Tomcat server and run:
startup
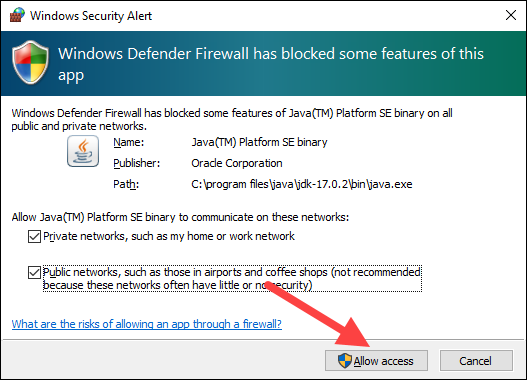
8. Add an exception for Tomcat in the firewall:
9. A new Tomcat console window appears. This console receives error messages and system.out.println() messages issued by the Java servlets.
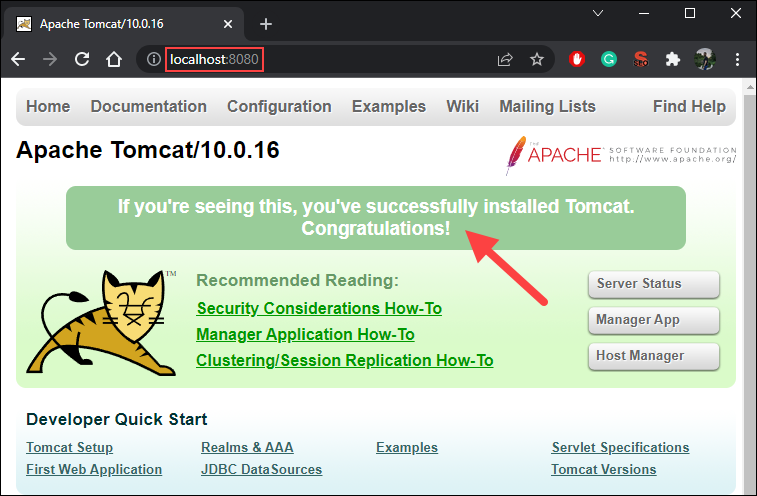
10. Access the server using a browser as an HTTP client. Browse to http://localhost:8080 and access the Tomcat welcome page to ensure the server works.
In addition, use the Developer Quick Start links to see more information about the server and start using and configuring the server.
11. Shut down the Tomcat server by pressing Ctrl+C on the Tomcat console.
Step 3: Check if Apache Tomcat Service Is Running
Installing Tomcat using the Windows Service Installer installs Tomcat as a Windows service that automatically runs on boot. Follow the steps below to ensure that Tomcat is started as a Windows service.
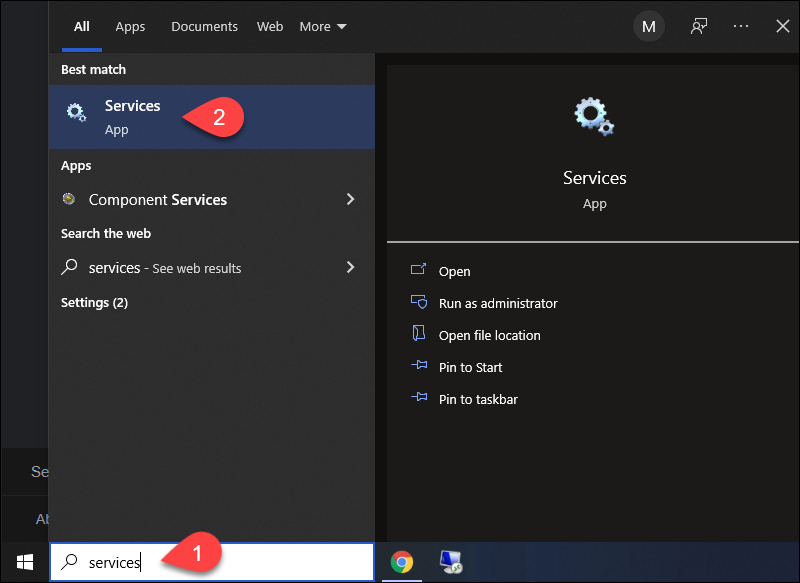
1. Open the Start menu and search for Services.
2. Select the Services result.
3. In the Services window, locate the Apache Tomcat service. The Status column indicates whether the service is running or not. Start or Stop the service using the buttons in the toolbar or by pressing Stop or Restart on the left side of the service list.
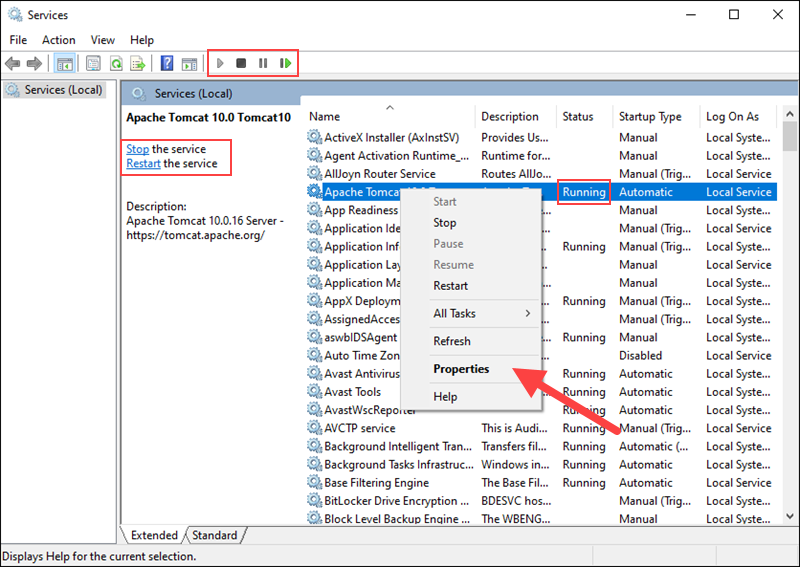
Configure the service startup by right-clicking the Tomcat service and selecting Properties.
4. In the Properties window, under the Startup type dropdown menu, select how to run the Tomcat service:
- Automatic (Delayed Start). Starts the service shortly after boot. A delayed start improves server boot performance and has security benefits.
- Automatic. Automatically starts the service on boot.
- Manual. The service starts only when Windows or another service needs it or if invoked.
- Disabled. Disables the service startup, even if you try to start it.
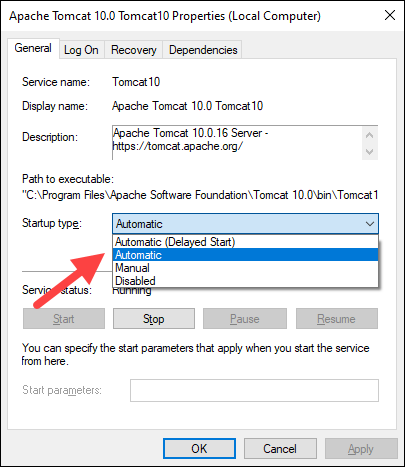
Click OK to confirm the changes.
Note: If you are looking for a different operating system, our Knowledge Base also has a tutorial on how to install Tomcat on Ubuntu.
Conclusion
This guide showed how to install the Apache Tomcat web server on Windows. While Tomcat doesn’t provide all the features of Java EE, many applications require only the features that Tomcat provides. Therefore, heavier tools aren’t always necessary.
Learn more about servers in our tutorial on big data servers, or learn what a database server is.
Предположительно у вас система Windows 7, разрядность: 64 Bits
Подробнее

Скачать Apache Tomcat 10.1.4 с официального сайта
Этот файл мы отметили как основной. Если вы не знаете что скачивать, то скачивайте его.
12.88 Мб
Подробнее
![]()
0
![]()
0
apache-tomcat-10.1.4.exe
|
apache-mirror.rbc.ru
MD5: b063797dba4c2452c15d230f78d77c46
SHA256: 55e0c6ecbd8a8151ec2a1ad7eb96c99d6e2dfe65486216e890fd2147d02873d2
Скачать Apache Tomcat 10.1.4 с нашего сайта
12.88 Мб
✔
Проверено антивирусами
Подробнее
![]()
0
![]()
0
apache-tomcat-10.1.4.exe
|
soft.mydiv.net
MD5: b063797dba4c2452c15d230f78d77c46
SHA256: 55e0c6ecbd8a8151ec2a1ad7eb96c99d6e2dfe65486216e890fd2147d02873d2
Скачать Apache Tomcat 10.0.27 с нашего сайта
12.24 Мб
✔
Проверено антивирусами
Подробнее
![]()
0
![]()
0
apache-tomcat-10.0.27.exe
|
soft.mydiv.net
MD5: 8a9ffc5e66b7bc25aa964b3a3b9c61fe
SHA256: 56f552783aaf7d0ccea955450a60e2b6a0e5e0dc680b8a0a2b6dc68975a08e35
Внимание! Мы стараемся тщательно проверять все программы, но не гарантируем абсолютную безопасность скачиваемых файлов. Администрация сайта не
несет ответственности за содержание файлов, программ и возможный вред от их использования.
In this article, I will show you how to install tomcat 9 on windows 10 correctly.
1. Prerequisites.
- The tomcat 9 supports JDK version 8 and later. So you need to install JDK 8 or higher version to run tomcat 9.
- You can open a dos window and run the command java -version to check the current installed JDK version.
> java -version
java version "1.8.0_131"
Java(TM) SE Runtime Environment (build 1.8.0_131-b11)
Java HotSpot(TM) 64-Bit Server VM (build 25.131-b11, mixed mode)
- If your JDK version is less than 8.0, you can click here to download JDK 8 according to your operating system.
2. Install Tomcat And Start It From Command-Line.
- Many web application developers like to run Tomcat from command-line, in most cases, they just run it from eclipse they used. Following are the steps to achieve this.
- Click here to go to the Tomcat 9.0 download page.
- You can find the download link on the above page Binary Distributions/Core area.
- Because I want to demo how to start Tomcat from the command line, so I download the Tomcat zip file, this is a cross-platform version.
- Unzip the zip file into a local folder like D:WorkToolapache-tomcat-9.0.45.
- Edit the confweb.xml file under your installation directory. It is D:WorkToolapache-tomcat-9.0.45confweb.xml in my Windows 10.
- Search text org.apache.jasper.servlet.JspServlet in web.xml file and add the 2 initial parameters ( compilerSourceVM, compilerTargetVM ) in it like below.
<servlet> <servlet-name>jsp</servlet-name> <servlet-class>org.apache.jasper.servlet.JspServlet</servlet-class> <init-param> <param-name>fork</param-name> <param-value>false</param-value> </init-param> <init-param> <param-name>xpoweredBy</param-name> <param-value>false</param-value> </init-param> <init-param> <param-name>compilerSourceVM</param-name> <param-value>1.8</param-value> </init-param> <init-param> <param-name>compilerTargetVM</param-name> <param-value>1.8</param-value> </init-param> <load-on-startup>3</load-on-startup> </servlet> - Now the Tomcat will compile JSP files with language features provided by Java SE 8 after adding the above 2 servlets init parameters.
- Before you can start it up, you need to set JAVA_HOME system environment variable’s value to the JDK 8 ‘s home you just installed. You can read the article How To Set Java Environment Variable JAVA_HOME, CLASSPATH, PATH to learn more.
- If you do not set the JAVA_HOME environment variable, when you start Tomcat it will display an error message like below.
D:WorkToolapache-tomcat-9.0.45bin> .startup.bat
Neither the JAVA_HOME nor the JRE_HOME environment variable is defined
At least one of these environment variable is needed to run this program
- After setting JAVA_HOME environment variable, you need to restart your dos window or shell window to make the settings take effect.
- Then you can start up Tomcat by run the command startup.bat ( Windows ) or startup.sh ( Linux ) command in Tomcat bin folder.
cd D:WorkToolapache-tomcat-9.0.45bin
> startup.bat
- Then Java console window popup and displaying the log information generated by the Tomcat process.
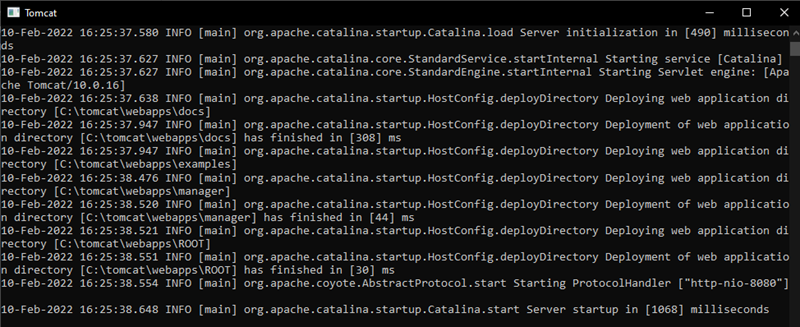
- When you see a message like Server startup in 1000 ms in the java console, that means it has been started successfully and is ready to process the client request.
- Open a web browser and browse URL http://localhost:8080/, then you will see the Apache Tomcat home page.
3. Install Tomcat As Windows Service.
Install and run Tomcat as windows service is commonly used in production and quality assurance environment.
3.1 Advantages of install tomcat as a windows service.
- Tomcat server startup do not need active administrator login.
- Tomcat server startup automatically when your server restart. This is very useful because in many cases you may need to restart your windows server. With this feature, you do not need to log in to your windows to start it again after os restart. Because as a windows service it will start automatically when os started.
- It is more secure when running a Tomcat server under a specific system account than an administrator account.
3.2 Steps to install tomcat as a windows service.
- Download the Tomcat windows installer file, the file name is 32-bit/64-bit Windows Service Installer.
- Click the installer to install Tomcat use default settings step by step.
- When you click the Finish button on the last screen. It will popup a progress bar to tell you that it just installing the Tomcat server as a windows service.
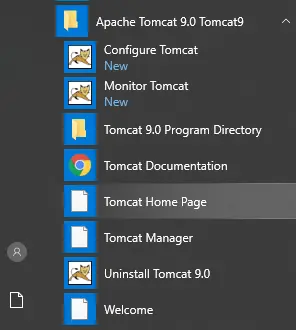
- After installation, click the Windows start menu, you can see the Apache Tomcat 9.0 Tomcat9 menu folder.

- When you click the Configure Tomcat sub-menu for the first time, it will prompt a dialog window with the error message The item referred to by this shortcut cannot be accessed. You may not have the appropriate permissions.
- To fix the above error, you can click the Tomcat 9.0 Program Directory sub-menu and it will popup an alert dialog with the message You don’t currently have permission to access this folder. Click Continue to permanently get access to this folder. Then you can click the Continue button and it will open the tomcat install folder.
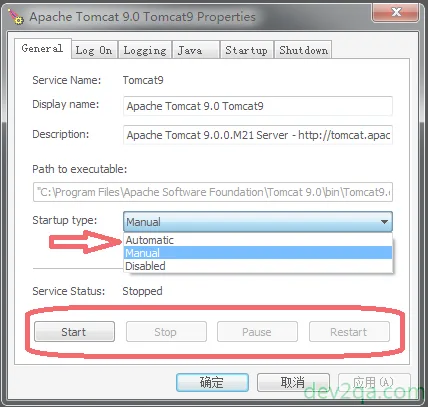
- Now click the Configure Tomcat sub-menu again will open the Apache Tomcat 9.0 Tomcat9 Properties dialog window.

- In the above Apache Tomcat 9.0 Tomcat9 Properties dialog window, you can configure to start the tomcat manually or automatically when windows startup. You can also stop, pause, restart it by clicking different buttons.
4. Different between Tomcat9.exe and Tomcat9w.exe.
- There are two wrapper programs in the Apache Tomcat bin directory, one is Tomcat9.exe the other is Tomcat9w.exe.
- Tomcat9.exe is the wrapper program that makes it run as a windows service in the background. We can see this from the above Apache Tomcat 9.0 Tomcat9 Properties dialog window Path to executable text box.
- .You can run it with a lot of input parameters. You can find all the parameters description and how to use them by click here.
- Tomcat9w.exe is the wrapper program that will pop up the Apache Tomcat 9.0 Tomcat9 Properties configure panel. You can do a lot of configuration in that panel.
- You can leave comments in this article. Our expert will respond to you asap.
5. Question & Answer.
5.1 Can not start tomcat service as windows service.
- I can run the Tomcat portable version ( the zip file version ) from command line successfully, for example, run the command startup.bat to start tomcat. Now I want to install Tomcat as a Windows service, then I open a dos window as windows administrator and run the command tomcat_home/bin/service.bat install, and its success. I can see the Tomcat Service in Windows Services list. But when I click the Start button in Windows Service to start it, it prompts the below error messge. Windows could not start the Apache Tomcat 9 on Local Computer. For more information, review the System Event Log. And I find the below error message in the Windows system event log. Apache Tomcat 9 service terminated with the following service-specific error: The operation completed successfully. How to fix this error.