I installed cygwin om windows 7.
I also need to install some packages, when I try to use the command-
apt-get install gstreamer-dbus-media-service gstreamer-tools gstreamer0.10-alsa gstreamer0.10-buzztard gstreamer0.10-buzztard-doc gstreamer0.10-crystalhd gstreamer0.10-doc gstreamer0.10-ffmpeg gstreamer0.10-ffmpeg-dbg gstreamer0.10-fluendo-mp3 gstreamer0.10-gconf gstreamer0.10-gnomevfs gstreamer0.10-gnonlin gstreamer0.10-gnonlin-dbg gstreamer0.10-gnonlin-doc gstreamer0.10-hplugins gstreamer0.10-nice gstreamer0.10-packagekit gstreamer0.10-plugins-bad gstreamer0.10-plugins-bad-doc gstreamer0.10-plugins-bad-multiverse gstreamer0.10-plugins-base gstreamer0.10-plugins-base-apps gstreamer0.10-plugins-base-dbg gstreamer0.10-plugins-base-doc gstreamer0.10-plugins-cutter gstreamer0.10-plugins-good gstreamer0.10-plugins-good-doc gstreamer0.10-plugins-ugly gstreamer0.10-plugins-ugly-doc gstreamer0.10-pocketsphinx gstreamer0.10-pulseaudio gstreamer0.10-qapt gstreamer0.10-sdl gstreamer0.10-tools gstreamer0.10-vaapi gstreamer0.10-vaapi-doc gstreamer0.10-x
I get this error:
bash: apt-get: command not found
I saw similar problems and solutions, for example- this link
https://code.google.com/p/apt-cyg/
but its not working
edit:
I followed the command and this is the error I get:
$ apt-cyg install nano
/usr/bin/apt-cyg: line 19: $'r': command not found
/usr/bin/apt-cyg: line 27: syntax error near unexpected token `||'
'usr/bin/apt-cyg: line 27: `  || test "-$GAWK-" = "--" || test "-$XZ-" = "--"
I will be happy for some help.
thank you.
Были ли у вас проблемы с командой APT-GET? Если да, то вы не одиноки. У многих других также была такая же проблема. Это неприятно, но есть несколько вещей, которые вы можете сделать, чтобы избежать повторного появления этой ошибки.
Это В этой статье будет обсуждаться ошибка APT-GET Command Not Found и некоторые распространенные решения этой досадной проблемы.
Команда Sudo apt-get не найдена на Mac
Большинство систем на основе Debian используют систему управления пакетами APT. APT создает, настраивает и устанавливает программное обеспечение из нескольких источников. Однако если вы получаете сообщение об ошибке APT-GET Command Not Found, это означает, что команда недоступна. Команды APT на Mac проблематичны.
К счастью, есть альтернатива. Приложение Homebrew должно решить эту проблему.
- Установить Homebrew
Homebrew — это эквивалент команды APT-GET для Mac. Этот менеджер пакетов должен решить ваши проблемы. Чтобы использовать Homebrew для устранения ошибки APT-GET Not Found, выполните следующие действия:
- Установите приложение Homebrew.

- Нажмите “Command+Пробел” для запуска Spotlight.
- Введите “Терминал” и нажмите клавишу ввода.
- Введите “xcode-select &ndash ;установить.”
- После установки инструмента Xcode введите “ruby -e “$(curl -fsSL https://raw.githubusercontent.com/Homebrew/install/master/install)”.
- Чтобы установить, нажмите “Enter” и ваш пароль.
- После установки введите “Имя установки brew” с “имя” пакет, который вы хотите установить.
- Пакет будет установлен в вашей системе.


Команда Sudo apt-get не найдена на устройстве Linux
Диспетчер пакетов APT также можно использовать для установки, обновления операционной системы или удаления приложений. Иногда вы могли получить команду APT-GET, не найденную на вашем компьютере под управлением Linux. Если это так, это означает, что вы, скорее всего, пытаетесь установить операционную систему, которая не поддерживает APT.
Если вы хотите установить операционные системы на основе rmp, команды APT-GET не сработают. Работа. Вам нужно будет использовать правильный менеджер пакетов. APT не поддерживает следующее:
Хорошим решением этой дилеммы является замена “APT-GET” со словом «ням». Синтаксис yum и apt работает во многом одинаково, поэтому использование утилиты yum может быть быстрым решением, которое вы ищете. Например, попробуйте ввести “sudo yum install” вместо “sudo APT-GET install”
Команда Sudo apt-get не найдена на сервере EC2
Вы получите сообщение об ошибке APT-GET Command Not Found при попытке использовать диспетчер команд APT-GET в EC2, запущенном с системой, отличной от Debian. Распространенным решением этой проблемы является замена команды APT-GET на “yum” Yum — это пакетная утилита командной строки с открытым исходным кодом.
Это также решение проблемы с ошибкой APT-GET Command Not Found – заменить “APT-GET” с “ням” Примером этого может быть использование “sudo yum install curl” вместо “sudo apt-get install curl” Это должно исключить появление ошибки APT-GET Command Not Found в будущем.
Sudo apt-get Command Not Found in CentOS
Вы можете получить сообщение об ошибке APT-GET Command Not Found при использовании CentOS. Основной причиной этой ошибки является менеджер пакетов CentOS по умолчанию, Yum. Этот менеджер пакетов и синтаксисы APT похожи, так что это может быть ответом на вашу проблему. Решение состоит в том, чтобы попробовать использовать следующую команду:
- Sudo yum install <packagename>
Если вы получили сообщение об ошибке, тогда вам следует попробовать загрузить пакет rpmforge-release, введя эту команду:
- Wget http://packages.sw.be/rpmforge-release/rpmforge-release-0.5.3-1.e15.rf.i386.rpm
Затем последовательно введите эти команды, чтобы установить и проверить пакет:
- Sudo rpm – импортировать http://apt.sw.be/RPM-GPG-KEY.dag.txt
- Rpm -k rpmforge-release-o.5.3-1.e15.rf.i386 .rpm
- Sudo rpm – I rpmforge-release-0.5.3-1.e15.i386.rpm
Это должно устранить ошибку APT-GET Command Not Found.
Sudo apt-get Command Not Found Windows
Если вы расстраиваетесь из-за ошибки APT-GET Command Not Found при использовании Windows, решением является использование Chocolately. Этот менеджер пакетов для Windows работает аналогично команде APT-GET.
Другим решением является использование инструмента командной строки Microsoft winget. Этот инструмент поставляется в комплекте с Windows 10 и Windows 11, поэтому, скорее всего, он у вас уже установлен. Это часть диспетчера пакетов Windows. Чтобы использовать winget, следуйте этим инструкциям:
- введите “winget search <appname>”.
- Затем используйте инструмент установки, введя “winget install <appname>”.
Приложение winget установит приложение на ваш компьютер, таким образом устраняя необходимость запуска apt-get.
Есть и другие доступные варианты, кроме использования команд APT-GET
Если вы были разочарованы ошибкой APT-GET Command Not Found, вы можете попробовать использование различных приложений или установка новых приложений или операционных систем. Какие приложения вы используете, зависит от того, какой тип компьютера вы используете и его ОС. Ключевым моментом является использование правильного диспетчера пакетов для вашего устройства.
Были ли у вас проблемы с командами APT-GET? Вы решили проблему с помощью одного из методов, описанных в этой статье? Дайте нам знать в разделе комментариев ниже.

Environment
PS C:Usersbubth> [Environment]::OSVersion

Platform ServicePack Version      VersionString
-------- ----------- -------      -------------
 Win32NT             10.0.19042.0 Microsoft Windows NT 10.0.19042.0


bub@bubs-surface-book-2:~$ lsb_release -r
Release:        20.04
bub@bubs-surface-book-2:~$ cat /proc/version
Linux version 4.19.128-microsoft-standard (oe-user@oe-host) (gcc version 8.2.0 (GCC)) #1 SMP Tue Jun 23 12:58:10 UTC 2020
Steps to reproduce
- Open powershell
- Run any commands like apt-get and see that it doesn’t exist
Windows PowerShell                                                                                                      Copyright (C) Microsoft Corporation. All rights reserved.                                                                                                                                                                                       Try the new cross-platform PowerShell https://aka.ms/pscore6                                                                                                                                                                                    PS C:Usersbubth> bash
bubs-surface-book-2:/mnt/host/c/Users/bubth# apt-get update
bash: apt-get: command not found
bubs-surface-book-2:/mnt/host/c/Users/bubth# sudo apt-get update
bash: sudo: command not found
bubs-surface-book-2:/mnt/host/c/Users/bubth#
- Note that if you run it directly from the Ubuntu shell application, it finds it:
To run a command as administrator (user "root"), use "sudo <command>".                                                                                                                              See "man sudo_root" for details.
bub@bubs-surface-book-2:~$ sudo apt-get update
[sudo] password for bub:
Hit:1 http://archive.ubuntu.com/ubuntu focal InRelease
Get:2 http://security.ubuntu.com/ubuntu focal-security InRelease [107 kB]
Get:3 http://archive.ubuntu.com/ubuntu focal-updates InRelease [111 kB]
Get:4 http://archive.ubuntu.com/ubuntu focal-backports InRelease [98.3 kB]
Get:5 http://security.ubuntu.com/ubuntu focal-security/main amd64 Packages [295 kB]
Get:6 http://archive.ubuntu.com/ubuntu focal/universe amd64 Packages [8628 kB]
Get:7 http://security.ubuntu.com/ubuntu focal-security/main Translation-en [70.0 kB]
Get:8 http://security.ubuntu.com/ubuntu focal-security/main amd64 c-n-f Metadata [4696 B]
Get:9 http://security.ubuntu.com/ubuntu focal-security/restricted amd64 Packages [59.2 kB]
Get:10 http://security.ubuntu.com/ubuntu focal-security/restricted Translation-en [9856 B]
Get:11 http://security.ubuntu.com/ubuntu focal-security/universe amd64 Packages [93.8 kB]
Get:12 http://security.ubuntu.com/ubuntu focal-security/universe Translation-en [35.5 kB]
Get:13 http://security.ubuntu.com/ubuntu focal-security/universe amd64 c-n-f Metadata [3004 B]
Get:14 http://security.ubuntu.com/ubuntu focal-security/multiverse amd64 Packages [1252 B]
Get:15 http://security.ubuntu.com/ubuntu focal-security/multiverse Translation-en [540 B]
Get:16 http://security.ubuntu.com/ubuntu focal-security/multiverse amd64 c-n-f Metadata [116 B]
Get:17 http://archive.ubuntu.com/ubuntu focal/universe Translation-en [5124 kB]
Get:18 http://archive.ubuntu.com/ubuntu focal/universe amd64 c-n-f Metadata [265 kB]
Get:19 http://archive.ubuntu.com/ubuntu focal/multiverse amd64 Packages [144 kB]
Get:20 http://archive.ubuntu.com/ubuntu focal/multiverse Translation-en [104 kB]
Get:21 http://archive.ubuntu.com/ubuntu focal/multiverse amd64 c-n-f Metadata [9136 B]
Get:22 http://archive.ubuntu.com/ubuntu focal-updates/main amd64 Packages [558 kB]
Get:23 http://archive.ubuntu.com/ubuntu focal-updates/main Translation-en [144 kB]
Get:24 http://archive.ubuntu.com/ubuntu focal-updates/main amd64 c-n-f Metadata [9960 B]
Get:25 http://archive.ubuntu.com/ubuntu focal-updates/restricted amd64 Packages [67.1 kB]
Get:26 http://archive.ubuntu.com/ubuntu focal-updates/restricted Translation-en [10.8 kB]
Get:27 http://archive.ubuntu.com/ubuntu focal-updates/restricted amd64 c-n-f Metadata [352 B]
Get:28 http://archive.ubuntu.com/ubuntu focal-updates/universe amd64 Packages [245 kB]
Get:29 http://archive.ubuntu.com/ubuntu focal-updates/universe Translation-en [94.5 kB]
Get:30 http://archive.ubuntu.com/ubuntu focal-updates/universe amd64 c-n-f Metadata [6236 B]
Get:31 http://archive.ubuntu.com/ubuntu focal-updates/multiverse amd64 Packages [15.1 kB]
Get:32 http://archive.ubuntu.com/ubuntu focal-updates/multiverse Translation-en [3892 B]
Get:33 http://archive.ubuntu.com/ubuntu focal-updates/multiverse amd64 c-n-f Metadata [480 B]
Get:34 http://archive.ubuntu.com/ubuntu focal-backports/main amd64 c-n-f Metadata [112 B]
Get:35 http://archive.ubuntu.com/ubuntu focal-backports/restricted amd64 c-n-f Metadata [116 B]
Get:36 http://archive.ubuntu.com/ubuntu focal-backports/universe amd64 Packages [4012 B]
Get:37 http://archive.ubuntu.com/ubuntu focal-backports/universe Translation-en [1448 B]
Get:38 http://archive.ubuntu.com/ubuntu focal-backports/universe amd64 c-n-f Metadata [224 B]
Get:39 http://archive.ubuntu.com/ubuntu focal-backports/multiverse amd64 c-n-f Metadata [116 B]
Fetched 16.3 MB in 4s (4229 kB/s)
Reading package lists... Done
bub@bubs-surface-book-2:~$
When looking at the paths for the default users, they don’t share the same filesystem:
PS C:Usersbubth> pwd

Path
----
C:Usersbubth


PS C:Usersbubth> bash
bubs-surface-book-2:/mnt/host/c/Users/bubth# pwd
/mnt/host/c/Users/bubth
vs.
bub@bubs-surface-book-2:~$ pwd
/home/bub
When looking for the commands in /usr/bin, they are not found in the bash shell from powershell:
bubs-surface-book-2:/usr/bin# ls | grep apt-get
bubs-surface-book-2:/usr/bin#
but are found in the ubuntu shell:
bub@bubs-surface-book-2:/usr/bin$ ls | grep apt-get
apt-get                                                                                                                                                                                             bub@bubs-surface-book-2:/usr/bin$
Expected behavior
Prior to updates to more recent windows versions, the WSL distro used the same filesystem and could be accessed by running bash from powershell.
Actual behavior
Dropping into the bash shell from powershell drops into a very restricted bash shell that’s missing most commands — after checking, I verified that there are no git-bash applications installed (removed them explicitly) and reinstalled WSL from scratch.

Debian Linux and Linux distributions based on Debian employ the APT package management system. APT configures, builds, and installs software from a variety of sources, including the internet, a LAN server, or a CD-ROM. It can make the process of installing and uninstalling software on a Linux machine much easier.
APT is a package management toolset made up of several commands, rather than a single command. Apt-get and apt-cache are two of the most regularly used APT commands.
When you try to run apt-get commands on your own Linux computer or a server, you may get an “apt-get: command not found” error. This article will help you understand a few possible causes and how to rapidly resolve them.
What is the apt-get command?
A command-line program for installing, updating, and uninstalling Linux packages is apt-get. It obtains information about the packages, as well as their dependencies, from trusted sources to install or delete them.
The most popular apt-get commands are as follows:
- sudo apt-get install (to install a package)
- sudo apt-get remove (package removal)
- sudo apt-get update (for updating a package)
- sudo apt-get upgrade (for upgrading a package)
- apt-get help (to know more about a command )
In this case, sudo is used to provide you with superuser security privileges.
What Causes the ‘sudo apt-get command not found’ Error on macOS?
When your Terminal displays the message ‘command not found,’ it signifies that the command isn’t accessible. All commands and features linked to that utility will not operate if the program or utility is not installed on your system.
We all know that the Terminal commands on Linux and macOS are nearly identical. However, this does not imply that both Linux and macOS will use the same package managers and tools for installation and management. Finally, the APT commands are not supported on macOS.
Alternatives of APT for macOS
APT commands are used in Terminal to download, update, and upgrade software. This option, however, is only available for a few Debian Linux distributions. As a result, there are just a few options for macOS that function in the same way as APT. These alternatives do the same functions as APT but with a few additional/improved capabilities.
How to solve the apt-get command not found an error?
This apt-get command not found error is solved using the following solutions:
- Check your Linux distribution
- Check apt path for its binary
- Reinstall apt using dpkg
- Using the Correct Package Manager
- Downloading the Latest APT Package
- Installing Homebrew in macOS
- Installing MacPorts in macOS
- Make sure You Are Connected to AWS
- Try to set the Software-properties-common Plan
- Run the Environment Variables
- Try to Update Ubuntu Repositories (Debian and Ubuntu)
- Reinstall the Operating System
- For CentOS
Let us go through them one by one:
Solution 1: Check your Linux distribution
There are around a thousand Linux distributions (or Linux distros) available at any given time. They may be set up and adjusted for a variety of devices (desktops, laptops, servers, tablets, etc).
They can be presented in a form that is appropriate for a particular culture. They can also be created specifically for usage on a web-based service (Amazon Linux AMI).
Only a few Linux distributions are mature enough to be deemed major. Almost everyone will base their release on one of the “majors,” each of which has its own set of standard packages (package manager like apt included).
By default, only Debian and Ubuntu-based distributions utilize apt.
You may use the command cat /etc/*-release or one of a few different methods to see if your distribution has apt beneath the hood.
If you’re copying terminal commands from a tutorial, we recommend looking for one that’s compatible with your Linux system.
A typical issue for AWS users that utilize Amazon Linux images on their servers is “apt-get: command not found.” Keep in mind that Amazon Linux was originally based on CentOS, then diverged, yet yum remains the default package manager.
Solution 2: Check apt path for its binary
The message apt-get: command is not found mac means that the system can’t find apt-get in its path. Manually verifying that the route is in place is the logical solution.
To discover where the system expects the apt-get binary to be, type the following command in the terminal: locate apt-get
The resulting output should resemble the image below or include the following string: /usr/bin/apt-get

If the command gives you no results, you don’t have the “apt” package installed. You’ll have to manually install it using a.deb file.
Solution 3: Reinstall apt using dpkg
To do so, you’ll need to download the corresponding .deb package for your OS version. Go to one of Ubuntu’s Archive Mirrors if you’re using it. In this scenario, go to http://us.archive.ubuntu.com/ubuntu/. and look under “/pool/main/a/apt/” for a list of.deb packages. Choose the option that best fits your architecture (and64/i386).
After it has finished downloading, use the following command to install the apt DEB file:
sudo dpkg -i /path/to/apt_deb_file.debRemember to substitute the path to the file you just downloaded for “/path/to/apt deb file.deb.”
Solution 4: Using the Correct Package Manager
The first step in resolving the issue is to use the apt-get command to install the necessary Linux distributions. Avoid downloading any of the following files that APT does not support:
- CentOS
- openSUSE
- RHEL
- Arch
- macOS X
- Fedora
Yum is the default package manager in Linux distributions including Fedora, CentOS, and RHEL. To use Yum to install them, use the following command:
$ sudo yum install <packagename>Homebrew is the default package manager for macOS X. You may utilize it by typing the following command:
$ brew install tmuxFor Arch Linux, you must use the Pacman package manager, which may be found here:
$ packman -S tmux Solution 5: Downloading the Latest APT Package
Another option for resolving this problem is to get the most recent APT package for your system. You must download the .deb file according to your system architecture, which might be either 32-bit or 64-bit.
The.deb file may be found in the “/etc/apt/sources.list” file. This file contains relevant links for package installation and upgrades. Running the command “$cat /etc/apt/sources.list” will reveal the downloading source.
Visit the “/pool/main/a/apt/” directory under the downloading source, find the.deb files relevant to your architecture and then download it. After downloading the file, use the dpkg command to install it —
$ sudo dpkg -i apt_1.9.3_i386.debSolution 6: Installing Homebrew in macOS
The apt-get tool is used to install packages on Linux computers. For the Mac, homebrew is the equivalent. Most people are familiar with it because of the package manager.
Packages are installed in their directory by Homebrew, which then symbolic links their files into /user/local. Follow the instructions below to install homebrew and run the command to install packages:
- To open Spotlight, hold down the Command key and press Space, then type Terminal and press Enter.
- To begin, use the following command to install the Xcode command-line tool:
xcode-select --install- After installing the Xcode tool, execute or copy the following command to install Homebrew on macOS:
ruby -e "$(curl -fsSL https://raw.githubusercontent.com/Homebrew/install/master/install)"- For confirmation, the installation will ask for the Return (Enter) key and password.
- For properly installing the utility, you will receive an installation success message.
- Type the following command in Homebrew to install any package you want:
brew install name- The package will be installed successfully on your system using the brew command.
Solution 7: Installing MacPorts in macOS
MacPorts is a piece of software that allows you to compile, install, and manage open source applications. Any needed dependencies for the port that the user is trying to install will be installed automatically by MacPorts.
It’s simple to use; with just one command, you may install, download, or build a program or library. Upgrades and uninstalls for installed ports are also available through MacPorts. You may install it by carefully following the procedures below:
- Open the App Store from the Dock and type Xcode into the search bar. Install Xcode by clicking Get. Because the file is about 6GB in size, it will take some time to install. It will prompt you for your App Store account’s username and password.
- By launching the program from the App Store or Dock and selecting the Agree button, you can agree to Xcode’s terms. To consent to the agreements, use the following command in Terminal:
sudo xcodebuild -license - To install the Xcode command-line tool, hold the Command key and press Space to launch Spotlight. Then enter Terminal and execute the following command:
xcode-select --install - Now, for your operating system, download MacPorts.
- To install apt-get, follow the on-screen instructions and supply the password if prompted.
- Restart Terminal when the installation is complete and run the following command:
sudo port selfupdate
If the notice ‘Updating MacPorts base sources using rsync’ appears, MacPorts has been installed. However, if you don’t see this message, you’ll need to reinstall it properly.
- Using the command “
sudo port install name” you may now install any package.
The package name in the command can be the name of the software you’re trying to install on your Mac.
Solution 8: Make sure You Are Connected to AWS
If you are new to RDP/AWS services, this is the best approach for you. Make sure you’re connected to AWS by going to the AWS Page and clicking on your instances. To finish “SSH,” press Connect and follow the on-screen instructions. When you’re finished, try using the apt command in AWS.
Solution 9: Try to set the Software-properties-common Plan
To begin, open your “Terminal” and type the following command: ”sudo apt-get install software-properties-common”. Then press Enter
You must wait till the procedure is finished.
For older Ubuntu, follow the command: “sudo apt-get mount python-software-properties”
Solution 10: Run the Environment Variables
If you’re still having trouble with the sudo apt-get command not found error, try the following command: “~/$[YOURUSER]/.bashrc”
Execute the following command in the next step: “sudo /usr/bin/apt-get update”
Once you’ve completed the preceding procedures, check to see whether the problem has been fixed. If it hasn’t, try using a root account and repeat the steps above. If you’re having trouble, try running the command listed here: “sudo find / -name ‘apt-get”
Solution 11: Try to Update Ubuntu Repositories (Debian and Ubuntu)
To update your database, go through the following steps:
- To begin, open your Terminal and type the following instructions, pressing Enter after each one:”sudo apt-get update” is a command.
- After that, wait until the operation is completed to see whether the sudo apt-get command not found error has been fixed.
Solution 12: Reinstall the Operating System
If the solutions listed above haven’t worked, the quickest alternative is to reinstall the operating system. On a server, just re-imaging the server will give you a fresh start. This may solve the issue.
Make sure that the sudo access keyword is used correctly in all of the commands. The apt-get problem might occur if your system administrator refuses to let you use the apt-get command.
Before you reinstall, make a backup of your data and settings.
Solution 13: For CentOS
The default package manager is “Yum,” therefore try the command “sudo yum install packagename>.”
To avoid an error, use the following command to get the rpmforge-release package:
wget http://packages.sw.be/rpmforge-release /rpmforge-release-0.5.3-1.e15.rf.i386.rpmFinally, type the instructions listed below for package verification and installation:
sudo rpm –import http://apt.sw.be/RPM-GPG-KEY.dag.txt
rpm -K rpmforge-release-0.5.3-1.e15.rf.i386.rpm
sudo rpm -I rpmforge-release-0.5.3-1.e15.rf.i386.rpm
Conclusion
That is all there is to it. I’ve done my best to offer you all of the available solutions to the sudo apt-get command not found the issue. Hopefully, one of the options suggested above successfully resolves your issue.
- Forum
- Get Help & Give Help!
- Ask a Question
-
I installed build 14328 and added bash. Love bash! However, on my installation apt-get is missing:
bash: apt-get: command not foundI haven’t seen other people having this issue, but I’m not sure what to do. This morning I updated to the newest build, 14332, but that didn’t help.
I tried uninstalling bash by going into Windows features and unchecking the Ubuntu on Windows checkbox, but while that did have me reboot, it didn’t actually remove bash, and it didn’t make apt-get appear. When I went back to Windows features, the checkbox was still unchecked. I checked it again, and it had me reboot again, but apt-get still did not appear.
Any theories on why apt-get might be missing?
04-27-2016 11:01 AM
-
OK I found the problem. I have a version of git bash installed on my machine already. When I installed the Windows Linux subsystem, it downloaded things and had me create a user. Great. But then every time I ran bash from the start menu (by typing ‘bash’) it was finding and running git bash, not Windows bash. Once I deleted git bash I was, running ‘bash’ opened the Windows bash, and commands like ‘sudo’ and ‘apt-get’ started working. Rather than delete git bash I probably could have checked if it was in my PATH and removed it, but either way, the problem is solved.
-
-
Good idea, but no. I’ve been trying no spaces «apt-get» but I tried «apt -get» in case there was a strange implementation here, but that didn’t work either.
04-27-2016 11:14 AM
-
-
Another good idea, but that fails too:
bash: sudo: command not found04-27-2016 11:35 AM
-
Apt-get shouldn’t be there. Fetching and installing packages for regular Ubuntu Linux won’t work and there’d be no repository for Ubuntu tools on Windows.
04-28-2016 03:06 AM
-
-
OK I found the problem. I have a version of git bash installed on my machine already. When I installed the Windows Linux subsystem, it downloaded things and had me create a user. Great. But then every time I ran bash from the start menu (by typing ‘bash’) it was finding and running git bash, not Windows bash. Once I deleted git bash I was, running ‘bash’ opened the Windows bash, and commands like ‘sudo’ and ‘apt-get’ started working. Rather than delete git bash I probably could have checked if it was in my PATH and removed it, but either way, the problem is solved.
04-28-2016 10:16 AM
-
Can’t you just run Ubuntu from search bar?
05-26-2018 11:06 PM
-
Had same issue, I uninstalled git bash and that still didn’t work for me.
11-15-2018 12:56 PM


- Forum
- Get Help & Give Help!
- Ask a Question

apt-get missing from bash
Similar Threads
-
Replies: 5
Last Post: 04-29-2016, 02:46 PM
-
Replies: 5
Last Post: 04-29-2016, 02:53 AM
-
Replies: 2
Last Post: 04-27-2016, 08:08 AM
-
Replies: 1
Last Post: 04-27-2016, 02:16 AM
-
Replies: 1
Last Post: 04-26-2016, 11:00 PM
LINK TO POST COPIED TO CLIPBOARD
Содержание
- Ошибка apt-get command not found
- Что значит apt get команда не найдена?
- Как исправить apt get команда не найдена?
- Выводы
- 🇦🇮 Как исправить ‘add-apt-repository command not found’в Ubuntu и Debian
- Что такое Personal Package Archive
- Добавление нового PPA (Personal Package Archive) в Ubuntu
- Исправить add-apt-repository: ошибка команды не найдена
- Установка пакета в Debian / Ubuntu LTS
- Установка пакета в Ubuntu 13.10 и старше
- apt-get command not found in Linux
- What is the apt-get command?
- What is the apt-get command not found?
- Operating System Not Supportive
- Package Not Available
- How to solve the apt-get command not found an error?
- 1) Using the Correct Package Manager
- 2) Downloading the Latest APT Package
- 3) Reinstalling the OS
- Why is the «apt» command not found?
- 4 Answers 4
- Ошибка apt-get command not found
- Что значит apt get команда не найдена?
- Как исправить apt get команда не найдена?
- Выводы
Ошибка apt-get command not found
В этой статье мы рассмотрим почему возникает такая ошибка, как это вообще может быть и как исправить apt get команда не найдена.
Что значит apt get команда не найдена?

Фактически это сообщение об ошибке означает как раз то, что оно нам сообщает, команда, которую вы пытаетесь выполнить не найдена в системе. Она либо еще не была установлена, либо была удалена. Но все это звучит очень странно в отношении к менеджеру пакетов. Рассмотрим основные причины возникновения ошибки:
Теперь рассмотрим как решить проблему. Это очень просто.
Как исправить apt get команда не найдена?
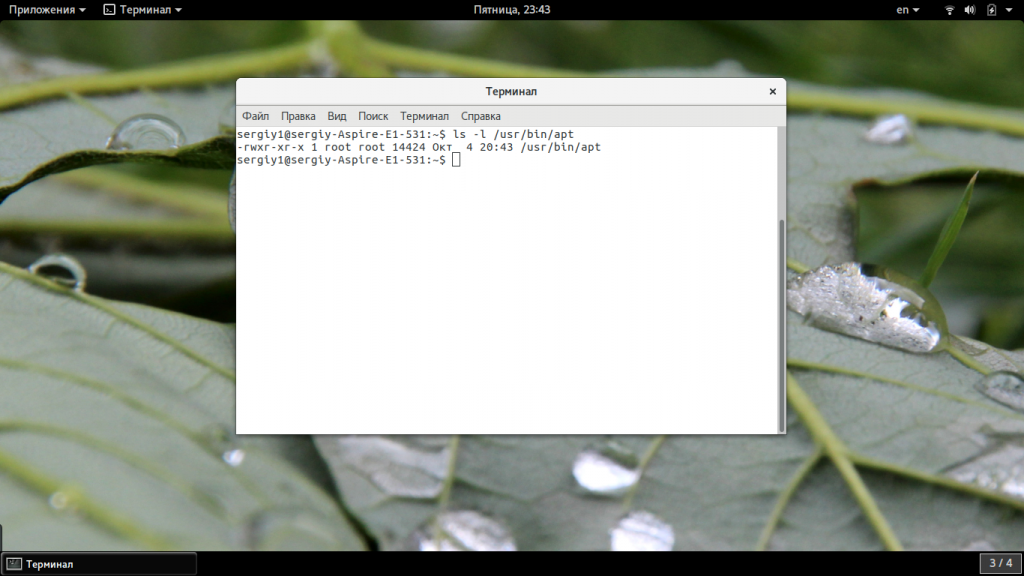
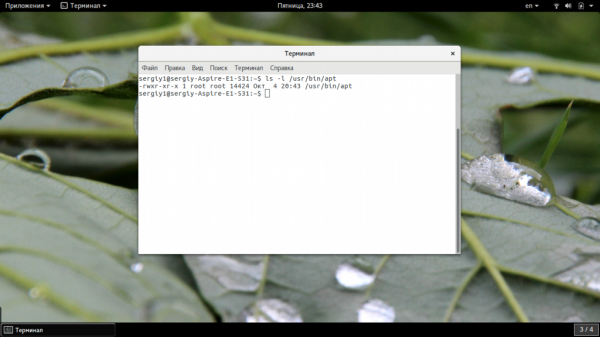
Поскольку вторая причина предполагает меньше действий, нам нужно сначала проверить ее. Обычно исполняемые файлы apt находятся в каталоге /usr/bin. Сначала посмотрим есть ли такой файл в той папке:

Если файл есть, то вы увидите что-то похожее как на снимке выше. Также обратите внимания на права. Для пользователя, группы и остальных должен быть выставлен флаг «x» означающий исполнение. Если же его нет, то apt придется переустановить. Если права отличаются от приведенных выше, а именно «-rwxr-xr-x», то их тоже нужно исправить, добавим для всех категорий флаг исполняемости:
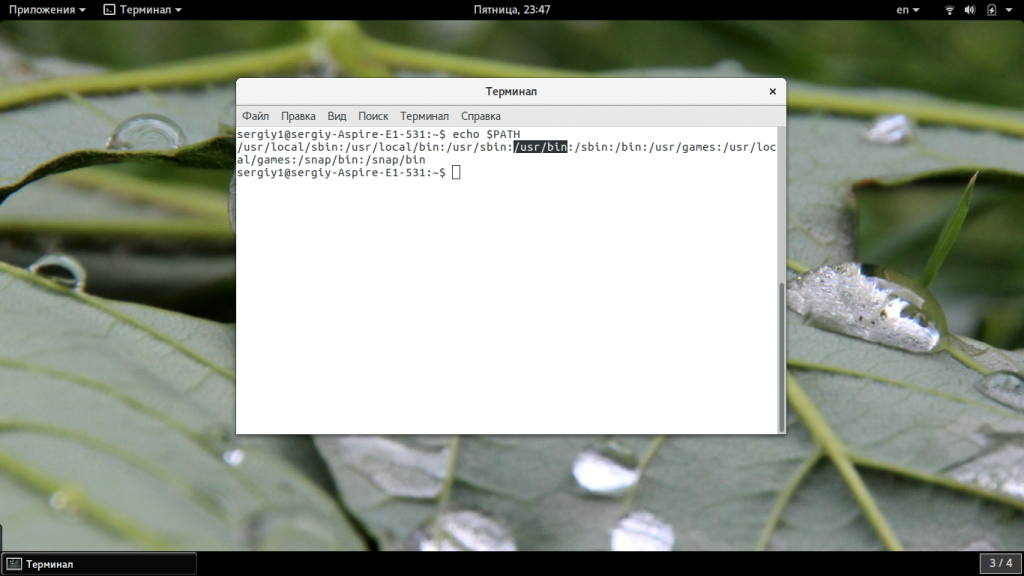
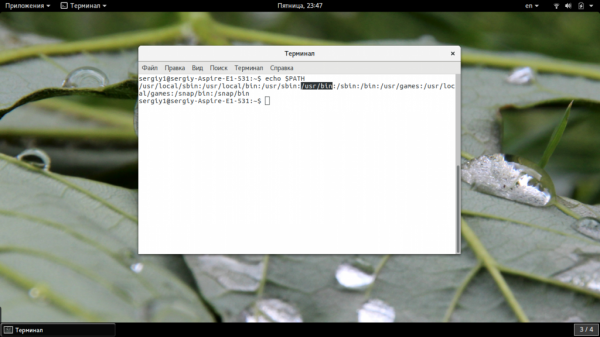
Если предыдущие варианты не сработали проверим содержимое переменной среды PATH:

Вы должны увидеть в ней ссылку на /usr/bin. Если такой строчки нет, то проблема была здесь, а строчку нужно добавить в конец:
Если вы вносили изменения в файл /etc/profile, и переменная PATH сломалась из-за этого, то нужно внести исправления и в этот файл.

Последний вариант, если ничего не помогло, это переустановить утилиту. Мы просто скачаем ее из официального сайта и установим в систему. Только нужно выбирать версию для своей операционной системы. Вы можете скачать пакет с помощью браузера или таких команд:
Для Ubuntu Yakkety:
Теперь осталось установить загруженный пакет:
Готово, после этого ошибка apt get command not found должна исчезнуть и вы сможете нормально работать со своими пакетами.
Выводы
В этой статье мы рассмотрели почему не работает apt get, из-за чего возникает ошибка apt get команда не найдена, а также как ее решить. Надеюсь, приведенная здесь информация была полезной для вас.
Источник
🇦🇮 Как исправить ‘add-apt-repository command not found’в Ubuntu и Debian

В некоторых случаях в Linux Mint, Linux Lite, Zorin OS, Elementary OS и других дистрибутивах на основе Ubuntu, а также в Ubuntu и Debian вы увидите ошибку, что команда add-apt-repository отсутствует.
Из этого руководства вы узнаете, как быстро исправить ошибку «command add-apt-repository not found» в Debian, Ubuntu и других дистрибутивах Linux на основе Debian.
Что такое Personal Package Archive
PPA – это веб-адрес личного репозитория.
Репозиторий представляет собой набор файлов, которые содержат информацию о различном программном обеспечении, его версиях и некоторых других деталях, таких как контрольная сумма.
Каждая версия Ubuntu имеет собственный официальный набор из четырех репозиториев.
Наиболее распространенный способ установки программного обеспечения в Ubuntu или Debian, если пакет еще не находится в официальном репозитории, – это использование PPA (Personal Package Archive).
add-apt-repository – это утилита командной строки для добавления PPA (Personal Package Archive) в Ubuntu и Debian Linux.
Добавление нового PPA (Personal Package Archive) в Ubuntu
Если вы хотите добавить новый репозиторий PPA, вам нужно будет использовать команду add-apt-repository:
Исправить add-apt-repository: ошибка команды не найдена
Таким образом, команда add-apt-repository в более новых системах находится под общим свойством software-properties пакета, и вам необходимо сначала установить этот пакет, чтобы установить add-apt-repository.
Установка пакета в Debian / Ubuntu LTS
Если вы используете Debian / Ubuntu LTS, такие как системы 18.04, 16.04 и 14.04, то установите пакет software-properties-common для получения команды add-apt-repository.
Примечание. Если вы видите сообщение об ошибке, в котором говорится, что пакет software-properties-common не найден, вам нужно запустить sudo apt-get update и затем попытаться установить его снова.
Установка пакета в Ubuntu 13.10 и старше
Если вы используете Ubuntu v13.10 или более раннюю, команда add-apt-repository доступна в пакете python-software-properties.
Поэтому вместо этого установите этот пакет, используя команду apt-get
После того, как вы установили software-properties-common или python-software-properties в зависимости от вашей системы, вы можете удобно использовать команды add-apt-repository или apt-add-repository для добавления PPA.
Давайте попробуем добавить пример PPA, ранее упомянутый в этом руководстве:
Надеюсь, это помогло вам решить ваши проблемы с PPA.
Если нет, или у вас есть другие вопросы, оставьте нам комментарий под статьей.
Источник
apt-get command not found in Linux
The APT (Advanced Package Tools) is a package manager used for managing packages of Debian-based operating systems and its derivatives, such as Ubuntu. APT can be used to install, update the OS and remove applications. While working with APT a common error that is encountered is “apt-get command not found”.
This error occurs when you are trying to install other operating systems that do not support APT. Using the command with the appropriate operating systems will solve the issue.
In this article, we will delve into the details of this error and its solutions.
What is the apt-get command?
The apt-get is a command-line tool used for installing, upgrading, and deleting a Linux package. It fetches information about the packages from authenticated sources to install or remove them, along with their dependencies.
The most common commands under apt-get are as follows –
Here, sudo is used for providing you with the security privileges of a superuser.
What is the apt-get command not found?
As mentioned earlier, when you try to install or modify a package on Linux with the apt-get command, you might receive this error. It may look something like this –
Let us see the reasons behind this problem.
Operating System Not Supportive
The apt-get command only works on Debian, Ubuntu, and its derivatives. If you are trying to install rpm-based operating systems such as Fedora, RHEL and CentOS, the command will not work. As a result, you will receive the error.
Distributions that support apt-get
To find out the Linux distribution name, type in the following command –
Package Not Available
If you are using an operating system that is compatible with the apt-get command, then check the availability of the APT. Type in the command locate apt-get to check whether it is installed in your system. The command must return the following output –
If no output is returned, it means that the APT package is not installed. You have to manually install it to get things working for you.
How to solve the apt-get command not found an error?
This apt-get command not found error using the following method:
1) Using the Correct Package Manager
Distributions such as Fedora, CentOS, and RHEL use Yum as their default package manager. Type in the following command to install them using Yum –
macOS X uses Homebrew as their default package manager. You can use it by running the command below –
For Arch Linux, you have to use the Pacman package manager like this –
2) Downloading the Latest APT Package
3) Reinstalling the OS
After installing the APT package, check the /usr/bin/ directory to ensure if it had properly installed. If the file is empty, then run the locate apt-get command again. If no result is shown, there is no alternative but to reinstall the operating system. This might fix the problem.
Make sure all the commands are properly using the sudo access keyword. The apt-get error may arise if the system administrator is not letting you execute the apt-get command on your system.
Источник
Why is the «apt» command not found?
What does this error mean? The apt command is not working, and I’ve lost the Software Center.
4 Answers 4
APT is a suite of utilities, including a database of information about what packages are available from where.
APT is not a single command. Rather, it provides several commands.
To update information about what packages are available and from where (which you should do before attempting to upgrade or install any packages with apt-get ), run:
To upgrade packages (i.e., «update your system»), run:
To upgrade packages, including packages that require uninstalled packages to be installed, or installed packages to be removed, run this (but be careful—it’s best to pay attention to what will be added or removed):
To remove one or more packages (i.e., to uninstall it), run:
To remove a package and also remove its systemwide configuration files (but not its per-user configuration files, which reside in users’ home directories), run:
To remove packages that were installed automatically because other packages needed them, but which now are no longer needed, run:
To do that, and also remove their global configuration files»
To reinstall a package, run:
To reinstall a package and delete its systemwide configuration files while doing so:
To deleted cached package installer files, but only for packages that are unlikely to be needed again (i.e., those that are so old they’ve been removed from the servers, as of last time sudo apt-get update was run):
You can learn more by reading the apt-get and apt manual pages.
Источник
Ошибка apt-get command not found
В этой статье мы рассмотрим почему возникает такая ошибка, как это вообще может быть и как исправить apt get команда не найдена.
Что значит apt get команда не найдена?

Фактически это сообщение об ошибке означает как раз то, что оно нам сообщает, команда, которую вы пытаетесь выполнить не найдена в системе. Она либо еще не была установлена, либо была удалена. Но все это звучит очень странно в отношении к менеджеру пакетов. Рассмотрим основные причины возникновения ошибки:
Теперь рассмотрим как решить проблему. Это очень просто.
Как исправить apt get команда не найдена?
Поскольку вторая причина предполагает меньше действий, нам нужно сначала проверить ее. Обычно исполняемые файлы apt находятся в каталоге /usr/bin. Сначала посмотрим есть ли такой файл в той папке:

Если файл есть, то вы увидите что-то похожее как на снимке выше. Также обратите внимания на права. Для пользователя, группы и остальных должен быть выставлен флаг «x» означающий исполнение. Если же его нет, то apt придется переустановить. Если права отличаются от приведенных выше, а именно «-rwxr-xr-x», то их тоже нужно исправить, добавим для всех категорий флаг исполняемости:
chmod +x /usr/bin/apt-get
Если предыдущие варианты не сработали проверим содержимое переменной среды PATH:

Вы должны увидеть в ней ссылку на /usr/bin. Если такой строчки нет, то проблема была здесь, а строчку нужно добавить в конец:
Если вы вносили изменения в файл /etc/profile, и переменная PATH сломалась из-за этого, то нужно внести исправления и в этот файл.

Последний вариант, если ничего не помогло, это переустановить утилиту. Мы просто скачаем ее из официального сайта и установим в систему. Только нужно выбирать версию для своей операционной системы. Вы можете скачать пакет с помощью браузера или таких команд:
Для Ubuntu Yakkety:
Теперь осталось установить загруженный пакет:
Готово, после этого ошибка apt get command not found должна исчезнуть и вы сможете нормально работать со своими пакетами.
Выводы
В этой статье мы рассмотрели почему не работает apt get, из-за чего возникает ошибка apt get команда не найдена, а также как ее решить. Надеюсь, приведенная здесь информация была полезной для вас.
Источник
Apt-get — это пакетный менеджер, который используется по умолчанию в семействе дистрибутивов Debian и Ubuntu. Учитывая, что это пакетный менеджер, один из почти самых основных пакетов системы, то логично, что программа должна присутствовать в каждом дистрибутиве. Но все же некоторые пользователи встречаются с ошибкой apt get command not found.
В этой статье мы рассмотрим почему возникает такая ошибка, как это вообще может быть и как исправить apt get команда не найдена.

Фактически это сообщение об ошибке означает как раз то, что оно нам сообщает, команда, которую вы пытаетесь выполнить не найдена в системе. Она либо еще не была установлена, либо была удалена. Но все это звучит очень странно в отношении к менеджеру пакетов. Рассмотрим основные причины возникновения ошибки:
- Одна из самых очевидных причин, получения ошибки «apt get не найдена» в том, что у вас не Ubuntu. Этот пакетный менеджер используется только в дистрибутивах Linux, основанных на Debian. Системы Red Hat, CentOS, Fedora, OpenSUSE, CoreOS, Cloud Linux, ArchLlinux и другие таковыми не являются. Они имеют собственный пакетный менеджер, у каждой свой и именно его нужно использовать для установки пакетов, а не искать apt.
- Если вы используете команду apt, а не apt-get, то, возможно, у вас старый дистрибутив, который не поддерживает такого синтаксиса, используйте apt-get;
- Вторая причина в том что вы случайно или намерено удалили пакет Apt. Его больше нет в системе поэтому система и не может его найти;
- Третья причина, может быть в невозможности обнаружения программы. Утилита apt есть в системе и исправно работает, но вы повредили переменную среды PATH и теперь система не ищет исполняемые файлы в той папке где находится apt.
Теперь рассмотрим как решить проблему. Это очень просто.
Как исправить apt get команда не найдена?
Поскольку вторая причина предполагает меньше действий, нам нужно сначала проверить ее. Обычно исполняемые файлы apt находятся в каталоге /usr/bin. Сначала посмотрим есть ли такой файл в той папке:
ls -l /usr/bin/apt-get
Если файл есть, то вы увидите что-то похожее как на снимке выше. Также обратите внимания на права. Для пользователя, группы и остальных должен быть выставлен флаг «x» означающий исполнение. Если же его нет, то apt придется переустановить. Если права отличаются от приведенных выше, а именно «-rwxr-xr-x», то их тоже нужно исправить, добавим для всех категорий флаг исполняемости:
chmod +x /usr/bin/apt-get
Если предыдущие варианты не сработали проверим содержимое переменной среды PATH:
echo $PATH
Вы должны увидеть в ней ссылку на /usr/bin. Если такой строчки нет, то проблема была здесь, а строчку нужно добавить в конец:
export PATH=текущее_содержимое:/usr/bin
Например:
export PATH=/usr/local/sbin:/usr/local/bin:/usr/sbin:/usr/bin:/sbin:/bin:/usr/games:/usr/local/games:/snap/bin:/snap/bin
Если вы вносили изменения в файл /etc/profile, и переменная PATH сломалась из-за этого, то нужно внести исправления и в этот файл.

Последний вариант, если ничего не помогло, это переустановить утилиту. Мы просто скачаем ее из официального сайта и установим в систему. Только нужно выбирать версию для своей операционной системы. Вы можете скачать пакет с помощью браузера или таких команд:
Для Ubuntu Xenial:
wget http://security.ubuntu.com/ubuntu/pool/main/a/apt/apt_1.2.15ubuntu0.2_i386.deb
Для Ubuntu Yakkety:
wget http://security.ubuntu.com/ubuntu/pool/main/a/apt/apt_1.3.3_i386.deb
Теперь осталось установить загруженный пакет:
sudo dpkg -i apt*
Готово, после этого ошибка apt get command not found должна исчезнуть и вы сможете нормально работать со своими пакетами.
Выводы
В этой статье мы рассмотрели почему не работает apt get, из-за чего возникает ошибка apt get команда не найдена, а также как ее решить. Надеюсь, приведенная здесь информация была полезной для вас.

Статья распространяется под лицензией Creative Commons ShareAlike 4.0 при копировании материала ссылка на источник обязательна .
Об авторе
![]()
Основатель и администратор сайта losst.ru, увлекаюсь открытым программным обеспечением и операционной системой Linux. В качестве основной ОС сейчас использую Ubuntu. Кроме Linux, интересуюсь всем, что связано с информационными технологиями и современной наукой.
Apt-get — это пакетный менеджер, который используется по умолчанию в семействе дистрибутивов Debian и Ubuntu. Учитывая, что это пакетный менеджер, один из почти самых основных пакетов системы, то логично, что программа должна присутствовать в каждом дистрибутиве. Но все же некоторые пользователи встречаются с ошибкой apt get command not found.
В этой статье мы рассмотрим почему возникает такая ошибка, как это вообще может быть и как исправить apt get команда не найдена.

Фактически это сообщение об ошибке означает как раз то, что оно нам сообщает, команда, которую вы пытаетесь выполнить не найдена в системе. Она либо еще не была установлена, либо была удалена. Но все это звучит очень странно в отношении к менеджеру пакетов. Рассмотрим основные причины возникновения ошибки:
- Одна из самых очевидных причин, получения ошибки «apt get не найдена» в том, что у вас не Ubuntu. Этот пакетный менеджер используется только в дистрибутивах Linux, основанных на Debian. Системы Red Hat, CentOS, Fedora, OpenSUSE, CoreOS, Cloud Linux, ArchLlinux и другие таковыми не являются. Они имеют собственный пакетный менеджер, у каждой свой и именно его нужно использовать для установки пакетов, а не искать apt.
- Если вы используете команду apt, а не apt-get, то, возможно, у вас старый дистрибутив, который не поддерживает такого синтаксиса, используйте apt-get;
- Вторая причина в том что вы случайно или намерено удалили пакет Apt. Его больше нет в системе поэтому система и не может его найти;
- Третья причина, может быть в невозможности обнаружения программы. Утилита apt есть в системе и исправно работает, но вы повредили переменную среды PATH и теперь система не ищет исполняемые файлы в той папке где находится apt.
Теперь рассмотрим как решить проблему. Это очень просто.
Как исправить apt get команда не найдена?
Поскольку вторая причина предполагает меньше действий, нам нужно сначала проверить ее. Обычно исполняемые файлы apt находятся в каталоге /usr/bin. Сначала посмотрим есть ли такой файл в той папке:
ls -l /usr/bin/apt-get
Если файл есть, то вы увидите что-то похожее как на снимке выше. Также обратите внимания на права. Для пользователя, группы и остальных должен быть выставлен флаг «x» означающий исполнение. Если же его нет, то apt придется переустановить. Если права отличаются от приведенных выше, а именно «-rwxr-xr-x», то их тоже нужно исправить, добавим для всех категорий флаг исполняемости:
chmod +x /usr/bin/apt-get
Если предыдущие варианты не сработали проверим содержимое переменной среды PATH:
echo $PATH
Вы должны увидеть в ней ссылку на /usr/bin. Если такой строчки нет, то проблема была здесь, а строчку нужно добавить в конец:
export PATH=текущее_содержимое:/usr/bin
Например:
export PATH=/usr/local/sbin:/usr/local/bin:/usr/sbin:/usr/bin:/sbin:/bin:/usr/games:/usr/local/games:/snap/bin:/snap/bin
Если вы вносили изменения в файл /etc/profile, и переменная PATH сломалась из-за этого, то нужно внести исправления и в этот файл.

Последний вариант, если ничего не помогло, это переустановить утилиту. Мы просто скачаем ее из официального сайта и установим в систему. Только нужно выбирать версию для своей операционной системы. Вы можете скачать пакет с помощью браузера или таких команд:
Для Ubuntu Xenial:
wget http://security.ubuntu.com/ubuntu/pool/main/a/apt/apt_1.2.15ubuntu0.2_i386.deb
Для Ubuntu Yakkety:
wget http://security.ubuntu.com/ubuntu/pool/main/a/apt/apt_1.3.3_i386.deb
Теперь осталось установить загруженный пакет:
sudo dpkg -i apt*
Готово, после этого ошибка apt get command not found должна исчезнуть и вы сможете нормально работать со своими пакетами.
Источник