Creating a Virtual Machine in KVM
This step-by-step guide will take you through setting up a CPU and memory efficient virtual machine to use with WinApps leveraging KVM, an open-source virtualization software contained in most linux distributions.
Install KVM
First up, you must install KVM and the Virtual Machine Manager. By installing virt-manager, you will get everything you need for your distribution:
sudo apt-get install -y virt-manager
Download the Windows Professional and KVM VirtIO drivers
You will need Windows 10 Professional (or Enterprise or Server) to run RDP apps, Windows 10 Home will not suffice. You will also need drivers for VirtIO to ensure the best performance and lowest overhead for your system. You can download these at the following links.
Windows 10 ISO: https://www.microsoft.com/en-us/software-download/windows10ISO
KVM VirtIO drivers (for all distros): https://fedorapeople.org/groups/virt/virtio-win/direct-downloads/stable-virtio/virtio-win.iso
Create your virtual machine
The following guide will take you through the setup. If you are an expert user, you may wish to:
- Define a VM from XML (may not work on all systems)
- Run KVM in user mode
Otherwise, to set up the standard way, open virt-manager (Virtual Machines).

Next, go to Edit->Preferences, and check Enable XML editing, then click the Close button.

Now it is time to add a new VM by clicking the + button.

Choose Local install media and click Forward.

Now select the location of your Windows 10 ISO, and Automatically detect the installation.

Set your memory and CPUs. We recommend 2 CPUs and 4096MB for memory. We will be using a Memory Ballooning service, meaning 4096 is the maximum amount of memory the VM will ever use, but will not use this amount except when it is needed.

Choose your virtual disk size, keep in mind this is the maximum size the disk will grow to, but it will not take up this space until it needs it.

Next, name your machine RDPWindows so that WinApps can detect it, and choose to Customize configuration before install.

After clicking Finish, ensure under CPU that Copy host CPU configuration is selected, and Apply.
NOTE: Sometimes this gets turned off after Windows is installed. You should check this option after install as well.

Next, go to the XML tab, and edit the <clock> section to contain:
<clock offset='localtime'>
  <timer name='hpet' present='yes'/>
  <timer name='hypervclock' present='yes'/>
</clock>
Then Apply. This will drastically reduce idle CPU usage (from ~25% to ~3%).

Next, under Memory, lower the Current allocation to the minimum memory the VM should use. We recommend 1024MB.

Under Boot options, check Start virtual machine on host boot up.

For SATA Disk 1, set the Disk bus to VirtIO.

For the NIC, set the Device model to virtio.

Click the Add Hardware button in the lower right, and choose Storage. For Device type, select CDROM device and choose the VirtIO driver ISO you downloaded earlier. This will give the Windows 10 Installer access to drivers during the install process. Now click Finish to add the new CDROM device.

You are now ready to click Begin Installation

Now move on to installing the virtual machine.
Install the virtual machine
From here out you will install Windows 10 Professional as you would on any other machine.

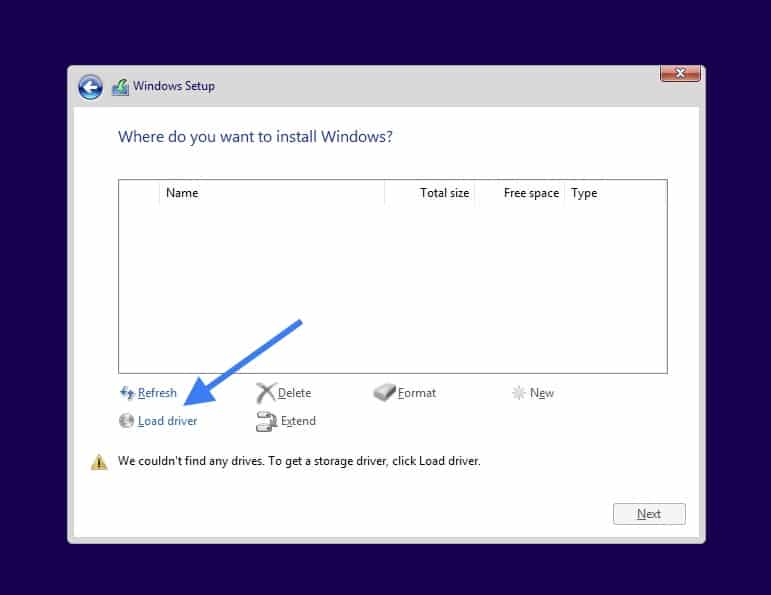
Once you get to the point of selecting the location for installation, you will see there are no disks available. This is because we need to load the VirtIO driver. Select Load driver.

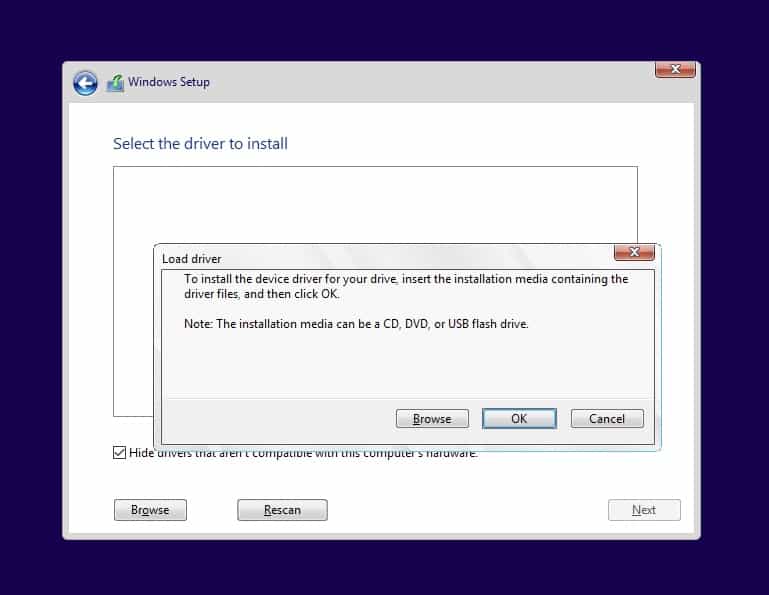
The installer will then ask you to specify where the driver is located. Select the E: drive or whichever drive the VirtIO driver ISO is located on.

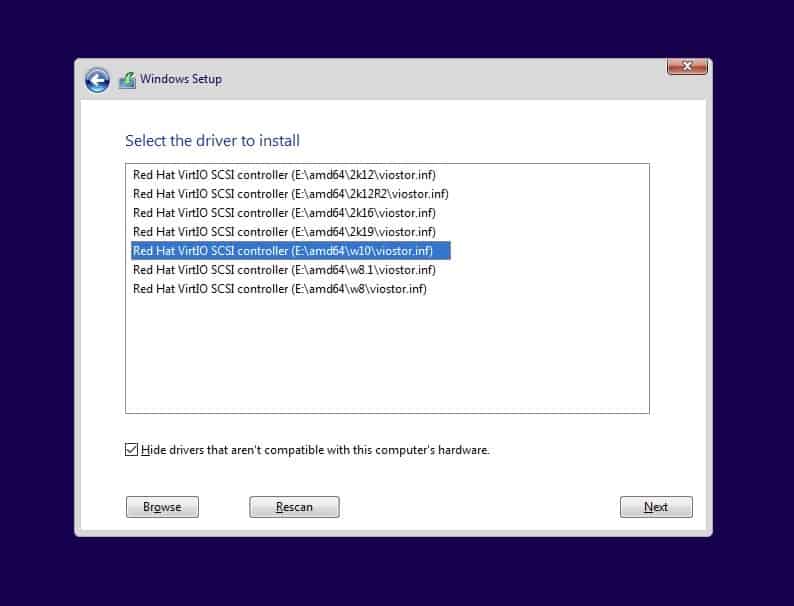
Choose the appropriate driver for the OS you have selected, which is most likely the w10 driver for Windows 10.

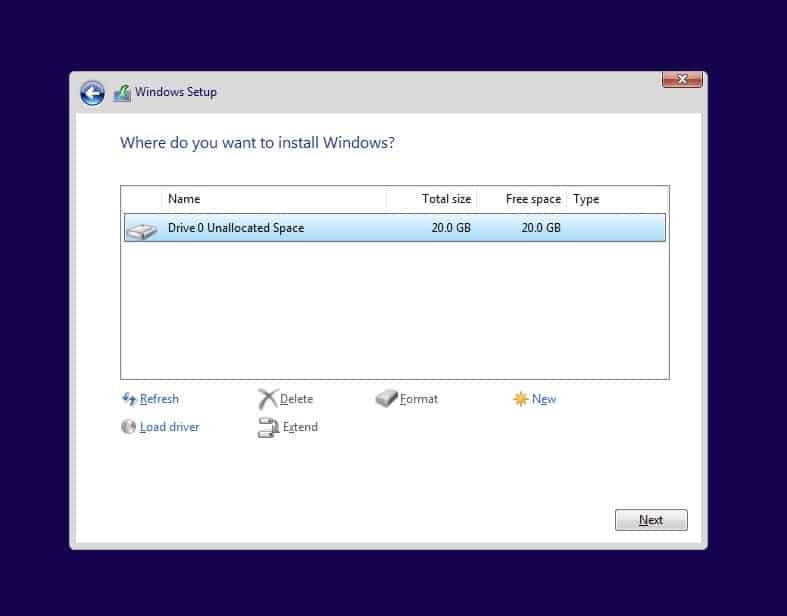
You will now see a disk you can select for the installation.

Windows will begin to install, and you will likely need to reboot the VM a number times during this process.

At some point, you will come to a network screen. This is because the VirtIO drivers for the network have not yet been loaded. Simply click I don't have internet.

It will confirm your choice, so just choose Continue with limited setup.

After you get into Windows and login with the user you created during the install. Open up Explorer and navigate the E: drive or wherever the VirtIO driver ISO is mounted. Double click the virt-win-gt-64.exe file to launch the VirtIO driver installer.

Leave everything as default and click Next through the installer. This will install device drivers as well as the Memory Ballooning service.

Once you finish the driver install, you will need to make some registry changes to enable RDP Applications to run on the system. Start by downloading the RDPApps.reg file from the WinApps repo by visiting https://github.com/Fmstrat/winapps/blob/main/install/RDPApps.reg, right clicking on the Raw button, and clicking on Save target as.

Once you have downloaded the registry file, right click on it, and choose Merge, then accept any confirmations along the way.

Next up, we need to rename the VM so that WinApps can locate it. Go to the start menu and type About to bring up the About your PC settings.

Scroll down and click on Rename this PC

Rename to RDPWindows, and then Next, but do not restart.

Lastly, scroll down to Remote Desktop, and toggle Enable Remote Desktop on, and Confirm.

At this point you will need to restart and you have completed your setup.
Rather than restart you can go right ahead and install other applications like Microsoft Office or Adobe CC that could be used through WinApps.
You may also wish to install the Spice Guest Tools inside the VM which enables features like auto-desktop resize and cut-and-paste when using virt-manager. As WinApps uses RDP, this is not necessary if you do not plan to access the machine via virt-manager.
Once you are finished, restart the VM, but do not log in. Simply close the VM viewer, and close the Virtual Machine Manager.
Expert installs
Define a VM from XML
This expert guide for XML imports is specific to Ubuntu 20.04 and may not work on all hardware platforms.
You can refer to the KVM documentation for specifics, but the first thing you need to do is set up a Virtual Machine running Windows 10 Professional (or any version that supports RDP). First, install KVM:
sudo apt-get install -y virt-manager
Now, copy your Windows ISO and VirtIO iso (links to download in the main guide) into the folder and update the kvm/RDPWindows.xml appropriately.
Next, define a VM called RDPWindows from the sample XML file with:
virsh define kvm/RDPWindows.xml
virsh autostart RDPWindows
You should then open the VMs properties in virt-manager and ensure that under CPU Copy host CPU configuration is selected.
Boot it up, install windows, and then Install the virtual machine.
Run KVM in user mode
Now set up KVM to run as your user instead of root and allow it through AppArmor (for Ubuntu 20.04 and above):
sudo sed -i "s/#user = "root"/user = "$(id -un)"/g" /etc/libvirt/qemu.conf
sudo sed -i "s/#group = "root"/group = "$(id -gn)"/g" /etc/libvirt/qemu.conf
sudo usermod -a -G kvm $(id -un)
sudo usermod -a -G libvirt $(id -un)
sudo systemctl restart libvirtd
sudo ln -s /etc/apparmor.d/usr.sbin.libvirtd /etc/apparmor.d/disable/
You will likely need to reboot to ensure your current shell is added to the group.
I love Ubuntu, especially when I wanted to work with python programming, But I also love windows 10 because of its GUI and the vast variety of software support.
In the last blog, I covered how you can install windows 10 on Centos/Redhat KVM. But in this tutorial I going to cover the Debian derivative Ubuntu.
And the steps mentioned here are exactly the same for the other Debian derivative Linux mint.
Since I get a lot of questions with regards to Ubuntu specifically I decided to write separate blogs for Ubuntu and Redhat, so if you are using Centos/Redhat/Fedora you may click here.
Prerequisite.
Ubuntu machine with good configuration.
Download the Windows ISO image by following the guide here.
Windows virtio drivers iso download latest.
Download Spice guest tools.
1. How to install KVM on Ubuntu?
The first step is to prepare the environment by installing the KVM utilities on the Ubuntu host.
On my PC I am using Ubuntu version 20.04 so enter the below commands to install KVM on an ubuntu machine. The Same command can be used with as well.
sudo apt update
sudo apt install qemu-kvm bridge-utils virt-manager libosinfo-bin -y
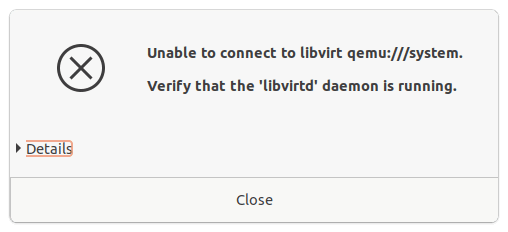
You may now go ahead and reboot the host, if you dont reboot the machine then you will end getting a below error.
2. Open the virtualization manager and create the VM.
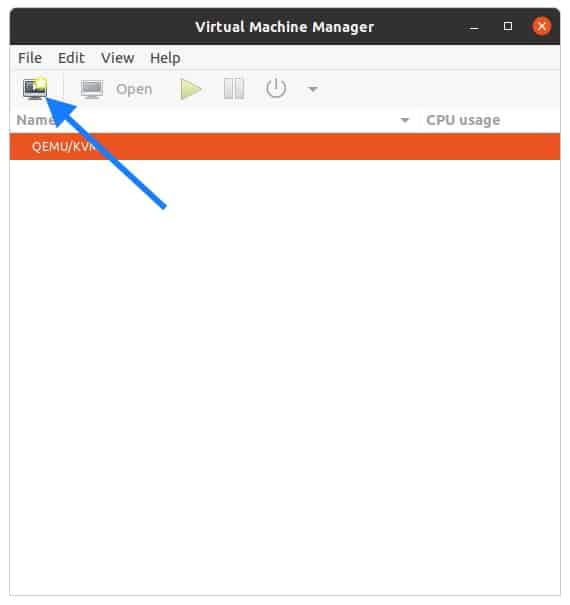
Open terminal and type virt-manager
In the virtual machine manager window click on create a new virtual machine.
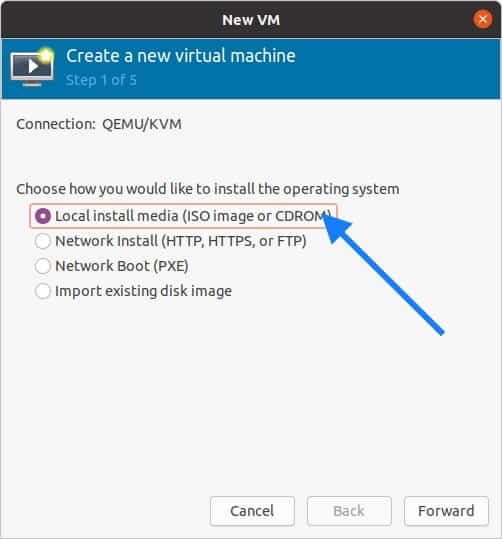
A new window now will pop up. In the New VM wizard select Local install media and click on forward.
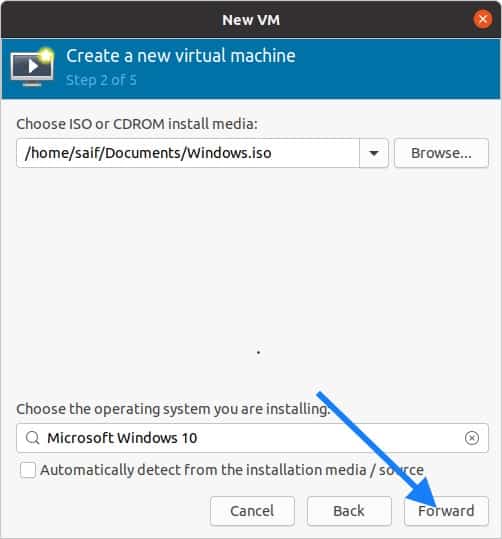
You will now have to browse for the windows 10 iso that you have downloaded and Uncheck the option which says automatically detect from the installation media.
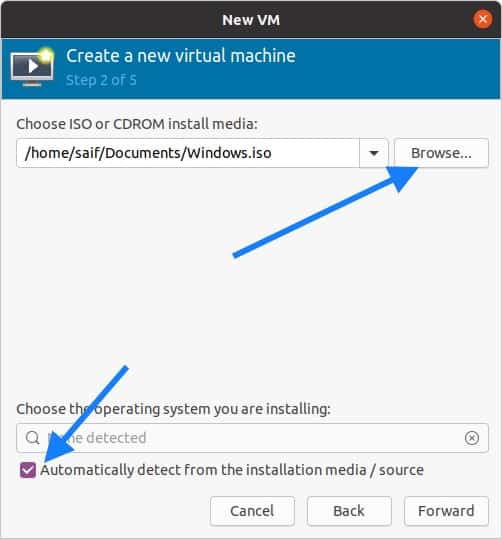
Start searching for the window10 under choose operating system, and check the box which says include end of life operating system. Once you check the box you will be able to see the Microsoft Windows 10 operating system in the list.
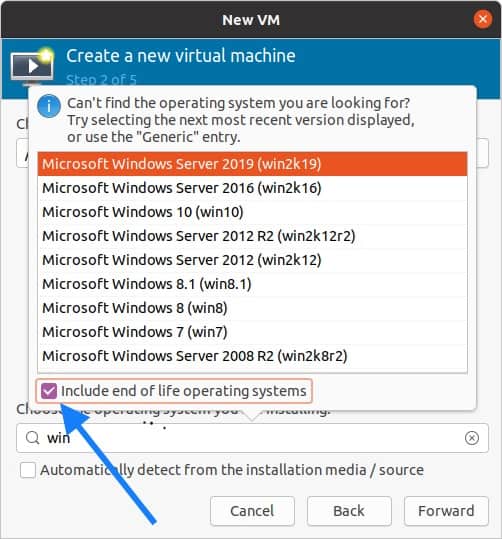
Once you select the Microsoft Windows 10 click on forward.
3. Configure the virtual machine resources.
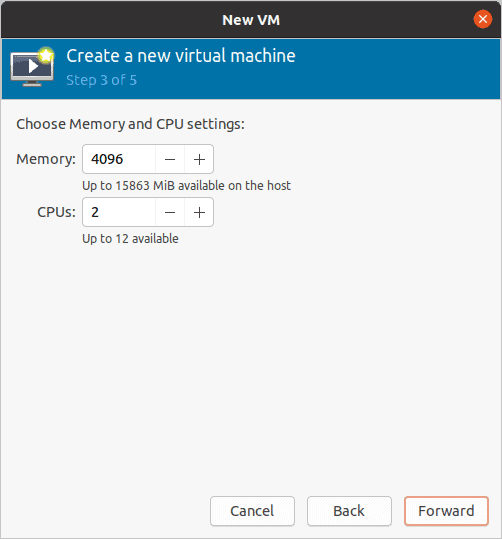
Next, you will be asked to define the memory and the CPU, I am giving 4GB of memory and 2 CPU’s and click on forward.
Depends on your configuration you may choose yours.
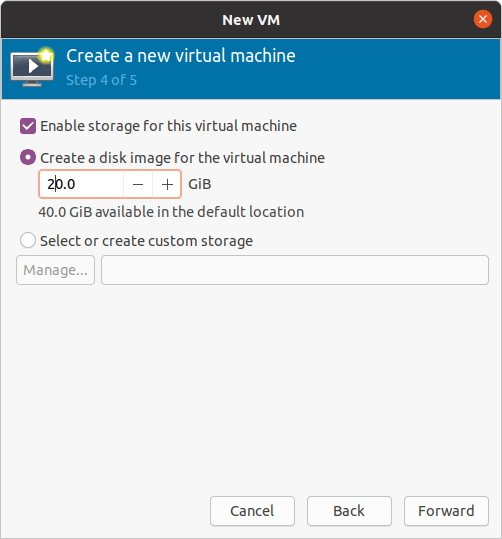
When you configure the virtual hard disk, by default Ubuntu KVM would pick up 40GB, since I don’t require that much space I just added only 20GB and clicked forward.
You may choose 40GB or more.
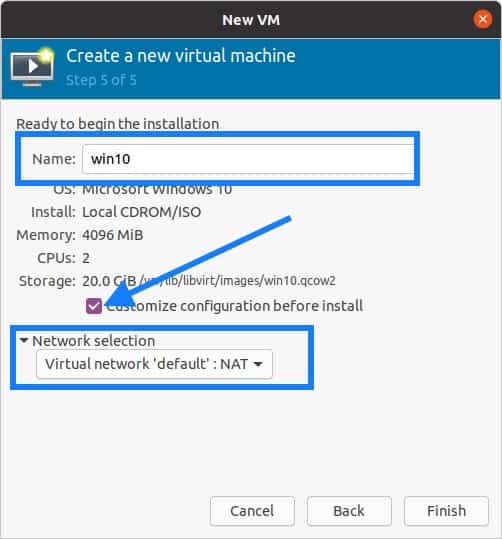
Finally, you will have to Name the windows KVM VM and check the option Customize configuration before install.
I also selected the network as Virtual network ‘default’ NAT. By selecting this network you guest VM will start using the Ubuntu host internet connection.
Click on Finish at this moment now.
4. Configure the virtual Hardware’s.
Since you selected customize option you will now be presented with the KVM customization screen.
Do not click on Begin installation yet, before that we have to modify some hardware changes.
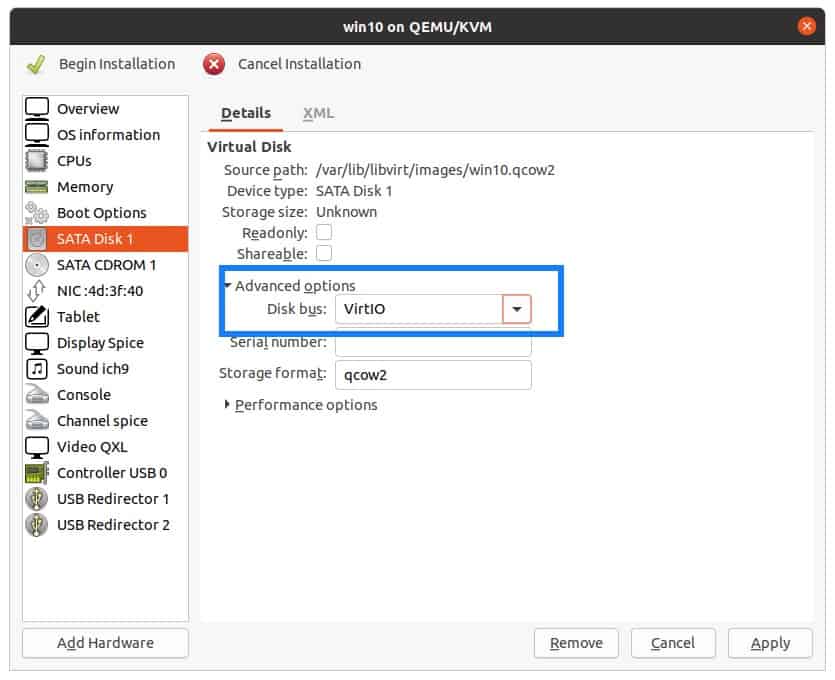
Click on the SATA Disk1 , and on the right side expand the advanced options and click on the Disk bus drop-down list.
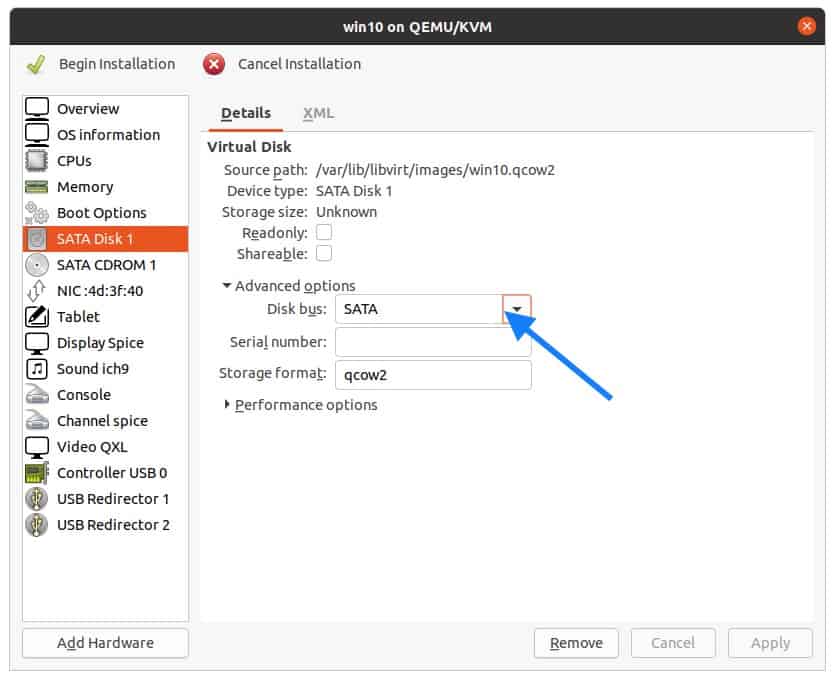
Select VirtIO as the disk bus, and then click on Apply.
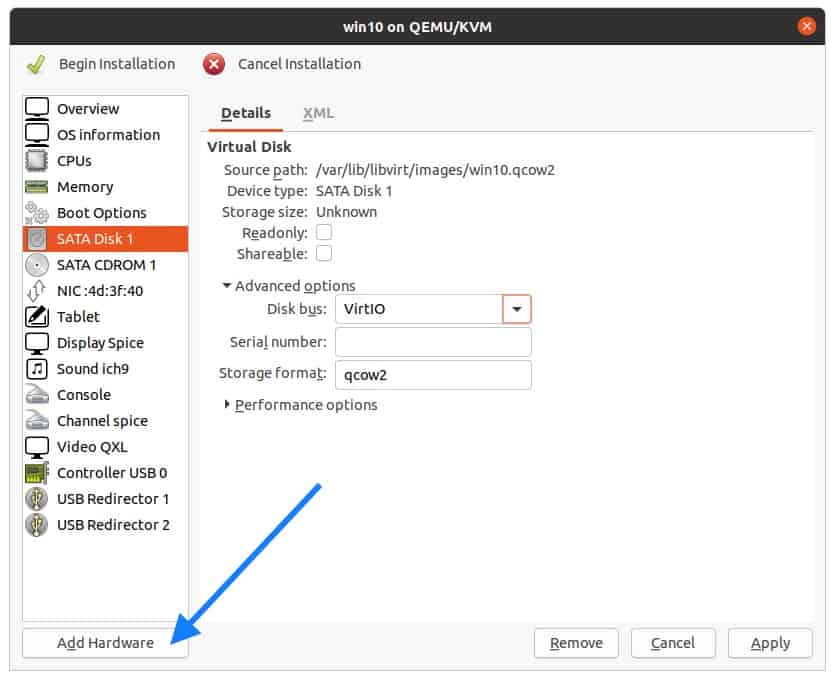
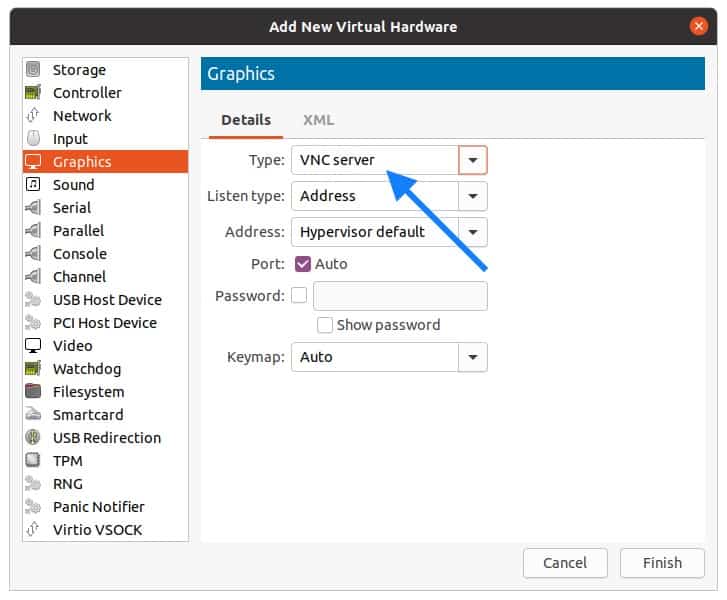
You now have to add VNC Viewer as the graphics, so click on Add hardware from the bottom left.
In the add New virtual hardware windows, select Graphics and in the Type select VNC Server and click on Finish.
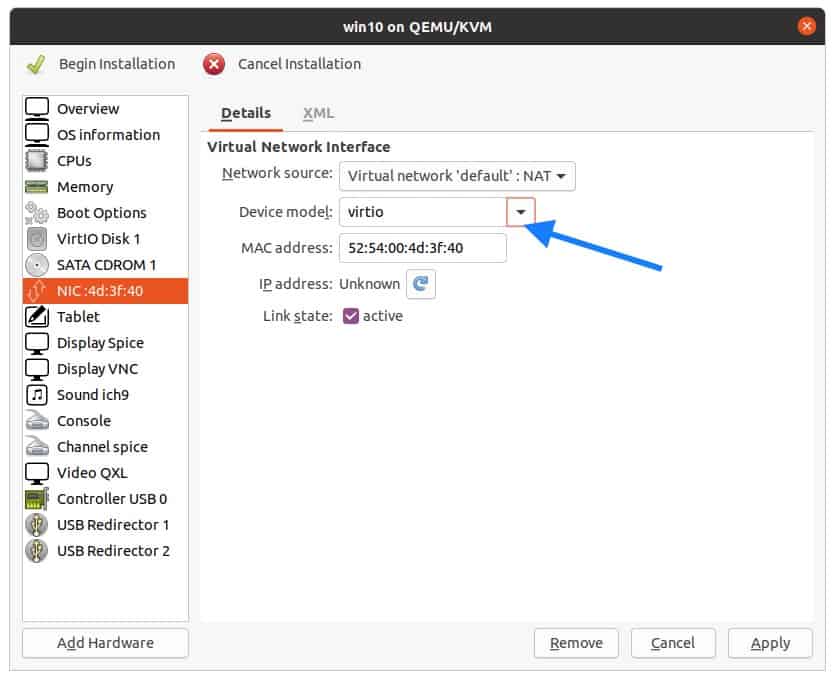
Click on Network interface card (NIC), change the device model to VirtIO, and click on Apply.
5. Add the Windows 10 virt drivers and configure the boot loader.
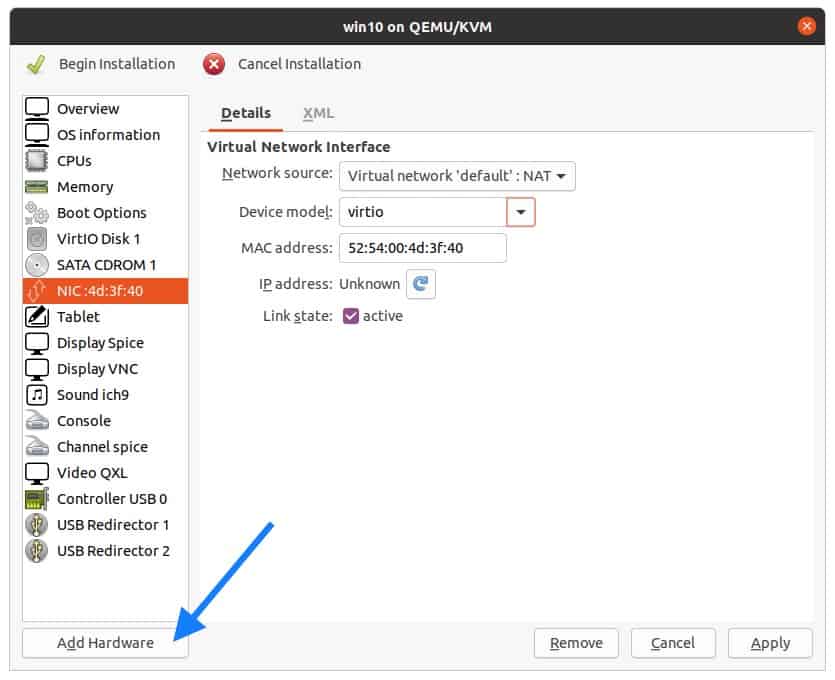
Remember that we have downloaded VirtIO Windows drivers for Ubuntu KVM, let’s attach that now. So click on Add hardware.
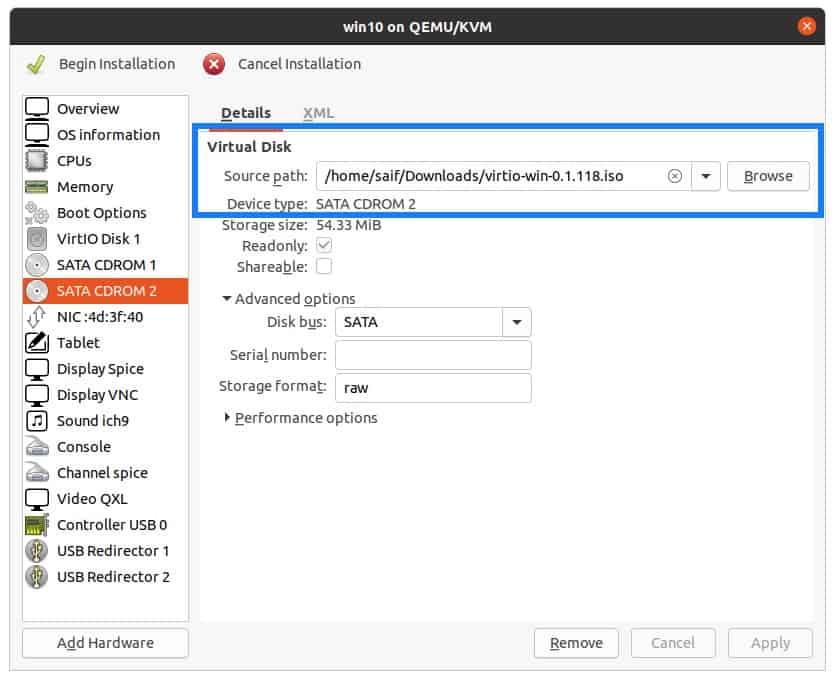
Select the storage and click on manage and attach the VirtIO iso file that we have downloaded, and also change the Disk type to CDROM device and click on Finish.

The second CDROM now has VirtIO drivers and the first one has the windows 10 ISO image.
Change the boot order for windows
Let’s go ahead and change the Boot order of the device, first being the CDROM1 and the VirtIO disk and the CDROM2.
Note : The important part is for the KVM to load the windows 10 image from the list.
Check the option Enable boot menu.
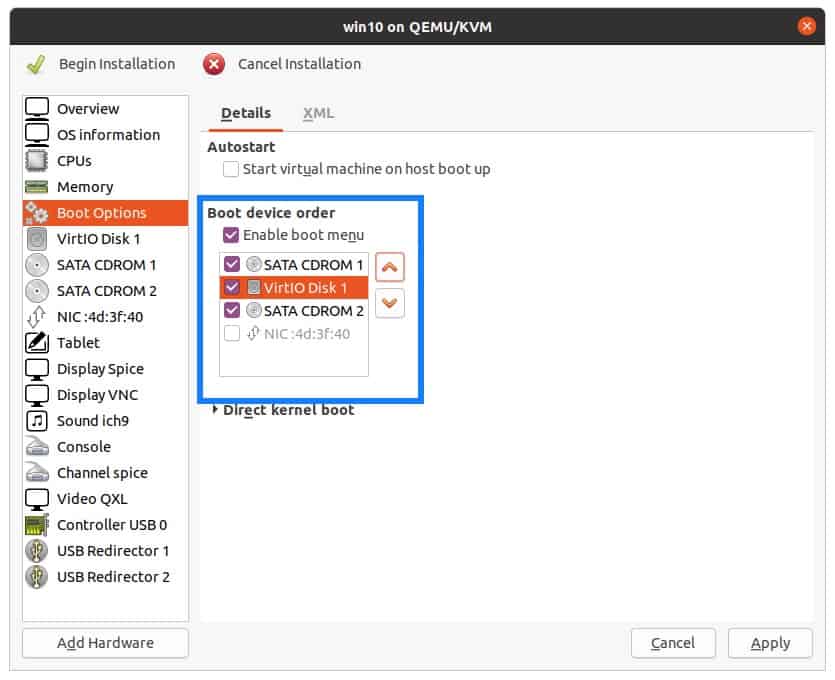
Once you rearranged the boot loader click on Apply.
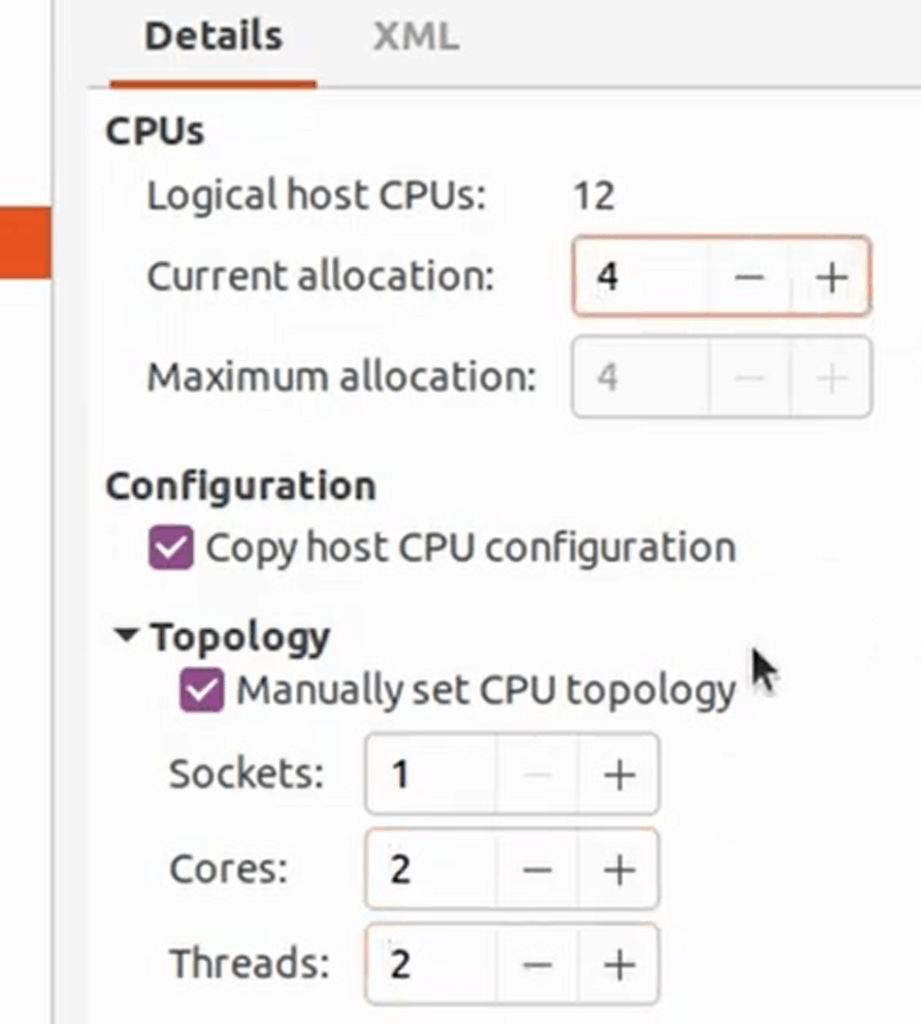
6. Configure the qemu CPU the right way.
Click on CPU and change the current allocations to 4
Check the options which say manually set CPU topology.
In the topology assign 1 socket, 2cores and 2threads.
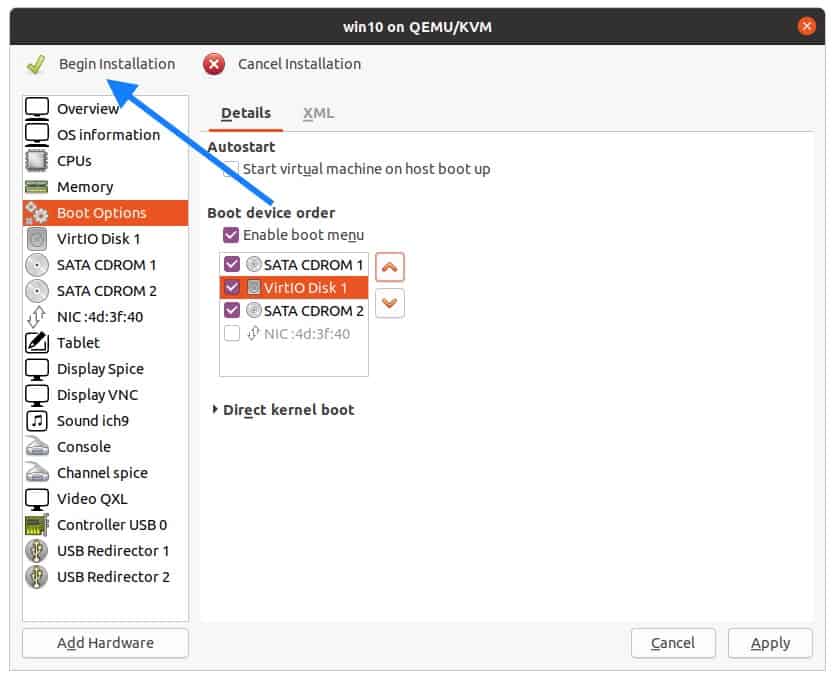
7. Begin the windows 10 VM installation.
We just finished adding the required virtual hardware, you may now click on Begin installation.
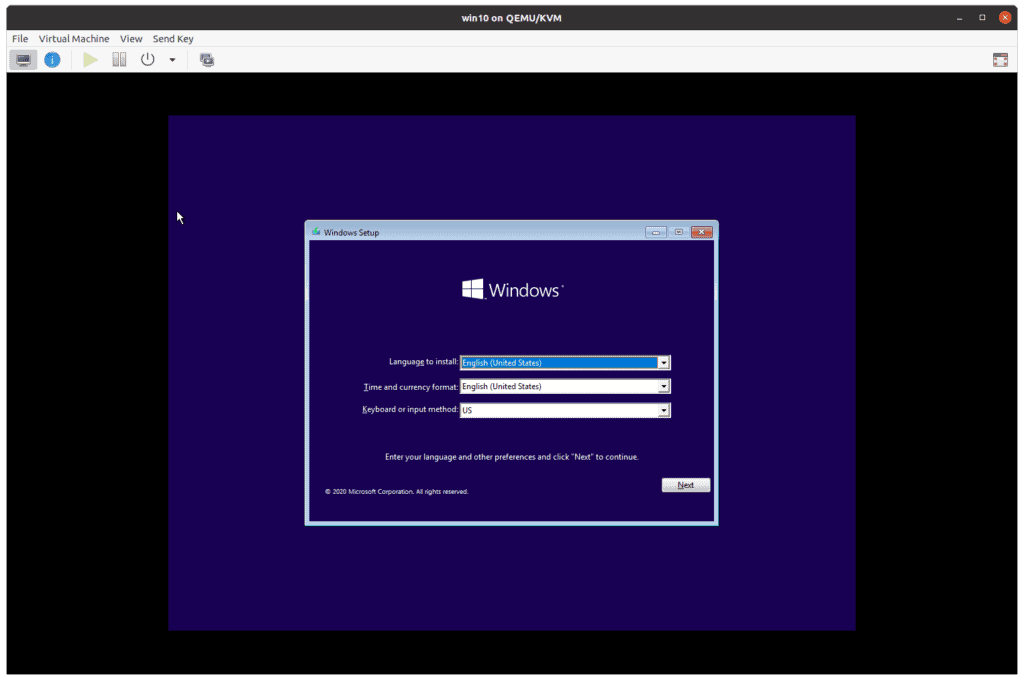
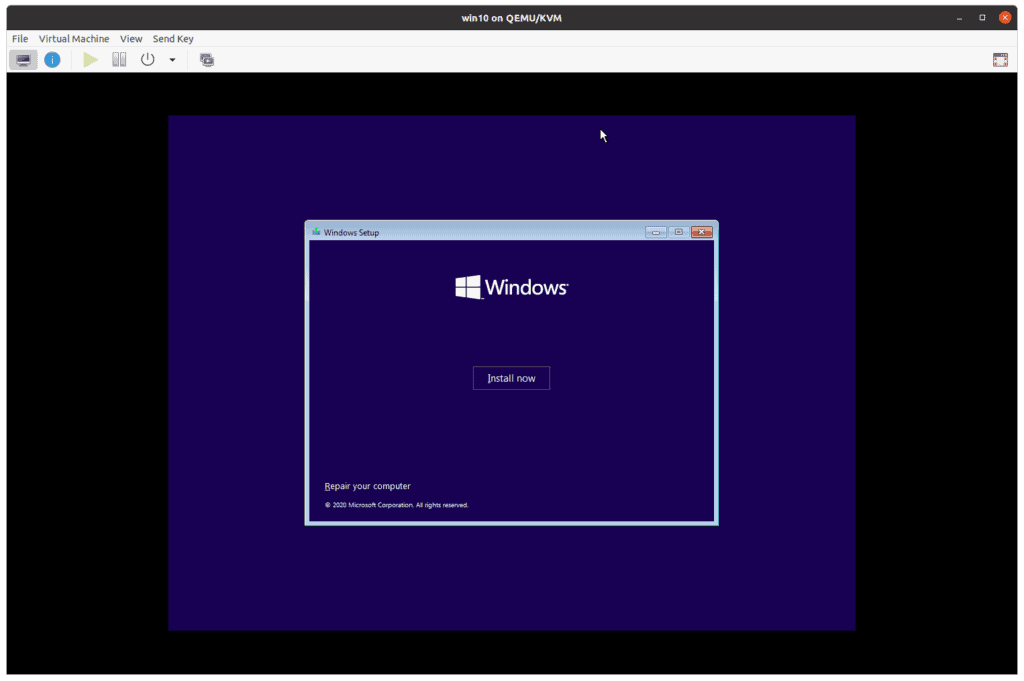
If everything went well, you should be able to see the windows logo, and after few seconds Windows prompt where you have to choose the language and the time and date and the keyboard click on Next.
You will have to click on install now on the next prompt.
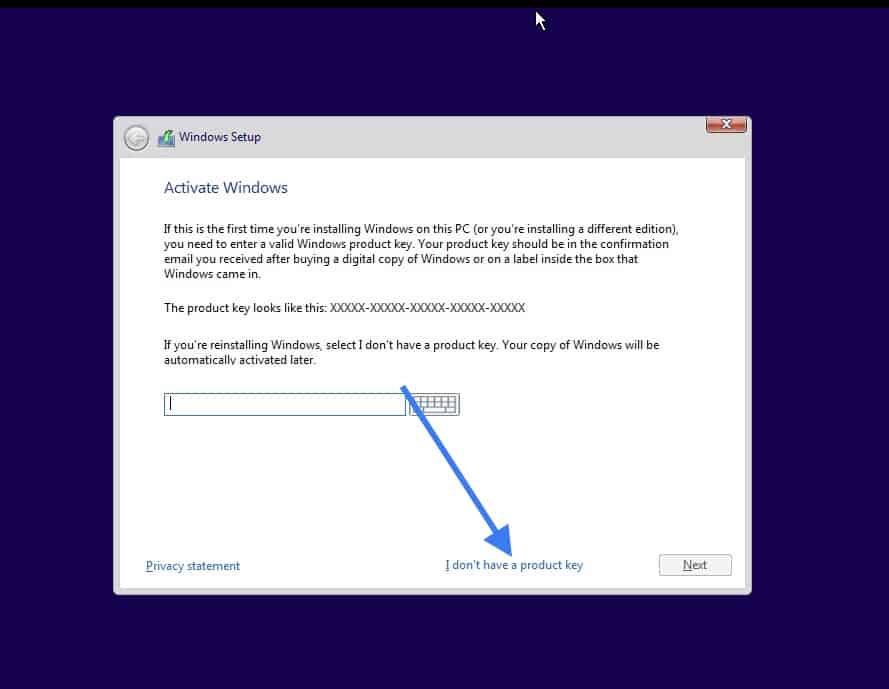
If you have the product license key, you may enter it now. Else click on I don’t have a product key, I choose the same as I didn’t have the product key during the installation.
Select the version that you would like to install, I am choosing the version Windows 10 Pro.

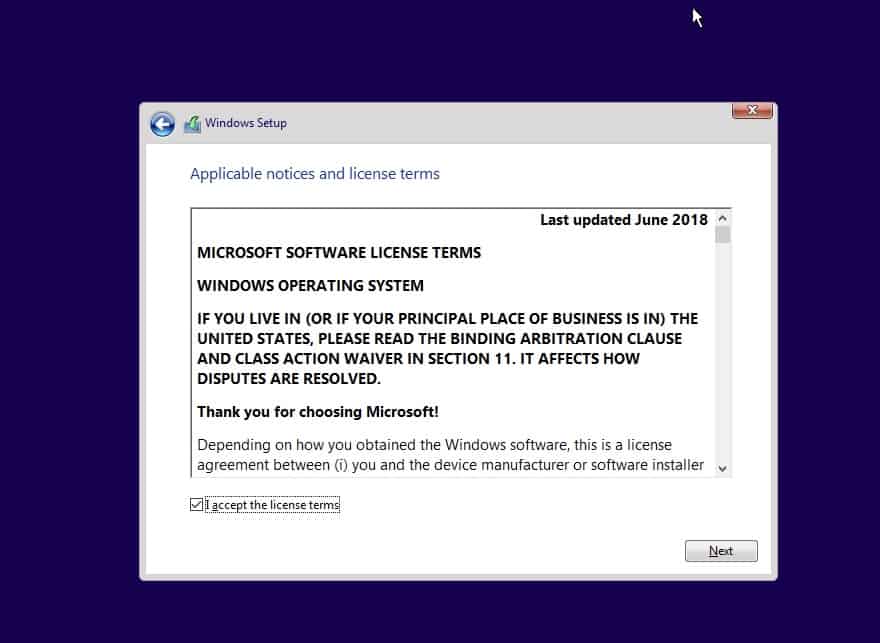
Accept the license agreement and click on Next.
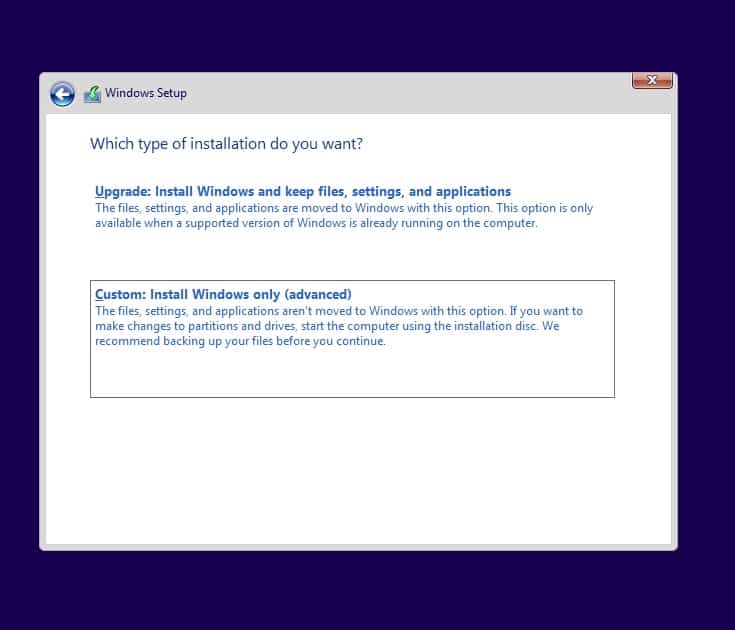
You now have two options to install the windows, Either upgrade or Custom, Choose custom here.
8. Install the Redhat SCSI controller driver.
Remember we have added the storage of 20GB in the beginning, but we are not able to see them so click on Load driver here.
You will get a load driver prompt click on OK.
Once you click on OK you will be able to see all the drivers like below.
Select the windows 10 SCSI driver and click on Next.
Note: If the driver doesn’t show up then you may follow the below steps.
- Click on Browse and expand the VirtIO driver iso file CDROM.
- Go down and expand the folder viostor.
- Expand Win10
- And select amd64 and click on OK.
- You should now be able to see the drive listed now.
After you selected the drive and once you click on Next after a few seconds you should be able to see the virtual hard disk that you have attached earlier, select that and click on Next.
The windows installation now begins and starts to copy the files now.
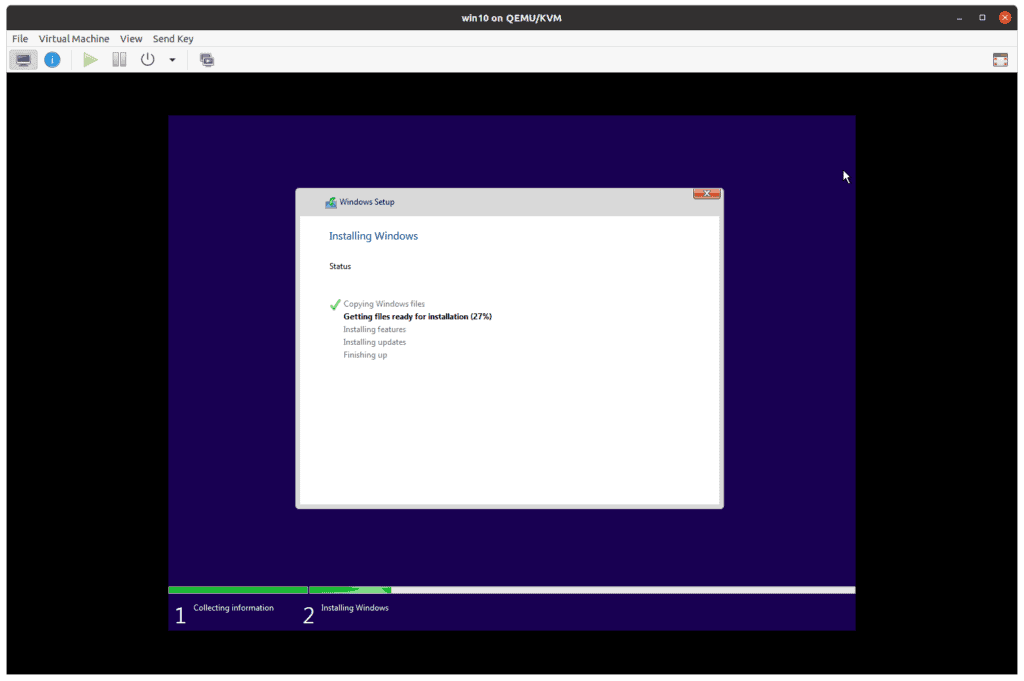
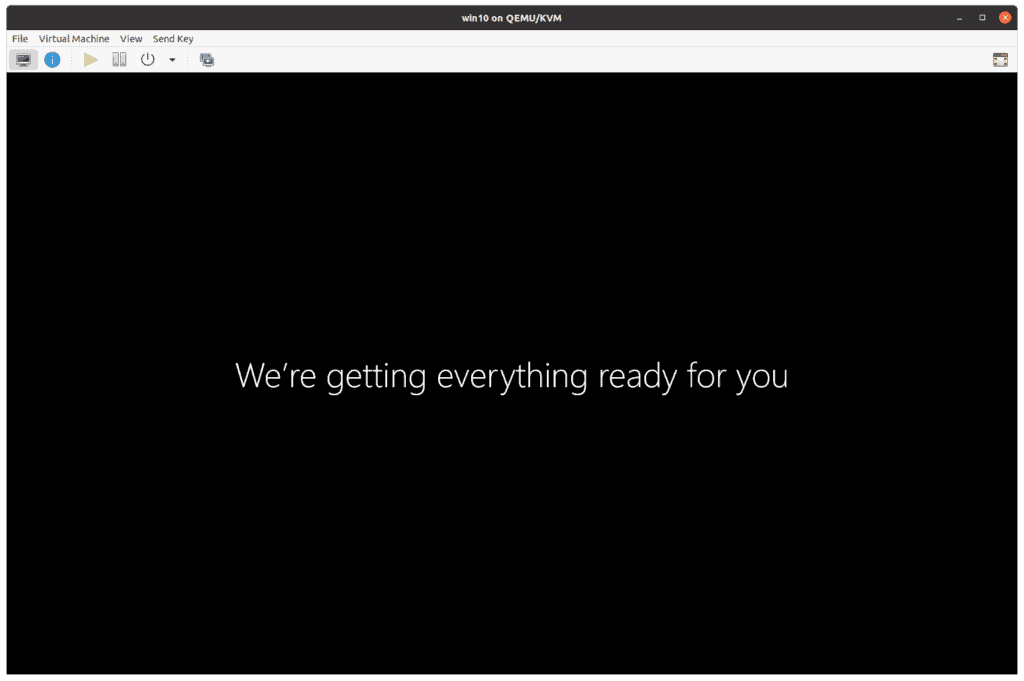
After a couple of restarts, you should get the windows setup screen where you need to have the basic configuration to be done.
During the process, you could either connect the Microsoft account or create a local account.
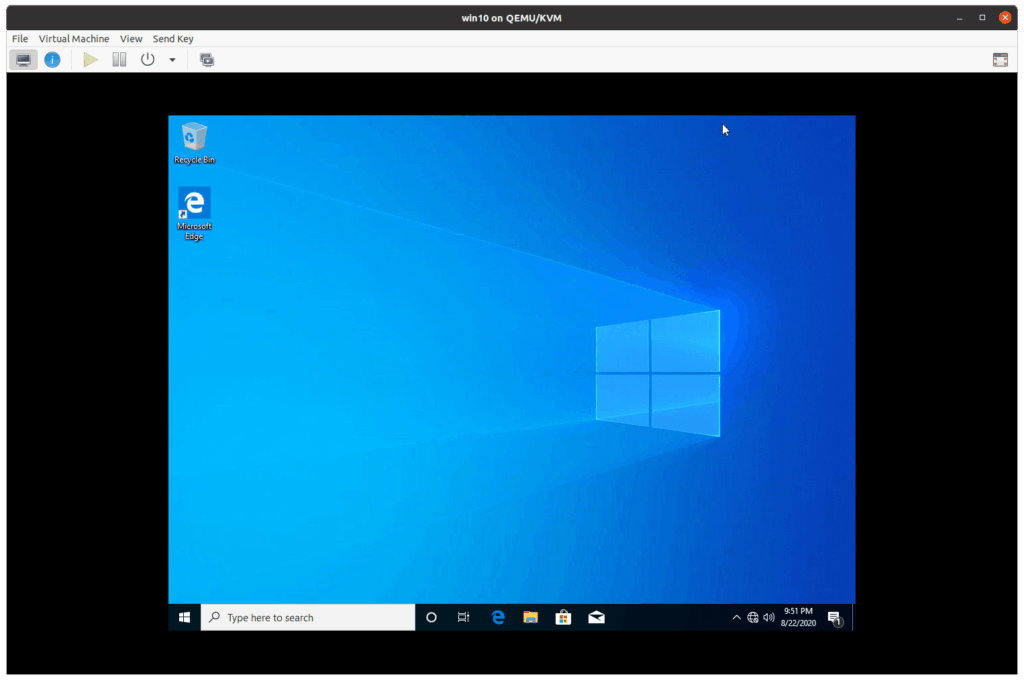
And you should be presented with the windows home screen like below.
9. How to install virtio drivers windows 10.
After the windows 10 installation is completed, you now have to install the VirtIO drivers to windows 10. Post which the networking, display graphics, copy-paste functionality, and others should work.
Type This PC and right click and click on Manage.
In the device manager, you should be able to see there are some drivers that are not installed under Other devices.
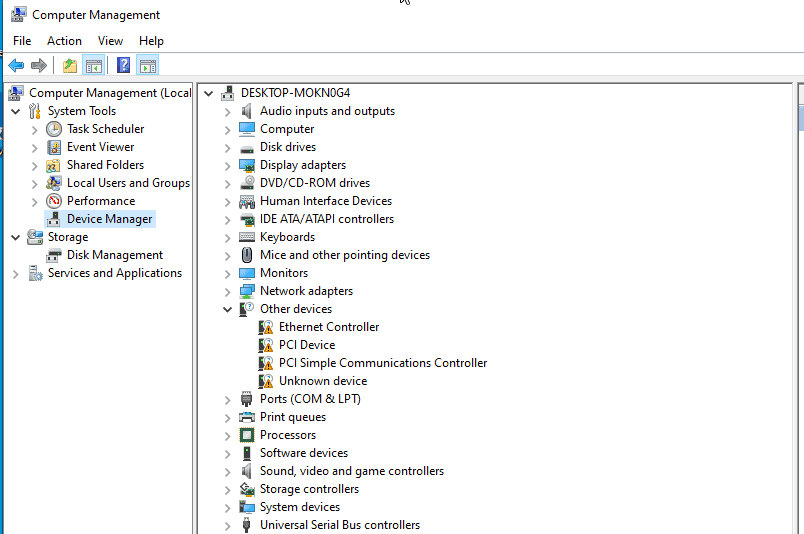
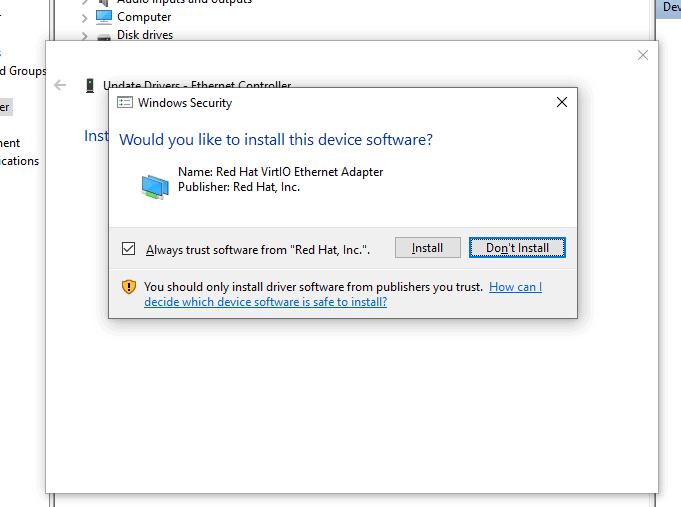
Just right click on each driver and click on update driver. Let’s see how we can do it for the Ethernet controller.
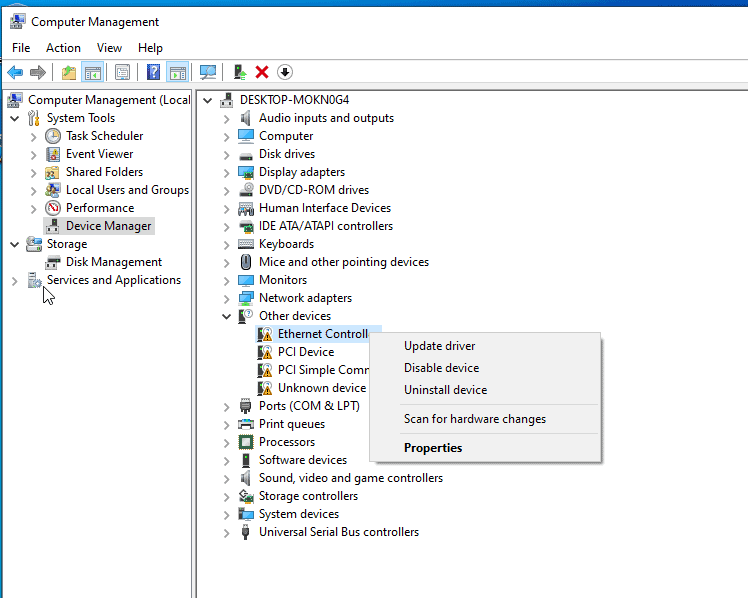
Click on Browse my computer for drivers
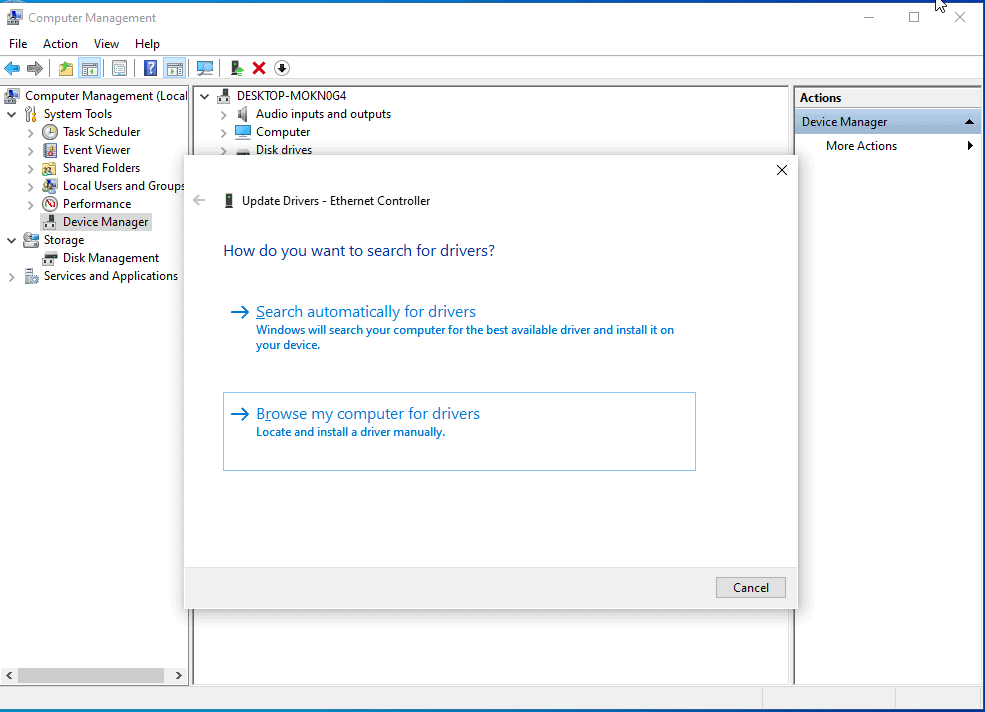
In the browse section select the VirtIO iso CDROM that we have attached.

You should be able to see the drive letter as E, check the box which says include subfolders, and click on Next.
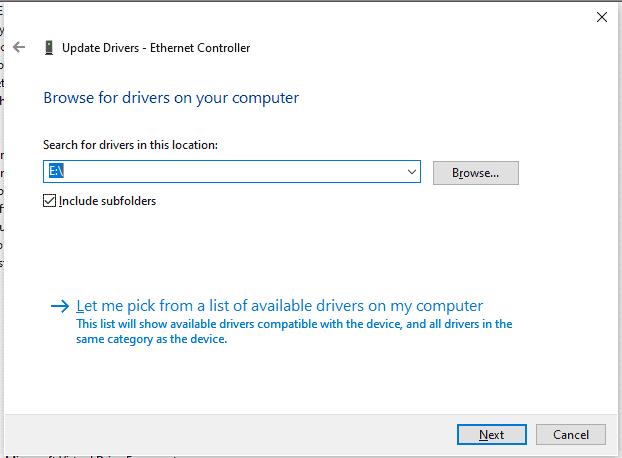
You should be able to see the pop up to install the Redhat ehternet Adapter driver to the machine click on Install.
Similarly do it for other dirvers as well.
Note: I couldn’t quite get the ‘Unknown device’ to get it working under other drivers, so it should be fine.
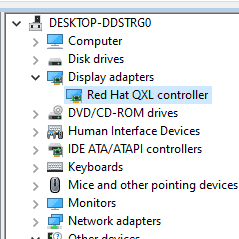
There is one more driver that you need to install, which is Display adapters, By default it has picked up Microsoft Basic Display Adapter.
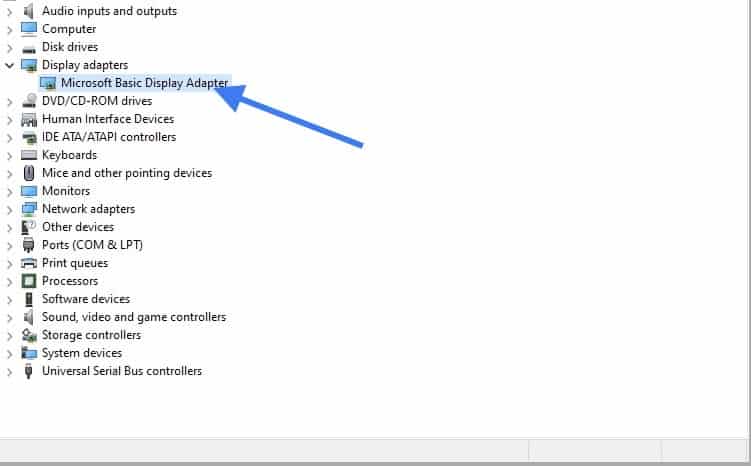
Just like you did the driver update for other devices, do the same thing for the display adapter as well.
10. Install SPICE Guest tools.
There is a SPICE Guest agent that you need to install now. For that you need to transfer the file from Ubuntu host machine to the windows.
Steps to transfer files from Ubuntu host to Windows 10 guest vm.
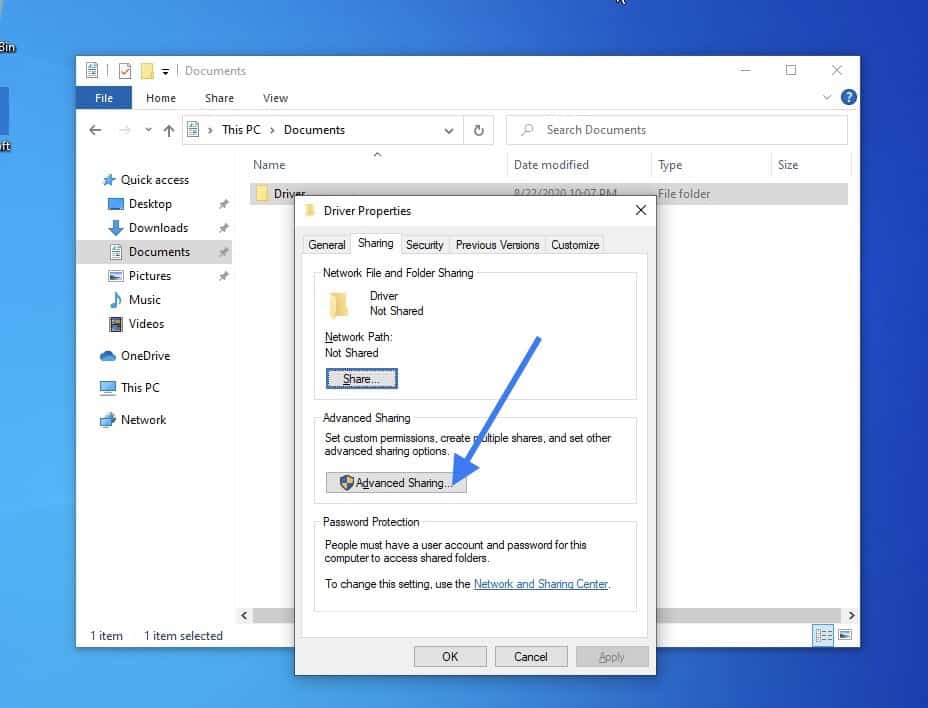
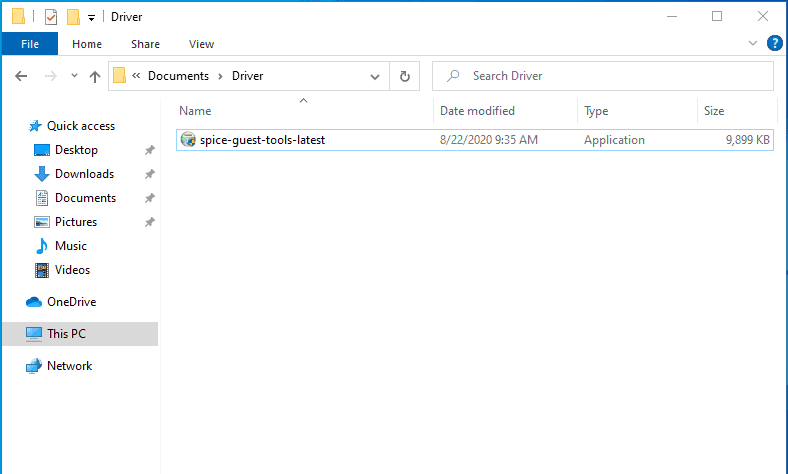
In windows create folder called Driver.
Now right click and click on properties.
Click on the Sharing tab, and click on Advanced sharing.
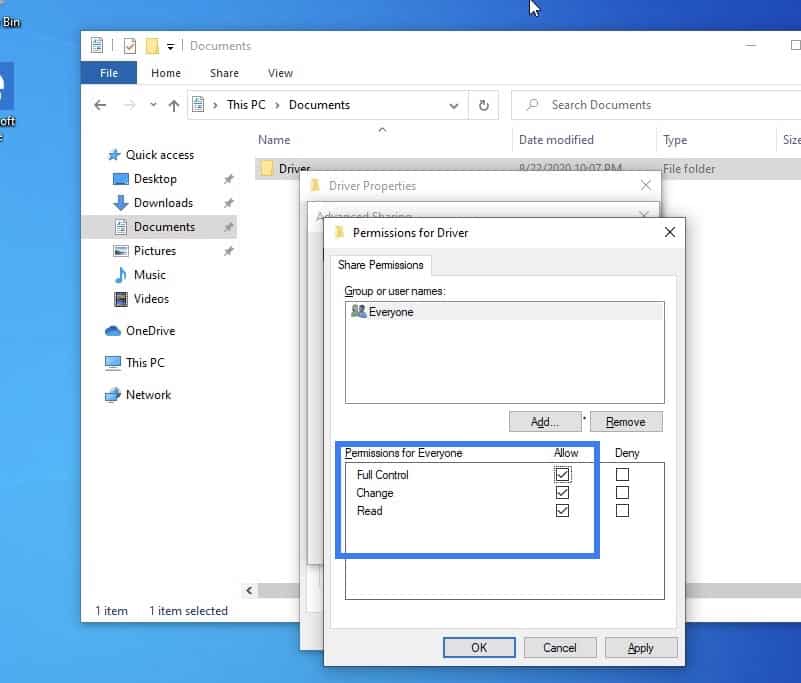
Check the option Share this folder and click on Permissions.
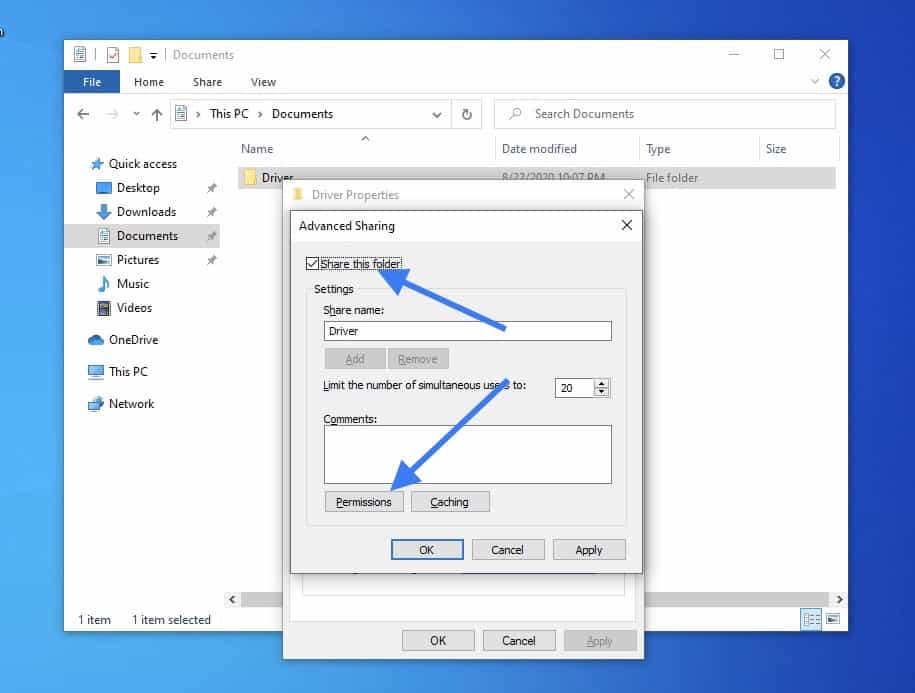
Check all the permissions now, you may cancel this later once you transfer the files.
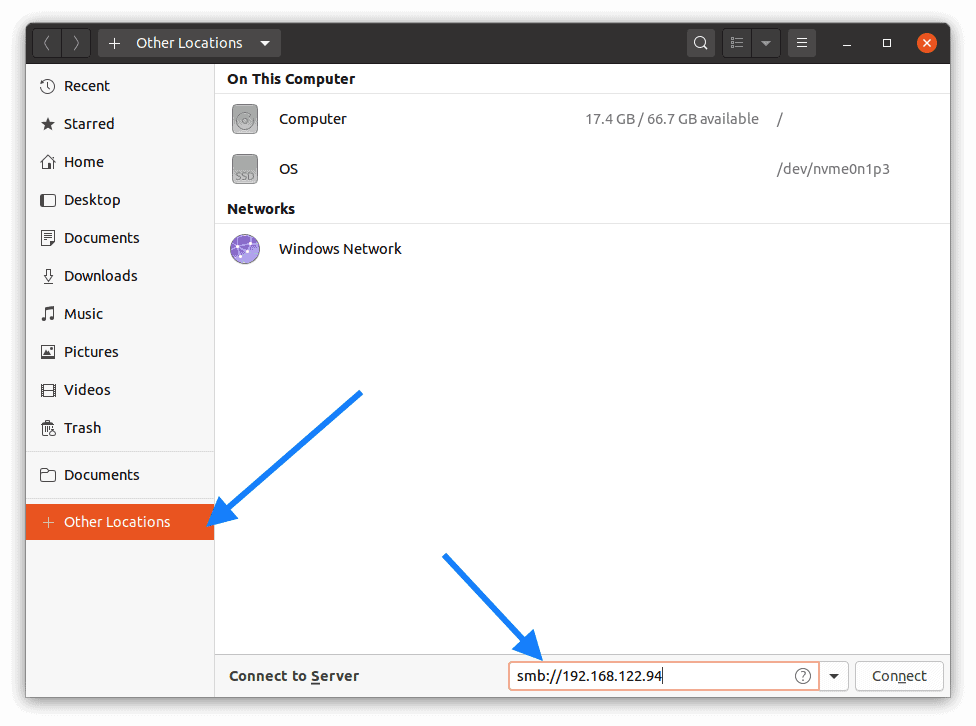
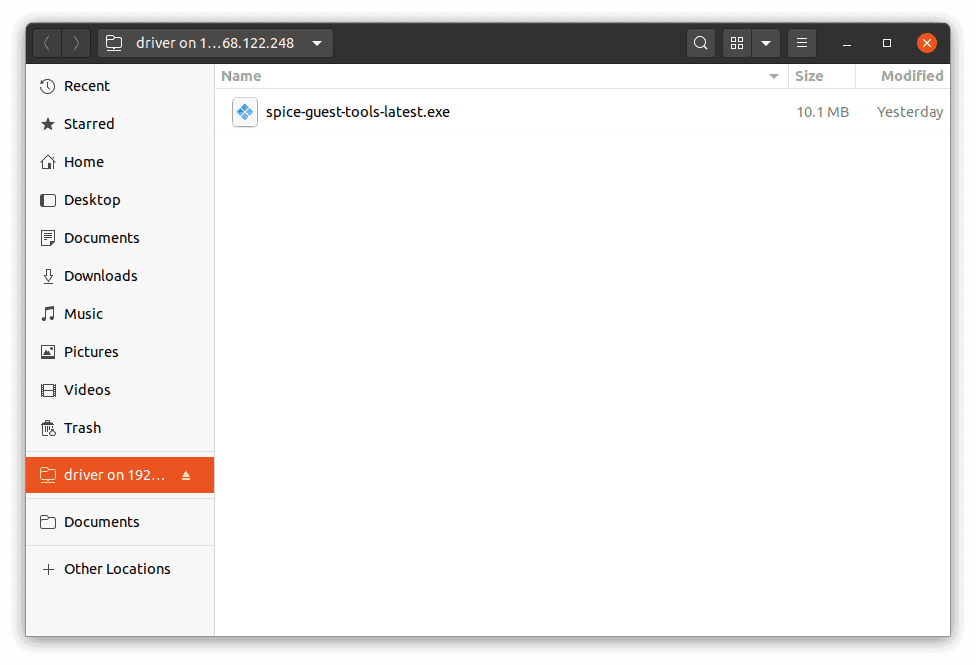
Now the folder is shared, go to Files in Ubuntu and click on Other locations.
In the connect to server address bar, type smb://windows host IP and hit enther.
You will be asked to provide the windows 10 credentials, enter it now.
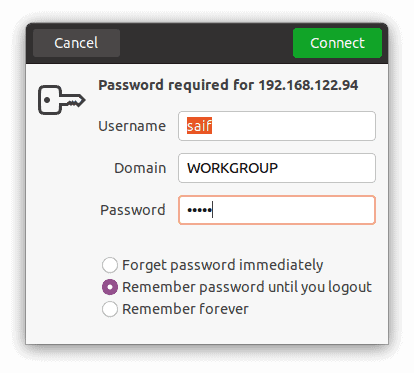
Paste the Spice guest tools here
Now go back to the windows 10 and you should be able to see the Spcie guest tools software there, double click on it install the software, and you should be good to go.
11. Detach the CDROM1 and 2.
Awesome! you just installed windows 10 on your Ubuntu KVM. If you wanted to know how you can manage this VM when you wanted to access it, you can check out the article here.
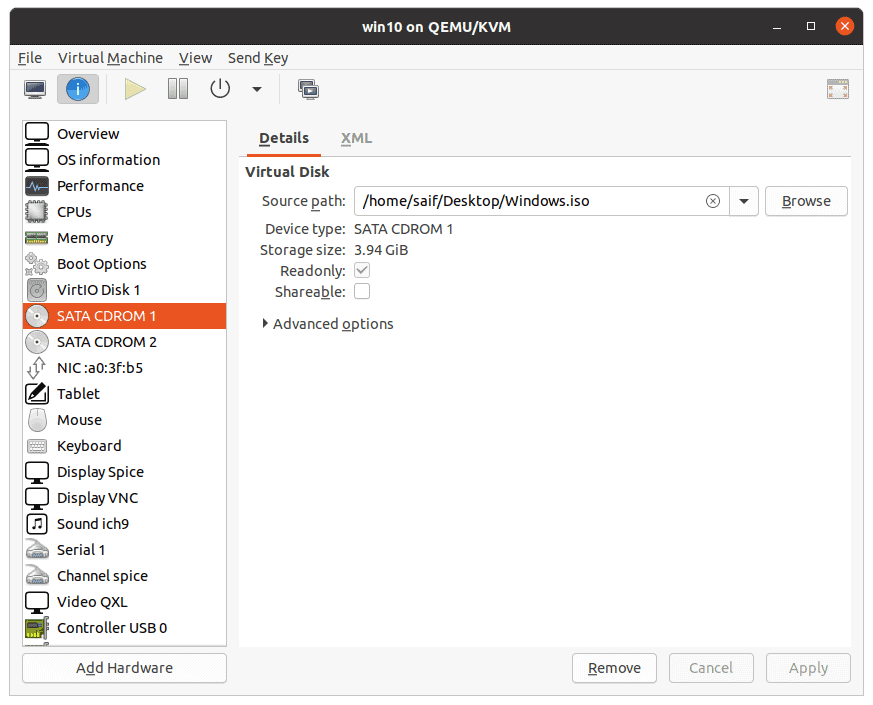
At this point you should be good to go however, next time when you shutdown the Guest VM, you need to make sure that you remove the CDROM drive 1 and two that you had attached during the installation.
In source path, you may click on the x icon to detach.
Below is the video, if you prefer to watch over video.
Последнее время применение виртуализации при построении серверной инфраструктуры встречается все чаще. Гибкость, масштабируемость, экономия делают эту технологию очень перспективной. Сейчас на рынке существует достаточное количество решений, как проприетарных, так и open source, позволяющих развернуть виртуальные сервера. Один из таких вариантов я хочу рассмотреть в данной статье.
Поигравшись с ГУЙовыми платформами виртуализации от Microsoft, VMware и Sun, я решил попробовать сделать тоже самое через консоль. Установив давно понравившийся мне linux дистрибутив ubuntu, стал выбирать — на какой же реализации виртуальных машин (ВМ) остановиться. В википедии есть интересная табличка, хотя посмотрев оффициальный help к ubuntu я понял, что лучше начать с KVM.
Процедура установки хост-сервера в общем-то стандартная, но есть нюансы. Во время установки включил LVM (как я понял — гостевые ОС можно впоследстии размещать на LVM-томах, что придаст дополнительную гибкость), а в окне выбора доустанавлемого ПО отметил OpenSSH server и Virtual Machine host.
Хост-серверу задан статический ip 172.16.4.24, что можно увидеть далее в приведенных конфигах.
После установки хост-сервера, подключаемся к нему по ssh (одноименной командой из linux или putty/kitty из windows).
Первым делом необходимо проверить, поддерживает ли железо сервера аппаратную виртуализацию командой
egrep ‘(vmx|svm)’ /proc/cpuinfo
Если вывод команды не пустой, значит поддерживает.
Скачиваем в домашнюю папку iso-образ того дистрибутива операционной системы, которая в последствии будет гостевой. У меня это тот же самый ubuntu-9.04-server-amd64.iso
Устанавливаем необходимые пакеты:
sudo apt-get install kvm libvirt-bin python-virtinst bridge-utils
Добавляем пользователя, который будет рулить виртуалками (в простейшем случае это тот пользователь, которого мы завели во время установки системы, и под которым проделываем все описываемые действия):
sudo adduser $USER libvirtd
После этого лучше ребутнуться.
Проверяем, как установилась KVM, командой:
virsh -c qemu:///system list —all
В консоли должно появиться примерно следующее:
az@vsrvs:~$ virsh -c qemu:///system list —all
Connecting to uri: qemu:///system
Id Name State
———————————-
если все так, продолжаем.
Для того, чтобы виртуальные сервера работали в нашей реальной локальной сети на хост-машине создаем сетевой мост. Для этого надо подредактировать файл /etc/network/interfaces
Так он выглядел до модификации:
# This file describes the network interfaces available on your system
# and how to activate them. For more information, see interfaces(5).

# The loopback network interface
auto lo
iface lo inet loopback

# The primary network interface
auto eth0
iface eth0 inet static
       address 172.16.4.24
       netmask 255.255.255.192
       network 172.16.4.0
       broadcast 172.16.4.63
       gateway 172.16.4.1
Так после:
# This file describes the network interfaces available on your system
# and how to activate them. For more information, see interfaces(5).

# The loopback network interface
auto lo
iface lo inet loopback

# The primary network interface
auto eth0
iface eth0 inet manual

auto br0
iface br0 inet static
        address 172.16.4.24
        netmask 255.255.255.192
        network 172.16.4.0
        broadcast 172.16.4.63
        gateway 172.16.4.1
        bridge_ports eth0
        bridge_fd 9
        bridge_hello 2
        bridge_maxage 12
        bridge_stp off
Далее переходим к инсталляции ВМ:
sudo virt-install -n vsrv1 -r 384 -f vsrv1.img -s 10 -c ubuntu-9.04-server-amd64.iso —accelerate —os-type=linux —os-variant=generic26 -v —vnc -w bridge:br0
где:
-n vsrv1 — имя ВМ;
-r 384 — выделяемый объем ОЗУ для нее;
-f vsrv1.img — файл, являющийся виртуальный жестким диском для гостевой ОС;
-s 10 — объем этого диска в гигабайтах;
-c ubuntu-9.04-server-amd64.iso — образ cd дистрибутива гостевой ОС, подключаемый как виртуальный cdrom;
—accelerate —os-type=linux —os-variant=generic26 -v — ускоряем, оптимизируем ВМ для конкретной гостевой ОС и задействуем аппаратные возможности виртуализации;
—vnc — запускаем для ВМ vnc-сервер;
-w bridge:br0 — указываем использовать сетевой мост.
Если после запуска этой команды не появилось никаких ошибок, а отобразилось нечто следующее:
Starting install…
Creating domain… 0 B 00:01
/usr/lib/python2.6/dist-packages/virtinst/Guest.py:1086: DeprecationWarning: integer argument expected, got float
for ignore in range(1, (5 / .25)): # 5 seconds, .25 second sleeps
Unable to connect to graphical console: virt-viewer not installed. Please install the ‘virt-viewer’ package.
Domain installation still in progress. You can reconnect to
the console to complete the installation process.
То все отлично, виртуальная машина запустилась, что можно проверить командой:
virsh -c qemu:///system list —all
Поэтому преступаем к установке гостевой ОС.
Для начала необходимо подключится к vnc-серверу, который отображает экран ВМ. Я делал это из WinXP, хотя, из практически любого linux дистрибутива, это делается аналогично.
Устанавливаем (если в самом начале не установили, а настраивали сервер локально) ssh-клиент, например, kitty (доработанный вариант putty). Запускаем, настраиваем:
- Во вкладке Session — Host Name (or IP address) адрес нашего хост-сервера (в моем случае 172.16.4.24).
- Во вкладке Windows-Translation — выбираем UTF-8.
- Во вкладке Connection-SSH-Tunnels — заполняем поля Source port 59000, Destination localhost:5900, нажимаем Add. Должна появится следующая запись:

- Жмем Open и мы должны подключится по SSH к хост-серверу. Одновременно у нас произойдет перенаправление порта 5900 хост-сервера (порт vnc-сервера) на наш локальный 59000 порт.

Примечание. При запуске еще одной ВМ, порт vnc-сервера увеличится на 1, поэтому для того, чтобы увидеть ее экран необходимо сделать перенаправление порта 5901 хост-сервера на, например, порт 59001.
Устанавливаем vnc-клиент, например UltraVNC, запускаем UltraVNC Viewer и подключаемся к localhost:59000. Если все сделано правильно, то мы увидим экран нашей ВМ с запущенным инсталлятором гостевой ОС.
Устанавливаем гостевую ОС.
Так она начинает загружаться после установки:
После установки и настройки гостевой ОС, ВМ можно клонировать командой
sudo virt-clone -o vsrv1 -n vsrv2 -f vsrv2.img —connect=qemu:///system
UPD: После клонирования для того, чтобы заработал сетевой интерфейс необходимо на клоне удалить файл /etc/udev/rules.d/70-persistent-net.rules ну и заодно изменить в /etc/hostname и в /etc/hosts имя сервера на новое.
TIP:
Команды для управления ВМ:
- virsh -c qemu:///system help
Встроенная помощь по командам - virsh -c qemu:///system list --all
Посмотреть статус установленных ВМ - virsh -c qemu:///system start vsrv1
Запусить ВМ vsrv1 - virsh -c qemu:///system shutdown vsrv1
Послать команду завершения работы ВМ - virsh -c qemu:///system destroy vsrv1
Принудительно завершить работу ВМ - virsh -c qemu:///system undefine vsrv1
Удалить ВМ
Использованные материалы:
- man-ы представленных программ
- https://help.ubuntu.com/9.04/serverguide/C/virtualization.html
- http://www.howtoforge.com/virtualization-with-kvm-on-ubuntu-9.04
Contents
-
Creating virtual machines
-
Ubuntu-vm-builder: the fast & powerful way to create Ubuntu JEOS VMs
- Basic use
- More complex example
- Starting Guest created in «complex example»
- Accessing the new server remotely with SSH tunnel / VNC
- Install on a raw block device
-
Create VMs running other operating systems: virt-install
- Example Windows install
- Example Ubuntu install
- Other Operating Systems
- Cloning a virtual machine
- Create a virtual machine from pre-existing image
- See also
-
Ubuntu-vm-builder: the fast & powerful way to create Ubuntu JEOS VMs
Creating virtual machines
Now that KVM is installed, let’s see how we create our first VM. This can be done using:
-
virt-manager: a GUI tool
-
virt-install, a python script developed by Red Hat
-
ubuntu-vm-builder, developed by Canonical.
Ubuntu-vm-builder: the fast & powerful way to create Ubuntu JEOS VMs
Ubuntu-vm-builder is probably the best tool to use if you want to create VMs running Ubuntu JEOS 8.04, as the install is entirely scripted (very fast).
This tool is packaged, and in universe:
sudo apt-get install ubuntu-vm-builder
Note: you will need to have grub installed for vmbuilder to work. If you’re using lilo to boot the host you will have to install the grub package. You can still use lilo to boot the host OS, but the guests will boot with grub. The grub command needs to be install on the host for the guest image to build.
Note for 8.10 (intrepid): the package is now named python-vm-builder, the command is now named vmbuilder and you can find a detailed tutorial on the wiki.
Note: make sure you have big enough /tmp (1GB or more). Also, some locales will crash ubuntu-vm-builder; en_US is safe.
Basic use
Here is a very basic example of how to use it:
sudo ubuntu-vm-builder kvm hardy
This will create an Ubuntu Hardy, with all options set to default. Note: if you want to use Virsh to manage your virtual machines as detailed below, you must add this parameter:
--libvirt qemu:///system
The javascript does not have an option for this itself, unfortunately.
Note: when using —libvirt, the xml file is injected into libvirt and not stored locally. Use virsh -c qemu:///system or virt-manager -c qemu:///system to start your machine or modify its configuration.
More complex example
Now here is a somewhat more complex example:
ubuntu-vm-builder kvm hardy
                  --domain newvm
                  --dest newvm
                  --arch i386
                  --hostname hostnameformyvm
                  --mem 256
                  --user john
                  --pass doe
                  --ip 192.168.0.12
                  --mask 255.255.255.0
                  --net 192.168.0.0
                  --bcast 192.168.0.255
                  --gw 192.168.0.1
                  --dns 192.168.0.1
                  --mirror http://archive.localubuntumirror.net/ubuntu
                  --components main,universe
                  --addpkg acpid
                  --addpkg vim
                  --addpkg openssh-server
                  --addpkg avahi-daemon
                  --libvirt qemu:///system ;
This will create a new Ubuntu Hardy VM called «newvm», the hostname will be set to «hostnameformyvm», the network will be configured with a static IP address and a gateway at address 192.168.0.1. The —mirror will tell the script to download the packages from a local Ubuntu mirror instead of the default server (this may speed up by a lot the time necessary to create the VM). The components argument will enable main and universe by default on the VM, —addpkg vim will install vim, and finally the last argument will automatically add the newly created VM to KVM.
By adding ‘openssh-server’ with —addpkg, we will be able to ssh into our new machine once its started (provided the networking works correctly).
By adding ‘avahi-daemon’ the VM will register an MDNS record (‘ubuntu.local’ in this case), so you can ssh right in without bothering with DHCP assigned IP addresses.
Note: The manual isn’t specific about the —exec option, used to execute a script file during the vm build process. If you specify the —exec option then you must provide the full path to the script you are executing. Not doing so will cause the installer to tell you that it can’t find the script file.
Bug notice: it seems that the package ‘linux-package’ is not found during the machine building process unless ‘restricted’ is also specified as a component option to ubuntu-vm-builder. If not specified, you’ll get a non-functioning system that boots into grub only. This line makes it work for me:
--components 'main,universe,restricted'
I’m assuming this is a bug in ubuntu-vm-builder.
Package requirement notice: When managing your guests, the shutdown/reboot commands send by virsh are ACPI events. So in order for your machine to shutdown/reboot, you must have ACPI support. If the guest O/S is Ubuntu run «sudo apt-get install acpid».
Starting Guest created in «complex example»
Once your Guest is created, you can see it by typing the following :
virsh 'list --all'
You’ll see :
 Id Name                 State
----------------------------------
 - YourGuestName         shut off
To start your virtual server, you can type :
virsh start YourGuestName
Accessing the new server remotely with SSH tunnel / VNC
If your server is remote, you can use the two following commands from your local machine {
The first guest is accessible, by default, on vnc:127.0.0.1:5900. If you are remotely accessing the server, you can setup an ssh tunnel and vnc onto the virtual server.
From terminal on your local machine :
ssh YOURUSER@YOURSERVER -L5900:127.0.0.1:5900
Now go into Applications -> Internet -> Remote Desktop Viewer. Protocol : VNC Host : 127.0.0.1 Everything else is by default.
This will connect you to the first guest.
Install on a raw block device
Ubuntu-vm-builder doesn’t allow you to create the VM on a raw block device yet (like a standalone partition, or a iSCSI share). You can use ubuntu-vm-builder to create the qcow2 image and then move the VM to the block device with qemu-img though; if /dev/sdb is the disk device on which you want to move the virtual machine:
sudo qemu-img convert root.qcow2 -O raw /dev/sdb
Edit the XML definition file for the VM in /etc/libvirt/qemu/, and set the source file to be:
<source file='/dev/sdb'/>
Redefine the VM and start it; it is now running from /dev/sdb.
Ubuntu-vm-builder is a very powerful tool — to get a more detailed list of its capabilities, use ubuntu-vm-builder —help.
Create VMs running other operating systems: virt-install
Virt-install is radically different in the way it works. Instead of creating automagically a new VM, it will allow you to boot on an iso, and therefore to install almost any operating system. For a list of supported operating system, consult kvm’s official webpage.
As you need virt-install to setup Windows guests, we will here describe how to install windows XP. There are a couple of small issues during the install, so I will also describe the workarounds.
Example Windows install

NB: The following install is for Windows XP under KVM-62 (default in Hardy as time of writing). I have been unable to run windows 2000 server in accelerated mode on it. To run windows 2000 server, I use the KVM-72 backport for Hardy provided by Soren in his PPA: https://launchpad.net/~soren/+archive.
Copy the ISO of the system you want to install to your working directory:
yhamon@paris:~$ ls *.iso
ubuntu-8.04-server-i386.iso  windowsxpsp2.iso
or create an ISO from a cd/dvd:
dd if=/dev/dvd of=dvd.iso
Install virt-install:
sudo apt-get install python-virtinst
Then, you need to run virt-install. On Ubuntu Hardy, with KVM-62, the install of windows XP doesn’t work when accelerated (ie, using —accelerate), so run the install without that argument, and replace qemu by kvm in the XML defintiion file (in /etc/libvirt/qemu) after the first reboot.
sudo virt-install --connect qemu:///system -n xpsp2 -r 512 -f windows.qcow2 -s 12 -c windowsxpsp2.iso --vnc --noautoconsole --os-type windows --os-variant winxp
Note for 8.10 (intrepid): to make above command work add —hvm option to enable fully virtualized guest.
Note for 9.10 (karmic): if virtual machine just freezes after 1 — 2 minutes after beginning of windows xp installation just use —accelerate option instead of —hvm
This will boot a new VM from the ISO. Connect to the new VM using virt-viewer:
virt-viewer -c qemu:///system xpsp2
Or if KVM is running on a different server:
virt-viewer -c qemu+ssh://ip/system xpsp2
You can now start the install. Another problem is that after the first reboot, in the process of the installation, the windows installer will complain that it can not see the disk anymore. In the XML definition of the VM again, add this to the list of devices:
<domain type='kvm'>
  [...]
  <devices>
    [...]
    <disk type='file' device='cdrom'>
      <source file='//home/yhamon/windowsxpsp2.iso'/>
      <target dev='hdc' bus='ide'/>
      <readonly/>
    </disk>
  </devices>
</domain>
Redefine the VM in virsh (sudo virsh define /etc/libvirt/qemu/xpsp2.xml) and restart the VM — it should work fine.
Another problem with virt-install in combination with Windows is that the created disk image is corrupted. At first the installation seems to work, but then after a reboot it stops with the message ‘A read error occured’. This can be easily fixed by creating a new disk image (prior to installation):
qemu-img create -f qcow2 disk0.qcow2 12G
Overwrite the qcow2 file created by virt-install by this new file, reboot your VM and you are ready to go.
Example Ubuntu install
You can perform the following to install Ubuntu Hardy:
sudo virt-install --connect qemu:///system -n hardy -r 512 -f hardy.qcow2 -s 12 -c hardy-server-amd64.iso --vnc --noautoconsole --os-type linux --os-variant ubuntuHardy --accelerate --network=network:default
The ‘—network’ option sets up the machine to use the default libvirt network. You can see available libvirt networks with:
virsh net-list --all
Other Operating Systems
Other Operating Systems can be installed using the same method as above. See ‘man virt-install’ for more information on different options for your virtual machine and supported OS types and OS variants.
Warning: this method fails with Fedora LiveCD installations and possibly others; see the bug here: https://bugs.launchpad.net/ubuntu/+source/kvm/+bug/220463
Cloning a virtual machine
You can clone an existing virtual machine using the virt-clone tool. This duplicates the disk image and sets up the virtual machine domain configuration.
If you wish to clone a virtual machine named srchost to a new machine newhost, ensure that the virtual machine srchost is not running and execute the following command.
$ virt-clone --connect=qemu:///system -o srchost -n newhost -f /path/to/newhost.qcow2
Create a virtual machine from pre-existing image
Assuming:
- Virt-manager is being used to manage virtual machines.
- You wish to add a pre-existing image to virt-manager.
Use case:
Using qcow2 with overlays, you can experiment heavily with your virtual machines without having to perform complete reinstalls if you manage to corrupt them. A side effect of this method in comparison to cloning, is that less disk space is used.
Procedure:
1. Create the hard drive image with qcow2 format:
$ qemu-img create -f qcow2 <image name>.qcow2
2. Install the virtual machine using virt-manager:
Instead of allowing virt-manager to create a new drive image, simply direct it to use the image you created in the previous step.
3. Create the overlay:
$ qemu-img create -f qcow2 -b <image name>.qcow2 <image name>.ovl
4. Create virtual image XML descriptor.
Read first:
$ man virt-image
$ man 5 virt-image
Copy the XML file created in step 2 above:
$ cp ~/.libvirt/qemu/<vm name>.xml overlay.xml
Then using your favorite editor, open and edit the copied XML file:
$ <editor> overlay.xml
Create the virtual image XML descriptor based on the virt-image(5) manpage. I simply commented out the original text, and used it as a guide when creating the new descriptor.
5. Create the new virtual machine from the image descriptor:
$ virt-image --vnc overlay.xml
6. Run and test the new virtual machine based on the overlay.
Open the new virtual machine in virt-manager and test to your hearts content. If you ‘break’ the virtual machine, simply destroy and delete it. Then recreate the overlay image and recreate the overlay virtual machine as described above. You can commit the overlay changes to the base image if desired, see the qemu-img manpage for details.
See also
The system specific adjustment recommended in the FAQ.
apt-cacher-ng for mirroring. You can reduce setup time to 3-4 minutes using ubuntu-vm-builder on a reasonable machine.
CategoryVirtualization
Содержание
- Windows Server 2019/Windows 10 VM on QEMU/KVM on Ubuntu 18.04
- 5 Comments
- Windows Server и KVM на Linux
- Установка KVM в Ubuntu
- Установка KVM в Ubuntu 20.04
- Использование KVM в Ubuntu
- Создание виртуальных машин KVM
- Создание виртуальных машин в GUI
- Выводы
- Настройка KVM на Ubuntu Server
- Проверка поддержки гипервизора
- Подготовка сервера
- Установка и запуск
- Настройка сети на сервере KVM
- Создание виртуальной машины
- Подключение к виртуальной машине
- Управление виртуальной машиной из командной строки
- Управление дисками
- Добавление диска
- Увеличение размера виртуального диска
- Управление сетевыми настройками виртуальной машины
- Резервирование IP на DHCP
Windows Server 2019/Windows 10 VM on QEMU/KVM on Ubuntu 18.04

This page documents how to set up Windows Server 2019 under QEMU/KVM on Ubuntu 18.04. I suspect the procedure is identical for Windows 10 and somewhat newer Ubuntu versions.
What you will need:
ISO locations
It is customary to put boot ISOs in /var/lib/libvirt/boot/ and the disk images in /var/lib/libvirt/images. Other places are fine but if you choose to put your disk images in a different location keep in mind you should tell Apparmor about it lest you get bothered with permissions issues.
This document will not describe backing up and restoring of VMs, nor will it explain snapshotting. Both are interesting in their own right and you should learn about them if you haven’t. I wanted to document specifically the process of installing and configuring a Windows Server 2019/Windows 10 guest.
Overview
1. Setting up the network interface
2. Installing the virtual machine
3. Installing drivers and the guest agent
4. Non-related tips
Setting up the network interface
I’m setting up a bridge interface for the VMs to use. By doing this the VMs will show up in my LAN on a regular LAN IP address. My subnet is 192.168.178.0/24. My host’s IP address is 192.168.178.18.
Mine looked like this:
Edit the file to look like this:
Be careful when editing this file; it’s easy to lock yourself out. Things to be aware of:
If all goes well do
You will end up with a physical interface that provides both the host and the VMs access to your LAN.
In case you have a separate network interface for your VMs try this configuration (enp7s0 and enp4s0f1 are both interfaces on my server; I want the VMs to use interface enp4s0f1 and use enp7s0 for management of the host machine itself):
Installing the VM
When I tried this on Ubuntu 20.04 with a Windows 10 VM I got a bunch of warning and errors and needed to do this:
The difference is the –cdrom specification instead of the –disk one. Also it now seems to require a –boot parameter. The rest of this article continues from the previous command, not the one in this note.
Let me break that down.
First of all, run the command as root or do sudo. The command for installing new VMs is virt-install. Do read its man page.
The VM’s name. In KVM terms this is called it’s domain. please note this name is case sensitive.
The amount of ram in kilobytes
Tells KVM to use the host’s cpu specifications for caching. If you’re planning on using clustering or live migration read up on this part in virt-install’s man page.
Do full instead of para virtualisation, if available
Give the VM two virtual CPU cores. Again, read the man file for interesting values, like auto.
The VM will be optimized for this OS type.
for a full list of supported OS variants. Pick the closest one.
We’re connecting the Windows ISO file to a CD ROM device here.
This is the driver CD ROM ISO file. This contains the driver for the drive we’ll be installing Windows on.
Which network interface to install on the VM.
Tell the VM what to do with graphics output. In this case we’ll send it through a VNC interface listening on any address (0.0.0.0) on port 5904. Check the man page for more options. 5900 is VNC’s default port but I’m already running something on that port so I’m specifying a different number.
Do not verify if the CD ROM is already in use by another VM.
Let’s kick off the installation and connect using your favourite VNC client. I used this one.

Connect VNC to your HOST’s IP address followed by the port you specified. The warning is because we didn’t specify a VNC password. That’s ok for now.

The Windows installer will inform you that there are no drives to install on and would like to add a driver?

Choose the virtio scsi driver. In my case the CD ROM ISO was mounted on e:.

Proceed as normal. At one point the installer will reboot and the connection will get lost. Reconnect and continue the installation.
Installing drivers and the guest agent
The guest agent facilitates communication between host and guest. Among other things this will make the VM shutdown gracefully when rebooting or shutting down the host.
After installation shut down the VM and do
This will allow you to directly edit the VM’s definition in the form of an XML file. Look up the section and within it add this section:
The W2K19.agent part (second line) must be unique per server. Again, the path can be anything but if you deviate from this standard you must tell Apparmor about it. I suggest you stick to the path above.
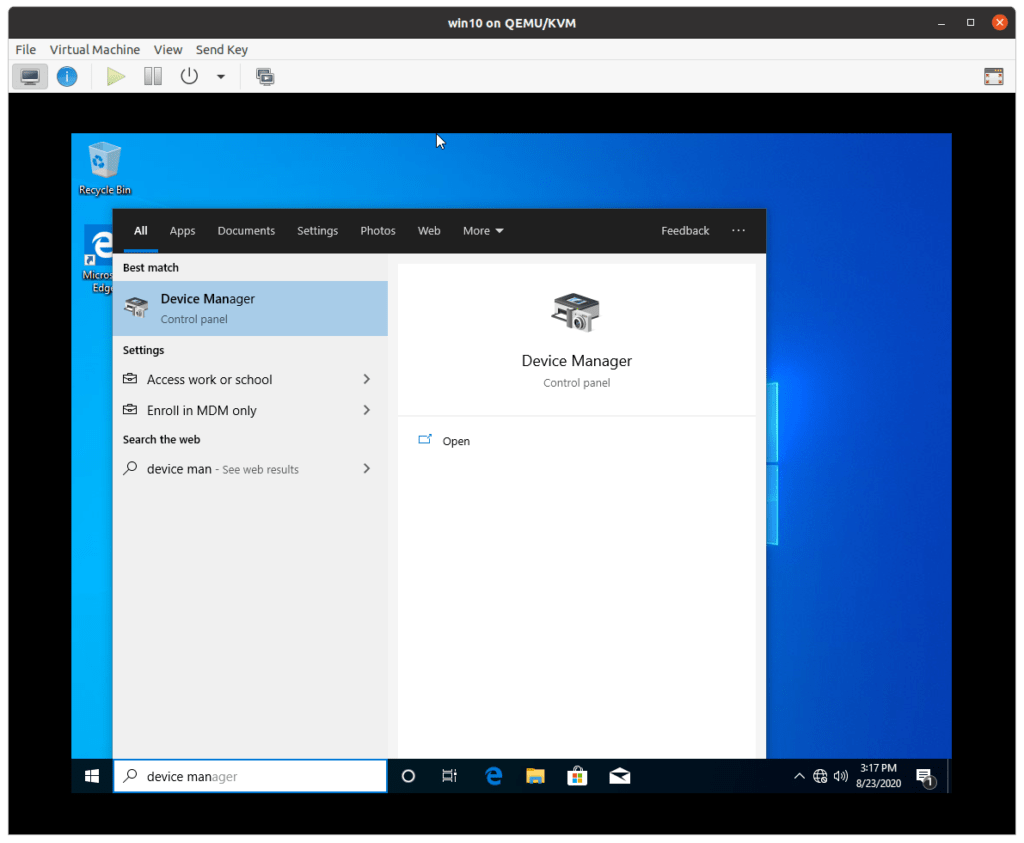
In the VM start the Device Manager. Note there are two devices that lack drivers. Rightclick them, choose Update driver and have the wizard search e: and subfolders.


One is the virtio Balloon Drivers, which allows for memory thin provisioning. The other is the virto serial driver, which is used by the virtio guest agent to facilitate communication between host and guest.
Shut down the VM and restart it with
To test agent communication, do
This should result in quite a bit of information.

If communication cannot be established your will see “error: argument unsupported: QEMU guest agent is not configured”.
Non-related tips
“Look up the section and within it add this section:”
Looks like you forgot to specify ” section. Otherwise, very useful article.
Ah, I see. The blog engine has discarded the angular quotes. «devices»
So, to sum up my two previous comments, this part:
“Look up the section and within it add this section:”
should be:
“Look up the section and within it add this section:”
Источник
Windows Server и KVM на Linux
Сегодня постараюсь описать все трудности в пути установки операционной системы (ОС) семейства Windows (а конкретнее Windows Server 2008 R2) на виртуальную машину KVM (используется qemu-kvm) в ОС Linux (а именно Debian 7)

Сложностей с установкой kvm возникнуть не должно
Далее необходимо скопировать установочный образ операционной системы куда-нибудь на диск. К примеру можно скопировать в
sudo dd if=/dev/cdrom of=Window_Server_2008_R2.iso
Самое необходимое: скачайте драйвера virtio, без них установка будет очень-очень долгой.
Затем создадим папку для файлов виртуального жёсткого диска
И сам файл виртуального жёсткого диска, где 25G — его размер
и самое главное — запуск самой виртуальной машины.
К сожалению, мне пришлось подключаться к удалённому рабочему столу, потому что по ssh установить Windows не удавалось, система требовала графический интерфейс.
Для запуска qemu под юзером производим следующие шаги:
Редактируем /etc/libvirt/qemu.conf, чтобы виртуальные машины работали у нас от непривилегированного пользователя:
user = «username»
group = «libvirt»
Поскольку у нас будут использоваться tun-устройства, нужно выставить capability CAP_NET_ADMIN, сделать это можно как для отдельного исполняемого файла, так и для пользователя в целом, или настроить чтобы libvirt не сбрасывал нужные права для qemu/kvm.
Выставляем для отдельного файла:
sudo setcap cap_net_admin=ei /usr/bin/kvm
Или выставляем для пользователя в целом в файле /etc/security/capability.conf:
Или выставляем соответствующую настройку в /etc/libvirt/qemu.conf:
Добавим пользователя в группу libvirt и kvm:
# adduser username libvirt
Установка Windows Server проста до безобразия, если знать когда подсунуть файлы драйверов для жёсткого диска.
Приведу краткий перечень действий, необходимых для корректной установки:
Единственная трудность случилась в конце установки, когда нужно придумать пароль для учётной записи администратора. Через RDP почему то не печатались иностранные символы, пришлось воспользоваться экранной клавиатурой.
Потребление памяти и утилизация процессора в пределах нормы и не превышала пары процентов при простое системы. Проц — Celeron G1620 🙂
Теперь осталось пробросить эту машину во внешку и подключится к ней по RDP, минуя RDP хостовой системы. Это пока не решено.
Источник
Установка KVM в Ubuntu
Само по себе программное обеспечение KVM в пространстве пользователя ничего не виртуализирует. Вместо этого, оно использует файл /dev/kvm для настройки виртуальных адресных пространств для гостевой машины в ядре. Каждая гостевая машина будет иметь свою видеокарту, сетевую и звуковую карту, жесткий диск и другое оборудование.
Также у гостевой системы не будет доступа к компонентам реальной операционной системы. Виртуальная машина выполняется в полностью изолированном пространстве. Вы можете использовать KVM как в системе с графическим интерфейсом, так и на серверах. В этой статье мы рассмотрим как выполняется установка KVM в Ubuntu 20.04.
Установка KVM в Ubuntu 20.04
Перед тем как переходить к самой установке KVM нужно проверить поддерживает ли ваш процессор аппаратное ускорение виртуализации от Intel-VT или AMD-V. Для этого выполните такую команду:

Теперь мы можем перейти к установке KVM, набор программ можно получить прямо из официальных репозиториев:
sudo apt install qemu qemu-kvm libvirt-daemon libvirt-clients bridge-utils virt-manager
Мы установили не только утилиту kvm, но и библиотеку libvirt, а также менеджер виртуальных машин. После того, как установка будет завершена вам необходимо добавить своего пользователя в группу libvirt, потому что только root и пользователи этой группы могут использовать виртуальные машины KVM:
Затем убедитесь, что сервис libvirt запущен и работает:
sudo systemctl status libvirtd

После выполнения этой команды выйдите из системы и войдите снова. Далее, давайте проверим все ли правильно было установлено. Для этого используйте команду kvm-ok:

Если все было сделано правильно, то вы увидите такое же сообщение.
Использование KVM в Ubuntu
Вы справились с задачей установить KVM в Ubuntu, но вы еще не можете использовать эту среду виртуализации но ее нужно еще настроить. Далее, мы рассмотрим как выполняется настройка KVM в Ubuntu. Что удобно, в новых версиях сеть уже настроена и вам не нужно создавать новый сетевой мост. Вы можете убедится в этом выполнив команду:

Интерфейсы virbr0 и virbr-nic созданы KVM по умолчанию и они полностью реализуют все необходимые возможности сети. Ещё вы можете посмотреть доступные мосты с помощью команды:

Создание виртуальных машин KVM
Настройка KVM Ubuntu завершена и теперь мы можем перейти к ее использованию. Сначала давайте просмотрим список уже существующих виртуальных машин:

Он пуст. Создать виртуальную машину можно через терминал или в графическом интерфейсе. Для создания через терминал используйте команду virt-install. Сначала перейдем в папку libvirt:
Для установки CentOS команда будет выглядеть вот так:
sudo virt-install
—virt-type=kvm
—name centos8
—ram 2048
—vcpus=2
—os-variant=rhl8.0
—hvm
—cdrom=/var/lib/libvirt/boot/CentOS-8.iso
—network=bridge:virbr0,model=virtio
—graphics vnc
—disk path=/var/lib/libvirt/images/centos7.qcow2,size=40,bus=virtio,format=qcow2
Разберем подробнее что означают параметры этой команды:
После завершения установки виртуальной машины вы можете узнать параметры подключения по VNC с помощью команды:
sudo virsh vncdisplay centos8
Теперь вы можете ввести полученные данные в вашем клиенте VNC и подключится к виртуальной машине даже удаленно. Для Debian команда будет немного отличаться, но все выглядит похожим образом:
Переходим в папку для образов:
Можно скачать установочный образ из интернета если это необходимо:
sudo wget https://mirrors.kernel.org/debian-cd/current/amd64/iso-dvd/debian-8.5.0-amd64-DVD-1.iso
Затем создадим виртуальную машину:
sudo virt-install
—virt-type=kvm
—name=debina8
—ram=2048
—vcpus=2
—os-variant=debian8
—hvm
—cdrom=/var/lib/libvirt/boot/debian-8.5.0-amd64-DVD-1.iso
—network=bridge=bridge0,model=virtio
—graphics vnc
—disk path=/var/lib/libvirt/images/debian8.qcow2,size=40,bus=virtio,format=qcow2
Теперь снова посмотрим список доступных машин:
Для запуска виртуальной машины можно использовать команду:
sudo virsh start имя_машины
sudo virsh shutdown имя_машины
Для перевода в режим сна:
sudo virsh suspend имя_машины
sudo virsh reboot имя_машины
sudo virsh reset имя_машины
Для полного удаления виртуальной машины:
sudo virsh destroy имя_машины
Создание виртуальных машин в GUI
Если у вас есть доступ к графическому интерфейсу то нет никакой необходимости использовать терминал, вы можете применить полноценный графический интерфейс менеджера виртуальных машин Virtual Manager. Программу можно запустить из главного меню:

Для создания новой машины кликните по иконке со значком монитора. Дальше вам будет необходимо выбрать образ ISO вашей системы. Также можно использовать реальный CD/DVD привод:

Если вы выбрали ISO образ, то надо его открыть из файловой системы:

На следующем экране выберите количество памяти, которая будет доступна для виртуальной машины, а также количество ядер процессора:

На этом экране вам нужно выбрать размер жесткого диска, который будет доступен в вашей машине:

На последнем шаге мастера вам предстоит проверить правильность настроек машины, а также ввести ее имя. Также нужно указать сетевой мост, через который машина будет подключаться к сети:

Затем автоматически запустится установка:

После этого машина будет готова к использованию и появится в списке. Вы можете запустить ее с помощью зеленого треугольника на панели инструментов менеджера.
Выводы
В этой статье мы рассмотрели как выполняется установка KVM Ubuntu 20.04, разобрали как полностью подготовить эту среду к работе, а также как создать виртуальные машины и использовать их. Если у вас остались вопросы, спрашивайте в комментариях!
На завершение лекция от яндекса о том что такое виртуализация в Linux:
Источник
Настройка KVM на Ubuntu Server
Инструкция написана на примере Linux Ubuntu Server 18.04.3 LTS. Она подойдет для большинства дистрибутивов на основе Debian.
Проверка поддержки гипервизора
Проверяем, что сервер поддерживает технологии виртуализации:
cat /proc/cpuinfo | egrep «(vmx|svm)»
В ответ должны получить что-то наподобие:
flags : fpu vme de pse tsc msr pae mce cx8 apic sep mtrr pge mca cmov pat pse36 clflush dts acpi mmx fxsr sse sse2 ss ht tm pbe syscall nx pdpe1gb rdtscp lm constant_tsc arch_perfmon pebs bts rep_good nopl xtopology nonstop_tsc aperfmperf pni pclmulqdq dtes64 monitor ds_cpl vmx smx est tm2 ssse3 cx16 xtpr pdcm pcid dca sse4_1 sse4_2 popcnt aes lahf_lm epb tpr_shadow vnmi flexpriority ept vpid dtherm ida arat
В противном случае, заходим в БИОС, находим опцию для включения технологии виртуализации (имеет разные названия, например, Intel Virtualization Technology или Virtualization) и включаем ее — задаем значение Enable.
Также проверить совместимость можно командой:
* если команда вернет ошибку «kvm-ok command not found», установите соответствующий пакет: apt-get install cpu-checker.
INFO: /dev/kvm exists
KVM acceleration can be used
значит поддержка со стороны аппаратной части есть.
Подготовка сервера
Для нашего удобства, создадим каталог, в котором будем хранить данные для KVM:
* будет создано два каталога: /kvm/vhdd (для виртуальных жестких дисков) и /kvm/iso (для iso-образов).
timedatectl set-timezone Europe/Moscow
* данная команда задает зону в соответствии с московским временем.
apt-get install chrony
systemctl enable chrony
* устанавливаем и запускаем утилиту для синхронизации времени.
Установка и запуск
Устанавливаем KVM и необходимые утилиты управления.
а) Ubuntu после версии 18.10
apt-get install qemu qemu-kvm libvirt-daemon-system virtinst libosinfo-bin
apt-get install qemu-kvm libvirt-bin virtinst libosinfo-bin
* где qemu-kvm — гипервизор; libvirt-bin — библиотека управления гипервизором; virtinst — утилита управления виртуальными машинами; libosinfo-bin — утилита для просмотра списка вариантов операционных систем, которые могут быть в качестве гостевых.
Настроим автоматический запуск сервиса:
systemctl enable libvirtd
Настройка сети на сервере KVM
Виртуальные машины могут работать за NAT (в качестве которого выступает сервер KVM) или получать IP-адреса из локальной сети — для этого необходимо настроить сетевой мост. Мы настроим последний.
Используя удаленное подключение, внимательно проверяйте настройки. В случае ошибки соединение будет прервано.
apt-get install bridge-utils
а) настройка сети в старых версиях Ubuntu (/etc/network/interfaces).
Открываем конфигурационный файл для настройки сетевых интерфейсов:
И приведем его к виду:
#iface eth0 inet static
# address 192.168.1.24
# netmask 255.255.255.0
# gateway 192.168.1.1
# dns-nameservers 192.168.1.1 192.168.1.2
auto br0
iface br0 inet static
address 192.168.1.24
netmask 255.255.255.0
gateway 192.168.1.1
dns-nameservers 192.168.1.1 192.168.1.2
bridge_ports eth0
bridge_fd 9
bridge_hello 2
bridge_maxage 12
bridge_stp off
* где все, что закомментировано — старые настройки моей сети; br0 — название интерфейса создаваемого моста; eth0 — существующий сетевой интерфейс, через который будет работать мост.
Перезапускаем службу сети:
systemctl restart networking
б) настройка сети в новых версиях Ubuntu (netplan).
* в зависимости от версии системы, конфигурационной файл yaml может иметь другое название.
Приводим его к виду:
network:
version: 2
renderer: networkd
ethernets:
eth0:
dhcp4: false
dhcp6: false
wakeonlan: true
bridges:
br0:
macaddress: 2c:6d:45:c3:55:a7
interfaces:
— eth0
addresses:
— 192.168.1.24/24
gateway4: 192.168.1.1
mtu: 1500
nameservers:
addresses:
— 192.168.1.2
— 192.168.1.3
parameters:
stp: true
forward-delay: 4
dhcp4: false
dhcp6: false
* в данном примере мы создаем виртуальный бридж-интерфейс br0; в качестве физического интерфейса используем eth0. 2c:6d:45:c3:55:a7 — физический адрес интерфейса, через который мы будем настраивать бридж; 192.168.1.24 — IP-адрес нашего сервера KVM; 192.168.1.1 — адрес шлюза; 192.168.1.2 и 192.168.1.3 — адреса серверов DNS.
Применяем сетевые настройки:
Настаиваем перенаправления сетевого трафика (чтобы виртуальные машины с сетевым интерфейсом NAT могли выходить в интернет):
Создание виртуальной машины
Для создания первой виртуальной машины вводим следующую команду:
Подключение к виртуальной машине
На компьютер, с которого планируем работать с виртуальными машинами, скачиваем VNC-клиент, например, TightVNC и устанавливаем его.
virsh vncdisplay VM1
команда покажет, на каком порту работает VNC для машины VM1. У меня было:
* :1 значит, что нужно к 5900 прибавить 1 — 5900 + 1 = 5901.
Запускаем TightVNC Viewer, который мы установили и вводим данные для подключения:

Кликаем по Connect. На запрос пароля вводим тот, что указали при создании ВМ, (vnc_password). Мы подключимся к виртуальной машине удаленной консолью.
Если мы не помним пароль, открываем настройку виртуальной машины командой:
* в данном примере для доступа к виртуальной машине используется пароль 12345678.
Управление виртуальной машиной из командной строки
Примеры команд, которые могут пригодиться при работе с виртуальными машинами.
1. Получить список созданных машин:
2. Включить виртуальную машину:
virsh start VMname
* где VMname — имя созданной машины.
3. Выключить виртуальную машину:
virsh shutdown VMname
4. Включить автозапуск виртуальной машины:
virsh autostart VMname
5. Редактирование конфигурации виртуальной машины:
6. Работа с сетевыми интерфейсами.
Добавить обычный сетевой интерфейс (default или NAT) виртуальной машине:
Добавить интерфейс типа bridge:
Удалить сетевой интерфейс:
* где bridge — тип сетевого интерфейса (также может быть network); 52:54:00:2e:a9:4d — MAC-адрес сетевого адаптера (узнать данный адрес можно в конфигурации виртуальной машины или в самой гостевой операционной системы).
7. Посмотреть IP-адреса, выданные виртуальным машинам автоматически:
virsh net-dhcp-leases default
* где default — виртуальная сеть, создаваемая по умолчанию при установке KVM.
8. Работа со снапшотами
Теневые копии или снапшоты позволяют нам быстро вернуть определенное состояние системы виртуальной машины. Рассмотрим процесс создания снапшота и управления им.
а) Создать снимок виртуальной машины можно командой:
* где VMname — название виртуальной машины; VMname_snapshot_2022-05-03 — название для снапшота.
б) Список снапшотов можно посмотреть командой:
* данной командой мы просмотрим список всех снапшотов для виртуальной машины VMname.
в) Для применения снапшота, сначала мы должны остановить виртуальную машину. Для этого можно либо выполнить выключение в операционной системе или ввести команду:
virsh shutdown VMname
* где VMname — имя виртуальной машины; VMname_snapshot_2022-05-03 — имя созданного снапшота.
г) Удалить снапшот можно так:
Управление дисками
Отдельно рассмотрим процесс работы с виртуальными дисками.
Добавление диска
Создаем файл для нового диска:
* в данном примере мы создадим файл формата raw по полному пути /data/kvm/vhdd/VMname-disk2.img размером 4 Гб.
Теперь подключим данный диск к виртуальной машине:
* в данном примере мы подключили его к машине VMname в качестве диска vdb.
Готово. Подключаемся к виртуальной машине и проверяем, что у нас появился новый диск. Например, в Linux можно посмотреть командой:
NAME MAJ:MIN RM SIZE RO TYPE MOUNTPOINT
sr0 11:0 1 1024M 0 rom
vda 252:0 0 24G 0 disk
??vda1 252:1 0 24G 0 part
??ubuntu—vg-root 253:0 0 23G 0 lvm /
??ubuntu—vg-swap_1 253:1 0 980M 0 lvm [SWAP]
vdb 252:16 0 4G 0 disk
Увеличение размера виртуального диска
Получаем список дисков для виртуальной машины:
virsh domblklist VMname
* в данном примере путь до диска — /data/kvm/vhdd/VMname-disk1.img.
Останавливаем виртуальную машину:
virsh shutdown VMname
* или завершаем работу в самой операционной системе.
Увеличиваем размер диска:
qemu-img resize /data/kvm/vhdd/VMname-disk1.img +100G
* данной командой мы расширим дисковое пространство виртуального диска /data/kvm/vhdd/VMname-disk1.img на 100 Гигабайт.
Получаем информацию о виртуальном диске:
qemu-img info /data/kvm/vhdd/VMname-disk1.img
Запускаем виртуальную машину:
virsh start VMname
Меняем размер блочного устройства:
virsh blockresize UBU /data/kvm/vhdd/VMname-disk1.img 200G
* где 200G — общий размер виртуального диска после расширения.
После необходимо поменять размер диска в самой операционной системе. Пример того, как это можно сделать можно прочитать в инструкции Добавление дискового пространства виртуальной машине в VMware (раздел «Настройка операционной системы»).
Управление сетевыми настройками виртуальной машины
В данном подразделе рассмотрим примеры работы с сетевыми настройками виртуальных машин.
Резервирование IP на DHCP
Если мы раздаем IP-адреса виртуальным машинам с помощью встроенного в KVM сервера DHCP, мы можем привязать определенный IP по mac-адресу. Для этого смотрим список наших виртуальных сетей:
Мы увидим список сетей, например:
Name State Autostart Persistent
———————————————————-
br0 active yes yes
default active yes yes
В моем случае, необходимо настроить сеть default — вводим:
Источник