2.0.3
Changed
- Switched from
arduino.window.zoomLeveltowindow.zoomLevelpreference (#1675) - Update Cortex-Debug to recent version (#246)
Fixed
- Fix editor widget resolving when creating new tab (#1718)
- Fix keybindings to switch between tabs on MacOs (#1685)
- Other ino files are not reflected in the window title (#1656)
- Debugger does not disconnect after stopping it (#995)
- Scrollbar covers bottom line of Serial Monitor output (#1602)
- Problem leaving «focus» mode (#1550)
editor.hover.delaysetting not used by new windows (#571)- Window title changes to «index.html» during reload (#999)
- Missing translation in Theia’s view-container context menu (#1498)
- Indentation guides are always visible (#1613)
- Rightmost tab is selected by default (#643)
- Selecting «New Remote Sketch» from File menu has no effect if «Remote Sketchbook» widget is not open (#1715)
- Serial Monitor sends spurious data (#375)
- Unable to start debugger when watch expressions are configured (#1582)
- Conditional breakpoint only stops the first time (#268)
Thanks to everyone who’s helping us improve the quality of the Arduino IDE:
- @asereq
- @palazzol
Full Changelog: 2.0.2…2.0.3
2.0.2
Added
- Create remote sketch (#1580)
Fixed
- Spurious IDE update notifications when using snapshot or nightly builds (#1440)
- Autoformat removes new-line before EOF (#1487)
- «Open Recent» menu missing after recent sketch is deleted (#1596)
- Additional sketches can’t be opened via file association/command line argument (#1590)
- «Built-in» examples fail to open with Linux AppImage (#1586)
- «Sketchbook» menu missing if sketch name is invalid regex (#1600)
- First time load of project with many files very slow (#1612)
Thanks to everyone who’s helping us improve the quality of the Arduino IDE:
- @kaysievers
- @nmzaheer
- @joshuag1000
- @FrightRisk
Full Changelog: 2.0.1…2.0.2
2.0.1
Added
- Make links to Boards Manager and Library Manager clickable inside the sketch (#1442)
- Message history in Serial Monitor (#1404)
- Create a custom sketch template for new sketches (#1559)
- Add a project contributor guide (#1419)
Changed
- Can send message to the monitor with
Enter(#572) - Show user fields dialog again if upload fails (#1386)
- Update translation files (#1462)
- Put Arduino libs on top of the Library Manager (#1541)
- Changed the daemon output from
jsontotext(#1544) - Make the «INSTALL» button always visible in Boards Manager and Library Manager (#1568)
Fixed
- Occasional «Unable to watch for file changes in this large workspace» warnings (#39)
- Label of unidentified port missing in «Board Selector» after opening new window (#1383)
- Bring existing Serial Plotter window to foreground when selected from IDE UI (#1346)
- UI unresponsive when sketch has a very long line (#1343)
- Align the primary button in all dialogs in IDE (#1368)
- Serial Monitor autoscroll only makes bottom line partially visible (#972)
- Dialogs UI scalability — Unexpected dialog layouts (#1350)
- Color contrast in the Firmware Updater dialog with the dark theme (#1441)
- Sketchbook folder not created on startup (#1445)
- 3rd party URLs dialog should not wrap text (#1470)
- Keyboard bindings do not work properly after change to different keyboard layouts (#989)
- Add missing translations (#1431)
- Spurious IDE update notifications when using snapshot or nightly builds (#1440)
- «Check for Arduino IDE Updates» operation fails when automatic update checks are disabled (#1437)
- Avoid intellisense widgets being covered by the bottom panel (#1479)
- When opening a dialog, set the focus inside it (#1373)
- Attempt to open deleted sketch from Sketchbook or Examples menus fails silently (#53)
- Serial Plotter requires
rnline endings (#1360) - IDE is non-functional if package index can’t be loaded (#1084)
- Only package indexes should updated after changing the «Additional Boards Manager URL» preference. (#1156)
- Application allows setting interface scaling interface past limits (#1384)
- Parts of the UI disappear when window is to small (#662 #1515)
- Incorrect spacing of the horizontal rules in the editor hover (#1503)
- Sort Board selection menus like as described in the platform’s
boards.txtconfiguration file (#802) - Intermittent failure to recognize ports (#573)
- The style of the buttons in the library installation dialog break when the labels are too long (#1314)
- Uploading disabled without port selection (#702 #770)
- Opening invalid sketch via file association/command line fails silently (#964)
Thanks to everyone who’s helping us improve the quality of the Arduino IDE:
- @aliphys
- @Chose99
- @dankeboy36
- @Edivad99
- @nbourre
- @nmzaheer
- @r3inbowari
- @plampix
- @tigoe
Full Changelog: 2.0.0…2.0.1
2.0.0
The moment you (and us) all have been waiting for has arrived.
Let’s all welcome the official, stable release of Arduino IDE 2.0
🎉🎉🎉
This new IDE provides a modern user interface thanks to its responsive interface, as well as a completely overhauled backend supplied by the Arduino CLI.
We hope you’ll enjoy it as much as we enjoy bringing it to you.
Yours truly,
Arduino Team
2.0.0-rc9.4
Fixed
- Leading zeros are stripped from Serial Monitor timestamps (#580)
- Fixed compile regression updating arduino-cli to 0.27.1
Full Changelog: 2.0.0-rc9.3…2.0.0-rc9.4
Thanks to everyone who’s helping us improve the quality of the Arduino IDE:
- @nmzaheer
2.0.0-rc9.3
Added
- Update translations (#1397, #1305)
- Filter Library and Boards Manager listings by category, type (#1361, #177)
- Updatable library and boards platform notifications, with «Update All» option (#1361, #1188)
- Communicate to user when upload is impossible due to no board selection (#1353, #845)
- Link compiler errors to editor (#1275, #118, arduino/Arduino#3383)
Changed
- Make error message from compiling without board selected more user friendly (#1353, #62)
- Remove File > Close Editor menu item (#1351, #660)
- Close compilation/upload error notifications on subsequent actions (#1275, #1154)
Fixed
- Ambiguous character check done inappropriately on «Output» panel text (#1375, #1210)
- «Built-in» libraries can have higher priority than platform bundled libraries (#1370, #1055)
- Incomplete Library and Boards Manager listings (#1361, #716)
- Hang during «Downloading index: …» process (#1358, arduino/arduino-cli#1804, arduino/arduino-cli#1828, #1330)
- Incorrect mouseover graphic for dirty indicator (#1351, #1034, #647)
- Unnecessary save confirmation dialog when closing unmodified temporary sketch (#1351, #1274, #1026)
- Inconsistent save confirmation dialogs on exit (#1351, #1016)
- Save as native file dialog pops when enabling auto-save on a temp sketch (#1351, #994)
- Missing internationalization for UI strings (#1341)
- Missing port labels (#1335, #1331, #567)
- Failure of OTA upload to ESP8266 boards (#1335, #740)
- Network ports not shown in «Board Selector» menu (#1332, #1327)
- Multiple boards/ports shown as selected in «Board Selector» menu (#1328, #928)
- Incorrect port selection after upload to native USB board (#1328, #710, #287)
- Port changes when board is unplugged (#1328, #180)
- No auto-update offer when using a nightly build (#1326, #1318)
- Dialogs UI scalability (#1311, #1309)
Full Changelog: 2.0.0-rc9.2…2.0.0-rc9.3
Thanks to everyone who’s helping us improve the quality of the Arduino IDE:
- @ben-qnimble
- @ckuethe
- @DeeEmm
- @GClairet
- @JAndrassy
- @KurtE
- @Lorandil
- @me-no-dev
- @Micahfriesen
- @mjs513
- @PaulStoffregen
- @pierrotm777
- @probonopd
- @RudraSen2
- @sellensr
- @Silver-Fang
- @sstaub
- @tigoe
- @toogooda
2.0.0-rc9.2
Added
- Live change of theme from Preferences dropdown (#1296 #1048)
- Add Auto Format item under the Edit menu (#1230)
Changed
- Replaced the splash screen with a preload (#1287)
Fixed
- Upload fails when Serial Monitor is open (#1278)
- Starting IDE creates an «undefined» folder in the current directory (#394)
- Auto Format configuration doesn’t match classic Arduino IDE (#42)
- IDE does not load until you return to the Arduino IDE screen and click on something (#193)
- Splash Screen Should not be Always on Top (#324)
- Application start-up is paused when the window is minimized (#327)
Full Changelog: 2.0.0-rc9.1…2.0.0-rc9.2
Thanks to everyone who’s helping us improve the quality of the Arduino IDE:
- @InstantMuffin
- @JayPi4c
- @Logicer16
- @tigoe
- @ggl
- @LordRafa
- @Master811129
- @MicSG-dev
- @80avin
2.0.0-rc9.1
Added
- Show progress indicator during verify/upload (#575 #1175)
Changed
- Improve the UX of the Arduino language server (#1255)
Fixed
- Wrong primary button color in info messages (#1227)
- Verbose output preferences are not applied correctly (#374)
- Incorrect theme shown on first start in settings (#1223)
- Settings dialog broken when scaling up the IDE (#1205)
- IDE2 might forget the selected language (#1219)
- Custom themes do not update correctly (#1225 #1257)
- High Contrast theme fixes (#1202)
- The address of the board is off from the board selection dropdown (#998)
- Quicker upload notification (#279)
- New file is opened using a quarter of the screen (#1244)
- SaveAs hangs with empty window (#1191)
Full Changelog: 2.0.0-rc9…2.0.0-rc9.1
Thanks to everyone who’s helping us improve the quality of the Arduino IDE:
- @tigoe
- @Wezz19
- @xinkiknix
- @finncat62
- @KurtE
2.0.0-rc9
Added
- New Toolbar UI (#1194)
- New Board Selector: show port protocol (#1193)
- Enable IDE translations: Italian, Russian, Spanish, Portuguese, Czech (#712 #1166)
Changed
- Improve UI, colors, and icons (#1095, #979, #1148, #1146, #1122, #1159 )
- Remove Editor tabs contextual menu (#1127)
Fixed
- Platform installation prompt only made for boards listed in oldest release (#979)
- Opening a sketch will not show the last state of the sidebar in the new window (#442)
- Remote sketchbook widget rendering empty (#1129)
- Sketchbook view can’t handle more than two tree levels (#1015)
- Platform installation only offered if port is selected (#854)
- Window minimum size is too small and content is not shown correctly when the size is small (#129 #662 #779)
- Package index is not downloaded after adding URL to preferences (#637 #906)
- Prevent overwriting existing libraries and platforms at first IDE start-up (#798 #1169)
- Default theme at first launch doesn’t match the OS theme (#530)
- Fall back to new sketch if opening failed (#1089)
- Board Selector only updates on board selection via other interfaces if associated port is selected (#1206)
- Avoid reindexing libraries on every single text document change event (#714)
Known Issues
- Themes: High Contrast is broken (#1202)
Full Changelog: 2.0.0-rc8…2.0.0-rc9
Thanks to everyone who’s helping us improve the quality of the Arduino IDE:
- @RussellAult
- @toogooda
- @dronecz
- @vielfarbig
- @KurtE
- @Wezz19
2.0.0-rc8
Added
- Reveal the error location after the failed verify (#1064 #608 #229)
- Survey notification (#1035)
- Can enable debug logging of the gRPC calls (#1065 #1056)
Changed
- Relaxed the error handling of the core client init (#1045 #1036)
- Output panel optimisation (#1058 #405 #68)
Fixed
- Restored the Settings UI. Deferred model loading. #1046 #1031
- Fix error in console when clicking in the editor, or output view (#1057 #977)
- Cleaned up
Filemenu (#1071 #1014) - UI fixes (#1088 #1092 #1097)
- Fixed widget lookup to eliminate duplicate tabs (#1085 #1054)
- Failing upload flag for monitor mgr (#1040 #1032)
- Disabled
MenuItemroleson macOS (#1022)
Full Changelog: 2.0.0-rc7…2.0.0-rc8
Мы решили сэкономить вам пару кликов и разместить у себя свежие версии среды разработки Arduino IDE, потому что на официальном сайте порой чёрт ногу сломит, пока найдёт нужную ссылку. Где скачать Arduino IDE — ваш выбор: файлы дистрибутивов абсолютно идентичны. Сейчас представлена финальная версия Arduino IDE 2.0.3 (релиз от 05.12.2022) и legacy-версия 1.8.19 (релиз от 20.12.2021).
Скачать для Windows
- Инсталлятор для Windows — Windows 10 (64 бита) и новее.
- Архив ZIP для Windows — установка без прав админа, портативная версия для флешки.
Скачать для macOS
- Приложение для macOS — macOS X 10.14 Mojave (64 бита) или новее.
Скачать для Linux
- AppImage для Linux (64 бита) — переносимое приложение для систем Linux x86-64.
- Архив Linux (64 бита) — версия для Linux-систем с архитектурой x86-64.
Для установки из архива в общем случае нужно выполнить следующие команды.
# Распаковываем архив и заходим в каталог
$ tar xvf arduino-latest-*.tar.xz
$ cd arduino-1.*

# Устанавливаем (только для текущего пользователя)
$ ./install.sh

# Добавляем себе права на пользование USB-портами
$ sudo usermod -a -G dialout $USER
В отдельных дистрибутивах Linux проще воспользоваться командой установки из пакетов.
# Arch Linux
$ sudo pacman -S arduino

# Fedora Linux
$ sudo dnf install arduino

# Debian, Ubuntu, Mint Linux
$ sudo apt-get install arduino
Как переключить язык
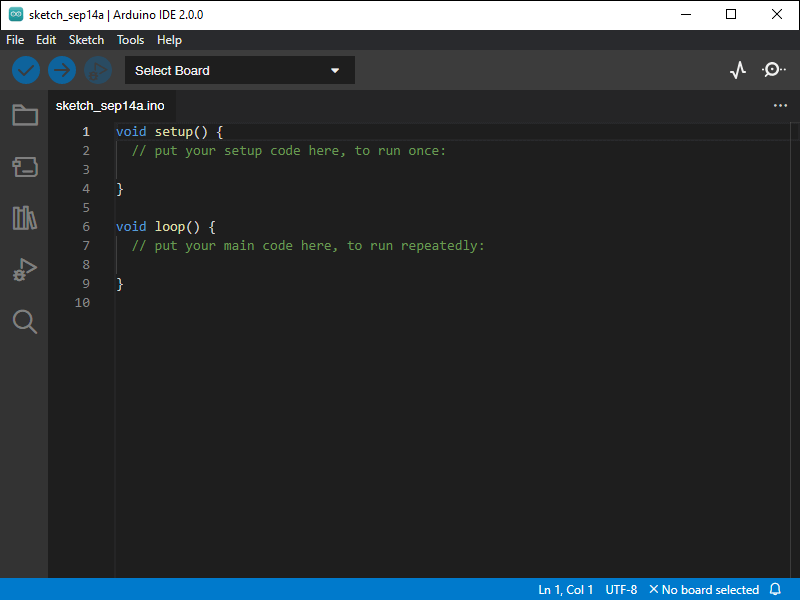
Arduino IDE при установке выбирает язык системы по умолчанию. Если вам понадобится переключить интерфейс на другой язык, это можно сделать в общих настройках программы.
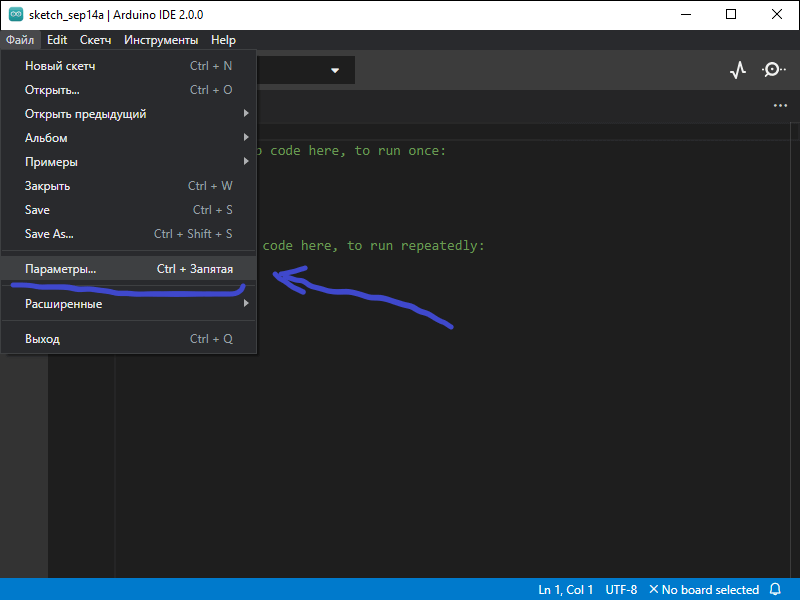
- Заходим в главном меню в пункт «Файл → Параметры».
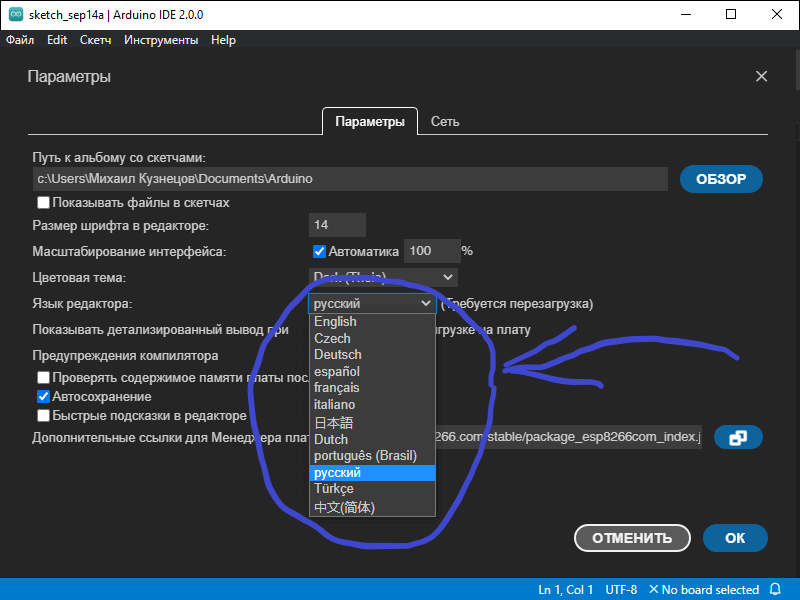
- Выбираем нужный язык в выпадающем списке «Язык редактора».
- Перезапускаем среду.
Прошлая версия 1.8.19
- Инсталлятор для Windows — Windows 7 и новее.
- Архив ZIP для Windows — установка из архива.
- Приложение для Windows 8.1/10 в Microsoft Store
- App для macOS — macOS X 10.8 Mountain Lion или новее.
- Linux x86 (64 бита)
- Linux x86 (32 бита)
- Linux ARM (64 бита)
- Linux ARM (32 бита)
Поддерживаемые платы
Arduino IDE из коробки работает со всеми оригинальными платами AVR-архитектуры и их прямыми аналогами.
- Оригинальные контроллеры Arduino
- Iskra Uno (аналог Uno)
- Iskra Neo (аналог Leonardo)
- Iskra Mega (аналог Mega 2560)
- Iskra Mini (аналог Mini)
- Uno Slot (гибрид Uno с платформой Troyka Slot)
- Strela (аналог Leonardo с драйверами моторов)
Также поддерживаются сторонние платы и контроллеры на других архитектурах: SAM, SAMD, Cortex-M. Они добавляются в среду отдельными пакетами. Ниже перечислены примеры установки некоторых таких плат.
- Arduino Due
- Arduino M0 Pro
- Arduino MKR GSM 1400
- Arduino MKR Vidor 4000
- Wi-Fi Slot
- Troyka-модуль Wi-Fi
- ESP32 DevKit v1
- ESP8266 (ESP-01)
- Контроллеры STM32
- Контроллеры Teensy
Полезные ссылки
- Как подключить Arduino к компьютеру
- Как добавить новую плату в Arduino IDE
Для работы с Ардуино нам понадобится компьютер (или смартфон), USB data-кабель и некоторый софт.
Компьютер с Windows 7 или выше. На WinХР новые версии Arduino IDE либо работают очень плохо, либо не работают вовсе. Также не компилируются некоторые библиотеки и ядро esp8266. MacOS и Linux-подобные оси тоже подходят, так как среда разработки Arduino IDE кроссплатформенная. Программировать Ардуино можно с планшета или даже смартфона под Андроид при помощи официального приложения, соответственно смартфон/планшет должен иметь поддержку OTG (подключение и работа с внешними устройствами через USB порт). Но это большое извращение, а также не все библиотеки будут компилироваться на смартфоне.
USB кабель должен быть именно Data-кабелем, по такому кабелю передаются данные (например таким подключается к компьютеру смартфон/фотоаппарат/плеер). Есть три типа USB штекера, которые используются на платах Ардуино: mini-USB (Arduino Nano), micro-USB (Wemos Mini, NodeMCU) и USB type B (Arduino UNO, MEGA), бывают и китайские поделки на USB type C. Кабель можно купить у китайцев, иногда он идёт в комплекте с платой, можно взять в наших магазинах (~50 рублей), либо просто поискать на полке.
Arduino IDE
Установка
Среда разработки Arduino IDE, качаем с официального сайта и устанавливаем актуальную версию для своей операционной системы. В окне загрузки жмём JUST DOWNLOAD, чтобы начать загрузку без пожертвования
- Прямая ссылка на установщик 1.8.13 для Windows 7 и выше
- Если у вас Windows XP – качаем версию 1.6.13
- Во время установки программа попросит установить драйвер – соглашаемся на всё
- Установка на Linux из системного репозитория – читать тут
- Установка на MacOS – читать тут
- КРИТИЧЕСКИ НЕ РЕКОМЕНДУЕТСЯ ставить Arduino Windows app из магазина приложений Windows 10, а также Beta Builds, Hourly Builds и старые версии IDE!
Распаковка портативной версии
Вместо полной установки программы можно скачать архив с уже “установленной”, на странице загрузки он называется Windows ZIP file. Вот прямая ссылка на 1.8.13. Распаковав архив, получим портативную версию Arduino IDE, которую можно скинуть на флешку и использовать на любом компьютере без установки программы. Но понадобится установить драйвер для китайских плат, а также драйверы из папки с программой Arduino IDE. Возможно понадобится установить Java.
Обновление IDE
Перед установкой новой версии нужно удалить старую. Ни в коем случае не удаляйте папку установленной IDE из Program Files, удалять нужно через “Установка и удаление программ“, либо запустив файл uninstall.exe из папки с установленной программой. Иначе установщик откажется устанавливать новую программу, так как в системе остались следы от старой. Решение этой проблемы описано в видео ниже. Вкратце о том, как удалить IDE вручную:
Удаляем папки:
- Папка с программой
- C:Program Files (x86)Arduino (64-битная версия Windows)
- C:Program FilesArduino (32-битная версия Windows)
- Папка со скетчами и библиотеками
- ДокументыArduino
- Папка с настройками и дополнительными “ядрами” плат
- C:Пользователи (или Users)Ваш_пользовательAppDataLocalArduino15
Удаляем следы из реестра:
- Открыть редактор системного реестра:
- Windows 10: Пуск/regedit
- Предыдущие: Пуск/Выполнить/regedit
- В открывшемся окне: Правка/Найти…
- В окне поиска пишем arduinouninstall
- Поиск
- Удаляем найденный параметр (см. скриншот ниже)
- На всякий случай Правка/Найти далее
- Удаляем и так далее, пока не удалим все найденные параметры с arduinouninstall
- После этого можно запускать установщик и устанавливать новую программу
Решение проблем
- Если перестала запускаться Arduino IDE – удаляем файлик preferences.txt из C:Пользователи (или Users)Ваш_пользовательAppDataLocalArduino15
Драйверы
Оригинальные платы от Arduino используют USB контроллер производства FTDI, либо отдельный микроконтроллер в качестве USB интерфейса. Если вы используете китайские платы, то вам понадобится дополнительный драйвер на китайский USB-TTL контроллер. Называется он CH340 (CH341), является производимым в Китае дешёвым аналогом дорогого шведского FTDI чипа.
Windows
Скачать драйвер можно по ссылке:
- FTP сайта
- Яндекс.Диск
- Сайт driverslab
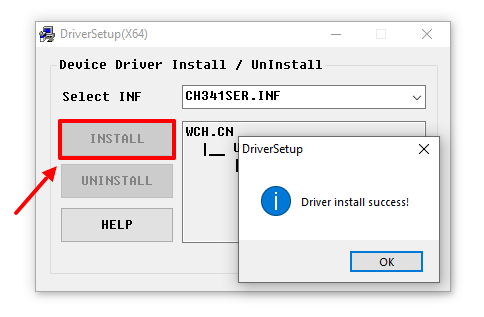
Запускаем и в появившемся окошке нажимаем INSTALL. Готово!
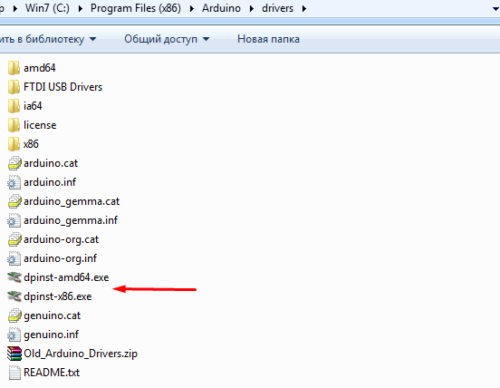
Если во время установки Arduino IDE вы по какой-то причине пропустили установку драйверов, то их можно установить вручную из папки с программой, расположенной по пути
- C/Program Files/Arduino/drivers (для 32-х разрядной системы)
- C/Program Files (x86)/Arduino/drivers (для 64-х разрядной системы).
Запустить файл
- dpinst-x86.exe (для 32-х разрядной системы)
- dpinst-amd64.exe (для 64-х разрядной системы)
Linux Mint
В Linux уже встроен необходимый драйвер, но Arduino IDE может отказаться с ним работать: Linux определяет ардуинку как устройство ttyUSB*, обычно это ttyUSB0 (это можно узнать командой dmesg в терминале), то есть в системе появляется интерфейс /dev/ttyUSB0. Чтобы с ним работать, нужны права доступа. Читать и писать на устройство /dev/ttyUSB0 имеет пользователь root и пользователи группы dialout. Работы с правами суперпользователя лучше избегать, поэтому следует занести своего пользователя в группу dialout. Это можно сделать следующей командой (обратите внимание, команда whoami в обратных кавычках)
sudo usermod -a -G dialout `whoami`
После этого нужно перелогиниться. Дальше запускаем Arduino IDE и в меню «Инструменты/Порт» ставим галочку напротив /dev/ttyUSB0.
Linux Arch
Вся информация по работе с IDE на данной ОСи есть вот в этой статье.
После установки и настройки всего необходимого можно попробовать прошить плату. Запускаем Arduino IDE и переходим к следующему уроку, где эту самую IDE рассмотрим более подробно.
Другие программы
- Пакет JRE (Java). Так как IDE написана на Java, для её работы требуется пакет JRE. Также качаем свежую версию с официального сайта и устанавливаем. Не актуально для свежих версий Arduino IDE, но может пригодиться для других программ.
- Дополнительно: прогерский блокнот Notepad++ для комфортной работы с текстовыми файлами библиотек или прошивок – официальный сайт.
Видео
Полезные страницы
- Набор GyverKIT – большой стартовый набор Arduino моей разработки, продаётся в России
- Каталог ссылок на дешёвые Ардуины, датчики, модули и прочие железки с AliExpress у проверенных продавцов
- Подборка библиотек для Arduino, самых интересных и полезных, официальных и не очень
- Полная документация по языку Ардуино, все встроенные функции и макросы, все доступные типы данных
- Сборник полезных алгоритмов для написания скетчей: структура кода, таймеры, фильтры, парсинг данных
- Видео уроки по программированию Arduino с канала “Заметки Ардуинщика” – одни из самых подробных в рунете
- Поддержать автора за работу над уроками
- Обратная связь – сообщить об ошибке в уроке или предложить дополнение по тексту ([email protected])
Each software is released under license type that can be found on program pages as well as on search or category pages. Here are the most common license types:
Freeware
Freeware programs can be downloaded used free of charge and without any time limitations. Freeware products can be used free of charge for both personal and professional (commercial use).
Open Source
Open Source software is software with source code that anyone can inspect, modify or enhance. Programs released under this license can be used at no cost for both personal and commercial purposes. There are many different open source licenses but they all must comply with the Open Source Definition — in brief: the software can be freely used, modified and shared.
Free to Play
This license is commonly used for video games and it allows users to download and play the game for free. Basically, a product is offered Free to Play (Freemium) and the user can decide if he wants to pay the money (Premium) for additional features, services, virtual or physical goods that expand the functionality of the game. In some cases, ads may be show to the users.
Demo
Demo programs have a limited functionality for free, but charge for an advanced set of features or for the removal of advertisements from the program’s interfaces. In some cases, all the functionality is disabled until the license is purchased. Demos are usually not time-limited (like Trial software) but the functionality is limited.
Trial
Trial software allows the user to evaluate the software for a limited amount of time. After that trial period (usually 15 to 90 days) the user can decide whether to buy the software or not. Even though, most trial software products are only time-limited some also have feature limitations.
Paid
Usually commercial software or games are produced for sale or to serve a commercial purpose.
Для того что бы создавать свои проекты на базе Arduino, вам будет необходимо писать прошивки и загружать их в ваш микроконтроллер. Эти функции позволяет выполнить программа Arduino IDE. Есть и другие способы написания прошивок и загрузки скетчей в ардуинку, но самый простой — это использовать Arduino IDE. Далее можно скачать Ардуино ИДЕ последней версии или одну из предыдущих, если вам нужна именно та версия. Далее я расскажу как настроить и как пользоваться этой программой.
Cкачать Arduino IDE
| Версия | Windows | Mac OS X | Linux |
| 1.6.5 |
Zip Installer |
Installer |
32 bits 64 bits |
| 1.8.2 |
Zip Installer |
Installer |
32 bits 64 bits ARM |
| 1.8.16 | Zip
Installer |
Installer | 32 bit
64 bit ARM 32 bit ARM 64 bit |
| 2.0 beta | Zip
Installer |
Installer | 64 bit |
Сейчас (21.10.2021) актуальная последняя версия программы Ардруино ИДЕ 1.8.16. Вы можете вверху выбрать установочник для вашей операционной системы. Или, если у вас Windows 10, то можете скачать и установить программу из официального магазина приложений Windows. Если же вам необходимо установить более позднюю версию то вы так же можете скачать, необходимую версию выше. Это может понадобится для поддержки старых плат Arduino или стороннего ПО. Все версии, кроме 2.0 бета, имеют поддержку русского языка. Не пугайтесь, если программа установки запускается на английском языке, ниже есть подробная инструкция по установке. Программа Ардуино ИДЕ будет на русском языке, а если нет, то это можно поменять в настройках.
Arduino IDE 2.0
Так же для скачивания доступна версия 2.0 beta. Обратите внимание, что это бета релиз, а значит что там могут быть еще мелкие недоработки и ошибки. Для начинающих рекомендуется скачивать последнюю стабильную версию, то есть 1.8.16 на данный момент. В новой версии 2.0 разработчики обещаю повышенную производительность, продвинутый редактор, более отзывчивый интерфейс, автозавершение команд, навигатор по коду и даже обработчик ошибок в режиме реального времени!
Для Windows есть возможность загрузки архива (Zip) и инсталлятора (Installer). Архив можно использовать как Portable версию. А если вы устанавливаете среду разработки ардуино на свое постоянное рабочее место, то лучше выбрать Installer.
Установка Arduino IDE
Если вы скачали архив, то просто распакуйте его и запустите Arduino.exe.
Если вы скачали установочный файл то вам необходимо выполнить стандартную установку. Процесс установки очень прост и не займет много времени, но для полноты статьи я распишу его подробно.
Запускаем установочный файл. Соглашаемся с условиями лицензионного соглашения (естественно после прочтения).
Выбираем необходимые модули программы. Первые два должны быть отмечены обязательно. Остальные на ваше усмотрение.
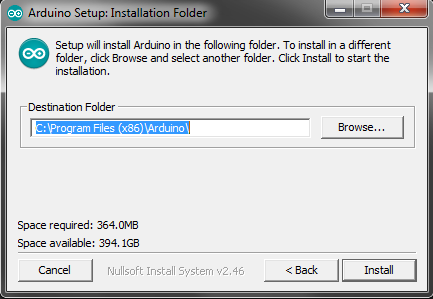
Далее указываем папку в которую хотим установить программу. Желательно, что бы путь к этой папке не содержал кириллических символов.
Во время установки может появиться окно с предложением установки драйвера USB-to-serial. Соглашаемся и ждем окончания установки. На этом весь процесс завершен. Осталось настроить среду разработки и можно творить.
Настройка Arduino IDE
После установки необходимо настроить программу. Сделать это очень легко:
1. Сначала подключите вашу ардуинку к компьютеру с помощью USB кабеля.
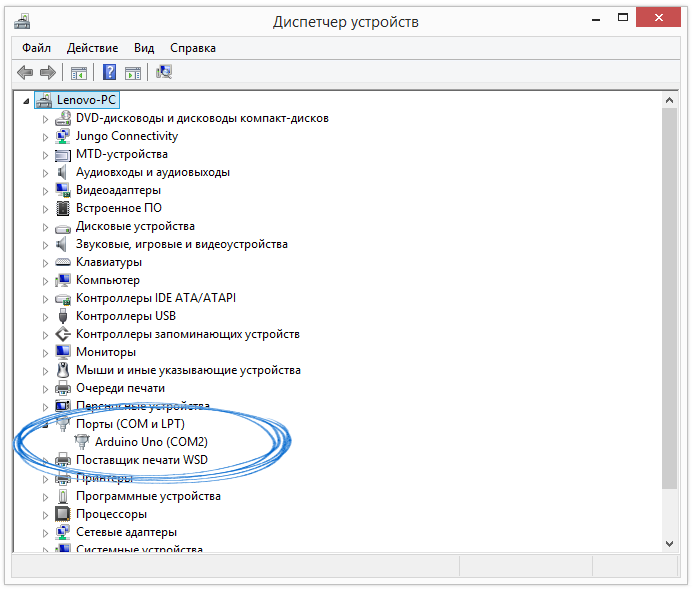
2. Потом перейдите в «Пуск >> Панель управления >> Диспетчер устройств«. Там надо найти «Порты COM и LPT». В этом списке будет указана ваша arduino и порт к которому она подключена (COM2). Запомните это значение.
Если вашего микроконтроллера нет в списке, или он показан как неопознанное устройство, значит драйвер установлен неправильно, или у вас китайская плата с чипом CH340. Это не проблема. Просто вам нужен другой драйвер. Где его скачать и как установить я рассказал в этой статье.
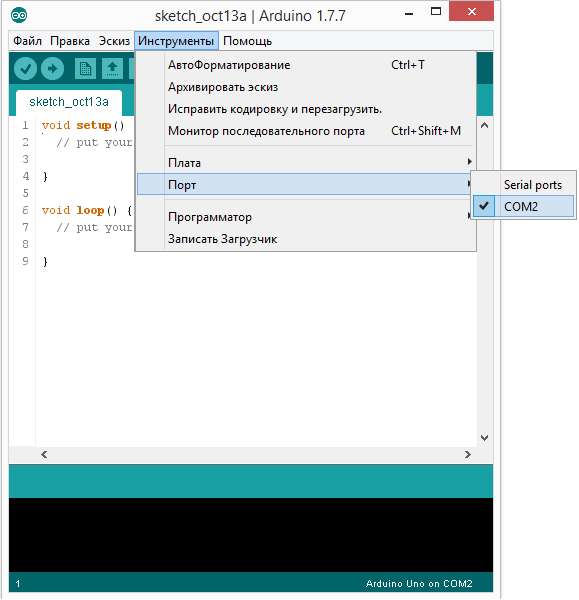
3. Теперь запускаем Arduino IDE и сразу идем в меню «Инструменты >> Порт«. Там необходимо выбрать тот COM порт, который вы запомнили.
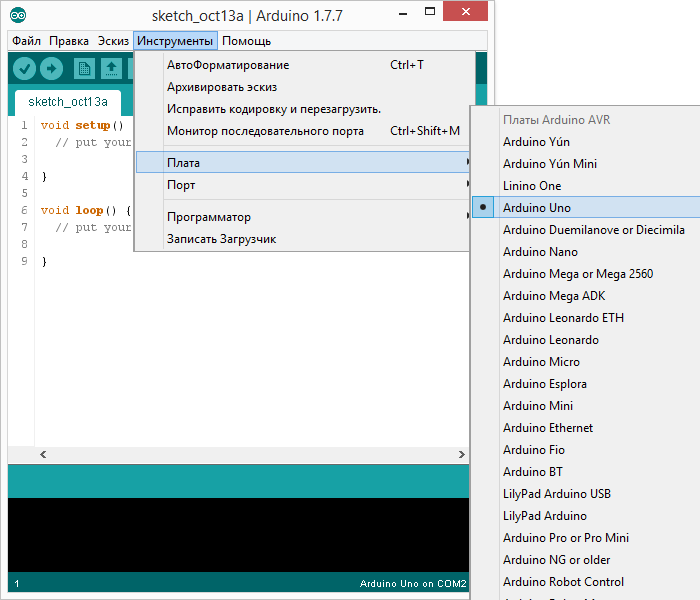
4. Далее надо выбрать плату. Для этого в меню»Инструменты >> Платы» выбираете модель вашей платы.
На этом настройка закончена. Не забывайте, что эти настройки придется менять если вы подключите плату к другому USB порту или будите использовать другую плату.
Использование Arduino IDE
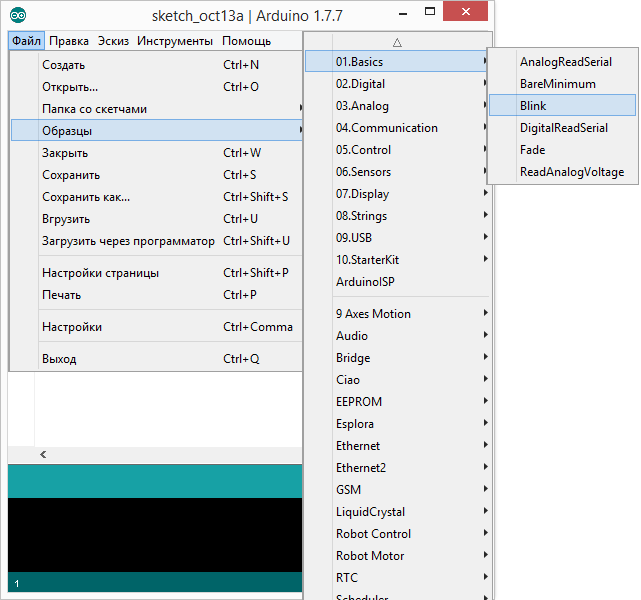
Программа очень проста в использовании. Для того что бы убедиться, что все работает правильно зальем свой первый скетч на микроконтроллер. Для этого используем стандартный пример с мигающим светодиодом. В среде разработки есть множество готовых примеров. Этим мы и воспользуемся.
Потом нажимаем кнопку «Загрузить» и ожидаем окончания загрузки скетча. После загрузки сразу должен начать мигать встроенный светодиод. Это значит что все работает так как надо. Теперь вы можете писать свои прошивки или использовать готовые. Описание функций языка программирования Arduino есть на странице моего сайта Программирование
Articles about Arduino IDE
-
The basics of debugging in Code::Blocks
So, you’ve successfully created your first program in Code::Blocks – that is, you have written your source code, made any changes needed, and compiled and built your code. Maybe you got lucky and your program came out just right on the first try. But more likely you’ll need to make edits and debug your code in order to come out with a finished product that works properly.
-
Create a sample program with Code::Blocks
If you’re new to Code::Blocks IDE and you’ve already downloaded and installed the program, it’s a good time to create your first program. We’ll go over the steps to create a specific starter program using Code::Blocks and programming in C++. This is a great way to get familiar with the layout and workings of the software.
-
Code::Blocks Tutorial: What it is and How to Use it
Code::Blocks is an open-source IDE (Integrated Development Environment). It helps you to work on software and programs you are developing, including coding, debugging, testing, and much more. It supports many compilers, such as GNU GCC (MinGW and Cygwin) and MS Visual C++. It is also free to download.
-
What’s the Best Browser for Web Developers?
Web developers can sometimes be a fickle bunch, but they’re not unlike regular web users. Each has his or her preferences for which browser works best, has the features needed to get the job done, and makes working and living easier.

