Last Updated:
January 17, 2022
ASIO4All is a free Windows tool that provides a generic high-performance audio driver for professional audio production in the absence of an audio interface with a dedicated driver.
If you are a Windows user and you are not using a dedicated audio interface (such as a Focusrite Scarlett 4i4), then you should download and install ASIO4All. Your audio performance will be significantly better than using native Windows audio drivers.
When you’re producing music on a computer using a DAW (such as Ableton Live, FL Studio, Reaper, etc), your computer needs a way to efficiently interface with your hardware.
This can include your microphones, instruments, speakers, headphones, etc. These all communicate with your audio and recording software. The piece of software that manages this communication in a computer is called an audio driver.
In the absence of a dedicated audio driver for windows, then ASIO4All is the next best thing!
Contents
- The Problem – The Windows Native Audio Driver is Not Efficient Enough
- The Solution
- ASIO
- What is ASIO4All?
- Downloading and Installing ASIO4All on Windows 10
- ASIO4All for Mac?
- Should You Use ASIO4All with Dedicated Audio Interfaces?
- Pros of ASIO4All
- Cons of ASIO4All
- Summary
The Problem – The Windows Native Audio Driver is Not Efficient Enough
In Windows, the native audio driver that controls communication with your onboard soundcard is not optimized for professional audio production.
Pro audio demands that there be very little lag or ‘latency’ in the communication between audio devices and software. For example, if you play a note on your MIDI keyboard connected to a VST plugin, you should hear the output almost instantaneously with no perceptible delay.
The Windows native audio driver produces significant latency because it involves the software commands having to traverse several software layers to access the soundcard, making it unsuitable for audio production.
The Solution

ASIO
To overcome this problem with native Windows drivers, Steinberg introduced a proprietary driver called Audio Stream InputOutput or ASIO.
The ASIO driver bypasses all the software layers that the native Windows driver would have to go through, and instead connects directly with the soundcard. This enables far less latency and makes real-time professional-grade audio production possible.
ASIO has become the standard for professional audio production on Windows systems. Since Windows doesn’t provide an ASIO driver natively, audio interface manufacturers implement their own ASIO drivers for their products which must be downloaded and installed separately to make use of the interface.
What is ASIO4All?
ASIO4All is a free tool that provides a generic ASIO driver within Windows for your audio hardware and software to utilize instead of the native Windows driver.
If you don’t have an audio interface and still want to experiment with audio production, or if you’re traveling and only have the option of using your headphones with your laptop’s headphone jack for monitoring, then ASIO4All will meet your needs.
ASIO4All is essentially a ‘driver wrapper’; it packages the native Windows audio drivers to appear as an ASIO driver, thus enabling it to bypass the additional software layers and connect directly to the onboard soundcard.
Downloading and Installing ASIO4All on Windows 10
- Download ASIO4All for your system architecture from http://www.asio4all.org/
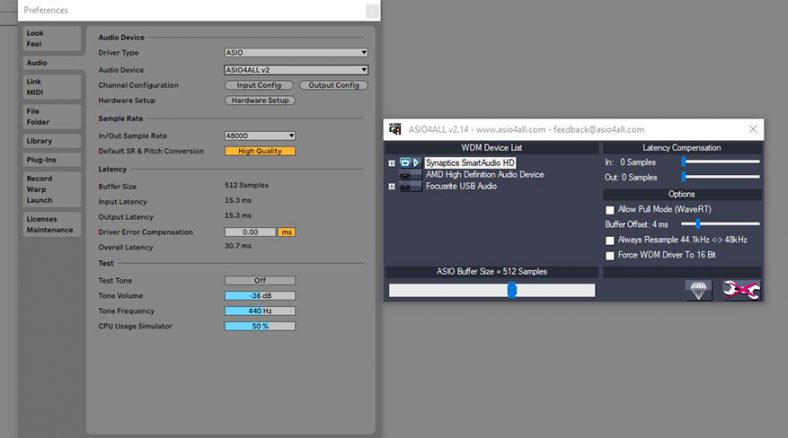
- Click on the downloaded file and install ASIO4All. Once installed you should see a triangle symbol appear in the taskbar for the ASIO4All settings. Click and open it.

- You should be presented with an interface that lists all the available audio devices on your system with a power button next to them. Audio devices that are unavailable (typically because they’re already in use by some other program) have a cross mark next to them.
- Set the power button to ‘on’ for all the devices you want to use with ASIO4All. For example, if you want to use your laptop’s inbuilt microphone and headphone jack, you may find their entry under the name of the soundcard manufacturer for your laptop (e.g. Realtek, Beats, etc.) marked as input and output.
- A slider at the bottom controls the buffer size. The buffer size essentially controls your latency, with a lower buffer size meaning lower latency but higher performance demands on your CPU. Experiment with the lowest buffer size you can achieve before your audio starts to crackle or glitch.
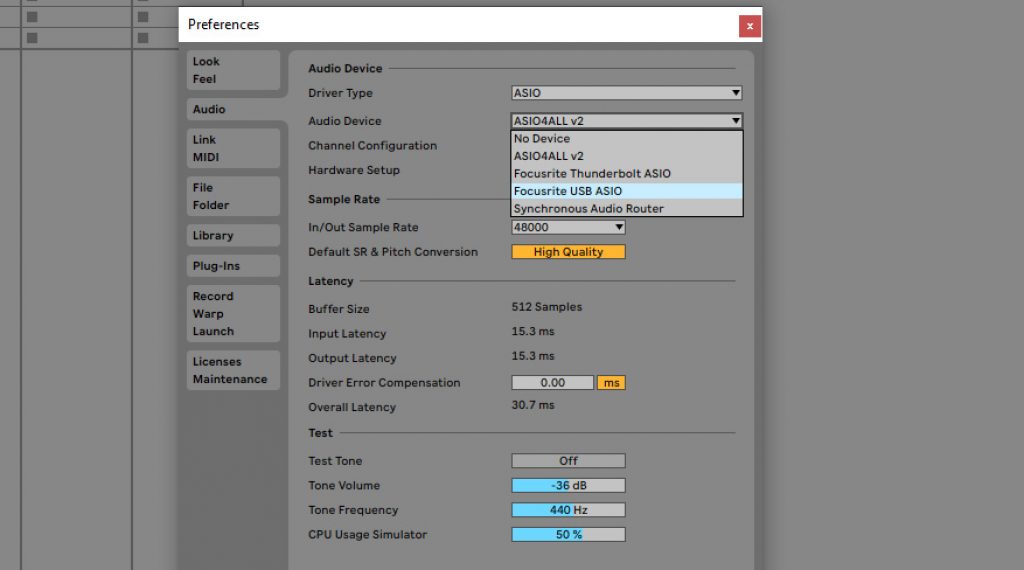
- On your DAW (or other audio application), to the settings to select the driver and audio device. Set the driver type to ASIO and set the device as ASIO4All. Select the inputs and outputs you had enabled in the ASIO4All settings. You should be good to go!
Note: ASIO4All cannot use an audio device if it’s already being used by some other program, like a browser or media player. Similarly, if a device is used by ASIO4All, it cannot be simultaneously used by some other program. Therefore, make sure to free up your devices in case you cannot access them with ASIO4All.
ASIO4All for Mac?
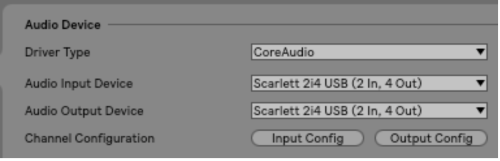
Instead of ASIO, Mac systems utilize Apple’s CoreAudio engine and driver system, which is built from the ground up keeping high-performance audio production in mind, so there is no need for any third-party driver to work with audio on Mac systems.
Even professional audio interfaces do not need any proprietary drivers to work with Mac. CoreAudio handles everything natively. Therefore ASIO4All or a similar equivalent isn’t necessary for Mac systems.
Should You Use ASIO4All with Dedicated Audio Interfaces?
If you have a dedicated audio interface like one from a manufacturer like Focusrite or Steinberg, they almost invariably come with their proprietary implementations of ASIO drivers which can be installed from a CD or downloaded from the internet. (For Mac systems, nothing needs to be downloaded.
Interfaces are designed to work with their own drivers. Either these are ‘plug and play’ or you download and install these when you are setting up your system for use with the audio interface.
In this case, there is no point in using ASIO4All over the included proprietary driver. ASIO4All will almost certainly have higher latency due to the overhead of driver wrapping and might conflict with the interface which is designed to work with its own drivers.
The purpose of ASIO4All is to provide an alternative in the absence of a dedicated soundcard and driver, so it becomes redundant to use one when you have a soundcard.
Pros of ASIO4All
- Far better performance than native Windows drivers with low latency.
- Doesn’t need a dedicated audio interface to make a Windows machine audio production capable.
- Useful for when you’re traveling and don’t have your soundcard with you.
Cons of ASIO4All
- Performance doesn’t match up to dedicated audio interfaces and drivers.
- Requires exclusive access of audio devices i.e. another program cannot use a device if it’s already being used by ASIO4All. So you cannot use your headphone jack to monitor your DAW while simultaneously playing a video on YouTube.
- ASIO4All is redundant if you have an audio interface with a dedicated ASIO driver.
Summary
In the absence of native support from Microsoft for high-performance audio drivers in Windows, ASIO4All is a great free tool to enable professional-grade audio production in any PC without immediately committing to buying a dedicated audio interface.
While in the long run, it is definitely recommended to get a dedicated audio interface (such as a
Focusrite Scarlett 4i4
) with its own optimized ASIO drivers, ASIO4All is a great alternative for those getting started with audio production, or to save time in a pinch.
ASIO4ALL — это универсальный драйвер ASIO передающий аудиопоток от воспроизводящей программы напрямую в драйвер звуковой карты, что позволяет сохранить исходное качество звука и минимизировать задержку, исключив из цепочки обработку и буферизацию звука ОС Windows.
Самое популярное объяснение, для чего применяется драйвер ASIO4ALL гласит, что если вы не знаете, что это такое, значит он вам не нужен. На самом деле аббревиатура ASIO обозначает Audio Stream Input/Output (ввод-вывод потоковых аудиоданных), а принцип работы драйвера достаточно прост: он обеспечивает прямой доступ программ воспроизводящих звук к аппаратным ресурсам аудиокарт. Это позволяет устранить задержку в воспроизведении, которая может достигать 300 миллисекунд и даже более, при передаче данных через стандартный буфер и высокой загрузке операционной системы (для которой воспроизведение звука отнюдь не является главным приоритетом).
Казалось бы, задержка не велика и составляет менее половины секунды, более того, видеопроигрыватели принудительно синхронизируют звук с видеорядом, так зачем городить огород? Именно поэтому в большинстве случаев ASIO4ALL используется при профессиональной записи и сведении звука, когда вступающие инструменты должны слышать себя без малейшей задержки.
Перехватывая звуковой поток, ASIO4ALL даёт возможность вручную настраивать фиксированный размер аудиобуфера, компенсировать задержку на входе и выходе, преобразовывать частоту звука и менять несколько других специализированных настроек. Универсальный драйвер ASIO4ALL фактически является мостом, перехватывающим звуковой поток от программ использующих ASIO и обеспечивая его передачу«бит-в-бит» на вход Windows Audio Session API.
Последняя версия ASIO4ALL которую можно скачать на нашем сайте включает в себя драйвер для 32 и 64 битных операционных систем Windows 10 и более ранних версий.
Данная статья подходит для всех операционных систем и всех версий Ableton Live.
Что такое аудио интерфейс?
Аудио интерфейс (часто используют термин «звуковая карта») — это устройство, которое позволяет воспроизводить звук, а также подключать к компьютеру микрофоны, инструменты (например, синтезаторы), чтобы Вы могли записывать их напрямую в вашу цифровую рабочую станцию. В нашем случае это секвенсор Ableton Live.
Настройка аудио в Ableton Live
Большинство внешних аудио интерфейсов используют для подключения к компьютеру порты USB, Thunderbolt или Firewire. В нашем примере мы будем использовать подключение по USB.
- Во-первых, загрузите и установите последнюю версию драйвера для вашего аудио интерфейса. На Mac это драйвер Core Audio, который, как правило уже установлен в системе. В Windows доступны различные типы драйверов, но ASIO будет лучшим вариантом. Пользователи Windows могут также использовать бесплатный универсальный аудио драйвер Asio4All;
- После установки драйвера, подключите аудио интерфейс к USB порту компьютера. Ableton рекомендует не подключать аудио интерфейс к USB-концентраторам (хабам), а подключать все оборудование напрямую, к встроенному в компьютер USB порту!;
- Откройте настройки Live, а затем перейдите на вкладку Audio (Options — > Preferences) ;

4. В поле Driver Type выберите: для Mac — CoreAudio, для Windows — ASIO;
5. На Mac можно выбрать разные устройства для звукового ввода (Input) и вывода (Output) или отключить их выбрав No Device;
6. Меню Input Config и Output Config позволяют активировать или деактивировать входы и выходы аудио интерфейса. У аудио интерфейсов начального уровня, как правило есть 2 входа и 2 выхода. Они будут автоматически настроены программой. Отключите не используемые входы и выходы, чтобы снизить нагрузку на процессор.

7. По умолчанию, для входа и выхода выбрана частота дискретизации 44100 Гц. При необходимости эта величина может быть уменьшена, либо увеличена.

8. Размера буфера (Buffer Size) может быть выбран начиная со значения 32 сэмпла. Чем меньше буфер, тем меньше задержка при вводе и выводе звука, однако, это также значительно увеличивает нагрузку на ЦП. Как разумный компромисс, Ableton рекомендует выставить значение от 256 до 512 сэмплов.
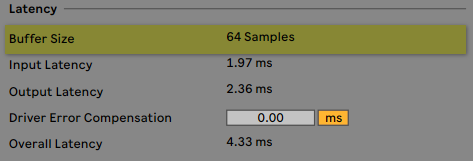
Чтобы настроить размер буфера, в Windows вам может потребоваться открыть панель управления аудио интерфейсом.
Подключение аудио мониторов и наушников
Перед подключением аудио мониторов (динамиков) к аудио интерфейсу, убедитесь, что аудио мониторы выключены. Подключите входы аудио мониторов к выходам аудио интерфейса. Выставите на аудио интерфейсе минимальное значение громкости. Теперь подключите наушники и увеличивайте громкость, пока не услышите звук.
Готово!
Подпишитесь на мой YouTube канал и смотрите обучающее видео по Ableton Live.
Использованы материалы с сайта Ableton.
Что это такое?
ASIO – это программный интерфейс передачи данных от программы, которая воспроизводит или принимает звуковой сигнал напрямую в драйвер звуковой карты, минуя звуковую подсистему ОС.
ASIO расшифровывается как “Audio Stream Input/Output”, т.е. “Аудио Поток Вход/Выход”. Первоначально он был разработан компанией Steinberg под свои продукты в момент перехода от MIDI к виртуальному синтезу и сегодня поддерживается практически всем профессиональным софтом и звуковыми интерфейсами, чтобы записывать мультитрековое цифровое аудио с минимальными задержками и лагами. Скачать вы его можете на официальном сайте – www.asio4all.org
Эти лаги и задержки называются Latency, и они способны изрядно подпортить настроение всем музыкантам.
Изначально в ОС семейства Windows задержка составляет от 7 до 300 мс и зависит от текущей загруженности системы. Как несложно догадаться, звуковая система не является приоритетной в Windows и все что от нее требуется, это что бы звук просто не заикался, а для этого аудио данные собираются отдельный буфер и передаются сразу большим куском. Для сверх малых задержек буфер должен быть маленьким и постоянно передаваться небольшими пакетами.
В случае с ASIO, маршрут пути меняется и становится гораздо короче. Звуку не нужно идти через “Windows”. Итак, ASIO позволяет избежать лишних операций в вашей системе.
Правильно установленный ASIO способен сделать Ableton таким же быстрым на отклик, как и любой другой аппаратный инструмент. В некоторых случаях вы можете сделать задержку практически незаметной – она будет составлять менее 8 миллисекунд!
Программа Ableton Live поддерживает драйвер ASIO на PC (необходимо заметить, что ASIO не актуален для Mac OS, за что мы можем сказать отдельное спасибо Core Audio интерфейсу).
Установка и настройка


После того, как программа будет установлена, жмите «готово». На этом установка драйвера Asio4All будет завершена. Теперь можно переходить к установке программы Ableton Live (если до сих пор не установили). Данный драйвер сразу же станет доступен во вкладке меню Preferences «Audio». Об этом разделе я подробно рассказываю в статье “Все Настройки Меню Ableton Preferences“
Fixes for not being able to hear playback in Ableton include checking output settings, selecting the appropriate driver, installing ASIO, and configuring channels. Also, check the driver type selector and install ASIO 4ALL for better sound quality.
There’s nothing worse than sitting down, ready to start recording, and unable to hear anything.
Luckily in this article, I will provide simple solutions to help you, so you can get back to creating instead of wondering, “Why can’t I hear playback in Ableton?”
Ableton No Sound On Playback – Step-By-Step Fixes
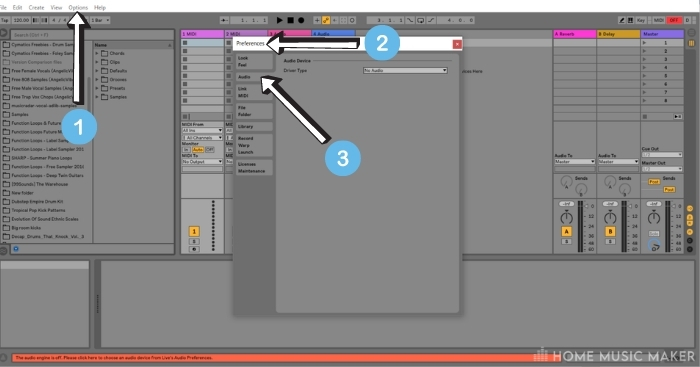
Step 1: Check Your Output Settings
Check your output settings by going to Options (1), then Preferences (2), then Audio (3).
If the Driver Type selector says No Audio, there’s your problem.
Step 2: Select A Driver
This part depends on your setup.
If you are using the soundcard built into your computer, select the MME/DirectX (1) driver.
At this point, you will notice that Audio Input Device (2) and an Audio Output Device (3) options appear.
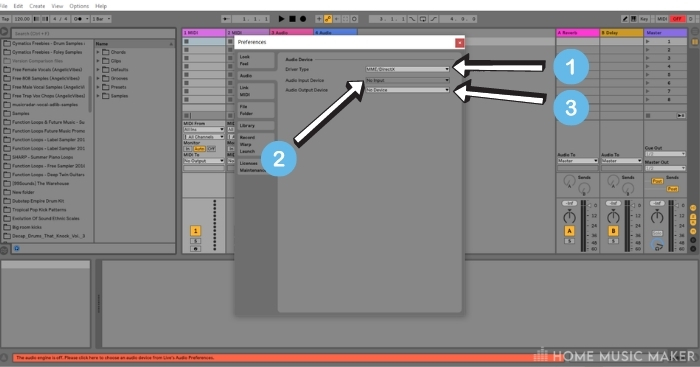
If there is nothing selected for the Audio Output Device, there will be no sound.
Go ahead and choose one of the speaker’s options from the dropdown list.
Hey presto, you should have Audio.
Step 3: Using ASIO
Of course, it is not usually ideal to use your inbuilt soundcard. Often, a computer’s inbuilt soundcard is not optimized for music production.
Instead, it is best to install ASIO 4ALL, which is a free Windows low-latency sound driver.
If this is installed, select ASIO (1) as your Driver Type and ASIO 4ALL V2 (2) as the Audio Device.
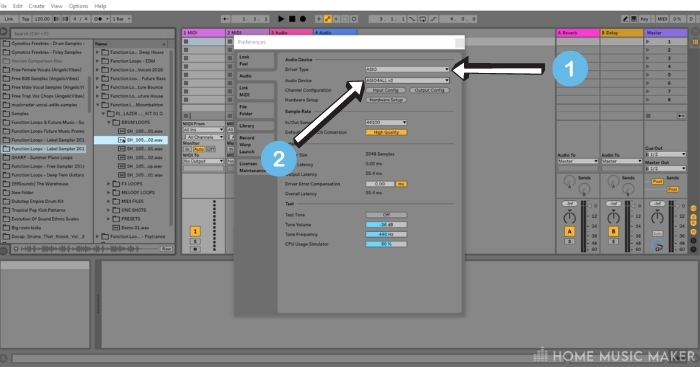
Often this is all you need to do to have your Live set playback smoothly and clearly, without latency or glitches.
However, if there is no sound when you playback, do the following.
Step 4: Channel Configuration
Select the Hardware Setup (1) option on the Preferences panel.
You will notice a control panel pops up with devices listed. You want to make sure that the output device is selected.
To do that, select the little power icon next to the output device’s name (2).
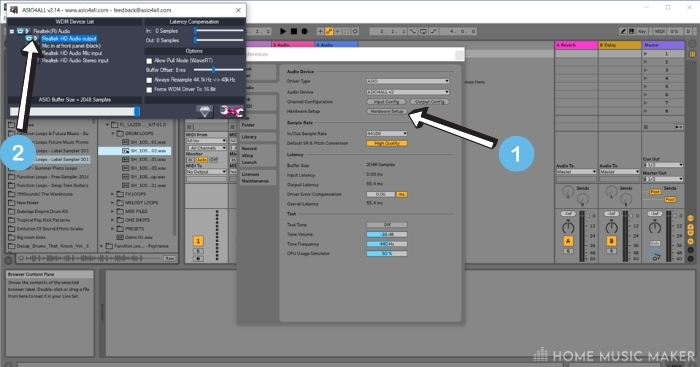
Typically, there should only be one output device listed.
Once you have turned the output device on, close the control panel and playback your live set.
There should now be audio.
Step 5: Configuring Your Audio Interface
If you have an audio interface (i.e., an external soundcard device) connected to your computer, you will need to select it as your audio output device.
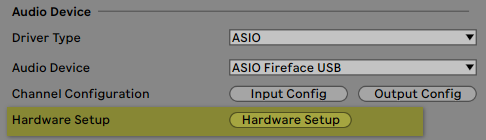
To do that, make sure that ASIO is chosen as your Driver Type.
Then select the Audio Interface from the Audio Device dropdown menu.
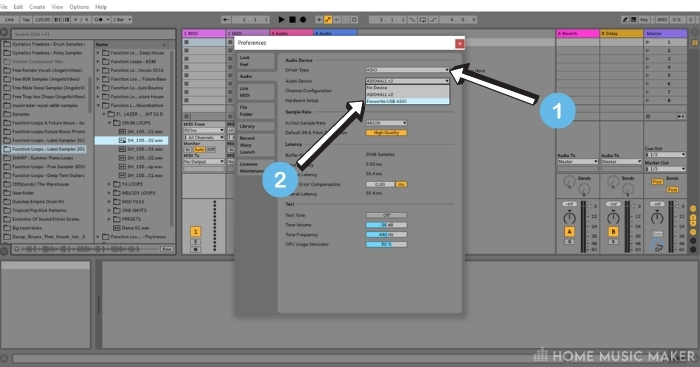
If you have followed these steps correctly, you should be able to hear playback in Ableton.
How do you mute an instrument in Ableton?
To mute an instrument, select the yellow Track Activator button on the track with that instrument. If you want to only mute a section of that instrument, right-click on the clip you want to mute and select Deactivate.
Why is your Ableton track muted?
Probably because you clicked on the yellow Track Activator button.
Why is Audio delayed while recording on Ableton?
That is a driver issue. If you use your computer’s stock audio driver, you will likely experience latency (delayed Audio). Either install ASIO 4ALL (free) to fix this issue or use an external audio interface.
Why do you hear crackling or glitches while playing guitar?
This could be a latency issue. If you are running a live set with tons of tracks, you might be overcooking your CPU, making recording difficult. Otherwise, use a third-party audio driver like ASIO 4ALL or an external interface. Doing either will help this issue.
Do you hear your guitar through the track when you are not recording?
Yes, if you have the audio input option on that track selected to the input channel of your guitar (running through your audio interface). You may also need the Arm Arrangement Recording button turned on for that track.
How do you change audio output in Ableton?
Follow the steps above, one through five.
Sound card recommendations for using Live with multiple instruments?
I am quite a fan of the Focusrite range. You can get Focusrite audio interfaces with 2 to 8 audio inputs. I use the Focusrite Scarlet 2i2, which only has two inputs (enough for guitar and vocals). However, I have recorded an entire live band using one of the eight input audio interfaces.
Final Words
Hopefully, by following the simple steps above, you have solved your issue of not hearing any playback.
In most cases, issues like this are relatively easy to fix and shouldn’t take long to get things rolling again.
Ableton Live Tutorial: Audio setup (Windows)
Edit: Updated. Valid for Live 8 to 11.
The audio set up on Windows computers is a bit trickier than on Macs and has a few stumbling blocks in store. This tutorial takes you step by step through the setup process. Let’s dive right in, shall we?
Looking for the tutorial how to set up audio on a Mac?
- If you have an audio interface check the manufacturer’s website for the latest ASIO driver (some offer none though) and possibly a control software. Download and install if available.
- If there’s no driver available or you want to use the built-in sound card of your computer, you need to install the ASIO4ALL driver from:
http://asio4all.com/ - Connect your audio interface to your PC (via USB or Firewire most likely) and to a power source if needed (most do). Then switch it on. Check the manual if there are any other setup steps necessary.
- Start Live and go to the Preferences > Audio. The shortcut for it is Ctrl + ,.
- Choose ASIO as the Driver Type. MME/DirectX is not suited for audio software and would give you high latencies.
- Choose either the ASIO4ALL v2 as the Audio Device or the one of your audio interface.
- If there’s Hardware Setup button, click on it. It will open the control panel of the driver. There you should be able to set your active input and output.

Click on the wrench icon on the bottom right to enable making changes. If the Sample Rate is greyed out in the Live Preferences, then you need to set it up in the control panel as well.
- Back in the Live Preferences you can activate the needed mono and/or stereo in- and outputs under Input and Output Config respectively. (Note: Since Live 10 it’s possible to label them for convenience.)
- Choose the Sample Rate as needed. It’s not saved with the Live Set, but is set universally so beware if you tend to switch, e.g. between live and studio. You can set the Bit Depth in Preferences > Record/Warp/Launch.
- A Buffer Size of 512 seems to work for most. Or you can try to find a setting that gives you low latency without audio drop outs. This should always be a power of 2 (64, 128, 256, 512, 1024 and so on) to avoid issues with the driver of the interface.
- Now you should be all set. If you’re using an audio interface, don’t forget to plug in headphones or connect it to speakers.


One last tip:
If your audio interface is off, Live will show Audio Engine as off. You need to change it back manually in the Preferences after turning it back on.
Any questions or comments? Let me know. Happy noise making!
There are plenty more Ableton Live tutorials where this one came from.
Share this article with others!

Related Posts
This site uses Akismet to reduce spam. Learn how your comment data is processed.
Page load link