| title | author | description | monikerRange | ms.author | ms.custom | ms.date | uid |
|---|---|---|---|---|---|---|---|
|
Host ASP.NET Core in a Windows Service |
rick-anderson |
Learn how to host an ASP.NET Core app in a Windows Service. |
>= aspnetcore-3.1 |
riande |
mvc |
12/19/2022 |
host-and-deploy/windows-service |
Host ASP.NET Core in a Windows Service
:::moniker range=»>= aspnetcore-7.0″
An ASP.NET Core app can be hosted on Windows as a Windows Service without using IIS. When hosted as a Windows Service, the app automatically starts after server reboots.
Prerequisites
- ASP.NET Core SDK 7.0 or later
- PowerShell 6.2 or later
Worker Service template
The ASP.NET Core Worker Service template provides a starting point for writing long running service apps. To use the template as a basis for a Windows Service app:
- Create a Worker Service app from the .NET Core template.
- Follow the guidance in the App configuration section to update the Worker Service app so that it can run as a Windows Service.
[!INCLUDE]
App configuration
Update Program.cs to call AddWindowsService. When the app is running as a Windows Service, AddWindowsService:
- Sets the host lifetime to
WindowsServiceLifetime. - Sets the content root to AppContext.BaseDirectory. For more information, see the Current directory and content root section.
- Enables logging to the event log:
- The application name is used as the default source name.
- The default log level is Warning or higher for an app based on an ASP.NET Core template that calls
CreateDefaultBuilderto build the host. - Override the default log level with the
Logging:EventLog:LogLevel:Defaultkey inappsettings.json/appsettings.{Environment}.jsonor other configuration provider. - Only administrators can create new event sources. When an event source can’t be created using the application name, a warning is logged to the Application source and event logs are disabled.
Consider the following ServiceA class:
:::code language=»csharp» source=»~/host-and-deploy/windows-service/samples/7.x/WebAppServiceSample/Services/ServiceA.cs» :::
The following Program.cs calls AddHostedService to register ServiceA:
:::code language=»csharp» source=»~/host-and-deploy/windows-service/samples/7.x/WebAppServiceSample/Program.cs» highlight=»5″:::
The following sample apps accompany this topic:
- Background Worker Service Sample: A non-web app sample based on the Worker Service template that uses hosted services for background tasks.
- Web App Service Sample: A Razor Pages web app sample that runs as a Windows Service with hosted services for background tasks.
For MVC guidance, see the articles under xref:mvc/overview and xref:migration/22-to-30.
Deployment type
For information and advice on deployment scenarios, see .NET Core application deployment.
SDK
For a web app-based service that uses the Razor Pages or MVC frameworks, specify the Web SDK in the project file:
<Project Sdk="Microsoft.NET.Sdk.Web">
If the service only executes background tasks (for example, hosted services), specify the Worker SDK in the project file:
<Project Sdk="Microsoft.NET.Sdk.Worker">
Framework-dependent deployment (FDD)
Framework-dependent deployment (FDD) relies on the presence of a shared system-wide version of .NET Core on the target system. When the FDD scenario is adopted following the guidance in this article, the SDK produces an executable (.exe), called a framework-dependent executable.
If using the Web SDK, a web.config file, which is normally produced when publishing an ASP.NET Core app, is unnecessary for a Windows Services app. To disable the creation of the web.config file, add the <IsTransformWebConfigDisabled> property set to true.
<PropertyGroup>
  <TargetFramework>net7.0</TargetFramework>
  <IsTransformWebConfigDisabled>true</IsTransformWebConfigDisabled>
</PropertyGroup>
Self-contained deployment (SCD)
Self-contained deployment (SCD) doesn’t rely on the presence of a shared framework on the host system. The runtime and the app’s dependencies are deployed with the app.
A Windows Runtime Identifier (RID) is included in the <PropertyGroup> that contains the target framework:
<RuntimeIdentifier>win7-x64</RuntimeIdentifier>
To publish for multiple RIDs:
- Provide the RIDs in a semicolon-delimited list.
- Use the property name <RuntimeIdentifiers> (plural).
For more information, see .NET Core RID Catalog.
Service user account
To create a user account for a service, use the New-LocalUser cmdlet from an administrative PowerShell 6 command shell.
On Windows 10 October 2018 Update (version 1809/build 10.0.17763) or later:
New-LocalUser -Name {SERVICE NAME}
On Windows OS earlier than the Windows 10 October 2018 Update (version 1809/build 10.0.17763):
powershell -Command "New-LocalUser -Name {SERVICE NAME}"
Provide a strong password when prompted.
Unless the -AccountExpires parameter is supplied to the New-LocalUser cmdlet with an expiration xref:System.DateTime, the account doesn’t expire.
For more information, see Microsoft.PowerShell.LocalAccounts and Service User Accounts.
An alternative approach to managing users when using Active Directory is to use Managed Service Accounts. For more information, see Group Managed Service Accounts Overview.
Log on as a service rights
To establish Log on as a service rights for a service user account:
- Open the Local Security Policy editor by running secpol.msc.
- Expand the Local Policies node and select User Rights Assignment.
- Open the Log on as a service policy.
- Select Add User or Group.
- Provide the object name (user account) using either of the following approaches:
- Type the user account (
{DOMAIN OR COMPUTER NAMEUSER}) in the object name field and select OK to add the user to the policy. - Select Advanced. Select Find Now. Select the user account from the list. Select OK. Select OK again to add the user to the policy.
- Type the user account (
- Select OK or Apply to accept the changes.
Create and manage the Windows Service
Create a service
Use PowerShell commands to register a service. From an administrative PowerShell 6 command shell, execute the following commands:
$acl = Get-Acl "{EXE PATH}"
$aclRuleArgs = "{DOMAIN OR COMPUTER NAMEUSER}", "Read,Write,ReadAndExecute", "ContainerInherit,ObjectInherit", "None", "Allow"
$accessRule = New-Object System.Security.AccessControl.FileSystemAccessRule($aclRuleArgs)
$acl.SetAccessRule($accessRule)
$acl | Set-Acl "{EXE PATH}"

New-Service -Name {SERVICE NAME} -BinaryPathName "{EXE FILE PATH} --contentRoot {EXE FOLDER PATH}" -Credential "{DOMAIN OR COMPUTER NAMEUSER}" -Description "{DESCRIPTION}" -DisplayName "{DISPLAY NAME}" -StartupType Automatic
{EXE PATH}: Path of the app’s executable on the host (for example,d:myservice). Don’t include the app’s executable file name in the path. A trailing slash isn’t required.{DOMAIN OR COMPUTER NAMEUSER}: Service user account (for example,ContosoServiceUser).{SERVICE NAME}: Service name (for example,MyService).{EXE FILE PATH}: The app’s full executable path (for example,d:myservicemyservice.exe). Include the executable’s file name with extension.{EXE FOLDER PATH}: The app’s full executable folder path (for exampled:myservice).{DESCRIPTION}: Service description (for example,My sample service).{DISPLAY NAME}: Service display name (for example,My Service).
Start a service
Start a service with the following PowerShell 6 command:
Start-Service -Name {SERVICE NAME}
The command takes a few seconds to start the service.
Determine a service’s status
To check the status of a service, use the following PowerShell 6 command:
Get-Service -Name {SERVICE NAME}
The status is reported as one of the following values:
StartingRunningStoppingStopped
Stop a service
Stop a service with the following PowerShell 6 command:
Stop-Service -Name {SERVICE NAME}
Remove a service
After a short delay to stop a service, remove a service with the following PowerShell 6 command:
Remove-Service -Name {SERVICE NAME}
Proxy server and load balancer scenarios
Services that interact with requests from the Internet or a corporate network and are behind a proxy or load balancer might require additional configuration. For more information, see xref:host-and-deploy/proxy-load-balancer.
Configure endpoints
By default, ASP.NET Core binds to http://localhost:5000. Configure the URL and port by setting the ASPNETCORE_URLS environment variable.
For additional URL and port configuration approaches, see the relevant server article:
- xref:fundamentals/servers/kestrel/endpoints
- xref:fundamentals/servers/httpsys#configure-windows-server
The preceding guidance covers support for HTTPS endpoints. For example, configure the app for HTTPS when authentication is used with a Windows Service.
[!NOTE]
Use of the ASP.NET Core HTTPS development certificate to secure a service endpoint isn’t supported.
Current directory and content root
The current working directory returned by calling xref:System.IO.Directory.GetCurrentDirectory%2A for a Windows Service is the C:WINDOWSsystem32 folder. The system32 folder isn’t a suitable location to store a service’s files (for example, settings files). Use one of the following approaches to maintain and access a service’s assets and settings files.
Use ContentRootPath or ContentRootFileProvider
Use IHostEnvironment.ContentRootPath or xref:Microsoft.Extensions.Hosting.IHostEnvironment.ContentRootFileProvider to locate an app’s resources.
When the app runs as a service, xref:Microsoft.Extensions.Hosting.WindowsServiceLifetimeHostBuilderExtensions.UseWindowsService%2A sets the xref:Microsoft.Extensions.Hosting.IHostEnvironment.ContentRootPath to AppContext.BaseDirectory.
The app’s default settings files, appsettings.json and appsettings.{Environment}.json, are loaded from the app’s content root by calling CreateDefaultBuilder during host construction.
For other settings files loaded by developer code in xref:Microsoft.Extensions.Hosting.HostBuilder.ConfigureAppConfiguration%2A, there’s no need to call xref:Microsoft.Extensions.Configuration.FileConfigurationExtensions.SetBasePath%2A. In the following example, the custom_settings.json file exists in the app’s content root and is loaded without explicitly setting a base path:
:::code language=»csharp» source=»windows-service/samples_snapshot/CustomSettingsExample.cs» highlight=»13″:::
Don’t attempt to use xref:System.IO.Directory.GetCurrentDirectory%2A to obtain a resource path because a Windows Service app returns the C:WINDOWSsystem32 folder as its current directory.
Store a service’s files in a suitable location on disk
Specify an absolute path with xref:Microsoft.Extensions.Configuration.FileConfigurationExtensions.SetBasePath%2A when using an xref:Microsoft.Extensions.Configuration.IConfigurationBuilder to the folder containing the files.
Troubleshoot
To troubleshoot a Windows Service app, see xref:test/troubleshoot.
Common errors
- An old or pre-release version of PowerShell is in use.
- The registered service doesn’t use the app’s published output from the dotnet publish command. Output of the dotnet build command isn’t supported for app deployment. Published assets are found in either of the following folders depending on the deployment type:
- bin/Release/{TARGET FRAMEWORK}/publish (FDD)
- bin/Release/{TARGET FRAMEWORK}/{RUNTIME IDENTIFIER}/publish (SCD)
- The service isn’t in the RUNNING state.
- The paths to resources that the app uses (for example, certificates) are incorrect. The base path of a Windows Service is c:WindowsSystem32.
- The user doesn’t have Log on as a service rights.
- The user’s password is expired or incorrectly passed when executing the
New-ServicePowerShell command. - The app requires ASP.NET Core authentication but isn’t configured for secure connections (HTTPS).
- The request URL port is incorrect or not configured correctly in the app.
System and Application Event Logs
Access the System and Application Event Logs:
- Open the Start menu, search for Event Viewer, and select the Event Viewer app.
- In Event Viewer, open the Windows Logs node.
- Select System to open the System Event Log. Select Application to open the Application Event Log.
- Search for errors associated with the failing app.
Run the app at a command prompt
Many startup errors don’t produce useful information in the event logs. You can find the cause of some errors by running the app at a command prompt on the hosting system. To log additional detail from the app, lower the log level or run the app in the Development environment.
Clear package caches
A functioning app may fail immediately after upgrading either the .NET Core SDK on the development machine or changing package versions within the app. In some cases, incoherent packages may break an app when performing major upgrades. Most of these issues can be fixed by following these instructions:
-
Delete the bin and obj folders.
-
Clear the package caches by executing dotnet nuget locals all —clear from a command shell.
Clearing package caches can also be accomplished with the nuget.exe tool and executing the command
nuget locals all -clear. nuget.exe isn’t a bundled install with the Windows desktop operating system and must be obtained separately from the NuGet website. -
Restore and rebuild the project.
-
Delete all of the files in the deployment folder on the server prior to redeploying the app.
Slow or unresponsive app
A crash dump is a snapshot of the system’s memory and can help determine the cause of an app crash, startup failure, or slow app.
App crashes or encounters an exception
Obtain and analyze a dump from Windows Error Reporting (WER):
-
Create a folder to hold crash dump files at
c:dumps. -
Run the EnableDumps PowerShell script with the application executable name:
.EnableDumps {APPLICATION EXE} c:dumps -
Run the app under the conditions that cause the crash to occur.
-
After the crash has occurred, run the DisableDumps PowerShell script:
.DisableDumps {APPLICATION EXE}
After an app crashes and dump collection is complete, the app is allowed to terminate normally. The PowerShell script configures WER to collect up to five dumps per app.
[!WARNING]
Crash dumps might take up a large amount of disk space (up to several gigabytes each).
App is unresponsive, fails during startup, or runs normally
When an app hangs (stops responding but doesn’t crash), fails during startup, or runs normally, see User-Mode Dump Files: Choosing the Best Tool to select an appropriate tool to produce the dump.
Analyze the dump
A dump can be analyzed using several approaches. For more information, see Analyzing a User-Mode Dump File.
Additional resources
- View or download sample code (how to download)
- Kestrel endpoint configuration (includes HTTPS configuration and SNI support)
- xref:fundamentals/host/generic-host
- xref:test/troubleshoot
:::moniker-end
:::moniker range=»= aspnetcore-6.0″
An ASP.NET Core app can be hosted on Windows as a Windows Service without using IIS. When hosted as a Windows Service, the app automatically starts after server reboots.
View or download sample code (how to download)
Prerequisites
- ASP.NET Core SDK 6.0 or later
- PowerShell 6.2 or later
Worker Service template
The ASP.NET Core Worker Service template provides a starting point for writing long running service apps. To use the template as a basis for a Windows Service app:
- Create a Worker Service app from the .NET Core template.
- Follow the guidance in the App configuration section to update the Worker Service app so that it can run as a Windows Service.
[!INCLUDE]
App configuration
The app requires a package reference for Microsoft.Extensions.Hosting.WindowsServices.
IHostBuilder.UseWindowsService is called when building the host. If the app is running as a Windows Service, the method:
- Sets the host lifetime to
WindowsServiceLifetime. - Sets the content root to AppContext.BaseDirectory. For more information, see the Current directory and content root section.
- Enables logging to the event log:
- The application name is used as the default source name.
- The default log level is Warning or higher for an app based on an ASP.NET Core template that calls
CreateDefaultBuilderto build the host. - Override the default log level with the
Logging:EventLog:LogLevel:Defaultkey inappsettings.json/appsettings.{Environment}.jsonor other configuration provider. - Only administrators can create new event sources. When an event source can’t be created using the application name, a warning is logged to the Application source and event logs are disabled.
In Program.cs:
- Set
ContentRootPath - Call
UseWindowsService
:::code language=»csharp» source=»~/host-and-deploy/windows-service/samples/6.x/WebAppServiceSample/Program.cs» highlight=»7,8,16″:::
The following sample apps accompany this topic:
- Background Worker Service Sample: A non-web app sample based on the Worker Service template that uses hosted services for background tasks.
- Web App Service Sample: A Razor Pages web app sample that runs as a Windows Service with hosted services for background tasks.
For MVC guidance, see the articles under xref:mvc/overview and xref:migration/22-to-30.
Deployment type
For information and advice on deployment scenarios, see .NET Core application deployment.
SDK
For a web app-based service that uses the Razor Pages or MVC frameworks, specify the Web SDK in the project file:
<Project Sdk="Microsoft.NET.Sdk.Web">
If the service only executes background tasks (for example, hosted services), specify the Worker SDK in the project file:
<Project Sdk="Microsoft.NET.Sdk.Worker">
Framework-dependent deployment (FDD)
Framework-dependent deployment (FDD) relies on the presence of a shared system-wide version of .NET Core on the target system. When the FDD scenario is adopted following the guidance in this article, the SDK produces an executable (.exe), called a framework-dependent executable.
If using the Web SDK, a web.config file, which is normally produced when publishing an ASP.NET Core app, is unnecessary for a Windows Services app. To disable the creation of the web.config file, add the <IsTransformWebConfigDisabled> property set to true.
<PropertyGroup>
  <TargetFramework>net6.0</TargetFramework>
  <IsTransformWebConfigDisabled>true</IsTransformWebConfigDisabled>
</PropertyGroup>
Self-contained deployment (SCD)
Self-contained deployment (SCD) doesn’t rely on the presence of a shared framework on the host system. The runtime and the app’s dependencies are deployed with the app.
A Windows Runtime Identifier (RID) is included in the <PropertyGroup> that contains the target framework:
<RuntimeIdentifier>win7-x64</RuntimeIdentifier>
To publish for multiple RIDs:
- Provide the RIDs in a semicolon-delimited list.
- Use the property name <RuntimeIdentifiers> (plural).
For more information, see .NET Core RID Catalog.
Service user account
To create a user account for a service, use the New-LocalUser cmdlet from an administrative PowerShell 6 command shell.
On Windows 10 October 2018 Update (version 1809/build 10.0.17763) or later:
New-LocalUser -Name {SERVICE NAME}
On Windows OS earlier than the Windows 10 October 2018 Update (version 1809/build 10.0.17763):
powershell -Command "New-LocalUser -Name {SERVICE NAME}"
Provide a strong password when prompted.
Unless the -AccountExpires parameter is supplied to the New-LocalUser cmdlet with an expiration xref:System.DateTime, the account doesn’t expire.
For more information, see Microsoft.PowerShell.LocalAccounts and Service User Accounts.
An alternative approach to managing users when using Active Directory is to use Managed Service Accounts. For more information, see Group Managed Service Accounts Overview.
Log on as a service rights
To establish Log on as a service rights for a service user account:
- Open the Local Security Policy editor by running secpol.msc.
- Expand the Local Policies node and select User Rights Assignment.
- Open the Log on as a service policy.
- Select Add User or Group.
- Provide the object name (user account) using either of the following approaches:
- Type the user account (
{DOMAIN OR COMPUTER NAMEUSER}) in the object name field and select OK to add the user to the policy. - Select Advanced. Select Find Now. Select the user account from the list. Select OK. Select OK again to add the user to the policy.
- Type the user account (
- Select OK or Apply to accept the changes.
Create and manage the Windows Service
Create a service
Use PowerShell commands to register a service. From an administrative PowerShell 6 command shell, execute the following commands:
$acl = Get-Acl "{EXE PATH}"
$aclRuleArgs = "{DOMAIN OR COMPUTER NAMEUSER}", "Read,Write,ReadAndExecute", "ContainerInherit,ObjectInherit", "None", "Allow"
$accessRule = New-Object System.Security.AccessControl.FileSystemAccessRule($aclRuleArgs)
$acl.SetAccessRule($accessRule)
$acl | Set-Acl "{EXE PATH}"

New-Service -Name {SERVICE NAME} -BinaryPathName "{EXE FILE PATH} --contentRoot {EXE FOLDER PATH}" -Credential "{DOMAIN OR COMPUTER NAMEUSER}" -Description "{DESCRIPTION}" -DisplayName "{DISPLAY NAME}" -StartupType Automatic
{EXE PATH}: Path of the app’s executable on the host (for example,d:myservice). Don’t include the app’s executable file name in the path. A trailing slash isn’t required.{DOMAIN OR COMPUTER NAMEUSER}: Service user account (for example,ContosoServiceUser).{SERVICE NAME}: Service name (for example,MyService).{EXE FILE PATH}: The app’s full executable path (for example,d:myservicemyservice.exe). Include the executable’s file name with extension.{EXE FOLDER PATH}: The app’s full executable folder path (for exampled:myservice).{DESCRIPTION}: Service description (for example,My sample service).{DISPLAY NAME}: Service display name (for example,My Service).
Start a service
Start a service with the following PowerShell 6 command:
Start-Service -Name {SERVICE NAME}
The command takes a few seconds to start the service.
Determine a service’s status
To check the status of a service, use the following PowerShell 6 command:
Get-Service -Name {SERVICE NAME}
The status is reported as one of the following values:
StartingRunningStoppingStopped
Stop a service
Stop a service with the following PowerShell 6 command:
Stop-Service -Name {SERVICE NAME}
Remove a service
After a short delay to stop a service, remove a service with the following PowerShell 6 command:
Remove-Service -Name {SERVICE NAME}
Proxy server and load balancer scenarios
Services that interact with requests from the Internet or a corporate network and are behind a proxy or load balancer might require additional configuration. For more information, see xref:host-and-deploy/proxy-load-balancer.
Configure endpoints
By default, ASP.NET Core binds to http://localhost:5000. Configure the URL and port by setting the ASPNETCORE_URLS environment variable.
For additional URL and port configuration approaches, see the relevant server article:
- xref:fundamentals/servers/kestrel/endpoints
- xref:fundamentals/servers/httpsys#configure-windows-server
The preceding guidance covers support for HTTPS endpoints. For example, configure the app for HTTPS when authentication is used with a Windows Service.
[!NOTE]
Use of the ASP.NET Core HTTPS development certificate to secure a service endpoint isn’t supported.
Current directory and content root
The current working directory returned by calling xref:System.IO.Directory.GetCurrentDirectory%2A for a Windows Service is the C:WINDOWSsystem32 folder. The system32 folder isn’t a suitable location to store a service’s files (for example, settings files). Use one of the following approaches to maintain and access a service’s assets and settings files.
Use ContentRootPath or ContentRootFileProvider
Use IHostEnvironment.ContentRootPath or xref:Microsoft.Extensions.Hosting.IHostEnvironment.ContentRootFileProvider to locate an app’s resources.
When the app runs as a service, xref:Microsoft.Extensions.Hosting.WindowsServiceLifetimeHostBuilderExtensions.UseWindowsService%2A sets the xref:Microsoft.Extensions.Hosting.IHostEnvironment.ContentRootPath to AppContext.BaseDirectory.
The app’s default settings files, appsettings.json and appsettings.{Environment}.json, are loaded from the app’s content root by calling CreateDefaultBuilder during host construction.
For other settings files loaded by developer code in xref:Microsoft.Extensions.Hosting.HostBuilder.ConfigureAppConfiguration%2A, there’s no need to call xref:Microsoft.Extensions.Configuration.FileConfigurationExtensions.SetBasePath%2A. In the following example, the custom_settings.json file exists in the app’s content root and is loaded without explicitly setting a base path:
:::code language=»csharp» source=»windows-service/samples_snapshot/CustomSettingsExample.cs» highlight=»13″:::
Don’t attempt to use xref:System.IO.Directory.GetCurrentDirectory%2A to obtain a resource path because a Windows Service app returns the C:WINDOWSsystem32 folder as its current directory.
Store a service’s files in a suitable location on disk
Specify an absolute path with xref:Microsoft.Extensions.Configuration.FileConfigurationExtensions.SetBasePath%2A when using an xref:Microsoft.Extensions.Configuration.IConfigurationBuilder to the folder containing the files.
Troubleshoot
To troubleshoot a Windows Service app, see xref:test/troubleshoot.
Common errors
- An old or pre-release version of PowerShell is in use.
- The registered service doesn’t use the app’s published output from the dotnet publish command. Output of the dotnet build command isn’t supported for app deployment. Published assets are found in either of the following folders depending on the deployment type:
- bin/Release/{TARGET FRAMEWORK}/publish (FDD)
- bin/Release/{TARGET FRAMEWORK}/{RUNTIME IDENTIFIER}/publish (SCD)
- The service isn’t in the RUNNING state.
- The paths to resources that the app uses (for example, certificates) are incorrect. The base path of a Windows Service is c:WindowsSystem32.
- The user doesn’t have Log on as a service rights.
- The user’s password is expired or incorrectly passed when executing the
New-ServicePowerShell command. - The app requires ASP.NET Core authentication but isn’t configured for secure connections (HTTPS).
- The request URL port is incorrect or not configured correctly in the app.
System and Application Event Logs
Access the System and Application Event Logs:
- Open the Start menu, search for Event Viewer, and select the Event Viewer app.
- In Event Viewer, open the Windows Logs node.
- Select System to open the System Event Log. Select Application to open the Application Event Log.
- Search for errors associated with the failing app.
Run the app at a command prompt
Many startup errors don’t produce useful information in the event logs. You can find the cause of some errors by running the app at a command prompt on the hosting system. To log additional detail from the app, lower the log level or run the app in the Development environment.
Clear package caches
A functioning app may fail immediately after upgrading either the .NET Core SDK on the development machine or changing package versions within the app. In some cases, incoherent packages may break an app when performing major upgrades. Most of these issues can be fixed by following these instructions:
-
Delete the bin and obj folders.
-
Clear the package caches by executing dotnet nuget locals all —clear from a command shell.
Clearing package caches can also be accomplished with the nuget.exe tool and executing the command
nuget locals all -clear. nuget.exe isn’t a bundled install with the Windows desktop operating system and must be obtained separately from the NuGet website. -
Restore and rebuild the project.
-
Delete all of the files in the deployment folder on the server prior to redeploying the app.
Slow or unresponsive app
A crash dump is a snapshot of the system’s memory and can help determine the cause of an app crash, startup failure, or slow app.
App crashes or encounters an exception
Obtain and analyze a dump from Windows Error Reporting (WER):
-
Create a folder to hold crash dump files at
c:dumps. -
Run the EnableDumps PowerShell script with the application executable name:
.EnableDumps {APPLICATION EXE} c:dumps -
Run the app under the conditions that cause the crash to occur.
-
After the crash has occurred, run the DisableDumps PowerShell script:
.DisableDumps {APPLICATION EXE}
After an app crashes and dump collection is complete, the app is allowed to terminate normally. The PowerShell script configures WER to collect up to five dumps per app.
[!WARNING]
Crash dumps might take up a large amount of disk space (up to several gigabytes each).
App is unresponsive, fails during startup, or runs normally
When an app hangs (stops responding but doesn’t crash), fails during startup, or runs normally, see User-Mode Dump Files: Choosing the Best Tool to select an appropriate tool to produce the dump.
Analyze the dump
A dump can be analyzed using several approaches. For more information, see Analyzing a User-Mode Dump File.
Additional resources
- Kestrel endpoint configuration (includes HTTPS configuration and SNI support)
- xref:fundamentals/host/generic-host
- xref:test/troubleshoot
:::moniker-end
:::moniker range=»= aspnetcore-5.0″
An ASP.NET Core app can be hosted on Windows as a Windows Service without using IIS. When hosted as a Windows Service, the app automatically starts after server reboots.
View or download sample code (how to download)
Prerequisites
- ASP.NET Core SDK 5.0
- PowerShell 6.2 or later
Worker Service template
The ASP.NET Core Worker Service template provides a starting point for writing long running service apps. To use the template as a basis for a Windows Service app:
- Create a Worker Service app from the .NET Core template.
- Follow the guidance in the App configuration section to update the Worker Service app so that it can run as a Windows Service.
[!INCLUDE]
App configuration
The app requires a package reference for Microsoft.Extensions.Hosting.WindowsServices.
IHostBuilder.UseWindowsService is called when building the host. If the app is running as a Windows Service, the method:
- Sets the host lifetime to
WindowsServiceLifetime. - Sets the content root to AppContext.BaseDirectory. For more information, see the Current directory and content root section.
- Enables logging to the event log:
- The application name is used as the default source name.
- The default log level is Warning or higher for an app based on an ASP.NET Core template that calls
CreateDefaultBuilderto build the host. - Override the default log level with the
Logging:EventLog:LogLevel:Defaultkey inappsettings.json/appsettings.{Environment}.jsonor other configuration provider. - Only administrators can create new event sources. When an event source can’t be created using the application name, a warning is logged to the Application source and event logs are disabled.
In CreateHostBuilder of Program.cs:
Host.CreateDefaultBuilder(args)
    .UseWindowsService()
    ...
The following sample apps accompany this topic:
- Background Worker Service Sample: A non-web app sample based on the Worker Service template that uses hosted services for background tasks.
- Web App Service Sample: A Razor Pages web app sample that runs as a Windows Service with hosted services for background tasks.
For MVC guidance, see the articles under xref:mvc/overview and xref:migration/22-to-30.
Deployment type
For information and advice on deployment scenarios, see .NET Core application deployment.
SDK
For a web app-based service that uses the Razor Pages or MVC frameworks, specify the Web SDK in the project file:
<Project Sdk="Microsoft.NET.Sdk.Web">
If the service only executes background tasks (for example, hosted services), specify the Worker SDK in the project file:
<Project Sdk="Microsoft.NET.Sdk.Worker">
Framework-dependent deployment (FDD)
Framework-dependent deployment (FDD) relies on the presence of a shared system-wide version of .NET Core on the target system. When the FDD scenario is adopted following the guidance in this article, the SDK produces an executable (.exe), called a framework-dependent executable.
If using the Web SDK, a web.config file, which is normally produced when publishing an ASP.NET Core app, is unnecessary for a Windows Services app. To disable the creation of the web.config file, add the <IsTransformWebConfigDisabled> property set to true.
<PropertyGroup>
  <TargetFramework>netcoreapp3.0</TargetFramework>
  <IsTransformWebConfigDisabled>true</IsTransformWebConfigDisabled>
</PropertyGroup>
Self-contained deployment (SCD)
Self-contained deployment (SCD) doesn’t rely on the presence of a shared framework on the host system. The runtime and the app’s dependencies are deployed with the app.
A Windows Runtime Identifier (RID) is included in the <PropertyGroup> that contains the target framework:
<RuntimeIdentifier>win7-x64</RuntimeIdentifier>
To publish for multiple RIDs:
- Provide the RIDs in a semicolon-delimited list.
- Use the property name <RuntimeIdentifiers> (plural).
For more information, see .NET Core RID Catalog.
Service user account
To create a user account for a service, use the New-LocalUser cmdlet from an administrative PowerShell 6 command shell.
On Windows 10 October 2018 Update (version 1809/build 10.0.17763) or later:
New-LocalUser -Name {SERVICE NAME}
On Windows OS earlier than the Windows 10 October 2018 Update (version 1809/build 10.0.17763):
powershell -Command "New-LocalUser -Name {SERVICE NAME}"
Provide a strong password when prompted.
Unless the -AccountExpires parameter is supplied to the New-LocalUser cmdlet with an expiration xref:System.DateTime, the account doesn’t expire.
For more information, see Microsoft.PowerShell.LocalAccounts and Service User Accounts.
An alternative approach to managing users when using Active Directory is to use Managed Service Accounts. For more information, see Group Managed Service Accounts Overview.
Log on as a service rights
To establish Log on as a service rights for a service user account:
- Open the Local Security Policy editor by running secpol.msc.
- Expand the Local Policies node and select User Rights Assignment.
- Open the Log on as a service policy.
- Select Add User or Group.
- Provide the object name (user account) using either of the following approaches:
- Type the user account (
{DOMAIN OR COMPUTER NAMEUSER}) in the object name field and select OK to add the user to the policy. - Select Advanced. Select Find Now. Select the user account from the list. Select OK. Select OK again to add the user to the policy.
- Type the user account (
- Select OK or Apply to accept the changes.
Create and manage the Windows Service
Create a service
Use PowerShell commands to register a service. From an administrative PowerShell 6 command shell, execute the following commands:
$acl = Get-Acl "{EXE PATH}"
$aclRuleArgs = "{DOMAIN OR COMPUTER NAMEUSER}", "Read,Write,ReadAndExecute", "ContainerInherit,ObjectInherit", "None", "Allow"
$accessRule = New-Object System.Security.AccessControl.FileSystemAccessRule($aclRuleArgs)
$acl.SetAccessRule($accessRule)
$acl | Set-Acl "{EXE PATH}"

New-Service -Name {SERVICE NAME} -BinaryPathName "{EXE FILE PATH}" -Credential "{DOMAIN OR COMPUTER NAMEUSER}" -Description "{DESCRIPTION}" -DisplayName "{DISPLAY NAME}" -StartupType Automatic
{EXE PATH}: Path of the app’s executable on the host (for example,d:myservice). Don’t include the app’s executable file name in the path. A trailing slash isn’t required.{DOMAIN OR COMPUTER NAMEUSER}: Service user account (for example,ContosoServiceUser).{SERVICE NAME}: Service name (for example,MyService).{EXE FILE PATH}: The app’s full executable path (for example,d:myservicemyservice.exe). Include the executable’s file name with extension.{DESCRIPTION}: Service description (for example,My sample service).{DISPLAY NAME}: Service display name (for example,My Service).
Start a service
Start a service with the following PowerShell 6 command:
Start-Service -Name {SERVICE NAME}
The command takes a few seconds to start the service.
Determine a service’s status
To check the status of a service, use the following PowerShell 6 command:
Get-Service -Name {SERVICE NAME}
The status is reported as one of the following values:
StartingRunningStoppingStopped
Stop a service
Stop a service with the following PowerShell 6 command:
Stop-Service -Name {SERVICE NAME}
Remove a service
After a short delay to stop a service, remove a service with the following PowerShell 6 command:
Remove-Service -Name {SERVICE NAME}
Proxy server and load balancer scenarios
Services that interact with requests from the Internet or a corporate network and are behind a proxy or load balancer might require additional configuration. For more information, see xref:host-and-deploy/proxy-load-balancer.
Configure endpoints
By default, ASP.NET Core binds to http://localhost:5000. Configure the URL and port by setting the ASPNETCORE_URLS environment variable.
For additional URL and port configuration approaches, see the relevant server article:
- xref:fundamentals/servers/kestrel/endpoints
- xref:fundamentals/servers/httpsys#configure-windows-server
The preceding guidance covers support for HTTPS endpoints. For example, configure the app for HTTPS when authentication is used with a Windows Service.
[!NOTE]
Use of the ASP.NET Core HTTPS development certificate to secure a service endpoint isn’t supported.
Current directory and content root
The current working directory returned by calling xref:System.IO.Directory.GetCurrentDirectory%2A for a Windows Service is the C:WINDOWSsystem32 folder. The system32 folder isn’t a suitable location to store a service’s files (for example, settings files). Use one of the following approaches to maintain and access a service’s assets and settings files.
Use ContentRootPath or ContentRootFileProvider
Use IHostEnvironment.ContentRootPath or xref:Microsoft.Extensions.Hosting.IHostEnvironment.ContentRootFileProvider to locate an app’s resources.
When the app runs as a service, xref:Microsoft.Extensions.Hosting.WindowsServiceLifetimeHostBuilderExtensions.UseWindowsService%2A sets the xref:Microsoft.Extensions.Hosting.IHostEnvironment.ContentRootPath to AppContext.BaseDirectory.
The app’s default settings files, appsettings.json and appsettings.{Environment}.json, are loaded from the app’s content root by calling CreateDefaultBuilder during host construction.
For other settings files loaded by developer code in xref:Microsoft.Extensions.Hosting.HostBuilder.ConfigureAppConfiguration%2A, there’s no need to call xref:Microsoft.Extensions.Configuration.FileConfigurationExtensions.SetBasePath%2A. In the following example, the custom_settings.json file exists in the app’s content root and is loaded without explicitly setting a base path:
:::code language=»csharp» source=»windows-service/samples_snapshot/CustomSettingsExample.cs» highlight=»13″:::
Don’t attempt to use xref:System.IO.Directory.GetCurrentDirectory%2A to obtain a resource path because a Windows Service app returns the C:WINDOWSsystem32 folder as its current directory.
Store a service’s files in a suitable location on disk
Specify an absolute path with xref:Microsoft.Extensions.Configuration.FileConfigurationExtensions.SetBasePath%2A when using an xref:Microsoft.Extensions.Configuration.IConfigurationBuilder to the folder containing the files.
Troubleshoot
To troubleshoot a Windows Service app, see xref:test/troubleshoot.
Common errors
- An old or pre-release version of PowerShell is in use.
- The registered service doesn’t use the app’s published output from the dotnet publish command. Output of the dotnet build command isn’t supported for app deployment. Published assets are found in either of the following folders depending on the deployment type:
- bin/Release/{TARGET FRAMEWORK}/publish (FDD)
- bin/Release/{TARGET FRAMEWORK}/{RUNTIME IDENTIFIER}/publish (SCD)
- The service isn’t in the RUNNING state.
- The paths to resources that the app uses (for example, certificates) are incorrect. The base path of a Windows Service is c:WindowsSystem32.
- The user doesn’t have Log on as a service rights.
- The user’s password is expired or incorrectly passed when executing the
New-ServicePowerShell command. - The app requires ASP.NET Core authentication but isn’t configured for secure connections (HTTPS).
- The request URL port is incorrect or not configured correctly in the app.
System and Application Event Logs
Access the System and Application Event Logs:
- Open the Start menu, search for Event Viewer, and select the Event Viewer app.
- In Event Viewer, open the Windows Logs node.
- Select System to open the System Event Log. Select Application to open the Application Event Log.
- Search for errors associated with the failing app.
Run the app at a command prompt
Many startup errors don’t produce useful information in the event logs. You can find the cause of some errors by running the app at a command prompt on the hosting system. To log additional detail from the app, lower the log level or run the app in the Development environment.
Clear package caches
A functioning app may fail immediately after upgrading either the .NET Core SDK on the development machine or changing package versions within the app. In some cases, incoherent packages may break an app when performing major upgrades. Most of these issues can be fixed by following these instructions:
-
Delete the bin and obj folders.
-
Clear the package caches by executing dotnet nuget locals all —clear from a command shell.
Clearing package caches can also be accomplished with the nuget.exe tool and executing the command
nuget locals all -clear. nuget.exe isn’t a bundled install with the Windows desktop operating system and must be obtained separately from the NuGet website. -
Restore and rebuild the project.
-
Delete all of the files in the deployment folder on the server prior to redeploying the app.
Slow or unresponsive app
A crash dump is a snapshot of the system’s memory and can help determine the cause of an app crash, startup failure, or slow app.
App crashes or encounters an exception
Obtain and analyze a dump from Windows Error Reporting (WER):
-
Create a folder to hold crash dump files at
c:dumps. -
Run the EnableDumps PowerShell script with the application executable name:
.EnableDumps {APPLICATION EXE} c:dumps -
Run the app under the conditions that cause the crash to occur.
-
After the crash has occurred, run the DisableDumps PowerShell script:
.DisableDumps {APPLICATION EXE}
After an app crashes and dump collection is complete, the app is allowed to terminate normally. The PowerShell script configures WER to collect up to five dumps per app.
[!WARNING]
Crash dumps might take up a large amount of disk space (up to several gigabytes each).
App is unresponsive, fails during startup, or runs normally
When an app hangs (stops responding but doesn’t crash), fails during startup, or runs normally, see User-Mode Dump Files: Choosing the Best Tool to select an appropriate tool to produce the dump.
Analyze the dump
A dump can be analyzed using several approaches. For more information, see Analyzing a User-Mode Dump File.
Additional resources
- Kestrel endpoint configuration (includes HTTPS configuration and SNI support)
- xref:fundamentals/host/generic-host
- xref:test/troubleshoot
:::moniker-end
:::moniker range=»< aspnetcore-5.0″
An ASP.NET Core app can be hosted on Windows as a Windows Service without using IIS. When hosted as a Windows Service, the app automatically starts after server reboots.
View or download sample code (how to download)
Prerequisites
- ASP.NET Core SDK 2.1 or later
- PowerShell 6.2 or later
Worker Service template
The ASP.NET Core Worker Service template provides a starting point for writing long running service apps. To use the template as a basis for a Windows Service app:
- Create a Worker Service app from the .NET Core template.
- Follow the guidance in the App configuration section to update the Worker Service app so that it can run as a Windows Service.
[!INCLUDE]
App configuration
The app requires a package reference for Microsoft.Extensions.Hosting.WindowsServices.
IHostBuilder.UseWindowsService is called when building the host. If the app is running as a Windows Service, the method:
- Sets the host lifetime to
WindowsServiceLifetime. - Sets the content root to AppContext.BaseDirectory. For more information, see the Current directory and content root section.
- Enables logging to the event log:
- The application name is used as the default source name.
- The default log level is Warning or higher for an app based on an ASP.NET Core template that calls
CreateDefaultBuilderto build the host. - Override the default log level with the
Logging:EventLog:LogLevel:Defaultkey inappsettings.json/appsettings.{Environment}.jsonor other configuration provider. - Only administrators can create new event sources. When an event source can’t be created using the application name, a warning is logged to the Application source and event logs are disabled.
In CreateHostBuilder of Program.cs:
Host.CreateDefaultBuilder(args)
    .UseWindowsService()
    ...
The following sample apps accompany this topic:
- Background Worker Service Sample: A non-web app sample based on the Worker Service template that uses hosted services for background tasks.
- Web App Service Sample: A Razor Pages web app sample that runs as a Windows Service with hosted services for background tasks.
For MVC guidance, see the articles under xref:mvc/overview and xref:migration/22-to-30.
Deployment type
For information and advice on deployment scenarios, see .NET Core application deployment.
SDK
For a web app-based service that uses the Razor Pages or MVC frameworks, specify the Web SDK in the project file:
<Project Sdk="Microsoft.NET.Sdk.Web">
If the service only executes background tasks (for example, hosted services), specify the Worker SDK in the project file:
<Project Sdk="Microsoft.NET.Sdk.Worker">
Framework-dependent deployment (FDD)
Framework-dependent deployment (FDD) relies on the presence of a shared system-wide version of .NET Core on the target system. When the FDD scenario is adopted following the guidance in this article, the SDK produces an executable (.exe), called a framework-dependent executable.
If using the Web SDK, a web.config file, which is normally produced when publishing an ASP.NET Core app, is unnecessary for a Windows Services app. To disable the creation of the web.config file, add the <IsTransformWebConfigDisabled> property set to true.
<PropertyGroup>
  <TargetFramework>netcoreapp3.0</TargetFramework>
  <IsTransformWebConfigDisabled>true</IsTransformWebConfigDisabled>
</PropertyGroup>
Self-contained deployment (SCD)
Self-contained deployment (SCD) doesn’t rely on the presence of a shared framework on the host system. The runtime and the app’s dependencies are deployed with the app.
A Windows Runtime Identifier (RID) is included in the <PropertyGroup> that contains the target framework:
<RuntimeIdentifier>win7-x64</RuntimeIdentifier>
To publish for multiple RIDs:
- Provide the RIDs in a semicolon-delimited list.
- Use the property name <RuntimeIdentifiers> (plural).
For more information, see .NET Core RID Catalog.
Service user account
To create a user account for a service, use the New-LocalUser cmdlet from an administrative PowerShell 6 command shell.
On Windows 10 October 2018 Update (version 1809/build 10.0.17763) or later:
New-LocalUser -Name {SERVICE NAME}
On Windows OS earlier than the Windows 10 October 2018 Update (version 1809/build 10.0.17763):
powershell -Command "New-LocalUser -Name {SERVICE NAME}"
Provide a strong password when prompted.
Unless the -AccountExpires parameter is supplied to the New-LocalUser cmdlet with an expiration xref:System.DateTime, the account doesn’t expire.
For more information, see Microsoft.PowerShell.LocalAccounts and Service User Accounts.
An alternative approach to managing users when using Active Directory is to use Managed Service Accounts. For more information, see Group Managed Service Accounts Overview.
Log on as a service rights
To establish Log on as a service rights for a service user account:
- Open the Local Security Policy editor by running secpol.msc.
- Expand the Local Policies node and select User Rights Assignment.
- Open the Log on as a service policy.
- Select Add User or Group.
- Provide the object name (user account) using either of the following approaches:
- Type the user account (
{DOMAIN OR COMPUTER NAMEUSER}) in the object name field and select OK to add the user to the policy. - Select Advanced. Select Find Now. Select the user account from the list. Select OK. Select OK again to add the user to the policy.
- Type the user account (
- Select OK or Apply to accept the changes.
Create and manage the Windows Service
Create a service
Use PowerShell commands to register a service. From an administrative PowerShell 6 command shell, execute the following commands:
$acl = Get-Acl "{EXE PATH}"
$aclRuleArgs = "{DOMAIN OR COMPUTER NAMEUSER}", "Read,Write,ReadAndExecute", "ContainerInherit,ObjectInherit", "None", "Allow"
$accessRule = New-Object System.Security.AccessControl.FileSystemAccessRule($aclRuleArgs)
$acl.SetAccessRule($accessRule)
$acl | Set-Acl "{EXE PATH}"

New-Service -Name {SERVICE NAME} -BinaryPathName "{EXE FILE PATH}" -Credential "{DOMAIN OR COMPUTER NAMEUSER}" -Description "{DESCRIPTION}" -DisplayName "{DISPLAY NAME}" -StartupType Automatic
{EXE PATH}: Path of the app’s executable on the host (for example,d:myservice). Don’t include the app’s executable file name in the path. A trailing slash isn’t required.{DOMAIN OR COMPUTER NAMEUSER}: Service user account (for example,ContosoServiceUser).{SERVICE NAME}: Service name (for example,MyService).{EXE FILE PATH}: The app’s full executable path (for example,d:myservicemyservice.exe). Include the executable’s file name with extension.{DESCRIPTION}: Service description (for example,My sample service).{DISPLAY NAME}: Service display name (for example,My Service).
Start a service
Start a service with the following PowerShell 6 command:
Start-Service -Name {SERVICE NAME}
The command takes a few seconds to start the service.
Determine a service’s status
To check the status of a service, use the following PowerShell 6 command:
Get-Service -Name {SERVICE NAME}
The status is reported as one of the following values:
StartingRunningStoppingStopped
Stop a service
Stop a service with the following PowerShell 6 command:
Stop-Service -Name {SERVICE NAME}
Remove a service
After a short delay to stop a service, remove a service with the following PowerShell 6 command:
Remove-Service -Name {SERVICE NAME}
Proxy server and load balancer scenarios
Services that interact with requests from the Internet or a corporate network and are behind a proxy or load balancer might require additional configuration. For more information, see xref:host-and-deploy/proxy-load-balancer.
Configure endpoints
By default, ASP.NET Core binds to http://localhost:5000. Configure the URL and port by setting the ASPNETCORE_URLS environment variable.
For additional URL and port configuration approaches, see the relevant server article:
- xref:fundamentals/servers/kestrel#endpoint-configuration
- xref:fundamentals/servers/httpsys#configure-windows-server
The preceding guidance covers support for HTTPS endpoints. For example, configure the app for HTTPS when authentication is used with a Windows Service.
[!NOTE]
Use of the ASP.NET Core HTTPS development certificate to secure a service endpoint isn’t supported.
Current directory and content root
The current working directory returned by calling xref:System.IO.Directory.GetCurrentDirectory%2A for a Windows Service is the C:WINDOWSsystem32 folder. The system32 folder isn’t a suitable location to store a service’s files (for example, settings files). Use one of the following approaches to maintain and access a service’s assets and settings files.
Use ContentRootPath or ContentRootFileProvider
Use IHostEnvironment.ContentRootPath or xref:Microsoft.Extensions.Hosting.IHostEnvironment.ContentRootFileProvider to locate an app’s resources.
When the app runs as a service, xref:Microsoft.Extensions.Hosting.WindowsServiceLifetimeHostBuilderExtensions.UseWindowsService%2A sets the xref:Microsoft.Extensions.Hosting.IHostEnvironment.ContentRootPath to AppContext.BaseDirectory.
The app’s default settings files, appsettings.json and appsettings.{Environment}.json, are loaded from the app’s content root by calling CreateDefaultBuilder during host construction.
For other settings files loaded by developer code in xref:Microsoft.Extensions.Hosting.HostBuilder.ConfigureAppConfiguration%2A, there’s no need to call xref:Microsoft.Extensions.Configuration.FileConfigurationExtensions.SetBasePath%2A. In the following example, the custom_settings.json file exists in the app’s content root and is loaded without explicitly setting a base path:
:::code language=»csharp» source=»windows-service/samples_snapshot/CustomSettingsExample.cs» highlight=»13″:::
Don’t attempt to use xref:System.IO.Directory.GetCurrentDirectory%2A to obtain a resource path because a Windows Service app returns the C:WINDOWSsystem32 folder as its current directory.
Store a service’s files in a suitable location on disk
Specify an absolute path with xref:Microsoft.Extensions.Configuration.FileConfigurationExtensions.SetBasePath%2A when using an xref:Microsoft.Extensions.Configuration.IConfigurationBuilder to the folder containing the files.
Troubleshoot
To troubleshoot a Windows Service app, see xref:test/troubleshoot.
Common errors
- An old or pre-release version of PowerShell is in use.
- The registered service doesn’t use the app’s published output from the dotnet publish command. Output of the dotnet build command isn’t supported for app deployment. Published assets are found in either of the following folders depending on the deployment type:
- bin/Release/{TARGET FRAMEWORK}/publish (FDD)
- bin/Release/{TARGET FRAMEWORK}/{RUNTIME IDENTIFIER}/publish (SCD)
- The service isn’t in the RUNNING state.
- The paths to resources that the app uses (for example, certificates) are incorrect. The base path of a Windows Service is c:WindowsSystem32.
- The user doesn’t have Log on as a service rights.
- The user’s password is expired or incorrectly passed when executing the
New-ServicePowerShell command. - The app requires ASP.NET Core authentication but isn’t configured for secure connections (HTTPS).
- The request URL port is incorrect or not configured correctly in the app.
System and Application Event Logs
Access the System and Application Event Logs:
- Open the Start menu, search for Event Viewer, and select the Event Viewer app.
- In Event Viewer, open the Windows Logs node.
- Select System to open the System Event Log. Select Application to open the Application Event Log.
- Search for errors associated with the failing app.
Run the app at a command prompt
Many startup errors don’t produce useful information in the event logs. You can find the cause of some errors by running the app at a command prompt on the hosting system. To log additional detail from the app, lower the log level or run the app in the Development environment.
Clear package caches
A functioning app may fail immediately after upgrading either the .NET Core SDK on the development machine or changing package versions within the app. In some cases, incoherent packages may break an app when performing major upgrades. Most of these issues can be fixed by following these instructions:
-
Delete the bin and obj folders.
-
Clear the package caches by executing dotnet nuget locals all —clear from a command shell.
Clearing package caches can also be accomplished with the nuget.exe tool and executing the command
nuget locals all -clear. nuget.exe isn’t a bundled install with the Windows desktop operating system and must be obtained separately from the NuGet website. -
Restore and rebuild the project.
-
Delete all of the files in the deployment folder on the server prior to redeploying the app.
Slow or unresponsive app
A crash dump is a snapshot of the system’s memory and can help determine the cause of an app crash, startup failure, or slow app.
App crashes or encounters an exception
Obtain and analyze a dump from Windows Error Reporting (WER):
-
Create a folder to hold crash dump files at
c:dumps. -
Run the EnableDumps PowerShell script with the application executable name:
.EnableDumps {APPLICATION EXE} c:dumps -
Run the app under the conditions that cause the crash to occur.
-
After the crash has occurred, run the DisableDumps PowerShell script:
.DisableDumps {APPLICATION EXE}
After an app crashes and dump collection is complete, the app is allowed to terminate normally. The PowerShell script configures WER to collect up to five dumps per app.
[!WARNING]
Crash dumps might take up a large amount of disk space (up to several gigabytes each).
App is unresponsive, fails during startup, or runs normally
When an app hangs (stops responding but doesn’t crash), fails during startup, or runs normally, see User-Mode Dump Files: Choosing the Best Tool to select an appropriate tool to produce the dump.
Analyze the dump
A dump can be analyzed using several approaches. For more information, see Analyzing a User-Mode Dump File.
Additional resources
- Kestrel endpoint configuration (includes HTTPS configuration and SNI support)
- xref:fundamentals/host/generic-host
- xref:test/troubleshoot
:::moniker-end
You’ve got a couple of options here — use Microsoft’s WebHostService class, inherit WebHostService or write your own. The reason for the latter being that using Microsoft’s implementation, we cannot write a generic extension method with a type parameter inheriting WebHostService since this class does not contain a parameterless constructor nor can we access the service locator.
Using WebHostService
In this example, I’m going to create a Console Application that uses Microsoft.DotNet.Web.targets, outputs an .exe and operates as a MVC app (Views, Controllers, etc). I assume that creating the Console Application, changing the targets in the .xproj and modifying the project.json to have proper publish options and copying the Views, Controllers and webroot from the standard .NET Core web app template — is trivial.
Now the essential part:
-
Get this package and make sure your framework in project.json file is net451 (or newer)
-
Make sure the content root in the entry point is properly set to the publish directory of the application .exe file and that the RunAsService() extension method is called. E.g:
public static void Main(string[] args)
{
    var exePath= System.Diagnostics.Process.GetCurrentProcess().MainModule.FileName;
    var directoryPath = Path.GetDirectoryName(exePath);

    var host = new WebHostBuilder()
        .UseKestrel()
        .UseContentRoot(directoryPath)
        .UseStartup<Startup>()
        .Build();

    if (Debugger.IsAttached || args.Contains("--debug"))
    {
        host.Run();
    }
    else
    {
        host.RunAsService();
    }
}
The .exe can now easily be installed using the following command
sc create MyService binPath = "FullPathToTheConsolefile.exe"
Once the service is started, the web application is hosted and successfully finds and renders its Views.
Inherit WebHostService
One major benefit of this approach is that this lets us override the OnStopping, OnStarting and OnStarted methods.
Let’s assume that the following is our custom class that inherits WebHostService
internal class CustomWebHostService : WebHostService
{
    public CustomWebHostService(IWebHost host) : base(host)
    {
    }

    protected override void OnStarting(string[] args)
    {
        // Log
        base.OnStarting(args);
    }

    protected override void OnStarted()
    {
        // More log
        base.OnStarted();
    }

    protected override void OnStopping()
    {
        // Even more log
        base.OnStopping();
    }
}
Following the steps above, we have to write down our own extension method that runs the host using our custom class:
public static class CustomWebHostWindowsServiceExtensions
{
    public static void RunAsCustomService(this IWebHost host)
    {
        var webHostService = new CustomWebHostService(host);
        ServiceBase.Run(webHostService);
    }
}
The only line that remains to be changed from the previous example of the entry point is the else statement in the end, it has to call the proper extension method
host.RunAsCustomService();
Finally, installing the service using the same steps as above.
sc create MyService binPath = "FullPathToTheConsolefile.exe"

![]()
In this article, we will be discussing how to deploy & host ASP.NET Core 3.1 Web API as a Windows Service. You may have one question in mind like why to host applications as windows service and why not on IIS. So in this article, we will see reasons behind hosting applications as windows service and we will be creating a Web API & host it as windows service. Let’s grab a cup of coffee and start coding.
What is Windows Service?
According to the Microsoft documentation:
Microsoft Windows services, formerly known as NT services, enable you to create long-running executable applications that run in their own Windows sessions. These services can be automatically started when the computer boots, can be paused and restarted, and do not show any user interface. These features make services ideal for use on a server or whenever you need long-running functionality that does not interfere with other users who are working on the same computer. You can also run services in the security context of a specific user account that is different from the logged-on user or the default computer account.
In most of the scenarios where we have to make application long-running then Windows service is the best option. Windows services require an exe i.e executable of our application.
Why to deploy Applications as Windows Service
When we create an application we have to host it somewhere so that users can access it. We can either host it on IIS or as windows service. So below are the few reasons for hosting application as Windows service are:
- Sometimes we host application on IIS but we don’t utilize full features of IIS.
- If the machine where we are hosting web application does not have IIS enabled or if it IIS enabled but not configure to host .NET Core application.
We have already discussed we require executable for hosting application as Windows service. So to do this .NET Core provides one deployment mode called Self-contained deployment (SCD). When we published our app as SCD then it will provide the executable of our app along with .NET Core runtime DLLs. If you don’t know about the different hosting and deployment models in .NET Core then you can check out my below articles:
Hosting ASP.NET Core 3.1 Web API as Windows service
So now its time to actually host application as Windows service. First, we have to create basic ASP.NET Core 3.1 Web API. Those who don’t know how to create then follow below steps.
Open Visual Studio 19 and also make sure .NET Core 3.1 is installed on your machine. Create a new project and select ASP.NET Core Web Application template and click on next:

Give a proper name for your application and click on Create button:
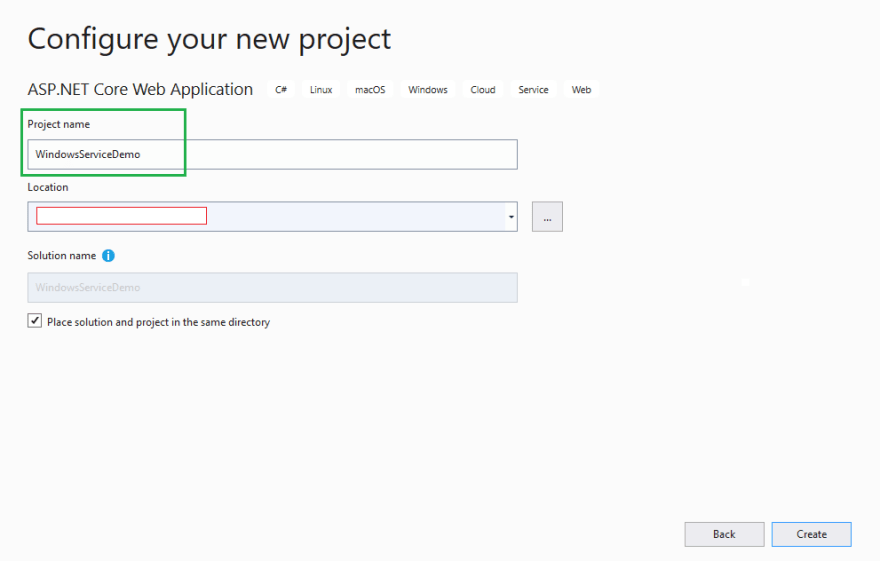
Select ASP.NET Core 3.1 in the dropdown and select API and click on Create button:

That’s it we have created our Web API.

Next step is we have to install a NuGet package.

Or
run below command in Nuget package manager console
Install-Package Microsoft.Extensions.Hosting.WindowsServices
Enter fullscreen mode
Exit fullscreen mode
Now there is only one line of code for convert Web API as Windows service. Open your Program.cs and you will see the CreateHostBuilder method so add UseWindowsService() at the end of the method.
public static IHostBuilder CreateHostBuilder(string[] args) =>
            Host.CreateDefaultBuilder(args)
                .ConfigureWebHostDefaults(webBuilder =>
                {
                    webBuilder.UseStartup<Startup>();
                }).UseWindowsService();
Enter fullscreen mode
Exit fullscreen mode
And that’s all the code changes required.
Now next step is to deploy the application in SCD mode. So right-click on the application and select Publish option.
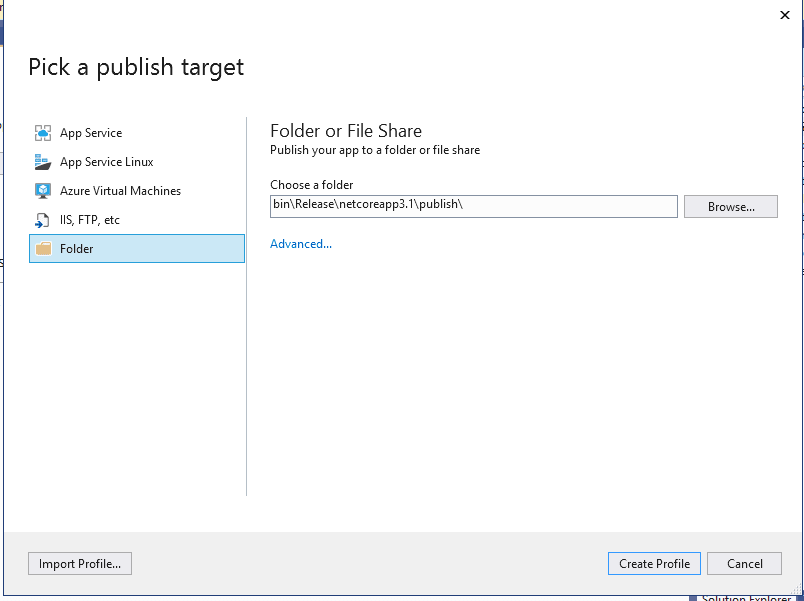
Select a publish target as Folder and click on Advanced.. button.

Select Deployment mode as Self-contained and Target Runtime as win-x64 and click on Save and then click on Create profile button.
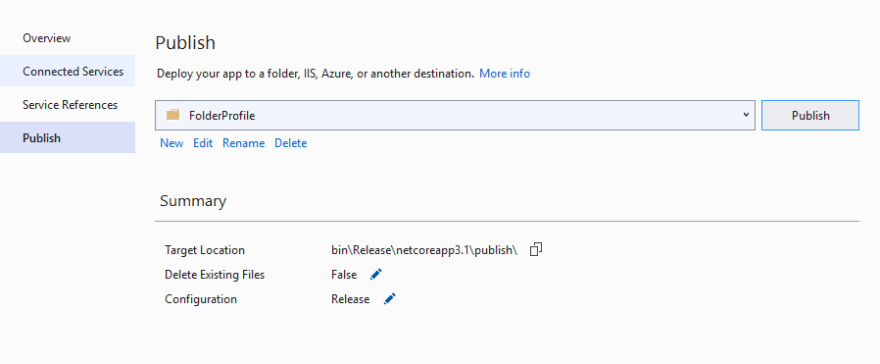
Finally, click on the Publish button to publish the app.
You can also publish your app using dotnet CLI by running below command:
dotnet publish -c Release -r win-x64 --self-contained
Enter fullscreen mode
Exit fullscreen mode
Go to binReleasenetcoreapp3.1 and you will find the win-x64 folder which contains our published dlls.
To create Windows service open a command prompt in administrator mode and use the below command:
sc create <name of service you want to create> binPath= <path of executable of your app>
Enter fullscreen mode
Exit fullscreen mode
So we will run the command as:
sc create WindowsServiceDemo binPath= "C:ProjectsWindowsServiceDemobinReleasenetcoreapp3.1win-x64WindowsServiceDemo.exe"
Enter fullscreen mode
Exit fullscreen mode
So our service is created.

Right-click on service and click on start. So our Web API is running on URL http://localhost:5000. Our API has only one controller at present so to check whether we will get output hit the URL http://localhost:5000/weatherforecast in a browser and you will see the response:

We have successfully hosted our ASP.NET Core 3.1 Web API as Windows service.
Conclusion
In this article, I have explained what is Windows service, reasons for hosting application as Windows service. Also, demonstrate how to host the ASP.NET Core 3.1 Web API as Windows Service.
I really hope that you enjoyed this article, share it with friends and please do not hesitate to send me your thoughts or comments.
You can follow me on twitter @sumitkharche01.
Happy Coding!
In this article, we are going to learn how to create a .NET Core Worker Service and run it as a Windows Service.
To download the source code for this article, you can visit our GitHub repository.
So let’s get started.
Windows Services in .NET Core
We may want to create long-running background services in .NET in specific scenarios. For instance, we might want to perform some processor-intensive tasks, queue some operations in the background or schedule some operations to execute at a later time. For all these purposes, we can make use of the BackgroundService class in .NET, which implements the IHostedService interface.
For implementing long-running services, we can create a class inheriting from the BackgroundService abstract class. Along with that, we’ll have to provide an implementation for the ExecuteAsync() method, which runs when the service starts. While implementing the ExecuteAsync() method, it should return a Task that represents the lifetime of the long-running operation. There is also an option to create our custom background service class by implementing the IHostedService interface if we wish to have more control over the background service functionality.
The background services that we create in .NET are cross-platform and support the inbuilt .NET features like logging, configuration, dependency injection, etc.
Creating the Project
For creating background services, we can use the Worker Service Template that is available with both the .NET CLI and Visual Studio. Worker Services allows for running background services through the use of a hosted service.
While creating a new project in Visual Studio, we can choose the Worker Service template.
On the other hand, If we are using the dotnet CLI, we can use the dotnet new command and specify the project type as worker:
dotnet new worker --name <project name>
Both these approaches will create a new project using the worker service template. Let’s examine the project in detail.
The Worker Service Template in .NET
A project we create using the worker service template will consist of 2 files – the Program class and the Worker class.
The Program class will contain the code to add the Worker class as a hosted service and run it:
IHost host = Host.CreateDefaultBuilder(args)
    .ConfigureServices(services =>
    {
        services.AddHostedService<Worker>();
    })
    .Build();

await host.RunAsync();
As we mentioned while explaining the windows services, any service that we implement should either inherit from the BackgroundService class or a custom implementation of it. Here, the Worker class contains the code for the service and it inherits from the BackgroundService class, which in turn implements the IHostedService interface:
public class Worker : BackgroundService
{
    private readonly ILogger<Worker> _logger;

    public Worker(ILogger<Worker> logger)
    {
        _logger = logger;
    }

    protected override async Task ExecuteAsync(CancellationToken stoppingToken)
    {
        while (!stoppingToken.IsCancellationRequested)
        {
            _logger.LogInformation("Worker running at: {time}", DateTimeOffset.Now);
            await Task.Delay(1000, stoppingToken);
        }
    }
}
An instance of ILogger is injected into the Worker class for the logging support. Additionally, there is the ExecuteAsync() method, which runs when the service starts. The default implementation of this method in the project template runs in a loop every second, logging the current date and time.
The Worker Service Template will provide the code for a simple background service and we can modify it to suit our requirements.
Wanna join Code Maze Team, help us produce more awesome .NET/C# content and get paid? >> JOIN US! <<
Configuring the Project
To have the support to host our application as a windows service, first, we need to install the Microsoft.Extensions.Hosting.WindowsServices NuGet package:
dotnet add package Microsoft.Extensions.Hosting.WindowsServices
After that, we need to modify the Program class by adding the UseWindowsService() class:
IHost host = Host.CreateDefaultBuilder(args)
    .UseWindowsService(options =>
    {
        options.ServiceName = "Code-Maze Service";
    })
    .ConfigureServices(services =>
    {
        services.AddHostedService<Worker>();
    })
    .Build();
The UseWindowsService() extension method configures the application to work as a windows service. Along with that, we have set the service name using the options.ServiceName property.
Similarly, let’s modify the ExecuteAsync() method of the Worker class to customize the log message:
protected override async Task ExecuteAsync(CancellationToken stoppingToken)
{
    while (!stoppingToken.IsCancellationRequested)
    {
        _logger.LogInformation("Code-Maze Service running at: {time}", DateTimeOffset.Now);
        await Task.Delay(60000, stoppingToken);
    }
}
Along with that, we change the logging interval to 1 minute as well. Now the service will log the message once every minute.
By default, the windows service will write logs into the Application Event Log and we can use the Event Viewer tool for viewing those. Also, by default, a windows service will write only logs of severity Warning and above into the Event Log. That said, we can configure this behavior in the appsettings file:
{
  "Logging": {
    "LogLevel": {
      "Default": "Information",
      "Microsoft.Hosting.Lifetime": "Information"
    },
    "EventLog": {
      "LogLevel": {
        "Default": "Information"
      }
    }
  }
}
By adding a new section for the Event Log, we can change the default Log Level to Information, which will log the information as well.
Wanna join Code Maze Team, help us produce more awesome .NET/C# content and get paid? >> JOIN US! <<
With that, our windows service project is ready.
Publishing the Project
The next step is publishing the app.
For publishing the app, we can right-click the project in the solution explorer and then click on the Publish option. For this example, we can choose to publish our app to a local folder. This will create a Publish Profile and we can provide the following settings:
- For the Configuration setting, we can choose
Release|Any CPU - We can choose the appropriate .NET version for the Target Framework setting
- From a portability standpoint, it is better to choose Deployment Mode as
Self-Contained - We can choose the appropriate Target Runtime. In this example, since we are using a 64-bit Windows system, we can choose
win-x64 - By using the Target Location setting, we can specify where to publish the output
In the File Publish Options, we are going to check several checkboxes:
- Produce Single File – This will produce the output combined into a single file
- Enable ReadyToRun Compilation – This will produce the output in Ready-to-Run format
After providing these settings, we can leave any other setting with the default values. Now we can publish the project by clicking the Publish button.
This will produce a standalone executable output of the service in the specified folder location.
Creating the Windows Service
For creating a Windows Service, we can use the Windows Service Control Manager (sc.exe) tool. The service control manager operations require higher permissions as we are working directly with the operating system and hence we need to run the commands in a Windows PowerShell console with Administrator privilege.
In the PowerShell console, we can use the sc.exe create command and provide the service name and path as arguments:
Wanna join Code Maze Team, help us produce more awesome .NET/C# content and get paid? >> JOIN US! <<
sc.exe create "Code-Maze Service" binpath="C:serviceCodeMazeWorkerService.exe"
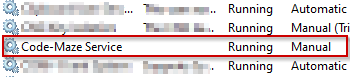
Once the command executes successfully, it will create a new windows service with the name Code-Maze Service and return the output:
[SC] CreateService SUCCESS
We can verify the newly created service in the Windows Service Management Console:
By default, the service might be in the stopped state and we will have to start it manually by using the sc.exe start command:
sc.exe start "Code-Maze Service"
Once the command executes successfully, it will provide an output similar to this one:
SERVICE_NAME: Code-Maze Service
        TYPE               : 10  WIN32_OWN_PROCESS
        STATE              : 2  START_PENDING
                                (NOT_STOPPABLE, NOT_PAUSABLE, IGNORES_SHUTDOWN)
        WIN32_EXIT_CODE    : 0  (0x0)
        SERVICE_EXIT_CODE  : 0  (0x0)
        CHECKPOINT         : 0x0
        WAIT_HINT          : 0x7d0
        PID                : 6720
        FLAGS
This will start the windows service and it will continue to run in the background.
Verifying the Windows Service
Now we are going to verify that the windows service works as expected. For that, let’s open the Event Viewer.
Remember that we implemented the service to write a log once every minute. Within the Event Viewer, we can find the logs in the Windows Logs -> Application node. We are going to see a bunch of events related to our service there:
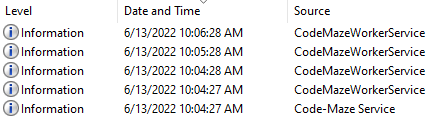
As soon as the service starts, the Windows Service Manager logs an event with the source as the service name. The first event with the source name Code-Maze Service corresponds to that. We can verify this by opening that event. The event details will contain the corresponding message and details:
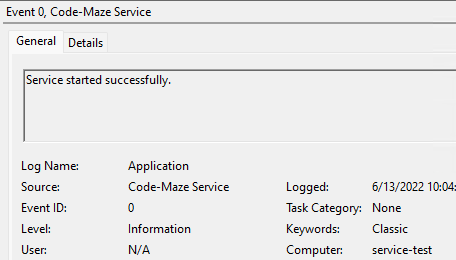
Apart from that, while the service is running, it logs an event every minute with the source matching the app’s namespace. All the subsequent events with the source name CodeMazeWorkerService correspond to those. We can verify this by opening those events. Those events will contain the message that the service logs:
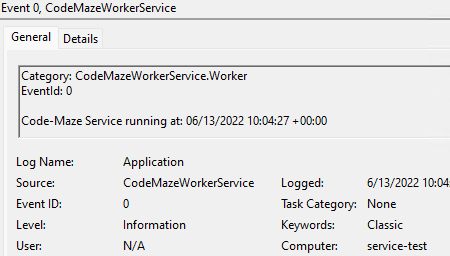
Wanna join Code Maze Team, help us produce more awesome .NET/C# content and get paid? >> JOIN US! <<
Great! We have verified that the windows service works as expected.
Removing the Windows Service
Once we create a windows service, it keeps on running in the background. For removing a windows service from the system, we have to first stop it and then delete it.
For stopping a windows service, we can use the sc.exe stop command:
sc.exe stop "Code-Maze Service"
This will stop the service and provide a similar response:
SERVICE_NAME: Code-Maze Service
        TYPE               : 10  WIN32_OWN_PROCESS
        STATE              : 3  STOP_PENDING
                                (STOPPABLE, NOT_PAUSABLE, ACCEPTS_SHUTDOWN)
        WIN32_EXIT_CODE    : 0  (0x0)
        SERVICE_EXIT_CODE  : 0  (0x0)
        CHECKPOINT         : 0x0
        WAIT_HINT          : 0x0
Even though this will stop the service, we can still find the service in the Services Console. This is particularly useful when we just need to stop the service temporarily and may want to start it later.
On the other hand, if we no longer need the service, we can delete it using the sc.exe delete command:
sc.exe delete "Code-Maze Service"
Wanna join Code Maze Team, help us produce more awesome .NET/C# content and get paid? >> JOIN US! <<
This will remove the service from the system and give the response:
[SC] DeleteService SUCCESS
Now if we check the Services Console, we cannot find the service as it will be completely removed from the system.
Conclusion
In this article, we discussed the Worker Service template in .NET Core and how to create a Windows Service Project using it. Additionally, we learned how to create and configure a Windows Service.
ASP.NET Core 2.1 introduces new application host for Windows services. We can now run ASP.NET Core applications as Windows services with minimal effort. This blog post introduces how it is done and how to build and run Windows services on ASP.NET Core without any need for dirty hacks.
Creating default web application
We start with new default ASP.NET Core 2.1 web application.

I don’t configure HTTPS at this moment as this is sample application and it does nothing important.
By deafult Program class looks like this.
public class Program
{
public static void Main(string[] args)
{
CreateWebHostBuilder(args).Build().Run();
}public static IWebHostBuilder CreateWebHostBuilder(string[] args) =>
WebHost.CreateDefaultBuilder(args)
.UseStartup<Startup>();
}
Now we have working default application and it’s time to focus to Windows service.
Running ASP.NET Core application as Windows service
Running application as Windows service takes some effort before we can open browser and see it running under service. First we have to specify runtime for our application as ASP.NET Core supports also operating systems and architectures where Windows services doesn’t run. For this we have to modify project file.
<Project Sdk="Microsoft.NET.Sdk.Web"><PropertyGroup>
<TargetFramework>netcoreapp2.1</TargetFramework>
<RuntimeIdentifier>win7-x64</RuntimeIdentifier>
</PropertyGroup><ItemGroup>
<PackageReference Include="Microsoft.AspNetCore.App" />
</ItemGroup></Project>
Next add reference to NuGet package Microsoft.AspNetCore.Hosting.WindowsServices. This package has everything needed to run ASP.NET Core application as Windows service.
NB! For me newest version 2.1.1 of Microsoft.AspNetCore.Hosting.WindowsServices conflicted with ASP.NET Core 2.1.0 and I webt with version 2.1.0 instead.
We have to modify also Main() method of Program class. In its simplest form Main() method looks like this.
public static void Main(string[] args)
{
var pathToExe = Process.GetCurrentProcess().MainModule.FileName;
var pathToContentRoot = Path.GetDirectoryName(pathToExe);var host = WebHost.CreateDefaultBuilder(args)
.UseContentRoot(pathToContentRoot)
.UseStartup<Startup>()
.Build();host.RunAsService();
}
All we have to do now is to publish our application, register it as a Windows service and start the service.
Running application as service or on console
Those who have built Windows services before know very well that debugging of services can be pain in one specific anatomic area as after building the service one has to deplpy new version of it, attach debugger etc. There is simple way around – we make our Windows service run also as a console application that is easy to run on debugger from Visual Studio.
We can apply the same trick also with ASP.NET Core application that is running as Windows service.
public static void Main(string[] args)
{
var isService = !(Debugger.IsAttached || args.Contains("--console"));
var pathToContentRoot = Directory.GetCurrentDirectory();
var webHostArgs = args.Where(arg => arg != "--console").ToArray();if (isService)
{
var pathToExe = Process.GetCurrentProcess().MainModule.FileName;
pathToContentRoot = Path.GetDirectoryName(pathToExe);
}var host = WebHost.CreateDefaultBuilder(webHostArgs)
.UseContentRoot(pathToContentRoot)
.UseStartup<Startup>()
.Build();if (isService)
{
host.RunAsService();
}
else
{
host.Run();
}
}
The code shown may seem a little tricky. Here are my explanations:
- To run application on console from Visual Studio we control if debugger is attached. If we want to run application as console application outside from Visual Studio we can use –console argument.
- When application runs as web application under web server we must use current directory as content root. But when application runs as a service we need executable path as content root.
- We remove –console argument as ASP.NET Core expects all arguments to be name-value pairs.
Now try to run application from Visual Studio. It starts as a usual web application.
Making application run as Windows service
To make application run as Windows service we need some additional steps.
- Publish application to some folder
- Open command line in administrative permissions
- Register application as Windows service using command (space after “binPath=“ is mandatory)
sc create AspNetWindowsService binPath= “path to my application exe”
- Start service
sc start AspNetWindowsService
- When service starts open browser and navigate to http://localhost:5000 to see web application running.
Before releasing new version of service the current running instance must be stopped. For this we can use command sc stop AspNetWindowsService. To remove service run the following command: sc delete AspNetWindowsService.
Wrapping up
With new Microsoft.AspNetCore.Hosting.WindowsServices NuGet package it is easy to run ASP.NET Core applications as Windows services. We had to modify project file a little bit and make application Main() method to understand if application runs as a service or console application. Using this trick we are able to build web application on Visual Studio and run it as a usual web application. Our burden to get web application run as Windows service was minimal.
Join the DZone community and get the full member experience.
Join For Free
asp.net core 2.1 introduces a new application host for windows services. we can now run asp.net core applications as windows services with minimal effort. this blog post introduces how it is done and how to build and run windows services on asp.net core without any need for dirty hacks.
creating a default web application
we start with new default asp.net core 2.1 web application.
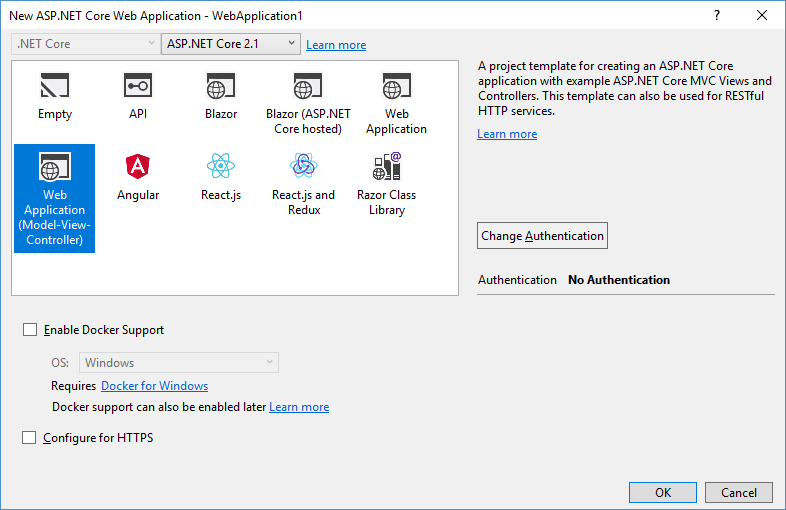 i didn’t configure https as this is a sample application and it does nothing important.
by default, the program class looks like this.
public class program
{
public static void main(string[] args)
{
createwebhostbuilder(args).build().run();
}
public static iwebhostbuilder createwebhostbuilder(string[] args) =>
webhost.createdefaultbuilder(args)
.usestartup<startup>();
}now we have working default application and it’s time to focus on the windows service.
running an asp.net core application as a windows service
running the application as a windows service takes some effort before we can open the browser and see it running under the service. first, we have to specify a runtime for our application, as asp.net core also supports operating systems and architectures where windows services don’t run. for this, we have to modify the project file.
<project sdk="microsoft.net.sdk.web">
<propertygroup>
<targetframework>netcoreapp2.1</targetframework>
<runtimeidentifier>win7-x64</runtimeidentifier>
</propertygroup>
<itemgroup>
<packagereference include="microsoft.aspnetcore.app" />
</itemgroup>
</project>next, add a reference to the nuget package microsoft.aspnetcore.hosting.windowsservices . this package has everything needed to run an asp.net core application as a windows service.
nb! for me, the newest version 2.1.1 of microsoft.aspnetcore.hosting.windowsservices conflicted with asp.net core 2.1.0 and i went with version 2.1.0 instead.
we also have to modify the main() method of the program class. in its simplest form, the main() method looks like this.
public static void main(string[] args)
{
var pathtoexe = process.getcurrentprocess().mainmodule.filename;
var pathtocontentroot = path.getdirectoryname(pathtoexe);
var host = webhost.createdefaultbuilder(args)
.usecontentroot(pathtocontentroot)
.usestartup<startup>()
.build();
host.runasservice();
}all we have to do now is to publish our application, register it as a windows service, and start the service.
running the application as a service or on a console
those who have built windows services before, know very well that the debugging of services can be a pain in one specific anatomical area as after building the service one has to deploy new version of it, attach a debugger, etc. there is simple way around — we make our windows service run also as a console application that is easy to run on debugger from visual studio.
we can apply the same trick also with asp.net core application that is running as windows service.
public static void main(string[] args)
{
var isservice = !(debugger.isattached || args.contains("--console"));
var pathtocontentroot = directory.getcurrentdirectory();
var webhostargs = args.where(arg => arg != "--console").toarray();
if (isservice)
{
var pathtoexe = process.getcurrentprocess().mainmodule.filename;
pathtocontentroot = path.getdirectoryname(pathtoexe);
}
var host = webhost.createdefaultbuilder(webhostargs)
.usecontentroot(pathtocontentroot)
.usestartup<startup>()
.build();
if (isservice)
{
host.runasservice();
}
else
{
host.run();
}
}the code shown may seem a little tricky. here are my explanations:
- to run the application on the console from visual studio we control if the debugger is attached. if we want to run the application as a console application outside of visual studio we can use the
-consoleargument. - when the application runs as a web application under the web server, we must use the current directory as the content root. but when the application runs as a service, we need an executable path as the content root.
- we remove the
-consoleargument, as asp.net core expects all arguments to be name-value pairs.
now try to run the application from visual studio. it starts as a usual web application.
making the application run as a windows service
to make the application run as windows service we need some additional steps.
- publish the application to some folder.
- open the command line in administrative permissions.
- register the application as a windows service using t command (space after «binpath=» is mandatory)
sc create aspnetwindowsservice binpath= "path to my application exe" - start service:
sc start aspnetwindowsservice. - when the service starts, open the browser and navigate to http://localhost:5000 to see the web application running.
before releasing a new version of the service, the currently running instance must be stopped. for this, we can use the command sc stop aspnetwindowsservice . to remove the service, run the following command: sc delete aspnetwindowsservice .
wrapping up
with the new microsoft.aspnetcore.hosting.windowsservices nuget package, it is easy to run asp.net core applications as windows services. we had to modify project file a little bit and make the application’s main() method in order to understand if an application runs as a service or a console application. using this trick we are able to build a web application on visual studio and run it as a typical web application. our burden to get a web application running as windows service was minimal.
application
ASP.NET Core
Web Service
ASP.NET
Published at DZone with permission of Gunnar Peipman, DZone MVB.
See the original article here.
Opinions expressed by DZone contributors are their own.
Данное руководство устарело. Актуальное руководство: Руководство по ASP.NET Core 7
Последнее обновление: 12.06.2018
ASP.NET Core можно развертывать в виде обычной службы Windows без каких-либо веб-серверов, в частности, IIS.
Создадим новый проект ASP.NET Core 2.1 любого типа. Прежде всего, нам надо добавить в проект через Nuget пакет
Microsoft.AspNetCore.Hosting.WindowsServices.
После создания проекта обратимся к файлу Program.cs, который во всех проектах выглядит идентично:
using System;
using System.Collections.Generic;
using System.IO;
using System.Linq;
using System.Threading.Tasks;
using Microsoft.AspNetCore;
using Microsoft.AspNetCore.Hosting;
using Microsoft.Extensions.Configuration;
using Microsoft.Extensions.Logging;
namespace ServiceHostingApp
{
public class Program
{
    public static void Main(string[] args)
    {
        CreateWebHostBuilder(args).Build().Run();
    }     public static IWebHostBuilder CreateWebHostBuilder(string[] args) =>
        WebHost.CreateDefaultBuilder(args)
            .UseStartup<Startup>();
}
}
Изменим его следующим образом:
using System.Diagnostics;
using System.IO;
using Microsoft.AspNetCore;
using Microsoft.AspNetCore.Hosting;
using Microsoft.AspNetCore.Hosting.WindowsServices;

namespace ServiceHostingApp
{
    public class Program
    {
        public static void Main(string[] args)
        {
            // получаем путь к файлу
            var pathToExe = Process.GetCurrentProcess().MainModule.FileName;
            // путь к каталогу проекта
            var pathToContentRoot = Path.GetDirectoryName(pathToExe);
            // создаем хост
            var host = WebHost.CreateDefaultBuilder(args)
                    .UseContentRoot(pathToContentRoot)
                    .UseStartup<Startup>()
                    .Build();
            // запускаем в виде службы
            host.RunAsService();
        }
    }
}
Чтобы запустить приложение в виде службы у объекта IWebHost вызывается метод RunAsService().
Публикация
Теперь нам надо опубликовать приложение в файловой системе. Мы можем это сделать через консоль с помощью команды dotnet publish.
Для этого вначале в командной строке/терминале надо перейти к папке проекта и из нее запустить команду:
dotnet publish --configuration Release --runtime win10-x64 --output c:myapp
Поскольку приложение будет устанавливаться в виде службы Windows и должно иметь исполняемый файл, то указывается
параметр --runtime. В данном случае служба будет устанавливаться на Windows 10 с 64-битной архитектурой. Поэтому
для этого параметра указано значение win10-x64.
Параметр --output указывает, где будет опубликовано приложение — то есть в данном случае в папке c:myapp.
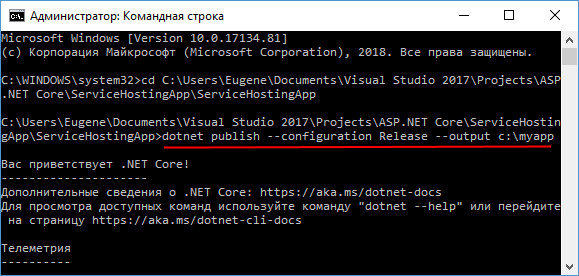
Также можно поизвести публикацию с помощью графических средств в Visual Studio.
Создание службы
После публикации с помощью консольной утилиты sc.exe создадим службу:
sc create НАЗВАНИЕ_СЛУЖБЫ binPath= "ПУТЬ К ИСПОЛНЯЕМОМУ ФАЙЛУ EXE"
После команды create указывается имя службы. Службу можно назвать как угодно.
Параметр binPath указывает на путь к исполняемому файлу (в том числе имя самого файла).
Причем между знаком равно и путем к файлу в кавычках должен идти пробел.
Например, ранее приложение было опубликовано в папке c:myapp. Как правило, название исполняемого файла соответствует названию проекта, то есть в моем случае
в папке c:myapp после публикации находится исполняемый файл ServiceHostingApp.exe. И, допустим, служба буде называться
MyAspService. В этом случае команда на создание службы будет выглядеть следующим образом:
sc create MyAspService binPath= "c:myappservicehostingapp.exe"
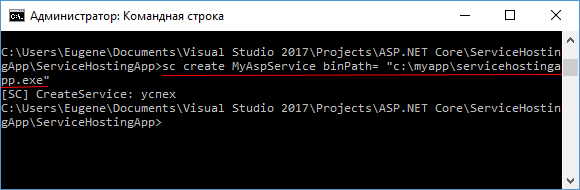
Запуск службы
После установки службы запустим ее с помощью команды:
Команде start передается имя ранее установленной службы — в моем случае это MyAspService.
После установки мы можем обратиться обратиться к нашему веб-приложению из браузера по адресу http://localhost:5000:
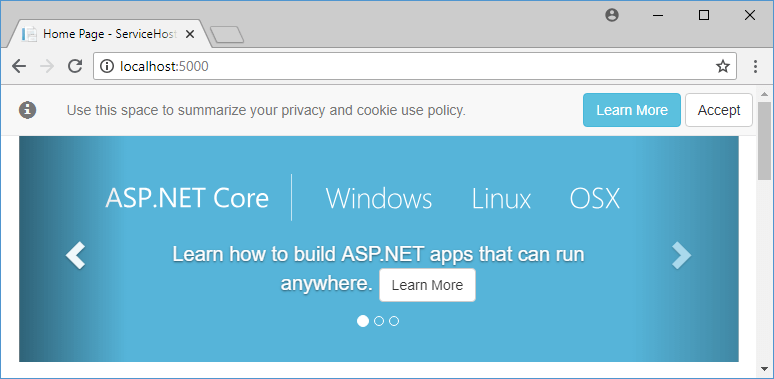

In this article, we shall see how Hosting ASP.NET Core API as Windows Service can be enabled in ASP.NET Core 3.1 or 5.0 API by using UseWindowsService.
Today in this article, we will cover below aspects,
- Getting started
- Enable UseWindowsService for the Host
- Hosting API as Service
- Summary
We shall be using an approach where we will use UseWindowsService and convert the API as a Windows service. If you want to create ASP.NET Core API as Service (in Addition to endpoint exposed via different HTTP route using Controller) using another approach i.e Worker template method discussed, please do visit the below article for more information.
- Create ASP.NET Core App as Windows Service using Worker Template
Let’s now look into an approach -II
Getting started
Create ASP.NET Core API using 3.1 or 5.0 .NET Core version.

Install Nuget Package as below,
PM> Install-Package Microsoft.Extensions.Hosting.WindowsServices
Or Using Nuget Manager,

Enable UseWindowsService for the Host
CreateDefaultBuilder generic host builder needs to be configured with UseWindowsService(). Here UseWindowsService sets the host lifetime to WindowsServiceLifetime, sets the Content Root, and enables logging to the event log with the application name as the default source name.
  public class Program
    {
        public static void Main(string[] args)
        {
            CreateHostBuilder(args).Build().Run();
        }

        public static IHostBuilder CreateHostBuilder(string[] args) =>
            Host.CreateDefaultBuilder(args)
                .ConfigureWebHostDefaults(webBuilder =>
                {
                    webBuilder.UseStartup<Startup>();

                }).ConfigureWebHost(config =>
                {
                    config.UseUrls("http://*:5050");

                }).UseWindowsService();
    }
Here I am configuring the Windows Service for the Url http://localhost:5050
As you can see we have converted our API as a service using just one line of code i.e UseWindowsService()
Let’s publish the package as self-contained and then followed by deploy using the Windows Service CLI command.
dotnet publish -c Release -r win-x64 --self-contained
or using Visual Studio

Hosting API as Service
Now we are all set to deploy the service to the services.msc.I shall install this service and validate the URLs working fine.
Please use the below command to register the service,
sc create [app-name] binPath=[filepath]
Example
sc create APIasWIN binPath="C:UsersWebAPIasServicebinReleasenetcoreapp3.1WebAPIasService.exe"
Once hosted successfully, you shall see the service listed in the Service Console as below,
Lets now execute the API routes below,
http://localhost:5050/WeatherForecast/
You shall be able to execute all the routes supported by your API without any issues.
That’s All! Thank you!
Reference:
- Hosting ASP.NET Core App as Service using Worker template -IHostedService
Do you have any comments or ideas or any better suggestions to share?
Please sound off your comments below.
Happy Coding !!
Summary
Today in this article we learned how to enable ASP.NET Core API as Service. We hosted API as a Window service using a Service console and were able to call API routes from the service easily.
Please bookmark this page and share it with your friends. Please Subscribe to the blog to get a notification on freshly published best practices and guidelines for software design and development.