
MegaRAID Storage Manager мне нужен для того, чтобы воткнуть в свой комп RAID контроллер и прошить его перед установкой в сервер. Прикрепляю к статье интерактивное руководство. MegaRAID Storage Manager есть под разные операционные системы. Будем устанавливать версию для Windows.
Ссылки
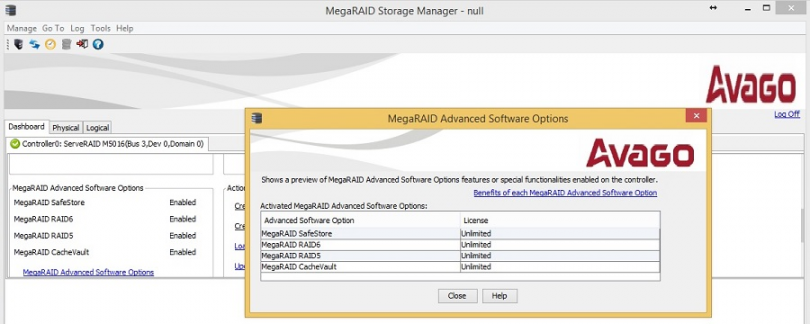
Интерактивное руководство В хроме подглючивает, открываете через Firefox.
Avago MegaRAID SAS 9380-8i8e
Более новая софтина: LSI Storage Authority Software
Установка MegaRAID Storage Manager
Качаем MegaRAID Storage Manager.
https://www.broadcom.com/products/storage/raid-controllers/megaraid-sas-9380-8i8e#downloads
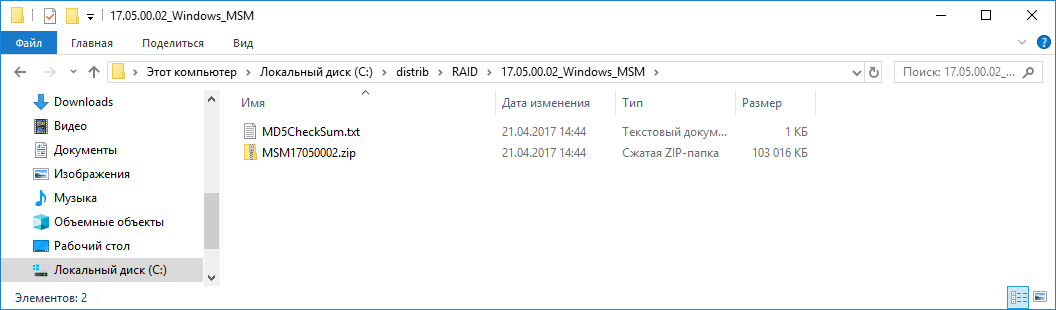
Я скачал версию 7.05.00.02.

Данная версия поддерживает контроллеры:
- RAID
- MegaRAID SAS 9362-4i
- MegaRAID SAS 9362-8i
- MegaRAID SAS 9361-4i
- MegaRAID SAS 9361-8i
- MegaRAID SAS 9363-4i
- MegaRAID SAS 9380-8e
- MegaRAID SAS 9381-4i4e
- MegaRAID SAS 9361-8iCC
- MegaRAID SAS 9380-8eCC
- MegaRAID SAS 9364-8i
- MegaRAID SAS 9340-8i
- MegaRAID SAS 9341-8i
- MegaRAID SAS 9341-4i
- MegaRAID SAS 9270-8i
- MegaRAID SAS 9271-4i
- MegaRAID SAS 9271-8i
- MegaRAID SAS 9271-8iCC
- MegaRAID SAS 9286-8e
- MegaRAID SAS 9286CV-8e
- MegaRAID SAS 9286CV-8eCC
- MegaRAID SAS 9265-8i
- MegaRAID SAS 9285-8e
- MegaRAID SAS 9240-4i
- MegaRAID SAS 9240-8i
- MegaRAID SAS 9260-4i
- MegaRAID SAS 9260CV-4i
- MegaRAID SAS 9260-8i
- MegaRAID SAS 9260CV-8i
- MegaRAID SAS 9260DE-8i
- MegaRAID SAS 9261-8i
- MegaRAID SAS 9280-4i4e
- MegaRAID SAS 9280-8e
- MegaRAID SAS 9280DE-8e
- MegaRAID SAS 9280-24i4e
- MegaRAID SAS 9280-16i4e
- MegaRAID SAS 9260-16i
- MegaRAID SAS 9266-4i
- MegaRAID SAS 9266-8i
- MegaRAID SAS 9285CV-8e
- MegaRAID SAS 8704ELP
- MegaRAID SAS 8704EM2
- MegaRAID SAS 8708ELP
- MegaRAID SAS 8708EM2
- MegaRAID SAS 8880EM2
- MegaRAID SAS 8888ELP
- MegaRAID SAS 8308ELP*
- MegaRAID SAS 8344ELP*
- MegaRAID SAS 84016E*
- MegaRAID SAS 8408E*
- MegaRAID SAS 8480E*
- MegaRAID SATA 300-8ELP*
- HBA
- LSI SAS 9211
- LSI SAS 9212
- LSI SAS3041E-R
- LSI SAS3041X-R
- LSI SAS3080X-R,
- LSI SAS3081E-R
- LSI SAS3442E-R
- LSI SAS3442X-R
- LSI WarpDrive SLP-300
- 9212 4i4e-R spec
- 9211-8i/4i-R spec
- LSI Nytro WarpDrive WLP4-200
- LSI Nytro WarpDrive WLP4-400
- LSI Nytro WarpDrive BLP4-400
- LSI Nytro WarpDrive BLP4-800
- LSI Nytro WarpDrive BLP4-1600
- LSI Nytro XD BLP4-400
- LSI Nytro XD BLP4-800
- LSI SAS 9207-4i4e
- LSI SAS 9217-4i4e
- LSI SAS 9207-8i
- LSI SAS 9217-8i
- LSI SAS 9207-8e
- LSI SAS 9201-16e
- LSI SAS 9200-8e
* Контроллеры предыдущих версий должны работать, но не тестировались.
Работает в ОС 32 и 64 бит:
- Windows* 2000
- Windows* 2003
- Windows* XP
- Windows* Vista
- Windows* 2008
- Windows* 7
- Windows* 8
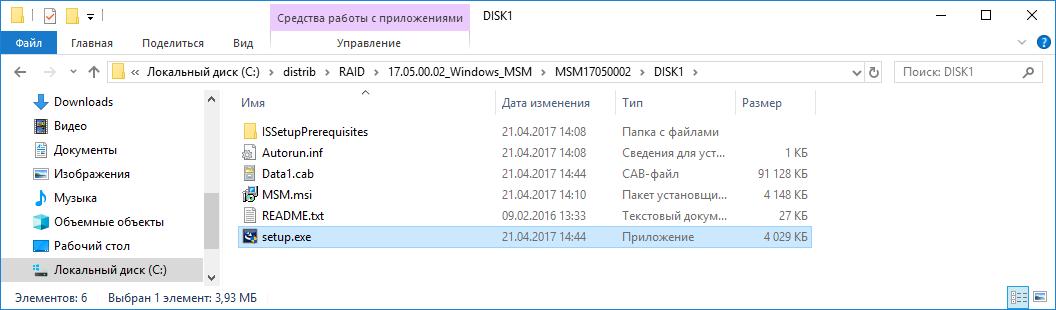
Распаковываем архив:
Запускаем setup.exe.
Запускается инсталлятор.
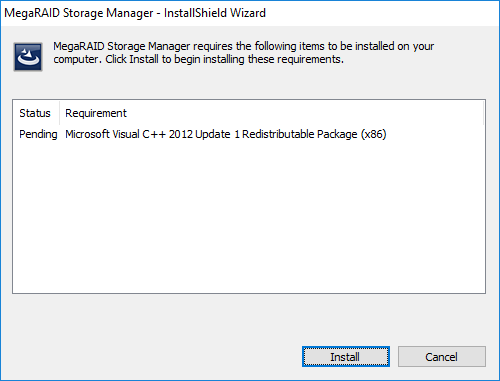
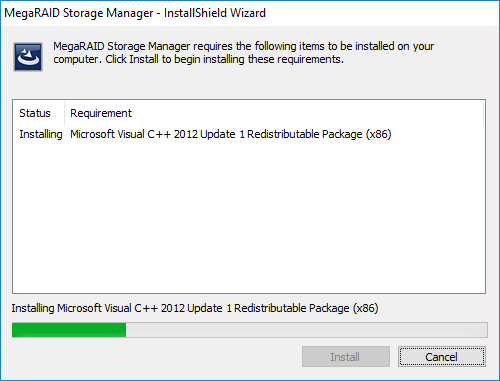
Install. Требуется C++ пакет.
Условия установки соблюдены. Открывается окно мастера установки.
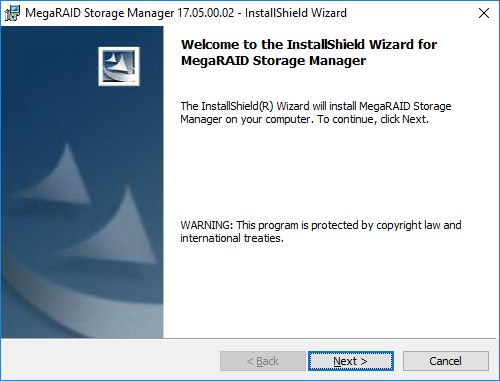
Next.
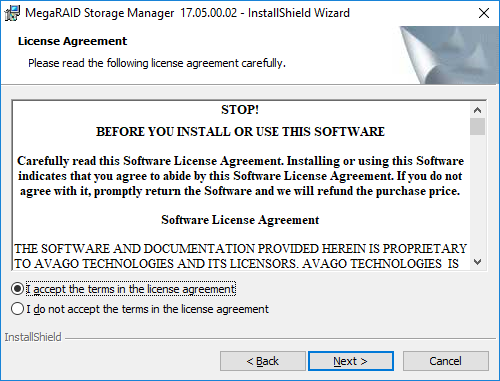
Принимаем лицензионное соглашение. Next.
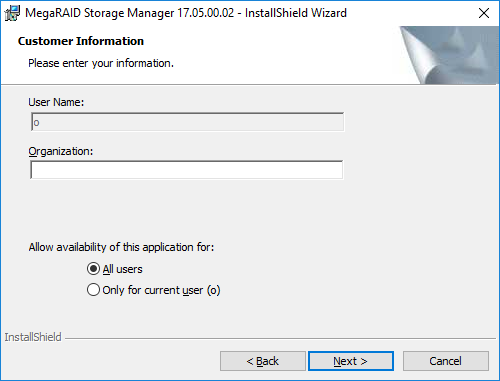
Я выбираю установку для всех пользователей. Next.
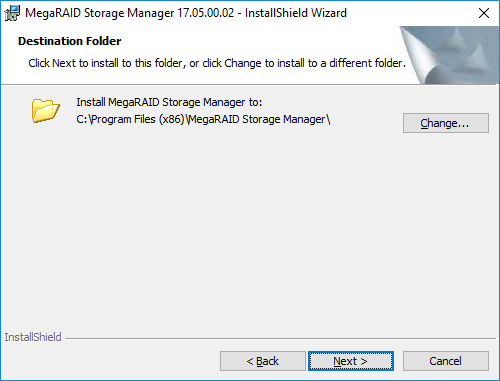
Можно сменить папку установки. Next.
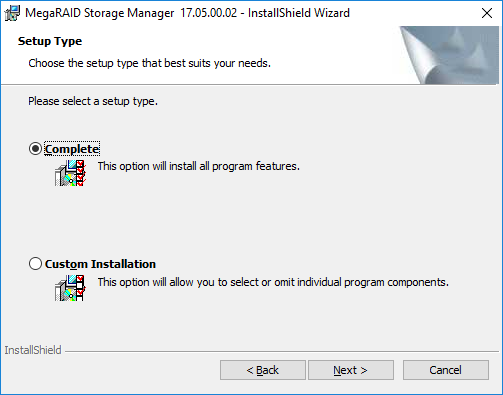
Выбираю обычную установку. Next.
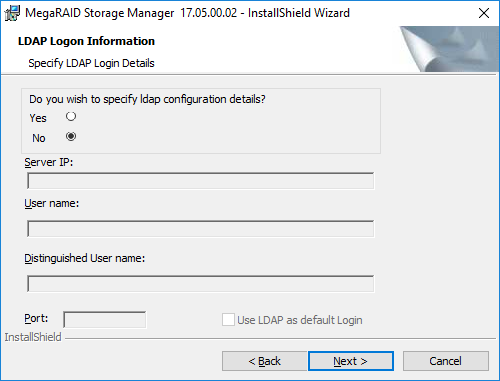
Предлагают настроить LDAP, забиваю. Next.
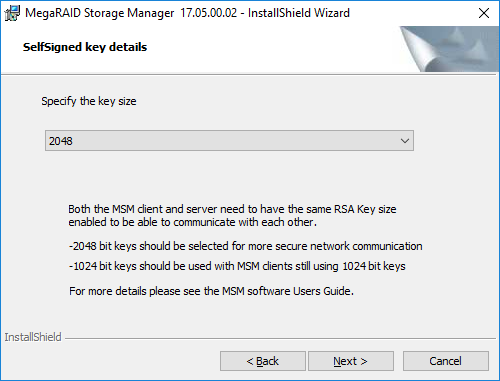
Указываем размер ключа. Поскольку я на своей же машине буду шить контроллер, то эта опция — по барабану. Next.
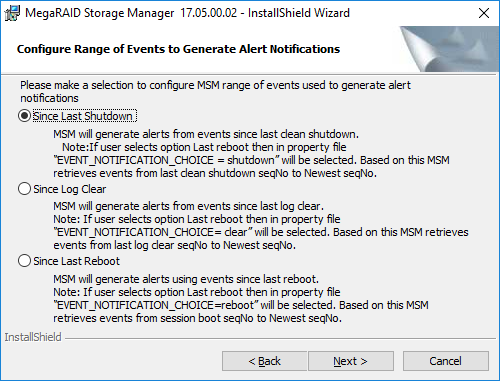
Вот тут я подвис и оставил значение по умолчанию. Это настройка диапазона времени, за которое выводить уведомления. Мне оно не нужно. Next.
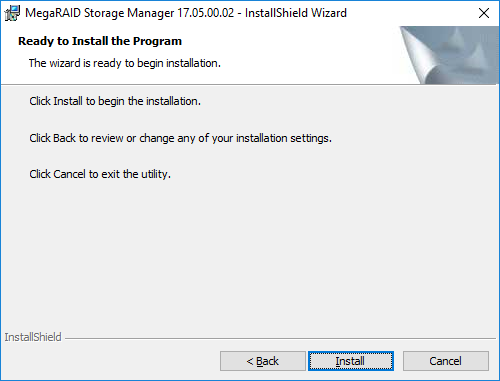
Эта страница предназначена только для того, чтобы нажать кнопку Install или не нажать. Идиотизм.
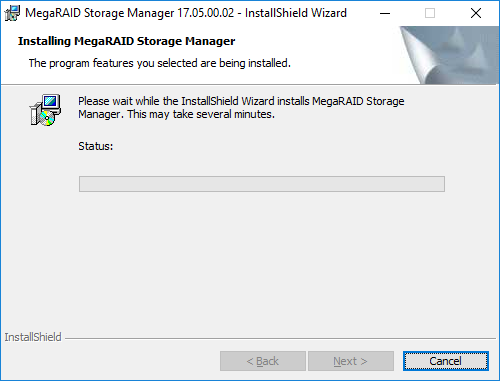
Начинается установка.
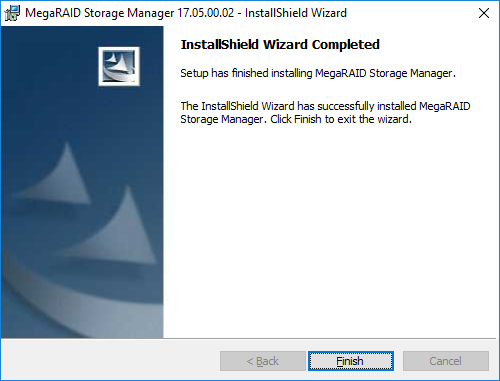
Установка завершена. Finish.
На рабочем столе появляется иконка MegaRAID Storage Manager. Для работу нужна java.
Обновлено 12.08.2019
Добрый день! Уважаемые читатели и гости одного из популярных IT блогов в российском сегменте интернета Pyatilistnik.org. В прошлый раз мы с вами успешно вывели операционную систему Windows из тестового режима. Сегодня я бы хотел написать обзорную, обучающую статью про инструменты управления RAID контроллерами Avago/LSI. Уверен, что начинающим инженерам информация окажется полезной, сразу увидев все популярные утилиты для повседневной работы с данным оборудованием.
Список инструментов управления для LSI/Avago
Правильно подобранная утилита, может выполнять поставленную задачу в разы удобнее и быстрее, и знание всех инструментов является прямой обязанностью любого системного администратора.
Кстати я уже делал похожие подборки по инструментам управления и настройки для серверов IBM, Supermicro и HP
Утилита LSI Storage Authority
Про LSA (LSI Storage Authority) я уже делал подробнейший обзор. На текущий момент, это флагманский инструмент имеющий графический интерфейс управления, прямо из вашего браузера, что делает его кросплатфомным, убирающим привязку к операционной системе. Что хорошо, что утилита работает не на медленном Java, а на HTML5, что делает ее очень удобной.
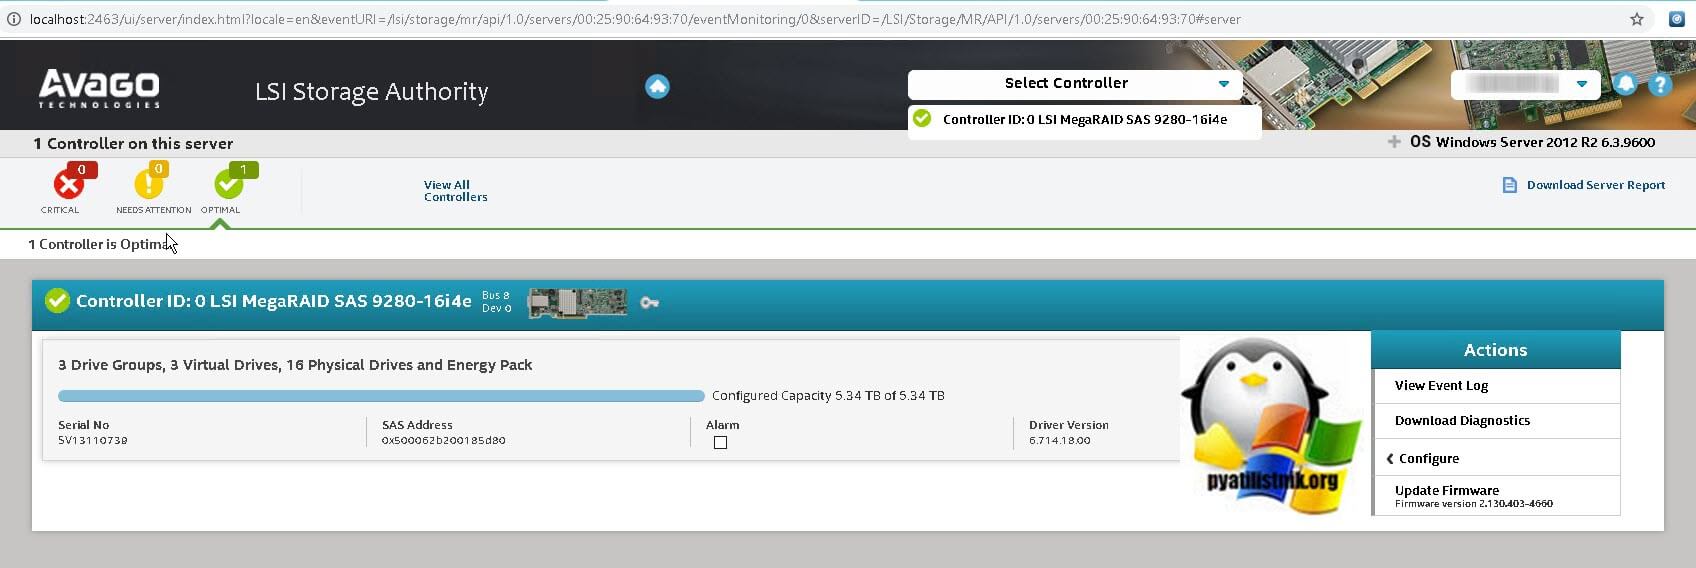
Вот так выглядит общий дашборд управления, на нем вы увидите список ваших устройств представленных на сервере, в моем примере Controller ID: 0 LSI MegaRAID SAS 9280-16i4e.
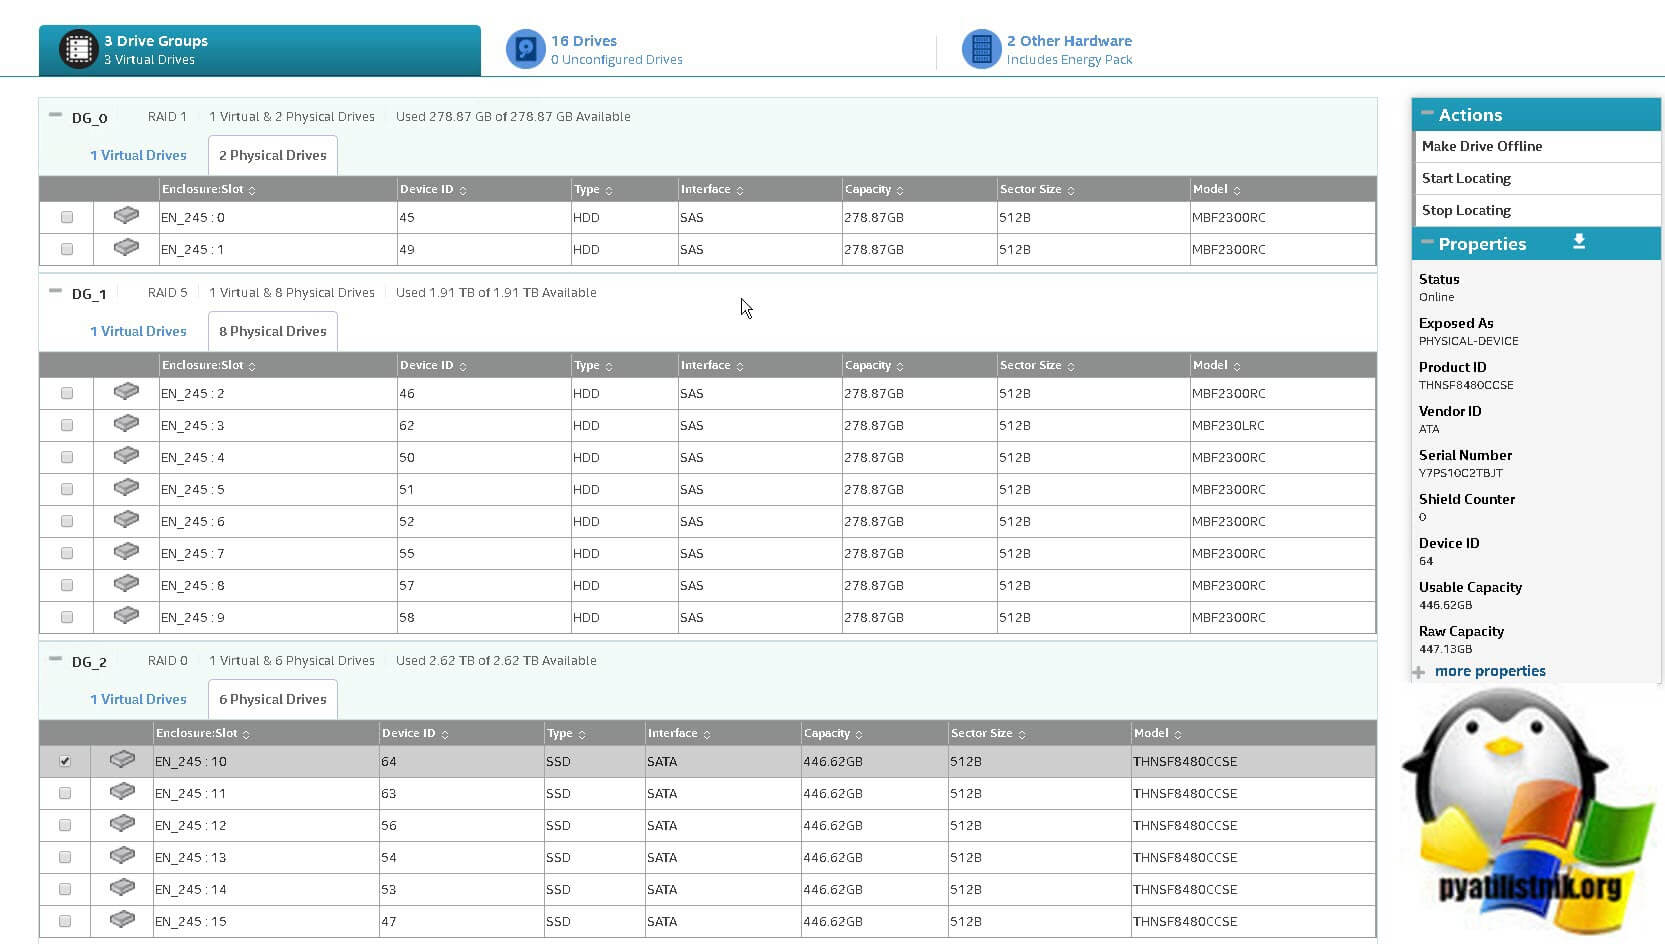
Вот так выглядит информация по вашим виртуальным и физическим дискам. Хочу отметить, что LSI Storage Authority показывает больше информации по свойствам физических дисков, тут вы легко обнаружите:
-
- Status — Online
- Exposed As — PHYSICAL-DEVICE
- Product ID — THNSF8480CCSE
- Vendor ID — ATA
- Serial Number — Y7PS10C2TBJT
- Shield Counter — 0
- Device ID — 64
- Usable Capacity — 446.62GB
- Raw Capacity — 447.13GB
- less properties — General Properties
- SAS Address 0 — 0x500062b200185da2
- Negotiated Link Speed — 6G
- Drive Speed — 6G
- Temperature — 25C
- Revision Level — DAC9
- Power Status — On
- Native Command Queueing Capable — No
- Physical Sector Size — 512B
- SCSI UNMAP — Disabled
- Enclosure Properties
- Enclosure ID — 245
- Enclosure Model — Backplane
- Enclosure Location — Internal
- Enclosure Connector — N/A
- Drive Security Properties
- Full Disk Encryption Capable — No
- Full Disk Encryption Type — NONE
- Protection Information Properties
- Protection Information — Incapable
Утилита MegaRAID Storage Manager
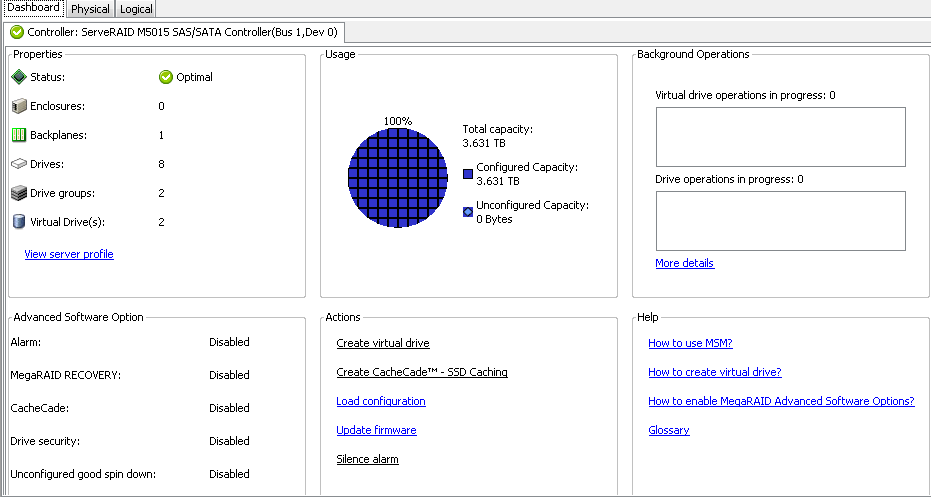
MegaRAID Storage Manager — это более старая утилита, с которой мы уже много взаимодействовали в предыдущих статьях. Например мы устанавливали MegaRAID Storage Manager на ESXI 5.5. Вот так выглядит базовый дашборд со сводной информацией, о RAID контроллерах LSI/Avago. Тут вы увидите:
- Общий объем ваших дисков, в моем примере это 5,3 ТБ
- Состояние контроллера (Status) — если все хорошо, то статус должен быть Optimal
- Drives — количество физических дисков
- Drive groups — количество датасторов
- Virtual Drives — количество виртуальных дисков
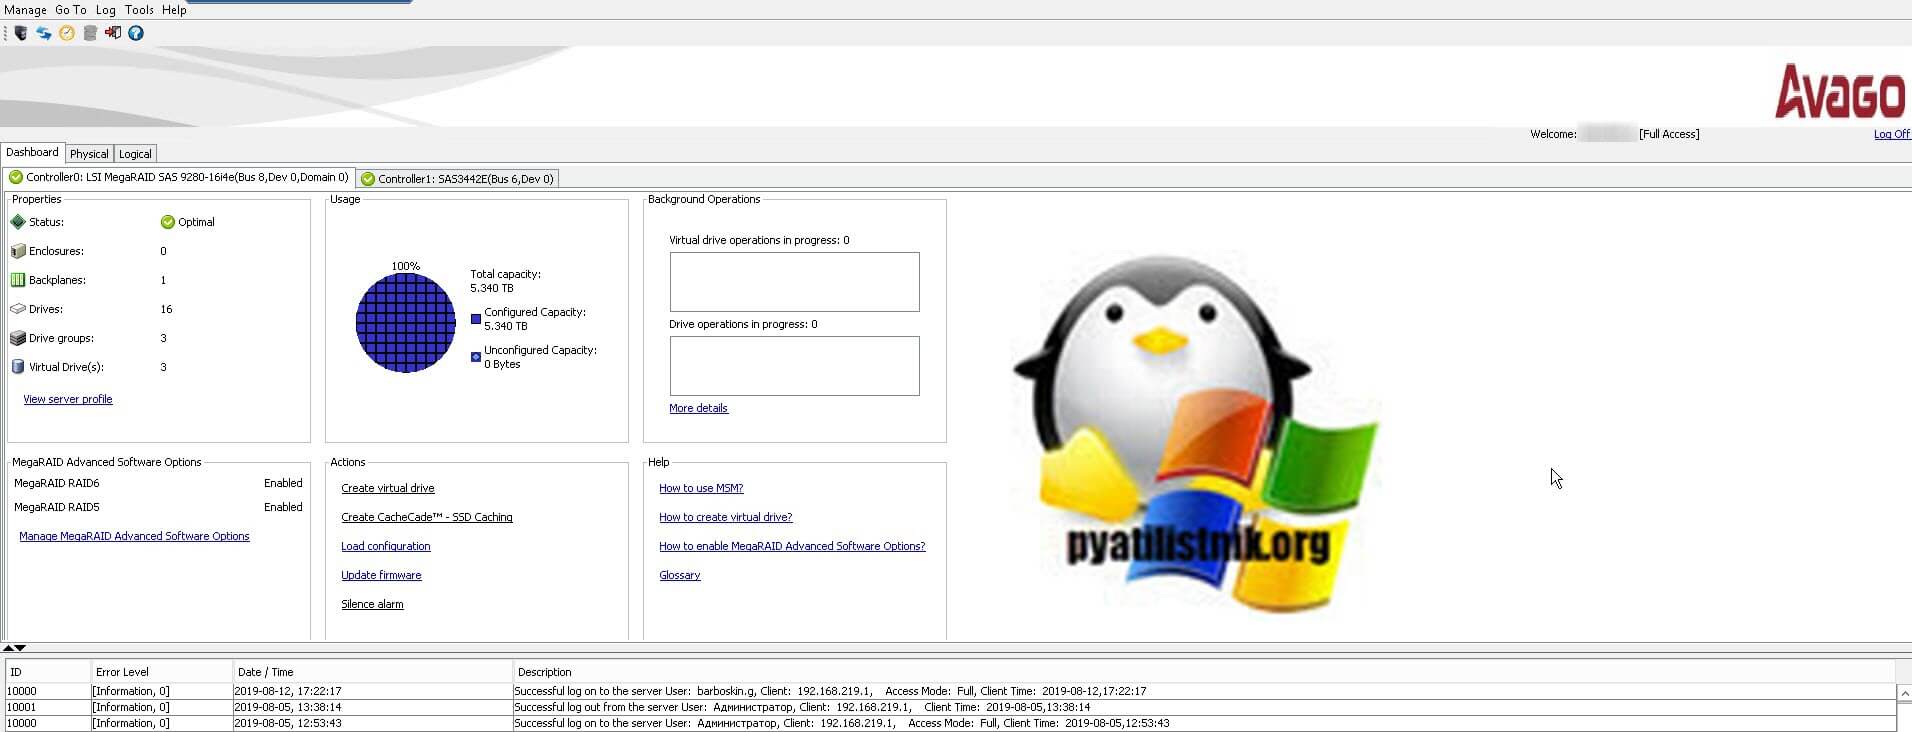
Тут же есть область «Action», позволяющая загрузить конфигурацию, обновить прошивку RAID контроллера, настроить звуковой сигнал предупреждения. Справа есть ссылки на документацию. Снизу вы увидите текущие события на вашем контроллере LSI/Avago. Вкладка «Physical» покажет ваши физические диски, выбрав любой из них вы увидите дополнительные свойства.

Вкладка «Logical» позволяет уже взаимодействовать с логическими сущностями. Например вы можете добавить HDD/SSD в существующий RAID массив. Вы легко можете изменить свойства любого Virtual Drive, изменить вид кэширования, включить или отключить инициализацию.
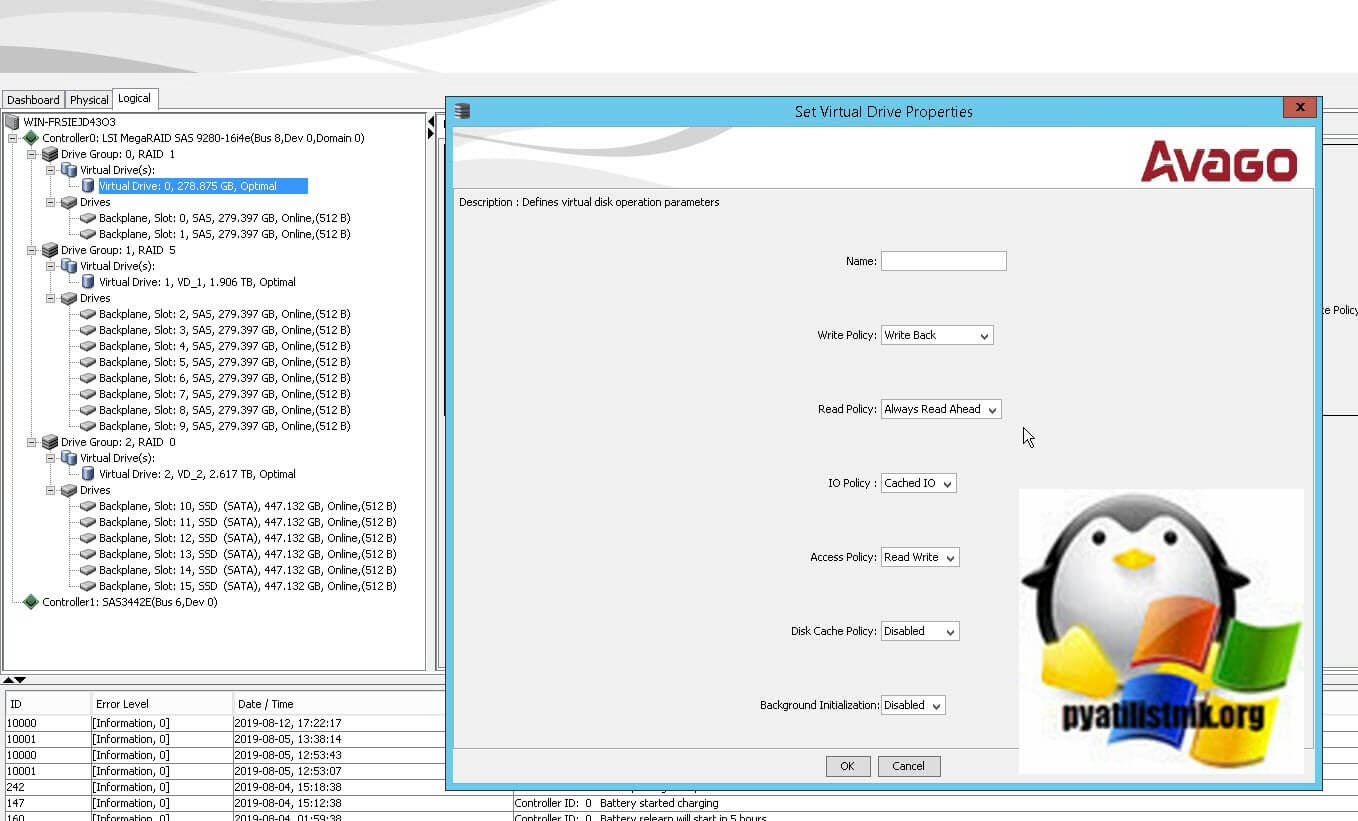
Методы создания различных видов RAID через MSM я подробно описывал. Чаще всего есть поддержка всех видов, но в некоторых контроллерах RAID 50 и 60 нужно разблокировать с помощью специального кода.
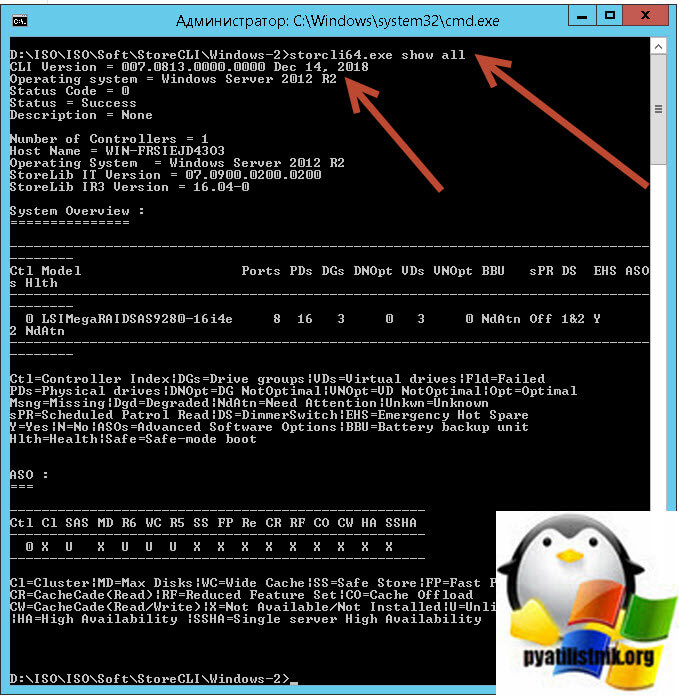
Утилита StorCLI
Инструмент StorCLI — это утилита командной строки, которая имеет больший функционал в отличии от графических аналогов LSA и MSM. Утилита очень простая и гораздо удобнее, по крайней мере с случае с Vmware ESXI, на которую порой установить MSM/LSA. это целая эпопея.
Скачать StorCLI можно по ссылке. Запускаете командную строку в режиме администратора. Для примера вы можете посмотреть общую, сводную информацию, о контроллере, для этого введите:
На выходе вы увидите:
- Версию Storecli, у меня это 007.0813 от 14 декабря 2018 года
- Количество контроллеров
- Имя компьютера
- Версия операционной системы
- Модель контроллера
Основные возможности Storecli
Storecli поддерживает операционные системы:
- Windows Client 10
- Windows 8.1
- Windows 8
- Windows Server 2016
- Windows Server 2012 R2
- Windows Server 2012
- Red Hat Enterprise Linux 7.4
- Red Hat Enterprise Linux 7.3
- Red Hat Enterprise Linux 7.2
- Red Hat Enterprise Linux 7.1
- Red Hat Enterprise Linux 7.0
- Red Hat Enterprise Linux 6.8
- Red Hat Enterprise Linux 6.7
- Red Hat Enterprise Linux 6.6
- SUSE Linux Enterprise Server 12 SP3
- SUSE Linux Enterprise Server 12 SP2
- SUSE Linux Enterprise Server 12 SP1
- SUSE Linux Enterprise Server 12
- SUSE Linux Enterprise Server 11 SP4
- SUSE Linux Enterprise Server 11 SP3
- SUSE Linux Enterprise Server 11 SP2
- Linux PowerPC for little-endian and big-endian (32 bit and 64 bit)
- VMware ESXi 6.5 Update 1
- VMware ESXi 6.5
- VMware ESXi 6.0 Update 2
- VMware ESXi 6.0 Update 1
- VMware ESXi 6.0
- VMware ESXi 5.5 Update 3
- VMware ESXi 5.5 Update 2
- VMware ESXi 5.5 Update 1
- Citrix XenServer 7.2
- Citrix XenServer 7
- Citrix XenServer 6.5
- Citrix XenServer 6.5 SP1
- CentOS-7.4
- CentOS-7.2
- CentOS-7.1
- CentOS-6.8
- CentOS-6.7
Утилита Storecli умеет и имеет в своем арсенале:
-
- Команды показа системы
- Команды контроллера
- Показать и установить команды свойств контроллера
- Диспетчерские команды
- Команды отладки контроллера
- Команды фоновой задачи контроллера
- Команды премиум-функций
- Команды безопасности контроллера
- Команды по работе с кэшем контроллера
- Команды настройки контроллера
- Команды привода
- Команды Drive Show
- Установка команд состояния VD
- Команды инициализации VD
- Команды Locate Drives
- Подготовка к удалению дисков
- Команды безопасного стирания диска
- Команды восстановления дисков
- Команды обратного копирования диска
- Команды горячего резервирования
- Команды мониторинга производительности
- Команды виртуального для диска
- Команды добавления виртуальных дисков
- Команды удаления виртуальных дисков
- Команды показа виртуального диска
- Сохраненные команды кеширования
- Команды изменения виртуальных свойств
- Команды инициализации виртуального диска
- Команды удаления виртуального диска
- Команды миграции виртуальных дисков
- Команды проверки согласованности виртуальных дисков
- Команды инициализации
- Команды расширения виртуального диска
- Отображение таблицы плохих блоков
- Команды JBOD
- Команды, связанные с BIOS
- Команды BIOS OPROM
- Команды для группы дисков
- Команды показа группы дисков
- Команды изменения параметров питания виртуального диска
- Команды CacheVault
- Команды оболочки
- PHY Команды
- Команды интерфейса хранения PCIe
- Команды настройки соединения
- Автоматические команды кэширования физического диска
- Команды восстановления (только UEFI)
- Настройка политики кэширования на виртуальном диске
- Отображение информации о виртуальном диске
- Удаление виртуальных дисков
- Прошивка контроллера
- Команды восстановления (только UEFI)
Как видите утилита Storecli умеет делать с RAID контроллерами LSI/Avago все, что угодно, главное привыкнуть к простому синтаксису и в перед.
Утилита Megacli
Ранее перед утилитой Storecli, был инструмент Megacli, на текущий момент он устарел и его можно применять только со старыми контроллерами, которые выпущены до 2014 года, так как более новые модели он не поддерживает. Ранее я вам показывал, как устанавливать в ESXI 5.5, там мы с помощью него производили настройку контроллера и пытались посмотреть IOPS.
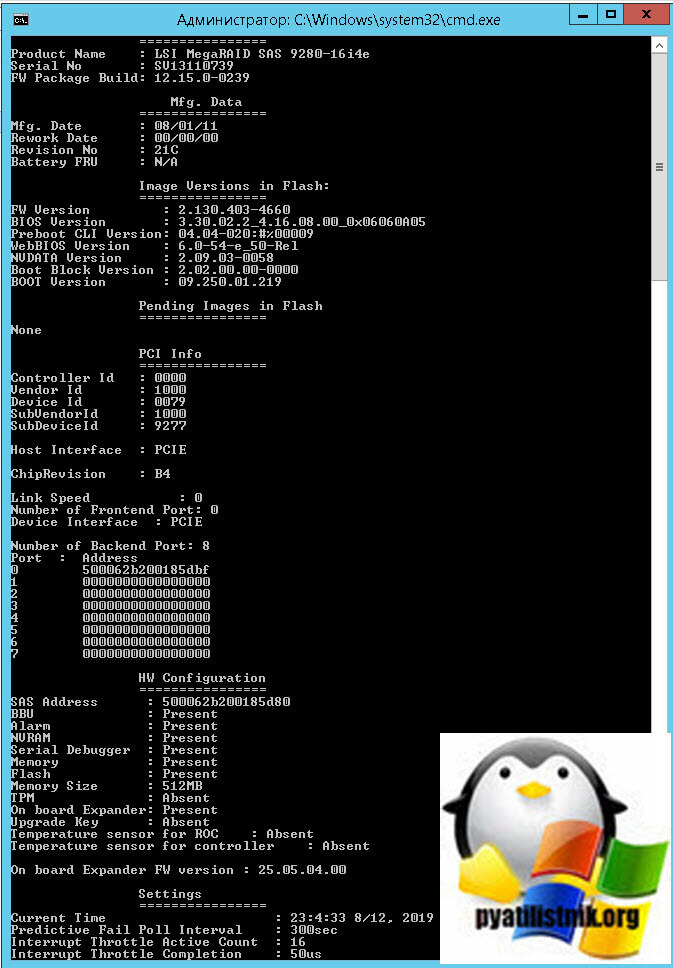
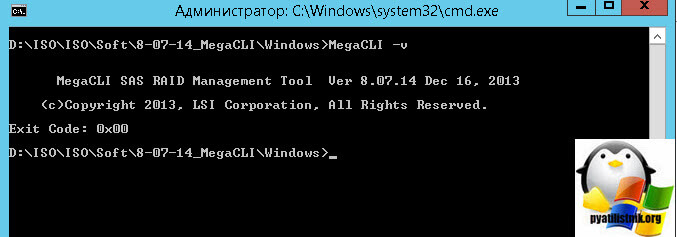
Последней версий Megacli является 8-07-14. . Запускаем утилиту так же, через командную строку в режиме администратора. Давайте для примера посмотрим информацию, о RAID контроллере LSI, для этого введите:
MegaCli64.exe -AdpAllInfo -aALL
Узнать версию можно командой MegaCLI -v
Изучить весь список команд утилиты Megacli вы можете по ссылке слева.
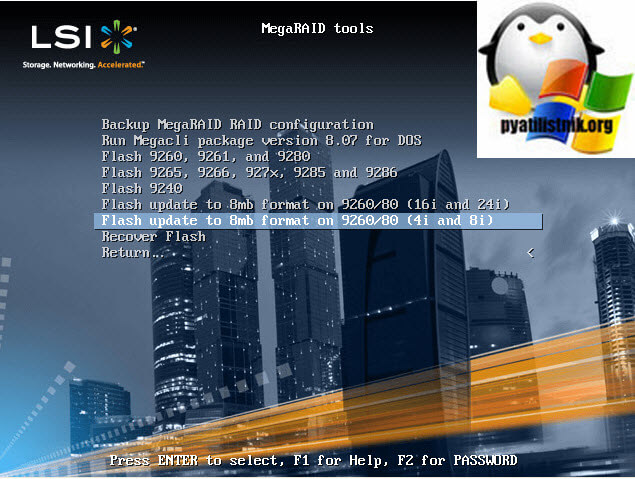
LSI PreBoot CD
LSI PreBoot CD — это специальный загрузочный диск позволяющий вам легко произвести обновление и восстановление прошивки, выгрузить настройки RAID контроллера. Выглядит, это вот таким образом. Скачать LSI PreBoot CD вы можете по ссылке, там же обзорная статья, как его записать на флешку и загрузиться с него.
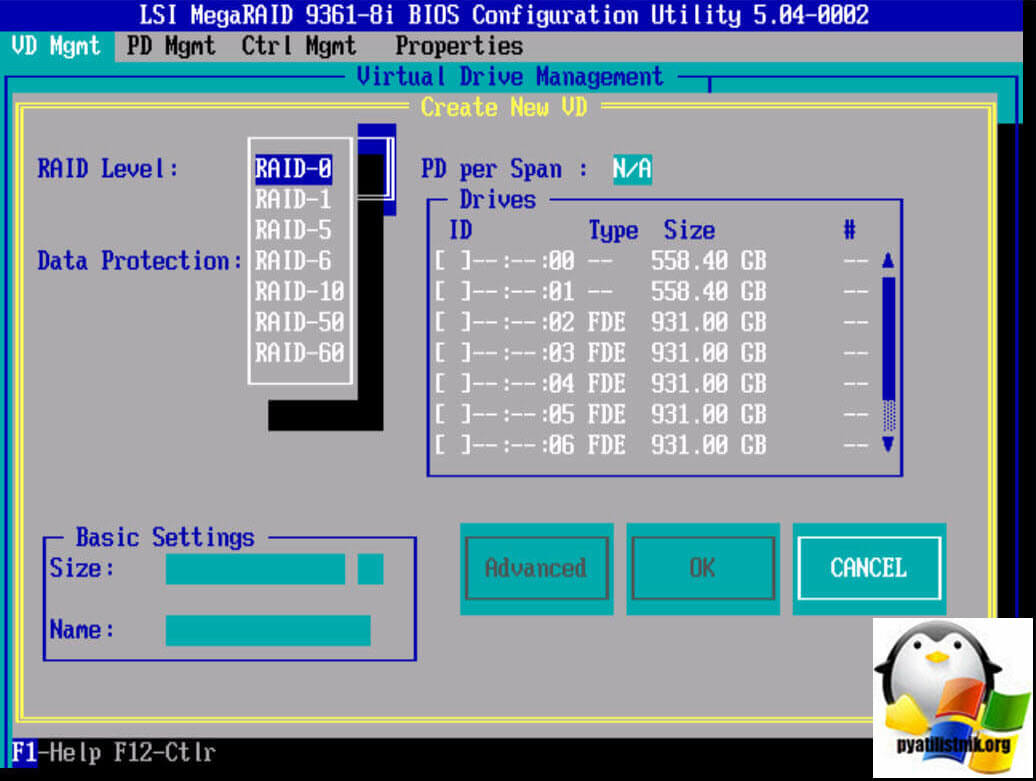
LSI Bios Configuration Utility
LSI Bios Configuration Utility — это встроенная DOS подобная утилита по настройке RAID контроллера LSI/Avago. Данная программка защита в сам контроллер и является его составляющей. Легко позволяет создать и разметить RAID массивы на контроллере перед тем, как вы будите устанавливать операционную систему. Например, LSI Bios Configuration Utility на контроллере 9381 8i.
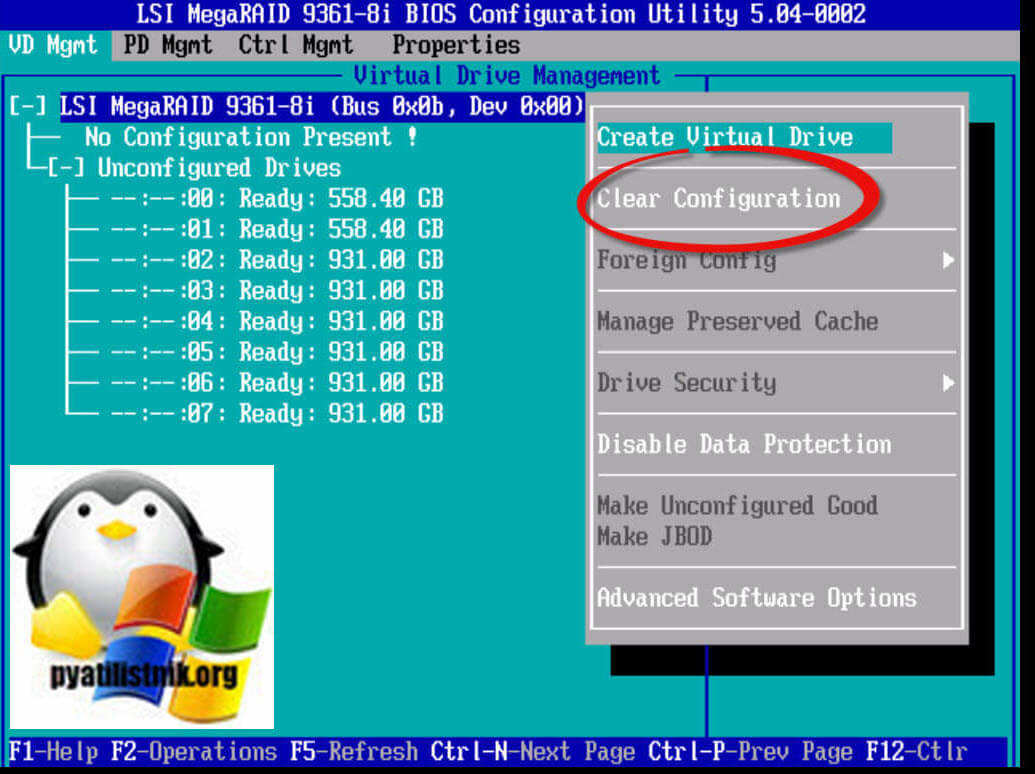
Данная утилита поддерживает большинство известных видов RAID.
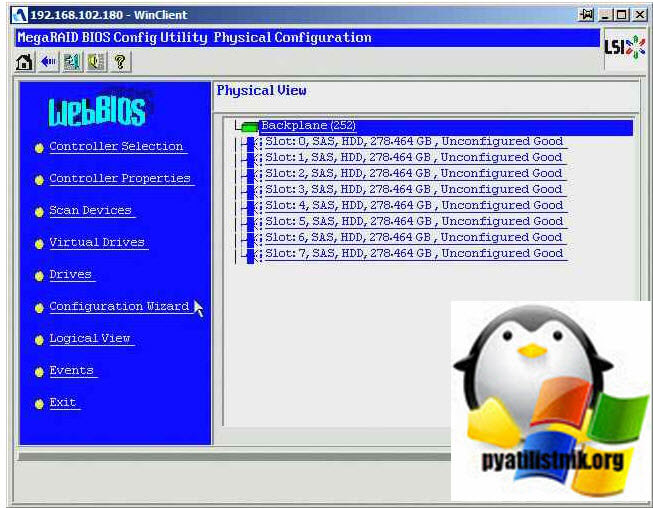
MegaRAID BIOS COnfig Utility
В более старых моделях контроллеров LSI, за место LSI Bios Configuration Utility идет утилита MegaRAID BIOS COnfig Utility, она так же позволяет производить настройку контроллера до установки на него операционной системы. Выглядит данная DOS подобная утилита вот так.
-
- Controller Selection — Выбор нужного контроллера
- Controller Properties — Свойства контроллера
- Scan Drives — проводит сканирование наличия дисков
- Virtual Drives — создание виртуальных массивов
- Drives — работа с дисками
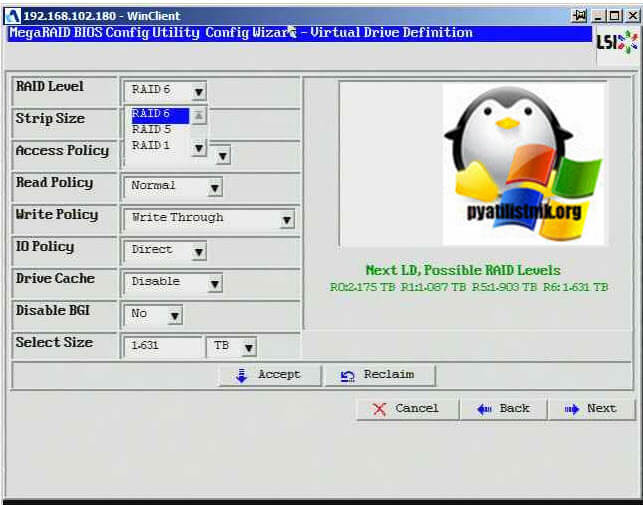
- Configuration Wizard — простой мастер по созданию RAID
- Logical View — свойства локальных дисков
- Events — логи
Вот так выглядит окно свойств, где вы выбирает нужный вид RAID и задаете всевозможные настройки.
На этом у меня все. Я познакомил вас с известными мне утилитами по работе с RAID контроллерами LSI/Avago. Если есть вопросы или дополнения, то пишите их в комментариях. С вами был Иван Семин, автор и создатель IT портала Pyatilistnik.org.
Содержание
- Avago megaraid sas 9341 4i обновление прошивки
- Алгоритм поиска драйверов и прошивок для LSI/Avago
- Avago megaraid sas 9341 4i обновление прошивки
- Популярные Похожие записи:
- 2 Responses to Как обновить прошивку (Firmware) на контроллере LSI
- Download LSI Avago MegaRAID SAS 9341-4i Drivers
- LSI Avago MegaRAID SAS 9341-4i Drivers
- Was this page helpful?
- Скачать LSI Avago MegaRAID SAS 9361-4i Драйверы
- LSI Avago MegaRAID SAS 9361-4i Драйверы
- Была ли эта страница полезной?
Avago megaraid sas 9341 4i обновление прошивки
 Добрый день! Уважаемые читатели и гости одного из крупнейших IT блогов в русскоязычном сегменте Pyatilistnik.org. В прошлый раз мы с вами разобрали, какие виды RAID построения массивом существуют, сегодня мы поговорим про мат часть. Предположим вам купили новый сервер, в нем куча винтов и raid контроллер LSi. Где взять для него драйвера прошивку, которую обычно обновляют до любого продакшена, различные утилиты, естественно на сайт производителя.
Алгоритм поиска драйверов и прошивок для LSI/Avago
Идем на сайт . Первое, что бросается в глаза это форма поиска.
Где скачать драйвера, утилиты и прошивки для LSI контроллеров MegaRAID-01
Заполняем поля поиска нужными вам данными, в моем случае это raid контроллер LSI-9260-4i и жмем search
Где скачать драйвера, утилиты и прошивки для LSI контроллеров MegaRAID-02
Видим, что нашлось очень много категорий.
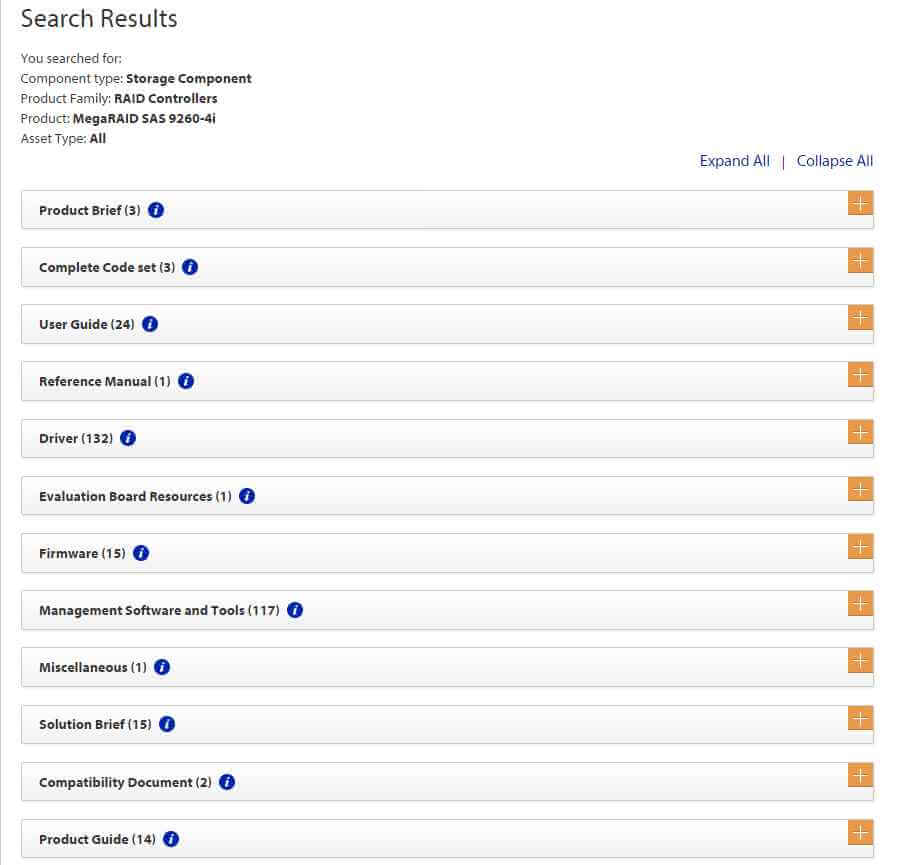
Где скачать драйвера, утилиты и прошивки для LSI контроллеров MegaRAID-03
Первое что очень полезно это драйвера

Где скачать драйвера, утилиты и прошивки для LSI контроллеров MegaRAID-04
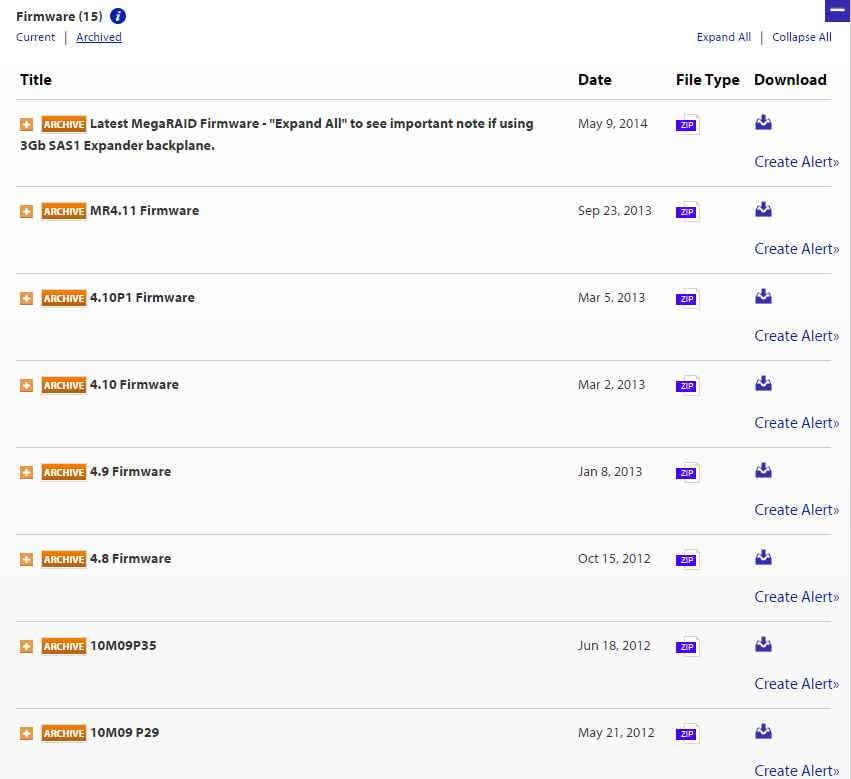
Прошивки как новые так и старые, если нажать archived

Где скачать драйвера, утилиты и прошивки для LSI контроллеров MegaRAID-05
Где скачать драйвера, утилиты и прошивки для LSI контроллеров MegaRAID-06
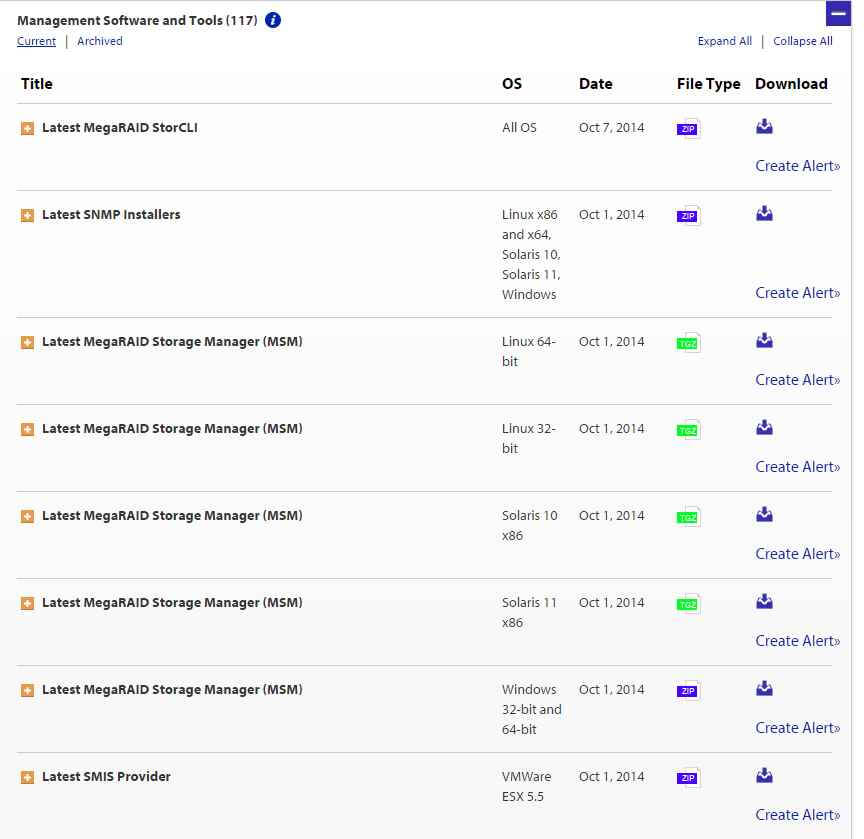
Ну и конечно полезные утилиты
такие как MSM и SMIS Provider.
Где скачать драйвера, утилиты и прошивки для LSI контроллеров MegaRAID-07
Источник
Avago megaraid sas 9341 4i обновление прошивки

Как обновить прошивку (Firmware) на контроллере LSI-01
Всем привет сегодня расскажу как обновить прошивку (Firmware) на контроллере LSI. Ранее я уже рассказывал вам как сохранить конфиг файл на Raid controller LSI, но хорошо бы чтобы в нем была последняя прошивка ведь не для кого не секрет, что только одними драйверами и улучшеными механизмами программного обеспечения (алгоритмы), можно очень сильно увеличить, как производительность системы, так и ее стабильность, так, что я вам настоятельно рекомендую отсеживать последние прошивки для вашего контроллера и читать, что они несут нового и не забывайте пожалуйста делать резервные копии, чтобы всегда можно было легко восстановиться в случае нештатной ситуации. Давайте смотреть как выполнить это не сложное действие.
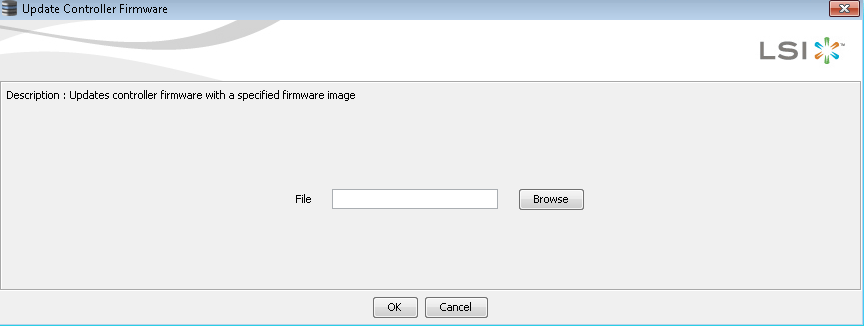
Для того чтобы попасть в консоль обновления прошивки LSI контроллера, вам нужно установить MegaRAID Storage Manager (MSM). После чего логинимся под учетной записью имеющей административные права. Сразу перед вами появляется Dashboard, со сводной информацией, жмем ссылку Update firmware снизу по центру.
Как обновить прошивку (Firmware) на контроллере LSI-02
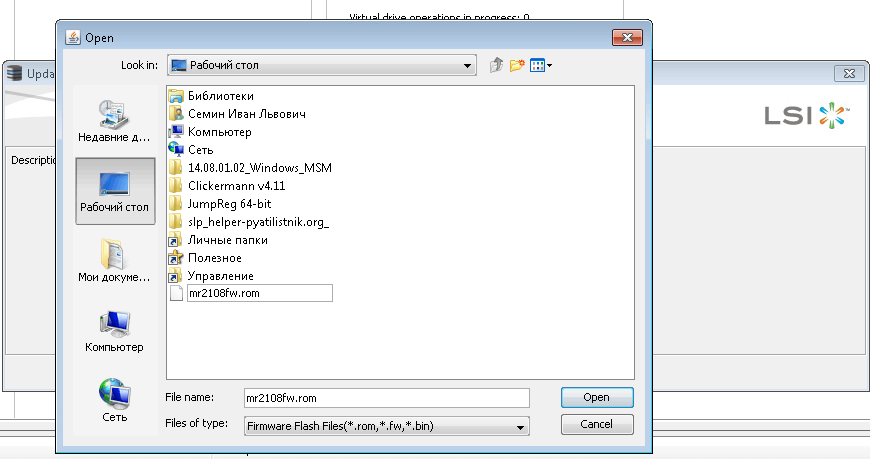
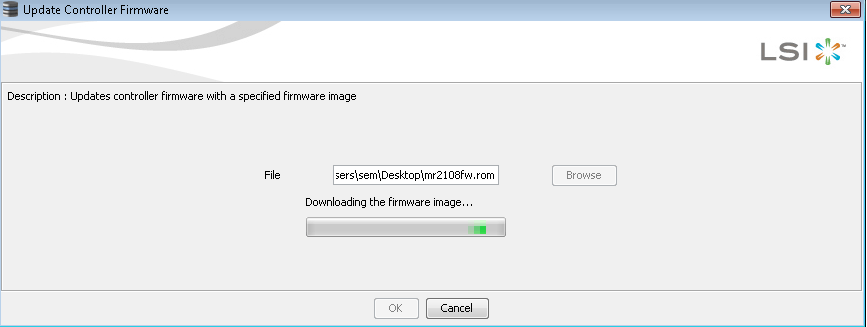
Указываем путь к вашему файлу прошивки, если у вас его нет то прочитайте Где скачать драйвера, утилиты и прошивки для LSI контроллеров MegaRAID
Как обновить прошивку (Firmware) на контроллере LSI-03
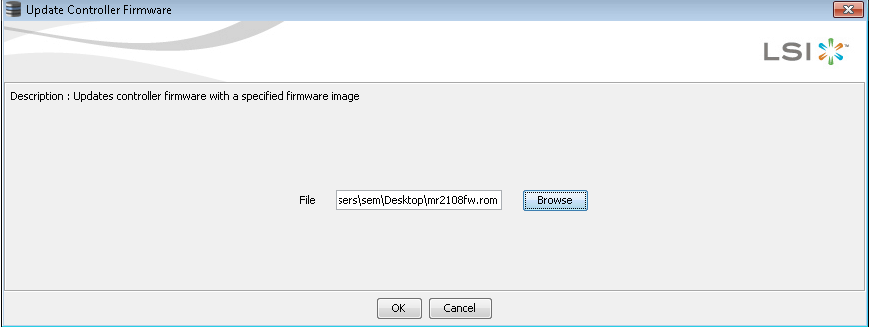
Выбираем файл и жмем Open
Как обновить прошивку (Firmware) на контроллере LSI-04
Как обновить прошивку (Firmware) на контроллере LSI-05
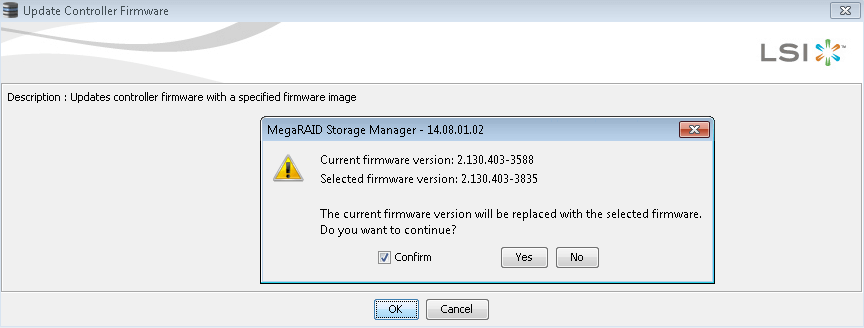
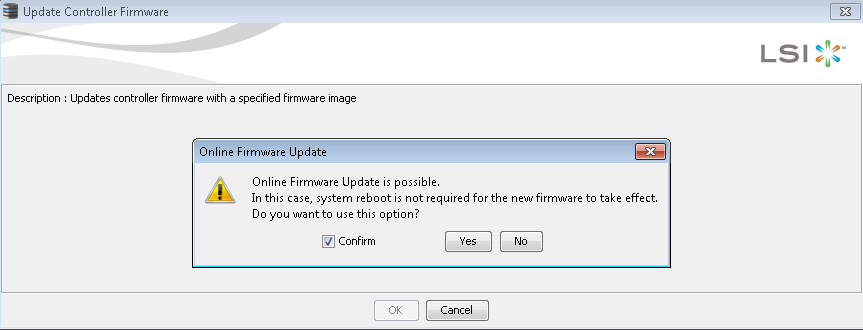
Видим, что моя прошивка новее, ставим галку Confirm и жмем Yes.
Как обновить прошивку (Firmware) на контроллере LSI-06
Начнется загрузка прошивки на контроллер
Как обновить прошивку (Firmware) на контроллере LSI-07
После ее загрузки, ставим галку Confirm и жмем Yes.
Как обновить прошивку (Firmware) на контроллере LSI-08
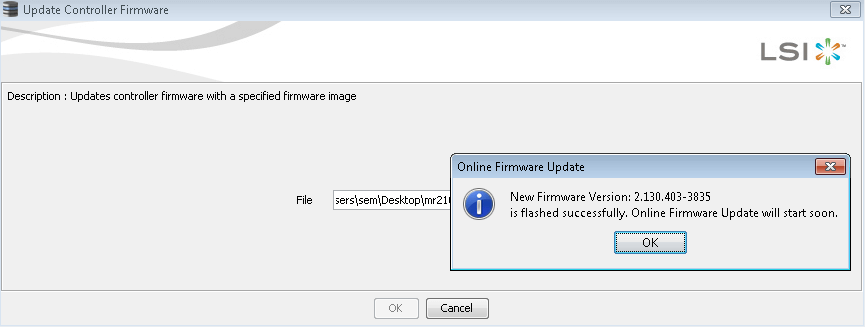
После прошивки видим, что все успешно установилось.
Как обновить прошивку (Firmware) на контроллере LSI-09
Вот так вот просто обновить прошивку (Firmware) на контроллере LSI. В примере был прошит контроллер
Популярные Похожие записи:
2 Responses to Как обновить прошивку (Firmware) на контроллере LSI
Добрый день, может сталкивались с такой проблемой.
Обновил прошивку рейда, перезагрузил сервера. И теперь при входе в MegaRAID Storage Manager, пишет ошибку «Servers could not be found because server may be down or server not installed in the host system»
Пытался сделать по вашей статье, не помогло.
В device manager пишет, «This device cannot start. (Code 10) An I/O adapter hardware error has occurred.»
Контроллер LSI MegaRAID SAS 9240-4i
у меня один в один такая же ситуация, обновил и все, кабзда.Контроллер такой же
Источник
Download LSI Avago MegaRAID SAS 9341-4i Drivers
You are running: OS X 10
Drivers found in our drivers database.
The release date of the drivers: 13 Jan 2023
See more information about Outbyte and unistall app.instrustions. Please review Outbyte EULA and app.privacy
Click “Download Now” to get the Drivers Update Tool that comes with the LSI Avago MegaRAID SAS 9341-4i :componentName driver. The utility will automatically determine the right driver for your system as well as download and install the LSI Avago MegaRAID SAS 9341-4i :componentName driver. Being an easy-to-use utility, The Drivers Update Tool is a great alternative to manual installation, which has been recognized by many computer experts and computer magazines. The tool contains only the latest versions of drivers provided by official manufacturers. It supports such operating systems as Windows 10, Windows 11, Windows 8 / 8.1, Windows 7 and Windows Vista (64/32 bit). To download and install the LSI Avago MegaRAID SAS 9341-4i :componentName driver manually, select the right option from the list below.
LSI Avago MegaRAID SAS 9341-4i Drivers
-
Hardware Name: Avago MegaRAID SAS 9341-4i Device type: HardDisk Controllers Manufactures: LSI Driver Version: 6.701.07.00 Release Date: 30 Aug 2013 File Size: 3.1KB System: Windows 8 64-bit Hardware ID: PCIVEN_1000&DEV_005F&SUBSYS_93431000 -
Hardware Name: Avago MegaRAID SAS 9341-4i Device type: HardDisk Controllers Manufactures: LSI Driver Version: 6.704.12.00 Release Date: 30 May 2014 File Size: 20.2KB System: Windows 2003, Windows Vista, Windows 8.1 64-bit, Windows 8 64-bit, Windows 7 64-bit, Windows XP, Windows 7, Windows 8, Windows Vista 64-bit Hardware ID: PCIVEN_1000&DEV_005F&SUBSYS_93431000 -
Hardware Name: Avago MegaRAID SAS 9341-4i Device type: HardDisk Controllers Manufactures: LSI Driver Version: 6.706.06.00 Release Date: 12 Nov 2014 File Size: 12.6KB System: Windows XP, Windows XP 64-bit, Windows Vista, Windows Vista 64-bit, Windows 7, Windows 7 64-bit, Windows 8, Windows 8 64-bit, Windows 8.1, Windows 8.1 64-bit Hardware ID: PCIVEN_1000&DEV_005F&SUBSYS_93431000 -
Hardware Name: Avago MegaRAID SAS 9341-4i Device type: HardDisk Controllers Manufactures: LSI Driver Version: 6.707.07.00 Release Date: 06 Mar 2015 File Size: 12.7KB System: Windows XP 64-bit, Windows Vista, Windows Vista 64-bit, Windows 7, Windows 7 64-bit, Windows 8, Windows 8 64-bit, Windows 8.1, Windows 8.1 64-bit Hardware ID: PCIVEN_1000&DEV_005F&SUBSYS_93431000 -
Hardware Name: Avago MegaRAID SAS 9341-4i Device type: HardDisk Controllers Manufactures: LSI Driver Version: 6.710.11.00 Release Date: 24 Nov 2015 File Size: 16.5KB System: Windows Vista, Windows Vista 64-bit, Windows 7, Windows 7 64-bit, Windows 8, Windows 8 64-bit, Windows 8.1, Windows 8.1 64-bit, Windows 10, Windows 10 64-bit, Windows 11, Windows 11 64-bit Hardware ID: PCIVEN_1000&DEV_005F&SUBSYS_93431000 -
Hardware Name: Avago MegaRAID SAS 9341-4i Device type: HardDisk Controllers Manufactures: LSI Driver Version: 6.712.13.00 Release Date: 02 Sep 2016 File Size: 11.0KB System: Windows Vista, Windows Vista 64-bit, Windows 8, Windows 8 64-bit Hardware ID: PCIVEN_1000&DEV_005F&SUBSYS_93431000 -
Hardware Name: Avago MegaRAID SAS 9341-4i Device type: HardDisk Controllers Manufactures: LSI Driver Version: 6.713.05.00 Release Date: 18 Nov 2016 File Size: 11.1KB System: Windows 8, Windows 8 64-bit, Windows 8.1, Windows 8.1 64-bit, Windows 10, Windows 10 64-bit, Windows 11, Windows 11 64-bit Hardware ID: PCIVEN_1000&DEV_005F&SUBSYS_93431000 -
Hardware Name: Avago MegaRAID SAS 9341-4i Device type: HardDisk Controllers Manufactures: LSI Driver Version: 6.714.18.00 Release Date: 22 Oct 2018 File Size: 4.9KB System: Windows 8, Windows 8 64-bit, Windows 8.1, Windows 8.1 64-bit, Windows 10, Windows 10 64-bit, Windows 11, Windows 11 64-bit Hardware ID: PCIVEN_1000&DEV_005F&SUBSYS_93431000
Was this page helpful?
What percentage of users, installed LSI drivers?
Источник
Скачать LSI Avago MegaRAID SAS 9361-4i Драйверы
Вы запускаете: OS X 10
Драйверы найдены в нашей базе драйверов.
Дата выпуска драйверов: 13 Jan 2023
См. дополнительную информацию об инструкциях по Outbyte и деинсталяции app.instrustions. Пожалуйста, просмотрите Outbyte EULA и app.privacy
Нажмите «Загрузить сейчас», чтобы получить средство обновления драйверов, которое поставляется с драйвером LSI Avago MegaRAID SAS 9361-4i :componentName. Утилита автоматически определит подходящий драйвер для вашей системы, а также загрузит и установит драйвер LSI Avago MegaRAID SAS 9361-4i :componentName. Инструмент обновления драйверов — это простая в использовании утилита, которая представляет собой отличную альтернативу ручной установке, признанной многими компьютерными экспертами и компьютерными журналами. Инструмент содержит только последние версии драйверов от официальных производителей. Он поддерживает такие операционные системы, как Windows 10, Windows 11, Windows 8 / 8.1, Windows 7 и Windows Vista (64/32 бит). Чтобы загрузить и установить драйвер LSI Avago MegaRAID SAS 9361-4i :componentName вручную, выберите нужный вариант из списка ниже.
LSI Avago MegaRAID SAS 9361-4i Драйверы
-
Имя оборудования: Avago MegaRAID SAS 9361-4i Тип устройства: Контроллеры Жестких Дисков Manufactures: LSI Версия драйвера: 6.701.07.00 Дата выпуска: 30 Aug 2013 Размер файла: 3.1KB Система: Windows 8 64-bit Идентификатор оборудования: PCIVEN_1000&DEV_005D&SUBSYS_93631000 -
Имя оборудования: Avago MegaRAID SAS 9361-4i Тип устройства: Контроллеры Жестких Дисков Manufactures: LSI Версия драйвера: 6.704.12.00 Дата выпуска: 30 May 2014 Размер файла: 20.2KB Система: Windows 2003, Windows Vista, Windows 8.1 64-bit, Windows 8 64-bit, Windows 7 64-bit, Windows XP, Windows 7, Windows 8, Windows Vista 64-bit Идентификатор оборудования: PCIVEN_1000&DEV_005D&SUBSYS_93631000 -
Имя оборудования: Avago MegaRAID SAS 9361-4i Тип устройства: Контроллеры Жестких Дисков Manufactures: LSI Версия драйвера: 6.706.06.00 Дата выпуска: 12 Nov 2014 Размер файла: 12.6KB Система: Windows XP, Windows XP 64-bit, Windows Vista, Windows Vista 64-bit, Windows 7, Windows 7 64-bit, Windows 8, Windows 8 64-bit, Windows 8.1, Windows 8.1 64-bit Идентификатор оборудования: PCIVEN_1000&DEV_005D&SUBSYS_93631000 -
Имя оборудования: Avago MegaRAID SAS 9361-4i Тип устройства: Контроллеры Жестких Дисков Manufactures: LSI Версия драйвера: 6.707.07.00 Дата выпуска: 06 Mar 2015 Размер файла: 12.7KB Система: Windows XP 64-bit, Windows Vista, Windows Vista 64-bit, Windows 7, Windows 7 64-bit, Windows 8, Windows 8 64-bit, Windows 8.1, Windows 8.1 64-bit Идентификатор оборудования: PCIVEN_1000&DEV_005D&SUBSYS_93631000 -
Имя оборудования: Avago MegaRAID SAS 9361-4i Тип устройства: Контроллеры Жестких Дисков Manufactures: LSI Версия драйвера: 6.710.11.00 Дата выпуска: 24 Nov 2015 Размер файла: 16.5KB Система: Windows Vista, Windows Vista 64-bit, Windows 7, Windows 7 64-bit, Windows 8, Windows 8 64-bit, Windows 8.1, Windows 8.1 64-bit, Windows 10, Windows 10 64-bit, Windows 11, Windows 11 64-bit Идентификатор оборудования: PCIVEN_1000&DEV_005D&SUBSYS_93631000 -
Имя оборудования: Avago MegaRAID SAS 9361-4i Тип устройства: Контроллеры Жестких Дисков Manufactures: LSI Версия драйвера: 6.712.13.00 Дата выпуска: 02 Sep 2016 Размер файла: 11.0KB Система: Windows Vista, Windows Vista 64-bit, Windows 8, Windows 8 64-bit Идентификатор оборудования: PCIVEN_1000&DEV_005D&SUBSYS_93631000 -
Имя оборудования: Avago MegaRAID SAS 9361-4i Тип устройства: Контроллеры Жестких Дисков Manufactures: LSI Версия драйвера: 6.713.05.00 Дата выпуска: 18 Nov 2016 Размер файла: 11.1KB Система: Windows 8, Windows 8 64-bit, Windows 8.1, Windows 8.1 64-bit, Windows 10, Windows 10 64-bit, Windows 11, Windows 11 64-bit Идентификатор оборудования: PCIVEN_1000&DEV_005D&SUBSYS_93631000 -
Имя оборудования: Avago MegaRAID SAS 9361-4i Тип устройства: Контроллеры Жестких Дисков Manufactures: LSI Версия драйвера: 6.714.18.00 Дата выпуска: 22 Oct 2018 Размер файла: 4.9KB Система: Windows 8, Windows 8 64-bit, Windows 8.1, Windows 8.1 64-bit, Windows 10, Windows 10 64-bit, Windows 11, Windows 11 64-bit Идентификатор оборудования: PCIVEN_1000&DEV_005D&SUBSYS_93631000
Была ли эта страница полезной?
Какой процент пользователей установили драйверы LSI?
Источник

Avago Technologies
— 9 —
MegaRAID SAS Device Driver Installation User Guide
June 2015
Windows Driver Installation
MegaRAID Primary Storage
Chapter 2: Windows Driver Installation
This chapter describes the installation of the following Microsoft Windows OSs:
Windows 7 Client SP1
Windows 8, 8.1, 8.1 Update 1
Windows 2008 R2 SP1
Windows Server 2012
Windows Server 2012 R2
Win Server 2012 R2 Update 1
2.1
MegaRAID Primary Storage
In the MegaRAID primary storage configuration, the Windows OS is installed on virtual drives provided by the
MegaRAID controller. The MegaRAID controllers (6Gb/s and 12Gb/s) include pre-boot configuration utilities
(WebBIOS™ and Ctrl-R) that creates the virtual drive before the installation of the Windows OS starts.
To install the Windows OS, prepare a USB flash drive, CD-ROM or diskette, as appropriate, with the MegaRAID driver.
The driver is distributed in a series of nested compressed files. Use an existing Windows device to extract the files for
the driver-loading device (USB, CD-ROM, or diskette) by using the appropriate Windows driver. Only two driver choices
exist across the supported Windows versions: one for 32-bit systems or one for 64-bit systems.
2.1.1
Storage Configuration
The procedures in this section describe how to create the virtual drive used for the Windows OS. You can add other
virtual drives to the running OS after the Windows OS has been installed. The MegaRAID preboot BIOS utilities, such as
WebBIOS (for 6Gb/s controllers) and Ctrl-R (for 12Gb/s controllers) that create the virtual disk for the Windows OS are
accessible during the power-on self-test (POST) part of the bootup process.
Refer to the MegaRAID SAS Software User Guide or the 12Gb/s MegaRAID® SAS Software User Guide for more information
about the WebBIOS configuration utility and the Ctrl-R Utility, respectively.
2.1.1.1
Creating Storage Configuration Using WebBIOS
The following procedure describes the creation of a RAID 1 array. You can use other RAID levels, and the steps are the
same except when selecting the RAID level. In a RAID 1 array, the RAID controller duplicates all data from one drive to
a second drive. The RAID 1 array provides complete data redundancy, but at the cost of doubling the required data
storage capacity. It is appropriate for small databases or any other environment that requires fault tolerance but
small capacity.
1.
When the host computer is booting, hold down the Ctrl key and press the H key when the following text appears
on the window:
Copyright© Avago Technologies
Press <Ctrl><H> for WebBIOS
The Controller Selection window appears.
2.
If the system contains multiple SAS/SATA controllers, select a controller.
3.
Click Start.
The main WebBIOS CU window appears.
Содержание
- Установка megaraid storage manager на windows
- Установка megaraid storage manager на windows
- Список инструментов управления для LSI/Avago
- Утилита LSI Storage Authority
- Утилита MegaRAID Storage Manager
- Утилита StorCLI
- Основные возможности Storecli
- Утилита Megacli
- LSI PreBoot CD
- LSI Bios Configuration Utility
- MegaRAID BIOS COnfig Utility
- Установка megaraid storage manager на windows
- Установка MegaRAID Storage Manager на Xen Cloud Platform
- Подключние к MegaRAID Storage Manager
- Avago MegaRAID Storage Manager — интерактивное руководство
- Ссылки
- Установка MegaRAID Storage Manager
- Установка megaraid storage manager на windows
- Что такое LSI Storage Authority Software?
- Где скачать LSI Storage Authority
- Установка утилиты LSA
- Обзор настроек контроллера в LSA
- Настройка уведомлений в LSA
Установка megaraid storage manager на windows
 Добрый день! Уважаемые читатели и гости одного из крупнейших IT блогов рунета Pyatilistnik.org. В прошлый раз мы с вами разобрали вопрос, какие есть инструменты управления RAID контроллерами LSI/Avago. Сегодня я хочу остановиться на вопросе правильной установки одного из этих инструментов, а именно речь пойдет про MegaRAID Storage Manager. Делать мы все это будем в операционной системе Windows Server 2012 R2, но все описанные этапы будут применимы и в других версиях.
Где скачать MegaRAID Storage Manager (MSM) для нужной вам платформы описано тут. После закачки распаковываем архив и запускаем setup.exe.

Как установить MegaRAID Storage Manager (MSM) в windows server 2012R2-01
Дистрибутив проверит наличие у вас библиотек «Microsoft Visual C++», если их нет, то мастер установки вам предложит, это исправить. Нажимаем «Install»

Как установить MegaRAID Storage Manager (MSM) в windows server 2012R2-02
Соглашаемся с лицензией.

Как установить MegaRAID Storage Manager (MSM) в windows server 2012R2-03
Далее нажимаем кнопку «Install»

Как установить MegaRAID Storage Manager (MSM) в windows server 2012R2-04
В итоге компоненты Microsoft Visual C++ успешно установлены.

Как установить MegaRAID Storage Manager (MSM) в windows server 2012R2-05
Начинается установка MSM.

Как установить MegaRAID Storage Manager (MSM) в windows server 2012R2-06

Как установить MegaRAID Storage Manager (MSM) в windows server 2012R2-07
Снова соглашаемся с лицензий.

Как установить MegaRAID Storage Manager (MSM) в windows server 2012R2-08
Для всех пользователей будет доступна данная программа.

Как установить MegaRAID Storage Manager (MSM) в windows server 2012R2-09
При желании можно сменить каталог установки

Как установить MegaRAID Storage Manager (MSM) в windows server 2012R2-10

Как установить MegaRAID Storage Manager (MSM) в windows server 2012R2-11
Выбираем установку без LDAP

Как установить MegaRAID Storage Manager (MSM) в windows server 2012R2-12

Как установить MegaRAID Storage Manager (MSM) в windows server 2012R2-14
Через пол минуты мастер закончит установку утилиты.

Как установить MegaRAID Storage Manager (MSM) в windows server 2012R2-15
У вас появится вот такой ярлык на рабочем столе, запускаем его

Как установить MegaRAID Storage Manager (MSM) в windows server 2012R2-16
Произойдет сканирование в вашей системе службы MSM.Убедитесь, что в вашем фаэрволе открыт входящий порт 3071, в противном случае вы получите ошибку, что сервер не найден»

Как установить MegaRAID Storage Manager (MSM) в windows server 2012R2-17
Источник
Установка megaraid storage manager на windows
Добрый день! Уважаемые читатели и гости одного из популярных IT блогов в российском сегменте интернета Pyatilistnik.org. В прошлый раз мы с вами успешно вывели операционную систему Windows из тестового режима. Сегодня я бы хотел написать обзорную, обучающую статью про инструменты управления RAID контроллерами Avago/LSI. Уверен, что начинающим инженерам информация окажется полезной, сразу увидев все популярные утилиты для повседневной работы с данным оборудованием.
Список инструментов управления для LSI/Avago
Правильно подобранная утилита, может выполнять поставленную задачу в разы удобнее и быстрее, и знание всех инструментов является прямой обязанностью любого системного администратора.
Про LSA (LSI Storage Authority) я уже делал подробнейший обзор. На текущий момент, это флагманский инструмент имеющий графический интерфейс управления, прямо из вашего браузера, что делает его кросплатфомным, убирающим привязку к операционной системе. Что хорошо, что утилита работает не на медленном Java, а на HTML5, что делает ее очень удобной.
Вот так выглядит общий дашборд управления, на нем вы увидите список ваших устройств представленных на сервере, в моем примере Controller ID: 0 LSI MegaRAID SAS 9280-16i4e.
Вот так выглядит информация по вашим виртуальным и физическим дискам. Хочу отметить, что LSI Storage Authority показывает больше информации по свойствам физических дисков, тут вы легко обнаружите:
Утилита MegaRAID Storage Manager
Тут же есть область «Action», позволяющая загрузить конфигурацию, обновить прошивку RAID контроллера, настроить звуковой сигнал предупреждения. Справа есть ссылки на документацию. Снизу вы увидите текущие события на вашем контроллере LSI/Avago. Вкладка «Physical» покажет ваши физические диски, выбрав любой из них вы увидите дополнительные свойства.
Вкладка «Logical» позволяет уже взаимодействовать с логическими сущностями. Например вы можете добавить HDD/SSD в существующий RAID массив. Вы легко можете изменить свойства любого Virtual Drive, изменить вид кэширования, включить или отключить инициализацию.
Методы создания различных видов RAID через MSM я подробно описывал. Чаще всего есть поддержка всех видов, но в некоторых контроллерах RAID 50 и 60 нужно разблокировать с помощью специального кода.
Утилита StorCLI
Скачать StorCLI можно по ссылке. Запускаете командную строку в режиме администратора. Для примера вы можете посмотреть общую, сводную информацию, о контроллере, для этого введите:
На выходе вы увидите:
Основные возможности Storecli
Storecli поддерживает операционные системы:
Утилита Storecli умеет и имеет в своем арсенале:
Как видите утилита Storecli умеет делать с RAID контроллерами LSI/Avago все, что угодно, главное привыкнуть к простому синтаксису и в перед.
Утилита Megacli
Ранее перед утилитой Storecli, был инструмент Megacli, на текущий момент он устарел и его можно применять только со старыми контроллерами, которые выпущены до 2014 года, так как более новые модели он не поддерживает. Ранее я вам показывал, как устанавливать в ESXI 5.5, там мы с помощью него производили настройку контроллера и пытались посмотреть IOPS.
Изучить весь список команд утилиты Megacli вы можете по ссылке слева.
LSI PreBoot CD
LSI Bios Configuration Utility
Данная утилита поддерживает большинство известных видов RAID.
MegaRAID BIOS COnfig Utility
В более старых моделях контроллеров LSI, за место LSI Bios Configuration Utility идет утилита MegaRAID BIOS COnfig Utility, она так же позволяет производить настройку контроллера до установки на него операционной системы. Выглядит данная DOS подобная утилита вот так.
Вот так выглядит окно свойств, где вы выбирает нужный вид RAID и задаете всевозможные настройки.
Источник
Установка megaraid storage manager на windows
В данном обзоре показывается возможность мониторинга в гипервизоре XEN контроллеров основанных на стеке LSI MegaRAID.
Это могут быть контроллеры как в форме дочерних плат (LSI MegaRAID 9260-8i mezz card), так и полноразмерные PCI-E контроллеры серии MegaRAID: LSI924X, LSI926X, LSI927X, LSI928X.
Для целей управления и мониторинга контроллеров MegaRAID используется програмнное обеспечение LSI MegaRAID Storage Manager (далее MSM).
В качестве тестового стенда использовалось следующее оборудование и программное обеспечение:
Установка MegaRAID Storage Manager на Xen Cloud Platform
Для установки MegaRAID Storage Manager на Xen Cloud Platform убедитесь в возможности удаленного подключения к серверу по протоколу ssh. На главном экране настроек Xen Cloud Platform выберите меню Remote Service Configuration.

При помощи программы (scp, WinSCP) сохраните файл с архивом MegaRAID Storage Manager (на момент написания статьи 13.04.03.01_Linux (x86)_MSM.tar.gz для 32-битных систем или 13.04.03.01_Linux(x64)_MSM.tar.gz для 64-битных систем) в домашнем каталоге пользователя root и разархивируйте его командой
Перейдите в каталог disk
Для удаленного мониторинга состояния RAID контроллера на сервере необходимо открыть tcp порт 3071.
Откройте для редактирования файл /etc/sysconfig/iptables
Добавьте правило, разрешающее прохождение пакетов на порт 3071
Также этот порт должен быть открыть на промежуточном сетевом оборудовании между сервером и клиентской рабочей станцией.
Подключние к MegaRAID Storage Manager
При помощи клиента MegaRAID Storage Manager для Windows-систем можно подключаться для удаленного управления и мониторинга RAID контроллеров LSI.
Запустите MegaRAID Storage Manager.
В поле IP Address введите IP-адрес сервера и нажмите Discover Host.

В окне Enter User Name and Password введите имя и пароль пользователя root.

После чего откроется консоль MegaRAID Storage Manager
Источник
Avago MegaRAID Storage Manager — интерактивное руководство


MegaRAID Storage Manager мне нужен для того, чтобы воткнуть в свой комп RAID контроллер и прошить его перед установкой в сервер. Прикрепляю к статье интерактивное руководство. MegaRAID Storage Manager есть под разные операционные системы. Будем устанавливать версию для Windows.
Ссылки
Интерактивное руководство В хроме подглючивает, открываете через Firefox.
Установка MegaRAID Storage Manager
Качаем MegaRAID Storage Manager.
Я скачал версию 7.05.00.02.
Данная версия поддерживает контроллеры:
* Контроллеры предыдущих версий должны работать, но не тестировались.
Работает в ОС 32 и 64 бит:
Install. Требуется C++ пакет.
Условия установки соблюдены. Открывается окно мастера установки.
Принимаем лицензионное соглашение. Next.
Я выбираю установку для всех пользователей. Next.
Можно сменить папку установки. Next.
Выбираю обычную установку. Next.
Предлагают настроить LDAP, забиваю. Next.
Указываем размер ключа. Поскольку я на своей же машине буду шить контроллер, то эта опция — по барабану. Next.
Вот тут я подвис и оставил значение по умолчанию. Это настройка диапазона времени, за которое выводить уведомления. Мне оно не нужно. Next.
Эта страница предназначена только для того, чтобы нажать кнопку Install или не нажать. Идиотизм.
Установка завершена. Finish.
На рабочем столе появляется иконка MegaRAID Storage Manager. Для работу нужна java.
Источник
Установка megaraid storage manager на windows
Добрый день! Уважаемые читатели и гости одного из лучших IT блогов в российском сегменте интернета Pyatilistnik.org. В прошлый раз мы с вами научились производить отключение защитника Windows 8.1, чтобы он у вас не конфликтовал с другим антивирусом и не потреблял лишние ресурсы. Двигаемся дальше и сегодня я хочу с вами разобрать установку одной замечательной утилиты, которая пришла на смену LSI MSM, стала его реинкарнацией, речь пойдет про LSA 7.5 (LSI Storage Authority Software). Мы разберем ее основные возможности, удобства и недостатки. Уверен, что будет интересно.
Что такое LSI Storage Authority Software?
Где скачать LSI Storage Authority
Для того, чтобы загрузить последнюю версию LSA вам необходимо зайти на сайт Lenovo, которой на текущий момент принадлежит бизнес LSI/Avago контроллеров, это долгая история поглощений.
В поисковую строку вводим LSI Storage Authority и нажимаем найти.

Переходим на вкладку загрузки и выбираем версию под вашу операционную систему, я буду устанавливать для Windows.

На текущий момент последней версией является 004.189.000.000. Она рассчитана на операционные системы Windows Server 2012 R2 до Windows Server 2019.

Распаковываем дистрибутив LSA и запускаем для последующей установки.

Установка утилиты LSA
Запускаем файл setup.exe

Если у вас не установлены компоненты Microsoft Visual C++ 2010, то они будут доставлены, нажимаем кнопку «Install«.

Откроется окно установки модуля OpenSLP 2, нажимаем «Next».

Принимаем лицензионное соглашение «I accept the terms in the License Agreement».

Достаточно будет выбрать обычную установку. нажмите «Typical».

Нажимаем кнопку «Install». Все OpenSLP 2 установлен.

Когда нужные компоненты установлены, можно переходить к инсталляции непосредственно LSI Storage Authority. На первом окне мастера просто нажмите «Next».

Принимаем лицензионное соглашение.

Можете при желании заполнить информацию, о пользователе.

Далее вы можете при желании поменять каталог установки, по умолчанию, это C:Program Files (x86)LSILSIStorageAutority

Далее вам необходимо выбрать тип установки LSI Storage Authority, тут четыре варианта:
Я выбираю полный режим Gateway.

Обратите внимание на порты по умолчанию, по которым работает LSI Storage Authority, это веб-порт подключения 2463 и LSA Server Port 9000. При желании вы можете их изменить.

Далее вы можете выбрать режим логирования и оповещения, я оставлю «Start From Now»

Завершаем установку кнопкой «Install»

У вас на рабочем столе появится значок Launch LSA.

В результате у вас откроется ваш браузер по умолчанию, со ссылкой http://localhost:2463/ui/remoteserver/index.html. Подключаемся к вашему серверу.

Указываем логин и пароль, при желании вы можете указать и доменные данные Active Directory.

В результате вы попадаете на общий экран управления вашим контроллером.

В пункте «Select Controller», позволяет вам выбрать нужный RAID контроллер, если на сервере их установлено несколько.

В моей системе представлен контроллер Controller ID: 0 LSI MegaRAID SAS 9280-16i4e. Тут я сразу вижу:

Справа вы обнаружите полезные кнопки:

Вот так выглядит скачанный лог


Обзор настроек контроллера в LSA
Щелкаем по имени вашего контроллера, в моем примере, это LSI MegaRAID SAS 9280-16i4e.

В пункте «Controller Info» нажмите «+», чтобы развернуть его сводные данные.

Ниже будет раздел «Premium Features», где вы можете при наличии ключей активировать дополнительные плюшки.

В правой части экрана будут кнопки действий, тут нас будет интересовать две:


Разобравшись с кнопками действий, посмотрим информацию о виртуальных дисках и физических дисках. Для этого загляните в соответствующую область. Как видим у меня есть три Virtual Drives.

На каждом есть вкладка «Physical Drives», позволяющая посмотреть из каких физических дисков состоит данный массив. Например посмотрим состав DG_2. Вижу, что это 6 SSD дисков. Выбрав любой из них, я могу посмотреть все его характеристики: Статус, Product ID, Vendor ID, Serial Number, Device ID, объем, температура и многое другое. Тут же вы можете перевести его в оффлайн, разметить.

Настройка уведомлений в LSA
Настроить какие оповещения стоит логировать и проводить оповещение в LSI Storage Authority находится в настройках, которые можно найти на против имени вашей учетной записи. Выбрав пункт «Settings».

Вкладка «Alert Settings» позволяет удобно выставить галочки на против того типа событий, которые следует логировать и посылать по почте.

Mail Server позволяет вам задать учетную запись от имени которой будут отправляться письма с оповещениями.

На вкладке «Email» вы можете составить список email адресов на которые нужно будет высылать оповещения.
Источник
 Loading…
![]()
MegaRAID® SAS Device Driver Installation
User Guide
Revision 2.2
June 2015
DB15-001203-02

MegaRAID SAS Device Driver Installation User Guide
June 2015
For a comprehensive list of changes to this document, see the Revision History.
|
Corporate Headquarters |
|
Website |
|
San Jose, CA |
tech.support@avagotech.com |
www.lsi.com |
Avago Technologies, the A logo, LSI, Storage by LSI, MegaRAID, and MegaRAID Storage Manager are trademarks of Avago Technologies in the United States and other countries. All other brand and product names may be trademarks of their respective companies.
Data subject to change. Copyright © 2006–2015 Avago Technologies. All Rights Reserved.

|
MegaRAID SAS Device Driver Installation User Guide |
Table of Contents |
|
June 2015 |
Table of Contents
Chapter 1: Overview . . . . . . . . . . . . . . . . . . . . . . . . . . . . . . . . . . . . . . . . . . . . . . . . . . . . . . . . . . . . . . . . . . . . . . . . . . . . . . . . . . . . . . . . . . . . . . . . . . . . . . . . . . . . 5
1.1 Driver Description . . . . . . . . . . . . . . . . . . . . . . . . . . . . . . . . . . . . . . . . . . . . . . . . . . . . . . . . . . . . . . . . . . . . . . . . . . . . . . . . . . . . . . . . . . . . . . . . . . . . . . . . . . . . . . . . . . 5
1.1.1 Driver Functions . . . . . . . . . . . . . . . . . . . . . . . . . . . . . . . . . . . . . . . . . . . . . . . . . . . . . . . . . . . . . . . . . . . . . . . . . . . . . . . . . . . . . . . . . . . . . . . . . . . . . . . . . . . . . 5
1.1.2 Driver Updates . . . . . . . . . . . . . . . . . . . . . . . . . . . . . . . . . . . . . . . . . . . . . . . . . . . . . . . . . . . . . . . . . . . . . . . . . . . . . . . . . . . . . . . . . . . . . . . . . . . . . . . . . . . . . . . 6
1.2 Driver Names . . . . . . . . . . . . . . . . . . . . . . . . . . . . . . . . . . . . . . . . . . . . . . . . . . . . . . . . . . . . . . . . . . . . . . . . . . . . . . . . . . . . . . . . . . . . . . . . . . . . . . . . . . . . . . . . . . . . . . . 6
Chapter 2: Windows Driver Installation . . . . . . . . . . . . . . . . . . . . . . . . . . . . . . . . . . . . . . . . . . . . . . . . . . . . . . . . . . . . . . . . . . . . . . . . . . . . . . . . . . . . . . . . . . 9
2.1 MegaRAID Primary Storage . . . . . . . . . . . . . . . . . . . . . . . . . . . . . . . . . . . . . . . . . . . . . . . . . . . . . . . . . . . . . . . . . . . . . . . . . . . . . . . . . . . . . . . . . . . . . . . . . . . . . . . . . 9 2.1.1 Storage Configuration . . . . . . . . . . . . . . . . . . . . . . . . . . . . . . . . . . . . . . . . . . . . . . . . . . . . . . . . . . . . . . . . . . . . . . . . . . . . . . . . . . . . . . . . . . . . . . . . . . . . . . . . 9 2.1.1.1 Creating Storage Configuration Using WebBIOS . . . . . . . . . . . . . . . . . . . . . . . . . . . . . . . . . . . . . . . . . . . . . . . . . . . . . . . . . . . . . . . . . . . . . . . . 9 2.1.1.2 Creating Storage Configuration Using Ctrl-R . . . . . . . . . . . . . . . . . . . . . . . . . . . . . . . . . . . . . . . . . . . . . . . . . . . . . . . . . . . . . . . . . . . . . . . . . . . 12
2.2 Primary OS Storage on the MegaRAID Controller . . . . . . . . . . . . . . . . . . . . . . . . . . . . . . . . . . . . . . . . . . . . . . . . . . . . . . . . . . . . . . . . . . . . . . . . . . . . . . . . . . . . 14 2.3 Secondary Storage on the MegaRAID Controller with the Windows 2008 OS . . . . . . . . . . . . . . . . . . . . . . . . . . . . . . . . . . . . . . . . . . . . . . . . . . . . . . . . . 14 2.4 Using the Device Manager to Install MegaRAID on the Windows 2008 OS . . . . . . . . . . . . . . . . . . . . . . . . . . . . . . . . . . . . . . . . . . . . . . . . . . . . . . . . . . . . 15 2.5 Installing a MegaRAID Driver on the Microsoft Windows 8 OS . . . . . . . . . . . . . . . . . . . . . . . . . . . . . . . . . . . . . . . . . . . . . . . . . . . . . . . . . . . . . . . . . . . . . . . 15 2.5.1 Driver Upgrades . . . . . . . . . . . . . . . . . . . . . . . . . . . . . . . . . . . . . . . . . . . . . . . . . . . . . . . . . . . . . . . . . . . . . . . . . . . . . . . . . . . . . . . . . . . . . . . . . . . . . . . . . . . . 16 2.6 Installing a MegaRAID Driver on the Windows Server 2012 Operating System . . . . . . . . . . . . . . . . . . . . . . . . . . . . . . . . . . . . . . . . . . . . . . . . . . . . . . . . 18 2.6.1 Upgrading the Driver for the Windows Server 2012 Operating System . . . . . . . . . . . . . . . . . . . . . . . . . . . . . . . . . . . . . . . . . . . . . . . . . . . . . . . . 19
Chapter 3: Red Hat Linux Driver Installation . . . . . . . . . . . . . . . . . . . . . . . . . . . . . . . . . . . . . . . . . . . . . . . . . . . . . . . . . . . . . . . . . . . . . . . . . . . . . . . . . . . . . 23
3.1 Installing the Driver in a New Red Hat Enterprise Linux 5.x, 6.x, or 7.x OS . . . . . . . . . . . . . . . . . . . . . . . . . . . . . . . . . . . . . . . . . . . . . . . . . . . . . . . . . . . . . 23 3.1.1 Installing from a CD or a DVD . . . . . . . . . . . . . . . . . . . . . . . . . . . . . . . . . . . . . . . . . . . . . . . . . . . . . . . . . . . . . . . . . . . . . . . . . . . . . . . . . . . . . . . . . . . . . . . . 23 3.1.2 Creating a Driver Update Disk with a USB Drive . . . . . . . . . . . . . . . . . . . . . . . . . . . . . . . . . . . . . . . . . . . . . . . . . . . . . . . . . . . . . . . . . . . . . . . . . . . . . . 23 3.1.3 Installing from a Driver Update Diskette . . . . . . . . . . . . . . . . . . . . . . . . . . . . . . . . . . . . . . . . . . . . . . . . . . . . . . . . . . . . . . . . . . . . . . . . . . . . . . . . . . . . . . 24 3.2 Installing the Red Hat Enterprise Linux 5.x, 6.x, or 7.x Driver in an Existing Installation . . . . . . . . . . . . . . . . . . . . . . . . . . . . . . . . . . . . . . . . . . . . . . . . 24
3.3 Installing or Updating the Red Hat Linux System Driver . . . . . . . . . . . . . . . . . . . . . . . . . . . . . . . . . . . . . . . . . . . . . . . . . . . . . . . . . . . . . . . . . . . . . . . . . . . . . 25 3.3.1 Installing or Updating the Driver by Using the Generic RPMs . . . . . . . . . . . . . . . . . . . . . . . . . . . . . . . . . . . . . . . . . . . . . . . . . . . . . . . . . . . . . . . . . . 25 3.3.2 Installing or Updating the Driver by Using the DKMS RPMs . . . . . . . . . . . . . . . . . . . . . . . . . . . . . . . . . . . . . . . . . . . . . . . . . . . . . . . . . . . . . . . . . . . 25 3.4 Uninstalling the Red Hat System Driver . . . . . . . . . . . . . . . . . . . . . . . . . . . . . . . . . . . . . . . . . . . . . . . . . . . . . . . . . . . . . . . . . . . . . . . . . . . . . . . . . . . . . . . . . . . . . 26
Chapter 4: SuSE Linux Enterprise Server (SLES) Driver Installation . . . . . . . . . . . . . . . . . . . . . . . . . . . . . . . . . . . . . . . . . . . . . . . . . . . . . . . . . . . . . . . . 27
4.1 Installing the Driver in a New SuSE Linux Enterprise Server System . . . . . . . . . . . . . . . . . . . . . . . . . . . . . . . . . . . . . . . . . . . . . . . . . . . . . . . . . . . . . . . . . . 27 4.1.1 Installing from a CD or a DVD . . . . . . . . . . . . . . . . . . . . . . . . . . . . . . . . . . . . . . . . . . . . . . . . . . . . . . . . . . . . . . . . . . . . . . . . . . . . . . . . . . . . . . . . . . . . . . . . 27 4.1.2 Creating a Driver Update Disk with a USB Drive . . . . . . . . . . . . . . . . . . . . . . . . . . . . . . . . . . . . . . . . . . . . . . . . . . . . . . . . . . . . . . . . . . . . . . . . . . . . . . 27 4.1.3 Installing from a Driver Update Diskette . . . . . . . . . . . . . . . . . . . . . . . . . . . . . . . . . . . . . . . . . . . . . . . . . . . . . . . . . . . . . . . . . . . . . . . . . . . . . . . . . . . . . . 28 4.2 Installing or Updating the SuSE Linux Enterprise Server Driver . . . . . . . . . . . . . . . . . . . . . . . . . . . . . . . . . . . . . . . . . . . . . . . . . . . . . . . . . . . . . . . . . . . . . . . 28 4.2.1 Installing the Driver by Using the Generic RPMs . . . . . . . . . . . . . . . . . . . . . . . . . . . . . . . . . . . . . . . . . . . . . . . . . . . . . . . . . . . . . . . . . . . . . . . . . . . . . . 28 4.2.2 Installing or Updating the Driver by Using the DKMS RPMs . . . . . . . . . . . . . . . . . . . . . . . . . . . . . . . . . . . . . . . . . . . . . . . . . . . . . . . . . . . . . . . . . . . 29
4.3 Uninstalling the SuSE Linux Enterprise Server Driver . . . . . . . . . . . . . . . . . . . . . . . . . . . . . . . . . . . . . . . . . . . . . . . . . . . . . . . . . . . . . . . . . . . . . . . . . . . . . . . . 29
Chapter 5: Ubuntu Linux Driver Installation . . . . . . . . . . . . . . . . . . . . . . . . . . . . . . . . . . . . . . . . . . . . . . . . . . . . . . . . . . . . . . . . . . . . . . . . . . . . . . . . . . . . . 30
5.1 Installing the Driver in a New Ubuntu Linux LTS OS . . . . . . . . . . . . . . . . . . . . . . . . . . . . . . . . . . . . . . . . . . . . . . . . . . . . . . . . . . . . . . . . . . . . . . . . . . . . . . . . . 30 5.2 Removing the Driver in a New Ubuntu Linux LTS OS . . . . . . . . . . . . . . . . . . . . . . . . . . . . . . . . . . . . . . . . . . . . . . . . . . . . . . . . . . . . . . . . . . . . . . . . . . . . . . . . 31
Chapter 6: FreeBSD Driver Installation . . . . . . . . . . . . . . . . . . . . . . . . . . . . . . . . . . . . . . . . . . . . . . . . . . . . . . . . . . . . . . . . . . . . . . . . . . . . . . . . . . . . . . . . . . 32
6.1 Avago MegaRAID Drivers and Software for the FreeBSD OS . . . . . . . . . . . . . . . . . . . . . . . . . . . . . . . . . . . . . . . . . . . . . . . . . . . . . . . . . . . . . . . . . . . . . . . . . 32 6.2 Obtaining Avago FreeBSD Drivers . . . . . . . . . . . . . . . . . . . . . . . . . . . . . . . . . . . . . . . . . . . . . . . . . . . . . . . . . . . . . . . . . . . . . . . . . . . . . . . . . . . . . . . . . . . . . . . . . . 33 6.3 Creating a FreeBSD OS Driver Diskette . . . . . . . . . . . . . . . . . . . . . . . . . . . . . . . . . . . . . . . . . . . . . . . . . . . . . . . . . . . . . . . . . . . . . . . . . . . . . . . . . . . . . . . . . . . . . . 33 6.4 Installing the FreeBSD OS on Storage Managed by a MegaRAID Controller (Primary Storage) . . . . . . . . . . . . . . . . . . . . . . . . . . . . . . . . . . . . . . . . . 33 6.4.1 Installing the FreeBSD OS on Storage Managed by a MegaRAID Controller . . . . . . . . . . . . . . . . . . . . . . . . . . . . . . . . . . . . . . . . . . . . . . . . . . . . 33 6.4.2 Creating a Custom ISO Image to Exclude the mfi (4) . . . . . . . . . . . . . . . . . . . . . . . . . . . . . . . . . . . . . . . . . . . . . . . . . . . . . . . . . . . . . . . . . . . . . . . . . . 35 6.5 Installing the Kernel Driver on a FreeBSD OS that Boots from a Device Not Managed by a MegaRAID Controller (Secondary Storage) . . 36 6.5.1 Installing the FreeBSD OS on a System that Does Not Include an Avago Controller before the OS Installation . . . . . . . . . . . . . . . . . . . 36

|
MegaRAID SAS Device Driver Installation User Guide |
Table of Contents |
|
June 2015 |
|
|
6.5.2 Installing the FreeBSD OS on a System that Includes an Avago Controller before the OS Installation . . . . . . . . . . . . . . . . |
. . . . . . . . . . . 37 |
|
6.6 Updating Drivers in the FreeBSD System . . . . . . . . . . . . . . . . . . . . . . . . . . . . . . . . . . . . . . . . . . . . . . . . . . . . . . . . . . . . . . . . . . . . . . . . . . . . . . . . |
. . . . . . . . . . . 37 |
|
6.6.1 Updating the Kernel with the New Driver Source . . . . . . . . . . . . . . . . . . . . . . . . . . . . . . . . . . . . . . . . . . . . . . . . . . . . . . . . . . . . . . . . . . |
. . . . . . . . . . . 37 |
|
6.6.2 Compiling and Loading the Driver as a Module by Using kldload (Dynamically Loadable Module) . . . . . . . . . . . . . . . . . . . . |
. . . . . . . . . . 39 |
|
6.6.3 Updating the MegaRAID Kernel Driver Module in the FreeBSD OS . . . . . . . . . . . . . . . . . . . . . . . . . . . . . . . . . . . . . . . . . . . . . . . . . . |
. . . . . . . . . . 40 |
Chapter 7: VMware Driver Installation . . . . . . . . . . . . . . . . . . . . . . . . . . . . . . . . . . . . . . . . . . . . . . . . . . . . . . . . . . . . . . . . . . . . . . . . . . . . . . . . . . . . . . . . . . 41
7.1 Installing Asynchronous Drivers on the VMware ESXi 5.x and 6.xOperating System . . . . . . . . . . . . . . . . . . . . . . . . . . . . . . . . . . . . . . . . . . . . . . . . . . . 41 7.1.1 Using esxcli and the Asynchronous Driver VIB File in an Existing ESXi Installation . . . . . . . . . . . . . . . . . . . . . . . . . . . . . . . . . . . . . . . . . . . . . . 41 7.1.2 Using esxcli and an Offline Bundle Async Driver Zip File in an Existing ESXi Installation . . . . . . . . . . . . . . . . . . . . . . . . . . . . . . . . . . . . . . . . 42 7.1.3 Installing an Upgrade . . . . . . . . . . . . . . . . . . . . . . . . . . . . . . . . . . . . . . . . . . . . . . . . . . . . . . . . . . . . . . . . . . . . . . . . . . . . . . . . . . . . . . . . . . . . . . . . . . . . . . . 42 7.1.4 Installing the VMware Update Manager . . . . . . . . . . . . . . . . . . . . . . . . . . . . . . . . . . . . . . . . . . . . . . . . . . . . . . . . . . . . . . . . . . . . . . . . . . . . . . . . . . . . . . 42
Chapter 8: Solaris Driver Installation . . . . . . . . . . . . . . . . . . . . . . . . . . . . . . . . . . . . . . . . . . . . . . . . . . . . . . . . . . . . . . . . . . . . . . . . . . . . . . . . . . . . . . . . . . . . 43
8.1 Contents of the Driver Distribution . . . . . . . . . . . . . . . . . . . . . . . . . . . . . . . . . . . . . . . . . . . . . . . . . . . . . . . . . . . . . . . . . . . . . . . . . . . . . . . . . . . . . . . . . . . . . . . . . 43 8.2 Supported Hardware . . . . . . . . . . . . . . . . . . . . . . . . . . . . . . . . . . . . . . . . . . . . . . . . . . . . . . . . . . . . . . . . . . . . . . . . . . . . . . . . . . . . . . . . . . . . . . . . . . . . . . . . . . . . . . 43 8.3 Supported Operating Systems . . . . . . . . . . . . . . . . . . . . . . . . . . . . . . . . . . . . . . . . . . . . . . . . . . . . . . . . . . . . . . . . . . . . . . . . . . . . . . . . . . . . . . . . . . . . . . . . . . . . . 43 8.4 Installing the Driver Package during OS Installation (Solaris10 OS, x86 Only) . . . . . . . . . . . . . . . . . . . . . . . . . . . . . . . . . . . . . . . . . . . . . . . . . . . . . . . . . 44 8.5 Installing the Driver Package during Operating System Installation (Solaris11 OS, x86 Only) . . . . . . . . . . . . . . . . . . . . . . . . . . . . . . . . . . . . . . . . . . 44 8.6 Installing the Driver Package during Operating System Installation (Solaris11.1 OS, x86 Only) . . . . . . . . . . . . . . . . . . . . . . . . . . . . . . . . . . . . . . . . 45 8.7 Installing or Upgrading the Driver Package after Operating System Installation . . . . . . . . . . . . . . . . . . . . . . . . . . . . . . . . . . . . . . . . . . . . . . . . . . . . . . 58 8.8 Removing the Driver Package . . . . . . . . . . . . . . . . . . . . . . . . . . . . . . . . . . . . . . . . . . . . . . . . . . . . . . . . . . . . . . . . . . . . . . . . . . . . . . . . . . . . . . . . . . . . . . . . . . . . . . 58
8.8.1 Removing an Existing Driver Package . . . . . . . . . . . . . . . . . . . . . . . . . . . . . . . . . . . . . . . . . . . . . . . . . . . . . . . . . . . . . . . . . . . . . . . . . . . . . . . . . . . . . . . . 59 8.8.2 Removing an Inbox Driver/Package on the Solaris 10 OS . . . . . . . . . . . . . . . . . . . . . . . . . . . . . . . . . . . . . . . . . . . . . . . . . . . . . . . . . . . . . . . . . . . . . . 59 8.8.3 Removing an Inbox Driver/Package on the Solaris 11 Operating System . . . . . . . . . . . . . . . . . . . . . . . . . . . . . . . . . . . . . . . . . . . . . . . . . . . . . . 60 8.8.4 Removing an Inbox Driver/Package on the Solaris 11 Operating System (Bootable Avago Controller) . . . . . . . . . . . . . . . . . . . . . . . . . . 60 8.9 Notes . . . . . . . . . . . . . . . . . . . . . . . . . . . . . . . . . . . . . . . . . . . . . . . . . . . . . . . . . . . . . . . . . . . . . . . . . . . . . . . . . . . . . . . . . . . . . . . . . . . . . . . . . . . . . . . . . . . . . . . . . . . . . 61
Chapter 9: XenServer Driver Installation . . . . . . . . . . . . . . . . . . . . . . . . . . . . . . . . . . . . . . . . . . . . . . . . . . . . . . . . . . . . . . . . . . . . . . . . . . . . . . . . . . . . . . . . 62
9.1 Creating a Driver Update Disk with a USB Drive . . . . . . . . . . . . . . . . . . . . . . . . . . . . . . . . . . . . . . . . . . . . . . . . . . . . . . . . . . . . . . . . . . . . . . . . . . . . . . . . . . . . . 62 9.2 Installing the XenServer 6.x Operating System on Storage Managed by a MegaRAID Controller (Primary Storage) . . . . . . . . . . . . . . . . . . . . . 62 9.3 Installing or Updating the XenServer 6.2 or 6.5 Operating System Driver . . . . . . . . . . . . . . . . . . . . . . . . . . . . . . . . . . . . . . . . . . . . . . . . . . . . . . . . . . . . . 64
Chapter 10: Debian Driver Installation . . . . . . . . . . . . . . . . . . . . . . . . . . . . . . . . . . . . . . . . . . . . . . . . . . . . . . . . . . . . . . . . . . . . . . . . . . . . . . . . . . . . . . . . . . 65
10.1 Installing the Driver in a Debian 7.x Operating System . . . . . . . . . . . . . . . . . . . . . . . . . . . . . . . . . . . . . . . . . . . . . . . . . . . . . . . . . . . . . . . . . . . . . . . . . . . . . 65
|
Chapter 11: Oracle Enterprise Linux Driver Installation . . . . . . . . . . . . . . . . . . . . . . . . . . . . . . . . . . . . . . . . . . . . . . . . . . . . . . . . . . . . . . . . . . . . . . . . . . |
66 |
|
Chapter 12: Fedora Driver Installation . . . . . . . . . . . . . . . . . . . . . . . . . . . . . . . . . . . . . . . . . . . . . . . . . . . . . . . . . . . . . . . . . . . . . . . . . . . . . . . . . . . . . . . . . . |
67 |
|
Chapter 13: CentOS Driver Installation . . . . . . . . . . . . . . . . . . . . . . . . . . . . . . . . . . . . . . . . . . . . . . . . . . . . . . . . . . . . . . . . . . . . . . . . . . . . . . . . . . . . . . . . . . |
68 |
|
Chapter 14: OVM Driver Installation . . . . . . . . . . . . . . . . . . . . . . . . . . . . . . . . . . . . . . . . . . . . . . . . . . . . . . . . . . . . . . . . . . . . . . . . . . . . . . . . . . . . . . . . . . . . |
69 |
|
Appendix A: 240 VD Driver Support and Known Limitations . . . . . . . . . . . . . . . . . . . . . . . . . . . . . . . . . . . . . . . . . . . . . . . . . . . . . . . . . . . . . . . . . . . . . . |
70 |
A.1 Operating System Driver Support . . . . . . . . . . . . . . . . . . . . . . . . . . . . . . . . . . . . . . . . . . . . . . . . . . . . . . . . . . . . . . . . . . . . . . . . . . . . . . . . . . . . . . . . . . . . . . . . . . 70
A.2 Known Driver Limitations . . . . . . . . . . . . . . . . . . . . . . . . . . . . . . . . . . . . . . . . . . . . . . . . . . . . . . . . . . . . . . . . . . . . . . . . . . . . . . . . . . . . . . . . . . . . . . . . . . . . . . . . . . 70
Revision History . . . . . . . . . . . . . . . . . . . . . . . . . . . . . . . . . . . . . . . . . . . . . . . . . . . . . . . . . . . . . . . . . . . . . . . . . . . . . . . . . . . . . . . . . . . . . . . . . . . . . . . . . . . . . . 71

|
MegaRAID SAS Device Driver Installation User Guide |
Overview |
|
June 2015 |
Driver Description |
Chapter 1: Overview
This chapter provides an overview of the operating system (OS) drivers for the MegaRAID® SAS RAID controllers.
Subsequent chapters provide installation instructions for the OSs. Use the latest updates provided by the OS manufacturer, and review the readme file that accompanies the driver for any updated information. You can download the latest drivers for the various OSs from the LSI, an Avago Technologies company website at http://www.lsi.com/support/Pages/download-search.aspx.
|
NOTE |
The MegaRAID RAID controllers do not all support the same OSs. Refer |
|
to the documentation for your MegaRAID controller for information |
|
|
about the OSs that the controller supports. You can search archived |
|
|
versions of this guide on the company website for information about |
|
|
OSs that are supported for earlier controllers. |
1.1Driver Description
You can install the MegaRAID SAS Controller in any IBM® AT-compatible computer that has a PCI Express® (PCIe®) local bus. The RAID controller can run under various OSs.
To use the controller with these OSs, you must install software drivers. Avago provides software drivers for the following OSs:
Microsoft® Windows®
Red Hat® Linux®
SuSE® Linux Enterprise Server (SLES®)
Ubuntu® Linux
FreeBSD®
VMware®
Solaris®
XenServer®
Debian®
CentOS®
Oracle® Enterprise Linux (OEL)
Fedora®
Oracle Virtual Machine (OVM)
1.1.1Driver Functions
MegaRAID provides drivers for the MegaRAID controllers, which bring up to 12 Gb/s Serial Attached SCSI performance and 6.0 Gb/s SATA III performance to host adapter, workstation, and server designs. The controllers support internal and external storage devices, which let you use a system that supports enterprise-class SAS and desktop-class SATA III drives.
The SAS controllers integrate eight high-performance SAS/SATA III PHYs and a PCI Express bus master DMA core. Each of the eight PHYs is capable of up to 12Gb/s SAS link rates, and 6.0 Gb/s SATA III link rates.
The SAS RAID controllers support the SAS protocol as described in the Serial Attached SCSI Standard, version 3.0, and the Serial ATA III (SATA III) protocol defined by the Serial ATA specification, version 3.0. SATA III is an extension to SATA 2.0.
The drivers perform these functions:

|
MegaRAID SAS Device Driver Installation User Guide |
Overview |
|
June 2015 |
Driver Names |
The PCI Express protocol
Multiple RAID storage adapters (RSAs)
The ability to see newly configured logical drives in the configuration software utility without rebooting the system
The random deletion of logical drives that were created by using MegaRAID Storage Manager™ software (refer to the MegaRAID SAS Software User Guide for more information)
The use of the remaining array capacity by MegaRAID Storage Manager software
1.1.2Driver Updates
Because Avago regularly updates device drivers, a feature might be added to your driver that is not included in the most recent documentation. If you have a question about a feature, consult the readme file that accompanies the
driver, or contact your MegaRAID support representative. Be sure to use the latest service packs provided by the OS manufacturer.
You can download the latest drivers and software on the company website at http://www.lsi.com/support/Pages/download-search.aspx. Under the Download tab, select your product from the pull-down list to display the latest drivers available for download.
1.2Driver Names
The following table lists the device driver files, driver RPM and driver ISO® support, and driver deb package for the MegaRAID controllers.
These files are available on the Universal Driver Suite CD that accompanied your MegaRAID controller. Avago updates the MegaRAID device drivers frequently. To make sure that you have the current version of these driver files, download the latest files from the company website at http://www.lsi.com/support/Pages/download-search.aspx. Refer to the readme file that accompanies the driver for any updated information.
To make a driver diskette, extract the files from the Universal Driver Suite CD to a blank diskette, or download the driver files from the company website and extract them to an empty diskette. Label the diskette as the MegaRAID driver diskette for the given OS.
Table 1 MegaRAID Device Driver Files, Driver RPMs Support, Driver ISO Support, and Driver Deb Package Support
|
MegaRAID |
MegaRAID |
|||
|
Operating System and Chapter |
6Gb/s |
12Gb/s |
Device Driver File Names |
Driver RPMs and Driver ISO |
|
Controller |
Controller |
Support |
||
|
Support |
Support |
|||
|
Chapter 2 |
||||
|
Windows 7 Client SP1 |
Yes |
Yes |
megasas.catmegasas |
N/A |
|
.sysNODEV.INFOEMSE |
||||
|
Windows 8, 8.1, 8.1 Update 1 |
Yes |
Yes |
||
|
TUP.INFTXTSETUP.OE |
||||
|
Windows 2008 R2 SP1 |
Yes |
Yes |
M |
|
|
Windows Server® 2012 |
Yes |
Yes |
||
|
Windows Server 2012 R2 |
Yes |
Yes |
||
|
Win Server 2012 R2 Update 1 |
Yes |
Yes |
||
|
Chapter 3 |
||||

|
MegaRAID SAS Device Driver Installation User Guide |
Overview |
|
June 2015 |
Driver Names |
Table 1 MegaRAID Device Driver Files, Driver RPMs Support, Driver ISO Support, and Driver Deb Package Support (Continued)
|
MegaRAID |
MegaRAID |
||||
|
Operating System and Chapter |
6Gb/s |
12Gb/s |
Device Driver File Names |
Driver RPMs and Driver ISO |
|
|
Controller |
Controller |
Support |
|||
|
Support |
Support |
||||
|
Red Hat Enterprise Linux 5.x – 5.9, 5.10, and |
Yes |
Yes |
N/A |
KMOD RPMs and ISO support |
|
|
5.11 |
|||||
|
Red Hat Enterprise Linux 6.x – 6.4, 6.5, and |
|||||
|
6.6 |
|||||
|
Red Hat Enterprise Linux 7.x – 7 and 7.1 |
|||||
|
Chapter 4 |
|||||
|
SuSE Linux Enterprise Server 10.x – 10 SP2, |
Yes |
Yes |
N/A |
KMP RPMs and ISO support |
|
|
10 SP3, and 10 SP4 |
|||||
|
SuSE Linux Enterprise Server 11.x – 11 SP2, |
|||||
|
11 SP3, and 12 |
|||||
|
Chapter 5 |
|||||
|
Ubuntu 14.04 |
Yes |
Yes |
Package.deb |
Deb package support |
|
|
Ubuntu 14.10 |
Yes |
Yes |
|||
|
Chapter 6 |
|||||
|
FreeBSD 9.2, 9.3, 10.0, and 10.1 |
Yes |
Yes |
mrsas.ko |
N/A |
|
|
|
3Gb/s RAID |
||||
|
controllers: mfi.ko |
|||||
|
|
6Gb/s RAID |
||||
|
controllers: mfi.ko |
|||||
|
or mrsas.ko, |
|||||
|
depending on the |
|||||
|
controller |
|||||
|
|
12Gb/s RAID |
||||
|
controllers: |
|||||
|
mrsas.ko |
|||||
|
Chapter 7 |
|||||
|
VMware ESXi 5.0.x – 5.0 Update 1, 5.0 |
Yes |
Yes |
|
ESX/ESXi 4.x: VMware |
N/A |
|
Update 2, and 5.0 Update 3 |
installation bundle |
||||
|
VMware ESXi 5.1.x – 5.1, 5.1 Update 1, 5.1 |
(VIB) file package |
||||
|
<offline_bundle |
|||||
|
Update 2, and 5.1 Update 3 |
|||||
|
VMware ESXi 5.5.x – 5.5, 5.5 Update 1, 5.5. |
>.zip file package |
||||
|
Update 2 |
|
ESXi 5.x: VMware |
|||
|
installation bundle |
|||||
|
VMware ESXi 6.0 |
|||||
|
(VIB) file package |
|||||
|
megaraid_sas.zi |
|||||
|
p file package |
|||||
|
Chapter 8 |
|||||

|
MegaRAID SAS Device Driver Installation User Guide |
Overview |
|
June 2015 |
Driver Names |
Table 1 MegaRAID Device Driver Files, Driver RPMs Support, Driver ISO Support, and Driver Deb Package Support (Continued)
|
MegaRAID |
MegaRAID |
|||||
|
Operating System and Chapter |
6Gb/s |
12Gb/s |
Device Driver File Names |
Driver RPMs and Driver ISO |
||
|
Controller |
Controller |
Support |
||||
|
Support |
Support |
|||||
|
|
Solaris 10.x – Solaris 10 Update 9 and |
Yes |
Yes |
|
For Gen1 82XX, 83XX, |
N/A |
|
Solaris 10 Update 10 |
and 84XX SAS RAID |
|||||
|
Solaris 11.x – Solaris 11 and Solaris 11 |
controllers: |
|||||
|
mega_sas (32-bit), |
||||||
|
Update 1 |
||||||
|
mega_sas (64-bit), |
||||||
|
mega_sas.conf |
||||||
|
|
For Gen2 87XX, 88XX, |
|||||
|
92XX, 96XX, and 98XX |
||||||
|
SAS RAID controllers: |
||||||
|
mr_sas (32-bit), mr_sas |
||||||
|
(64-bit), mr_sas.conf |
||||||
|
|
For Gen2 MegaRAID |
|||||
|
Entry controllers: |
||||||
|
mrentry_sas (32-bit), |
||||||
|
mrentry_sas (64-bit), |
||||||
|
mrentry_sas.conf |
||||||
|
Chapter 9 |
||||||
|
XenServer 5.6 FP1, 6.2, and 6.5 |
Yes |
Yes |
N/A |
RPMs and ISO support |
||
|
Chapter 10 |
||||||
|
Debian 7, 7.6 |
Yes |
Yes |
N/A |
N/A |
||
|
Chapter 11 |
||||||
|
|
OEL 6.x – 6.5, 6.6 |
Yes |
Yes |
N/A |
KMOD RPMs and ISO support |
|
|
OEL 7.x – 7, 7.1 |
||||||
|
|
Update 5UEK (3.8.13-16.2.1) |
Yes |
Yes |
|||
|
|
Update 6UEK (3.8.13-44.1.1) |
|||||
|
|
UEK3 U1 (3.8.13-26.1.1) |
|||||
|
|
UEK3 U2 (3.8.13-35) |
|||||
|
|
UEK3 U3 (3.8.13-44) |
|||||
|
|
UEK3 U4 (3.8.13-55) |
|||||
|
|
UEK3 U5(3.8.13-68) |
|||||
|
|
Gold UEK (3.8.13-35.2.1) |
|||||
|
Chapter 12 |
||||||
|
Fedora 19 and 20 |
Yes |
Yes |
N/A |
KMOD RPMs support |
||
|
Chapter 13 |
||||||
|
CentOS 6.5 and 7.0 |
Yes |
Yes |
N/A |
N/A |
||
|
Chapter 14 |
||||||
|
Oracle VM 3.2.1, 3.3.1 |
Yes |
Yes |
N/A |
N/A |
||

|
MegaRAID SAS Device Driver Installation User Guide |
Windows Driver Installation |
|
June 2015 |
MegaRAID Primary Storage |
Chapter 2: Windows Driver Installation
This chapter describes the installation of the following Microsoft Windows OSs:
Windows 7 Client SP1
Windows 8, 8.1, 8.1 Update 1
Windows 2008 R2 SP1
Windows Server 2012
Windows Server 2012 R2
Win Server 2012 R2 Update 1
2.1MegaRAID Primary Storage
In the MegaRAID primary storage configuration, the Windows OS is installed on virtual drives provided by the MegaRAID controller. The MegaRAID controllers (6Gb/s and 12Gb/s) include pre-boot configuration utilities (WebBIOS™ and Ctrl-R) that creates the virtual drive before the installation of the Windows OS starts.
To install the Windows OS, prepare a USB flash drive, CD-ROM or diskette, as appropriate, with the MegaRAID driver.
The driver is distributed in a series of nested compressed files. Use an existing Windows device to extract the files for the driver-loading device (USB, CD-ROM, or diskette) by using the appropriate Windows driver. Only two driver choices exist across the supported Windows versions: one for 32-bit systems or one for 64-bit systems.
2.1.1Storage Configuration
The procedures in this section describe how to create the virtual drive used for the Windows OS. You can add other virtual drives to the running OS after the Windows OS has been installed. The MegaRAID preboot BIOS utilities, such as WebBIOS (for 6Gb/s controllers) and Ctrl-R (for 12Gb/s controllers) that create the virtual disk for the Windows OS are accessible during the power-on self-test (POST) part of the bootup process.
Refer to the MegaRAID SAS Software User Guide or the 12Gb/s MegaRAID® SAS Software User Guide for more information about the WebBIOS configuration utility and the Ctrl-R Utility, respectively.
2.1.1.1Creating Storage Configuration Using WebBIOS
The following procedure describes the creation of a RAID 1 array. You can use other RAID levels, and the steps are the same except when selecting the RAID level. In a RAID 1 array, the RAID controller duplicates all data from one drive to a second drive. The RAID 1 array provides complete data redundancy, but at the cost of doubling the required data storage capacity. It is appropriate for small databases or any other environment that requires fault tolerance but small capacity.
1.When the host computer is booting, hold down the Ctrl key and press the H key when the following text appears on the window:
Copyright© Avago Technologies Press <Ctrl><H> for WebBIOS
The Controller Selection window appears.
2.If the system contains multiple SAS/SATA controllers, select a controller.
3.Click Start.
The main WebBIOS CU window appears.

|
MegaRAID SAS Device Driver Installation User Guide |
Windows Driver Installation |
|
June 2015 |
MegaRAID Primary Storage |
4.Click Configuration Wizard.
The first Configuration Wizard window appears.
5.Click New Configuration.
|
NOTE |
If you choose the first or second option, all of the existing data in the |
|
configuration will be deleted. Make a backup copy of any data that |
|
|
you want to keep before you choose an option. |
6.Click Next.
A dialog warns that you will lose data if you click Clear Configuration or New Configuration. The WebBIOS Configuration Method window appears.
7.Select Manual Configuration.
Manual configuration lets you control all attributes of the new storage configuration as you create drive groups and virtual drives, and set their parameters.
8.Click Next.
The Disk Group Definition window appears. You use this window to select drives to create drive groups.
9.Hold down the Ctrl key while you select two ready drives in the Drives panel on the left. You must select an even number of drives.
10.Click Add To Array to move the drives to a proposed drive group configuration in the Disk Groups panel. If you need to undo the changes, click Reclaim.
11.Choose whether to use power save mode.
12.Choose whether to use drive encryption.
|
NOTE |
A RAID 1 virtual drive can contain up to 16 drive groups and up to |
|
32 drives in a single span. (Other factors, such as the type of controller, |
|
|
can limit the number of drives.) You must use two drives in each |
|
|
RAID 1 drive group in the span. |
13.After you finish selecting drives for the drive group, click Accept DG.
14.Click Next.
The Virtual Drive Definition window appears. You use this window to select the RAID level, strip size, read policy, and other attributes for the new virtual drives.
15.Change the virtual drive options from the defaults listed on the window as needed. Here are brief explanations of the virtual drive options:
—RAID Level: The drop-down menu lists the possible RAID levels for the virtual drive. Select RAID 1.
—Strip Size: The strip size specifies the length of the data segments that the RAID controller writes across multiple drives, not including parity drives. For example, consider a stripe that contains 64 KB of drive space and has 16 KB of data residing on each drive in the stripe. In this case, the stripe size is 64 KB and the strip size is 16 KB. You can set the strip size to 8, 16, 32, 64, 128, 256, 512, and 1024 KB. A larger strip size produces higher
Avago Technologies
— 10 —
![]()
|
MegaRAID SAS Device Driver Installation User Guide |
Windows Driver Installation |
|
June 2015 |
MegaRAID Primary Storage |
read performance. If your computer regularly performs random read requests, choose a smaller strip size. The default is 64 KB.
—Access Policy: Select the type of data access that is allowed for this virtual drive.
RW: Permit read/write access. This setting is the default.
Read Only: Permit read-only access.
Blocked: Do not permit access.
—Read Policy: Specify the read policy for this virtual drive.
Normal: Disable the read-ahead capability. This setting is the default.
Ahead: Enable read-ahead capability, which permits the controller to read sequentially ahead of requested data and to store the additional data in cache memory, anticipating that the data will be needed soon. This setting speeds up read operations for sequential data, but little improvement exists when accessing random data.
—Write Policy: Specify the write policy for this virtual drive.
WBack: In Write Back mode, the controller sends a data transfer completion signal to the host when the controller cache has received all of the data in a transaction. This setting is recommended in Standard mode.
WThru: In Write Through mode, the controller sends a data transfer completion signal to the host when the drive subsystem has received all of the data in a transaction. This setting is the default.
Write Back with BBU: Select this mode if you want the controller to use Write Back mode, but the controller either has no battery backup unit (BBU) or the BBU is bad. If you do not choose this option, the controller firmware automatically switches to Write Through mode if it detects a bad or missing BBU.
|
NOTE |
You can use Write Back mode with or without a battery. You should |
|
use either a battery to protect the controller cache or an |
|
|
uninterruptible power supply (UPS) to protect the entire system. If you |
|
|
do not use a battery or a UPS, and a power failure occurs, you risk |
|
|
losing the data in the controller cache. Although you can enable or |
|
|
disable the disk cache, you should disable it. If you enable the disk |
|
|
cache, the drive sends a data transfer completion signal to the |
|
|
controller when the drive cache has received all the data in a |
|
|
transaction. However, the data has not been actually transferred to the |
Avago Technologies
— 11 —

|
MegaRAID SAS Device Driver Installation User Guide |
Windows Driver Installation |
|
June 2015 |
MegaRAID Primary Storage |
disk media, so you risk losing the data in the disk cache if a power failure occurs. The data is unrecoverable.
—IO Policy: The IO policy applies to read operations on a specific virtual drive. It does not affect the read-ahead cache.
Direct: Read operations are not buffered in cache memory. Data is transferred to the cache and the host concurrently. If the same data block is read again, it comes from cache memory. This setting is the default.
Cached: Read operations are buffered in cache memory before they are sent to the host.
—Drive Policy: Specify the drive cache policy.
Enable: Enable the drive cache.
Disable: Disable the drive cache.
NoChange: Leave the current drive cache policy as is. This setting is the default.
—Disable BGI: Specify the background initialization status.
No: Leave background initialization enabled. A new configuration can be initialized in the background while you use WebBIOS to perform other configuration tasks. This setting is the default.
Yes: Select Yes if you do not want to allow background initialization for configurations on this controller.
—Select Size: Specify the size of the virtual drive or drives in MB, GB, or TB. Usually, this size is the full size for the RAID 1 array shown in the Configuration panel on the right. You can specify a smaller size if you want to create other virtual drives on the same drive group.
—Update Size: Click Update Size to update the Select Size Field value for the selected RAID levels.
16.Either click Accept to accept the changes to the virtual drive definition, or click Reclaim to return to the previous settings.
17.Click Next after you define the virtual drives. The Configuration Preview window appears.
18.Check the information in the configuration preview.
19.If the virtual drive configuration is acceptable, click Accept to save the configuration. Otherwise, click Back to return to the previous screens and change the configuration.
20.If you accept the configuration, click Yes at the prompt to save the configuration and initialize the new virtual drive.
21.After the initialization is complete (the elapsed time depends on the RAID level and the disk size), click the Home button, and then click Exit in the left hand window frame.
22.Select Exit Application, and reboot the computer with the Windows OS in the DVD drive or the CD drive.
2.1.1.2Creating Storage Configuration Using Ctrl-R
Perform the following steps to create a virtual drive.
1.When the host computer is booting, hold down the Ctrl key and press the R key when the following text appears on the window:
Copyright© Avago Technologies Press <Ctrl><R> for Ctrl-R
The Controller Selection window appears.
2.In the VD Mgmt screen, navigate to the controller and press the F2 key.
3.Press Enter.
The Create New VD screen appears.
4.Select a RAID 1level for the drive group from the RAID Level field.
Avago Technologies
— 12 —

|
MegaRAID SAS Device Driver Installation User Guide |
Windows Driver Installation |
|
June 2015 |
MegaRAID Primary Storage |
5.Select a power save mode for the drive group from the Power save mode field. The options available are Auto, Max, and Controller defined.
This field is enabled only if power saving on configured drives is supported on the controller.
6.Enter a name for the virtual drive in the Name field.
The name given to the virtual drive cannot exceed 15 characters.
7.Press OK.
A dialog appears, asking you whether you want to initialize the virtual drive you just created.
8.To initialize the virtual drive, press OK. The Create New VD dialog appears again.
9.Press Advanced.
The Create Virtual Drive – Advanced dialog appears. The following are the additional virtual drive properties that you can select while you create virtual drive. Change these parameters only if you have a specific reason for doing so. It is usually best to keep them at their default settings.
Strip Size – The strip size is the portion of the stripe that resides on a single virtual drive in the drive group. Strip sizes of 64 KB, 128 KB, 256 KB, 512 KB, or 1 MB are supported.
Read Policy – Specify one of the following options to specify the read policy for this virtual drive:
—Normal – Read ahead capability lets the controller read sequentially ahead of requested data and to store the additional data in cache memory, thereby anticipating that the data will be needed soon. This process speeds up reads for sequential data, but there is little improvement when the computer accesses random data.
—Ahead – Disables the read ahead capability.
Write Policy – Select one of the following options to specify the write policy for this virtual drive:
—Write Back – In this mode, the controller sends a data transfer completion signal to the host when the controller cache receives all of the data in a transaction. If you select the Write Back policy and the battery is absent, the firmware disables the Write Back policy and defaults to the Write Through policy.
—Write Through – In this mode, the controller sends a data transfer completion signal to the host when the drive subsystem receives all the data in a transaction.
—Always Write Back – In this mode, the controller sends a data transfer completion signal to the host when the controller cache receives all the data in a transaction. If you select the Always Write Back policy and the battery is absent, the firmware is forced to use the Write Back policy.
I/O Policy – The I/O policy applies to reads on a specific virtual drive. It does not affect the read ahead cache.
—Cached – In this mode, all reads are buffered in cache memory. Cached I/O provides faster processing.
—Direct – In this mode, reads are not buffered in cache memory. Data is transferred to the cache and the host concurrently. If the same data block is read again, it comes from cache memory. Direct I/O makes sure that the cache and the host contain the same data.
Disk cache policy – Select a cache setting for this virtual drive:
—Enable – Enable the drive cache.
—Disable – Disable the drive cache.
—Unchanged – Updating the drive cache policy to Unchanged may enable /disable the drive cache based on the WCE (Write Cache Policy) bit of the save mode page of the drive.
Emulation – Lets you to set the emulation type on a virtual drive to default or none. The force option forces the emulation to be set on a controller even when MFC settings do not support it. The possible options are Default,
Disabled, or Forced.
Initialize – Select to initialize the virtual drive. Initialization prepares the storage medium for use. Fast initialization will be performed on the virtual drive.
Configure Hot Spare – Select to configure physical drives as hot spares for the newly created virtual drive.
This option is enabled only if there are additional drives and if they are eligible to be configured as hot spares. This option is not applicable for RAID 0. If you select this option after the Virtual drive is created, a dialog appears. The dialog asks you to choose the physical drives that you want to configure as hot spares.
Avago Technologies
— 13 —

|
MegaRAID SAS Device Driver Installation User Guide |
Windows Driver Installation |
|
June 2015 |
Primary OS Storage on the MegaRAID Controller |
Provide shared access– Select this option if you want the virtual drive to be shared between the servers in a cluster. This option appears only if the controller supports High Availability DAS.
10.Select Initialize, and press OK.
The new virtual drive is created and initialized.
11.After the initialization is complete (the elapsed time depends on the RAID level and the disk size), press Esc twice (once to exit the dialog, and the second time to exit the utility).
A confirmation message box appears.
12.Press OK to exit the utility, and reboot the computer with the Windows OS in the DVD drive or the CD drive.
2.2Primary OS Storage on the MegaRAID Controller
For the Windows 2008 OS, the MegaRAID driver is added after other installation steps.
Perform the following steps to set up the primary operating system storage on your MegaRAID controller:
1.The operating system loads and decompresses the core files from the boot DVD first.
2.After the Install Windows Language selection window, the Install Now window appears, followed by the OS selection, license agreement and installation type.
On new installations, the Custom installation type is the only option.
3.On the next Windows installation window, a Load Driver link introduces the MegaRAID driver. For the Windows 2008 OS, you can add the driver from the CD, DVD, or USB flash drive.
4.Click Browse, and select the device and the folder with the previously extracted drivers.
5.In the next Windows installation window, select the driver to be installed, and click Next. If no driver appears, two common problems might have occurred.
—The folder with the files was not selected.
—The wrong driver (32-bit as compared to 64-bit) was selected.
6.After the driver is loaded, follow the rest of the standard Windows installation steps.
2.3Secondary Storage on the MegaRAID Controller with the Windows 2008 OS
As the MegaRAID controller is installed and the previously installed Windows OS starts, the Windows 2008 OS prompts with Found New Hardware.
Perform the following steps to set up secondary storage for the Windows 2008 OS:
1.Select Locate and Install.
2.Select Don’t Search Online.
3.Select Show Me Other Options
4.Select Browse My Computer.
5.Click Browse.
6.In the Browse for Folder window, locate the previously extracted driver files from the local boot disk, CD, DVD, network, or USB device.
7.Click OK.
8.Click Next.
Avago Technologies
— 14 —

|
MegaRAID SAS Device Driver Installation User Guide |
Windows Driver Installation |
|
June 2015 |
Using the Device Manager to Install MegaRAID on the Windows 2008 OS |
9.Click Install.
The Hardware Wizard displays the following message: The software for this device has been successfully installed.
10.Reboot the system.
The system does not require a reboot when the MegaRAID controller driver is loaded for the first time.
2.4Using the Device Manager to Install MegaRAID on the Windows 2008 OS
If you do not install the MegaRAID driver at boot time, the MegaRAID driver is added or updated in the Windows environment using the Device Manager. Many methods exist to start the Device Manager, including one general method for all supported versions of the Windows OS.
Perform the following steps to add or update the MegaRAID driver in the Windows environment using the Device Manager:
1.Select Start > Search > devmgmt.msc > enter key (for all versions except the Windows 2003 OS).
In the Device Manager, a MegaRAID controller with no driver appears under the heading Other devices as a RAID Controller or Unknown Device, depending on the system history.
2.Right-click and select either RAID Controller or Unknown Device, as appropriate.
3.If the device does not appear, double-click Storage controllers to expose any detected controllers that are supported by an existing driver.
4.If you locate the MegaRAID controller, right-click on the controller.
The driver installation steps for the Windows 2008 OS are the same no matter where the device was found.
5.Click Update Driver Software.
6.Click Browse My Computer to search for driver software.
7.Click the Browse button.
8.In the Browse for Folder window, locate the previously extracted driver files from the local boot disk, CD, DVD, network, or USB device.
9.Click OK.
10.Click Next.
11.Click Install.
The Update Driver Software wizard shows the message: The software for this device has been successfully installed.
12.Reboot the system.
2.5Installing a MegaRAID Driver on the Microsoft Windows 8 OS
Microsoft Windows Server 8 includes a MegaRAID driver in box. The driver version 5.2.122.0, dated April 3, 2012.
Consider the following points before you install the driver.
If you want to use the MegaRAID controller for primary storage, see Section 2.1.1.1, Creating Storage Configuration Using WebBIOS, on configuring a virtual disk for the OS in a pre-boot environment. The Windows installation program recognizes the MegaRAID controller, and it automatically installs a driver.
If you want to use the MegaRAID controller as secondary storage, install the OS with the MegaRAID controller installed. The OS automatically configures the controller with the in-box driver.
Avago Technologies
— 15 —
|
MegaRAID SAS Device Driver Installation User Guide |
Windows Driver Installation |
|
June 2015 |
Installing a MegaRAID Driver on the Microsoft Windows 8 OS |
When the Microsoft OS is running on the machine with the MegaRAID controller, upgrade to the latest Avago® MegaRAID driver.
2.5.1Driver Upgrades
Perform the following steps to upgrade the Windows 8 driver.
1.Download the updated driver and put it on a USB, CD or DVD disc.
2.Boot the Microsoft Windows 8 OS, and then move the mouse to the upperor lower-right corner of the screen to expose the desk icons for Search, Share, Start, Devices, and Settings, shown in the following figure.
Figure 1 Settings Option
3.Click Settings.
4.On the Settings bar, click Control Panel, as shown in the following figure.
Figure 2 Settings Bar
5.In the Control Panel, click Hardware and Sound. The following figure appears.
Avago Technologies
— 16 —

|
MegaRAID SAS Device Driver Installation User Guide |
Windows Driver Installation |
|
June 2015 |
Installing a MegaRAID Driver on the Microsoft Windows 8 OS |
Figure 3 Hardware and Sound
6.In the Hardware and Sound screen, click Device Manager under the Devices and Printers heading. The following figure appears.
Figure 4 Device Manager
Avago Technologies
— 17 —
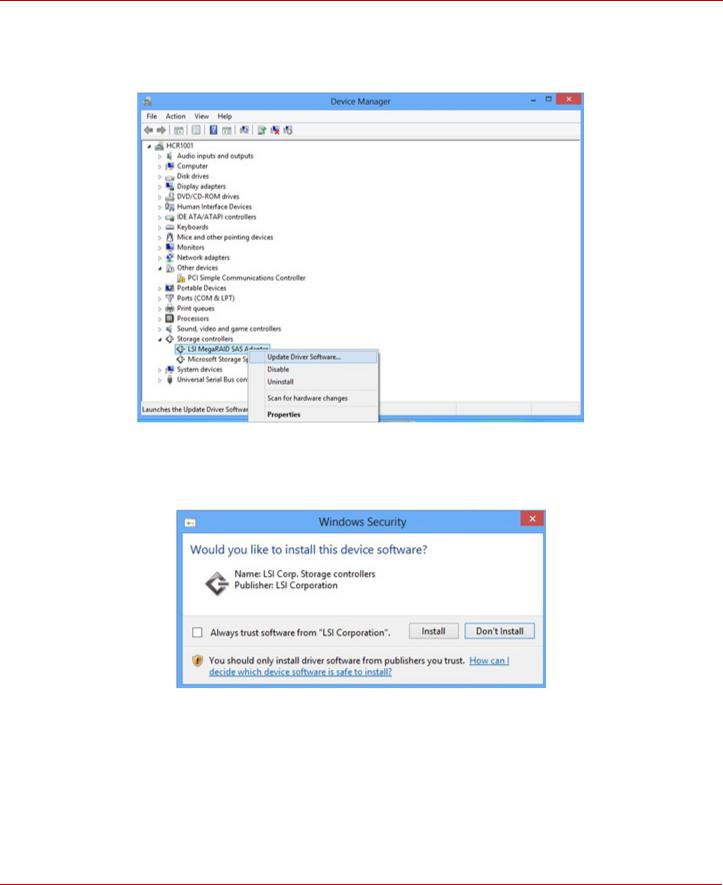
|
MegaRAID SAS Device Driver Installation User Guide |
Windows Driver Installation |
|
June 2015 |
Installing a MegaRAID Driver on the Windows Server 2012 Operating System |
7.In the Device Manager, expand the sub-menu under Storage Controllers and right-click Update Driver Software, as shown in the following figure.
You can find the version of the existing driver by right-clicking Properties and selecting the Driver tab.
Figure 5 Update Driver Software Option
8.In the Update Driver Software wizard, select Browse My Computer to locate the updated driver on the USB, CD, or DVD.
9.When the driver is found, click Install to confirm, as shown on the following screen.
Figure 6 Install Button
10.The installation wizard presents progress screens and announces the completion of the installation.
11.After the driver is installed, reboot the system.
2.6Installing a MegaRAID Driver on the Windows Server 2012 Operating System
The Microsoft Windows Server 2012 operating system package includes a MegaRAID driver in box. The type of installation to use depends on how you plan to use your MegaRAID controller:
Avago Technologies
— 18 —

|
MegaRAID SAS Device Driver Installation User Guide |
Windows Driver Installation |
|
June 2015 |
Installing a MegaRAID Driver on the Windows Server 2012 Operating System |
If you use the MegaRAID controller as primary storage, see Section 2.1.1.1, Creating Storage Configuration Using WebBIOS, on configuring a virtual disk for the OS in a pre-boot environment. The Windows installation program recognizes the MegaRAID controller, and it automatically installs a driver.
If you use the MegaRAID controller as secondary storage, Avago recommends that you install the OS without the MegaRAID controller, shut down the system, install the controller, and let the OS automatically configure the controller with the in-box driver.
After the Windows Server 2012 OS is running on the machine with the MegaRAID controller, an upgrade to the latest Avago MegaRAID driver is recommended. The following section describes how to upgrade the driver.
2.6.1Upgrading the Driver for the Windows Server 2012 Operating System
Perform the following steps to upgrade the driver.
1.Download the updated driver from http://www.lsi.com/support, and put it on a USB, CD, or DVD.
2.Boot the Microsoft Server 2012 OS.
3.Click the Server Manager button to start Server Manager, if it does not start automatically.
The button to start Server Manager is the first item on the left of the start bar, as shown in the following figure.
Figure 7 Server Manager Button
The Server Manager page appears.
4.In Server Manager, open the Tools menu, and select Computer Management, as shown in the following figure.
Figure 8 Computer Management Option
The Computer Management window appears.
Avago Technologies
— 19 —
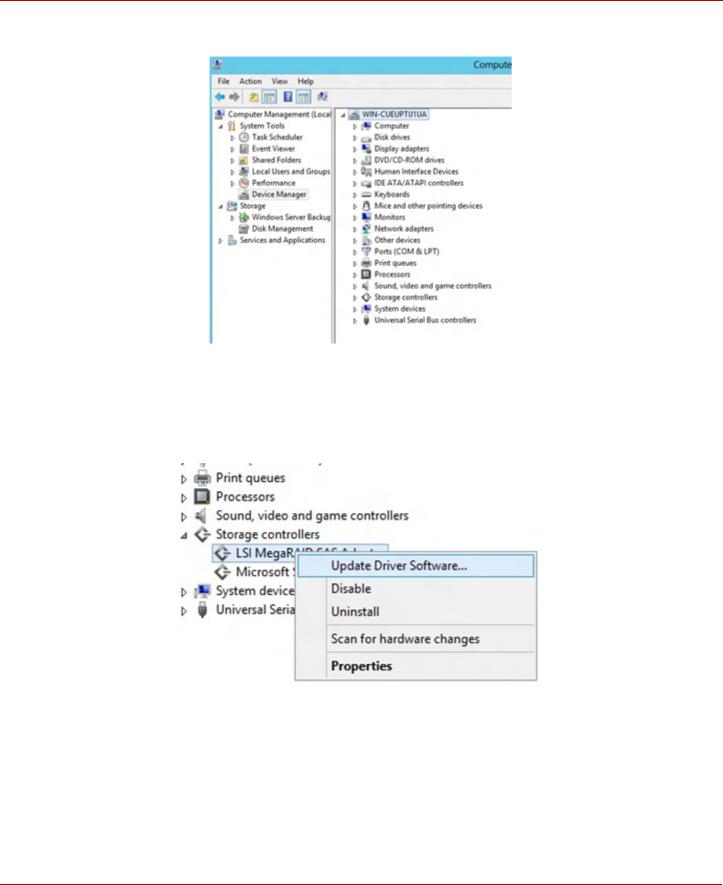
|
MegaRAID SAS Device Driver Installation User Guide |
Windows Driver Installation |
|
June 2015 |
Installing a MegaRAID Driver on the Windows Server 2012 Operating System |
5.In the left frame of the Computer Management window, select Device Manager.
Figure 9 Device Manager Option
The Device Manager window appears.
6.In the Device Manager window, expand the submenu under Storage Controllers.
7.Right-click the Avago MegaRAID Controller option, and click Update Driver Software, as shown in the following figure.
Figure 10 Update Driver Software Option
To find the version of the existing driver, right-click the Avago MegaRAID Controller option. Click Properties, and select the Drivers tab as shown in the following figure.
Avago Technologies
— 20 —
![]()
|
MegaRAID SAS Device Driver Installation User Guide |
Windows Driver Installation |
|
June 2015 |
Installing a MegaRAID Driver on the Windows Server 2012 Operating System |
Figure 11 Driver Version
8.In the Update Driver Software wizard, click the Browse button to locate the updated driver on the USB, CD, or DVD.
Figure 12 Update Driver Software Wizard
After you locate the updated driver, the Windows Security dialog appears.
9.Click the Install button in the Windows Security dialog, as shown in the following figure.
Avago Technologies
— 21 —

|
MegaRAID SAS Device Driver Installation User Guide |
Windows Driver Installation |
|
June 2015 |
Installing a MegaRAID Driver on the Windows Server 2012 Operating System |
Figure 13 Windows Security Dialog
The installation wizard presents progress screens and announces the completion of the installation.
Figure 14 Installation Complete Dialog
10. Reboot the system after the driver is installed.
Avago Technologies
— 22 —
Содержание:
- 1 Как создать RA > 15.11.2015 Raid, LSI, Adaptec 3 комментария
- 2 Как создать RA >
- 3 Настройка LSI 9381 8i
- 4 Доступные виды RAID
- 4.1 Создаем RAID1
- 4.2 Ссылки
- 4.3 Установка MegaRAID Storage Manager
Как создать RA > 15.11.2015 Raid, LSI, Adaptec 3 комментария
Как создать RA >
Всем привет! В первой части цикла статей, мы с вами рассмотрели, как производится «Установка RA >
Настройка LSI 9381 8i
И так мы с вами попали в утилиту LSI MegaRAID 9361-8i BIOS Configuration Utility.

Первое что я вам советую сделать это нажать клавишу F1 и прочитать небольшой мануал с помощью и функциями RAID контроллера.
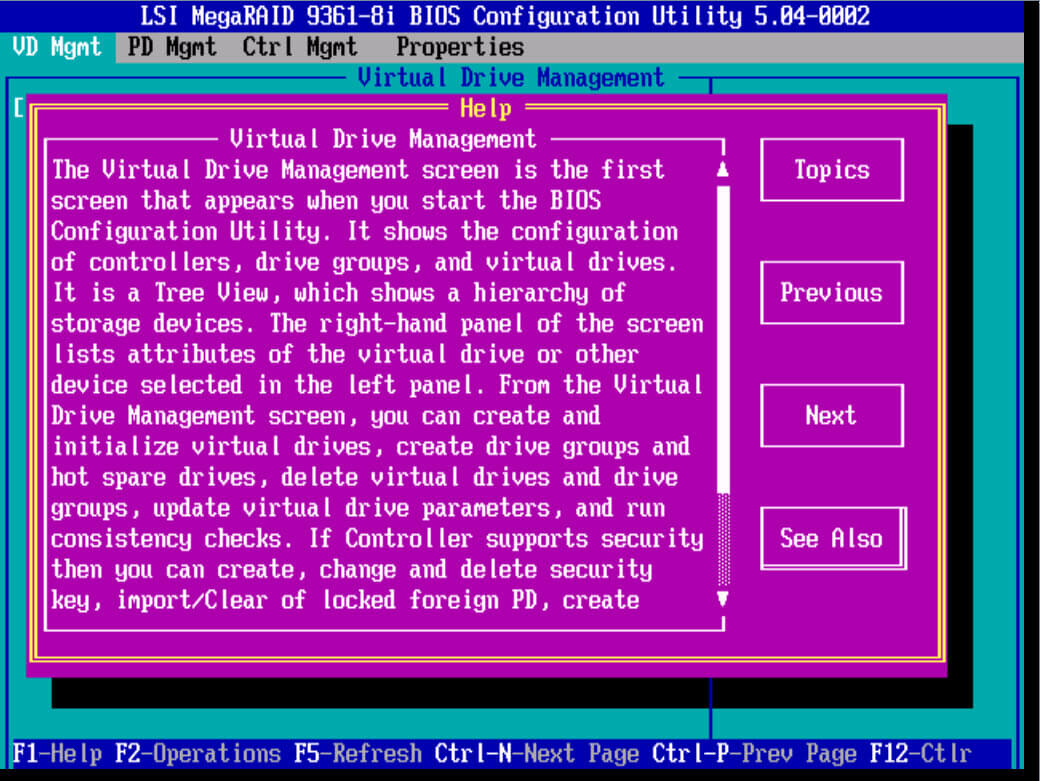
Прочитав help, выберите самый верхний пункт LSI MegaRAID 9361-8i и нажмите F2. У вас откроется контекстное меню, с возможными действиями. Первое что нужно сделать это затереть конфигурацию, на всякий случай. Выбираем Clear Configuration.
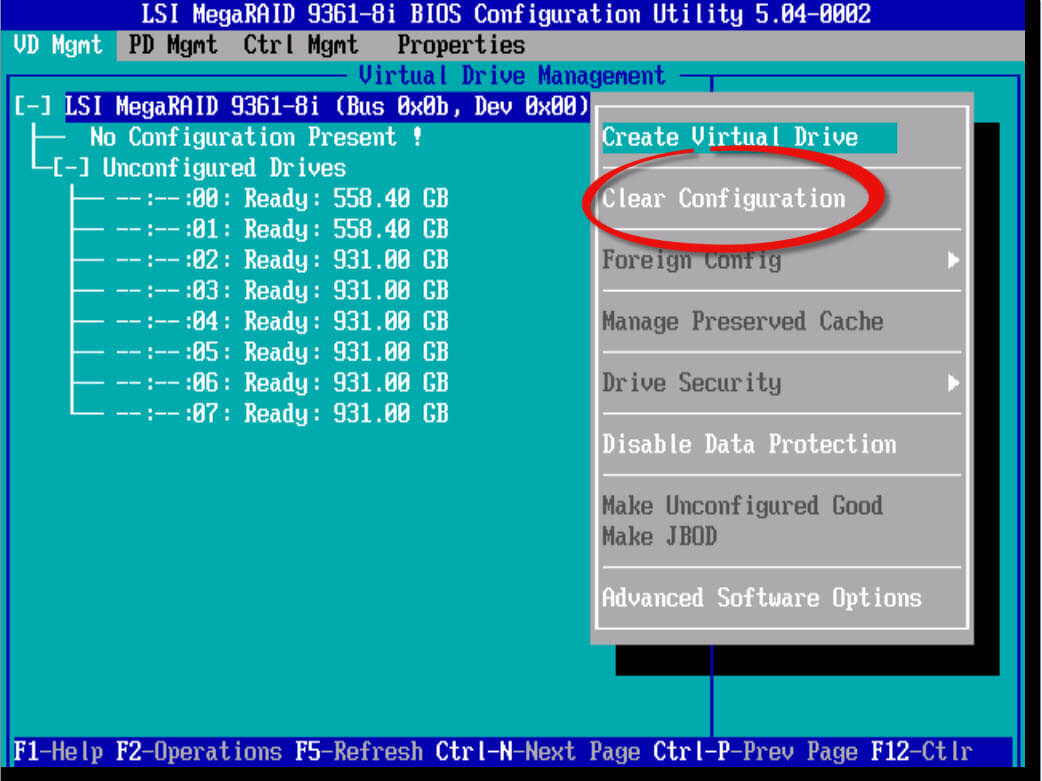
На вопрос хотите ли вы удалить жмем Yes.
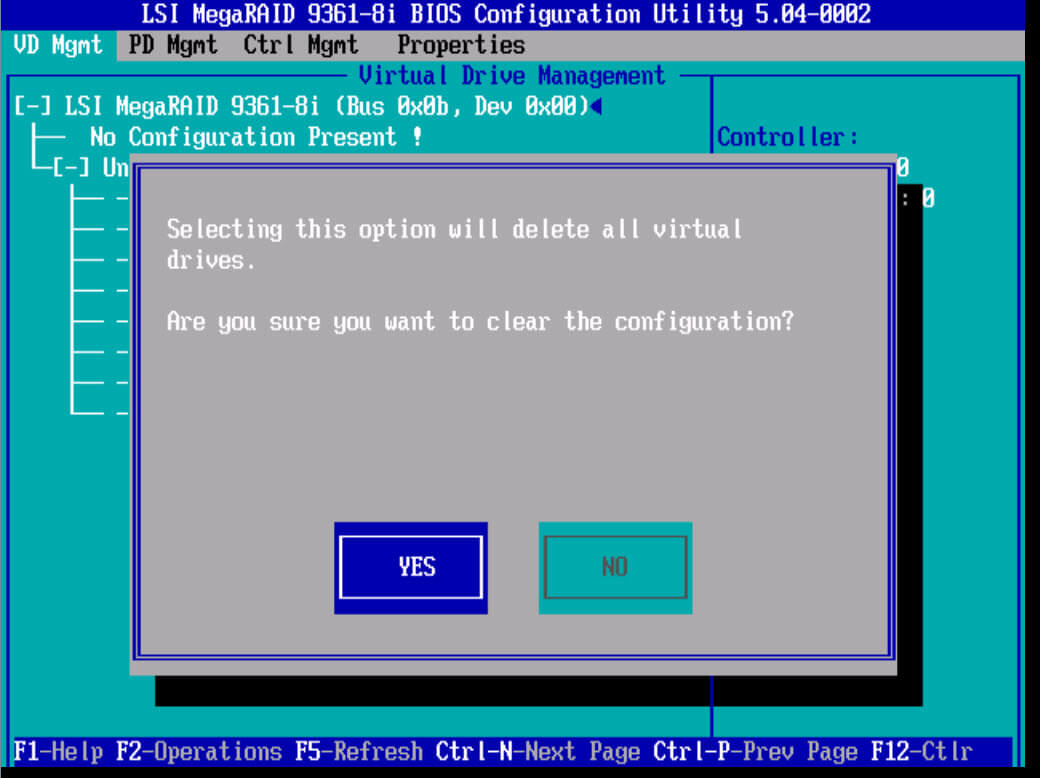
Теперь, когда у вас уже чистая конфигурация, давайте пробежимся по доступным опциям, для этого жмем клавишу F2. Первое на что хочу обратить внимание это пункт Advanced Software Options (Дополнительные настройки)

Тут можно активировать специальным ключиком, дополнительные плюшки, типа Fast Path и что то расширяющее функционал RAID 5 и RAID 6. Если у вас есть ключ, то вволим его и жмем Activate.
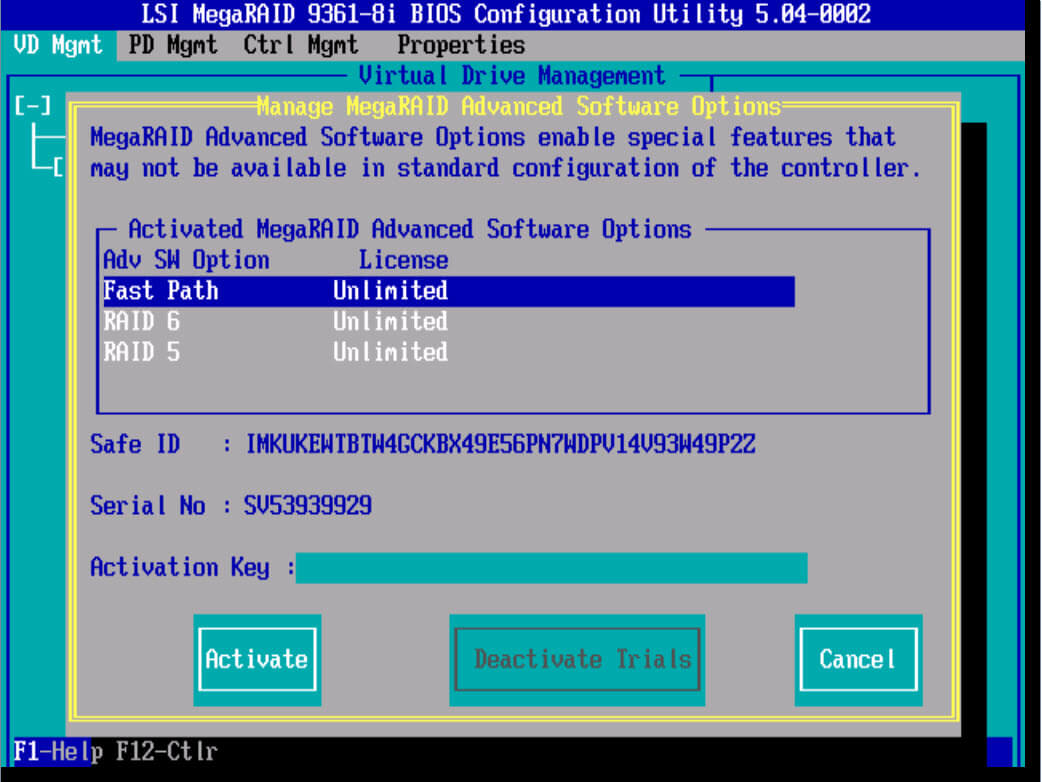
Если у вас RAID контроллер идет с модулем защиты от внезапного выключения, то проверьте,ч то у вас включена защита Data Protection.
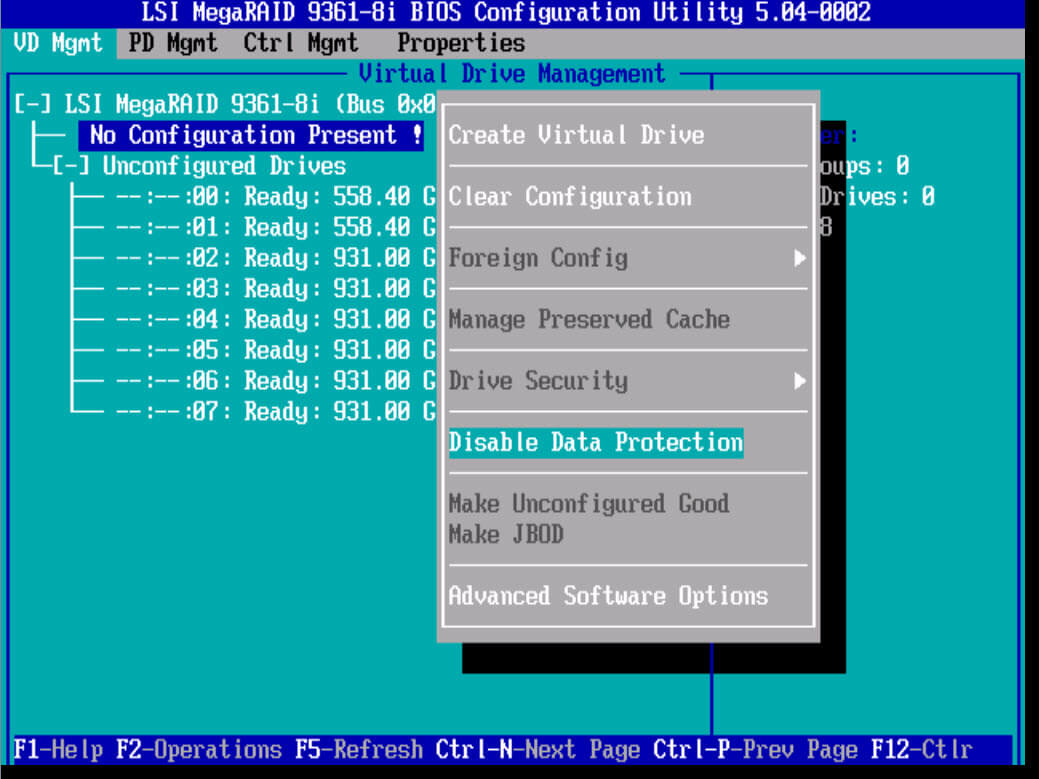
Доступные виды RAID
И так выберем теперь пункт Create Virtual Drive, для создания системного LUN, на который будет установлен VMware ESXI 5.5. Откроется окно Virual Drive Management. В нем нас интерисует пункт RAID Level.
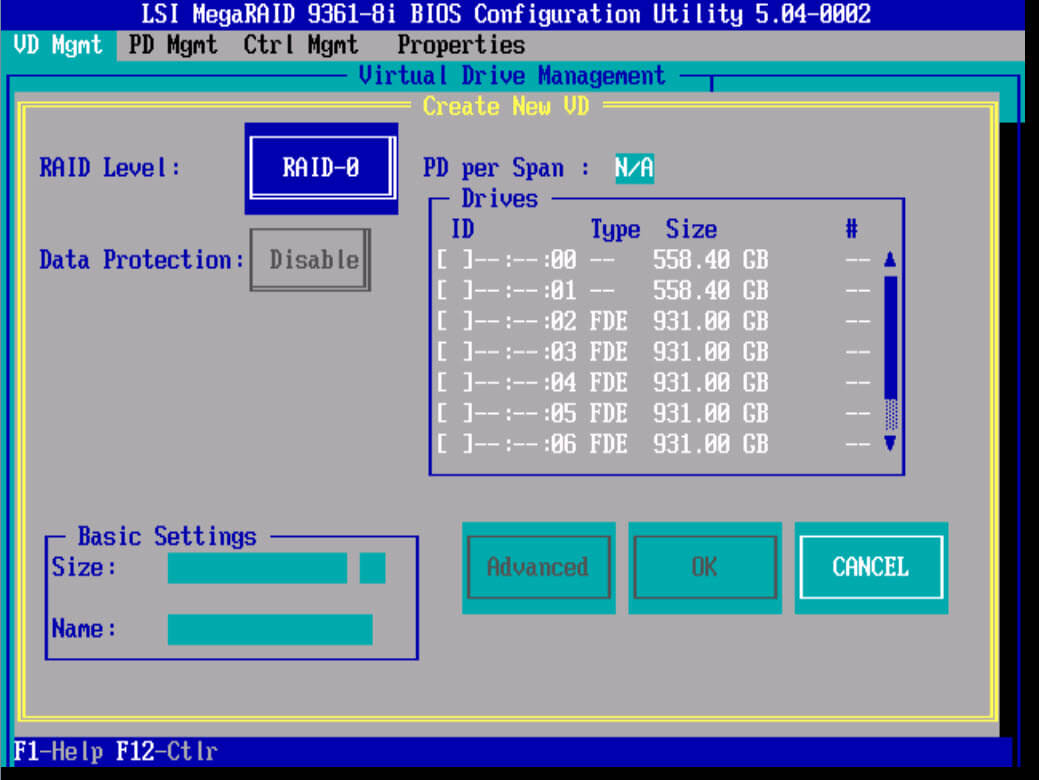
нажав на нем Enter у вас появится выбор доступных видов RAID. Среди них все самые известные виды RAID (0,1,5,6,10,50,60). Так как у меня для системы установлены в 1 и 2 слоты два SAS HDD, то я из них создам RAID 1 зеркало, под систему. Выбираем RAID 1. Более подробно про виды RAID читайте тут.
Создаем RAID1
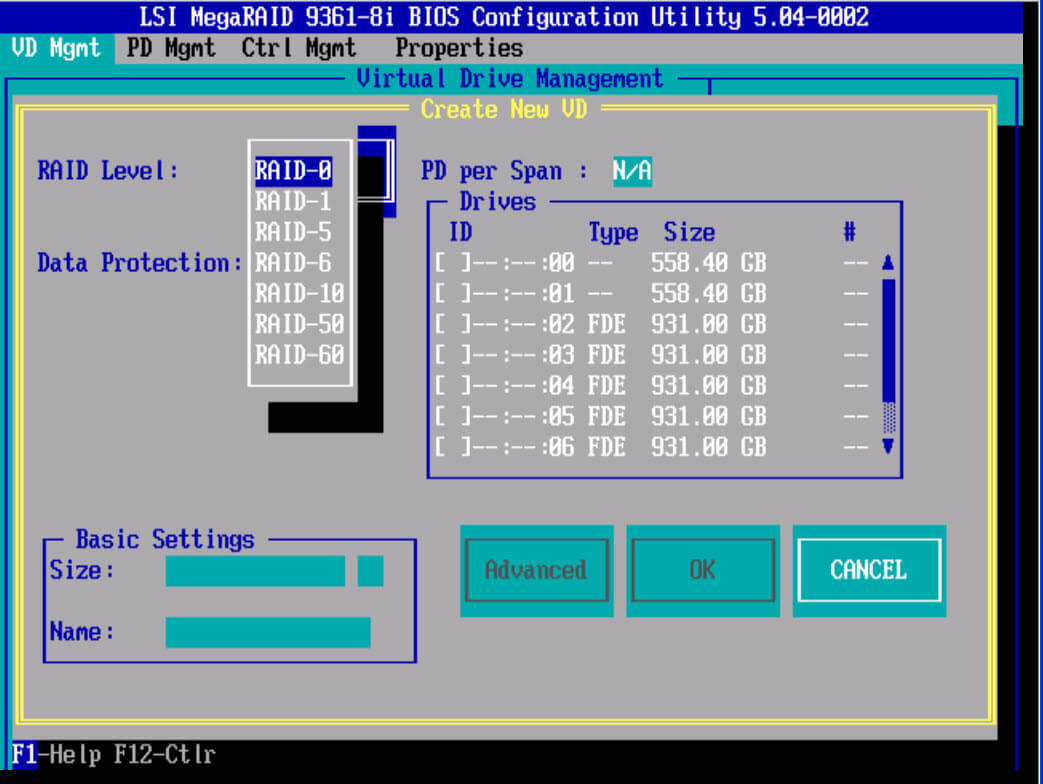
Выделяем в пункте Drives два HDD диска, для нашего зеркала, напомню диски должны быть одинаковыми. Вы видите размер в пункте Size, помните,что на одном lun можно создать много логических разделов, совет при тестировании нет смысла создавать раздел максимального размера, советую делать его на порядок меньше, на тестирование производительности это ни как не повлияет. Можете задать имя разделу.

Далее жмете пункт advanced. Тут можно поиграться с видами кэша на LSI контроллере. Более подробно почитать про виды кэширования и best prictice можно тут. Во время создания советую сразу инициализировать раздел, сделать это можно в окне задания stripe size, поставив птичку initialize.
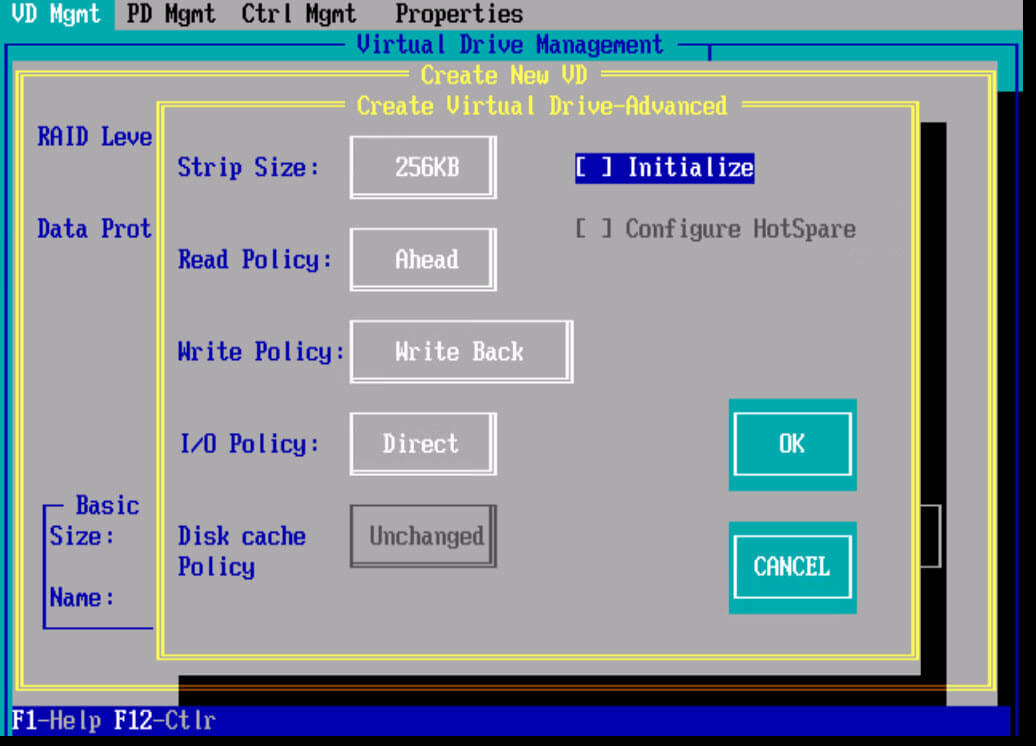
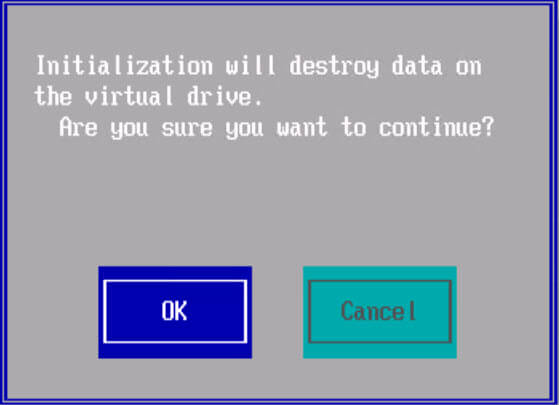
Как только инициализация пройдет вы увидите вот такое сообщение
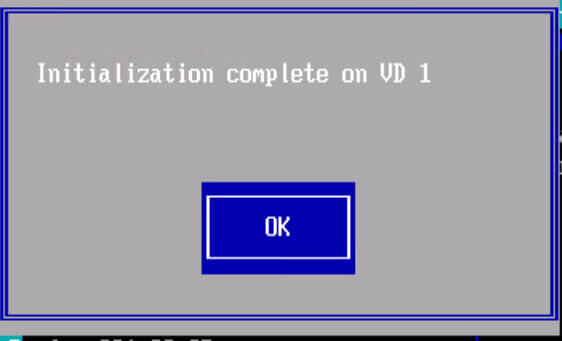
Если во время выбора размера stripe вы не не поставили галку инициализации, то сделать это можно в пункте меню VD Mgmt,выбрав ваш virtual drive ID и нажав Initialization-Fast init
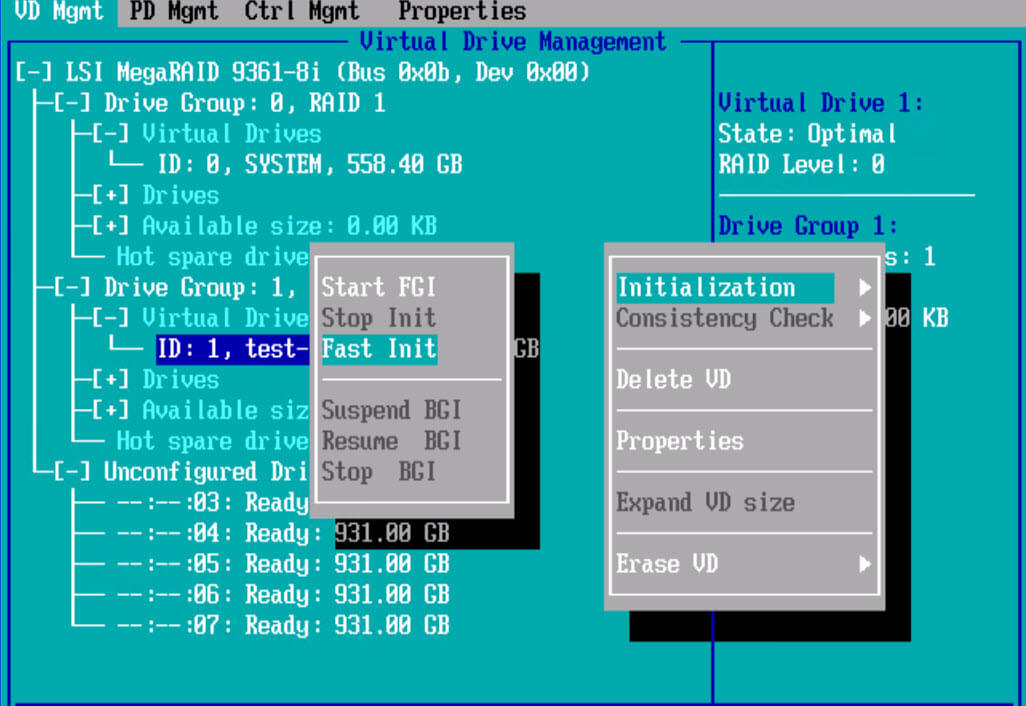
тут же можно сразу сделать Consistency Check, проверку целостности.
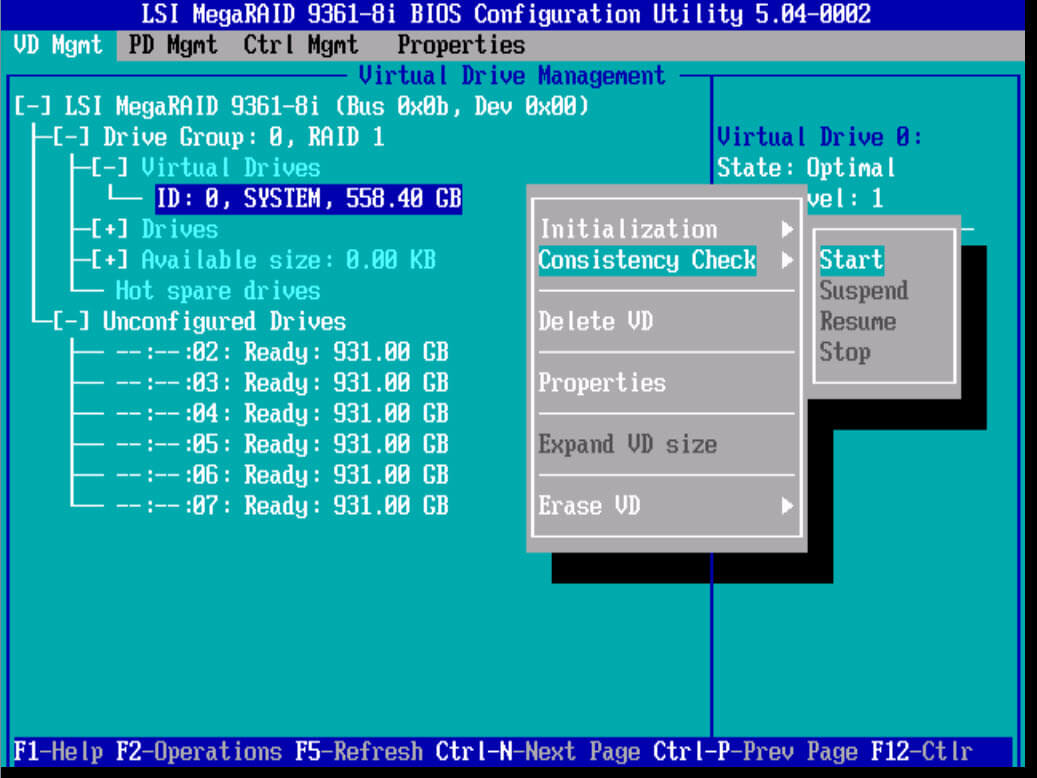
Если нажать Properties то вы сможете поменять настройки задаваемые при создании
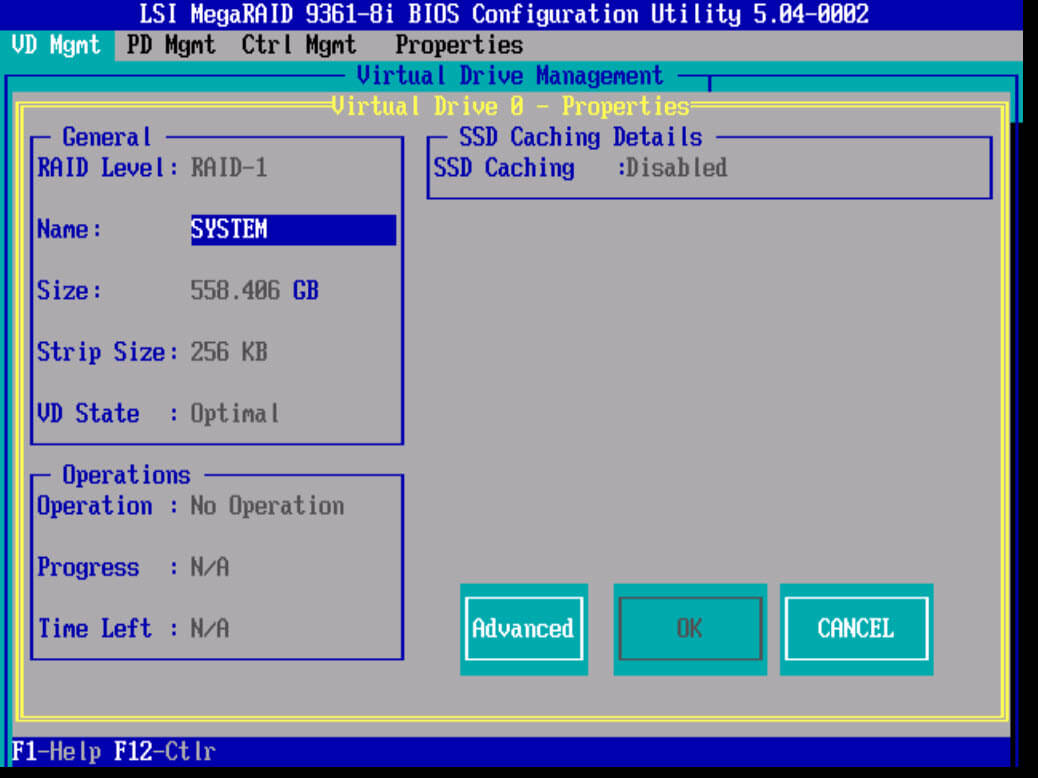
Себе я задам на RAID1 вид кэширования Write Back.

Если выбрать Manage Ded. HS
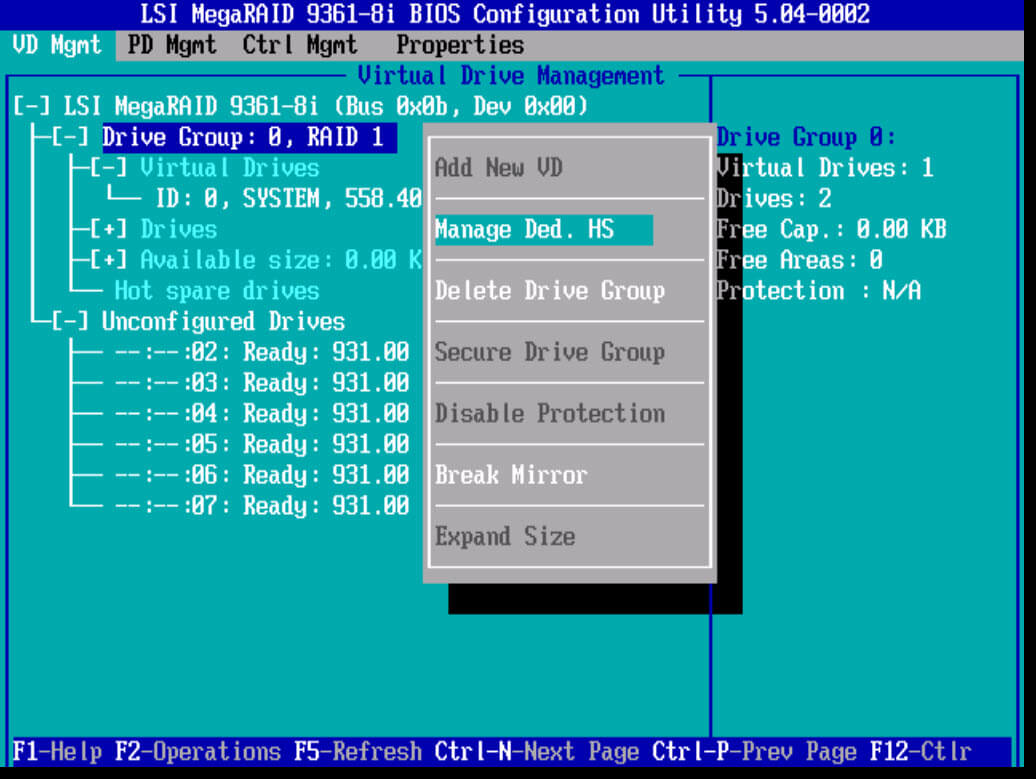
То вы сможете добавить Hot Spare.
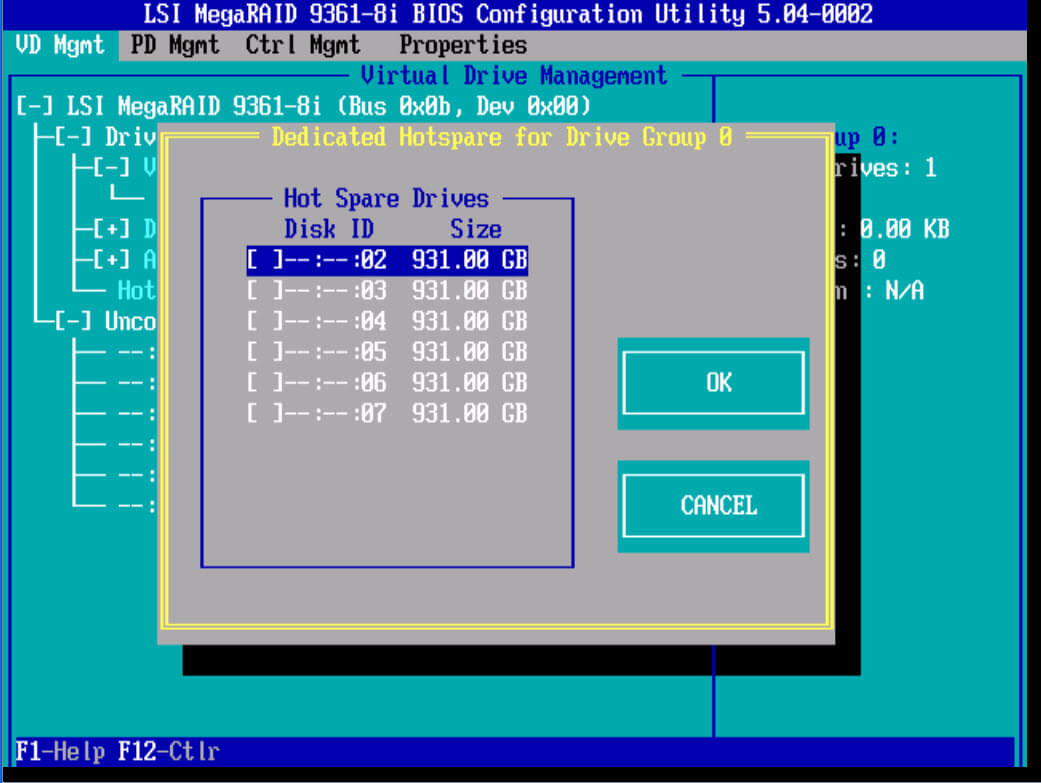
Вот так легко создается RAID 1 зеркало, далее во второй части мы рассмотрим создание RAID 0, RAID 10, RAID 5, RAID 50, RAID 60 на контроллере LSI 9361 8i.

- 26 февраля
MegaRAID Storage Manager мне нужен для того, чтобы воткнуть в свой комп RAID контроллер и прошить его перед установкой в сервер. Прикрепляю к статье интерактивное руководство. MegaRAID Storage Manager есть под разные операционные системы. Будем устанавливать версию для Windows.
Ссылки
Интерактивное руководство В хроме подглючивает, открываете через Firefox.
Установка MegaRAID Storage Manager
Качаем MegaRAID Storage Manager.
Я скачал версию 7.05.00.02.
Данная версия поддерживает контроллеры:
- RAID
- MegaRAID SAS 9362-4i
- MegaRAID SAS 9362-8i
- MegaRAID SAS 9361-4i
- MegaRAID SAS 9361-8i
- MegaRAID SAS 9363-4i
- MegaRAID SAS 9380-8e
- MegaRAID SAS 9381-4i4e
- MegaRAID SAS 9361-8iCC
- MegaRAID SAS 9380-8eCC
- MegaRAID SAS 9364-8i
- MegaRAID SAS 9340-8i
- MegaRAID SAS 9341-8i
- MegaRAID SAS 9341-4i
- MegaRAID SAS 9270-8i
- MegaRAID SAS 9271-4i
- MegaRAID SAS 9271-8i
- MegaRAID SAS 9271-8iCC
- MegaRAID SAS 9286-8e
- MegaRAID SAS 9286CV-8e
- MegaRAID SAS 9286CV-8eCC
- MegaRAID SAS 9265-8i
- MegaRAID SAS 9285-8e
- MegaRAID SAS 9240-4i
- MegaRAID SAS 9240-8i
- MegaRAID SAS 9260-4i
- MegaRAID SAS 9260CV-4i
- MegaRAID SAS 9260-8i
- MegaRAID SAS 9260CV-8i
- MegaRAID SAS 9260DE-8i
- MegaRAID SAS 9261-8i
- MegaRAID SAS 9280-4i4e
- MegaRAID SAS 9280-8e
- MegaRAID SAS 9280DE-8e
- MegaRAID SAS 9280-24i4e
- MegaRAID SAS 9280-16i4e
- MegaRAID SAS 9260-16i
- MegaRAID SAS 9266-4i
- MegaRAID SAS 9266-8i
- MegaRAID SAS 9285CV-8e
- MegaRAID SAS 8704ELP
- MegaRAID SAS 8704EM2
- MegaRAID SAS 8708ELP
- MegaRAID SAS 8708EM2
- MegaRAID SAS 8880EM2
- MegaRAID SAS 8888ELP
- MegaRAID SAS 8308ELP*
- MegaRAID SAS 8344ELP*
- MegaRAID SAS 84016E*
- MegaRAID SAS 8408E*
- MegaRAID SAS 8480E*
- MegaRAID SATA 300-8ELP*
* Контроллеры предыдущих версий должны работать, но не тестировались.
Работает в ОС 32 и 64 бит:
- Windows* 2000
- Windows* 2003
- Windows* XP
- Windows* Vista
- Windows* 2008
- Windows* 7
- Windows* 8
Install. Требуется C++ пакет.
Условия установки соблюдены. Открывается окно мастера установки.
Принимаем лицензионное соглашение. Next.
Я выбираю установку для всех пользователей. Next.
Можно сменить папку установки. Next.
Выбираю обычную установку. Next.
Предлагают настроить LDAP, забиваю. Next.
Указываем размер ключа. Поскольку я на своей же машине буду шить контроллер, то эта опция — по барабану. Next.
Вот тут я подвис и оставил значение по умолчанию. Это настройка диапазона времени, за которое выводить уведомления. Мне оно не нужно. Next.
Эта страница предназначена только для того, чтобы нажать кнопку Install или не нажать. Идиотизм.
Установка завершена. Finish.
На рабочем столе появляется иконка MegaRAID Storage Manager. Для работу нужна java.
Процедура создания RAID10 на контроллерах LSI MegaRAID несколько непрозрачна. Рассмотрим ее по шагам на примере модели SAS 9260-4i и четырех SATA HDD.
При загрузке системы нажимаем + , что бы попасть в интерфейс настройки LSI MegaRAID.
Как известно RAID 10 – это RAID 1+0, т.е. набор логических хранилищ RAID 1, склеенных в один логический RAID 0. Создадим RAID 10 с помощью «Configuration Wizard». 


Конкретно в нашем примере необходимо создать два Drive Group, каждому из которых присвоить по два HDD. В других конфигурациях количество Drive Group может быть больше – в зависимости от количества носителей. 


Теперь созданные Drive Group необходимо добавить в Span. 
И на последнем этапе приступаем к созданию непосредственно RAID 10. 
Для задания максимально допустимого объема нового виртуального диска, используйте кнопку Update Size, а затем нажмите Accept.
На этом процедура создания RAID 10 закончена. 

Подпишитесь на рассылку полезных информационных материалов!