AVRDUDE for Windows
![]()
This is a fork of AVRDUDE from https://github.com/avrdudes/avrdude.
The purpose of this fork is to add better support for Windows to bring it on par with the Linux version of AVRDUDE.
Noteable changes include:
- Support Atmel AVR programmers out of the box
- Support Micronucleus bootloader
- Support Teensy HalfKay bootloader
- Support COM port discovery via USB VID/PID
- Support Arduino Leonardo bootloader auto-reset
- Support WinUSB devices via custom libusb
- Support FTDI devices via custom libftdi
- Support HID devices via libhidapi
- Support Visual Studio
- Miscellaneous bug-fixes and patches
The original AVRDUDE project homepage can be found here https://github.com/avrdudes/avrdude.
Documentation
Documentation for current and previous releases is on Github Pages.
Download
To get the latest version of AVRDUDE for Windows, go to the releases folder:
https://github.com/mariusgreuel/avrdude/releases
Feature Details
Support Atmel AVR programmers out of the box
This build contains support for Atmel AVR programmers, such as
- Atmel-ICE (Part Number: ATATMEL-ICE)
- Atmel AVRISP mkII (Part Number: ATAVRISP2)
This build does not rely on libusb drivers. Instead the default Atmel drivers can be used, allowing you to use AVRDUDE and Atmel Studio 7 side-by-side, without switching drivers.
If you previously changed the driver of your programmer to libusb, you should use Windows Device Manager to uninstall the device, and then reinstall using the default Windows drivers.
Support Micronucleus bootloader
This build adds support for the Micronucleus bootloader, so you do no longer need a separate command-line utility when working with devices that use the Micronucleus bootloader.
The Micronucleus bootloader is typically used on small ATtiny boards, such as Digispark (ATtiny85), Digispark Pro (ATtiny167), and the respective clones.
By default, it uses the USB VID/PID 16D0:0753 (MCS Digistump).
Since this bootloader is optimized for size, it implements writing to flash memory only.
As it does not support reading, you need to use the -V option to prevent AVRDUDE from verifing the flash memory. To have AVRDUDE wait for the device to be connected, use the extended option ‘-x wait’.
Example: Flashing a Micronucleus bootloader device
avrdude -c micronucleus -p t85 -x wait -V -U flash:w:main.hex:i
Support Teensy HalfKay bootloader
This build adds support for the Teensy HalfKay bootloader, so you do no longer need a the Teensy Loader tool when working with Teensy devices.
Since this bootloader is optimized for size, it implements writing to flash memory only.
As it does not support reading, you need to use the -V option to prevent AVRDUDE from verifing the flash memory. To have AVRDUDE wait for the device to be connected, use the extended option ‘-x wait’.
Supported devices are:
- Teensy 1.0 (AT90USB162)
- Teensy 2.0 (ATmega32U4)
- Teensy++ 1.0 (AT90USB646)
- Teensy++ 2.0 (AT90USB1286)
Example: Flashing a Teensy 2.0 device
avrdude -c teensy -p m32u4 -x wait -V -U flash:w:main.hex:i
Support COM port discovery via USB VID/PID
Most Arduino boards use a USB-based virtual COM port, which is connected to some sort of bootloader. Since COM port numbers (COM1, COM2, …) are determined by Windows, you first need to use Windows device manager to figure out the COM port before you can use AVRDUDE to flash the board. Alternatively, you may use Windows device manager to assign a COM port of your choice to the USB device. Additionally, the COM port of your Arduino board may change over time, for instance if you plug the device in a different USB port.
To simplify the discovery of your Arduino board, I provided the possibility to specify the USB vendor and product ID instead of the COM port.
For instance, to connect to an Arduino Leonardo, use the following command:
avrdude -c avr109 -P usb:2341:0036 -p m32u4
Since the USB vendor and device ID 2341:0036 is the identical for all Leonardo boards, the command above will work regardless of which COM port was actually assigned to your board.
Note that can cannot use this method if you have more than one device of the same type (i.e. that share the same USB VID/PID) plugged into your computer. Also, some devices ship various versions of firmwares using different VID/PID.
To figure out the USB VID and PID, you may use Windows devices manager (see the Hardware IDs of the Details tab of the USB device), or look it up in the official list of Arduino devices:
https://github.com/arduino/ArduinoCore-avr/blob/master/boards.txt
USB VID/PID pairs for some popular boards and the respective commands are:
- Arduino Uno Rev 3: 2A03:0043 ->
avrdude -c arduino -P usb:2A03:0043 -p m328p - Arduino Micro: 2341:0037 ->
avrdude -c avr109 -P usb:2341:0037 -p m32u4 - Arduino Leonardo: 2341:0036 ->
avrdude -c avr109 -P usb:2341:0036 -p m32u4 - Sparkfun Pro Micro (5V): 1B4F:9205 ->
avrdude -c avr109 -P usb:1B4F:9205 -p m32u4 - Sparkfun Pro Micro (3.3V): 1B4F:9203 ->
avrdude -c avr109 -P usb:1B4F:9203 -p m32u4 - Adafruit Circuit Playground: 239A:0011 ->
avrdude -c avr109 -P usb:239A:0011 -p m32u4
Support Arduino Leonardo bootloader auto-reset
Before any Arduino board may be flashed via the bootloader, you need to kick it into bootloader mode first. This can done manually by pressing the reset button, or automatically via an special auto-reset mechanism: For boards with a USB to serial converter chip (such as Arduino Uno or Nano), the tool needs to pull the DTR signal to low, which will briefly pull the RESET pin of the microcontroller to low. For boards with a direct USB connection (such as Arduino Leonardo or Micro), the sketch typically implements a serial port via a USB composite device with a virtual COM port. To perform the auto-reset, the sketch implements a hack that resets the device into bootloader mode when the COM port is opened with a baudrate of 1200bps. To make matters even more complicated, the bootloader COM port has a different USB VID:PID pair than the sketch COM port, which causes the COM port to change while performing the reset.
To simplify the process of auto-resetting the board, this version will auto-reset the device when AVRDUDE detects that the device is running in sketch mode. Note that the sketch is required to implement a USB composite device with a virtual COM port with a matching USB VID:PID, which is implemented in the Arduino core software.
Support WinUSB devices via custom libusb
Since AVRDUDE originated from Unix, the USB support in AVRDUDE is built upon the Unix-based USB library libusb. In order to support Windows, libusb has been ported to Windows libusb-win32.
The downside of using libusb-win32 is that it requires the user to manually install a kernel-mode driver (libusb0.sys or libusbk.sys) instead of the manufacturer supplied Windows driver. There are several hacks to accomplish this, such as the Zadig driver installation utility, which installs a self-signed root certificate in the Windows driver store due to the lack of proper driver installation packages.
This build contains a custom library called libwinusb, which implements a sub-set of the libusb-win32 API. The libwinusb implementation supports both the winusb.sys driver, and the libusb0.sys driver as well. This patch has a number of advantages, such as
- Many USB devices that ship with WinUSB drivers, such as Atmel programmer, will run out of the box.
- Works with both WinUSB and libusb: You can use either Windows built-in WinUSB driver to access your USB devices, or keep using the libusb drivers if you have them installed already.
- No static dependency to libusb0.dll: You cannot run the original version AVRDUDE, unless you previously installed libusb. On systems where libusb is not installed, this build eliminates the error «The code execution cannot proceed because libusb0.dll was not found. Reinstalling the program may fix this problem».
Microsoft OS descriptors and firmware examples
Windows provides a mechanism to automatically load the built-in WinUSB driver without providing a driver installation package (INF file). The automatic WinUSB driver installation is triggered via a special Microsoft OS descriptor that must be present in the firmware of the USB device.
To demonstrate how this works, I added Microsoft OS descriptors to the following projects:
-
USBasp — USB programmer for Atmel AVR controllers: https://github.com/mariusgreuel/USBasp
-
FabISP a.k.a USBtinyISP — A fab-able in-system programmer: https://github.com/mariusgreuel/FabISP
-
Micronucleus — ATtiny USB bootloader with a strong emphasis on bootloader compactness: https://github.com/mariusgreuel/micronucleus
Support FTDI devices via custom libftdi
In order to support FTDI devices, AVRDUDE uses the Unix-based library libftdi1. Similar to libusb, the libftdi1 library does not play nice on Windows: On Windows, FTDI devices load the manufacturer supplied driver via plug-and-play. The FTDI drivers implement an API via the FTDI D2XX DLLs. However, libftdi1 cannot use the D2XX interface, so it will not work with the plug-and-play drivers.
This build contains a patches library of libftdi. The patches load the D2XX DLLs to support FTDI devices, so FTDI devices will just work.
Support HID devices via libhidapi
This build include the WIN32 version of libhidapi, and some patches, to allow HID devices to work out of the box.
Support Visual Studio
This build adds support for Microsoft Visual Studio. Building AVRDUDE with Microsoft Visual C/C++ will give you the best user and debugging experience while working on Windows.
Miscellaneous bug-fixes and patches
-
This build fixes bug #54159: Buffer overflow in usbtiny.c, which causes AVRDUDE to crash when using the USBtiny programmer.
-
Support new microcontroller: ATtiny167
Releases
You can find the latest releases of AVRDUDE for Windows here:
https://github.com/mariusgreuel/avrdude/releases
Users manual
You can find the original users manual (does not contain AVRDUDE for Windows extras) of AVRDUDE here:
https://www.nongnu.org/avrdude/user-manual/avrdude.html
Build
The build instructions have been moved here:
https://github.com/avrdudes/avrdude/wiki
Building AVRDUDE for Windows using MSVC
Windows Prerequisites
In order to build AVRDUDE on Windows, you need:
- Flex and Bison installed, for instance via Chocolatey
- Microsoft Visual Studio 2019 with Desktop development with C++ and CMake enabled
Windows Build Instructions
To build AVRDUDE on Windows, do the following:
git clone --branch windows https://github.com/mariusgreuel/avrdude- Open the folder avrdude using the menu item File->Open->Folder
- Build the project using the menu item Build->Build All
Linux udev rules
If you intent to use either the Micronucleus or Teensy bootloader, you should edit the udev rules so that you can run AVRDUDE without root.
For instance, if you are on Ubuntu and you installed the avrdude package, you would edit /lib/udev/rules.d/60-avrdude.rules and add the following rules:
# Micronucleus Bootloader
SUBSYSTEM=="usb", ATTR{idVendor}=="16d0", ATTR{idProduct}=="0753", TAG+="uaccess"
# Teensy Bootloader
SUBSYSTEM=="usb", ATTR{idVendor}=="16c0", ATTR{idProduct}=="0478", TAG+="uaccess"
Troubleshooting Tips & Tricks
Atmel DFU Device driver broken
The current version of the Atmel DFU drivers that are distributed via the Windows Update are goofed up (@Atmel: It might have something to do with the fact that you commented out the CopyFiles sections!).
Symptoms are:
- You cannot use AVRDUDE to connect to an Atmel DFU device, and you get the error message «No matching USB device found».
- When installing the drivers via Windows Update, you get the error message «Windows encountered a problem installing the drivers for your device» and «A service installation section in this INF is invalid.»
- In Windows Device Manager, the Atmel DFU device shows up as an unknown device.
You should use an older driver package that does not contain this bug.
Outdated libusb0 driver
The most current version of libusb0.sys is 1.2.6.0, signed on 12/17/2012 by Travis Lee Robinson. If you are using an older version (check with Windows Device Manager), you may not be able to connect to your USB devices using the libusb0 driver.
AVRDUDE_PROG 3.1
Основные отличия:
Настройки параметров оболочки «AVRDUDE_PROG» реализованы в «ini» файлах. Что такое «ini» файлы можно посмотреть тут http://ru.wikipedia.org/wiki/.ini» target=»_blank
Теперь возможно самостоятельно добавлять и редактировать список контроллеров, программаторов, портов, Fuse бит, добавить различные языки и пр.
Список контроллеров и состояния Fuse бит, редактируется в файле «atmel.ini», список программаторов и портов в файле «programm.ini», список поддерживаемых языков в файле «language.ini». Файлы «ini» находится в корневой папке программы.
В файле «atmel.ini», все значения введены по умолчанию в соответствии с datasheet на МК, можете изменить по Вашему усмотрению.
В том случае, если МК нет в списке или при выборе МК во вкладке Fuse везде «error», Вам необходимо самостоятельно ввести значения в файл «atmel.ini» в соответствии с datasheet и приведённым ниже примером.
Пример на мк AT90CAN128
Заголовок раздела
[AT90CAN128] — имя МК которое появиться в выпадающем списке, «[» и «]» обязательны. В данном случае «AT90CAN128».
Параметр для типа МК
mcuavrdude=c128 // тип мк в avrdude
Значение и описание параметров раздела для Fuse бит
Lock байт
lockbytebit*enabled=0 // «*» — номер бита в Lock байте, «**enabled=0» — невозможно изменение состояния бита, «**enabled=1» — возможно изменение состояния бита. В данном случае изменение бита невозможно. Изменение бита будет недоступно.
lockbytebit*name=NOT USED // «*» — номер бита в Lock байте, «**name = NOT USED» — бит не используется. Если бит используется, вводиться его имя в соответствии с datasheet.
lockbytebit*def= // «*» — номер бита в Lock байте, «**def=» — если имя бит бита = «NOT USED», то значение не вводится.
High байт
highbytebit*enabled=1 // «*» — номер бита в High байте, «**enabled=0» — невозможно изменение состояния бита, «**enabled=1» — возможно изменение состояния бита. В данном случае изменение бита возможно. Изменение бита будет доступно.
highbytebit*name=OCDEN // «*» — номер бита в High байте, «**name = OCDEN» — имя бита в соответствии с datasheet.
highbytebit*def=1 // «*» — номер бита в High байте, «**def=1» — значение бита по умолчанию, вводиться в соответствии с datasheet. В данном случае значение по умолчанию «1».
Low байт
lowbytebit*enabled=1 // «*» — номер бита в Low байте, «**enabled=0» — невозможно изменение состояния бита, «**enabled=1» — возможно изменение состояния бита. В данном случае изменение бита возможно. Изменение бита будет доступно.
lowbytebit*name=CKDIV8 // «*» — номер бита в Low байте, «**name = CKDIV8» — имя бита в соответствии с datasheet.
lowbytebit*def=0 //»*» — номер бита в Low байте, «**def=0» — значение бита по умолчанию, вводиться в соответствии с datasheet. В данном случае значение по умолчанию «0».
Extended байт
extendedbytebit*enabled=0 // «*» — номер бита в Extended байте, «enabled=0» — невозможно изменение состояния бита, «enabled=1» — возможно изменение состояния бита. В данном случае изменение бита невозможно. Изменение бита будет недоступно.
extendedbytebit*name=NOT USED //»*» — номер бита в Extended байте, «name = NOT USED» — бит не используется. Если бит используется, вводиться его имя в соответствии с datasheet.
extendedbytebit*def= // «*» — номер бита в Lock байте, «**def=» — если имя бит бита = «NOT USED», то значение не вводится.
Буду рад отзывам и предложениям ![]()
P.S. некоторые контроллеры прописал в файле «atmel.ini», возможны ошибки, будьте внимательны.
AVRDUDE_PROG 3.1 скачать
This tutorial will guide you through the installation and setup of the AVR GCC Toolchain under Microsoft Windows. You’ll also learn how to install some additional and useful tools that will help you write easier your first microcontroller programs.
Prerequisites
What do we need to complete this guide?
- Computer with Microsoft Windows – version 7, 8, or 10.
- Administrative access to Windows.
- One USB port – available for use.
- ISP programmer – type USBasp is recommended.
- AVR-powered microcontroller board – we use, as always, a Tinusaur board.
NOTE: It takes about 2 hours for an inexperienced person to do it.

1. What is AVR GCC Toolchain?
The AVR GCC Toolchain is a collection of tools and libraries used to compile your code for the AVR microcontrollers. This collection includes a compiler, assembler, linker, and some libraries.
Most of the tools are based on efforts from the GNU community (GCC stands for GNU Compiler Collection), and some others are developed by Microchip.
2. What is WINAVR?
WINAVR is a great project or rather was.
It was an installation package for Windows that contained everything you needed to compile your C or C++ code for AVR microcontroller under Windows and most importantly, for people like me, it allowed us to do it in the text console.
The most “recent” WINAVR files are from 2010-01-20. 🙂 In other words, it is outdated.
There are many projects that attempted to replace it but none of them (AFAIK) is extremely popular.
This guide will walk you through the steps on how to setup everything manually. There is no installation package that you could run and that will do everything for you.
3. AVR GCC Toolchain – Setup for Windows

To setup and use AVR GCC Toolchain we need 3 essential components:
- AVR GCC – Windows Binary
- GNU Make – on Windows
- AVRDUDE – on Windows
All the suggested downloads, folders, and file names are based on our own setup and some of them could be changed according to your preferences.
AVR GCC – Windows Binary
Let’s start with the AVR GCC. Let’s download it from the Microchip website.
Toolchains for AVR® Microcontrollers (MCUs):
- https://www.microchip.com/en-us/tools-resources/develop/microchip-studio/gcc-compilers/
On the page, look for “AVR 8-bit Toolchain v3.62 – Windows” or similar.
You will need an account (free registration) to download the ZIP archive. It is debatable if this Free and Open Source software should be put behind a registration wall, but it is rather an ethical issue than legal.
Create a “Programs” folder (if it does not exist already) for the various programs that we’re going to install. The name and location are up to you, those given here are just an example.
C:UsersMY_USER_NAMEPrograms
Extract the contents of the ZIP file in the “Programs” folder. All the folders and files should be in an “avr8-gnu-toolchain-win32_x86” folder”. Let’s rename that to “avr8-gnu-toolchain” just to simplify thong – it is not required.
The Toolchain is now at:
C:UsersMY_USER_NAMEProgramsavr8-gnu-toolchain
The sub-folders should look something like this: avr, bin, doc, i686-w64-mingw32, include, info, lib, libexec, man, share.
Do not add anything to your Windows Environment PATH variable.
Alternatives
There is a very interesting project that you could use as an alternative:
AVR-GCC 11.1.0 for Windows 32 and 64 bit
The AVRGCCStart.cmd Script
It would’ve been very convenient if there was a command that would start the console development environment for us. So, let’s create a short command prompt script that will setup everything for us. Let’s call it AVR GCC Toolchain STARTER.
Instead of adding the file system Path of the Toolchain to the system PATH (in the environment variables) we are going to create that simple command prompt script that will do this only for the command prompt that we will open with that script. The advantage of doing it this way is that we’re not going to “contaminate” the system PATH variable with too many executables and libraries. Doing otherwise might cause issues with some other already installed development environments.
How to create the AVRGCCStart.cmd file?
- Open the Windows Notepad application.
- Press CTRL + S (to save).
- Type in the name “AVRGCCStart.cmd”.
Choose a folder where to save the file – the “Programs” folder is a good choice.
Add the following lines to the AVRGCCStart.cmd file:
set Path=%Path%;C:UsersMY_USER_NAMEProgramsavr8-gnu-toolchainbin
set Path=%Path%;C:UsersMY_USER_NAMEProgramsavr8-gnu-toolchainavrbin

start cmd
That will add what is necessary to the Path and will open a command prompt window.
IMPORTANT: Don’t forget to replace MY_USER_NAME with your username.
Testing
Start the AVRGCCStart.cmd script.
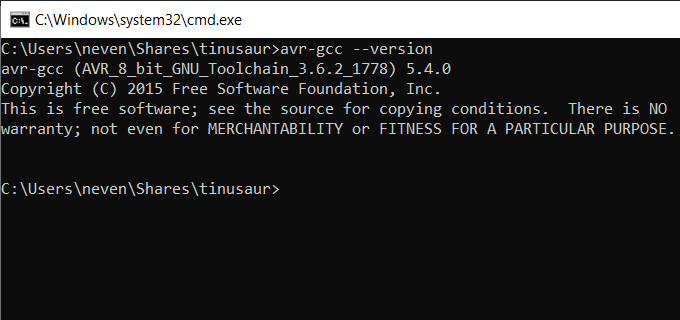
In the command prompt execute:
avr-gcc --version
That should output the version of the AVR GCC compiler. Something like this:
avr-gcc (AVR_8_bit_GNU_Toolchain_3.6.2_1778) 5.4.0
That also means that everything is correctly installed and setup up to this point.
GNU Make – on Windows
In order to package all the compiled C or C++ source code into a HEX file in a convenient way, i.e. by using the so-called Makefile, we need the GNU Make program.

There are many bundles for Windows that contain the GNU Make – we are going to use the GnuWin Packages located at http://gnuwin32.sourceforge.net/packages.html. They are part of the GnuWin (also known as gnuwin32) project at http://gnuwin32.sourceforge.net/.
In the “Programs” folder create a “gnuwin32” sub-folder for the gnuwin32 packages.
Download the Make packages from: http://gnuwin32.sourceforge.net/packages/make.htm
- Locate the Binaries ZIP file. This should be something like “make-3.81-bin.zip”. Download it to your computer.
- Extract the contents in the gnuwin32 folder.
The sub-folders and files should look like: bin, contrib, man, manifest, share.
The make.exe requires some additional libraries, so we should download also the Dependencies (a file like “make-3.81-dep.zip”) from the same page and extract them at the same location.
Optionally, you could download and extract the Documentation.
Update AVRGCCStart
Edit the AVRGCCStart.cmd script – add the following line (before the “start cmd” line):
set Path=%Path%;C:UsersMY_USER_NAMEProgramsgnuwin32bin
Don’t forget to replace MY_USER_NAME with your username.
IMPORTANT: Every time you update the content of the AVRGCCStart.cmd script – close its open windows (if there are any) and relaunch the script again, so the changes will take effect.
Testing
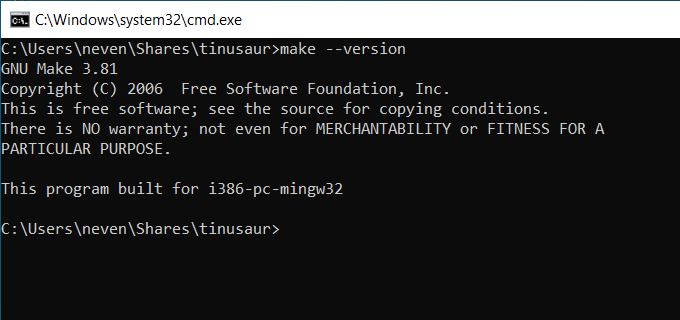
In the command prompt execute:
make --version
That should output the version of the GNU Make. Something like this:
GNU Make 3.81
That also means that everything is correctly installed and setup up t this point.
GNU CoreUtils for Windows

Some Makefile files (like ls, rm, mv, mkdir, etc. – those we are going to use later) might need other GNU tools that are part of the GNU CoreUtils.
Download the CoreUtils package: http://gnuwin32.sourceforge.net/packages/coreutils.htm
- Locate the Binaries ZIP file. This should be something like “coreutils-5.3.0-bin.zip”.
- Extract the contents in the gnuwin32 folder.
- Download and extract Dependencies.
- Optionally, download and extract the Documentation.
NOTE: Some of the files in the Dependencies package might already exist in the gnuwin32 folder – it’s OK to override (or skip) them.
Recommended Packages
Grep for Windows: http://gnuwin32.sourceforge.net/packages/grep.htm
Alternatives
- The GNU Make could also be downloaded from the Steve.fi (Steve Kemp) website:
https://steve.fi/software/make/
Please, note that those are quite old.
- Another alternative is the Gow (Gnu On Windows) project – a lightweight alternative to Cygwin.
https://github.com/bmatzelle/gow
Please, note that those are quite old.
Testing
In the command prompt execute:
ls -la
That should list the files in the current folder. Something like this:
total 20
drw-rw-rw-   2 neven 0     0 2021-12-28 17:09 .
drw-rw-rw-  32 neven 0 12288 2021-12-28 15:52 ..
-rwxrwxrwx   1 neven 0   205 2021-12-28 17:37 AVRGCCStart.cmd
That also means that everything is correctly installed and setup up to this point.
AVRDUDE on Windows
When we start compiling our programs and packaging them as HEX files we are going to need a program to upload them to the microcontroller. One such and very popular program is the AVRDUDE. And yes, there is, of course, a build for Windows.
In the “Programs” folder create an “avrdude-mingw32” sub-folder for the AVRDUDE package.
Go to download.savannah.gnu.org/releases/avrdude/ and locate the mingw32 ZIP file.
At the time of writing this guide, the most recent version that works out of the box without the need to install additional libraries and/or packages is 6.3.
Download the AVRDUDE package: download.savannah.gnu.org/releases/avrdude/avrdude-6.3-mingw32.zip
- Locate the Binaries ZIP file. This should be something like “avrdude-6.3-mingw32.zip”.
- Extract the contents in the avrdude-mingw32 folder.
NOTE: The 6.4 version of the AVRDUDE requires the “libhidapi-0.dll” library that might not be available on your computer.
The libusb0.dll problem
This is important!
The avrdude program requires the libusb library located in the libusb0.dll file. Note that this file is not part of the AVRDUDE ZIP package.
The issue could get a bit more complicated because the driver installation procedure described in one of the sections below uses the Zadig (which is a great program). That will place a libusb0.dll file in the “C:WindowsSystem32” folder, but that file might not be compatible with our AVRDUDE package.
Here is a short description of the problem. The libusb0.dll comes in 2 flavors – one to be used in the 32-bit and another one for 64-bit software. The AVRDUDE needs the 32bit version while Zadig comes with the 64-bit version.
Here is a solution to the problem. We will get a 32-bit flavor of the libusb0.dll and will put it in the same folder where AVRDUDE is.
Getting the libusb0.dll
The libusb0.dll file that is part of the libusbK project (located at https://sf.net/p/libusbk) is what we need.
The latest suitable release is 3.1.0.0 located at:
https://sourceforge.net/projects/libusbk/files/libusbK-release/3.1.0.0/
Download the libusbK-3.1.0.0-bin.7z file and extract its contents in a temporary location.
Locate the libusbK-3.1.0.0-binbindllx86 folder and the libusb0.dll file.
Check file properties, the “Digital Signature” tab and make sure that it is valid:
Travis Lee Robinson – Tuesday, 17 January, 2012 19:40:19
Copy the libusb0.dll file over to our AVRDUDE folder – avrdude-mingw32.
Alternatives
- There is AVRDUDE (by mariusgreuel) located at https://github.com/mariusgreuel/avrdude. It includes all the necessary libraries in the binary.
NOTE: Might not work on 32-bit Windows.
Update AVRGCCStart
Add the following line to the AVRGCCStart.cmd script (before the “start cmd” line):
set Path=%Path%;C:UsersMY_USER_NAMEProgramsavrdude-mingw32
Testing
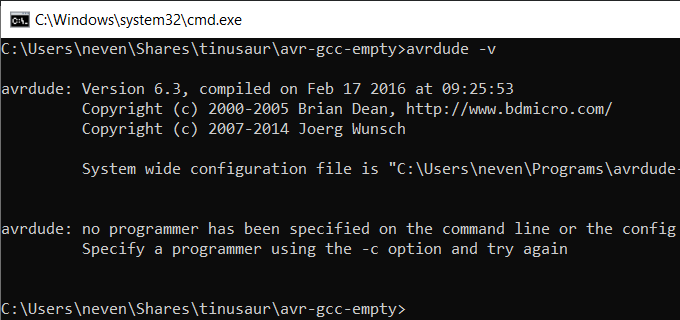
In the command prompt execute:
avrdude -v
That should output the version of the AVRDUDE . Something like this:
avrdude: Version 6.3, compiled on Feb 17 2016 at 09:25:53
That also means that everything is correctly installed and setup up to this point.
USB Programmer Drivers
To upload the compiled and packaged binary code (in the form of a HEX file) into the microcontroller we will need a Programmer. In most cases that is a USB device. A very popular device is the USBasp programmer. Under Windows such devices require an additional driver to be installed for them to work properly.
One of the best and easiest ways to install a driver for that kind of Programmer is to use the Zadig program.
- Download the latest EXE file from https://zadig.akeo.ie.
- Insert your USBasp programmer into the USB of your computer.
- Run the program. You may need to click on some warning buttons that Windows will show you.
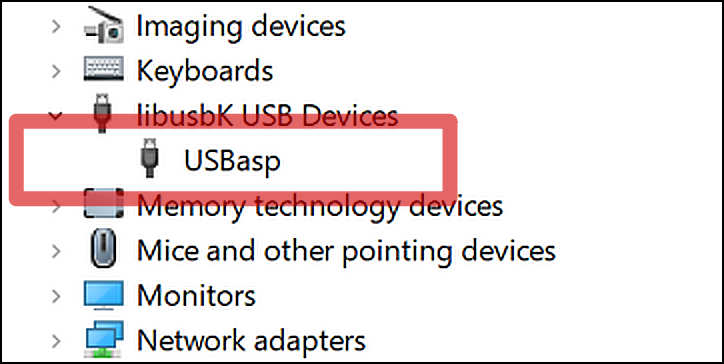
- Choose the correct driver which is the “libusbK”.
Note: on 32-bit WIndows you need to choose libusb-win32. - Press the “Install” button.
You might need to wait a minute or two.
Check on Windows Device Manager if the driver was installed correctly.
Testing
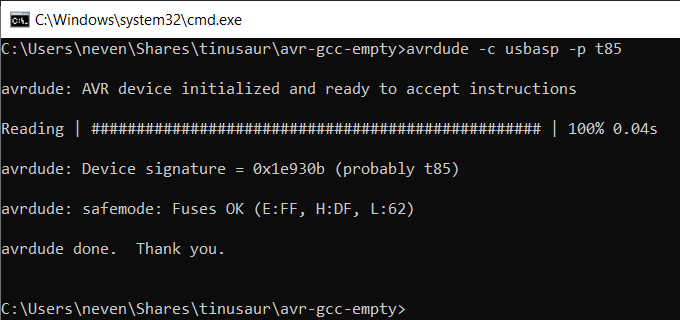
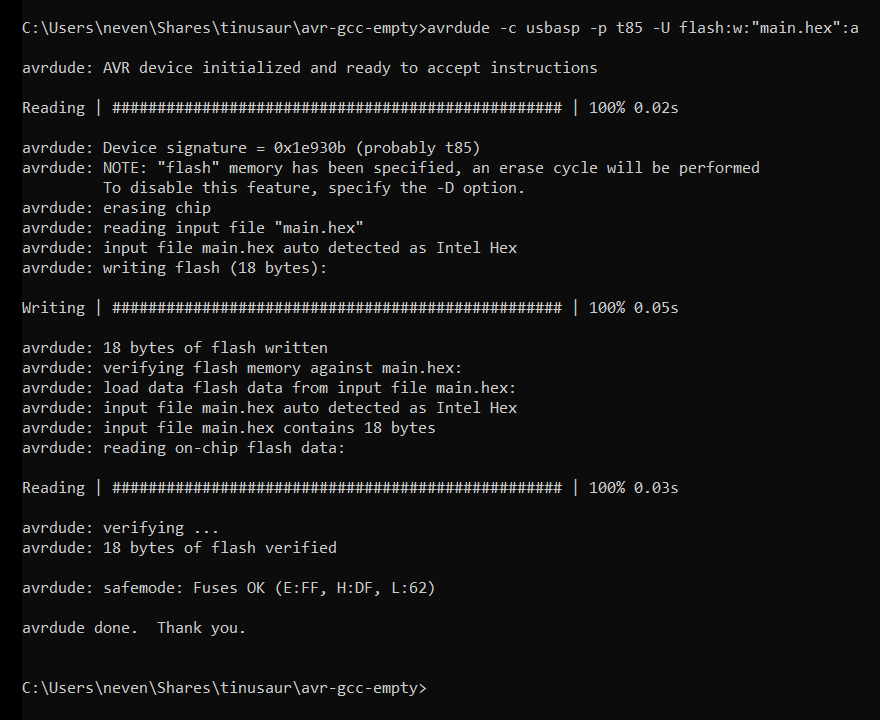
Let’s now check if the USBasp programmer could communicate with our microcontroller (ATtiny85). First, make sure that the USBasp programmer is inserted in the USB and connected to the microcontroller board. Execute this command:
avrdude -c usbasp -p t85
The result should be something like this:
avrdude: AVR device initialized and ready to accept instructions
Reading | ################################################## | 100% 0.09s
avrdude: Device signature = 0x1e930b (probably t85)
avrdude: safemode: Fuses OK (E:FF, H:DF, L:62)
avrdude done.  Thank you.
If we have a microcontroller different than the one specified in the command (ATtiny85) the avrdude will suggest what it might be.
Other Useful Tools
Those were the minimum tools that we will need to compile our source code for the AVR platform.
The following are recommended but not required additional tools.
Shell – BASH

It will be convenient to have a console that is a bit better than the Windows Command Prompt. A good alternative is the BASH shell. Developed as part of the GNU Project it is now used on many other operating systems including Linux, Android, Mac OS, and of course – Windows.
OPTION-1
We have put together an archive that consists of the bash.exe and a few other necessary .dll files. It is located at our GitLab repository:
- https://gitlab.com/tinusaur/bash-mingw/-/releases,
and also at our GitHub repository - https://github.com/tinusaur/bash-mingw/releases
Download the ZIP archive and extract it at a temporary location.
Copy the “bash-mingw” sub-folder to the “Programs” folder.
The BASH executable will be located in the “Programsbash-mingwbin“ folder.
OPTION-2
At Steve.fi – (Steve Kemp’s website) there is a Windows binary for download. It is quite old but still works.
In the “Programs” folder create a “bash” sub-folder for the bash package.
Go to the website: https://steve.fi/software/bash/
- Locate the download link: https://steve.fi/software/bash/bash-203.zip
- Download and save the ZIP file.
- Extract the contents into a temporary location. There will be a bash-2.03 folder.
- From the bash-2.03 folder, copy 2 files: bash.exe and bash.dll, into the “Programs/bash” folder.
- Optionally, you could also copy the .bash.rc file in your home folder:
C:UsersMY_USER_NAME
Edit it – if you know how it functions.
NOTE: The executables are really old – some of them date back to 1998, 1999.
Alternatives
- win-bash – A stand-alone bash for Windows
http://win-bash.sourceforge.net - How To Install Bash On Windows 10
https://hackernoon.com/how-to-install-bash-on-windows-10-lqb73yj3
Update AVRGCCStart
Add the following line to the AVRGCCStart.cmd script (before the “start cmd” line):
set Path=%Path%;C:UsersMY_USER_NAMEProgramsbash-mingwbin
Replace the line:
start cmd
With:
set HOME=%USERPROFILE%
start bash

Testing
Start the AVRGCCStart script.
It should look like this:
bash-3.1$_
Note: You might see some warning messages about a missing “tmp” folder.
Text editor – nano
A console-based text editor will be (optional) a nice finish!
The nano text editor is very popular and is available even for Windows.
GNU nano for Windows is a good option and it is located at:
https://github.com/lhmouse/nano-win
The package could be downloaded from this page:
https://files.lhmouse.com/nano-win/
Look for the latest build at the bottom. Should be something like “nano-win_9732_v5.9-10-ga2d202368.7z”. Download it and extract it into a temporary location. It should look like this:
pkg_i686-w64-mingw32 (this is the 32-bit version)
pkg_x86_64-w64-mingw32 (this is the 64-bit version)
.nanorc
In the “Programs” folder create a “nano” sub-folder for the nano package.
Pick a folder for a 32 or 64 bit version, depending on your computer, and copy its contents (something like bin, share, etc.) to the “nano” sub-folder.
Optionally, copy the .nanorc file to your home folder.C:UsersMY_USER_NAME
Alternatives
- nano for Windows
https://sourceforge.net/projects/nano-for-windows/
Note: this is a version of the one above. - nano – Text editor / win32-support
https://nano-editor.org/dist/win32-support/
Note: might not work on a 32-bit Windows.
Update AVRGCCStart
Add the following line to the AVRGCCStart.cmd script (before the “start cmd” or “start bash” line):
set Path=%Path%;C:UsersMY_USER_NAMEProgramsnanobin
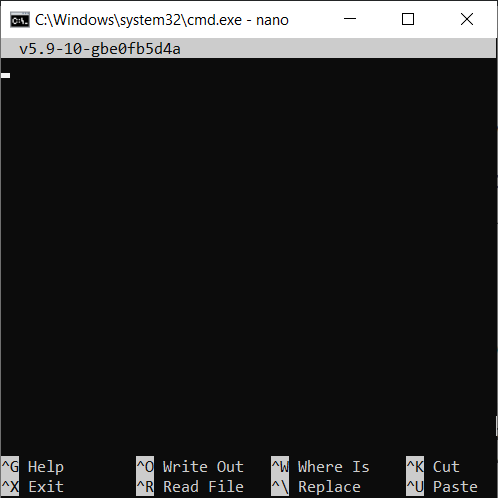
Testing
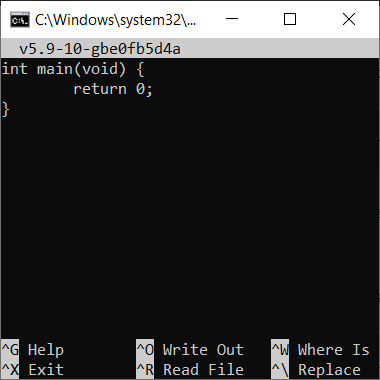
- In the command prompt execute:
nano --version
That should output the version of the nano. Something like this:
GNU nano from git, v5.9-10-gbe0fb5d4a
- In the command prompt execute:
nano
That should start the nano editor.
To exit the editor press CTRL + X.
The “^” symbol in the menu means that you have to press the “CTRL” key.
Update AVRGCCStart
Before we start the command prompt with either “cmd” or “bash”, we could go to the Home or other folder (let’s say our projects folder).
Add a line to the script before the “start bash” line:
cd %HOME%
At this point the contents of the AVRGCCStart.cmd file should be something like this:
set Path=%Path%;C:UsersMY_USER_NAMEProgramsavr8-gnu-toolchainbin
set Path=%Path%;C:UsersMY_USER_NAMEProgramsavr8-gnu-toolchainavrbin
set Path=%Path%;C:UsersMY_USER_NAMEProgramsgnuwin32bin
set Path=%Path%;C:UsersMY_USER_NAMEProgramsavrdude-mingw32
set Path=%Path%;C:UsersMY_USER_NAMEProgramsbash-mingwbin
set Path=%Path%;C:UsersMY_USER_NAMEProgramsnanobin

set HOME=%USERPROFILE%
cd %HOME%
start bash
4. AVR GCC “Hello, World!”
Let’s now write our first program – the “Hello, World!”.
In the world of microcontrollers, this is the Blinking LED program.
But, before that let’s see if we can write, compile, package, and upload any program.
AVR GCC – The “Empty” Program
Let’s first create a folder (if it doesn’t already exist) where we will put all our projects.
mkdir Projects
cd Projects
Let’s now create a working folder. Let’s call it “avr-gcc-empty”.
mkdir avr-gcc-empty
cd avr-gcc-empty
Let’s write just a few lines of code in a “main.c” file.
Start the nano with a new file – main.c:
nano main.c
Enter the code:
int main(void) {
    return 0;
}
- Compile the source code:
avr-gcc main.c -o main.elf
Note: the result will be an ELF file – main.elf.
We need to convert it to a HEX file,
- Convert to HEX:
avr-objcopy main.elf -O ihex main.hex
The result is a main.hex file.
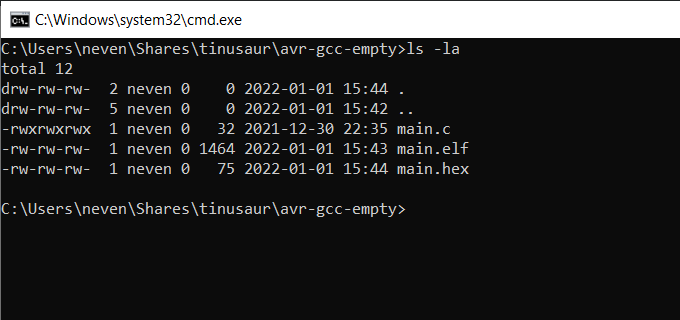
Let’s see what’s inside of the file:
cat main.hex
The result should look li this:
:10000000CF93DF93CDB7DEB780E090E0DF91CF9163
:02001000089551
:00000001FF
Now, with the AVRDUDE we could upload that file into the microcontroller:
- Upload the HEX:
avrdude -c usbasp -p t85 -U flash:w:"main.hex":a
In this example “-p t85” specifies that the microcontroller is an ATtiny85.
NOTE that this program does not do anything. It is just an example of checking our setup.
We could also take a look at the assembly instructions of our program:
avr-objdump main.elf -d
The result should look li this:
   0:   cf 93           push    r28
   2:   df 93           push    r29
   4:   cd b7           in      r28, 0x3d       ; 61
   6:   de b7           in      r29, 0x3e       ; 62
   8:   80 e0           ldi     r24, 0x00       ; 0
   a:   90 e0           ldi     r25, 0x00       ; 0
   c:   df 91           pop     r29
   e:   cf 91           pop     r28
  10:   08 95           ret
If we add the “-Os” the compilation will be performed and optimized for smaller code sizes. Let’s try this:
avr-gcc main.c -Os -o main.elf
Then, check the assembly instructions:
avr-objdump main.elf -d
The result will be something like that:
   0:   80 e0           ldi     r24, 0x00       ; 0
   2:   90 e0           ldi     r25, 0x00       ; 0
   4:   08 95           ret
It is really obvious that the code size is much smaller.
The real “Hello, World!” program
For how to write a real “Hello, World!” program that actually does Blinking LED look at the “AVR GCC Hello World” tutorial. (COMING SOON)
Содержание
- Способ 1: Самостоятельная загрузка libusb0.dll
- Способ 2: Обновление драйверов Windows
- Способ 3: Установка последней версии сборки LibUSB
- Способ 4: Ручная регистрация libusb0.dll
- Способ 5: Восстановление системных файлов Windows
- Способ 6: Использование исходников libusb
- Вопросы и ответы

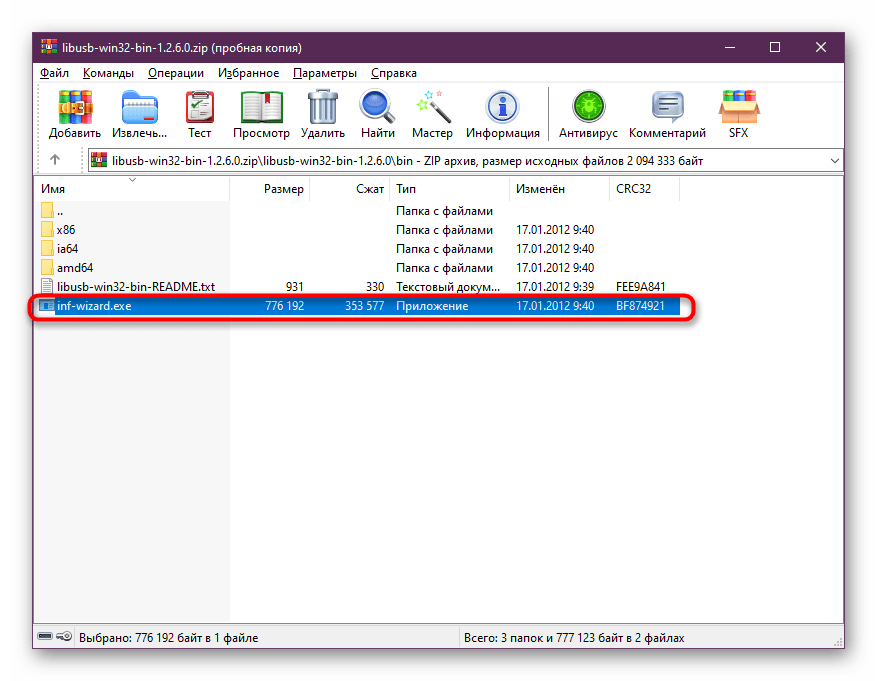
Динамически подключаемая библиотека libusb0.dll не является известной в кругах начинающих пользователей, поскольку практически никто не сталкивается с ней в ходе своего обычного взаимодействия с операционной системой. Большинство узнает об этом файле только при запуске стороннего программного обеспечения, когда на экране появляется уведомление об его отсутствии. В рамках сегодняшнего материала мы бы хотели рассказать все о данном файле и рассмотреть доступные методы решения возникшей неполадки.
Изначально небольшая утилита с графическим интерфейсом под названием LibUSB была предназначена исключительно для формирования файлов форматов INF из информации подключенных USB-устройств. Это помогало пользователям обмениваться драйверами, генерировать их особенные копии или даже использовать в текущей операционной системе. Позже сторонние разработчики начали добавлять элементы этого компонента в свои продукты, переделав функционирование утилиты под формат DLL. Теперь это ПО не пользуется популярностью, однако многие до сих пор задействуют его в своем софте, назначая этому компоненту выполнение определенных опций.
Если по каким-то причинам файл действительно отсутствует, вы можете как найти его самостоятельно в исходниках (Способ 6), так и скачать его отдельно, например, с нашего сайта.
Скачать libusb0.dll
Полученную библиотеку необходимо переместить в основную папку приложения, которое сообщает об отсутствии DLL, или в системную директорию C:WindowsSystem32 или C:WindowsSysWOW64 (отталкивайтесь от разрядности ОС). Возможно, при повторном появлении ошибки, понадобится провести регистрацию файла (Способ 4).
Способ 2: Обновление драйверов Windows
Если вы пропустили предыдущий вариант, обратите внимание не на сам рассматриваемый файл, а на актуальность абсолютно всех драйверов операционной системы, обязательно включая в этот список и периферийные устройств, которые соединяются через USB. Виндовс иногда некорректно понимает ошибку библиотеки, интерпретировав ее по-своему, однако на самом деле файл все это время присутствовал, а его нормальное функционирование невозможно из-за конфликта с другими объектами. Потому вам следует выбрать оптимальный метод и с его помощью проверить наличие апдейтов для каждого оборудования. Детальнее об этом читайте в инструкции далее.
Подробнее: Обновление драйверов в Windows
Способ 3: Установка последней версии сборки LibUSB
Этот вариант подойдет только тем юзерам, кто использует программу LibUSB. Как уже было сказано ранее, ее основное предназначение заключается в создании файлов-драйверов для подключенных USB-устройств. Использование устаревшей версии данного софта может привести к тому, что во время обращения к нему на экране появится уведомление об отсутствии рассматриваемой динамически подключаемой библиотеки. Поэтому обязательным условием использования LibUSB является загрузка последней версии. Сделать это можно на официальном сайте, что выглядит следующим образом:
Скачать LibUSB с официального сайта
- Перейдите по ссылке выше, где нажмите на кнопку «Скачать».
- Загрузка архива начнется автоматически. По завершении его нужно будет распаковать через любой удобный соответствующий софт.
- Для дальнейшего запуска программы требуется перейти в папку «bin».
- Дважды кликните левой кнопкой мыши по находящемуся там исполняемому файлу.
- Ознакомьтесь с информацией о программе и переходите далее, кликнув по кнопке «Next».
- Если уже на этом этапе не возникло никаких неполадок, скорее всего, инсталляция последней версии LibUSB помогла решить существующие неполадки, а значит, можно смело приступать к созданию INF-файлов.


Если вы не ставите перед собой цель работать с рассмотренным софтом, все равно рекомендуется установить его. В некоторых случаях это помогает избавиться от существующей проблемы, однако нет абсолютно никаких гарантий действенности такого варианта.
Способ 4: Ручная регистрация libusb0.dll
Давайте теперь рассмотрим ту ситуацию, когда при инсталляции стороннего софта стандартная процедура регистрации libusb0.dll не произошла или что-то спровоцировало ее сброс. Встречается такое довольно редко, но не стоит исключать возможность появления подобной трудности. Справиться с ней можно самостоятельно, проверив регистрацию и произведя ее заново, что осуществляется путем ввода соответствующих команд в стандартной консоли.
- Запустите «Командную строку» через меню «Пуск». Обязательно делайте это от имени администратора, чтобы не получить уведомление об отсутствии прав для запуска системных утилит.
- После появления привычного окна консоли введите туда команду
regsvr32 /u libusb0.dll, активировав ее нажатием по клавише Enter. Это действие отменит текущую регистрацию, о чем будет свидетельствовать всплывающее окно. Закройте его и переходите к следующему шагу. - Осталось только написать команду
regsvr32 /i libusb0.dll, которая создаст повторную регистрацию для динамически подключаемой библиотеки.

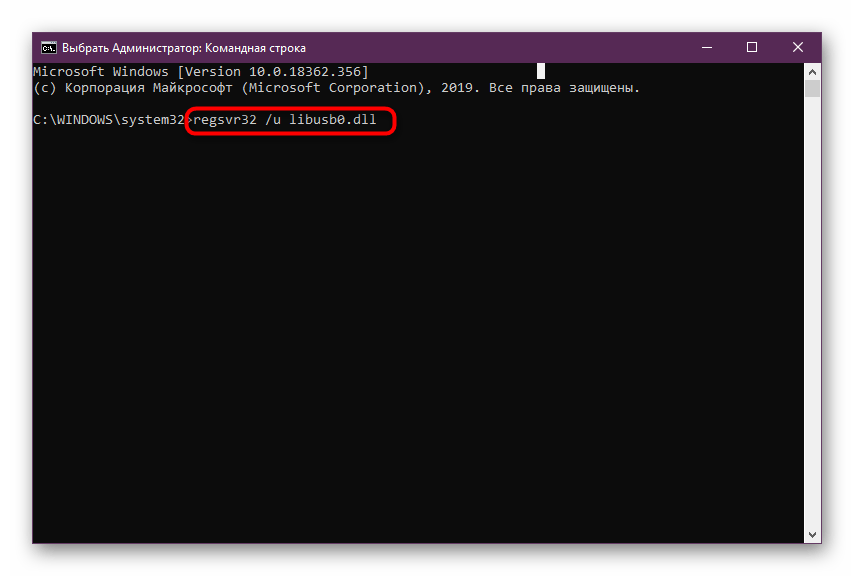
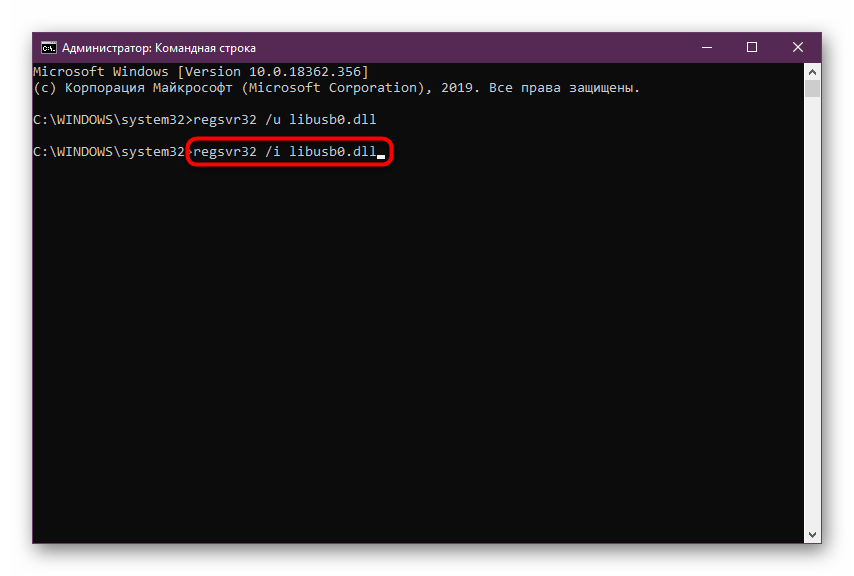
После этого рекомендуется сразу же перейти к проверке эффективности способа, поскольку перезагрузка компьютера в этом случае не требуется и изменения вступают в силу сразу же после активации команд. Если это не принесло никакого результата, переходите к рассмотрению следующих инструкций.
Способ 5: Восстановление системных файлов Windows
Существует небольшая вероятность того, что при работе операционной системой произошел какой-либо сбой, вызвавший нарушение целостности важных файлов. Это может привести не только к проблемам с объектом libusb0.dll, но и вызвать более глобальные трудности. К счастью, проверить ОС на подобные повреждения очень просто, ведь все действия за пользователя осуществляют утилиты SFC и DISM. Первая производит исправление системных файлов, а если появляется ошибка, свидетельствующая о повреждении резервного хранилища, следует запустить DISM для его восстановления, а потом уже возвращаться к SFC. Обо всем этом в максимально развернутом виде читайте в руководстве далее.
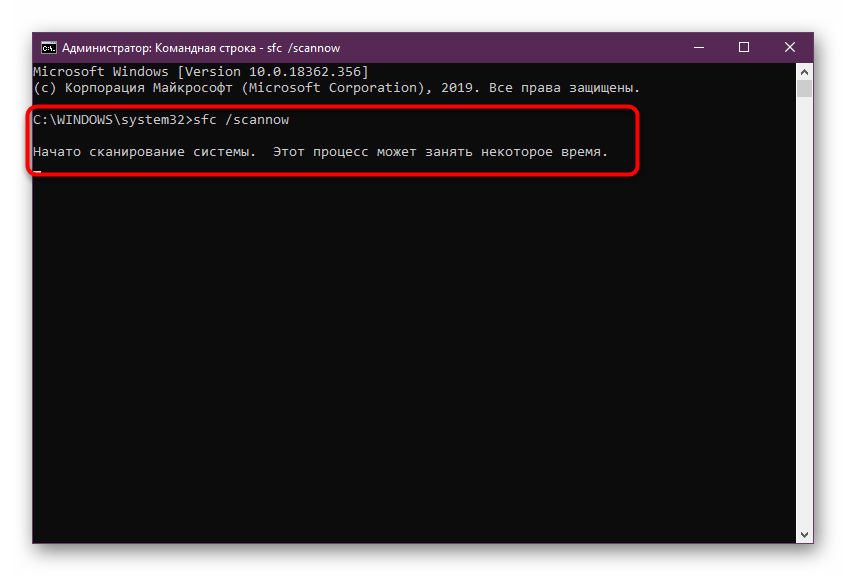
Подробнее: Использование и восстановление проверки целостности системных файлов в Windows
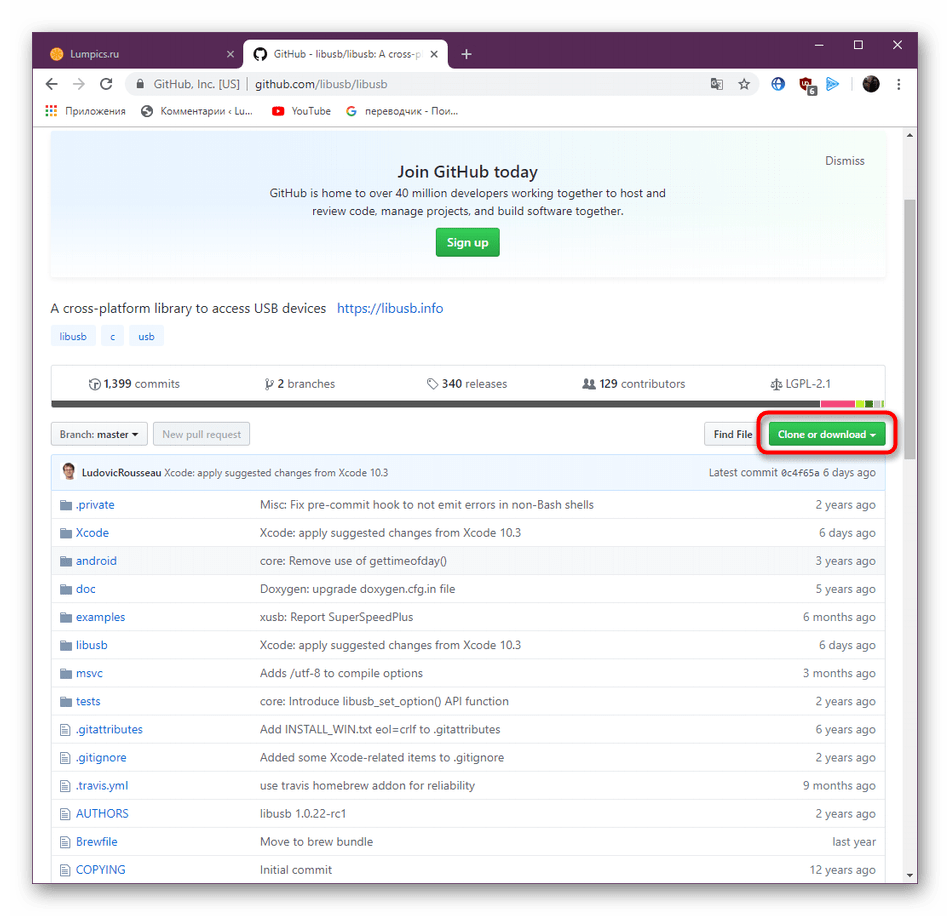
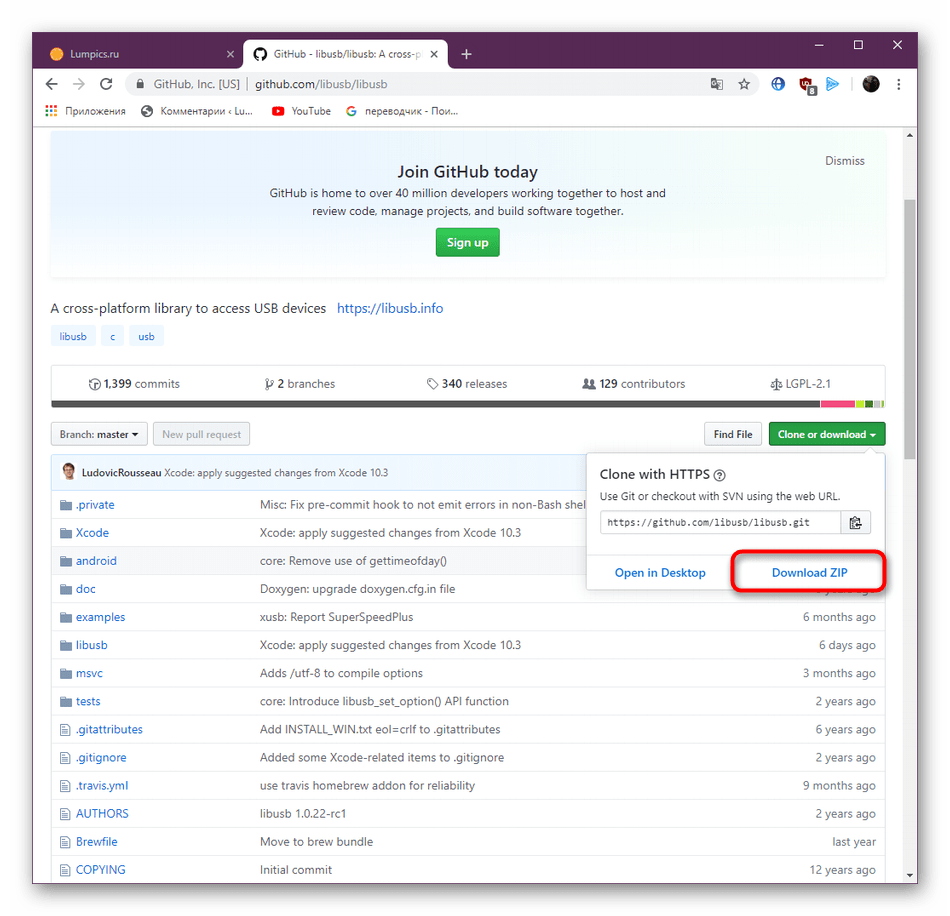
Способ 6: Использование исходников libusb
На последнее место мы поставили способ, подходящий исключительно для разработчиков программного обеспечения. Его суть заключается в том, чтобы рассказать опытным юзерам о доступности исходников библиотек от libusb. Если во время тестирования софта у вас возникли проблемы с рассматриваемым сегодня файлом, рекомендуем обратить внимание именно на этот пакет последней версии. Сейчас мы не будем останавливаться на правильном его применении в своем проекте, а лишь продемонстрируем банальную процедуру скачивания.
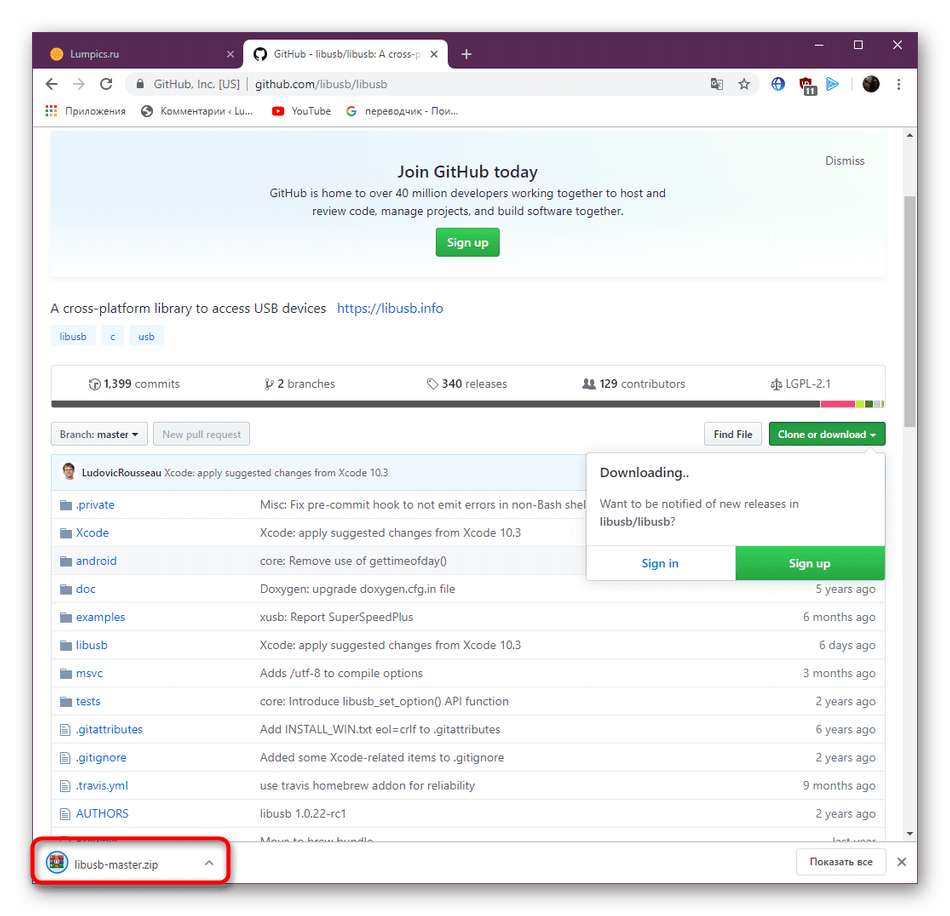
Скачать libusb с GitHub
- Переместитесь на официальный ресурс GitHub, кликнув по ссылке выше. Выберите один из предложенных вариантов загрузки.
- Ознакомьтесь с полным содержимым каталога и нажмите на зеленую кнопку «Clone or download».
- Кликните по «Download ZIP».
- Ожидайте окончания скачивания каталога, а затем откройте его через любой удобный архиватор.
- Теперь вы можете ознакомиться с содержанием пакета и использовать необходимые его элементы при взаимодействии со своим проектом.

Выше мы предложили вашему вниманию шесть возможных вариантов решения неполадки с отсутствием libusb0.dll в Виндовс. Как видите, алгоритм выполнения каждого способа абсолютно разный, поэтому вам следует начать с самого первого и эффективного, постепенно переходя к следующим, если положительного эффекта не будет наблюдаться.
This document solves usb driver errors for Arduino programmers. The problem usually happens after installing Atmel Studio. The error will often be:- avrdude: usbdev_open()
Atmel changed the usb driver they install to Jungo which doesn’t work with the Arduino Ide and therfore with Visual Micro
This document explains how to switch the driver to one that the Arduino tool chain will work with.
Sorry about the formatting of the following, it is my fault and caused by conversion from ms word. This update was submiited by Brian M. It explains how to make both the Arduino and Atmel Studio Native commands to work using the same usb driver
Using Atmel’s AVRISP mk II Programmer
with the Visual Micro plug-in for Atmel Studio IDE
Overview: When you install the Arduino IDE, a USB driver is installed so that you can use the Atmel AVRISP mk II programmer as an alternative to using the Arduino serial Boot-loader. Also, if you need to actually program an AVR MCU with the bootloader code itself (i.e. if you have a blank Mega328 that has not had the boot-loader firmware pre-installed), you can do so from the Arduino IDE using the Tools/Burn Bootloader function- after having specified the AVRISP mk II as the programmer using Tools/Programmer function.
When you install Studio 6.1/ 6.2 however, the Atmel installation will install it’s own USB driver, which work with the Studio6.x IDE. This is the Jungo driver, and while you have the option of not installing the Jungo driver during the Studio install process, you can’t use the Atmel AVRISP mk II nor the Atmel JTAGICE3 without this driver.
The Problem: When you install the Visual Micro plug-in for Studio 6.x, you are most likely to be using the Arduino serial bootloader, since Visual Micro’s programming and debugging capability is based upon the USB-serial link between the PC and the Arduino board. Doing things this way works fine.
However, if you decide that you want to use the Atmel AVRISP mk II from within the Visual Micro/Studio 6.x IDE (for downloading your program, or burning the Arduino bootloader), you will find that it doesn’t work. You will get an error message to the effect that AVRdude (the programming software used by the Arduino IDE), can’t “see” the AVRISP mk II programmer. This happens because Studio6.x uses the Jungo USB driver, and Visual
Micro basically calls the AVRdude programming software (located in the Arduino program folder) just like the Arduino IDE does. AVRdude won’t work properly, because its normal USB driver has been replaced by the Jungo driver that Studio6.x has loaded.
The Solution: What we need is a way to allow the Jungo driver that is associated with the Studio6.x to co-exist with the USB driver that the Arduino IDE uses. That is, we want the Arduino programming routines (i.e. the AVRdude program) to work even with the Atmel Studio6x Jungo driver loaded. This is not too difficult to achieve.
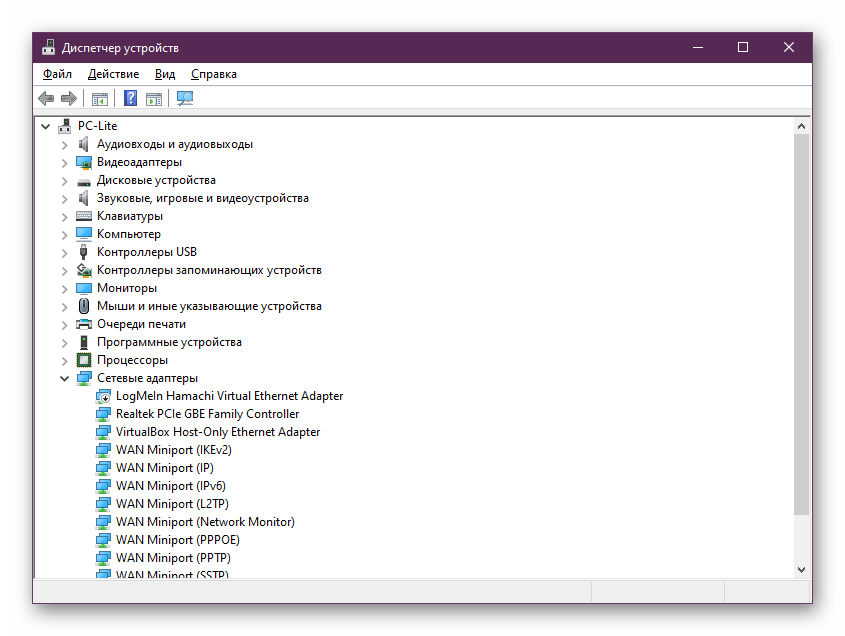
1) If you want to be certain that Studio6.x has installed the Jungo driver, you can run the Windows Device Manager program, and you will see the following (assuming your AVRISP mk II is plugged in)

2) The USB driver that the Arduino IDE uses (and therefore Visual Micro) is libusb0.dll. This DLL comes from a larger driver package that installs a basically generic USB driver (which can be used by a variety of Windows applications). This package provides drivers in two formats: stand-alone and filter. The stand-alone format is what the Arduino IDE installs when you run the Arduino setup program. It works fine on its own, but doesn’t work with native Atmel Studio6.x tools unless using Visual Micro. If the Atmel Studio usb drivers are installed then we can still program Arduino using Visual Micro but not the Arduino IDE. This can be fustrating if we want all software to work all of the time regardless of Visual Micro. The filter version of the driver works differently. It basically interfaces to your application (Arduino IDE in this case) via the libusb0.dll, but the filter version of the DLL then “massages” the data and forwards it along to the Jungo driver (which is what Studio 6.x uses by default).So, after installing this “filter” version, when you use the “upload using programmer” or “Burn bootloader” functions available in the Tools/Visual Micro toolbar, they will work correctly.
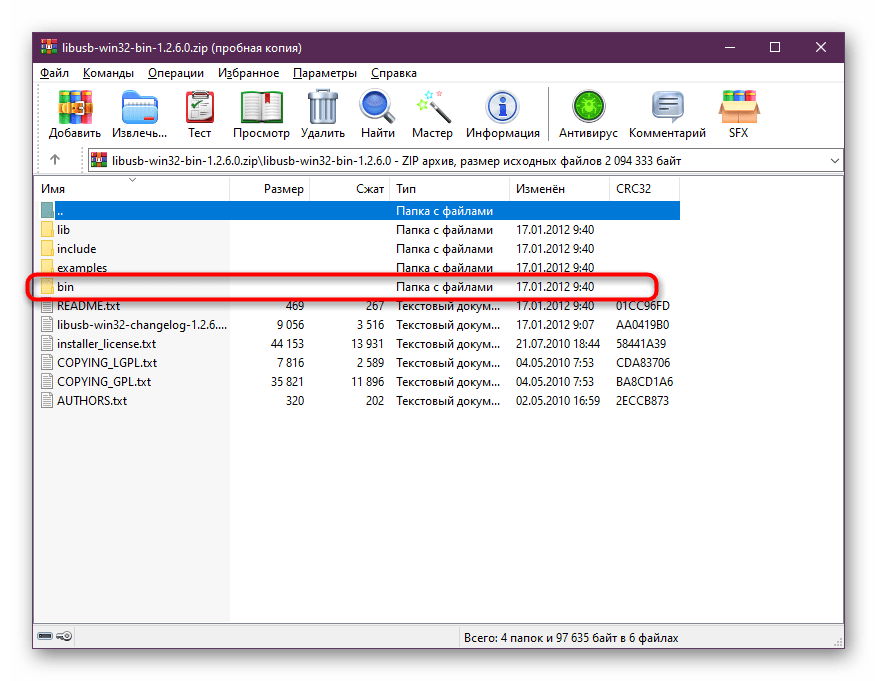
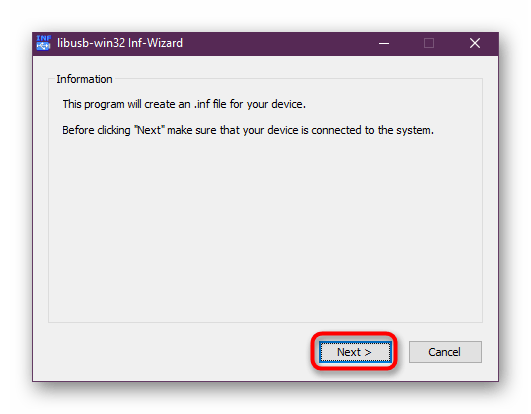
3) You download the libusb package from the sourceforge.net website, by searching for libusb. Pick the libusb-winb32 version. Unzip the downloaded file (libusb-win32-bin-1.2.6.0 when I did it), navigate to the libusb-win32-bin-1.2.6.0/bin folder and enter the i86 folder. Plug in your AVRISP mk II now. Then run the install-filter-win program, which will display the following screen:
 |
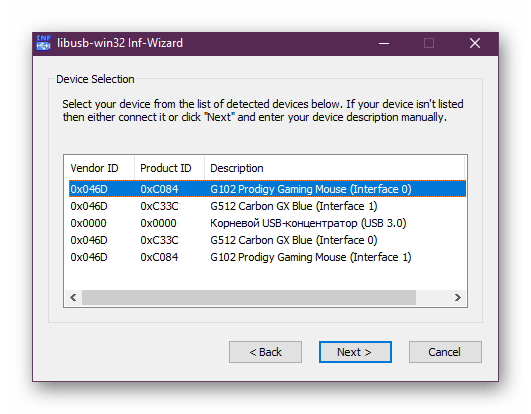
Press Next, and you should see your Atmel AVRISP mk II in the list:
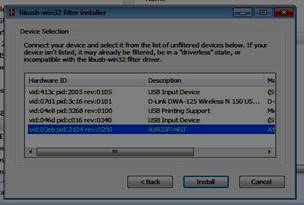
Select the AVRISP mk II and hit Install.
If the AVRISP mk II does NOT appear, it is possible that a libusb driver for it has already been installed (and presumably not the filter version, or you would not be having this problem in the first place).You can go back and select the “remove a device filter” option, and if you see the AVRISP mk II in that list, remove it. Then you should be able to re-try the installation of the filter driver for the AVRIPS mk II. If successful, you should get the following message:

4) You should now have a libusb0.dll filter driver installed for the AVRISP mk II. You can check for its presence in the Windows/System32 folder under the filename libusb0.dll. You can test the driver using the testlibusb program (in the x86 folder mentioned above):

We’re almost done. However, we have to stop the AVRdude program (used by Arduino for programming) from using the libusb0.dll file that it has already installed in its own folder, and use the new (filter version) one that we’ve just installed. Do do this, we have to “remove” all instances of the libusb0.dll file from within the c:program filesarduino folder hierarchy.
The best way to do this is to navigate to the c:program filesarduino folder, and do a search for “libusb0.dll. Once you have found them, rename them to libusb0.dll.bak (in case something goes wrong and you need them back again!

In the case of my XP computer, there were 3 files, and on my 32-bit Win7 computer, there was an additional libusb0-x64.dll file (for 64 bit windows). Once these files are “removed” by renaming them, AVRdude will still look for libusb0.dll, but will only find the filter version in the windowssystem32 folder, (where all windows programs look, by default, if they can’t find the necessary DLL in their own folder).
At this point you should be able to open the Studio6.x program and go to the Tools/visual Micro/Programmers tab and select the AVRISP mk II. After you click the “upload using programmer” tab you should now be able to download programs to your AVR target board using the AVRISP mk II programmer, or use the “burn Bootloader” routine in the Tools/Visual Micro menu bar.
NOTE: to use the Visual Micro USB debugging routines, you will still need to connect your Arduino board to the PC using the standard USB connection cable, as fully described in the Visual Micro documentation.
This procedure worked for me on both my XP and 32-bit Windows 7 computers, one with Studio6.1 and the other with Studio6.2 and the Visual Micro plug-in.
Популярнейшая программа AVRDUDE_PROG 3.3 предназначена для программирования микроконтроллеров AVR ATmega и ATtiny:
1. Возможность самостоятельного добавления программаторов, настройки скорости программирования и т.п;
2. Возможность самостоятельного добавления МК;
3. Редактирование и настройка отображения Fuses битов;
4. Выбор инверсных или прямых Fuses битов;
5. Окна вывода значений Fuses битов в HEX формате;
6. Сохранение настроек программирования при закрытии программы, т.е. при последующем открытии все настройки восстановятся.
В прошлой статье я рассказал о простом (но очень хорошем) программаторе для прошивки микроконтроллеров AVR ATmega и ATtiny — USBASP AVR программатор. В той же статье я указал какие программы поддерживают данный программатор. Наиболее лучшей из них, на мой взгляд, является программа AVRDUDE_PROG автором которой является Сергей Боднар. О ней мы сегодня и поговорим.
Последняя версия программы AVRDUDE_PROG — 3.3, из программы всегда можно попасть на сайт разработчика и скачать новые версии.
Программа очень проста в использовании, имеет приятный интуитивно понятный интерфейс на русском языке, поддерживает очень много различных программаторов и практически все микроконтроллеры ATmega и ATtiny. Немаловажно и то, что в программу можно самому вносить изменения — добавлять программаторы, микроконтроллеры, изменять некоторые настройки (все подробно расписано на сайте разработчика).
Программа не требует установки на компьютер, необходимо только разархивировать скачанный файл и можно сразу приступать к работе, поддерживаются все разновидности Windows — от ХР до 10.
Окно запущенной программы AVRDUDE_PROG:
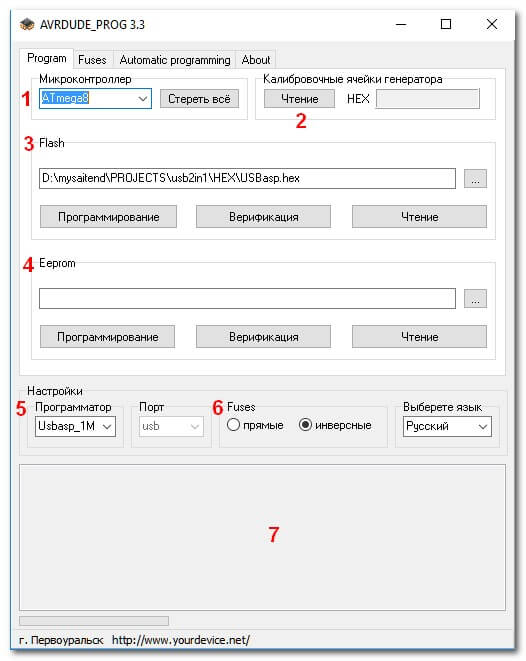
Что есть что:
1:
— окно выбора типа микроконтроллера
— кнопка «Стереть все» — очищает все внутренности микроконтроллера
2:
— чтение калибровочных ячеек микроконтроллера

В данном примере показаны четыре калибровочные ячейки микроконтроллера ATmega8 для внутреннего RC генератора:
ВВ — для частоты 1 МГц (частота по умолчанию)
BD — для частоты 2 МГц
В2 — для частоты 4 МГц
В2 — для частоты 8 МГц
При тактировании микроконтроллера ATmega8 частотой 1 МГц от внутреннего RC генератора (по умолчанию) содержимое первой калибровочной ячейки автоматически учитывается микроконтроллером для подстройки внутреннего генератора. При других частотах — содержимое соответствующей калибровочной ячейки необходимо вручную вводить в регистр микроконтроллера для получения более стабильной частоты (если такое нужно). К примеру, в конструкции «Трехканальный термостат, термоморегулятор, таймер…», которая работает с тактовой частотой 8 МГц от встроенного генератора с внутренней RC цепочкой, требуется перед прошивкой ЕЕPROM памяти записать в определенную ячейку HEX файла значение калибровочной ячейки для частоты 8 МГц.
3:
— выбор HEX файла для прошивки Flash памяти микроконтроллера, сверка записанного файла с оригиналом, чтение данных из памяти
4:
— выбор HEX или EEP файла для прошивки EEPROM памяти микроконтроллера, сверка и чтение
5:
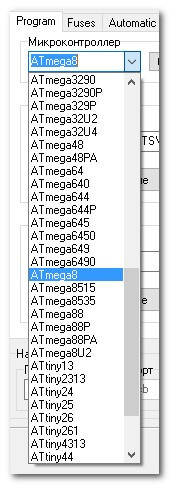
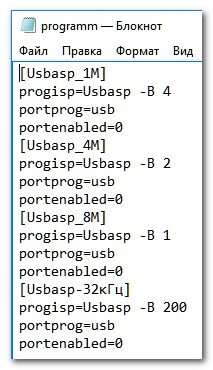
— выбор программатора (по умолчанию — USBASP)
 Если вы будете пользоваться программой скачанной с сайта разработчика то там, по умолчанию (первым в списке), будет идти «USBASP», у меня на картинке 4 разновидности USBASP программатора:
— Usbasp_1M
— Usbasp_4M
— Usbasp_8M
— Usbasp-32кГц
Дело в том, что программатор USBASP позволяет записывать файлы прошивки с двумя скоростями:
— для МК с тактовой частотой 1,5 МГц и выше (без перемычки на J3) — скорость записи 375 кГц
— для МК с тактовой частотой менее 1,5 МГц (с перемычкой на J3) — скорость записи 5 кГц
Для нормальной записи прошивки в МК требуется скорость в 4 раза меньше, чем установленная тактовая частота.
Для прошивки нового МК, у которого по умолчанию тактовая частота 1 МГц, необходимо устанавливать в программаторе перемычку на разъем J3, а сама скорость — 5 кГц, в некоторых случаях начинает нервировать.
Для того, чтобы не портить нервы, не дергаться с перемычкой, я программно установил 4 варианта скорости записи, которые выбираются в зависимости от текущей тактовой частоты МК:
— Usbasp_1M — скорость 187,5 кгЦ, для частот 1-4 МГц
— Usbasp_4M — скорость 375 кГц, для частот 4-8 МГц
— Usbasp_8M — скорость 750 кГц, для частот 8 и более МГц
— Usbasp-32кГц — скорость 4 кГц, для часового кварца
Все эти установки прописаны в самом начале файла «programm.ini» где скорость записи зависит от ключа «-В» и числа после него:

6:
— выбор отображения FUSE битов — прямой (как в UniProf и даташитах) и инверсный (как в PonyProg)
7:
— окно вывода служебной информации о выполняемых и выполненных операциях
Внешний вид окна «FUSES» программы AVRDUDE_PROG:

Тут все просто — расставляем в нужном виде галочки или убираем их и программируем FUSE биты. Если что-то намудрили — нажатие кнопки «По умолчанию» приведет установки FUSE битов в значения «по умолчанию» (сами FUSE биты в МК не изменятся!). Очень внимательно устанавливайте FUSE биты — ошибка может привести к отказу микроконтроллера.
Хочу обратить ваше внимание на самую распространенную ошибку при установки FUSE битов. В большинстве случаев мы изменяем только биты ответственные за выбор источника тактирования и частоту тактирования, к примеру для ATmega8 это: CKSEL0-CKSEL3. По умолчанию у ATMEGA8 тактовая частота 1 МГц от внутреннего генератора — сброшен бит CKSEL0 (стоит галочка). Нам, допустим, нужно установить тактовую частоту 8 МГц от внутреннего генератора — сбросить бит CKSEL2 (поставить галочку), что мы и делаем. Но при этом ЗАБЫВАЕМ УСТАНОВИТЬ БИТ CKSEL0 (убрать галочку)!. В результате, программируя FUSE биты, мы получаем совершенно иной результат — программа не работает, а МК не реагирует на программатор. Забыв сбросить бит CKSEL0 мы получаем другой источник тактирования МК — внешний RC. Отчаиваться не надо, главное разобраться в том, что вы получили в результате. В нашем примере — внешний RC, смотрим даташит, подсоединяем к соответствующим входам МК сопротивление и конденсатор (по схеме из даташита и с нужными номиналами) и восстанавливаем контроль над МК.
Внешний вид окна «Автоматическое программирование» AVRDUDE_PROG:
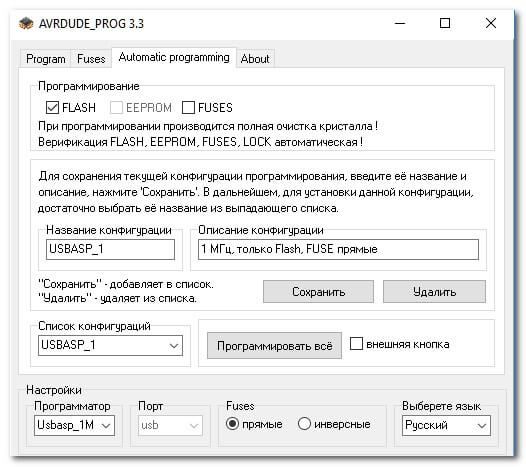
Здесь можно задать первоначальные настройки для разных случаев использования программы.
Как видите — программа AVRDUDE_PROG проста и понятна в использовании, за что и скажем спасибо Сергею Боднару!
 Скачать программу AVRDUDE_PROG 3.3 (1,3 MiB, 94 174 hits)
Скачать с ЯндексДиска
Программирование микроконтроллеров AVR фирмы Atmel
1. Микроконтроллеры — первый шаг
2. Системы счисления: десятичная, двоичная и шестнадцатиричная
3. Логические операции, логические выражения, логические элементы
4. Битовые операции
5. Прямой, обратный и дополнительный коды двоичного числа
6. USBASP программатор для микроконтроллеров AVR — идеальное решение для начинающих, и не только

 (31 голосов, оценка: 4,84 из 5)
![]() Загрузка…
Загрузка…
Программа AVRDUDE_PROG
Программа AVRDUDE_PROG: программирование микроконтроллеров AVR ATmega, ATtiny
Published by: Мир микроконтроллеров
Date Published: 09/17/2016