В данной статье показаны действия, с помощью которых можно включить или отключить автоматическое подключение к беспроводной сети в операционной системе Windows 10.
При подключении к новой беспроводной сети, операционная система создает профиль беспроводной сети. Профиль беспроводной сети (Wi-Fi) содержит SSID (имя сети), пароль и сведения о безопасности для подключения к беспроводной сети.
Далее в статье рассмотрены различные способы как включить или отключить автоматическое подключение к беспроводной сети в радиусе её действия.
Содержание
- Как включить или отключить автоматическое подключение к беспроводной сети при подключении к сети
- Как включить или отключить автоматическое подключение к беспроводной сети используя «Параметры Windows»
- Как включить или отключить автоматическое подключение к беспроводной сети в окне «Сетевые подключения»
- Как включить или отключить автоматическое подключение к беспроводной сети в командной строке
Как включить или отключить автоматическое подключение к беспроводной сети при подключении к сети
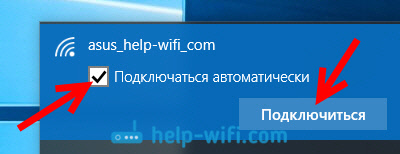
Чтобы включить автоматическое подключение к сети, при подключении к беспроводной сети установите флажок Подключаться автоматически.

Чтобы отключить автоматическое подключение к сети, отключитесь от беспроводной сети. Теперь, если вы захотите снова подключиться к этой сети, то нужно будет выполнить подключение вручную.

Как включить или отключить автоматическое подключение к беспроводной сети используя «Параметры Windows»
Чтобы включить или отключить автоматическое подключение к беспроводной сети, нажмите на панели задач кнопку Пуск ![]() и далее выберите Параметры
и далее выберите Параметры ![]() или нажмите сочетание клавиш
или нажмите сочетание клавиш ![]() + I.
+ I.

В открывшемся окне «Параметры Windows» выберите Сеть и Интернет.

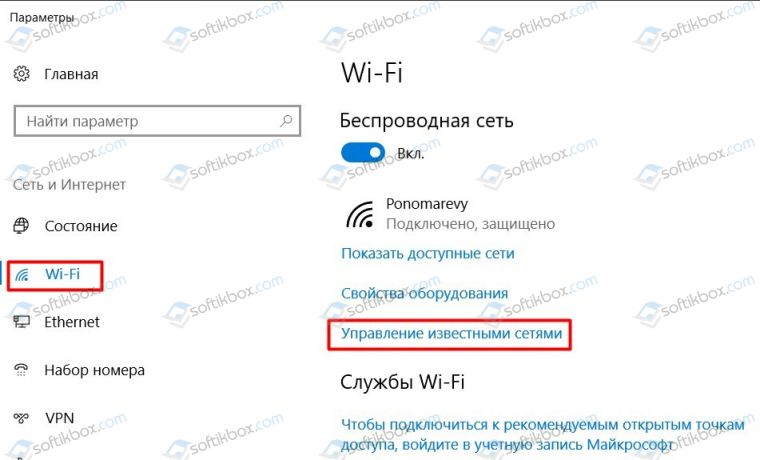
Затем выберите вкладку Wi-Fi, и в правой части окна нажмите на подключенную беспроводную сеть (в данном примере TestNetwork).

Теперь установите переключатель Подключаться автоматически в радиусе действия в соответствующее положение.

Как включить или отключить автоматическое подключение к беспроводной сети в окне «Сетевые подключения»
Чтобы включить или отключить автоматическое подключение к беспроводной сети данным способом, нажмите сочетание клавиш ![]() + R, в открывшемся окне Выполнить введите ncpa.cpl и нажмите клавишу Enter ↵.
+ R, в открывшемся окне Выполнить введите ncpa.cpl и нажмите клавишу Enter ↵.

В открывшемся окне «Сетевые подключения», дважды щелкните на подключенное беспроводное сетевое подключение.

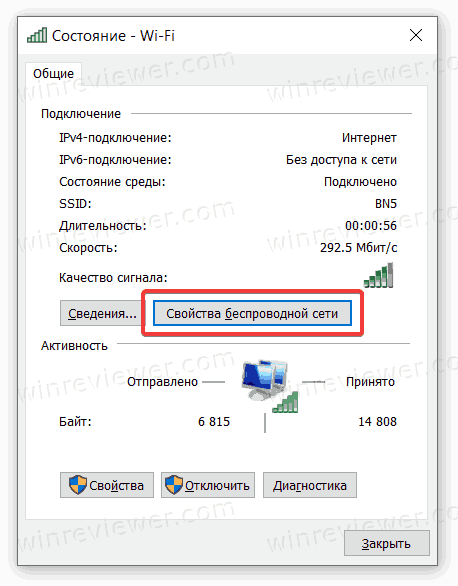
В открывшемся окне «Состояние» нажмите кнопку Свойства беспроводной сети.

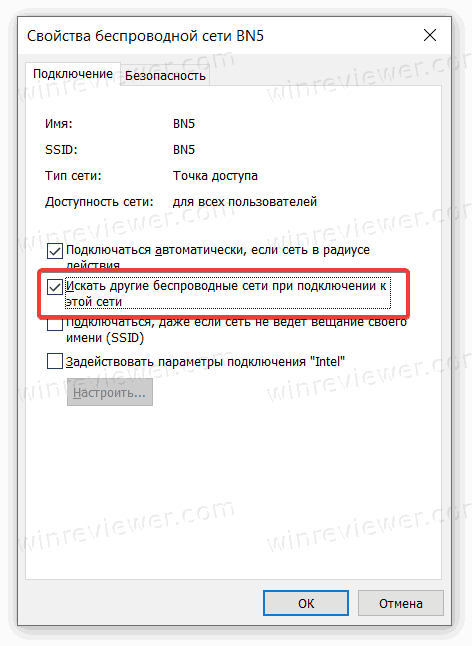
Затем в окне «Свойства беспроводной сети» на вкладке Подключение, установите (для включения) или снимите (для отключения) флажок опции Подключаться автоматически, если сеть находится в радиусе действия и после этого нажмите кнопку OK.

Как включить или отключить автоматическое подключение к беспроводной сети в командной строке
Первое что нужно сделать, это узнать имя профиля беспроводной сети для которой нужно включить или отключить автоматическое подключение, для этого запустите командную строку от имени администратора и выполните следующую команду:
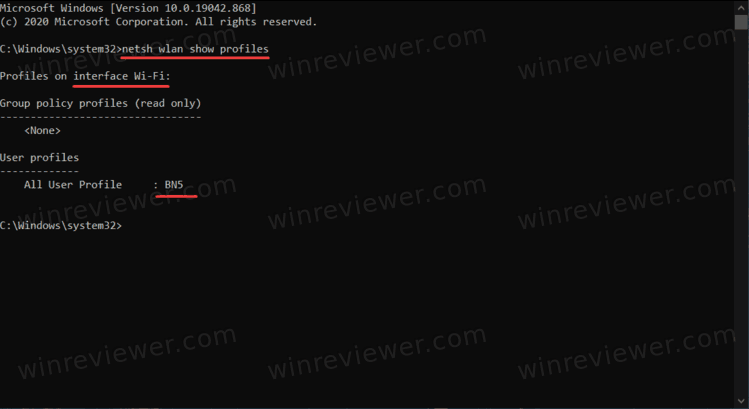
netsh wlan show profiles
Запомните имя профиля беспроводной сети (в данном примере TestNetwork).

Теперь проверим настроен ли режим подключения данной беспроводной сети на автоматическое подключение или подключение вручную, для этого выполните команду следующего вида:
netsh wlan show profiles «Имя»
Замените Имя в команде выше фактическим именем профиля беспроводной сети (в данном примере TestNetwork).
В данном примере команда выглядит следующим образом:
netsh wlan show profiles «TestNetwork»


Чтобы включить автоматическое подключение к беспроводной сети, выполните команду следующего вида:
netsh wlan set profileparameter name=»Имя» connectionmode=auto
Чтобы отключить автоматическое подключение к беспроводной сети, выполните команду следующего вида:
netsh wlan set profileparameter name=»Имя» connectionmode=manual
Замените Имя в командах выше фактическим именем профиля беспроводной сети. В данном примере команды выглядят следующим образом:
netsh wlan set profileparameter name=»TestNetwork» connectionmode=auto
netsh wlan set profileparameter name=»TestNetwork» connectionmode=manual


Подключение к Wi-Fi в Windows 10 обычно не вызывает вообще никаких вопросов. Все просто и понятно (ну, если с драйверами нет проблем). Но бывают случаи, когда Windows 10 не хочет автоматически подключатся к беспроводной сети. Получается, что мы к Wi-Fi подключились, указали пароль, а после повторного включения ноутбука, нужно снова вручную устанавливать соединение. И если речи идет о домашней беспроводной сети, то не очень удобно каждый раз подключаться вручную.
Я уже писал о том, как подключать свой ноутбук на Windows 10 к Wi-Fi, и при первом подключении к беспроводной сети уже стоит галочка «Подключаться автоматически». Если вы ее конечно же не убрали. Это нужно проверить. Достаточно обратить внимание на окно подключения, когда вы в очередной раз будете устанавливать соединение. Или, можно отключится от нужной нам сети:

А затем подключится заново. Обязательно установив галочку возле «Подключаться автоматически».
Если этот способ не поможет, то можно еще попробовать «Забыть сеть».
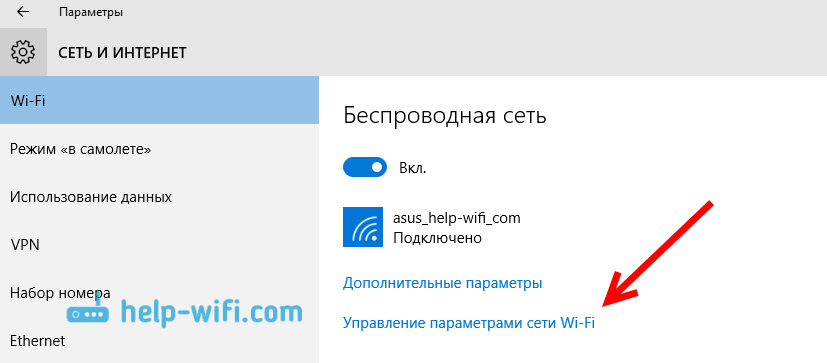
Нажмите на значок подключения к интернету, и выберите Сетевые параметры.

В новом окне нажмите на Управление параметрами сети Wi-Fi.
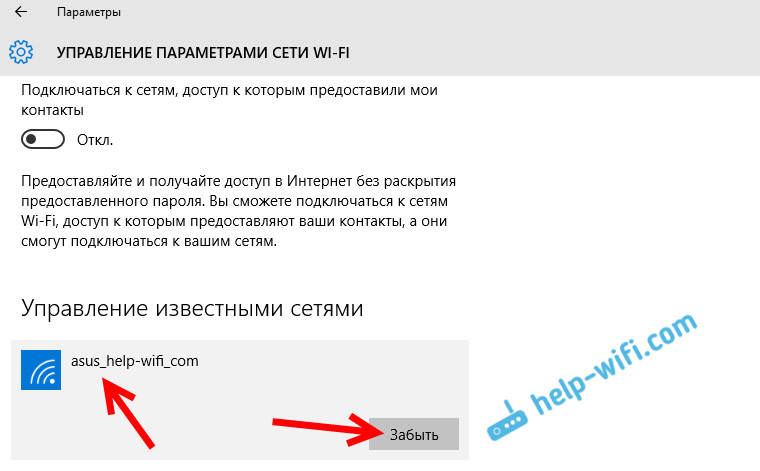
Выберите нужную сеть, и нажмите на кнопку «Забыть».
Ну и подключиться к своей сети, и в процессе подключения проверить что бы стояла галочка «Подключаться автоматически».
Обновление: отключаем быстрый запуск
Нужно отключить быстрый запуск в настройках электропитания в Windows 10.
- Нажмите правой кнопкой мыши на значок батареи в трее и выберите «Электропитание».

- Нажмите на «Действие кнопки питания» и затем на «Изменение параметров, которые сейчас недоступны».

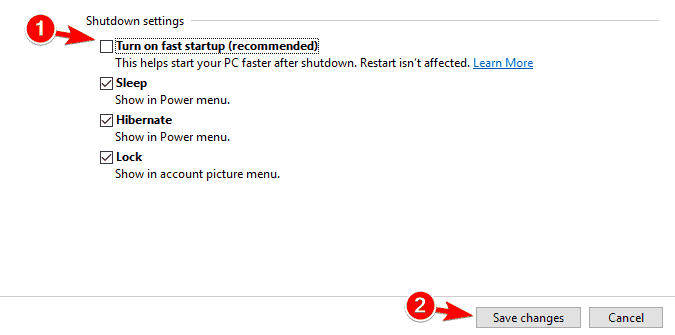
- Уберите галочку возле пункта «Включить быстрый запуск» и сохраните настройки.


Может есть еще какие-то решения, или секреты, но я о них пока не знаю. Если будет новая информация по этой проблеме, то обязательно добавлю ее в статью.
Вы можете включить автоматическое переключение Wi-Fi в Windows 10 – это специальный механизм, с помощью которого операционная система обеспечивает пользователю максимально стабильное и быстрое подключение к беспроводному Интернету. Если у вас включено автоматическое переключение Wi-Fi, Windows 10, продолжает искать доступные сети даже когда вы уже подключены к сети. Как только компьютер обнаруживает сеть с более сильным сигналом, он автоматически переключится на нее. Эта статья расскажет, как активировать автоматическое переключение беспроводных сетей Wi-Fi в Windows 10. По умолчанию эта настройка отключена, поэтому пользователю надо включать ее вручную.
По умолчанию Windows 10 автоматически подключается к известным сетям, когда устройство попадает в их диапазон. Компьютер определяет известную сеть с самым сильным сигналом и подключается к ней. Если же у другой сети сигнал слабее, но выше приоритет, Windows проигнорирует сеть с сильным сигналом и отдаст предпочтение сети с приоритетом выше. Вы можете узнать, как сменить приоритет Wi-Fi сети в Windows 10 в отдельной статье. Во времена Windows 7 в операционной системе от Microsoft был предусмотрен удобный способ определять приоритет Wi-Fi сетей, но в Windows 10 что-то пошло не так. Теперь в компьютерах на актуальной ОС сменить приоритет сетей можно только через Командную строку.
Также, разработчиками предусмотрена возможность выключить автоматическое подключение к Wi-Fi в Windows 10. Если вы предпочитаете подключаться вручную, обязательно ознакомьтесь с тем, как это сделать.
Эта инструкция расскажет вам, как активировать автоматическое переключение Wi-Fi в Windows 10. Действия не требуют прав Администратора, поэтому их можно выполнить даже на обычных профилях пользователя.
- Нажмите Win + I для запуска приложения Параметры Windows.
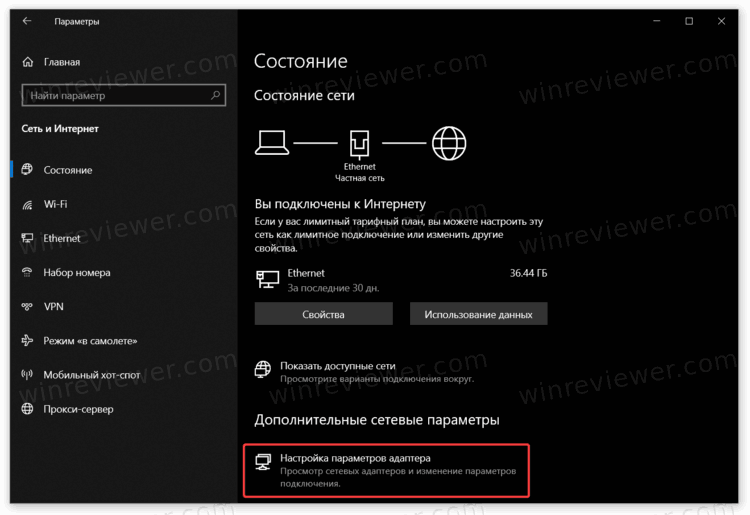
- Перейдите в раздел Сеть и Интернет > Состояние.
- Нажмите на ссылку Настройка параметров адаптера.

- В появившемся окне со всеми сетевыми адаптерами щелкните правой кнопкой мыши по устройству, для которого вы хотите включить автоматическое переключение Wi-Fi сетей.
- В появившемся меню выберите Состояние.

- Кликнете кнопку Свойства беспроводной сети.

- Перейдите на вкладку Подключение и установите отметку возле пункта Искать другие беспроводные сети при подключении к этой сети.

- Сохраните изменения, щелкнув кнопку Ок.
Готово. Обратите внимание, что эти действия включают автоматическое переключение Wi-Fi только для текущей сети, к которой вы подключены. Вам надо будет повторить процедуру для всех других сетей, если понадобится.
Второй способ предусматривает включение все того же параметра, только с помощью пары команд в Командной строке. Опять же, вам не нужны права Администратора для их выполнения.
Включить автоматическое переключение Wi-Fi в командной строке
- Запустите Командную строку.
- В появившемся окне консоли введите команду
netsh wlan show profiles. Она отобразит на экране все известные сети для доступных адаптеров. Найдите название сети, для которой надо включить автоматическое переключение Wi-Fi.
- Введите команду
netsh wlan set profileparameter name=”ИМЯ СЕТИ” autoswitch=Yes. Обязательно замените ИМЯ СЕТИ на название нужной вам сети. К примеру,netsh wlan set profileparameter name=”BN5” autoswitch=Yes.
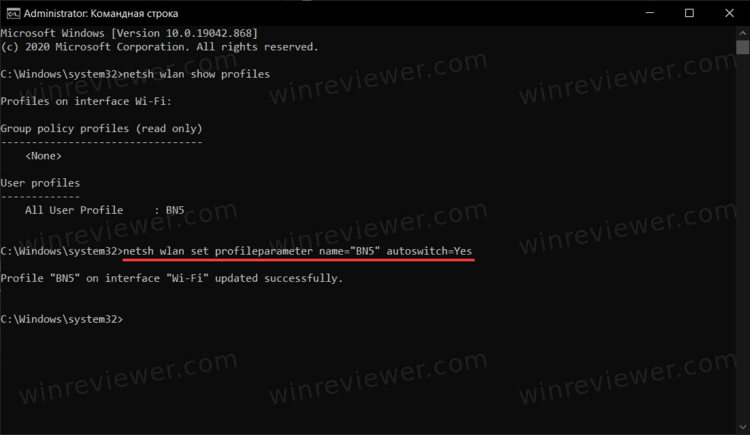
Готово. Если вы хотите выключить автоматическое переключение Wi-Fi сетей, просто смените в команде Yes на No. К примеру, netsh wlan set profileparameter name=”ИМЯ СЕТИ” autoswitch=No. Опять же, замените ИМЯ СЕТИ на нужное название сети.
Кстати, если ваш компьютер использует несколько Wi-Fi адаптеров и вы хотите включить автоматическое переключение для конкретного адаптера, используйте следующую команду: netsh wlan set profileparameter name=”ИМЯ СЕТИ” interface=”ИМЯ АДАПТЕРА” autoswitch=Yes.
💡Узнавайте о новых статьях быстрее. Подпишитесь на наши каналы в Telegram и Twitter.
Судя по тому, что вы читаете этот текст, вы дочитали эту статью до конца. Если она вам понравилась, поделитесь, пожалуйста, с помощью кнопок ниже. Спасибо за вашу поддержку!
Обычно, если вы больше не используете Wi-Fi, пользователи часто отключают Wi-Fi, чтобы продлить срок службы батареи. Однако, когда вам нужно использовать, нам нужно выполнить еще несколько шагов, чтобы снова открыть Wi-Fi. Это очень трудоемко и отнимает много времени. Чтобы сэкономить силы и время, мы можем установить время для повторного включения Wi-Fi через определенный период времени.
Хотя в операционной системе нет автоматической опции для включения Wi-Fi через определенный период времени, однако с Windows 10, сборка 14942, пользователи могут настроить Windows 10 на автоматическое включение Wi-Fi примерно через 1 час, 4 часа и 1 день.
В следующей статье сетевой администратор расскажет вам о двух способах настройки Windows 10 для автоматического включения Wi-Fi через 1 час, 4 часа и 1 день.
Примечание:
Для использования этой функции на вашем компьютере с Windows 10 должна быть установлена Windows 10, сборка 14942 или более поздние версии.
Это самое быстрое решение для отключения и повторного открытия Wi-Fi на компьютерах с Windows 10.
Шаг 1:
Сначала щелкните значок Wi-Fi на панели задач панели задач, чтобы просмотреть все доступные подключения Wi-Fi и проверить, к какому сетевому подключению подключен ваш компьютер.
Если значок Wi-Fi не отображается на панели задач панели задач, вы можете обратиться к инструкциям по восстановлению значка Wi-Fi на панели задач здесь.
Шаг 2:
Затем щелкните поле со значком Wi-Fi, чтобы выключить Wi-Fi и открыть всплывающее меню.
Шаг 3:
В разделе «Включить Wi-Fi снова» вы можете выбрать вариант «Печать 1 час», «Un 4 часа» или «Печать 1 день». В зависимости от выбранного вами варианта Windows 10 автоматически снова включит Wi-Fi через 1 час, 4 часа или 1 день.
2. Через настройки параметров
Шаг 1:
Сначала откройте приложение «Настройки» на компьютере с Windows 10, затем в окне «Настройки» найдите и щелкните значок «Сеть и Интернет».
Шаг 2:
Нажмите Wi-Fi, чтобы увидеть настройки Wi-Fi.
Шаг 3:
В Wi-Fi отключите Wi-Fi, чтобы снова увидеть параметр Включить Wi-Fi.
Шаг 4:
Здесь вы выбираете опцию Print 1 hour, Print 4 hours или Print 1 day из раскрывающегося меню, чтобы автоматически включить Wi-Fi через 1 час, 4 часа или 1 день.
См. Некоторые из следующих статей:
- Wi-Fi в Windows 10 не подключается после выхода из спящего режима
- Как удалить Wi-Fi, сохраненный в Windows 10?
- Как использовать командную строку для управления беспроводными сетями в Windows 10?
Удачи!
На чтение 20 мин. Просмотров 7.6k. Опубликовано 03.09.2019
Многие из нас используют Wi-Fi для подключения к Интернету, но иногда могут возникнуть проблемы с Wi-Fi. По словам пользователей, Windows 10 Wi-Fi не подключается автоматически, и сегодня мы собираемся показать вам, как решить эту проблему.
Содержание
- Windows 10 WiFi не подключается автоматически, как это исправить?
- Решение 1 – Изменить параметры групповой политики
- Решение 2. Переустановите драйвер Wi-Fi
- Решение 3 – Удалить все сохраненные сети Wi-Fi
- Решение 4 – Используйте программное обеспечение PROSet
- Решение 5 – Изменить ваш реестр
- Решение 6 – Отключить функцию быстрого запуска
- Решение 7 – Установите последние версии драйверов вручную
- Решение 8. Замените беспроводной адаптер
- Решение 9. Удалите файлы из каталога Wlansvc.
- Решение 10 – Изменить разрешения безопасности
- Решение 11 – Измените свойства вашего беспроводного соединения
- Решение 12. Создайте новое беспроводное сетевое соединение.
- Решение 13 – Удалите все сторонние беспроводные программы
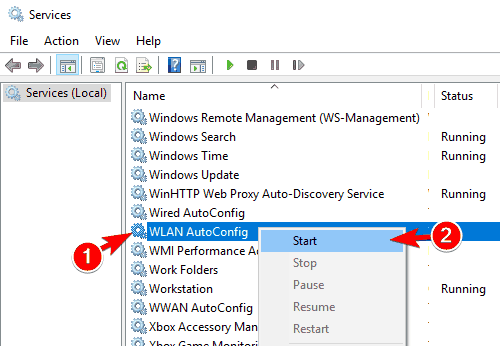
- Решение 14. Установите для службы WLAN AutoConfig значение Автоматически.
- Решение 15 – Выполните сканирование DISM и SFC
- Решение 16. Измените настройки питания вашего устройства
- Решение 17 – Измените настройки вашего маршрутизатора
- Решение 18 – Минимизируйте количество одновременных подключений
- Решение 19 – Измените безопасность вашего маршрутизатора
Windows 10 WiFi не подключается автоматически, как это исправить?
Решение 1 – Изменить параметры групповой политики
Групповая политика – это полезная функция, которая позволяет вносить общесистемные изменения на вашем ПК. По словам пользователей, вы можете решить эту проблему, просто сделав несколько изменений с помощью редактора групповой политики. Мы должны отметить, что эта функция доступна только в Профессиональной и Корпоративной версиях Windows, поэтому, если вы используете какую-либо другую версию, эта функция может быть недоступна. Чтобы решить эту проблему, сделайте следующее:
-
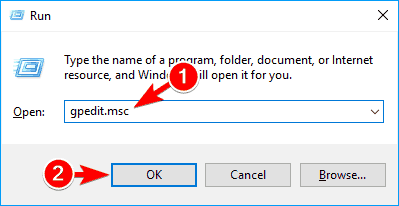
Нажмите Windows Key + R и введите gpedit.msc . Нажмите Enter или нажмите ОК .

-
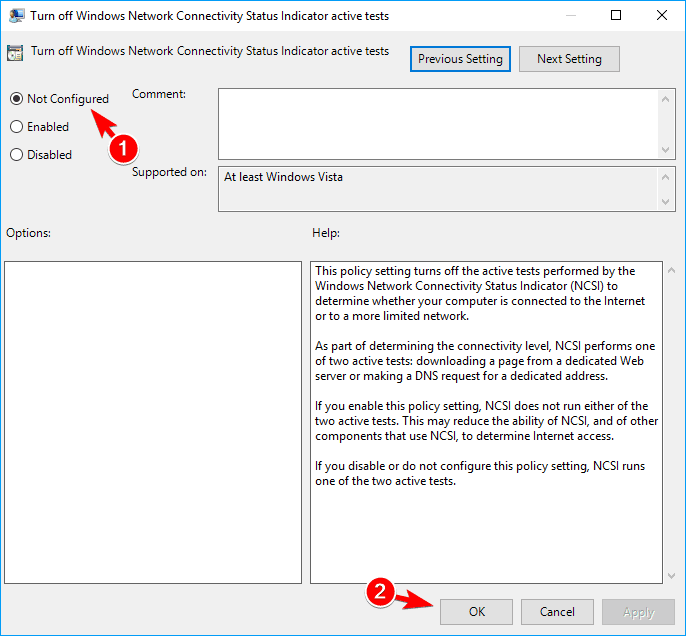
На левой панели выберите Конфигурация компьютера> Административные шаблоны> Система> Управление интернет-коммуникациями> Настройки интернет-коммуникаций . На правой панели найдите Отключить активные тесты индикатора состояния сетевого подключения Windows и дважды щелкните его, чтобы открыть его свойства.
-
Выберите Не настроено в меню и нажмите Применить и ОК , чтобы сохранить изменения.


По умолчанию для этой политики установлено значение Не настроено , но по какой-то причине она может быть включена на вашем ПК, поэтому мы рекомендуем вам проверить параметры групповой политики.
Решение 2. Переустановите драйвер Wi-Fi
По словам пользователей, вы можете временно решить эту проблему, переустановив драйвер Wi-Fi. Это относительно просто, и вы можете сделать это, выполнив следующие действия:
-
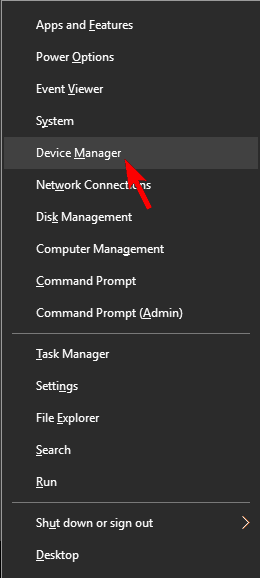
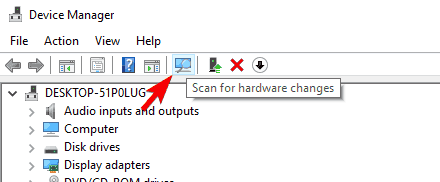
Нажмите Ключ Windows + X , чтобы открыть меню Win + X, и выберите Диспетчер устройств из списка.
-
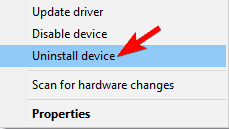
После запуска Диспетчер устройств вам необходимо найти ваше устройство Wi-Fi. Щелкните правой кнопкой мыши устройство Wi-Fi и выберите в меню Удалить устройство .
-
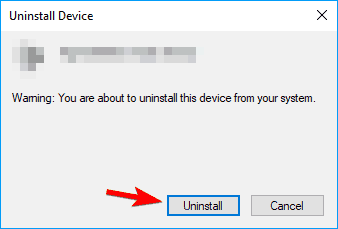
Появится подтверждающее сообщение. Нажмите Удалить , чтобы продолжить.
-
После этого нажмите значок Сканировать на предмет изменений оборудования . Теперь Windows проверит вашу систему и установит недостающие драйверы.


- ЧИТАЙТЕ ТАКЖЕ: восклицательный знак Wi-Fi на ПК с Windows 10
После установки драйвера проблема с Wi-Fi должна быть полностью решена. Немногие пользователи утверждают, что это всего лишь обходной путь, поэтому, если проблема появится снова, вы можете загрузить и установить последнюю версию драйвера для адаптера Wi-Fi.
Обновлять драйверы автоматически
После удаления драйверов вы можете поискать их на сайте производителя. Очень важно правильно выбрать версию драйвера. Если вы выберете и установите неправильный, это может повредить всю вашу систему.
Модуль обновления драйверов Tweakbit (одобрен Microsoft и Norton Antivirus) поможет вам автоматически обновлять драйверы и предотвратить повреждение ПК, вызванное установкой неправильных версий драйверов. После нескольких тестов наша команда пришла к выводу что это лучшее автоматизированное решение.
Вот краткое руководство по его использованию:
-
-
Загрузите и установите средство обновления драйверов TweakBit
-
После установки программа начнет сканирование вашего компьютера на наличие устаревших драйверов автоматически. Driver Updater проверит установленные вами версии драйверов по своей облачной базе данных последних версий и порекомендует правильные обновления. Все, что вам нужно сделать, это дождаться завершения сканирования.
-
По завершении сканирования вы получите отчет обо всех проблемных драйверах, найденных на вашем ПК. Просмотрите список и посмотрите, хотите ли вы обновить каждый драйвер по отдельности или все сразу. Чтобы обновить один драйвер за раз, нажмите ссылку «Обновить драйвер» рядом с именем драйвера. Или просто нажмите кнопку «Обновить все» внизу, чтобы автоматически установить все рекомендуемые обновления.
Примечание. Некоторые драйверы необходимо установить в несколько этапов, поэтому вам придется нажмите кнопку «Обновить» несколько раз, пока все его компоненты не будут установлены.
-
Загрузите и установите средство обновления драйверов TweakBit


Отказ от ответственности : некоторые функции этого инструмента не являются бесплатными.
Решение 3 – Удалить все сохраненные сети Wi-Fi
Если Windows не может подключиться к сети Wi-Fi автоматически, вы можете решить проблему, удалив все сохраненные сети Wi-Fi. Это относительно просто, и вы можете сделать это, выполнив следующие действия:
- Откройте Настройки приложения . Вы можете сделать это быстро, нажав Windows Key + I .
-
Открыв приложение “Настройки” , перейдите в раздел Сеть и Интернет .
- На левой панели перейдите в категорию Wi-Fi . Теперь найдите Управление настройками Wi-Fi на правой панели и нажмите на нее.
- Найдите Управление известными сетями и нажмите на него.
- Теперь вы должны увидеть список всех сетей, к которым вы подключались в прошлом. Чтобы забыть сеть, просто выберите ее и нажмите Забыть . Теперь повторите эти шаги для всех сетей в списке.

Вы также можете забыть все сохраненные сети с помощью командной строки. Это немного продвинутое решение, поскольку вам нужно использовать командную строку, поэтому, если вы являетесь обычным пользователем, вы можете пропустить его. Чтобы удалить сохраненные сети Wi-Fi с помощью командной строки, необходимо сделать следующее:
- Нажмите Windows Key + X и выберите в меню Командная строка (Администратор) . Если у вас нет командной строки в списке, вы можете вместо этого выбрать PowerShell (администратор) .
- Когда откроется Командная строка , введите netsh wlan show profile и нажмите Enter , чтобы запустить команду. После этого вы увидите список всех сохраненных сетей Wi-Fi.
- Чтобы удалить сохраненную сеть Wi-Fi, просто введите netsh wlan delete profile name = «Имя сети Wi-Fi» и нажмите Enter , чтобы запустить команду.
- ЧИТАЙТЕ ТАКЖЕ: Windows 10 теряет соединение Wi-Fi. Может ли это быть общей ошибкой?
Этот метод немного продвинут, но его можно использовать быстрее, если вы знакомы с Командная строка . Оба метода из этого решения будут иметь одинаковые результаты, поэтому не стесняйтесь использовать любой из них.
После удаления всех сохраненных сетей вам просто нужно подключиться к вашей сети и ввести ее пароль, и проблема должна быть решена. Некоторые пользователи утверждают, что вам просто нужно удалить собственную сеть Wi-Fi из списка сохраненных сетей, поэтому обязательно попробуйте сначала.
Решение 4 – Используйте программное обеспечение PROSet
Несколько пользователей сообщили, что использование программного обеспечения PROSet устранило проблему для них. По какой-то причине их ПК задержался на одну минуту, прежде чем компьютер смог автоматически подключиться к сети Wi-Fi. Однако после установки программного обеспечения PROSet проблема была полностью решена.
По словам пользователей, они использовали беспроводной маршрутизатор Cisco, что также может быть частью проблемы. Даже если вы не используете сетевое устройство Cisco, попробуйте это программное обеспечение.
Решение 5 – Изменить ваш реестр
Ваш реестр содержит конфиденциальную информацию, и, изменив ее, вы можете изменить скрытые настройки Windows. Несколько пользователей утверждают, что они решили проблему, просто сделав пару небольших изменений в своем реестре. Для этого выполните следующие действия:
-
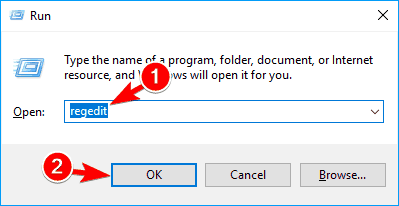
Нажмите Windows Key + R и введите regedit . Нажмите ОК или нажмите Ввод .
-
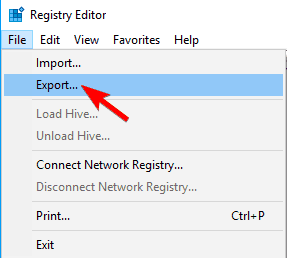
Необязательно: Изменение реестра может вызвать некоторые проблемы с вашим ПК, если вы не будете осторожны, поэтому всегда полезно создать резервную копию на случай, если что-то пойдет не так. Для этого нажмите Файл> Экспорт .
Установите диапазон экспорта на Все и введите желаемое имя файла. Выберите безопасное место и нажмите кнопку Сохранить .
Теперь у вас есть готовая резервная копия реестра. В случае возникновения проблем после изменения реестра, вы сможете исправить это, просто запустив этот файл. -
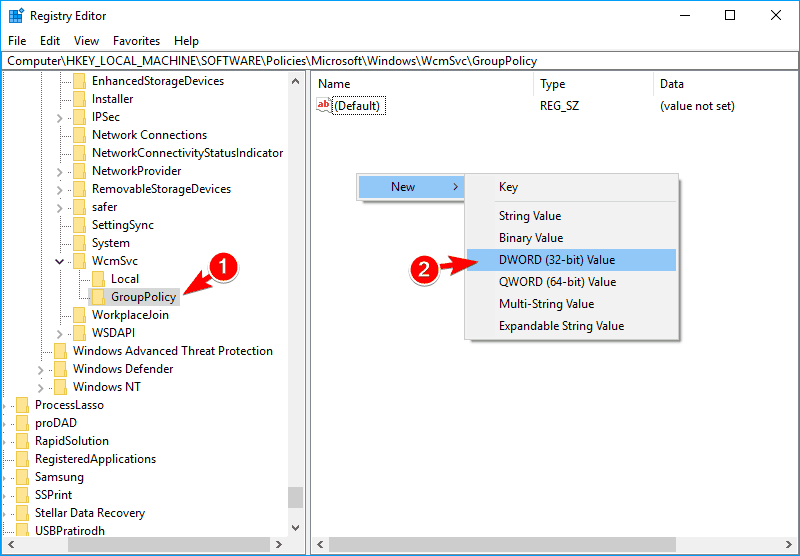
Перейдите в HKEY_LOCAL_MACHINE SOFTWARE Policies Microsoft Windows WcmSvc на левой панели. Разверните ключ WcmSvc и найдите ключ GroupPolicy . Если этот ключ недоступен, вам нужно создать его вручную. Для этого нажмите правой кнопкой мыши WcmSvc и выберите в меню Новый> Ключ . Теперь введите GroupPolicy в качестве имени нового ключа.
-
Перейдите к клавише GroupPolicy и на правой панели щелкните пустое место и выберите Создать> Значение DWORD (32-разрядное) .Введите fMinimizeConnections в качестве имени нового DWORD.
- После этого закройте редактор реестра и перезагрузите компьютер.

 Установите диапазон экспорта на Все и введите желаемое имя файла. Выберите безопасное место и нажмите кнопку Сохранить .


- Читайте также: 5 лучших анализаторов Wi-Fi для Windows 10
После перезагрузки компьютера проблема должна быть решена, и ваш компьютер автоматически подключится к сети Wi-Fi. Если возникнут какие-либо проблемы, вы можете просто удалить созданный ключ GroupPolicy , чтобы исправить их.
Решение 6 – Отключить функцию быстрого запуска
В Windows 10 есть полезная функция под названием «Быстрый запуск». Эта функция включена по умолчанию, и она будет сохранять ваши данные при выключении компьютера. В результате ваш компьютер будет загружаться быстрее при следующем включении. Это полезная функция, но иногда она может вызывать определенные проблемы. Пользователи сообщили, что причиной этой проблемы является быстрый запуск, и для ее устранения необходимо отключить быстрый запуск, выполнив следующие действия:
-
Нажмите Windows Key + S и войдите в панель управления . Теперь выберите Панель управления в меню. Кроме того, вы можете просто открыть меню «Пуск» и найти панель управления.
-
Когда откроется Панель управления , перейдите в Параметры электропитания .
-
Когда откроется окно Параметры электропитания , нажмите Выберите параметр «Кнопка включения питания » в меню слева.
-
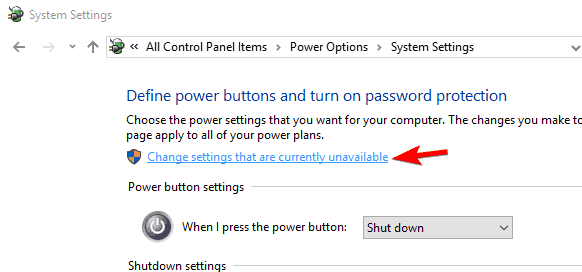
Нажмите Изменить настройки, которые в данный момент недоступны .
-
Снимите флажок Включить быстрый запуск (рекомендуется) и нажмите Сохранить изменения .


После отключения этой опции ваш компьютер может загружаться немного медленнее, но проблемы с Wi-Fi должны быть решены.
Решение 7 – Установите последние версии драйверов вручную
Эти типы проблем обычно вызваны вашими драйверами, но в большинстве случаев вы можете исправить их, просто обновив драйверы до последней версии. Для этого выполните следующие действия:
- Загрузите и установите последние версии драйверов для вашего беспроводного адаптера. Если возможно, попробуйте загрузить драйверы без какого-либо дополнительного программного обеспечения для настройки беспроводной сети.
-
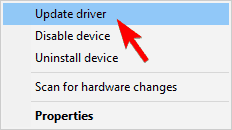
Запустите Диспетчер устройств и найдите свое беспроводное устройство. Щелкните правой кнопкой мыши беспроводное устройство и выберите Обновить драйвер .
-
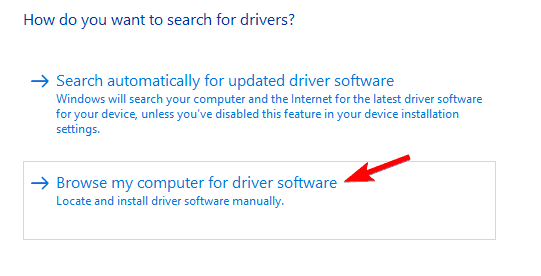
Выберите Просмотреть мой компьютер для поиска драйверов .
-
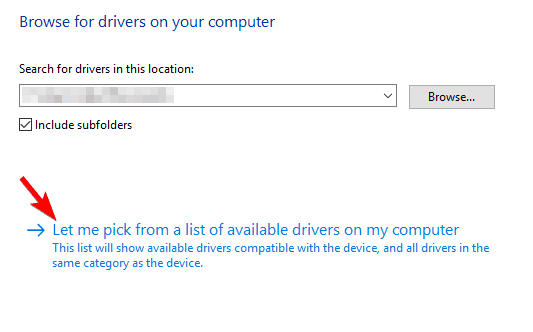
Теперь нажмите Позвольте мне выбрать из списка доступных драйверов на моем компьютере .
- Вы должны увидеть несколько разных драйверов. Выберите драйвер от производителя вашего беспроводного адаптера и нажмите Далее .


- ЧИТАЙТЕ ТАКЖЕ: обновление для создателей Windows 10 разрушает драйвер Wi-Fi [FIX]
После установки драйвера вручную проблема должна быть решена, и вы сможете без проблем подключиться к беспроводной сети.
Решение 8. Замените беспроводной адаптер
Если Windows 10 не может автоматически подключиться к Wi-Fi, попробуйте заменить беспроводной адаптер. Некоторые беспроводные адаптеры не полностью совместимы с Windows 10, и это может быть в случае с вашим адаптером. Если это так, вам необходимо заменить беспроводной адаптер на другую модель и проверить, решает ли это проблему. Это радикальное решение, и вы должны использовать его, только если другие решения из этой статьи не могут решить вашу проблему.
Большинство беспроводных адаптеров полностью совместимы с Windows 10, но если вы используете неизвестную марку, вы можете столкнуться с этой проблемой на вашем ПК.
Решение 9. Удалите файлы из каталога Wlansvc .
Эта проблема иногда может быть вызвана файлами в каталоге Wlansvc. Чтобы решить эту проблему, необходимо отключить службу WLAN AutoConfig и удалить проблемные файлы. Вы можете сделать это, выполнив следующие действия:
-
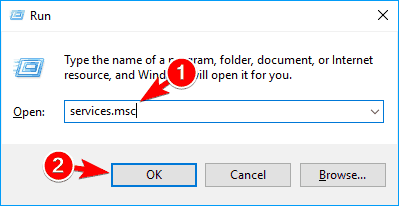
Нажмите Windows Key + R и введите services.msc . Нажмите Enter или нажмите ОК .
-
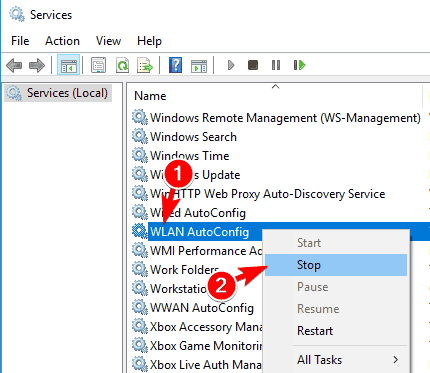
Появится список всех доступных сервисов. Найдите службу автоматической настройки WLAN , щелкните ее правой кнопкой мыши и выберите в меню Стоп . После остановки службы сверните окно Службы .
-
Откройте Проводник и перейдите в каталог C: ProgramData Microsoft Wlansvc . Если вы не можете найти этот каталог, обязательно откройте скрытые файлы и папки.Для этого просто перейдите на вкладку Вид и установите флажок Скрытые элементы .
- После входа в каталог Wlansvc удалите из него все файлы и каталоги, кроме каталога Профили .
- Теперь перейдите в каталог Профили . Удалите все файлы и каталоги, кроме папки Интерфейсы .
- Откройте папку Интерфейсы и удалите из нее все файлы и папки.
-
Вернитесь в окно Службы , найдите службу Автоконфигурация WLAN , щелкните ее правой кнопкой мыши и выберите в меню Пуск .
- Подключитесь к вашей беспроводной сети еще раз. Обязательно установите флажок для автоматического подключения к выбранной сети.


- ЧИТАЙТЕ ТАКЖЕ: как устранить проблему отсутствия доступа к Интернету через Wi-Fi в Интернете без поддержки Интернета 10
После этого вам просто нужно перезагрузить компьютер и проверить, решает ли это проблему.
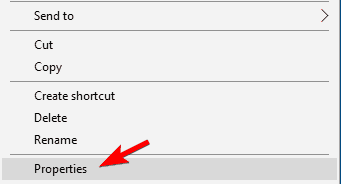
Немногие пользователи также предлагают вернуться в каталог C: ProgramData Microsoft Wlansvc Profiles Interfaces и найти вновь созданный XML-файл в одной из папок. Этот XML-файл представляет ваше сетевое подключение, и для решения проблемы вам нужно щелкнуть правой кнопкой мыши этот файл и выбрать в меню Свойства .
Перейдите на вкладку Общие и установите флажок Только для чтения в разделе Атрибуты . Нажмите Применить и ОК , чтобы сохранить изменения.

По словам пользователей, похоже, что Windows модифицировала XML-файл, вызывая эту проблему. Установив файл в режим Только для чтения , проблема была решена полностью.
Решение 10 – Изменить разрешения безопасности
Как мы уже упоминали, ваша папка Profiles может иногда вызывать проблемы с Wi-Fi. Чтобы решить эту проблему, вам нужно изменить настройки безопасности, выполнив следующие действия:
-
Перейдите в каталог C: ProgramData Microsoft Wlansvc . Найдите каталог Профили и щелкните его правой кнопкой мыши. Выберите в меню Свойства .
-
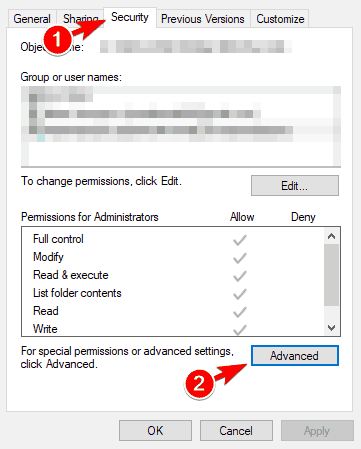
Перейдите на вкладку Безопасность и проверьте, доступна ли группа Администраторы в разделе Группы или имена пользователей . Если нет, нажмите кнопку Дополнительно . Если группа администраторов доступна, перейдите на Шаг 7 .
-
Теперь нажмите кнопку Добавить .
-
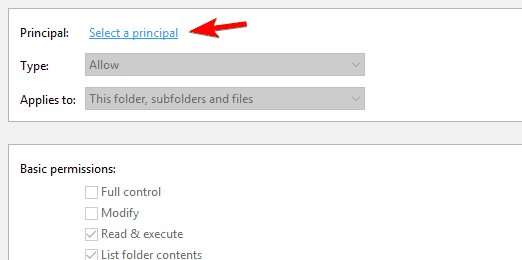
Нажмите Выберите участника .
-
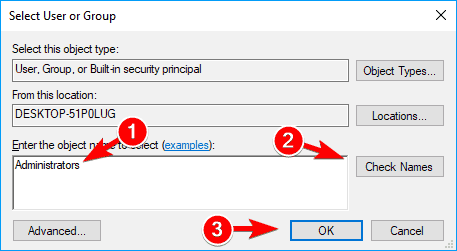
В поле Введите имена объектов для выбора , введите Администраторы и нажмите Проверить имена . Если все в порядке, нажмите ОК .
-
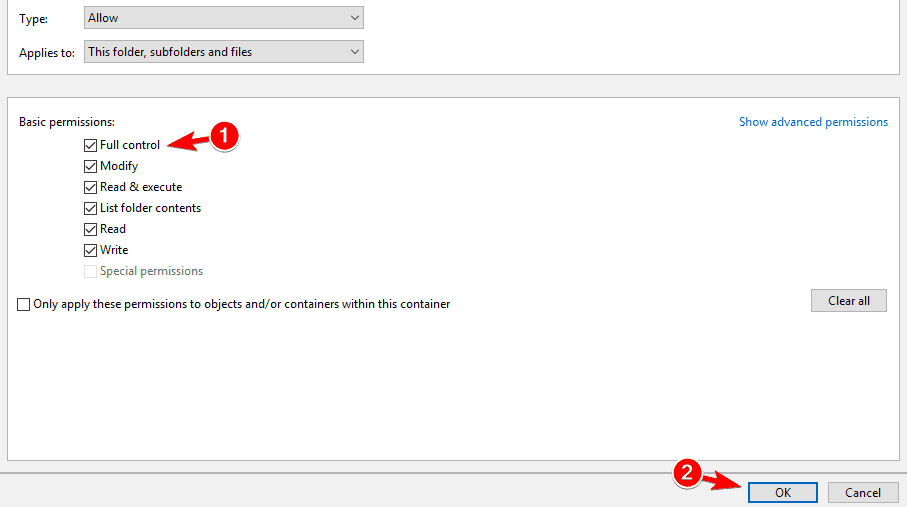
Установите флажок Полный контроль и нажмите ОК , чтобы сохранить изменения.
-
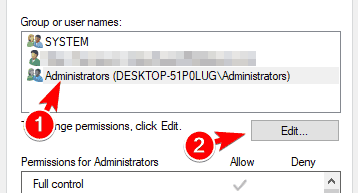
Выберите Администраторы и нажмите Изменить .
-
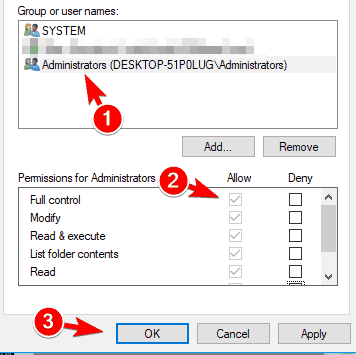
Выберите Администраторы и убедитесь, что в столбце Разрешить установлен флажок Полный доступ . Теперь нажмите Применить и ОК , чтобы сохранить изменения.
- Перейдите в Центр управления сетями и общим доступом и попробуйте добавить беспроводное соединение.


После этого проблема должна быть решена, и вы сможете без проблем подключиться к вашей беспроводной сети.
- ЧИТАЙТЕ ТАКЖЕ: исправлено: не работает Virgin Media Wi-Fi
Решение 11 – Измените свойства вашего беспроводного соединения
Если Windows 10 Wi-Fi не подключается автоматически, вы можете решить проблему, изменив свойства вашего беспроводного соединения. Это относительно просто, и вы можете сделать это, выполнив следующие действия:
- Нажмите значок Доступ в Интернет на панели задач . Появится список всех беспроводных подключений.
- Щелкните правой кнопкой мыши свое подключение и выберите в меню Свойства .
- Когда откроется окно Свойства , перейдите на вкладку Подключения . Теперь установите флажок Подключаться автоматически, когда эта сеть находится в диапазоне , и сохраните изменения.
После включения этой опции проблема должна быть решена, и вы сможете без проблем использовать ваше беспроводное соединение.
Решение 12. Создайте новое беспроводное сетевое соединение.
По словам пользователей, вы можете решить эту проблему, просто создав новое беспроводное сетевое соединение. Прежде чем сделать это, вам, возможно, придется удалить беспроводное соединение. Чтобы установить новое беспроводное соединение, выполните следующие действия:
-
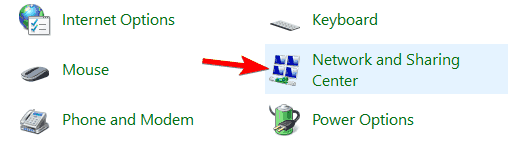
Откройте Панель управления и выберите Центр управления сетями и общим доступом .
-
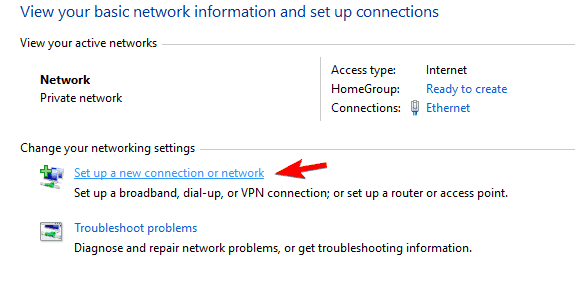
Когда откроется Центр управления сетями и общим доступом , нажмите Настройка нового подключения или сети .
- Выберите Подключиться к беспроводной сети вручную и нажмите Далее .
- Введите имя сети и необходимые настройки. Кроме того, обязательно установите флажки Автоматически запускать это подключение и Подключиться, даже если сеть не передает параметры. Теперь нажмите Далее и следуйте инструкциям, чтобы завершить процесс.


После этого у вас будет готово новое соединение, и Windows автоматически подключится к нему.
Решение 13 – Удалите все сторонние беспроводные программы
Многие беспроводные адаптеры поставляются с собственным программным обеспечением, которое может помочь вам настроить беспроводную сеть. Чтобы решить эту проблему, необходимо удалить все программы настройки беспроводной сети, поставляемые с беспроводным адаптером. Имейте в виду, что удаление этого программного обеспечения может также удалить драйверы для вашего беспроводного адаптера.
- ЧИТАЙТЕ ТАКЖЕ: исправлено: в Windows 10 отсутствует значок Wi-Fi
Чтобы решить эту проблему, вам необходимо переустановить драйверы, но не устанавливать программное обеспечение для настройки беспроводной сети. Самый простой способ сделать это – установить драйверы вручную. Для этого выполните следующие действия:
- Откройте Диспетчер устройств , найдите беспроводной адаптер, щелкните его правой кнопкой мыши и выберите в меню Обновить драйвер .
- Выберите Просмотреть мой компьютер для поиска драйверов .
-
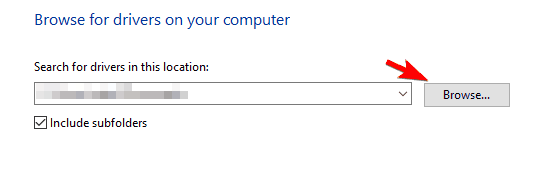
Нажмите кнопку Обзор и найдите драйверы беспроводной связи на вашем ПК. Обычно они находятся на компакт-диске, который вы получили вместе с беспроводным адаптером. Если вы загрузили драйверы онлайн, обязательно проверьте каталог загрузки.
-
После выбора каталога драйверов установите флажок Включить подпапки и нажмите Далее . Следуйте инструкциям на экране, чтобы завершить процесс.


В некоторых случаях Windows спросит вас, хотите ли вы использовать Windows или стороннее программное обеспечение для управления беспроводным устройством. Если это произойдет, обязательно выберите Windows.
Пользователи сообщали, что иногда стороннее программное обеспечение беспроводного управления может запускаться автоматически с Windows, вызывая эту проблему. Чтобы решить эту проблему, вам нужно управлять элементами автозагрузки и предотвращать автоматический запуск программного обеспечения с Windows.
Пользователи сообщали о проблемах с программным обеспечением Netgear, но проблема может также возникнуть с программным обеспечением других производителей.
Решение 14. Установите для службы WLAN AutoConfig значение Автоматически.
По словам пользователей, проблема может возникнуть, если для службы WLAN AutoConfig не установлено значение «Автоматически». Чтобы устранить проблему, вам нужно изменить тип запуска этой службы, выполнив следующие действия:
- Откройте окно Службы . Мы уже показали вам, как это сделать в Решении 9 , поэтому обязательно ознакомьтесь с подробными инструкциями.
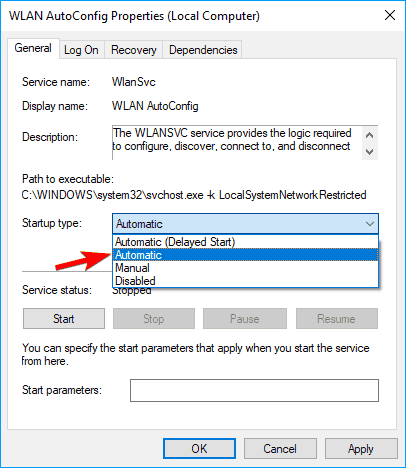
- Когда откроется окно Службы , найдите службу WLAN AutoConfig и дважды щелкните ее, чтобы открыть ее свойства.
-
Установите для Тип запуска значение Автоматически .
-
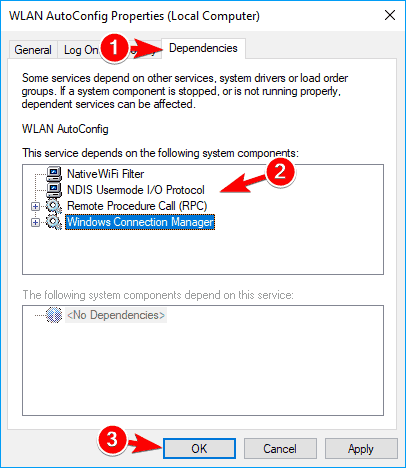
Перейдите на вкладку Зависимости и проверьте список служб, которые зависят от WLAN AutoConfig . Запишите эти услуги, поскольку они понадобятся вам для следующего шага. Нажмите ОК и Применить , чтобы сохранить изменения.
- Теперь найдите все зависимые службы из предыдущего шага и убедитесь, что для их Тип запуска установлено значение Автоматически .


После внесения необходимых изменений в окне Службы проблема должна быть решена полностью.
- ЧИТАЙТЕ ТАКЖЕ: Исправлено: Wi-Fi не работает на Lumia 535
Решение 15 – Выполните сканирование DISM и SFC
Повреждение файла может произойти на любом ПК, и иногда, если ваши системные файлы повреждены, вы можете столкнуться с этой проблемой. По словам пользователей, вы можете решить эту проблему с помощью сканирования SFC. Для этого выполните следующие действия:
- Откройте Командную строку от имени администратора.
- Когда откроется Командная строка , введите sfc/scannow и нажмите Enter , чтобы запустить его.
- Сканирование SFC начнется. Сканирование может занять некоторое время, поэтому не прерывайте его.
Если сканирование SFC не может решить проблему или вы вообще не можете его запустить, вы можете вместо этого использовать сканирование DISM. Для этого запустите Командную строку от имени администратора и введите Dism/Online/Cleanup-Image/RestoreHealth . После завершения сканирования DISM вы сможете без проблем запустить сканирование SFC.
Решение 16. Измените настройки питания вашего устройства
Несколько пользователей сообщили, что Windows 10 Wi-Fi не подключается автоматически после выхода компьютера из спящего режима. По словам пользователей, проблема, кажется, вызвана настройками питания вашего устройства. Если у вас возникла эта проблема, вам просто нужно изменить один параметр, и вы можете сделать это, выполнив следующие действия:
- Запустите Диспетчер устройств .
- Найдите свой беспроводной адаптер в списке, щелкните его правой кнопкой мыши и выберите в меню Свойства .
-
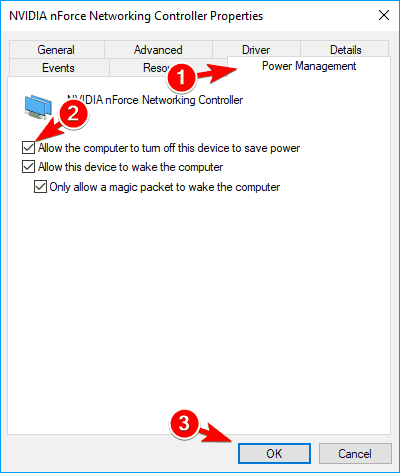
Когда откроется окно Свойства , перейдите в раздел Управление питанием . Теперь найдите Разрешить компьютеру выключать это устройство для экономии энергии и проверьте его. Нажмите ОК , чтобы сохранить изменения.

После включения этой опции компьютер всегда выключит беспроводной адаптер, когда ваш компьютер перейдет в спящий режим или в спящий режим. Пользователи сообщили, что это решение устраняет эту проблему при выходе компьютера из спящего режима, но вы можете попробовать его, даже если вы не используете функцию гибернации на своем компьютере. Несколько пользователей сообщили, что эта опция автоматически отключается после установки новой сборки Windows, поэтому, если вы устанавливаете какое-либо серьезное обновление, обязательно включите эту функцию снова.
- Читайте также: как подключиться к скрытой сети Wi-Fi в Windows 10
Мы также должны упомянуть, что немногие пользователи утверждают, что отключение Разрешить компьютеру выключать это устройство для экономии энергии решило проблему для них, поэтому обязательно попробуйте.
Решение 17 – Измените настройки вашего маршрутизатора
По словам пользователей, эта проблема может возникнуть, если вы используете на компьютере соединение Ethernet и Wi-Fi. Иногда ваш компьютер может предпочесть Ethernet, а не Wi-Fi соединение, что вызывает проблему. Похоже, что эта проблема вызвана настройками вашего роутера, и для ее устранения необходимо сделать следующее:
- Войдите в свой роутер. Чтобы увидеть, как это сделать, мы настоятельно рекомендуем проверить руководство по эксплуатации вашего маршрутизатора.
- Теперь нажмите Дополнительно и нажмите Да для подтверждения.
- Найдите функцию IGMP Proxy и выберите Отключить .
- Нажмите Применить , чтобы сохранить изменения.
После отключения этой функции проблема должна быть решена, и ваш компьютер автоматически подключится к сети Wi-Fi без каких-либо проблем. Имейте в виду, что все маршрутизаторы разные, поэтому вам может потребоваться предпринять несколько разные шаги, чтобы отключить эту функцию. Для получения подробных инструкций о том, как отключить эту функцию, мы рекомендуем вам ознакомиться с инструкцией по эксплуатации.
Решение 18 – Минимизируйте количество одновременных подключений
По словам пользователей, вы можете решить эту проблему, просто сделав пару изменений в редакторе групповой политики. Чтобы устранить эту проблему, вам просто нужно найти и отключить политику Минимизировать количество одновременных подключений . Этот параметр не позволяет устанавливать несколько подключений к Интернету, поэтому, если вы уже подключены к Интернету с помощью подключения Ethernet, ваш компьютер не будет автоматически подключаться к сети Wi-Fi. Эта опция включена по умолчанию, и для ее отключения необходимо сделать следующее:
- ЧИТАЙТЕ ТАКЖЕ: Исправлено: Wi-Fi не имеет действительной конфигурации IP в Windows 10
- Откройте Редактор групповой политики . Мы показали вам, как это сделать в Решении 1 , поэтому просмотрите подробные инструкции.
-
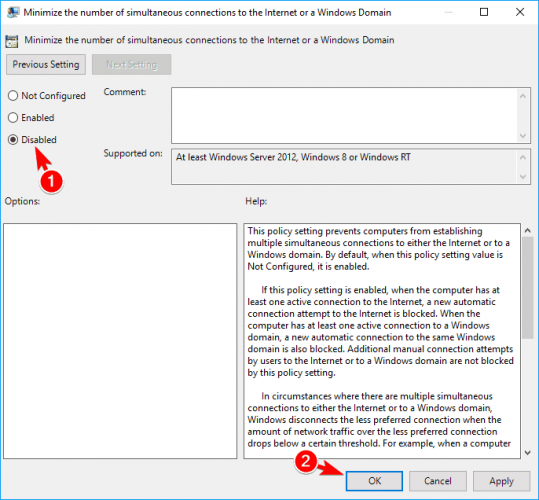
Когда откроется Редактор групповой политики , на левой панели выберите Конфигурация компьютера> Административные шаблоны> Сеть> Диспетчер подключений Windows . На правой панели найдите Минимизируйте количество одновременных подключений к Интернету или домену Windows и дважды щелкните его.
-
Выберите Отключено и нажмите Применить и ОК , чтобы сохранить изменения.
- После этого закройте Редактор групповой политики .


После отключения этого параметра проблема с подключением к Wi-Fi должна быть полностью решена.
Решение 19 – Измените безопасность вашего маршрутизатора
Это просто обходной путь, поэтому это может быть не лучшим постоянным решением. Не рекомендуется менять безопасность вашего маршрутизатора, так как некоторые стандарты безопасности менее безопасны, чем другие. Используя этот метод, вы снизите безопасность вашей беспроводной сети, поэтому не забывайте об этом.
Некоторые пользователи утверждают, что проблема возникает при использовании безопасности WPA 2 для защиты беспроводной сети. По словам пользователей, переключение безопасности беспроводной сети с WPA или WPA 2 на WEP решило проблему для них. Мы должны предупредить вас, что стандарт безопасности WEP устарел, поэтому всегда лучше использовать стандарт WPA 2. Почти все беспроводные устройства полностью совместимы со стандартом WPA 2, и, если у вашего устройства есть проблемы с ним, вам, возможно, придется проверить его настройки или обновить драйверы.
Чтобы переключиться на защиту WEP, вам просто нужно войти в свой маршрутизатор и выбрать защиту WEP в разделе Беспроводная связь . Для получения дополнительных инструкций о том, как это сделать, мы рекомендуем вам ознакомиться с инструкцией по эксплуатации вашего маршрутизатора. Еще раз отметим, что безопасность WEP устарела, и если вы собираетесь ее использовать, используйте ее только как временное решение.
Как видите, это может быть досадной проблемой, но мы надеемся, что вам удастся решить ее с помощью одного из наших решений.
07.12.2017
Просмотров: 30107
Часто на компьютерах и ноутбуках, которые работают под управлением операционной системы Windows 7 и Windows 10, пользователи замечают, что беспроводная сеть пропадает. При повторном поиске ПК не хочет подключаться автоматически и требует ввод пароля. Почему же компьютер не запоминает беспроводную сеть и не хочет подключаться автоматически?
Читайте также: Способы изменения пароля Wi-Fi на компьютере с Windows 10
Способы решения проблемы, когда система не подключается автоматически к Wi-Fi
На компьютерах с Windows 7 и выше описанная проблема возникает из-за системных сбоев и решается несколькими способами.
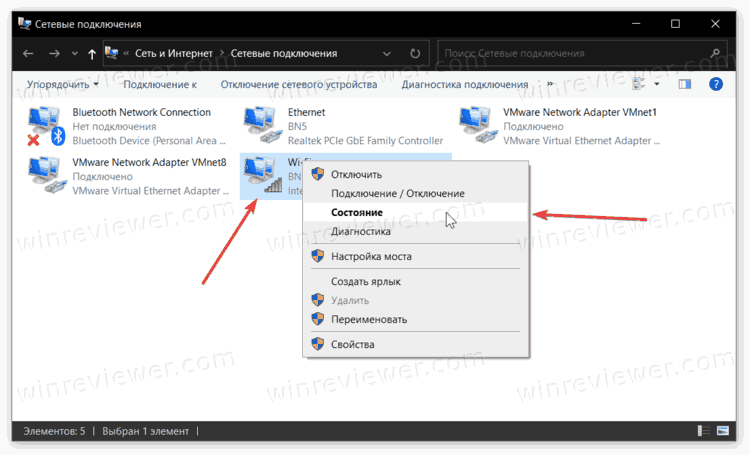
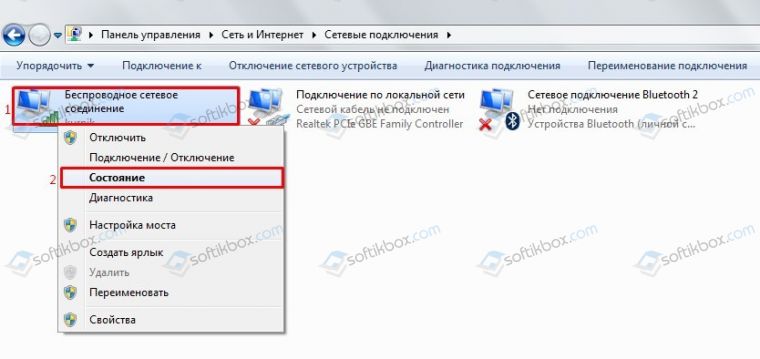
- Открываем «Центр управления сетями и общим доступом», нажав правой кнопкой мыши на значке Wi-Fi (что на панели задач).

- Откроется новое окно. Находим беспроводную сеть и нажимаем правой кнопкой мыши. Выбираем «Состояние».
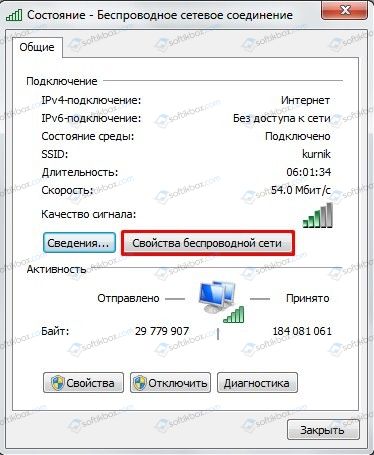
- Появится небольшое окно. Нажимаем на кнопку «Свойства беспроводной сети».
- Откроется мини-окно. Здесь нужно поставить отметку «Подключаться автоматически, если сеть в радиусе действия».
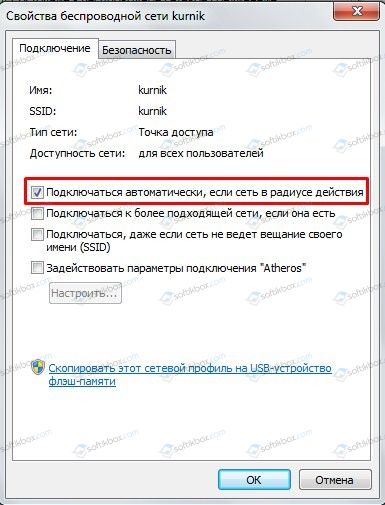
Теперь нужно перезагрузить ПК и повторить подключение к сети.
В случае, если такая проблема возникла на компьютере с Windows 10, то на этом вышеописанные методы не заканчиваются. Стоит выполнить следующее:
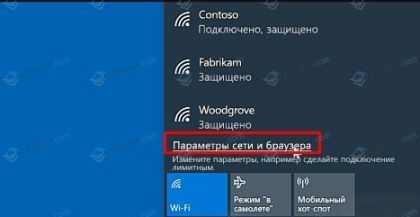
- После того, как вы поставили отметку «Подключаться к сети автоматически…», стоит открыть «Параметры сети и Интернет». Для этого нажимаем на значке Wi-Fi, что расположен в системном трее.
- Откроется раздел «Параметров», а точнее Wi-Fi. Здесь нужно нажать на ссылку «Управление известными сетями».
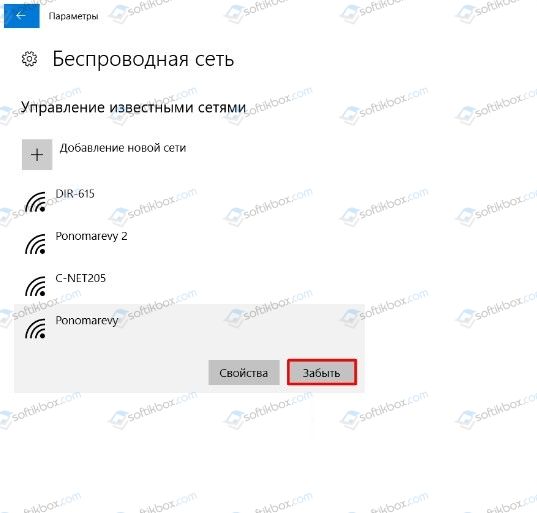
- Появится список всех точек Wi-Fi, к которым ранее подключался ПК. Нужно выбрать ту, с которой возникают проблемы и нажать «Забыть».
- После этого рекомендуем перезагрузить ПК и повторно подключиться к сети с вводом пароля.
Если вышеуказанные действия не помогли решить проблему, стоит обновить драйвер беспроводного адаптера, а также попробовать откатить систему к более раннему состоянию. Возможно, программное обеспечение было обновлено или повреждено работой вирусного приложения.
The drivers can cause the most issues regarding the Wi-Fi
by Milan Stanojevic
Milan has been enthusiastic about technology ever since his childhood days, and this led him to take interest in all PC-related technologies. He’s a PC enthusiast and he… read more
Updated on December 30, 2022
Reviewed by
Alex Serban

After moving away from the corporate work-style, Alex has found rewards in a lifestyle of constant analysis, team coordination and pestering his colleagues. Holding an MCSA Windows Server… read more
- Many users have reported that their PC does not connect to the Wi-Fi automatically.
- Corrupted or outdated drivers cause this issue most of the time.
- If you too are experiencing this, then follow the guide written below.

XINSTALL BY CLICKING THE DOWNLOAD FILE
This software will repair common computer errors, protect you from file loss, malware, hardware failure and optimize your PC for maximum performance. Fix PC issues and remove viruses now in 3 easy steps:
- Download Restoro PC Repair Tool that comes with Patented Technologies (patent available here).
- Click Start Scan to find Windows issues that could be causing PC problems.
- Click Repair All to fix issues affecting your computer’s security and performance
- Restoro has been downloaded by 0 readers this month.
Many of us use Wi-Fi to connect to the Internet, but sometimes issues with Wi-Fi can occur.
According to users, Windows 10 Wi-Fi isn’t connecting automatically, and today we’re going to show you how to fix that problem.
- How can I fix a Wi-Fi that doesn’t connect automatically?
- 1. Change the properties of your wireless connection
- 2. Reinstall your Wi-Fi driver
- 3. Change Group Policy settings
- 4. Remove all saved Wi-Fi networks
- 5. Use PROSet software
- 6. Modify your registry
- 7. Turn off the Fast Startup feature
- 8. Install the latest drivers manually
- 9. Replace your wireless adapter
- 10. Remove files from Wlansvc directory
- 11. Change the security permissions
- 12. Create a new wireless network connection
- 13. Remove any third-party wireless software
- 14. Set WLAN AutoConfig service to Automatic
- 15. Perform DISM and SFC scan
- 16. Change your device’s power settings
- 17. Change your router settings
- 18. Minimize the number of simultaneous connections
- 19. Change your router’s security
How can I fix a Wi-Fi that doesn’t connect automatically?
1. Change the properties of your wireless connection
If Windows 10 Wi-Fi isn’t connecting automatically, you might be able to fix the problem by changing the properties of your wireless connection.
This is relatively simple, and you can do it by following these steps:
- Click the Internet access icon in your Taskbar.
- A list of all wireless connections will appear.
- Right-click your connection and choose Properties from the menu.
- When Properties window opens, go to Connections tab.
- Now check Connect automatically when this network is in range option and save changes.
After enabling this option the problem should be resolved and you’ll be able to use your wireless connection without any issues.
2. Reinstall your Wi-Fi driver
- Press Windows Key + X to open Win + X menu and choose Device Manager from the list.


- After Device Manager starts, you need to locate your Wi-Fi device.
- Right-click the Wi-Fi device and choose Uninstall device from the menu.

- The confirmation message will now appear.
- Click on Uninstall to proceed.

- After doing that, click on Scan for hardware changes icon.
- Windows will now scan your system and install the missing drivers.
According to users, you might be able to temporarily fix this problem by reinstalling your Wi-Fi driver. Once your driver is installed, the problem with Wi-Fi should be resolved completely.
Few users claim that this is just a workaround, so if the problem appears again you might want to download and install the latest driver for your Wi-Fi adapter.
Update drivers automatically
After uninstalling the drivers, you might want to search for them on the manufacturer’s website. It is very important to choose the right driver versions.
However, if you don’t want to risk installing an older version, or the wrong driver, then you might as well use a third-party drive updater to do the job for you instead.
Most of the time, the generic drivers for your PC’s hardware and peripherals are not properly updated by the system. There are key differences between a generic driver and a manufacturer’s driver.Searching for the right driver version for each of your hardware components can become tedious. That’s why an automated assistant can help you find and update your system with the correct drivers every time, and we strongly recommend DriverFix. Here’s how to do it:
- Download and install DriverFix.
- Launch the software.
- Wait for the detection of all your faulty drivers.
- DriverFix will now show you all the drivers that have issues, and you just need to select the ones you’d liked fixed.
- Wait for the app to download and install the newest drivers.
- Restart your PC for the changes to take effect.

DriverFix
Keep your PC components drivers working perfectly without putting your PC at risk.
Disclaimer: this program needs to be upgraded from the free version in order to perform some specific actions.
3. Change Group Policy settings
To fix this problem, do the following:
- Press Windows Key + R and enter gpedit.msc.
- Press Enter or click OK.

- In the left panel, navigate to Computer Configuration > Administrative Templates > System > Internet Communication Management > Internet Communicating Settings.
- In the right panel, locate Turn off Windows Network Connectivity Status Indicator active tests and double click it to open its properties.

- Select Not Configured from the menu and click on Apply and OK to save changes.


Group Policy is a useful feature that allows you to make system-wide changes on your PC. According to users, you might be able to fix this problem simply by making a few changes using the Group Policy Editor.
We have to mention that this feature is available only on Professional and Enterprise versions of Windows, so if you’re using any other version you might not have this feature available.
By default, this policy is set to Not Configured, but for some reason, it might become enabled on your PC, so we advise you to check your Group Policy settings.
Most Windows 10 users have no idea how to edit the Group Policy. Learn how you can do it by reading this simple article.
4. Remove all saved Wi-Fi networks
- Open the Settings app. You can do that quickly by pressing Windows Key + I.
- Once the Settings app opens, navigate to Network & Internet section.

- In the left panel, navigate to Wi-Fi category. Now locate Manage Wi-Fi settings in the right panel and click on it.
- Locate Manage known networks and click it.
- Now you should see a list of all networks that you’ve connected to in the past. To forget a network, simply select it and click on Forget. Now repeat these steps for all networks on the list.

If Windows can’t connect to a Wi-Fi network automatically, you might be able to fix the problem by removing all saved Wi-Fi networks.
You can also forget all saved networks by using the Command Prompt. This is a bit advanced solution since you have to use a command line, so if you’re a basic user you might want to skip it.
To delete saved Wi-Fi networks with Command Prompt, you need to do the following:
- Press Windows Key + X and choose Command Prompt (Admin) from the menu.
- If you don’t have Command Prompt available on the list, you can choose PowerShell (Admin) instead.
- When Command Prompt opens enter this line and press Enter to run the command:
netsh wlan show profiles
- After doing that, you’ll see the list of all saved Wi-Fi networks.
- To delete a saved Wi-Fi network, simply enter this line and press Enter to run the command:
netsh wlan delete profile name="Name of the Wi-Fi network"
This method is a bit advanced, but it might be faster to use if you’re familiar with Command Prompt. Both methods from this solution will have the same results, so feel free to use any of them.
After removing all saved networks, you just have to connect to your network and enter its password and the problem should be resolved.
Some users claim that you just have to delete your own Wi-Fi network from the list of saved networks, so be sure to try that first.
5. Use PROSet software
Several users reported that using the PROSet software fixed the problem for them. For some reason, there was a one-minute delay on their PC before the computer could connect to a Wi-Fi network automatically.
However, after installing PROSet software the problem was completely resolved.
According to users, they used a Cisco wireless router, so that can also be a part of the problem. Even if you don’t use Cisco’s network device, feel free to try this software.
If you have a Wi-Fi exclamation mark on Windows 10, check our dedicated guide that will help you solve the problem.
6. Modify your registry
- Press Windows Key + R and enter regedit.
- Click on OK or press Enter.
- Optional: Modifying the registry can cause some problems with your PC if you’re not careful, therefore it’s always a good idea to create a backup just in case anything goes wrong.
- To do that, click on File > Export.

- To do that, click on File > Export.
- Set Export range to All and enter the desired file name.
- Choose a safe location and click on Save button.

- Now you’ll have a backup of your registry ready. In case any problems occur after modifying your registry, you should be able to fix them simply by running this file.
- Navigate to this key in the left panel:
HKEY_LOCAL_MACHINESOFTWAREPoliciesMicrosoftWindowsWcmSvc
- Expand WcmSvc key and look for GroupPolicy key.
- If this key isn’t available, you need to create it manually.
- To do that, right-click WcmSvc and choose New > Key from the menu.
- Now enter GroupPolicy as the name of the new key.

- Navigate to the GroupPolicy key and in the right pane click on empty space and choose New > DWORD (32-bit) value.
- Enter fMinimizeConnections as the name of the new DWORD.

- After doing that, close Registry Editor and restart your PC.


Your registry holds sensitive information, and by modifying it you can change hidden Windows settings.
Several users claim that they fixed the problem simply by making a couple of small changes to their registry.
Once your PC restarts, the problem should be resolved and your PC will automatically connect to the Wi-Fi network. If any problems occur, you can simply delete the GroupPolicy key you created to fix them.
If you can’t edit your Windows 10’s registry, read this handy guide and find the quickest solutions to the issue.
7. Turn off the Fast Startup feature
- Press Windows Key + S and enter control panel. Now choose Control Panel from the menu.
- Alternatively, you can just open the Start Menu and search for Control Panel.

- When Control Panel opens, navigate to Power Options.

- When Power Options window opens, click on Choose what the power button does option from the menu on the left.

- Click on Change settings that are currently unavailable.

- Uncheck Turn on fast startup (recommended) option and click on Save changes.


Windows 10 has a useful feature called Fast Startup. This feature is enabled by default, and it will save your data when turning off your PC.
As a result, your PC will boot faster the next time you turn it on. This is a useful feature, but it can sometimes cause certain issues to appear.
Users reported that Fast Startup is the cause of this problem.
After turning this option off, your PC might boot a bit slower, but your Wi-Fi problems should be resolved.
You can’t open Control Panel? Take a look at our step-by-step guide to finding a solution.
8. Install the latest drivers manually
- Download and install the latest drivers for your wireless adapter.
- If possible, try to download the drivers without any additional wireless configuration software.
- Start Device Manager and locate your wireless device.
- Right-click the wireless device and choose Update driver.

- Choose Browse my computer for driver software.

- Now click on Let me pick from a list of available drivers on my computer.

- You should see several different drivers available. Select the driver from your wireless adapter manufacturer and click on Next.
These types of problems are usually caused by your drivers, but in most cases, you can fix them simply by updating your drivers to the latest version.
After you install the driver manually, the problem should be resolved and you’ll be able to connect to the wireless network without any problems.
9. Replace your wireless adapter
If Windows 10 can’t automatically connect to the Wi-Fi, you might want to try replacing your wireless adapter. Some wireless adapters aren’t fully compatible with Windows 10, and that can be the case with your adapter.
If that’s so, you need to replace your wireless adapter with a different model and check if that solves the problem. This is a drastic solution, and you should use it only if other solutions from this article can’t fix your problem.
Most wireless adapters are fully compatible with Windows 10, but if you’re using an unknown brand, you might experience this problem on your PC.
If you’re having wireless adapter or access point issues on Windows 10, take a look at this awesome guide to solve them.
10. Remove files from Wlansvc directory
- Press Windows Key + R and enter services.msc. Press Enter or click OK.
- A list of all available services will now appear. Locate WLAN AutoConfig service, right-click it and choose Stop from the menu.
- After stopping the service, minimize the Services window.

- Open File Explorer and go to this directory:
C:ProgramDataMicrosoftWlansvc- If you can’t find this directory, be sure to reveal hidden files and folders.
- To do that, simply click on the View tab and then check Hidden items option.

- Once you enter Wlansvc directory, delete all files and directories from it except Profiles directory.
- Now navigate to the Profiles directory. Delete all files and directories except Interfaces folder.
- Open Interfaces folder and delete all files and folders from it.
- Now go back to Services window, locate WLAN AutoConfig service, right-click it and choose Start from the menu.

- Connect to your wireless network once again. Be sure to check the option to automatically connect to the selected network.

This problem can sometimes be caused by files inside the Wlansvc directory.
To fix the issue, you need to disable the WLAN AutoConfig service and remove the problematic files.
After doing that, you just have to restart your computer and check if that solves the problem.
Some PC issues are hard to tackle, especially when it comes to corrupted repositories or missing Windows files. If you are having troubles fixing an error, your system may be partially broken.
We recommend installing Restoro, a tool that will scan your machine and identify what the fault is.
Click here to download and start repairing.
A few users are also suggesting going back to this directory and locating the newly created .xml file in one of the folders:
C:ProgramDataMicrosoftWlansvcProfilesInterfaces
This .xml represents your network connection, and to fix the problem, you need to right-click this file and choose Properties from the menu.

Now go to the General tab and check the Read-only option in the Attributes section. Click on Apply and OK to save changes.
According to users, it seems that Windows was modifying the .xml file causing this problem to appear. By setting the file to Read-only mode, the problem was resolved completely.
11. Change the security permissions
- Navigate to C:ProgramDataMicrosoftWlansvc directory.
- Locate the Profiles directory and right-click it.
- Choose Properties from the menu.

- Go to Security tab, and check if Administrators group is available in Group or user names section.
- If not, click the Advanced button.
- If Administrators group is available, go to Step 7.

- Now click on Add button.

- Click on Select a principal.

- In the Enter the object names to select the field enter Administrators and click on Check Names.
- If everything is in order, click on OK.

- If everything is in order, click on OK.
- Check Full control option and click on OK to save changes.

- Select Administrators and click on Edit.

- Select Administrators and make sure that Full control option is checked in Allow column.
- Now click on Apply and OK to save changes.

- Go to Network and Sharing Center and try to add your wireless connection.

As we already mentioned, your Profiles folder can sometimes cause problems with Wi-Fi to occur.
After doing that, the problem should be resolved and you’ll be able to connect to your wireless network without any issues.
12. Create a new wireless network connection
- Open Control Panel and choose Network and Sharing Center.

- When Network and Sharing Center opens, click on Set up a new connection or network.

- Choose Manually connect to a wireless network option and click on Next.
- Enter the network name and required settings. In addition, be sure to check to Start this connection automatically and Connect even if the network is not broadcasting options.
- Now click on Next and follow the instructions to complete the process.
According to users, you might be able to solve this problem simply by creating a new wireless network connection. Before you do that, you might have to remove your wireless connection.
After doing that, you’ll have a new connection ready and Windows will automatically connect to it.
If your Wi-Fi icon is missing on Windows 10, get it back by following this simple guide.
13. Remove any third-party wireless software
- Open Device Manager, locate your wireless adapter, right-click it and choose Update driver from the menu.
- Select Browse my computer for driver software.
- Click the Browse button and locate the wireless drivers on your PC.
- Usually, they’ll be on a CD that you got with your wireless adapter.
- If you downloaded the drivers online, be sure to check your download directory.

- After you select the driver directory, Check Include subfolders option and click on Next.
- Follow the instructions on the screen to complete the process.


Many wireless adapters come with their own software that can help you configure your wireless network. To fix this problem, you need to remove any wireless configuration software that came with your wireless adapter.
Keep in mind that removing this software can also remove drivers for your wireless adapter.
To fix the issue, you need to reinstall your drivers, but be sure not to install any wireless configuration software. The simplest way to do that is to install the drivers manually.
In some cases, Windows will ask you if you want to use Windows or third-party software to control the wireless device. If that happens, be sure to choose Windows.
Users reported that sometimes third-party wireless control software can start automatically with Windows causing this problem to appear.
To fix the issue, you need to manage your startup items and prevent the software from starting automatically with Windows.
Users reported problems with Netgear software, but the problem can also appear with software from other manufacturers.
14. Set WLAN AutoConfig service to Automatic
- Open the Services window.
- We already showed you how to do that in Solution 9, so be sure to check it for detailed instructions.
- When Services window opens, locate WLAN AutoConfig service and double-click it to open its properties.
- Set Startup type to Automatic.

- Go to Dependencies tab and check the list of services that are dependent on WLAN AutoConfig.
- Write down those services since you’ll need them for the next step. Click OK and Apply to save changes.
- Now locate all dependant services from the previous step and make sure that their Startup type is set to Automatic.
According to users, the problem can occur if the WLAN AutoConfig service isn’t set to Automatic. After making the necessary changes in the Services window the problem should be resolved entirely.
15. Perform DISM and SFC scan
- Open Command Prompt as administrator.
- When Command Prompt opens, enter sfc /scannow and press Enter to run it.
- The SFC scan will now start. The scan can take a while, so don’t interrupt it.
File corruption can occur on any PC, and sometimes if your system files are corrupted you might experience this problem.
According to users, you might be able to fix this issue by using the SFC scan.
If the SFC scan can’t fix the problem or if you can’t run it at all, you might want to use the DISM scan instead. To do that, start Command Prompt as administrator and enter:
Dism /Online /Cleanup-Image /RestoreHealth.
After the DISM scan is completed you should be able to run an SFC scan without any problems.
16. Change your device’s power settings
- Start Device Manager.
- Locate your wireless adapter on the list, right-click it and choose Properties from the menu.
- When Properties window opens, go to Power Management section.
- Now locate Allow the computer to turn off this device to save power option and check it.
- Click OK to save changes.

Several users reported that Windows 10 Wi-Fi isn’t connecting automatically after waking up their PC from hibernation. According to users, the issue seems to be caused by your device’s power settings.
After enabling this option, your computer will always turn off your wireless adapter when your PC enters hibernation or Sleep Mode.
Users reported that this solution fixes this problem when waking your PC from hibernation, but feel free to try it even if you don’t use the hibernation feature on your PC.
Several users reported that this option automatically turns back off after you install a new build of Windows, so if you install any major update, be sure to turn on this feature again.
We also have to mention that a few users claim that disabling Allow the computer to turn off this device to save power option fixed the problem for them, so be sure to try it out.
17. Change your router settings
According to users, this problem can occur if you’re using both Ethernet and Wi-Fi connections on your PC. Sometimes your PC might prefer Ethernet over your Wi-Fi connection causing the problem to appear.
It seems that this issue is caused by your router settings, and in order to fix that problem, you need to do the following:
- Log in to your router. To see how to do that, we strongly suggest checking your router’s manual.
- Now click on Advanced and click Yes to confirm.
- Locate IGMP Proxy feature and choose Disable.
- Click on Apply to save changes.
After turning this feature off, the problem should be resolved and your PC will automatically connect to a Wi-Fi network without any problems.
Keep in mind that all routers are different, so you might need to take slightly different steps to disable this feature. For detailed instructions on how to disable this feature, we advise you to check your instruction manual.
18. Minimize the number of simultaneous connections
- Open Group Policy Editor. We showed you how to do that in Solution 1, so check it for detailed instructions.
- When Group Policy Editor opens, in the left pane navigate to Computer Configuration > Administrative Templates > Network > Windows Connection Manager.
- In the right pane, locate Minimize the number of simultaneous connections to the Internet or a Windows Domain and double-click it.

- Select Disabled and click on Apply and OK to save changes.
- After doing that, close Group Policy Editor.

According to users, you might be able to fix this problem simply by making a couple of changes in Group Policy Editor. To fix the issue, you just need to find and disable Minimize the number of simultaneous connections policy.
This setting prevents establishing multiple connections to the Internet, so if you’re already connected to the Internet using an Ethernet connection, your PC won’t connect automatically to the Wi-Fi network.
After disabling this setting, the problem with your Wi-Fi connection should be completely resolved.
19. Change your router’s security
This is just a workaround, so it might not be the best permanent solution. Changing your router’s security isn’t advised since some security standards are less secure than others.
By using this method you’ll reduce the security of your wireless network, so be sure to keep that in mind.
Several users claim that the problem appears while using WPA 2 security to secure the wireless network. According to users, switching the wireless security from WPA or WPA 2 to WEP fixed the problem for them.
We have to warn you that the WEP security standard is outdated, so it’s always better to use WPA 2 standard instead.
Almost all wireless devices are fully compatible with WPA 2 standard, and if your device has a problem with it, you might have to check its settings or update your drivers.
To switch to WEP security, you just have to log in to your router and select WEP security from the Wireless section. For more instructions on how to do that, we advise you to check your router’s instruction manual.
Once again we have to mention that WEP security is outdated, and if you’re going to use it, use it only as a temporary solution.
As you can see, this can be an annoying problem, but we hope that you’ll manage to solve it by using one of our solutions.
If you have any more questions, don’t hesitate to leave them in the comments section below and we’ll be sure to check them out.
![]()
Newsletter
The drivers can cause the most issues regarding the Wi-Fi
by Milan Stanojevic
Milan has been enthusiastic about technology ever since his childhood days, and this led him to take interest in all PC-related technologies. He’s a PC enthusiast and he… read more
Updated on December 30, 2022
Reviewed by
Alex Serban
After moving away from the corporate work-style, Alex has found rewards in a lifestyle of constant analysis, team coordination and pestering his colleagues. Holding an MCSA Windows Server… read more
- Many users have reported that their PC does not connect to the Wi-Fi automatically.
- Corrupted or outdated drivers cause this issue most of the time.
- If you too are experiencing this, then follow the guide written below.
XINSTALL BY CLICKING THE DOWNLOAD FILE
This software will repair common computer errors, protect you from file loss, malware, hardware failure and optimize your PC for maximum performance. Fix PC issues and remove viruses now in 3 easy steps:
- Download Restoro PC Repair Tool that comes with Patented Technologies (patent available here).
- Click Start Scan to find Windows issues that could be causing PC problems.
- Click Repair All to fix issues affecting your computer’s security and performance
- Restoro has been downloaded by 0 readers this month.
Many of us use Wi-Fi to connect to the Internet, but sometimes issues with Wi-Fi can occur.
According to users, Windows 10 Wi-Fi isn’t connecting automatically, and today we’re going to show you how to fix that problem.
- How can I fix a Wi-Fi that doesn’t connect automatically?
- 1. Change the properties of your wireless connection
- 2. Reinstall your Wi-Fi driver
- 3. Change Group Policy settings
- 4. Remove all saved Wi-Fi networks
- 5. Use PROSet software
- 6. Modify your registry
- 7. Turn off the Fast Startup feature
- 8. Install the latest drivers manually
- 9. Replace your wireless adapter
- 10. Remove files from Wlansvc directory
- 11. Change the security permissions
- 12. Create a new wireless network connection
- 13. Remove any third-party wireless software
- 14. Set WLAN AutoConfig service to Automatic
- 15. Perform DISM and SFC scan
- 16. Change your device’s power settings
- 17. Change your router settings
- 18. Minimize the number of simultaneous connections
- 19. Change your router’s security
How can I fix a Wi-Fi that doesn’t connect automatically?
1. Change the properties of your wireless connection
If Windows 10 Wi-Fi isn’t connecting automatically, you might be able to fix the problem by changing the properties of your wireless connection.
This is relatively simple, and you can do it by following these steps:
- Click the Internet access icon in your Taskbar.
- A list of all wireless connections will appear.
- Right-click your connection and choose Properties from the menu.
- When Properties window opens, go to Connections tab.
- Now check Connect automatically when this network is in range option and save changes.
After enabling this option the problem should be resolved and you’ll be able to use your wireless connection without any issues.
2. Reinstall your Wi-Fi driver
- Press Windows Key + X to open Win + X menu and choose Device Manager from the list.
- After Device Manager starts, you need to locate your Wi-Fi device.
- Right-click the Wi-Fi device and choose Uninstall device from the menu.
- The confirmation message will now appear.
- Click on Uninstall to proceed.
- After doing that, click on Scan for hardware changes icon.
- Windows will now scan your system and install the missing drivers.
According to users, you might be able to temporarily fix this problem by reinstalling your Wi-Fi driver. Once your driver is installed, the problem with Wi-Fi should be resolved completely.
Few users claim that this is just a workaround, so if the problem appears again you might want to download and install the latest driver for your Wi-Fi adapter.
Update drivers automatically
After uninstalling the drivers, you might want to search for them on the manufacturer’s website. It is very important to choose the right driver versions.
However, if you don’t want to risk installing an older version, or the wrong driver, then you might as well use a third-party drive updater to do the job for you instead.
Most of the time, the generic drivers for your PC’s hardware and peripherals are not properly updated by the system. There are key differences between a generic driver and a manufacturer’s driver.Searching for the right driver version for each of your hardware components can become tedious. That’s why an automated assistant can help you find and update your system with the correct drivers every time, and we strongly recommend DriverFix. Here’s how to do it:
- Download and install DriverFix.
- Launch the software.
- Wait for the detection of all your faulty drivers.
- DriverFix will now show you all the drivers that have issues, and you just need to select the ones you’d liked fixed.
- Wait for the app to download and install the newest drivers.
- Restart your PC for the changes to take effect.
DriverFix
Keep your PC components drivers working perfectly without putting your PC at risk.
Disclaimer: this program needs to be upgraded from the free version in order to perform some specific actions.
3. Change Group Policy settings
To fix this problem, do the following:
- Press Windows Key + R and enter gpedit.msc.
- Press Enter or click OK.
- In the left panel, navigate to Computer Configuration > Administrative Templates > System > Internet Communication Management > Internet Communicating Settings.
- In the right panel, locate Turn off Windows Network Connectivity Status Indicator active tests and double click it to open its properties.
- Select Not Configured from the menu and click on Apply and OK to save changes.
Group Policy is a useful feature that allows you to make system-wide changes on your PC. According to users, you might be able to fix this problem simply by making a few changes using the Group Policy Editor.
We have to mention that this feature is available only on Professional and Enterprise versions of Windows, so if you’re using any other version you might not have this feature available.
By default, this policy is set to Not Configured, but for some reason, it might become enabled on your PC, so we advise you to check your Group Policy settings.
Most Windows 10 users have no idea how to edit the Group Policy. Learn how you can do it by reading this simple article.
4. Remove all saved Wi-Fi networks
- Open the Settings app. You can do that quickly by pressing Windows Key + I.
- Once the Settings app opens, navigate to Network & Internet section.
- In the left panel, navigate to Wi-Fi category. Now locate Manage Wi-Fi settings in the right panel and click on it.
- Locate Manage known networks and click it.
- Now you should see a list of all networks that you’ve connected to in the past. To forget a network, simply select it and click on Forget. Now repeat these steps for all networks on the list.
If Windows can’t connect to a Wi-Fi network automatically, you might be able to fix the problem by removing all saved Wi-Fi networks.
You can also forget all saved networks by using the Command Prompt. This is a bit advanced solution since you have to use a command line, so if you’re a basic user you might want to skip it.
To delete saved Wi-Fi networks with Command Prompt, you need to do the following:
- Press Windows Key + X and choose Command Prompt (Admin) from the menu.
- If you don’t have Command Prompt available on the list, you can choose PowerShell (Admin) instead.
- When Command Prompt opens enter this line and press Enter to run the command:
netsh wlan show profiles
- After doing that, you’ll see the list of all saved Wi-Fi networks.
- To delete a saved Wi-Fi network, simply enter this line and press Enter to run the command:
netsh wlan delete profile name="Name of the Wi-Fi network"
This method is a bit advanced, but it might be faster to use if you’re familiar with Command Prompt. Both methods from this solution will have the same results, so feel free to use any of them.
After removing all saved networks, you just have to connect to your network and enter its password and the problem should be resolved.
Some users claim that you just have to delete your own Wi-Fi network from the list of saved networks, so be sure to try that first.
5. Use PROSet software
Several users reported that using the PROSet software fixed the problem for them. For some reason, there was a one-minute delay on their PC before the computer could connect to a Wi-Fi network automatically.
However, after installing PROSet software the problem was completely resolved.
According to users, they used a Cisco wireless router, so that can also be a part of the problem. Even if you don’t use Cisco’s network device, feel free to try this software.
If you have a Wi-Fi exclamation mark on Windows 10, check our dedicated guide that will help you solve the problem.
6. Modify your registry
- Press Windows Key + R and enter regedit.
- Click on OK or press Enter.
- Optional: Modifying the registry can cause some problems with your PC if you’re not careful, therefore it’s always a good idea to create a backup just in case anything goes wrong.
- To do that, click on File > Export.
- To do that, click on File > Export.
- Set Export range to All and enter the desired file name.
- Choose a safe location and click on Save button.
- Now you’ll have a backup of your registry ready. In case any problems occur after modifying your registry, you should be able to fix them simply by running this file.
- Navigate to this key in the left panel:
HKEY_LOCAL_MACHINESOFTWAREPoliciesMicrosoftWindowsWcmSvc
- Expand WcmSvc key and look for GroupPolicy key.
- If this key isn’t available, you need to create it manually.
- To do that, right-click WcmSvc and choose New > Key from the menu.
- Now enter GroupPolicy as the name of the new key.
- Navigate to the GroupPolicy key and in the right pane click on empty space and choose New > DWORD (32-bit) value.
- Enter fMinimizeConnections as the name of the new DWORD.
- After doing that, close Registry Editor and restart your PC.
Your registry holds sensitive information, and by modifying it you can change hidden Windows settings.
Several users claim that they fixed the problem simply by making a couple of small changes to their registry.
Once your PC restarts, the problem should be resolved and your PC will automatically connect to the Wi-Fi network. If any problems occur, you can simply delete the GroupPolicy key you created to fix them.
If you can’t edit your Windows 10’s registry, read this handy guide and find the quickest solutions to the issue.
7. Turn off the Fast Startup feature
- Press Windows Key + S and enter control panel. Now choose Control Panel from the menu.
- Alternatively, you can just open the Start Menu and search for Control Panel.
- When Control Panel opens, navigate to Power Options.
- When Power Options window opens, click on Choose what the power button does option from the menu on the left.
- Click on Change settings that are currently unavailable.
- Uncheck Turn on fast startup (recommended) option and click on Save changes.
Windows 10 has a useful feature called Fast Startup. This feature is enabled by default, and it will save your data when turning off your PC.
As a result, your PC will boot faster the next time you turn it on. This is a useful feature, but it can sometimes cause certain issues to appear.
Users reported that Fast Startup is the cause of this problem.
After turning this option off, your PC might boot a bit slower, but your Wi-Fi problems should be resolved.
You can’t open Control Panel? Take a look at our step-by-step guide to finding a solution.
8. Install the latest drivers manually
- Download and install the latest drivers for your wireless adapter.
- If possible, try to download the drivers without any additional wireless configuration software.
- Start Device Manager and locate your wireless device.
- Right-click the wireless device and choose Update driver.
- Choose Browse my computer for driver software.
- Now click on Let me pick from a list of available drivers on my computer.
- You should see several different drivers available. Select the driver from your wireless adapter manufacturer and click on Next.
These types of problems are usually caused by your drivers, but in most cases, you can fix them simply by updating your drivers to the latest version.
After you install the driver manually, the problem should be resolved and you’ll be able to connect to the wireless network without any problems.
9. Replace your wireless adapter
If Windows 10 can’t automatically connect to the Wi-Fi, you might want to try replacing your wireless adapter. Some wireless adapters aren’t fully compatible with Windows 10, and that can be the case with your adapter.
If that’s so, you need to replace your wireless adapter with a different model and check if that solves the problem. This is a drastic solution, and you should use it only if other solutions from this article can’t fix your problem.
Most wireless adapters are fully compatible with Windows 10, but if you’re using an unknown brand, you might experience this problem on your PC.
If you’re having wireless adapter or access point issues on Windows 10, take a look at this awesome guide to solve them.
10. Remove files from Wlansvc directory
- Press Windows Key + R and enter services.msc. Press Enter or click OK.
- A list of all available services will now appear. Locate WLAN AutoConfig service, right-click it and choose Stop from the menu.
- After stopping the service, minimize the Services window.
- Open File Explorer and go to this directory:
C:ProgramDataMicrosoftWlansvc- If you can’t find this directory, be sure to reveal hidden files and folders.
- To do that, simply click on the View tab and then check Hidden items option.
- Once you enter Wlansvc directory, delete all files and directories from it except Profiles directory.
- Now navigate to the Profiles directory. Delete all files and directories except Interfaces folder.
- Open Interfaces folder and delete all files and folders from it.
- Now go back to Services window, locate WLAN AutoConfig service, right-click it and choose Start from the menu.
- Connect to your wireless network once again. Be sure to check the option to automatically connect to the selected network.
This problem can sometimes be caused by files inside the Wlansvc directory.
To fix the issue, you need to disable the WLAN AutoConfig service and remove the problematic files.
After doing that, you just have to restart your computer and check if that solves the problem.
Some PC issues are hard to tackle, especially when it comes to corrupted repositories or missing Windows files. If you are having troubles fixing an error, your system may be partially broken.
We recommend installing Restoro, a tool that will scan your machine and identify what the fault is.
Click here to download and start repairing.
A few users are also suggesting going back to this directory and locating the newly created .xml file in one of the folders:
C:ProgramDataMicrosoftWlansvcProfilesInterfaces
This .xml represents your network connection, and to fix the problem, you need to right-click this file and choose Properties from the menu.
Now go to the General tab and check the Read-only option in the Attributes section. Click on Apply and OK to save changes.
According to users, it seems that Windows was modifying the .xml file causing this problem to appear. By setting the file to Read-only mode, the problem was resolved completely.
11. Change the security permissions
- Navigate to C:ProgramDataMicrosoftWlansvc directory.
- Locate the Profiles directory and right-click it.
- Choose Properties from the menu.
- Go to Security tab, and check if Administrators group is available in Group or user names section.
- If not, click the Advanced button.
- If Administrators group is available, go to Step 7.
- Now click on Add button.
- Click on Select a principal.
- In the Enter the object names to select the field enter Administrators and click on Check Names.
- If everything is in order, click on OK.
- If everything is in order, click on OK.
- Check Full control option and click on OK to save changes.
- Select Administrators and click on Edit.
- Select Administrators and make sure that Full control option is checked in Allow column.
- Now click on Apply and OK to save changes.
- Go to Network and Sharing Center and try to add your wireless connection.
As we already mentioned, your Profiles folder can sometimes cause problems with Wi-Fi to occur.
After doing that, the problem should be resolved and you’ll be able to connect to your wireless network without any issues.
12. Create a new wireless network connection
- Open Control Panel and choose Network and Sharing Center.
- When Network and Sharing Center opens, click on Set up a new connection or network.
- Choose Manually connect to a wireless network option and click on Next.
- Enter the network name and required settings. In addition, be sure to check to Start this connection automatically and Connect even if the network is not broadcasting options.
- Now click on Next and follow the instructions to complete the process.
According to users, you might be able to solve this problem simply by creating a new wireless network connection. Before you do that, you might have to remove your wireless connection.
After doing that, you’ll have a new connection ready and Windows will automatically connect to it.
If your Wi-Fi icon is missing on Windows 10, get it back by following this simple guide.
13. Remove any third-party wireless software
- Open Device Manager, locate your wireless adapter, right-click it and choose Update driver from the menu.
- Select Browse my computer for driver software.
- Click the Browse button and locate the wireless drivers on your PC.
- Usually, they’ll be on a CD that you got with your wireless adapter.
- If you downloaded the drivers online, be sure to check your download directory.
- After you select the driver directory, Check Include subfolders option and click on Next.
- Follow the instructions on the screen to complete the process.
Many wireless adapters come with their own software that can help you configure your wireless network. To fix this problem, you need to remove any wireless configuration software that came with your wireless adapter.
Keep in mind that removing this software can also remove drivers for your wireless adapter.
To fix the issue, you need to reinstall your drivers, but be sure not to install any wireless configuration software. The simplest way to do that is to install the drivers manually.
In some cases, Windows will ask you if you want to use Windows or third-party software to control the wireless device. If that happens, be sure to choose Windows.
Users reported that sometimes third-party wireless control software can start automatically with Windows causing this problem to appear.
To fix the issue, you need to manage your startup items and prevent the software from starting automatically with Windows.
Users reported problems with Netgear software, but the problem can also appear with software from other manufacturers.
14. Set WLAN AutoConfig service to Automatic
- Open the Services window.
- We already showed you how to do that in Solution 9, so be sure to check it for detailed instructions.
- When Services window opens, locate WLAN AutoConfig service and double-click it to open its properties.
- Set Startup type to Automatic.
- Go to Dependencies tab and check the list of services that are dependent on WLAN AutoConfig.
- Write down those services since you’ll need them for the next step. Click OK and Apply to save changes.
- Now locate all dependant services from the previous step and make sure that their Startup type is set to Automatic.
According to users, the problem can occur if the WLAN AutoConfig service isn’t set to Automatic. After making the necessary changes in the Services window the problem should be resolved entirely.
15. Perform DISM and SFC scan
- Open Command Prompt as administrator.
- When Command Prompt opens, enter sfc /scannow and press Enter to run it.
- The SFC scan will now start. The scan can take a while, so don’t interrupt it.
File corruption can occur on any PC, and sometimes if your system files are corrupted you might experience this problem.
According to users, you might be able to fix this issue by using the SFC scan.
If the SFC scan can’t fix the problem or if you can’t run it at all, you might want to use the DISM scan instead. To do that, start Command Prompt as administrator and enter:
Dism /Online /Cleanup-Image /RestoreHealth.
After the DISM scan is completed you should be able to run an SFC scan without any problems.
16. Change your device’s power settings
- Start Device Manager.
- Locate your wireless adapter on the list, right-click it and choose Properties from the menu.
- When Properties window opens, go to Power Management section.
- Now locate Allow the computer to turn off this device to save power option and check it.
- Click OK to save changes.
Several users reported that Windows 10 Wi-Fi isn’t connecting automatically after waking up their PC from hibernation. According to users, the issue seems to be caused by your device’s power settings.
After enabling this option, your computer will always turn off your wireless adapter when your PC enters hibernation or Sleep Mode.
Users reported that this solution fixes this problem when waking your PC from hibernation, but feel free to try it even if you don’t use the hibernation feature on your PC.
Several users reported that this option automatically turns back off after you install a new build of Windows, so if you install any major update, be sure to turn on this feature again.
We also have to mention that a few users claim that disabling Allow the computer to turn off this device to save power option fixed the problem for them, so be sure to try it out.
17. Change your router settings
According to users, this problem can occur if you’re using both Ethernet and Wi-Fi connections on your PC. Sometimes your PC might prefer Ethernet over your Wi-Fi connection causing the problem to appear.
It seems that this issue is caused by your router settings, and in order to fix that problem, you need to do the following:
- Log in to your router. To see how to do that, we strongly suggest checking your router’s manual.
- Now click on Advanced and click Yes to confirm.
- Locate IGMP Proxy feature and choose Disable.
- Click on Apply to save changes.
After turning this feature off, the problem should be resolved and your PC will automatically connect to a Wi-Fi network without any problems.
Keep in mind that all routers are different, so you might need to take slightly different steps to disable this feature. For detailed instructions on how to disable this feature, we advise you to check your instruction manual.
18. Minimize the number of simultaneous connections
- Open Group Policy Editor. We showed you how to do that in Solution 1, so check it for detailed instructions.
- When Group Policy Editor opens, in the left pane navigate to Computer Configuration > Administrative Templates > Network > Windows Connection Manager.
- In the right pane, locate Minimize the number of simultaneous connections to the Internet or a Windows Domain and double-click it.
- Select Disabled and click on Apply and OK to save changes.
- After doing that, close Group Policy Editor.
According to users, you might be able to fix this problem simply by making a couple of changes in Group Policy Editor. To fix the issue, you just need to find and disable Minimize the number of simultaneous connections policy.
This setting prevents establishing multiple connections to the Internet, so if you’re already connected to the Internet using an Ethernet connection, your PC won’t connect automatically to the Wi-Fi network.
After disabling this setting, the problem with your Wi-Fi connection should be completely resolved.
19. Change your router’s security
This is just a workaround, so it might not be the best permanent solution. Changing your router’s security isn’t advised since some security standards are less secure than others.
By using this method you’ll reduce the security of your wireless network, so be sure to keep that in mind.
Several users claim that the problem appears while using WPA 2 security to secure the wireless network. According to users, switching the wireless security from WPA or WPA 2 to WEP fixed the problem for them.
We have to warn you that the WEP security standard is outdated, so it’s always better to use WPA 2 standard instead.
Almost all wireless devices are fully compatible with WPA 2 standard, and if your device has a problem with it, you might have to check its settings or update your drivers.
To switch to WEP security, you just have to log in to your router and select WEP security from the Wireless section. For more instructions on how to do that, we advise you to check your router’s instruction manual.
Once again we have to mention that WEP security is outdated, and if you’re going to use it, use it only as a temporary solution.
As you can see, this can be an annoying problem, but we hope that you’ll manage to solve it by using one of our solutions.
If you have any more questions, don’t hesitate to leave them in the comments section below and we’ll be sure to check them out.
![]()