Ok, this may be my last disaster recovery and backup blog for a long time. As you can probably tell from the title this blog entry is all about keeping backup strategies as cheap as possible.
My strategy is to backup all of my Windows and Linux servers to one central Windows server that is running a Tivoli backup agent. All of my servers are hosted elsewhere, and since it costs $99.00 per server to backup I am getting the most for my money by only backing a single server to tape/SAN. However that single server carries all of the files that need to be remotely backed up to tape/SAN.
My earlier posts show how to backup the Windows servers:
Windows backup bat script using xcopy
Also, how to backup the Windows Domain Controller:
Backup Windows Domain Controller using NTBACKUP via cmd
And I also showed how to backup a Linux server to a local file:
Linux backup using CRON to local directory
Now I will show how I moved the files backed up on the Linux servers to the Windows server prior to tape/SAN backup. I have decided to use Samba and mount a directory pointing to a shared folder on the Windows server. Lets begin:
- Create a share on the Windows server to use as your backup location.
- Create a user to use this share, and give the user permissions to use it.
- Pick, or create, a user that you’re going to use to backup the files. Log in as this user and type ‘id’ to get the numeric ID of the user in the Linux OS. (You will need it later.)
- Become ‘root’. (This will enable you to perform the next tasks without problems.)
- Install samba and samba-client if they are not installed yet.
yum install samba
yum install samba-client
You will need to answer ‘y’ to when prompted.
- By default only the root user can mount or unmount a cifs, so we must open it to other users.
chmod 4755 /sbin/mount.cifs
chmod 4755 /sbin/umount.cifs
- Now we need to make a directory to use as our mount point.
mkdir /mnt/sharename
- To enable our desired user to mount and unmount this we need to assign ownership to that user. Changing permissions with chmod is not enough.
chown userfrom#1 /mnt/sharename
- Now we need to edit the /etc/fstab file and add an entry. Replace the user ID of 500 with your user ID from #1. Replace sharename with your Windows share name. Replace WINDOWSHOST with your hostname or IP address. If you don’t know the shares run smbclient -L WINDOWSHOST
//WINDOWSHOST/sharename /mnt/sharename cifs credentials=/root/smblogin,uid=500,noauto,user 0 0
- Create/Edit a file /root/smblogin and put the following two lines in it.
username=WINDOWS USERNAME
password=WINDOWS PASSWORD
- Now we must give our user from #1 access to the file, but still protect it.
chown userfrom#1 /root/smblogin
chmod 600 /root/smblogin
- If you have IPTABLES active on your server you will need to make sure to add a policy to allow OUTPUT port 445.
- Log in as the user from #1
- Try to mount the share:
mount /mnt/sharename
ls -la /mnt/sharename
umount /mnt/sharename
- If that was successful you are now ready to write a script that will automate the moving of your backup files from the Linux to the Windows share. (Script/File = backup.sh)
#!/bin/sh
mount /mnt/sharename

cp -r /path/to/file.tar.gz /mnt/sharename/path/to/file.tar.gz

umount /mnt/sharename
Of course you can add this to the end of the file described in Linux backup using CRON to local directory which would create a complete solution for backing up files, then relocating them to a remote Windows server.
- Next you will add an entry to the crontab of the user from #1 to happen automagically.
crontab -e -u userfrom#1
- Enter this into the crontab.
# Backup at 1:00 A.M. every day. Call 'man 5 crontab' for more information
* 1 * * * /path/to/backup.sh
Now once this is all done you can rest a little bit easier knowing that your servers are backed up. I hear the beach calling me now….ttyl.
main content
Back up the contents of the linux host to the windows machine.
Backup linux
The main features of using tar backup:
- Reserved permissions
- Suitable for backing up entire directories
- You can choose different compression methods
- If you choose not to compress, you can still achieve incremental backup, partial restore, refer to man tar
There are many options for tar, which are selected according to specific requirements.
The tar command incrementally backs up the linux directory:
tar -g snapshot -cvpzf $tarfile --exclude-from=$exclude_from $sourcedirectoryBackup content
Full and incremental
In the above command, an incremental backup will be performed according to the contents of the snapshot file each time it is executed. If snapshot does not exist, all files are backed up.
If the target file is large, it will be time-consuming to perform a full backup. In order to reduce the burden on the server, incremental backups are performed daily, and full backups are performed weekly or monthly.
Target directory
In the above command, $sourcedirectory is the object directory we backed up. It can be one directory or multiple directories, or it can be specified as the specific content of a file. For example, it can be set to /opt. All files in this directory will be packaged, except the files or directories specified by the -exclude-from option. —Exclude-from can specify a directory or a file path, or specify the specific content of a file.
Clean up historical backup files
In the above command, the backup file $tarfile is saved locally in Linux. The files that have been transferred to the remote server (windows) need to be deleted regularly.
If the file is stored on a remote server, the remote server should be responsible for the management of the file itself, and it does not need to be managed on Linux.
Transfer of backup files
In the above command, it is assumed that the file is saved locally and uploaded to the windows server regularly.
Need to prepare:
- The pscp on windows, the scp-like program provided by putty, is used to transfer files between windows and linux.
- Open remote access interface on linux to provide connection capability for pscp program.
Obtain files from Linux regularly, and upload a marked file to notify Linux that the file transfer is complete, and Linux can clean up the files that have been transferred.
Recover linux (verification is not run)
tar xvpfz
tarfile−C
targetdirectory
This command will put
tarfileofInsideContentcovercoverTo
The targetdirectory directory requires special attention.
For incremental backup files, you can perform incremental recovery in reverse order.
reference:
Centos uses the tar command to do incremental backups
Centos7 system backup and restore
Record the usage of putty’s pscp
Example code:
backupall.sh Start backup at 12:30 every day
#!/bin/bash
# /backup/backupall.sh

# define
dayofweek=`date "+%u"`
today=`date "+%Y%m%d"`
source=/
backup=/backup/
exclude_from=/backup/exclude_from

# action
cd $backup

# clean backuped files
for ff in `ls done/*.tar.gz.*`
do
  fff=${ff##*/}
  fff=${fff%.*}
  echo done file: ${fff}
  rm -f $ff
  rm -f $fff
done

# do backup
if [ $dayofweek -eq 6 ]; then
  tarfile = "$today"_full.tar.gz
  if [ ! -f $tarfile ]; then
    rm -rf snapshot
    tar -g snapshot -cvpzf $tarfile --exclude-from=$exclude_from $source
  fi
else
  tarfile = "$today"_incr.tar.gz
  if [ ! -f $tarfile ]; then
    tar -g snapshot -cvpzf $tarfile --exclude-from=$exclude_from $source
  fi
fi

echo $tarfile created.
exclude_from
/backup
/proc
/lost+found
/mnt
/media
/sys
backup_centos_server.bat Start transferring files at 11:00 and 14:00 every day
rem linux: backup files at 12:30
rem backup: get backup files at 11:00 and 14:00

@setlocal
@echo off
set backupPath=f:backupcentos7server
set path=e:termputty
set PSCP=%path%pscp.exe -pw
set PSCPP=Pscpp$ecret10
set remote=backup@10.10.132.199:/backup

rem get files
%PSCP% %PSCPP% %remote%/*.tar.gz %backupPath%temp

rem check files
cd %backupPath%
for /R temp %%f in (*.tar.gz) do (
  echo %%f
  if %errorlevel% equ 0 (
    echo %%f > %%f.saved
    date /t >> %%f.saved
    time /t >> %%f.saved
    %PSCP% %PSCPP% %%f.saved %remote%/done
  )
)

rem clean files
move %backupPath%temp*.tar.gz %backupPath%
del /Q %backupPath%temp*.saved
The sample code does not consider safety factors, pay attention!
I would like copy a backup file from image vmware linux to windows but I don’t know how to process it?
I tried:
scp /source/backup.tar.gz admin@x.x.x.x:/c:ProgrammefilesC:Documentsand SettingsAdminMyDocuments
but error and I know that it’s not like that, so if you have solutions?
![]()
asked Aug 18, 2010 at 16:54
![]()
2
Why not just add MyDocuments as a shared folder with your VM? That would simplify things a lot.
Regardless, you need something like WinSCP on your Windows box or else there’s nothing to really ssh to.
answered Aug 18, 2010 at 17:03
![]()
GregGreg
1111 bronze badge
1
No! You can’t use «scp» command to copy date remotely from Linux box to Windows box. You need to install «WinScp» utility on windows machine and then transfer the data from Linux box to windows box.
You can download WinScp from : https://winscp.net/eng/download.php
answered Oct 24, 2016 at 10:11
![]()
If you can SSH into your linux VM, you have another option.
I use Cygwin on Windows.
You can use this SSH command to copy a file from the VM to your Windows box.
ssh HOST "cat < REMOTEFILE" > LOCALFILE
It also works on binaries.
answered Oct 18, 2013 at 14:28
![]()
naisanzanaisanza
3032 silver badges9 bronze badges
2
To copy a file from Linux to Windows, you can use the following command from Windows (no Windows SSH server required):
scp user@ip:/dir1/dir2/file "D:dir1dir2"
answered Sep 13, 2021 at 7:04
![]()
Wenfang DuWenfang Du
5115 silver badges16 bronze badges
Yes think you, if i want that it be include in my script who will be execute automatically ???
Because i have my script «.sh» who make a backup and compress this backup and at the end of my script i would to copy this compress file to a windows folder.
I think with the scp command.
answered Aug 19, 2010 at 9:56
![]()
user46745user46745
212 gold badges2 silver badges3 bronze badges
1
rsync is a great backup tool, maybe the best. Learn how to use it in Windows, on a debian machine running with Windows Subsystem for Linux (WSL)
About this post
Accept reality and have a backup plan
— Miley Cyrus
I can’t count how many times I’ve lost files because I was too lazy to set up a proper backup. And every time, I told myself that this would not happen ever again.
At some point, I found the solution for macs and Linux computers:
rsync
, a tool that can synchronize the contents of two directories.
If you’re here, it’s because you’re desperately looking for a solution to run rsync on windows, so you probably know already that rsync is:
-
efficient
: it uses the size and modification times of the files to decide which files need to be transferred. -
easy
to use: one command is enough to synchronize a whole directory -
versatile
: for example, you can make backups to a remote machine, logging in as a different user. -
safe
: I never had any issue with it, and you can test what rsync will do with the dry run option before doing it.
The only drawback with this perfect backup tool is that it’s not available on windows. There were a few solutions, like running rsync with cygwin. But I got some issues, for example when dealing with filenames with weird characters like the French accents.
Still, I wanted to be able to back up my precious collection of Georges Brassens, Serge Gainsbourg, and Renaud.
Another solution is to install a full Linux virtual machine on the windows host, but that’s really using a sledgehammer to crack a nut, and a complete waste of time and resources, especially disk space.
But now is the future! it’s finally possible to run a Linux distribution on Windows 10 using Windows Subsystem for Linux (WSL). And in this distribution, to run rsync.
In this post, you’ll learn how to:
- Enable WSL and install a Linux distribution of your choice
- Use rsync to back up a folder on your windows PC to another folder on a different disk on the same PC
To do this, you must have Windows 10 installed on your PC.
Windows Subsystem for Linux (WSL)
The Windows Subsystem for Linux has been introduced in Windows 10. It lets developers run GNU/Linux environment — including most command-line tools, utilities, and applications — directly on Windows, unmodified, without the overhead of a virtual machine.
It’s really easy and the documentation is great! And there is no need for plagiarism, so I won’t repeat the installation instructions here. But I just want to give you a bit of help to get started.
At some point, you will be asked to enable WSL by opening a powershell.
You can open the powershell by hitting the windows key or the start button, and by typing:
A terminal window opens. To enable WSL, you need to run powershell as an administrator. So in your powershell terminal, type:
Start-Process powershell -Verb runAs
This opens yet another powershell window where you have administrator rights. Now you can follow the
instructions from microsoft
.
I chose to install a Debian Linux distribution. You can do the same or choose ubuntu if you prefer, it will work as well. If you take another distro, some of my instructions below probably won’t work, but you certainly know what you’re doing.
After the
initialization of your debian system
, we can get started with rsync.
Install rsync
To install rsync, just do:
sudo apt install rsync openssh-client
Then, we’re going to test it. Create two directories:
Now, create two empty files in srcdir, and list the contents of this directory:
touch srcdir/file1 srcdir/file2
ls srcdir
To synchronize the srcdir and backup directories, type:
rsync -av srcdir/ backup/
sending incremental file list
./
file1
file2

sent 176 bytes  received 57 bytes  466.00 bytes/sec
total size is 0  speedup is 0.00
Finally, list the destination directory, it contains the two files. Let’s try to remove one of the files before running rsync again:
rm srcdir/file2
rsync -av srcdir/ backup/
We see that backup still contains file2. By default, rsync will not delete anything. If you want to delete, do:
rsync -av --delete srcdir/ backup/
sending incremental file list
deleting file2

sent 82 bytes  received 21 bytes  206.00 bytes/sec
total size is 0  speedup is 0.00
You should now have enough faith in rsync to do a backup of your data. Let’s do it!
Mounting an external drive
DISCLAIMER: before attempting to run the commands below, I strongly advise to backup your data!
Ok just kidding 
I assume that you want to backup to an external drive, so first connect the drive to your PC. You should be able to see the drive in Windows Explorer. In the Linux terminal, the mounted drives are in /mnt. List them by doing:
These are the letters assigned to the partitions of my drives by Windows. C: is my system partition.
Probably, you will not find your external drive partitions here. It’s mounted by windows, but not by the Linux machine. To mount it, do the following:
- in Windows Explorer, find out which letter Windows assigned to the partition on your external drive. Let’s say it’s J:
- then, create the mount point and mount the partition
sudo mkdir /mnt/j
sudo mount -t drvfs J: /mnt/j
You can now see the contents of the partition with
and you can go the root of the partition with
You can use cd to change directory and ls to list the contents of a directory.
Starting the backup
Let’s assume you want to backup C:data to J:.
Just do the following. The -a option is always needed: it’s what most people use, you can check the rsync manual for more information. The -v option gives you a verbose output. And the -n option is for dry run: nothing will happen, this is just a test. Finally, I’m using sudo because I got permission errors without it.
sudo rsync -avn /mnt/c/data/ /mnt/j/
And observe the output. If it looks good to you, rerun without the -n option.
And now?
In this post, you’ve learnt how to:
- configure WSL, the Windows Subsystem for Linux, to run a debian machine
- use rsync to back up your files to an external drive
Every time you want to do a backup, you should launch the Debian machine and run the rsync command.
It would be nice to automatize this so that the back up is done every time your start the PC. I don’t know how to do this yet, but I’ll make an article as soon as I find out.
Stay tuned!
Please let me know what you think in the comments! I’ll try and answer all questions.
And if you liked this article, you can subscribe to my mailing list to be notified of new posts (no more than one mail per week I promise.)
Содержание
- GeekyBoy.com
- Бэкап сетевой шары (samba) в Linux по мотивам Windows Server Backup
- Введение
- Доступ к предыдущим версиям файлов
- Создание архивов и snapshot
- Бэкап windows из линукса
- Не нужен
GeekyBoy.com
Ok, this may be my last disaster recovery and backup blog for a long time. As you can probably tell from the title this blog entry is all about keeping backup strategies as cheap as possible.
My strategy is to backup all of my Windows and Linux servers to one central Windows server that is running a Tivoli backup agent. All of my servers are hosted elsewhere, and since it costs $99.00 per server to backup I am getting the most for my money by only backing a single server to tape/SAN. However that single server carries all of the files that need to be remotely backed up to tape/SAN.
My earlier posts show how to backup the Windows servers:
Windows backup bat script using xcopy
And I also showed how to backup a Linux server to a local file:
Linux backup using CRON to local directory
Now I will show how I moved the files backed up on the Linux servers to the Windows server prior to tape/SAN backup. I have decided to use Samba and mount a directory pointing to a shared folder on the Windows server. Lets begin:
- Create a share on the Windows server to use as your backup location.
- Create a user to use this share, and give the user permissions to use it.
- Pick, or create, a user that you’re going to use to backup the files. Log in as this user and type ‘id’ to get the numeric ID of the user in the Linux OS. (You will need it later.)
- Become ‘root’. (This will enable you to perform the next tasks without problems.)
- Install samba and samba-client if they are not installed yet.
You will need to answer ‘y’ to when prompted.
Of course you can add this to the end of the file described in Linux backup using CRON to local directory which would create a complete solution for backing up files, then relocating them to a remote Windows server.
Now once this is all done you can rest a little bit easier knowing that your servers are backed up. I hear the beach calling me now….ttyl.
Источник
Бэкап сетевой шары (samba) в Linux по мотивам Windows Server Backup
Введение
Чем хороша служба Windows Server Backup и теневые копии? Они входят в поставку Windows Server и не требуют доплаты (если не использовать облачную архивацию), а также хорошо справляются с возложенными на них задачами. Для простых сценариев использования — очень достойное решение. А доступ к теневым копиям через диалог свойств файла — вообще очень удобен. Теперь попробуем сделать аналогично для файлового сервера Linux с Samba.
Доступ к предыдущим версиям файлов
Эту возможность нам дает модуль Samba shadow_copy2. Его надо прописывать в секции сетевого ресурса в файле smb.conf:
В отличие от модуля первой версии, этот позволяет разместить папку с копиями в разных местах и с разными именами.
Теперь, если внутри папки path = /mnt/.share мы создадим подпапку @GMT-2016.12.25-10.17.52
то у нас ничего не выйдет. Добавим такие настройки в секции [general]:
Теперь в свойствах сетевой шары, в разделе предыдущих версий, мы увидим нашу «копию». Обратите внимание, время указывается в UTC и преобразуется в локальное по часовому поясу.
Создание архивов и snapshot
Иметь механизм доступа к копиям без механизма их создания — бесполезно. В этом нам поможет следующий скрипт (есть и официальный аналог):
#!/bin/bash # # LVM-ThinVolume BackUp with rsync script set # # (c) 2016 — # Andrew Leshkevich (magicgts@gmail.com) # # # This script set is free software; you can redistribute it and/or modify # it under the terms of the GNU General Public License as published by the # Free Software Foundation, either version 2 of the license or, at your # option, any later version. # # This program is distributed in the hope that it will be useful, # but WITHOUT ANY WARRANTY; without even the implied warranty of # MERCHANTABILITY or FITNESS FOR A PARTICULAR PURPOSE. See the # GNU General Public License for more details. # # You should have received a copy of the GNU General Public License # along with this program; if not, see . # # For a list of supported commands, type ‘thin_lv_backup help’ # # . Please forgive me for bad english . # ################################################################################################ ################################################################################################ #Mount the snapshot to the specified mount point, if a snapshot is not active, then activate it # Arguments: # $ <1>— Short path to Volume (in VG/LV format) # $ <2>— Mount point # $ <3>— Optional LMV Volume attribute # Returns: # Return 0 if no errors ################################################################################################ mount_snapshot() < local SRC=$<1>local MNT_TGT=$ <2>[ «$#» -lt 2 ] && echo ‘Error: expected / [ ]’ && return 1 if [ «$#» -eq 2 ]; then local ATTR=$(lvs —noheadings -o lv_attr $) else local ATTR=$ <3>fi findmnt -nf —source /dev/$ >/dev/null 2>&1 && echo «Skip: LV $ is already mounted!» && return 0 findmnt -nf —target $ >/dev/null 2>&1 | grep -v -q $ && echo «Skip: the directory $ is already a mount point» && return 3 if [ ! -d «$» ]; then mkdir -p «$» || echo «Error: Creating directory $» || return 4 echo «Info: directory $ has been created» fi find $ -prune -empty | grep -v -q $ && echo «Skip: $ directory is not empty» && return 5 [[ $ =
.*a.* ]] || lvchange -ay -K $ || echo «Error: Volume Activation $» || return 6 mount -o ro,nouuid /dev/$ $ || echo «Error: Mounting $» || return 7 return 0 > ################################################################################################ # UnMount snaphot, deactivate volume and remove it mount point directory # Arguments: # $ <1>— Short path to Volume (in VG/LV format) # Returns: # Return 0 if no errors ################################################################################################ umount_snapshot() < local SRC=$<1>local TGT [ «$#» -ne 1 ] && echo ‘Error: expected / ‘ && return 1 local _TGT=(«$( findmnt -nf —source /dev/$ | cut -d ‘ ‘ -f 1 )») if [ ! -z «$_TGT» ]; then umount -A /dev/$ || echo «Error: Umounting $» || return 2 for TGT in «$<_TGT[@]>«; do find $ -prune -empty | grep -q «$» && rm —one-file-system -df $ [ -d «$» ] && echo «Info: Fail to remove target directory $» done fi lvchange -an -K $ || echo «Error: Volume Deactivation $» || return 3 return 0 > ################################################################################################ # Mount all associated snapshots of the volume to its origin mount points # All snapshots must be named on the template: -GMT-%Y.%m.%d-%H.%M.%S # Arguments: # $ <1>— Short path to Origin Volume (in VG/LV format) # $ <2>— Optional archive volume group, that used to mount all archive snapshots # Returns: # Return 0 if no errors ################################################################################################ mount_all_snapshot() < local SRC=$<1>local A_VG=$ <2>local ATTR_S local SNAP [ «$#» -lt 1 ] && echo ‘Error: expected / []’ && exit 1 IFS=$’/’ read -r -a ATTR_S / ‘ && return 1 IFS=$’/’ read -r -a ATTR_S / [
]’ && exit 1 local DATE=$(date -u +GMT-%Y.%m.%d-%H.%M.%S) [ «$#» -eq 2 ] && DATE=»$<2>» IFS=$’/’ read -r -a ATTR_S / ‘ && return 1 IFS=$’/’ read -r -a ATTR_S / ‘ && return 1 local VOL_SRC=$ <1>local MNT_TGT=$ <2>mkdir -p $ mount /dev/$ $ || echo «Error: Mounting $» || return 7 > ################################################################################################ # Post archive operation: unmount target volume, remove its mount point, create its snaphot # Arguments: # $ <1>— Short path to Origin Volume (in VG/LV format) # $ <2>— Mount point for $ <1># Returns: # Return 0 if no errors ################################################################################################ post_archive() < [ «$#» -ne 3 ] && echo ‘Error: expected / / ‘ && return 1 local VOL_SRC=$<1>local MNT_TGT=$ <2>local TGT=$ <3>umount /dev/$ && rm -rd $ && lvcreate -n $ -s /dev/$ && return 0 return 1 > ################################################################################################ # Create rsync archive # Arguments: # $ <1>— Short path to Origin Volume (in VG/LV format) # $ <2>— Name of archive Volume Group # $ <3>— Optional connection string in @ format # $ <4>— Optional path to this script on remote machine # $ <5>— Optional prefix name for volume name on remote machine (
— -GMT-%Y.%m.%d-%H.%M.%S) # $ <6>— Optional also make local archive # Returns: # Return 0 if no errors ################################################################################################ create_archive() < local SRC=$<1>local TGT=$ <2>local CONN=$ <3>local CALL=$ <4>local PREFIX=$ <5>local ATTR_S local ATTR_D local RESULTS local RET [ «$#» -lt 2 ] && echo ‘Error: expected / [
Источник
Бэкап windows из линукса
Имеется всего один «лишний» раздел (место под завязку). Хотелось бы бэкапить и раскатывать то Windows 7, то Rolling Linux при необходимости (основная система Xubuntu LTS) и просто выполнять update-grub. Прокатит ли просто скопировать файлы винды? Ведь потеряются права. dd не хочу использовать, боюсь запортить. Чем можно архивировать винду из линукса?

fsarchiver , он вроде был и на SystemRescueCd

Ещё ntfsclone есть.


Спасибо, попробую. По описанию то, что надо. Получается, ntfs-3g умеет читать расширенные атрибуты и права, просто в линуксе они не используются. Сделал архив, fsarchiver ругался, что атрибуты у файлов из winsxs имеют отрицательный размер. Сжался архив хорошо 2.3 вместо 5.8 Гб. Завтра разархивирую. Если будут сбои, восстановлю образ ntfsclone, который не умеет сжимать сам.
Интересно, если раздел потом увеличить, как ntfsclone отреагирует при —restore-image?
И fsarchiver, и ntfs используют в качестве назначения /dev/sda*. Если файловой системы там нет, они ее создадут/отформатируют? Главное не ошибиться номером.
Для бекаов нужен _другой_ физический накопитель данных!

Не нужен
Для резервных копий не обязателен, для архивных — совсем другое дело. И то, и другое называют «бекапом», что вызывает путаницу.

Clonezilla спасет отца русской демократии.
Зачем? Ему же не бэкап.
восстановлю образ ntfsclone, который не умеет сжимать сам.
Сжимать не умеет, но там есть опция снятия в специальном spare формате, в результате файл с образом файловой системы будет размером не с весь раздел диска, а размером с используемого пространства на файловой системе.
Дд через сжатие делай не парь моск.
Обе утилиты справились. fsarchiver правда жаловался, что не смог восстановить 3 файла из winsxs. fsarchiver работает на файловом уровне через ntfs-3g, после него меняется карта расположения файлов https://i.imgur.com/SG3vKK9.png и NTFS структура воссоздается ntfs-3g. Виндовый chkdsk сказал, что «сделал изменения в фс». Еще fsarchiver распаковывает файлы винды в линуксовую tmp папку на корневом разделе (странно, что количество занятого места при этом не уменьшается). ntfsclone просто раскатывает образ, что предпочтительнее. Структура та же, в chkdsk чистота. UUID, от которого зависит активация, тоже восстанавливается прежний в обоих случаях.
Если файловой системы там нет, fsarchiver и ntfsclone ее создадут/отформатируют?
1. Если раздел примонтирован, они откажутся работать (хинт, чтобы не ошибиться, перед запускам монтировать важные разделы). 2. fsarchiver вроде бы форматирует в ntfs, ntfsclone просто раскатывает образ на любую фс. По факту в обоих случаях получается ntfs и данные, если какие были там, не сохраняются при восстановлении образа.
Сжимать не умеет, но там есть опция снятия в специальном spare формате
Это понятно, что свободное место не пишется в файл, но еще и сами файлы хорошо жмутся. ntfsclone можно запускать совместно с внешним архиватором через —
https://linux.die.net/man/8/ntfsclone

Ноутбук или десктоп?
Если второе, я бы купил второй винт. Личного времени тупо жальче.
Десктоп, 1 Тб.
Да и винду я уже передумал держать. Поставлю Debian 10 и Fedora 30, наверное, вместо Xubuntu 16.04.
Это все относительно. У меня раньше был SSD на 60 Гб, я «метался» между полностью настроенной openSUSE KDE4 и Windows 7: загружался в Windows Live CD и в HDD Raw Copy Portable делал «снимок» всего диска, восстанавливал другой. Предварительно свободное место нулями забив и сжимал WinRAR’ом (7zip был очень медленным на таких гигантских файлах). Всё проще, чем с нуля ставить Linux или Windows и настраивать. Тем более подобные «прыжки» у меня были всего раз в месяц. Это ведь страшный сон с нуля настраивать, по сравнению с которым раскатка образа сущие пустяки. Ставил винду, ужасался сколько работы предстоит и восстанавливал Сусю. Поэтому я с трудом соскочил на винду. В Сусе было все удобно, но на винде банально больше софта было (это имело значение для меня раньше). В линуксе к тому же можно конфиги сохранять, это упрощает новую установку.
Многие задаются вопросом: какой минимальный размер диска, на который установится Windows 7. Официальные данные гласят: 16 Гб для x86, 20 Гб для x64. В интернетовских обсуждениях можно встретить сообщение, что инсталлеру нужно минимум 15 Гб.
Так вот сообщаю: для Win7 x86 нужно чуть менее 10 Гб. После установки занимает 5.5 Гб. 15 Гб это видимо для x64. Инсталлер красным пишет минимальные цифры, если не соответствует.
RAM нужно минимум 512. После установки можно уменьшить до 384 точно.
XP была гораздо легковеснее. После установки занимала 1.6 Гб.
Источник
From the world of “why would anyone ever bother to do this?” comes a new approach to backing up your favourite Windows 10 computer! OK so why am I even doing this? I guess the answer to that question is really “just to see if I could.” It’s not the best answer but not everything needs a practical reason right?
So how does one go about using the awesome rsync utility to perform a Windows backup? Well first off you’ll need to enable the Windows Subsystem for Linux on your Windows 10 computer. There’s some documentation here from Microsoft but essentially you just need to enable the Feature and then go into the Windows Store, search for your favourite supported distribution, and click the Get button. Once the installation has finished you should launch bash and create a user account. Depending on the distribution you chose rsync may not be installed already so you may need to add it as well.
The actual backup process is really easy from that point. When you launch bash it will automatically mount your Windows drives under /mnt/, so for example the C: drive gets mounted as /mnt/c. Therefore if you wanted to backup the whole C: drive to an external drive you plugged in that showed up as E: in Windows you could simply run something like:
rsync -rv /mnt/c /mnt/e
Now while this should more or less work it will result in a load of errors as rsync doesn’t know how to or isn’t allowed to access a bunch of the special directories and files in Windows.
Also note that I’m only using the -r option above instead of the more “traditional” -a option. This is because of an incompatibility between the linux and Windows file permissions, so it isn’t able to correctly preserve them anyway. There are other options you may want to pass rsync as well, for instance the –delete option which will remove previously copied files on the destination drive if they are subsequently deleted from the source drive to keep them in sync.
How about an example?
For the purposes of an example backup let’s say I just wanted to copy the files under the USER (substitute your username here!) directory, excluding some of the nonsense directories I didn’t need. And let’s assume I want the files to end up on that E: drive as before. Oh and let’s also assume I want to run this backup on a schedule. Here’s how I would set it up:
1) Create a script to store our rsync commands
Technically you don’t need to do this but I find it easier to maintain this way. I created a file in C:UsersUSERrsyncbackup called rsyncbackup.sh. The reason I placed it under my Windows user directory, and not within the linux user directory, was simply one of preference but this way the script itself will also be part of the backup. Finally I placed the following in it:
#!/bin/bash
rsync -rv --delete --exclude-from '/mnt/c/Users/USER/rsyncbackup/rsyncbackup.exclude' --progress /mnt/c/Users/USER /mnt/e
Be careful when saving files in Windows that you use the UNIX line endings and not the Windows line endings option, otherwise rsync may have issues with it. As you can see from above this rsync command is referencing a file call rsyncbackup.exclude. This is the file where I will place directories, files and wildcards for things I don’t want rsync to bother with. Here is what that file could look like:
*.lnk
*.url
AppData
Application Data
Cookies
desktop.ini
Documents/My Music
Documents/My Pictures
Documents/My Videos
IntelGraphicsProfiles
Local Settings
MicrosoftEdgeBackups
My Documents
NetHood
NTUSER.DAT*
ntuser*
PrintHood
Recent
Searches
SendTo
Start Menu
Templates
2) Try it out!
Now we can try to see if this will work. Open up a Windows command prompt (e.g. cmd.exe) and run the following:
bash -c '/mnt/c/Users/USER/rsyncbackup/rsyncbackup.sh'
If it all looks good then we can move onto the next step of scheduling it.
3) Schedule the backup
This is where you might be thinking
Well if we’re already using the Windows Subsystem for Linux why don’t we just schedule it with cron?
The answer is that from my testing it doesn’t appear as though Windows starts the Subsystem automatically after a restart. So if that never gets started, cron never runs and your backup never happens. Instead what we’ll do is simply use good old Windows Task Scheduler to get the job done.
Create a new task, schedule it accordingly and place the command you used in cmd.exe above as the Action. Feel free to run the task to test and confirm the results!
4) Other cool tricks
What’s neat about doing a backup this way is that you get additional access to all of the cool Linux commands and functionality as well. For example what if you wanted to do the same backup above, but weren’t sure what drive letter your external drive would show up under? Well an easy solution would be to place a uniquely named text file on your backup drive, something like “THIS_IS_THE_BACKUP_DRIVE.txt“, and use bash to find it for you!
#!/bin/bash
BACKUPDIR="${find /mnt -type d -name "c" -prune -o -type f -name "THIS_IS_THE_BACKUP_DRIVE.txt" -print 2>/dev/null}"
BACKUPDIR="${BACKUPDIR/THIS_IS_THE_BACKUP_DRIVE.txt/BACKUP}"
rsync -rv --delete --exclude-from '/mnt/c/Users/USER/rsyncbackup/rsyncbackup.exclude' --progress /mnt/c/Users/USER $BACKUPDIR
How does this work?
BACKUPDIR="${find /mnt -type d -name "c" -prune -o -type f -name "THIS_IS_THE_BACKUP_DRIVE.txt" -print 2>/dev/null}"
This first looks in all of the mounted Windows drives (everything under /mnt), excluding directories that have a “c” in the name (e.g. the C: drive) for a file called “THIS_IS_THE_BACKUP_DRIVE.txt” and stores the path to that file in the variable BACKUPDIR. I added 2>/dev/null in order to omit any errors, such as “Permission denied” that rsync may echo out. So for example if the backup drive was mounted under E: then my variable BACKUPDIR would contain the text “/mnt/e/THIS_IS_THE_BACKUP_DRIVE.txt”
BACKUPDIR="${BACKUPDIR/THIS_IS_THE_BACKUP_DRIVE.txt/BACKUP}"
Next it replaces the text “THIS_IS_THE_BACKUP_DRIVE.txt” in the variable with the text “BACKUP” because I want my backup files to end up in a folder on the drive called BACKUP (e.g. E:BACKUP).
Finally it runs the normal rsync command put sets the destination directory to the contents of our variable above.
rsync -rv --delete --exclude-from '/mnt/c/Users/USER/rsyncbackup/rsyncbackup.exclude' --progress /mnt/c/Users/USER $BACKUPDIR
Neat right? OK but what if I want to back up my computer over the internet using ssh? Well we can certainly do that too! To make this easier I’m going to pre-setup some ssh keys so we don’t need to worry about providing a password. This will make scheduling the backup easier.
First off in bash on Windows you’ll want to generate some ssh keys:
ssh-keygen
Make sure to just hit enter when prompted for the password so that the keys aren’t password protected. Next you’ll want to copy those keys to your remote machine. I find the ssh-copy-id command especially easy for this:
ssh-copy-id -i ~/.ssh/id_rsa.pub x.x.x.x
Where x.x.x.x is the IP address of your remote machine. If that was successful you should be able to ssh to the remote machine without providing a password:
ssh x.x.x.x
Note that it’s perfectly fine for your linux username to not match your Windows username, you just need to be sure to explicitly provide the correct username as part of the rsync command below. If you were able to ssh then we just need to setup our backup script to use the remote machine as the destination:
#!/bin/bash
rsync -rv --delete --exclude-from '/mnt/c/Users/USER/rsyncbackup/rsyncbackup.exclude' -e "ssh -o StrictHostKeyChecking=no -o UserKnownHostsFile=/dev/null" --progress /mnt/c/Users/USER USER@x.x.x.x:/home/USER/BACKUP
Running the script now will automatically connect to the remote machine at x.x.x.x using the linux user USER and run the backup, placing the files under the USER home directory in a folder called BACKUP. If your remote machine listens for ssh connections on a different port you can specify that too using the -p option right after the ssh portion, so something like:
rsync -rv --delete --exclude-from '/mnt/c/Users/USER/rsyncbackup/rsyncbackup.exclude' -e "ssh -p 1234 -o StrictHostKeyChecking=no -o UserKnownHostsFile=/dev/null" --progress /mnt/c/Users/USER USER@x.x.x.x:/home/USER/BACKUP
Anyway I hope you found this information interesting if not helpful. Maybe you too could setup your very own convoluted backup system!
This post, re-published here with permission, was originally published on my personal site here.
I recently needed to setup a way to backup files from a linux workstation to a windows server. I found that the utility, from the Samba project, smbclient was able to be scripted to provide such services. Smbclient acts much like a command line ftp program.
NOTE: If you will be using a Windows 2003 server, please upgrade your Samba package to 3.0.x. Windows 2003 uses SMB keys to authenticate SMB requests. Prior versions of smbclient will give an error such as:
tree connect failed: NT_STATUS_ACCESS_DENIED
A work around for this error can be to disable the security feature on the Windows 2003 server:
Key: HKLMSYSTEMCCSServicelanmanserverparameters
Value: RequireSecuritySignature
Content: 0 to disable, 1 to enable
Create Password File
- Use your favorite text editor to create a file called “.smbclient”. (I use the “.” (period) before the file to somewhat hide the file.)
* In the file add the following components, in this format:- username=joetest
- password=12345678
- domain=WINDMN
- Obviously you need to change the components to fit your environment. If you do not have a Windows Domain to authenticate against, you can remove the line completely.
- At the command prompt, make sure to make the .smbclient file readable ONLY by you!
chmod 500 .smbclient
Test Command
- Now we can test the connection to the server using the “.smbclient” file.
- At the prompt type:
smbclient //servername/share -A .smbclient
- You should get a response similar to:
added interface ip=10.1.2.10 bcast=10.1.2.255 nmask=255.255.255.0

Domain=[WINDMN] OS=[Windows 5.0] Server=[Windows 2000 LAN Manager]

smb: >
- If you experience errors, please check the “note” at the beginning of the article.
Create Script
- Now you want to use your favorite editor to create a shell script for automating this backup.
- You can pass to a command prompt anything you normally would type at the smbclient prompt.
- I personally want…
- To change directories on the remote server (cd backup)
- Set the local directory to be working from on the workstation (lcd /home/username/files)
- Not prompt for permission for each file when putting multiple files (prompt)
- Recursively copy folders (recurse)
- And finally exit
- The command would look something like:
smbclient //servername/share -A .smbclient -c "cd backup; lcd /home/username/files; prompt; recurse; mput *; exit;"
- If you aren’t sure what options you want, or are available, you can simply type “help” at the command prompt for smbclient… then type “help ” to learn more about what it does
- At this point the shell script would look something like:
#!/bin/sh

/usr/local/bin/smbclient //servername/share -A /home/username/.smbclient -c "cd backup; lcd /home/username/files; prompt; recurse; mput *; exit;"
- You will notice I have explicitly defined the path to the “smbclient” binary, and the “.smbclient” password file.
- At prompt you should be able to run something like:
sh backupscript.sh
Add Script to be run by Cron
- To better understand how to add files to a crontab ( to be run on a scheduled basis), I recommend using your favorite search engine to find tutorials.
Rsync is one of the most commonly used backup/synchronization software for Linux users. Here, you can know what it is and how to use it on Windows 10. Besides, there is a piece of Rsync alternative software – Minitool software for you.
What Is Rsync
Rsync stands for remote synchronization. It is a Linux/Unix-based utility for local and remote data backup and synchronization. Using the Rsync command, you can synchronize files and directories across directories, disks, or networked computers.
Also see: How to Install Linux (Ubuntu) on Windows 10 [Ultimate Guide 2021]
Advantages of Rsync
- It can efficiently copy files to or synchronize files from remote systems.
- It supports copying links, devices, owners, groups, and permissions.
- It uses compression and decompression methods to send and receive data at both ends at the same time, so the occupied bandwidth utilization is low.
- It is faster than SCP (secure copy) because Rsync uses the remote update protocol, which only allows the difference between the two sets of files to be transferred.
How to Use Rsync
This part is about how to use Rsync for Windows. The details are as follows.
Step 1: Install Windows Subsystem for Linux (WSL)
There are many ways to run Linux commands in Windows 10. One is Linux and Windows dual boot, which allows you to choose which system to start at boot, but it may be troublesome, especially when you don’t try to use Linux often.
Therefore, it is more recommended to install Windows Subsystem for Linux (WSL) on your computer. It is used as a Windows utility that enables you to run Linux distributions in command line mode. This is a relatively simple way to use Rsync in Windows 10, and it is also applicable to other Linux utilities.
You can refer to this post — Guide to Install Windows Subsystem for Linux (WSL) in Win 10 to get the detailed steps of installing WSL.
Step 2: Install Rsync
You can use the following command in your Linux distribution to install the Rsync package. Different distributions have the corresponding command. You need to choose it based on your Linux distribution.
On Debian/Ubuntu & Mint — $ sudo apt-get install rsync
On Arch Linux — $ pacman -S rsync
On Gentoo — $ emerge sys-apps/rsync
On Fedora/CentOS/RHEL and Rocky Linux/AlmaLinux — $ sudo dnf install rsync
On openSUSE — $ sudo zypper install rsync
Step 3: Start to Use Rsync
Some common options are used with the Rsync command.
- -v: verbose mode
- -z: Compress file data.
- -r: Recursively copy data (but does not retain time stamps and permissions when transferring data.
- -a: Archive mode, allowing recursive copying of files, it also preserves symbolic links, file permissions, user and group ownership, and timestamps.
- -h: Human-readable, output numbers in a human-readable format.
Here we take backing up to an external drive using Rsync as an example. First, you need to connect the drive to your PC. You should be able to see the drive in Windows Explorer. In the Linux terminal, the mounted drive is located in /mnt.
Step 1: Input ls /mnt to list your drives. The letter Windows assigned to your drive partitions will be listed.
Step 2: Maybe you will not find your external drive partition here since it is mounted by Windows, not by a Linux machine. Thus, you need to input the following commands. (J can be replaced with any other partition number)
sudo mkdir /mnt/j
sudo mount -t drvfs J: /mnt/j
Step 3: Input the following command to see the contents of the partition.
ls /mnt/j
Step 4: Suppose you want to back up C:data to J:. You need to input the following command.
sudo rsync -avn /mnt/c/data/ /mnt/j/
If you want to back up data to the remote server (such as NAS drive) using Rsync. The instructions are as follows.
Here in this example, a directory /abc/djskah which is on a remote server is being copied in your local computer in /efg/klagd. You should type the following command.
rsync -avzh [email protected]/abc/djskah /efg/klagd
Tip: In the command, daisy can be replaced with your remote servers’ name and 192.168.1.213 can be replaced with your remote servers’ address.
Rsync Alternative for Windows 10
From the content above, you can find that as a command in Linux, Rsync can be used in Windows 10, but the process is complicated and time-consuming. Thus, to back up and synchronize files locally and remotely more conveniently, there is a Rsync alternative – MiniTool ShadowMaker for you.
MiniTool ShadowMaker is a professional file backup and sync software. It allows you to sync your files between two computers and it also allows you to back up and restore files & folders and the system you need.
Thus it can help you protect your important data and perform data recovery. Other functions are also available, such as cloning disk and creating bootable media to boot the computer.
This free backup software offers a Trial Edition that allows a 30-day free trial for all backup features.
Now, we will show you how to back up data step by step with pictures.
Step 1: Download and install MiniTool ShadowMaker and launch it, click Keep Trial to continue.
Free Download
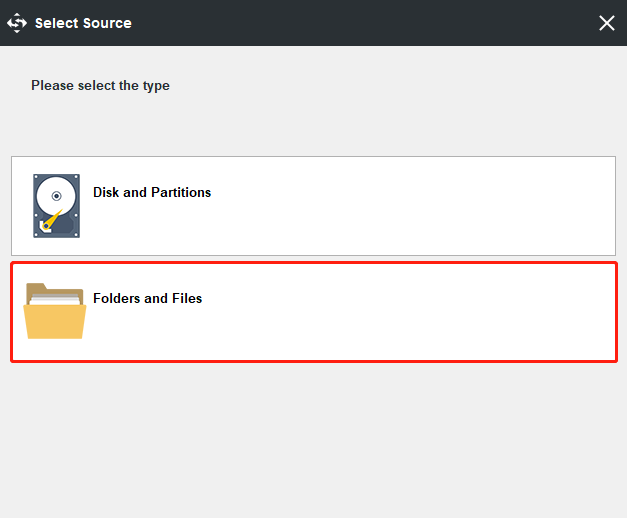
Step 2: After entering its main interface, go to the Backup page. Then click the Source module to choose the backup source. As for data backup, please choose Folders and Files to continue and choose the files you want to back up.
Step 3: Returning to the Backup page, click the Destination module to select the destination path to save the backup image. It is recommended to choose an external hard drive. Here, you can also choose NAS drive as your destination.

Tip: After you select Shared, you can directly sync files to the computer you select on the same LAN.
To get an extraordinary file backup experience, there are three important things you can do.
- MiniTool ShadowMaker is a user-friendly program that enables you to set an automatic file backup by clicking the Schedule button.
- MiniTool ShadowMaker also provides three different backup schemes so that it enables you to manage disk space by deleting some old backup images. The Incremental backup scheme is chosen by default and you can click the Scheme feature to change.
- You can set some advanced backup parameters such as changing image creation mode, compressing files size, and so on by clicking the Options button.
Step 4: After having successfully selected the backup source and destination, you can click Back up Now to perform the data backup action immediately. Or you can choose to click Back up Later to delay the process of files backup.
When the process is finished, you have successfully backed up files and have protected the data. From the above information, you can see MiniTool ShadowMaker is a great Rsync alternative, which is very easy and convenient to back up files.
You can also use the Sync feature of MiniTool ShadoaMaker to back up your data. Detailed operating steps are listed as follows:
Step 1: Enter Main Interface
Step 2: Specify Folders and Path to Sync
- Go to the Sync page and click it in the toolbar.
- Specify the source and destination for files sync.
What to Sync
- Go to the Source section.
- Under the Sourcetab, three paths are available: Administrator, Libraries, and Computer. You can choose a source to select files. Then click OKto continue.
Where to save synchronized folders
Under the Destination tab, there are four paths available: Administrator, Libraries, Computer, and Shared. To sync files to NAS, choose Shared, type Path, User name and Password in sequence, and click OK to finish.
Step 3: Start to Sync Files
- Please go to Sync.
- You can click Sync Now to perform file sync or click Sync Later to postpone it. Besides, you can continue this sync task on the Manage page.

If you want to sync files automatically, you can also click the Schedule button. Here are also four schedule settings available: Daily, Weekly, Monthly, and On Event. You can choose one to set up a time point and click the OK button to confirm the setting for automatic file sync.
If you want to set some advanced sync parameters, you can click the Options button. Here, you can compare and filter the files that you want to sync.
You can also try Windows snap-in tool — Backup and Restore (Windows 7) to back up data. Here is how to use it step by step. It is also a Rsync alernative.
Step 1: Type Control Panel in the search box of Windows 10 and choose it to continue.
Step 2: In the popup window, choose the Backup and Restore (Windows 7) link to continue.
Step 3: Next, click Set up backup under Back up or restore your files section to go on.
Step 4: Now, you are required to decide where you want to save the backup images and click Next to continue.
Step 5: In the next window, you will see two options. If you want to choose the backup source by yourself, you need to select the Let me choose option and click Next to continue.

Step 6: Select the files you want to back up and click Next to continue.
Step 7: Then you need to review your backup settings. And if you want to set an automatic backup or change the backup schedule, you can click Change schedule to continue. Next, click Save settings and run backup to perform the data backup action.
Step 8: Then the file backup process will begin. After that, you have successfully backed up your files.
Bottom Line
Here is the information about Rsync Windows 10. You can know what it is and how to use it. However, it’s complicated and time-consuming. Thus, you can try the Backup feature and Sync feature of MiniTool ShadowMaker as the Rsync alternative for Windows 10.
If you have any questions about Rsync Windows 10, you can share them in the comment zone. Besides, if you have any problem with the MiniTool software, please don’t hesitate to contact us via the email [email protected].
I am running a putty client on a Windows machine to connect successfully to a Linux box. Now I want to be able to copy a file from the Linux machine under the path /home/ubuntu/myfile to C:/Users/Anshul/Desktop on my local computer. The user at the Windows machine is anshul. I am giving the following command on putty but it is not working:
scp /home/ubuntu/myfile ip_address_of_windows_machine:C:/Users/Anshul/Desktop
I think the path for the Windows machine is wrong. Please help as I have banged my head on a large number of forums but none seem to give correct path for Windows server. Don’t suggest alternate options like WinScp
![]()
Guy Avraham
3,3623 gold badges40 silver badges49 bronze badges
asked Apr 19, 2012 at 19:56
![]()
5
This one worked for me.
scp /home/ubuntu/myfile username@IP_of_windows_machine:/C:/Users/Anshul/Desktop
answered Mar 12, 2018 at 6:04
![]()
emoblazzemoblazz
1,3111 gold badge6 silver badges3 bronze badges
6
Download pscp from Putty download page, then use it from Windows Command Line CMD as follows:
pscp username_linux_machine@ip_of_linux_machine:/home/ubuntu/myfile.ext C:UsersNameDownloads
Copying starts once you enter the password for the Linux machine.
![]()
ifnotak
3,8673 gold badges21 silver badges35 bronze badges
answered Jun 8, 2016 at 20:49
![]()
Hesham EraqiHesham Eraqi
2,4254 gold badges22 silver badges45 bronze badges
3
Try this, it really works.
$ scp username@from_host_ip:/home/ubuntu/myfile /cygdrive/c/Users/Anshul/Desktop
And for copying all files
$ scp -r username@from_host_ip:/home/ubuntu/ *. * /cygdrive/c/Users/Anshul/Desktop
![]()
fluffyBatman
6,3443 gold badges22 silver badges24 bronze badges
answered Jun 10, 2014 at 11:57
![]()
8
Access from Windows by Git Bash console (also works for CMD and PowerShell):
scp user@ip:/dir1/dir2/file "D:dir1dir2"
![]()
Wenfang Du
7,3707 gold badges49 silver badges79 bronze badges
answered Jan 4, 2019 at 13:18
![]()
byteprombyteprom
4514 silver badges4 bronze badges
5
You could use something like the following
scp -r linux_username@linux_address:path/to/file path/to/local/directory
This will copy file to the specified local directory on the system you are currently working on.
The -r flag tells scp to recursively copy if the remote file is a directory.
answered Feb 16, 2015 at 23:58
![]()
AtifAtif
3251 gold badge4 silver badges16 bronze badges
Windows doesn’t support SSH/SCP/SFTP natively. Are you running an SSH server application on that Windows server? If so, one of the configuration options is probably where the root is, and you would specify paths relative to that root. In any case, check the documentation for the SSH server application you are running in Windows.
Alternatively, use smbclient to push the file to a Windows share.
![]()
George
6,5193 gold badges42 silver badges56 bronze badges
answered Apr 19, 2012 at 19:59
![]()
theglaubertheglauber
27.9k7 gold badges29 silver badges46 bronze badges
5
For all, who has installed GiT completly with «Git Bash»: You can just write:
scp login@ip_addres:/location/to/folders/file.tar .
(with space and DOT at the end to copy to current location). Than just add certificate (y), write password and that’s all.
answered Oct 3, 2017 at 12:31
![]()
1
Your code isn’t working because c:/ or d:/ is totally wrong for linux just use /mnt/c or/mnt/c
From your local windows10-ubuntu bash use this command:
for download:
(from your remote server folder to d:/ubuntu) :
scp username@ipaddress:/folder/file.txt /mnt/d/ubuntu
Then type your remote server password if there is need.
for upload:
(from d:/ubuntu to remote server ) :
scp /mnt/d/ubuntu/file.txt username@ipaddress:/folder/file.txt
Then type your remote server password if there is need.
note: I tested and it worked.
answered Feb 19, 2019 at 12:09
![]()
I had to use pscp like above Hesham’s post once I downloaded and installed putty. I did it to Windows from Linux on Windows so I entered the following:
c:ssl>pscp username@linuxserver:keenan/ssl/* .
This will copy everything in the keenan/ssl folder to the local folder (.) you performed this command from (c:ssl). The keenan/ssl will specify the home folder of the username user, for example the full path would be /home/username/keenan/ssl. You can specify a different folder using a forward slash (/), such as
c:ssl>pscp username@linuxserver:/home/username/keenan/ssl/* .
So you can specify any folder at the root of Linux using :/.
![]()
halfer
19.7k17 gold badges95 silver badges183 bronze badges
answered Dec 14, 2018 at 12:47
![]()
To send a file from windows to linux system
scp path-to-file user@ipaddress:/path-to-destination
Example:
scp C:/Users/adarsh/Desktop/Document.txt root@127.0.0.1:/tmp
keep in mind that there need to use forward slash(/) inplace of backward slash() in for the file in windows path else it will show an error
C:UsersadarshDesktopDocument.txt: No such file or directory
.
After executing scp command you will ask for password of root user in linux machine.
There you GO…
To send a file from linux to windows system
scp -r user@ipaddress:/path-to-file path-to-destination
Example:
scp -r root@127.0.0.1:/tmp/Document.txt C:/Users/adarsh/Desktop/
and provide your linux password.
only one you have to add in this command is -r.
Thanks.
answered Mar 15, 2019 at 6:00
![]()
ADARSH KADARSH K
5967 silver badges20 bronze badges
Here is the solution to copy files from Linux to Windows using SCP without password by ssh:
-
Install sshpass in Linux machine to skip password prompt
-
Script
sshpass -p 'xxxxxxx' scp /home/user1/*.* testuser@x.x.x.x:/d/test/
Details:
sshpass -p 'password' scp /source_path/*.* windowsusername@windowsMachine_ip:/destination_drive/subfolder/
![]()
serenesat
4,59110 gold badges35 silver badges53 bronze badges
answered Aug 28, 2015 at 12:47
![]()
As @Hesham Eraqi suggested, it worked for me in this way (transfering from Ubuntu to Windows (I tried to add a comment in that answer but because of reputation, I couldn’t)):
pscp -v -r -P 53670 user@xxx.xxx.xxx.xxx:/data/genetic_map/sample/P2_283/* \Desktop-mojbd3ndcc_01-1940_data
where:
-v: show verbose messages.
-r: copy directories recursively.
-P: connect to specified port.
53670: the port number to connect the Ubuntu server.
\Desktop-mojbd3ndgenetic_map_data: I needed to transfer to an external HDD, thus I had to give permissions of sharing to this device.
answered Jun 27, 2019 at 3:37
![]()
giannkasgiannkas
1683 silver badges14 bronze badges
Open bash window. Preferably git bash.
write
scp username@remote_ip:/directory_of_file/filename ‘windows_location_you_want_to_store_the_file’
Example:
Suppose your username is jewel
your IP is 176.35.96.32
your remote file location is /usr/local/forme
your filename is logs.zip
and you want to store in your windows PC’s D drive forme folder
then the command will be
scp jewel@176.35.96.32:/usr/local/forme/logs.zip ‘D:/forme’
**Keep the local file directory inside single quote.
answered Apr 7, 2019 at 6:02
![]()
ZenithZenith
9371 gold badge8 silver badges21 bronze badges
I know this is old but I was struggling with the same. I haven’t found a way to change directories, but if you just want to work with the C drive, scp defaults to C. To scp from Ubuntu to Windows, I ended up having to use (notice the double back-slashes):
scp /local/file/path user@111.11.11.111:Users\Anshul\Desktop
Hope this helps someone.
![]()
Racil Hilan
24.2k12 gold badges49 silver badges52 bronze badges
answered Jul 29, 2016 at 0:35
![]()
AcmagAcmag
12 bronze badges
2
Try this:
scp /home/ubuntu/myfile C:usersAnshulDesktop
![]()
Pang
9,344146 gold badges85 silver badges121 bronze badges
answered Jan 12, 2013 at 2:50
![]()
Corey BurnettCorey Burnett
7,2629 gold badges54 silver badges92 bronze badges
1
If you want to copy paste files from Unix to Windows and Windows to Unix just use filezilla with port 22.
answered Sep 4, 2012 at 7:38
![]()