BAD_OBJECT_HEADER – является ошибкой, относящейся к типу “синий экран смерти”. Она прерывает всю работу компьютера и принудительно перезагружает систему. Такая ситуация может не только раздражать, но и привести к потере данных и прогресса работы. Однако сообщение говорит о том, что с программным обеспечением Windows не всё в порядке.
Причин появления ошибки может быть несколько – от проблем с памятью до неисправных драйверов. Во многих случаях нарушение заключается именно в устаревшем программном обеспечении или несовместимости с новым обновлением Windows. К сожалению, из-за широких возможностей настройки, которые предоставляет ОС, не существует универсального способа исправить BSOD BAD_OBJECT_HEADER. Поэтому ниже приведены несколько вариантов решения, один из которых должен устранить проблему.
Содержание
- Решение 1. Обновите Windows
- Решение 2. Отключите автоматический перезапуск Windows
- Решение 3. Обновите драйверы
- Решение 4. Проверьте память с помощью средства диагностики Windows
- Решение 5. Запустите средство проверки системных файлов
Решение 1. Обновите Windows
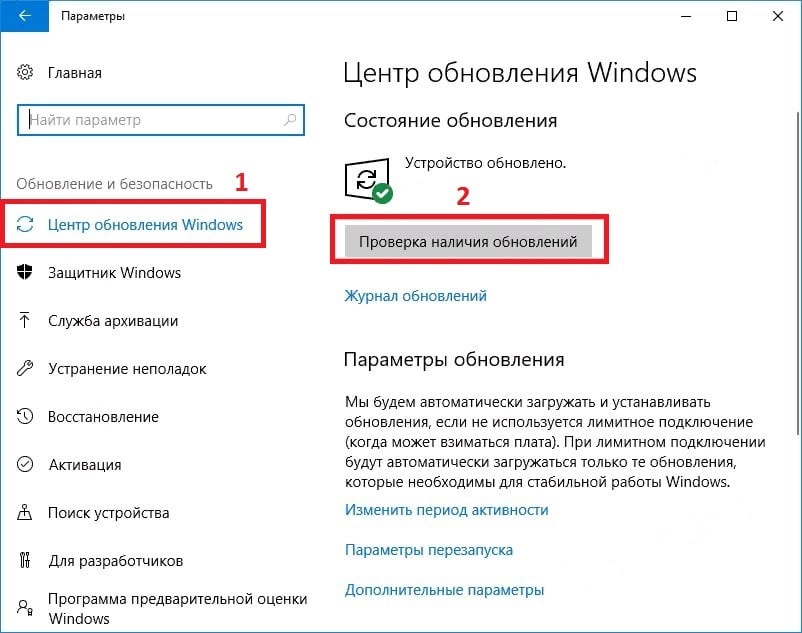
Всегда необходимо следить за актуальными обновлениями Windows, так как они исправляют ошибки и недоработки предыдущих версий. Как правило, они включены по умолчанию, и устанавливаются автоматически. Однако, если они отключены, следует сделать это вручную:
- Нажмите правой кнопкой мыши по значку Windows (левый, нижний угол).
- Выберите Параметры, и перейдите в раздел Центр Обновления Windows.
- Справа запустите Проверку наличия обновлений, и установите их, если таковые имеются.
- Затем перезагрузите систему.
Решение 2. Отключите автоматический перезапуск Windows
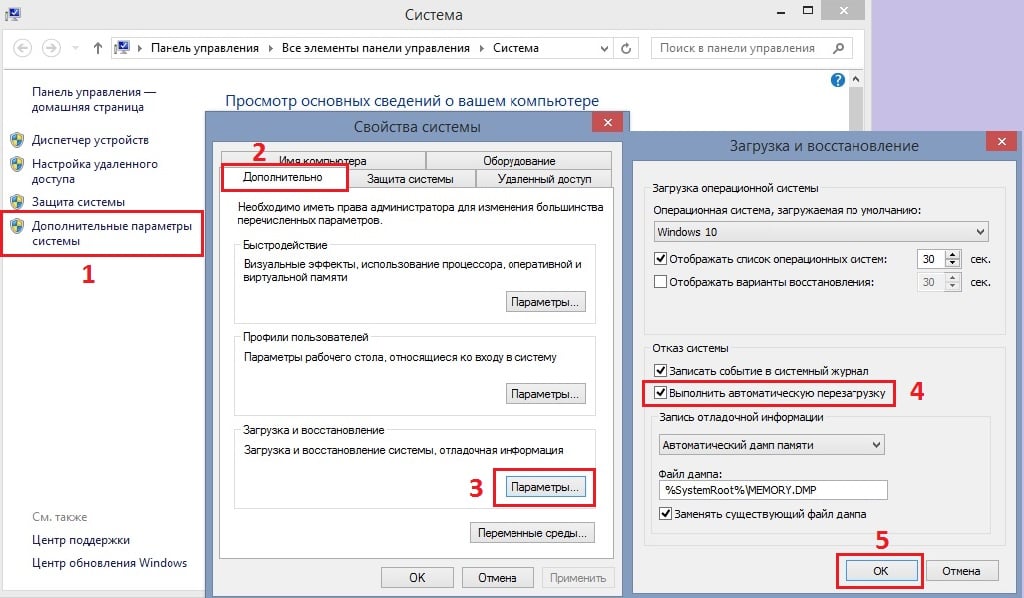
В некоторых случаях ошибку BAD OBJECT HEADER невозможно устранить из-за постоянного цикла перезапуска, сопровождающегося также сообщениями: BAD_POOL_HEADER и PAGE_FAULT_IN_NONPAGED_AREA. В этом случае стоит отключить автоматическую перезагрузку Windows.
- Нажмите ПКМ по значку Windows, и выберите Система.
- Далее пройдите в Дополнительные параметры системы.
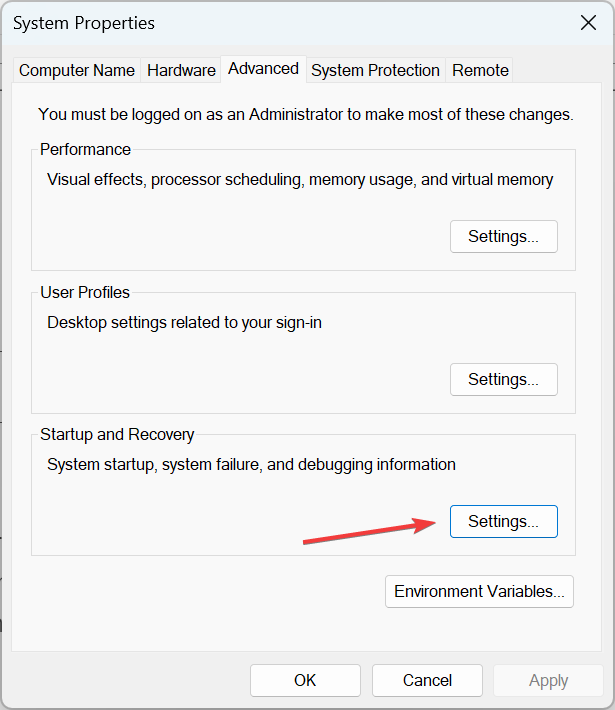
- Откройте вкладку Дополнительно, и нажмите Параметры в разделе Загрузка и восстановление.
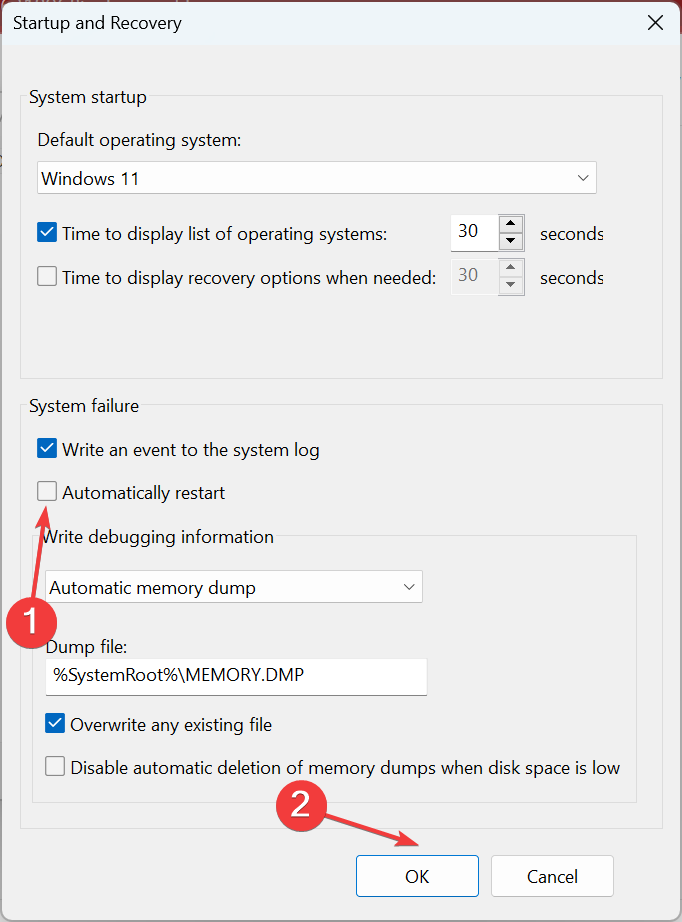
- В новом окне снимите галочку с настройки Выполнить автоматическую перезагрузку, и кликните Ок.
- Это предотвратит автоматический перезапуск системы.
Решение 3. Обновите драйверы
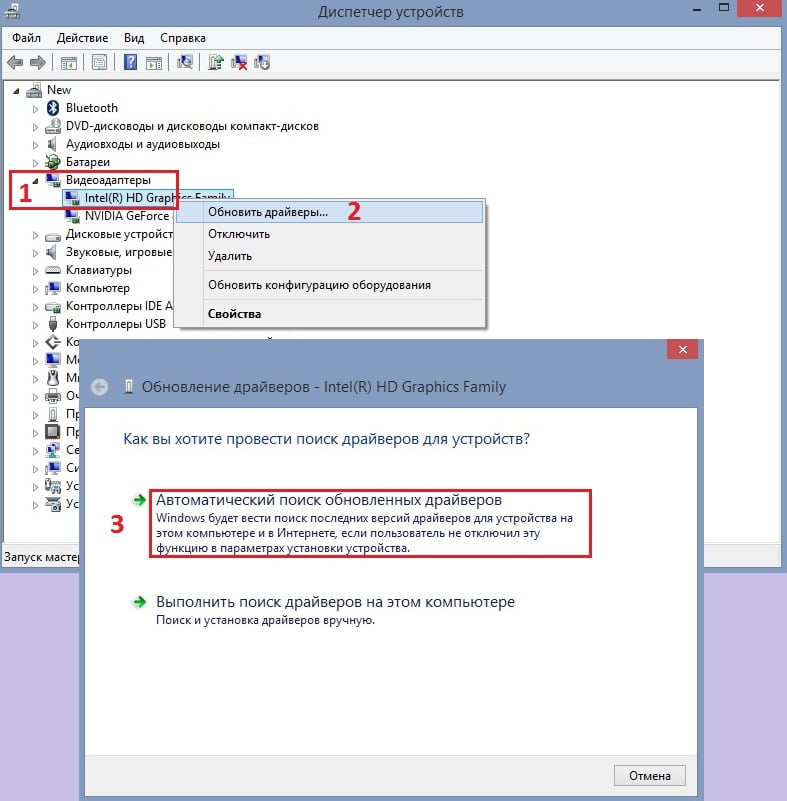
Хотя некоторые драйверы устанавливаются вместе с обновлениями Windows, этот метод применим во многих случаях.
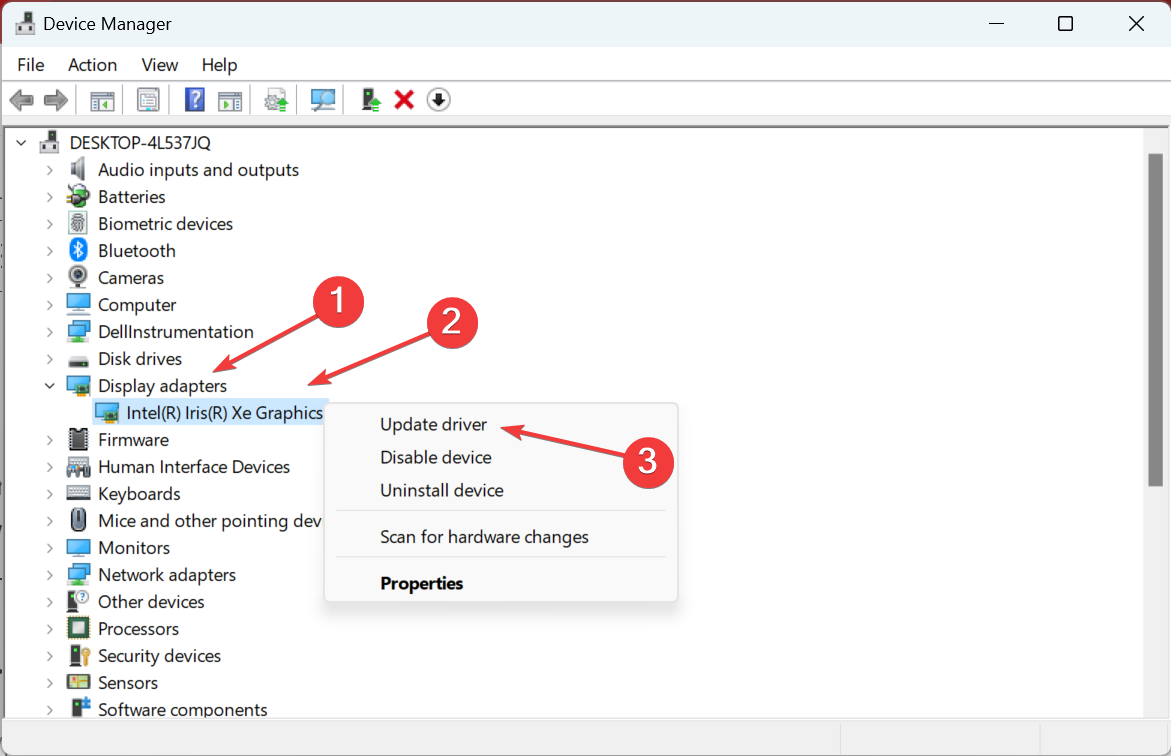
- Нажмите ПКМ по значку Windows, и перейдите в Диспетчер устройств.
- Разверните раздел Видеадаптеры и щёлкните ПКМ по драйверу Intel.
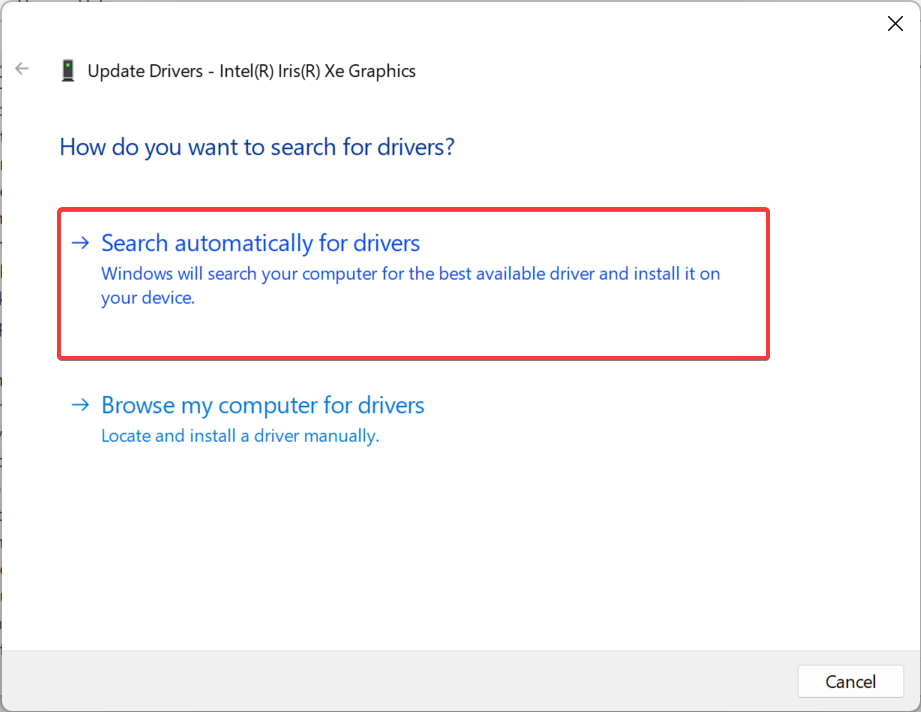
- Обновите программные обеспечения, выбрав в следующем окне Автоматический поиск обновлённых.
- Также следует загрузить новый драйвер Thunderbolt, если вы используете это оборудование.
- После этого перезагрузите компьютер.
Решение 4. Проверьте память с помощью средства диагностики Windows
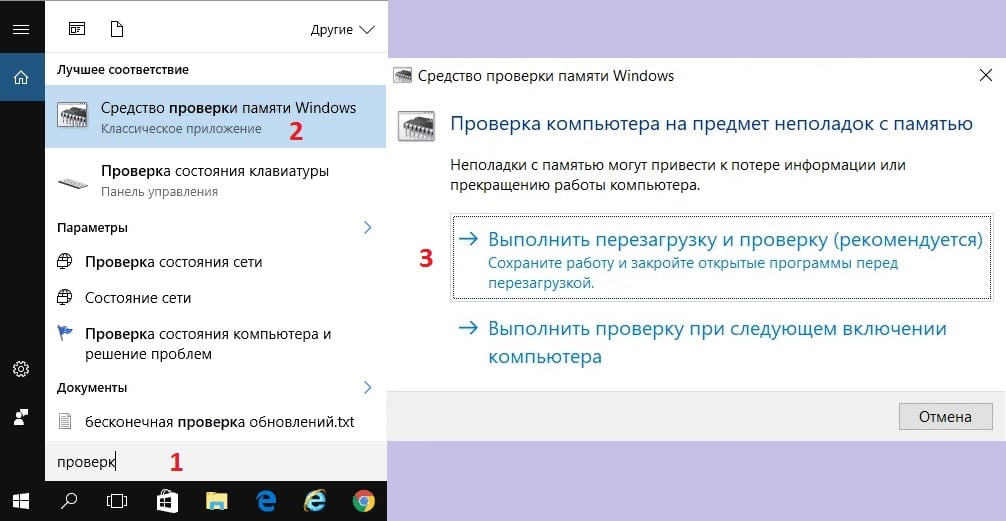
Повреждение памяти является одной из основных причин появления экрана BSOD. Поэтому следует запустить автоматическую проверку оперативы. Сделать это можно следующим образом:
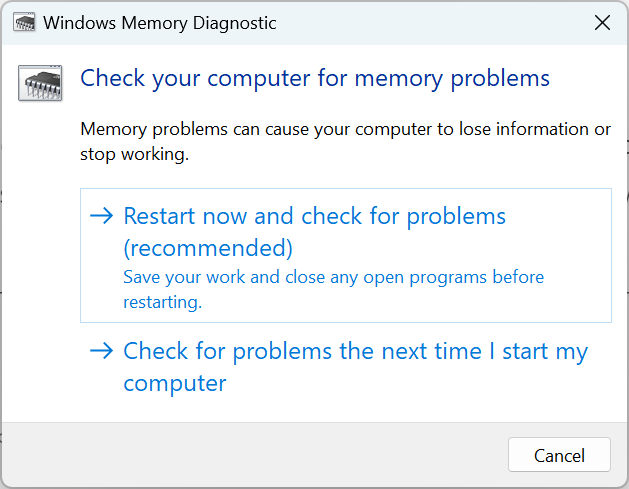
- Введите в поиск Windows Средство проверки памяти, и нажмите Enter.
- В появившихся результатах выберите аналогичную строку и запустите диагностику.
- Этот процесс автоматически перезагрузит компьютер и выполнит проверку памяти, поэтому перед этим следует сохранить все документы и приложения, открытые на рабочем столе.
Решение 5. Запустите средство проверки системных файлов
Проверьте системные файлы на предмет нарушений целостности следующим образом:
- Нажмите ПКМ по значку Windows, и выберите Командная строка (Администратор).
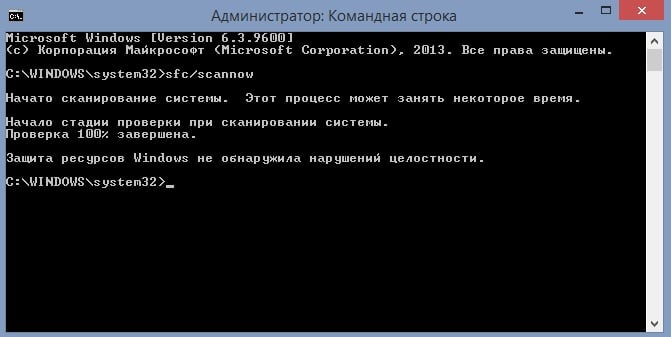
- В открывшемся окне введите команду sfc/scannow и нажмите Enter.
- Дождитесь окончания процесса, после чего система сообщит о результатах.
- Перезагрузите компьютер, чтобы исправления вступили в силу.
Вопрос
Проблема: как исправить BAD_OBJECT_HEADER в Windows 10?
Привет. В последнее время мой ноутбук несколько раз вылетал с ошибкой BAD_OBJECT_HEADER. Что это значит? Думаю, что-то не так, и я не знаю, как это исправить. Не могли бы вы мне с этим помочь?
Решенный ответ
BAD_OBJECT_HEADER — синий экран смерти[1] ошибка, которая прерывает всю работу компьютера в Windows и немедленно перезагружается. Без сомнения, ошибки BSOD могут не только раздражать, приводить к потере данных или хода работы, но также могут указывать на то, что что-то не так с программным обеспечением Windows или даже с оборудованием.
Windows 10 — сложная операционная система с тысячами различных параметров, процессов, служб и миллионами файлов, которые работают вместе. К сожалению, из-за широких возможностей настройки, которые предоставляет ОС, у некоторых людей что-то может пойти не так. Из-за этого не существует универсального способа исправить BSOD BAD_OBJECT_HEADER, который работал бы для всех, поэтому вам придется выполнить некоторые действия по устранению неполадок.
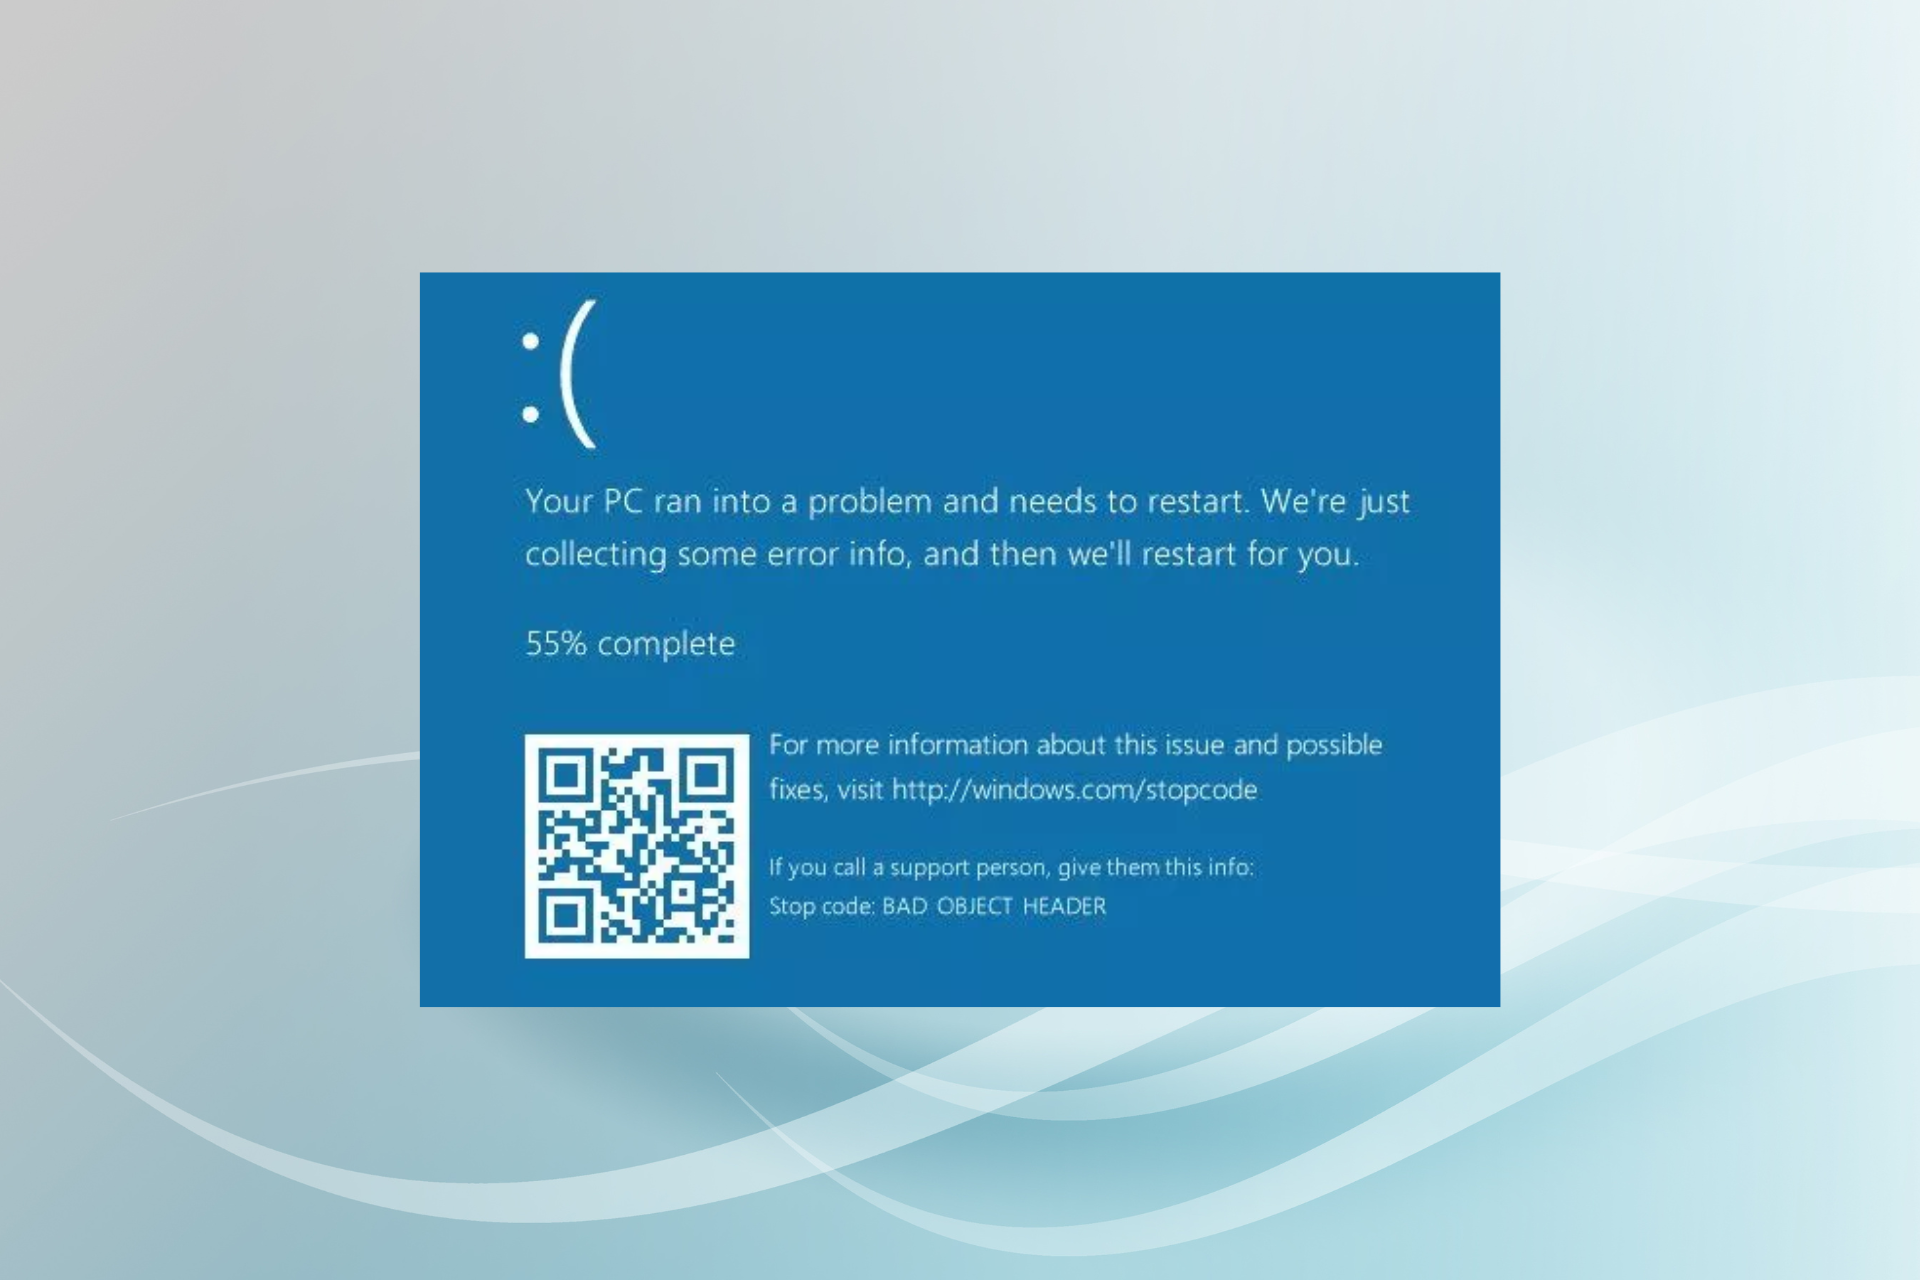
Пользователи, которые получают сообщение об ошибке, вынуждены перезагружать свои компьютеры (точнее, это происходит автоматически), и единственное сообщение, которое они могут увидеть, выглядит следующим образом:
На вашем ПК возникла проблема, и вам необходимо перезагрузить компьютер. Мы просто собираем дополнительную информацию, а затем перезапустим для вас.
1% завершено
Если вы звоните в службу поддержки, сообщите ему эту информацию:
Код остановки: BAD OBJECT HEADER
Очевидно, что хотя название кода ошибки полезно при попытке найти способ исправить это, оно не говорит напрямую о том, что вызывает проблему или что делать для ее решения. К счастью, вы попали в нужное место, и мы поможем вам с этой проблемой. Также стоит отметить, что пользователи, которые столкнулись с этой ошибкой позже, также столкнулись с BAD_POOL_HEADER и PAGE_FAULT_IN_NONPAGED_AREA.

Причин ошибки BSOD BAD OBJECT HEADER может быть много — от проблем с памятью до неисправных драйверов. Однако похоже, что причиной могут быть драйверы, поэтому их обновление или переустановка может решить проблему. Помимо этого, ниже мы также предлагаем другие способы решения этой проблемы раз и навсегда.
Если вам нужно автоматическое исправление BAD_OBJECT_HEADER, вы можете попробовать использовать ReimageСтиральная машина Mac X9 инструмент восстановления вместо этого — он специально разработан для исправления BSOD (поэтому вам не придется сталкиваться с аналогичными ошибками, такими как СПЕЦИАЛЬНЫЙ БАССЕЙН ОБНАРУЖИЛ ПОВРЕЖДЕНИЕ ПАМЯТИ или APC_INDEX_MISMATCH), отсутствующие библиотеки DLL,[2] ошибки реестра и многое другое — все автоматически, без необходимости переустанавливать Windows.
Решение 1. Обновите Windows
Исправить это сейчас!Исправить это сейчас!
Для восстановления поврежденной системы необходимо приобрести лицензионную версию Reimage Reimage.
Обновления Windows чрезвычайно важны и могут помочь в исправлении различных ошибок в системе, поэтому вы должны убедиться, что установлены все критические и дополнительные обновления.
- Введите Центр обновления Windows в поиске Windows и нажмите Входить
- В правой части окна нажмите Проверить обновления

- Подождите, пока все соответствующие обновления будут установлены автоматически
- Начать сначала твой компьютер.

Решение 2. Остановить Windows от автоматического перезапуска
Исправить это сейчас!Исправить это сейчас!
Для восстановления поврежденной системы необходимо приобрести лицензионную версию Reimage Reimage.
Некоторые пользователи утверждали, что они не смогли исправить BAD OBJECT HEADER из-за постоянного цикла перезапуска, в котором их Windows зависала на некоторое время. Если вы столкнулись с этой проблемой, вы можете предотвратить перезагрузку Windows каждый раз:
Решение 3. Обновите ваши драйверы
Исправить это сейчас!Исправить это сейчас!
Для восстановления поврежденной системы необходимо приобрести лицензионную версию Reimage Reimage.
Хотя некоторые драйверы устанавливаются вместе с обновлениями Windows, это применимо не ко всем. Многие люди сказали, что обновление их Intel и видеодрайверов помогло им решить проблему. Вот как это можно сделать через диспетчер устройств:
- Щелкните правой кнопкой мыши на Начинать и выбрать Диспетчер устройств
- Расширять Видеоадаптеры
- Щелкните правой кнопкой мыши свое устройство и выберитеt Обновить драйвер
- Выбирать Автоматический поиск драйверов и ждать
- Начать сначала ваш компьютер когда-то готов.

Примечание: также обновите драйверы Thunderbolt, если вы используете это оборудование.
Однако настоятельно рекомендуется загрузить последние версии драйверов с официального сайта производителя устройства, например Nvidia или AMD. В качестве альтернативы вы можете использовать автоматическое обновление драйверов, например DriverFix который автоматически загрузит и установит соответствующие драйверы для всех ваших устройств.
Решение 4. Проверьте свою память с помощью средства диагностики Windows Media
Исправить это сейчас!Исправить это сейчас!
Для восстановления поврежденной системы необходимо приобрести лицензионную версию Reimage Reimage.
Повреждение памяти является одним из основных виновников определенных ошибок BSOD. Это, вы должны запустить автоматическую проверку вашей оперативной памяти.[3] следующее:
- Введите объем памяти в поиске Windows и нажмите Входить
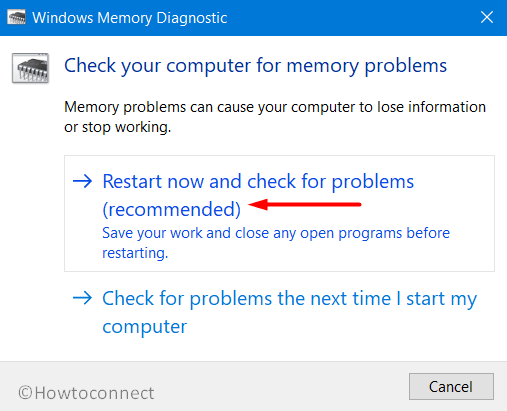
- Когда появится новое окно, выберите Перезагрузите сейчас и проверьте наличие проблем (рекомендуется)
- Это автоматически перезагрузит ваш компьютер и выполнит проверку памяти.

Решение 5. Запустить проверку системных файлов
Исправить это сейчас!Исправить это сейчас!
Для восстановления поврежденной системы необходимо приобрести лицензионную версию Reimage Reimage.
Проверьте системные файлы на предмет нарушений целостности следующим образом:
- Введите cmd в поиске Windows
- Щелкните правой кнопкой мыши на Командная строка и выберите запуск от имени администратора
- В новом окне введите sfc / scannow и ударил Входить
- Подождите, пока Windows завершит сканирование и сообщит о результатах.
- Начать сначала ваш компьютер.

Исправляйте ошибки автоматически
Команда ugetfix.com делает все возможное, чтобы помочь пользователям найти лучшие решения для устранения их ошибок. Если вы не хотите бороться с методами ручного ремонта, используйте автоматическое программное обеспечение. Все рекомендованные продукты были протестированы и одобрены нашими профессионалами. Инструменты, которые можно использовать для исправления ошибки, перечислены ниже:
Предложение
сделай это сейчас!
Скачать Fix
Счастье
Гарантия
сделай это сейчас!
Скачать Fix
Счастье
Гарантия
Совместим с Майкрософт ВиндоусСовместим с OS X По-прежнему возникают проблемы?
Если вам не удалось исправить ошибку с помощью Reimage, обратитесь за помощью в нашу службу поддержки. Сообщите нам все подробности, которые, по вашему мнению, нам следует знать о вашей проблеме.
Reimage — запатентованная специализированная программа восстановления Windows. Он диагностирует ваш поврежденный компьютер. Он просканирует все системные файлы, библиотеки DLL и ключи реестра, которые были повреждены угрозами безопасности.Reimage — запатентованная специализированная программа восстановления Mac OS X. Он диагностирует ваш поврежденный компьютер. Он просканирует все системные файлы и ключи реестра, которые были повреждены угрозами безопасности.
Этот запатентованный процесс восстановления использует базу данных из 25 миллионов компонентов, которые могут заменить любой поврежденный или отсутствующий файл на компьютере пользователя.
Для восстановления поврежденной системы необходимо приобрести лицензионную версию Reimage инструмент для удаления вредоносных программ.

Нажмите
Условия использования Reimage | Политика конфиденциальности Reimage | Политика возврата денег за товар | Нажмите
VPN имеет решающее значение, когда дело доходит до конфиденциальность пользователя. Онлайн-трекеры, такие как файлы cookie, могут использоваться не только платформами социальных сетей и другими веб-сайтами, но также вашим интернет-провайдером и правительством. Даже если вы примените самые безопасные настройки через веб-браузер, вас все равно можно будет отслеживать через приложения, подключенные к Интернету. Кроме того, браузеры, ориентированные на конфиденциальность, такие как Tor, не являются оптимальным выбором из-за пониженной скорости соединения. Лучшее решение для вашей максимальной конфиденциальности — это Частный доступ в Интернет — быть анонимным и безопасным в сети.
Программное обеспечение для восстановления данных — один из вариантов, который может вам помочь восстановить ваши файлы. После удаления файла он не исчезает в воздухе — он остается в вашей системе до тех пор, пока поверх него не записываются новые данные. Восстановление данных Pro это программа для восстановления, которая ищет рабочие копии удаленных файлов на вашем жестком диске. Используя этот инструмент, вы можете предотвратить потерю ценных документов, школьных заданий, личных фотографий и других важных файлов.
Effortlessly fix the error with our solutions in no time!
by Vlad Turiceanu
Passionate about technology, Windows, and everything that has a power button, he spent most of his time developing new skills and learning more about the tech world. Coming… read more
Published on December 6, 2022
Reviewed by
Alex Serban

After moving away from the corporate work-style, Alex has found rewards in a lifestyle of constant analysis, team coordination and pestering his colleagues. Holding an MCSA Windows Server… read more
- The Bad Object Header is a BSOD error that can arise due to hardware and software issues.
- In most cases, outdated drivers or issues with the RAM and CPU triggered the error.
- To fix things, you can scan the PC for malware, check for hardware conflicts, and update the driver, amongst other solutions.
XINSTALL BY CLICKING THE DOWNLOAD FILE
This software will repair common computer errors, protect you from file loss, malware, hardware failure and optimize your PC for maximum performance. Fix PC issues and remove viruses now in 3 easy steps:
- Download Restoro PC Repair Tool that comes with Patented Technologies (patent available here).
- Click Start Scan to find Windows issues that could be causing PC problems.
- Click Repair All to fix issues affecting your computer’s security and performance
- Restoro has been downloaded by 0 readers this month.
Blue Screen of Death is one of the most dreaded errors in Windows, and each time it’s encountered, the OS crashes, leading to data loss. One of these, the Bad Object Header error, is slightly intricate to resolve.
The tricky part which makes troubleshooting a tad more difficult is that the underlying cause could have to do with both the hardware and the software. So, let’s find out all about the stop code Bad Object Header with a bug check value of 0x00000189.
Here are a few reasons you might be getting the error:
- Incompatible or outdated drivers – In most cases, it was either incompatibility or running an outdated driver that triggered the error.
- Issues with the RAM modules – If the RAM modules malfunction, chances are you will encounter this error and several others.
- Corrupt system files – When the system files are corrupt, the OS won’t function effectively, trigger BSOD errors, and Windows will abruptly crash.
Before we try the slightly complex and time-consuming solutions, here are a few quick tricks:
- Check for Windows Updates and make sure you are running the latest version. If there are any updates available, install them right away.
- Make sure the hardware components are correctly connected, including the RAM and CPU.
- Scan your PC for malware using Windows Security, the built-in antivirus, or a reliable third-party antivirus that detects all malware and viruses.
- Look for issues with the storage drive using an effective health check tool since a failing hard drive can also trigger the Bad Sector Header error.
If none of these work, head to the solutions listed next.
1. Use a specialized software
Since any BSOD problem is rather complex, then using software that will scan your entire device and fix the cause of the Blue Screen error is indicated.
Restoro is a reliable tool for repairing and updating all outdated drivers on your device.
Restoro is powered by an online database that features the latest functional system files for Windows 10 PCs, allowing you to easily replace any elements that can cause a BSoD error.
This software can also help you by creating a restore point before starting the repairs, enabling you to easily restore the previous version of your system if something goes wrong.
This is how you can fix registry errors using Restoro:
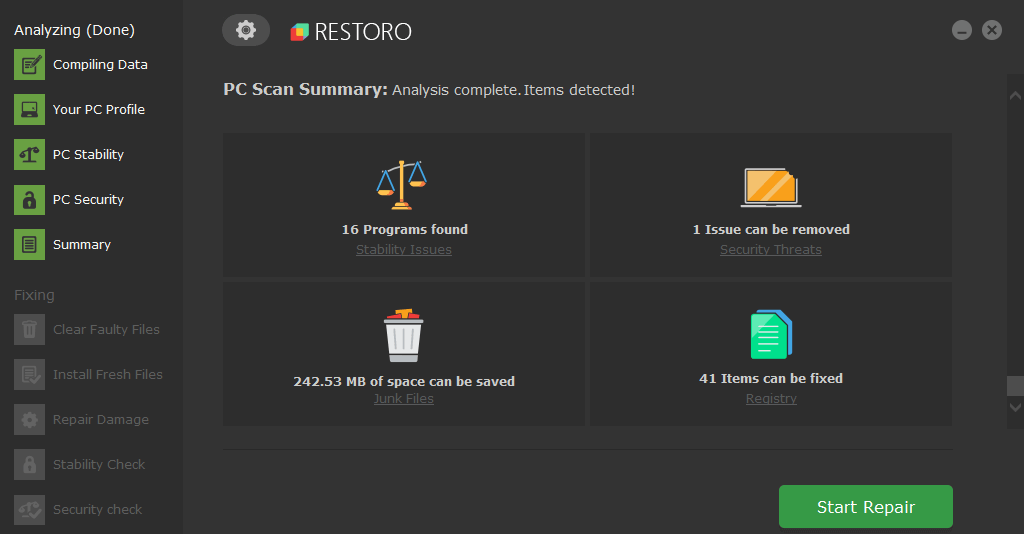
- Download and install Restoro.
- Launch the application.
- Wait for the software to identify stability issues and possible corrupted files.
- Press Start Repair.
- Restart your PC for all the changes to take effect.
As soon as the fixing process is completed, your PC should work without problems, and you will not have to worry about BSoD errors or slow response times ever again.
⇒ Get Restoro
Disclaimer: This program needs to be upgraded from the free version in order to perform some specific actions.
2. Update the drivers
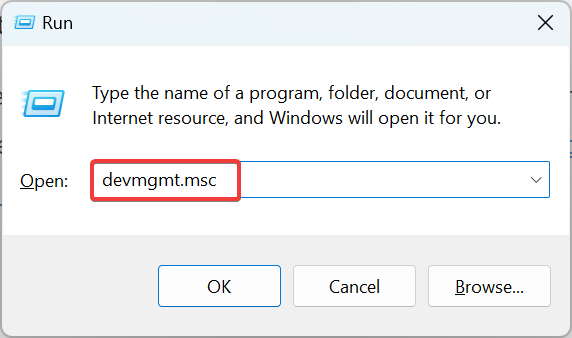
- Press Windows + R to open Run, type devmgmt.msc, and hit Enter.

- Expand the Display adapters entry, right-click on the graphics adapter, and choose Update driver.

- Now, select Search automatically for drivers.

Some PC issues are hard to tackle, especially when it comes to corrupted repositories or missing Windows files. If you are having troubles fixing an error, your system may be partially broken.
We recommend installing Restoro, a tool that will scan your machine and identify what the fault is.
Click here to download and start repairing.
Drivers are an integral part of the computer and allow the effective functioning of the hardware. If Windows cannot find a newer version, you can constantly manually update the driver. To find out which driver needs to be updated, check the log files.
3. Test the RAM
An easy way to test the RAM is to run Windows Memory Diagnostic, a tool that comes installed in Windows and eliminates trivial issues. It runs a few quick tests and lists out the problems with the RAM if any.
Another more reliable option is to run MemTest86+, an open-source tool that does extensive testing on all RAM modules identifies even the minutest of the issues, and lists them. However, it will take a few hours for a complete scan.
If the RAM modules turn out to be faulty, we recommend replacing them immediately since the constant BSOD errors followed by OS crashes can lead to other severe issues.
- WHEA Internal Error: Fix it Using These 9 Quick Methods
- Windows Update Error 80200053: 4 Quick Fixes
4. Disable automatically restart
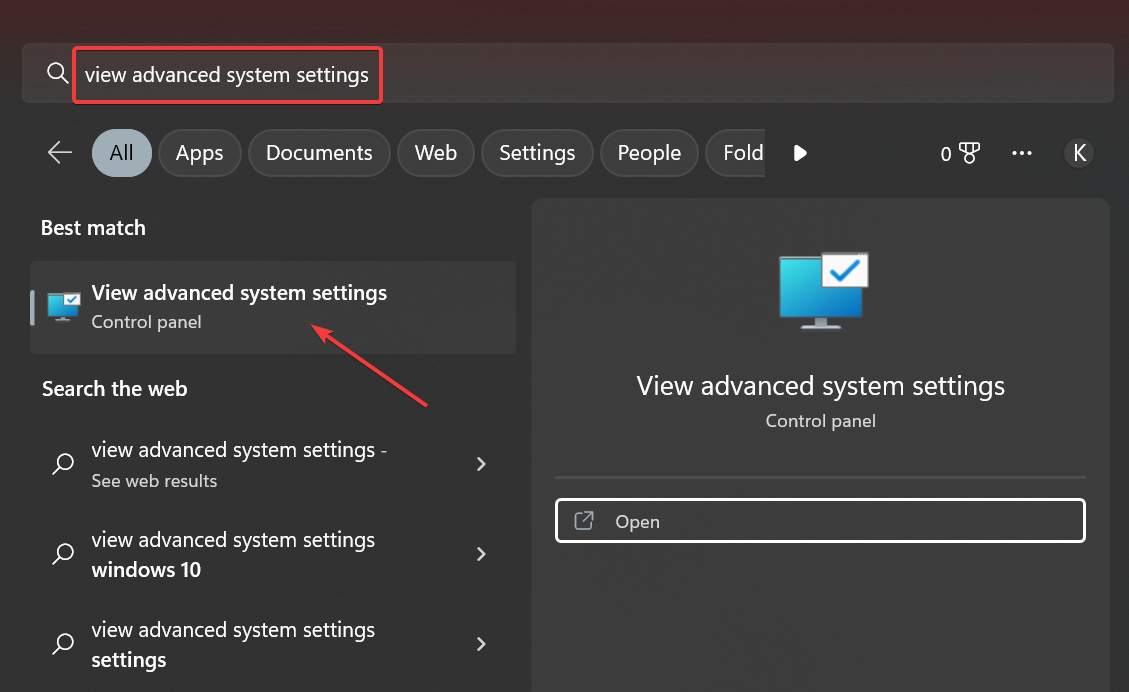
- Press Windows + S to open Search, type View advanced system settings in the text field, and click on the relevant search result.

- In the Advanced tab, click on Settings under Startup and Recovery.

- Now, untick the checkbox for Automatically restart under System failure, and click OK to save the changes.

Once done, verify whether the BAD_OBJECT_HEADER 189 error is resolved. In case you still come across Bad Object Header, take your PC to a repair shop and get the various hardware components and connections checked.
Also, discover the best Windows 11 hidden tips and tricks for a seamless experience.
Please tell us which fix worked for you in the comments section below. And do not forget to drop any solutions that we may have missed.
Still having issues? Fix them with this tool:
SPONSORED
If the advices above haven’t solved your issue, your PC may experience deeper Windows problems. We recommend downloading this PC Repair tool (rated Great on TrustPilot.com) to easily address them. After installation, simply click the Start Scan button and then press on Repair All.
![]()
Newsletter
Effortlessly fix the error with our solutions in no time!
by Vlad Turiceanu
Passionate about technology, Windows, and everything that has a power button, he spent most of his time developing new skills and learning more about the tech world. Coming… read more
Published on December 6, 2022
Reviewed by
Alex Serban
After moving away from the corporate work-style, Alex has found rewards in a lifestyle of constant analysis, team coordination and pestering his colleagues. Holding an MCSA Windows Server… read more
- The Bad Object Header is a BSOD error that can arise due to hardware and software issues.
- In most cases, outdated drivers or issues with the RAM and CPU triggered the error.
- To fix things, you can scan the PC for malware, check for hardware conflicts, and update the driver, amongst other solutions.
XINSTALL BY CLICKING THE DOWNLOAD FILE
This software will repair common computer errors, protect you from file loss, malware, hardware failure and optimize your PC for maximum performance. Fix PC issues and remove viruses now in 3 easy steps:
- Download Restoro PC Repair Tool that comes with Patented Technologies (patent available here).
- Click Start Scan to find Windows issues that could be causing PC problems.
- Click Repair All to fix issues affecting your computer’s security and performance
- Restoro has been downloaded by 0 readers this month.
Blue Screen of Death is one of the most dreaded errors in Windows, and each time it’s encountered, the OS crashes, leading to data loss. One of these, the Bad Object Header error, is slightly intricate to resolve.
The tricky part which makes troubleshooting a tad more difficult is that the underlying cause could have to do with both the hardware and the software. So, let’s find out all about the stop code Bad Object Header with a bug check value of 0x00000189.
Here are a few reasons you might be getting the error:
- Incompatible or outdated drivers – In most cases, it was either incompatibility or running an outdated driver that triggered the error.
- Issues with the RAM modules – If the RAM modules malfunction, chances are you will encounter this error and several others.
- Corrupt system files – When the system files are corrupt, the OS won’t function effectively, trigger BSOD errors, and Windows will abruptly crash.
Before we try the slightly complex and time-consuming solutions, here are a few quick tricks:
- Check for Windows Updates and make sure you are running the latest version. If there are any updates available, install them right away.
- Make sure the hardware components are correctly connected, including the RAM and CPU.
- Scan your PC for malware using Windows Security, the built-in antivirus, or a reliable third-party antivirus that detects all malware and viruses.
- Look for issues with the storage drive using an effective health check tool since a failing hard drive can also trigger the Bad Sector Header error.
If none of these work, head to the solutions listed next.
1. Use a specialized software
Since any BSOD problem is rather complex, then using software that will scan your entire device and fix the cause of the Blue Screen error is indicated.
Restoro is a reliable tool for repairing and updating all outdated drivers on your device.
Restoro is powered by an online database that features the latest functional system files for Windows 10 PCs, allowing you to easily replace any elements that can cause a BSoD error.
This software can also help you by creating a restore point before starting the repairs, enabling you to easily restore the previous version of your system if something goes wrong.
This is how you can fix registry errors using Restoro:
- Download and install Restoro.
- Launch the application.
- Wait for the software to identify stability issues and possible corrupted files.
- Press Start Repair.
- Restart your PC for all the changes to take effect.
As soon as the fixing process is completed, your PC should work without problems, and you will not have to worry about BSoD errors or slow response times ever again.
⇒ Get Restoro
Disclaimer: This program needs to be upgraded from the free version in order to perform some specific actions.
2. Update the drivers
- Press Windows + R to open Run, type devmgmt.msc, and hit Enter.
- Expand the Display adapters entry, right-click on the graphics adapter, and choose Update driver.
- Now, select Search automatically for drivers.
Some PC issues are hard to tackle, especially when it comes to corrupted repositories or missing Windows files. If you are having troubles fixing an error, your system may be partially broken.
We recommend installing Restoro, a tool that will scan your machine and identify what the fault is.
Click here to download and start repairing.
Drivers are an integral part of the computer and allow the effective functioning of the hardware. If Windows cannot find a newer version, you can constantly manually update the driver. To find out which driver needs to be updated, check the log files.
3. Test the RAM
An easy way to test the RAM is to run Windows Memory Diagnostic, a tool that comes installed in Windows and eliminates trivial issues. It runs a few quick tests and lists out the problems with the RAM if any.
Another more reliable option is to run MemTest86+, an open-source tool that does extensive testing on all RAM modules identifies even the minutest of the issues, and lists them. However, it will take a few hours for a complete scan.
If the RAM modules turn out to be faulty, we recommend replacing them immediately since the constant BSOD errors followed by OS crashes can lead to other severe issues.
- WHEA Internal Error: Fix it Using These 9 Quick Methods
- Windows Update Error 80200053: 4 Quick Fixes
- Your Computer Could Not Connect to Another Console Session [Fixed]
4. Disable automatically restart
- Press Windows + S to open Search, type View advanced system settings in the text field, and click on the relevant search result.
- In the Advanced tab, click on Settings under Startup and Recovery.
- Now, untick the checkbox for Automatically restart under System failure, and click OK to save the changes.
Once done, verify whether the BAD_OBJECT_HEADER 189 error is resolved. In case you still come across Bad Object Header, take your PC to a repair shop and get the various hardware components and connections checked.
Also, discover the best Windows 11 hidden tips and tricks for a seamless experience.
Please tell us which fix worked for you in the comments section below. And do not forget to drop any solutions that we may have missed.
Still having issues? Fix them with this tool:
SPONSORED
If the advices above haven’t solved your issue, your PC may experience deeper Windows problems. We recommend downloading this PC Repair tool (rated Great on TrustPilot.com) to easily address them. After installation, simply click the Start Scan button and then press on Repair All.
![]()
Newsletter
Содержание
- Error updating changes bad object head
- Reason:
- Solution:
- Warning:
- Zelig880
- How to fix git error “fatal: bad object HEAD”
- The problem
- The code
- The explanation
- Conclusion
- Как исправить BAD_OBJECT_HEADER в Windows 10?
- Решение 1. Обновите Windows
- Решение 2. Отключите автоматический перезапуск Windows
- Решение 3. Обновите драйверы
- Решение 4. Проверьте память с помощью средства диагностики Windows
- Решение 5. Запустите средство проверки системных файлов
- GIT: фатальный: не удалось проанализировать ошибку HEAD при фиксации
- Git статус показывает фатальный: плохой объект HEAD
Error updating changes bad object head
First of all, note that using git itself is not enough to keep data safe. You still need to back it up and have a remote repository in cases of corruption.
There are some reasons when a git repository becomes badly damage and when you do:
Reason:
More likely a disk error or an unclean PC or Laptop shutdown or disconnect suddenly and unsafely a hard drive from laptop could have left the repository in this state.
The consequence problem is that the
/main_repo/.git directory of your repository is damaged.
There are several ways and methods to fix it but if you have a backup in GitHub or other online git repositories or another remote server, you can fix such errors easily.
Solution:
I assume you have a backup in github like:
So make a temp directory and then clone the backup repository in it.
Note: Be careful for cloning the repository with suffix .git like above. If you put backup_repo instead of backup_repo.git then you can not find .git directory inside what you have cloned.
Then replace the broken .git folder with the one from the clone by mv or cp -r commands.
Warning:
If you delete the damaged .git directory by:
and try to copy the clone (backup)
/backup_repo/.git directory to
you will lose all the things that are not in your working directory (local branches, stash, etc).
So first of all just use cp -r or mv try to fix the problem.
You will see the stage becomes normal!
If you want to run all the git commands just in one command read this.
Источник
Zelig880

How to fix git error “fatal: bad object HEAD”
During development, I stumbled upon an error in GIT that prevented me to complete any operation that required to contact remote origin (Fetch, push, etc..)
No matter which branch I was on, I would always received the following error when trying any of the above operations:
fatal: bad object HEAD
The repository in question was quite big ( over 4gb) and I wanted to find a solution that did not require me to pull a full copy of the repository down again.
The problem
The source of the issue, is a corrupted file within the GIT folder. There is no special reason for this to happen ( or at least I could not find any reasonable explanation for it), but it is not extremely common.
The code
I am going to share the solution that I have used in my specific case. It solved the issue in just a few seconds.
The following code, need to be run from the location of the affected repository.
The explanation
The code above is self explanatory, but for the curious I will explain below line by line.
This line uses the command utility for copying files (read more). It is simply make a backup copy of the config file, within the .git folder
This line of code uses the remote feature of git, that has the main duty of
managing set of track repository. As explained on the official Git documentation , the remove command is used to remove all remote-tracking branches and configuration settings.
This last line of code, is the actual solution to our problem. By removing all configuration and existing files of remote branches, we remove our corrupted files.
We are not going to use another command utility, the one for moving files MV, as explained on the wikipedia website. The command is restoring our previously backed up config file. This step is needed to re-set all the remote branches.
If you have ever used GIT, you will have come across the FETCH command. Running this command, will recreate all the files that we have previously removed. GIT is going to use the information within the config file, to know what branches and tags should be fetched from remote.
Conclusion
The above code helped me, and I hope it will support you in solving your issues. Please feel free to post any comment and/or suggestion to improve the above fix.
Источник
BAD_OBJECT_HEADER – является ошибкой, относящейся к типу “синий экран смерти”. Она прерывает всю работу компьютера и принудительно перезагружает систему. Такая ситуация может не только раздражать, но и привести к потере данных и прогресса работы. Однако сообщение говорит о том, что с программным обеспечением Windows не всё в порядке.
Причин появления ошибки может быть несколько – от проблем с памятью до неисправных драйверов. Во многих случаях нарушение заключается именно в устаревшем программном обеспечении или несовместимости с новым обновлением Windows. К сожалению, из-за широких возможностей настройки, которые предоставляет ОС, не существует универсального способа исправить BSOD BAD_OBJECT_HEADER. Поэтому ниже приведены несколько вариантов решения, один из которых должен устранить проблему.
Решение 1. Обновите Windows
Всегда необходимо следить за актуальными обновлениями Windows, так как они исправляют ошибки и недоработки предыдущих версий. Как правило, они включены по умолчанию, и устанавливаются автоматически. Однако, если они отключены, следует сделать это вручную:
- Нажмите правой кнопкой мыши по значку Windows (левый, нижний угол).
- Выберите Параметры, и перейдите в раздел Центр Обновления Windows.
- Справа запустите Проверку наличия обновлений, и установите их, если таковые имеются.
- Затем перезагрузите систему.

Решение 2. Отключите автоматический перезапуск Windows
В некоторых случаях ошибку BAD OBJECT HEADER невозможно устранить из-за постоянного цикла перезапуска, сопровождающегося также сообщениями: BAD_POOL_HEADER и PAGE_FAULT_IN_NONPAGED_AREA. В этом случае стоит отключить автоматическую перезагрузку Windows.
- Нажмите ПКМ по значку Windows, и выберите Система.
- Далее пройдите в Дополнительные параметры системы.
- Откройте вкладку Дополнительно, и нажмите Параметры в разделе Загрузка и восстановление.
- В новом окне снимите галочку с настройки Выполнить автоматическую перезагрузку, и кликните Ок.
- Это предотвратит автоматический перезапуск системы.
Решение 3. Обновите драйверы
Хотя некоторые драйверы устанавливаются вместе с обновлениями Windows, этот метод применим во многих случаях.
- Нажмите ПКМ по значку Windows, и перейдите в Диспетчер устройств.
- Разверните раздел Видеадаптеры и щёлкните ПКМ по драйверу Intel.
- Обновите программные обеспечения, выбрав в следующем окне Автоматический поиск обновлённых.
- Также следует загрузить новый драйвер Thunderbolt, если вы используете это оборудование.
- После этого перезагрузите компьютер.
Решение 4. Проверьте память с помощью средства диагностики Windows
Повреждение памяти является одной из основных причин появления экрана BSOD. Поэтому следует запустить автоматическую проверку оперативы. Сделать это можно следующим образом:
- Введите в поиск Windows Средство проверки памяти, и нажмите Enter.
- В появившихся результатах выберите аналогичную строку и запустите диагностику.
- Этот процесс автоматически перезагрузит компьютер и выполнит проверку памяти, поэтому перед этим следует сохранить все документы и приложения, открытые на рабочем столе.
Решение 5. Запустите средство проверки системных файлов
Проверьте системные файлы на предмет нарушений целостности следующим образом:
- Нажмите ПКМ по значку Windows, и выберите Командная строка (Администратор).
- В открывшемся окне введите команду sfc/scannow и нажмите Enter.
- Дождитесь окончания процесса, после чего система сообщит о результатах.
- Перезагрузите компьютер, чтобы исправления вступили в силу.
Источник
GIT: фатальный: не удалось проанализировать ошибку HEAD при фиксации
При попытке зафиксировать с помощью
fatal: could not parse HEAD Error When Committing
но не получил выхода, но я получил
Я могу ошибаться, но думаю, что git сказал мне, чтобы я пошел на хуй 😀 . — /. Следующее, кажется, подтверждает это:
Есть ли еще способ примириться с git?
Я также получаю
Каков ваш идеальный конечный результат? Я так понимаю, у вас есть некоторые локальные изменения, которые вы хотите зафиксировать. В какой ветке вы хотите их зафиксировать? Вы уже выписали эту ветку? Если нет, можете ли вы сделать git checkout branch-name , а затем сделать коммит?
Не могли бы вы выложить права и содержание вашего HEAD файла: ls -l .git/HEAD ; cat .git/HEAD ?
@ Code-Apprentice: Да, я хочу зафиксировать локальные изменения. У меня только ветка master. Как видно из вопроса, проверить это не удалось.
@LeGEC: у меня есть: -rw-rw-r— 1 меня я 23 апр 2 22:07 .git / HEAD ref: refs / Heads / master
@ Make42: хорошо; Можете ли вы проверить, что cat .git/refs/heads/master дает вам тот же sha1, что и недопустимый sha1, упомянутый вашим git fsck ?
@ Make42: такая же проверка на .git/refs/remotes/origin/master
@LeGEC: Пожалуйста, посмотрите мой обновленный вопрос.
Произошло ли на вашем компьютере что-то особенное, что могло вызвать повреждение внутри репозитория git, например синий экран?
@Ferrybig: Ничего из того, что я знаю. Однако я не использовал git в этом репо около года. Я работал с файлами, но никогда не фиксировал, не отправлял и не извлекал с сервера. Так что я не знаю, произошло ли что-то в этом году, я не помню.
Привет @ Make42, удалось ли вам вернуться к стабильному репо, сохранив свои изменения?
@LeGEC: Да, я клонировал репо с сервера, вручную перенес свои изменения в новое репо и удалил старое. Думаю, я ничего не потерял. Так что все хорошо, но немного расстраивает то, что на самом деле это невозможно исправить, но эй, все хорошо, что хорошо кончается. Я только что заметил обновление в вашем ответе — сейчас проверю.


Похоже, что с вашим местным репо что-то случилось.
Посмотрите, поможет ли вам простой git fetch вернуть некоторые из этих недостающих объектов.
Можете ли вы создать свежий клон удаленного репозитория и проверить:
- если refs/remotes/origin/master все еще указывает на c45fd85. , или если в его истории есть c45fd85. ?
- если c45fd85. существует и является действительным объектом? ( git fsck , git cat-file -p c45fd85 )
Комментарии (3)
Фактически: в недавно клонированном репо я вижу, что c45fd85. был коммитом до моих новых коммитов. Кажется, что коммит здесь действителен.
хорошо, а в фальшивом репо git cat-file -p c45fd85 вам что-то показывает?
Я удалил ошибочное репо, поэтому мы не узнаем. Простите.
Файл refs/heads/master — это ссылка, которая должна указывать на действительный хеш фиксации. По какой-то причине ваш мастер указывает на c45fd8579e1f313fcd651df4cbafbf6c8f8edba6 , которого нет в вашем репозитории. Возможно, этот объект каким-то образом был удален из каталога .git/objects , или же master указывает на хэш, которого никогда не существовало. Я не могу быть уверен, пока не узнаю, что ты сделал. Возможно, git reflog master или git reflog HEAD предложат некоторые подсказки относительно того, что произошло, но я не могу быть уверен.
Я предполагаю, что ваш каталог .git был подделан. Я вижу несколько недостающих коммитов. Это плохой знак. Если репозиторий благополучно перемещен в какое-то место, повторное клонирование — один из способов решения проблемы. Если команды reflog дают полезный результат, вы можете принудительно сбросить ( git reset —hard ) свой мастер до предыдущей фиксации, в которой он был ( git reset —hard master@ <1>), а затем попробовать выполнить выборку снова. Надеюсь, он внесет все недостающие коммиты. Это уничтожит последний коммит, но, учитывая, что он все равно болтается, я не думаю, что вы потеряете много.
У меня такая же проблема, я читал все ответы, здесь ничего не помогло. Но когда я удалил папку «.git» в каталоге своего проекта и повторно инициализировал, проблема исчезла. Надеюсь, это тебе тоже поможет.
Источник
Git статус показывает фатальный: плохой объект HEAD
У меня проблема с git на Windows Azure. Состояние Git показывает – “fatal: bad object HEAD”, и я попытался запустить:
Но git fsck показывает:
git branch – * Мастер
Ваш репозиторий поврежден. Это означает, что данные теряются, которые не могут быть восстановлены самим git. Если у вас есть еще один клон этого репозитория, вы можете восстановить объекты оттуда или создать новый клон.
fatal: bad object HEAD означает, что ветка, на которую ссылается HEAD, указывает на плохой объект commit, что может означать, что он отсутствует или поврежден.
Из вывода git fsck вы можете увидеть, что есть несколько объектов tree, blob и commit.
Обратите внимание, что использование самого git недостаточно для обеспечения безопасности данных. Вам все равно нужно поддерживать это в случаях коррупции.
попробуйте это: сработало для меня
rm -rf .git
затем скопируйте .git из другого клона
git init
это должно решить вашу проблему, ВСЕ ЛУЧШИЕ
У меня была аналогичная проблема, и для меня работала, чтобы сделать новый клон из моего оригинального репозитория
Это произошло потому, что по ошибке я удалил какой-то основной файл GIT. Попробуйте, это сработало для меня.
получать данные с пульта
Теперь проверьте все ваши изменения и статус git по
Мне удалось установить аналогичную проблему, если некоторые из файлов git были повреждены:
В моем ответе на этот вопрос, найдите ту часть, где у меня было такое же сообщение об ошибке, что и здесь:
Вы можете попробовать следовать тому, что я сделал с этого момента. Обязательно сначала создайте резервную копию всей папки.
Конечно, ваш репозиторий может быть поврежден совершенно другим способом, и то, что я сделал, не решит вашу проблему. Но это может дать вам некоторые идеи! git внутренности кажутся магией, но на самом деле это всего лишь куча файлов, которые можно редактировать, перемещать, удалять так же, как и любые другие. Когда у вас есть хорошее представление о том, что они делают и как они сочетаются, у вас есть хорошие шансы на успех.
Ваш репозиторий сломан. Но вы, вероятно, можете исправить его и сохранить свои изменения:
- Сначала выполните резервное копирование: cp your_repository your_repositry_bak
- Клонировать сломанный репозиторий (все еще работает): git clone your_repository your_repository_clone
- Замените сломанную папку .git на одну из клонов: rm -rf your_repository/.git && cp your_repository_clone/.git your_repository/ -r
- Удалить клонирование и резервное копирование (если все в порядке): rm -r your_repository_*
Сделайте копию своего каталога git на локальном хосте и запустите git init еще раз. Перетащите проект в новый реестр.
Я решил это, скопировав данные ветки (с ошибками) на локальную папку git на моем ноутбуке Apple.
Как-то в терминале и при запуске: git status, сообщает мне более конкретные данные, где возникает ошибка. Если вы посмотрите на ошибки, надеюсь, вы увидите список папок с ошибкой. В моем случае git отобразилась папка, которая отвечала за ошибку. Удалив эту папку и запустив ветвь, мне это удалось. git статус снова работал
другие устройства, обновляемые с помощью git pull; все работает снова на каждой машине.
Надеюсь, это сработает и для вас.
Это вряд ли является источником вашей проблемы – но если вам случится работать в .NET, вы получите кучу папок obj/ . Иногда полезно удалить все эти папки obj/ , чтобы решить проблему сборки.
Я получил тот же fatal: bad object HEAD в моей текущей ветке (master) и не смог запустить git status или извлечь любую другую ветку (я всегда получаю error refs/remote/[branch] does not point to a valid object ),
Если вы хотите удалить все ваши папки obj , не ленитесь и не допускайте .git/objects в микс. В этой папке находится все фактическое содержимое ваших коммитов git.
Будучи близким к тому, чтобы сдаться, я решил посмотреть, какие файлы были в моей корзине, и там это было. Восстановил файл и мой локальный репозиторий был как новый.
Я решил это, переименовав ветвь в файл .git/refs/remotes/origin/HEAD .
Источник
You will find effective workarounds to resolve BAD_OBJECT_HEADER BSOD Error in Windows 10 in this article. The issue represents actually corruption in The OBJECT_HEADER and for obvious reason, it has got a bug check value of 0x00000189. Once detected in the user PC, Windows will have a proclivity to restart without notifying the person dealing with. In addition, people might experience hanging resulting in making device inaccessible and frequent showing of error messages. In a nutshell, like seems at a stake when a device is detected with this notorious error.
BAD OBJECT HEADER Error in Windows 10 aka BAD_OBJECT_HEADER will shout its presence in the system mostly when you have outdated, old and troublesome device drivers. With that, malicious threats deleting important windows components, corrupted system files as well as missing DLL ones, leaving update patches pending for longer time, incorrect allocating of memory will add extra momentum from software end. Hardware troubles like the presence of dreadful areas in the Disk drive, running in low space can also cause the same. Hence, in the latter part, we will be presenting some powerful workarounds to dismiss this error. So, let’s begin –
Here is how to fix BAD_OBJECT_HEADER BSOD Error in Windows 10 –
Obstruct Automatic Restarting of Windows
Since Windows goes under continuous rebooting after being affected with BAD_OBJECT_HEADER blue screen of death error, this has become the most annoying issue. We can neither take it normally nor can resolve the error as insufficient time to deploy workarounds. Therefore, the prime workaround is to stop this restarting.
Step-1: Save and close ongoing processes if have any and straightway head to Desktop area by pressing Win+D hotkeys combined.
Step-2: When in place, do a right click on This PC icon here and select Properties eventually.
Step-3: Once System window comes into view, select “Advanced system settings” from the left sidebar of this page.
Step-4: A wizard will be visible, move on to its Advanced tab.
Step-5: Move straight down to the Startup and Recovery section and hit Settings button.
Step-6: After the next wizard unrolls, come down to System failure area and remove the checkmark from the box beside Automatically restart.
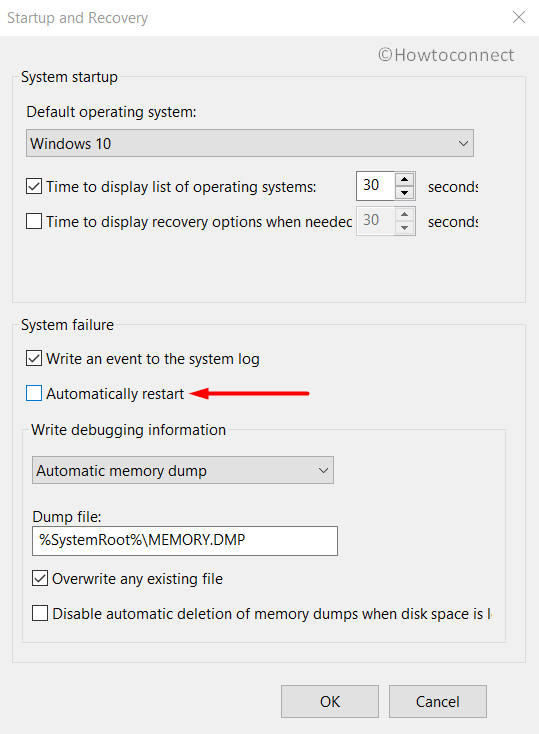
Step-7: Now, hit the OK button located at the bottom and leave the wizard as well.
Make the Operating System up to date by installing every single available patch
Well, when we talk about the operating system, obviously an updated one comes to the imagination. Outdated ones lack features, bugs and are naturally weak in strength which is incapable to fight BSOD errors. We are now moving out to download and install all the available update patches using Windows Settings app to fix BAD OBJECT HEADER Blue Screen of death.
Important – Ensure you are connected with a high-speed internet connection, broadband or a wireless one. In case of using the “Mobile Data”, disable the Metered Connection in the Network Settings, otherwise, downloading will not take place.
- Make a combined press of Win+I hotkeys and open Windows Settings app.
- While in the app accessible area, head to Update & Security and perform a click on it.
- On the following page, select Windows Update located at the left-hand side.
- Shifting on the right side, you might see the dialog “You’re up to date”. Be less bothered and directly click on the button saying Check for updates.
- Once the searching is finished and available patches are previewed, select the Download button under each of these.
- After all the files get into the system, the installation will take place automatically.
- Windows will prompt for restart, and attend all the requirements in the process.
Once the Windows are up to date, there might not be any BSOD error in the system.
Allow Default Blue Screen Troubleshooter to work by your side
Windows has its own built-in utility in the name of Blue Screen Troubleshooter to fight for you in BAD OBJECT HEADER issue. To avail this privilege, you have to upgrade the OS to Windows 10 Fall Creators update or above. This is a handy and light tool that can potentially remove stop errors. The most amazing fact is, you don’t need to go for any installation as it is a default utility.
- Get access to Windows Settings app using the above guidelines and head straightway to the additional settings of Update & Security.
- Once the next page comes in the view, select Troubleshoot from the left sidebar and jump to the adjacent side.
- Here, locate the Blue Screen option and perform a click on it.
- When expanded downward, hit Run the Troubleshooter and let it do the rest.
The troubleshooter will start detecting the possible causes and will eventually make an attempt to repair them as well.
Eliminate Problems in Windows Memory and RAM issues
Windows memory itself often create malfunction and end up calling BAD_OBJECT_HEADER BSOD Error. However, the wrong allocation of memory devices, defective areas in RAM will cost you badly. Therefore, let’s use the “Windows Memory Diagnostic” to eliminate these problems. Move forward with below instructions-
- Manage to open the Windows Settings app using the same instructions stated above.
- When you will see a search box here in this page, start typing memory here.
- Once the results start peeking up, select Diagnose your computer’s memory problems.
- Sharply Windows Memory Diagnostic will open up on the screen and here, perform a click on “Restart now and check for problems (recommended)”.
- Windows will, therefore, reboot initially in accordance with the command and once it completes the first cycle of this task, you will experience a blue screen.
- This Blue screen will start detecting the memory issues present in the system and progress will be previewed in percentage. When it reaches 100%, Windows will again restart for the second time.
- Result of the diagnosis will be available in the System tray- notification area once it gets back to operation further.
Safe Boot- the most reliable resort to solve BAD_OBJECT_HEADER BSOD Error
Starting from the development of Windows as an operating system, booting in Safe Mode continuously serving best for critical issues such as BAD OBJECT HEADER. This as renowned in work as upon application Windows loads only basic services and programs. Most of the error take leave in this process and like every other time, let’s try this method in the following steps –
Step#1: Move the pointer to the extreme left bottom end of Desktop and eventually do a click on Start menu.
Step#2: Once the options are loaded, hit the Power icon from here and also select the Restart. At the same time, press and hold the Shift key.
Step#3: The device will restart and upon powering ON, there will be a blue screen with few options on the page.
Step#4: Select the option saying Troubleshoot and move ahead to the consequent page.
Step#5: Choose Advanced options => Startup settings.
Step#6: Proceeding ahead to the right bottom end of this page, hit Power => Restart.
Step#7: Windows will prepare for the second tier of rebooting. Upon startup, you will find some more options including “Boot in Safe Mode“.
Step#8: Now, keep pressing the F4 key continuously and lead to the Safe Mode on the further move.
Correct the Windows System components and recover missing DLL files
Windows tends to damage its necessary system elements and lose DLL files once fall into corruption. In the process, the ultimate result is BAD_OBJECT_HEADER BSOD Error. We really cannot afford this to happen in our systems. Therefore, System File Checker is developed by Microsoft and undoubtedly it can serve the best. You just need to run a command line tool in “elevated Command Prompt“.
- Execute a right-click on the taskbar and choose Task Manager from the pop-up menu.
- Hit on File option located at the top left end and select Run new task once visible.
- When a dialog box appears, type cmd in the empty text field provided here and also put a checkmark before “Create this task with administrative privileges”. Click OK.
- In the black window, type the following command where cursor blinks and hit Enter key-
sfc /scannow
Immediately, System File Checker will be executed and start checking the corrupted elements. If any discrepancy is discovered, it will resolve automatically also resulting in fixing BAD OBJECT HEADER.
Give a break to Hardware components
We often use Hardware items as well as external HDD to serve respective purposes. Some people have discovered BAD_OBJECT_HEADER BSOD Error in their system after connecting an additional Hard Disk. It might seem little weird but yes this is true but the solution is simple as well. You just need to offer them a pause and then reconnect again once issue resolves.
- Unhook all the accessories along with additional Hard Disk from the computer.
- Leave them separate in a safer place to avoid any damage.
- Open the Start menu and hit on Power sign.
- Select the Restart option and allow it to reboot at once.
- When the device gets back to normal activity, perform a thorough checking for the existence of the issue.
- Hopefully, the result will be on your side and if happen so, start connecting them again.
- Now, launch Edge browser, and in the process make a visit to the manufacturer website of those hardware items.
- Download the latest Drivers and install them in the system.
Never Allow Malware to stay over in the system, Dismiss in Windows Security
We all are well aware that, a virus is moving to and fro everywhere on the web. Still, these bugs manage to get inside of our system and cause vulnerabilities. Once they get the pass to Windows, have a tendency to remove the necessary components required to run OS. Therefore, the result is a BAD_OBJECT_HEADER BSOD Error in Windows 10. Windows has its own security system offers you the opportunity to resolve this notorious malware.
- Hover the cursor to the right side of the taskbar and do a click on the “Shield” icon and head to Windows Security app.
- Moving ahead to the app area, choose Virus and threat protection from the left-hand side and move sideward.
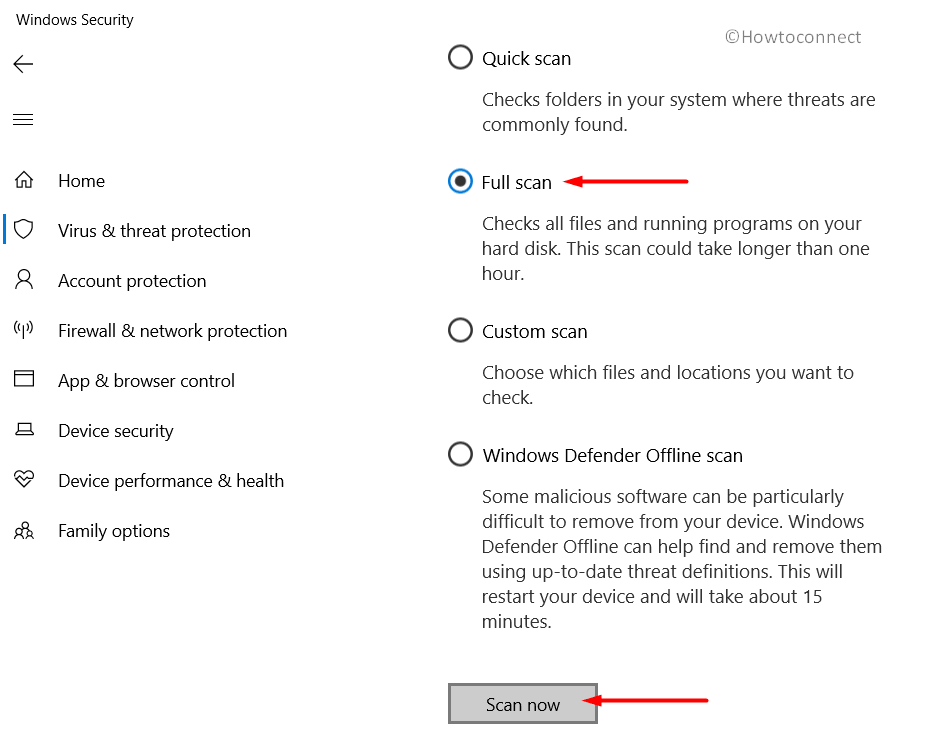
- On this place, make a click on the link Scan options and once all of them are displayed, hit the radio button behind Full scan.
- Proceeding forward, select Scan now button located here and allow Windows to carry out malware checking.
- When the result is upfront after searching, wipe out all the viruses by clicking Clean threats option.
- Proceeding ahead to the next page, three will be three option left for you. Choose Remove and finally hit the Start actions option.
Restrict staying over of similar programs in the system
Once similar programs get a chance to stay side by side, they are prone to be in collision with each other. This act results in removing some vital components in the system and hence, BAD_OBJECT_HEADER Error in Windows 10 is imminent. To stop this, we can uninstall one of such applications and if the error resolves, reinstall the removed one once necessary.
- Do a combined press of “Win+R” hotkeys and open the Run dialog box on the screen.
- Once seen, type appwiz.cpl in the blank search box and hit the Enter key.
- Programs and Features window upon unrolling on display, locate the programs causing BAD_OBJECT_HEADER BSOD Error in Windows 10.
- Perform a right click on each and select Uninstall option from there.
- Perform the upcoming tasks as will be displayed on the screen to completely remove these.
- Once all these programs get dismissed, restart the device using normal procedure.
- When returning back to the desktop again, check if there are any issues present like BAD_OBJECT_HEADER BSOD Error.
- If there is no problem in the system and in case the removed program is necessary, download them again.
Clear up the Storage from Junk and make some more space
Junk files are fabricated by processes to accomplish tasks. When they grow large in amount, take up huge space in storage and eventually the volume run in low space. “Disk Cleanup” utility comes handy in freeing up job ending up as a solution to BAD OBJECT HEADER.
- Make a conjugal press of Windows and S keys together and open the Taskbar Search.
- Fill the blank text area here with cleanmgr and when Disk Cleanup Desktop app is visible in the list, select it.
- A small popup dialog will open up shortly asking the drive where the task will be carried out. Select C: by clicking on the dropdown menu and press Enter key.
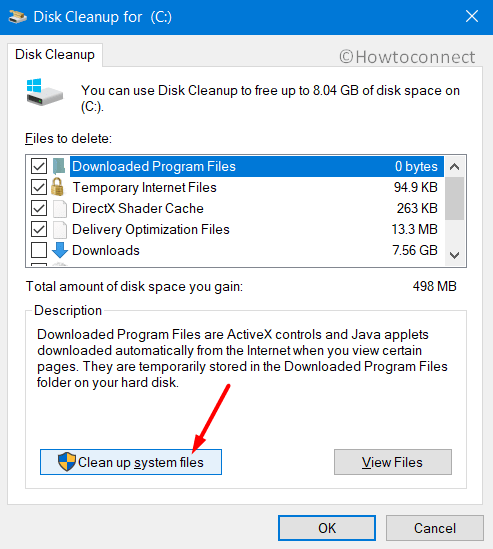
- The Disk Cleanup Utility will start the action by calculating the space it can bring out from the system and unroll a wizard.
- Move down in the wizard and hit on “Clean up system files” option.
- The small popup will ask one more time for selecting the preferable drive. Choose C: again and hit the Enter button.
- Disk Cleanup for C: will appear after doing the calculation again.
- Check all the boxes here only except Downloads and then perform a click on the Ok button located at the bottom.
- This process involves several deleting and hence might take a quite long time, wait patiently until it gets over.
Note- Before proceeding with this workaround, make sure there is nothing important left in Recycle Bin folder as everything will be deleted.
Assign Deployment Image Servicing and Management (DISM) tool to repair dreadful image files
When Windows Image files run in disruption, so many errors are like to occur in the system. Among them, BAD_OBJECT_HEADER BSOD Error can damage the most. However, a simple tool namely DISM can save you from a devastating case.
- Access Command Prompt with administrative rights using the same instruction we have shown before.
- When in the dark window, type or copy-paste the below-mentioned command and at the hit of the Enter key, DISM tool will be activated and rectify defective image files once detected.
DISM.exe /Online /Cleanup-image /Restorehealth
- Thus you can get rid of the BAD_OBJECT_HEADER BSOD Error in Windows 10.
Bade Farewell to Defective Windows Update Files
We recommend all users update their OS by installing all available patches. This process is autonomous and rarely fall into manipulation. Once it undergoes such malfunction or stops at the midway of installation, BSOD error like BAD OBJECT HEADER is impending as a result. So, the best deal is to erase them from device going through the below steps.
- Launch the built-in Settings app by clicking the gear icon located on the Start menu.
- Straightway move to Update & Security tile when in the app UI and perform a click on it.
- Once the next page is upfront, select Windows Update from the left wing and then transfer to the alongside pane.
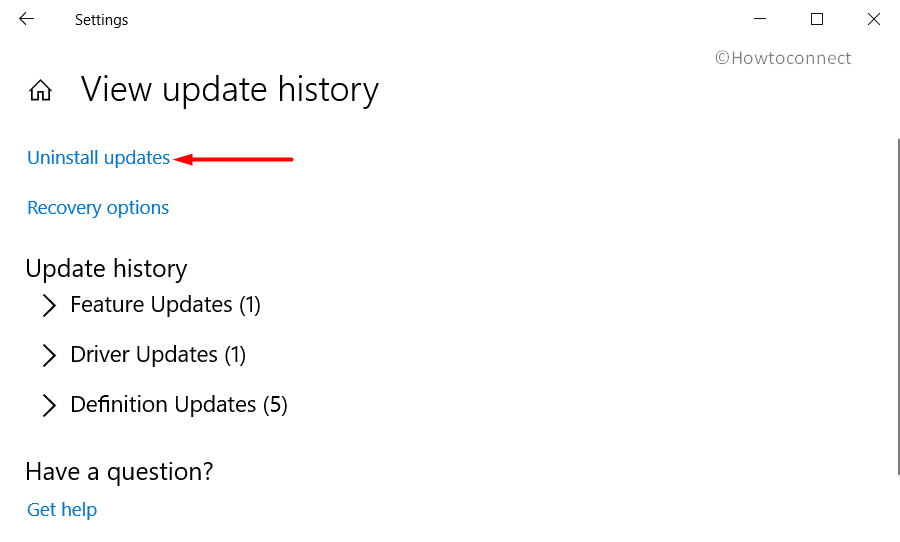
- On this side, hit a click on View update history link and open all the received patches list.
- Proceeding forward, execute a hit on Uninstall updates.
- By default, you will be guided to the “Installed Updates” page from Control Panel.
- Move ahead to the last received patch and do a right click on it.
- Select the Uninstall option and go through the on-screen guidelines to get rid of them.
Recruit Disk Checking Utility in Elevated Command Prompt to deal with bad Hard Disk areas
“CHKDSK” command is basically a Disk Checking utility which potentially detects as well as fix the worse sectors present in HDD. Since it may resolve the BSOD BAD OBJECT HEADER error also, we can definitely give it a try.
- Roll the cursor to the left bottom side of Taskbar and make a click on the Search icon.
- Once the Taskbar Search launches, type cmd.exe in the empty text field.
- When Command Prompt shows in the result, hit a right click on it and select “Run as Administrator” option.
- When UAC prompts for permission, hit Yes to continue.
- On the Elevated Command Prompt window, type the following command where the cursor winks.
chkdsk C: /f /r /x
Here, CHKDSK will only show the Disk status upon activation. We have used a few other notations indicating following-
f- represents fixing the detected problems.
r- represents detecting the existing problems in the Disk.
x- represents splitting up of the disk volume to facilitate the detection process.
C: - represent the Disk where the OS is installed. You can change this to D:, E: or any depending upon your usage.
- Once you hit Enter key, the Disk Checking Utility will detect and fix all the problems immediately. This process will take some time, so, hold the patience and wait until it gets over.
- Restart Windows 10 PC and upon startup, check for the occurrence of BAD OBJECT HEADER error codes.
Perform updating Drivers having Yellow indication Mark in Device Manager
Outdated and troublesome device drivers came out strongly to cause BAD_OBJECT_HEADER BSOD Error in Windows 10. Every time we experience this BSOD error, the solution is indeed singular and simple. Drivers having yellow indication mark in Device Manager needs to update.
- Perform a right click on Start icon and choose Run from Win+X menu.
- When it is visible, type devmgmt.msc in the search box located here and press Enter key.
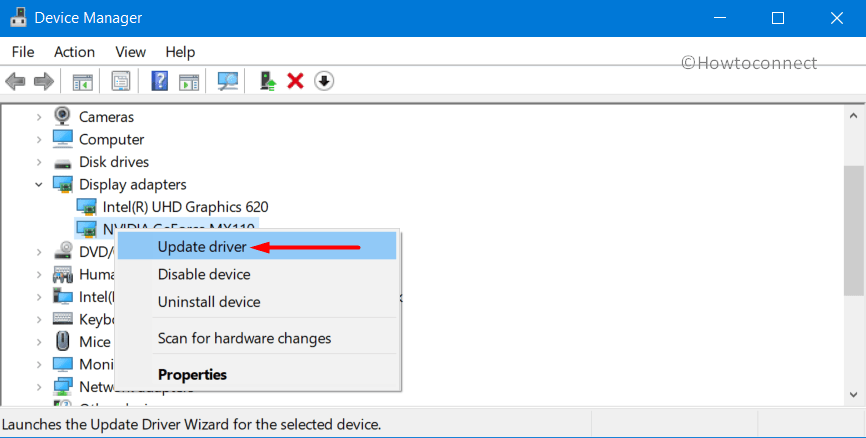
- “Device Manager” will open and if you see any mark of exclamation, expand that specific device.
- Perform a right click on the driver and select “Update driver” option.
- Keep cooperating with Windows by following shown instruction until the drivers are up to date.
Go back to last created Point and revert all the recent changes
If you have a previously created restore point, you can straightway go back to a point where there was no BSOD error. As recent modifications in the registry by installing or removing a program can be guilty, and hence, System Restore will provide you the ultimate relief from BAD OBJECT HEADER problem.
- On Cortana search, type rstrui and hit Enter key to launch the System Restore.
- When the popup window is visible on display, hit the Next button to move ahead.
- On the consequent page, uncover all the past created points by clicking the Show more restore points.
- Select the recently created one from the list and hit Next again.
- Once the next page unrolls, select Finish to start the Restoring process.
Use only Windows Security, remove all other third-party anti-virus programs
Windows Security offers the best deal in malware issues and this is also a built-in program. So, if you have a third party anti-malware tool, it’s really meaningless and might cause BAD OBJECT HEADER. So, we will show you how to remove these completely from the system in the below instructions.
- Launch Settings => Apps.
- Hit Apps & features option from the left side and jump to the corresponding pane.
- On the right, when the apps are loaded, find out antivirus programs installed in the system.
- Select to expand in the pane and hit Uninstall option once seen.
- If User Account Control prompts for permission, give consent by selecting Yes.
- Perform the on-screen guidelines to completely remove the programs.
Hereby we have discussed all the best available workarounds to resolve BAD_OBJECT_HEADER BSOD Error in Windows 10. Bravo! If you have finally succeeded to fix this notorious issue and the hard work has come out victorious. It’s a matter of frustration if you are having the issue still in the device after performing all these tasks. Well, there is no problem on the earth without a solution we believe. You can perform “Clean installation of Windows 10” and that will be the ultimate solution for ending all problems.
After being assured of doing this task, make sure you have already saved all the required data, files, images as back up in the external drive. We recommend you to seek help from experts for doing this task if you are not confident enough. Hopefully, you can recover the device from all issues including BAD OBJECT HEADER after doing so.
That’s all!!
Repair any Windows problems such as Blue/Black Screen, DLL, Exe, application, Regisrty error and quickly recover system from issues using Reimage.
Bad Pool Header Windows 10 относится к ошибкам, вызывающим очень серьезную неприятность — экран смерти (BSOD), и в данной статье мы поговорим о том, как ее исправить. Чаще всего такие ошибки всплывают при установке нового «железа» или ПО. Для успешного устранения проблемы важно отследить момент, когда именно появилась эта ошибка.
Как понять, что при запуске Windows 10 вы столкнулись именно с ошибкой 0x00000019 Bad Pool Header. Вот основные признаки:
- окно активной программы вылетает
- появляется сообщение об ошибке — синий экран смерти код ошибки 0x00000019
- После этого компьютер зависает или начинает работать очень медленно, с заторможенным реагированием на ввод с клавиатуры и мыши.

Что это за ошибка Bad Pool Header? Каковы причины ее появления?
- Неверно сконфигурированы драйверы, они устарели или повреждены (это случается чаще всего);
- Реестр поврежден из-за недавних изменений ПО, связанного с Windows
- У вас появился вирус или вредоносное ПО
- После установки нового оборудования произошел конфликт между драйверами
- Неполадки с системными файлами
- Повреждения загрузочного диска или оперативной памяти.
К сожалению, это не всё. Причина появления blue screen может крыться где угодно — в самом оборудовании, в драйверах, прошивках и программном обеспечении. Stop 0x00000019 Bad Pool Header — требует предельного внимания с вашей стороны, и запускать ситуацию не стоит.
Как исправить ошибку 0x00000019 Bad Pool Header?
Мы предлагаем попробовать следующие варианты устранения этой проблемы под названием «код остановки Bad Pool Header», но будьте, пожалуйста, внимательны.
- Восстановление записи реестра, которые связаны с этой ошибкой. Данный шаг не рекомендуется выполнять самостоятельно, поскольку малейшая погрешность парализует всю работу компьютера напрочь.
- Провести сканирование компьютера на вирусы и вредоносное ПО
- Почистить систему от мусора, убрать с диска временные файлы и папки
- Обновить драйверы
- Использовать Восстановление системы и Отменить последние изменения в Windows
- Удалить и поставить снова программу Windows Operating System
- Проверяем системные файлы
- Поставьте все имеющиеся в доступе обновления для Windows
- Проверяем жесткий диск на ошибки
- Проверяем оперативку
- Производим чистую установку Windows
Упростим вам задачу и приведем самый популярный алгоритм, который чаще всего помогает при появлении синего экрана с ошибкой Bad Pool Header:
Также обратите внимание на статьи на нашем сайте по аналогичным темам:
- ошибка Dpc Watchdog Violation Windows 10 ;
- ошибка Video TDR Failure в Windows 10 — с инструкциями для видеокарт Nvidia и AMD.
Все эти ошибки появляются вследствие устаревания ПО и драйверов, повреждений реестра, жесткого диска или оперативки, или вирусов.
Если вы интересуетесь, как создать разделы на жестком диске Windows 10, в одноименной статье-инструкции мы рассказали об этом подробно.
Надеемся, что данная статья вам помогла, и теперь вы знаете, как исправить Bad Pool Header Windows 10.
Question
Issue: How to fix BAD_OBJECT_HEADER on Windows 10?
Hello. Recently, my laptop has crashed several times with an error BAD_OBJECT_HEADER. What does this mean? I guess something is wrong and I don’t know how to fix this. Could you help me with this?
Solved Answer
BAD_OBJECT_HEADER is a Blue Screen of Death[1] error that interrupts all computer work on Windows and reboots immediately. Without a doubt, BSOD errors might not only be annoying, can result in data or work progress loss, but might also indicate that there is something wrong with Windows software or even hardware.
Windows 10 is an intricate operating system with thousands of different parameters, processes, services, and millions of files that work altogether. Unfortunately, due to the high customization options that the OS provides, things are bound to go wrong for some people. Due to this, there is no universal way to fix BAD_OBJECT_HEADER BSOD that would work for everybody, so you will have to perform some troubleshooting.
Users who receive the error are forced to restart their PCs (or rather, it happens automatically), and the only message they can see is as follows:
You PC ran into a problem and needs to restart. We’re just collecting some more info, and then we’ll restart for you.
1% complete
If you call a support person, give them this info:
Stop code: BAD OBJECT HEADER
As evident, while the error code name is useful when trying to find a way to fix this, this does not directly tell what is causing the problem or what to do to solve it. Luckily, you are in the right place for it, and we will help you with this problem. It is also worth motioning that users who dealt with this error later also encountered BAD_POOL_HEADER and PAGE_FAULT_IN_NONPAGED_AREA.

Reasons for the BSOD error BAD OBJECT HEADER might be plenty – from memory issues to faulty drivers. However, it seems like drivers are likely to be the cause, so updating or reinstalling them might solve the issue. Besides this, we also provide other ways on how to solve this problem once and for all below.
If you want an automatic BAD_OBJECT_HEADER fix, you can try using the ReimageMac Washing Machine X9 repair tool instead – it is particularly designed to fix BSODs (so you will not have to deal with similar errors, such as SPECIAL POOL DETECTED MEMORY CORRUPTION or APC_INDEX_MISMATCH), missing DLLs,[2] registry errors, and much more – all automatically, without you having to reinstall Windows.
Solution 1. Update Windows
Fix it now!
Fix it now!
To repair damaged system, you have to purchase the licensed version of Reimage Reimage.
Windows updates are extremely important and can help patching various bugs on the system, so you should ensure that all the critical and optional updates are installed.
- Type in Windows Update in Windows search and press Enter
- On the right side of the window, press Check for updates
- Wait till all the relevant updates are installed automatically
- Restart your computer.

Solution 2. Stop Windows from automatically restarting
Fix it now!
Fix it now!
To repair damaged system, you have to purchase the licensed version of Reimage Reimage.
Some users claimed that they were unable to fix BAD OBJECT HEADER due to constant restart loop their Windows got stuck in for awhile. If you are affected by this issue, you can prevent Windows from rebooting each time:
Solution 3. Update your drivers
Fix it now!
Fix it now!
To repair damaged system, you have to purchase the licensed version of Reimage Reimage.
While some of the drivers are installed along with Windows updates, it does not apply to everything. Many people said that updating their Intel and video drivers helped them to solve the issue. Here’s how you can do that via the Device Manager:
- Right-click on Start and pick Device Manager
- Expand Display Adapters
- Right-click on your device and select Update Driver
- Pick Search automatically for drivers and wait
- Restart your computer once done.

Note: also update Thunderbolt drivers if you are using this hardware
It is, however, highly recommend you download the latest drivers from the official website of the device manufacturer, such as Nvidia or AMD. Alternatively, you can employ an automatic driver updater such as DriverFix which would download and install appropriate drivers for all your devices automatically – fast.
Solution 4. Check your memory with Windows Media Diagnostic Tool
Fix it now!
Fix it now!
To repair damaged system, you have to purchase the licensed version of Reimage Reimage.
Memory corruption is one of the main culprits of certain BSOD errors. This, you should run the automatic check of your RAM[3] as follows:
- Type in Memory in Windows search and press Enter
- Once the new window pops up, select Restart now and check for problems (recommended)
- This will automatically restart your computer and perform a memory check.

Solution 5. Run System File Checker
Fix it now!
Fix it now!
To repair damaged system, you have to purchase the licensed version of Reimage Reimage.
Check your system files for integrity violations as follows:
- Type in cmd in Windows search
- Right-click on Command Prompt and select run as administrator
- In the new window, type in sfc /scannow and hit Enter
- Wait till Windows finishes the scan and reports the findings
- Restart your PC.

Repair your Errors automatically
ugetfix.com team is trying to do its best to help users find the best solutions for eliminating their errors. If you don’t want to struggle with manual repair techniques, please use the automatic software. All recommended products have been tested and approved by our professionals. Tools that you can use to fix your error are listed bellow:
do it now!
Download Fix
Happiness
Guarantee
do it now!
Download Fix
Happiness
Guarantee
Compatible with Microsoft Windows
Compatible with OS X
Still having problems?
If you failed to fix your error using Reimage, reach our support team for help. Please, let us know all details that you think we should know about your problem.
Reimage — a patented specialized Windows repair program. It will diagnose your damaged PC. It will scan all System Files, DLLs and Registry Keys that have been damaged by security threats.Reimage — a patented specialized Mac OS X repair program. It will diagnose your damaged computer. It will scan all System Files and Registry Keys that have been damaged by security threats.
This patented repair process uses a database of 25 million components that can replace any damaged or missing file on user’s computer.
To repair damaged system, you have to purchase the licensed version of Reimage malware removal tool.

A VPN is crucial when it comes to user privacy. Online trackers such as cookies can not only be used by social media platforms and other websites but also your Internet Service Provider and the government. Even if you apply the most secure settings via your web browser, you can still be tracked via apps that are connected to the internet. Besides, privacy-focused browsers like Tor is are not an optimal choice due to diminished connection speeds. The best solution for your ultimate privacy is Private Internet Access – be anonymous and secure online.
Data recovery software is one of the options that could help you recover your files. Once you delete a file, it does not vanish into thin air – it remains on your system as long as no new data is written on top of it. Data Recovery Pro is recovery software that searchers for working copies of deleted files within your hard drive. By using the tool, you can prevent loss of valuable documents, school work, personal pictures, and other crucial files.
Bad Pool Header — ошибка появляется вместе с синим экраном BSoD. Может возникнуть внезапно, но в основном, пользователи с ней сталкивались после обновления или переустановки Windows 7, 8.1, 10. С ее появлением дальнейшая работа на компьютере будет невозможной, потребуется его перезагрузка. Но, чаще всего, после перезагрузки она появляется снова и снова.
Bad Pool Header в основном связана с неправильным выделением памяти системой Windows. Это может произойти по множеству причин. Но все же, самым распространенным виновником являются устаревшие или неправильные драйвера. Поскольку это связано с выделением памяти, причиной также может быть сбой в работе планок ОЗУ (например, через плохой контакт). Также ошибку могут вызвать некоторые антивирусные программы. Есть несколько способов ее исправить.

Содержание
- 1 Способ 1: отключение или удаление антивируса
- 2 Способ 2: отключение быстрого запуска
- 3 Способ 3: проверка драйверов
- 4 Способ 4: проверка ОЗУ
Способ 1: отключение или удаление антивируса
Прежде всего, нужно проверить, не является ли источником ошибки антивирус. Хотя он не относится к самым распространенным источникам, но, безусловно, поможет сузить диапазон поиска.
Попробуйте отключить через иконку в трее (правый нижний угол). Просто кликните правой кнопкой мыши на значок антивируса и выберите пункт «Отключить». Если пункт отключения не отображается, кликните дважды по значку для входа в основное окно и поищите его в настройках.
Если решили удалить, выполните следующие действия:
- Нажмите совместно клавиши Win+R.
- Введите appwiz.cpl и подтвердите выполнение на Enter.
- Найдите антивирусную программу, кликните на ней правой кнопкой и выберите «Удалить». Следуйте инструкциям на экране. После перезагрузите компьютер и проверьте, возникает ли синий экран BSoD.
Если при удалении антивируса возникает синий экран и препятствует дальнейшей работе, попробуйте загрузить компьютер в безопасном режиме.
- Нажмите вместе клавиши Win+R.
- Впишите msconfig и кликните на Enter.
- Перейдите на вкладку «Загрузка».
- Отметьте в параметрах загрузки «Безопасный режим». Сохраните изменения нажатием на «Применить» и «ОК».
- Перезагрузите систему, если перезагрузка не началась автоматически.
Система будет загружена в безопасном режиме. Теперь можно легко удалить антивирусную программу, минуя BSoD, так как антивирус не работает в этом режиме.
- Нажмите Win+R, введите appwiz.cpl и подтвердите запуск на Enter.
- Кликните правой кнопкой мыши на антивирус и выполните его удаление.
После успешного удаления выйдите из безопасного режима:
- Вызовите окно «Выполнить» (Win+R), введите msconfig.
- Откройте вкладку «Загрузка».
- Снимите флажок с параметра «Безопасный режим». После нажатия на «Применить» и «ОК» компьютер автоматически перезагрузится в обычном режиме.
Если ошибку Bad Pool Header удалось исправить удалением антивируса, то рекомендуем установить другой для полноценной защиты ваших данных, который не вызывает эту проблему.
Способ 2: отключение быстрого запуска
Этот способ помог исправить ошибку Bad Pool Header у большинства пользователей. В ускоренном режиме компьютер грузится намного быстрее в сравнении с обычным запуском. Иногда это вызывает проблемы, поскольку быстрый запуск не дает программному обеспечению достаточно времени для правильной загрузки.
- Удерживая клавишу Win нажмите R.
- Впишите команду powercfg.cpl и подтвердите ее на Enter.
- Перейдите в раздел «Действие кнопок питания».
- Нажмите «Изменение параметров которые сейчас не доступны».
- Снимите флажок с «Быстрого запуска», и сохраните изменения.
Перезагрузите ПК и проверьте, появляется ли синий экран с ошибкой Bad Pool Header.
Способ 3: проверка драйверов
Чаще всего к возникновению ошибки Bad Pool Header причастны драйверы устройств.
Если недавно переустанавливали или обновляли WIndows, то проверьте их в первую очередь. Во время переустановки или обновления WIndows автоматически устанавливает стандартные поверх оригинальных драйверов производителей. Обновленные версии, загруженные из Центра обновления Windows могут не подходить, вследствие неправильная работа и распознавание устройств приводит к ошибке Bad Pool Header.
Конечно, выявление «неправильного» драйвера может оказаться долгой процедурой. Нужно обновить все устройства. Но можно сузить поиск. Например, если синий экран BSOD возникает всякий раз при подключении к интернету, то сначала проверяем в Диспетчере устройств Wi-Fi адаптер и сетевую карту (Ethernet).
Приведем пример обновления сетевого адаптера. Эти шаги нужно повторить для обновления всех устройств, которые, по вашему видению, могут быть причиной проблемы:
- Нажмите одновременно Win+R.
- Наберите devmgmt.msc и подтвердите выполнение.
- Разверните раздел Сетевые адаптеры.
- Проверьте, есть ли желтый треугольник с восклицательным знаком, который указывает на ошибки с драйверами. Если присутствует красный значок, то у Windows возникли проблемы с установкой соединения с этим оборудованием.
Если видите желтый предупреждающий знак, выполните следующие действия:
- Щелкните правой кнопкой мыши на адаптер и выберите «Обновить драйвер».
- Выберите автоматический поиск обновленных драйверов.
Если ничего не находит, перейдите на официальный сайт производителя сетевой карты и скачайте последнюю версию в любую папку на компьютере.
После загрузки последней версии выполните следующие действия:
- В Диспетчере задач разверните Сетевые адаптеры.
- Щелкните правой кнопкой мыши на сетевую карту и выберите Свойства.
- Перейдите на вкладку Драйвер.
- Посмотрите на версию драйвера и проверьте, совпадает ли она с последней версией, загруженной из сайта производителя. Если это не так, закройте это окно.
- Снова щелкните правой кнопкой мыши на устройстве и выберите «Обновить…».
- Выполните поиск драйверов на этом компьютере.
- Кликните на «Обзор» и перейдите к папке, в которую скачали последнюю версию.
- Нажмите «Далее» и следуйте инструкциям на экране.
Если проблема все еще не решена, нужно удалить устройство и пусть Windows установит стандартный набор сетевых драйверов. Это может решить проблему, так как Windows установит наиболее совместимые.
Для этого, кликните на сетевой карте правой кнопкой мыши, выберите «Удалить», сохраните изменения и перепустите компьютер. Система автоматически установит новый универсальный драйвер для этого устройства.
Способ 4: проверка ОЗУ
Синий экран с ошибкой Bad Pool Header может вызван неисправностью оперативной памяти. В частности, через плохой контакт или наличием пыли как на самой планке, так и вокруг слота.
Первое, что нужно сделать, извлечь планку ОЗУ, очистить контакты ластиком, продуть слоты от пыли и вставить ее обратно. Убедитесь, что планка подключена правильно, защелки с обеих сторон зафиксированы. После этого включите компьютер и проверьте на наличие ошибки Bad Pool Header.
Если не удалось исправить ошибку, приготовьтесь потратить некоторое время на тестирование ОЗУ утилитой Memtest.
Диагностика памяти Windows
В системе Windows есть собственный встроенный инструмент для проверки оперативной памяти. Хотя он не считается более точным инструментом, когда дело доходит до тестирования. Поэтому лучше использовать стороннюю утилиту Memtest.
Чтобы запустить встроенное средство диагностики памяти:
- Вызовите окно «Выполнить» нажатием клавиш Win+R.
- Впишите команду mdsched и щелкните на Enter.
- Нажмите «Выполнить перезагрузку и проверку (рекомендуется)».
Если возникли какие-либо ошибки или он не запускается:
- Нажмите клавишу Windows один раз.
- Введите «диагностика памяти» в поисковую строку.
- В результатах поиска щелкните правой кнопкой мыши на «Диагностика проблем оперативной памяти» и выберите Запуск от имени администратора.
- Нажмите «Выполнить перезагрузку и проверку (рекомендуется)».
Windows автоматически перезагрузится и начнется тестирование. На экране будет отображаться сам процесс тестирования. После завершения компьютер автоматически перезагрузится, и результаты будут отображены при входе в Windows. По результата тестирования можно определить, нужно ли вам менять оперативную память или нет.
Memtest
Это основная программа для проверки состояния оперативной памяти. Она занимает много времени, но очень полезна для определения ее состояния.
Ручное тестирование
Поскольку Memtest занимает много времени, есть другой вариант, при условии, что имеется запасная планка ОЗУ.
Если после замены одной из планок система работает нормально и не возникает синий экран с ошибкой bad pool header, то эта замененная планка была источником проблемы. Но, все же рекомендуем ее проверить утилитой Memtest, чтобы на 100% убедится в ее неисправности.