New issue
Have a question about this project? Sign up for a free GitHub account to open an issue and contact its maintainers and the community.
By clicking “Sign up for GitHub”, you agree to our terms of service and
privacy statement. We’ll occasionally send you account related emails.
Already on GitHub?
Sign in
to your account
Closed
Sola1991 opened this issue
Jan 2, 2019
· 8 comments
Comments
![]()
This my 1st time trying to compile a project.
I’m following building instructions of MSYS2 Method Building-on-Windows
but I’m facing this error.
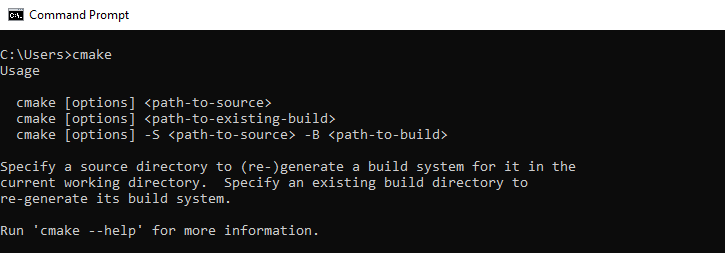
Cmake command is not found
$ cmake .. -G 'Unix Makefiles' -DUSE_SDL2_LIBS=1
bash: cmake: command not found
make should have been downloaded & installed as part of:pacman --noconfirm --needed -Sy pkg-config make mingw-w64-i686-toolchain mingw-w64-i686-cmake mingw-w64-i686-zlib mingw-w64-i686-SDL2 mingw-w64-i686-SDL2_image mingw-w64-i686-SDL2_mixer
I’m using Windows 10×64-bit.
![]()
Hm CMake should have been installed by mingw-w64-i686-cmake, did you see any related errors when you run pacman? It’s also possible that it comes from a different package now; try installing mingw-w64-cmake or just cmake to see if it works.
![]()
MSYS2 still report the same error once I run the cmake argument.
This what I get after running thees code
$ pacman -Sy mingw-w64-cmake make
:: Synchronizing package databases...
 mingw32 is up to date
 mingw64 is up to date
 msys is up to date
error: target not found: mingw-w64-cmake
warning: make-4.2.1-1 is up to date -- reinstalling
$ pacman --noconfirm --needed -Sy pkg-config make mingw-w64-i686-toolchain mingw-w64-i686-cmake mingw-w64-i686-zlib mingw-w64-i686-SDL2 mingw-w64-i686-SDL2_image mingw-w64-i686-SDL2_mixer
:: Synchronizing package databases...
 mingw32 is up to date
 mingw64 is up to date
 msys is up to date
warning: pkg-config-0.29.2-1 is up to date -- skipping
warning: make-4.2.1-1 is up to date -- skipping
:: There are 17 members in group mingw-w64-i686-toolchain:
:: Repository mingw32
   1) mingw-w64-i686-binutils  2) mingw-w64-i686-crt-git  3) mingw-w64-i686-gcc  4) mingw-w64-i686-gcc-ada  5) mingw-w64-i686-gcc-fortran  6) mingw-w64-i686-gcc-libgfortran
   7) mingw-w64-i686-gcc-libs  8) mingw-w64-i686-gcc-objc  9) mingw-w64-i686-gdb  10) mingw-w64-i686-headers-git  11) mingw-w64-i686-libmangle-git  12) mingw-w64-i686-libwinpthread-git
   13) mingw-w64-i686-make  14) mingw-w64-i686-pkg-config  15) mingw-w64-i686-tools-git  16) mingw-w64-i686-winpthreads-git  17) mingw-w64-i686-winstorecompat-git

Enter a selection (default=all):
warning: mingw-w64-i686-binutils-2.30-5 is up to date -- skipping
warning: mingw-w64-i686-crt-git-7.0.0.5285.7b2baaf8-1 is up to date -- skipping
warning: mingw-w64-i686-gcc-7.4.0-1 is up to date -- skipping
warning: mingw-w64-i686-gcc-ada-7.4.0-1 is up to date -- skipping
warning: mingw-w64-i686-gcc-fortran-7.4.0-1 is up to date -- skipping
warning: mingw-w64-i686-gcc-libgfortran-7.4.0-1 is up to date -- skipping
warning: mingw-w64-i686-gcc-libs-7.4.0-1 is up to date -- skipping
warning: mingw-w64-i686-gcc-objc-7.4.0-1 is up to date -- skipping
warning: mingw-w64-i686-gdb-8.2.1-1 is up to date -- skipping
warning: mingw-w64-i686-headers-git-7.0.0.5285.7b2baaf8-1 is up to date -- skipping
warning: mingw-w64-i686-libmangle-git-7.0.0.5230.69c8fad6-1 is up to date -- skipping
warning: mingw-w64-i686-libwinpthread-git-7.0.0.5273.3e5acf5d-1 is up to date -- skipping
warning: mingw-w64-i686-make-4.2.1-2 is up to date -- skipping
warning: mingw-w64-i686-pkg-config-0.29.2-1 is up to date -- skipping
warning: mingw-w64-i686-tools-git-7.0.0.5272.d66350ea-1 is up to date -- skipping
warning: mingw-w64-i686-winpthreads-git-7.0.0.5273.3e5acf5d-1 is up to date -- skipping
warning: mingw-w64-i686-winstorecompat-git-7.0.0.5230.69c8fad6-1 is up to date -- skipping
warning: mingw-w64-i686-cmake-3.12.4-1 is up to date -- skipping
warning: mingw-w64-i686-zlib-1.2.11-5 is up to date -- skipping
warning: mingw-w64-i686-SDL2-2.0.9-1 is up to date -- skipping
warning: mingw-w64-i686-SDL2_image-2.0.4-1 is up to date -- skipping
warning: mingw-w64-i686-SDL2_mixer-2.0.4-1 is up to date -- skipping
![]()
Checked the mingw-w64-i686-cmake package, it does provide CMake, but seems it’s not on your PATH for some reason (and probably the other 32-bit binaries aren’t either). Try installing mingw-w64-x86_64-cmake, it should add CMake and then we’ll see if it founds the other parts.
![]()
Same issue; I see the pkg has been installed tough.
here is the log
$ pacman -Sy mingw-w64-x86_64-cmake
:: Synchronizing package databases...
mingw32 is up to date
mingw64 is up to date
msys is up to date
resolving dependencies...
looking for conflicting packages...
Packages (38) mingw-w64-x86_64-brotli-1.0.7-1 mingw-w64-x86_64-bzip2-1.0.6-6 mingw-w64-x86_64-c-ares-1.15.0-1 mingw-w64-x86_64-ca-certificates-20180409-1 mingw-w64-x86_64-curl-7.63.0-1
mingw-w64-x86_64-expat-2.2.6-1 mingw-w64-x86_64-gcc-libs-8.2.1+20181214-1 mingw-w64-x86_64-gettext-0.19.8.1-7 mingw-w64-x86_64-gmp-6.1.2-1 mingw-w64-x86_64-jansson-2.12-1
mingw-w64-x86_64-jemalloc-5.1.0-3 mingw-w64-x86_64-jsoncpp-1.8.4-3 mingw-w64-x86_64-libarchive-3.3.3-2 mingw-w64-x86_64-libffi-3.2.1-4 mingw-w64-x86_64-libiconv-1.15-3
mingw-w64-x86_64-libidn2-2.0.5-1 mingw-w64-x86_64-libmetalink-0.1.3-3 mingw-w64-x86_64-libpsl-0.20.2-1 mingw-w64-x86_64-libssh2-1.8.0-3 mingw-w64-x86_64-libsystre-1.0.1-4
mingw-w64-x86_64-libtasn1-4.13-1 mingw-w64-x86_64-libtre-git-r128.6fb7206-2 mingw-w64-x86_64-libunistring-0.9.10-1 mingw-w64-x86_64-libuv-1.24.1-1
mingw-w64-x86_64-libwinpthread-git-7.0.0.5273.3e5acf5d-1 mingw-w64-x86_64-lz4-1.8.3-1 mingw-w64-x86_64-lzo2-2.10-1 mingw-w64-x86_64-mpc-1.1.0-1 mingw-w64-x86_64-mpfr-4.0.1-2
mingw-w64-x86_64-nettle-3.4.1-1 mingw-w64-x86_64-nghttp2-1.35.1-1 mingw-w64-x86_64-openssl-1.1.1.a-1 mingw-w64-x86_64-p11-kit-0.23.14-1 mingw-w64-x86_64-rhash-1.3.6-2
mingw-w64-x86_64-xz-5.2.4-1 mingw-w64-x86_64-zlib-1.2.11-5 mingw-w64-x86_64-zstd-1.3.8-1 mingw-w64-x86_64-cmake-3.12.4-1
Total Download Size: 21.79 MiB
Total Installed Size: 156.76 MiB
:: Proceed with installation? [Y/n] y
:: Retrieving packages...
mingw-w64-x86_64-gmp-6.1.2-1-any 486.0 KiB 266K/s 00:02 [#####################################################################] 100%
mingw-w64-x86_64-mpfr-4.0.1-2-any 338.3 KiB 512K/s 00:01 [#####################################################################] 100%
mingw-w64-x86_64-mpc-1.1.0-1-any 78.9 KiB 1924K/s 00:00 [#####################################################################] 100%
mingw-w64-x86_64-libwinpthread-git-7.0.0.5273.3e5acf5d-1-any 43.3 KiB 1445K/s 00:00 [#####################################################################] 100%
mingw-w64-x86_64-gcc-libs-8.2.1+20181214-1-any 578.6 KiB 559K/s 00:01 [#####################################################################] 100%
mingw-w64-x86_64-c-ares-1.15.0-1-any 98.1 KiB 68.0K/s 00:01 [#####################################################################] 100%
mingw-w64-x86_64-brotli-1.0.7-1-any 329.2 KiB 254K/s 00:01 [#####################################################################] 100%
mingw-w64-x86_64-expat-2.2.6-1-any 158.7 KiB 630K/s 00:00 [#####################################################################] 100%
mingw-w64-x86_64-libiconv-1.15-3-any 616.3 KiB 561K/s 00:01 [#####################################################################] 100%
mingw-w64-x86_64-gettext-0.19.8.1-7-any 3.1 MiB 597K/s 00:05 [#####################################################################] 100%
mingw-w64-x86_64-libunistring-0.9.10-1-any 625.6 KiB 565K/s 00:01 [#####################################################################] 100%
mingw-w64-x86_64-libidn2-2.0.5-1-any 114.0 KiB 1932K/s 00:00 [#####################################################################] 100%
mingw-w64-x86_64-libmetalink-0.1.3-3-any 61.1 KiB 1970K/s 00:00 [#####################################################################] 100%
mingw-w64-x86_64-libpsl-0.20.2-1-any 101.9 KiB 1756K/s 00:00 [#####################################################################] 100%
mingw-w64-x86_64-libtasn1-4.13-1-any 186.3 KiB 773K/s 00:00 [#####################################################################] 100%
mingw-w64-x86_64-libffi-3.2.1-4-any 44.9 KiB 1953K/s 00:00 [#####################################################################] 100%
mingw-w64-x86_64-p11-kit-0.23.14-1-any 296.0 KiB 664K/s 00:00 [#####################################################################] 100%
mingw-w64-x86_64-ca-certificates-20180409-1-any 356.3 KiB 769K/s 00:00 [#####################################################################] 100%
mingw-w64-x86_64-bzip2-1.0.6-6-any 81.3 KiB 1891K/s 00:00 [#####################################################################] 100%
mingw-w64-x86_64-zlib-1.2.11-5-any 177.8 KiB 330K/s 00:01 [#####################################################################] 100%
mingw-w64-x86_64-openssl-1.1.1.a-1-any 4.7 MiB 598K/s 00:08 [#####################################################################] 100%
mingw-w64-x86_64-libssh2-1.8.0-3-any 232.3 KiB 526K/s 00:00 [#####################################################################] 100%
mingw-w64-x86_64-jansson-2.12-1-any 65.8 KiB 1530K/s 00:00 [#####################################################################] 100%
mingw-w64-x86_64-jemalloc-5.1.0-3-any 306.3 KiB 633K/s 00:00 [#####################################################################] 100%
mingw-w64-x86_64-nghttp2-1.35.1-1-any 201.0 KiB 280K/s 00:01 [#####################################################################] 100%
mingw-w64-x86_64-curl-7.63.0-1-any 1144.9 KiB 486K/s 00:02 [#####################################################################] 100%
mingw-w64-x86_64-jsoncpp-1.8.4-3-any 284.3 KiB 618K/s 00:00 [#####################################################################] 100%
mingw-w64-x86_64-lz4-1.8.3-1-any 133.7 KiB 541K/s 00:00 [#####################################################################] 100%
mingw-w64-x86_64-lzo2-2.10-1-any 101.1 KiB 3.40M/s 00:00 [#####################################################################] 100%
mingw-w64-x86_64-libtre-git-r128.6fb7206-2-any 84.2 KiB 75.4K/s 00:01 [#####################################################################] 100%
mingw-w64-x86_64-libsystre-1.0.1-4-any 24.0 KiB 0.00B/s 00:00 [#####################################################################] 100%
mingw-w64-x86_64-nettle-3.4.1-1-any 419.4 KiB 466K/s 00:01 [#####################################################################] 100%
mingw-w64-x86_64-xz-5.2.4-1-any 297.7 KiB 595K/s 00:01 [#####################################################################] 100%
mingw-w64-x86_64-zstd-1.3.8-1-any 369.4 KiB 557K/s 00:01 [#####################################################################] 100%
mingw-w64-x86_64-libarchive-3.3.3-2-any 647.4 KiB 492K/s 00:01 [#####################################################################] 100%
mingw-w64-x86_64-libuv-1.24.1-1-any 187.6 KiB 439K/s 00:00 [#####################################################################] 100%
mingw-w64-x86_64-rhash-1.3.6-2-any 163.9 KiB 656K/s 00:00 [#####################################################################] 100%
mingw-w64-x86_64-cmake-3.12.4-1-any 4.7 MiB 439K/s 00:11 [#####################################################################] 100%
(38/38) checking keys in keyring [#####################################################################] 100%
(38/38) checking package integrity [#####################################################################] 100%
(38/38) loading package files [#####################################################################] 100%
(38/38) checking for file conflicts [#####################################################################] 100%
(38/38) checking available disk space [#####################################################################] 100%
:: Processing package changes...
( 1/38) installing mingw-w64-x86_64-gmp [#####################################################################] 100%
( 2/38) installing mingw-w64-x86_64-mpfr [#####################################################################] 100%
( 3/38) installing mingw-w64-x86_64-mpc [#####################################################################] 100%
( 4/38) installing mingw-w64-x86_64-libwinpthread-git [#####################################################################] 100%
( 5/38) installing mingw-w64-x86_64-gcc-libs [#####################################################################] 100%
( 6/38) installing mingw-w64-x86_64-c-ares [#####################################################################] 100%
( 7/38) installing mingw-w64-x86_64-brotli [#####################################################################] 100%
( 8/38) installing mingw-w64-x86_64-expat [#####################################################################] 100%
( 9/38) installing mingw-w64-x86_64-libiconv [#####################################################################] 100%
(10/38) installing mingw-w64-x86_64-gettext [#####################################################################] 100%
(11/38) installing mingw-w64-x86_64-libunistring [#####################################################################] 100%
(12/38) installing mingw-w64-x86_64-libidn2 [#####################################################################] 100%
(13/38) installing mingw-w64-x86_64-libmetalink [#####################################################################] 100%
(14/38) installing mingw-w64-x86_64-libpsl [#####################################################################] 100%
(15/38) installing mingw-w64-x86_64-libtasn1 [#####################################################################] 100%
(16/38) installing mingw-w64-x86_64-libffi [#####################################################################] 100%
(17/38) installing mingw-w64-x86_64-p11-kit [#####################################################################] 100%
(18/38) installing mingw-w64-x86_64-ca-certificates [#####################################################################] 100%
(19/38) installing mingw-w64-x86_64-bzip2 [#####################################################################] 100%
(20/38) installing mingw-w64-x86_64-zlib [#####################################################################] 100%
(21/38) installing mingw-w64-x86_64-openssl [#####################################################################] 100%
(22/38) installing mingw-w64-x86_64-libssh2 [#####################################################################] 100%
(23/38) installing mingw-w64-x86_64-jansson [#####################################################################] 100%
(24/38) installing mingw-w64-x86_64-jemalloc [#####################################################################] 100%
(25/38) installing mingw-w64-x86_64-nghttp2 [#####################################################################] 100%
(26/38) installing mingw-w64-x86_64-curl [#####################################################################] 100%
(27/38) installing mingw-w64-x86_64-jsoncpp [#####################################################################] 100%
(28/38) installing mingw-w64-x86_64-lz4 [#####################################################################] 100%
(29/38) installing mingw-w64-x86_64-lzo2 [#####################################################################] 100%
(30/38) installing mingw-w64-x86_64-libtre-git [#####################################################################] 100%
(31/38) installing mingw-w64-x86_64-libsystre [#####################################################################] 100%
(32/38) installing mingw-w64-x86_64-nettle [#####################################################################] 100%
(33/38) installing mingw-w64-x86_64-xz [#####################################################################] 100%
(34/38) installing mingw-w64-x86_64-zstd [#####################################################################] 100%
(35/38) installing mingw-w64-x86_64-libarchive [#####################################################################] 100%
(36/38) installing mingw-w64-x86_64-libuv [#####################################################################] 100%
(37/38) installing mingw-w64-x86_64-rhash [#####################################################################] 100%
(38/38) installing mingw-w64-x86_64-cmake [#####################################################################] 100%
Optional dependencies for mingw-w64-x86_64-cmake
mingw-w64-x86_64-qt5: CMake Qt GUI
Sola@Sola MSYS /c/supermariowar/build
$ cmake .. -G 'Unix Makefiles' -DUSE_SDL2_LIBS=1
bash: cmake: command not found
![]()
Ah there’s the issue:
Sola@Sola MSYS /c/supermariowar/build
You should launch the «MSYS2 MinGW 32-bit» command prompt, which adds /mingw32/bin to your PATH.
![]()
Thanks @mmatyas,
You are totally correct. Now I’m able to run cmake & make arguments.
![]()
Hi. My situation is similar with Sola1991, but after I finish the steps above I had another error.
je55i@LAPTOP-JFI2G606 MINGW32 /d/Master/zacros/zacros_2.0/build
$ cmake .. -G»MSYS Makefiles»
CMake Error: CMake was unable to find a build program corresponding to «MSYS Makefiles». CMAKE_MAKE_PROGRAM is not set. You probably need to select a different build tool.
CMake Error: CMake was unable to find a build program corresponding to «MSYS Makefiles». CMAKE_MAKE_PROGRAM is not set. You probably need to select a different build tool.
CMake Error: CMAKE_Fortran_COMPILER not set, after EnableLanguage
CMake Error: CMAKE_AR was not found, please set to archive program.
— Configuring incomplete, errors occurred!
![]()
Hi, have you tried running CMake with -G 'Unix Makefiles'? I’m not sure «MSYS Makefiles» works.
This post helps you to fix the «cmake: command not found» error encountered during the build process of your software. There are two major reasons for getting cmake command errors, either cmake is not installed or Path is not correctly set up. It doesn’t matter, which operating system you have. Following this post step by step will get this issue resolved for sure.
Below mentioned are the types of errors that occur while working with the «cmake» command —
- cmake: command not found
- cmake command not found macOS
- autogen.sh cmake command not found
- /bin/sh cmake command not found
- ‘cmake’ is not recognized as an internal or external command, operable program or batch file
- command ‘cmake’ not found
- bash: /snap/bin/cmake: No such file or directory
Table of Contents
- 1 Why am I getting the «cmake: command not found» error?
- 2 How to fix CMake: command not found error in macOS
- 3 How to check «CMake» package is installed or not
- 4 How to fix command ‘cmake’ not found error in Linux
- 5 How to fix ‘cmake’ is not recognized as an internal or external command, operable program or batch file error in Windows
- 6 How to install CMake in Docker
- 7 End note
- 8 Other helpful articles
Why am I getting the «cmake: command not found» error?
Following are the reason for getting the cmake command not found issue —
- cmake is not installed in your operating system
- cmake is installed but PATH or environmental variable is not setup correctly
Let’s assume you are trying to build software which is trying to run «build && cmake» commands and you are getting cmake errors. It means you don’t have the CMake package installed in your macOS.
To solve this CMake issue, we will follow 3 steps approach —
- Check if CMake is installed or not
- If it’s not installed, install the cmake using the right way.
- If CMake is installed but not working, then look for the PATH variable.
The above-mentioned approach is applicable to all operating systems whether it’s Windows, Debian, RedHat or macOS.
How to check «CMake» package is installed or not
The best way is to run the CMake command —
- Open a terminal in macOS
- Run
cmakecommand see the output
$ cmake
If it shows the cmake help, then cmake is installed in your system and your life is sorted, else you need to install cmake using the following command.
$ brew install cmake- Alternatively, you can also go to the cmake download page and download the precompiled binaries as disk image «.dmg» or «.tar.gz» (tarball) binary as per your macOS version.

- Copy CMake.app into /Applications (or a custom location) and then double click to run it. Then follow the “How to Install For Command Line Use” menu item
Once you install the cmake it will automatically be available in the PATH. but in case you don’t have that automatically and get the cmake: command not found error, then you need to set up the cmake PATH manually using the following commands —
How to setup PATH for cmake in macOS
- Open
.bash_profileor.bashrcin your home directory using vim or nano editor. - Add the following line to the end of the file and save the file.
export PATH=»/Applications/CMake.app/Contents/bin»:»$PATH»
- If you want to create symlinks to ‘/usr/local/bin’, run the following command from the terminal
$ sudo "/Applications/CMake.app/Contents/bin/cmake-gui" --install
How to fix command ‘cmake’ not found error in Linux
If you use Ubuntu or any other Debian-based Linux and get «cmake: command not found errors«, then follow these series of commands —
Step-1 check for existing cmake installation

As shown in the above image, cmake is not installed in my Linux system.
Step2- Install cmake, if not installed already
How to install cmake in Linux — 4 Methods
There are 4 ways to install cmake in your Debian Linux system like Ubuntu, LinuxMint, Kubuntu, Kali Linux etc.
- 1. Using the apt command
Run the following commands —
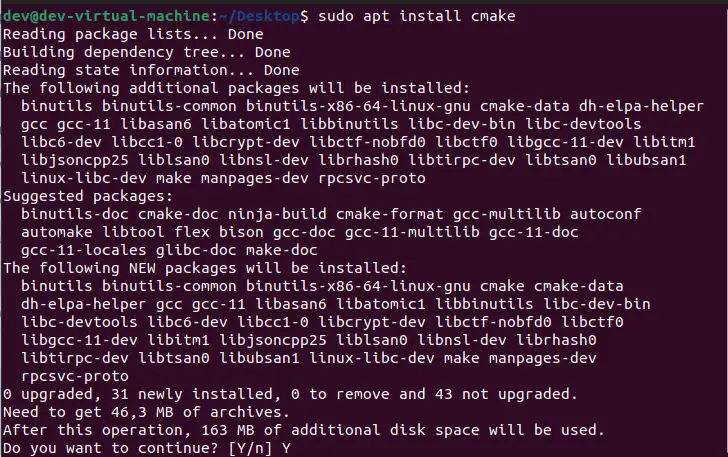
$ sudo apt update
$ sudo apt install cmake
- 2. Using the snap command as the apt command is going to obsolete soon
$ sudo snap install cmake --classic

- By using pre-compiled binaries available on the make download page.

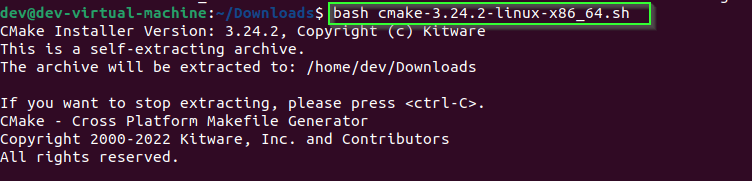
- 3. Download the cmake-3.24.2-linux-x86_64.sh file and execute it.
$ bash cmake-3.24.2-linux-x86_64.sh
- Accept license by typing «y» and either accept the default location to install or provide your custom directory.
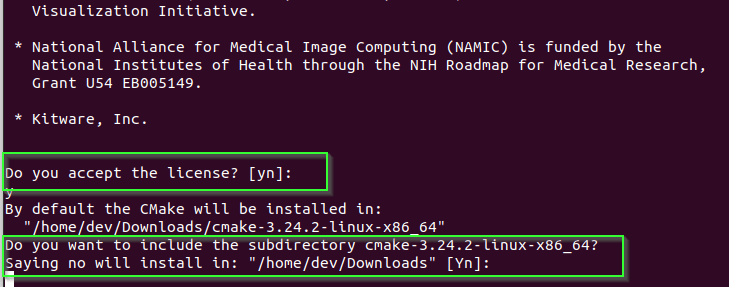
** Note — whatever the directory location you will provide in the above step, the same path you need to include in $PATH manually if the cmake command gives you an error.
For example, in my case, I will add the following line to the last of .bashrc or .bash_profile file in the user’s home directory
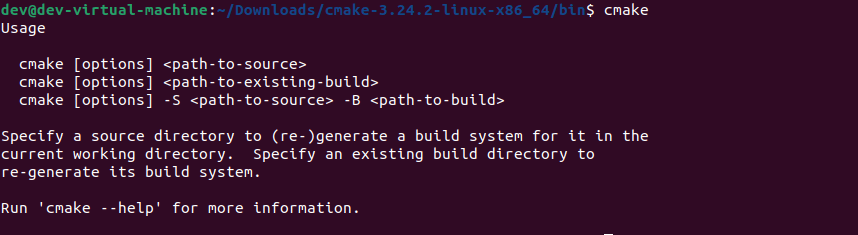
$ export PATH=$PATH:/home/dev/Downloads/cmake-3.24.2-linux-x86_64/bin
- Check the command
"cmake"is running successfully
$ cmake
How to fix ‘cmake’ is not recognized as an internal or external command, operable program or batch file error in Windows
In the case of the Windows operating system, if you get cmake command errors, then follow the below-mentioned process to fix it.
- Download cmake binaries from the cmake website

- Double-click on the installer and click «
next» on the welcome page - Accept the license and hit
nextin the wizard
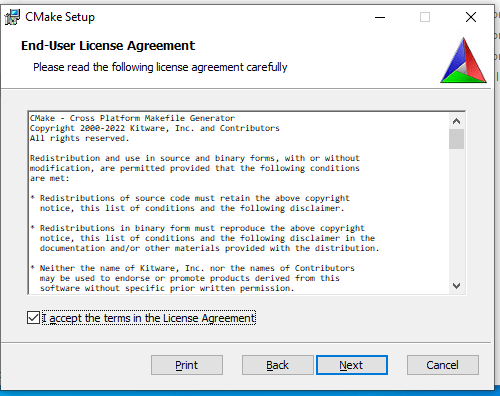
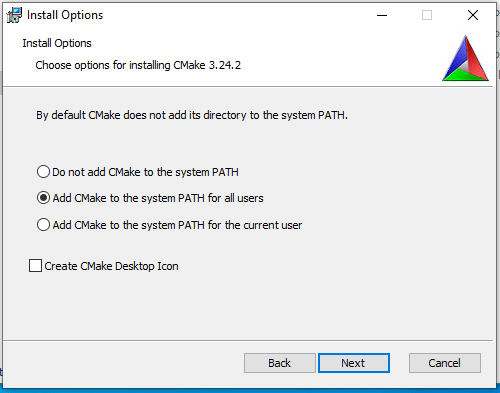
- Important step — Select the option to add the CMake directory to the system PATH.
You will get 3 options —
- Do not add CMake to the system PATH — If you have selected this option, then you need to add the CMake path manually in the system after installation. That is one of the reasons when you have cmake installed and still, you get «‘cmake’ is not recognized as an internal or external command» error. So don’t select this option.
- Add CMake to the system PATH for all users — If you log in with different users to your system, then you can select this option. It will set up the cmake PATH variable for all users, who is present on the system.
- Add CMake to the system PATH for the current user — If you are the only user, then this is the recommended option.
You can select either option 2 or 3 based on your requirement, both will set up the PATH variable in your environment and will fix the cmake command errors.
- Select custom or leave it to default for the cmake installation directory.
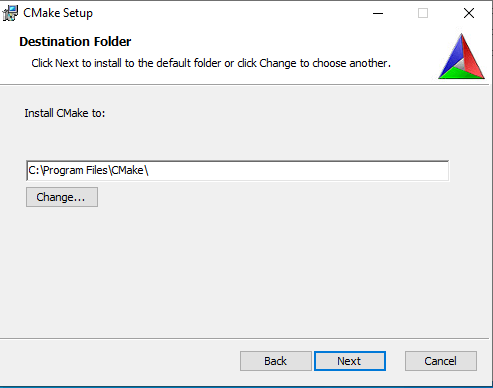
- Then Click
Installand accept select «Yes» in case of user control dialogue box permission
- Click Finish, once the cmake installation is done
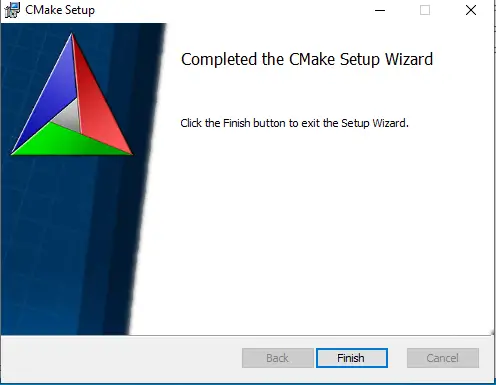
- Open the command prompt and run the
cmakecommand to validate.
c:> cmake
How to install CMake in Docker
Add this line to install CMake in the Docker file —
#!/bin/bash
wget -qO- "https://github.com/Kitware/CMake/releases/download/v3.24.2/cmake-3.24.2-linux-x86_64.tar.gz" | tar --strip-components=1 -xz -C /usr/local
Change the version with your required version, I have shown an example of v3.24.2 latest available while writing this article. If you get the error wget command not found, then add appt update && apt install wget in your file.
End note
The fundamental approach is the same to troubleshoot the CMake command not found error in all operating systems —
- Check for cmake installation
- Install cmake as shown in this post for your operating systems
- setup PATH or Environment variable, if required
- Run cmake and build apps
Leave your feedback or comments, if you face any other issues in the cmake command.
Other helpful articles
- Yarn command not found error
- Sudo command not found error
- Fix «mkvirtualenv command not found» error
- Nodemon command not found
- Nodemon app crashed — Waiting for file changes before starting
- Keytool command issues
- Cmake command errors
Linux
- 20.12.2016
- 9 806
- 4
- 07.03.2019
- 10
- 9
- 1
- Содержание статьи
- Описание
- Комментарии к статье ( 4 шт )
- Добавить комментарий
В данной статье будут даны рекомендации о том, что делать в случаях, когда при попытке собрать что-либо из исходников, вы получаете ошибку, говорящую о том, что cmake не найден в вашей системе.
Описание
Эту ошибку очень часто можно встретить при начале компиляции чего-либо из исходного кода в дистрибутивах, которые имеют в своем названии minimal. Например, Ubuntu-1610-yakkety-64-minimal 
cmake: command not found
Она означает, что в вашей системе не найдена кроссплатформенная система автоматизации сборки программного обеспечения из исходного кода (она же и есть cmake). Для установки cmake в большинстве современных дистрибутивов достаточно сделать следующее:
sudo apt-get update
sudo apt-get install cmake
После этого можно пробовать запустить cmake еще раз.
I have installed CMake and cmake.exe is in C:Program Files (x86)CMakebin
But when I run call cmake %CMAKE_BUILD_OPTIONS% through a bat file I am getting an error message
‘cmake’ is not recognized as an internal or external command, operable program or batch file.
Should I set this path in environment variable?
![]()
usr1234567
20.5k16 gold badges109 silver badges126 bronze badges
asked Jul 28, 2015 at 11:35
![]()
3
It resolved after adding C:Program Files (x86)CMakebin to environment variable PATH.
![]()
usr1234567
20.5k16 gold badges109 silver badges126 bronze badges
answered Jul 28, 2015 at 11:47
![]()
NicNic
3672 gold badges5 silver badges16 bronze badges
1
Was able to resolve the issue by installing Chocolatey (on Windows 10) and running choco install cmake
answered Apr 2, 2020 at 3:27
![]()
monkrusmonkrus
1,33724 silver badges23 bronze badges
CMake is an open-source platform that cuts across build systems. CMake is composed of a group of tools designed to build, test, and package software. However, while trying to work, you may get an error message stating, “CMake command not found’.
This error message can be frustrating. However, to help, we have provided information on all you need to know about CMake and how to fix the Error.
Individuals have complained of getting the CMake command not found error massage. You May encounter the error in the formats and actual price now. For the first option:
[!] /bin/bash -c
set -e
echo `pwd`
sed -i ” ‘s/include <(cmark.*)>/include “1″/’ src/cmark.h
mkdir -p build; cd build && cmake -G Xcode ..
/Users/mac1/Library/Caches/CocoaPods/Pods/Release/cmark/0.24.1-ec027
/bin/bash: line 4: CMake: command not foundGitHub
OR ‘cmake’ is not recognized as an internal or external command, operable program or batch file. GitHub
How Can I Resolve CMake is not Found Error?
Fix 1: The first step we would advise you to take is checking if you have Cmake installed. If you do, then you should check if it was properly installed.
Fix 2: Enter the command line include_directories{$CEGUI_INCLUDE_DIR} / . . /
Installing CMake
-C <initial-cache> – Pre-load a script to populate the cache.
When CMake is first to run in an empty build tree, it creates a CMakeCache.txt file and populates it with customizable project settings. These customizable options may be used to specify a file from which to load cache entries before passing through the project’s cmake list files.
Loaded order entries are prioritized over all other default values in the project. The given file must be a CMake script that contains SET commands, use the CACHE option, and not a cache-format file.
What are the Different Functions of cmake?
- Create a cmake cache entry – When cmake is run first in an empty build tree, it creates a CMakeCache.txt file. This text tile is further populated by settings that can be customized to suit your project. You can use this option to specify what settings should be prioritized above your project’s default value. The option can be repeated for as many cache entries as desired.
-U <globbing_expr>
- Remove matching entries from CMake cache – In some cases, we may need to remove the specified product. Running Cmake can opt to remove one or more variables from the CMakeCache.txt file, globbing expressions using *irrelevant, and queries are supported. You can repeat the option for as many cache entries as desired.
- Send Text Messages – CMakeCache.txt non-working.
-G <generator-name> – With cmake, you can specify a system generator build. CMake may sometimes allow multiple native system build on specified platforms and generate a specific build of the system. You will find suggestions for possible generator names specified in the Generators section.
- -T <toolset-name> – Specify the toolset name if it is supported by generator. Some CMake generators support a toolset name given to the native build system to choose a compiler. The feature is supported only on specific generators:
Visual Studio >= 10
Xcode >= 3.0
-
Check the native build system documentation for recommended toolset names – A <platform-name> – Specify platform name if supported by generator. Some CMake generators support a platform name given to the native build system to choose a compiler or SDK. The feature is supported only on specific generators:
Visual Studio >= 8: See native build system documentation for allowed platform names.
-Wno-dev
-
Suppress developer warnings – Suppress warnings are for the author of the CMakeLists.txt files.
-Udev
You can alter the settings to make some changes possible. For instance, you can
Allow developer warnings in settings.
Twerk settings enable warnings meant for the author of the CMakeLists.txt files.
-E <command> [<options>…]
How Can I List Out Non-Advanced Cached Variables?
List cache variables run CMake and list the CMake cache variables that are not marked as INTERNAL or ADVANCED. Effectively, this will display the current CMake settings, which can then be changed with the -D option.
Tampering with a few of the variables may cause more variables to be created. If for example, A is specified, then the display will also include advanced variables. If it is H that is specified, then help options for each of the variables will be displayed.
Working With Cmake on Linux
Some of the steps you should take to work with cmake on Linux will be to download cmake first. Once the download has been completed, you will need to configure, test, compile, and install CMake on a Linux device. These instructions work on Debian/Ubuntu Linux distributions as well as Linux machines that have compilers and make utilities installed.
Please ensure you check the integrity of the downloaded file before unzipping it. The ‘#’ (without quotes) in front of commands mean you should run the command as a root user (or make use of sudo instead if your operating system permits that).
How Can I Configure Cmake On A Device?
Step 1: Enter the command: $ wget http://www.cmake.org/files/v2.8/cmake-2.8.3.tar.gz to download the file. GitHub.com
Step 2: Start the extraction of the source code for cmake from the downloaded file. Do this by entering the code:
$ tar xzf cmake-2.8.3.tar.gz
$ cd cmake-2.8.3. Cmake
Step 3: Select the configuration options. If you want to see the available configuration options, run the command below. Ensure you hit enter after every line inputted.
$ ./configure –help
Step 4: It is important to configure cmake before installing it. For this purpose, enter this command: $ ../configure –prefix=/opt/cmake
This code tells the install script to install CMake in /opt/cmake.
Step 5: Compilation
Use this command: $ make
Please ensure you check the integrity of the downloaded file before you unzip it. ‘#’ (without quotes) in front of the commands means that you have to run the command as root user (or use sudo instead if your system supports that).
Step 6: Download
For downloads, enter the following codes
$ wget http://www.cmake.org/files/v2.8/cmake-2.8.3.tar.gz
Configuration:
You can add CMake to the PATH by entering the command line:
PATH=”/Applications/CMake.app/Contents/bin”:”$PATH”Cmake
Or, to install symlinks to ‘/usr/local/bin’, run:
sudo “/Applications/CMake.app/Contents/bin/cmake-gui” –install
Or, to install symlinks to another directory, run:
sudo “/Applications/CMake.app/Contents/bin/cmake-gui” –install=/path/to/bin
Pick any of the methods listed below to add to Cmake. cmake
Method 1. Add an environment variable
Method 2. Install symlinks
Open the terminal to execute:
sudo “/Applications/CMake.app/Contents/bin/cmake-gui” –install
Implementation:
AppledeiMac: apple$
sudo “/Applications/CMake.app/Contents/bin/cmake-gui” –install
Password:
Linked: ‘/usr/local/bin/cmake’ -> ‘/Applications/CMake.app/Contents/bin/cmake’
Linked: ‘/usr/local/bin/ctest’ -> ‘/Applications/CMake.app/Contents/bin/ctest’
Linked: ‘/usr/local/bin/cpack’ -> ‘/Applications/CMake.app/Contents/bin/cpack’
Linked: ‘/usr/local/bin/cmake-gui’ -> ‘/Applications/CMake.app/Contents/bin/cmake-gui’
Linked: ‘/usr/local/bin/ccmake’ -> ‘/Applications/CMake.app/Contents/bin/ccmake’
AppledeiMac apple$ cmake –version
cmake version 3.12.3GitHub Community
Method 3. Install symlinks to other paths
In fact, it is a variant of Method 2, but it is installed to other paths.
Conclusion
CMake is a cross-platform build system generator. Sometimes, you may encounter the error message, Cmake not found while working on your system. It is important not to panic. Check if you have Cmake installed on the device and if it is installed correctly.
Метод 1 и метод 2 про тест доступны
mac версия 10.13.4 (17E199)
Недавно cmake был установлен из-за потребностей проекта, но обнаружил, что он не работает в командной строке:
AppledeiMac:~ apple$ cmake --version
-bash: cmake: command not found
AppledeiMac:~ apple$
Это связано с тем, что в переменных среды отсутствует путь, вам нужно только добавить его в .bash_profile корневого каталога пользователя.
.bash_profile путь:

 # Add Cmake Root to Path
 export CMAKE_ROOT=/Applications/CMake.app/Contents/bin/
 export PATH=$CMAKE_ROOT:$PATH
После завершения добавления откройте новое окно терминала и проверьте номер версии cmake:
AppledeiMac:~ apple$ cmake --version
cmake version 3.12.3
Вы также можете добавить в командную строку другие способы, чтобы открыть графическое приложение cmake:

Tools–How to Install For Command Line Use:

One may add CMake to the PATH:

 PATH="/Applications/CMake.app/Contents/bin":"$PATH"

Or, to install symlinks to '/usr/local/bin', run:

 sudo "/Applications/CMake.app/Contents/bin/cmake-gui" --install

Or, to install symlinks to another directory, run:

 sudo "/Applications/CMake.app/Contents/bin/cmake-gui" --install=/path/to/bin

Как вы можете видеть из рисунка: метод, использованный выше, на самом деле является методом 1, который должен добавить CMake к Path: …
Способ 1. Добавьте переменные среды
Смотрите начало статьи.
Способ 2. Установите символические ссылки
Откройте терминал и выполните:
sudo "/Applications/CMake.app/Contents/bin/cmake-gui" --install
Реализация:
AppledeiMac:~ apple$  sudo "/Applications/CMake.app/Contents/bin/cmake-gui" --install
Password:
Linked: '/usr/local/bin/cmake' -> '/Applications/CMake.app/Contents/bin/cmake'
Linked: '/usr/local/bin/ctest' -> '/Applications/CMake.app/Contents/bin/ctest'
Linked: '/usr/local/bin/cpack' -> '/Applications/CMake.app/Contents/bin/cpack'
Linked: '/usr/local/bin/cmake-gui' -> '/Applications/CMake.app/Contents/bin/cmake-gui'
Linked: '/usr/local/bin/ccmake' -> '/Applications/CMake.app/Contents/bin/ccmake'
AppledeiMac:~ apple$ cmake --version
cmake version 3.12.3
Способ 3. Установите символические ссылки на другой путь
На самом деле это вариант метода 2, но он просто установлен по другому пути.
СMake это набор кроссплатформенных утилит для сборки программ из исходного кода на разных компиляторах и операционных системах. Непосредственно сборкой она не занимается, а только генерирует Makefile, который потом будет выполнен утилитой make.
Если утилита cmake не установлена в Linux, то при запуске команды компиляции вы получите ошибку:
cmake: command not found
Попробуйте вручную запустить команду cmake с указанием абсолютного пути:
/usr/bin/cmake –version
Проверьте, что путь к каталогу с командой cmake указан в переменной окружения $PATH:
echo $PATH
Если нужно, добавьте путь в $PATH.
Рассмотрим, как установить команду make в разных версиях Linux.
Для установки cmake в Ubuntu и Debian (и других deb системах), выполните:
sudo apt-get update
sudo apt-get install cmake
Также можно сразу установить метапакет build-essential, в который входит полный набор утилит для компиляции, в том числе cmake:
sudo apt-get install build-essential
В rpm дистрибутивах (CentOS/RHEL/Fedora) можно установить cmake с помощью пакетного менеджера:
dnf install cmake
Также вы можете в любом дистрибутиве Linux скачать и установить последнюю версию cmake из исходных файлов:
wget https://github.com/Kitware/CMake/releases/download/v3.22.1/cmake-3.22.1-linux-x86_64.tar.gz
Распакуйте архив:
tar -zxvf cmake-3.22.1-linux-x86_64.tar.gz
Перейдите в каталог:
cd cmake-3.22.1-linux-x86_64
И выполните команды:
./bootstrap
Make
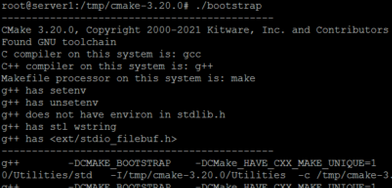
Соберите cmake:
sudo make install
Убедитесь, что cmake успешно установлена на вашем хосте, выведя ее версию:
cmake --version
Для сборки из исходников также используется команда CMake. Если она не установлена, появится ошибка cmake command not found.
В данной статье будут даны рекомендации о том, что делать в случаях, когда при попытке собрать что-либо из исходников, вы получаете ошибку, говорящую о том, что cmake не найден в вашей системе.
Эту ошибку очень часто можно встретить при начале компиляции чего-либо из исходного кода в дистрибутивах, которые имеют в своем названии minimal. Например, Ubuntu-1610-yakkety-64-minimal 😉
Она означает, что в вашей системе не найдена кроссплатформенная система автоматизации сборки программного обеспечения из исходного кода (она же и есть cmake). Для установки cmake в большинстве современных дистрибутивов достаточно сделать следующее:
После этого можно пробовать запустить cmake еще раз.
- Аноним
- 16.02.2022 14:09
cmake установлен, файл компилируется, однако запускается только при указания полного адреса директории, в которой этот скомпилированный файл расположен.
То есть, вы скомпилировали файл, но после этого не можете просто запустить его, набрав в терминале имя полученного файла?
В таком случае, проблема то в том, что система понятия не имеет, в какой директории лежит данный файл, а она его ищет только в директориях, указанных в переменной PATH.
Таким образом, для исправления указанной проблемы, нужно либо поместить полученный файл в директорию вроде /usr/bin, либо добавить нужную директорию в переменную PATH.
Cmake установлен, но команда все равно не работает.
Без текста ошибки, понять, чего там не работает очень проблематично.
Источник
Установка CMake в Ubuntu
CMake — это набор инструментов, который позволяет создавать, тестировать и упаковывать программное обеспечение. Это семейство инструментов доступно сразу на нескольких платформах и распространяется под открытым исходным кодом. Чаще всего CMake применяют для упрощения процесса компиляции созданного ПО путём использования простых кроссплатформенных файлов конфигурации.Также с помощью CMake создаются специальные файлы makefile — наборы инструкций, которые позволяют использовать возможности компилятора в дальнейшем при автоматизации сборки.
Автором CMake является команда Kitware. Создание этого ПО было продиктовано необходимостью формирования мощной среды, которая могла бы работать сразу на нескольких платформах с проектами, где открыт исходный код (прежде всего — с Insight Segmentation and Registration Toolkit и Visualization Toolkit). В этом материале вы узнаете, как установить CMake Ubuntu, используя графический интерфейс либо командную строку. Если вы пытаетесь собрать программу и получаете ошибку cmake not found, то эта статья будет для вас очень полезной.
Установка CMake в Ubuntu
1. Менеджер приложений
На момент написания этой статьи использовалась самая последняя версия CMake (3.15.2). Она была доступна в рамках известного всем магазина Snap Store. Ниже вы узнаете, как установить CMake через штатный в Менеджер приложений в Ubuntu.
Если вы не хотите тратить много времени на взаимодействие с командной строкой, то работа с графическим интерфейсом должна вам понравиться из-за своей простоты. На панели инструментов, расположенной слева, щёлкните значок Менеджер приложений.
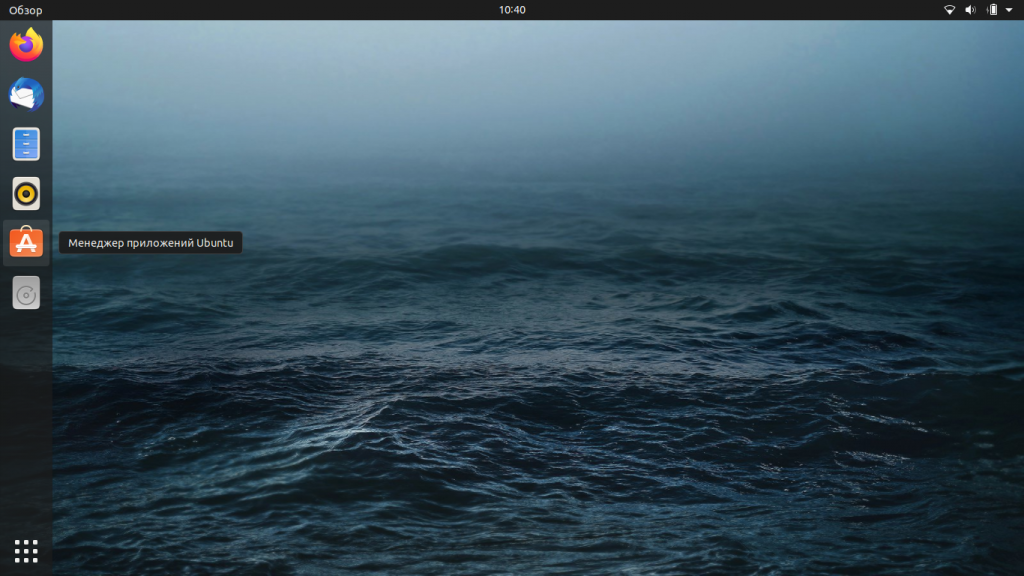
В верхней части открывшегося окна нажмите на значок поиска и в появившейся строке введите CMake. Результаты отобразятся следующим образом:
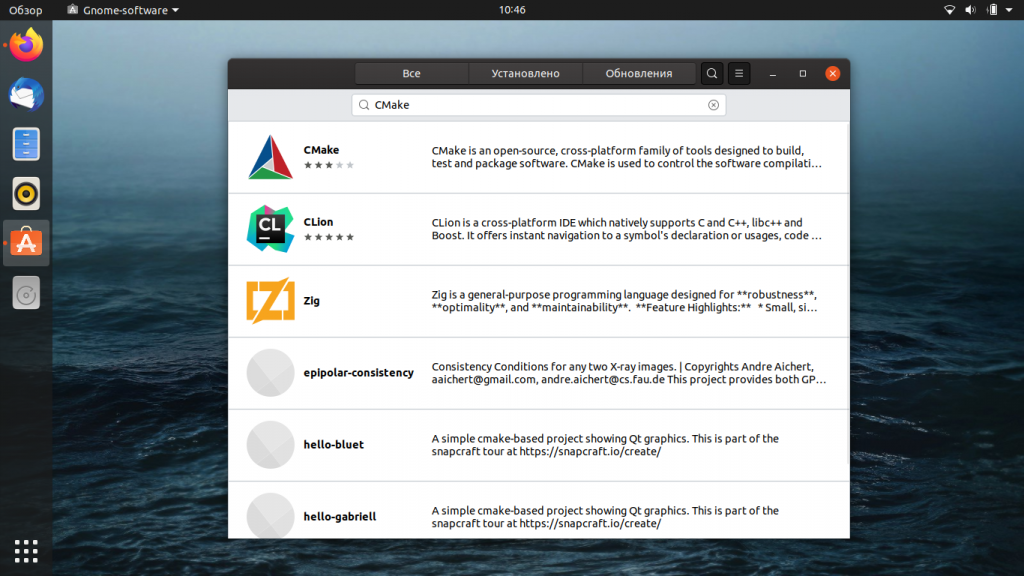
Первый пакет в результатах поиска — это и есть нужный нам файл, доступный в рамках магазина Snap Store. Щёлкните по этой записи и вы попадёте в раздел с подробной информацией о приложении, который будет выглядеть так:
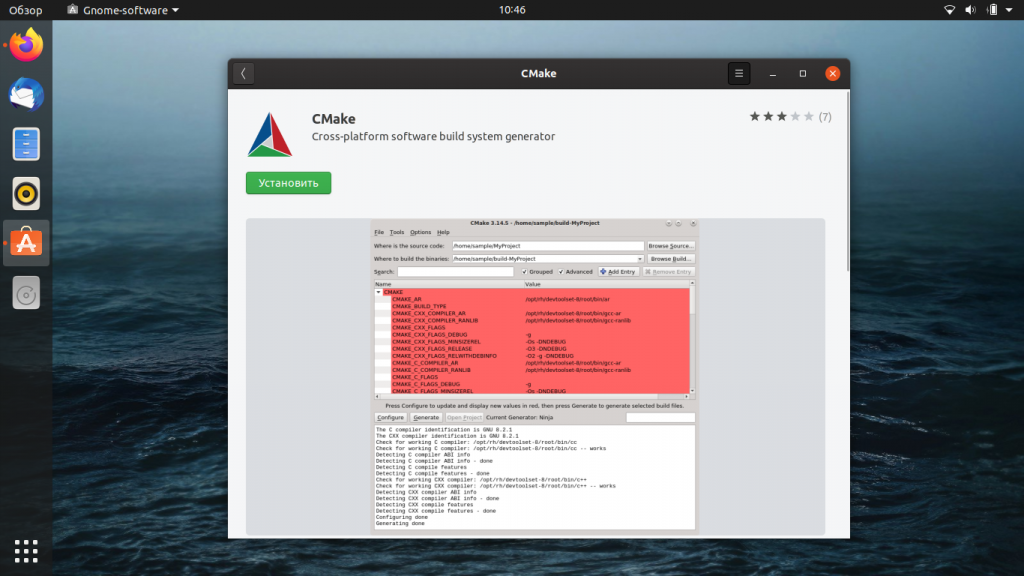
Нажмите кнопку Установить, чтобы запустить процесс установки CMake. Возможно, вам придётся ввести свой пароль в окошке аутентификации, которе появится сразу после нажатия кнопки Установить. Это одна из форм защиты в Ubuntu — только авторизированный пользователь может устанавливать программное обеспечение в этой системе.
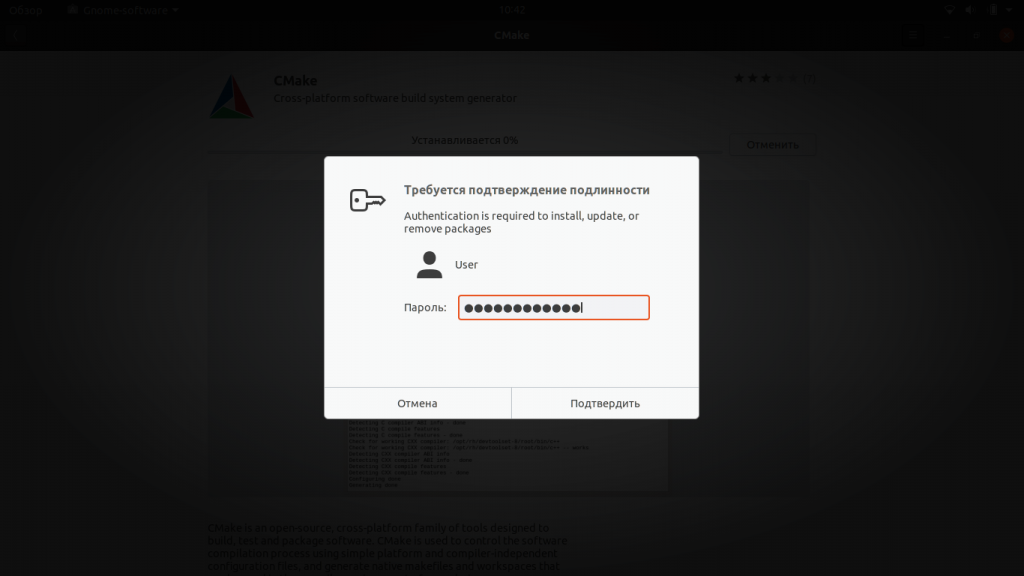
Введите свой пароль и нажмите кнопку Enter. После этого вы сможете наблюдать за статусом установки на отображающемся графическом индикаторе.

После успешной установки система выдаст вам следующее сообщение:

Из этого окна уже можно запустить CMake (или тут же, например, удалить).
2. Менеджер пакетов snap и apt
Такую же версию CMake можно установить через командную строку, если воспользоваться следующей командой:
sudo snap install cmake
Установка cmake ubuntu 18.04 из официальных репозиториев выполняется командой:
sudo apt install cmake
3. Сборка CMake из исходников
Если по каким-то причинам вы не хотите использовать графический интерфейс, или вы хотите самую свежую версию, можно прибегнуть к помощи командной строки. Нам надо будет скачать исходный код с официального сайта (https://cmake.org/download/), скомпилировать его, а потом установить.
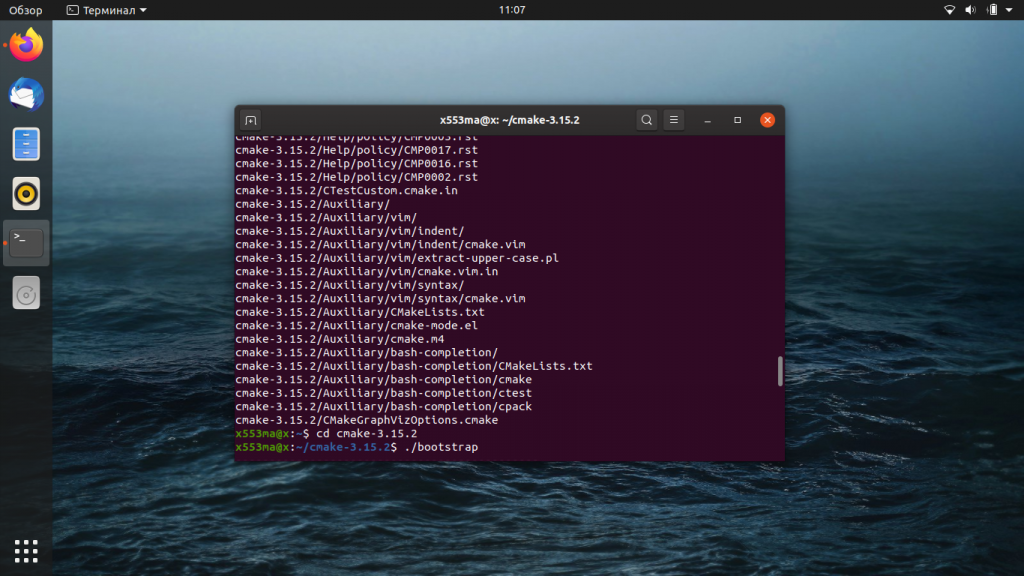
Откройте командную строку — для этого либо найдите приложение «Терминал», либо нажмите сочетание клавиш Ctrl+Alt+T. Введите команду, которая начнёт загрузку исходного кода:
Когда tar.gz полностью скачается, его нужно распаковать. Воспользуемся следующей командой:
tar -zxvf cmake-3.15.2.tar.gz
Перейдём с помощью терминала к папке с распакованными файлами:
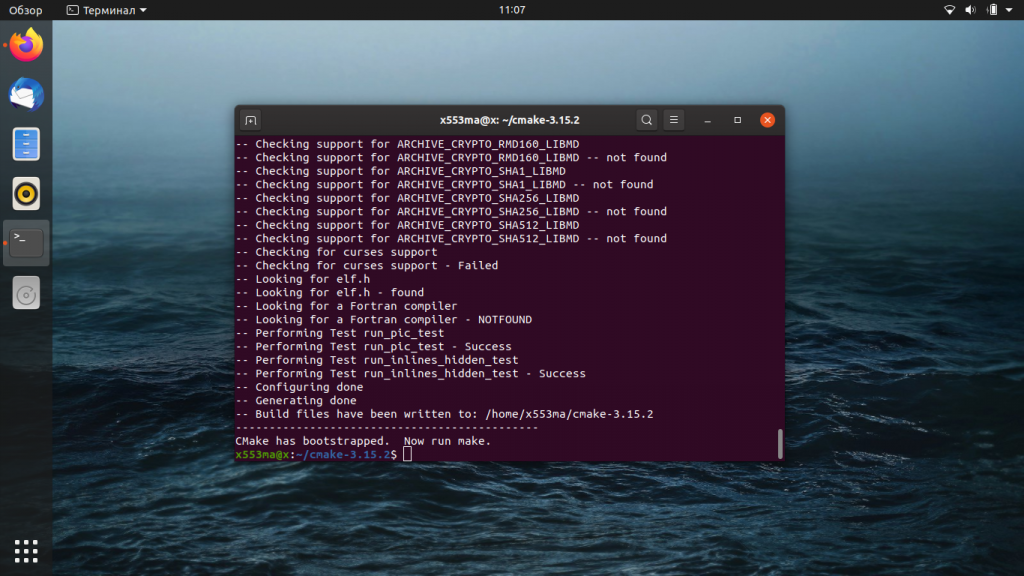
Чтобы провести компиляцию скачанного кода, выполним ещё одну команду:
После правильного выполнения всех операций, командная строка выдаст следующий результат:
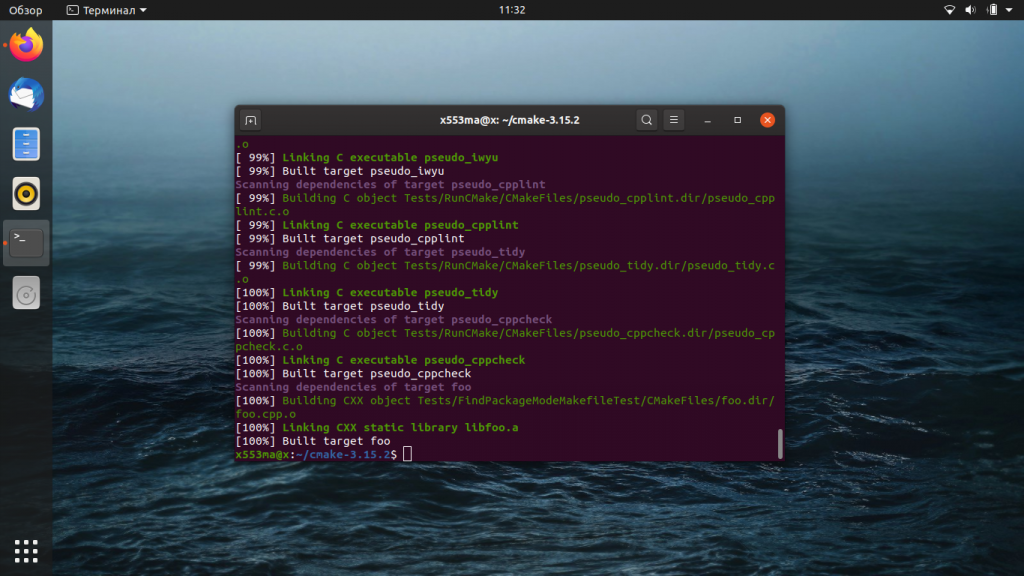
Теперь можно запустить процесс установки с помощью простой команды:
Затем выполните ещё одну команду:
sudo make install
Процесс установки завершён. Теперь можно проверить версию CMake, чтобы убедиться в правильности своих действий.
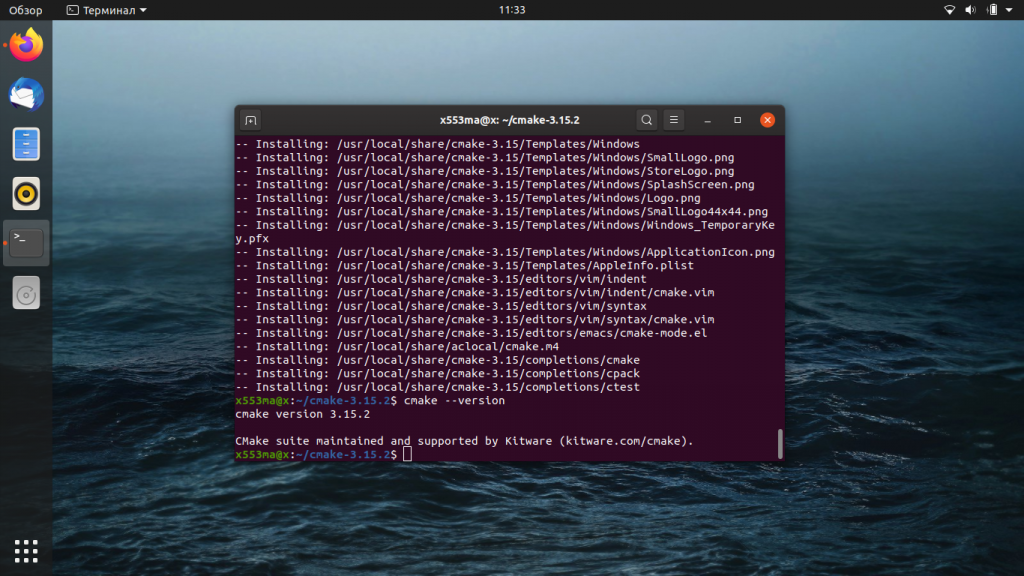
На момент написания этого материала CMake был доступен в версии 1.15.2, с которой мы и работали. Теперь вы можете использовать этот инструмент для выполнения своих рабочих задач.
Как удалить CMake?
Если вы решили удалить CMake, который был установлен через Менеджер приложений, то этот процесс будет происходить следующим образом. Снова откройте Менеджер приложений, в открывшемся списке найдите пункт CMake (рядом с ним будет надпись Установлен). Нажмите на иконку приложения, перейдите к следующему экрану и найдите кнопку Удалить. Так будет запущен процесс деинсталляции.
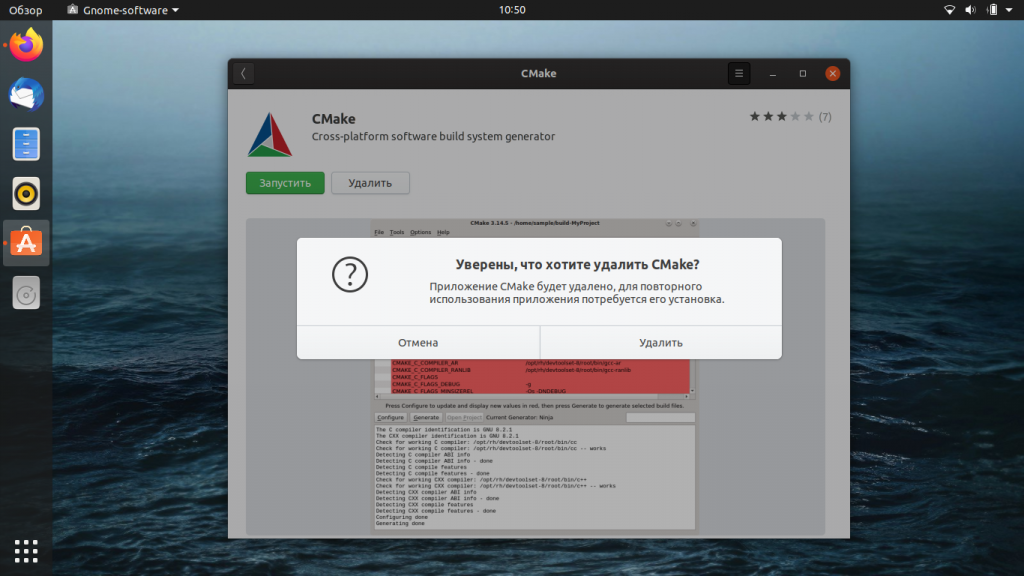
После этого система вновь предложит ввести вам пароль — и сразу же после этого приложение будет удалено.
Источник
Не найдена команда cmake в Linux
СMake это набор кроссплатформенных утилит для сборки программ из исходного кода на разных компиляторах и операционных системах. Непосредственно сборкой она не занимается, а только генерирует Makefile, который потом будет выполнен утилитой make.
Если утилита cmake не установлена в Linux, то при запуске команды компиляции вы получите ошибку:
Попробуйте вручную запустить команду cmake с указанием абсолютного пути:
Проверьте, что путь к каталогу с командой cmake указан в переменной окружения $PATH:
Если нужно, добавьте путь в $PATH.
Рассмотрим, как установить команду make в разных версиях Linux.
Для установки cmake в Ubuntu и Debian (и других deb системах), выполните:
sudo apt-get update
sudo apt-get install cmake
Также можно сразу установить метапакет build-essential, в который входит полный набор утилит для компиляции, в том числе cmake:
sudo apt-get install build-essential
В rpm дистрибутивах (CentOS/RHEL/Fedora) можно установить cmake с помощью пакетного менеджера:
dnf install cmake
Также вы можете в любом дистрибутиве Linux скачать и установить последнюю версию cmake из исходных файлов:
tar -zxvf cmake-3.22.1-linux-x86_64.tar.gz
Перейдите в каталог:
И выполните команды:
sudo make install
Убедитесь, что cmake успешно установлена на вашем хосте, выведя ее версию:
Источник
Русские Блоги
-Bash: cmake: команда не найдена
Метод 1 и метод 2 про тест доступны
mac версия 10.13.4 (17E199)
Недавно cmake был установлен из-за потребностей проекта, но обнаружил, что он не работает в командной строке:
Это связано с тем, что в переменных среды отсутствует путь, вам нужно только добавить его в .bash_profile корневого каталога пользователя.
.bash_profile путь:
После завершения добавления откройте новое окно терминала и проверьте номер версии cmake:
Вы также можете добавить в командную строку другие способы, чтобы открыть графическое приложение cmake:
Tools–How to Install For Command Line Use:
Как вы можете видеть из рисунка: метод, использованный выше, на самом деле является методом 1, который должен добавить CMake к Path: .
Способ 1. Добавьте переменные среды
Смотрите начало статьи.
Способ 2. Установите символические ссылки
Откройте терминал и выполните:
Способ 3. Установите символические ссылки на другой путь
На самом деле это вариант метода 2, но он просто установлен по другому пути.
Источник
Linux: не найдена команда make
Утилита make в Linux используется для сборки и компиляции программ из исходных файлов. Инструкции о компиляции утилита берет из файла makefile. В некоторых дистрибутивах Linux утилита make не установлена по умолчанию (например, в Linux CentOS 8), поэтому при запуске команды сборки, вы увидеть ошибку:

Прежде всего проверьте, есть ли исполняемый файл make в каталоге с бинарными файлами. Попробуйте запустить ее с абсолютным путем:
Рассмотрим, как установить команду make в разных версиях Linux.
Проверьте, есть ли путь к каталогу с утилитой make в переменные окружения $APTH:
Если нужно, добавьте путь к каталогу в $PATH.
В CentOS, Fedora и RHEL утилита make входит в состав группы пакетов «Development tools» (потребуется около 500 Мб на диске). Для их установки, выполните:
dnf groupinstall «Development tools» (в RHEL/CentOS 
yum groupinstall «Development tools» (в предыдущих версиях RPM дистрибутивов Linux)
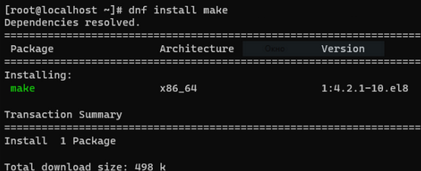
Или можно установить только утилиту make:
yum install make
dnf install make
Если make уже установлен, но не работает, можете переустановить его:
yum reinstall make
В Ubuntu и Debian (и других deb системах) команда make содержится в матепакете build-essential. Для его установки выполните:
apt-get install build-essential
Или можно установить только один пакет make:
apt-get install make
Для переустановки пакета make, выполните:
apt-get install —reinstall make
apt-get remove make
apt-get install make
Источник