So I had to re-install my system.
I installed Cygwin in C:cygwinbin
And I used the batch file that worked on my previous installation:
«start_cygwin.bat»
@echo off
C:
chdir C:cygwinbin
bash -c "cd /cygdrive/e/apache-solr-3.5.0/example/;java -Dsolr.solr.home="./example-DIH/solr/" -jar start.jar"
But after running this command:
bash -c "cd /cygdrive/e/apache-solr-3.5.0/example/;java -Dsolr.solr.home="./example-DIH/solr/" -jar start.jar"
I get the error:
bash: java: command not found
I thought it had something to do with java, but I installed the java jdk 6.27 (which worked fine before) and when I type «java» in my command prompt I see a list of possible java commands.
asked Oct 14, 2012 at 19:45
![]()
0
Its not able to locate your java.exe file.
To resolve the issue, you have two options:
-
Add Java installed folder in your PATH
-
Use full path of
java.exein the above command i.e. in place ofjava, use/home/../jdk.../bin/java.
One of the tow options, should help resolving your issue.
answered Oct 14, 2012 at 19:47
![]()
Yogendra SinghYogendra Singh
33.7k6 gold badges63 silver badges73 bronze badges
2
If it doesn’t work using the path to java/bin then you can try to
— create symbolic link: ln -s /cygdrive/c/Program Files/Java/jre1.8.0_102/bin/java.exe /usr/bin/java
— create an alias: alias java="/cygdrive/c/Program Files/Java/jre1.8.0_102/bin/java.exe"
— add the java path to the paths: export JAVA_HOME="/cygdrive/c/Program Files/Java/jre1.8.0_102" export PATH="$PATH:$JAVA_HOME/bin"
answered Aug 26, 2016 at 12:25
![]()
If you trying to set up Java in your system or it’s already installed but you are getting a «Java command not found» error. It may be due to either it’s not installed properly or the path variable is not set up correctly for your operating system. In this tutorial, I will let you know the possible cause of this Java error and how to fix it easily.
Below mentioned are the common Java-related error you may encounter —
- java command not found ubuntu
- java command not found windows 10
- -bash: java: command not found mac
- Java is not recognized as an internal or external command?
- java command not found Red Hat
- java environment not found
Table of Contents
- 1 Why am I getting a Java command not found error?
- 2 How do I fix the Java command not found?
- 3 Solution-1 — Install the Java correctly in Windows to get rid of the Java command not found error
- 4 How to install Java in Windows 10
- 5 Solution2 — How to set an environment variable for java in Windows 10, if you have Java already installed
- 6 Solution3- How to install Java in Ubuntu 21.04 correctly
- 7 Solution4 — How to set the «JAVA_HOME» variable in Ubuntu 21.04
- 8 Solution5- How to install Java in macOS to fix the java command not found error
- 9 Solution6 — How to set Java_Home environment variable in macOS
- 10 Solution-7 Uninstall and reinstall Java, if nothing works
- 11 Summary
Why am I getting a Java command not found error?
Generally, you get a java command not found error due to the following reasons —
- Java is not installed in your system
- Java installation is not complete due to errors during installation
- Environment variable or Path is not setup correctly for Java
- Java conflict due to more than one java installation in your system
These are the quick checks before starting troubleshooting to fix the java command not found error —
- Check whether java is installed or not?
- If java is installed, look for the java version
- Validate environment variable or path is set up correctly for your operating system
- Make sure you are using the right version in case of more than one Java version installed
Let’s deep dive and see step-by-step solutions —
Solution-1 — Install the Java correctly in Windows to get rid of the Java command not found error
Mostly, you don’t have java installed and installing java is the first step to fix java related issues. Follow these steps based on your operating system to install java correctly.
Step1 — Check whether Java is installed in your system
- In Windows, Open the command prompt and run
java --version
- In the case of Linux, run
sudo java -version

output -
bash: java: command not found
In case you get «Java command not found» or Java is not recognized as an internal or external command then keep following this tutorial to install java in your system.

- To check default versions installed in Linux, run
sudo update-alternatives --config javaHow to install Java in Windows 10
I would recommend you to download the latest java and install it in your system.
Step2 Download Java
Visit oracle.com and download JDK 18 (JAVA SE Development Kit) or the latest available for your system. I am downloading it for Windows 10 (64-bit). Soon Java 19 will supersede JDK 18.
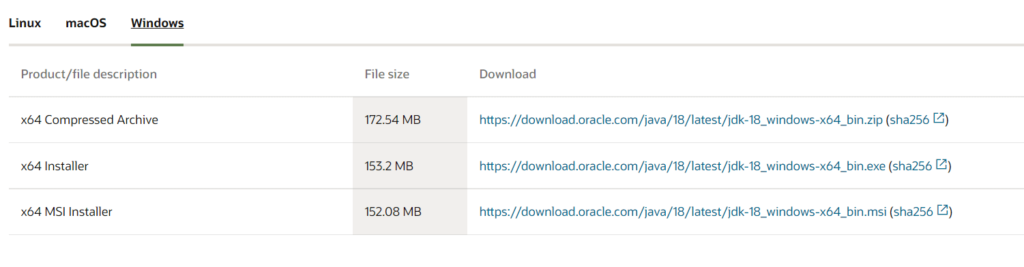
Step3 Install the latest Java 18 on Windows 10/11
Once you have downloaded the «jdk-18_windows-x64_bin.exe» for your Windows system. Double click and run the installer and follow the steps
- I recommend keeping «C:Program filesjavajdk-18.0.1.1 (64-bit)» as the default installation folder. Select Next.
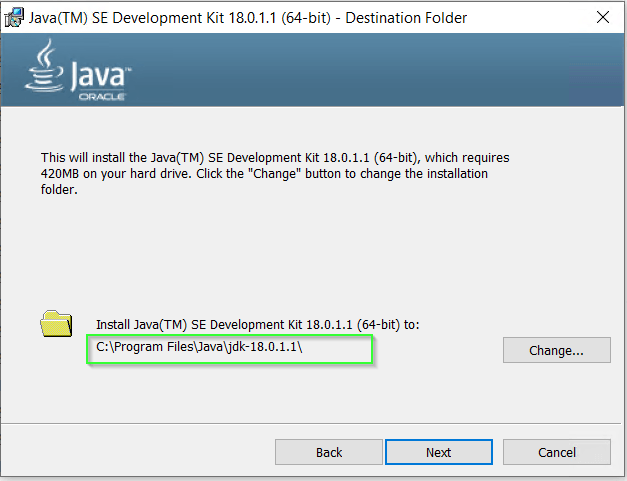
You may select different installation folders also. For example, if you are installing a second instance of java software. Click on change and browse for the target folder.
Solution2 — How to set an environment variable for java in Windows 10, if you have Java already installed
If you have Java already installed and then all the environment variables are set up automatically as shown in the image.
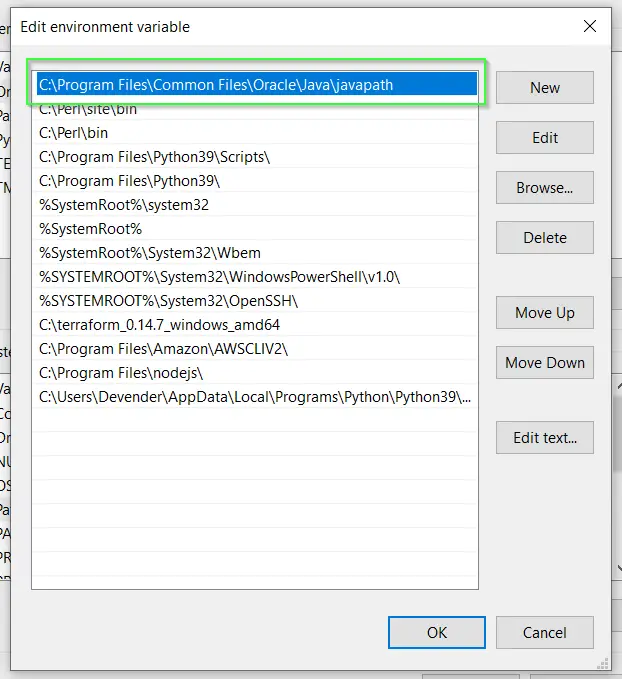
But in case you are still getting «Java is not recognised as an internal or external command» error then set up the environment variable for your Java.
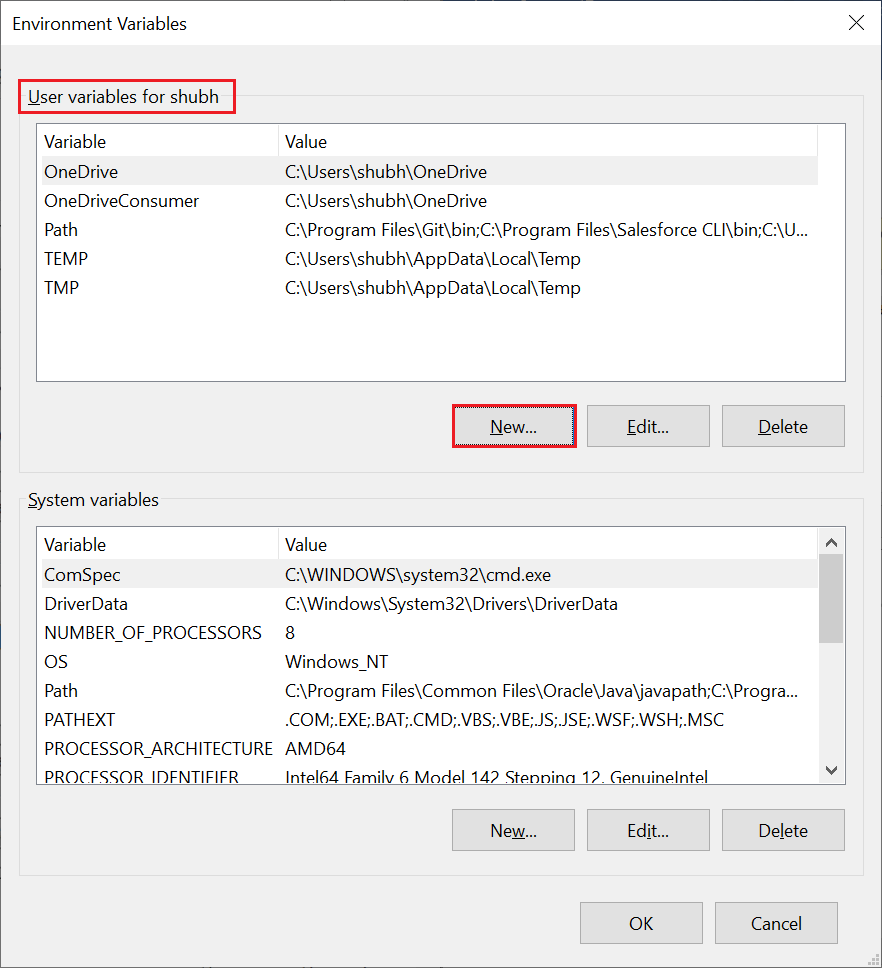
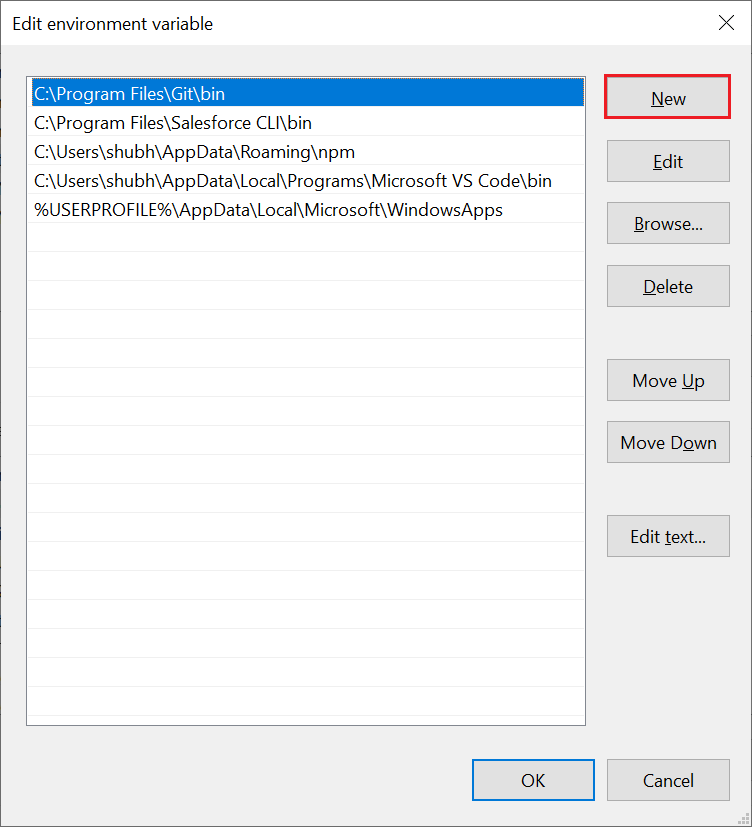
- Type «environment» in the search window. Click «open» on «Edit the system environment variables«

- Click on Environment variables.

- Select «Path» > Then click Edit.

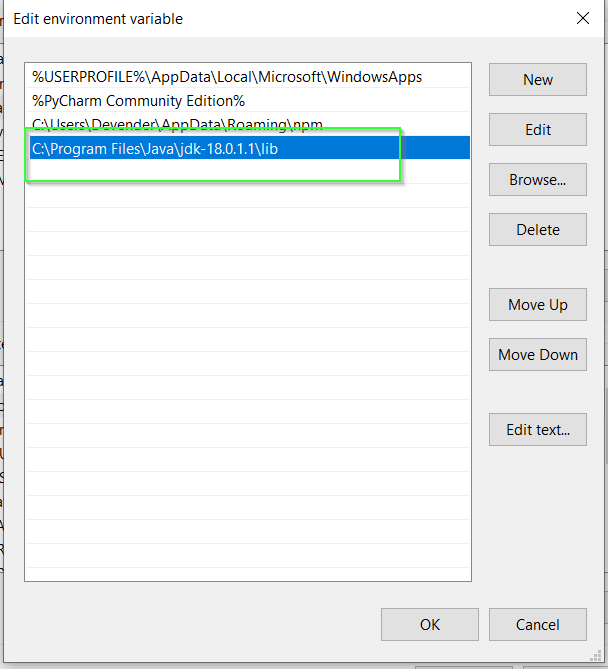
- Select New > Give path of java installation directory > For example, «C:Program filesjavajdk-18.0.1.1bin» in my case. If you have selected the custom folder to install Java. You can enter your path to the bin folder. It will set up only the java variable for that specific user.
Click OK.
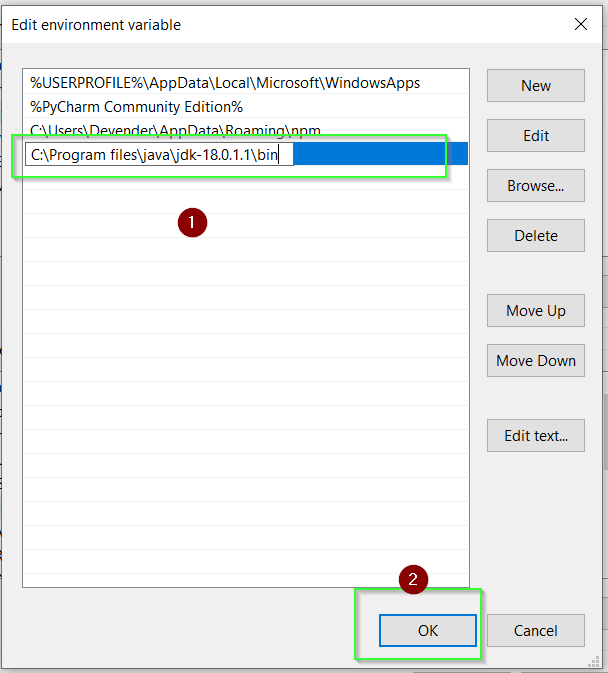
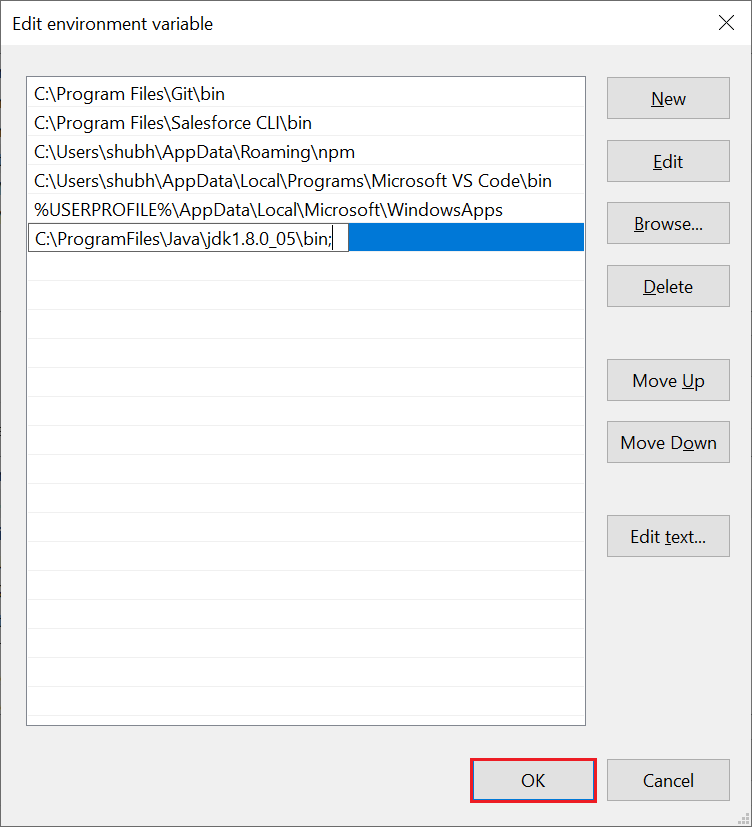
- Set «classpath» for java. Click «New» in the environment variable window. It allows to set up the new environment variables.

In «Variable name», enter «classpath«. Also in «variable value» provide path to your java installation till «lib» folder. In my case it is «C:program filesjavajdk-18.0.1.1lib > Select OK
- Close all open environment variables windows by selecting OK.
Solution3- How to install Java in Ubuntu 21.04 correctly
To install Java in Linux —
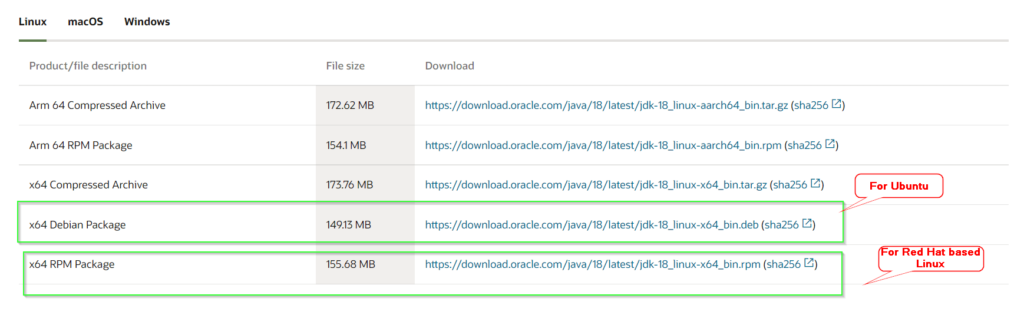
- Visit oracle.com and download JDK 18 or the latest available .deb and transfer it to your system. I am downloading Debian package jdk-18_linux-x64_bin.deb for Ubuntu 21.04. The same can be used for any Debian-based OS like Linux Mint, Kubuntu, Lubuntu etc.
- Download RPM package for CentOS, AlmaLinux, Red Hat or Rocky Linux operating system.
- Rename the .deb file using the mv command, if required. Then install the Debian package using the dpkg command.
Learn more ways to install the .deb package.
$ sudo dpkg -i ".deb-file-path"

For example
$ sudo dpkg -i ./jdk-18_linux-x64_bin.deb
In case you get any error related to the libc6-x32 dependency package, then
dpkg: dependency problems prevent configuration of jdk-18:
jdk-18 depends on libc6-i386; however:
Package libc6-i386 is not installed.
jdk-18 depends on libc6-x32; however:
Package libc6-x32 is not installed.
Either install the dependency package or run the following command to fix the broken.
$ sudo apt --fix-broken install
Once all the dependent packages are installed, try installing java 18 again on Ubuntu 21.
$ sudo dpkg -i ./jdk-18_linux-x64_bin.deb
- You can use the rpm command to install java in RPM-based operating systems
$ sudo rpm -ivh "path to rpm"
For example
$ sudo rpm -ivh jdk-18_linux-x64_bin.rpm
Solution4 — How to set the «JAVA_HOME» variable in Ubuntu 21.04
Set the JAVA_HOME variable for all users in Ubuntu by editing the environment file.
- Edit /system/environment file using vi or nano editor.
$ sudo vi /etc/environment
- Add path «/usr/lib/jvm/jdk-18/bin» to the last of the environment file as shown in the image. Then, save and exit
The output of the Environment file after adding the Java path

- Run source command to execute changes made in the environment file.
$ sudo source /etc/environment
- Check your java version
$ sudo java -version

Solution5- How to install Java in macOS to fix the java command not found error
To install the JDK on macOS:
- Download the JDK
.dmgfile for macOS,jdk-18_macos-x64_bin.dmgfrom the Java SE Downloads page. - Then Click Accept License Agreement.
- Double-click the
.dmgfile to start it - A Finder window appears that contains an icon of an open box and the name of the
.pkgfile - Double-click the
JDK 18.pkgicon to start the installation application - The installation application displays the Introduction window
- Click Continue. The Installation Type window appears.
- Click Install. A window appears that displays the message: Installer is trying to install new software. Enter your password to allow this.
- Enter the Administrator user name and password and click Install Software. The software is installed and a confirmation window is displayed.
You can delete the .dmg file if you want to save disk space after installation.
Solution6 — How to set Java_Home environment variable in macOS
- If you use the bash shell, run
echo export "JAVA_HOME=$(/usr/libexec/java_home)" >> ~/.bash_profile- In the case of zsh shell, run
echo export "JAVA_HOME=$(/usr/libexec/java_home)" >> ~/.zshrc- Restart your shell once in both cases
Solution-7 Uninstall and reinstall Java, if nothing works
If you are getting java command not found error even after setting up java home variable. It means there is something wrong with the installation. In that case, my recommendation will be to uninstall all existing versions of java and reinstall it.
Check out my other post, If you don’t know how to uninstall java from Windows or Linux. There are individual sections provided for the uninstallation of Java.
Summary
I am sure, you will be able to fix your java command not found error by following this tutorial step by step and carefully.
Let me know, in case you still face any issues. I will try to help you out to the best of my knowledge. You can check out these Oracle tutorials to learn java after installation by following this post step by step.
I’m trying to run a series of programs in Cygwin.
My current dilemma is running a java file. My input and the error is below.
Gaius@Ellislab2015 ~/muTect-1.1.4-bin
$ java -jar muTect-1.1.4.jar
-bash: java: command not found
How can I fix this?
![]()
DavidPostill♦
149k77 gold badges344 silver badges383 bronze badges
asked May 22, 2015 at 22:24
![]()
-bash: java: command not found
You need to add Java to your bash PATH variable.
This is normally done by editing the appropriate lines in ~/.bash_profile.
# User dependent .bash_profile file

...

# Set PATH so it includes user's private bin if it exists
# if [ -d "${HOME}/bin" ] ; then
#   PATH="${HOME}/bin:${PATH}"
# fi
Further reading
- How can I set my Cygwin PATH to find javac?
- 64 Bit Java Path in Cygwin
![]()
answered May 22, 2015 at 22:56
![]()
DavidPostill♦DavidPostill
149k77 gold badges344 silver badges383 bronze badges
I added the following to my file in home/.bash_profile (~/.bash_profile), as suggested by DavidPostill, and after looking at documents he referenced:
Before:
# Set PATH so it includes user's private bin if it exists
# if [ -d "${HOME}/bin" ] ; then
#   PATH="${HOME}/bin:${PATH}"
# fi
After:
# Set PATH so it includes user's private bin if it exists
# if [ -d "${HOME}/bin" ] ; then
# PATH=/cygdrive/c/Program Files (x86)/Java/jre1.8.0_45/bin/:${PATH}
# fi
answered May 26, 2015 at 18:51
![]()
If you’re new to java programming, the error “java command not found” or “’java’ is not recognized as an internal or external command, operable program or batch file” may have occurred to you.
There are 2 reasons that you’re facing “Java command not found” in your Linux/Mac java’ is not recognized as an internal or external command, operable program or batch file” in your windows PC.
Lets discuss these two reasons and its solution one by one.
1. JRE is Not Installed in Your System
If you’re facing this error, that means either you’re running a bytecode (.class file) or a .jar file which requires JRE (Java Runtime Environment) to run. So there are two ways to get a Java Runtime Environment. Firstly you have to download and install the JRE, using which you can run the file which requires java.
To Download JRE on windows and MacOS:
https://www.oracle.com/java/technologies/javase-jre8-downloads.html
To Download JRE on Linux (Ubuntu):
Open terminal and execute these commands one by one:
sudo apt update
apt install default-jre
On other hand, if you also want to write programs in java as well as run those programs then you can download and install JDK (Java Development Kit) from https://www.oracle.com/java/technologies/javase-jdk13-downloads.html.
Using JDK, you can develop java programs as well as run those programs. So the JRE comes along with JDK. Which means if you have installed JDK in your system then you won’t be needing to install JRE separately.
To Install JDK in Windows: https://www.thecrazyprogrammer.com/2014/06/java-installation-downloading-installing-and-setting-path.html
Even for the Mac, an installer like Windows is available on the same site.
To Install JDK on Linux (Ubuntu):
Open terminal and execute these commands:
sudo apt update
apt install default-jre
2. The Path of JRE or JDK Has not Been Set
This is one of the most common mistakes we make while installing JRE or JDK in our system. When we install java in our system, it requires a particular location (Example: C:Program FilesJavajdk1.8.0_101 ) to extract its files. Now the binary files that we required to run the java file are present in a particular directory. So when you move the file into the bin folder inside the JRE or JDK directory to run it, it will run.
But when you want to run your java file from any directory then you need to paste the path of the bin folder that is inside your JDK or JRE folder to a global path (Environment Variables) from where you can access it anywhere in the system.
To setup the path in windows you can again open:
To setup the path in Linux (Ubuntu):
You need to open terminal and type:
sudo gedit ~/.bashrc
It will open .bashrc file in the text editor now go to the last of that file and add following lines:
export JAVA_HOME=/usr/java/<your version of java> export PATH=${PATH}:${JAVA_HOME}/bin
So now you can run your java files without facing the error “java command not found” or ‘java’ is not recognized as an internal or external command, operable program or batch file” in your system.
So that’s all, if you’ve any query or question related to this article, please let us know in comment box.
This topic probably is a common one, but when looking online I didn’t see much that related to my case, since I’m not running a normal ubuntu, but rather WSL (Windows Subsystem for Linux).
So my problem is that I switched from java 8 to java 17 recently (I required java 8 for a course), but I noticed that on ubuntu terminals, java -version still showed openjdk-1.8.(something), rather than jdk-17 or something like that.
So I thought that uninstalling openjdk would do the trick, which I did with sudo apt-get autoremove openjdk-8-jre. However, now typing java in an ubuntu terminal doesn’t work anymore at all, and shows: Command 'java' not found, but can be installed with: .... But I fear that installing it with one of these commands will install a new version of java, rather than using the one that’s already installed.
I have set the JAVA_HOME variable to the java installation directory, which is mnt/c/Program Files/Java/jdk-17.0.1, but the space in Program Files does seem to be a problem.
How can I fix this? I usually prefer using a bash terminal than Powershell or cmd because I know the commands better, so not being able to use java or javac in bash is an issue for me. Thanks!
Java Runtime Environment (JRE) is a powerful set of software that allow you to develop Java applications quickly and easily. It includes the Java Virtual Machine (JVM), essential core classes and libraries, and everything else you need to get started with Java. JRE is a part of the Java Development Kit (JDK), but can be installed separately. The Java Runtime Environment was originally created by Sun Microsystems Inc., a subsidiary of Oracle Corporation. It’s also known as the Java Runtime.
Installing Java in Linux should be easy using package managers, such as apt, yum, or pacman, depending on your Linux distribution. However, there are times that you may encounter «java: command not found» error, even though you think you have installed it. The full error message may look something like this :
Command 'java' not found, but can be installed with:

1.  sudo apt install default-jre
2.  sudo apt install openjdk-11-jre-headless
3.  sudo apt install openjdk-8-jre-headless
In this article, we will show you a few solutions that you can use to fix java command not found error.
Add Java to PATH environment variable
Most operating systems look for executables and binaries in a specific set of places. The list of all those places is stored in an environment variable, often named PATH.
If you knew where the Java binary is placed, you can add one of the Java path to PATH variable using the following command.
export PATH=$PATH:/path/to/java/binary/
Reinstall JRE
The quickest way to fix java command not found error is to reinstall JRE. In order to do so, run the following command:
sudo apt install default-jreThere are other alternative packages that you can choose instead of default-jre, which installs the latest version of JRE (11 at the time of this writing).
You can choose to install one of the two LTS version of JRE (8 and 11) by installing openjdk-8-jre and openjdk-11-jre. There are also headless packages that don’t provide any graphical functionalities, which often used in servers.
The difference between Java packages can quickly be summed up as the following:
- The
openjdk-<version>-jre-headlesspackage is used when you don’t need to draw anything in the graphical user interface. For example a background service or a terminal application. It’s commonly used on servers. - The
openjdk-<version>-jrepackage includes theopenjdk-<version>-jre-headlesspackage since it contains most of the Java features. Desktop users should install this package. - The
openjdk-<version>-jrepackage provides more functionality, but heavier than its headless counterpart. It’s not recommended to install on a server since it installs extra software that is not commonly used on a server.
Replacing the version number allows you to install multiple versions of Java in the same machine. In that case, you can run sudo update-alternatives --config java to manage which version you want to use at the exact moment.
There are 3 choices for the alternative java (providing /usr/bin/java).

  Selection    Path                                      Priority   Status
------------------------------------------------------------
* 0            /usr/lib/jvm/java-6-openjdk/jre/bin/java   1061      auto mode
  1            /usr/bin/gij-4.4                           1044      manual mode
  2            /usr/lib/jvm/java-6-openjdk/jre/bin/java   1061      manual mode
  3            /usr/lib/jvm/java-6-sun/jre/bin/java       63        manual mode

Press enter to keep the current choice[*], or type selection number:
We hope that the information above is useful to you and helped you fix java command not found error. If you have any questions, then please feel free to ask in the comments below.
Javac command is usually used to check whether the Java is installed in our system or not. When the Java is not installed in our system and we try to run Javac command, we get Javac command not found or Java is not Recognized. We can also get this error when Java is installed in our system but the path is not added to the system’s environment variable.
Javac command is used to compile our java program. When the compiler doesn’t find the javac.exe file, our command prompt shows the Javac Command Not Found or path is not recognized error.

Resolve Javac Command Not Found Error
In order to solve this issue, we first have to installed Java or jdk in our system. If the jdk is already installed in our system, we have to add the path variable into our system’s environment variable. This path is basically is the location of that folder where the java.exe file is present. So, it is required to add the bin directory because java.exe file is available in bin folder.
In our system, the path of the bit folder is as follows:
In order to set the path to the environment variable, we have two options. The first option is to set the path temporary and another one is to set the path permanently.
- We go to the command prompt and type the following command and press the enter key. Once you press the enter key, the path is set to the specified location. After running this command, we can compile and run the java program.
- If we want to set the path permanently, we have to follow the following steps:
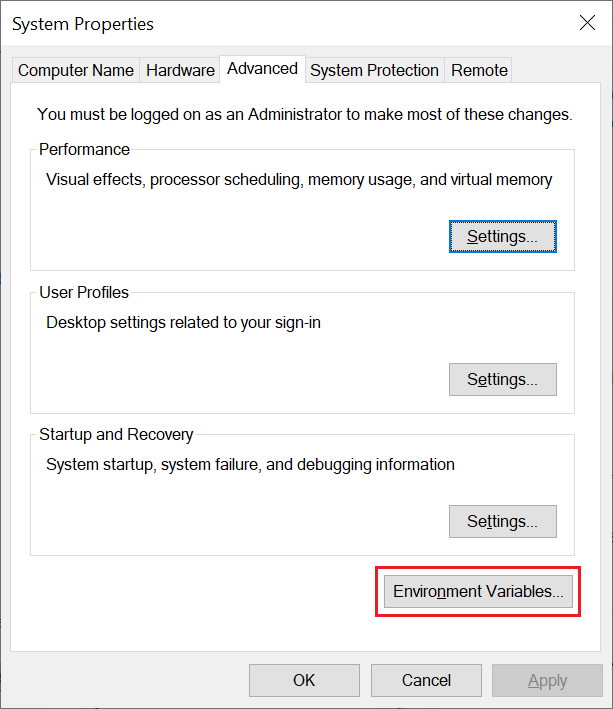
- We go to the advance system setting by clicking on the Advance system settings option of our system.

- When we click on the Advance system settings, a dialog box will be open. From this popup, we click on the Environment Variables.
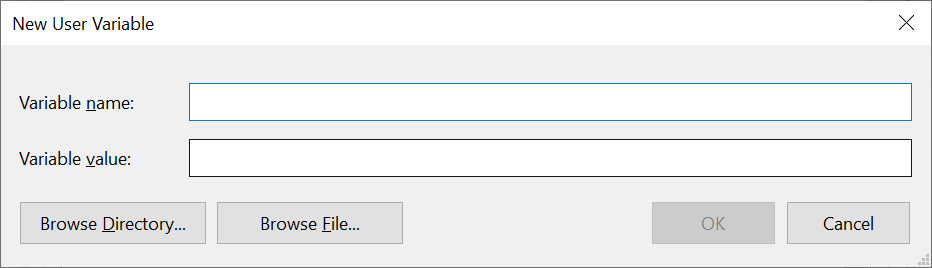
- When we click on the Environment Variables, a new dialog popup for setting path permanently. We will click on the New button to set path and for that it open New User Variable dialog.
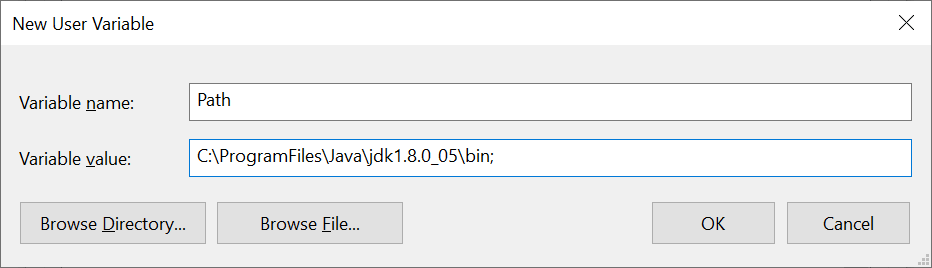
- We give variable name Path and path of the bin directory of JDK folder will be the value of it. We create a new user variable only when there is not path variable. If it already exists, we edit it and add path value to that variable.
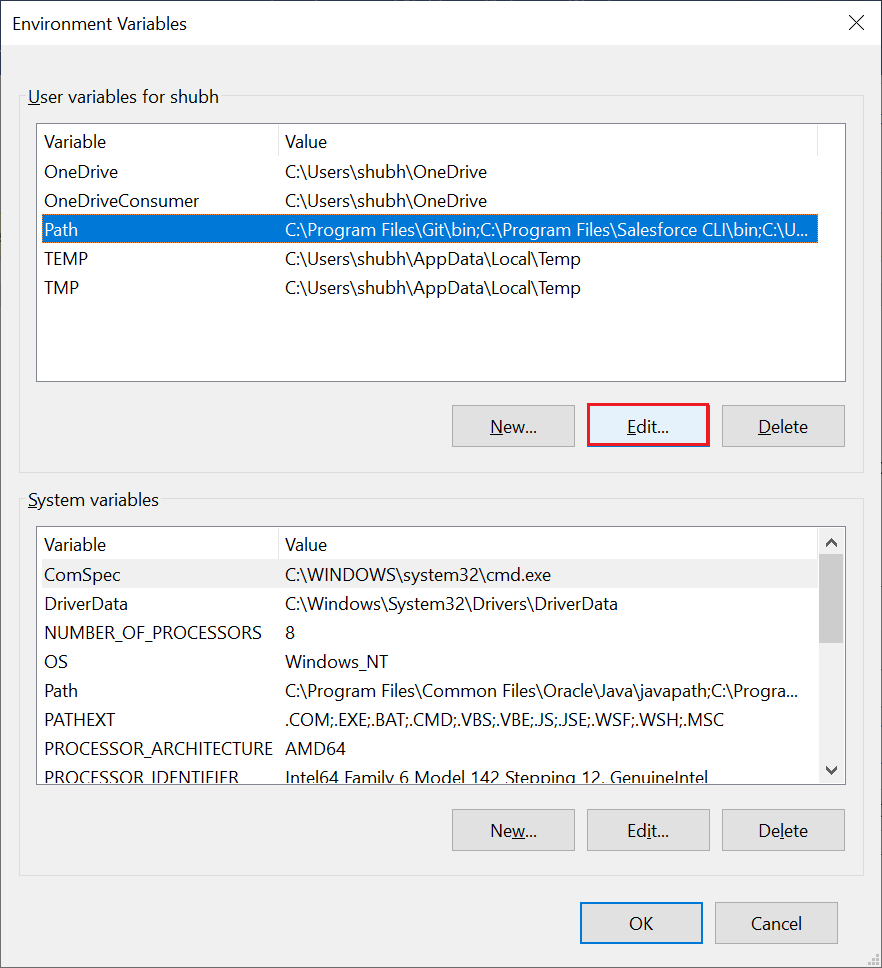
- If the path variable is already exists, we select the Path variable and click on the Edit
- When we click on the Edit button, it will open a new dialog and from that dialog we click on the New button to add path of the bin directory and click on the Ok
- We go to the advance system setting by clicking on the Advance system settings option of our system.
Welcome to the Treehouse Community
The Treehouse Community is a meeting place for developers, designers, and programmers of all backgrounds and skill levels to get support. Collaborate here on code errors or bugs that you need feedback on, or asking for an extra set of eyes on your latest project. Join thousands of Treehouse students and alumni in the community today. (Note: Only Treehouse students can comment or ask questions, but non-students are welcome to browse our conversations.)
Looking to learn something new?
Treehouse offers a seven day free trial for new students. Get access to thousands of hours of content and a supportive community. Start your free trial today.

I tried the code with my own bash, and it failed to compile the document
5 Answers
Steve Hunter July 11, 2017 11:37am
If you can compile in the IDE you must have the JDK installed.
The javac command isn’t automatically usable at every command prompt or PowerShell. You need to add it to your environment variables and the path. Google that — it’s easy to do.
Also, you can navigate to the folder location of javac.exe. Go to C:Program FilesJavajdk<version>bin and run javac using a bash call like ./javac — that’ll give you all its available options. You can add a path to the source file to compile it directly.
I hope that helps,
Steve.
PLUS
I already used «javac» and it is still not working.
It returns:
bash: javac: command not found
Bartosz Piechaczek July 10, 2017 1:04pm
Java is a case-sensitive language. Use «javac» instead of «Javac».
PLUS
Wouldn’t it slow your computer down?
I had installed a virtual machine once but at that time I knew it would consume my computer resources, so I hesitated and decided not to use it.
PLUS
It is great having a super-computer to do everything we need. I feel like having a desktop as opposed to a notebook. It seems like notebooks commonly have smaller disk space and a higher price.