Install beautifulsoup python 3 windows, linux and Ubuntu. In the tutorial we will learn the installation of the beautifulsoup in python. The python programming language will support the third party module as beautiful soup. The module developer should be well prepared and the installer should be executable. The debian is based on the operating system and said as platform specific installer. The library makes easy to scrape off the information from web pages. Also sits at the top and provides pythonic idioms for searching, iterating and modifying.
Pip install BeautifulSoup
Installing Beautiful Soup in Windows:-
We make use of python packages available from the website and use the setup.py to install beautiful soup.
Verifying Python path in Windows:-
The python.exe is not added to environment by default in windows.
So to check from the windows command line prompt we type python.
The command will work without errors and python is added in the environment within the installed directory.
For the python 2.x it has c:python2x and python 3.x we have c:python3x
For adding path in windows machine we have to,
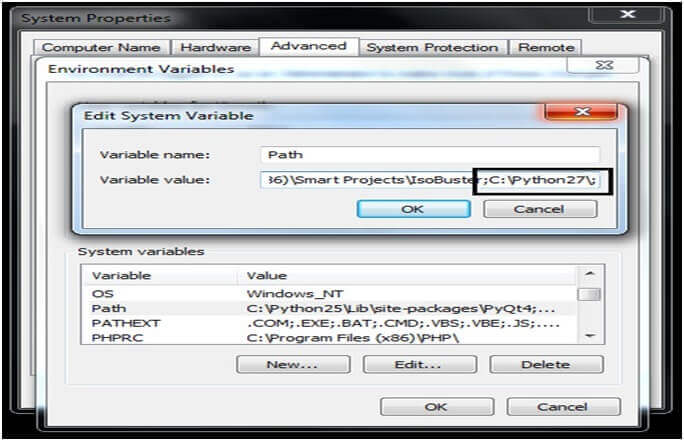
Right-click on MY Computer<properties<environment variables<system variable<path variable and add section to path variable.
C:pythonXY for example C:Python 27
Install beautifulsoup python 3 windows
Install beautiful soup 4 with python 2.7 on windows 10:-
We can add system variable by,
- Click on Properties of My Computer.
- Choose Advanced System Settings
- Then click on Advanced Tab
- After that click on Environment Variables
- Then System Variables >>> select the variable path.
- Click to edit and then add the following lines at the end of it
- C:python27;c:Python27scripts
You do this once only.
- Then restart windows.
- Install the beautifulsoup4
- Then open cmd and type,
pip install beautifulsoup4
easy_install beautifulsoup4
or
easy_install beautifulsoup
Then add the Python path in Windows and next process after Python path is ready we follow the steps for installing Beautiful Soup on a Windows machine.
2) Installation on Ubuntu:-
If pip is not installed does it now:-
apt-get update
apt-get-y install python pip
3) Install beautifulsoup 4 with pip:-
Pip install beautifulsoup4
It will also support python 2 and 3 version.
Installation on Windows with Pip:-
install pip to download python packages faster and easier from the command line.
Then open command prompt as,
Download get-pip, py then open CMD and cd to folder downloaded and run it.
Cd C:UsersAttilaDesktopFolder
Python get-pip.py
Then the pip is installed on your system and tests it by checking versions as,
Pip-V
Install beautiful soup with pip
Pip install beautifulsoup4
Easy install and pip are the tools used for managing and installing Python packages.
Anyone of them can be used to install Beautiful Soup.
Copy
Studo pip install beautifulsoup4
5) Installation on Windows without pip:-
Install the beautifulsoup without pip on windows,
- Firstly download the latest package for extracting.
- Then Open CMD and cd to the folder from which you have extracted.
Cd:C:UsersAttilaDesktopFolderbeautifulsoup4-4.1.0
Here open cmd and type,
Pip install beautifulsoup4
I would like to install Beautiful Soup 4 but I can’t install Beautiful Soup by copying the file into the site-packages directory.
Firstly we have to install pip and then run some commands from the command prompt.
Python-m pip
After getting Usage and Commands instructions you have to install and if python is not found it needs to be added to the path.
So you can run the same command from the installation directory of python.
Python-m pip install Beautifilsoup4
Easy_install beautiful soup4 or
Easy_install beautiful soup
To install easy_install
The python programming g will support modules such as beautiful soup.
We expect the module developer and prepare an installer.
6) Installing Beautiful Soup in Linux:-
Installing Beautiful Soup is simple and straightforward in Linux machines. For versions like Ubuntu and Debian the beautifulsoup is available as package.
The package is installed using the system package manager.
There are three ways to install Beautiful Soup in Linux machines:-
Using the package manager
Using easy_install
Using pip
7) Installing Beautiful Soup using the package manager:-
Linux machines come with a package manager to install various packages.
The default package manager is based on the apt-get and we will use the apt-get.
 Installing Beautiful Soup using easy_install:-
 Installing Beautiful Soup using easy_install:-
This tool will install the package from Python Package Index (PyPI) and type the command as,
Copy
Sudo easy_install beautifulsoup4
Active network connection is important to install the beautifulsoup in Linux.
The setup.py script come with python package downloaded from the pypi.pythopn.org.
9) Installing Beautiful Soup using setup.py:-
Install Python packages using the script that come with every Python package and downloaded it from the Python package index.
Unzip to folder
Then open up command line prompt and navigate to the unzipped folder as
Cd BeautifulSoup
Python setup.install
The python setup.py install is installed on the system.
- Need pip use by downloading and running python setup.py from a directory.
- Easy_install beautifulsoup4
Or easy_install beautifulSoup
- Use http://pypi.python.org/pypi/setuptools
- Install the pip by the get-pip method and downloading it then we will save it.
- Then add system by,
- Clicking properties of my computer
- Choose the advanced system setting
- Then click advanced tab
- Then enviourement variables
- From the system variables,>>select path
Open cmd and type
Pip install beautifulsoup4
Checking way is python-m pip
If we get usage and command instruction then you have installed beautiful soup on system.
Python-m pip install beautifulsoup4
Beautifulsoup is a python package that is useful in scrapping web content from a particular URL. It parses HTML and XML documents and creates a parse tree that is used to extract data from HTML. But how you will install it in your system. In this entire tutorial you will know how to pip install Beautifulsoup, means how to install Beautifulsoup using the pip command.
Steps to Install Beautifulsoup using PIP
In this section, you will know all the steps required to install beautifulsoup in your system. I will tell you how to install in both windows and linux operating system.
Install Beautifulsoup on Windows
Step 1: Open your command prompt
Step 2: Check the version of the python by typing the following command.
python --version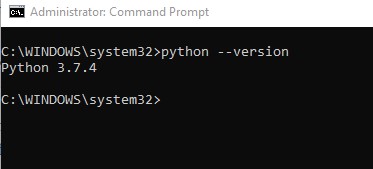
Step 3: Install the beautifulsoup using pip
After checking the version of the python now you can install beautifusoup for different python versions.
For python 3.xx
pip3 install beautifulsoup4For python 2.xx
pip install beautifulsoup4In my system, the python version is 3.xx. So I will use the pip3 command.

Install Beautifulsoup on Linux
Now let’s install Beautifulsoup on Linux. You have to follow the below steps to install it.
Step 1: Update the Linux
To update the Linux use the following command.
sudo apt-get update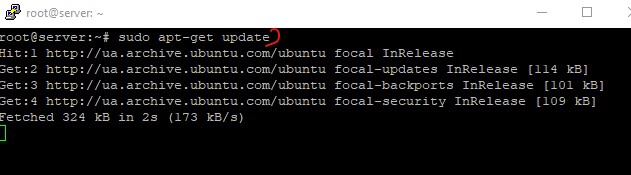
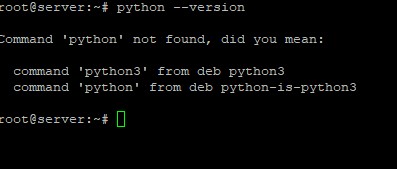
Step 2: Check the python version
To check the python version. If it is installed then you will get the version number. And if are getting the following error then you have to install it.
To install python use the pip3 command.
pip3 install pythonIt will install the python 3.xx version.
Step 3: Install the Beautifulsoup
After the installation of the python install the Beautifulsoup using the pip command. Run the following bash command to install it.
pip3 install beautifulsoup4It will successfully install the beautifulsoup on the Linux OS.
Conclusion
If you want to make your own scrapper then beautifulsoup python package is very useful. These are the steps to install beautifulsoup using the pip command for Linux and Window OS. Hope this tutorial has solved your queries. If you want to get more help then you can contact us anytime. We are always ready to help you. Apart from installation, there are so many operations you should explore with beautifulsoap package like extracting data using findall() function , parsing HTML and select.
Source:
Beautifulsoup documentation

Join our list
Subscribe to our mailing list and get interesting stuff and updates to your email inbox.
We respect your privacy and take protecting it seriously
Thank you for signup. A Confirmation Email has been sent to your Email Address.
Something went wrong.
Improve Article
Save Article
Improve Article
Save Article
Beautiful Soup is a Python library for pulling data out of HTML and XML files. It works with your favorite parser to provide idiomatic ways of navigating, searching, and modifying the parse tree. It commonly saves programmers hours or days of work. The latest Version of Beautifulsoup is v4.9.3 as of now.
Prerequisites
- Python
- Pip
How to install Beautifulsoup?
To install Beautifulsoup on Windows, Linux, or any operating system, one would need pip package. To check how to install pip on your operating system, check out – PIP Installation – Windows || Linux.
Now, run a simple command,
pip install beautifulsoup4
Wait and relax, Beautifulsoup would be installed shortly.
Install Beautifulsoup4 using Source code
One can install beautifulsoup, using source code directly, install beautifulsoup tarball from here – download the Beautiful Soup 4 source tarball
after downloading cd into the directory and run,
Python setup.py install
Verifying Installation
To check whether the installation is complete or not, let’s try implementing it using python

Project description
Beautiful Soup is a library that makes it easy to scrape information
from web pages. It sits atop an HTML or XML parser, providing Pythonic
idioms for iterating, searching, and modifying the parse tree.
Discontinuation notice
You should use the ‘beautifulsoup4’ package instead of this package.
Development on the 3.x series of Beautiful Soup ended in 2011, and the
series will be discontinued on January 1, 2021, one year after the
Python 2 sunsetting date. At some point after that, the
‘beautifulsoup’ pip package will be updated to a recent version of
Beautiful Soup. This will free up the ‘beautifulsoup’ package name to
be used by a more recent release.
If you’re relying on version 3 of Beautiful Soup, you really ought to
port your code to Python 3. A relatively small part of this work will
be migrating your Beautiful Soup code to Beautiful Soup 4.
Download files
Download the file for your platform. If you’re not sure which to choose, learn more about installing packages.
Source Distribution
Built Distribution
The Internet is a landmine of data, however, you’re going to need the right tools to scrape it. One of the best options right now is Beautifulsoup, a Python library designed to extract data from HTML and XML documents. In this tutorial, we will explain how to install it on Windows 10.To begin using Beautifulsoup, you’re going to need to install Python on your computer first. If you already have it installed, skip to Section 2 of this tutorial.
Section 1. Installing Python on Windows 10.
Step 1. Download the latest Python version from Python.org.
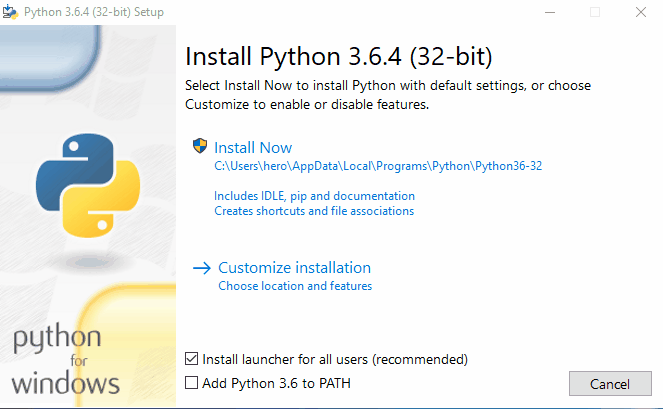
Step 2. Start the installer.
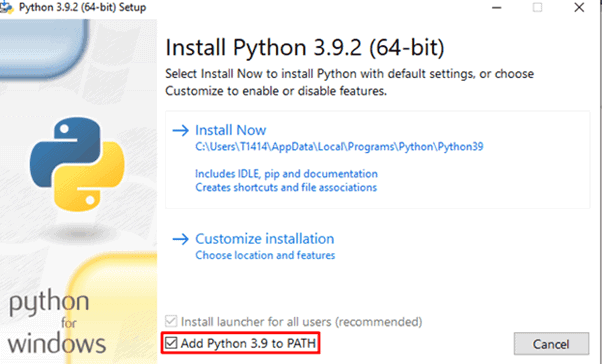
Step 3. Select Add Python 3.X to PATH. This step is necessary to install the libraries using the built-in Python package installer, PIP.
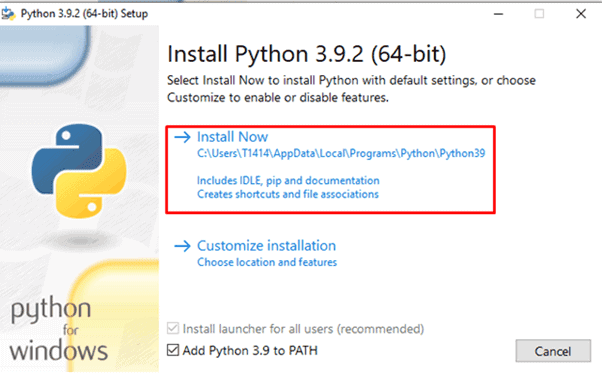
Step 4. Click on the Install Now button.
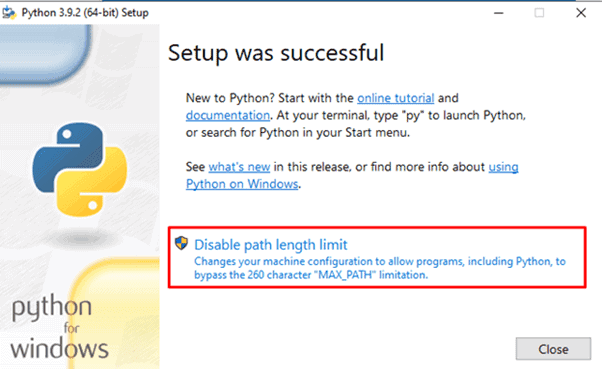
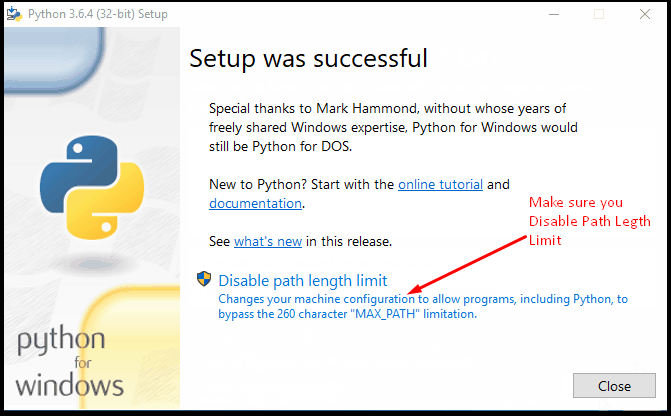
Step 5. After the installation is complete, click on Disable path length limit and close the window.
Section 2. Installing Beautifulsoup on Windows 10.
We will install Beautifulsoup on Windows 10 using PIP.
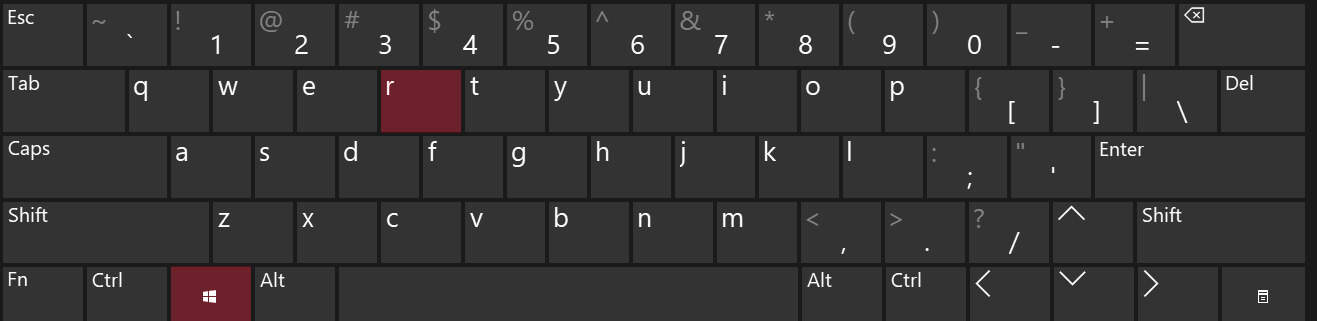
Step 1. Press ⊞ Windows + R buttons at the same time.
Step 2. Type cmd and click the OK button.
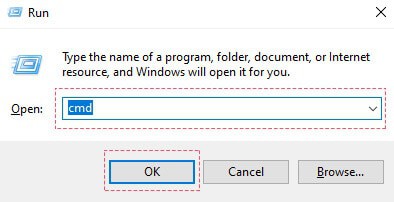
Step 3. Then, type in the command below and press ENTER.
pip install beautifulsoup4After installation, you should receive a message similar to the following:
![]()
As BeautifulSoup is not a standard python library, we need to install it first. We are going to install the BeautifulSoup 4 library (also known as BS4), which is the latest one.
To isolate our working environment so as not to disturb the existing setup, let us first create a virtual environment.
Содержание
- Creating a virtual environment (optional)
- Linux environment
- Windows environment
- Installing virtual environment
- Screenshot
- Installing BeautifulSoup
- Linux Machine
- Windows Machine
- Problems after installation
- Installing a Parser
- Linux Machine
- Windows Machine
- Running Beautiful Soup
- Output
- Output
- Работа с веб-данными с помощью Requests и Beautiful Soup в Python
- Требования
- Установка Requests
- Установка Beautiful Soup
- Сбор данных веб-страницы с помощью Requests
- Turtle Soup
- Использование библиотеки beautifulsoup в Python
- Введение
- Инструменты
- Реализация
- Сбор заголовков последних технических новостей
- Проверка источника данных
- Извлечение веб-страницы
- Использование BeautifulSoup
- Извлечение заголовка и тела страницы
- Поиск HTML-элементов
- Поиск HTML-элементов по имени класса
- Извлечение текста из HTML-элементов
- Beautiful Soup Documentation
- Getting help
- Quick Start
- Installing Beautiful Soup
- Problems after installation
- Installing a parser
- Модуль BeautifulSoup4 в Python, разбор HTML.
- Извлечение данных из документов HTML и XML.
- Установка BeautifulSoup4 в виртуальное окружение:
- Содержание:
- Выбор парсера для использования в BeautifulSoup4.
- Основные приемы работы с BeautifulSoup4.
- Навигация по структуре HTML-документа:
- Извлечение URL-адресов.
- Извлечение текста HTML-страницы.
- Поиск тегов по HTML-документу:
- Поиск тегов при помощи CSS селекторов:
- Дочерние элементы.
- Родительские элементы.
Creating a virtual environment (optional)
A virtual environment allows us to create an isolated working copy of python for a specific project without affecting the outside setup.
Best way to install any python package machine is using pip, however, if pip is not installed already (you can check it using – “pip –version” in your command or shell prompt), you can install by giving below command −
Linux environment
Windows environment
To install pip in windows, do the following −
Download the get-pip.py from https://bootstrap.pypa.io/get-pip.py or from the github to your computer.
Open the command prompt and navigate to the folder containing get-pip.py file.
Run the following command −
That’s it, pip is now installed in your windows machine.
You can verify your pip installed by running below command −
Installing virtual environment
Run the below command in your command prompt −
After running, you will see the below screenshot −

Below command will create a virtual environment (“myEnv”) in your current directory −
Screenshot
To activate your virtual environment, run the following command −

In the above screenshot, you can see we have “myEnv” as prefix which tells us that we are under virtual environment “myEnv”.
To come out of virtual environment, run deactivate.
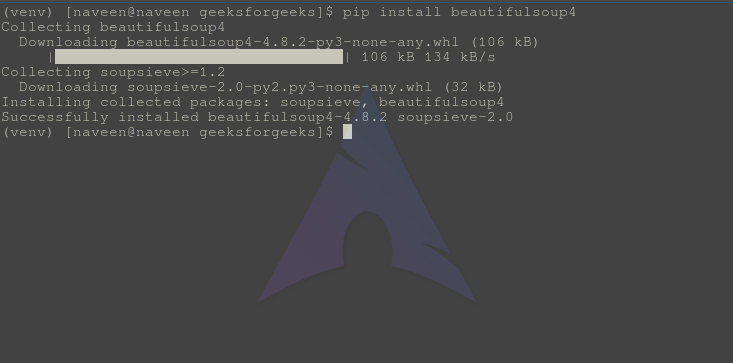
As our virtual environment is ready, now let us install beautifulsoup.
Installing BeautifulSoup
As BeautifulSoup is not a standard library, we need to install it. We are going to use the BeautifulSoup 4 package (known as bs4).
Linux Machine
To install bs4 on Debian or Ubuntu linux using system package manager, run the below command −
You can install bs4 using easy_install or pip (in case you find problem in installing using system packager).
(You may need to use easy_install3 or pip3 respectively if you’re using python3)
Windows Machine
To install beautifulsoup4 in windows is very simple, especially if you have pip already installed.

So now beautifulsoup4 is installed in our machine. Let us talk about some problems encountered after installation.
Problems after installation
On windows machine you might encounter, wrong version being installed error mainly through −
error: ImportError “No module named HTMLParser”, then you must be running python 2 version of the code under Python 3.
error: ImportError “No module named html.parser” error, then you must be running Python 3 version of the code under Python 2.
Best way to get out of above two situations is to re-install the BeautifulSoup again, completely removing existing installation.
If you get the SyntaxError “Invalid syntax” on the line ROOT_TAG_NAME = u’[document]’, then you need to convert the python 2 code to python 3, just by either installing the package −
or by manually running python’s 2 to 3 conversion script on the bs4 directory −
Installing a Parser
By default, Beautiful Soup supports the HTML parser included in Python’s standard library, however it also supports many external third party python parsers like lxml parser or html5lib parser.
To install lxml or html5lib parser, use the command −
Linux Machine
Windows Machine

Generally, users use lxml for speed and it is recommended to use lxml or html5lib parser if you are using older version of python 2 (before 2.7.3 version) or python 3 (before 3.2.2) as python’s built-in HTML parser is not very good in handling older version.
Running Beautiful Soup
It is time to test our Beautiful Soup package in one of the html pages (taking web page – https://www.tutorialspoint.com/index.htm, you can choose any-other web page you want) and extract some information from it.
In the below code, we are trying to extract the title from the webpage −
Output
One common task is to extract all the URLs within a webpage. For that we just need to add the below line of code −
Output
Similarly, we can extract useful information using beautifulsoup4.
Now let us understand more about “soup” in above example.
Источник
Работа с веб-данными с помощью Requests и Beautiful Soup в Python
Данный мануал научит работать с пакетами Requests и Beautiful Soup для использования данных с веб-страниц. Модуль Requests позволяет интегрировать программы Python с веб-сервисами, а модуль Beautiful Soup предназначен для ускорения анализа экранных данных. С помощью интерактивной консоли Python и этих библиотек можно проанализировать веб-страницу и работать с имеющейся там текстовой информацией.
Требования
Вам понадобится среда разработки Python 3. Чтобы создать такую среду, можно воспользоваться руководствами Настройка локальной среды разработки для Python 3 в Ubuntu 16.04 или Установка Python 3 и настройка среды разработки на сервере Ubuntu 16.04.
Также рекомендуем ознакомиться со следующими статьями:
Кроме того, вам нужно иметь базовые знания о структурах и тегах HTML.
Установка Requests
Разверните среду программирования Python 3. Убедитесь, что вы находитесь в каталоге, в котором находится ваша среда, и выполните следующую команду:
Чтобы работать с веб-страницами, их нужно будет запрашивать. Библиотека Requests позволяет использовать HTTP в своих программах Python.
Установите Requests в среду программирования.
pip install requests
Collecting requests
Downloading requests-2.18.1-py2.py3-none-any.whl (88kB)
100% |████████████████████████████████| 92kB 3.1MB/s
.
Installing collected packages: chardet, urllib3, certifi, idna, requests
Successfully installed certifi-2017.4.17 chardet-3.0.4 idna-2.5 requests-2.18.1 urllib3-1.21.1
Если библиотека Requests была установлена ранее, вы получите такой вывод:
Requirement already satisfied
.
Установка Beautiful Soup
Теперь нужно установить Beautiful Soup с помощью pip. На данный момент последней версией является Beautiful Soup 4.
pip install beautifulsoup4
Collecting beautifulsoup4
Downloading beautifulsoup4-4.6.0-py3-none-any.whl (86kB)
100% |████████████████████████████████| 92kB 4.4MB/s
Installing collected packages: beautifulsoup4
Successfully installed beautifulsoup4-4.6.0
Теперь можно приступать к работе с библиотеками.
Сбор данных веб-страницы с помощью Requests
С помощью этих двух библиотек Python, можно проанализировать веб-страницу.
Перейдите в Python Interactive Console:
Импортируйте модуль Requests, чтобы собрать данные с веб-страницы:
Присвойте URL-адрес тестовой страницы (в данном случае это mockturtle.html) переменной url.
Затем можно присвоить результат запроса этой страницы переменной page с помощью метода request.get(). Передайте URL-адрес страницы, который был присвоен переменной url, этому методу.
Переменная page присвоена объекту Response.
Объект Response сообщает свойство status_code в квадратных скобках (в данном случае это 200). Этот атрибут можно вызвать явно:
Возвращаемый код 200 сообщает, что страница загружена успешно. Коды, начинающиеся с номера 2, обычно указывают на успешное выполнение операции, а коды, начинающиеся с 4 или 5, сообщают об ошибке. Вы можете узнать больше о кодах состояния HTTP по этой ссылке.
Чтобы работать с веб-данными, нужно получить доступ к текстовому содержимому веб-файлов. Прочитать содержимое ответа сервера можно с помощью page.text (или page.content, чтобы получить значение в байтах).
‘ nn n n nn Turtle
Soup n nn n
Turtle Soup
id=»first»>Beautiful Soup, so rich and green,
n Waiting in a hot tureen!
n Who for
such dainties would not stoop?
n Soup of the evening, beautiful Soup!
n Soup of
the evening, beautiful Soup!
Beau—ootiful
Soo—oop!
n Beau—ootiful Soo—oop!
n Soo—oop of the e—e—evening,
n
Beautiful, beautiful Soup!
Beautiful Soup! Who cares
for fish,
n Game or any other dish?
n Who would not give all else for two
n
Pennyworth only of Beautiful Soup?
n Pennyworth only of beautiful Soup?
Beau—ootiful Soo—oop!
n Beau—ootiful Soo—oop!
n
Soo—oop of the e—e—evening,
n Beautiful, beauti—FUL SOUP!
/>
Источник
Использование библиотеки beautifulsoup в Python
Это руководство для начинающих по использованию библиотеки beautifulsoup для парсинга данных с веб сайтов.
Введение
Веб парсинг это метод программирования для извлечения данных с веб-сайтов. Процесс получения данных с веб-сайтов может быть выполнен вручную, но это медленный и утомительный процесс, когда данных много. Web Scraping обеспечивает более автоматизированный и простой способ извлечения информации с веб-сайтов.
Веб парсинг это больше, чем просто получение данных: этот метод также может помочь вам архивировать данные и отслеживать изменения в данных онлайн.
Он также известен как веб скрейпинг или веб паук.
В интернете очень много информации на эту тему, и она растет довольно быстро. Люди парсят интернет по многим причинам и вот некоторые из них:
Все сводится к тому, какие данные вы хотите получить или отследить в интернете.
Инструменты
Существует множество инструментов и языков программирования для очистки контента в интернете, но Python обеспечивает плавный и простой процесс. Веб-скрейпинг может быть выполнен на Python с помощью таких библиотек, как Requests, BeautifulSoup, Scrapy и Selenium.
Beautifulsoup это лучший выбор при запуске веб-скрейпинга в Python, поэтому мы будем использовать BeautifulSoup4 и библиотеку запросов Python для Web Scraping.
Не все веб-сайты разрешают собирать данные, поэтому перед сбором вам следует проверить политику веб-сайта.
Реализация
Есть всего три шага в очистке веб-страницы:
Сбор заголовков последних технических новостей
habr.com предоставляет последние новости из технической индустрии, поэтому сегодня я буду парсить последние заголовки новостей с их домашней страницы.
Проверка источника данных
Итак, вы должны иметь некоторые базовые знания HTML. Чтобы ознакомиться с веб-страницей habr.com, сначала посетите ее сайт habr.com, затем в вашем браузере нажмите CTRL + U, чтобы просмотреть исходный код веб-страницы. Просматриваемый исходный код это тот же самый код, из которого мы будем собирать наши данные.
Обладая некоторыми базовыми знаниями в области HTML, вы можете проанализировать исходный код и найти HTML-разделы или элементы, которые содержат некоторые данные, такие как заголовки новостей, обзор новостей, дата статьи и так далее.
Извлечение веб-страницы
Чтобы собрать информацию с веб-страницы, вы должны сначала извлечь (получить или загрузить) страницу. Но обратите внимание, что компьютеры не видят веб-страницы так, как мы, люди, то есть красивые макеты, цвета, шрифты и тому подобное.
Компьютеры видят и понимают веб-страницы как код, то есть исходный код, который мы видим, когда просматриваем исходный код в браузере, нажимая CTRL + U, как мы это делали при проверке веб-страницы.
Чтобы получить веб-страницу с помощью Python, я буду использовать библиотеку requests, которую вы можете установить с помощью pip:
Чтобы получить веб-страницу с помощью библиотеки запросов, я пишу код:
Переменная response содержит ответ, который мы получаем после отправки запроса на https://www.habr.com/.
response.status_code возвращает код ответа, указывающий, был ли запрос успешным или нет. Код состояния 200 указывает на то, что запрос был успешным, 4** означает ошибку клиента (ошибку с вашей стороны) и 5** означает ошибку сервера.
response.content возвращает содержимое ответа, которое является исходным кодом веб-страницы, и это тот же исходный код, который доступен вам при просмотре его в веб-браузере.
Использование BeautifulSoup
После того, как я получил веб-страницу и доступ к ее исходному коду, мне нужно разобрать ее с помощью BeautifulSoup.
Beautiful Soup это библиотека Python для извлечения данных из HTML-и XML-файлов. Я буду использовать ее для извлечения необходимых нам данных из нашего исходного кода HTML.
Устанавливаем BeautifulSoup через pip:
Прежде чем сделать какое-либо извлечение, я должен разобрать HTML, который у нас есть:
Класс BeautifulSoup требует двух аргументов: исходного кода HTML страницы, который хранится в response.content, и HTML-parser.
HTML-parser это простой модуль синтаксического анализа HTML, встроенный в Python и BeautifulSoup, который нужен для разбора response.content (исходный код HTML).
Извлечение заголовка и тела страницы
После синтаксического анализа с помощью BeautifulSoup анализируемый HTML-код хранится в переменной Soup, которая является основой всего извлечения, которое мы собираемся сделать. Давайте начнем с извлечения заголовка страницы, элементов head и body:
soup.title возвращает элемент title веб-страницы в формате html(…). Аналогично soup.head и soup.body возвращают элементы head и body веб-страницы.
Поиск HTML-элементов
Выборка только заголовков, head и body веб-страницы по-прежнему дает нам слишком много нежелательных данных. Нам нужны только некоторые данные из тела HTML, такие как поиск определённых HTML-элементов, например, div, a, p, footer, img, и так далее. Моя цель собрать заголовки новостей с веб-страницы. Когда я проводил проверку, вы заметили, что новостные статьи хранились с разбивкой по тегам. Давайте посмотрим, будет ли полезно найти все элементы a на веб-странице:
Поиск всех тэгов a это еще один шаг ближе к цели, но мне все равно нужно быть более конкретным и находить только те элементы a с нужными нам данными.
Как вы можете видеть выше, заголовки новостей находятся в элементах a с именем класса post__title_link, то есть:
Таким образом, нам нужно будет найти только элементы a с классом post__title_link.
Поиск HTML-элементов по имени класса
Чтобы найти все элементы a с классом post__title_link, я пишу следующий код:
ищет все элементы a названием класса post__title_link и возвращает их списком.
Затем мы перебираем возвращенный список и извлекаем из него все элементы, поскольку он содержит искомый текст:
Мы почти закончили, у меня есть список элементов с нашими новостными заголовками в них. Мы должны извлечь их из HTML-элемента (извлечь текст из элементов).
Извлечение текста из HTML-элементов
Источник
Beautiful Soup Documentation

Beautiful Soup is a Python library for pulling data out of HTML and XML files. It works with your favorite parser to provide idiomatic ways of navigating, searching, and modifying the parse tree. It commonly saves programmers hours or days of work.
These instructions illustrate all major features of Beautiful Soup 4, with examples. I show you what the library is good for, how it works, how to use it, how to make it do what you want, and what to do when it violates your expectations.
This document covers Beautiful Soup version 4.9.3. The examples in this documentation should work the same way in Python 2.7 and Python 3.8.
You might be looking for the documentation for Beautiful Soup 3. If so, you should know that Beautiful Soup 3 is no longer being developed and that support for it will be dropped on or after December 31, 2020. If you want to learn about the differences between Beautiful Soup 3 and Beautiful Soup 4, see Porting code to BS4.
This documentation has been translated into other languages by Beautiful Soup users:
Getting help
If you have questions about Beautiful Soup, or run into problems, send mail to the discussion group. If your problem involves parsing an HTML document, be sure to mention what the diagnose() function says about that document.
Quick Start
Here’s an HTML document I’ll be using as an example throughout this document. It’s part of a story from Alice in Wonderland :
Running the “three sisters” document through Beautiful Soup gives us a BeautifulSoup object, which represents the document as a nested data structure:
Here are some simple ways to navigate that data structure:
One common task is extracting all the URLs found within a page’s tags:
Another common task is extracting all the text from a page:
Does this look like what you need? If so, read on.
Installing Beautiful Soup
If you’re using a recent version of Debian or Ubuntu Linux, you can install Beautiful Soup with the system package manager:
$ pip install beautifulsoup4
$ python setup.py install
If all else fails, the license for Beautiful Soup allows you to package the entire library with your application. You can download the tarball, copy its bs4 directory into your application’s codebase, and use Beautiful Soup without installing it at all.
I use Python 2.7 and Python 3.8 to develop Beautiful Soup, but it should work with other recent versions.
Problems after installation
Beautiful Soup is packaged as Python 2 code. When you install it for use with Python 3, it’s automatically converted to Python 3 code. If you don’t install the package, the code won’t be converted. There have also been reports on Windows machines of the wrong version being installed.
If you get the ImportError “No module named HTMLParser”, your problem is that you’re running the Python 2 version of the code under Python 3.
If you get the ImportError “No module named html.parser”, your problem is that you’re running the Python 3 version of the code under Python 2.
In both cases, your best bet is to completely remove the Beautiful Soup installation from your system (including any directory created when you unzipped the tarball) and try the installation again.
$ python3 setup.py install
or by manually running Python’s 2to3 conversion script on the bs4 directory:
Installing a parser
Beautiful Soup supports the HTML parser included in Python’s standard library, but it also supports a number of third-party Python parsers. One is the lxml parser. Depending on your setup, you might install lxml with one of these commands:
Another alternative is the pure-Python html5lib parser, which parses HTML the way a web browser does. Depending on your setup, you might install html5lib with one of these commands:
$ pip install html5lib
This table summarizes the advantages and disadvantages of each parser library:
Источник
Модуль BeautifulSoup4 в Python, разбор HTML.
Извлечение данных из документов HTML и XML.
Установка BeautifulSoup4 в виртуальное окружение:
Содержание:
Выбор парсера для использования в BeautifulSoup4.
BeautifulSoup4 представляет один интерфейс для разных парсеров, но парсеры неодинаковы. Разные парсеры, анализируя один и того же документ создадут различные деревья HTML. Самые большие различия будут между парсерами HTML и XML. Так же парсеры различаются скоростью разбора HTML документа.
Если дать BeautifulSoup4 идеально оформленный документ HTML, то различий построенного HTML-дерева не будет. Один парсер будет быстрее другого, но все они будут давать структуру, которая выглядит точно так же, как оригинальный документ HTML. Но если документ оформлен с ошибками, то различные парсеры дадут разные результаты.
Различия в построении HTML-дерева разными парсерами, разберем на короткой HTML-разметке:
Обратите внимание, что парсер html5lib НЕ игнорирует висячий тег
, и к тому же добавляет открывающий тег
. Также html5lib добавляет пустой тег ( lxml этого не сделал).
Вывод: Парсер html5lib использует способы, которые являются частью стандарта HTML5, поэтому он может претендовать на то, что его подход самый «правильный«.
Основные приемы работы с BeautifulSoup4.
Первым делом документ конвертируется в Unicode, а HTML-мнемоники конвертируются в символы Unicode:
Дальнейшие примеры будут разбираться на следующей HTML-разметке.
Передача этого HTML-документа в конструктор класса BeautifulSoup() создает объект, который представляет документ в виде вложенной структуры:
Навигация по структуре HTML-документа:
— следовательно они находятся на одном уровне.
Извлечение URL-адресов.
Одна из распространенных задач, это извлечение URL-адресов, найденных на странице в HTML-тегах :
Извлечение текста HTML-страницы.
Поиск тегов по HTML-документу:
Поиск тегов при помощи CSS селекторов:
Поиск тега под другими тегами:
Поиск тега непосредственно под другими тегами:
Поиск одноуровневых элементов:
Поиск тега по классу CSS:
Дочерние элементы.
Обратите внимание, что все переводы строк n и пробелы между тегами, так же будут считаться дочерними элементами. Так что имеет смысл заранее привести исходный HTML к «нормальному виду«, например так: re.sub(r’>s+
Извлечение ВСЕХ дочерних элементов. Эта операция похожа на рекурсивный обход HTML-дерева в глубину от выбранного тега.
Обратите внимание, что простой текст, который находится внутри тега, так же считается дочерним элементом этого тега.
Родительские элементы.
Источник
Web scraping using Python in Windows was tough. Installing pip in windows and using it to install packages useful for web scraping was the hardest part of all. Fortunately, those days are over. Python 3 now ships with PIP built-in. It can be installed easily in Windows by downloading Python 3 from Python.org. Follow the steps below to setup python 3 on your Windows 10 computer.
Installing Python 3 and PIP on Windows
Here are the steps
-
- Download Python 3 from Python.org. Python 3.6.4 is the latest stable release at the time of writing this article. You can download it here https://www.python.org/downloads/release/python-364/
- Start the installer. The installation is straightforward. Its good to just verify if PIP is selected in Optional Features (It must be). pip is a package management system used to install and manage software packages written in Python. Many packages can be found in the Python Package Index (PyPI). Make sure you select Add Python3.6 to PATH to add python environment variables to your PATH making Python and PIP accessible from PowerShell or Command Prompt. We will need this to install packages via pip and run scripts from command line using
python <script>
Below is a GIF of the installation process.

- After setup is successful, Disable path length python limit. If python was installed in a directory with a path length greater than 260 characters, adding it to the path could fail.

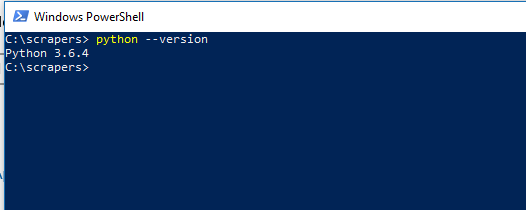
You can close the window now. - Verify Python Installation – Let us verify if it really worked. Open PowerShell (or Command Prompt) and type
python --versionand press enter. You should see a screen similar to the one below with the version of python you installed printed below.

- Verify Pip Installation – Now let’s verify if pip is also installed. In PowerShell (or Command Prompt) type
pip -Vand you should see something like this

That’s it. You’ve set up Python and PIP in windows. Let’s continue to install packages.
Installing Python Packages is a breeze with PIP. All you have to do is open PowerShell or Command Prompt and type:
pip install <pypi package name>
Here are some of the most common packages we use in our web scraping tutorials
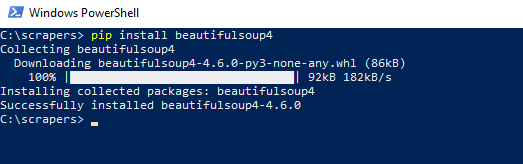
BeautifulSoup
BeautifulSoup is a library for pulling data out of HTML and XML files. It works with your favorite parser to provide idiomatic ways of navigating, searching, and modifying the parse tree. It commonly saves programmers hours or days of work. Install BeautifulSoup in Windows with this command:
pip install BeautifulSoup4
You’ll get a screen similar to this when done.
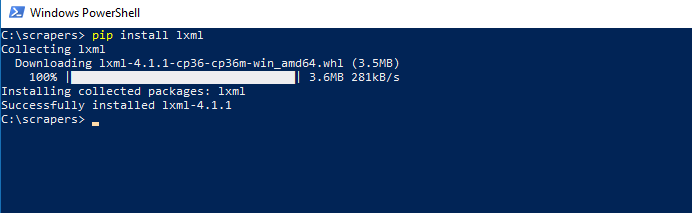
LXML
LXML is the most feature-rich and easy-to-use library for processing XML and HTML in the Python language. We use LXML to parse HTML content downloaded from web pages by converting it into a Tree Like structure that can be navigated programmatically using semi-structured Query Languages like XPaths or CSS Selectors.
Install it using
pip install lxml
You’ll get a screen similar to this when done.
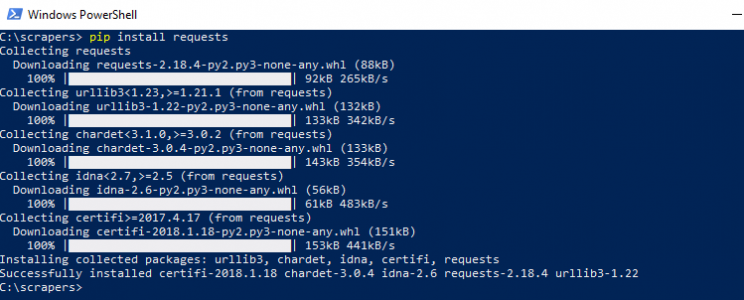
Requests – HTTP for Humans
Although python has its own HTTP Libraries, requests cut down lots of manual labor that comes with urllib. Requests allow you to send organic, grass-fed HTTP/1.1 requests, without the need for manual labor. There’s no need to manually add query strings to your URLs or to form-encode your POST data. Keep-alive and HTTP connection pooling are 100% automatic, thanks to urllib3. Install it using
pip install requests
Once done it would look like this
We can help with your data or automation needs
Turn the Internet into meaningful, structured and usable data

Definition of BeautifulSoup Install
BeautifulSoup install is very easy, we can install this module in any of the OS versions. Python allows us to install third-party modules like BeautifulSoup. In the best-case scenario, the module developer may have produced a platform-specific installer, such as an executable installer for Windows. However, this is not always the case, and we should be aware of the alternatives in the event that the platform-specific installer is unavailable.
How to Install BeautifulSoup?
- We’ll go over the many installation options on several operating systems, including Linux and other OS X. We are using rpm package for Red Hat and Debian-based operating systems.
- The Python version we’ll use to install in the following examples is Python 3, and the methods for Python 3 will most likely be different.
- It is easy to set up on Linux computers. It is a package that can be installed using the system package manager. We can install the BeautifulSoup on the Linux system by using the following methods.
1. By using the package manager
2. By using pip
3. By using easy_install
4. By using source code
- To use package manager is the simplest technique and involves the least amount of effort from the user, we’ll start there. If one stage of the installation is successful, we don’t need to go to the next because the four procedures listed above do the same thing.
1. Install the BeautifulSoup by using package manager on linux based systems
- A package manager is usually included with Linux machines, and it can be used to install numerous packages.
- We will use the system package manager to install it. Package manager on Linux PCs such as Ubuntu and Debian is apt-get, so we’ll use apt-get to complete the operation.
- Version 4 will be installed on ubuntu system with the command apt-get.
- To install in our system we requires root user privileges. Normal user cannot install beautifulsoup package.
- Below example shows installation by using package manager are as follows.
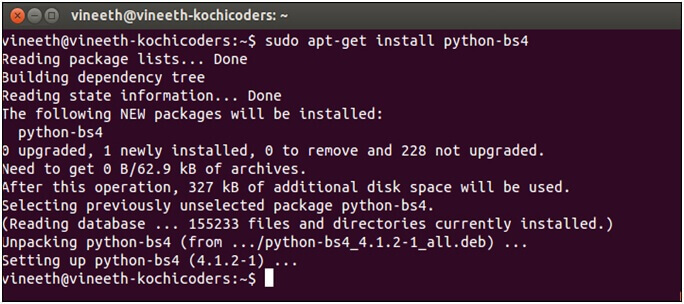
apt-get install python-bs4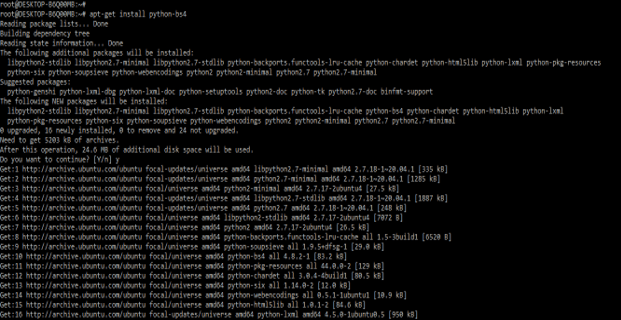
2. Install the BeautifulSoup by using easy_install command on linux based systems
- Python packages are managed and installed with the help of the utilities pip and easy_install. We can install using either of them.
easy_install beautifulsoup4
3. Install the BeautifulSoup by using pip command on linux based systems
- We have installed it by using the pip command on Linux based system. In below example we have already installed bs4 package in our system so, it will show that requirement is already satisfied then we have no need to do anything. We can directly use this package in our program.
pip install bs4
4. Install the BeautifulSoup by using source code on linux based systems
- We can also install by using source installation. To install the beautifulsoup by using source installation first we need to download the source package from the website. In the below example, we are downloading the package from the website using wget command.
# wget https://www.crummy.com/software/BeautifulSoup/bs4/download/4.0/beautifulsoup4-4.0.0b3.tar.gz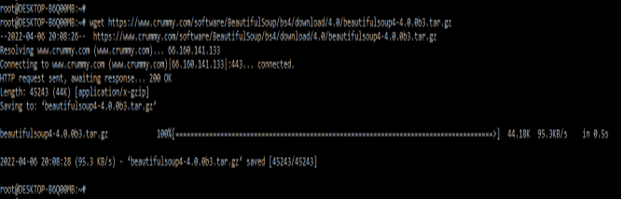
- After downloading the package in this step we are unzipping this file. We are unzipping the file by using tar command.
# tar -xvzf beautifulsoup4-4.0.0b3.tar.gz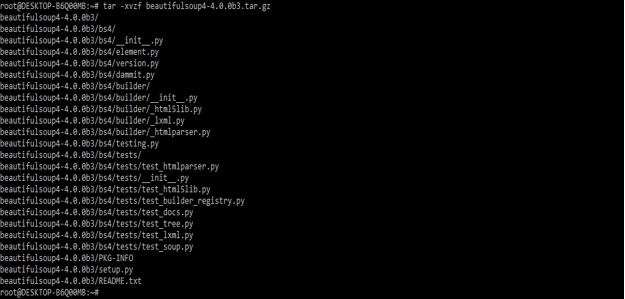
- After unzipping the package we are installing the beautifulsoup by using following command.
# python setup.py install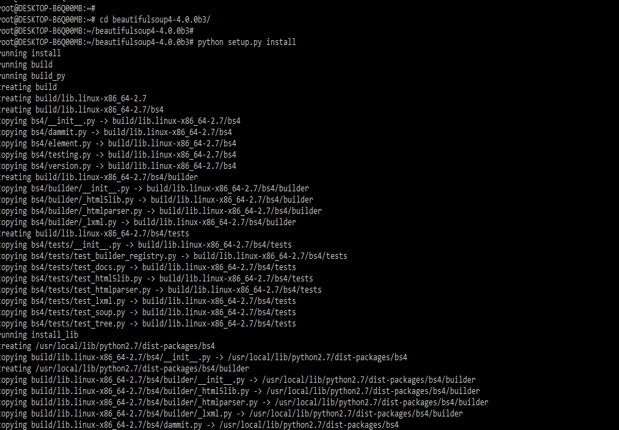
- After installing in Linux based system we are verifying the same by using the following command. In the below example first, we are login into the python shell. After login into the python shell, we are importing the bs4 module by using the import command. Then we are printing where our bs4 module is actually located on the system.
python3
import bs4
print (bs4)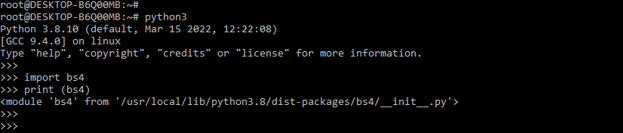
- We need to install BeautifulSoup first because it isn’t a standard Python package. We can install on windows system by using following methods.
- By using pip command
- BY using source installation
- To install by using source installation we need to download the package first.
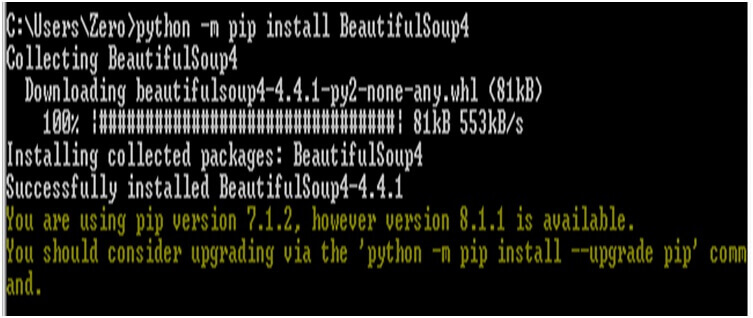
1. Install the BeautifulSoup by using pip command on windows based systems –
- In below example we are installing BeautifulSoup package on windows system are as follows.
- In below example we are installing beautifulsoup by using pip command are as follows.
pip install beautifulsoup4
2. Install the BeautifulSoup by using source on windows based systems –
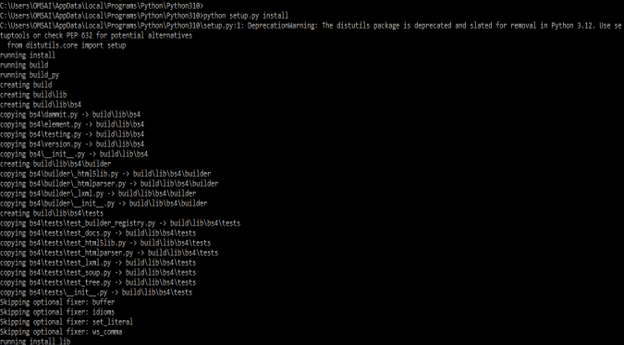
- In below example we are installing BeautifulSoup package on the windows system by using source installation are as follows.
- To install the BeautifulSoup package by using source we need to follow below steps.
- First we need to download the package from website. After downloading the package we need to unzip the file. Then we need to go into that directory and need to run below command are as follows.
- After installing the BeautifulSoup in windows based system we are verifying the same by using the following command. In the below example first, we are login into the python shell. After login into the python shell, we are importing the bs4 module by using the import command.
# python
import bs4
- After installing the BeautifulSoup package we are checking beautifulsoup by using the same code. In below example we are using BeautifulSoup module.
Code –
from bs4 import BeautifulSoup
import requests
py_url = "https://www.python.org/"
py_req = requests.get (py_url)
py_soup = BeautifulSoup (py_req.text, "html.parser")
print (py_soup.title)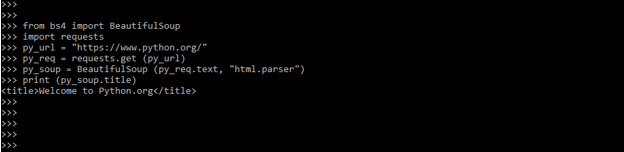
Conclusion
We will go over the many installation options for BeautifulSoup on several operating systems, including Linux and other OS X. BeautifulSoup install is very easy, we can install this module in any of the OS versions. Python allows us to install third-party modules like BeautifulSoup.
Recommended Articles
This is a guide to BeautifulSoup Install. Here we discuss the Definition, How to install BeautifulSoup, examples with code implementation. You may also have a look at the following articles to learn more –
- Python BeautifulSoup
- Python deepcopy
- Python mkdir
- Python KeyboardInterrupt
A common error you may encounter when using Python is modulenotfounderror: no module named ‘bs4’.
This error occurs when the Python interpreter cannot detect the BeautifulSoup4 library in your current environment.
You can install BeautifulSoup4 in Python 3 with the command python3 -m pip install beautifulsoup4.
This tutorial goes through the exact steps to troubleshoot this error for the Windows, Mac and Linux operating systems.
Table of contents
- ModuleNotFoundError: no module named ‘bs4’
- What is BeautifulSoup?
- How to Install BeautifulSoup4 on Windows Operating System
- BeautifulSoup4 installation on Windows Using pip
- How to Install BeautifulSoup4 on Mac Operating System using pip
- How to Install BeautifulSoup4 on Linux Operating Systems
- Installing pip for Ubuntu, Debian, and Linux Mint
- Installing pip for CentOS 8 (and newer), Fedora, and Red Hat
- Installing pip for CentOS 6 and 7, and older versions of Red Hat
- Installing pip for Arch Linux and Manjaro
- Installing pip for OpenSUSE
- BeautifulSoup4 installation on Linux with Pip
- Installing BeautifulSoup4 Using Anaconda
- Check BeautifulSoup4 Version
- Using BeautifulSoup4
- Summary
ModuleNotFoundError: no module named ‘bs4’
What is BeautifulSoup?
Beautiful Soup is a Python library for extracting data from HTML and XML files.
This tutorial covers the installation of Beautiful Soup major version, or Beautiful Soup 4.
The simplest way to install BeautifulSoup4 is to use the package manager for Python called pip. The following installation instructions are for the major Python version 3.
How to Install BeautifulSoup4 on Windows Operating System
First, you need to download and install Python on your PC. Ensure you select the install launcher for all users and Add Python to PATH checkboxes. The latter ensures the interpreter is in the execution path. Pip is automatically on Windows for Python versions 2.7.9+ and 3.4+.
You can check your Python version with the following command:
python3 --versionYou can install pip on Windows by downloading the installation package, opening the command line and launching the installer. You can install pip via the CMD prompt by running the following command.
python get-pip.pyYou may need to run the command prompt as administrator. Check whether the installation has been successful by typing.
pip --versionBeautifulSoup4 installation on Windows Using pip
To install BeautifulSoup4, run the following command from the command prompt.
python3 -m pip install beautifulsoup4We use python -m pip to execute pip using the Python interpreter we specify as Python. Doing this helps avoid ImportError when we try to use a package installed with one version of Python with a different version. You can use the command which python to determine which PYthon interpreter you are using.
How to Install BeautifulSoup4 on Mac Operating System using pip
Open a terminal by pressing command (⌘) + Space Bar to open the Spotlight search. Type in terminal and press enter. To get pip, first ensure you have installed Python3:
python3 --versionPython 3.8.8Download pip by running the following curl command:
curl https://bootstrap.pypa.io/get-pip.py -o get-pip.pyThe curl command allows you to specify a direct download link. Using the -o option sets the name of the downloaded file.
Install pip by running:
python3 get-pip.pyFrom the terminal, use pip to install BeautifulSoup4:
python3 -m pip install beautifulsoup4How to Install BeautifulSoup4 on Linux Operating Systems
All major Linux distributions have Python installed by default. However, you will need to install pip. You can install pip from the terminal, but the installation instructions depend on the Linux distribution you are using. You will need root privileges to install pip. Open a terminal and use the commands relevant to your Linux distribution to install pip.
Installing pip for Ubuntu, Debian, and Linux Mint
sudo apt install python-pip3Installing pip for CentOS 8 (and newer), Fedora, and Red Hat
sudo dnf install python-pip3Installing pip for CentOS 6 and 7, and older versions of Red Hat
sudo yum install epel-release

sudo yum install python-pip3
Installing pip for Arch Linux and Manjaro
sudo pacman -S python-pipInstalling pip for OpenSUSE
sudo zypper python3-pipBeautifulSoup4 installation on Linux with Pip
Once you have installed pip, you can install BeautifulSoup4 using:
python3 -m pip install beautifulsoup4Installing BeautifulSoup4 Using Anaconda
First, to create a conda environment to install bs4.
conda create -n bs4 python=3.6 Then activate the bs4 container. You will see “bs4” in parentheses next to the command line prompt.
source activate bs4Now you’re ready to install BeautifulSoup4 using conda.
Anaconda is a distribution of Python and R for scientific computing and data science. You can install Anaconda by going to the installation instructions. Once you have installed Anaconda and created your conda environment, you can install BeautifulSoup4 using the following command:
conda install -c anaconda beautifulsoup4Check BeautifulSoup4 Version
Once you have successfully installed BeautifulSoup4, you can check the version of it. If you used pip to install BeautifulSoup4, you can use pip show from your terminal.
python3 -m pip show beautifulsoup4Name: beautifulsoup4
Version: 4.9.3
Summary: Screen-scraping librarySecond, within your python program, you can import bs4 and then reference the __version__ attribute:
import bs4
print(bs4.__version__)4.9.3If you used conda to install BeautifulSoup4, you could check the version using the following command:
conda list -f beautifulsoup4# Name Version Build Channel
beautifulsoup4 4.9.3 pyhb0f4dca_0 anacondaUsing BeautifulSoup4
Let’s look at an example where we parse an HTML document using BeautifulSoup. First, we import the BeautifulSoup class. We will then read a URL using urllib to get an HTML document and assign it to a variable called content. Then, we create an object of the BeautifulSoup class with content as a parameter. The object represents the document as a nested data structure. We can call the find_all() method on the object to get the title of the HTML document. Let’s look at the code:
from bs4 import BeautifulSoup

from urllib.request import urlopen

url = "https://www.forbes.com"

content = urlopen(url).read()

soup = BeautifulSoup(content, 'html.parser')

print(soup.find_all("title")
When we run the code, we get:
[≺title itemprop="headline"≻Forbes≺/title≻]Summary
Congratulations on reading to the end of this tutorial. The modulenotfounderror occurs if you misspell the module name, incorrectly point to the module path or do not have the module installed in your Python environment. If you do not have the module installed in your Python environment, you can use pip to install the package. However, you must ensure you have pip installed on your system. You can also install Anaconda on your system and use the conda install command to install BeautifulSoup4.
Go to the online courses page on Python to learn more about Python for data science and machine learning.
For further reading on missing modules in Python, go to the articles:
- How to Solve Python ModuleNotFoundError: no module named ‘urllib2’.
- How to Solve Python ModuleNotFoundError: no module named ‘yaml’.
Have fun and happy researching!