В этой статье мы поговорим об особенностях резервного копирования контроллеров домена Active Directory, рассмотрим, как настроить автоматическое резервное копирование AD с помощью PowerShell и встроенных средств Windows Server.
Содержание:
- Нужно ли бэкапить Active Directory?
- Как проверить дату последнего бэкапа контроллера домена Active Directory?
- Бэкап контроллера домена AD с помощью Windows Server Backup
- Резервное копирование Active Directory с помощью PowerShell
Нужно ли бэкапить Active Directory?
Не раз слышал от знакомых администраторов мысль, что если у тебя несколько (5, 10 и т.д.) территориально разнесенных контроллеров домена Active Directory, то бэкапать AD вообще не нужно, т.к. при нескольких DC вы уже обеспечили высокую отказоустойчивость домена. Ведь в такой схеме вероятность одновременного выхода из строя всех DC стремится к 0, а если один контроллер домена упал, то быстрее развернуть новый DC на площадке, а старый контроллер домена удалить согласно инструкции (или с помощью ntdsutil).
Однако в своей практике я встречался с различными сценариями, когда все контроллеры домена оказались повреждёнными: в одном случае все контроллеры домена (а их было более 20 штук в разных городах) оказались зашифрованными из-за перехвата пароля домена шифровальщиком через утилиту mimikatz (для предотвращения таких схем см. статьи “Защита Windows от mimikatz” и “Защита привилегированных групп администраторов”), в другом случае домен положила репликация поврежденного файла NTDS.DIT.
В общем, бэкапить AD можно и нужно. Как минимум вы должны регулярно создавать резервные копии ключевых контроллеров доменов, владельцев ролей FSMO (Flexible single-master operations). Вы можете получить список контролеров домена с ролями FSMO командой:
netdom query fsmo
Как проверить дату последнего бэкапа контроллера домена Active Directory?
Вы можете проверить, когда создавалась резервная копия текущего контроллера домена Active Directory с помощью утилиты repadmin:
repadmin /showbackup
В данном примере видно, что последний раз бэкап DC и разделов AD выполнялся 2017-02-18 18:01:32 (скорее всего он не делался с момента развертывания контроллера домена).
Вы можете получить статус по резервному копированию всех DC в домене командой:
repadmin /showbackup *
Если ваши контроллеры домена запущены на виртуальных машинах, и вы создаете бэкап через снапшоты (см. пример с резервным копированием Hyper-V), то при бэкапе эти даты не обновляются по понятной причине. В большинстве современных средств резервного копирования есть опция, позволяющая указать что это DC и при бэкапе нужно обновлять данные в каталоге LDAP.
Бэкап контроллера домена AD с помощью Windows Server Backup
Если у вас нет специального ПО для резервного копирования, вы можете использовать для создания резервных копий встроенный Windows Server Backup (этот компонент пришел на замену NTBackup). Вы можете настроить автоматическое задание резервного копирования в графическом интерфейсе Windows Server Backup, но у него будут ряд ограничений. Основной недостаток – новая резервная копия сервера всегда будет перезаписывать старую.
При создании резервной копии контроллера домена через WSB, вы создаете резервную копию Состояния системы (System State). В System State попадает база Active Directory (NTDS.DIT), объекты групповых политик, содержимое каталога SYSVOL, реестр, метаданные IIS, база AD CS, и другие системные файлы и ресурсы. Резервная копия создается через службу теневого копирования VSS.
Вы можете проверить, установлен ли компонент Windows Server Backup с помощью PowerShell командлета Get-WindowsFeature:
Get-WindowsFeature Windows-Server-Backup

Если компонент WSB отсутствует, его можно установить с помощью PowerShell:
Add-Windowsfeature Windows-Server-Backup –Includeallsubfeature
Или установите его из Server Manager -> Features.
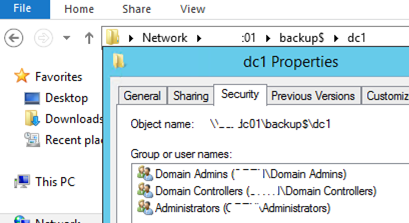
Я буду сохранять бэкап данного контроллера домена AD в сетевую папку на отдельном выделенном сервере для резевного копирования. Например, путь к каталогу будет таким \srvbak1backupdc01. Настроим NTFS разрешения на этой папке: предоставьте права чтения-записи в этот каталог только для Domain Admins и Domain Controllers.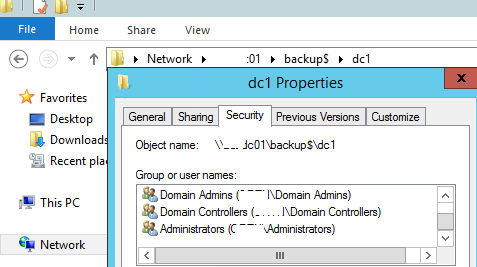
Резервное копирование Active Directory с помощью PowerShell
Попробуем создать бэкап контроллера домена с помощью PowerShell. Для хранения нескольких уровней копий AD мы будем хранить каждый бэкап в отдельном каталоге с датой создания копии в качестве имени папки.
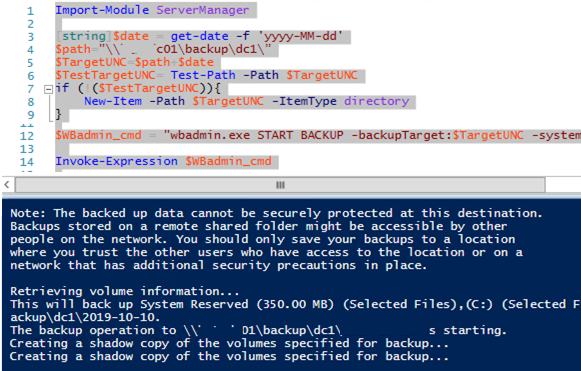
Import-Module ServerManager
[string]$date = get-date -f 'yyyy-MM-dd'
$path=”\srvbak1backupdc1”
$TargetUNC=$path+$date
$TestTargetUNC= Test-Path -Path $TargetUNC
if (!($TestTargetUNC)){
New-Item -Path $TargetUNC -ItemType directory
}
$WBadmin_cmd = "wbadmin.exe START BACKUP -backupTarget:$TargetUNC -systemState -noverify -vssCopy -quiet"
Invoke-Expression $WBadmin_cmd
Запустите данный скрипт. Должна появится консоль wbadmin с информацией о процессе создании резервной (теневой) копии диска:
The backup operation to \srvbak1backupdc12019-10-10 is starting.
Creating a shadow copy of the volumes specified for backup...
У меня первая попытка создать бэкап DC завершилась с ошибкой (контролер домена — это виртуальная машина VMWare):
Detailed error: The filename, directory name, or volume label syntax is incorrect.
The backup of the system state failed [10.10.2019 8:31].
Я открыл журнал ошибок WSB — C:WindowsLogsWindowsServerBackupBackup_Error-10-10-2019_08-30-24.log.
В файле содержится одна ошибка:
Error in backup of C:windows\systemroot during enumerate: Error [0x8007007b] The filename, directory name, or volume label syntax is incorrect.
Забегая вперед, скажу, что проблема оказалась в некорректном пути в одном из драйверов VMWware Tools.
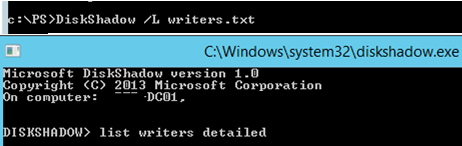
Чтобы исправить эту ошибку, откройте командную строку с правами администратора и выполните:
DiskShadow /L writers.txt
list writers detailed
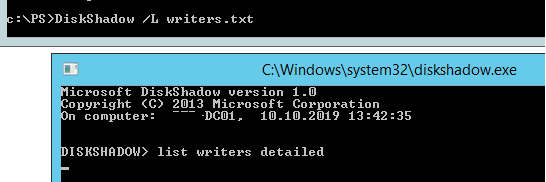
После формирование списка наберите quit и откройте файл «C:WindowsSystem32writers.txt». Найдите в нем строку, содержащую “windows\”.
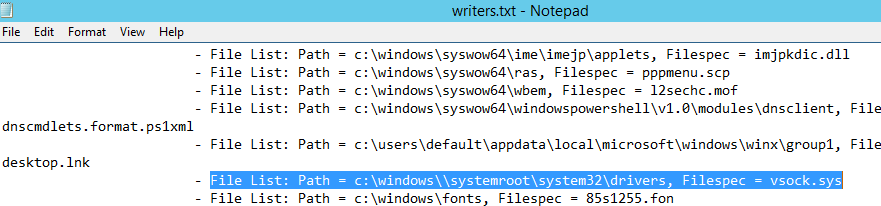
В моем случае найденная строка выглядит так:
File List: Path = c:windows\systemrootsystem32drivers, Filespec = vsock.sys
Как вы видите, используется неверный путь к драйверу VSOCK.SYS.
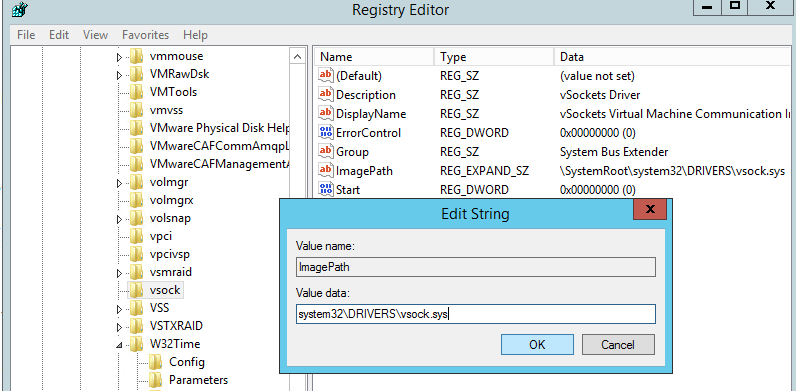
Чтобы исправить путь, откройте редактор реестра и перейдите в раздел HKLMSYSTEMCurrentControlSetServicesvsock.
Измените значение ImagePath с
systemrootsystem32DRIVERSvsock.sys
на
System32DRIVERSvsock.sys
Запустите скрипт бэкапа еще раз.
Если бэкап выполнен успешно, в логе появятся сообщения:
The backup operation successfully completed.
The backup of volume (C:) completed successfully.
The backup of the system state successfully completed [10.10.2019 9:52].
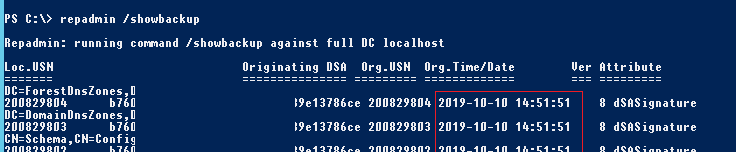
Проверим даты последнего бэкапа на DC:
repadmin /showbackup
Теперь тут указано, что последний раз бэкап контроллера домена выполнялся сегодня.
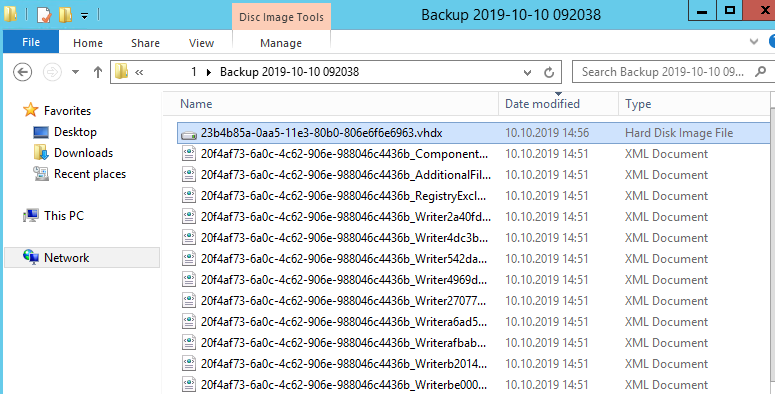
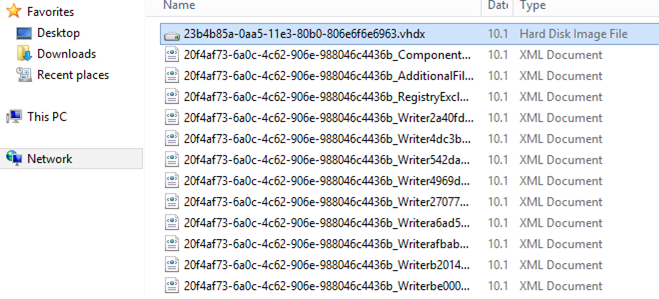
На сервере резевного копирования размер каталога с резервной копией контроллера домена занимает около 9 Гб. По сути на выходе вы получили vhdx файл, который можно использовать для восстановления ОС через WSB, или вы можете вручную смонтировать vhdx файл и скопировать из него нужные файлы или папки.
Если на площадке имеется несколько DC, то не обязательно бэкапить их все. Для экономии места достаточно периодически бэкапить базу данных AD — файл ntds.dit. Для этого используйте следующие команды:
$WBadmin_cmd = "wbadmin start backup -backuptarget:$path -include:C:WindowsNTDSntds.dit -quiet"
Invoke-Expression $WBadmin_cmd
Размер такого бэкапа будет составлять всего 50-500 Мб в зависимости от размера базы AD.
Для автоматического выполнения бэкапа, нужно на DC создать скрипт c:psbackup_ad.ps1. Этот скрипт нужно запускать по расписанию через Task Sheduler. Вы можете создать задание планировщика из графического интерфейса или из PowerShell. Главное требование — задание должно запускать от имени SYSTEM с включенной опцией Run with highest privileges. Для ежедневного бэкапа контролера домена AD создайте следующее задание:
$Trigger= New-ScheduledTaskTrigger -At 01:00am -Daily
$User= "NT AUTHORITYSYSTEM"
$Action= New-ScheduledTaskAction -Execute "PowerShell.exe" -Argument "c:psbackup_ad.ps1"
Register-ScheduledTask -TaskName "StartupScript_PS" -Trigger $Trigger -User $User -Action $Action -RunLevel Highest –Force
Итак, мы настроили резевное копирование состояния AD, а в следующей статье мы поговорим о способах восстановления AD из имеющейся резервной копии контроллера домена.
В этой статье мы посмотрим, как создать резервную копию контроллера домена Active Directory на базе Windows Server 2019. Такая резервная копия DC позволит вам восстановить как отдельные объекты AD, так и домен целиком при возникновении проблем.
Несмотря на то, что сервисы Active Directory разработаны с учетом избыточности, администратору AD нужно разработать и внедрить четкую политику резервного копирования Active Directory.
Как минимум, необходимо создавать резервную копию DC с ролями FSMO и по одному DC на каждой площадке (филиале). Конкретные рекомендации по стратегии резервного копирования сильно зависят от архитектуры вашего домена и структуры сети.
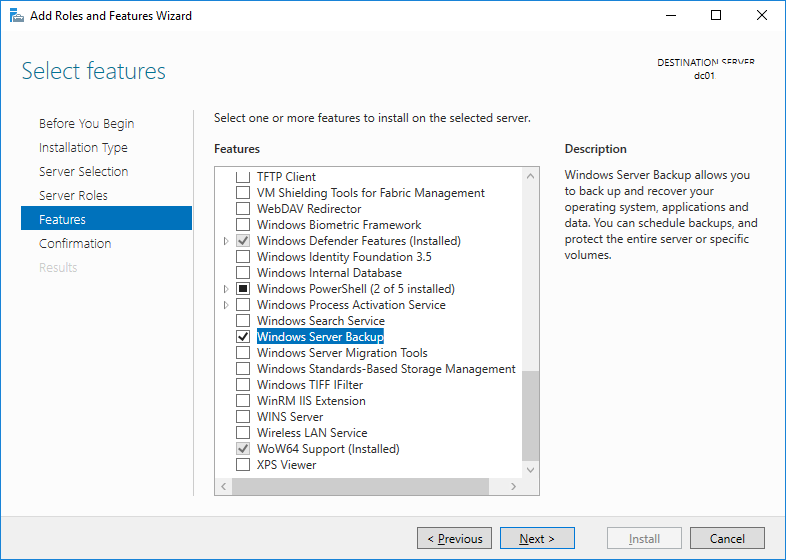
В Windows Server 2019 есть встроенный компонент Windows Server Backup, позволяющий создать резервную копию AD.
Запустите Server Manager на контроллере домена Windows Server и выберите Add Roles and Features. Затем нажмите Next несколько раз и выберите для установки компонент Windows Server Backup.
Также вы можете установить компонент WSB в Windows Server с помощью команды PowerShell:
Install-WindowsFeature -Name Windows-Server-Backup -IncludeAllSubfeature –IncludeManagementTools
Дождитесь окончания установки Windows Server Backup и нажмите Close.
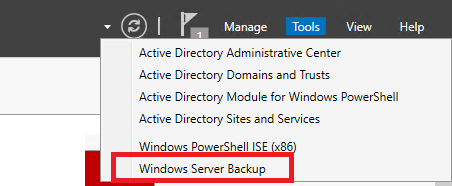
Теперь в Server Manager выберите Tools -> Windows Server Backup.
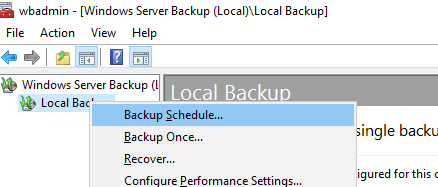
В левой панели выберите Local Backup, вызовите контекстное меню и выберите Backup Schedule.
В настройках резервного копирования выберите Custom.
Для полного резевного копирования контоллера домена Active Directory нужно выбрать режим бэкапа System State. Такого образа вполне достаточно для восстановления контроллера домена Active Directory.
System State включает в себя:
- Базу Active Directory (ntds.dit)
- Каталог Sysvol (с объектами GPO)
- Встроенные DNS зоны со всеми записями
- Базу данных службы сертификации (Certificate Authority)
- Системные загрузочные файлы
- Реестр
- Базу данных службы компонентов (Component Services)
С помощью такого бэкапа вы сможете развернуть службы AD на том же самом сервере (не поддерживается восстановление ОС из system state backup на другом сервере). Если вы планируете восстанавливать контроллер домена на другом сервер, нужно выбрать опцию Bare metal recovery.
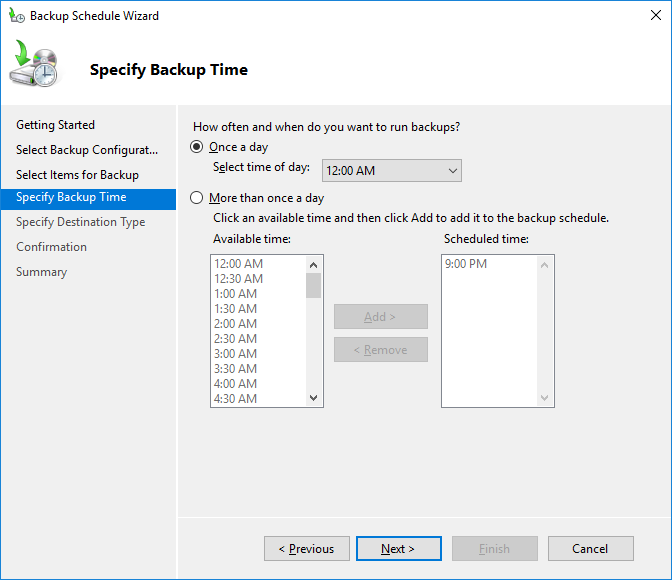
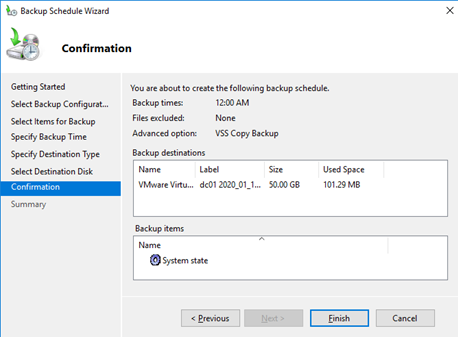
Задайте расписание резервного копирования. Например, я хочу создавать резервную копию AD ежедневно в 12:00.
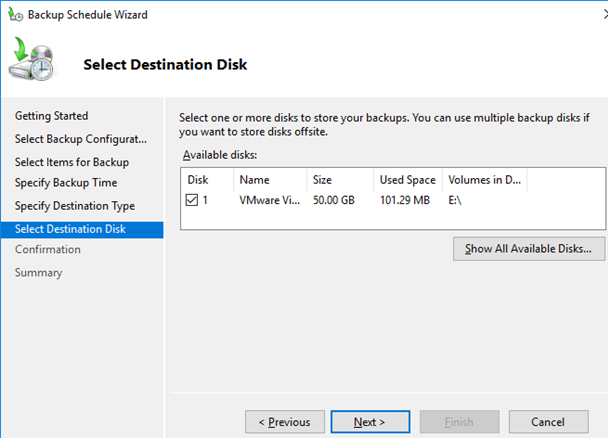
Вы можете складывать резервные копии контроллера домена на отдельный физический диск или в сетевую папку на другом сервере или NAS устройстве. Я использую выделенный диск (выберите его в качества устройства для хранения резервных копий).
Нажмите Finish чтобы создать новое задание резервного копирования.
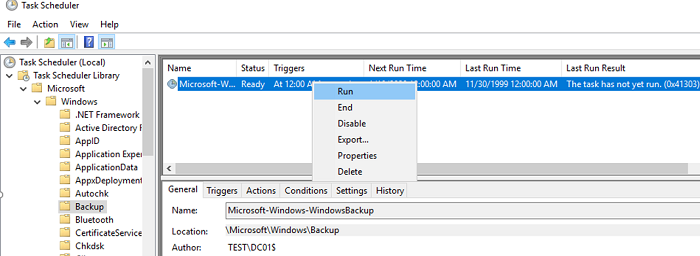
Вы можете найти созданное задание резервного копирования в Task Scheduler. Запустите taskschd.msc, перейдите в раздел Task Scheduler Library -> Microsoft -> Windows -> Backup и найдите задание Microsoft-Windows-WindowsBackup. Данное задание запускается от имени системы (аккаунта NT AuthoritySYSTEM). Если вы хотите создать резервную копию DC немедленно, в настройках задания на вкладке Settings включите опцию “Allow task to be run on demand”. Сохраните изменения, щелкните ПКМ по заданию и выберите Run (или дождитесь автоматического запуска задания по расписанию).
После окончания процесса резервного копирования на диске E: появится каталог с именем WindowsImageBackup. Обратите внимание на структуру каталога WindowsImageBackup. В нем содержится каталог с именем контроллера домена. В этой папке находится каталог с именем Backup и временем создания резервной копии (например, E:WindowsImageBackupdc01Backup 2021-10-17 120957). Внутри этого каталога находится файл vhdx. Это виртуальных диск с образом вашего контроллера домена. Вы можете вручную подключить его через Disk Manager и получить доступ к файлам.

Также вы можете выполнять резервное копирование DC с помощью консольной утилиты wbadmin. Например, чтобы создать резервную копию system state сервера и сохранить ее на отдельный диск, выполните команду:
wbadmin start systemstatebackup -backuptarget:e: -quiet
В этом примере содержимое каталога WindowsImageBackup на целевом диске перезаписывается.
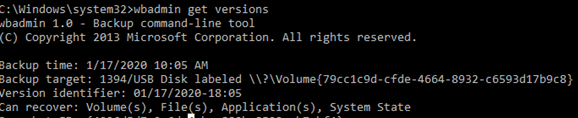
Список доступных резервных копий на диске можно вывести так:
wbadmin get versions
Чтобы удалить все старые резервных копии, кроме последней, выполните команду:
wbadmin delete backup -keepVersions:1
Также вы можете использовать PowerShell модуль WindowsServerBackup для создания резервной копии Active Directory на DC. Следующий PowerShell скрипт создаст резервную копию System State на указанном диске:
$WBpolicy = New-WBPolicy
Add-WBSystemState -Policy $WBpolicy
$WBtarget = New-WBBackupTarget -VolumePath "E:"
Add-WBBackupTarget -Policy $policy -Target $WBtarget
Start-WBBackup -Policy $WBpolicy
Для восстановления AD в случае аварий вам понадобится SystemState Backup в корне локального диска DC. При восстановлении AD вам нужно загрузить сервер с ролью ADDS в режиме Directory Services Restore Mode (DSRM).
Active Directory is one of the most important components in any Windows network. Having no AD backup strategy could put your organization at risk. We provide a step-by-step guide on how to backup Active Directory running on Windows Server.
UPDATED: November 4, 2022
Active Directory (AD) is a Microsoft proprietary directory service developed for Windows domain networks. It was first introduced in Windows Server 2000 for centralized domain management.
It is now included in all subsequent Windows Server operating systems, enabling network administrators to create and manage domains, users, objects, privileges, and access within a network.
AD is great at managing traditional on-premises Microsoft infrastructure but not cloud environments. Microsoft cloud infrastructure uses Azure Active Directory, which serves the same purposes as its on-premises counterpart. Active Directory and Azure Active Directory are distinct but can work together to some degree if your organization has a hybrid deployment (on-premises and cloud).
The AD layout follows a tiered structure made up of domains, trees, and forests. A domain is a group of objects (such as users or devices) sharing the same AD database. A tree is a collection of domains, and a forest is a collection of trees. The main Active Directory service is Active Directory Domain Services (AD DS), which is part of the Windows Server operating system. The servers that run AD DS are called Domain Controllers (DCs). Some organizations have multiple DCs, and each one has a copy of the directory for the entire domain. To ensure that the DCs stay up to date, changes made to the directory on one DC such as change of password are also replicated to the other DCs.
The Active Directory database (directory) has a hierarchical tree-like structure and contains information about the AD objects in the domain. Common types of AD objects include users, computers, applications, printers, and shared folders. The Ntds.dit file is used to store the AD database. The database is divided into several sections that contain different types of information—a schema partition (which determines the AD database design), configuration partition (information about AD structure), and domain names context (users, groups, printer objects). Active Directory is tightly integrated with Windows protected system files, System Registry of a domain controller, Sysvol directory, COM+ Class Registration Database, and cluster service information. When planning for a backup strategy, it is important to consider such integration, especially because of the immediate impact it has on the AD.
Do you need to back up the active directory?
Active Directory is one of the most important components in any Windows network. Having no backup strategy whatsoever could put the entire organization at risk. Its best practice is to have multiple active directory domain controllers with fail-over functionalities so that when one fails, you would still be able to recover even without a backup. However, having multiple domain controllers is not enough justification to not do a backup. You should still be doing a backup of the active directory whether you have multiple domain controllers or not. Multiple domain controllers can fail at once, accidental or deliberate deletion of all the accounts or critical organizational units (OU) can occur, entire database corruption can occur, viruses, and ransomware or some other disaster could wipe out all domain controllers. In such a situation, you would need to restore it from a backup. This is why you need to backup.
You probably don’t need to back up every single domain controller, to get a good backup of the AD. You only really should have to back up one of the domain controllers. If your domain controller crashes, your network and by extension, business activities come to a halt. Although active directory services are designed with high redundancy (if you deployed several DCs in your network). It’s therefore important to develop and implement a clear active directory backup policy. If you have multiple DCs running, you need to back up at least one of them. The ideal DC to backup should be the one running the Flexible Single Master Operation (FSMO ) role. With a good backup and recovery strategy implementation, your organization can easily recover after your domain controllers crash.
If the Active Directory Domain Controller (AD DC) becomes unavailable for whatever reason, then users cannot log in and systems cannot function properly, which can cause disruption to business activities. That’s why backing up your Active Directory is important. In this article, we will show you how to backup an Active Directory domain controller running on Windows Server 2019. Before we begin we will take a look at a concept known as System State backup and how it affects Active Directory data.
System State backup
Microsoft Windows Server offers the possibility to perform a ‘Full’ backup or a ‘System State’ backup. A Full backup makes a copy of the system drives of a physical or a virtual machine, including applications, operating systems, and even the System State. This backup can be used for bare metal recovery—this allows you to easily reinstall the operating system and use the backup to recover.
System State backup on the other hand creates a backup file for critical system-related components. This backup file can be used to recover critical system components in case of a crash. Active Directory is backed up as part of the System State on a domain controller whenever you perform a backup using Windows Server Backup, Wbadmin.exe, or PowerShell. For the purpose of this guide, we will be using System State backup because it allows us to backup only the components needed to restore Active Directory. However note that Microsoft does not support restoring a System State backup from one server to another server of a different model, or hardware configuration. The System State backup is best suited for recovering Active Directory only on the same server.
As described later in this guide, Windows Server Backup must be installed through features in Server Manager before you can use it to back up or recover your server. The type of backup you select for your domain controllers will depend on the frequency of changes to Active Directory and the data or applications that might be installed on the domain controller. The bare minimum you need to back up to protect essential Active Directory data on a domain controller is the System State. The System State includes the following list plus some additional items depending on the roles that are installed:
- Domain controller: Active Directory DC database files (NTDS.DIT), boot files & system protected files, COM+ class registration database, registry, system volume (SYSVOL)
- Domain member: Boot files, COM+ class registration database, registry
- A machine running cluster services: Additionally backs up cluster server metadata
- A machine running certificate services: Additionally backs up certificate data
In addition, System State backups will back up Active Directory-integrated DNS zones but will not back up file-based DNS zones. File-based DNS zones must be backed up as part of a volume-level backup, such as a critical volume backup or full server backup. All the above backup types can be run manually on-demand, or they can be scheduled using Windows Server Backup. You can use either Windows Server backup or Wbadmin.exe to perform a System State backup of a domain controller to back up Active Directory. Microsoft recommends using either a dedicated internal disk or an external removable disk such as a USB hard disk to perform the backups.
Backup operators do not have the privileges required to schedule backups. You must have administrative rights to be able to schedule a System State backup or restore. A System State backup is particularly important for disaster recovery purposes as it eliminates the need to reconfigure Windows back to its original state before the system failure occurred. It is important that you always have a recent backup of your System State. They may require you to perform regular System State backups to increase your level of protection. We recommended that you perform System State backups before and after any major change is made to your server.
Before going ahead with the backup process, you need to take note of the following initial steps:
- It is important that you have the necessary amount of storage space to accommodate the backup you are about to perform.
- If you’re going to be backing up while the applications that produce the data are still running (which is usually the case), you need to configure the Volume Shadow Copy Service, also known as Volume Snapshot Service (VSS) on the drive for the backup to be successful. This service helps to create backup copies or snapshots of computer files or volumes, even when they are in use.
- You need to install the Windows Server Backup feature if you haven’t done this yet. Windows Server 2019 just like previous editions, comes with the Windows Server Backup feature that helps to perform Active Directory database backups and restores. Now we will go through the above steps in detail.
Configure the Volume Shadow Copy Service (VSS)
It is important to ensure that the AD database is backed up in a way that preserves database consistency. One way to preserve consistency is to back up the AD database when the server is in a powered-off state. However, backing up the Active Directory server in a powered-off state may not be a good idea if the server is operating in 24/7 mode.
For this reason, Microsoft recommends the use of Volume Shadow Copy Service (VSS) to back up a server running Active Directory. VSS is a technology included in Microsoft Windows that can create backup copies or snapshots of computer files or volumes, even when they are in use. VSS writers create a snapshot that freezes the System State until the backup is complete to prevent modifying active files used by Active Directory during a backup process. In this way, it is possible to back up a running server without affecting its performance. For this guide, we are going to show you how to change the Shadow Copy size limit configuration on the volume where we are going to store the AD database.
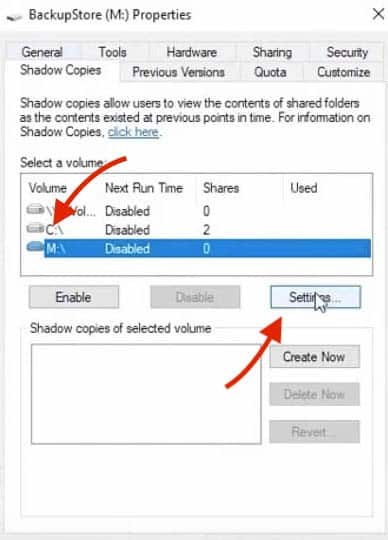
1. Press a combination of Win+X on your keyboard to open the Disk Manager. Select the partition where the server is installed, then right-click on it and click on Properties.
2. Go to the Shadow Copies tab and then click on Enable as shown on the image below.

3. In the next window, click Yes to confirm that you want to enable shadow copies as shown below.

4. After confirmation, you’ll see a restore point created in the selected partition. Click on Settings to continue.

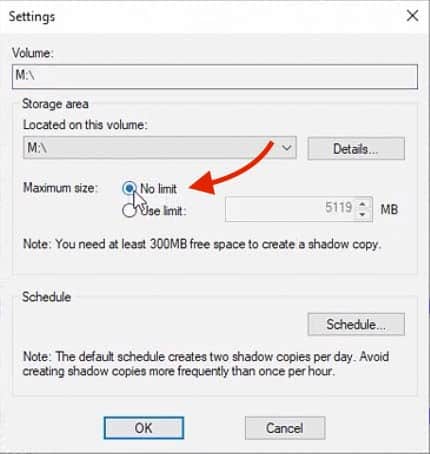
5. In the Settings screen shown below, under Maximum size, select No limit. Once completed click the OK button, and that does it for this section—configure the Volume Shadow Copy Service (VSS).

Install the Windows Server backup feature
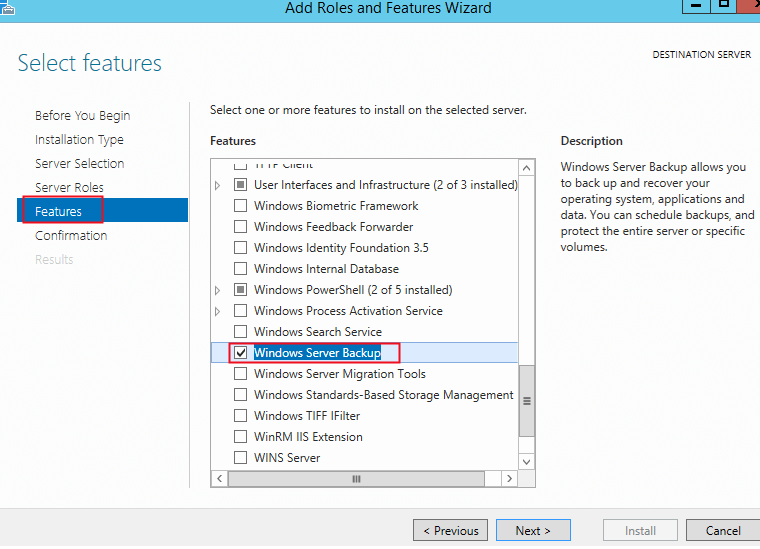
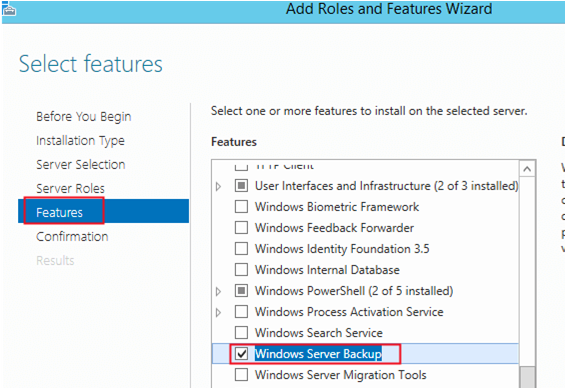
Windows Server Backup is a utility provided by Microsoft with Windows Server 2008 and later editions. It replaced the NTBackup utility which was built into the Windows Server 2003. Windows Server Backup is a feature that is installable in Windows Server 2019 just like in other previous editions. So if you haven’t used the backup feature yet, you will likely have to install it first. The way to install this feature is through the Server Manager.
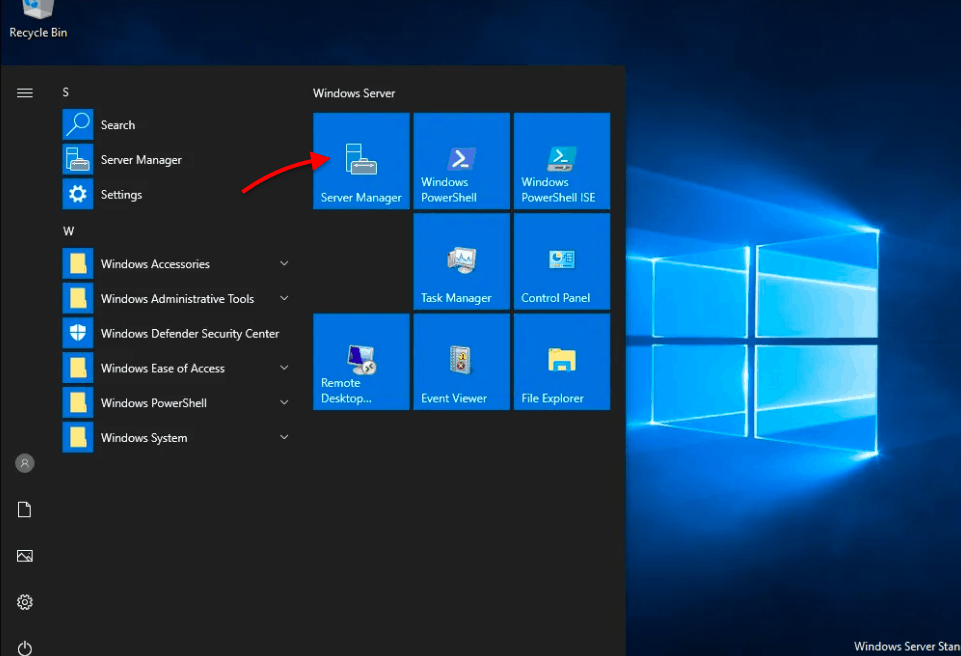
1. Open the Server Manager console as shown in the image below.

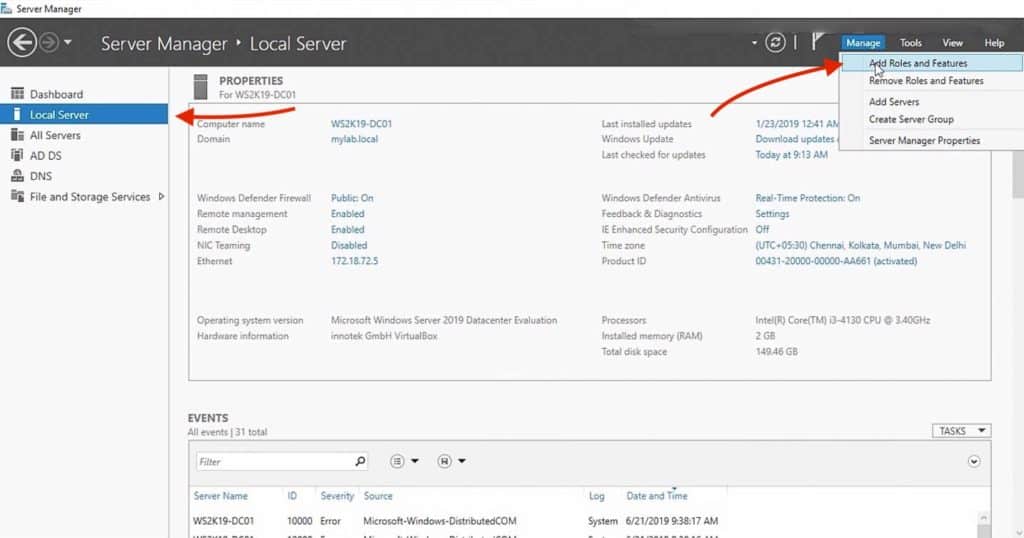
2. Go to Local Server >> Manage tab >> and click on the Add Roles and Features as seen in the image below. This will open the Add Roles and Features Wizard.

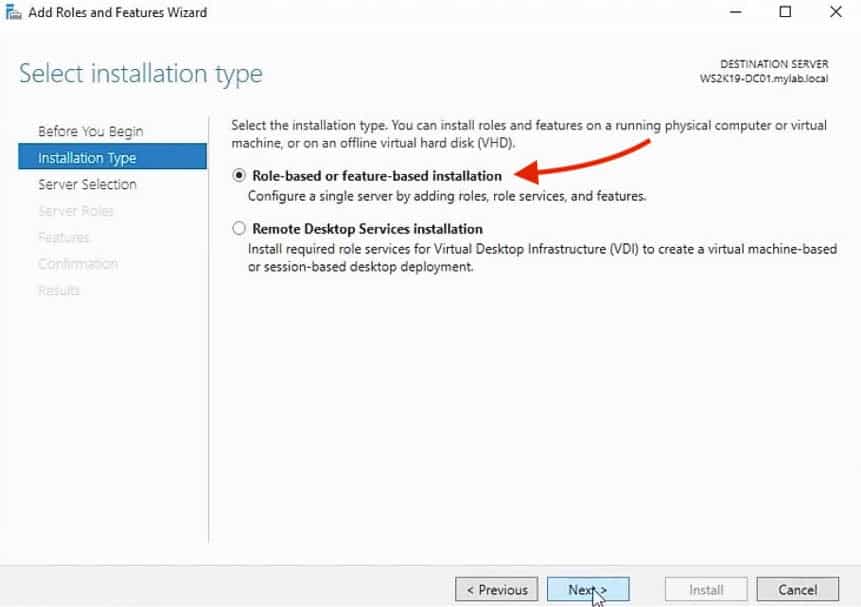
3, In the Select installation type screen, select the Role-based or feature-based installation option and click Next.
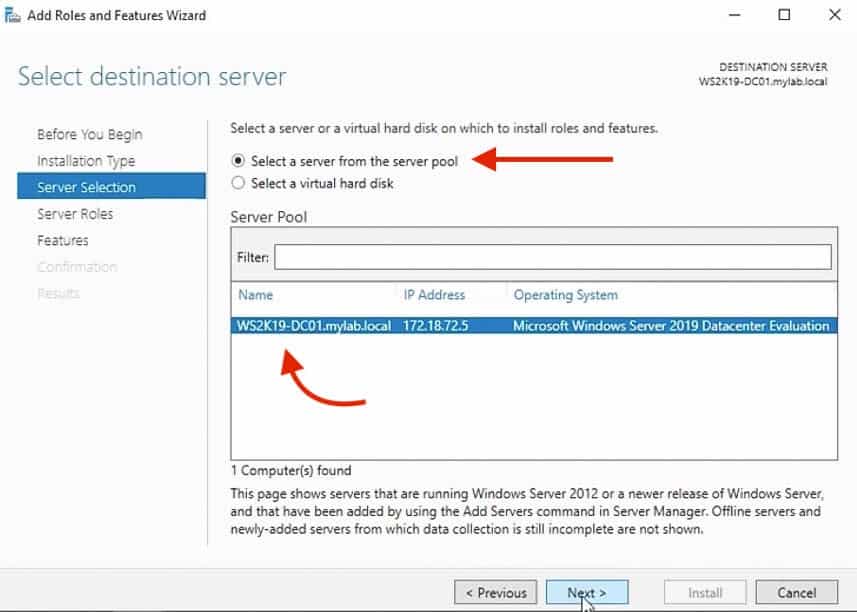
4. In the next screen called Select destination server, you will be required to select the server on which you want to install roles and features. Windows will automatically display the server pool. In this case, we are going to select the local server, which is WD2K19-DC01-mylablocal.

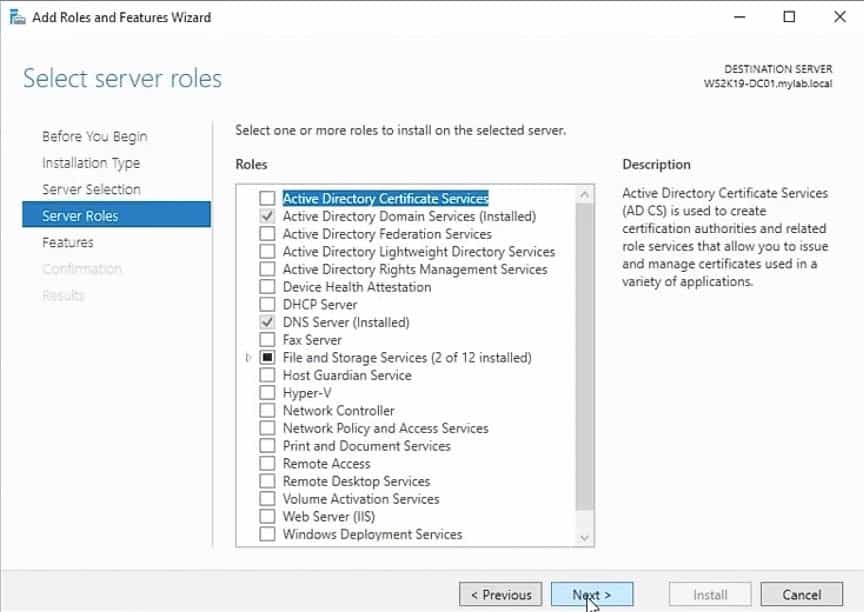
5. In the Select server roles screen, you are required to select the roles to install on the server. Since we are installing a feature, you can ignore this section and continue to the next screen. Click Next to continue.

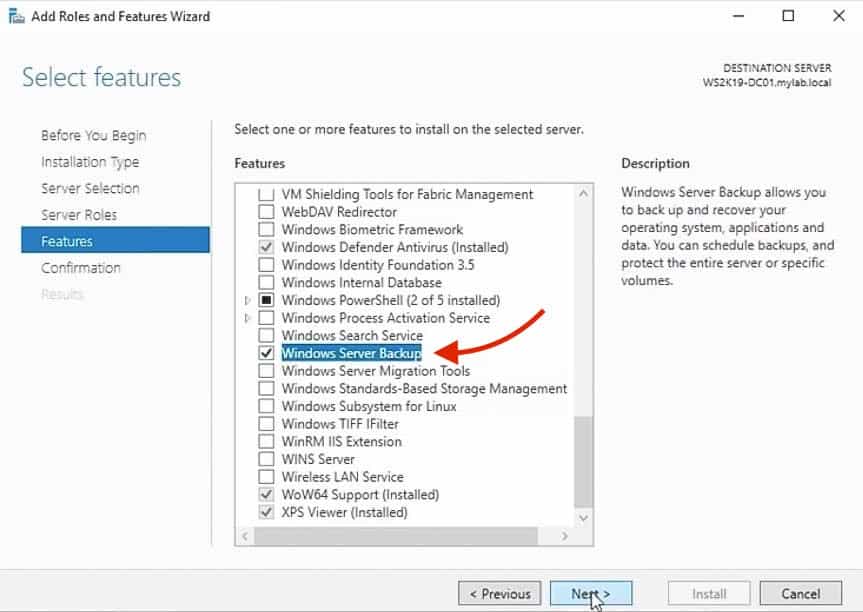
6. In the Select features screen below, scroll down to the Windows Server Backup feature, and select it as seen in the image below. Click Next to continue.

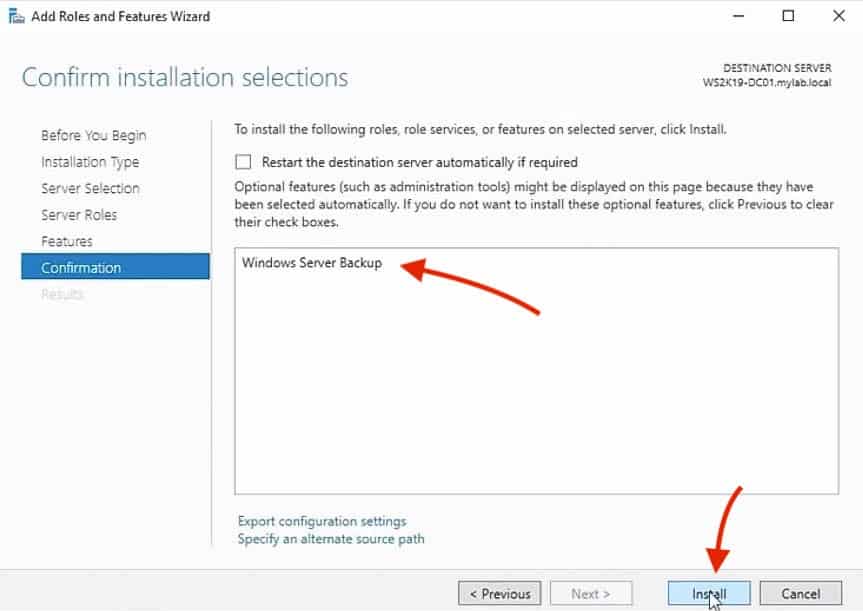
7. In the Confirm installation selections screen, make sure that the Windows Server Backup feature is on the screen and click on the Install button to begin the installation.

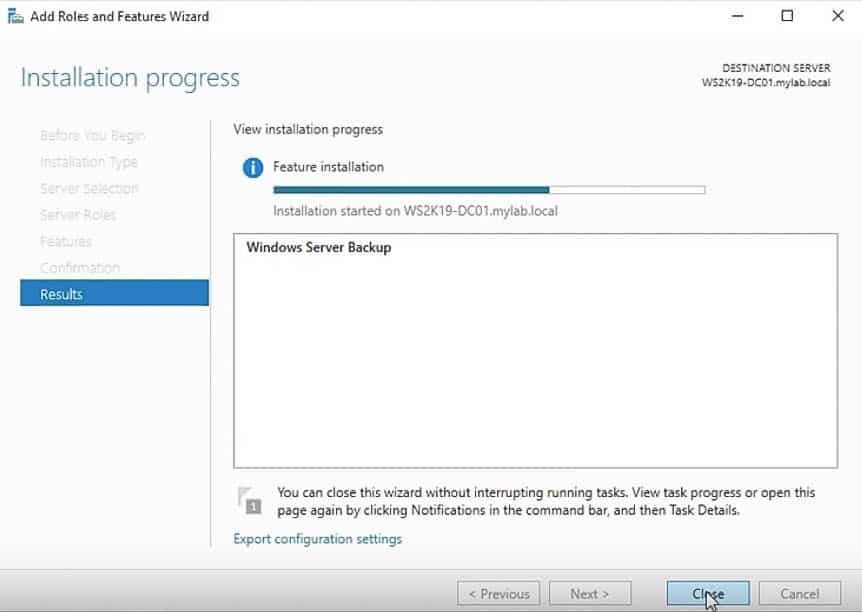
The Windows Server Backup feature will begin to install on your local server. Once the installation is completed, click the Close button to close the console.

Backup the Active Directory database
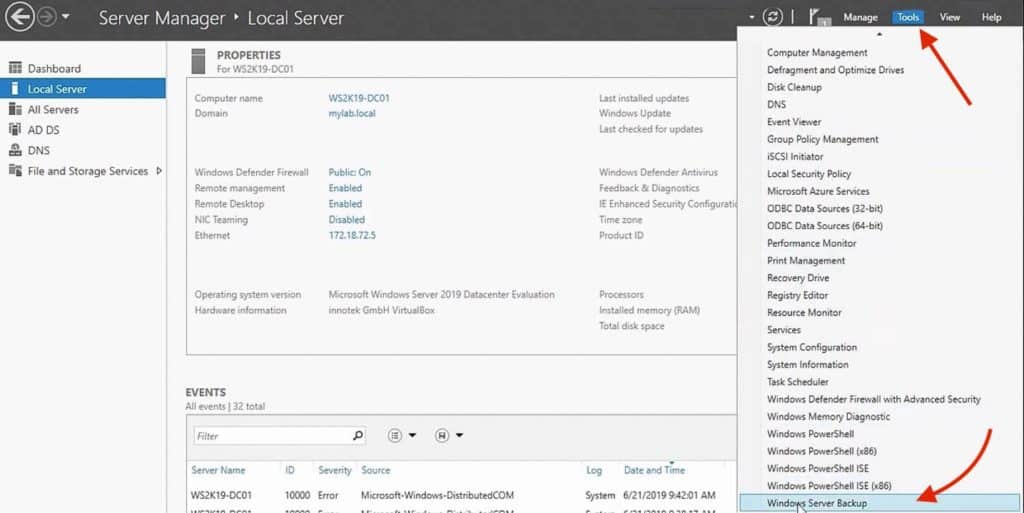
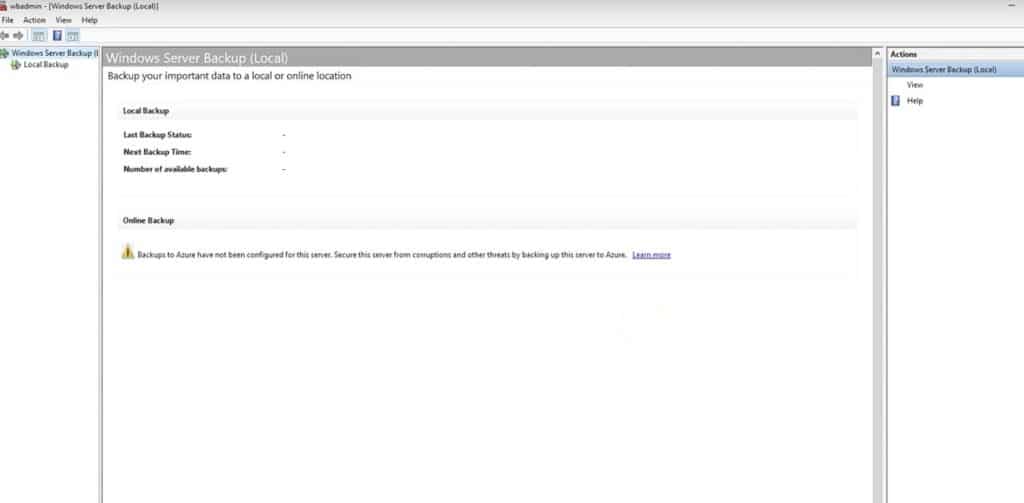
1. Now go to the Server Manager and click on Tools >> Windows Server Backup, in order to open it. You can also open this console by running the command wbadmin.msc on the Windows Run (Ctrl+R). Once it opens up, you’ll be able to see the scheduled and last backup status (unless this is the first time you’re doing this.)

2. Once the server backup opens, click on Backup Once to initiate a manual AD database backup. Although you can also create automatic scheduled backups by clicking Backup schedule, for this guide we are going to create a manual backup.

3. Under Backup Options select Different options and click on the Next button This option is used where there is no scheduled backup.

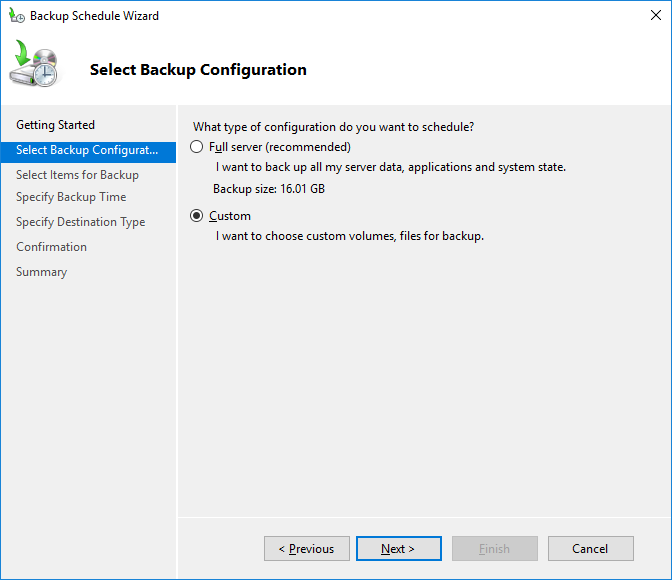
4. In the Select Backup Configuration screen, you have two options:
-
- Full Server backs up all server data, applications, and System State
- Custom lets you choose what you want to back up.
Since we just want to back up the active directory, we choose the second option. So select Custom and click Next.

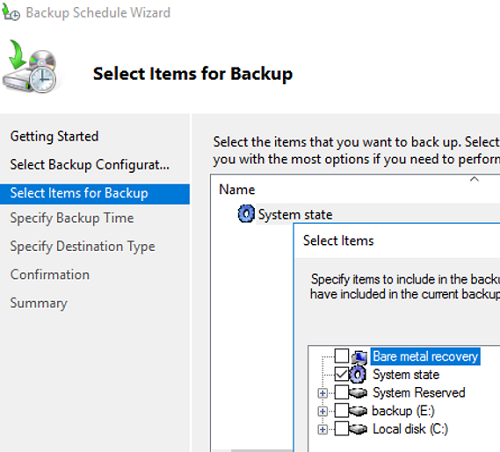
5. In the Select Items for Backup screen, specify the items that you want to include in the backup. In this backup, we are going to choose the System State Backup item. To do this, click on the Add items button >> select System State option >> and click on the Ok button to complete the process.


6. Now we are going to enable the Volume Shadow Copy Service for this backup item. Doing this prevents AD data from being modified while the backup is in progress. To enable VSS, click on Advanced Settings >> VSS Settings >> Select VSS Full Backup, and click Ok. The VSS Full Backup is the recommended option if it is your first backup, and you are not using any third-party backup tool. This option allows you to create a backup of all the files. It is also the preferred method for incremental backups, as it does not affect the sequence of backup.

7. In the next screen, you would need to specify the backup destination type — Local drives or Remote shared folder. For the purpose of this demonstration, we are using a local hard drive to store the backup. So choose Local drives and click Next.

8. In the Select Backup Destination screen you can choose the actual partition where you want to store the backup. Once you are done, click Next to proceed to the next screen.

9. The Confirmation screen lets you double-check that all backup parameters are correctly configured. Once you are good to go, click the Backup button. The backup should take some time depending on the size of the domain controller server. Once the backup is successfully completed, you can close the Backup Wizard.

If you closed the Backup Wizard without waiting for the last message status, the backup will continue to run in the background. You can also confirm the status and completion results of the backup from the webadmin console (or Windows Server Backup Feature). The console will display a message with information from this backup (and others).
Active Directory backup automation
There are a number of tools available to manage backup and restore functions for applications or entire disks and these can help you save time with backing up Active Directory. Such systems can also be used to replicate and migrate the objects in a domain controller.
ManageEngine AD360 (FREE TRIAL)
An example of an Active Directory backup system can be found in ManageEngine AD360. 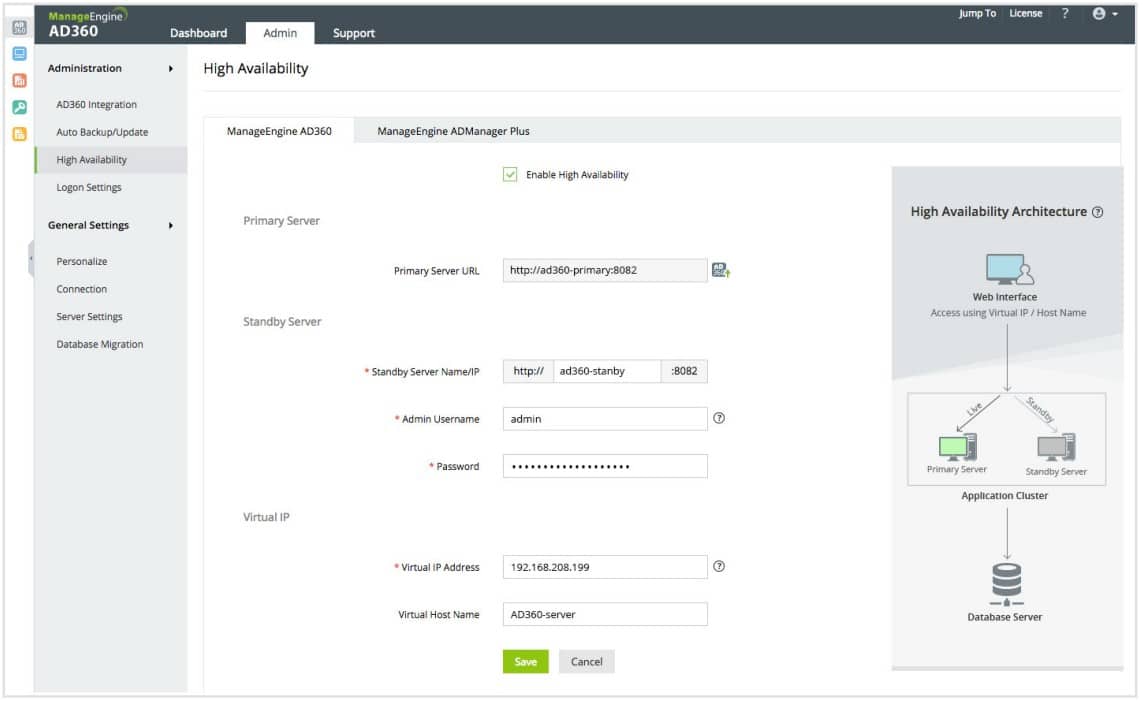
The Standard edition of this bundle includes a tool called RecoveryManager Plus. The advantage of this tool is that it is integrated into a package of tools to manage Active Directory, so you get all of your AD management systems in one console.

AD360 is able to manage both cloud and on-premises implementations of Active Directory. This is a software bundle and you install it on Windows Server. It is also available from the marketplace of AWS and Azure – these are not SaaS platforms but software packages that you run in your cloud account space.
Why do we recommend it?
ManageEngine AD360 is a collection of many Active Directory-related tools offered by ManageEngine – there are seven in total. Among this list is ADAudit Plus package, which provides controls that prevent unauthorized changes to AD objects. Another unit, ADManager Plus lets you assess, improve, and monitor the efficiency and security of user accounts. Recovery Manager Plus is another component and this manages the backup of Active Directory instances.
Who is it recommended for?
ManageEngine AD360 is a comprehensive package of everything you will need to manage and control Active Directory. The package is very large and you might not need all of the components. If you are only interested in the backup and recovery services of AD360, you might prefer to just buy RecoveryManager Plus.
Pros:
- Dramatically improves the usability of Active Directory, making routine tasks easier to perform and automate
- Can monitor changes across both local and cloud-based AD environments
- Supports SSO and MFA, great for securing your access management with multiple layers of authentication
- Extensive 60-day trial period
Cons:
- Can take time to fully explore the entire platform
The best way to understand the Active Directory backup capabilities of AD360 is to access it on a 30-day free trial.
ManageEngine 360
Start 30-day FREE Trial
Active Directory backup FAQs
Is it necessary to backup Active Directory?
It is very important to backup Active Directory. The system won’t back itself up without your intervention. However, there is a native backup system built into Windows Server, which makes the process of saving a copy of Active Directory easy.
What are the different types of backup in Active Directory?
You can run a full backup to take a copy of the entire Active Directory database and then repeat this process periodically on a schedule to create rollback points. This is the system that is available in the native backup service in Windows Server, which is called Volume Shadow Copy Service (VSS). It is more efficient to take periodical full backups and then perform incremental or differential backups more frequently. These just extract the objects that have changed since the last backup and so are much quicker and take up less space. However, you need a third-party tool to implement these strategies because they are not available in Windows Server VSS.
How does Windows Server backup work?
Windows Server Backup uses a method called Volume Shadow Copy Service (VSS). this gives you the option to backup the operating system and all of the contents of the disk This is called a Bare Metal Backup and it will copy everything on the computer, not just Active Directory. The other option is called System State Backup. This copies important system files as well as the items you select. This is the option to choose in order to back up Active Directory.
Conclusion
We have explained in detail how to back up the Active Directory using the Windows Server backup. We used the manual “Backup Once” approach, but of course, you can also configure a “Backup Schedule,” to run periodic AD backup tasks.
As already mentioned, the Windows Server Backup feature is an easy to use free tool that is bundled in most Windows Server OS, and it can work with VSS to perform Full or System State backups. However, there are also lots of third party Active Directory backup tools out there that you can use. In fact, almost every enterprise-level backup service should be capable of backing up Active Directory with little to no difficulty. The difference between all those tools lies mostly in the way some of them provide more capabilities, especially when it comes to backing up and restoring the Active Directory.
In this post, you are going to learn how to do a Manual backup of an Active Directory domain controller. First, we are going to install the Windows Server Backup Feature, which is a new tool that started with Windows Server 2016.
This feature is easy to use and can help you set up manual, scheduled, full, or custom AD backups. We are going to perform a “customized” System State backup that includes the most important components needed to restore Active Directory.
Active Directory is critical for any Windows environment. So as a best practice, it is recommended to perform full scheduled backups. For now, we’ll keep it simple and start with the basics.
Active Directory Backup Recommendations
- Always Backup System State When planning for a backup strategy, it is important to consider the elements that influence AD. At least always backup the System State, which includes DNS Server, Windows System Files, DC Registry, Sysvol directory, COM+ Class Registration Database, Certificate Services Database, etc.
- DC Failover and Backup If you have only One Domain Controller in the network, backup immediately! If you have more than one, which is recommended for fail-over protection, backup at least one DC. Although a fail-over solution could give you fault tolerance for AD, ALWAYS perform a Backup. The ideal DC to backup should be the one running the FSMO (Flexible Single Master Operation) role.
- Perform Backups on a Regular Basis You should back up AD with time intervals lower than 60 days; this is because, by default, the lifetime of AD tombstones are set to 60 days. Tombstone is a “deleted object” that remains in the database for 60 days. After the 60 days pass, the object disappears completely. If possible backup Active Directory every day. You can create incremental backups by using a Windows Server Backup feature called Volume Shadow Copy Service (VSS).
- Restoring from a Backup Should be the Last Option A handy tool to avoid restoring is the Active Directory Recycle Bin. When you delete an object, it automatically goes to the Recycle Bin. So if you want to recover a particular object that you recently deleted, go to the bin and restore it.
- Follow the 3-2-1 Backup Rule Keep 3 copies of your Backup – 2 Backups on Locally on different media (hard-drives, etc) and 1 Backup off-site (on a remote server, or in the cloud).
How to Backup Active Directory in Windows Server 2019
Active Directory is one of the most important components in any Windows network. When AD crashes, Everything comes to a Halt. Having no protection or backup strategy whatsoever could put the entire organization in danger – Believe it or not, Many small businesses don’t regularly backup Active Directory.
Make sure to have multiple domain controllers working together with fail-over functionalities and create a good backup and recovery strategy.
Step 1. Understanding the Backup Environment
The environment for our backup is as follows:
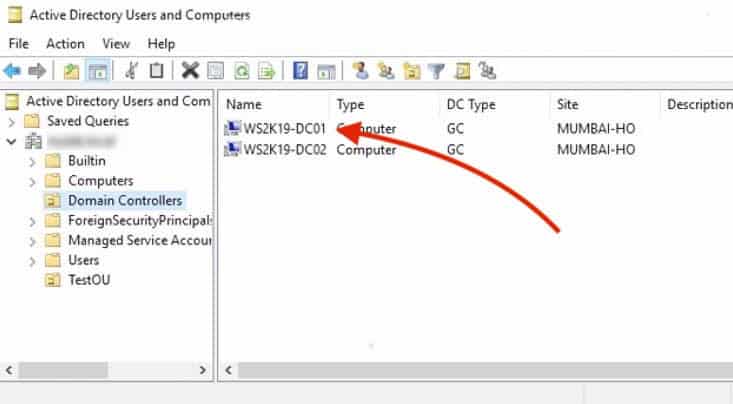
In this demonstration, we have two Domain Controllers (DC), one is called WD2K19-DC01 and the other WD2K19-DC02.
To see the DCs, you can go to the Active Directory Users and Computers (ADUC) snap-in console on the Windows Server.
- Click on the Domain Controllers container on the right hand.
- This will show you the current DCs, along with Type, DC Type, Site, and Description. As you can see, there are two DCs: WD2K19-DC01 and WD2K19-DC02.
- We are going to perform the backup on the domain controller, WD2K19-DC01.

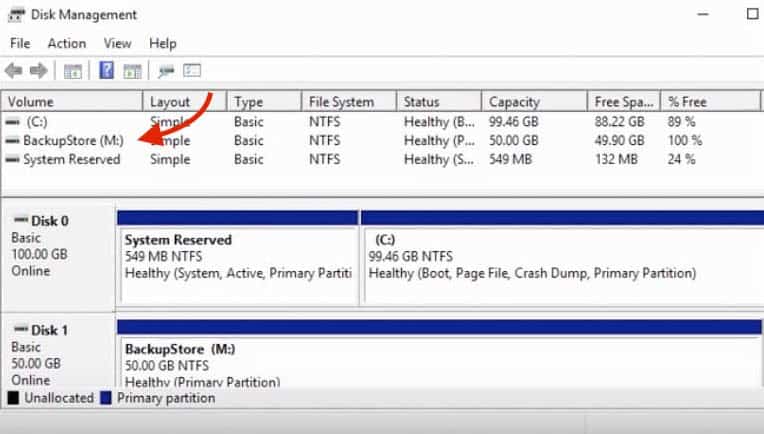
- Before performing the backup, it is recommended to have enough available storage for the specific backup/restore. You can use the Disk Management system utility in Windows to view your available storage.
- In this lab, we are going to attach a new disk called “BackupStore (M:)” to store the DC backup.

Step 2. Configuring the Shadow Copy Service (VSS) on the Volume
To create the backup copy of the DC even when the volume “BackupStore (M:),” is being used, configure the Shadow Copy (or Volume Snapshot Service, “VSS”).
The Shadow Copy helps backup data on the volume even while applications that produce data are still running.
It also allows the users to view the contents of shared folders as the content existed in previous points in time (Snapshots).
- For this lab, we are only going to change the Shadow Copy size limit configuration on the volume where we are going to store the AD database.
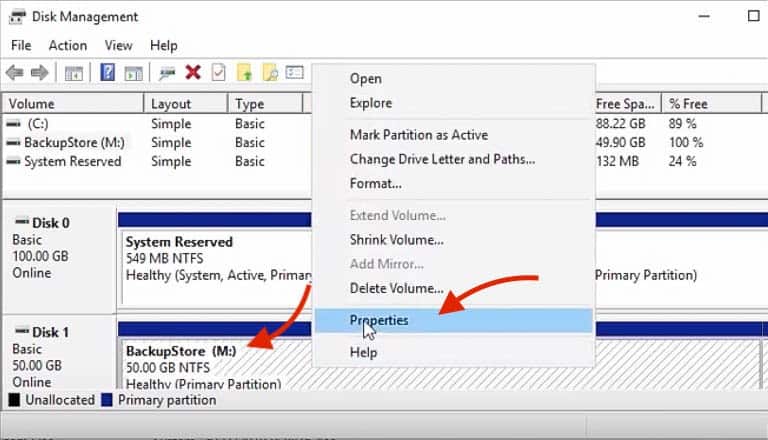
- Go back to Disk Management. Then Right-click on the BackupStore (M:) and go to Properties.

- Go to the “Shadow Copies” tab. Select the volume where you are going to store the backup, which in this case is (M:), and then click “Settings“.

- In the Shadow Copies Settings section, just select the No limit as the Maximum Size, as seen below in the screenshot. This option will allow all the space available in the volume for the AD backup.

Step 3. Installing the Windows Server Backup Feature
Windows Server 2019 comes with the Windows Server Backup feature, which is essentially the same as Windows Server Backup 2016.
This feature can help you perform Active Directory database backups and restores.
Although many third-party tools help you deliver Active Directory backup and restore, the Windows Server Backup Feature is easy to use and is already bundled with Windows Server – and most importantly, 100% FREE.
So if you haven’t used the backup feature yet, you will likely have to install it first.
The way to install this feature is through the Server Manager.
- Open the Server Manager console.

- Select your Local Server. Go to the Manage tab on the right upper-hand and click on the Add Roles and Features as seen in the image below.

- This will open the Add Roles and Features Wizard – Here you’ll see the Installation Type screen. Select the Role-based or feature-based installation and click Next.

- The next screen will let you select the server on which you want to install the feature. Windows will automatically display the server pool. In this case, we are going to select the local server, which is WD2K19-DC01-mylablocal.

- In the next screen, you can select the roles to install on the server. We are installing a feature, so you can continue to the next screen.

- In the Features screen below, you’ll need to Find and Select the Windows Server Backup feature, as seen in the screenshot below.

- Confirm your installation. Make sure that the Windows Server Backup feature is on the screen and click on the Install button to begin the installation.

- The feature will begin to install on your local server. Once the installation has been completed, you can close the console.

Step 4. Performing the Backup on AD
- Go back to the Server Manager. On the top right hand, select Tools and open the Windows Server Backup. You can also open this console by running the command wbadmin.msc on the Windows Run (Ctrl+R).

- Once, you open the Windows Server Backup, you’ll be able to see scheduled backups and last backup status. Since this is the first time we do a backup here, you will not see any details.

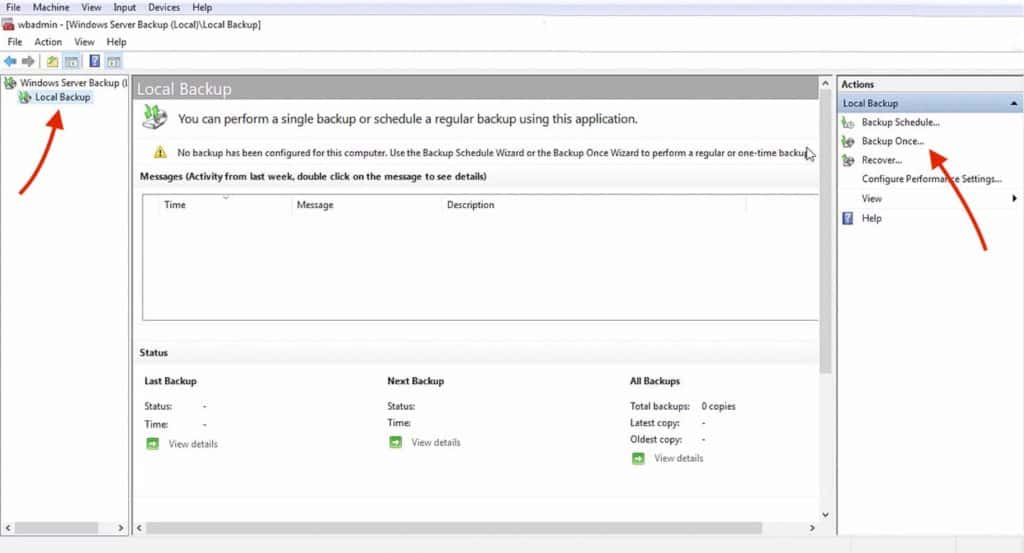
- From the same console, go to Local Backup – Here you’ll see that there is no backup configured or no backup currently running for the local Domain Controller.
Although you can also create an automatic scheduled backup to run daily or weekly at different hours, for this demonstration we are going to create a manual backup.
To begin a manual AD database backup, go to Backup Once, on the right-hand window.
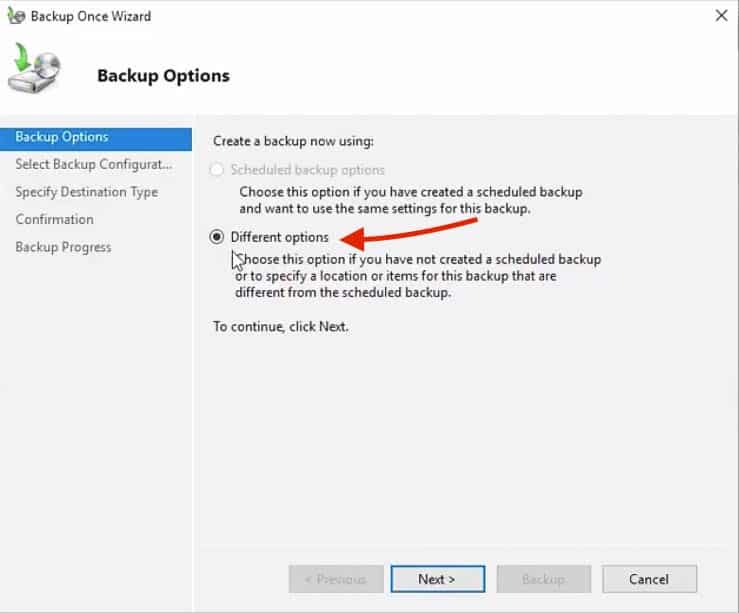
- The Backup Once option will let you configure all the details of your Backup, such as backup items and destination.
In the first screen, Backup Options select Different Options – The Scheduled Backup Options is grayed out because we are only doing a manual backup.
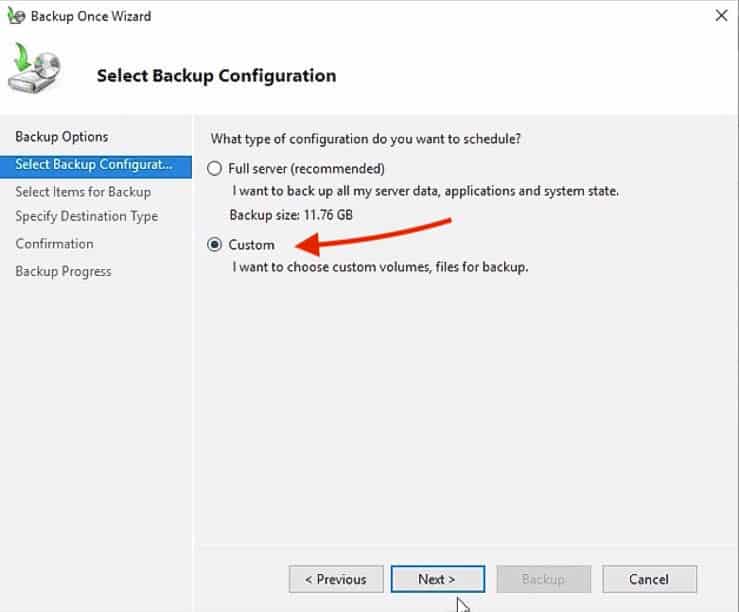
- In the next screen, Select Backup Configuration and you’ll have two options,
– Full Server (recommended)
– Custom
As you may notice the Full Server backup is the recommended option, as it creates a copy of all the server data, including applications, and the system state.But for this time, we’ll only backup System State – So click on Custom and click Next
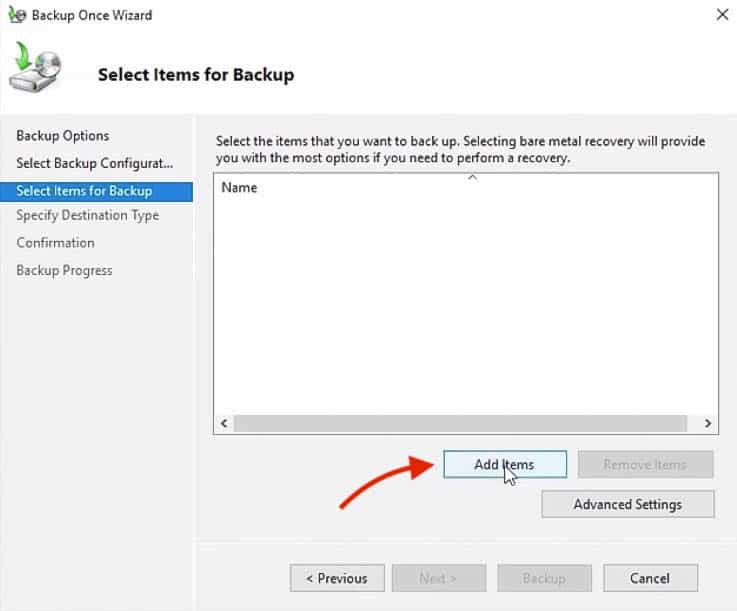
- In the Select Items for Backup screen, you’ll specify the items that you want to include in the backup.
Items can be Bare Metal Recovery, System State, System Restore, or any other volume on the server.
For now, there are no items specified on the backup; so go ahead and click on Add Items
- In this backup, we are going to choose the System State Backup item, which is a copy of the most important Operating System components.
The “System State Backup” components include:
- Windows System Registry.
- Performance Counter Configuration
- Component Services Class database
- Boot and system files.
- Active Directory Database
- Certificate Services.
- Sysvol file.
8. Go ahead and check the box “System State,” and click “Ok“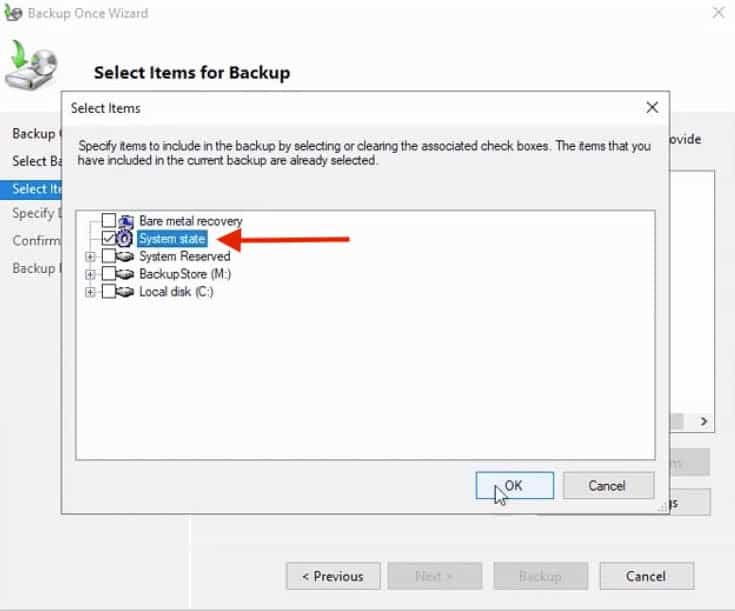
9. You’ll see the “System State” item on the list for Backup.
Now we are going to configure the Volume Shadow Copy Service (VSS) for this backup item.
Go ahead and click on “Advanced Settings“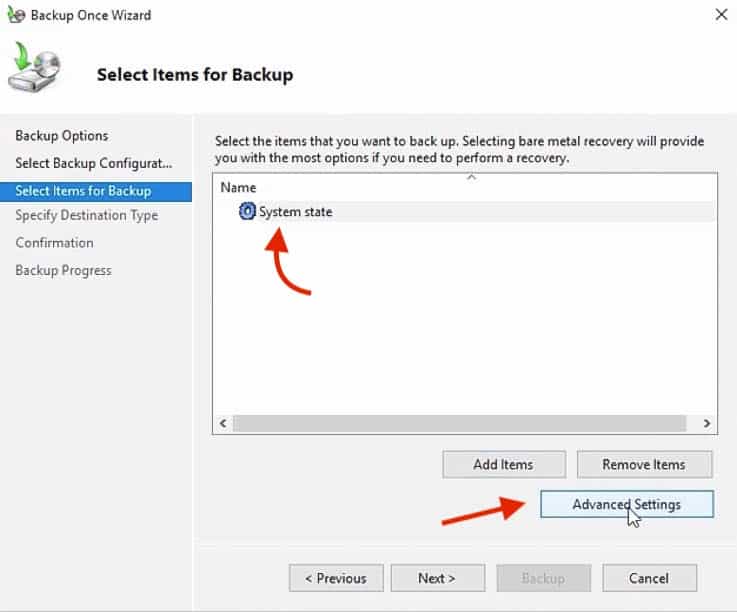
10. In Advanced Settings, go to the VSS Settings.
Here you’ll be able to choose the type of VSS backup that you’ll be creating.
Since we are not using any third-party application to perform the backup, select the “VSS Full Backup”
This option allows you to create a backup of all the files.
After the VSS Full Backup is finished, the backup application may shorten logs or change files.
The VSS Copy Backup on the other hand also does a full backup but preserves all the application files including logs on the system.
This option is the preferred method for incremental backups, as it does not affect the sequence of backup.
In other words, it prevents AD data from being modified while the backup is in progress.
The VSS copy backup can’t be used for starting an incremental backup (or restore).
So, since this is the first backup and we are not using any third-party backup tool, we’ll go for the “VSS Full Backup” option.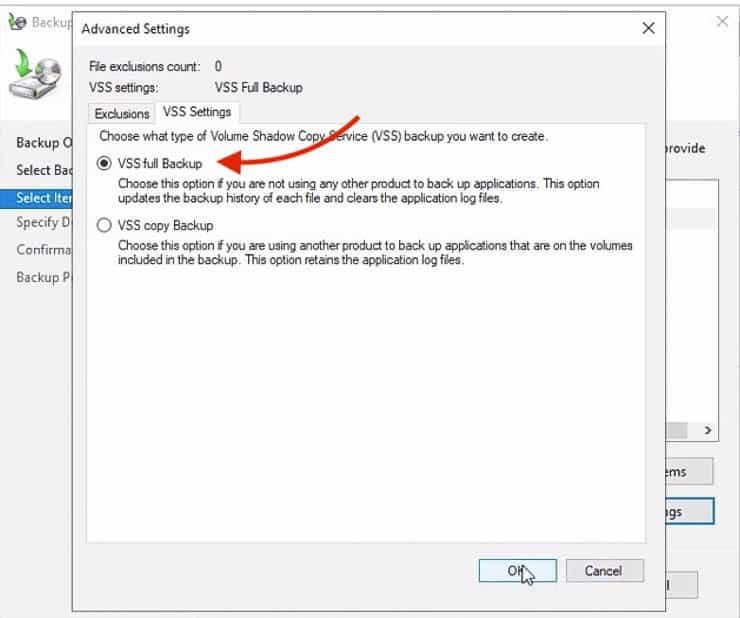
11. In the next screen, “Specify Destination Type” you’ll need to select the type of storage for the backup.
Here you’ll be able to choose between Local Drive or Remote Shared Folder.
For the purpose of this demonstration, we are using a local hard disk to store the backup.
So choose “Local Drives” and click “Next“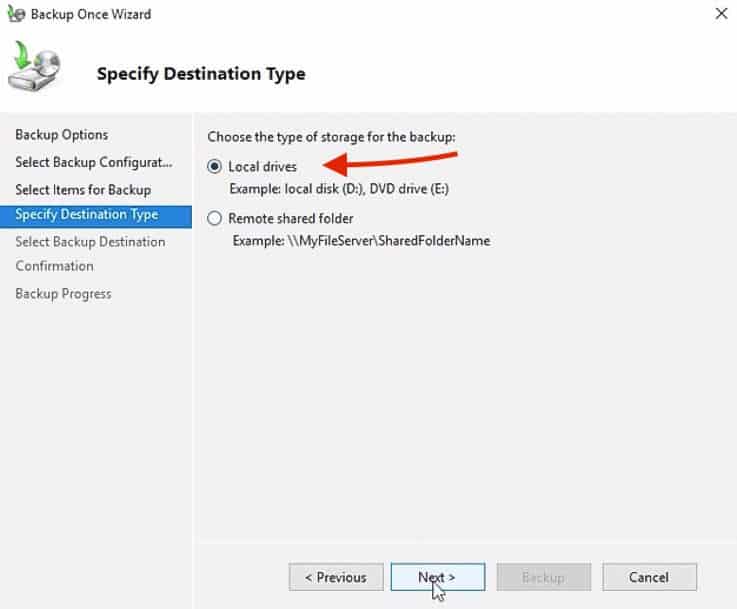
12. In the next screen, “Select Backup Destination” you can choose the partition where you want to store the backup.
By default, the “BackupStore M:” is already selected.
So make sure to select the right destination and click “Next“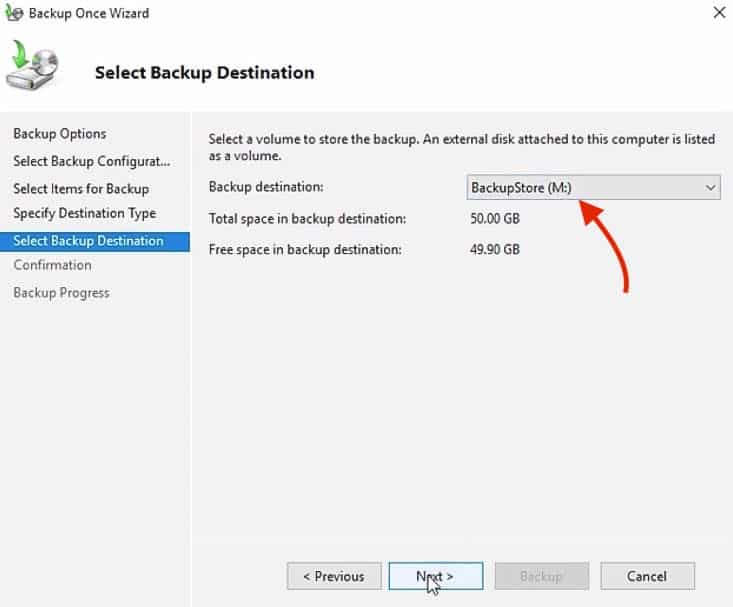
13. The next screen “Confirmation“, lets you double-check that all backup parameters are set correctly.
Once, you are ready, click the “Backup” button. 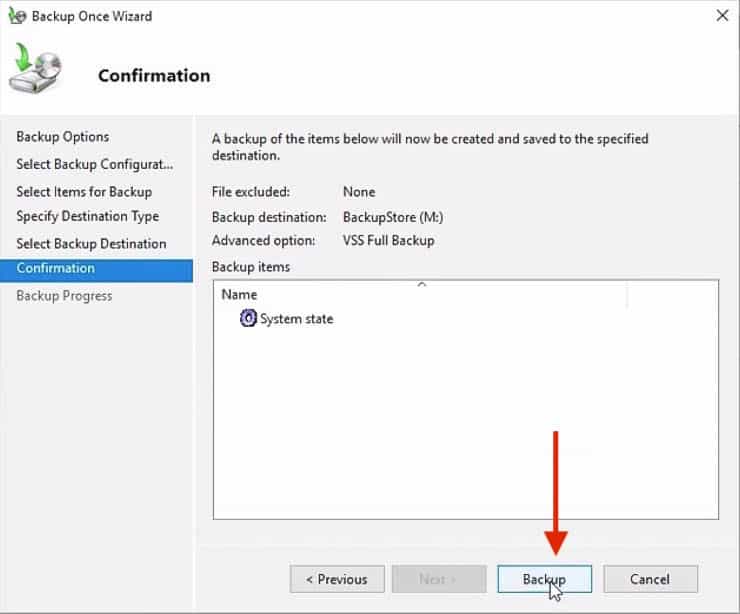
14. The backup should take some time depending on the size of the domain controller server.
Once the backup is completed successfully, you can close the Backup Console.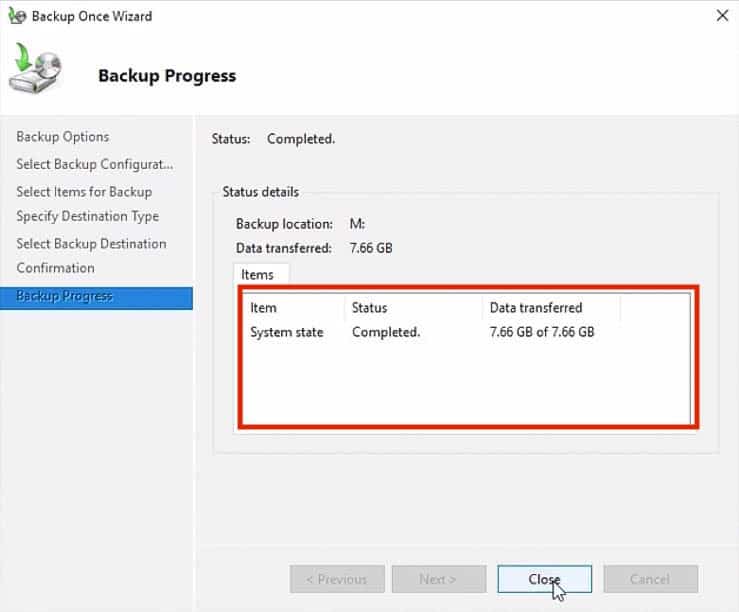
15. If you closed the Backup Wizard without waiting for the last message status, the backup will continue to run on the background.
You can also confirm the status and completion results of the backup from the webadmin console (or Windows Server Backup Feature).
The console will display a message with information from this backup (and others).
It will show the timestamp, type, and results.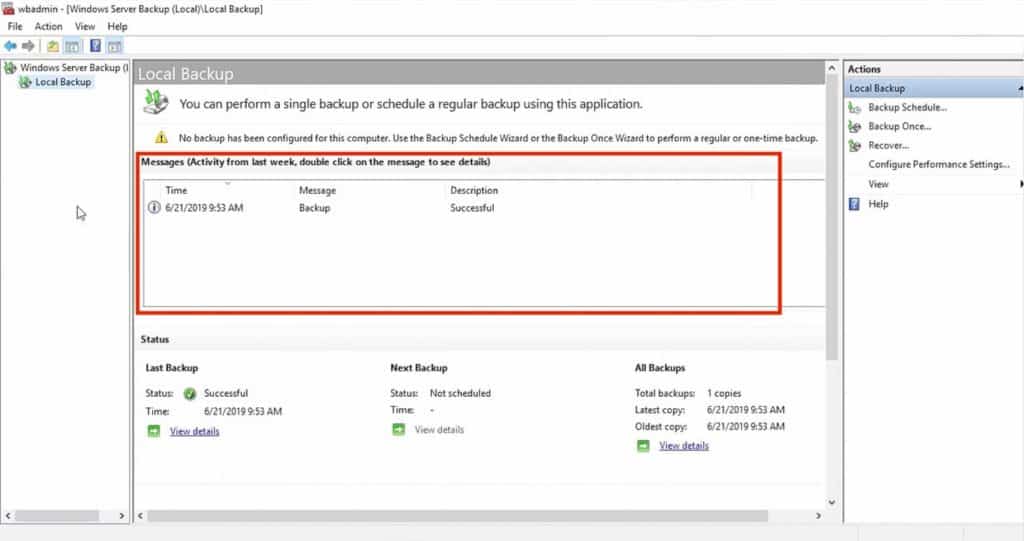
Backup Active Directory with third-party tools
Setting up automated backups for AD is just one of the tasks you will need to perform in order to get your access rights management solution running well through Active Directory. If you use different implementations of AD, you will need to log into several consoles to set this backup system up and check on its status. It is a lot simpler to use a frontend for all of your AD implementations that will manage all domain controllers by replicating the objects and settings that you have managed through that single console.
ManageEngine AD360 – FREE TRIAL
ManageEngine AD360 is an example of the type of package that will save you time. Asa well as managing backups, this system lets you upload, create, and maintain all of the objects in aloof your domain controllers no matter where they are. It also covers Azure AD and the ARM at the heart of Microsoft 365 and Google Workspaces.

The AD360 is a collection of six AD-related ManageEngine tools, including RecoveryManager Plus. This service backs up all of your instances through one console and deploys an object-level strategy.
The AD360 service can be set up to create a version history of AD, which lets you roll back to a previous timestamp if your most recent backup gets corrupted.
Pros:
- Dramatically improves the usability of Active Directory, making routine tasks easier to perform and automate
- Can monitor changes across both local and cloud-based AD environments
- Supports SSO and MFA, great for securing your access management with multiple layers of authentication
- Extensive 60-day trial period
Cons:
- Can take time to full explore all options, integrations, and features
The AD360 software installs on Windows Server. You can access it as a service on AWS and Azure through the marketplaces of those two platforms. Assess ManageEngine AD360 with a 30-day free trial.
Final Words
The main objective of this Active Directory backup demonstration was to manually store a copy of one of the two domain controllers on the local volume of the Windows server.
We manually ran a “Backup Once” but you can also configure a “Backup Schedule,” to run regular daily backup tasks.
You can also choose between a Full Backup vs. a Custom Backup.
The full backup will create a copy of all server data, including applications, OS files, and the system state. In this demonstration, we ran a customize “System State” backup, which includes essential components needed to restore Active Directory.
As already mentioned before in the Backup Recommendations section, always backup at least once a day and follow the 3-2-1 rule.
Also, remember always to have more than one domain controller running with fault-tolerance. When one DC fails, the other one should take over.
Although you can use third-party tools to run backups, the Windows Server Backup Feature comes for free as a bundled tool, and it is really easy to use.
Оглавление
- Настройка сетевых интерфейсов Active Directory 2019
- Установка и настройка сервиса Active Directory 2019 через Диспетчер серверов
- Проверка. Запускаем принудительное реплицирование домена
Как установить и настроить основной контроллер домена Active Directory 2019 смотрите тут: Установка и настройка контроллера домена Active Directory на базе Microsoft Windows Server 2019 Standart.
Настройка сетевых интерфейсов Active Directory 2019
И так. У нас было 2 сервера виртуализации, 50 пользователей домена, 5 марок сетевых коммутаторов, полсотни групповых политик и гора CD-дисков, и всего такого, всех цветов.
Не то, чтобы это всё было нужно в настройке резервного контроллера доменов, но раз начал наводить порядок в конторе, то иди в своём деле до конца.
На самом деле всё не так страшно, даже наооборот. Основной сервер будет называться AD-01, а резервный AD-02. Логично же  ? На сервере AD-01 прописываем в Альтернативный DNS-сервер
ip адрес нашего будующего резервного контроллера домена. Так как у меня он находится в другом офисе, то и подсеть у него отличается, если бы он был в местной локальной сети, то имел ту же подсеть.
Вводим сервер резервный контроллер домена AD-02 в домен, а затем добавляем в Предпочтительный DNS-сервер ip адрес нашего основного сервера AD-01.
Установка и настройка сервиса Active Directory 2019 через Диспетчер серверов
На резервном контроллере домена через Диспетчер серверов вызываем Мастер добавление ролей и компонентов. Отмечаем чекбоксы DNS-сервер и Доменные службы Active Directory.
Далее ничего особенного, проходим до пункта Подтверждение, соглашаемся и начинаем установку.
После установки ролей и компонентов на резервном контроллере домена нам необходимо повысить роль сервера до уровня контроллера доменов.
Отмечаем Добавить контроллер домена в существующий домен, через кнопку Выбрать вибираем наш основной сервер и чуть ниже вводим наши учётные данные от домена.
В разделе Дополнительные параметры указываем источник репликации основной сервер AD-01. Вот и всё, репликация сервера Active Directory готова!
Проверка. Запускаем принудительное реплицирование домена
Для того чтобы сразу протестировать настройку реплецирования резервного контроллера домена открываем Диспетчер серверов и запускаем Средства / Active Directory — сайты и службы
В открывшемся окне переходим Sites / Default-First-Site-Name / Servers / AD-02 / NTDS Settings,
выбираем в окне справа наше подключение Правая кнопка мыши / Реплицировать сейчас.
А после мы должны увидеть уведовление об успешном реплицировании нашего каталога. Надеюсь помог и вы настроили свой резервный контроллер домена Active Directory! Спасибо за внимание!
In this article we’ll talk about Active Directory domain controller backup and learn how to configure automatic AD backup using PowerShell and built-in Windows Server tools.
Contents:
- Do I Need to Back Up Active Directory?
- Get Last Active Directory Domain Controller Backup Date
- Backing Up AD Domain Controller Using Windows Server Backup
- Active Directory Backup with PowerShell
Do I Need to Back Up Active Directory?
Many times I have heard from my fellow administrators that if you have multiple (3, 8, etc.) domain controllers that are distributed across different geographic location, you don’t need to back up your AD at all. Since with multiple DCs you have provided domain fault tolerance. It is the schema when the simultaneous failure of all DCs tends to 0, and if one of the domain controllers fails, you can quickly deploy a new one on the same site and remove the old one using ntdsutil.
However, in my practice I have come across various scenarios when all domain controllers turned out to be damaged: in one case all domain controllers (although there were more than 20 of them in different cities) were encrypted due to a domain admin password capture by a ransomware using the mimikatz tool (to prevent these scenarios see “How to Protect Windows Against Mimikatz?” and“Securing Administrators Groups in Active Directory”), in another case a replication of a damaged NTDS.DIT file resulted in a domain failure.
So you can and should back up your AD. You must backup at least key domain controllers and FSMO (Flexible single-master operations) role owners regularly. You can get the list of domain controllers with FSMO roles using this command:
netdom query fsmo
Get Last Active Directory Domain Controller Backup Date
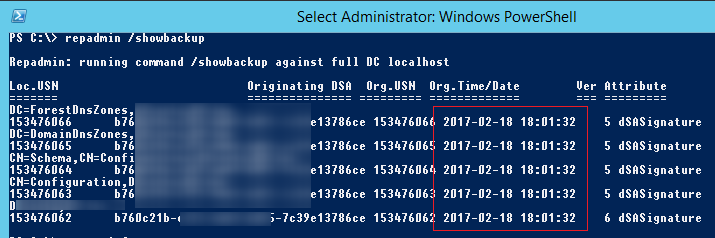
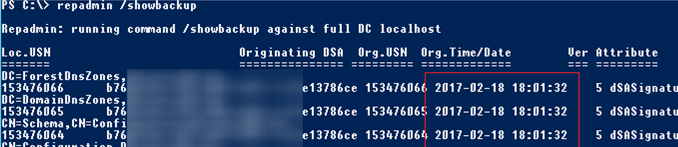
You can check when the current Active Directory domain controller was backed up last time using the repadmin tool:
repadmin /showbackup
You can see that in this example the last time the DC and AD partitions had been backed up was 2017-02-18 (it is likely, the backup has not been done since the domain controller was deployed).
You can get the backup status for all DCs in the domain using this command:
repadmin /showbackup *
If your domain controllers are running on virtual machines and you back them up using snapshots (see the example with Hyper-V backup), the backup dates won’t be updated on an evident reason. Most modern backup tools have an option you can check to specify that it is a DC and data in LDAP directory must be updated during backup.
Backing Up AD Domain Controller Using Windows Server Backup
If you don’t have any special backup software, you can use the built-in Windows Server Backup (this component has replaced the NTBackup tool). You can configure an automatic backup task in the Windows Server Backup GUI, but it has some restrictions. The main disadvantage is that a new server backup will always overwrite a previous one.
When you back up a domain controller using WSB, you create a System State backup. The System State includes the Active Directory database (NTDS.DIT), Group Policy Objects, SYSVOL directory contents, the registry, the IIS metadata, the AD CS database and other system files and resources. The backup is created through the Volume Shadow Copy Service (VSS).
You can check if Windows Server Backup is installed using the Get-WindowsFeature PowerShell cmdlet:
Get-WindowsFeature Windows-Server-Backup

If WSB is not installed, you can add it with PowerShell:
Add-Windowsfeature Windows-Server-Backup –Includeallsubfeature
Or install Windows Server Backup via Server Manager -> Features.
I will save the backup of this AD domain controller to a shared network folder on a dedicated backup server. For example, a path to the backup directory may look like this: \mun-back1backupdc01. Configure the NTFS permissions for this folder: grant Read and Write access permissions to Domain Admins and Domain Controllers groups only.
Active Directory Backup with PowerShell
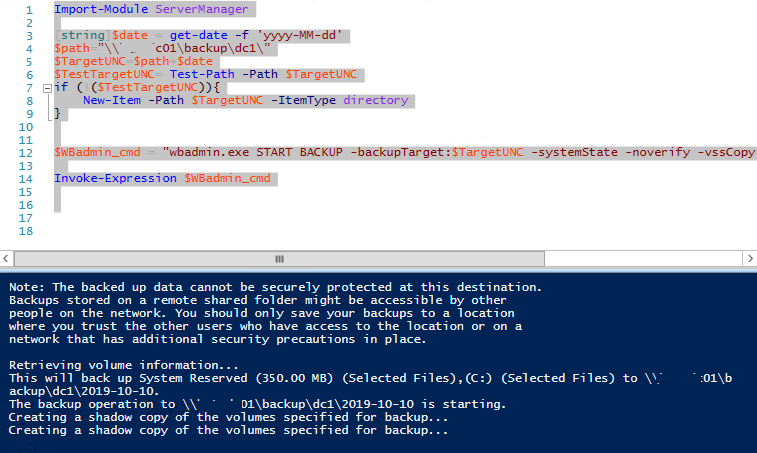
Let’s try to back up a domain controller using PowerShell. To keep multiple levels of AD backup copies, we will store each backup copy in a separate directory with the date of backup creation as the folder name.
Import-Module ServerManager

[string]$date = get-date -f 'yyyy-MM-dd'

$path=”\mun-back1backupdc1”

$TargetUNC=$path+$date

$TestTargetUNC= Test-Path -Path $TargetUNC

if (!($TestTargetUNC)){

New-Item -Path $TargetUNC -ItemType directory

}

$WBadmin_cmd = "wbadmin.exe START BACKUP -backupTarget:$TargetUNC -systemState -noverify -vssCopy -quiet"

Invoke-Expression $WBadmin_cmd
Run the PowerShell script. The wbadmin console will appear. It contains information about the process of disk backup (shadow copy) creation:
The backup operation to \mun-back1backupdc12020-06-01 is starting.
Creating a shadow copy of the volumes specified for backup...
My first attempt to back up a DC failed up with an error (the domain controller was a VMWare virtual machine):
Detailed error: The filename, directory name, or volume label syntax is incorrect.
The backup of the system state failed [01.06.2020 8:31].
I opened the WSB error log — C:WindowsLogsWindowsServerBackupBackup_Error-01-06-2020_09-23-14.log.
There was the following error in the file:
Error in backup of C:windows\systemroot during enumerate: Error [0x8007007b] The filename, directory name, or volume label syntax is incorrect.
Looking ahead, I will tell that the problem was in the incorrect path of a VMWware Tools driver.
To fix the error, start the elevate command prompt and run this command:
DiskShadow /L writers.txt

list writers detailed
After getting the list, type quit and open C:WindowsSystem32writers.txt. Find the string containing “windows\” in it.
In my case the string I had found looked like this:
File List: Path = c:windows\systemrootsystem32drivers, Filespec = vsock.sys
As you can see, a wrong path to the VSOCK.SYS driver is used.

To correct the path, open the Registry Editor and go to reg key HKLMSYSTEMCurrentControlSetServicesvsock.
Change the ImagePath value from
systemrootsystem32DRIVERSvsock.sys
to
System32DRIVERSvsock.sys

Run the backup script again.
If the backup has been successful, you will see the following messages in the log:
The backup operation successfully completed.
The backup of volume (C:) completed successfully.
The backup of the system state successfully completed [01.06.2020 09:52].
Check the time of the last DC backup:
repadmin /showbackup
Now it says that the last domain controller backup was performed today.

The size of the directory with the domain controller backup on the server is about 9GB. In fact, we have got a VHDX file you can use to restore the OS from WSB, or you can manually mount the VHDX file and copy the files or folders you need from it.
If there are multiple DCs in Active Directory, you do not need to back up all of them. To save the space, it is enough to periodically backup the Active Directory database — ntds.dit file. To do it, use these commands:
$WBadmin_cmd = "wbadmin start backup -backuptarget:$path -include:C:WindowsNTDSntds.dit -quiet"

Invoke-Expression $WBadmin_cmd
The size of such a backup will be only 50-500MB depending on the AD database size.
For automatic AD backup, create the C:PSBackup_AD_DC.ps1 script on your DC. Run it according to the schedule using Task Scheduler. You can create a Scheduler task from the GUI or with PowerShell. The main requirement is that the task must be run under the NT AUTHORITYSYSTEMaccount with the Run with highest privileges option checked. For a daily AD domain controller backup, create the following scheduled task:
$Trigger= New-ScheduledTaskTrigger -At 02:00am -Daily

$User= "NT AUTHORITYSYSTEM"

$Action= New-ScheduledTaskAction -Execute "PowerShell.exe" -Argument "C:PSBackup_AD_DC.ps1"

Register-ScheduledTask -TaskName "BackupAD-DC-daily" -Trigger $Trigger -User $User -Action $Action -RunLevel Highest –Force
So, we have configured an AD backup, and we will talk ways to restore AD from a domain controller system state backup in our next article.
In this article, we will learn the steps to Backup and Restore an Active Directory Integrated DNS zones in windows server 2019. DNS is one of the core components of Active Directory Domain Services. The backup of the AD integrated DNS zones is very important.
By default, DNS service stores all information such as logs, basic DNS files, and backups under the DNS folder located under “%systemdrive%WindowsSystem32”. Active Directory Integrated DNS stores, its data in the Active Directory database, we can back it up by using Active Directory backup and restore it by using AD restore. The Active Directory restoration process is time-consuming and it leads to increased downtime, which impacts productivity.
Luckily, it’s possible to back up a DNS server using the DNSCMD command-line tool and PowerShell.
How to Backup the AD Integrated DNS zone:
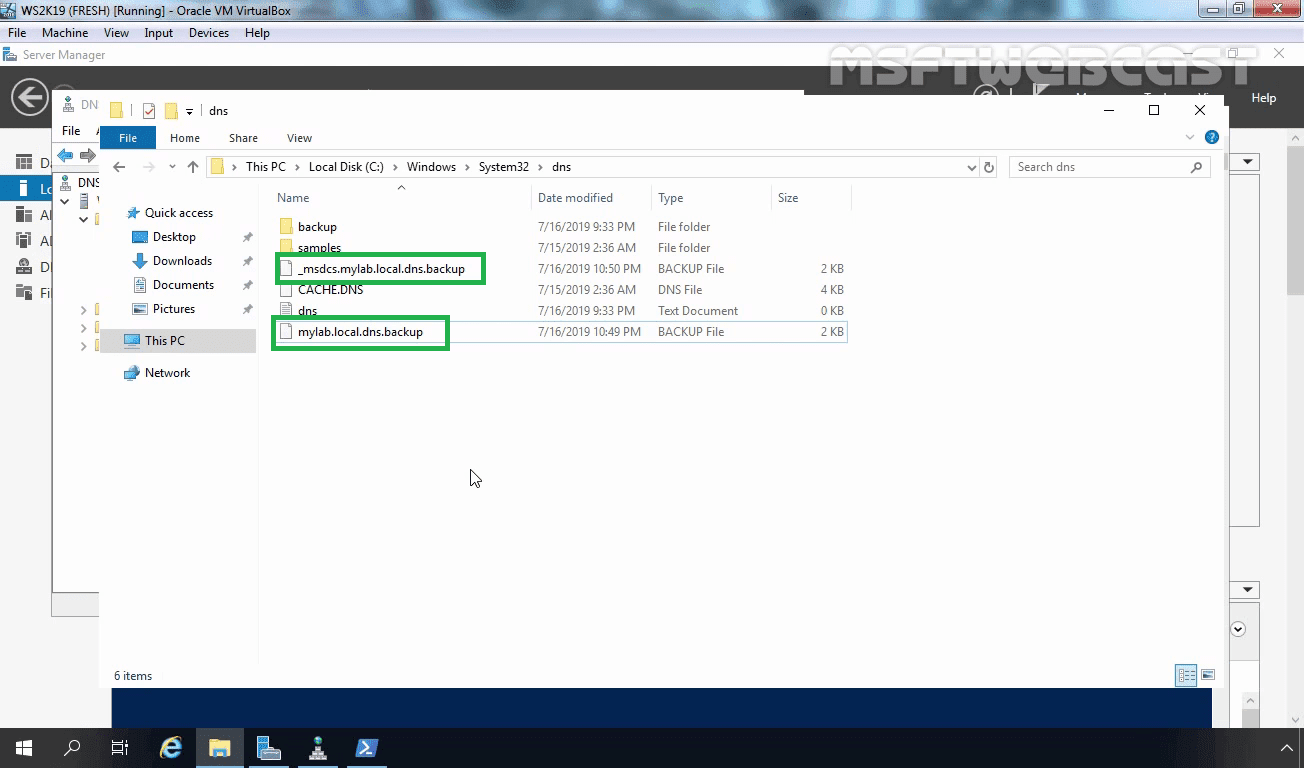
In this article, we will use the DNSCMD command to backup (export) mylab.local Active Directory Integrated DNS zone.

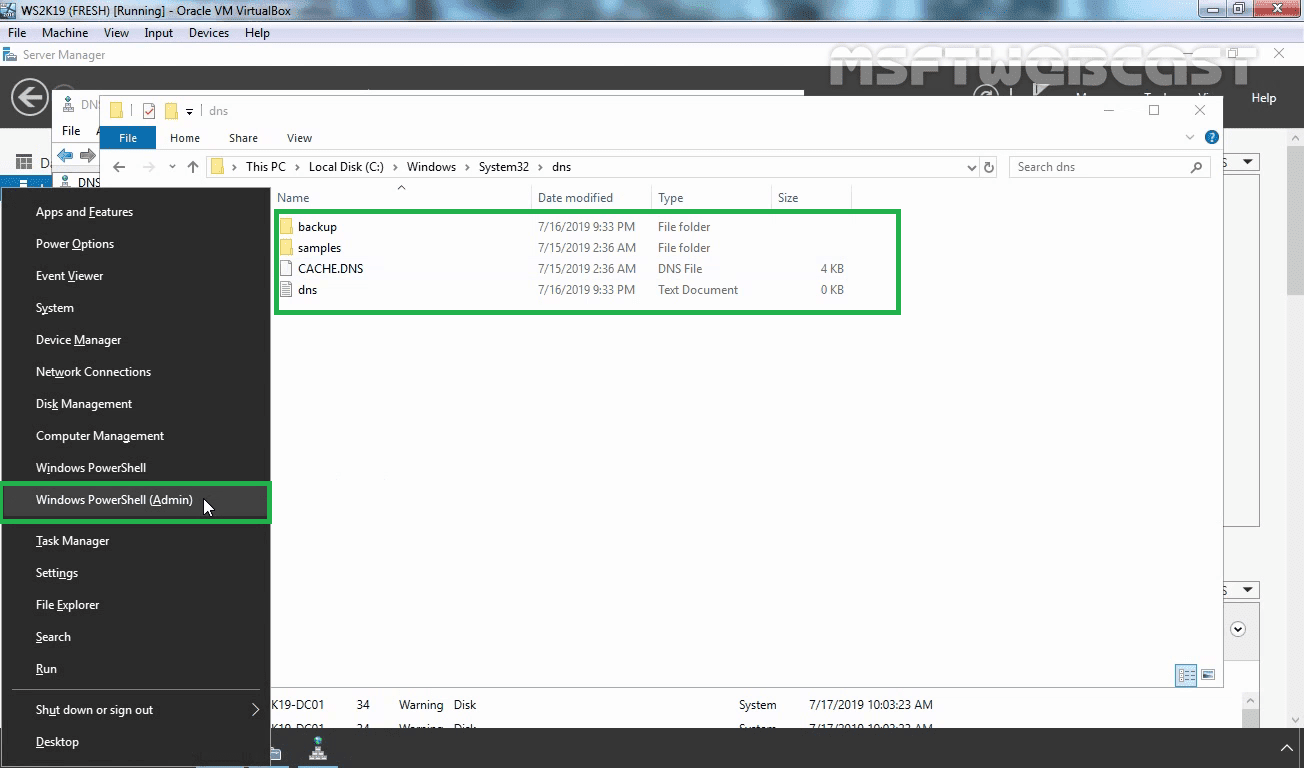
Open Windows PowerShell (admin) by right-clicking on the start button.
To back up the mylab.local zone locally on a DNS server, you’d run the below command on the DNS server:
dnscmd /zoneexport mylab.local mylab.local.dns.backup

This command creates a copy of the mylab.local zone to the %systemroot%system32dnsbackupmylab.local.dns.backup file.
How to Restore the AD Integrated DNS zone using the GUI method:
In the DNS Manager Console. Expand the Server, then right-click Forward Lookup Zone and Click New Zone.

On the New Zone Wizard, Click Next.

On the Zone Type Wizard, select Primary zone and unchecked the Store the zone in Active Directory (available only if DNS server is a writable domain controller).
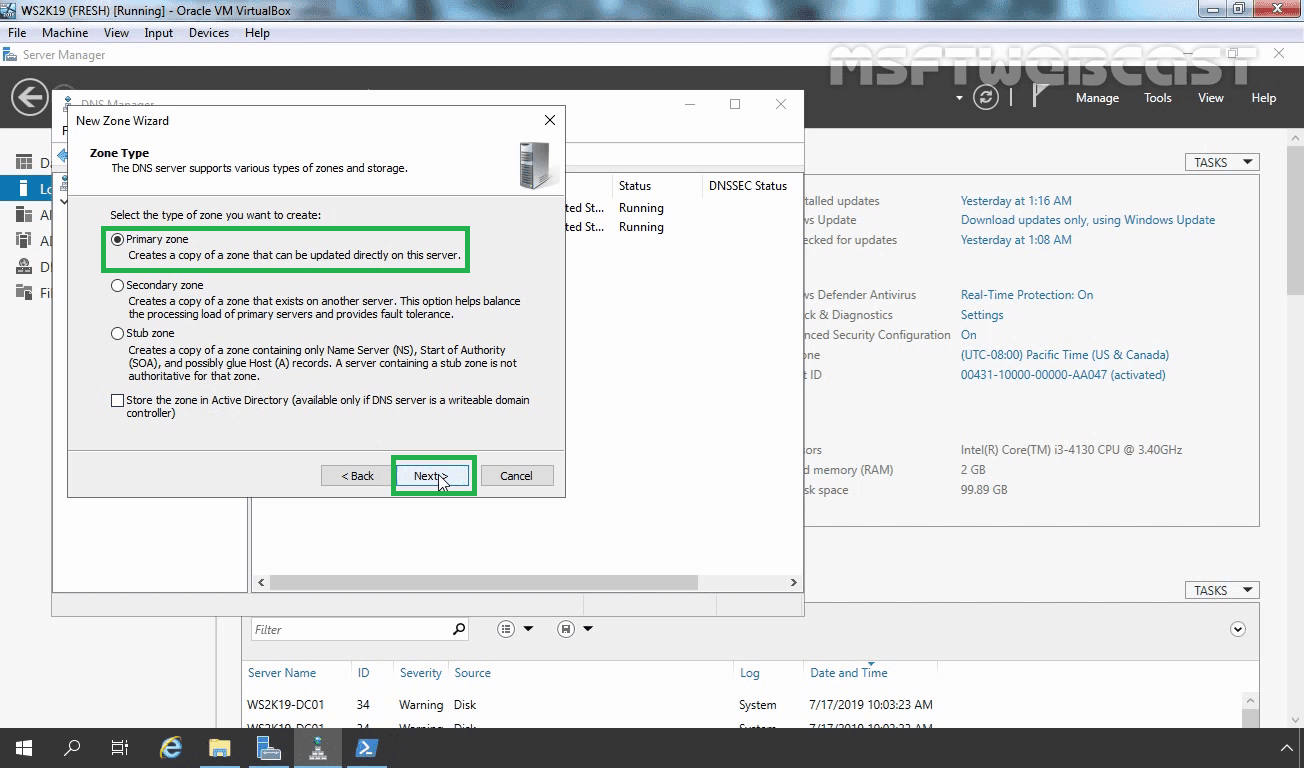
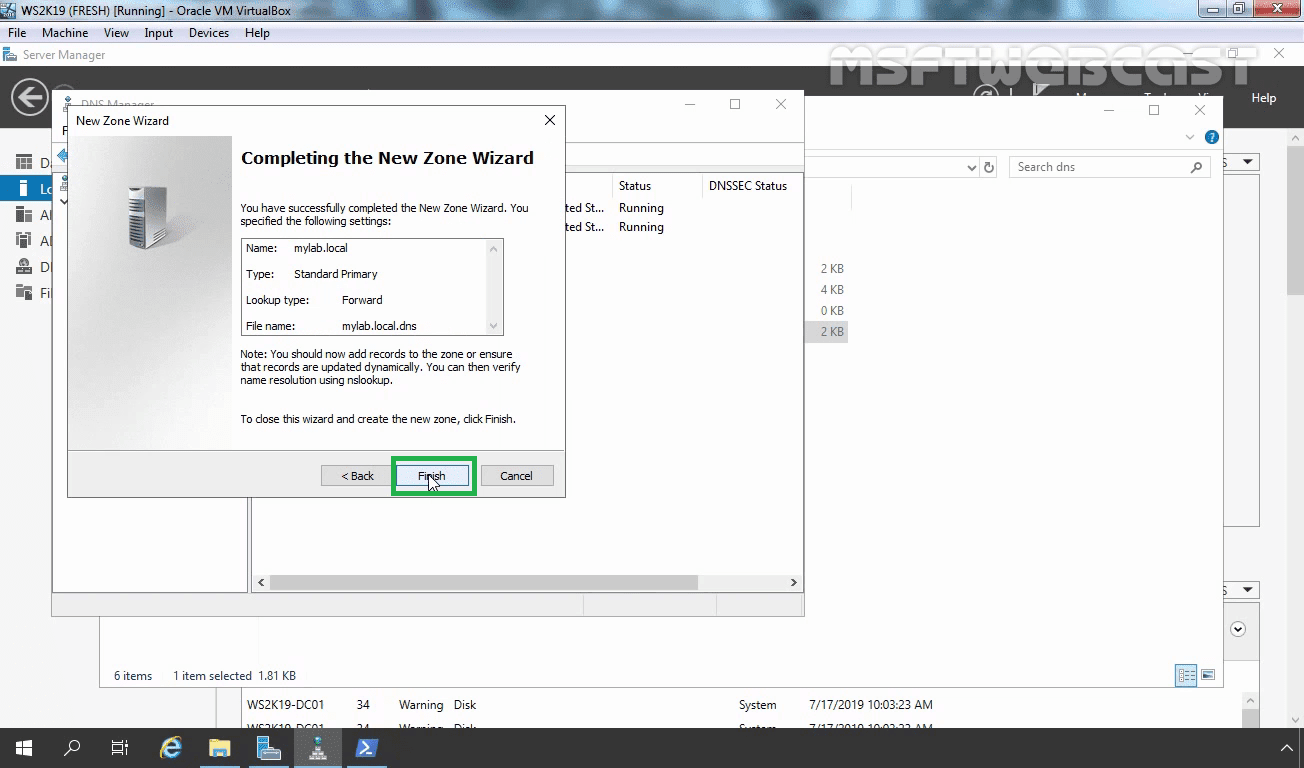
On the Zone Name Wizard, type the name of the zone being restored. In our case, it is mylab.local. Click on the Next.

Rename the file from mylab.local.dns.backup to mylab.local.dns (remove the .backup extension).

On the Zone File Wizard, select the option Use this existing file and give the path of the file (our file is stored in %systemroot%system32dns so we have given mylab.local.dns). Click on Next.
On the Dynamic Update wizard page, select Do not Allow dynamic updates and Click Next.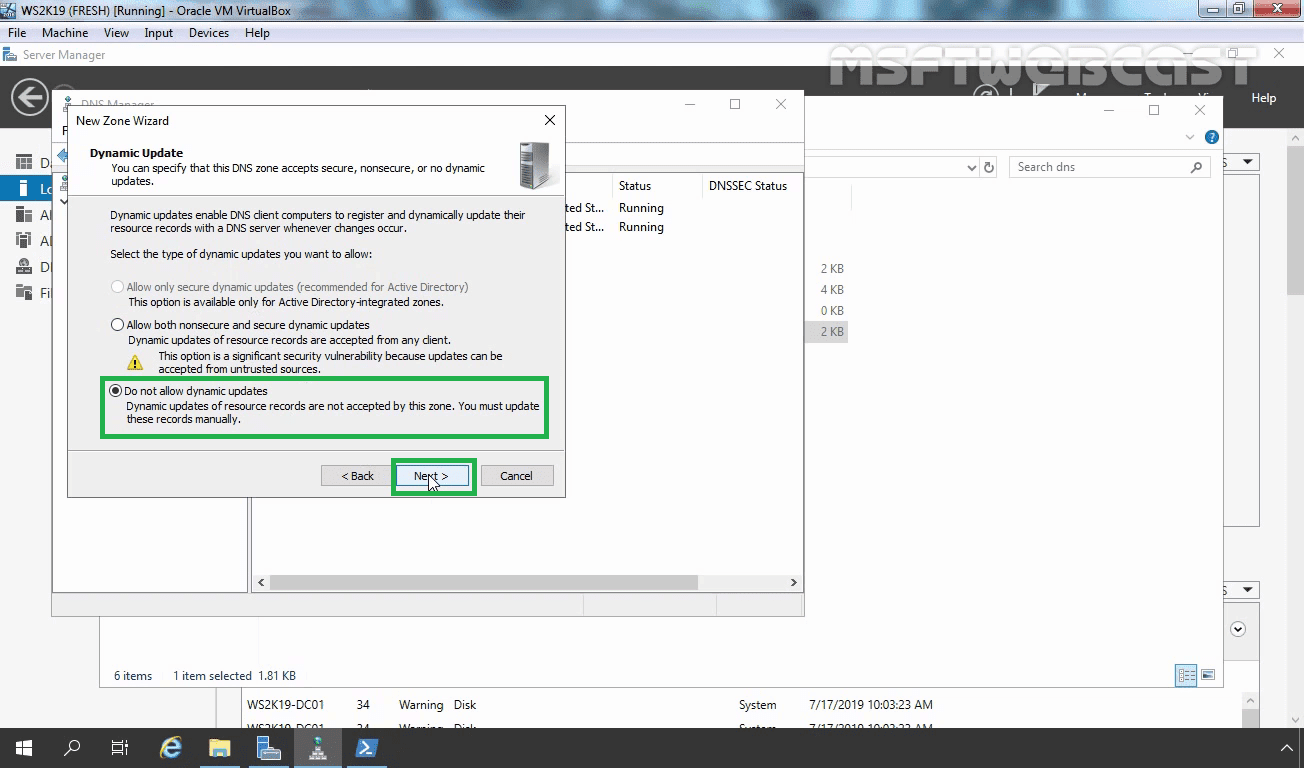
On the Completing the New Zone Wizard page, click Finish.
Right-click on mylab.local zone and select Properties.

Click the Change button at Type: Primary field.

On the Change Zone Type page, make sure the Primary zone is selected and select the option Store the zone in Active Directory (available only if DNS server is a domain controller) and click OK.

Click Yes to accept the change.

Select Secure only at the Dynamic updates field.

Click on Apply and Ok button to convert standard primary zone into Active Directory Integrated DNS zone.
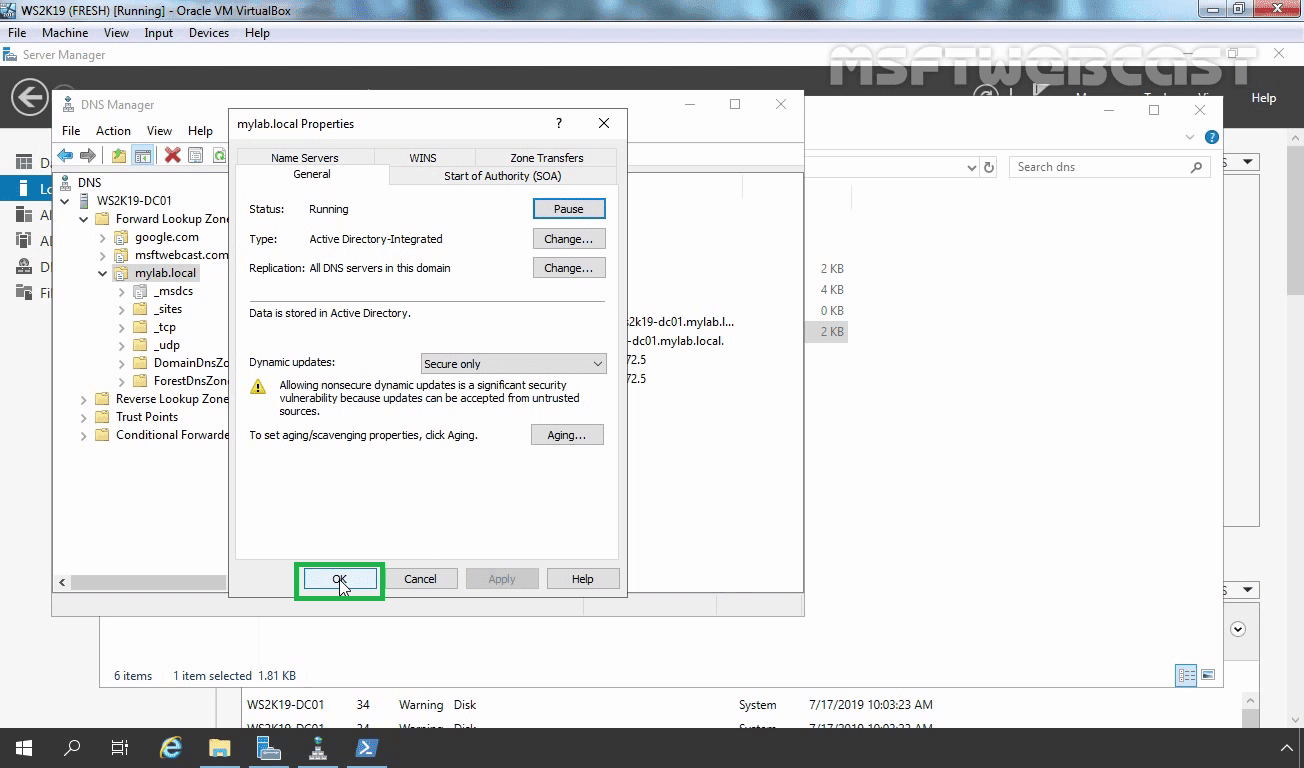
Finally, we have Active Directory Integrated DNS Zone up and running, restored from the existing backup file.
I hope you will find this information useful. Thank you!
Link to my video on How to Backup-Restore An Active Directory Integrated DNS Zone.
Post Views: 4,103