The BIOS or Basic Input Output System is a firmware interface that helps to start your PC. The very first thing your PC does when it switches on is going through BIOS. BIOS checks different essential PC hardware at Startup, boots the operating system, and maintaining hardware transfer on the computer. BIOS is in the ROM (read-only memory). Hence, the firmware can be executed while you switch on the PC. Though critical to performance, BIOS remains invisible to PC users. And because of the task it performs, it’s necessary to upgrade it with the most recent version.
If you want to update BIOS, please ensure that the BIOS version is compatible with your PC as well as backup BIOS before the update. If you fail to update your Bios, the result can be terrible. Hence, it’s wise to choose a BIOS update software for the job.

What BIOS Update Software Does?
As we have discussed earlier that not upgrading BIOS could lead to different performance and security issues, it’s necessary to update the BIOS version of your Windows PC. But, you should be an advanced user to operate BIOS or even update it. It’s not as easy as updating any other component in the computer ecosystem. A BIOS update software allows you to update your PC BIOS version effortlessly even when you are a rookie in updating BIOS. It automatically checks for outdated BIOS versions and updates it, if any. Moreover, it’s safe, efficient, and reliable.
However, there are certain software that can update BIOS on Windows. Here we have listed the two best BIOS update software that can seamlessly update your BIOS version.
Top BIOS Update Software You Need To Have On Your Windows 10 PC
Below are some of the most famous & useful BIOS Update Tools that can help you update BIOS on your computer without any hassles.
1. BIOSAgentPlus
BIOSAgentPlus is arguably the best BIOS update software you can ever find online. We all know that updating BIOS is a critical and risky task. Any wrong tweak can be problematic and exchange the entire functioning of the PC. Hence, it’s always good to look for the best tool to update BIOS on Windows computers for smooth functioning. BIOSAgentPlus is the right tool you’re looking for.
Here are some of the highlighted features of the tool. Have a look at it: –
- BIOSAgentPlus is safe for your Windows PC. It safely checks whether your BIOS needs an update or not and only then proceeds to update it. However, it will certainly ask your consent for updating the BIOS of Windows PC.
- It also checks for old drivers in your systemand recommends updates if necessary.
- It allows you to get hold of the BIOS report instantly. Thus, you can easily consider the BIOS update option when required.
- By updating your system’s BIOS, BIOSAgentPlus prevents different computer performance and securityissues, resulting in outdated BIOS versions.

Overall, it has got many features that make it one of the topmost BIOS updater for different Windows such as Windows 10, 8.1, 8, 7, Vista, and even XP. Want to download an incredible BIOS update software? Click here.
2. UEFI BIOS Updater
UEFI BIOS Updater is one of the best BIOS update software. Like BIOSAgentPlus, the BIOS manager tool has also got useful features that can quickly update BIOS is your Windows PC in snap time. UEFI BIOS Updater is specially designed to update UEFI or OROM modules of AMI UEFI BIOS firmware. It can be used any user even if they don’t have any advanced knowledge on BIOS modding methods.
Here are some of the most loved features from the UEFI BIOS Updater. Have a look at it:
- UEFI BIOS Updater allows you to facilitate BIOS modifications with negligible chances of BIOS issues.
- UEFI BIOS Updater quickly detects the BIOS version of EFI and OROM modules and updates them. The process also helps update the CPU microcode.
- It’s a freeware with not more than 18 MB file size. Moreover, the BIOS update software supports all Windows versions.

Overall, UEFI BIOS Updater is a reliable and efficient BIOS update software that performs BIOS updates on Windows with negligible BIOS crashes. Click here to download UEFI BIOS Updater.
Note: – UEFI BIOS Updater cannot update BIOS types/modes such as Intel mainboard BIOS, non-UEFI AMI BIOS, or Award/Phoenix BIOS.
3. ASUS Live Update Utility
One of the most famous names on this list of BIOS Update Software for Windows 10 is ASUS Live Update Utility. ASUS is a well-known brand for producing best-in-class PCs, laptops, Software & smartphones; they are leading manufacturers of providing BIOS firmware. The feature-rich utility is packed with a great set of tools to update BIOS. Additionally, you can easily find and replace your device’s drivers using the tool.
Here are some of the most valuable features from ASUS Live Update Utility. Have a look at it: –
- Capable of detecting new driver versions whenever available.
- Finds & update new compatible upgrades of the programs available from the ASUS official website.
- Ensures automatic updating of your BIOS without any hassles.
- Allows you to save the current BIO file as well.
- Easily view BIOS version information before updates.
- Offers a dedicated scheduler to check updates; it can be set to every day, Every three days, Every week, Every two weeks, Every month, etc.

ASUS Live Update Utility ensures that you safely update BIOS without overclocking the system or CPU. It uses the least system resources & you just need to reboot your PC to implement the update. Click here to get the BIOS Update Tool right on your PC!
4. Biostar BIOS Update Utility
Here comes another intuitive & feature-rich BIOS Update Software by Biostar. The utility is fully automated & just requiring a simple installation on your system to work correctly. No heavy setup comes with Biostar, therefore making the BIOS update task uncomplicated. The tool walkthrough users with step-by-step instructions to update BIOS on their system without any hiccups.
Here are some of the most valuable features from Biostar BIOS Update Utility. Have a look at it: –
- Allows you to download the latest BIOS for your PC.
- Automatically provides you with available BIOS firmware updates & the step by step instruction to getting the task done right.
- The update utility searches for a compatible package in any given location or on the web.

It is highly recommended that BIOS should be upgraded by a Pro user who knows how to use the advanced system features. Though, Biostar BIOS Update Utility is relatively easier to use & helps to fulfil the needs of a regular user. Click here to get Biostar’s BIOS update software on your PC!
5. Gigabyte @BIOS Live Update
Install the latest BIOS firmware in just a few clicks by using Gigabyte @BIOS Live Update utility. The tool is fast & reliable to make progressive changes in your system without any hiccups. Gigabyte’s product @BIOS Live Update is designed with smart algorithms to maintain your BIOS and download necessary updates from official and trusted sources.
Here are some of the most valuable features from the Gigabyte @BIOS Live Update. Have a look at it:
- The BIOS Update Software provides several options to download the BIOS update.
- These include: Internet Update (if you want to download & update your BIOS directly)
- Save Current BIOS (if you want to keep a backup for your current BIOS.
- Offers a complete wizard to learn the BIOS updates process.

Gigabytes @BIOS Live Update is an outstanding software to update BIOS in no time. Click here to download the software now!
To check BIOS setting mode, press “‘Windows’ key + R” simultaneously to open the ‘Run’ dialogue box. Further, type ‘msinfo32’ inbox and hit Enter. A window with every information about the computer will appear on the screen. Check BIOS mode in the same window.
In conclusion, all we need to say is that it’s always recommended to update your BIOS with the help of a BIOS update software unless you’re a subject matter expert. We hope that these tools will help your BIOS stay up-to-date.
Find out everything about flashing your BIOS
by Milan Stanojevic
Milan has been enthusiastic about technology ever since his childhood days, and this led him to take interest in all PC-related technologies. He’s a PC enthusiast and he… read more
Updated on November 7, 2022
Reviewed by
Vlad Turiceanu

Passionate about technology, Windows, and everything that has a power button, he spent most of his time developing new skills and learning more about the tech world. Coming… read more
- If you’re not changing your hardware and you don’t have any specific errors, it’s not necessary to update the BIOS.
- The BIOS comes pre-installed on the motherboard so in this guide you will learn how to update the motherboard BIOS.
- Updating the BIOS is a tricky operation and you should start by checking the BIOS version and gathering information.
- You can update BIOS in Windows 10 from the BIOS itself as indicated in our solutions below.

XINSTALL BY CLICKING THE DOWNLOAD FILE
This software will repair common computer errors, protect you from file loss, malware, hardware failure and optimize your PC for maximum performance. Fix PC issues and remove viruses now in 3 easy steps:
- Download Restoro PC Repair Tool that comes with Patented Technologies (patent available here).
- Click Start Scan to find Windows issues that could be causing PC problems.
- Click Repair All to fix issues affecting your computer’s security and performance
- Restoro has been downloaded by 0 readers this month.
BIOS is a crucial component of every PC that allows you to change your hardware settings without starting Windows.
Your BIOS has many features available, but some advanced users tend to update theirs in order to get access to new features.
Updating BIOS can be a somewhat complicated procedure, so today we’re going to show you how to flash your BIOS on Windows 10.
How do I update my BIOS in Windows 10? The easiest way to update your BIOS is directly from its settings. Before you start the process, check your BIOS version and the model of your motherboard.
Another way to update it is to create a DOS USB drive or use a Windows-based program. If you want to know how to do that, check the steps below.
How can I flash the BIOS on Windows 10?
- Do I need to update my BIOS for Windows 10?
- How do I check my BIOS version?
- Update BIOS through Windows
- Create a DOS USB drive
- Use Windows-based programs
- Can I perform a BIOS update on Windows 10 without a battery?
1. Do I need to update my BIOS for Windows 10?
Flashing your BIOS is an advanced procedure, and if you don’t perform it properly you can cause major damage to your PC.
The main problem with BIOS is that it’s located on a chip on your motherboard, and if the update process goes wrong, you won’t be able to start Windows at all.
In most cases, you don’t even have to update your BIOS unless there’s a major problem with your hardware.
How do I know if my BIOS needs updating? If you have a hardware problem and the only way to fix it is to update BIOS, then you might have to update it.
To perform a BIOS update successfully, you need to be sure that the update process isn’t interrupted by a power loss or unexpected shutdown.
If that happens, the BIOS update process will fail, and you’ll most likely cause damage to your motherboard.
To prevent any problems, be sure to connect your laptop directly to the power outlet or use a UPS for your desktop PC.
Although updating the BIOS can be potentially dangerous, there are certain benefits after updating it. Sometimes, the BIOS update brings support for new hardware, such as support for new CPUs.
Another benefit of BIOS updates is improved stability and potentially new features such as overclocking.
2. How do I check my BIOS version?

Before you update your BIOS, you need to find out which version are you currently using. The easiest way to do that is to use Command Prompt or System Information tool.
Here are more ways to check the BIOS version on Windows 10
- Use Command Prompt
- Use System Information tool
- Try the Registry Editor
- Use DXDiag
- Use PowerShell
We already covered each method extensively, so make sure you take a look at our full guide on how to check your BIOS version on Windows 10.
In addition to the BIOS version, you also need to know the model of your motherboard. If you don’t have the data readily available you can use our guide to check your motherboard model.
You can see the model of your motherboard by using any hardware information tool such as Speccy or CPU-Z. Here’s a full list of tools to check your system configuration.
- After finding the version of BIOS that you’re using, you need to download the new version from your motherboard manufacturer’s website.
- Go to the Support or Download section and select your motherboard model. Be sure to download the BIOS update for the exact model of the motherboard that you’re using.
- When you download a new version of BIOS, it will be stored in an archive so you’ll need to extract it first.
- After that, check the available readme file for instructions and any additional information.

NOTE
Installing the wrong version of BIOS on your motherboard can cause damage, so be extra cautious.
Almost all versions of BIOS have update notes available on the download page so you can easily see what issues the update fix.
3. Update BIOS through Windows
1. Download the newest BIOS version from your motherboard manufacturer’s website and copy it onto an USB flash drive.
2. Open the Start Menu and click the Power button.
3. Hold the Shift key and choose the Restart option.
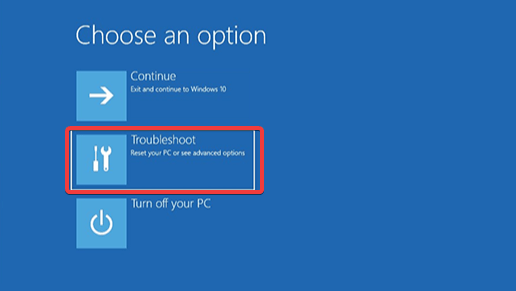
4. You should see several options available. Choose Troubleshoot.
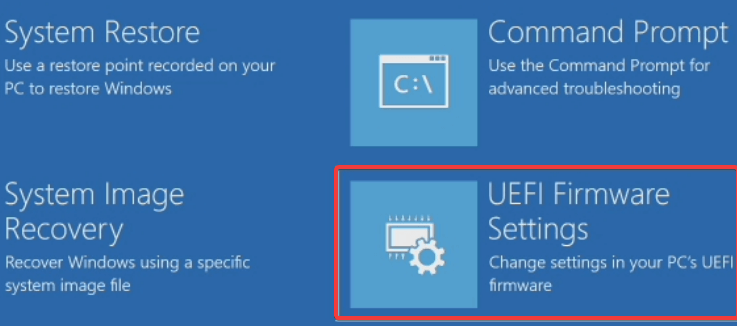
5. Now select Advanced options and select UEFI Firmware Settings.
6. Click the Restart button and your computer should now boot to BIOS.
7. Once you enter BIOS, look for BIOS update option and select it.
8. Now you need to choose the BIOS update file from your USB flash drive and wait while your BIOS updates.
Some motherboard manufacturers allow you to flash your Windows 10 BIOS simply by accessing it and choosing the update option.
Some PC issues are hard to tackle, especially when it comes to corrupted repositories or missing Windows files. If you are having troubles fixing an error, your system may be partially broken.
We recommend installing Restoro, a tool that will scan your machine and identify what the fault is.
Click here to download and start repairing.
This is relatively simple and in order to do that you need to move the downloaded BIOS update to a USB flash drive. Manufacturers offer tools that will create a USB flash drive with all the necessary files, so you won’t have to transfer them manually.
Before moving the update to the USB drive, be sure that there aren’t any other files available on the drive.
You can access BIOS during the boot sequence by pressing the appropriate key. In most cases that’s Del or some other F key, so keep an eye for a message that tells you to press a certain key to enter SETUP.
In addition, you can always check your motherboard manual to see which key you need to press in order to access BIOS.
Keep in mind that the update process is a bit different for each motherboard model, so be sure to check the instruction manual for details on how to update your BIOS.
4. Create a DOS USB drive
This DOS solution is an older method of flashing BIOS and is probably the most complicated. This process requires you to create a bootable USB flash drive and to copy the new version of BIOS to the drive as well.
In addition, you’ll need a script that will flash the BIOS. This file will usually be available in the archive with your BIOS update, and it will have .exe or .bat extension.
In some cases, this script will have to be downloaded separately. To create a bootable USB drive with a DOS system, you need to use third-party tools such as Rufus.
Simply format the drive using this tool and be sure to check the Create a bootable disk using the FreeDOS option.
After doing that, transfer the BIOS update file and an installation script to the USB drive and restart your PC. Boot your PC from the USB drive and run the setup script using DOS.
This is an advanced procedure, so we highly recommend that you check your motherboard manual for detailed instructions on how to do that.
- 8 best USB drives for fast data transfer [2022 Guide]
- 5+ best overclocking software for Windows 10/11 [2022 Guide]
- 16 best privacy protector software for Windows 10/11
5. Use Windows-based programs
If using DOS seems too complicated for you, you might want to consider using a Windows-based application in order to update Windows 10’s BIOS.
Many motherboard manufacturers have BIOS update applications available that allow you to update BIOS by using a simple graphic interface.
Although this is the simplest way to do it, there are certain issues with it. Installed software can sometimes interfere with this process and cause BIOS updates to fail.
Security programs can often interfere with BIOS update process and cause all sorts of problems to appear, so it might be best that you disable them completely while flashing your BIOS.
Any system crash or freeze could also affect the update process, so it might be better that you use some different method to update BIOS.
Motherboard manufacturers will often recommend the best method to update your BIOS, so be sure to use that method.
Updating BIOS isn’t a hard process, but it might be potentially dangerous, so be cautious if you decide to update your BIOS.
In addition, be sure to double-check everything before starting. Many BIOS update tools will give you the option to save or back up your current BIOS, so be sure to use this feature.
It’s not necessary that you update your BIOS, especially because you can cause irreversible damage to your motherboard if you don’t do it properly.
However, if you’re having a hardware issue and the only solution is to update your BIOS, be sure to carefully read your motherboard’s instruction manual to see how to update your BIOS properly.
Some computer manufacturers like Asus, Dell, or Lenovo offer a built-in tool to update your BIOS. You can always check your PC’s manual to see if it offers such a tool to make things a little bit easier.
6. Can I perform a BIOS update on Windows 10 without a battery?
Sometimes, you might find yourself in a situation where your laptop battery is not charging. Performing a BIOS update can help you recover a stubborn battery that refuses to charge. But there is a catch.
As you probably know, updating your BIOS requires an AC adapter plugged in or at least 10% of battery autonomy. So how to break this loop and force the Windows 10 BIOS to update?
Here’s how to bypass the BIOS battery requirements:
Download the latest BIOS update file from your manufacturer’s home page and store it at hand.
- Next, open the CMD with administrative privileges. (Don’t worry if it does not work from the first attempt, we will show you what to do if you can’t run Command Prompt as admin).

- Enable UAC if prompted.
- Once you reached the root directory in the C:Windowssystem32> area, type the following:
biosfilename.exe/forceit - Note that you must replace the biosfilename value with the exact name of the file you previously downloaded from the manufacturer’s site.
- Press Enter and proceed with the reboot in order to complete the BIOS flashing.

Not sure how to access BIOS in Windows 10? Don’t worry, we will guide you from the very beginning.
If you have any more questions or concerns with the Windows 10 BIOS update process, don’t hesitate to leave them in the comments section below.
Still having issues? Fix them with this tool:
SPONSORED
If the advices above haven’t solved your issue, your PC may experience deeper Windows problems. We recommend downloading this PC Repair tool (rated Great on TrustPilot.com) to easily address them. After installation, simply click the Start Scan button and then press on Repair All.
![]()
Newsletter
FAQ
Есть два способа для обновления BIOS:
- Обновить BIOS в Windows
- Обновить BIOS с помощью BIOS Utility (EZ Flash tool)
Так как процедура обновления через утилиту EZ Flash в BIOS более сложная, то в этой статье мы рассмотрим более простой вариант обновления BIOS в Windows.
How to update the BIOS version in Windows system?
Чтобы получить более подробную инструкцию, Вы также можете перейти по ссылке на видео ASUS Youtube ниже:
Содержание:
Перед началом обновления BIOS Вам нужно сначала скачать необходимые утилиты. Есть два способа их скачать:
Способ 1: Скачайте утилиту обновления BIOS через MyASUS
Способ 2: Скачайте утилиту обновления BIOS с сайта поддержки ASUS
Примечание: Если Вы столкнулись с какими-либо проблемами при обновлении BIOS, пожалуйста, обратитесь в Сервисный центр ASUS.
Способ 1: Скачайте утилиту обновления BIOS через MyASUS
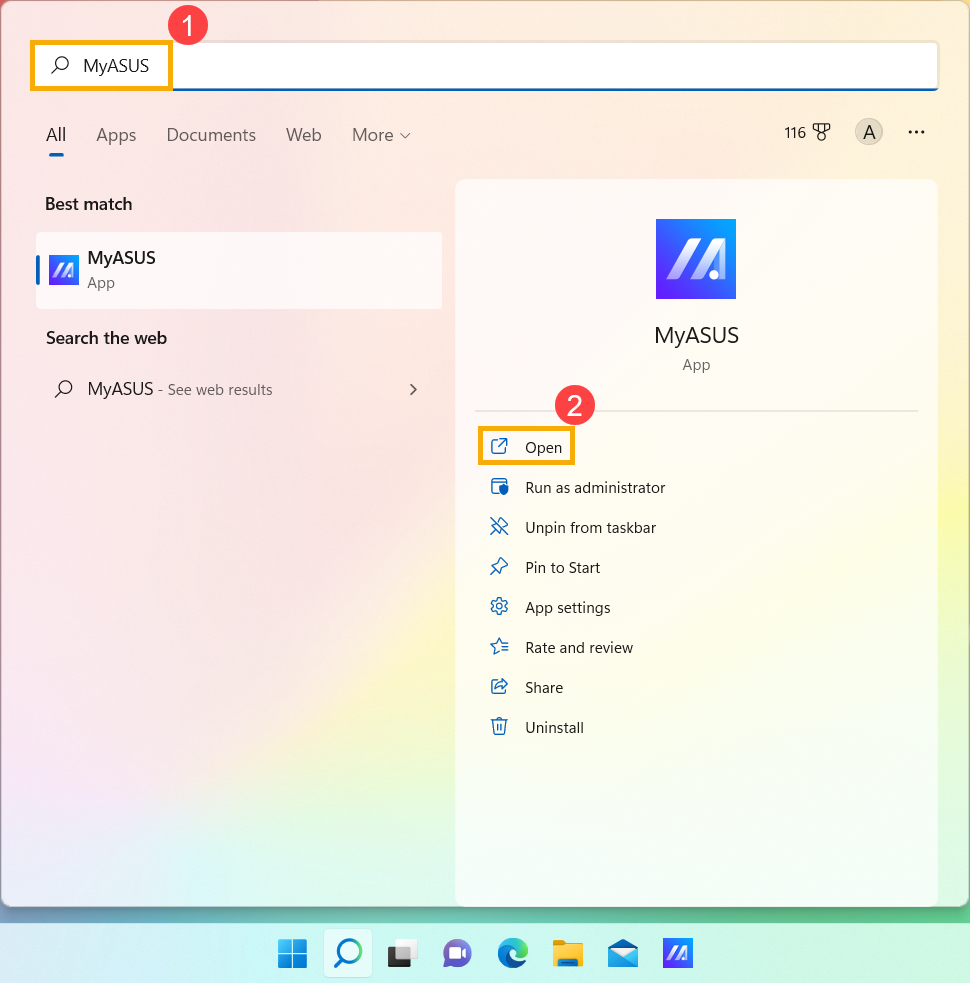
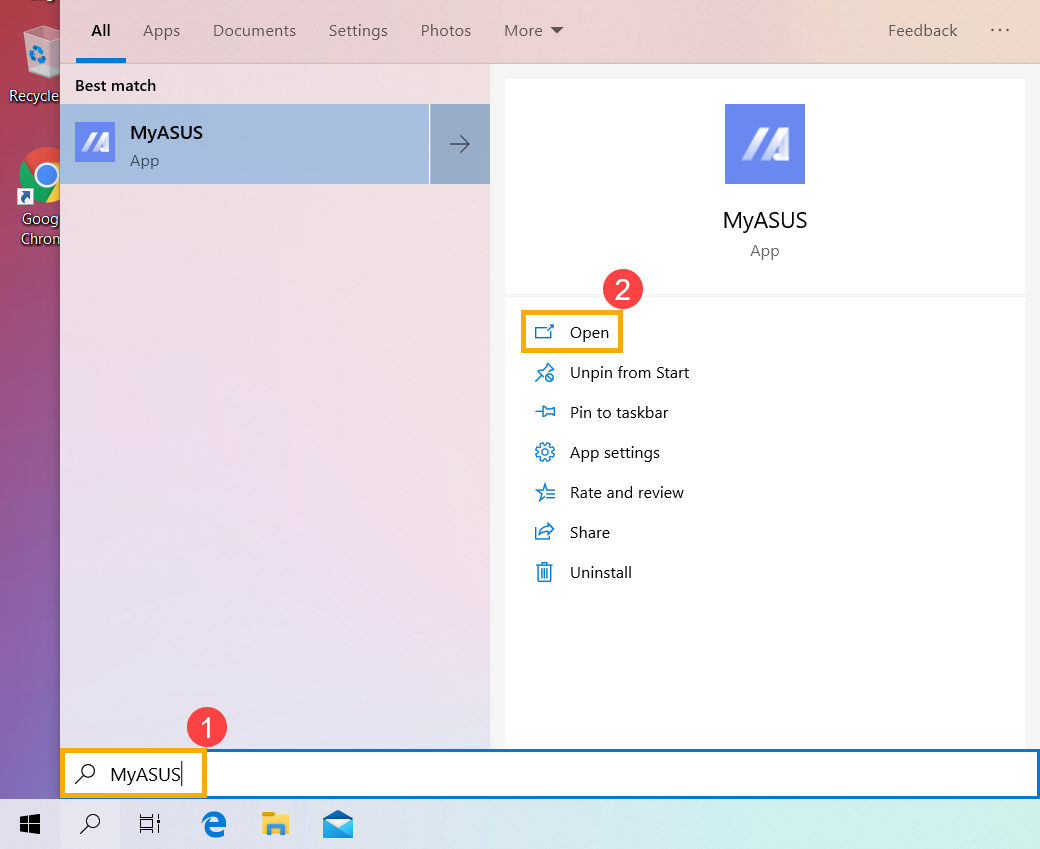
- Укажите в поисковой строке Windows [MyASUS] ①, затем нажмите [Открыть] ②. (Картинка слева относится к операционной системе Windows 11, картинка справа — к Windows 10).
Если результаты поиска ничего не показали, значит утилита не установлена. Пожалуйста, установите утилиту по инструкции.
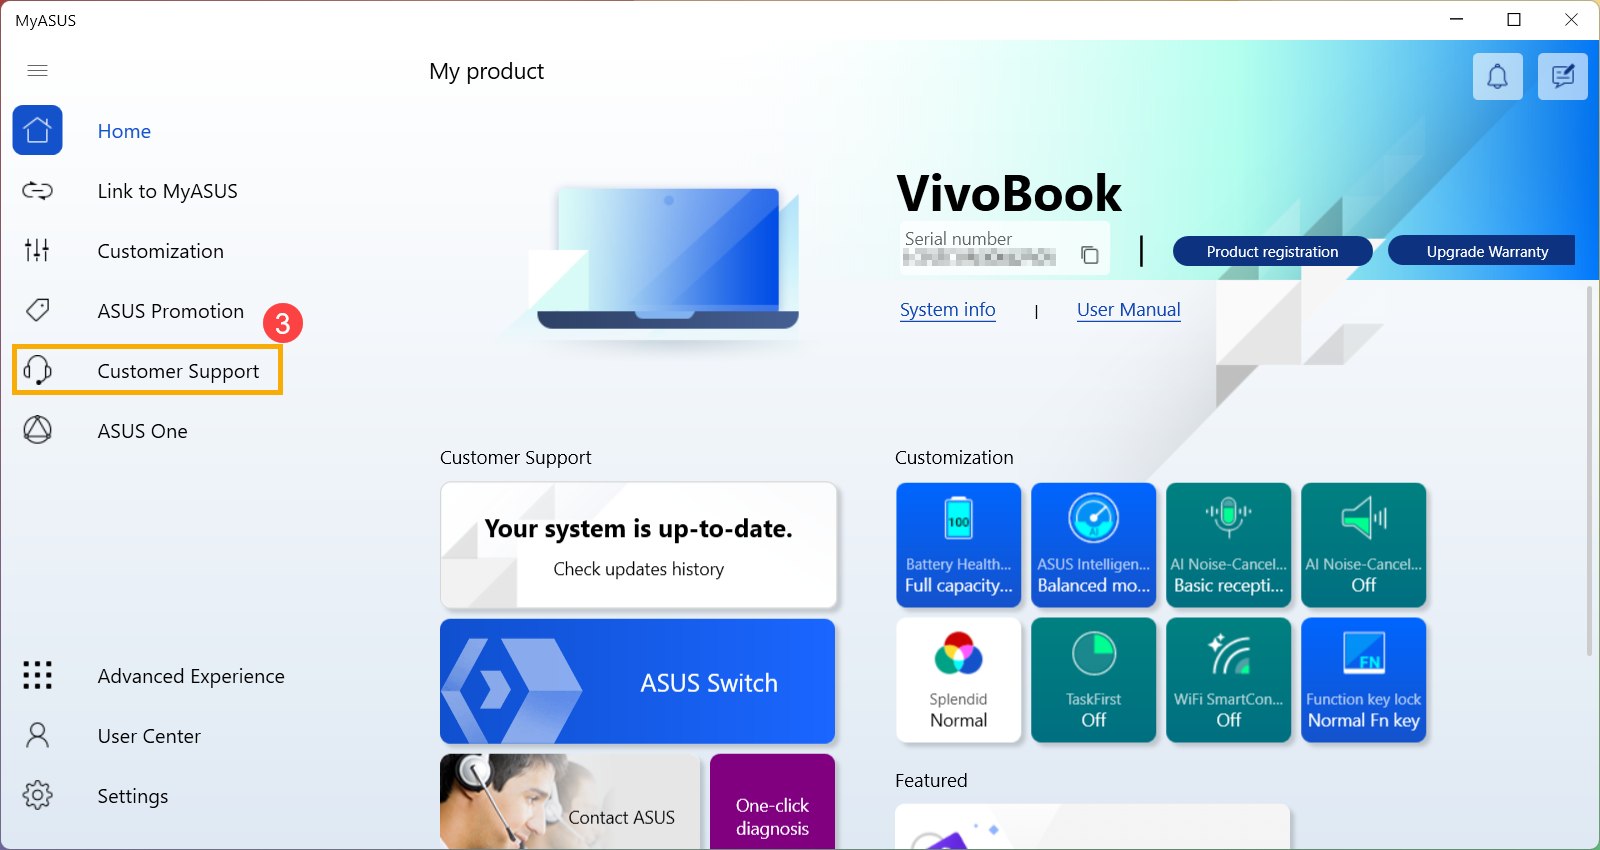
- В MyASUS выберите [Поддержка пользователя] ③.
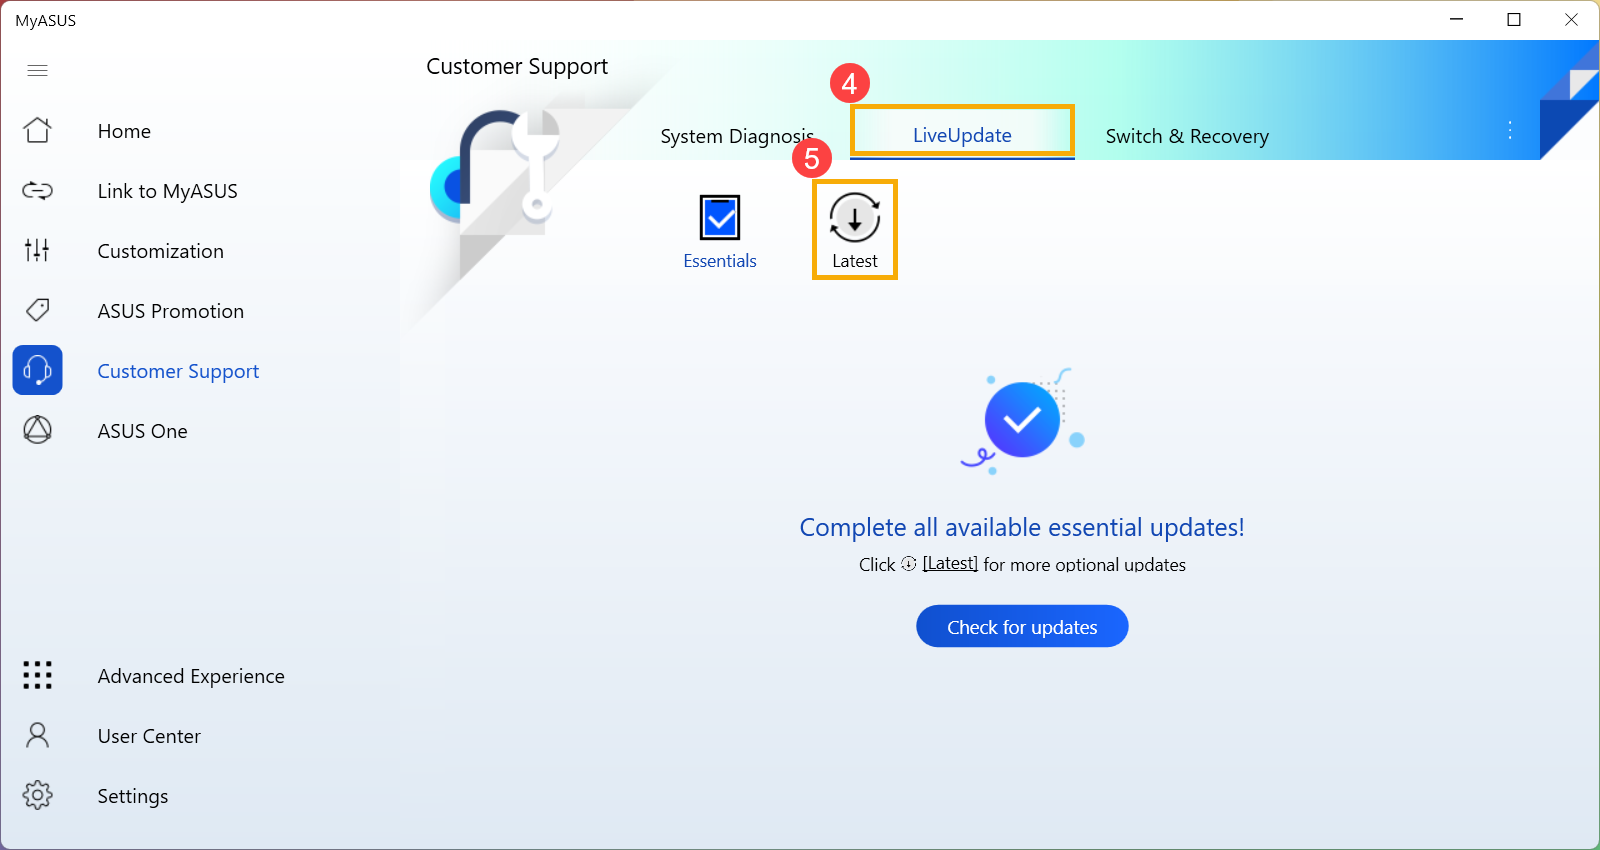
- Выберите [Live Update] ④, а затем [Последние обновления] ⑤, узнать больше можно по ссылке: [MyASUS для Windows] Live Update.
Примечание: если Вы не видите вкладку Live Update в MyASUS это означает, что компьютер не поддерживает эту функцию, перейдите к способу 2. Узнать больше можно по ссылке: Почему я вижу только “Поддержку пользователей” в MyASUS .
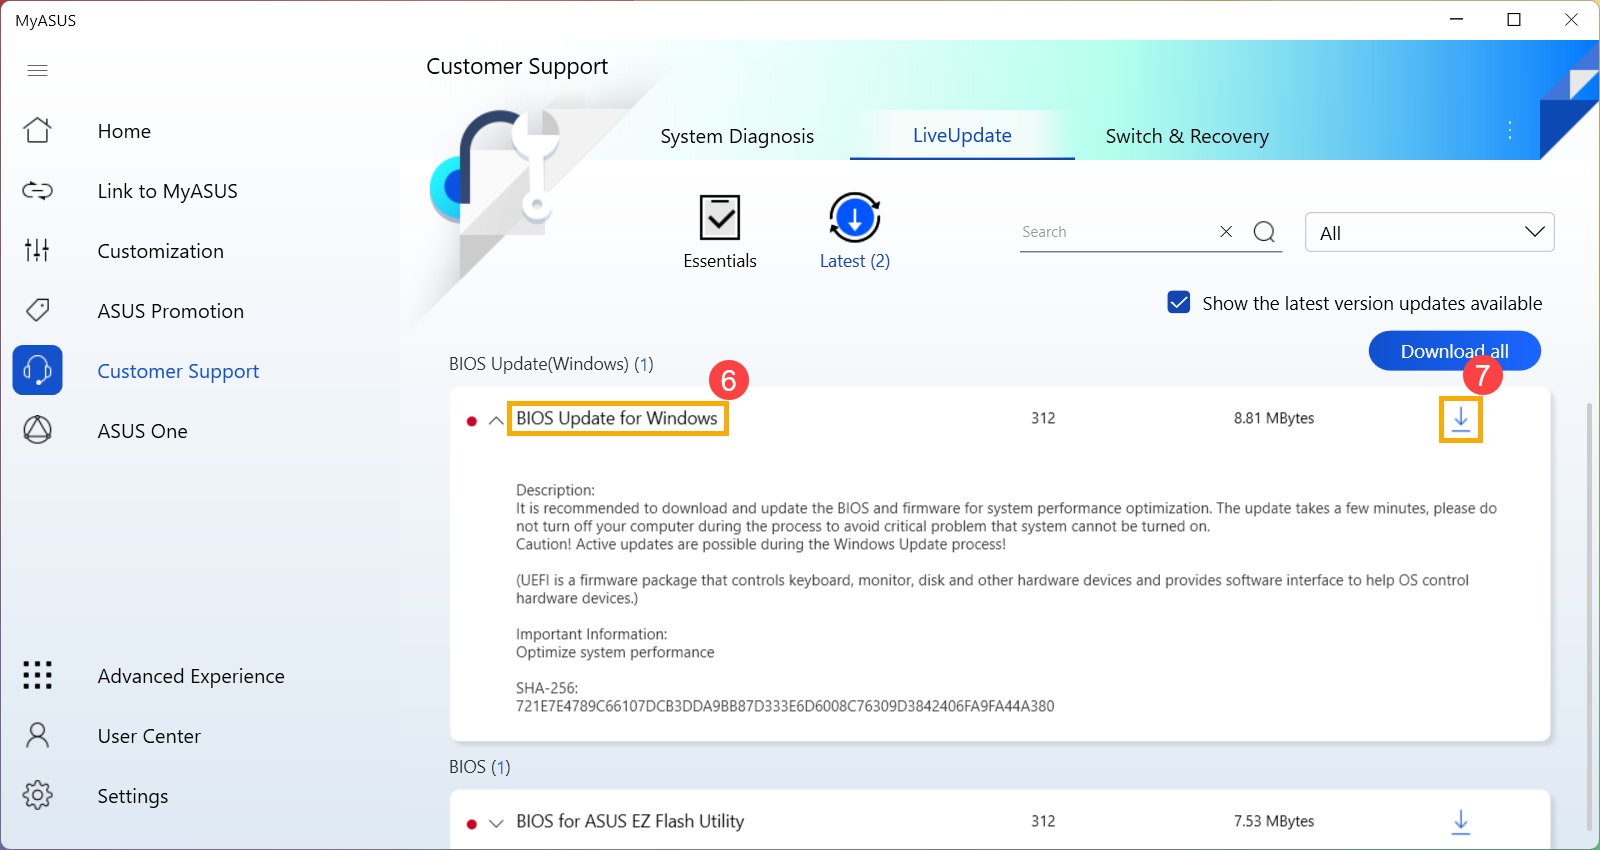
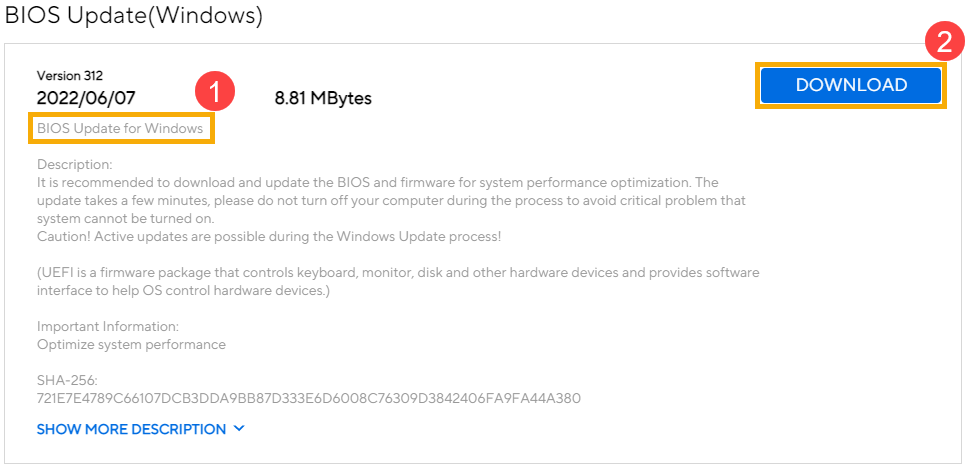
- Найдите [BIOS Update для Windows или BIOS Installer для Windows], который расположен в разделе BIOS Update (Windows) ⑥. Когда найдете файл, нажмите [Скачать] ⑦ затем обратитесь к приложению: Как использовать BIOS Installer для обновления BIOS.
Примечание: Если Вы не нашли «BIOS Update для Windows” или “BIOS Installer для Windows”, т.к. некоторые модели не поддерживают обновление BIOS из среды Windows, пожалуйста, обратитесь к статье Как использовать утилиту EZ Flash для обновления BIOS.
 ]
] 
Назад к содержанию
Способ 2: Скачайте утилиту обновления BIOS с сайта поддержки ASUS
- Перейдите на страницу поддержки ASUS с названием модели Вашего компьютера, здесь Вы можете узнать больше о том, как найти и загрузить BIOS.
Примечание: Чтобы загрузить соответствующий файл BIOS, см. раздел Как правильно определить название модели. - На странице поддержки, пожалуйста, найдите [BIOS Update для Windows или BIOS Installer для Windows], который расположен в разделе BIOS Update(Windows) ①. Если Вы видите там файл, нажмите [Скачать] ②, затем обратитесь к приложению Как использовать BIOS Installer для обновления BIOS.
Примечание: Если Вы не нашли «BIOS Update для Windows” или “BIOS Installer для Windows”, т.к. некоторые модели не поддерживают обновление BIOS из среды Windows, пожалуйста, обратитесь к статье Как использовать утилиту EZ Flash для обновления BIOS.
Назад к содержанию
Приложение:
Как использовать BIOS Update для Windows для обновления BIOS
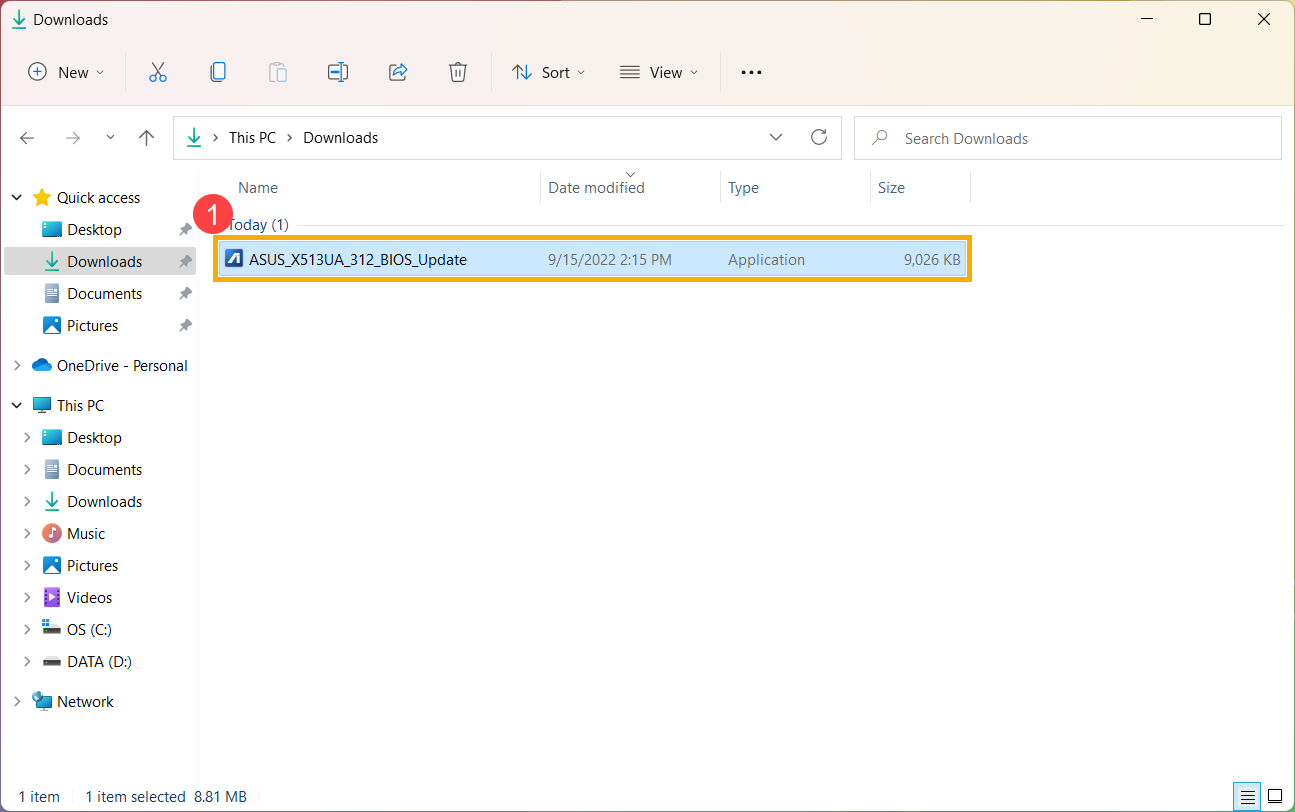
- После загрузки файла обновления BIOS для Windows дважды щелкните приложение обновления BIOS, чтобы начать обновление BIOS ①. (В качестве примера ниже взята модель: X513UA)
Если файл, который Вы скачали, является архивом, нажмите на него правой кнопкой мышки, и выберите «Извлечь все».
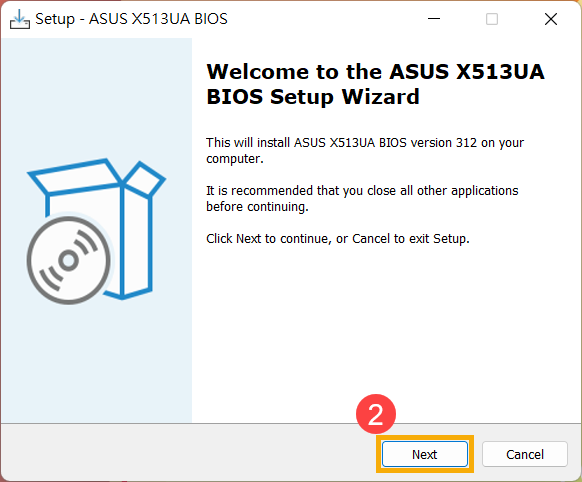
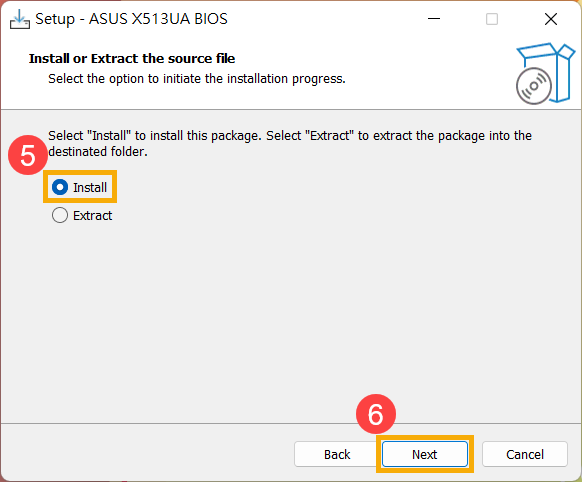
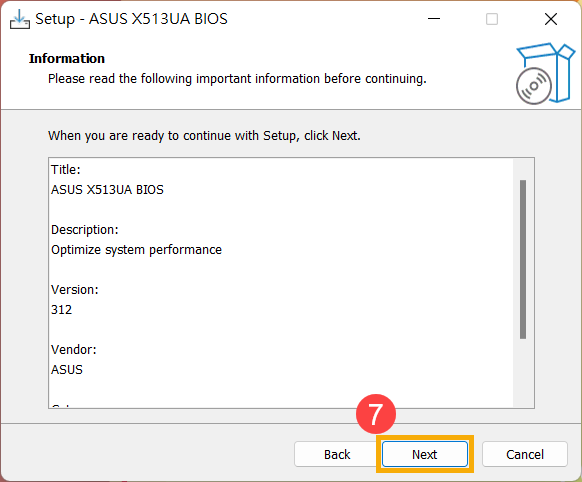
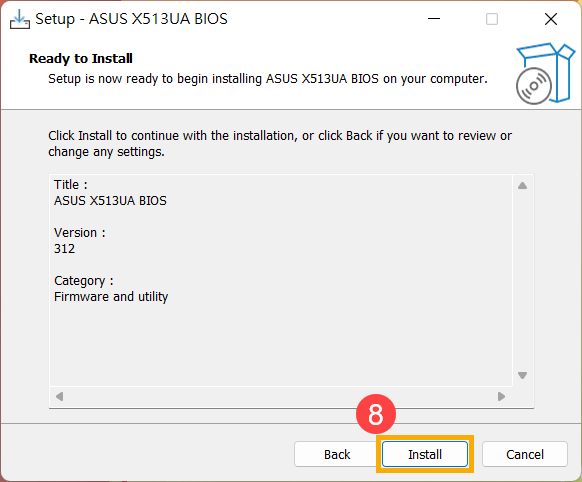
- Мастер установки поможет Вам начать процесс обновления BIOS, нажмите [Далее] ②.
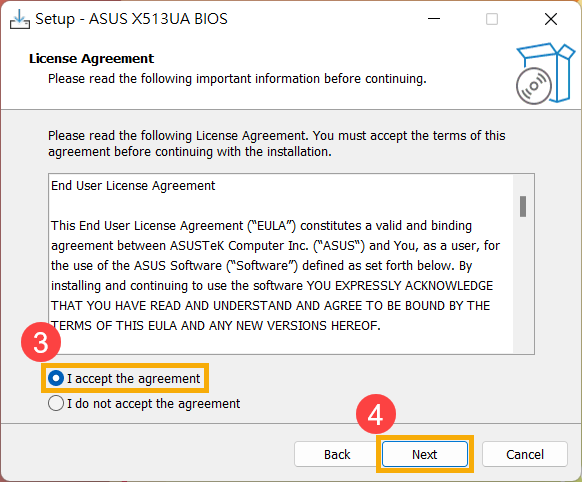
- Ознакомьтесь с Лицензионным соглашением, установите галочку [Я принимаю условия соглашения] ③ и потом нажмите [Далее] ④.
- Следите за индикатором процесса установки обновления BIOS.
- Теперь выберите [Да, перезагрузить компьютер сейчас] ⑨ и нажмите [Готово] ⑩. Ноутбук перезагрузится и начнется процесс обновления BIOS. После завершения обновления операционная система Windows загрузится автоматически.
Примечание: Перед тем как нажать Готово в утилите, сохраните все открытые документы/приложения, чтобы избежать потери данных.
Примечание: Пожалуйста, убедитесь, что адаптер питания подключен к ноутбуку перед выполнением обновления BIOS. Во время выполнения обновления BIOS не выключайте ноутбук, т.к. это может привести к поломке устройства.
Процесс обновления BIOS.
- После того, как компьютер загрузится в Windows, это будет означать, что BIOS был успешно обновлен. Здесь Вы можете узнать больше о том, как проверить версию BIOS, чтобы проверить, успешно ли обновлен BIOS.

Назад к приложению
-
Категория
Настройки Windows/ Система -
Тип
Product Knowledge
Эта информация была полезной?
Yes
No
- Приведенная выше информация может быть частично или полностью процитирована с внешних веб-сайтов или источников. Пожалуйста, обратитесь к информации на основе источника, который мы отметили. Пожалуйста, свяжитесь напрямую или спросите у источников, если есть какие-либо дополнительные вопросы, и обратите внимание, что ASUS не имеет отношения к данному контенту / услуге и не несет ответственности за него.
- Эта информация может не подходить для всех продуктов из той же категории / серии. Некоторые снимки экрана и операции могут отличаться от версий программного обеспечения.
- ASUS предоставляет вышеуказанную информацию только для справки. Если у вас есть какие-либо вопросы о содержании, пожалуйста, свяжитесь напрямую с поставщиком вышеуказанного продукта. Обратите внимание, что ASUS не несет ответственности за контент или услуги, предоставляемые вышеуказанным поставщиком продукта.
BIOS – набор микропрограмм, обеспечивающих взаимодействие аппаратных системных компонентов. Его код записывается на специальную микросхему, расположенную на материнской плате, и может быть заменен на другой – более новый или старый. Желательно всегда держать БИОС в актуальном состоянии, так как это позволяет избежать многих проблем, в частности, несовместимости компонентов. Сегодня мы поговорим о программах, которые помогают обновить код BIOS.
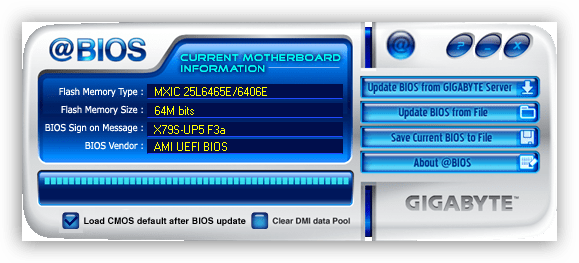
GIGABYTE @BIOS
Как становится понятно из названия, данная программа предназначена для работы с «материнками» от ГигаБайт. Она позволяет обновлять БИОС в двух режимах – ручном, с использованием заранее скачанной прошивки, и автоматическом – с коннектом к официальному серверу компании. Дополнительные функции сохраняют дампы на жесткий диск, сбрасывают настройки на дефолтные и удаляют данные DMI.
Скачать GIGABYTE @BIOS
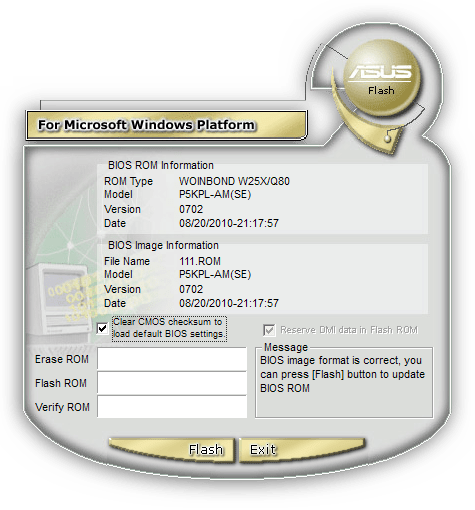
ASUS BIOS Update
Эта программа, входящая в пакет с названием «ASUS Update», похожа по функционалу на предыдущую, но нацелена исключительно на платы Асус. Она также умеет «шить» BIOS двумя способами, делать бэкапы дампов, менять значения параметров на исходные.
Скачать ASUS BIOS Update
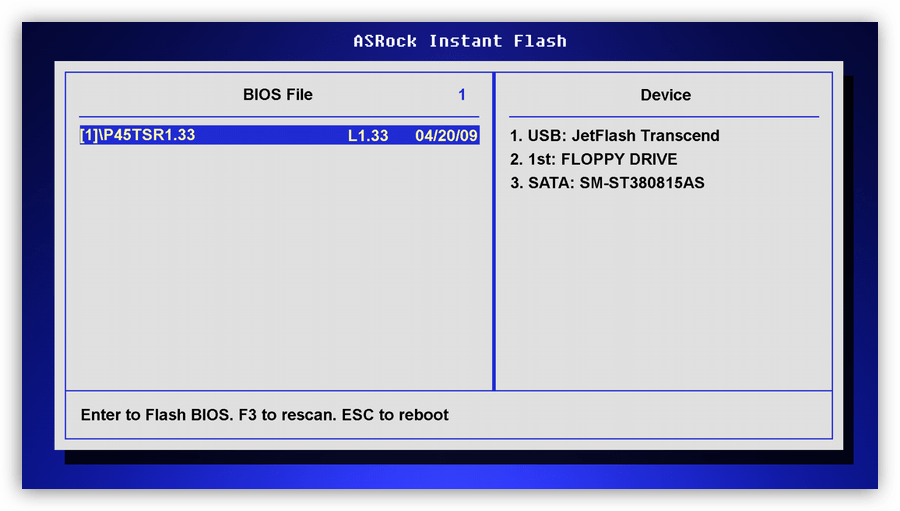
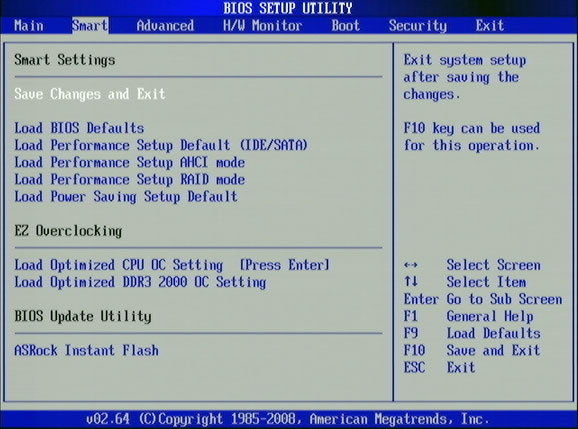
ASRock Instant Flash
Инстант Флеш нельзя в полной мере считать программой, так как она входит в состав БИОС на материнских платах ASRock и представляет собой флеш-утилиту для перезаписи кода микросхемы. Доступ к ней осуществляется из меню установок при загрузке системы.
Скачать ASRock Instant Flash
Все программы из данного списка помогают «прошить» BIOS на «материнках» разных вендоров. Первые две можно запустить непосредственно из Windows. При взаимодействии с ними необходимо помнить, что подобные решения, помогающие облегчить процесс обновления кода, таят в себе некоторые опасности. К примеру, случайный сбой в ОС может привести к неработоспособности оборудования. Именно поэтому такими программами стоит пользоваться с осторожностью. Утилита от ASRock лишена этого недостатка, так как на ее работу влияет минимум внешних факторов.
Еще статьи по данной теме:
Помогла ли Вам статья?
На чтение 8 мин. Просмотров 15.8k. Опубликовано 03.09.2019
BIOS является важным компонентом каждого ПК, который позволяет вам изменять настройки оборудования без запуска Windows. В вашем BIOS доступно много функций, но некоторые продвинутые пользователи, как правило, обновляют свои, чтобы получить доступ к новым функциям.
Обновление BIOS может быть довольно сложной процедурой, поэтому сегодня мы собираемся показать вам, как прошить BIOS в Windows 10.
Содержание
- Нужно ли обновлять BIOS?
- Шаги для прошивки BIOS в Windows 10:
- Решение 1 – Обновление из BIOS
- Решение 2 – Создайте DOS USB-накопитель
- Решение 3 – Используйте программы для Windows
Нужно ли обновлять BIOS?
Перепрограммирование BIOS – это сложная процедура, и если вы ее не выполните должным образом, вы можете нанести серьезный ущерб вашему ПК. В большинстве случаев вам даже не нужно обновлять BIOS, если нет серьезных проблем с вашим оборудованием.
Основная проблема с BIOS заключается в том, что он расположен на микросхеме на материнской плате, и если процесс обновления идет не так, вы вообще не сможете запустить Windows.
Если вы не являетесь опытным пользователем, вам не нужно обновлять BIOS, но если у вас проблема с оборудованием, и единственный способ ее исправить – обновить BIOS, возможно, вам придется обновить его.
Чтобы успешно выполнить обновление BIOS, необходимо убедиться, что процесс обновления не прерывается из-за потери питания или неожиданного выключения. Если это произойдет, процесс обновления BIOS завершится неудачно, и вы, скорее всего, повредите материнскую плату.
Чтобы избежать каких-либо проблем, обязательно подключите ноутбук напрямую к электрической розетке или используйте ИБП для настольного ПК.
Хотя обновление BIOS может быть потенциально опасным, после обновления BIOS есть определенные преимущества. Иногда обновление BIOS обеспечивает поддержку нового оборудования, например, поддержку новых процессоров.
Еще одним преимуществом обновления BIOS является улучшенная стабильность и потенциально новые функции, такие как разгон. Как видите, нет необходимости постоянно обновлять BIOS, особенно потому, что неправильное обновление BIOS может привести к множеству других проблем.
Рекомендуется обновить BIOS, если у вас есть какие-либо проблемы с оборудованием, которые могут быть связаны с вашим BIOS. Существует несколько различных способов обновления BIOS, и сегодня мы собираемся показать вам, как это сделать.
- ЧИТАЙТЕ ТАКЖЕ . Исправлено: повреждение BIOS в Windows 10 .
Как обновить BIOS в Windows 10? Самый простой способ обновить BIOS – прямо из его настроек. Прежде чем начать процесс, проверьте версию BIOS и модель вашей материнской платы. Еще один способ обновить его – создать USB-диск для DOS или использовать программу для Windows.
Если вы хотите знать, как это сделать, проверьте шаги ниже.
Шаги для прошивки BIOS в Windows 10:
- Обновление из BIOS
- Создайте DOS USB-накопитель
- Используйте программы для Windows
Прежде чем обновить BIOS, вам необходимо выяснить, какую версию вы используете в данный момент. Самый простой способ сделать это – использовать командную строку или системную информацию.
Мы уже писали о нескольких различных методах, которые можно использовать для проверки версии BIOS в Windows 10, поэтому обязательно ознакомьтесь с этой статьей.
Помимо версии BIOS, вам также необходимо знать модель вашей материнской платы. Вы можете увидеть модель вашей материнской платы с помощью любого аппаратного информационного инструмента, такого как Speccy или CPU-Z.
После нахождения версии BIOS, которую вы используете, вам необходимо загрузить новую версию с веб-сайта производителя вашей материнской платы. Перейдите в раздел поддержки или загрузки и выберите модель своей материнской платы.
Обязательно загрузите обновление BIOS для точной модели материнской платы, которую вы используете. Установка неправильной версии BIOS на материнскую плату может привести к ее повреждению, поэтому будьте особенно осторожны при загрузке новой версии BIOS.
Практически во всех версиях BIOS имеются заметки об обновлениях, доступные на странице загрузки, чтобы вы могли легко увидеть, какие проблемы устраняет обновление.
Когда вы загрузите новую версию BIOS, она будет сохранена в архиве, поэтому вам нужно будет сначала извлечь ее. После этого проверьте доступный файл readme для инструкций и любой дополнительной информации.
Есть несколько способов обновить BIOS, и мы кратко рассмотрим их.
Решение 1 – Обновление из BIOS
Некоторые производители материнских плат позволяют вам перепрограммировать BIOS, просто открыв его и выбрав вариант обновления. Это относительно просто, и для этого вам нужно перенести загруженное обновление BIOS на USB-накопитель.
Перед перемещением обновления на USB-накопитель убедитесь, что на диске нет других доступных файлов. Теперь вам нужно подключить USB-накопитель к вашему ПК и получить доступ к BIOS.
Вы можете получить доступ к BIOS во время загрузки, нажав соответствующую клавишу. В большинстве случаев это Del или какая-либо другая клавиша F, поэтому следите за сообщением, в котором вам нужно нажать определенную клавишу для входа в SETUP.
Кроме того, вы всегда можете проверить руководство своей материнской платы, чтобы увидеть, какую клавишу нужно нажать, чтобы получить доступ к BIOS.
Если это не работает, вы можете получить доступ к BIOS, выполнив следующие действия:
- Когда Windows 10 запустится, откройте меню «Пуск» и нажмите кнопку Питание .
- Удерживая клавишу Shift , выберите вариант Перезагрузить .
-
Вы должны увидеть несколько доступных вариантов. Выберите Устранение неполадок .
-
Теперь выберите Дополнительные параметры> Настройки прошивки UEFI .
- Нажмите кнопку Перезагрузить , и ваш компьютер должен загрузиться в BIOS.


После входа в BIOS найдите параметр обновления BIOS и выберите его. Теперь вам нужно выбрать файл обновления BIOS с USB-накопителя и дождаться обновления BIOS.
Некоторые производители предлагают инструменты для создания флэш-накопителя USB со всеми необходимыми файлами, поэтому вам не придется переносить их вручную.
Имейте в виду, что процесс обновления немного отличается для каждой модели материнской платы, поэтому обязательно ознакомьтесь с инструкцией по эксплуатации, чтобы узнать, как обновить BIOS.
- Читайте также: EVGA выпускает обновления BIOS для устранения проблем с перегревом на многих картах GeForce GTX
Решение 2 – Создайте DOS USB-накопитель
Это более старый метод перепрошивки BIOS и, вероятно, самый сложный. Этот процесс требует, чтобы вы создали загрузочную флешку и скопировали на нее новую версию BIOS.
Кроме того, вам понадобится скрипт, который будет прошивать BIOS. Этот файл обычно будет доступен в архиве с вашим обновлением BIOS и будет иметь расширение .exe или .bat. В некоторых случаях этот скрипт должен быть загружен отдельно.
Чтобы создать загрузочный USB-накопитель с системой DOS, вам нужно использовать сторонние инструменты, такие как Rufus. Просто отформатируйте диск с помощью этого инструмента и обязательно установите флажок Создать загрузочный диск с помощью FreeDOS .
После этого перенесите файл обновления BIOS и сценарий установки на USB-накопитель и перезагрузите компьютер. Загрузите компьютер с USB-накопителя и запустите сценарий установки с помощью DOS.
Это сложная процедура, поэтому мы настоятельно рекомендуем вам ознакомиться с руководством по материнской плате для получения подробных инструкций о том, как это сделать.
- ЧИТАЙТЕ ТАКЖЕ. Как исправить: «Не удается обновить систему до Windows 10 из-за BIOS»
Решение 3 – Используйте программы для Windows
Если использование DOS кажется вам слишком сложным, вы можете рассмотреть возможность использования приложения для Windows.
Многие производители материнских плат имеют в своем распоряжении приложения для обновления BIOS, которые позволяют обновлять BIOS с помощью простого графического интерфейса.
Хотя это самый простой способ сделать это, есть определенные проблемы с ним. Установленное программное обеспечение может иногда мешать этому процессу и приводить к сбою обновления BIOS.
Программы безопасности часто могут мешать процессу обновления BIOS и приводить к появлению всевозможных проблем, поэтому лучше всего полностью отключить их во время обновления BIOS.
Любой сбой или зависание системы также может повлиять на процесс обновления, поэтому может быть лучше использовать другой метод для обновления BIOS.
Производители материнских плат часто рекомендуют лучший способ обновления BIOS, поэтому обязательно используйте этот метод.
Обновление BIOS не является сложным процессом, но может быть потенциально опасным, поэтому будьте осторожны, если решите обновить BIOS.
Кроме того, обязательно проверьте все перед запуском. Многие инструменты обновления BIOS дают вам возможность сохранить или сохранить резервную копию вашего текущего BIOS, поэтому обязательно используйте эту функцию.
Необязательно обновлять BIOS, тем более что вы можете нанести непоправимый ущерб вашей материнской плате, если вы не сделаете это должным образом.
Однако, если у вас возникла аппаратная проблема, и единственным решением является обновление BIOS, обязательно внимательно прочитайте инструкцию по эксплуатации материнской платы, чтобы узнать, как правильно обновить BIOS.
Некоторые производители компьютеров, такие как Asus, Lenovo или Dell, предлагают встроенный инструмент для обновления BIOS. Вы всегда можете проверить руководство вашего ПК, чтобы увидеть, предлагает ли он такой инструмент, чтобы сделать вещи немного проще.
- ЧИТАЙТЕ ТАКЖЕ: ПК не загружается после обновления BIOS? Вот как это исправить
Если у вас есть какие-либо вопросы или проблемы с процессом обновления BIOS, не стесняйтесь оставлять их в разделе комментариев ниже.
BIOS is a term we have heard from quite sometimes, in fact, it’s possible that for most of your hardware issues the IT guy may have suggested a BIOS upgrade before troubleshooting the hardware. What is BIOS? BIOS is an acronym for (Basic Input Output System) and is a piece of software that goes along with the PC’s motherboard.
In a nutshell, it forms a layer of communication between the hardware and the operating system. Thus needless to say the BIOS is very crucial when it comes to the functionality of your Windows 10/8/7 computer.
Why update the System BIOS
BIOS is, after all, a piece of software that needs to be regularly updated, just to the operating system or the apps in general. The updates usually bake in enhancements and fixes, which will eventually help the software maintain its compatibility with the hardware and the software. That being said, unlike most other apps, the BIOS needs to be updated manually, which is precisely the very thing that we will be explaining in this segment.
Most do not need to or have to update the BIOS. If your computer is working properly, you do not need to update or flash your BIOS. In any case, should you wish to, we recommend that you do not try to update your BIOS yourself but instead take it to a computer technician who may be better equipped to do it. One needs to consider updating the BIOS only if you are facing some performance issues or other problems that necessitate you to update the BIOS. One needs to be careful and know how to update the BIOS; else, it could brick your entire system.
How to check your BIOS version
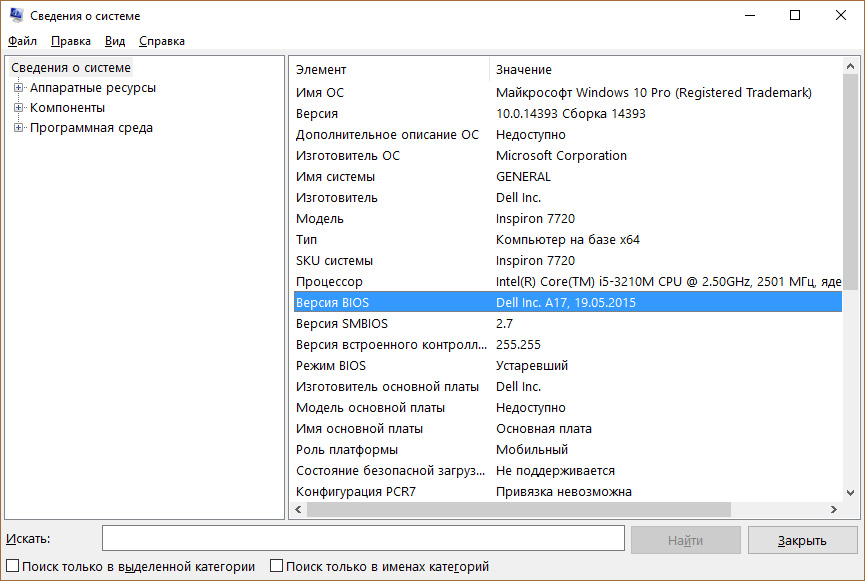
Before updating the BIOS, you need to check the version of BIOS from the System Information. We have already seen how to check the BIOS version. You have to type msinfo32 into the search and press Enter. Once the System Information Tool opens, you can check the BIOS version.
One can also run a command in CMD to check the BIOS version. Click on “Start Button” and press Run; once the Run box appears, type system info and then press OK. You can jot down the BIOS number and match it against the latest version from the manufacturer’s website; if needed, update it.
BIOS helps maintain the stability of your system and increases security, and tries to protect the system from any vulnerability.
Before you begin, make sure that you have power backup while upgrading the BIOS. Because if the computer turns off during the process, the BIOS may be corrupted, and you will need a technician to fix it. Your boot CD/DVD may or may not help to depend upon how the BIOS stands after a power cut or a sudden system turn off while rewriting the BIOS.
Generally speaking, to update the BIOS, visit the manufacturer’s site to download the BIOS update. Identify your product by entering the Service Tag or serial number.
- If the system shown is the wrong one, click on “View a different product” and try Browsing for a product manually. Once the correct product is chosen, go to the BIOS from the pull-down category.
- If there are multiple files listed, select the latest one by checking out the update number by clicking on “View Details.”
- Download and save the file to your desktop
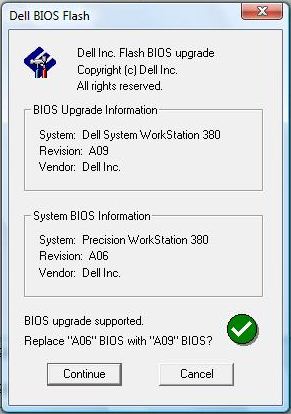
- Double click on the icon, and this will reboot your system and open up a BIOS update page.
That being said, the update procedure might vary slightly from product to product. It is also worth mentioning that the OEM’s stop updating the BIOS for some of the machines after a certain period.
Read: How to reset BIOS settings to default.
Update BIOS by creating a Bootable USB
One can also download the BIOS update.EXE file to a bootable Flash drive and update the same. To do this, first, you need to head over to the official company website and download the BIOS file.
In order to create a Bootable USB Flash Drive use, Dell Diagnostic Deployment Package and the corresponding instructions are given here.
- Download the BIOS update file, which is usually .exe
- Copy the file to the bootable USB flash drive.
- Now insert the USB stick into the system on which you need to update the BIOS.
- After the reboot, press F12, ensure that the USB with BIOS is plugged in.
- Select USB Storage device from the menu and press Return
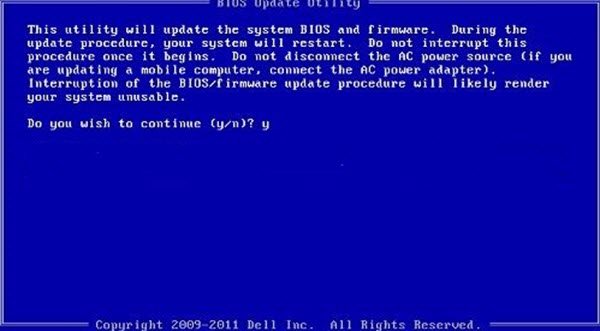
- The system will open up a command prompt
- Follow the onscreen instructions and complete the update process.
Read: How to use BIOS settings on Windows computers.
Using BIOS Update applications
This is the easiest part, and I have been using this method to update the BIOS on my HP Laptop for quite some time. The motherboard manufacturers have their own BIOS update applications, and all you need to do is press a button, and voila! The software will take care of the rest. It’s always advisable to turn off firewalls and other security software since they could meddle with the process.
All OEM manufacturers have utilities that help you easily update BIOS, firmware, and drivers. Search for yours and download it from the official site only. This is the safest way to update the BIOS.
- If you own a Dell laptop, you can head over to Dell.com or use Dell Update Utility.
- ASUS users can download the MyASUS BIOS update utility from the ASUS support site.
- ACER users can go here. Enter your Serial Number/SNID or search for your product by Model, select BIOS/Firmware, and click the Download link for the file you want to download.
- Lenovo users can use the Lenovo System Update Tool.
- HP users can use the bundled HP Support Assistant.
Updating the BIOS on HP computers
As we explained earlier, the BIOS update process is slightly different for different brands, and in order to leave no stones unturned, we will also be taking you through steps to update the BIOS for HP systems.
- Go to the HP Software & Driver Downloads web page and choose the correct Model.
- Select the operating system
- The web page will display a list of updates for your computer, and you need to check for the BIOS section. If the BIOS option is not available, it means that you are already running the latest BIOS.
- Ensure that the BIOS update is meant for your computer model. If there is some confusion, check your system information. Wrong BIOS can cause severe damage to the motherboard.
- Download the BIOS file and save it
- Disable the anti-virus and other security programs temporarily
- Double click on the BIOS file and follow the onscreen instruction
- After the installation is complete, restart the PC as prompted by the installer.
Read: How to downgrade BIOS on Windows computer.
Use Lenovo System Update to update BIOS on Lenovo laptops
If you own a Lenovo laptop, the best way to update the BIOS would be to use the Lenovo System Update supported on ThinkPad, ThinkCentre, ThinkStation, Lenovo V, B K, and E-Series. Alternatively, you can directly download the BIOS from the Lenovo support site and install the same manually.
- Find the latest version of the BIOS for your machine from the support site.
- Go to the product > Click on Drivers and Software>Select BIOS>Choose your operating system on the support page.
- Lenovo advises users to switch off the anti-virus or any firewall before starting the BIOS update.
- Once the file is downloaded from the support site, extract it and run the same if needed. Follow the onscreen instructions.
- Restart the computer when prompted to, and voila! Your BIOS is updated.
Update BIOS on ASUS using WinFLASH
To update the BIOS on ASUS systems, you will have to use WinFLASH Utility. Detailed instructions can be found on asus.com.
In a nutshell, updating the BIOS is a pretty straightforward process considering that you get the model number right. Most of the recent Windows versions like Windows 10 handle the update process much more elegantly than, let’s say, Windows XP systems.
How to check BIOS version Windows 11/10?
You can check the BIOS version using the Command Prompt in Windows. In the Command Prompt window, type wmic bios, get smbiosbiosversion, and then press Enter. The string of letters and numbers following SMBBIOSBIOSVersion is the BIOS version. Make sure to check the motherboard model to find the latest version of BIOS available on the manufacturer’s website.
How to change Boot Device in BIOS or UEFI?
BIOS or UEFI offers a dedicated section where the boot order of the connected devices or type can be changed. If you need to boot from a USB driver of an external hard drive, you can change the order here and save the settings. Next time the PC reboots, it will look for the connected devices first and reboot if it finds the boot record; else, it will fall back to the last option.
How to lock BIOS with a Password?
If you do not want anyone else to change the settings, putting a password lock in the BIOS is good. Every BIOS or UEFI has a security section where the BIOS password will be available. That said, if you ever forget the password, you will need to reset it. If it’s a laptop, check with manual, but a dedicated Clear CMOS button on the rear of the cabinet is available for motherboards. Resetting the BIOS doesn’t create any motherboard issue but clears anything change in the settings made.
-
Проверка версии прошивки
-
Где скачать?
-
Инструкция по обновлению
-
В Windows
-
В BIOS
-
В DOS
Прошивка BIOS это не трудоемкий процесс и займет немного времени. Рекомендуется устанавливать новую версию и только от производителя, если в предыдущей наблюдалась некорректная работа. Рассмотрим в статье вопрос: как обновить BIOS на компьютере Windows 10.
Проверка версии прошивки
Проверить текущую версию прошивки можно несколькими способами:
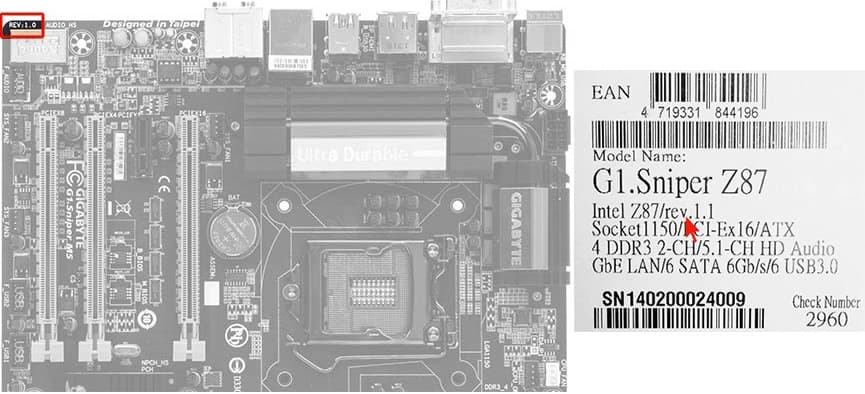
- Просмотрев информацию на самой материнской плате или на оставшейся упаковке. Ищите похожую надпись rev 1.0, rev 1.1, rev 1.3.

- В операционной системе Windows. Откройте команду “Выполнить” (Win+R) и пропишите команду
msinfo32
В открывшемся окне “Сведения о системе” смотрите элемент “Версия BIOS”.

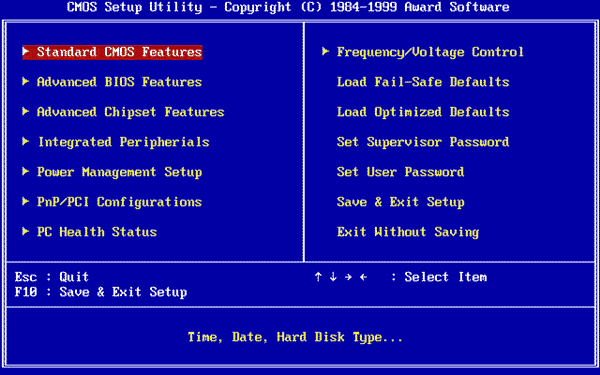
- В самом меню BIOS (ознакомьтесь со статьей: как запустить BIOS) в Main или внизу экрана.

Где скачать?
Установочные файлы BIOS можно скачать на официальных сайтах разработчиков материнских плат или на сайтах производителей ноутбуков (например Dell, Lenovo, HP, Acer) в разделе “Загрузки” (Download).
Инструкция по обновлению
Существует несколько способов прошить BIOS.
В Windows
Чтобы выполнить обновление, скачайте нужную прошивку на компьютер. Затем воспользуйтесь фирменной утилитой от производителя системной платы:
- программа Winflash от ASUS.
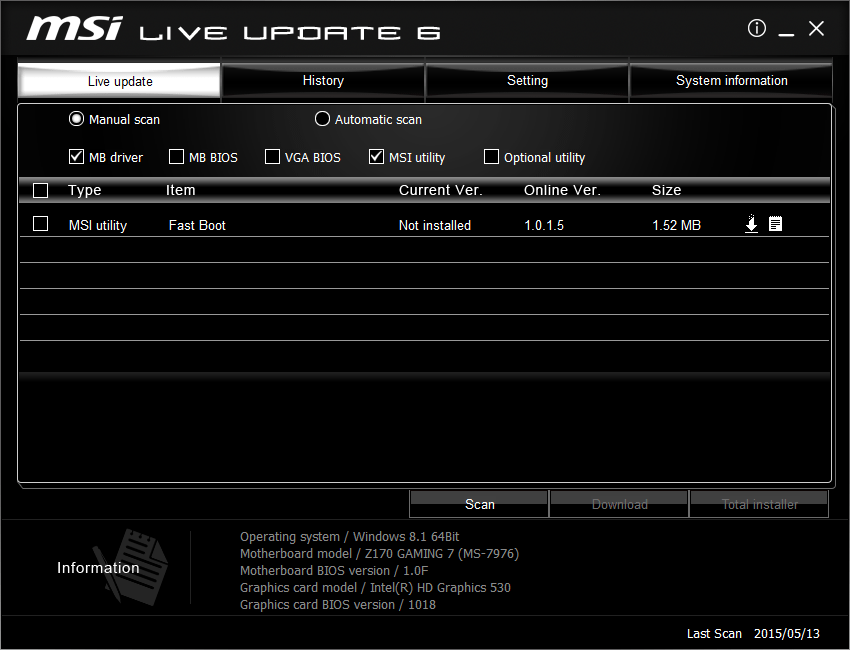
- программа Live Update 6 от MSI.

Если скачанный файл является исполняемым (расширение .exe) запустите его и ожидайте окончания установки (об этом пишет производитель в инструкции по прошивке, например Dell).
Совет! Обновление выполняется на всех версиях Windows 10, 8, 7, XP.
В BIOS
Большинство современных плат поддерживают способ апгрейда версии в среде BIOS. Для прошивки загрузите установочный файл на флешку и подключитесь к ПК. Используйте утилиту в материнских платах для установки BIOS:
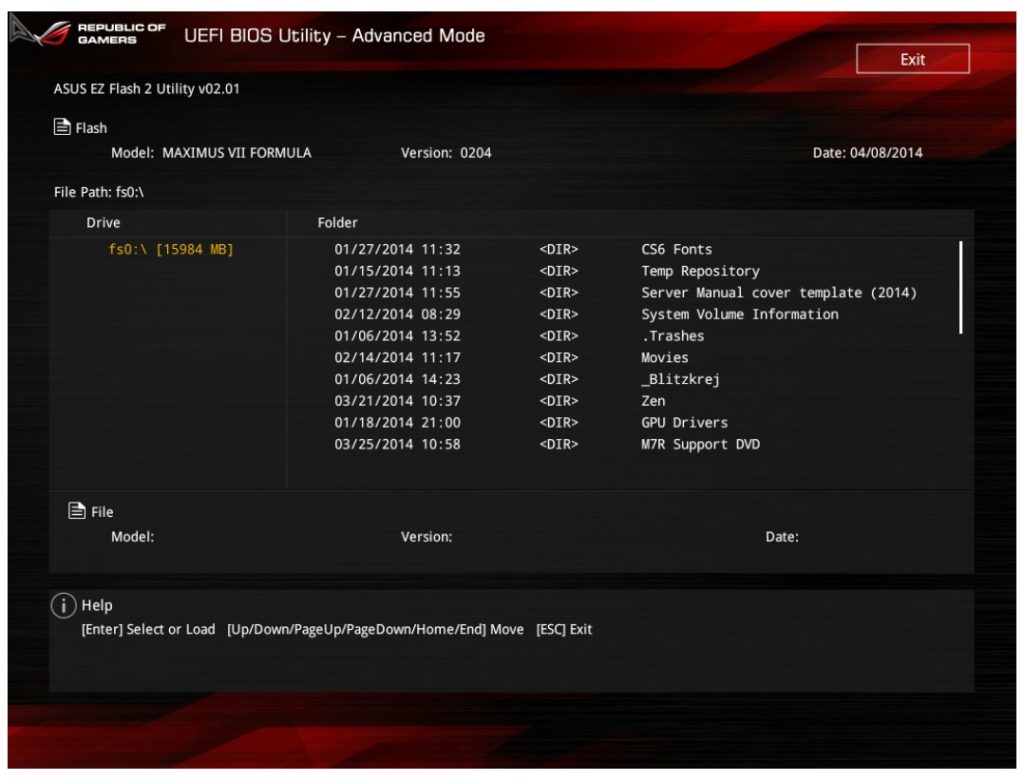
- для ASUS это EZ Flash 2.

- для Gigabite это Q-Flash.
В DOS
Чтобы обновить BIOS используя среду DOS, нужно создать загрузочную флешку с DOS и самим BIOS. К тому же, может понадобится утилита для процесса обновления (Gigabite используют DOS Flash utility). Обновление должно содержать файл с расширением .bat (Update.bat или Autoexec.bat) для запуска прошивки в DOS. Этот способ отживает свое и применяется к старым моделям материнских плат.
Возникли вопросы, касательно прошивки вашего компьютера? Спрашивайте об этом в комментариях или используйте специальную форму.