Blackmagic Disk Speed Test для ПК: Как скачать и установить на ПК Windows

Чтобы получить Blackmagic Disk Speed Test работать на вашем компьютере легко. Вам обязательно нужно обратить внимание на шаги, перечисленные ниже. Мы поможем вам скачать и установить Blackmagic Disk Speed Test на вашем компьютере в 4 простых шага ниже:
1: Загрузить эмулятор приложения Andriod
Эмулятор имитирует / эмулирует устройство Android на вашем компьютере, облегчая установку и запуск приложений Android, не выходя из вашего ПК. Для начала вы можете выбрать одно из следующих приложений:
i. Nox App .
ii. Bluestacks .
Я рекомендую Bluestacks, так как он очень популярен во многих онлайн-уроках
2: Теперь установите программный эмулятор на ПК с Windows
Если вы успешно загрузили Bluestacks.exe или Nox.exe, перейдите в папку «Загрузки» на вашем компьютере или в любое место, где вы обычно храните загруженные файлы.
- Найдя его, нажмите его. Начнется процесс установки.
- Примите лицензионное соглашение EULA и следуйте инструкциям на экране.
Если вы сделаете все правильно, Программное обеспечение будет успешно установлено.
3: С помощью Blackmagic Disk Speed Test на компьютере
После установки откройте приложение эмулятора и введите Blackmagic Disk Speed Test в строке поиска. Теперь нажмите Поиск. Вы легко увидите желаемое приложение. Нажмите здесь. Это будет отображаться Blackmagic Disk Speed Test в вашем программном обеспечении эмулятора. Нажмите кнопку Установить, и ваше приложение начнет установку. Чтобы использовать приложение, сделайте это:
Вы увидите значок «Все приложения».
Нажмите, чтобы перейти на страницу, содержащую все ваши установленные приложения.
Вы увидите app icon. Нажмите, чтобы начать использовать ваше приложение. Вы можете начать использовать Blackmagic Disk Speed Test для ПК!
Другие источники загрузки
Скачать для Android — Ссылка 1 ↲
Бесплатно В iTunes ↲
отказ
Blackmagic Disk Speed Test разработан Blackmagic Design Inc. Этот сайт не имеет прямого отношения к разработчикам. Все товарные знаки, зарегистрированные товарные знаки, названия продуктов и названия компаний или логотипы, упомянутые здесь, являются собственностью их соответствующих владельцев.
Если вы считаете, что это приложение / игра нарушает ваши авторские права, пожалуйста, Свяжитесь с нами здесь. Мы DMCA-совместимы и рады работать с вами. Пожалуйста, найдите DMCA страница здесь.
This post tells you some information about Blackmagic Disk Speed Test, including its overview, download, install, use, uninstall, and alternatives. To get more details about Blackmagic Disk Speed Test for Windows, read this post of MiniTool now.
You have two methods to know the performance of a hard drive. One method is to check the read & write speed from its website, while the other is to perform a hard drive test with a piece of disk benchmark software. There are various hard drive benchmark tools on the market. Blackmagic Disk Speed Test is one of them. To get more details about it, pay attention to the section below.
An Overview of Blackmagic Disk Speed Test
Being a part of Blackmagic Design, Blackmagic Disk Speed Test is used to measure and certify the performance of your disk with a standard method. It only fills in the free space on the disk with a sample of data and then assesses the read and write speed of the disk.
Blackmagic Disk Speed Test is especially useful for benchmarking the performance of the hard disk used for high-quality video. Well, you will have a further understanding of this disk benchmark tool by reading the content below.
Supported Platforms
Blackmagic Disk Speed Test supports both Windows and Mac devices.
Compatible Windows Operating Systems
- Windows 11
- Windows 10
- Windows 8.1
- Windows 7
- Windows Vista
Compatible Mac Operating Systems
Generally speaking, Blackmagic Disk Speed Test requires an Intel 64-bit processor and is compatible with OS X 10.7 or later. The specific compatible Mac systems are listed as follows.
- OS X 10.10: Yosemite
- OS X 10.11: El Capitan
- macOS 10.12: Sierra
- macOS 10.13: High Sierra
- macOS 10.14: Mojave8
- macOS 10.15: Catalina
- macOS Big Sur (macOS 11)
Pros and Cons
Pros
- Perform a quick scan
- Work for anyone (cater to video professionals)
- Free of charge
- One of the simplest disk performance test tools
Cons
- With limited configuration options
- Without data logging for comparing multiple speed tests
- Doesn’t offer extensive performance information
- The test operation repeats over and over again
Download and Use Blackmagic Disk Speed Test on Windows PC
As mentioned earlier, Blackmagic Disk Speed Test supports Windows and macOS. The tutorial below only shows you how to download, install, use, and uninstall it on Windows PCs.
If you want to download Blackmagic Disk Speed Test for Mac, navigate to the Mac App Store and then find and download it.
Step 1: Download Blackmagic Disk Speed Test for Windows PC by clicking here.
Step 2: You will see that the Capture and Playback option is highlighted by default under the Select a Product Family section. Scroll down the content under the Latest Downloads part to find the latest Desktop Video release with the support of Windows, and then download it by clicking on the button with the “Windows” word.

Step 3: In the pop-up window, choose a download option. You can either click on the Download Only button or the Register & Download button. To save time, it is recommended to choose the first option.

Step 4: After that, the Desktop Video package will automatically download. If it fails to download, use the link shown on the screen.

Step 5: Open the downloaded package and run the installer. In the setup window, click Next.
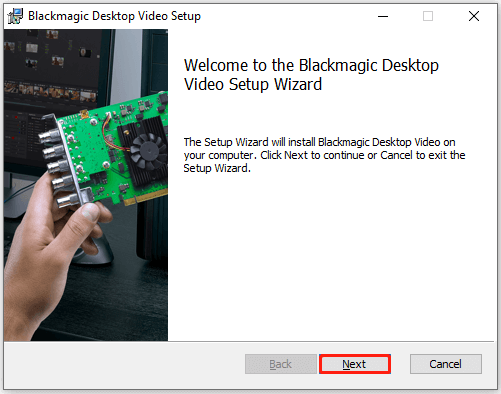
Step 6: Follow the on-screen instructions to move on. When you are required to restart the PC, click Yes to confirm the operation.
Step 7: After your PC boots up, open the Start menu > find and expand Blackmagic Design > click Blackmagic Disk Speed Test.

Step 8: After you click on the Start button, Blackmagic Disk Speed Test uses large blocks of data to write test disks and then displays the result. The program will keep testing the write and read speed of your disk, so you can evaluate its performance and readability.
Step 9: Once the test ends, it will show you the result.

Roblox FPS Unlocker: Overview, Download, and Usage
Further reading:
If you don’t want to use Blackmagic Disk Speed Test Windows, remove it from your PC either via Control Panel or Windows Settings.
Steps on Control Panel
- Open the Run window by pressing Windows and R keys
- Type control in the window and hit OK or press the Enter key on the keyboard.
- Click Programs and Features.
- Find and right-click on Blackmagic Disk Speed Test, and then click Uninstall.
- Click Uninstall or Yes in the prompted window to confirm the operation.
Steps on Settings
- Open the Start menu and click Apps and Features.
- Find and click Blackmagic Disk Speed Test from the list of installed apps, and then click Uninstall.
- Click Uninstall to confirm the operation.
Top 5 Alternatives to Blackmagic Disk Speed Test
If you are looking for an alternative to Blackmagic Disk Speed Test for Windows, you should pay attention to this part. Here, some Blackmagic Disk Speed Test alternatives will be introduced to you.
#1. MiniTool Partition Wizard
As a comprehensive partition manager, MiniTool Partition Wizard also allows you to benchmark partitions/disks. It can be used to test various connected storage devices on the Windows PC. To be specific, it enables you to perform a hard drive/SSD speed test, USB speed test, SD card speed test, U disk speed test, etc.
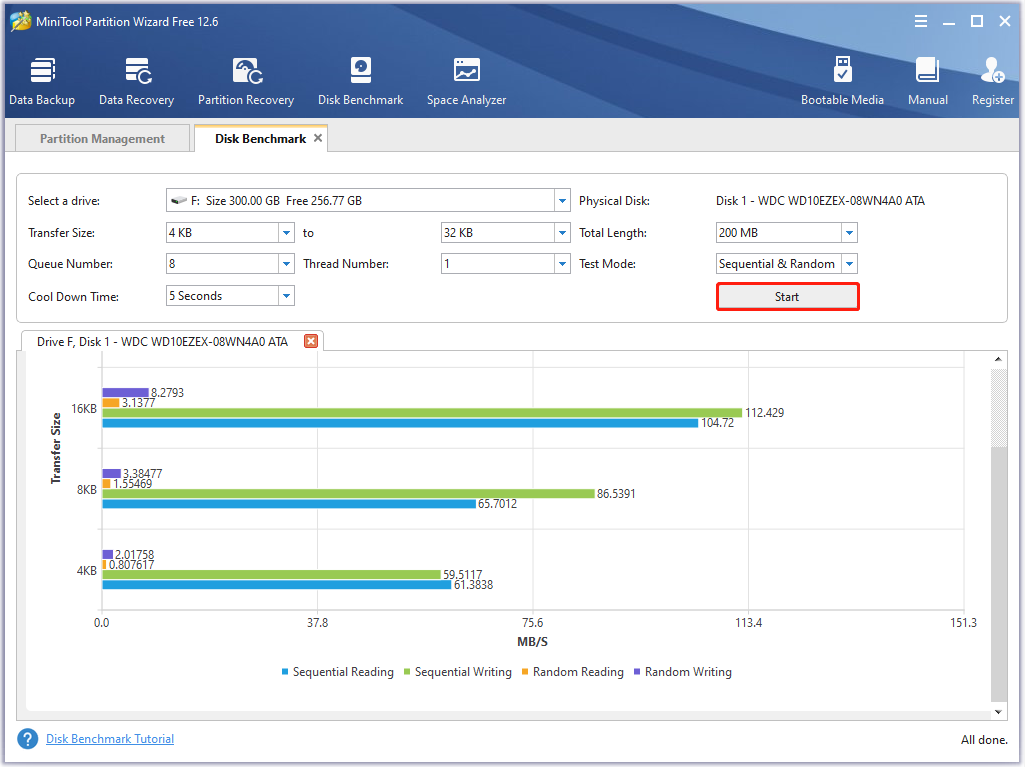
MiniTool Partition Wizard is a free disk benchmark tool with multiple configuration options. For instance, it offers you options to set transfer size, queue number, cool down time, thread number, total length, and test mode (sequential, random, or sequential & random).
Here’s the guide on how to test a hard drive with MiniTool Partition Wizard. This tool works on Windows 11/10/8.1/8/7/Vista.
Step 1: Download the program by clicking the button below and then install it on the computer.
If you want to test an external hard drive or other portable storage devices, connect it to your PC.
Free Download
Step 2: Launch MiniTool Partition Wizard to enter its main interface.
Step 3: Click Disk Benchmark at the toolbar.

Step 4: In the next window, set disk test parameters according to your needs. If you don’t have specific requirements, follow the default setting.
- Select a drive from the drop-down menu.
- Set transfer size from 1KB to 512KB.
- Set queue number, cool down time, and thread number.
- Choose the total length and a test mode from the drop-down menu.
Step 5: After that, click on the Start button to begin the test.
Step 6: You will get the test result after some time.
Further reading:
In addition to Disk Benchmark, MiniTool Partition Wizard also boasts features like Space Analyzer, Partition Recovery, Data Recovery, and Surface Test. With it, you can do various partition/disk related operations such as create/resize/move/extend/format/wipe partition, check file system, convert MBR to GPT, migrate OS to SSD/HD, copy disk, etc.
MiniTool Partition Wizard is used as a file deleter, NTFS undelete program, SD card formatter, duplicate file finder, Window migration tool, or an SSD optimizer. It provides you with a MiniTool Portable Partition Manager, so you can take it with you conveniently. To explore its advanced features, please use MiniTool Partition Wizard Pro or higher editions.
Free Download
Also read: The Guide to Test and Improve USB 3.0 Speed [With Pictures]
#2. CrystalDiskMark
CrystalDiskMark is an HDD benchmark utility that allows you to measure the sequential and random read/write speeds of your disk. It is compatible with Windows 11/10/8.1/8/7/Vista/XP and Windows Server 2003/2008/2012/2016/2019/2022. It is an open-source and free hard drive test tool.

When you use CrystalDiskMark to test storage devices, you should pay attention to the items below.
- MB/s refers to 1, 000, 000 bytes per second.
- The test result is not compatible between different major versions.
- The result varies according to test file size, test file position, fragmentation, IDE (PATA)/SATA/RAID/SCSI/NVMe controller, CPU speed, etc.
- CrystalDiskMark may shorten the lifespan of the SSD/USB flash drive.
- If you run CrystalDiskMark with admin rights, it won’t show the network drive. To measure the performance of network drives, run as w/o Administrator rights by opening the UAC dialog window > clicking Yes > clicking w/ Administrator Rights, NO > w/o Administrator Rights.
To learn more detailed information about this tool, read this post.
#3. AS SSD Benchmark
As its name indicates, AS SSD Benchmark can test the speed of all installed SSDs on the computer. To help you know the performance while the hard drive copies, reads, and writes data, it performs three separate tests. In addition to that, it also determines the access time of an SSD.
With AS SSD Benchmark, you can find any issues that your computer is experiencing. Then you can take actions immediately. It displays all the information it finds in a table. Importantly, it offers you a portable version. It works on Windows 7 or above.
#4. UserBenchMark
UserBenchMark is a free all-one benchmark tool, which can test the performance of CPU, GPU, SSD, HDD, and USB drives. After it finishes the test, it compares results with other users and tells you which part you can upgrade and the expected performance enhancement.
Can You Upgrade a Prebuilt PC? How to Upgrade CPU/GPU/Storage?
#5. HD Tune
HD Tune is a feature-rich hard disk/SSD benchmark and diagnose tool. To be specific, it is capable of scanning for errors, testing the performance of disks, erasing disks securely, checking the health status (S.M.A.R.T), etc.
How to get and use Blackmagic Disk Speed Test Windows? This post offers you a complete tutorial. Additionally, it offers you 5 Blackmagic Disk Speed Test alternatives, so you can have other options to test disks on Windows PCs. Click to Tweet
Conclusion
If you are going to download and install Blackmagic Disk Speed Test for Windows, this post is worth reading as it provides you with a step-by-step guide to doing that. Moreover, top 5 Blackmagic Disk Speed Test alternatives are offered to you as well. With them, you are able to perform hard drive tests with ease.
For any thoughts about Blackmagic Disk Speed Test Windows, directly write them in the comment area below. If you encounter any issues while using MiniTool Partition Wizard, contact us via [email protected]. We will make a reply as soon as possible.
Supports your favorite software!
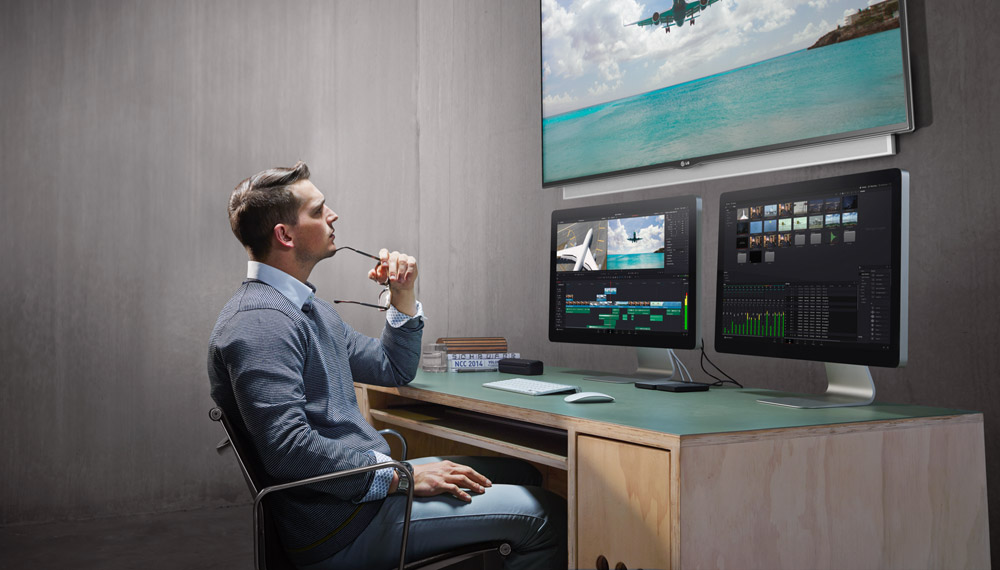
DeckLink supports more editing, design and video software than any other capture card, freeing you to work with your favorite creative software. They also work with any Mac, Windows and Linux applications. Get full editing compatibility with DaVinci Resolve, Final Cut Pro X, Media Composer, Premiere Pro and more! Create stunning visual effects with Fusion, After Effects and Photoshop. Perform unparalleled color correction using DaVinci Resolve. Work seamlessly with Fairlight audio in DaVinci Resolve or ProTools for audio production. With such a wide range of software support, DeckLink is perfect for every part of your workflow!
Find Reseller
DaVinci Resolve
DaVinci Resolve for Mac and Windows is the world’s most advanced editing, color correction and professional audio software solution. It is compatible with high performance GPU cards, hardware control panels such as the DaVinci Resolve Micro, Mini and Advanced panels, and even third party panels from Tangent, JL Cooper Eclipse and more. You get 64-bit float YRGB processing for all effects, power windows, tracking, primaries and secondaries, and 3D object tracking. DeckLink cards were developed to be the perfect solution for DaVinci color grading and have been designed to perfectly match the powerful features in the latest DaVinci Resolve!
Learn more about DaVinci Resolve >
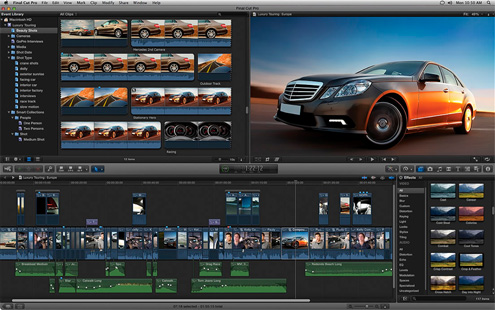
Final Cut Pro X
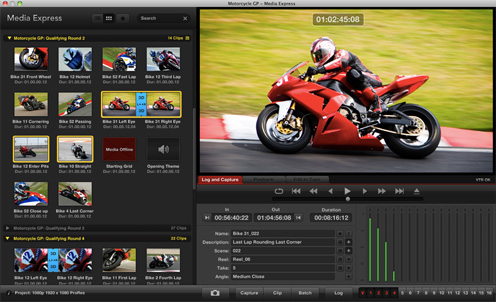
DeckLink cards are qualified by Apple for Final Cut Pro X compatibility so you can edit in Final Cut Pro while monitoring to any SD, HD or Ultra HD display. You can also connect to HDCAM SR, HDCAM, HD-D5 and DVCPRO HD decks, as well as SD decks such as Digital Betacam for output back to tape. DeckLink supports playback with absolute sample accurate AV sync. The included Media Express software lets you manage capture from external devices such as decks with wide metadata support.
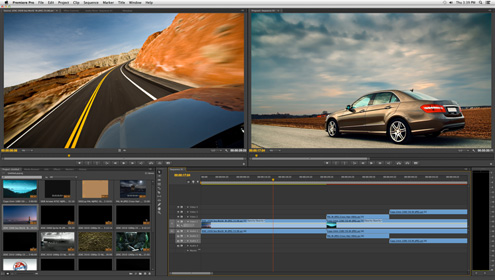
Premiere Pro
DeckLink is the highest quality editing solution for Premiere Pro and fully supports the Mercury Playback engine for incredible realtime effects. You get a full suite of Premiere plug-ins with deck control and full support for 8 and 10 bit uncompressed AVI and QuickTime files, as well as Motion JPEG and DVCPRO HD which can all be played back on the same Premiere Pro timeline without rendering. QuickTime uncompressed files from Macs can also be played back for cross-platform media sharing!
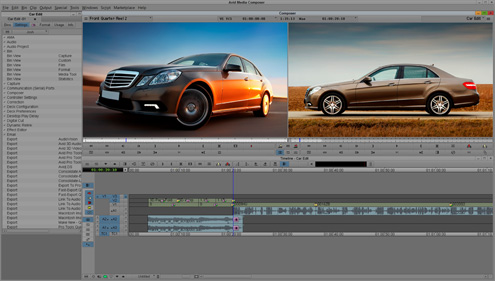
Media Composer
The Avid Media Composer family of software, including Symphony and NewsCutter, provides fully integrated support for DeckLink. Capture and play back in full 10 bit uncompressed 4:2:2 and 4:4:4 quality, or directly in Avid DNxHD or other popular compressed formats. Media Composer has fast and familiar operation along with a 64-bit architecture that lets you play back complex layered effects in real time. DeckLink is the perfect choice for professionals looking for the best possible Avid workflow!
WDM Driver for Windows
DeckLink supports WDM and DirectShow so you can capture high quality video straight into your Windows NLE workflow! With WDM and DirectShow compatibility, DeckLink allows your acquisition, editing and post workflow to be entirely configured on the Windows platform and works with hundreds of post production and broadcast software utilities such as MAGIX Video Pro, vMix, VidBlasterX ! With WDM and DirectShow support, DeckLink gives you the freedom to configure your Windows system the way you want!
Cyberlink Power Director
Magix Video Pro
vMix
Vidblaster X
Blackmagic Utilities Included!
Blackmagic Media Express software comes free with every DeckLink card. Media Express lets you batch capture and playback 2D or even dual stream stereoscopic 3D in uncompressed YUV 4:2:2 and RGB 4:4:4 QuickTime, AVI and DPX, or compressed ProRes, DVCPRO and MJPEG files. DeckLink cards also include Blackmagic LiveKey and Blackmagic Disk Speed Test. LiveKey lets you insert logos and other graphics in real time using SDI outputs. Disk Speed Test checks your disk array and gives you an easy to understand speed test with the results in video frames per second!
Compatible with leading Broadcast Design Tools
Add amazing effects and graphics to your work
![]()
Fusion
![]()
Cinema 4D
![]()
Photoshop CC
![]()
After Effects CC
Broadcasting Design
Feature film and television post production demands the highest possible image quality for things such as color correction and visual effects. For powerful digital compositing, DeckLink cards are compatible with Fusion, Nuke, After Effects and more so you can mix dozens of live action, matte paintings, 2D and 3D CGI layers! DeckLink cards are perfect for broadcast design because they deliver the high quality and reliability you need for working under pressure in broadcast workflows!
![]()
Avid Pro Tools
![]()
Apple Logic
![]()
Steinberg Cubase
![]()
Steinberg Nuendo
Support for your favorite professional audio software
DeckLink is fully compatible with the world’s best NLE software systems so you can take your edit from any system and master your audio using Fairlight audio in DaVinci Resolve or ProTools! By adding a DeckLink card to your ProTools system, you can confidently play video and audio together while mixing to avoid dropped audio and lip sync misalignments. Windows audio software support allows you to use Steinberg Nuendo for audio re-recording and multitrack mastering and in Cubase you can score music to a separate video track!
Live VJ
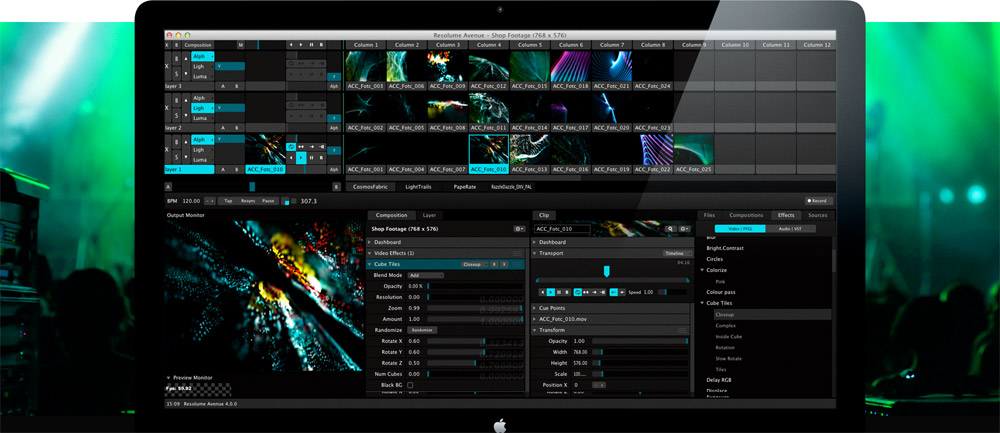
Resolume software supports all DeckLink capture and playback products straight out of the box! With DeckLink and Resolume you can capture and play back any QuickTime and AVI video files, as well as Flash animations and text overlays with your WAV and AIFF audio files. With Resolume Arena you can even use SMPTE timecode captured by DeckLink to synchronize clips with lasers, lights, fireworks displays or anything you can imagine for the most mind blowing VJ performances!
Streaming
DeckLink is fully compatible with popular video and audio streaming software so you can get your live stream to millions of online viewers! On Mac, stream live video with OBS, Wirecast and Livestream Producer. When streaming on Windows, you get compatibility with OBS, Xsplit Broadcaster, Wirecast and Livestream Producer. Stream high quality video of live events, webcasts, educational seminars, sales presentations, concerts or even video gameplay with DeckLink!
Developer SDK
All DeckLink cards include a free software developer kit for Mac, Windows and Linux. This lets you develop custom solutions for in house use or even commercial distribution! DeckLink also includes DirectShow filters, a WDM Windows Driver and QuickTime API that lets DeckLink cards integrate seamlessly with an unbelievably wide range of applications and codecs. Develop your solutions with confidence because DeckLink cards are a flexible, proven foundation that frees you to work without limitations. The DeckLink SDK provides both low level control of hardware and high level interfaces that allow you to easily perform common tasks. It even lets you develop once and then easily deploy your solution across the entire range of DeckLink capture cards.

Blackmagic Disk Speed Test is a tool for checking the performance of a hard drive. Designed for Macintosh, this tool uses a standard method to determine the reading and writing speed of your hard drive.
If you use your computer for meticulous tasks that require fast and reliable hard drives, like video editing and coding, you will need your hard drive to be in the best possible condition. Blackmagic Disk Speed Test is a user-friendly tool that can be used to test and optimize the performance of your hard disk. Thanks to this tool, you can assure yourself that your hard drive won’t let you down during your activities.
What are the key features of Blackmagic Disk Speed Test?
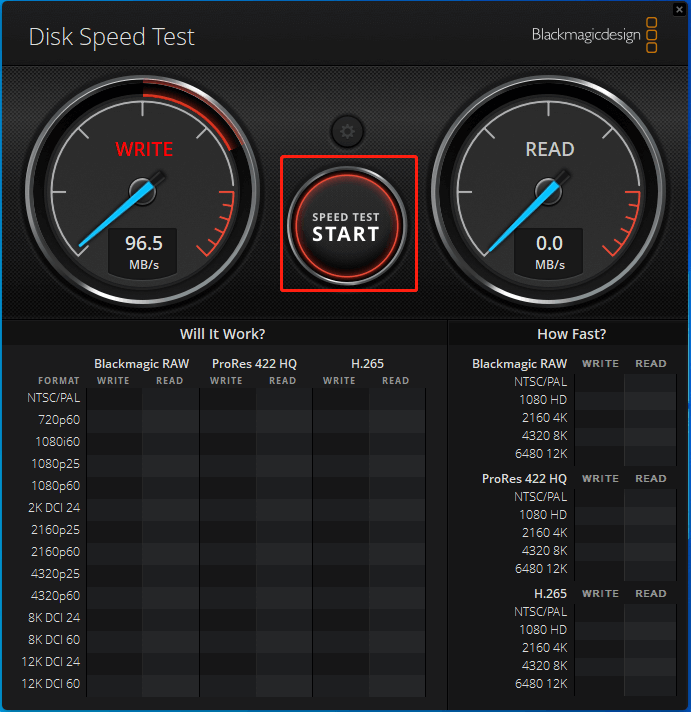
In essence, Blackmagic Disk Speed Test only carries out one main feature. The tool is designed to test your hard drive’s reading and writing speed. The dashboard of the tool sports two-speed gauges. The gauge on the left side measures the writing speed of your disk, whereas the gauge on the right is focused on the reading speed of your disk.
The tool has a start button which can be used to initiate a new disk performance test. Blackmagic Disk Speed Test will let you know how fast your drive is. When performing several tests over time, you will get a good insight into any possible performance changes.

How to install and use Blackmagic Disk Speed Test on PC?
This was originally developed to be a macOS application, and therefore there is no stand-alone Blackmagic Disk Speed Test app for the Windows platform. However, you can still use it on your Windows PC, as the tool can be found in Blackmagic’s Desktop Video Suite, which is fully PC compatible. Desktop Video is the tool that is offered under the Windows download button at the top of this page. The installation process is very straightforward:
- Download the zip file offered and unpack it to your hard drive.
- Now double-click the Desktop Video Installer v12.3.msi file and follow the on-screen instructions.
- When the installation process is finished, you will be prompted to restart your PC.
- As soon as your PC is up and running again, simply head to the start menu and search for Blackmagic Disk Speed Test.
The application works identical to the Mac version. Simply click the start button, and Disk Speed Test will write test your disk using large blocks of data and then display the result. Disk Speed Test will continue to test writes and reads from your disk so you can evaluate both performance and readability over time.
Is it free?
Although Blackmagic Disk Speed Test is a high-quality software, it is surprisingly offered to download completely free of charge.
Is it safe?
Yes, Blackmagic Disk Speed Test is a completely safe tool. Before you start using this software, you may want to consider reading the Blackmagic Privacy Policy to see how and why the software collects your personal information.
✔ What’s Cool
1. Disk Speed Test is an easy to use tool to quickly measure and certify your disk performance for working with high quality video! Simply click the start button and Disk Speed Test will write test your disk using large blocks of data, and then display the result.
Software Screenshots

Download and install Blackmagic Disk Speed Test on your computer
Check compatible PC Apps or Alternatives
Or follow the guide below to use on PC:
Select Windows version:
- Windows 7-10
- Windows 11
Learn how to install and use the Blackmagic Disk Speed Test app on your PC or Mac in 4 simple steps below:
- Download an Android emulator for PC and Mac:
Get either Bluestacks or the Nox App >> . We recommend Bluestacks because you can easily find solutions online if you run into problems while using it. Download Bluestacks Pc or Mac software Here >> . - Install the emulator on your PC or Mac:
On your computer, goto the Downloads folder » click to install Bluestacks.exe or Nox.exe » Accept the License Agreements » Follow the on-screen prompts to complete installation. - Using Blackmagic Disk Speed Test on PC [Windows 7/ 8/8.1/ 10/ 11]:
- Open the Emulator app you installed » goto its search bar and search «Blackmagic Disk Speed Test»
- The search will reveal the Blackmagic Disk Speed Test app icon. Open, then click «Install».
- Once Blackmagic Disk Speed Test is downloaded inside the emulator, locate/click the «All apps» icon to access a page containing all your installed applications including Blackmagic Disk Speed Test.
- Now enjoy Blackmagic Disk Speed Test on PC.
- Using Blackmagic Disk Speed Test on Mac OS:
Install Blackmagic Disk Speed Test on your Mac using the same steps for Windows OS above.
Need help? contact us here →
How to download and install Blackmagic Disk Speed Test on Windows 11
To use Blackmagic Disk Speed Test mobile app on Windows 11, install the Amazon Appstore. This enables you browse and install android apps from a curated catalog. Here’s how:
- Check device compatibility
- RAM: 8GB (minimum), 16GB (recommended)
- Storage: SSD
- Processor: Intel Core i3 8th Gen (minimum), AMD Ryzen 3000 (minimum) or Qualcomm Snapdragon 8c (minimum)
- Processor architecture: x64 or ARM64
- Check if there’s a native Blackmagic Disk Speed Test Windows app ». If none, proceed to next step.
- Install the Amazon-Appstore ».
- Click on «Get» to begin installation. It also automatically installs Windows Subsystem for Android.
- After installation, Goto Windows Start Menu or Apps list » Open the Amazon Appstore » Login (with Amazon account)
- Install Blackmagic Disk Speed Test on Windows 11:
- After login, search «Blackmagic Disk Speed Test» in search bar. On the results page, open and install Blackmagic Disk Speed Test.
- After installing, Goto Start menu » Recommended section » Blackmagic Disk Speed Test. OR Goto Start menu » «All apps».
Blackmagic Disk Speed Test On iTunes
| Download | Developer | Rating | Score | Current version | Adult Ranking |
|---|---|---|---|---|---|
| Free On iTunes | Blackmagic Design Inc | 3.4.2 | 4+ |
Download on Android
Download Android
Thank you for reading this tutorial. Have a nice day!
Software Features and Description
Disk Speed Test is an easy to use tool to quickly measure and certify your disk performance for working with high quality video! Simply click the start button and Disk Speed Test will write test your disk using large blocks of data, and then display the result. Disk Speed Test will continue to test writes and reads from your disk so you can evaluate both performance and readability over time.
Top Pcmac Reviews
-
Blackmagic is now faster enough to rate internal SSD speeds, even the Startup Disk
By Capt.Huffnpuff (Pcmac user)
the app has been updated to adequately report the speed of SSD devices.
When the app tries to read the Startup Disk, you get the message that the device is not writeable, hence you cannot rate the the transfer rates of the drive.
I found a workaround that will report the rates of the Startup Disk. Its quite simple. Create a disk image (.dmg) using the disk utility specifying file->new image->blank image. Make it big enough for the app to work with (7+ GB) and name it what you will. Mount the volume (if it is not already mounted).
In the app select the disk image mounted. Since the “volume” is on your Startup Disk, you will see how fast it drive is. On my 2016 MacBook Pro, I am seeing speeds like 1,000+ MB/s write, and 1100+ MB/S read. I have tried this on my older mackbooks with SSD and they do scale down as the device is older. On an older MacBook Pro the rates I see are 500 MB/S both read and write, as you would expect.
I have run the app on USB 2, thumb drives, USB 3, and USB C devices to see if I’m getting my money’s worth. You can easily detect when a device is performing subpar and, and with the spinning disk, you can see is transfer speeds deteriorates over time.
-
Almost Perfect, Great Price
By MidlandPaintedTurtle (Pcmac user)
Disk Speed Test is a very useful product and one cannot complain about the price point.
However, a few enhancements would make this program truly wonderful.
Ability to Specify Number of Runs
Instead of just running forever, it would be nice to be able to specify that Disk Speed Test is to run some user specified number of times.Ability to specify the pause period between runs
At the default values, it is hard to stop the program after it has totally finished one test, and before it has started another. It would be nice to be able to specify a pause between runs.Log File
It would be nice if Disk Speed Test had an option to save a log file with the test results for each run. Something that one could import into Excel or some other spreadsheet would be idea.Command Line Run
The ability to run Disk Speed Test from the command line would allow for automation. And also for remote collection of such data by admins, who could use this feature with ARD or other secure command line login. -
Great tool, price is perfect
By 2584LuckyLu (Pcmac user)
i wish it had a button in the UI to cancel current test. i know i can simply quit application but doing that on SD cards always makes me nervous. I know about all the pertient data i need from the first couple reads/writes on an SD card, dont need the full 10min + run of tests. But an awesome tool nonetheless. Installed and ran immediately on Sierra 12.6, but doesnt open when you click to launch from the Mac store, so close the store and open from applications drawer.
-
Nice FREE Utility
By ChangeMachine (Pcmac user)
I use this often and appreciate it. The update (3.1) seems to provide much more stable speed readings than the 2.x version I’ve been using (where the guage is all over the map). One issue I have is that it seems to have issues with NTFS formatted drives. I’m using Paragon’s NTFS for Mac, and BMDST writes to it well (430 to my SSD) but on the read test it often (though not always) fails with «Error reading the test file». Aside from this niche case it’s an awesome tool.

Working with video often requires big storage and fast speeds. Here, we use SSDs to either capture the video directly (like with the BMPCC) or to create an on-location backup (like with everything we do). When we need to evaluate the performance of an SSD, we turn to benchmark software.
There are many SSD benchmarking tools out there. CrystalDiskMark is probably ranked at the top, but there are others too. For video, though, one of the best benchmarking software is the Blackmagic Disk Speed Test. Sadly it is only available for Mac. I use a PC. So in this tutorial, I will show you how to install and enable the Blackmagic Disk Speed Test on a PC.
Luckily, Blackmagic’s Disk Speed Test is part of a bigger software suite called Desktop Video, and that package is both free and PC compatible. Here are the steps you need to install it.
1. head over to the Blackmagic support page for capture and playback devices here.

2. From the download list, select the latest Desktop Video release (in the screen capture above, it’s 11.6). Now go ahead and download the install package.
3. you will be treated with a registration screen, but Blackmagic also allows you to “download only” check the download only link at the bottom left.

4. the next steps are to download and install the Desktop Video package. You would need to restart your computer, so make sure you don’t have anything running.
5. This is it. You can now head over to your start menu and look for Black Magic Disk Test and run the software.

Here are the results from a recent test we ran on the Samsung T7 2TB drive on a recent I7 6700 desktop with a Type-C USB 3.1 Gen 2 socket.
