Hardware Setup
Yeti is plug ‘n play with MAC and PC systems and is compatible with Mac OS X (10.4.11 or higher), Windows 8 (incl. 8.1), Windows 7, Windows Vista,XP Home Edition, and XP Professional. Simply connect the Yeti directly to your computer with the supplied USB cable (avoid USB hubs or multipliers), and you are good to go. For more specific information about how to setup Yeti with MAC and PC, please see below.*
* For information about how to set up Yeti Pro,
please visit the Yeti Pro Specifications page
Macintosh Setup Procedure
(OS X Yosemite)
- Connect Yeti with the supplied USB cable.
- Click Apple menu -> System Preferences.
- Select Sound.
- Click the Output tab, and select Yeti Stereo Microphone under Select a device for sound output.
- Click the Input tab, and select Yeti Stereo Microphone under Select a device for sound input.
- Exit System Preferences
WINDOWS 8.1 Setup Procedure
- Connect Yeti with the supplied USB cable.
- Move your mouse to the lower-right side of the screen to open the Windows 8.1 Charms Bar menu, choose Settings, select Control Panel, and click on Hardware and Sound.
- Click on Sounds.
- Select the Playback tab, choose Yeti Stereo Microphone, and click the Set Default button.
- Select the Recording tab, choose Yeti Stereo Microphone, and click the Set Default button.
- Press OK.
WINDOWS 7 Setup Procedure
- Connect Yeti with the supplied USB cable.
- Under Start Menu open Control Panel, click on Hardware and Sound, then select Sound.
- Select the Playback tab, choose Yeti Stereo Microphone, and click the Set Default button.
- Select the Recording tab, choose Yeti Stereo Microphone, and click the Set Default button.
- Press OK.
SOFTware Setup
As there are so many different software packages that are compatible with the Yeti, we suggest consulting your software’s manual, user forums and technical help lines. Here are a few to get you started.
GARAGEBAND
(Mac)
- Make sure Yeti is connected directly to your computer with the included USB cable.
- Open up GarageBand
- Select New Project, and double click Vocal
- Go to the GarageBand drop down menu, select Preferences…, and click Audio/MIDI
- Select Yeti Stereo Microphone as the Output Device and Input Device. Close Preferences.
- Make sure the Mute button on the Yeti is solid red and not blinking.
STUDIO ONE ARTIST
(OSX)
- Make sure Yeti is connected directly to your computer with the included USB cable.
- Open up Studio One Artist.
- Go to the Studio One drop down menu, choose Options… and select Audio Setup
- For Audio Device, select Yeti Stereo Microphone, press Close.
- Press Create a new Song from the Studio One Artist start screen, choose a template or Empty Song. Go to Track menu -> Add Tracks, press OK.
- Make sure the Mute button on the Yeti is solid red and not blinking
- Press the Record button on the new track you just created, then press the Record button on the Transport at the bottom of the Studio One Artist screen.
AUDACITY
(PC)
AUDACITY
(PC)
- Open Audacity.
- Go to Edit menu -> Preferences… and select Devices
- Under Interface, select Host: MME
- Under Playback, select Device: Yeti Stereo Microphone
- Under Recording, select Device: Yeti Stereo Microphone, press OK.
- Make sure the Mute button on the Yeti is solid red and not blinking, then press the Record button on Audacity.
STUDIO ONE ARTIST
(PC)
- Make sure Yeti is connected directly to your computer with the included USB cable.
- Open Studio One Artist.
- Go to Studio One drop down menu -> Options… and select Audio Setup
- For Audio Device, select Windows Audio, click Control Panel
- Under Playback, select Yeti Stereo Microphone
- Under Recording, select Yeti Stereo Microphone, press Close.
- Press Create a new Song from the Studio One Artist start screen, choose a template or Empty Song. Go to Track menu -> Add Tracks, press OK.
- Make sure the Mute button on the Yeti is solid red and not blinking
- Press the Record button on the new track you just created, then press the Record button on the Transport at the bottom of the Studio One Artist screen.
FAQ
Is Yeti compatible with Windows Vista? What about Windows 7 and 8?
Yes, Yeti is compatible with Vista, Windows 7 and Windows 8!
Do I need any special software to use Yeti? Do I need any drivers?
Technically, no. Depending on your application, your OS may have sufficient features to utilize the capabilities of Yeti. But, to get the most out of your Yeti, you’ll want to have some kind of software that allows for digital signal processing and non-linear editing that will accept audio from the USB port.
Does Yeti need batteries? I’ve heard that condenser microphones require something called «Phantom Power».
Do I need to concern myself with this?
No. Yeti does not require batteries. Yeti derives its operating power from something called bus voltage, which is always present on your USB port. As long as the red LED is glowing, you’ve got power.
Can I use Yeti with a traditional analog audio mixer?
No, the Yeti features digital output only. It must be connected to a USB port in order to function.
What sample rate and word length does Yeti use?
The Yeti’s digital output is set to 16 bit/48 kHz.
How can I select a different sample rate?
Because Yeti is designed for the greatest ease of operation and setup, sample rate / word length are not user-definable. Sorry, geeks.
Can I use more than one Yeti at a time?
Some audio editing software allows for multiple USB connections. Check with your software vendor— they should have technical support staff who can answer all of your questions about their product.
What does polar pattern mean? Why should I care?
If you think of polar patterns as the shape of the area that a microphone «hears», omnidirectional hears everything at equal volume from all angles (in a 360 degree sphere surrounding the mic), while cardioid only hears what’s right in front of it at full volume and other sounds at increasingly diminished volume as the sound source moves further away from the center of the mic (audio techs call this off-axis). You should care, because one of the most useful features of a microphone is the ability to control its pickup. We like polar patterns so much, that some of our professional studio microphones have as many as nine different patterns!
Why doesn’t my Yeti have a THX logo?
The THX microphone certification program helped establish the audio input performance standard for which the best-selling Yeti microphone family is known. However, the microphone certification program will be discontinued over the coming months as THX will be focusing on its core home theater program (TVs, speakers, etc). Regardless of the discontinuation of this category, Yeti and Yeti Pro will continue to be manufactured to the same specification and standards.
My microphone doesn’t seem to be working.
Ensure your USB cable is properly connected directly to your computer’s USB port. Also check that the status light is illuminated. Open your computer’s audio menu and verify that Blue Microphones Yeti is the selected sound source
What part of the mic do I talk into?
The Yeti Pro is a side address microphone. A side address microphone accepts sound from an angle perpendicular to the mic as opposed to a front address mic where you speak into the «end» of the microphone.
TROUBLESHOOTING
I’M NOT HEARING ANY SOUND COMING THROUGH THE HEADPHONES PLUGGED INTO MY YETI.
- Verify that the Yeti microphone is properly connected to your computer, and ensure that Blue Microphone’s Yeti is the selected sound source
- Verify that the indicator light on the Yeti is lit, and that the headphone plug is fully inserted into the headphone jack at the underside of the Yeti
- Confirm that the headphone volume knob is turned up, with the tab pointing up to start. Also confirm that the microphone is not currently muted (indicator light should be solid, not flashing)
- Check your computer’s onscreen menus to verify that Blue Microphones Yeti is selected as your output.
MY MICROPHONE DOESN’T SEEM TO BE WORKING.
Ensure your USB cable is properly connected directly to your computer’s USB port. Also check that the status light is illuminated. Open your computer’s audio menu and verify that Blue Microphones Yeti is the selected sound source.
WHY DO MY SPEAKERS FEEDBACK WHEN I PLUG IN MY YETI?
Anytime you use a microphone in conjunction with live speakers or open back headphones, there is a potential for feedback. When using a microphone with live speakers or open back headphones, you need to make sure that the speakers are not pointed directly at the microphone. Also, you should make sure that your speaker/headphone volume isn’t loud enough to be picked up by the microphone. When your speakers/headphones are emitting the sound from a microphone directly into the same microphone, it will cause, what is referred to as, a feedback loop. So, when you plug in your Yeti, make sure that the speaker/headphone volume is turned down, and your speakers are far enough away from the microphone to avoid a potential feedback loop. Once you’ve plugged in the microphone and established a signal, adjust your speaker/headphone volume to an appropriate level.
MY RECORDING IS DISTORTING.
Decrease the microphone gain by turning the microphone gain knob counterclockwise or try increasing the distance between your Yeti and your sound source.
MY RECORDING IS NOT LOUD ENOUGH.
Increase the microphone gain by turning the microphone gain knob clockwise or try decreasing the distance between your Yeti and your sound source.
MANUALS & DRIVERS
- Если вы работаете в студии и вам нужно профессиональное записывающее оборудование, покупка микрофона Blue Yeti — хороший способ начать.
- К сожалению, неправильные настройки системы или устаревшие драйверы могут привести к тому, что ваш компьютер не сможет обнаружить микрофон Blue Yeti.
- Посетите наш специализированный центр по устранению неполадок, связанных с системными ошибками, для получения более подробных руководств и, возможно, даже подумайте о том, чтобы сохранить их для использования в будущем.
- Однако, если вы хотите узнать больше об устранении проблем с микрофоном, загляните на нашу страницу исправления периферийных устройств.
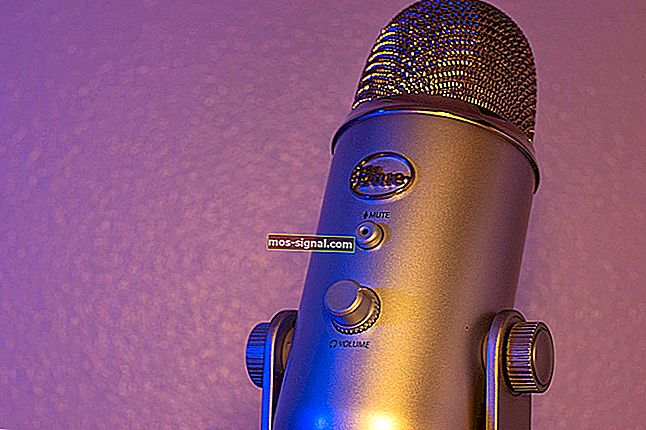
Микрофоны Blue Yeti хорошо известны ютуберам и пользователям, которые записывают аудио или ведут подкасты. Причина в том, что соотношение цены и качества потрясающее. Но у многих из них возникают проблемы с подключением или драйверами, которые делают микрофон непригодным для использования. Проблемы накапливаются, от неисправного USB-кабеля до поврежденных драйверов или чего-либо еще.
Для получения дополнительной информации о том, как это сделать, ознакомьтесь с руководством ниже.
1. Осмотрите оборудование.
- Проверьте свое оборудование — убедитесь, что все в рабочем состоянии.
- Убедитесь, что ваш микрофон включен и работает, а на вашем ПК с Windows 10 нет неизвестных проблем.
- Проверьте подключение — одна из самых частых проблем — это кабель.
- Если возможно, попробуйте подключить микрофон к другому компьютеру и посмотрите, поможет ли это.
- Если нет, замените кабель и проверьте целостность кабеля на обоих концах.

- Это кажется очевидным и довольно глупым исправлением, но вы должны знать, что микрофон Blue Yeti работает только с USB 2.0 , а не с USB 3.0.
- Смена USB помогла большинству пользователей, а также могла помочь вам сэкономить много времени и нервов.
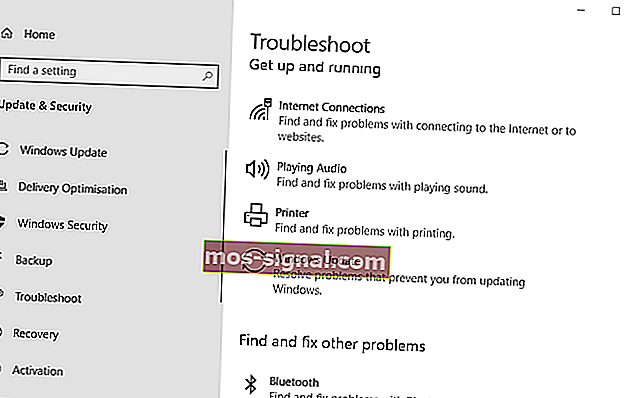
2. Запустите средство устранения неполадок при воспроизведении звука.
- Перейдите в Пуск> Настройки .
- Щелкните Обновление и безопасность .
- На левой боковой панели выберите Устранение неполадок .
- В правом разделе нажмите « Воспроизведение звука», а затем « Запустить средство устранения неполадок» .
- Дождитесь завершения процесса.
Мы много писали о проблемах с микрофоном. Ознакомьтесь с этими руководствами для получения дополнительной информации.
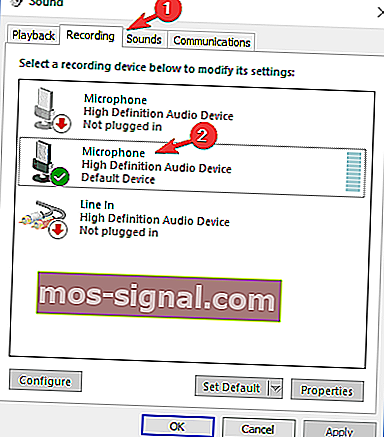
3. Установите Blue Yeti в качестве устройства по умолчанию.
- Щелкните правой кнопкой мыши значок динамиков в нижнем левом углу экрана Windows 10.
- Щелкните Звуки .
- Выберите вкладку Запись .
- Найдите свой микрофон Blue Yeti, щелкните его правой кнопкой мыши и выберите « Установить как устройство по умолчанию» .
- Щелкните Применить, а затем ОК .
Если это решение не сработало или вашего Blue Yeti не было в списке, перейдите к следующему решению.
4. Обновите, удалите или переустановите драйверы Blue Yeti.
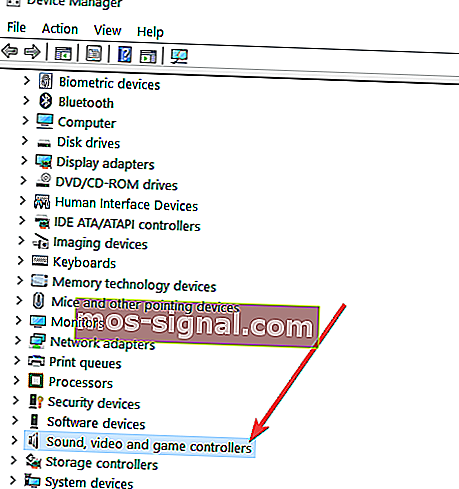
- В поле поиска Windows введите Диспетчер устройств и нажмите Enter.
- В диспетчере устройств найдите Звуковые, видео и игровые контроллеры и разверните его. пери
- Найдите свое устройство, щелкните его правой кнопкой мыши и выберите « Обновить драйвер» .
- Когда появится новое окно, выберите Автоматический поиск обновленного программного обеспечения драйвера и дождитесь завершения процесса.
 пери
периВы можете выполнить те же действия, чтобы отключить или удалить устройство. Кроме того, вы можете удалить микрофон> отключить его от ПК> снова подключить> позволить Windows 10 установить драйверы.
- Скачайте драйвер с сайта производителя.
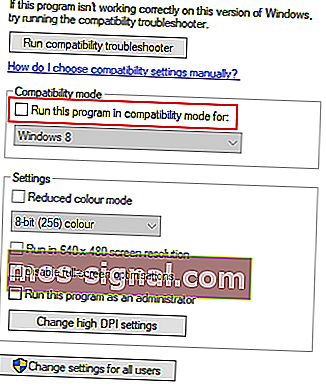
- После завершения загрузки щелкните программу установки правой кнопкой мыши и выберите пункт « Свойства» .
- Перейдите на вкладку « Совместимость ».
- В режиме совместимости установите флажок Запускать эту программу в режиме совместимости и выберите Windows 7 .
- Нажмите Применить и ОК .
После этого ваш микрофон Blue Yeti должен отлично работать в Windows 10.
- Что такое микрофоны Blue Yeti?
Blue Yeti — это марка микрофонов, наиболее подходящая для студийного и профессионального использования. Конечно, есть и другие замечательные производители, например, тот, чья продукция представлена в этом удивительном списке.
- Насколько хороши микрофоны Blue Yeti?
Микрофоны Blue Yeti считаются одними из лучших как с точки зрения качества, так и с точки зрения производительности, с моделями из чрезвычайно широкого ценового диапазона.
- Как исправить проблемы с микрофоном?
Один из быстрых способов решить многие проблемы с микрофоном — регулярно обновлять драйверы. Для получения дополнительной информации о том, как сделать это эффективно, ознакомьтесь с этим подробным руководством по этому вопросу.
Если у вас есть дополнительные вопросы о микрофоне Blue Yeti в Windows 10, не стесняйтесь оставлять их в разделе комментариев ниже.
Примечание редактора: этот пост был первоначально опубликован в июне 2019 года и с тех пор был переработан и обновлен в апреле 2020 года для обеспечения свежести, точности и полноты.
Микрофоны Blue Yeti хорошо известны ютуберам и пользователям как отличное оборудование для записи звука, от музыки до подкастов.
Причина в том, что соотношение цены и качества просто потрясающее. Но многие из них испытывают некоторые проблемы с подключением или драйверами, которые делают микрофон непригодным для использования.
Проблемы накапливаются, начиная от неисправного USB-кабеля и заканчивая поврежденными драйверами или чем-то еще. Для получения дополнительной информации о том, как это сделать, ознакомьтесь с руководством ниже.
Почему мой Blue Yeti не обнаруживается?
Из-за аппаратных ограничений соединение с микрофоном может быть ненадежным. Возможно, USB-порт не обнаружил подключенный микрофон, что привело к тому, что Blue Yeti USB не распознал проблему.
Прежде чем вы сможете использовать свой микрофон Blue Yeti, необходимо выполнить несколько требований, связанных с программным обеспечением. Это справедливо даже в том случае, если сам микрофон полностью исправен.
Даже после этого остаются такие вещи, как громкость системы и устройства, воспроизводящие звук, которые могут изменять или останавливать ввод, поступающий через микрофон.
Более того, непредвиденные ситуации всегда могут помешать и вызвать ошибки или проблемы на наших компьютерах. Мы изо всех сил старались охватить наиболее распространенные решения, которые эффективны при устранении ошибки «Микрофон Blue Yeti не распознан».
Как заставить микрофон Blue Yeti работать в Windows 10 и 11?
1. Обновите, удалите или переустановите драйверы Blue Yeti.
- Чтобы устранить проблему с подключением Blue Yeti к ПК, в поле поиска Windows введите «Диспетчер устройств» и нажмите Enter.
- В диспетчере устройств найдите «Звуковые, видео и игровые контроллеры» и разверните его.

- Найдите свои драйверы Blue Yeti X, щелкните их правой кнопкой мыши и выберите «Обновить драйвер».
- Когда появится новое окно, выберите Автоматический поиск обновленного программного обеспечения драйвера и дождитесь завершения процесса.
Вы можете выполнить те же действия, чтобы отключить или удалить устройство. Кроме того, вы можете удалить микрофон, отключить его от ПК, снова подключить и разрешить Windows 10 установить драйверы.
- Скачайте драйвер с сайта производителя.
- После завершения загрузки щелкните правой кнопкой мыши программу установки и выберите «Свойства».
- Перейдите на вкладку «Совместимость».
- В разделе Режим совместимости установите флажок Запустить эту программу в режиме совместимости и выберите Windows 7.

- Нажмите Применить и ОК.
Проблема с Blue Yeti также могла быть вызвана неправильной установкой, поэтому для решения проблемы лучше удалить, а затем переустановить драйверы. После этого ваши драйверы Blue Yeti будут отлично работать в Windows 10.
1.1 Обновите драйверы с помощью расширенного инструмента
Повысьте производительность вашего оборудования с помощью этого профессионального программного обеспечения, которое может сканировать ваше устройство со скоростью света и предоставлять точный отчет обо всех драйверах, требующих обновления.
С помощью этого приложения у вас есть база данных из более чем 18 миллионов новых файлов, которые вы можете загрузить, чтобы ваша система всегда работала без сбоев. Положитесь на функцию диспетчера расписания, чтобы не пропустить ни одного обновления.
2. Осмотрите оборудование
- Проверьте свое оборудование — убедитесь, что все в рабочем состоянии.
- Убедитесь, что ваш микрофон включен и работает, а на ПК с Windows 10 нет неизвестных проблем.
- Проверьте подключение — одна из самых частых проблем — это кабель.
- Попробуйте подключить микрофон к другому компьютеру, если это возможно, и посмотрите, поможет ли это.
- Если нет, замените кабель и проверьте целостность кабеля на обоих концах.
Это кажется очевидным и довольно глупым решением, но вы должны знать, что микрофон Blue Yeti работает только с USB 2.0, а не с USB 3.0.
Замена USB помогла большинству пользователей, а также тем, кто сообщил, что их Blue Yeti не распознается Mac, а также может помочь вам сэкономить много времени и хлопот.
Если микрофон Blue Yeti не обнаружен, рекомендуется проверить оборудование и убедиться, что кабели работают правильно. Если это не решит проблему, см. наше следующее решение.
3. Запустите средство устранения неполадок с воспроизведением аудио.
- Перейдите в «Пуск», затем выберите «Настройки».
- Нажмите «Обновление и безопасность».
- На левой боковой панели выберите Устранение неполадок.

- В правом разделе нажмите «Воспроизведение аудио», а затем «Запустить средство устранения неполадок».
- Дождитесь завершения процесса.
Когда устройство Blue Yeti не распознается в вашей Windows 10, пришло время выполнить устранение неполадок, что в этом случае довольно легко сделать, если вы будете следовать нашему руководству.
4. Установите Blue Yeti в качестве устройства по умолчанию.
- Щелкните правой кнопкой мыши значок «Динамики» в левом нижнем углу экрана Windows 10.
- Нажмите Звуки.
- Выберите вкладку «Запись».
- Найдите свой микрофон Blue Yeti, щелкните его правой кнопкой мыши и выберите «Установить как устройство по умолчанию».

- Нажмите «Применить», а затем «ОК».
Еще один эффективный вариант, к которому вы можете прибегнуть, если ваш компьютер не распознает Blue Yeti, — установить Yeti в качестве устройства по умолчанию. Начните с открытия меню «Звук», затем следуйте нашим инструкциям.
Как заставить микрофон Blue Yeti работать в Windows 11?
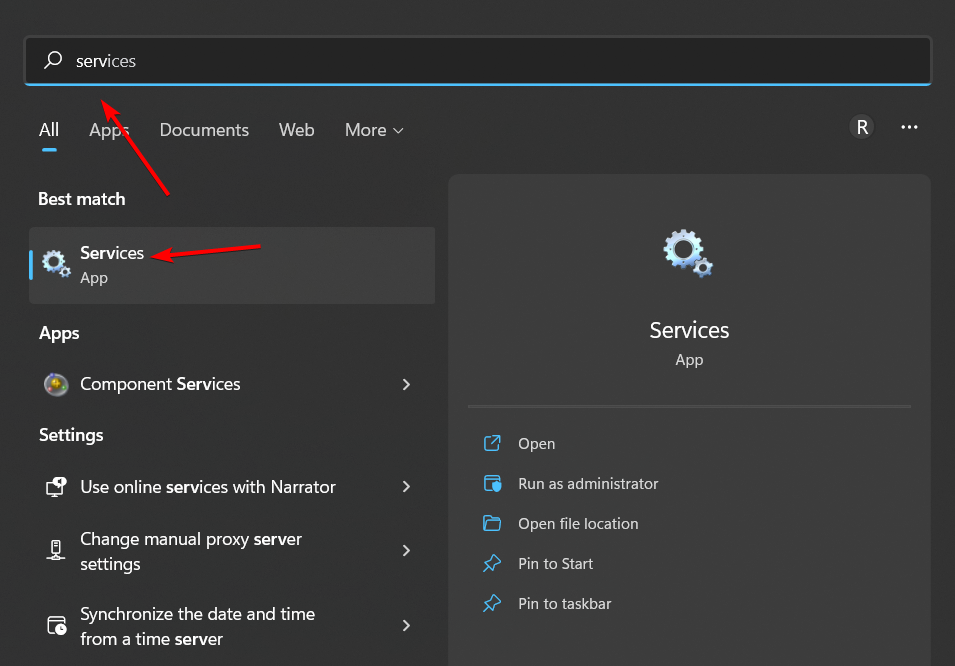
- Нажмите Windows, затем введите services и откройте верхний результат.

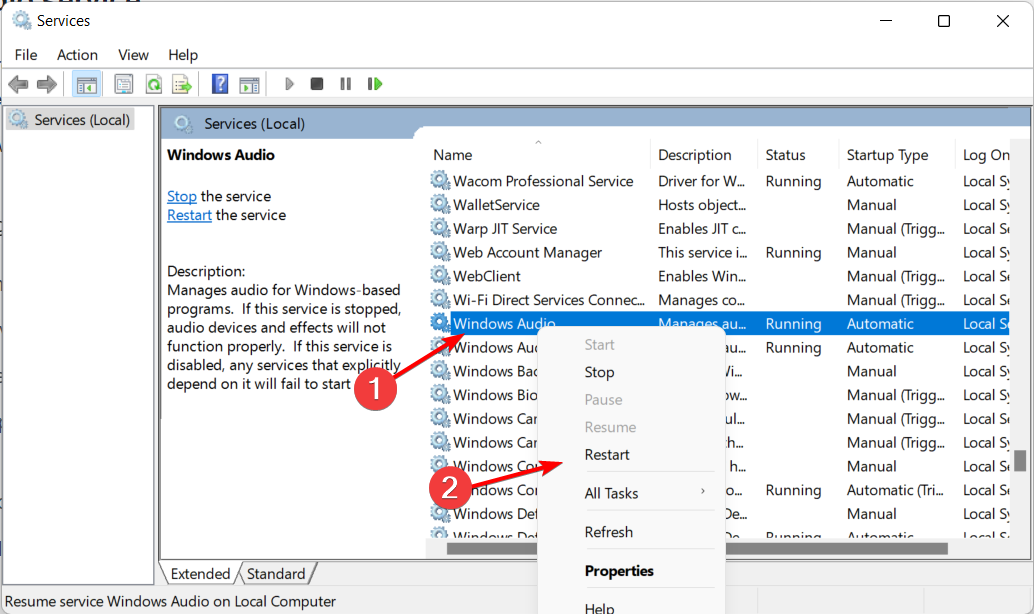
- Здесь прокрутите вниз, пока не увидите службу Windows Audio, щелкните ее правой кнопкой мыши и выберите «Перезагрузить».

Драйверы Blue Yeti для Windows 11 можно обновить так же, как вы делаете это в Windows 10. Кроме того, перезапуск службы Windows Audio решит проблему, а Blue Yeti распознается как расширенная аудиосистема USB.
Как видите, существуют различные решения, к которым вы можете прибегнуть, если компьютер не распознает ваш микрофон Yeti.
От обновления драйверов с помощью специального инструмента до устранения неполадок в соответствии с нашими инструкциями мы уверены, что по крайней мере одно из решений в этом руководстве поможет вам решить проблему.
Если у вас есть еще вопросы о микрофоне Blue Yeti в Windows 10/11, не стесняйтесь задавать их в разделе комментариев ниже.
DIY Video Studio is supported by its readers. Please assume links on this site are affiliate links, and that I get commissions for purchases made through these links. As an Amazon Associate, I earn from qualifying purchases. Thank you if you use any of the links.
When I went shopping for my Blue Yeti, because I knew it had been originally launched in 2009, I asked, “does the Blue Yeti does work with Windows 10”. Yes, it does, I was assured. Happy with that answer, I went ahead and bought this nice-looking USB microphone.
When I got the mic home because an installation disk wasn’t included in the box, I looked on the Blue Microphones![]() website to see if I could find any installation files and a Blue Yeti drivers download. However, I needn’t have bothered.
website to see if I could find any installation files and a Blue Yeti drivers download. However, I needn’t have bothered.
You do not need Blue Yeti drivers for Windows 10 since the Yeti is a Plug’n’Play USB microphone. Just connect the Yeti to your PC’s USB port with the supplied cable and Windows 10 will recognize and install the Yeti as a USB audio input device.
So, instead of having to look for installation software and drivers, it turns out that setting up the Blue Yeti is very simple. Which of course is one of the advantages of using a USB microphone. You don’t need those professional XLR plugs and cables, nor do you need to get and install an audio interface. USB keeps everything simple.
Connecting a Blue Yeti to your Windows 10 PC
To connect the Yeti to your PC, you’ll need the USB cable that came with your Blue Yeti. Insert the mini-USB plug into the socket on the base of the Yeti.
Then connect the other end, the one with the USB-A plug, into one of the USB ports on your computer. If you are using a more recent computer that only has USB-C ports, you’ll obviously need a mini-USB to USB-C cable.
Once connected to your computer, since the Yeti is a Plug’n’Play device, Windows 10 will detect the microphone and install it as one of your available audio input devices. You probably will now be able to start using your Blue Yeti as your sound input in whatever app you’re going to run, such as Audacity, Adobe Audition, or Zoom.
Setting your Blue Yeti as the default audio input device
Although Windows may automatically set the Blue Yeti as your default input audio device, it may not do that if you have another device already selected, such as the microphone on a webcam. If that’s the case, here’s what to do.
To select the Blue Yeti as your microphone you need to do that in Windows Sound settings. There are two easy ways to open the Sound settings window.
(1) Type “sound settings” in the Windows search bar. Then in the results list that opens, click on Sound Settings.

(2) Right-click on the Speaker icon in the bottom right of the Windows 10 task bar. A small panel will open. Then click on “Open Sound settings”.
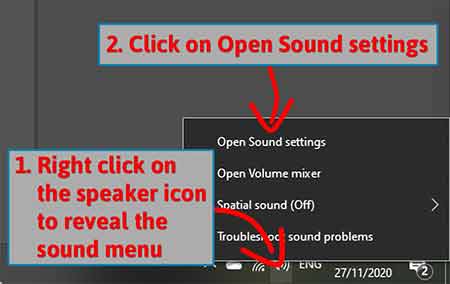
Whichever method you use, you should now see the Sound settings window open.
Under Sound you will first see a section titled Output. Below this there is another section called Input. This is where you can choose your input device.
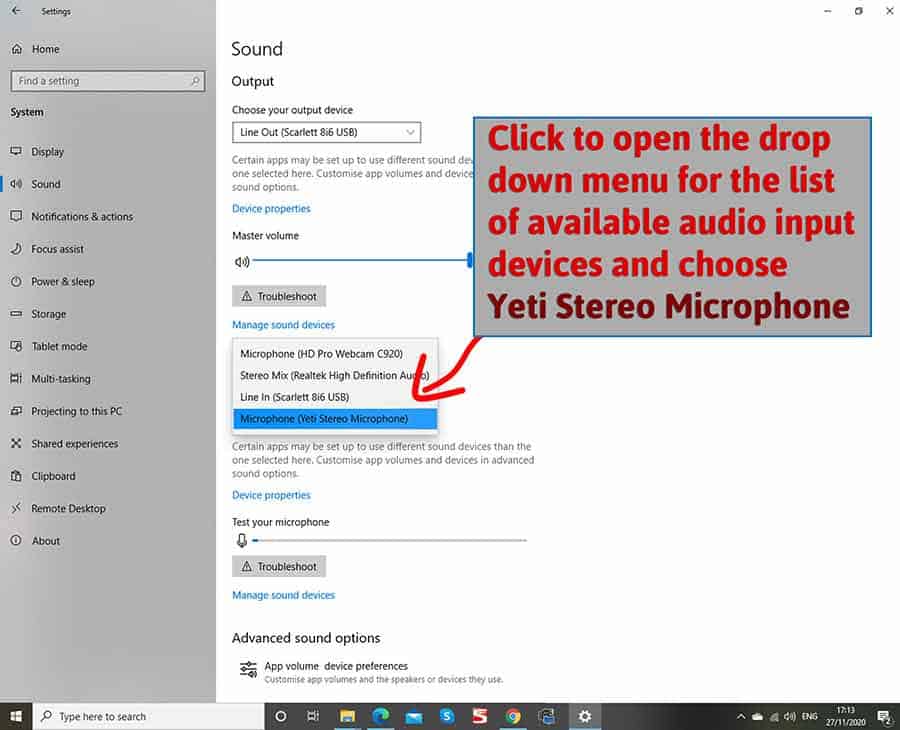
If you already have another microphone installed, perhaps if you have a webcam, it might be set as your default audio input device.
To change to the Yeti, click on the box beneath “Choose your input device”. Then select the Blue Yeti from the drop-down list of available audio input devices.
Once you’ve selected the Yeti as your input device, its entry in the list will turn blue, and you’re done. The Blue Yeti will now be your selected default audio input device.
Blue Yeti USB device not recognized windows 10
The solution to your Blue Yeti not showing up Windows 10 may end up with you having to dive into Windows Sound System settings and Device Manager but there are a few things to try first.
If your blue yeti is not showing up as a device in Windows, before you do anything else, make sure it is plugged into your computer’s USB port.
In my experience, even if the Yeti has previously been installed, it must be connected to the PC in order to be visible in Device Manager or Sound Settings.
[i] Check the USB cable
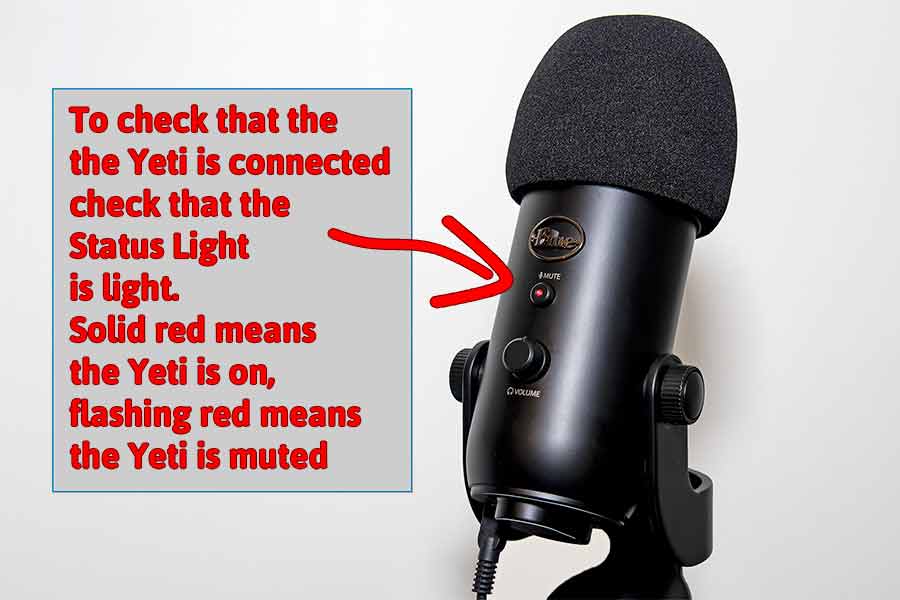
The simplest test of all is to visually check the status light in the middle of the Yeti’s mute button. The microphone does not have an on/off switch, so if the mic is plugged into your PC the status light will be lit up red. If you have muted the Yeti by pressing the mute button the status light will flash red. Either way, you will know if the mic is receiving power from your computer.
If the status light does not come on when the mic is connected, check the USB cable. Is each USB connector fully inserted? Try unplugging and plugging in again. If the Yeti’s status light still doesn’t light up, try another USB port on your computers or try using a USB cable that you know works.
[2] Check the Yeti on another computer
Still no luck? Try using the Blue Yeti on another computer.
If the Yeti’s status light comes on and everything appears fine, then the USB socket on your original computer may be faulty.
But if the status light doesn’t come on and you have tried a couple of USB cables, then the Yeti may be faulty.
[3] Reinstall your Blue Yeti as an audio device
If the Yeti’s red status light is lit but you’re still getting the “Blue Yeti not recognized Windows 10” error you can try uninstalling and then reinstalling the Yeti.
You’ll need to go into your computer’s Device Manager and delete the Blue Yeti as an audio device and then connect the microphone again, so Windows reinstalls it. To do this, follow these steps.
Step 1: Ensure the Blue Yeti is connected to a USB port on your computer. You should see the red LED on the mic’s mute button lit up.
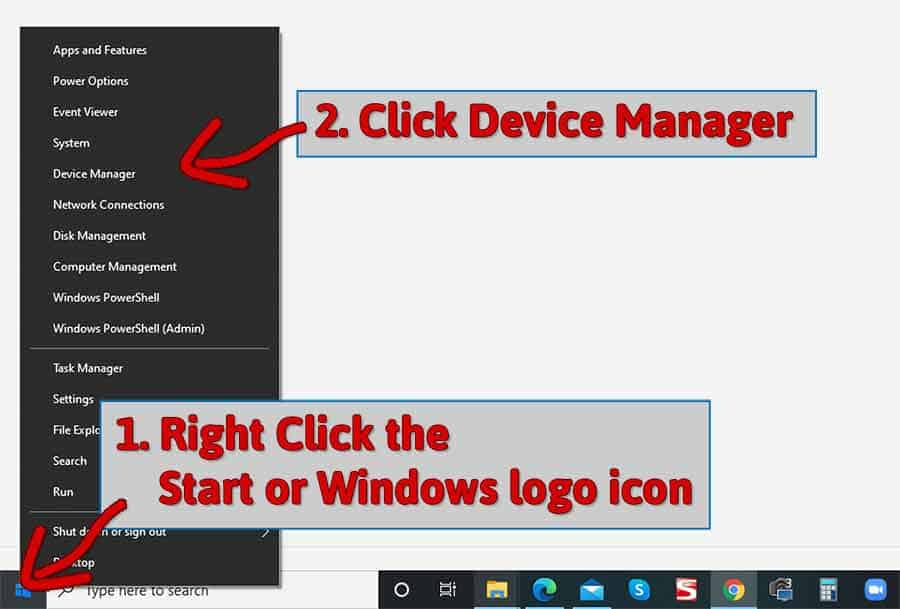
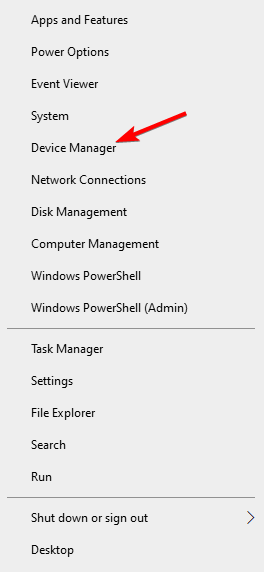
Step 2: Right-click on the Windows logo icon on the left corner of the taskbar to open the pop-up menu. You should see “Device Manager” as approximately the fifth entry from the top. Click on it to open the Device Manager.
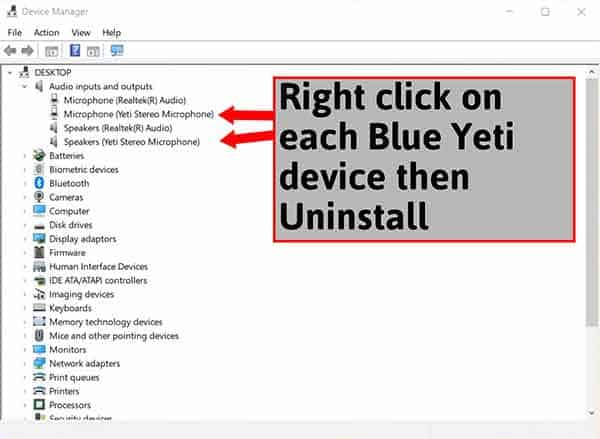
Step 3: With the Device Manager open, expand Audio inputs and outputs. You should see Yeti Stereo Microphone listed as both a microphone and speakers. Right-click on each Blue Yeti device and choose “Uninstall”.
Step 4: With the Yeti uninstalled you can now unplug the Yeti’s USB cable from your computer.
Step 5: Reboot the computer. Once the PC has rebooted and you’ve logged back into Windows, connect the Blue Yeti microphone using the USB cable and wait for Windows to install the microphone again.
Hopefully the Yeti will now be detected, and you can go ahead and use it in the app of your choice. But if you’re still experiencing problems you can try updating the Blue Yeti’s drivers.
[4] Update the Blue Yeti microphone driver
If the Yeti is still not being detected it may be that the drivers may have become corrupt and are stopping the microphone from functioning.
You’ll again need to open the Device Manager, so the initial steps are much the same as in uninstalling and reinstalling the Yeti as an audio device.
Step 1: Ensure the Blue Yeti is connected to a USB port on your computer. You should see the red LED on the mic’s mute button lit up.
Step 2: Right click on the Start or Windows logo icon on the left corner of the taskbar to open the pop-up menu.
You should see “Device Manager” as approximately the fifth entry from the top. Click on it to open the Device Manager.
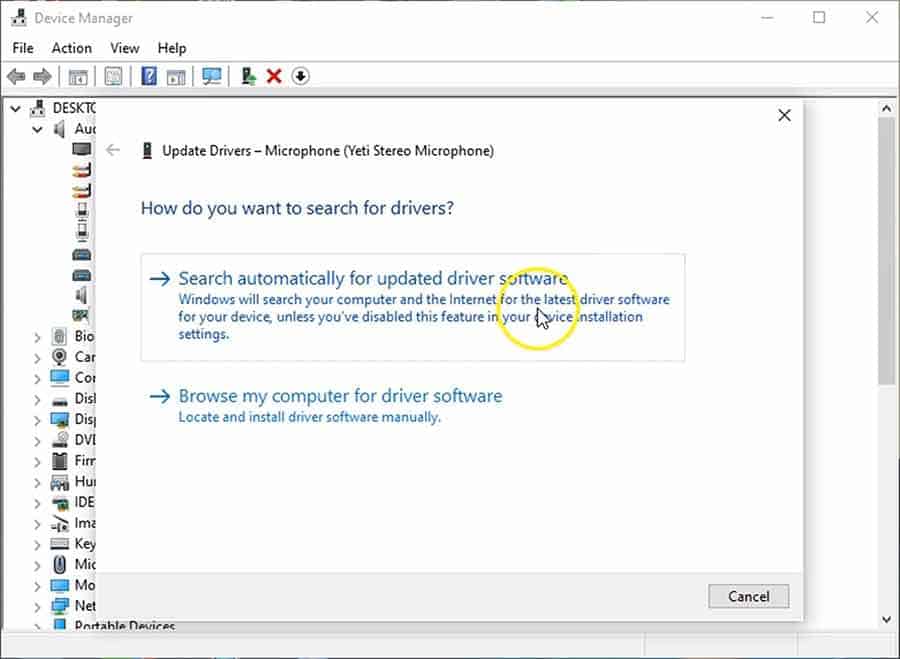
Step 3: With the Device Manager open, expand Audio inputs and outputs. You should see Yeti Stereo Microphone listed as both a microphone and speakers. Right-click on each Blue Yeti device and choose “Update Driver”.

Step 4: Windows will ask you; how do you want to search for drivers? Choose the first option of Search automatically for updated driver software.
Device Manager will search for the required driver and update it, but it may also report that the best driver is already installed.
Step 6: If all went well, restart your computer and log into Windows. Hopefully this will have fixed the problem and you’ll no longer have the problem of “Blue Yeti not recognized Windows 10”.
[5] Avoid using a Blue Yeti with a USB hub
If you use a lot of USB devices, be aware that Blue Microphones does not recommend plugging the Yeti into a USB hub.
Normally, you should not share a USB hub with other high-data throughput devices. This could lead to problems such as the Blue Yeti producing choppy audio, clicks, or stuttering. Using a USB hub may also cause problems with the Yeti not being recognized.
This has not been a problem for me when I’ve tried using a USB. I tried using my Yeti with a USB hub but did not experience any problems. But I know of others who have. If that’s the case for you, try bypassing the USB hub and plugging the Yeti directly into one of your computer’s USB ports.
Tosh Lubek runs an audio and video production business in the UK and has been using the Canon EOS R since it was released in the Autumn of 2018. He has used the camera to shoot TV commercials for Sky TV, promotional business videos, videos of events and functions, and YouTube creator content. He has also won international awards for his advertising and promotional work. You can meet him by visiting his “video booth” at HashTag business events across the country.
Update the Blue Yeti drivers in Windows 10, 11 to fix this error
by Alexandru Poloboc
With an overpowering desire to always get to the bottom of things and uncover the truth, Alex spent most of his time working as a news reporter, anchor,… read more
Published on August 24, 2022
Reviewed by
Vlad Turiceanu

Passionate about technology, Windows, and everything that has a power button, he spent most of his time developing new skills and learning more about the tech world. Coming… read more
- Users have reported that the Blue Yeti mic is not recognized by their system, and wrong hardware settings could be to blame.
- Out-of-date device drivers can be at the root of the problem, but in this guide, you’ll find the perfect tool for that.
- Another solution to solve the issue is to run the dedicated audio system troubleshooter.
XINSTALL BY CLICKING THE DOWNLOAD FILE
This software will repair common computer errors, protect you from file loss, malware, hardware failure and optimize your PC for maximum performance. Fix PC issues and remove viruses now in 3 easy steps:
- Download Restoro PC Repair Tool that comes with Patented Technologies (patent available here).
- Click Start Scan to find Windows issues that could be causing PC problems.
- Click Repair All to fix issues affecting your computer’s security and performance
- Restoro has been downloaded by 0 readers this month.
Blue Yeti microphones are well-known between Youtubers and users as an excellent piece of hardware for recording audio, from music to podcasts.
The reason is that the price-to-quality ratio is amazing. But many of them experience some connection or driver problems that make the mic unusable.
From a faulty USB cable to some corrupted drivers or anything in between, the issues pile up. For more info on how to do that, check the guide below.
Why is my blue yeti not recognized?
Because of hardware limitations, the connection to the microphone might be somewhat loose. It’s possible that the USB port didn’t detect the microphone you plugged in, resulting in the Blue Yeti X USB not recognized issue in Windows 10, and more.
Before you may use your Blue Yeti microphone, there are a few software-related requirements that need to be satisfied. This is true even if the microphone itself is fully operational.
Even after this, there are still things like the loudness of the system and the devices that produce audio that can change or halt the input that comes via the microphone.
Does Blue Yeti work with Windows 11?
Yes, Blue Yeti works with Windows 11. Though some users reported issues, it’s usually the drivers to blame and simply updating or reinstalling them fixed things.
Also, you must check the connections and try plugging the device into a different USB port on the computer.
Does Blue Yeti require drivers?
Yes, Blue Yeti requires drivers, but you won’t have to download and install them manually.
Just plug in the device, and it should start working automatically. Though if you encounter issues with it, the following solutions could help.
How do I fix Blue Yeti microphone if it’s not recognized?
- Why is my blue yeti not recognized?
- How do I fix Blue Yeti microphone if it’s not recognized?
- 1. Update, uninstall, or reinstall Blue Yeti drivers
- 2. Inspect the hardware
- 3. Run the Playing Audio troubleshooter
- 4. Set Blue Yeti as the default device
- How do I get my Blue Yeti mic to work on Windows 11?
1. Update, uninstall, or reinstall Blue Yeti drivers
- In order to fix the Blue Yeti won’t connect to PC issue, right-click the Start icon then select Device Manager.

- In Device Manager find Sound, video and game controllers and expand it.

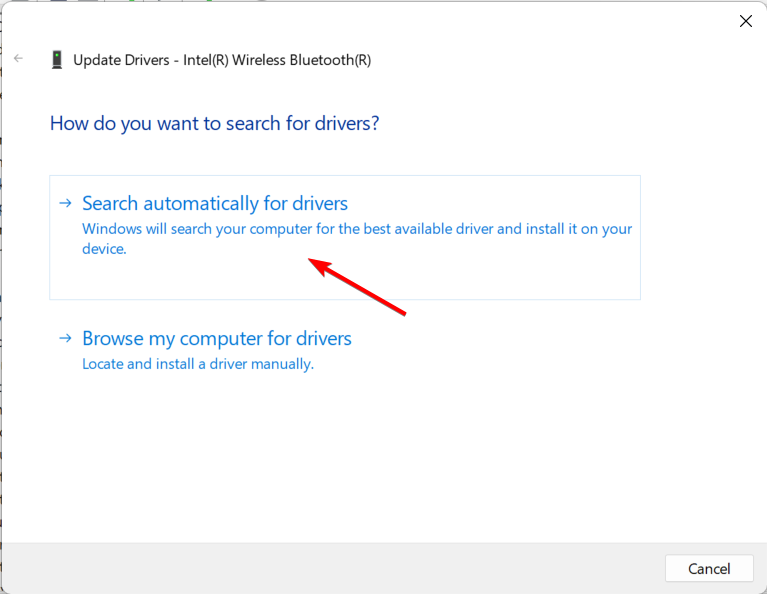
- Find your Blue Yeti X drivers, right-click them and choose Update driver.
- When the new window appears, choose Search automatically for updated driver software and wait for the process to finish.


You can follow the same steps to disable or uninstall the device. Also, you can uninstall your mic, disconnect it from the PC, reconnect it and allow Windows 10 install the drivers.
- Download the driver from the manufacturer’s website.
- After the download has finished, right-click the installer and choose Proprieties.
- Go to the Compatibility tab.
- Under Compatibility mode, check Run this program in compatibility mode for and choose Windows 7.

- Click Apply and OK.

The Blue Yeti not recognized issue in Windows 10, 11, and Mac might also have been caused by a faulty installation, so in order to fix the issue, it’s best to remove, then reinstall the drivers. After this, your Blue Yeti drivers will work perfectly in Windows 10.
1.1 Update your drivers with an advanced tool
Improve the performance of your hardware with this professional software that can scan your device at light speed and provide an accurate report of all the drivers that need updating.
With this app, you have a database of over 18 million new files that you can download in order to to keep your system running smoothly all the time. Rely on the Schedule Manager feature to not miss any updates.
Most of the time, the generic drivers for your PC’s hardware and peripherals are not properly updated by the system. There are key differences between a generic driver and a manufacturer’s driver.Searching for the right driver version for each of your hardware components can become tedious. That’s why an automated assistant can help you find and update your system with the correct drivers every time, and we strongly recommend DriverFix. Here’s how to do it:
- Download and install DriverFix.
- Launch the software.
- Wait for the detection of all your faulty drivers.
- DriverFix will now show you all the drivers that have issues, and you just need to select the ones you’d liked fixed.
- Wait for the app to download and install the newest drivers.
- Restart your PC for the changes to take effect.

DriverFix
Keep your PC components drivers working perfectly without putting your PC at risk.
Disclaimer: this program needs to be upgraded from the free version in order to perform some specific actions.
2. Inspect the hardware
- If Blue Yeti is not showing up in Device Manager, check your hardware – verify that everything is in working condition.
- Make sure your mic is turned on and functioning, and your Windows 10 PC doesn’t have any unknown problems.
- Check the connection – one of the most common problems is the cable.
- Try connecting the mic to another PC, if possible, and see if that helps.
- If not, change the cable and verify the integrity of the cable on both ends.
This seems like an obvious and quite silly fix, but you have to know that Blue Yeti mic’s only work on a USB 2.0, and not on USB 3.0.
Changing the USB helped the majority of users, as well as those who reported their Blue Yeti is not recognized by Mac, and it could also help you save a lot of time and hassle.
If the Blue Yeti microphone is not detected, then a good idea is to check your hardware and verify if the cables are working properly. If this doesn’t fix the problem, see our next solution.
- 5 best Blue Yeti mic software for Windows 10/11
- Blue Yeti mic not recognized in Logitech G Hub? Try these fixes
- 4 best Seasonal Blue Yeti microphone deals in 2022
3. Run the Playing Audio troubleshooter
- Go to Start, then select Settings.
- Click on Update & Security.
- In the left sidebar, select Troubleshoot.

- In the right section, click on Playing Audio and then on Run the troubleshooter.
- Wait for the process to finish.The Blue Yeti Nano not detected issue will be solved.

When the Blue Yeti device is not recognized on your Windows 10, then it’s time you perform some troubleshooting, which in this case is quite easy to do if you follow our guide.
4. Set Blue Yeti as the default device
- Right-click the Speakers icon in the bottom left of your Windows 10 display.
- Click on Sounds.
- Select the Recording tab.
- Find your Blue Yeti microphone, right-click it, and select Set as Default Device.

- Click Apply and then OK. The Logitech G Hub not detecting Blue Yeti issue will be fixed.

Another efficient option you can resort to if your computer is not recognizing Blue Yeti, is to set Yeti as your default device. Start off by opening the Sound menu then follow our instructions.
How do I get my Blue Yeti mic to work on Windows 11?
- Press Windows then type services and open the top result.

- Here, scroll down until you see the Windows Audio service, right-click it and choose Restart.

The Windows 11 Blue Yeti drivers can be updated in the same manner you do in Windows 10. Besides this, restarting the Windows Audio service will address the issue as well as the Blue Yeti recognized as USB advanced audio one.
As you can see there are various solutions you can resort to if the computer is not recognizing your Yeti mic.
From updating your drivers using a specialized tool to troubleshooting following our instructions we are sure that at least one of the solutions in this guide will help you fix the problem.
If you have any more questions about Blue Yeti mic’s on Windows 10/11, feel free to drop them in the comments section below.
![]()
Newsletter
People adore the Blue Yeti microphone, but you won’t dispute that it has a number of issues that are difficult to deal with at times.
In addition, if you encounter any problems with the Blue Yeti Drivers for Windows 10, you can find a solution here!
Today, we’ll teach you about the quickest and most straightforward methods of resolving Blue Yeti Driver issues. Check out the processes we’ve listed and make sure you follow them to get your problems resolved!

IMPORTANT: The Blue Yeti cannot be connected to both your computer and your audio interface or mixer (both of which are analog). When the Yeti is connected to an external analog device, the headphone jack is disabled, and you will need to monitor through a preamp, interface, or mixer to avoid hearing background noise.
In order for the Yeti to function properly, it must be designated as the primary audio device by the operating system. Most programs will allow you to do this through Sound Settings (Windows) or Sound Preferences (Mac OS X) (Mac). Because most streaming and recording software has its own sound settings, you’ll need to make sure that the Yeti is selected as the primary input and output device when using it.
This means that your streaming software or other associated audio software must be aware of the audio device connected to the computer, as well as which input and output streams are being used. Once you’ve linked the Yeti to your computer, you’ll need to alter the sound settings on your Windows or Mac computer, which are detailed below.

Blue Yeti installation on Windows 10
1. From the Windows toolbar, select Sound from the context menu by right-clicking the speaker icon.
2. Select the Playback tab, right-click “Speakers BLUE Yeti,” pick Set as Default Playback Device from the context menu, and then select Set as Default Communication Device from the contextual menu.
3. Then, pick Properties from the context menu of the “Speakers BLUE Yeti.” Then, click on the Advanced tab to continue.
4. Uncheck the “Allow applications…” box located inside the Exclusive Mode section, then click Apply and then OK to complete the process.
5. When you update the sound settings in your software, you’ll also need to access the Advanced box in order to modify the sample rate used.
Blue Yeti configuration for Mac OS X
1. From the Menu bar, select the Apple icon, then System Preferences from the drop-down menu.
2. Select Sound from the drop-down menu.
3. Select your Blue Yeti from the Input and Output tabs on the toolbar.
4. When altering the sound settings in your software, you’ll also need to use the Format dropdown box to select a different sample rate from the list.
Is your Blue Yeti not functioning properly?
The Yeti may not appear when you connect it to your computer; if this is the case, reconnect the microphone by disconnecting it and inserting it back in. If you haven’t already, consider adjusting the USB connections on the Blue Yeti such that it is directly connected to your computer instead of being through a hub. Use a different USB port or cable to see whether the problem is still present. More information on troubleshooting audio device connectivity issues can be found in our Windows and Mac tutorials.
Take a look at these Solutions
- Don’t feel obligated to try them all; simply make your way down the list until you find one that works well for you.
- Attempt using a different USB port or cable.
- Ensure that the microphone driver is up to date.
- Disabled devices should be visible in the settings.
- Make use of the audio troubleshooting tool.
Solution 1: Try using a different USB port or cable.
To rule out a hardware problem, you can first try connecting your USB cable to another USB port and making sure it is correctly attached. Check to see if your microphone has returned to normal operation. Many customers have discovered that switching the USB port from 3.0 to 2.0 solves the problem.
Try using a different USB cord if Blue Yeti is still not showing up on your PC after several attempts. You may easily obtain a replacement cable from Amazon.com. To ensure proper operation, ensure that the status light is illuminated.
Solution 2: Install the most recent version of the microphone driver.
If there’s nothing wrong with your hardware, it’s possible that the problem is with your software. When the driver software for your Blue Yeti microphone becomes corrupted or out of date, your Blue Yeti microphone will no longer be recognized.
There are primarily two approaches available to you for resolving this driver issue:
Option 1 – It will happen automatically (Recommended)
You can use Driver Easy to automatically update device drivers if you aren’t sure in your ability to work with device drivers. Driver Easy will automatically recognize your system and locate the most up-to-date drivers for your sound card and Blue Yeti microphone, which it will then download and install in the proper configuration.
1) Download and install Driver Easy on your computer.
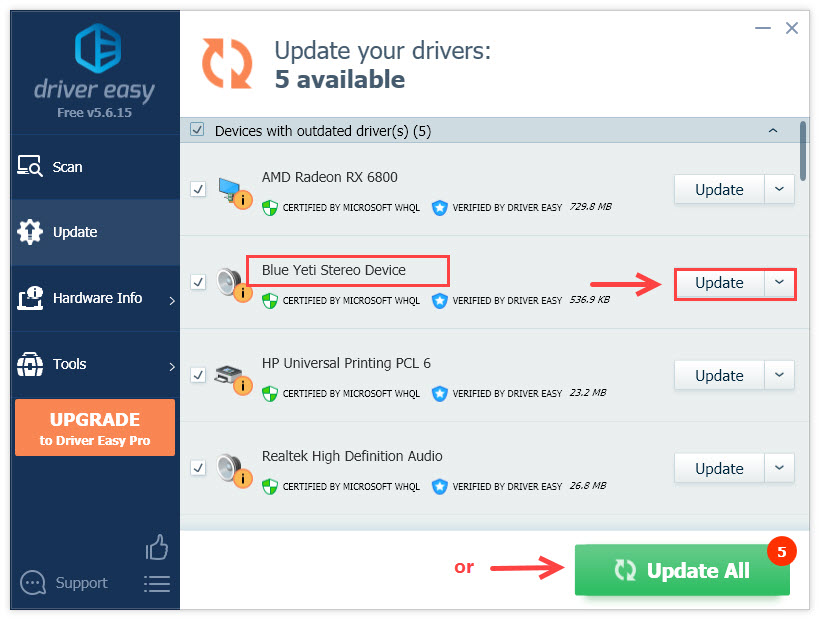
2) Launch Driver Easy and click on the Scan Now icon to begin scanning. After that, Driver Easy will scan your computer and identify any problem drivers.
3) Select Update next to the driver who has been flagged (this is partially manual).
Alternatively, you can click Update all to update all of the drivers at once. This necessitates the purchase of the Pro Version, which includes full support as well as a 30-day money-back guarantee. When you select Update All, you will be prompted to do an update.
4) Restart your computer in order for the modifications to take effect.
Option 2 — Using a Manual
It will take time and patience to manually update the Blue Yei microphone driver, on the other side, so be patient. If you’re up for it, here’s how to go about it:
1) Verify that your Blue Yeti microphone is correctly connected to your computer.
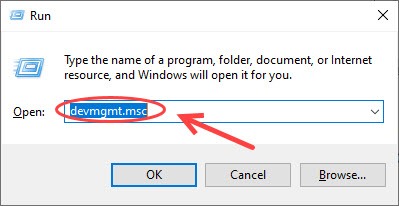
Press the Windows key and the R key together on your keyboard to bring up the Run box.
3) In the Run box, type devmgmt.msc and hit Enter.
If your Blue Yeti device is not mentioned in the Sound, video, and gaming controllers area, expand that category and look for it.
5) If this is the case, right-click it and choose Uninstall. When prompted, select Delete the driver software for this device from the drop-down menu and then click Uninstall. Allow for the completion of the process. It may take a few seconds for this to complete.
(If this is not the case, you can proceed to Step 
6. Right-click the Sound, Video, and Game Controllers and choose Scan for hardware changes from the context menu that appears.
7) The driver software will be reinstalled on its own without any intervention. Now, your Blue Yeti microphone may be effectively identified and used.
If you do not see your Blue Yeti driver listed in the Sound, video, and game controllers section, you may need to unplug your Blur Yeti microphone before proceeding.
9 ) Disconnect the Blue Yeti microphone from the Universal Serial Bus controllers and reconnect it thereafter. You will see that there is an additional USB Composite Device listed in the Device Manager.
10) Right-click the device and select Update driver from the context menu.
11) Select the option to search for drivers automatically.
12) Your Blue Yeti will become visible once the update has been completed. By now, your microphone should have been detected.
Solution 3: Install the latest version of Device Manager.
The procedure outlined below should be followed in order to update drivers using the Device Manager tool.
1. First and foremost, you must look at the taskbar at the bottom of the screen. Now, navigate to the Windows logo that may be seen there.
2. You must first perform a right-click on it.
3. Following that, you will be presented with a number of options. The Device Manager must be selected from the drop-down menu.
You will see the faulty Blue Yeti Mic in the Device Manager, as seen in Figure 4. Navigate to the microphone and right-click on it. This will lead you to the Update Driver menu option, which you may select.
The Device Manager will assist you in searching for the most recent driver available online. 5. Select the Update driver option and then you must wait. Simple as clicking on Search Automatically for Updated Driver Software, and your job is done for the day!
Driver Updates Done Manually
However, if you do not want the Device Manager to perform its functions on your behalf, you can manually do the driver update procedure.
To begin, go to the manufacturer’s website and fill out the necessary information. You’ll be able to find the necessary software on that page. All that is required is that you download and install it on your computer.
Please keep in mind that this process necessitates your full attention and caution. It is essential that you do not install the incorrect driver on your computer. In any other case, it will result in a malfunction of your system.
Solution 3: Install the most recent audio driver.
However, even if there is no dedicated driver for the Blue Yeti Microphone, it is reasonable to assume that you should download the most recent driver for your USB and audio devices. In this case, your Blue Yeti Microphone would not be detected by Windows 10 if the audio driver is out of date or corrupted, for whatever reason.
It is, therefore, appropriate to begin the process of updating the audio or USB driver for your PC in conjunction with the Blue Yeti Microphone at this time.
First and foremost, Driver Booster may be used to automatically upgrade the audio driver for the Blue Yeti.
In addition to having a 3 million driver database, Driver Booster can be a very useful tool when there is no driver for Blue Yeti on Windows 10. If no driver for Blue Yeti is available on Windows 10, Driver Booster can locate and update the missing or outdated audio driver for you automatically to the Blue Yeti pro driver. Driver Booster, in addition to being the greatest driver update application available, can also assist you in resolving the Blue Yeti device not recognized error by utilizing its Fix No Sound feature.
Driver Booster should be downloaded, installed, and launched on Windows 10 with an undetectable Blue Yeti driver.
2. Select Scan to allow Driver Booster to look for a corrupted or out-of-date driver for the Blue Yeti microphone.
Install the latest Blue Yeti driver for Windows 10 by searching for it in the Sound, Video, and Game Controllers section of the Control Panel.
Then Driver Booster will download and install the most recent version of the audio driver for the Blue Yeti device. After that, if the Blue Yeti is still not detected, you should try using Driver Booster to resolve the sound problem.
4. In the Driver Booster’s left-hand window, select the Tools icon and then select the Fix No Sound option.
Perhaps Driver Booster will be able to determine what is causing the Blue Yeti microphone USB not to be recognized or to be detected but not to be recorded on Windows 10 and then assist in resolving the issue if at all possible.
If you prefer to have the most up-to-date Yeti driver within Windows 10, you may update the device drivers through Device Manager.
In some ways, Device Manager can help you identify the Blue Yeti driver you’re looking for, and this can help you resolve the problem of Windows 10 not recognizing the Blue Yeti microphone driver.
1. Launch the Device Manager application.
2. In Device Manager, expand Audio inputs and outputs and right-click the audio driver to select Update driver from the context menu that appears.
3. Select the option to automatically search for and install updated driver software.
When you click on this, Device Manager will automatically download and install the most recent audio or USB driver for you on Windows 10. Alternatively, you can go to the Blue Yeti Mic’s official website and download the driver from there.
Our Final Thoughts
So, if you ever have a problem with Blue Yeti Drivers for Windows 10, you may easily resolve it without any difficulty! Check out the simple methods and give them a shot in your house. There are a variety of alternative options for dealing with the Blue Yeti problem.
Please tell us which one you are following! Also, please leave a comment below describing the issue you are having with Blue Yeti.
Frequently Ask Questions
What is causing my microphone to not appear to be working?
Check to see that your USB cable is correctly connected to the USB port on your computer’s keyboard. Check to see if the status light is illuminated as well. Open the audio options on your computer and make sure that the Blue Microphones Yeti is the sound source that is being used.
There is feedback from my speakers when I put my yeti in. Why is this?
Any time you utilize a microphone in conjunction with live speakers or open-back headphones, there is the possibility of feedback being generated. The speakers should not be oriented directly at the microphone when utilizing a microphone in conjunction with live speakers or open-back headphones, since this can cause feedback to the microphone. Additionally, you should ensure that the volume of your speaker or headphones is not too loud so that it is picked up by the microphone.
The phenomenon known as a feedback loop occurs when your speakers/headphones are producing the sound from a microphone and the sound from the microphone is returned to the same speaker/headphones. In order to avoid a potential feedback loop while connecting your Yeti, make sure that the speaker/headphone volume is set down and that your speakers are placed far enough away from the microphone to avoid a feedback loop. Once you’ve connected the microphone and created a signal, you can change the volume of your speaker or headphones to the desired level.
What is causing the distortion in my microphone?
Reduce the microphone gain by turning the microphone gain knob counterclockwise, or try increasing the distance between your Yeti and the sound source to see if that helps.

I’m a multi-faceted artist that loves exploring the creative side of life. Writing, photography, and music are my passions. From captivating stories to unique perspectives through photos, I’m always looking for ways to create meaningful content.
Contents
- Make sure your microphone is turned on
- Check your microphone connection
- Make sure it is not a hardware issue
- Set your Blue Yeti as a default device
- Make sure your mic is not disabled in Windows
- Restart the audio service
- Run the Audio Troubleshooter
- Update your microphone driver
- Update the driver manually
- Use Device Manager
- Recruit Auslogics Driver Updater
- Conclusion

‘I am blessed that I am recognized’
Deshaun Watson
If you are desperate to know how to fix Blue Yeti microphone issues, you have luckily arrived at the right place. We know simple and effective ways to fix Blue Yeti not recognized on Windows 10 and other issues with this mic. Just work your way down through the list of tips below and get your device up and running again:
Make sure your microphone is turned on
Yep, we know that seems too obvious, but a lot of users get panicked into troubleshooting before checking if their Blue Yeti mic is actually on. So, take a closer look at yours and see if the piece of hardware has been switched on – this might save you both time and effort.
Check your microphone connection
The second step is to ensure that your mic is properly connected. It is a good idea to reconnect it – some users have reported this manoeuvre has worked for them. You can also try another USB port since the current one might be faulty.
Make sure it is not a hardware issue
Now it is time to connect your device to another computer. The point is, the mic might be faulty. If so, you need to invest in a new device.
Set your Blue Yeti as a default device
You may have issues with your Blue Yeti mic if it is not configured to be your default device. Here is how you can fix that:
- Go to your taskbar.
- Navigate to the system tray.
- Right-click on the Speaker icon.
- Select Recording Devices.
- Locate your Blue Yeti mic (keep in mind that it might be under the name USB Advanced Audio Device).
- Right-click on the device and select Set Default Device.
- Click Apply and OK to save the changes.

Now check if your Blue Yeti issue has been resolved.
On Windows 11, go to the Settings application and click on Sound under the System page. When you get to the Sound page, click on Microphone to check your default mic. If you want to add a Bluetooth device, click on Add Device beside “Pair a new advice.”
No success so far? Then keep on reading – one of the following fixes is sure to help you.
Make sure your mic is not disabled in Windows
To do that, take the steps below:
- Go to the volume icon in the taskbar.
- Right-click on the icon.
- Select Recording devices.
- Locate an empty space and right-click on it.
- Select ‘Show disconnected devices’ and ‘Show disabled devices’.
On Windows 11, follow these steps:
- Go to the Settings application and click on Sound under the System page.
- When you get to the Sound page, click on Microphone to check if your default mic is enabled.
- If you want to add a Bluetooth device, click on Add Device beside “Pair a new advice.”
See if your microphone is detected now. Then enable it.
Restart the audio service
The audio service is responsible for audio-related processes, including the Microphone. You may be experiencing the error because the service isn’t properly configured.
Restarting the Windows Audio and Windows Audio End Point Builder services should fix the issue in this case.
The steps below will guide you, whether you use Windows 10 or Windows 11:
- Open the Start menu and type “Services.”
- Click on the Services app in the search results.
- After the Services application opens, scroll down to Windows Audio and double-click it.
- Click on the Stop button once you see the Windows Audio Properties (Local Computer) dialog window.
- Select Automatic beside the Startup Typed drop-down menu and click on the Start button.
- Click on OK and repeat steps 3 to 5 for the Windows Audio Endpoint Builder service.
Run the Audio Troubleshooter
Windows’ native audio troubleshooter finds and fixes audio-related problems. It can detect mic issues and resolve them or suggest solutions.
Follow these steps to run the troubleshooter in Windows 11:
- Tap Win + I on your keyboard to launch Settings.
- Click on Sound under the System page of the Settings app.
- Scroll down under the System > Sound page to the Advanced section.
- Click on Input devices beside “Troubleshoot common sound problems.”
- The tool will ask which device you want to troubleshoot. Choose one and click on Next.
- It’ll scan for issues and automatically resolve them if it has the corresponding fix. If the troubleshooter can’t resolve the problem, it will tell you what’s wrong.
Follow these steps to run the troubleshooter in Windows 10:
- Tap Win + I on your keyboard to launch Settings.
- Click on Update & Security once you get to the Settings app’s home page.
- Go to the left pane of the Update & Security page and click on Troubleshoot.
- Next, go under the Troubleshoot page, click on Playing Audio, then select the Run the Troubleshooter option.
- The tool will scan for audio-related errors, which may include the microphone, and provide solutions.
Update your microphone driver
If your mic’s driver is out of date, it can prevent the device from proper functioning. This means that updating the driver will most likely resolve your Blue Yeti problem.
Here is how you can do that:
Update the driver manually
You can update the driver in question yourself. To do that, you should go to the manufacturer’s website and find the necessary software. Download it, then install it on your PC. Remember that you should be very careful since installing the wrong driver may cause your system to malfunction.
Use Device Manager
Another option is to use the built-in Device Manager tool:
- Navigate to the taskbar and right-click on the Windows logo icon.
- Select Device Manager from the list of options.
- Locate your problematic Blue Yeti mic.
- Right-click on the device.
- Select the Update driver option.
- Make Device Manager search for the driver you need online.
- Select the ‘Search automatically for updated driver software’ option.
Device Manager will search for the driver needed online. However, it may fail to succeed in this. So, bear in mind this method is not flawless.
Recruit Auslogics Driver Updater
On this list, the easiest way to resolve the problem is by using Auslogics Driver Updater. This tool needs just your click to scan your system for driver-related problems. Then it will find the latest manufacturer-recommended versions of the drivers that your PC needs to function properly and install them on your computer. This means all your driver issues – not only those related to your Blue Yeti devices – will be fixed. As a result, you will get a much faster and more stable system.
Ensure that all your drivers are up to date.
Conclusion
Now you know how to fix Blue Yeti microphone issues in Windows 10. If you need further assistance, do not hesitate to leave your comment below.
Do you like this post? 🙂
Please rate and share it and subscribe to our newsletter!
53 votes,
average: 2.26 out of
5
Loading…