Содержание
- Почему компьютер не может обнаружить систему
- Вариант 1: Исправление ошибок файловой системы
- Вариант 2: Восстановление загрузчика
- Вариант 3: Ручное пересоздание BCD
- Вариант 4: Переустановка Windows
- Вопросы и ответы
Почему компьютер не может обнаружить систему
Для исправления связанных с запуском системы неисправностей в Windows предусмотрена специальная служебная утилита «Bootrec». Она входит в состав среды WinPE и используется для восстановления загрузчика, а также данных конфигурации загрузки системы. Это мощный инструмент, но и он может выдавать ошибки: например, при выполнении сканирования диска на предмет имеющихся на нем операционных систем командой bootrec /scanos утилита может вернуть ошибку «Общее количество обнаруженных систем Windows: 0».
С этой ошибкой пользователь может столкнуться и при выполнении похожей команды — bootrec /rebuildbcd, позволяющей не только обнаруживать на диске совместимые с Windows системы, но и добавлять выбранные из них в хранилище конфигураций загрузки. Существует три основных причины появления указанной ошибки: повреждение целостности файловой системы, повреждение конфигурационного файла BCD и повреждение содержимого системного каталога «System32».
Вариант 1: Исправление ошибок файловой системы
Для начала следует исключить повреждения файловой системы, но, поскольку в рассматриваемом случае система, скорее всего, не загрузится, вам нужно будет воспользоваться установочным диском с Windows.
Читайте также: Как создать загрузочную флешку с Windows 11 / Windows 10 / Windows 8 / Windows 7 Windows XP
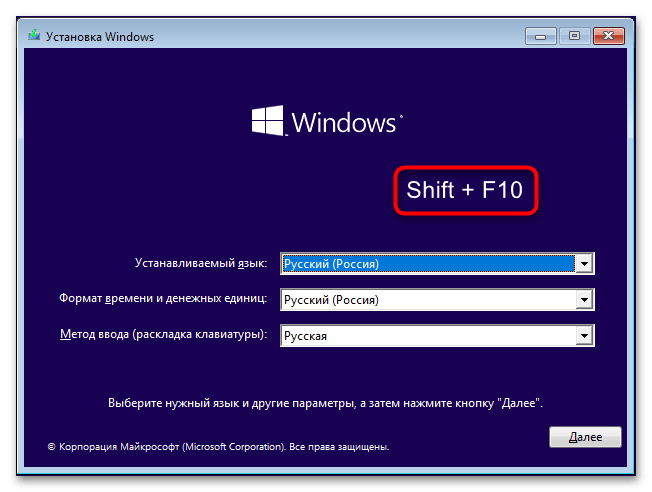
- Загрузите компьютер с флешки или DVD-диска с дистрибутивом Windows, а когда на экране появится окно мастера-установщика, нажмите Shift + F10.
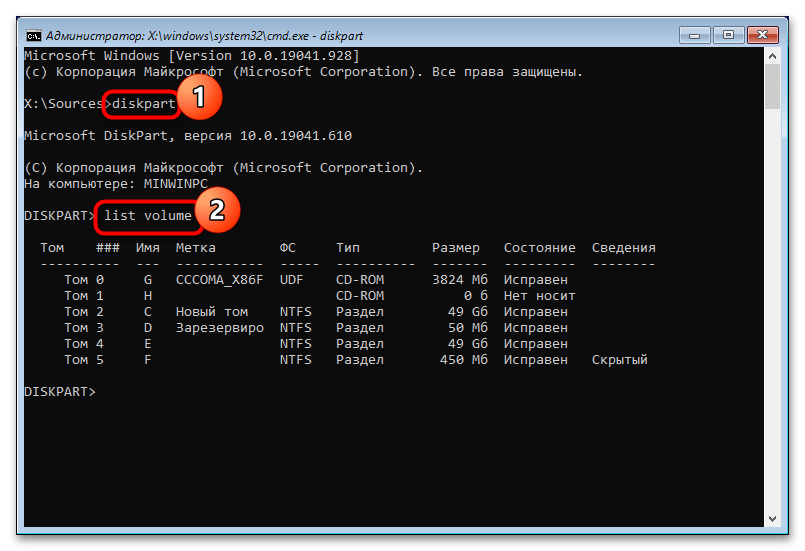
- В открывшейся командной строке определите буквы разделов на жестком диске, для чего последовательно выполните команды
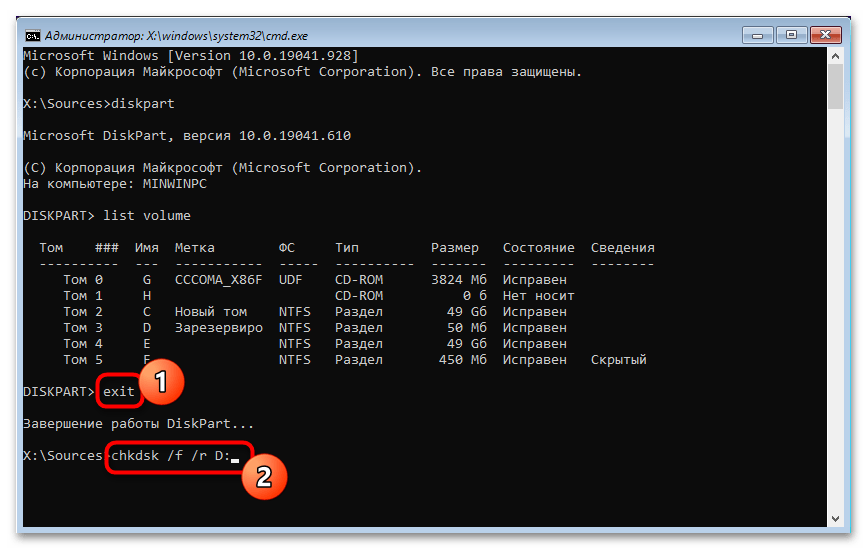
diskpartиlist volume. - Выйдите из утилиты «Diskpart» командой
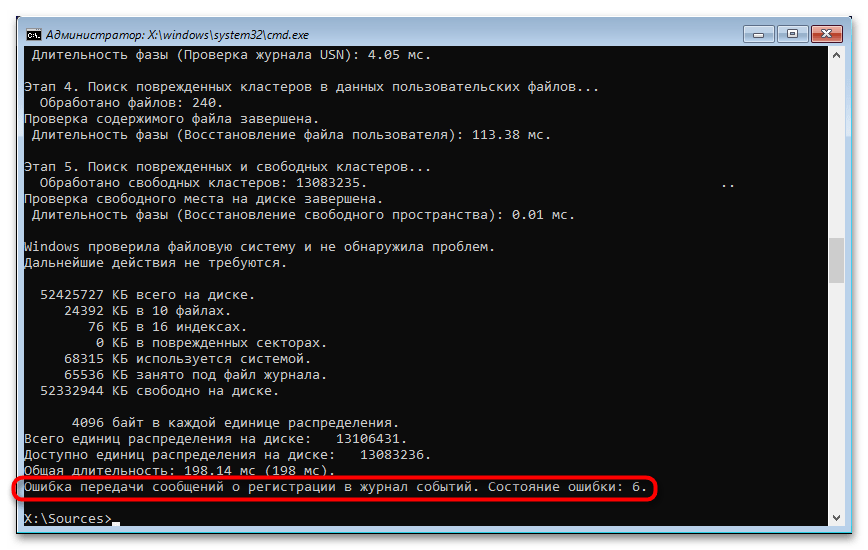
exit, а затем выполните командуchkdsk /f /r D:, где D — буква проверяемого раздела. - Проверьте все системные разделы, подставляя в команду их букву.
Если в процессе сканирования будут обнаружены ошибки файловой системы, утилита «chkdsk» исправит их. Не обращайте внимания на ошибку передачи сообщений о регистрации в журнал событий — это нормально, поскольку в неработающей Windows последний недоступен.
Вариант 2: Восстановление загрузчика
В состав загрузочной среды Windows входит инструмент, позволяющий устранять типовые проблемы с загрузкой операционной системы, — воспользуйтесь им.
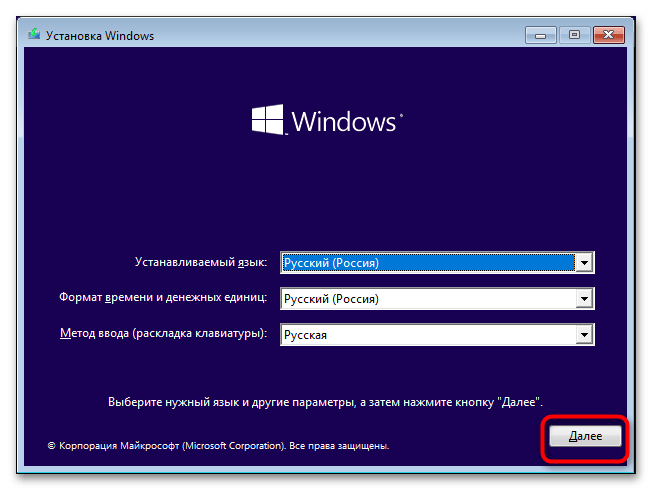
- Загрузите компьютер с установочного диска и нажмите в окне мастера установщика «Далее».
- В следующем окне нажмите «Восстановление системы».
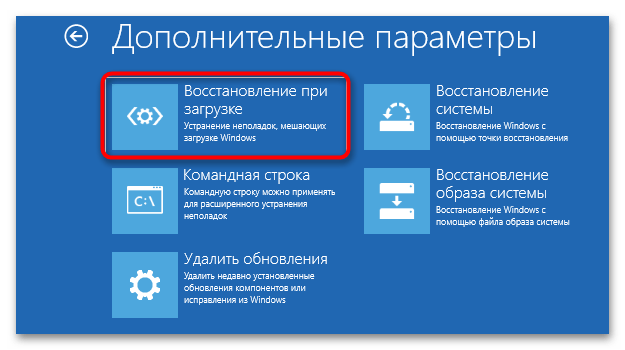
- Выберите в меню действий «Поиск и исправление неисправностей» → «Восстановление при загрузке».
- Дождитесь результата.

Вариант 3: Ручное пересоздание BCD
Если «chkdsk» не выявила ошибок или исправление найденных ошибок не дало результатов, вероятно, дело в повреждении загрузочного файла BCD. В этом случае его нужно пересоздать.
- Загрузите компьютер с установочного диска и откройте «Командную строку» нажатием Shift + F10.
- Определите букву системного служебного тома средствами утилиты «DiskPart» как было показано выше. Вам нужен том с файлом BCD.
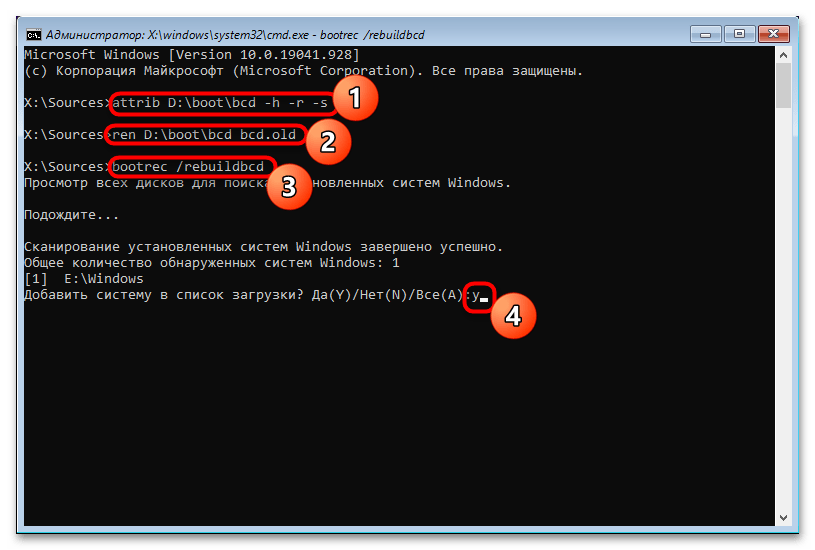
- Выполните последовательно следующие команды:
- В случае успеха вам будет предложено добавить систему в список загрузки — подтвердите действие вводом Y и нажатием клавиши Enter.
- Попробуйте загрузиться в обычном режиме.
attrib D:bootbcd -h -r -s

ren D:bootbcd bcd.old

bootrec /rebuildbcd

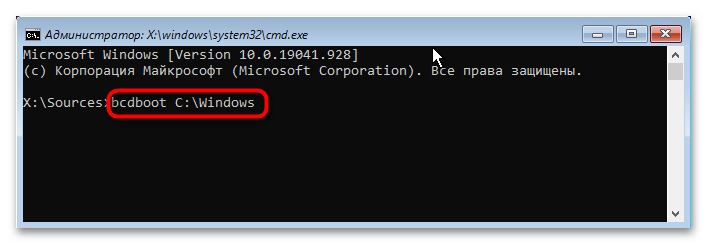
Если при включении компьютера вы получите ошибку загрузки с кодом 0xc000000f и указанием на файл BCD, вернитесь к предыдущему шагу и выполните команду восстановления файлов загрузки bcdboot C:windows.
Когда перечисленные выше меры не дали положительного результата, причина ошибки может заключаться в повреждении самой Windows. Если у вас имеется полная резервная копия системы, выполните восстановление из нее, если же бэкап отсутствует, Виндовс придется переустановить. В крайнем случае ОС придется откатить к заводскому состоянию.
Подробнее: Возвращаем Windows 10 к заводскому состоянию
Еще статьи по данной теме:
Помогла ли Вам статья?
Have you ever come across the “total identified Windows installations 0” error in CMD? What does it mean and how to fix it? Don’t worry. This article will tell you all the information about the error total identified Windows installations 0 Windows 10/8/7.
When your PC ran into problem and was unable to boot into Windows, you might try various solutions to fix it. And one is to rebuild BCD with a few commands. You may input the following commands to rebuild BCD in CMD with a bootable USB drive.
- bootrec /fixmbr
- bootrec /fixboot
- bootrec /scanos
- bootrec /rebuildbcd
However, some users get into trouble during the process. When they type the command bootrec /scanos or bootrec /rebuildbcd and hit Enter key, the “total identified Windows installations 0” error message emerges unexpectedly. What happened? You might be confused.
If you have no idea about how to fix this issue, you may read this article.
What does the Windows 10 total identified Windows installations 0 message mean? Actually this error message is to tell you that bootrec couldn’t find any additional installations of Windows on your computer to add to the BCD. How to fix it? Don’t worry. You will just need to run a few more commands to repair the BCD.
Solution 1. Repair BCD
If you receive the “Total identified Windows installations: 0” message instead of “Total identified Windows installations: 1” message, you need to run a few more commands to fix this issue and continue to rebuild BCD.
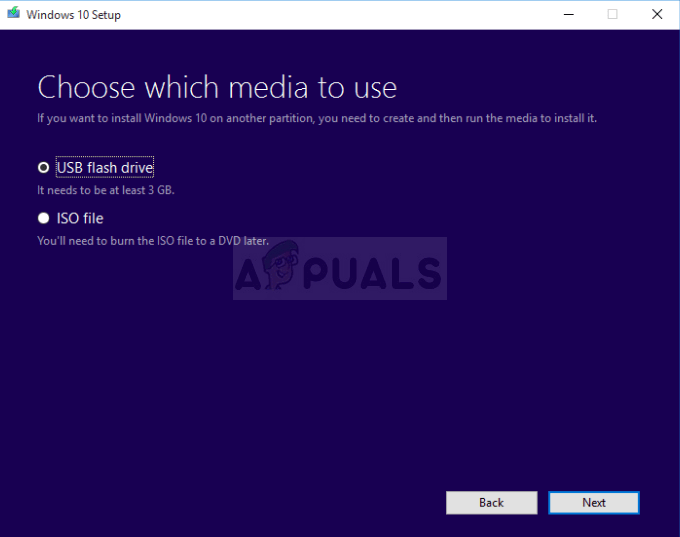
Step 1. Create a Windows 10 bootable USB drive with Windows Media Creation Tool. If you have one, just ignore this step.
Step 2. Change BIOS boot order to boot from the USB flash drive.
Step 3. On the Windows setup page, choose your language preference, and then click Next to continue.
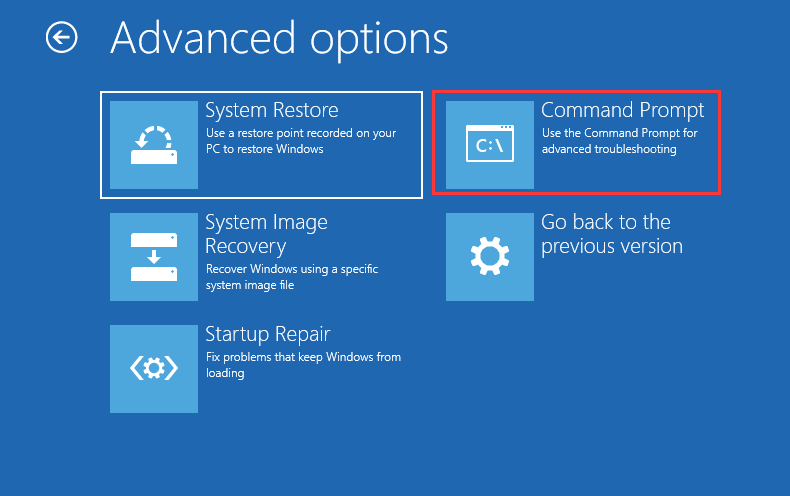
Step 4. Go to Repair your computer -> Advanced Options -> Troubleshoot -> Command Prompt.
Step 5. Input the following command and hit Enter. After inputting this command, you may encounter the total identified Windows installations: 0 error. Just follow the step-by-step guide to continue.
bootrec /rebuildbcd
Step 6. Type the following commands and hit Enter after each one
- bcdedit /export c:bcdbackup (This step is to created a backup of the previous BCD store.)
- attrib c:bootbcd -h -r -s (This step is to remove the hidden, read-only, and system attributes from the file BCD.)
- ren c:bootbcd bcd.old (This is to rename the BCD store)
- bootrec /rebuildbcd
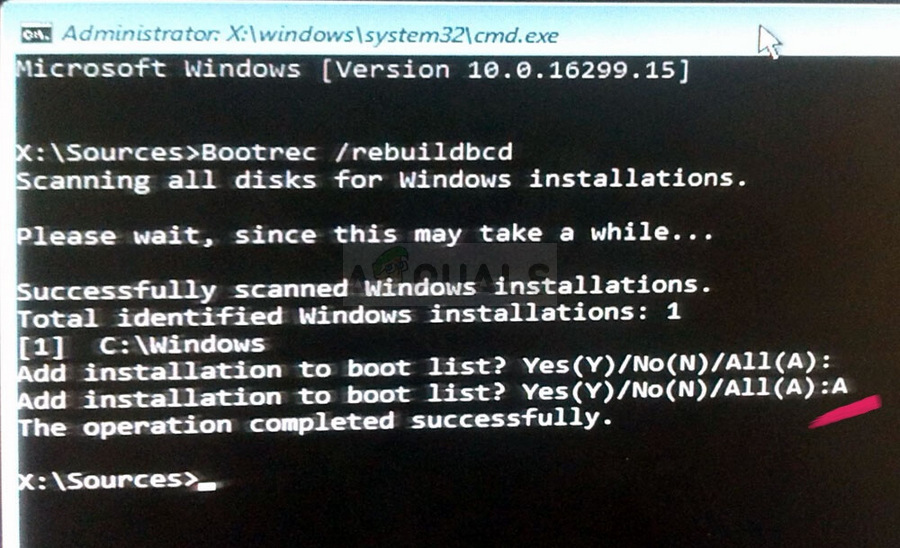
Then following contents will appear:
Successfully scanned Windows installations.
Total identified Windows installations: 1
[1] C:Windows
Add installation to boot list? Yes<Y>/No<N>/All<A>:
Press Y to add the installation to boot list and hit Enter. Then you will see the “The operation completed successfully” message, which indicates that the BCD rebuild is finished completely.
Step 7. The error has been removed now. Then you can restart your computer and check to see if you are able to boot normally. Windows should start as expected.
If this method does not work, you may try the next solution to fix error total identified Windows installations 0 Windows 7/8/10.
Solution 2. Perform System Restore
The Windows built-in feature System Restore enables you to restore your computer to an early state by using the system restore points created in previous days. So System Restore is a quick fix for you to repair system issues. If you encounter bootrec rebuildbcd total identified Windows installations 0 issue, just try System Restore to restore your PC.
Tip: System Restore can only be used to recover Windows system files, programs, and registry settings installed on your system. It does not affect your personal files and cannot help you to restore your personal files like e-mail, documents, and so on.
Here is the tutorial.
Step 1. Boot from the bootable USB flash drive you made before.
Step 2. Go to Repair your computer -> Advanced Options -> Troubleshoot get into the Advanced options page.
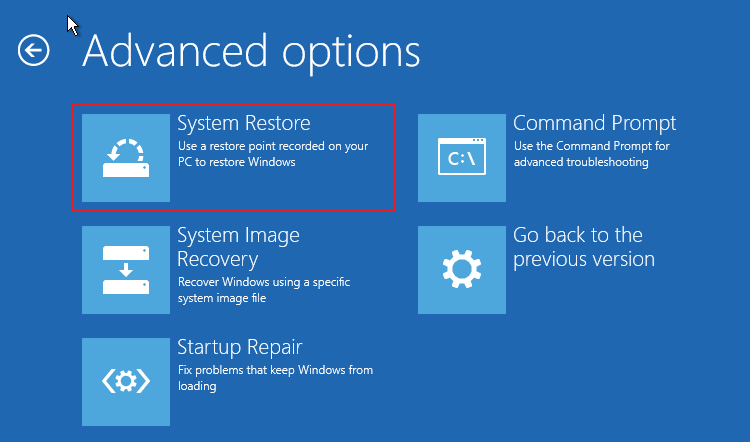
Step 3. On this page, click System Restore and follow the prompts to revert system to a normal state with system restore points.
System Restore can help you remove the error total identified Windows installations 0 and fix Windows startup issue in one step, which is very convenient and effective.
However, if you do not have created a system restore point before, you are unable to perform a system restore. And if other fixes cannot help you, you may need to reinstall Windows 10.
Solution 3. Reinstall Windows 10
If the above fixes cannot help you or you’ve tried many fixes on the Internet but just don’t work, you can reinstall Windows 10 to resolve this issue.
Step 1. Create a Windows 10 bootable USB drive with Windows Media Creation Tool. If you have one, just ignore this step.
Step 2. Change BIOS boot order to boot from the USB drive.
Step 3. On the Windows setup page, choose your language preference, and then click Next to continue.
Step 4. Click Install Now.
Step 5. Enter the license key. You can also click I don’t have a product key to skip it, but you will be required to enter the license key later.
Step 6. Choose the operating system you want to install and click Next.
Step 7. Read and accept the license terms and click Next.
Step 8. Here choose one method to reinstall your operating system.
If you choose to perform a clean install (install Windows only), you need to backup important files in advance, as this option will wipe your hard drive and make a fresh start.
- [Upgrade: Install Windows and keep files, settings, and applications]: This will keep all your files, settings and applications saved in the system partition. However, it is only available when a supported version of Windows is already running on the computer.
- [Custom: Install Windows only (advanced)]: This will remove all your personal files, settings and applications and give you a clean install of Windows 10. You can make changes to partitions and drives. It is recommend to backup your files before you continue.
Step 7. Follow the on-screen instructions to complete the system installation. The installation process will start and your PC will reboot. When it’s finished, you just need to log in with your account.
Recover Data from PC with Total Identified Windows Installations 0 Error
If you come across any data loss, you may use MiniTool Partition Wizard Pro Ultimate to help you make data recovery. MiniTool Partition Wizard Pro Ultimate is a piece of professional hard drive recovery software. It can help you recover many types of file including documents, photos, audio, music, videos, emails, archives and so on.
If you want to recover data from the PC with total identified Windows installations 0 error directly, you can just follow the steps below.
Now I will show you the detailed steps to recover data from the unbootable computer.
Step 1. Get MiniTool Partition Wizard Pro Ultimate by click the following button. Install it on a normal PC that can boot into Windows and launch it to get the main interface.
Buy Now
Step 2. Click the Bootable Media on the main interface and follow the prompts to create a bootable USB drive. If your PC can boot into Windows, you can use the software on your PC to perform data recovery directly.
Step 3. Boot from the USB drive and you will see the MiniTool Partition Wizard Bootable Edition.
Step 4. On the interface of MiniTool Partition Wizard Bootable Edition, you can click Data Recovery button on the top toolbar to launch it.
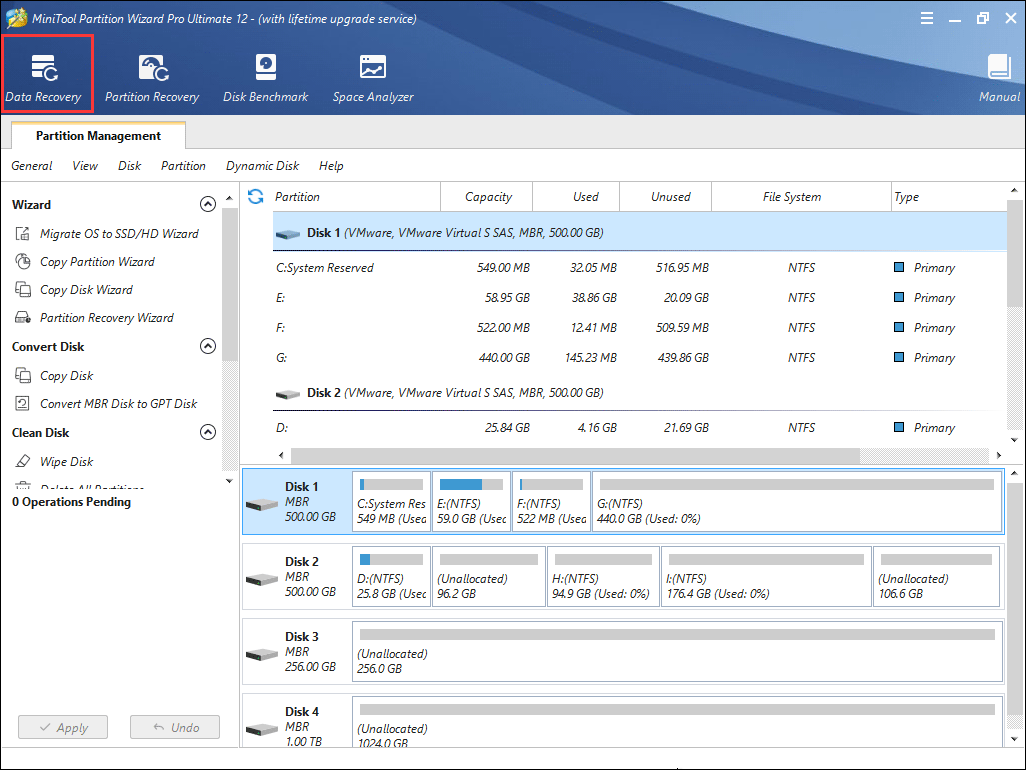
Tip: you can also right-click a partition and choose Data Recovery to scan the partition directly.
Step 5. On the Data Recovery interface, choose a partition and click Scan button on the lower right corner.

There are five parts listed on the interface, namely Recovery Result, Logical Drive, Lost Partition, Unallocated Space, Hard Disk.
- Recovery Result will recover the last scanning result and you can load .rss file manually to get result recovery you’ve scanned.
- Logical Drive will list all existing partitions on your PC.
- Hard Disk will show you all disks connected on your PC including SSD, HDD, USB flash drives, SD cards as so on.
- Lost Partition or Unallocated Space part will only appear when there is lost partitions or unallocated spaces on your PC hard drive.
Step 6. You see, the software is scanning your drive right now. When it is finished, you can check out the recovery result. During the process, you can pause or stop the scanning any time you want. Just click the Pause or Stop button near the progress bar.
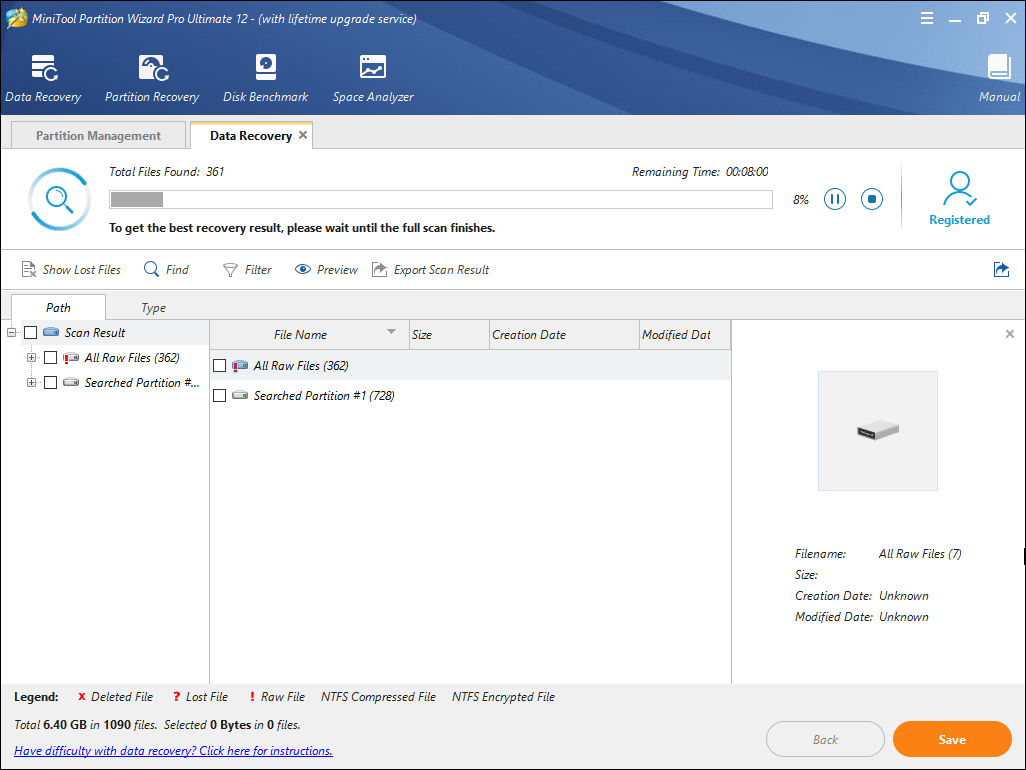
Step 7. When it is finished, you can check the items you want to recover and click Save button.
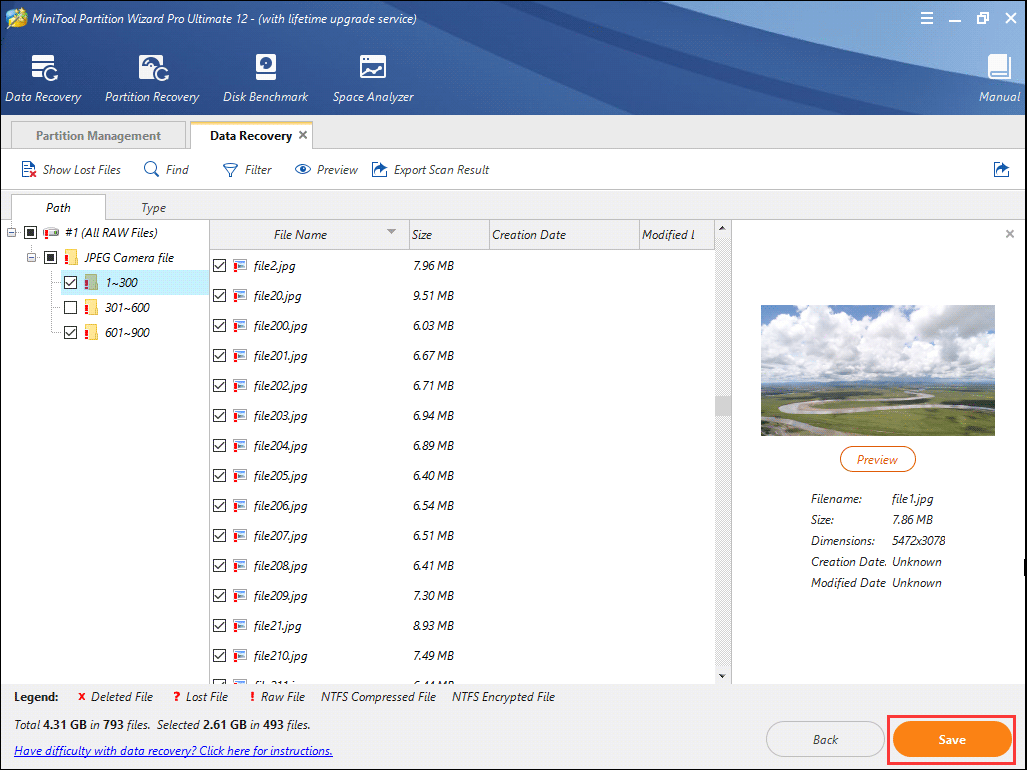
These features on the top tool bar can help you find needed files quickly.
- Show Lost Files: Click this button to check out lost files only.
- Find: Click this button to find a file by its file name exactly with its Match Case and Match Word option.
- Filter: Click this button to find needed files by filename/extension, file size, file creation or modification date
- Preview: Click this button to preview a file before recovery. The supported preview file types reach to 70 in 14 categories.
Step 8. Choose a directory to save the needed files immediately. It is recommended to save the recovered files on another drive. Otherwise, the lost/deleted data could be overwritten.
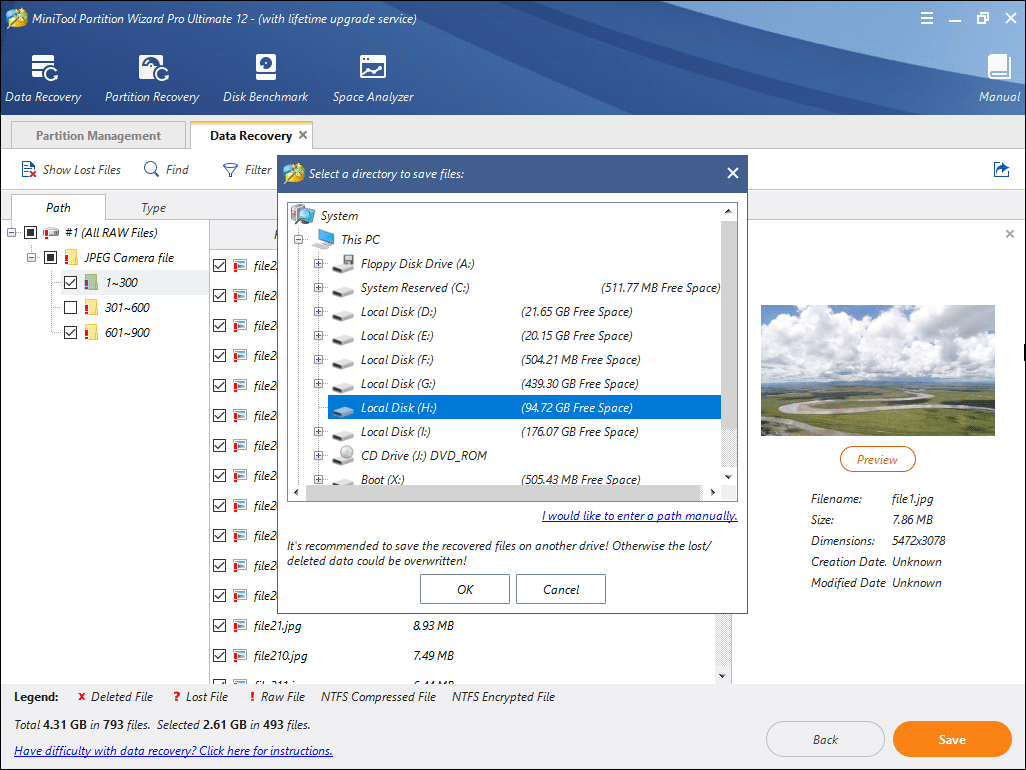
If you find any data loss on your PC, you can utilize MiniTool Partition Wizard Pro Ultimate to recover the data immediately. And keep in mind that do not save new files to the hard drive that encounter data loss, or the lost data will be overwritten.
Buy Now
I have very important files stored on my PC. But my PC got into trouble with total identified Windows installations 0 error message. Luckily, with MiniTool Partition Wizard, I successfully recovered data from my drive.Click to Tweet
Bottom Line
This article has shown you how to remove the error total identified Windows installations 0 when you rebuild BCD in CMD. The above three methods are proven to be effective. If you come across the error total identified Windows installations: 0 when running bootrec /scanos OR bootrec /rebuildbcd, you might as well try the fixes shown in this article.
If you have any question about how to fix the error total identified Windows installations 0 Windows 7/8/10 or recover data from the computer, you may post your comment in the following comment zone. And we will reply as soon as possible. If you need any help when using MiniTool software, you can contact us via [email protected].
The worst kind of Windows errors is the one which can’t be solved easily because of the fact that you haven’t actually booted into your computer yet. It’s immeasurably easier to solve a problem when you have already booted into your Windows operating system and when you are able to use various troubleshooters and tools.
This is what makes this error so difficult to solve. It appears during startup and nothing works. Whatever you try, a “Total Identified Windows Installations: 0” message appears leaving you helpless. Follow the instructions in the article below in order to try and solve the problem.
Preparation:
In order to perform any of the troubleshooting explained in this article, you will need to prepare a Windows installation media DVD or USB which you will use to troubleshoot everything. For older versions of Windows (older than Windows 10) you will need to use the original disc you received with the operating system. However, for Windows 10, you can create it easily.
- Download the Media Creation Tool from Microsoft’s official website. Double-click on the downloaded file called MediaCreationTool.exe in order to launch the wizard. Tap Accept.
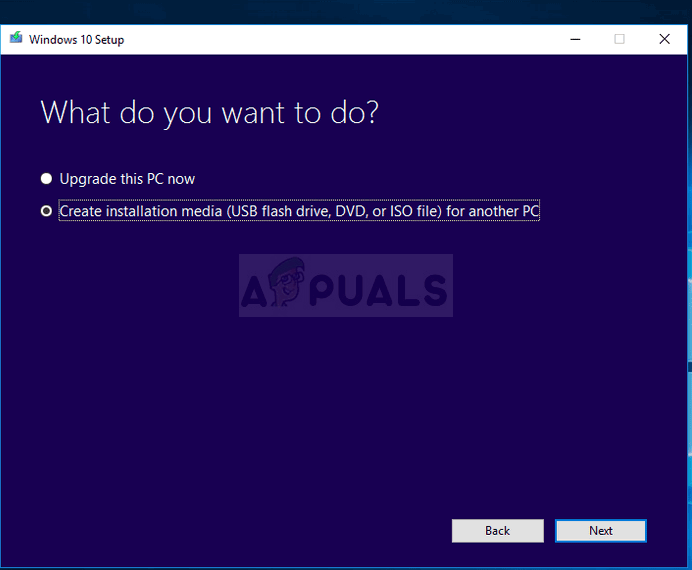
- Select the Create installation media (USB flash drive, DVD, or ISO file) for another PC option from the initial screen.
- The language, architecture, and edition of the bootable drive will be selected based on your computer’s configuration, but you should clear the Use the recommended options for this PC setting in order to select the correct settings for your broken PC (you are probably creating this on a different PC).
- Click Next and click on the USB flash drive or DVD option when prompted to choose between USB or DVD, depending on which device you want to use.
- Click Next and choose the drive from the list which displays the storage devices connected to your computer.
- Click Next and the Media Creation Tool will proceed to download the files necessary to install create the installation media.
Solution 1: Registry Recovery
Recovering the registry is one of the only rational steps you can undertake in order to solve the problem. You should still be aware of the fact that the problem can be caused by various circumstances. If one of your components such as the drive where your operating system is located has gone corrupt, there is nothing else you can do but replace it.
However, if the problem is indeed related to corrupt registry entries, you can fix it by following the steps below:
- Insert the recovery drive you own or which you created for your operating system and start your computer. The following steps differ from one operating system to another so follow them accordingly:
WINDOWS XP, VISTA, 7: Windows Setup windows should open prompting you to enter the language along with time and date settings. Enter them and choose the Repair your computer option at the lower part of the screen after proceeding. Keep the first radio button checked when prompted with Use recovery tools or Restore your computer and click on the Next button. Choose Command Prompt when presented with the Choose a recovery tool screen.
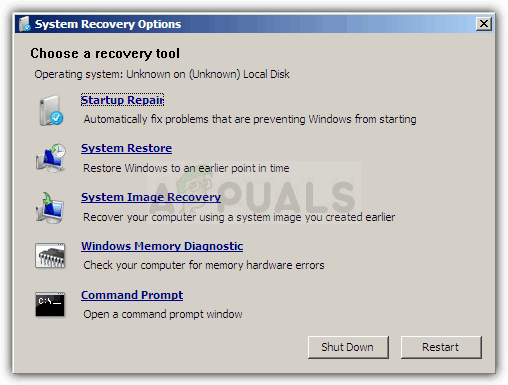
WINDOWS 8, 8.1, 10: You will see a Choose your keyboard layout screen so choose the one you want to use. The Choose an option screen will appear so click on Troubleshoot >> Advanced Options >> Command Prompt.
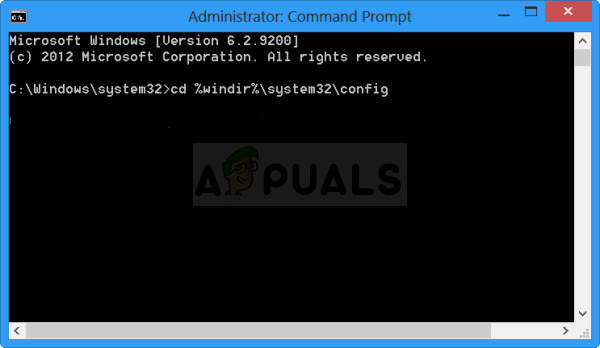
- Navigate to the following folder in the Command Prompt “C:WindowsSystem32config” by using the command displayed below. Make sure you click Enter after each one.
cd windows
cd system32
cd config
Run the following commands in order to replace the folders DEFAULT, SAM, SECURITY, SOFTWARE and SYSTEM:
del c:windowssystem32configsam
del c:windowssystem32configsecurity
del c:windowssystem32configsoftware
del c:windowssystem32configdefault
del c:windowssystem32configsystem
copy c:windowstmpsoftware c:windowssystem32configsoftware
copy c:windowstmpsystem c:windowssystem32configsystem
copy c:windowstmpsam c:windowssystem32configsam
copy c:windowstmpsecurity c:windowssystem32configsecurity
copy c:windowstmpdefault c:windowssystem32configdefault
- Check to see if the problem is solved now after restarting your computer and trying to boot without the recovery DVD.
Solution 2: Boot Recovery
There is a useful in-built feature called Boot Recovery and it can be accessed easily via Command Prompt. As it name suggests, this tool can help you boot into your computer easily and help you fix various issues which may have appeared with the boot process.
- If you are unable to access Command Prompt otherwise, follow the same set of steps from above in order to access Command Prompt from the recovery drive.
- Type in the following command and make sure you click Enter after you type it in correctly:
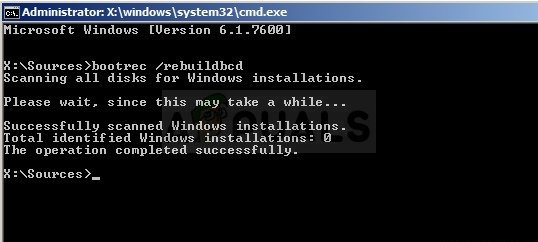
bootrec /rebuildbcd
- You should be able to see the message saying:
Scanning all disks for Windows installations.
Please wait, since this may take a while…
Successfully scanned Windows installations.
Total identified Windows installations: 0
The operation completed successfully.
- Since you obviously have Windows installed, you will need to ‘remove’ and rebuilt it again from the list using the following commands:
bcdedit /export c:bcdbackup
attrib c:bootbcd -h -r -s
- The first command created a backup of the previous BCD store and the second one removed certain attributed which restricted the actions you could undertake with it. Now you can delete or rename it and rebuild it again by using this command:
ren c:bootbcd bcd.old
- Now you can repeat the same command we tried in the beginning where we received the 0 Windows installations message:
bootrec /rebuildbcd
- The following message will appear:
Please wait, since this may take a while…
Successfully scanned Windows installations.
Total identified Windows installations: 1
[1] D:Windows
Add installation to boot list? Yes<Y>/No<N>/All<A>:
- Press Y and you should see the “The operation completed successfully” message meaning that the BCD rebuild is complete. Restart your computer and check to see if you are able to boot normally.

Kevin Arrows
Kevin is a dynamic and self-motivated information technology professional, with a Thorough knowledge of all facets pertaining to network infrastructure design, implementation and administration. Superior record of delivering simultaneous large-scale mission critical projects on time and under budget.
Если запись загрузочной конфигурации (BCD) накрылась (стёрлась) или ещё чего с ней приключилось, Windows не сможет запуститься, в результате чего при загрузке можно увидеть сообщение типа «BOOTMGR is Missing» или что-то подобное. Иногда система просто постоянно загружается в режиме восстановления.
Наиболее простым решением является воссоздать BCD, что можно сделать автоматически при помощи команды bootrec.
Приведенная ниже инструкция относится к Windows Vista, Windows 7 и Windows 2008 R2.
Инструкция:
- Запустите систему в режиме восстановления (с установочного CD).
- Запустите командную стоку.
- в режиме командной строки запустите:
bootrec /rebuildbcd
Эта команда осуществляет поиск установленных копий Windows не включённых в BCD и спрашивает добавить их или нет.
- В результате выполнения мы увидим одно из двух сообщений.
Вариант 1Scanning all disks for Windows installations. Please wait, since this may take a while... Successfully scanned Windows installations. Total identified Windows installations: 0 The operation completed successfully.Вариант 2
Scanning all disks for Windows installations.

Please wait, since this may take a while...

Successfully scanned Windows installations.
Total identified Windows installations: 1
[1]  D:Windows
Add installation to boot list? Yes<Y>/No<N>/All<A>:
В первом случае переходим к шагу 5. Скорее всего, инсталляционные данные Windows в хранилище BCD есть, а bootrec не смог найти дополнительныеинсталляции Windows для добавления в BCD. Это нормально, просто потребуется выполнить несколько дополнительных действий для воссоздания BCD.
Во втором случае отвечаем положительно на поставленный вопрос и переходим к шагу 10. - Поскольку хранилище BCD существует и содержит инсталляции Windows , нам нужно удалить их вручную, а затем попытаться воссоздать их снова.
Выполняем команду:bcdedit /export c:bcdbackup
Эта команда экспортирует хранилище BCD в файл c:bcdbackup.
При успешном выполнении команда выводит на экран следующее сообщение:The operation completed successfully. - Теперь снимем атрибуты системный, только для чтения и скрытый с файла c:bootbcd при помощи команды:
attrib c:bootbcd -h -r -s
теперь мы можем переименовать этот файл.
- Переименуем его используя команду:
ren c:bootbcd bcd.old
Теперь мы вполне можем выполнить действия шага 3, поскольку хранилища BCD больше нет. В принципе, мы могли удалить этот файл, поскольку собираемся воссоздать его заново, однако для дополнительной надёжности лучше сохранить его как своеобразную резервную копию.
- Воссоздаём хранилище BCD при помощи команды:
bootrec /rebuildbcd
которая должна выдать следующее сообщение:
Scanning all disks for Windows installations. Please wait, since this may take a while... Successfully scanned Windows installations. Total identified Windows installations: 1 [1] D:Windows Add installation to boot list? Yes<Y>/No<N>/All<A>: - Подтверждаем наше желание воссоздать BCD и в случае успеха получаем сообщение:
The operation completed successfully. - Перезапускаем компьютер.
Если единственной проблемой было хранилище BCD, то Windows должен запуститься.

Худший вид ошибок Windows — это тот, который нелегко решить из-за того, что вы еще не загрузились на свой компьютер. Когда вы уже загрузились в свою операционную систему Windows и можете использовать различные средства устранения неполадок и инструменты, решить проблему неизмеримо проще.
Именно поэтому эту ошибку так сложно исправить. Он появляется при запуске и ничего не работает. Что бы вы ни пытались, появляется сообщение «Всего идентифицированных установок Windows: 0», оставляя вас беспомощным. Следуйте инструкциям в статье ниже, чтобы попытаться решить проблему.
Подготовка:
Чтобы выполнить любое из действий по устранению неполадок, описанных в этой статье, вам необходимо подготовить установочный DVD-диск Windows или USB-накопитель, который вы будете использовать для устранения всех неполадок. Для более старых версий Windows (старше Windows 10) вам потребуется использовать оригинальный диск, который вы получили с операционной системой. Однако для Windows 10 это легко создать.
- Загрузите Media Creation Tool с официального сайта Microsoft. Дважды щелкните загруженный файл с именем MediaCreationTool.exe, чтобы запустить мастер. Коснитесь Принять.
- Выберите «Создать установочный носитель (USB-накопитель, DVD или файл ISO) для другого ПК» на начальном экране.

- Язык, архитектура и выпуск загрузочного диска будут выбраны в зависимости от конфигурации вашего компьютера, но вы должны снять флажок Использовать рекомендуемые параметры для этого ПК, чтобы выбрать правильные настройки для сломанного ПК (вероятно, вы создаете этот на другом ПК).
- Нажмите «Далее» и выберите вариант USB-накопителя или DVD, когда будет предложено выбрать между USB или DVD, в зависимости от того, какое устройство вы хотите использовать.

- Щелкните Далее и выберите диск из списка, в котором отображаются устройства хранения, подключенные к вашему компьютеру.
- Нажмите Далее, и Media Creation Tool продолжит загрузку файлов, необходимых для установки, и создаст установочный носитель.
Решение 1. Восстановление реестра
Восстановление реестра — один из единственно рациональных шагов, которые вы можете предпринять для решения проблемы. Вы все равно должны знать, что проблема может быть вызвана различными обстоятельствами. Если один из ваших компонентов, например, диск, на котором расположена ваша операционная система, поврежден, вы ничего не можете сделать, кроме как заменить его.
Однако, если проблема действительно связана с поврежденными записями реестра, вы можете исправить ее, выполнив следующие действия:
- Вставьте диск восстановления, которым вы владеете или который вы создали для своей операционной системы, и запустите компьютер. Следующие шаги различаются в зависимости от операционной системы, поэтому выполняйте их соответственно:
WINDOWS XP, VISTA, 7: Окна установки Windows должны открыться с предложением ввести язык вместе с настройками времени и даты. Введите их и после продолжения выберите «Восстановить компьютер» в нижней части экрана. При появлении запроса «Использовать инструменты восстановления» или «Восстановить компьютер» установите первый переключатель и нажмите кнопку «Далее». Выберите «Командная строка», когда появится экран «Выбрать средство восстановления».

ОКНА 8, 8.1, 10: Вы увидите экран «Выберите раскладку клавиатуры», поэтому выберите ту, которую хотите использовать. Появится экран выбора варианта, поэтому нажмите Устранение неполадок >> Дополнительные параметры >> Командная строка.
- Перейдите в следующую папку в командной строке «C: Windows System32 config», используя команду, показанную ниже. Обязательно нажимайте Enter после каждого.
cd windows
cd system32
cd config
Выполните следующие команды, чтобы заменить папки DEFAULT, SAM, SECURITY, SOFTWARE и SYSTEM:
del c: windows system32 config sam del c: windows system32 config security del c: windows system32 config software del c: windows system32 config default del c: windows system32 config system copy c: windows tmp software c: windows system32 config software copy c: windows tmp system c: windows system32 config system copy c: windows tmp sam c: windows system32 config sam copy c: windows tmp security c: windows system32 config security copy c: windows tmp default c: windows system32 config default
- Проверьте, решена ли проблема после перезагрузки компьютера и попытки загрузки без DVD восстановления.
Решение 2. Восстановление загрузки
Существует полезная встроенная функция под названием Boot Recovery, к которой можно легко получить доступ через командную строку. Как следует из названия, этот инструмент может помочь вам легко загрузиться на ваш компьютер и помочь вам исправить различные проблемы, которые могли возникнуть в процессе загрузки.
- Если вы не можете получить доступ к командной строке в противном случае, выполните тот же набор шагов, что и выше, чтобы получить доступ к командной строке с диска восстановления.
- Введите следующую команду и убедитесь, что вы нажали Enter после правильного ввода:
bootrec / rebuildbcd
- Вы должны увидеть сообщение:
Сканирование всех дисков для установки Windows.
Подождите, это может занять некоторое время…
Установки Windows успешно просканированы.
Всего идентифицированных установок Windows: 0
Операция завершилась успешно.

- Поскольку у вас, очевидно, установлена Windows, вам нужно будет «удалить» и заново собрать ее из списка, используя следующие команды:
bcdedit / export c: bcdbackup attrib c: boot bcd -h -r -s
- Первая команда создала резервную копию предыдущего хранилища BCD, а вторая удалила определенные атрибуты, которые ограничивали действия, которые вы могли предпринять с ним. Теперь вы можете удалить или переименовать его и восстановить заново с помощью этой команды:
ren c: boot bcd bcd.old
- Теперь вы можете повторить ту же команду, которую мы пробовали в начале, когда мы получили сообщение об установке 0 Windows:
bootrec / rebuildbcd
- Появится следующее сообщение:
Подождите, это может занять некоторое время…
Установки Windows успешно просканированы.
Всего идентифицированных установок Windows: 1
[1] D: Windows
Добавить установку в список загрузки? да/ Нет/Все:
- Нажмите Y, и вы должны увидеть сообщение «Операция успешно завершена», означающее, что восстановление BCD завершено. Перезагрузите компьютер и проверьте, можете ли вы нормально загрузиться.

1) Indicate any malware issues with the computer.
2) Which antivirus(AV) and firewall products have been in use in the past 1 year (always on and manual)
There were multiple misbehaving drivers.
The drive master file table (MFT) is corrupt.
The logs first displayed MFT corruption on 1/9/2018
There were reports of drive file corruption in addition to the MFT.
The RAM is mismatched.
3) There were multiple misbehaving software drivers:
a) Trusteer software:
RapportHades64.sys
RapportPG64.sys
IBM Trusteer Rapport Driver
Download — http://www.trusteer.com/download-rapport
Support — http://www.trusteer.com/support
b) cmdguard.sys
COMODO Firewall Pro Sandbox Driver
http://forums.comodo.com/index.php?action=dlattach;topic=17220.0;attach=17692 Requires registration
4) There was 1 misbehaving hardware driver:
nvlddmkm.sys
5) There were boot-start drivers that failed to load. If possible uninstall the software now and reinstall the software after the troubleshooting and observation period has completed:
VBoxDrv.sys
VBoxUSBMon.sys
VirtualBox USB driver
http://www.virtualbox.org/wiki/Downloads
6) For all tests /steps please post images into the thread.
7) If there are any problems posting images please use one drive or drop box share links.
 Please make sure that any new information (updated links) are always posted in the newest post.
9) Backup all files to another drive or to the cloud
10) Make a backup image using Macrium or similar software:
https://www.macrium.com/reflectfree
https://www.tenforums.com/tutorials/85198-use-macrium-reflect-rescue-media-fix-windows-boot-issues.html
https://kb.macrium.com/KnowledgebaseArticle50168.aspx
https://www.tenforums.com/tutorials/61026-backup-restore-macrium-reflect.html
There are alternative imaging software but I think you will find Macrium to be the most robust.
Sometimes the imaging software cannot be installed or if it is installed it cannot make a backup image. It may find problems with the drive and display error messages or error codes.
11) Check the drive with HD Tune:
http://www.hdtune.com/
Post images into the thread for results of the tests on these tabs:
a) Health (SMART)
b) Benchmark
c) Full error scan
12) Uninstall Trusteer software:
http://www.trusteer.com/en/support/uninstall-troubleshooting
https://www.trusteer.com/en/support/uninstalling-rapport-using-safeuninstall-utility
13) Uninstall Comodo Firewall and antivirus software:
https://forums.comodo.com/install-setup-configuration-faq-cis-b141.0/;0-t71897.0.html
https://www.raymond.cc/blog/comprehensive-list-of-uninstallers-or-removal-tools-for-antivirus-software/
https://forums.comodo.com/install-setup-configuration-help-cis/most-effective-way-to-reinstall-cis-to-avoidfix-problems-t58620.0.html
14) Turn on Windows defender
15) uninstall the Nvidia GPU driver using DDU (display driver uninstaller)
16) re-install the Nvidia GPU driver from the Nvidia website
17) make sure that you check the clean install box and if available install the physx driver.
Display Driver Uninstaller Download version 17.0.8.2
https://www.sevenforums.com/tutorials/367109-display-driver-uninstaller-how-use.html
http://www.nvidia.com/Download/index.aspx
18) Open administrator X:windowssystem32cmd.exe > X:sources> type these commands
19) Use a camera or smart phone camera to take pictures and post results into the thread
20) C:
21) dir
22) D:
23) dir
24) X:
25) diskpart
26) list disk
27) list volume
28) select disk 0
29) list partition
30) select disk 1
31) list partition
32) exit
33) bcdedit /enum
34) bcdedit | find «osdevice»
35) chkdsk /r C:
reboot
This may take many hours
36) Please post images of all tests / steps into the thread.
37) Open the website for the computer or motherboard manufacturer > enter the computer’s product or serial number or the model > select the operating system > view drivers and BIOS > post a URL or hyperlink into the thread
38) Remove the 2 GB RAM module
39) Run memtest86+ version 5.01 for at least 8 passes.
http://www.memtest.org/
This may take hours so plan to run it overnight.
a) Please make sure you use the Memtest86+ version 5.01 with the link below.
http://www.memtest.org/
The testing is done not by time but by passes.
The more passes the better.
There are a significant number of false negatives if fewer than 8 passes are made.
A false negative is a test pass when there is malfunctioning RAM.
There is 8 GB of RAM on the computer.
Memtest86+ version 5.01 testing takes approximately 1 — 2 hours /GB RAM
Just 1 error is a fail and you can abort testing.
Then test 1 RAM module at a time in the same DIMM each for 8 or more passes.
b) When Memtest86+ version 5.01 has completed 8 or more passes use a camera or smart phone camera to take a picture and post an image into the thread.
https://answers.microsoft.com/en-us/windows/wiki/windows_10-update/memory-problems/21c3f63f-f570-4522-b2ef-ecc7b7ff6461
https://www.tenforums.com/tutorials/14201-memtest86-test-ram.html
40) The software that was uninstalled (Trusteer, and Comodo) can be reinstalled 2 to 3 weeks after the troubleshooting has completed. One software product can be reinstalled and then wait 3 — 5 days before installing the second software product.
The longer that you can wait to reinstall any of the software and have a stable computer environment the stronger the cause and effect when software is reinstalled. So any new BSOD would be more strongly related to the re-installation.
41) Mismatched RAM can cause unexpected restarts, crashes, or BSOD crashes. It is always best to use RAM in pairs with the identical SKU. The RAM modules can be checked to see if the RAM malfunctions. However the testing of the RAM modules
does not rule in or rule out problems with mismatched RAM. So at this time it would be best to run the computer with the 8 GB module.
View the computer’s or motherboard’s owner’s manual to see the maximum amount of RAM that can be used in each DIMM. Then determine you needs. A quick way to view information about the computer and available hardware is to use this scanner: http://www.crucial.com/usa/en/systemscanner
After the troubleshooting has completed you can use the scanner to quickly see and compare the hardware available on other websites.
Event[5880]:
Log Name: System
Source: Ntfs
Date: 2018-02-12T20:04:12.422
Event ID: 55
Task: N/A
Level: Error
Opcode: Info
Keyword: N/A
User: S-1-5-18
User Name: NT AUTHORITYSYSTEM
Computer: mydev-pc
Description:
A corruption was discovered in the file system structure on volume Local Disk.
The exact nature of the corruption is unknown. The file system structures need to be scanned online.
.
.
.
Event[2180]:
Log Name: System
Source: Ntfs
Date: 2018-01-09T15:23:37.987
Event ID: 55
Task: N/A
Level: Error
Opcode: Info
Keyword: N/A
User: S-1-5-18
User Name: NT AUTHORITYSYSTEM
Computer: mydev-pc
Description:
A corruption was discovered in the file system structure on volume Local Disk.
The Master File Table (MFT) contains a corrupted file record. The file reference number is 0x9000000000009. The name of the file is «<unable to determine file name>».
.
.
Event[16934]:
Log Name: System
Source: volmgr
Date: 2018-03-04T20:13:11.267
Event ID: 46
Task: N/A
Level: Error
Opcode: N/A
Keyword: Classic
User: N/A
User Name: N/A
Computer: mydev-pc
Description:
Crash dump initialization failed!
.
.
Event[5778]:
Log Name: System
Source: Service Control Manager
Date: 2018-02-11T20:46:18.874
Event ID: 7000
Task: N/A
Level: Error
Opcode: N/A
Keyword: Classic
User: N/A
User Name: N/A
Computer: mydev-pc
Description:
The Windows Defender Antivirus Service service failed to start due to the following error:
Windows cannot verify the digital signature for this file. A recent hardware or software change might have installed a file that is signed incorrectly or damaged, or that might be malicious software from an unknown source.
.
.
Event[5633]:
Log Name: System
Source: Disk
Date: 2018-02-11T11:51:55.186
Event ID: 51
Task: N/A
Level: Warning
Opcode: N/A
Keyword: Classic
User: N/A
User Name: N/A
Computer: mydev-pc
Description:
An error was detected on device DeviceHarddisk2DR19 during a paging operation.
.
.
Event[2641]:
Log Name: System
Source: Display
Date: 2018-01-11T14:10:13.875
Event ID: 4101
Task: N/A
Level: Warning
Opcode: Info
Keyword: Classic
User: N/A
User Name: N/A
Computer: mydev-pc
Description:
Display driver nvlddmkm stopped responding and has successfully recovered.
.
.
Event[16747]:
Log Name: System
Source: Service Control Manager
Date: 2018-03-03T07:23:12.603
Event ID: 7026
Task: N/A
Level: Information
Opcode: N/A
Keyword: Classic
User: N/A
User Name: N/A
Computer: mydev-pc
Description:
The following boot-start or system-start driver(s) did not load:
AFD
bam
cmdGuard
cmdHlp
CSC
dam
Dfsc
EhStorClass
FileCrypt
GpuEnergyDrv
inspect
MsSecFlt
NetBIOS
NetBT
npsvctrig
nsiproxy
Psched
RapportHades64
rdbss
tdx
VBoxDrv
VBoxUSBMon
VfpExt
vwififlt
.
.
.
Please remember to mark the replies as answers if
they help.
.
.
-
Edited by
questionsformicrosoftproducts
Monday, March 5, 2018 4:08 AM -
Proposed as answer by
questionsformicrosoftproducts
Wednesday, March 7, 2018 1:52 AM -
Marked as answer by
luisdv
Thursday, March 15, 2018 6:44 AM