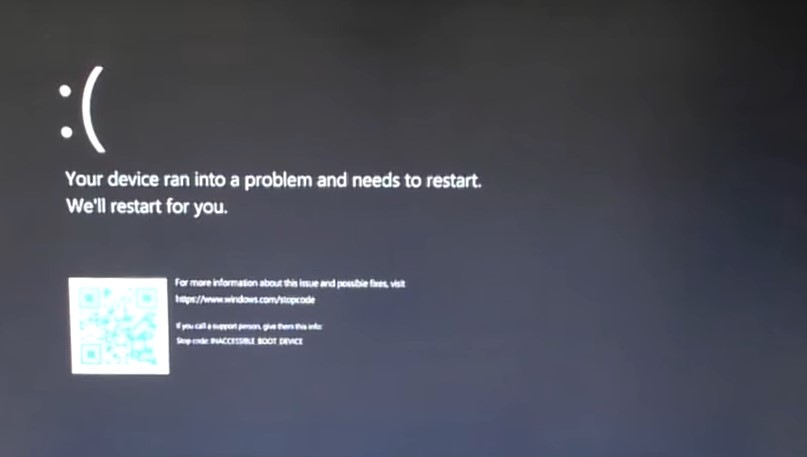
Времена идут, а ошибки никуда не деваются. Новенькая Windows 11 тоже способна выдавать ошибку INACCESSIBLE_BOOT_DEVICE при загрузке с «синим экраном смерти» (точнее с черным). Если столкнулись с этой же бедой, добро пожаловать в подборку советов по возможному решению проблемы.
Сразу оговорюсь – проблема сложная, просто так угадать для всех нужный вариант и исправить за 15 секунд здесь невозможно, поэтому придется перебирать. Если вы нашли какое-то другое решение конкретно под свой случай, пожалуйста, напишите об этом в комментариях, так вы можете кому-то очень сильно помочь.
Попробуйте сначала сделать пару-тройку простых перезагрузок компьютера или ноутбука через кнопку. И только если это не поможет, продолжайте чтение статьи.
Статья рассчитана на опытного пользователя ПК. Если вы не уверены в своих силах, лучше отдать свою систему кому-нибудь на переустановку, т.к. эта проблема не совсем очевидна, и возиться с этой ошибкой следует только при острой необходимости.
Содержание
- Причина ошибки
- Запуск командной строки для восстановления
- Проверка диска
- Проверка загрузчика
- Проблемы BIOS
- Исходное состояние
- Задать вопрос автору статьи
Причина ошибки
Причина ошибки очевидна – INACCESSIBLE_BOOT_DEVICE. Т.е. система ругается на недоступность системного диска с Windows 11 (а точнее с загрузчиком) и выпадает в ошибку с этим самым кодом остановки.
А вот почему недоступен диск уже никто не знает. Я бы на вашем месте попытался вспомнить последние манипуляции и установки в системе, вдруг что-то прояснится. А так ошибка может охватывать все уровни проблем: от нарушения целостности системы и повреждения жесткого диска до странных настроек в BIOS. Я, конечно, попробую описать возможные варианты для среднего пользователя, но порой будет гораздо проще и быстрее переустановить Windows (если только дело не в физическом повреждении).
Запуск командной строки для восстановления
Вся проблема этой ошибки заключается в том, что она вылетает именно во время загрузки системы. Т.е. стандартными средствами под самой Windows 11 воспользоваться не получится. Придется запускать режим восстановления и командную строку оттуда.
- Создаем загрузочную флешку Windows У нас есть по этой теме отдельная статья. Правда конкретно она про «десятку», но суть уловите и для загрузки просто используете другую страницу. Так как ваш компьютер полностью недоступен, придется где-то найти другой на время создания этой флешки. Без нее загрузиться не получится.
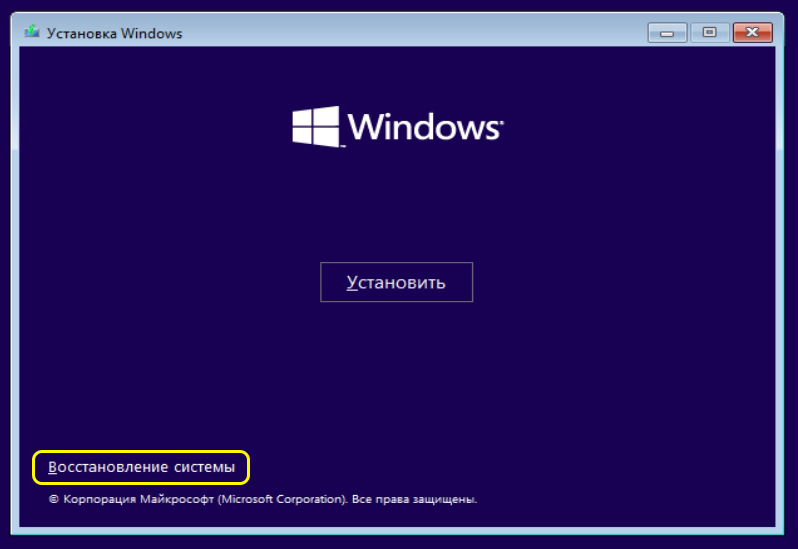
- Загружаемся с этой флешки. Появится экран с кнопкой «Установить», а ниже будет небольшая ссылка «Восстановление системы». Щелкаем по ней.
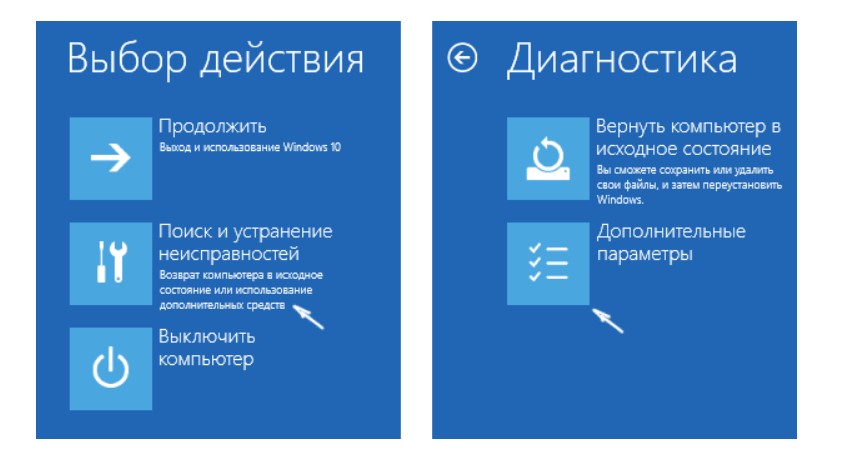
- Переходим по пунктам «Поиск и устранение неисправностей – Дополнительные параметры – Командная строка».
Эта командная строка нам еще очень пригодится. Надеюсь, у вас все получилось. Если вы придумали какой-то свой способ запуска командной строки без загрузчика – пожалуйста, используйте его.
Проверка диска
Конечно, можно вскрыть компьютер и ноутбук и проверить вручную подключение диска, но нам нужно убедиться, что именно система видит это подключенное устройство. Поэтому в командной строке, которую мы запускали выше, выполняем по очереди следующие команды:
diskpart
list disk
Должен появиться список подключенных физических дисков, например, вот по такому подобию:

На примере выше видно, что подключен один физический диск. У вас тоже все ваши физические диски подключены? Тогда идем дальше.
Выполняем команду:
list vol
Эта команда уже выводит список логических разделов ваших дисков (включая разделы с метками диска, например, C: и D:)
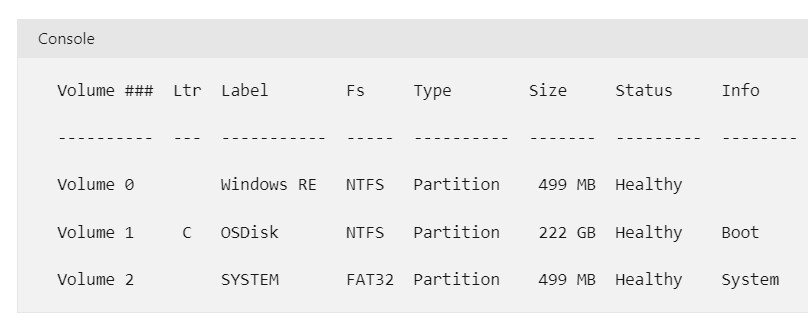
В списке должен находиться ваш Boot раздел. Если его нет – плохо дело, нужно уже думать, куда диск мог пропасть.
На добивку предлагаю проверить на целостность системный диск:
chkdsk C: /r
Проверка загрузчика
Если на прошлом этапе вы убедились, что с дисками все хорошо, значит есть вероятность в повреждении хранилища загрузки Windows. Т.е. все находится на месте, просто Windows не знает, где ей искать это место. В командной строке запускаем следующую команду:
bcdedit
Проверяем раздел «Диспетчер загрузки Windows»:
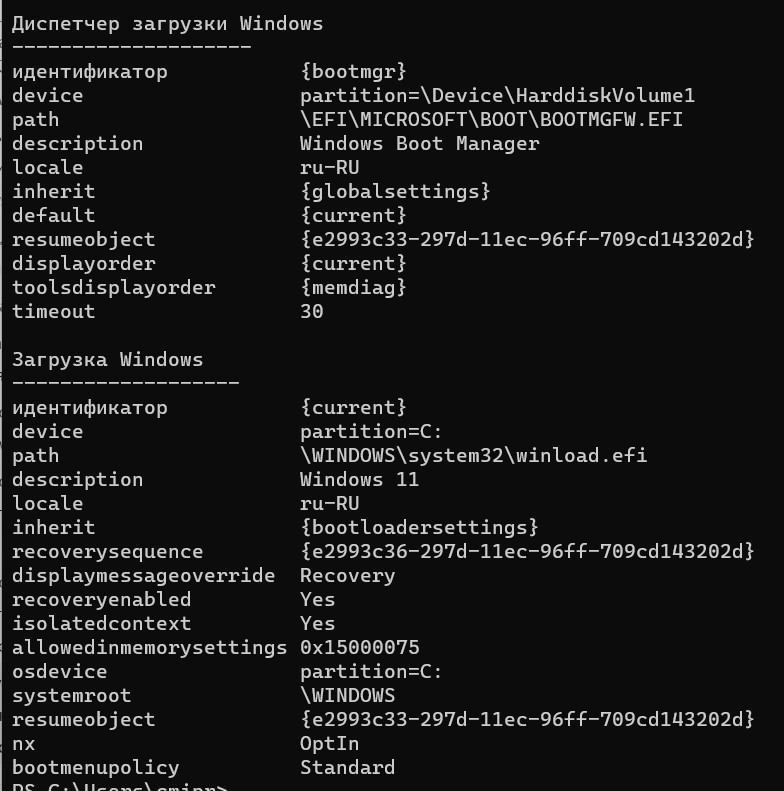
У меня здесь видно, что загрузка переложена на UEFI, но все равно используется диск 1. У владельцев BIOS сразу же в разделе «device» может быть указан диск загрузки, например, «partition=C:». Главное, чтобы здесь не было чего-то странного, пустого или не понятного.
Особо внимательно проверяем: device, path, osdevice и systemroot.
Если что-то не так, в первую очередь создаем резервную копию хранилища загрузки:
bcdedit /export C:tempbcdbackup
Хранилище сохраняется в папку C:temp с именем bcdbackup.
Для дальнейшего восстановления можно использовать команду:
bcdedit /import C:tempbcdbackup
Для внесения ручных правок используется этот вариант:
bcdedit /set *{identifier}* option value
Пример выполнения этой команды для установки раздела:
bcdedit /set {default} device partition=C:
Проблемы BIOS
В этом разделе под BIOS и UEFI мы будем понимать одно и то же. После отключения питания и посаженной батарейки в BIOS могут твориться чудеса, поэтому стоит зайти туда и проверить все глазами. Эти разделы у всех разные, поэтому даю лишь общие рекомендации:
- Проверьте порядок загрузки дисков. Бывает, что сам диск из этого порядка выходит. Конечно, это не приведет к ошибке этой статьи, но мало ли.
- Можно проверить режим работы SATA: встречаются варианты с IDE и AHCI. Временно меняем одно на другое, сохраняем биос, пробуем загрузиться. После тестирования рекомендую все-таки вернуть настройки на дефолтные.
Исходное состояние
Если ничего выше не помогло, а заниматься полной переустановкой не хочется, можно попробовать сделать сброс в исходное состояние (предварительно лучше загрузиться с какой-нибудь портативной системы и скинуть все важные данные над другой диск).
- Как в первом разделе загружаемся с загрузочной Windows 11, но идем в другой раздел.
- «Восстановление системы – Поиск и устранение неисправностей – Вернуть компьютер в исходное состояние».
Просто читаем внимательно все шаги и ждем восстановления системы.
Ошибка Inaccessible_Boot_Device — это еще одна проблема BSOD (стоп-код), которая может возникать по разным причинам. Эта конкретная ошибка имеет код остановки 0x0000007b и часто возникает во время запуска системы.
Поскольку в такой момент возникает ошибка Inaccessible_Boot_Device, она более серьезна, чем случайные ошибки BSOD, поскольку не позволяет ПК загружаться правильно. Следовательно, некоторые пользователи не могут войти в систему и использовать свои компьютеры при возникновении этой ошибки.
Что такое недоступное загрузочное устройство в Windows 11?
В общем, загрузочное устройство — это любое устройство, которое содержит или может считывать файлы и драйверы, необходимые для запуска компьютера. Для запуска компьютера операционная система обычно загружается с загрузочного носителя, которым может быть жесткий диск, CD/DVD или USB-накопитель.
Короче говоря, ошибка недоступного загрузочного устройства информирует ПК о том, что он столкнулся с проблемой и должен перезагрузиться, чтобы решить ее. Если вы заметили недоступное загрузочное устройство, это означает, что ваш компьютер не может прочитать раздел Windows 11 на жестком диске, с которого он загружается.
Эта проблема может привести к сбою жесткого диска. Это также может быть простая проблема с драйвером или сбой загрузочной записи.
При загрузке Windows может не получить доступ к разделу памяти, содержащему системные файлы. Это приводит к сообщению об ошибке Inaccessible_Boot_Device в Windows 11 и останавливает загрузку вашего компьютера.
Что вызывает недоступное загрузочное устройство?
Хотя многие сообщали, что видели это сообщение об ошибке в результате неудачного обновления, проблема с загрузочным устройством может быть вызвана множеством факторов, включая обновления BIOS и разгон процессоров. В большинстве случаев недоступность загрузочного устройства означает более одной причины.
Один из ваших твердотельных накопителей не отображается, что маловероятно, но возможно. Вы всегда можете попробовать подключить его к другому компьютеру, чтобы увидеть, появится ли SSD. Еще один аспект, который следует учитывать, — это что-то в BIOS было изменено, что не позволяет компьютеру получить доступ к SSD.
Хорошей новостью является то, что из-за его близости к Центру обновления Windows это легко исправить и не приведет к потере данных. Дело только в том, что Windows не может найти диск, но все данные на диске все еще присутствуют и останутся. Вот наиболее распространенные сценарии, в которых вы можете столкнуться с этой ошибкой:
🚩Недоступное загрузочное устройство Windows 11 после сбоя обновления драйвера🚩Недоступное загрузочное устройство Windows 11 после создания клона 🚩Недоступное загрузочное устройство после неудачного обновления BIOS🚩Недоступное загрузочное устройство Windows 11 SSD отсутствует
Как утверждают многие пользователи, Lenovo и Dell являются наиболее пострадавшими производителями ПК от ошибки недоступного загрузочного устройства Windows 11, но это не означает, что это стандартно только для этих брендов ПК.
Худший аспект во всем этом заключается в том, что они вызваны необходимыми обновлениями без предварительного уведомления. Это сложное исправление, но оно достижимо, если у вас есть доступ к расширенным настройкам загрузки и командной строке.
Та же ошибка Inaccessible_Boot_Device появляется и в Windows 10. Однако есть несколько способов исправить это. Для этого вам нужно максимально использовать встроенные системные инструменты Windows 11, которые часто предоставляют лучшие решения для проблем BSOD.
Это ошибка синего, зеленого или черного экрана?
В Windows 10 ошибка Inaccessible_Boot_Device является ошибкой Blue Screen of Death. Однако Microsoft изменила цвет фона ошибок BSOD на черный в Windows 11. Таким образом, эта проблема представляет собой «черный экран смерти» на последней настольной платформе, но это все та же ошибка.
Чтобы сделать ситуацию немного более запутанной, в сборках Windows 11 Insider Preview вместо черных ошибок отображаются зеленые экраны смерти. Это те же ошибки с другим цветом фона. Таким образом, экран ошибки Inaccessible_Boot_Device также может иметь зеленый фон для некоторых пользователей.
Таким образом, Inaccessible_Boot_Device — это ошибка синего, зеленого и черного экрана. Это все та же проблема в Windows 11 и 10, независимо от цвета фона.
Как войти в расширенные параметры восстановления Windows 11?
Если вы не можете войти в Windows 11 из-за ошибки Inaccessible_Boot_Device, вам нужно будет ввести дополнительные параметры восстановления во время запуска системы. Дополнительные параметры восстановления — это централизованное синее меню за пределами Windows, которое включает в себя множество системных инструментов и параметров.
Некоторые пользователи могут вводить дополнительные параметры восстановления с помощью F11клавиши клавиатуры. Попробуйте нажать ее вскоре после включения компьютера. Затем может открыться синее меню «Выберите вариант», но это не универсальный метод.
Если это не сработает, перезагрузите компьютер, нажав и удерживая его Powerкнопку в течение 5–10 секунд, когда во время запуска появится логотип Windows. Принудительно отключите таким образом три раза. После того, как вы перезагрузите компьютер три раза подряд, появится экран автоматического восстановления.
На этом экране есть кнопка «Дополнительные параметры». Нажмите эту кнопку, чтобы войти в меню дополнительных параметров восстановления. Оттуда вы можете получить доступ к системным инструментам, которые могут реально исправить ошибку Inaccessible_Boot_Device или активировать безопасный режим.

Вы можете вернуться в Windows с опцией безопасного режима. Для этого выберите «Устранение неполадок» и «Дополнительные параметры». Оттуда выберите «Параметры запуска» и «Перезагрузить». После перезагрузки Windows нажмите F4(или F5), чтобы выбрать «Включить безопасный режим» в меню «Параметры запуска».

После этого вы сможете применить приведенные ниже потенциальные исправления, как описано в безопасном режиме. Этот режим является специальным диагностическим для Windows 11, который загружается с минимальным набором драйверов и служб.
Как исправить ошибку Inaccessible_Boot_Device в Windows 11?
1. Запустите сканирование системных файлов
- Щелкните значок увеличительного стекла для инструмента поиска на панели задач Windows 11.

- Введите cmd в текстовом поле поиска.
- Выберите параметр «Запуск от имени администратора», чтобы открыть окно командной строки с повышенными привилегиями.

- Сначала введите эту команду и нажмите Enter:
DISM.exe /Online /Cleanup-image /Restorehealth - Затем введите эту команду SFC и нажмите Return:
sfc /scannow

- Подождите, пока сканирование достигнет 100-процентной проверки, чтобы просмотреть его результат.
2. Запустите проверку диска
- Откройте командную строку с повышенными привилегиями, как описано в шагах с первого по третий предыдущего решения.
- Введите следующую команду в окне подсказки :
chkdsk /r C: - Нажмите клавишу Enterклавиатуры, чтобы начать сканирование.

- После этого дождитесь завершения сканирования Check Disk.
- Откройте меню «Пуск» и нажмите «Питание», затем «Перезагрузить».
3. Удалите последние обновления Windows 11.
- Нажмите кнопку «Пуск» на панели задач.
- Выберите приложение «Настройки», закрепленное в меню «Пуск».

- Затем перейдите на вкладку Центр обновления Windows.
- Выберите История обновлений на этой вкладке.

- Затем нажмите «Удалить обновления».

- Выберите самое последнее установленное обновление в окне, которое вы видите ниже:

- Затем нажмите кнопку «Удалить».
4. Запустите утилиту восстановления при загрузке.
- Нажмите кнопку меню «Пуск» на панели задач.
- Выберите параметр «Питание».
- Затем нажмите «Перезагрузить», удерживая Shiftклавишу.
- Затем выберите «Устранение неполадок» и «Дополнительные параметры».

- Выберите параметр «Восстановление при запуске».

5. Обновите драйверы устройств
- Щелкните правой кнопкой мыши кнопку меню «Пуск», чтобы выбрать «Диспетчер устройств».

- Найдите устройства с желтыми восклицательными знаками рядом с ними в диспетчере устройств.
- Если вы найдете устройство с желтым восклицательным знаком, щелкните его правой кнопкой мыши и выберите «Обновить драйвер».

- Затем выберите автоматический поиск обновленного программного обеспечения драйвера в открывшемся окне.
Если устройств с желтыми восклицательными знаками нет, все же рекомендуется обновить хотя бы графические, сетевые и звуковые драйверы устройств.
Хороший способ проверить, какие устройства на вашем ПК нуждаются в новых драйверах, — это просканировать компьютер с помощью стороннего программного обеспечения для обновления драйверов. DriverFix — идеальный выбор в этом отношении.
6. Откатите Windows 11 до точки восстановления.
- Нажмите Windows клавишу + R сочетание клавиш, чтобы открыть «Выполнить».
- Введите этот текст в поле «Выполнить» «Открыть»:
rstrui - Нажмите «ОК», чтобы открыть «Восстановление системы».
- Нажмите кнопку «Далее».

- Если доступен параметр Показать больше точек восстановления, установите этот флажок.
- Выберите точку восстановления, которая вернет Windows 11 к состоянию, предшествующему ошибке Inaccessible_Boot_Device на вашем ПК. Или выберите самую старую доступную точку восстановления.

- Выберите вариант «Далее».
- Нажмите Готово, чтобы начать процесс восстановления.
7. Сбросить Windows 11
- Нажмите «Пуск», затем «Настройки» в Windows 11.
- Выберите «Восстановление» на вкладке «Система».

- Нажмите кнопку «Сбросить этот компьютер».

- Выберите «Сохранить мои файлы» в утилите «Сбросить этот компьютер».

- Затем нажмите «Локальная переустановка».
- Выберите вариант «Далее», чтобы продолжить.
- Нажмите «Сброс» для подтверждения.
Могу ли я применить перечисленные выше потенциальные исправления, не входя в безопасный режим?
Меню «Дополнительные параметры» за пределами Windows включает инструменты «Восстановление системы», «Командная строка», «Восстановление при загрузке» и «Удалить обновления». Так что да, вы можете применить большинство из вышеперечисленных разрешений, открыв оттуда необходимые инструменты для них.
Чтобы сбросить платформу вне Windows, вам необходимо выбрать «Устранение неполадок и сброс этого компьютера» в разделе «Дополнительные параметры восстановления». Затем откроется утилита Reset this PC. После этого вы можете выбрать параметры для сброса Windows 11 по мере необходимости.
В меню «Дополнительные параметры» также есть утилита восстановления образа системы. Если на вашем ПК есть резервная копия образа системы, этот параметр может устранить ошибку Inaccessible_Boot_Device.
Если этих потенциальных разрешений недостаточно для исправления ошибки Inaccessible_Boot_Device на вашем компьютере, проблема может быть связана с неисправным оборудованием. В этом случае вам может потребоваться удалить и заменить неисправные внутренние аппаратные модули, чтобы решить эту проблему.
Домашним пользователям не рекомендуется самостоятельно удалять неисправные внутренние компоненты. Поэтому рассмотрите возможность возврата вашего ПК производителю для ремонта, если приведенные выше решения не устраняют ошибку. Если гарантийный срок вашего компьютера еще не истек, его производитель может устранить проблему бесплатно.
Тем не менее, сначала попробуйте потенциальные решения, указанные выше, прежде чем обращаться к какой-либо ИТ-поддержке или услугам по ремонту. Хотя они не являются полностью гарантированными исправлениями, есть большая вероятность, что хотя бы одно из них устранит ошибку Inaccessible_Boot_Device на вашем ПК.
Если у вас есть какие-либо вопросы, не стесняйтесь оставлять их в разделе комментариев ниже, и мы обязательно их рассмотрим.
by Matthew Adams
Matthew is a freelancer who has produced a variety of articles on various topics related to technology. His main focus is the Windows OS and all the things… read more
Updated on January 18, 2023
- The Inaccessible_Boot_Device Windows 11 error can arise because of incompatible or outdated device drivers, corrupted system files, faulty hardware, and not only.
- You might need to repair bad disk sectors with system tools to fix this issue for good.
- Updating device drivers can help resolve Inaccessible Boot Device and many other BSOD errors.
- Windows 11’s System Restore tool often comes in handy for solving the problem.

XINSTALL BY CLICKING THE DOWNLOAD FILE
- Download Restoro PC Repair Tool that comes with Patented Technologies (patent available here).
- Click Start Scan to find Windows 11 issues that could be causing PC problems.
- Click Repair All to fix issues affecting your computer’s security and performance
- Restoro has been downloaded by 0 readers this month.
The Inaccessible Boot Device Windows 11 error is another BSOD (stop code) issue that can arise due to various causes. This particular error has a 0x0000007b stop code and often arises during the system startup.
As the Inaccessible Boot Device error occurs in such a moment, it’s more serious than random BSOD errors because it stops PCs from booting correctly. Consequently, some users can’t log in to and utilize their computers when this error arises.
How can I fix the Inaccessible Boot Device Windows 11 error?
- How can I fix the Inaccessible Boot Device Windows 11 error?
- 1. Run a system file scan
- 2. Run a Check Disk scan
- 3. Remove recent Windows 11 updates
- 4. Run the Startup Repair utility
- 5. Update device drivers
- 6. Roll Windows 11 back to a restore point
- 7. Reset Windows 11
- What is an inaccessible boot device in Windows 11?
- What causes an inaccessible boot device?
- Is this a blue, green, or black screen error?
- How can I enter Windows 11’s Advanced Recovery Options?
- Can I apply the potential fixes above without entering Safe Mode?
1. Run a system file scan
- Click the magnifying glass icon for the search tool on Windows 11’s taskbar.

- Type cmd in the search text box.
- Select the Run as administrator option to open an elevated Command Prompt window.

- First, input this command and press Enter:
DISM.exe /Online /Cleanup-image /Restorehealth - Then type in this SFC command and press Return:
sfc /scannow
- Wait for the scan to reach 100 percent verification to view its outcome.


2. Run a Check Disk scan
- Open an elevated Command Prompt as outlined within steps one to three of the previous resolution.
- Type the following command in the Prompt’s window:
chkdsk /r C: - Press the Enter keyboard key to start the scan.

- Thereafter, wait for the Check Disk scan to finish.
- Open the Start menu, and click the Power, then Restart.

3. Remove recent Windows 11 updates
- Click the taskbar’s Start button.
- Select the Settings app that’s pinned to the Start menu.

- Next, click the Windows Update tab.
- Select Update history on that tab.

- Then click the Uninstall updates option.

- Select the most recently installed update on the window that you can see below:

- Then click the Uninstall button.


4. Run the Startup Repair utility
- Click the taskbar’s Start menu button.
- Select the Power option.
- Then click the Restart option whilst pressing and holding the Shift key.
- Next, select Troubleshoot and Advanced options.

- Select the Start-up Repair option.


5. Update device drivers
- Right-click the Start menu’s button to select Device Manager.

- Look for devices with yellow exclamation marks by them in Device Manager.
- If you find a device with a yellow exclamation mark, right-click it and select Update driver.

- Then select the Search automatically for updated driver software option within the window that opens.


If there aren’t any devices with yellow exclamation marks, it’s still recommended that you at least update graphics, network, and audio device drivers, as this is likely to fix the Inaccessible Boot Device Windows 11 error.
A good way to check what devices on your PC need new drivers is to scan the computer with third-party driver updater software. DriverFix is an ideal choice in that regard.
6. Roll Windows 11 back to a restore point

NOTE
When you roll back Windows 11, the software installed after your selected restore point date is removed. To check what software a chosen restore point removes, click System Restore’s Scan for affected programs button.
- Press the Windows key + R keyboard shortcut, which will open Run.
- Type this text in Run’s Open box:
rstrui - Click OK to bring up System Restore.
- Press the Next button.

- If there’s a Show more restore point option available, select that checkbox.
- Choose a restore point that will roll Windows 11 back to a time that predates the Inaccessible_Boot_Device error on your PC. Or select the oldest restore point available.

- Select the Next option.
- Click Finish to start the restoration process.


7. Reset Windows 11
NOTE
This resolution will restore Windows 11 to default factory settings. You will need to reinstall all software that didn’t come preinstalled on your PC after resetting. Therefore, this is suggested as a last resort fix.
- Click Start, then Settings in Windows 11.
- Select Recovery on the System tab.

- Press the Reset this PC button.

- Select Keep my files in the Reset this PC utility.

- Next, click the Local reinstall option.
- Select the Next option to continue.
- Click Reset to confirm.


What is an inaccessible boot device in Windows 11?
In general, a boot device is any piece of hardware that holds or is capable of reading the files and drivers necessary for a computer launch. To start your computer, the operating system is usually loaded from the boot media, which can be a hard disk, a CD/DVD, or a USB drive.
In a nutshell, the inaccessible boot device error informs the PC that it has met a problem and must restart to address it. If you notice an Inaccessible Boot Device this implies that your computer is unable to read the Windows 11 partition on the hard drive from which it boots.
This problem might lead to hard disk failure. It might also be a simple driver issue or a boot record failure.
When Windows boots up, it may fail to reach the memory partition containing the system files. This results in the Inaccessible_Boot_Device error message in Windows 11 and stops your PC from booting.
What causes an inaccessible boot device?
Although many many reported seeing this error message as a consequence of a failed update, the boot device problem can be caused by a variety of factors, including BIOS upgrades and overclocked CPUs. In most cases, an inaccessible boot device Windows 11 error signifies more than just one reason.
One of your SSDs is not showing, which might be unlikely but not impossible. You can always try plugging it into another computer to see if the SSD appears. Another aspect to consider is something in the BIOS has been modified, preventing the computer from accessing the SSD.
The good news is that, due to its proximity to the Windows Update, this is easily fixable and will result in no data loss. It’s only that Windows can’t locate the disk, but all of the data on the drive is still present and will remain. These are the most common scenarios in which you may encounter this error:
🚩Inaccessible boot device Windows 11 after driver update failure
🚩Inaccessible boot device Windows 11 after clone is made
🚩Inaccessible boot device after BIOS update not successful
🚩Inaccessible boot device Windows 11 SSD is missing
As stated by many users, Lenovo and Dell are the most afflicted PC manufacturers by the inaccessible boot device windows 11 error, but that doesn’t mean it’s standard only on these PC brands.
The worst aspect about it all is that these are caused by necessary updates without notice. This is a complex fix, but it is achievable once you have access to the Advanced Boot settings and the command prompt.
The same Inaccessible_Boot_Device error appears on Windows 10 too. There are, however, a few ways you can feasibly fix it. To do so, you’ll need to make the most of Windows 11’s built-in system tools, which often provide the best solutions for BSOD issues.
Is this a blue, green, or black screen error?
In Windows 10, the Inaccessible_Boot_Device error is a Blue Screen of Death error. However, Microsoft has changed the background color of BSOD errors to black in Windows 11. Therefore, this issue is a Black Screen of Death one in the latest desktop platform, but it’s still the same error.
Some PC issues are hard to tackle, especially when it comes to corrupted repositories or missing Windows files. If you are having troubles fixing an error, your system may be partially broken.
We recommend installing Restoro, a tool that will scan your machine and identify what the fault is.
Click here to download and start repairing.
To make things a bit more confusing, Windows 11 Insider Preview builds have Green Screens of Death errors instead of black ones. They’re the same errors with a different background color. Thus, the Inaccessible_Boot_Device error screen can also have a green background for some users.
Therefore, the Inaccessible_Boot_Device is a blue, green, and black screen error. It’s still the same issue on Windows 11 and 10 irrespective of its background color.
How can I enter Windows 11’s Advanced Recovery Options?
If you can’t get into Windows 11 because of the Inaccessible_Boot_Device error, you’ll need to enter Advanced Recovery Options during the system startup. Advanced Recovery Options is a centralized blue menu outside of Windows that includes numerous system tools and options.
Some users may be able to enter Advanced Recovery Options with the F11 keyboard key. Try pressing it shortly after turning on your PC. Then the blue Choose an option menu might open, but that’s not a universal method.
If that doesn’t work, restart the computer by pressing and holding its Power button for about 5 to 10 seconds when you see the Windows logo during the startup. Force the shutdown in that way three times. After you restart your PC like that three times in a row, an Automatic Repair screen will appear.
This screen includes an Advanced options button. Click that button to enter the Advanced Recovery Options menu. From there, you can access system tools that can feasibly fix the Inaccessible_Boot_Device error or activate Safe Mode.

You can get back into Windows with the Safe Mode option. To do so, select Troubleshoot and Advanced options. From there, select Start-up Settings and Restart. When Windows restarts, press F4 (or F5) to choose Enable Safe Mode on the Start-up Settings menu.

Thereafter, you will be able to apply the potential fixes above as outlined in Safe Mode. That mode is a special diagnostic one for Windows 11, which loads with only minimal driver sets and services.
- Browser Not Working on Windows 11: How to Fix This
- Fix: Your Account Doesn’t Match Your Dev Environment
Can I apply the potential fixes above without entering Safe Mode?
The Advanced options menu outside of Windows includes System Restore, Command Prompt, Startup Repair, and Uninstall Updates tools. So yes, you can apply most of the resolutions above by opening the required tools for them from there.
To reset the platform outside of Windows, you’ll need to select Troubleshoot and Reset this PC within Advanced Recovery Options. Then the Reset this PC utility open. Thereafter, you can select the options to reset Windows 11 as required.
The Advanced options menu also includes a System Image Recovery utility. If your PC has a system image backup, that option could resolve the Inaccessible_Boot_Device error.
If those potential resolutions aren’t enough to fix the Inaccessible Boot Device Windows 11 error on your computer, the issue might be due to faulty hardware. In which case, you might need to remove and replace faulty internal hardware modules to solve it.
It’s not recommended for home users to remove faulty internal components themselves. So, consider returning your PC to its manufacturer for repairs if the above resolutions don’t resolve the error. If your computer is still within its warranty period, its manufacturer might fix the issue free of charge.
However, give the potential resolutions above a try first before turning to any IT support or repair services. Although they’re not entirely guaranteed fixes, there’s a good chance at least one of them will resolve the Inaccessible_Boot_Device error on your PC.
Even more, take a look at this article dedicated to solving No boot device available errors. Even if it’s for Windows 10, rest assured that the solutions may be applied on Windows 11 PCs too.
If you have any questions regarding the Inaccessible Boot Device Windows 11 error, don’t hesitate to leave them in the comments section below and we’ll be sure to take a look.
![]()
Newsletter
Критическая ошибка «INACCESSIBLE BOOT DEVICE» вызывает синий экран и препятствует нормальной загрузке системы? Ниже мы разберем основные причины и методы устранения данной ошибки.

Содержание
- Основные причины ошибки «INACCESSIBLE_BOOT_DEVICE»
- Ошибка «INACCESSIBLE_BOOT_DEVICE» после обновления или сброса настроек системы
- Ошибка «INACCESSIBLE_BOOT_DEVICE» после настроек или обновления BIOS
- Ошибка «INACCESSIBLE_BOOT_DEVICE» после изменения логической структуры или физического повреждения носителя
- Что делать, если ничего не помогло или пропали важные данные?
Ошибка «INACCESSIBLE_BOOT_DEVICE» (недопустимое загрузочное устройство) является довольно распространенной проблемой, которая возникает у пользователей Windows во время загрузки операционной системы. Суть ошибки заключается в том, что во время старта компьютера первым делом запускается система BIOS, которая в автоматическом режиме ищет жесткий диск или другой накопитель, где установлена ОС. Если во время поиска BIOS не может обнаружить носитель с Windows или ему не удается распознать расположение системы, пользователю выдается сообщение с ошибкой «INACCESSIBLE_BOOT_DEVICE».
Основные причины ошибки «INACCESSIBLE_BOOT_DEVICE»
Ошибка «INACCESSIBLE_BOOT_DEVICE» может быть вызвана многими причинами, которые происходят из-за неправильного обновления или отката операционной системы до предыдущего состояния.
Помимо этого, синий экран с ошибкой может быть следствием:
- Неудачной установки обновления Windows
- Повреждения системы вредоносными программами.
- Неправильной установки или обновления драйверов.
- Изменения логической структуры диска.
- Неправильной активации режима AHCI для интерфейса SATA в уже установленной Windows через BIOS.
- Повреждения системных файлов и данных реестра.
- Выхода из строя компонентов жесткого диска.
Ошибка «INACCESSIBLE_BOOT_DEVICE» после обновления или сброса настроек системы
Проблемы с запуском операционной системы могут возникать после установки новых обновлений или сброса настроек системы. Данная проблема исправляется простым запуском безопасного режима или функцией восстановления при загрузке.
После нескольких неудачных попыток загрузки (как правило, среда восстановления загружается после третьей неудачной попытки загрузки), система автоматически предложит перейти в режим восстановления. Для этого достаточно после сообщения об ошибке загрузки нажать по кнопке «Дополнительные параметры», а затем в открывшемся меню необходимо выбрать пункт «Параметры загрузки».

В параметрах загрузки следует нажать кнопку «Перезагрузить», и при новой загрузке система предложит выбрать варианты работы. Для исправления ошибки понадобится вариант под номером 4 «Безопасный режим».

После загрузки в безопасном режиме можно перезагрузить компьютер из кнопки «Пуск», после чего система начнет запускаться в штатном режиме.
Если проблема не была решена, в меню восстановления «Дополнительные параметры» следует попробовать пункт «Восстановление при загрузке». Данный способ также может быть эффективным при сбоях после обновления или отката.

Ошибка «INACCESSIBLE_BOOT_DEVICE» после настроек или обновления BIOS
Многие пользователи сталкивались с ошибкой после обновления BIOS или изменения его настроек.
Стоит отметить, что самой часто причиной появления данной проблемы является изменение режимов AHCI для SATA в BIOS.
Если данный режим был изменен в BIOS с уже установленной операционной системой, то Windows не сможет правильно распознать диск и будет выдавать ошибку «INACCESSIBLE_BOOT_DEVICE».
Для исправления данной проблемы достаточно зайти в BIOS и изменить режим с AHCI на IDE или наоборот.
Как правильно это сделать, можно прочитать в соответствующей статье «Как включить режим AHCI для SATA в BIOS без переустановки Windows».
Ошибка «INACCESSIBLE_BOOT_DEVICE» после изменения логической структуры или физического повреждения носителя
Зачастую ошибки с загрузкой операционной системы могут возникать в ходе физического повреждения носителя или соединительных кабелей. Чтобы устранить такую проблему, настоятельно рекомендуется провести осмотр кабелей, портов подключения и состояния носителей.
Возможно, в процессе очистки компьютера от пыли некоторые компоненты были подключены неверно, что привело к ошибке.
После проверки подключения компонентов рекомендуется отключить все сторонние носители кроме того, где установлена система. Если ошибка повторяется, следует загрузиться при помощи загрузочного диска или загрузочной флешки для восстановления системы.
После входа в среду восстановления Windows выбираем пункт «Поиск и устранение неисправностей», затем на следующем окне переходим в «Дополнительные параметры».

В меню «Дополнительные параметры» можно произвести восстановление, откат и восстановление при загрузке операционной системы. Помимо этого, пункт «Вернуться к предыдущей сборке» позволяет восстановить предыдущую версию операционной системы с сохранением её работоспособности. Данное действие поможет эффективно исправить возникшую ошибку.

Также здесь можно выбрать режим «Командная строка» и с его помощью попробовать исправить проблемы с загрузкой системы. Подробнее ознакомиться с методами восстановления загрузчика можно в статье «Как восстановить загрузчик Windowss».
Если проблема кроется не в загрузчике, в «Дополнительные параметры» выбираем пункт командная строка и поочередно вводим команду «chkdsk C: /r» для проверки состояния носителя.
C:UserUser>chkdsk C: /r
Что делать, если ничего не помогло или пропали важные данные?
Однако чаще всего проблема кроется именно в программных сбоях и, если ничего не помогает – лучше всего извлечь ценные данные с диска и переустановить операционную систему с нуля. Однако не стоит забывать, что на рабочем столе и на системном диске тоже может хранится ценная информация.
Кроме того, проблемы с операционной системой могут также стать причиной повреждений файлов или логической структуры дисков. Дело в том, что многие модели компьютеров если не могут загрузить операционную систему, уходят в так называемую постоянную перезагрузку и плохо как для жесткого, так для SSD диска.
Поэтому, как только у вас появилась ошибка INACCESSIBLE BOOT DEVICE – немедленно извлеките важные данные в безопасное место при помощи RS Partition Recovery.
RS Partition Recovery – позволяет восстанавливать данные после случайного удаления, форматирования диска, при повреждениях логической структуры накопителя и во многих других случаях.
Программа абсолютно не требовательна к ресурсам ПК, что позволяет использовать ее на слабых компьютерах и офисных ноутбуках.
В RS Partition Recovery восстановление информации происходит в несколько кликов мышки благодаря интуитивно понятному интерфейсу и встроенному мастеру восстановления файлов.

Помимо прочего хотелось бы отметить, режим глубокого сканирования накопителя, который позволяет восстанавливать данные даже спустя месяц после их удаления. Эта функция будет полезной если вы не заметили сразу пропажу важного файла, и лишь спустя некоторое время обнаружили что нужный вам файл отсутствует.
Часто задаваемые вопросы
Ошибка «INACCESSIBLE BOOT DEVICE» что BIOS/UEFI не смог найти загрузочное устройство или расположение операционной системы. То есть компьютер не знает, как загрузить операционную систему.
Среди главных причин можно выделить такие: неудачная установка обновления Windows, повреждения системы вирусами, изменение логической структуры диска, и многие другие. Полный перечень ошибок и способов их исправления вы сможете найти на нашем сайте.
Воспользуйтесь программой RS Partition Recovery. Она позволяет вернуть утерянные данные после случайного удаления, форматирования диска и во многих других случаях. Процесс восстановления детально описан на нашем сайте.
Если после очередного обновления Windows вы наблюдаете ошибку «INACCESSIBLE_BOOT_DEVICE», войдите в безопасный режим Windows, а затем загрузите систему в нормальном режиме. На нашем сайте вы найдете детальную инструкцию как исправить ошибку INACCESSIBLE_BOOT_DEVICE в самых разных ситуациях.
Если на системном диске нету важных данных – вы можете провести чистую установку системы. Если же важные данные присутствуют – можно подключить диск к другому компьютеру и перенести данные ы безопасное место.
BSODs or Blue screens of death are dreaded Windows errors that can cause serious issues with your PC and prevent you from booting into Windows 11 altogether. BSODs happen for several reasons and often display a stop code that helps you identify the issue.
The ‘Inaccessible boot device‘ is one such stop code that is the reason for a lot of fo BSODs on Windows 11 according to recent user reports. A Windows update, driver update, or even a third-party program could be the cause of this issue. If you’re in the same boat, then here’s all you need to know about it.
Why am I getting ‘Inaccessible boot device’ Stop Code on Windows 11 and what is it?
The ‘Inaccessible boot device’ is a stop code issued by Windows when it’s unable to identify and boot from your boot drive. This could happen due to several reasons and the most common ones have been listed below.
- Drive failure
- Faulty drivers
- Power failure
- Bad sectors
- Drive letter change for the boot drive
- Corrupted boot structure
- Failing SATA/NVMe ports
- Loose cables
- Loose connections
- Physical damage
- Corrupted programs
- Malware
- Corrupted BIOS
and more! All these reasons can lead to an unreadable boot drive which can lead to this BSOD on your PC.
Related: How to Repair Windows 11 [15 Ways]
Here’s how you can fix the Inaccessible boot device BSOD on your system. We first recommend you perform a few checks on your system to narrow down the cause of your issue. You can then use the appropriate fix mentioned below to fix this BSOD on your Windows 11 system. Let’s get started.
Windows 11 Inaccessible boot device: 5 checks to do
Let’s start by first checking if your boot drive shows up in the BIOS menu. If it does, then you’re likely looking at issues with your Windows installation. However, if your boot drive does not show up in the BIOS menu then it might be an indicator of a failing drive. Let’s get started.
#1: Check for your boot drive in the BIOS
Reboot your PC and use one of the BIOS keys depending on your OEM to access your BIOS menu. If you aren’t aware of your PC’s BIOS key, then you can use this comprehensive post from us. Once you’re in the BIOS menu, switched to Advanced settings and look for Boot order or a similarly named option. This will allow you to select a boot device from which you wish to boot into the desired OS.
We don’t need to change this option but rather check the available drives. If your boot drive shows up as an option to select for your boot order, then you’re facing an issue with your Windows 11 installation. However, if your drive is missing then you’re likely looking at a drive failure. We recommend you opt for the following fixes and checks to verify the same.
- Check for damage
- Check your SATA/NVMe port
- Try using the drive on a different PC
Follow either of the relevant sections below depending on your diagnosis to continue fixing the Inaccessible boot device BSOD on your Windows 11 PC.
Related: How to Repair Windows 11 Without CD: 12 Methods Explained!
#2: Check your drive for physical damage
If you’re comfortable, we recommend opening up your PC and checking your drive for physical damage. This could be relevant if you faced a recent power failure, traveled with your PC, or transported your PC under stress. Open up your PC or laptop and detach the concerned drive from the connected port. We now recommend you check the drive’s connector pins for any damage. This can show up as dents, scratches, and even black smudges that might be evidence of an electric spark. If you’re using an SSD with a heat sink we recommend you check the thermal pad and subsequently the heatsink for any signs of damage. If you’re using an HDD then you can shake it to diagnose any broken or misaligned parts.
Once you’re done, if your drive shows any sign of damage then you should take it to a certified technician at the earliest. This will maximize your chances of data recovery before parts and sectors on your drive become unreadable.
#3: Check if you can access Recovery mode
Windows Recovery mode offers a set of in-built advanced features designed to diagnose and fix issues when booting the OS. You can trigger the Recovery mode automatically by restarting your PC mid-way through the boot process 3 times. You can also press F11 on your keyboard to enter the same during the boot process. If you can access the Recovery mode then you’re likely facing a minor issue with your Windows 11 installation. However, if you’re unable to access the Recovery mode then it might indicate a more serious issue with your PC. We recommend you follow the relevant fixes below depending on your diagnosis.
Some PCs might also come bundled with custom Recovery modes that are stored on hidden partitions on your boot drive. This is usually the case with pre-built PCs and laptops where you have a custom recovery mode from your OEM that offers additional recovery options. If you’re able to access this mode then you can try recovering your PC and fixing the Inaccessible Boot Device BSOD using these options.
Related: Windows 11 Spotlight Not Working? 9 Fixes and 3 Checks To Do
#4: Check for loose cables
If you recently performed repairs or upgrades on your PC then we recommend you check all your cables and verify all the necessary connections. You could have missed a wire or a connector might not have fit properly. Reseating all the concerned connections and ports can help fix issues especially when your BIOS is unable to access the boot drive. If you have an M.2 SSD and multiple ports on your motherboard then you can even try switching ports. You could be facing issues with a faulty or failing M.2 port. Changing the port can help diagnose and fix the same for the meanwhile until you can take your PC to a certified technician.
Windows 11 Inaccessible boot device: 17 fixes explained
Now that you’ve verified and checked your PC to diagnose your issue further, you can use either of the relevant sections below to start fixing your PC. Let’s get started.
Part 1: If you can access your boot drive: 13 Fixes
If you’re able to access and view your boot drive in the BIOS then you can start with the fixes mentioned below. We recommend you start with the first fix and make your way through the list until you’re able to boot into Windows 11.
Fix 1: Uninstall recently installed programs
A recently installed program or app is likely preventing you from booting Windows. You can uninstall recent programs and apps using the CMD which can either be accessed using the Recovery mode or by using a Windows installation media. To boot into Recovery Mode, restart your PC during the boot process 3 times. If you’re using a Windows boot media then plug in the same and click Next.

Now click Repair your computer.

Once you’re booted into the Windows recovery environment, click Troubleshoot.

Click Advanced options.

Now click Command Prompt.

You can now use the commands below to uninstall recently installed programs and apps that you suspect are causing the Inaccessible Boot Device BSOD on your PC. Type in the following and press Enter to get you started.
dir

You will now be shown the drive and volume where Windows is installed. Note down its drive letter and execute the following command. Replace LTR with the drive letter you noted down earlier.
Dism /Image:LTR: /Get-Packages

Now identify the program you wish to remove from your PC and note down its name. Use the following command to uninstall it from your PC. Replace NAME with the name of the program you noted down earlier. Similarly, replace LTR with the drive letter where Windows is installed.
exe /image:LTR:/remove-package/packagename:NAME

The selected program will now be uninstalled from your PC. Once uninstalled, use the following command to close CMD.
exit

Now restart your PC and see if you still face the Inaccessible Boot Device stop code when encountering a BSOD. If a recently installed program was causing issues then it should now be fixed.
Fix 2: Try to switch your SATA mode in the BIOS
We now recommend you switch your SATA mode in the BIOS, especially if you have an Intel system. Reboot your PC and use F2 to boot into the BIOS menu. You can find the BIOS key relevant to your OEM at this link from us. Once you’re in the BIOS, switch your SATA mode to AHCI or vice versa. Depending on your PC, the following options might be available to you.
- AHCI
- Intel RST
- IDE
- RAID
and more. The idea is to switch to another mode and see which one works the best for you. Toggling and switching modes can sometimes help fix issues with your boot drive especially if your BIOS is facing a bug.
Fix 3: Cancel pending Windows updates
We now recommend you cancel any pending Windows updates that might be trying to install during the boot process and thus preventing Windows from accessing the boot drive. Use the steps below to help you along with the process.
Boot into the Recovery mode using your preferred method and launch CMD.
Type in the following and press Enter.
reg load HKLMtemp c:windows

Now execute the following command.
system32config

Subsequently, execute the following command.
software

Now use the following command to delete the pending update registry key.
reg delete "HKLMtempMicrosoftWindowsCurrentVersionComponent Based ServicingSessionsPending"/v exclusive

Use the following command to unload the registry.
reg unload HKLMtemp

Now enter the following command to view available updates on your PC. Replace c with the drive letter for your boot drive if applicable.
dism /image:c: /get-packages

Look for updates with the Install Pending tag. Note down their names once found. Once you’re done, type in the following and press Enter.
MKDIR C:temppackages

Now type in the following and press Enter to execute the command. Replace NAME with the name of the update package you noted down earlier. Additionally replace c: with the drive letter for your boot drive if applicable.
dism /image:c: /remove-package /packagename:NAME /scratchdir:c:temppackages

Repeat the steps above for other pending updates on your PC. Once done, use the following command to close CMD.
exit

Restart your PC and you should now be able to boot into Windows 11 if pending updates were the cause of your BSOD.
Fix 4: Run Chkdsk
Launch Recovery Mode on your PC using the desired method and launch Command Prompt.
Now use the following command to run Chkdsk. Replace c: with the drive letter for your boot drive if applicable.
chkdsk /f /r c:

Once done, use the following command to close CMD.
exit

Reboot your PC and if bad sectors on your boot drive were causing the Inaccessible Boot Device issue on your PC then it should now be fixed.
Fix 5: Boot Windows in Safe mode
We now recommend you try booting Windows in Safe mode. If you can boot Windows in Safe mode then it is likely that a third-party program or service is causing issues with your system and causing the Inaccessible Boot Device BSOD. Follow the steps below to help you along with the process.
Reboot your PC into the Recovery Mode using your preferred method. Click Troubleshoot.
Now click Advanced options.
Click Startup Settings.

Click Restart.

Your PC will now reboot and display the relevant startup options. Press F4 or 4 on your keyboard to boot Windows into safe mode.

If your PC manages to boot Windows in Safe mode then you can diagnose and remove recently installed third-party programs to fix your issue. If however, you’re unable to boot into Windows, you can continue with the other fixes mentioned below.
Fix 6: Update drivers for your storage controllers
Outdated or faulty storage controller drivers can also prevent your PC from accessing your boot drive. A recent BIOS update could have led to incompatibility or a recent driver update could be facing undiagnosed bugs. Use the steps below to help you remove faulty drivers and install known working drivers for your storage controllers.
Note: You will need to download or source the appropriate drivers for your storage controller and transfer them to a USB connection to your PC before proceeding with this guide.
Reboot your PC in Recovery mode using your preferred method and launch Command Prompt.
Now use the following command to get a list of all the drivers installed on your PC.
pnputil -e > C:drivers.txt

Use the following command to view a list of all the drivers installed on your PC.
type C:drivers.txt

Now identify your storage controller drivers from the list on your screen and note down its Published name. Use the following command to remove the driver. Replace NAME with the name you noted down previously.
pnputil.exe -d NAME.inf

Once removed, use the command below to install the appropriate driver from your USB. Replace LTR with the drive letter for your USB and NAME with the name of your driver in the USB.
pnputil.exe -a LTR:NAME.INF

Now use the following command to close CMD.
exit

Reboot your PC and try booting into Windows normally. If faulty storage controller drivers were the cause of your issue then it should now be fixed on your PC.
You can use the bootrec.exe commands to try and fix issues with the Windows boot menu. Use the steps below to help you along with the process.
Reboot your PC in Recovery mode and launch Command Prompt.
Type in the following command and press Enter.
bootrec.exe /rebuildbcd

Next, execute the following command.
bootrec.exe /fixmbr

Lastly, execute the following command to fix your boot order.
bootrec.exe /fixboot

Use the following command to close CMD.
exit

Reboot your PC and try booting Windows 11 as usual. If issues with your boot menu were preventing you from booting then it should now be fixed on your system.
Fix 8: Run Startup Repair
Startup Repair is an in-built utility in the Recovery mode that can help you fix issues with startup on Windows 11. Follow the steps below to help you along with the process.
Reboot your PC to Recovery Mode and click Troubleshoot.

Now click Advanced Options.
Click Startup Repair.

Sign in to your User account to confirm your identity. Windows will now try to fix issues with startup on your system automatically. Once done, reboot your PC and you should now be able to boot into Windows if Startup repair managed to fix your issue.
Fix 9: Use System Restore
System Restore can help you restore your PC to a previous restore point when everything was working as intended. All recently installed programs, services, and drivers after the restore point will be deleted during this process. Follow the steps below to help you along with the process.
Reboot your PC to Recovery Mode using your preferred method and click Troubleshoot.
Click Advanced Options.
Now click System Restore.

Click and select the desired user account and verify your identity by entering your password. System Restore will now launch on your PC. Click Next.

Now click Choose a different restore point if prompted. Click and select the desired restore point when everything was working as intended on your PC.
Tip: You can click Scan for affected programs to view a list of programs that will be removed from your PC during this process.

Click Next.

Now click Finish.

Your PC will now be restored to the selected restore point. You should no longer face the Inaccessible Boot Device BSOD on your system.
Fix 10: Run SFC & DISM scan
Reboot your PC to recovery mode and launch Command Prompt.
Now use the following command to run an SFC scan.
sfc /scannow

Once done, use the following command to restore your Windows 11 installation image.
DISM /Cleanup-Image /RestoreHealth

Once done, use the following command to close CMD.
exit
Reboot your PC and try booting into Windows 11 as usual. If corrupted system files were causing BSOD on your system, then the issue should now be fixed.
Fix 11: ReFlash your system BIOS
We now recommend you try reflashing your BIOS. You could be facing issues with an outdated or corrupted BIOS that might be facing bugs with your current hardware components. Reflashing your BIOS can help fix issues with the same. Flashing your BIOS can be a different process for each PC depending on its OEM. We recommend you follow the guides linked below depending on your OEM to flash your BIOS.
- Dell
- Acer
- Asus | For Laptops | For Desktops
- Gigabyte
- Lenovo
- HP
If BIOS issues were causing the Inaccessible Boot Device BSOD on your system, then the issue should now be fixed.
Fix 12: Check & Re-assign your boot drive letter if changed
Sometimes the drive letter for your boot drive can get changed depending on the changes you make to your PC. The same can prevent you from booting Windows and cause a BSOD with the stop code Inaccessible Boot Device. Use the steps below to check and correct the same on your PC. Let’s get started.
Reboot your PC to Recovery Mode using your preferred method and launch Command Prompt.
Now use the following command to launch diskpart.
diskpart

Type in the following and press Enter.
list vol

Find and identify your boot drive from the list on your screen using the Info column. Check the letter beside the same. If it is different from your initial boot drive letter (C:) then use the commands below to correct the same.

Start by selecting your boot volume using the command below. Replace VOLUMENUMBER with the relevant volume number for your boot volume.
sel vol VOLUMENUMBER

Now type in the following command to assign C: as the default drive letter to your boot volume.
assign letter=C

Use the following command to close diskpart.
exit

Now use the following command to close CMD.
exit

Reboot your PC and you should now be able to boot into Windows 11 as usual.
Fix 13: Install Intel RST drivers manually (only for Intel users)
If you have Rapid Storage compatible drive and CPU then you could be facing issues with your RST drivers. RST drivers are notorious for causing issues when trying to boot Windows during certain scenarios and re-installing the same can help fix many issues. Use the steps below to help you re-install or install Intel RST drivers depending on your PC.
Note: We highly recommend you download and use the drivers relevant to your PC published by your OEM. If your OEM doesn’t provide any Intel RST drivers then we recommend you verify your compatibility and download the relevant drivers from this link.
Start by downloading the relevant RST drivers for your PC and transferring them to a USB using a second device. Connect the USB to your PC. Now Reboot your PC to Recovery Mode and launch Command Prompt.
Use the following command to export a list of all installed drivers.
pnputil -e > C:drivers.txt
Use the following command to view a list of drivers installed on your PC.
type C:drivers.txt
Find and identify any RST drivers installed on your PC. If you find any, note down the Published name. Now use the following command to remove the driver. Replace NAME with the name you noted down earlier.
pnputil.exe -d NAME.inf
Repeat the steps above to remove any additional RST drivers on your PC. Your PC could have multiple versions of the driver in some cases. Once you’re done, use the following command to install the downloaded drivers from your USB. Replace LTR with the letter assigned to your USB drive and NAME with the name of your driver .INF file.
pnputil.exe -a LTR:NAME.INF
The selected driver will now be installed for your Windows 11 installation. Use the following command to close CMD.
exit
Reboot your PC and try booting Windows 11 as usual again. If faulty or incompatible RST drivers were causing issues with your system, then the same should now be fixed.
Last Resorts
If by this time you’re still facing Inaccessible Boot Device BSOD on your system then it’s time for some drastic measures. We now recommend you format your boot drive and reinstall Windows 11 from scratch. This can help fix major issues with your Windows 11 installation.
We will first backup all your important data using an Ubuntu ISO. We can then format and reinstall Windows 11 without the risk of losing your data.
If however, starting from scratch does not fix your issue, then you might be looking at a hardware failure. We recommend you get in touch with a certified technician at the earliest in such cases.
Things you need
- A second PC
- A USB stick (Preferably two)
- An external drive to backup your data
- Windows 11 ISO | Download Link
- Ubuntu ISO | Download Link
- Rufus | Download Link
Format and reinstall Windows 11
Here’s how you can format and reinstall Windows 11 on your PC. Use the steps below to help you along with the process.
Step 1: Backup your data using Ubuntu
Start by downloading the Ubuntu ISO linked above. Similarly, download a portable copy of Rufus using the link above. Now launch Rufus on your PC. Click the drop-down menu at the top and select your USB if not already selected.

Click SELECT.

Navigate to the Ubuntu ISO you downloaded and double-click the same to select it.

The values will be automatically filled in for your Ubuntu ISO. Click START once done.

If you’re asked about image mode, let it be at its default option, Write in ISO Image mode (Recommended).

Click OK.

You will now be shown an alert that all data on your USB will be deleted. Click OK to confirm your choice.

Rufus will now format and create a bootable Ubuntu USB. This can take some time depending on your PC and USB. You can track its progress at the bottom of Rufus.

Once done, leave your USB plugged in and reboot your PC. Press Esc on your keyboard as soon as your PC reboots. You will now be given the choice to select your boot device. Use the arrow keys to select your USB drive and press Enter to select the same. You can also use the BIOS to set the USB as your preferred boot device. Now select Try or Install Ubuntu from the Grub menu.

Your PC will now boot from your USB drive and launch Ubuntu. Click and select your preferred language from the left sidebar.

Now click Try Ubuntu.

The live desktop environment will now boot and launch on your PC. Once done, double-click the Home folder on your desktop.

Click Other Locations on your left. You will now be shown all the available disks on your PC. This includes your failing Windows drive as well. Double click the same and backup all your important files to your external drive.

Once you’re done simply reboot your PC and follow the next step to format and reinstall Windows 11 on your drive.

Step 2: Format and reinstall Windows 11
Similar to booting Ubuntu, you will need to create a Windows 11 installation media using the downloaded ISO. Once you’re done, you can boot from the USB, format the concerned drive, and re-install Windows 11. Keep in mind that formatting your boot drive will remove all data from the same including hidden partitions. If you have a custom recovery partition, then we recommend you backup the same before proceeding further.
Once you’re ready, use this comprehensive guide from us to format and reinstall Windows 11 on your PC.
Part 2: If you can not access your drive at all (4 Fixes)
If you can not access your drive at all in your BIOS menu then it might indicate a failing drive or in the worst case, a hardware failure. We recommend you try out the following fixes to try and diagnose your issue further. Let’s get started.
Fix 1: Try changing SATA/NVMe ports
If you have multiple ports available on your motherboard then you can try switching the same to see if that fixes the issue for you. You could be facing a failing SATA or NVMe port on your PC which is preventing your boot drive from showing up on your PC.
Ports can get damaged due to various reasons including stress, transit damage, power surges, failing chargers, and more. All these issues can prevent your drive from being read which can cause the Inaccessible Boot Device BSOD on your system.
If you’re comfortable, we recommend you open up your PC or laptop and try switching drive slots to see if that helps your drive show up on your PC. Most NVMe drives are held down by a single screw and will pop up once the screw is removed. The drives are inserted removed at an angle and then pressed down to create tension.
SATA drives and HDDs on the other hand use slot-in or cable connectors that can be pulled out and inserted. These drives are also held down using screws and detaching the connector can help your remove the same.
If however, you’re using a laptop then your options can be limited. You might not have an additional port on your system which might force you to try your drive on a different PC or a test bench. Use the next section to help you along with the same.
Fix 2: Try using your drive on a different PC
We now recommend you try using the concerned drive on a different PC. While you will face your issues when trying to boot your Windows 11 installation, the idea is to check the BIOS and verify if the drive can be read or not. This can help you diagnose issues with your PC that might be specific to your hardware components and will be preventing you from using the concerned drive on your PC. If your drive shows up on a different PC then we recommend you get in touch with a certified technician to further diagnose and fix this issue specific to your PC.
Fix 3: Replace your faulty drive
If your drive is unreadable and dead then there is not much you can do at this point. You can pay for professional data recovery services to recover important data from your drive if needed and then replace the drive to start afresh.
You can use this guide from us to fresh install Windows 11 on your new drive once replaced.
Fix 4: Reinstall Windows 11 on a new drive
You can try installing Windows 11 on a different drive to further diagnose and fix the issue with your previous installation. You can however only do this if you have another drive installed on your system. As your boot drive is currently unreadable, you won’t be able to create a new partition to install Windows 11 on the same. Use the steps below to help you along with the process.
Step 1: Backup your data using Ubuntu
As we’ll be installing Windows 11 on your alternate drive, you can backup data from the same using the Ubuntu live environment. Follow the steps below to help you along with the process.
- Ubuntu | Download Link
- Rufus | Download Link
Start by downloading the Ubuntu ISO linked above. Similarly, download a portable copy of Rufus using the link above. Now launch Rufus on your PC. Click the drop-down menu at the top and select your USB if not already selected.
Click SELECT.
Navigate to the Ubuntu ISO you downloaded and double-click the same to select it.
The values will be automatically filled in for your Ubuntu ISO. Click START once done.
Let the image mode be its default selection and click OK if you’re prompted.
You will now be shown an alert that all data on your USB will be deleted. Click Yes to confirm your choice.
Rufus will now format and create a bootable Ubuntu USB. This can take some time depending on your PC and USB. You can track its progress at the bottom of Rufus.
Once done, leave your USB plugged in and reboot your PC. Press Esc on your keyboard as soon as your PC reboots. You will now be given the choice to select your boot device. Use the arrow keys to select your USB drive and press Enter to select the same. Your PC will now boot from your USB drive and launch Ubuntu. Select Try or Install Ubuntu from the Grub menu.
Click and select your preferred language from the left sidebar.
Now click Try Ubuntu.
The live desktop environment will now boot and launch on your PC. Once done, double-click the Home folder on your desktop.
Click Other Locations on your left.
You will now be shown all the available disks on your PC. This includes your failing Windows drive as well. Double click the same and backup all your important files to your external drive.
Once you’re done simply reboot your PC and follow the next step to format and reinstall Windows 11 on your drive.
Step 2: Install Windows 11
We now recommend you format your drive and install Windows 11 on the same. Use this comprehensive guide from us to help you along with the process. Once you’ve installed Windows 11 you can set up your PC as needed and try reading your initial drive using data recovery tools. You might be looking at a bricked drive that might need additional fixes to get it working again. If the drive does not show up at all, we recommend you get in touch with a certified technician to further help diagnose and fix your PC.
We hope this post helped you fix the Inaccessible Boot Device stop code BSOD on your PC. If you have any more questions, feel free to reach out using the comments below.
RELATED
- How to Fix Copy and Paste on Windows 11
- How to Fix: Computer Won’t Wake Up From Sleep on Windows 11
- Windows 11 Taskbar Not Showing? How to Fix
- How to Fix Windows 11 Green Screen Error [8 Ways]