- Remove From My Forums
-
Question
-
Having a problem with this and getting this error after reboot. It contacts the WDS server and bring down the image and then tells me «Unable to parse unattended.xml c:windowspantherunattended.xml
file is invalid» Attached is my «image unattend» and my unattend files. Both files pass in waik with no errors.In advance thanks for the help
Doc
Unattend
<?xml version=»1.0″ encoding=»utf-8″?>
<unattend xmlns=»urn:schemas-microsoft-com:unattend»>
<settings pass=»windowsPE»>
<component name=»Microsoft-Windows-International-Core-WinPE» processorArchitecture=»x86″ publicKeyToken=»31bf3856ad364e35″ language=»neutral» versionScope=»nonSxS» xmlns:wcm=»http://schemas.microsoft.com/WMIConfig/2002/State»
xmlns:xsi=»http://www.w3.org/2001/XMLSchema-instance»>
<SetupUILanguage>
<UILanguage>en-us</UILanguage>
</SetupUILanguage>
<InputLocale>en-us</InputLocale>
<SystemLocale>en-us</SystemLocale>
<UILanguage>en-us</UILanguage>
<UserLocale>en-us</UserLocale>
</component>
<component name=»Microsoft-Windows-Setup» processorArchitecture=»x86″ publicKeyToken=»31bf3856ad364e35″ language=»neutral» versionScope=»nonSxS» xmlns:wcm=»http://schemas.microsoft.com/WMIConfig/2002/State» xmlns:xsi=»http://www.w3.org/2001/XMLSchema-instance»>
<DiskConfiguration>
<Disk wcm:action=»add»>
<CreatePartitions>
<CreatePartition wcm:action=»add»>
<Extend>true</Extend>
<Order>1</Order>
<Type>Primary</Type>
</CreatePartition>
</CreatePartitions>
<ModifyPartitions>
<ModifyPartition wcm:action=»add»>
<Active>true</Active>
<Extend>false</Extend>
<Format>NTFS</Format>
<Label>os</Label>
<Letter>C</Letter>
<Order>1</Order>
<PartitionID>1</PartitionID>
</ModifyPartition>
</ModifyPartitions>
<DiskID>0</DiskID>
<WillWipeDisk>true</WillWipeDisk>
</Disk>
<WillShowUI>OnError</WillShowUI>
</DiskConfiguration>
<WindowsDeploymentServices>
<Login>
<Credentials>
<Domain>my.local</Domain>
<Password>password</Password>
<Username>wds</Username>
</Credentials>
</Login>
<ImageSelection>
<InstallImage>
<ImageName>Image Name as displayed in WDS</ImageName>
<ImageGroup>Image Group</ImageGroup>
<Filename>Image Filename</Filename>
</InstallImage>
<InstallTo>
<DiskID>0</DiskID>
<PartitionID>1</PartitionID>
</InstallTo>
<WillShowUI>Always</WillShowUI>
</ImageSelection>
</WindowsDeploymentServices>
</component>
</settings>
<cpi:offlineImage cpi:source=xmlns:cpi=»urn:schemas-microsoft-com:cpi» />
</unattend>Imageunattend use after reboot in c:windowspanther for oobe portion
<?xml version=»1.0″ encoding=»utf-8″?>
<unattend xmlns=»urn:schemas-microsoft-com:unattend»>
<settings pass=»specialize»>
<component name=»Microsoft-Windows-Shell-Setup» processorArchitecture=»x86″ publicKeyToken=»31bf3856ad364e35″ language=»neutral» versionScope=»nonSxS» xmlns:wcm=»http://schemas.microsoft.com/WMIConfig/2002/State»
xmlns:xsi=»http://www.w3.org/2001/XMLSchema-instance»>
<ComputerName>*</ComputerName>
<TimeZone>Eastern Standard Time</TimeZone>
<RegisteredOwner>ECBOE</RegisteredOwner>
<RegisteredOrganization>ECBOE</RegisteredOrganization>
<ShowWindowsLive>false</ShowWindowsLive>
<ProductKey></ProductKey>
</component>
<component name=»Microsoft-Windows-UnattendedJoin» processorArchitecture=»x86″ publicKeyToken=»31bf3856ad364e35″ language=»neutral» versionScope=»nonSxS» xmlns:wcm=»http://schemas.microsoft.com/WMIConfig/2002/State»
xmlns:xsi=»http://www.w3.org/2001/XMLSchema-instance»>
<Identification>
<Credentials>
<Domain>my.local</Domain>
<Password>password</Password>
<Username>tech</Username>
</Credentials>
<JoinDomain>my.local</JoinDomain>
<UnsecureJoin>true</UnsecureJoin>
</Identification>
</component>
</settings>
<settings pass=»oobeSystem»>
<component name=»Microsoft-Windows-International-Core» processorArchitecture=»x86″ publicKeyToken=»31bf3856ad364e35″ language=»neutral» versionScope=»nonSxS» xmlns:wcm=»http://schemas.microsoft.com/WMIConfig/2002/State»
xmlns:xsi=»http://www.w3.org/2001/XMLSchema-instance»>
<InputLocale>en-us</InputLocale>
<SystemLocale>en-us</SystemLocale>
<UILanguage>en-us</UILanguage>
<UserLocale>en-us</UserLocale>
</component>
<component name=»Microsoft-Windows-Shell-Setup» processorArchitecture=»x86″ publicKeyToken=»31bf3856ad364e35″ language=»neutral» versionScope=»nonSxS» xmlns:wcm=»http://schemas.microsoft.com/WMIConfig/2002/State»
xmlns:xsi=»http://www.w3.org/2001/XMLSchema-instance»>
<OOBE>
<NetworkLocation>Work</NetworkLocation>
<HideEULAPage>true</HideEULAPage>
<HideWirelessSetupInOOBE>true</HideWirelessSetupInOOBE>
<ProtectYourPC>1</ProtectYourPC>
</OOBE>
<UserAccounts>
<AdministratorPassword>
<Value>cpassword</Value>
<PlainText>false</PlainText>
</AdministratorPassword>
<LocalAccounts>
<LocalAccount wcm:action=»add»>
<Password>
<Value>password</Value>
<PlainText>false</PlainText>
</Password>
<DisplayName>tech</DisplayName>
<Name>tech</Name>
<Group>Administrators</Group>
</LocalAccount>
</LocalAccounts>
</UserAccounts>
<RegisteredOrganization>my</RegisteredOrganization>
<RegisteredOwner>my</RegisteredOwner>
<ShowWindowsLive>false</ShowWindowsLive>
<TimeZone>Eastern Standard Time</TimeZone>
<AutoLogon>
<Password>
<Value>password</Value>
<PlainText>false</PlainText>
</Password>
<Domain>my.local</Domain>
<Enabled>true</Enabled>
<Username>tech</Username>
</AutoLogon>
</component>
</settings>
</unattend>
Answers
-
I found my problem and here is the link to it.
http://support.microsoft.com/kb/909264
Thanks Doc
-
Marked as answer by
Saturday, May 5, 2012 9:41 PM
-
Marked as answer by
Hello,
I’m having difficulties automatically assigning ComputerName through Unattend.xml file:
<settings pass=»specialize»>
<component name=»Microsoft-Windows-Shell-Setup» processorArchitecture=»x86″ publicKeyToken=»31bf3856ad364e35″ language=»neutral» versionScope=»nonSxS» xmlns:wcm=»http://schemas.microsoft.com/WMIConfig/2002/State» xmlns:xsi=»http://www.w3.org/2001/XMLSchema-instance»>
<RegisteredOwner>XXXXXXX</RegisteredOwner>
<RegisteredOrganization>XXXXXXXXX</RegisteredOrganization>
<ProductKey>XXXXXXXXX</ProductKey>
<ComputerName>Vista-PC</ComputerName>
</component>
</settings
When machine boots up and executes the Specialize pass, it records the following in the setupact.log under C:WindowsPantherUnattendGC:
2006-12-13 18:42:41, Info [windeploy.exe] WinDeploy.exe launched with command-line []…
2006-12-13 18:42:41, Info [windeploy.exe] Setup has not completed, adding pending reboot.
2006-12-13 18:42:41, Info [windeploy.exe] UnattendSearchExplicitPath: Found unattend file at [C:WindowsPantherunattend.xml]; examining for applicability.
2006-12-13 18:42:41, Info [windeploy.exe] UnattendSearchExplicitPath: Found usable unattend file for pass [oobeSystem] at [C:WindowsPantherunattend.xml].
2006-12-13 18:42:41, Info [windeploy.exe] Found unattend file: [C:WindowsPantherunattend.xml]
2006-12-13 18:42:41, Info [windeploy.exe] Found generalization state [0x4], setup.exe completion flag [False] —> launching setup.exe.
2006-12-13 18:42:41, Info [windeploy.exe] Launching [C:Windowssystem32oobesetup.exe]…
2006-12-13 18:46:52, Info [Shell Unattend] Running ‘specialize’ pass
2006-12-13 18:46:52, Error [Shell Unattend] ComputerName: failed to set the computer name [hr=0x80070005][gle=0x00000005]
2006-12-13 18:46:52, Info [Shell Unattend] Exiting ‘specialize’ pass with status 0x80070005
2006-12-13 18:52:20, Info [windeploy.exe] Process exited with exit code [0x1f]
2006-12-13 18:52:20, Error [windeploy.exe] Setup.exe failed, returning exit code [0x1f]
2006-12-13 18:52:20, Error [windeploy.exe] Failure occured during online installation. Online installation cannot complete at this time.; hr = 0x80004005
2006-12-13 18:52:20, Info [windeploy.exe] Flushing registry to disk…
2006-12-13 18:52:20, Info [windeploy.exe] Flush took 16 ms.
2006-12-13 18:52:20, Info [windeploy.exe] WinDeploy.exe exiting with code [0x80004005]
2006-12-13 18:54:14, Info [windeploy.exe] ————————————————
Any ideas on how to work around this?
Living Table of Contents
- MDT Tutorial: Prologue & Requirements
- MDT Tutorial Part 1: Installation
- MDT Tutorial Part 2: Initial Configuration
- MDT Tutorial Part 3: Imaging
- MDT Tutorial Part 4: CustomSettings.ini
- MDT Tutorial Part 5: Bootstrap.ini
- MDT Tutorial Part 6: Customizing Boot Media
- MDT Tutorial Part 7: Customizing Base MDT Template & ADK WinPE Template WIM
- MDT Tutorial Part 8: Unattend.xml
- MDT Tutorial Part 9: Logging
- MDT Tutorial Part 10: CustomSettings.ini Validation Testing & Troubleshooting Part 1
- MDT Tutorial Part 11: Troubleshooting Part 2: Windows could not parse or process unattend answer file [C:windowsPantherunattend.xml] for pass [specialize]. The answer file is invalid.
- MDT Tutorial Part 11: Troubleshooting Part 3: Windows could not parse or process unattend answer file [C:windowsPantherunattend.xml] for pass [specialize]. The answer file is invalid.
- MDT Tutorial Part 11: Troubleshooting Part 4: Task Sequence Variable is Being Overwritten
- MDT Tutorial Part 11: Troubleshooting Part 5: Invalid DeploymentType value “” specified. The deployment will not proceed.
- MDT Tutorial Part 11: Troubleshooting Part 6: Unable to mount the WIM, so the update process cannot continue
- MDT Tutorial Part 11: Troubleshooting Part 7: Non-Fatal OSD Errors & Warnings
What These Guides Are:
A guide to help give you some insight into the troubleshooting process in general.
What These Guides Are Not:
A guide to fix all issues you’re going to encounter.
We’re going to role-play a bunch of scenarios and try to work through them. Remember in math where you had to show your work? Well, what follows is like that which is why this post is [more than] a [little] lengthy.
You boot your special VM, click the ‘Run the Deployment Wizard to install a new Operating System‘ button and it immediately starts. Excellent! It applies the OS, reboots and you’re faced with this error:
![Title: Windows Setup Body: Windows could not parse or process unattend answer file [C:windowsPantherunattend.xml] for pass [specialize]. The answer file is invalid.](https://itinlegal.files.wordpress.com/2017/10/troubleshoot-003.png?w=940)
Windows could not parse or process unattend answer file [C:windowsPantherunattend.xml] for pass [specialize]. The answer file is invalid.
Well this is strange, because you didn’t touch the unattend.xml so what gives?
Fortunately, this dialog provides some meaningful insight:
-
- The unattend file is C:WindowsPantherunattend.xml
- The specific area is the specialize pass
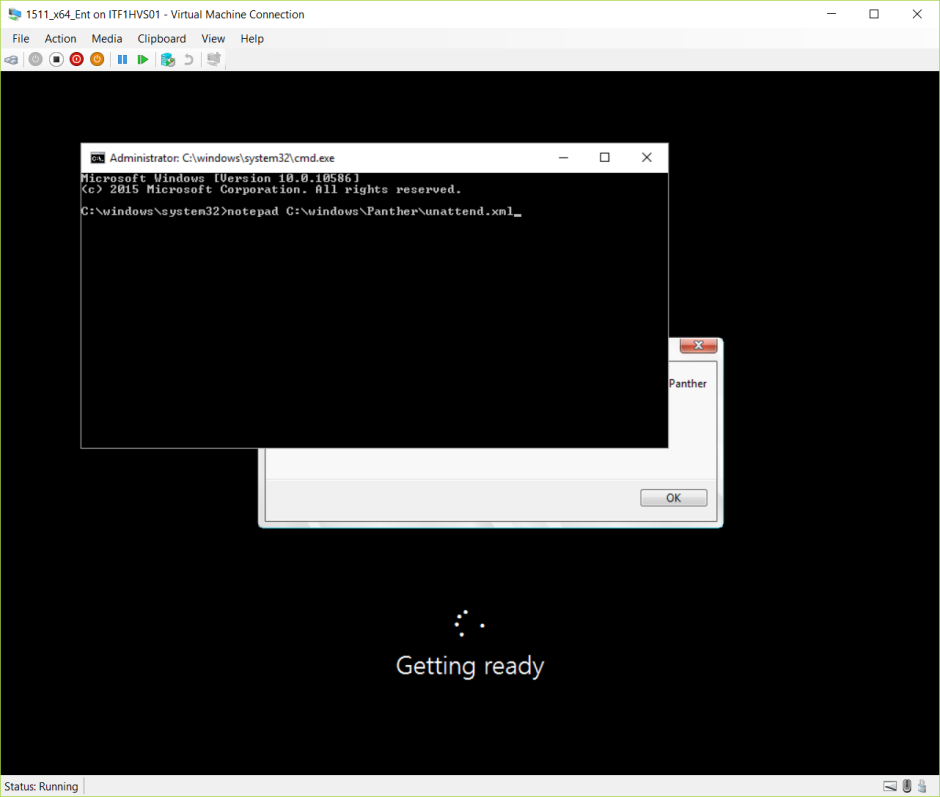
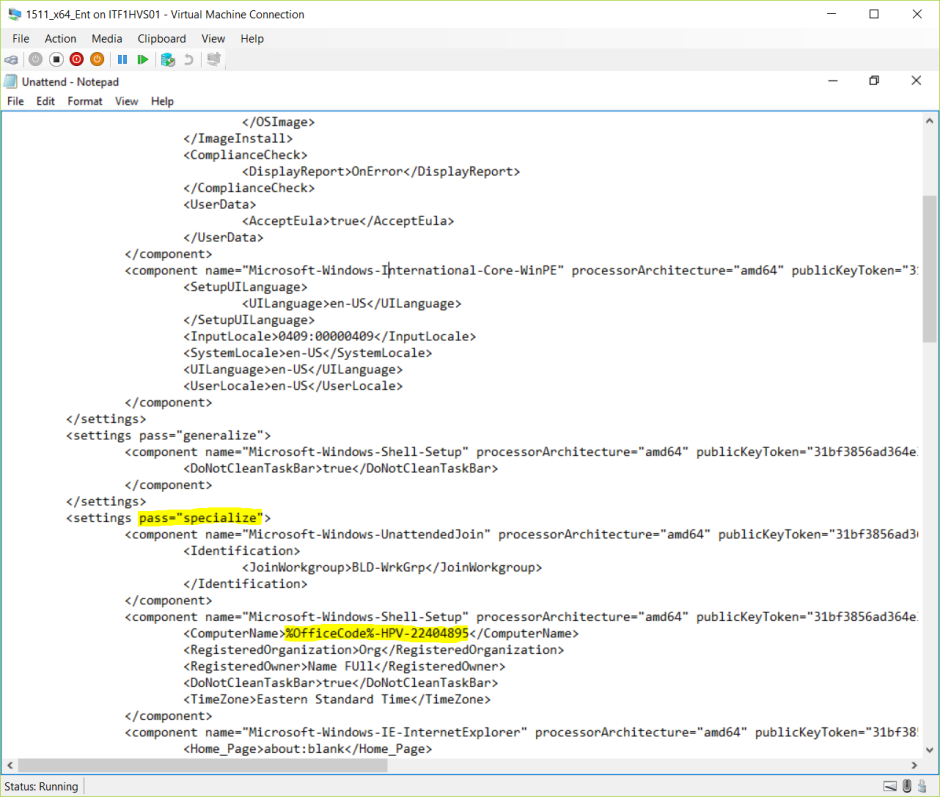
Press SHIFT+F10 here to open a command prompt and then open C:WindowsPantherunattend.xml with notepad
You search for ‘specialize’ and after taking a very close look see that your computer name is incorrect. It should be some two or three character prefix not %OfficeCode%.
Since that is set via the CS.INI, you run the CustomSettings.ini test again and now you see what was missed before:

You review the CS.INI and find your problems
- You didn’t define the OfficeCode property: Wasn’t added to the
Propertiesline - You didn’t set a value for
OfficeCode.
With that fixed, you run the test again, the variable is populated and as you reimage the machine, you see it is named correctly in the logs.
Copypasta Closing
Hopefully these examples will help give you an idea of the overall troubleshooting process. Most of the time the problems you’ll encounter will be caused by a typso, order of operations or a ‘known issue’ that requires a specific process to be followed.
As you make changes to your environment, here’s what I recommend:
- Be diligent about keeping a change log so you can easily backtrack
- Backup your CS.INI or Bootstrap.ini before you make any changes
- Backup your ts.xml or unattend.xml (in DeploymentShareControlTaskSequenceID) before you make any changes
- Introduce small changes at time with set checkpoints in between and set milestones markers where you backup core files (e.g cs.ini bootstrap.ini ts.xml unattend.xml etc) to help minimize frustration troubleshooting.
And if when you do run into some turbulence, upload relevant logs (at least smsts.log but be prepared to submit others depending on the issue) to a file sharing service like OneDrive, post on TechNet then give a shout to your resources on Twitter.
Good Providence to you!
- Remove From My Forums
-
Question
-
We have been successfully deploying Vista Business over the network for some time now.
We are replicating our working server, and have copied all of the files from the working server to a new server. However, installing from the new server results in the following error:
Windows Could not parse or process unattend answer file [C:WindowsPantherunattend.xml] for pass [auditUser]. The settings specified in the answer file cannot be applied. The error was detected while processing settings for component [Microsoft-Windows-Deployment].
I have run FCIV on all of the files on the working server and the new server, and all of the files MD5 checksums match so I have no idea what could be causing this error. I have also compared the C:WindowsPantherunattend.xml file from an installation from the working server and the new server and they also match.
Is it possible that the network settings for the net server could cause this error to appear ?
Any suggestions would be greatly appreciated.
Stumped and stupified,
Jimmy Griffith
Answers
-
It is possible — even a duplicate computer name on the network could cause an error like this. For the exact cause, you’ll need to find the setupact.log and setuperr.log to see which parameter it didn’t like.
-Michael Niehaus
mniehaus@microsoft.com
http://blogs.technet.com/mniehaus
Для автоматической установки необходимо предварительно создать специальный файл ответов. В этом файле прописаны ответы на вопросы, которые задает пользователю установщик Windows (принятие условий лицензии, выбор диска для установки, языковые параметры и т.п.). Можно указать лишь часть ответов — в этом случае установка будет полуавтоматической. По мимо упрощения самой процедуры установки мы получаем доступ к дополнительным настройкам системы, о которых установщик никогда пользователя не спросит. Например можно перенести папку профилей пользователей (Users, Documents and Setings) на другой диск, настроить Internet Explorer и многое другое.
- Автоматическая установка Windows 7 / Vista
- Автоматическая установка Windows XP
Автоматическая установка Windows 7 / Vista
Файл ответов для Windows 7 / Vista должен быть назван — Autounattend.xml. Расположение файла: либо в корне инсталляционного диска, либо в корне съемного диска (обычно usb-флэшка). Причем, если установщик найдет два файла (например на установочном диске и на флэшке), то обрабатываться в первую очередь будет файл на флэшке.
Для создания файлов ответов нужен инсталляционный DVD, а также «Набор автоматической установки Windows (AIK)». Скачать его можно здесь:
- Набор автоматической установки Windows AIK для Windows 7
- Набор автоматической установки Windows AIK для Windows Vista
Устанавливать AIK для Семерки можно на Висту и на оборот. Файл ответов для установки Windows 7 должен создаваться в AIK для Windows 7 (не важно установлен он под Вистой или Семеркой). Аналогично файл ответов для установки Висты должен создаваться в AIK для Windows Vista. Апдейт: AIK для Win 7 работает и под XP.
Далее рассмотрим процесс создания файла ответов для установки Windows 7:
- Инсталляционный DVD Windows 7 загружаем в дисковод.
- Запускаем: Программы -> Microsoft Windows AIK -> «Диспетчер образов системы Windows».
- Открываем меню: Файл -> «Выбрать образ Windows» -> открываем дисковод DVD -> переходим в папку Sources и открываем файл install.wim
- Появится диалоговое окно с выбором образа Windows. Выбирайте образ той редакции, которую планируете устанавливать. Например Windows 7 PROFESSIONAL.
- Для создания нового файла ответов нажмите CTRL+N или выберите соответствующий пункт в главном меню.
- Добавляем нужные компоненты в файл ответов. В области «Образ Windows» раскройте ветку Components. Чтобы добавить компонент, нажмите на нем правой кнопкой, затем выберите в списке нужный этап установки:

Добавление компонент в файл ответов Список базовых компонент:
Microsoft-Windows-International-Core-WinPESetupUILanguage добавить к этапу windowsPE,
Microsoft-Windows-SetupDiskConfigurationDiskCreatePartitionsCreatePartition -> windowsPE (2 раза, т.к в процессе установки нам нужно создать два логических диска),
Microsoft-Windows-SetupDiskConfigurationDiskModifyPartitionsModifyPartition -> windowsPE (2 раза),
Microsoft-Windows-SetupImageInstallOSImageInstallTo -> windowsPE,
Microsoft-Windows-SetupUserData -> windowsPE,
Microsoft-Windows-Shell-SetupOOBE -> oobeSystem
+
Microsoft-Windows-Shell-SetupFolderLocations -> oobeSystem (для изменения расположения папки профилей пользователей) - Теперь нужно ввести параметры компонент в файле ответов:
WindowsPEMicrosoft-Windows-International-Core-WinPE InputLocale = ru-RU
SystemLocale = ru-RU
UILanguage = ru-RU
UserLocale = ru-RUWindowsPEMicrosoft-Windows-International-Core-WinPESetupUILanguage UILanguage = ru-RU WindowsPEMicrosoft-Windows-SetupDiskConfiguration WillShowUI = OnError WindowsPEMicrosoft-Windows-SetupDiskConfigurationDisk DiskID = 0
WillWipeDisk = true (с основного диска будут стерты все существующие партиции)WindowsPEMicrosoft-Windows-SetupDiskConfigurationDiskCreatePartitionsCreatePartition Order = 1
Size = 40960 (размер партиции в мегабайтах)
Type = PrimaryWindowsPEMicrosoft-Windows-SetupDiskConfigurationDiskCreatePartitionsCreatePartition Extend = true (вторая партиция займет все оставшееся место на диске)
Order = 2
Type = PrimaryWindowsPEMicrosoft-Windows-SetupDiskConfigurationDiskModifyPartitionsModifyPartition Active = true
Format = NTFS
Label = System (метка диска — не обязательно)
Letter = C (буква диска)
Order = 1
PartitionID = 1WindowsPEMicrosoft-Windows-SetupDiskConfigurationDiskModifyPartitionsModifyPartition Format = NTFS
Label = DATA
Letter = D
Order = 2
PartitionID = 2WindowsPEMicrosoft-Windows-SetupImageInstallOSImage InstallToAvailablePartition = false
WillShowUI = OnErrorWindowsPEMicrosoft-Windows-SetupImageInstallOSImageInstallTo DiskID = 0
PartitionID = 1WindowsPEMicrosoft-Windows-SetupUserData AcceptEula = true oobeSystemMicrosoft-Windows-Shell-SetupFolderLocations ProfilesDirectory = D:Users (путь к папке профилей)
ProgramData = D:ProgramData (путь к папке ProgramData — переносим ее на тот же диск, что и Users)oobeSystemMicrosoft-Windows-Shell-SetupOOBE HideEULAPage = true
HideWirelessSetup = true
NetworkLocation = Home
ProtectYourPC = 3
Изменяем путь к папке профилей и ProgramData - Сохраняем файл под именем Autounattend.xml, и записываем его на флэшку (или в корень инсталляционного DVD). Теперь можно преступать к установке Windows (перезагрузить компьютер и загрузиться с инсталляционного DVD).
- Если опции оставить неизменными, то порядок установки будет примерно такой: в самом начале появится окно с выбором редакции Windows, потом долгое время ваше участие не потребуется вплоть до самого последнего этапа — необходимо будет ввести имя компьютера, имя пользователя и пароль, выбрать часовой пояс, ввести серийный номер. Все! Папки Users и ProgramData будут созданы на диске D. ProgramData — скрытая папка, чтобы ее увидеть необходимо включить опцию «Показывать скрытые файлы и папки».


Описания (на русском) всех опций даны в разделе Справка -> «Справочник по автоматической работе» — пользуйтесь.
Автоматическая установка Windows XP
По сравнению с Windows 7 и Вистой автоматическая установка XP, конечно, устарела. Здесь и не такое большое количество опций, нет поддержки разбивки дисков на партиции, но самое главное — отсутствует поддержка usb. Т.е. единственное место где может размещаться файл ответов при установки с CD — на том же установочном диске (в папке i386). Поэтому нам понадобится дополнительный софт: для работы с образами CDDVD дисков (например UltraISO или Nero Burning ROM) и для создания/форматирования разделов на жестком диске (рекомендую что-то типа загрузочного Hiren’s Boot CD).
Файл ответов Windows XP должен называться winnt.sif и располагаться на инсталляционном CD в папке i386.
В отличие от семерки winnt.sif — обычный текстовый файл. Чтобы упростить его создание, можно скачать «Средства развертывания пакета обновления 2 (SP2) для Windows XP«. Из архива понадобятся два файла: setupmgr.exe и ref.chm (справочник опций). Setupmgr.exe лучше всего запускать под Windows XP — под Вистой и Семеркой работает некорректно.
Процесс создания файла ответов в setupmgr.exe достаточно прост. Поэтому описывать его здесь я не буду, просто покажу пример файла ответов с некоторыми добавлениями (для переноса папки Documents and Settings):
;SetupMgrTag
[Data]
    AutoPartition=0
    MsDosInitiated="0"
    UnattendedInstall="Yes"

[Unattended]
    UnattendMode=FullUnattended
    OemSkipEula=Yes
    OemPreinstall=No
    TargetPath=WINDOWS

[GuiUnattended]
    AdminPassword="XXX"
    EncryptedAdminPassword=NO
    OEMSkipRegional=1
    TimeZone=145
    OemSkipWelcome=1
    ProfilesDir=D:Users

[UserData]
    ProductKey=XXXXX-XXXXX-XXXXX-XXXXX-XXXXX
    FullName="Пользователь"
    OrgName="Дом/работа"
    ComputerName=Comp

[Display]
    BitsPerPel=32
    Xresolution=1024
    YResolution=768
    Vrefresh=60

[RegionalSettings]
    LanguageGroup=1,5
    Language=00000419

[Identification]
    JoinWorkgroup=HOME

[Networking]
    InstallDefaultComponents=Yes
После создания файла winnt.sif (убедитесь, что файл называется именно так, а не winnt.sif.txt — это распространенная ошибка), нужно создать образ инсталляционного CD (если таковой отсутствует) и добавить к нему winnt.sif в папку i386. Затем образ записать на болванку.
Для переноса Documents and Settings на другой диск, перед установкой необходимо предварительно создать нужные разделы и логические диски, отформатировать их в NTFS. Для этого понадобится Hiren’s Boot CD или подобный софт.
Если перенос не требуется, удалите из файла ответов директиву: ProfilesDir=D:Users
Установка почти полностью автоматическая. В начале только придется выбрать диск для установки, и в конце стандартные опции: имя нового пользователя, включение/не включение автоматического обновления, ну и регистрироваться ли на сайте Микрософт.
Ссылки по теме:
- Как полностью перенести папку Users (Windows 7, Vista) или Documents and settings (XP) на другой диск — если переустанавливать систему под чистую не планируете!
- Remove From My Forums
-
Question
-
I am having this error message that absolutely makes no sense since I am using an unattend.xml file that works in other deployments but this. The main difference with installing the base windows 7 install for this one from WDS/MDT 2012 and customized, so
I did not have to create a temporary account since this process enables the Administrator account unlike installing from a DVD that forces you to create a temporary admin level account that one has to delete thereafter. Whether I create the current one by
this method or from a Win7 DVD is producing this same error message. I have looked at various forums and nothing they suggest is wrong with my image so I don’t know where this is coming from. I could not paste the error message here so I have shared it on
SkyDrive;-
Edited by
Sunday, July 22, 2012 9:37 PM
-
Edited by
Answers
-
Leaving the PS/2 Mouse and Keyboard… I came across this KB I have not seen before:
CopyProfile fails with FindLatestProfile failed (0x80070003) error during Windows 7 deployment
http://support.microsoft.com/kb/2530664Can you see what you have in the registry and follow KB, perhaps you are hitting this issue?
Dave Guenthner [MSFT] This posting is provided «AS IS» with no warranties, and confers no rights. http://blogs.technet.com/b/davguents_blog
Finally, the issue is resolved. Thanks to you geniuses. I have seen many posts about a previously deleted user account info remaining in the registry but I felt it did not apply to me since I never created an account but instead either used CTRL+SHIFT+F3
to bypass creating any admin user during a Windows 7 install from DVD so it logs me in with the Administrator profile in Audit mode where I just get on with configuring the profile, or I simply deploy Windows 7 from WDS/MDT so it logs me on
using the Administrator account. The fact is that whether you use these methods or not or whether you later delete a profile or not, follow these instructions in the following registry path,
expand ProfileList and click on each sub-node to see the profile name on the right pane. Make sure there are only
4 (four) profiles listed there, namely
SystemProfile,
LocalProfile, NetworkProfile, and
Administrator. Anything beyond these 4 (four) profiles need to be deleted (of course this is assuming you are using the Administrator profile to configure
the default user profile, but why create confusion by creating/using an additional profile);HKEY_LOCAL_MACHINESOFTWAREMicrosoftWindows NTCurrentVersionProfileList
This is something that is not well explained in various posts and neither does anyone spell out what profiles should absolutely be listed there, it is also inaccurate they tell you this is a problem «if you previously deleted a profile». In my case, I did not
previously delete any profile but there was an additional profile that had no name, sitting below the Administrator profile, which was listed last. This empty profile only had the following entries in it, no name or anything else and once I deleted it all
went well;(Default)
ProfileLoadTimeHigh
ProfileLoadTimeLow-
Marked as answer by
techiegzz
Sunday, July 22, 2012 9:38 PM -
Edited by
techiegzz
Sunday, July 22, 2012 11:13 PM
-
Marked as answer by
-
Hi,
Please use the following steps to use CopyProfile to set customized user profiles:
1. Log on as a user whose profile you can customize (for example, the built-in-administrator account).
2. Customize the desired user profile settings.
3. Set CopyProfile to true in the Unattend.xml file that you will use with Sysprep in the next step.
4. Run sysprep /generalize /unattend:unattend.xml to copy the customized user profile settings over the default user profile.All subsequent user accounts that are created will have the customizations that you have set. For details about Sysprep, see the Sysprep Technical Reference in the Windows OEM Preinstallation Kit (Windows OPK) User’s Guide. (Opk.chm).
This setting does not copy the built-in administrator profile unless the built-in administrator is the currently logged-on user.
Note : The CopyProfile unattend setting is processed only in the specialize phase of Windows Setup, so you must use Sysprep with the /generalize option.
Regards,
James
James Xiong
TechNet Community Support

-
Marked as answer by
techiegzz
Sunday, July 22, 2012 9:38 PM
-
Marked as answer by
-
Leaving the PS/2 Mouse and Keyboard… I came across this KB I have not seen before:
CopyProfile fails with FindLatestProfile failed (0x80070003) error during Windows 7 deployment
http://support.microsoft.com/kb/2530664Can you see what you have in the registry and follow KB, perhaps you are hitting this issue?
Dave Guenthner [MSFT] This posting is provided «AS IS» with no warranties, and confers no rights. http://blogs.technet.com/b/davguents_blog
-
Marked as answer by
techiegzz
Sunday, July 22, 2012 9:37 PM
-
Marked as answer by