Устанавливаем утилиту cifs-utils
[root@localhost ~]# yum install cifs-utilsДобавляем пользователей
[root@localhost ~]# useradd -u 5000 UserPackages
[root@localhost ~]# useradd -u 5001 UserTraffic
[root@localhost ~]# groupadd -g 6000 share_library
[root@localhost ~]# usermod -G share_library -a UserPackages
[root@localhost ~]# usermod -G share_library -a UserTraffic
Создаем каталоги, в которые будем монтировать расшаренные windows-ресурсы
[root@localhost ~]# mkdir /mnt/Packages
[root@localhost ~]# mkdir /mnt/Traffic
Создаем файл с настройками доступа к расшаренным windows-ресурсам и задаем права на этот файл

[root@localhost ~]# nano /root/smb_user
username=user
domain=DOMAIN
password=password
[root@localhost ~]# chmod 0600 /root/smb_user
Монтируем
[root@localhost ~]# mount.cifs \\192.168.0.15\Packages /mnt/Packages -o credentials=/root/smb_user,uid=5000,gid=6000
[root@localhost ~]# mount.cifs \\192.168.0.15\Traffic /mnt/Traffic -o credentials=/root/smb_user,uid=5001,gid=6000
Команды для размонтирования:
[root@localhost ~]# umount /mnt/Packages
[root@localhost ~]# umount /mnt/Traffic
Автоматическое монтирование каталогов при последующей загрузке операционной системы
Открываем файл /etc/fstab в текстовом редакторе и добавляем в конце файла строки:
[root@localhost ~]# nano /etc/fstab
\\192.168.0.15\Packages /mnt/Packages    cifs    credentials=/root/smb_user,uid=5000,gid=6000 0 0
\\192.168.0.15\Traffic /mnt/Traffic   cifs    credentials=/root/smb_user,uid=5001,gid=6000 0 0
У блога появился хостинг, его любезно предоставила компания Облакотека. Облакотека — облачные сервисы для создания и управления виртуальной ИТ-инфраструктурой.
Если вам понравился мой блог и вы хотели бы видеть на нем еще больше полезных статей, большая просьба поддержать этот ресурс.
Если вы размещаете материалы этого сайта в своем блоге, соц. сетях, и т.д., убедительная просьба публиковать обратную ссылку на оригинал
Contents
- Required packages
- Basic method
- Better Method
- Even-better method
- Yet Another Even-better method
OK, we live in the wonderful world of Linux. BUT, for many of us, having to deal with Windows is a fact of life. For example, you may want to use a Linux server to back up Windows files. This can be made easy by mounting Windows shares on the server. You will be accessing Windows files as if they are local and essentially all Linux commands can be used. Mounting Windows (or other samba) shares is done through the cifs virtual file system client (cifs vfs) implemented in kernel and a mount helper mount.cifs which is part of the samba suite.
The following names are used in our examples.
-
remote Windows machine winbox
share name on winbox: getme
username: sushi
password: yummy
Word of warning: the default behaviour for mount.cifs is leaving the mounted share unsecured (http://bugs.centos.org/view.php?id=4537). If you are managing a multiuser system, consider setting the dir_mode and file_mode options to your mount point.
1. Required packages
Make sure that the following packages are installed:
[root@host]# yum install samba-client samba-common cifs-utils
which will also pull in any needed dependencies. Note that cifs-utils is for CentOS-6 (or later) only.
2. Basic method
Create a local mount point. For example:
[root@host]# mkdir /mnt/win
Edit the /etc/fstab file and add a line like:
\winboxgetme /mnt/win cifs user,uid=500,rw,suid,username=sushi,password=yummy 0 0
The Windows share gets mounted on boot. Add the noauto option if you wish to manually mount it by the command mount /mnt/win . In this example, local user (uid=500) will become the owner of the mounted files. Use of the uid flag is optional. However, it may be required for certain applications (for example, Acrobat) to work because they are picky about the permissions.
You may want to use different options for cifs. For example, nocase allows case insensitive path name matching. Do a man mount.cifs to see more options.
[Note: if you used smbfs in earlier versions of CentOS, you must replace it with cifs in CentOS 5 because smbfs has been deprecated.]
3. Better Method
The above method has a little problem. Username and password are visible to everyone. We can avoid this by using a credentials file.
\winboxgetme /mnt/win cifs user,uid=500,rw,noauto,suid,credentials=/root/secret.txt 0 0
Note: per jbroome, in IRC, a working example looks like this
\jellyfishDBRefreshLogsbeta2 /media/DBRefreshLogs/beta2 cifs credentials=/root/secret.txt,_netdev,uid=oracle,gid=dba 0 0
Where the /root/secret.txt file looks like this:
username=sushi
password=yummy
This file can be placed anywhere. Encrypted passwords cannot be used. Make sure it is not readable by others. Note also that no spaces are allowed.
(Note: username can have a form of username=<domain>/<hostname>)
4. Even-better method
Once mounted through /etc/fstab the remote share remains mounted unless you umount it. This might cause problems if the remote share becomes unavailable, resulting in stale mounts. For example, the Windows machine you are connecting to might crash (surprise!) or the network might go down.
Automount comes in handy (if you don’t already have autofs, install it by yum install autofs). Here is what you need to do. First create a mount point
[root@host]# mkdir /mymount
[Note: You can use any directory; make sure that directory exists]
To the /etc/auto.master file add a line like:
/mymount /etc/auto.mymount
Then edit the /etc/auto.mymount file you just entered:
winbox -fstype=cifs,rw,noperm,user=sushi,pass=yummy ://winbox/getme
Or by using the same credentials file as above:
winbox -fstype=cifs,rw,noperm,credentials=/root/secret.txt ://winbox/getme
Note that /etc/auto.mymount can be made world-unreadable, so, use of the credentials file is not as important as in the previous method.
[More note: If you cannot connect by the machine name but can connect by its IP address, then add wins on the hosts line of /etc/nsswitch.conf .]
When all is ready, run /sbin/service autofs restart as root.
Now try accessing the share by ls /mymount/winbox or by cd /mymount/winbox . It is dynamically loaded upon access. After some inactivity (default 60 seconds), the share will be unmounted.
[Note: Upon automounting, you may see an error mount_cifs.so: cannot open shared object file in /var/log/messages. This is harmless and can be safely ignored.]
5. Yet Another Even-better method
If you have multiple shares to mount with the same credentials, there is a handy way to set it up.
Create a local mountpoint (of your choice):
[root@host]# mkdir /mnt/smb
Add this line to /etc/auto.master:
/mnt/smb /etc/auto.smb.top
Create /etc/auto.smb.top as:
* -fstype=autofs,-Dhost=& file:/etc/auto.smb.sub
Create /etc/auto.smb.sub as (adjust as needed):
* -fstype=cifs,credentials=/root/secret.txt,uid=500,gid=100 ://${host}/&
Let’s make sure that the permission bits are correct and restart the service:
[root@host]# chmod 644 /etc/auto.smb.*
[root@host]# /sbin/service autofs restart
Now you can access by simply typing:
[user@host]$ cd /mnt/smb/winbox/getme
(Thanks to Mia Via for sending in this tip)
Additional tips:
If you have multiple remote servers and shares with different usernames and/or passwords, use this formula:
* -fstype=cifs,credentials=/root/${host}.secret.txt,uid=${UID},gid=${EUID} ://${host}/&
To allow users to put their own usernames/passwords to their home directories (might expose security even more):
* -fstype=cifs,credentials=${HOME}/${host}.secret.txt,uid=${UID},gid=${EUID} ://${host}/&
To improve security with Samba-servers, you could also add sec=ntlmv2, and make credentials file hidden like this:
* -fstype=cifs,sec=ntlmv2,credentials=${HOME}/.${host}.secret.txt,uid=${UID},gid=${EUID} ://${host}/&
See mount.cifs man page for details about the sec- and other cifs related mount parameters.
(Thanks to Tapio Ryhänen for sending in these tips)
If you just want to browse Windows files, you do not need to mount them. There are easy ways to access them from your file browser.
In Konqueror, Go -> Network folders -> Samba Shares
In Nautilus, Places -> Network -> Windows Network
To go to a specific share more quickly, you can type directly in the Location box of Konqueror:
smb://winbox/getme
If you use Nautilus and do not see the location box, you can type a / to bring it up (thanks to JohnnyHughes for this hint).
-
Written and currently maintained by AkemiYagi. Corrections/suggestions welcome.
CIFS —
один из способов (протокол) передачи данных по сети с одного устройства на другое. Самый распространенный пример использования — сетевой диск или сетевая папка для общего доступа. CIFS (Common Internet File System) также называют SMB (Server Message Block) — по сути, это одно и тоже.
Версии:
- SMB или CIFS
- SMB 2.0
- SMB 3.0
Для работы CIFS/SMB необходим порт 445 — по нему предоставляется удаленный доступ к сетевым ресурсам. А также для разрешения имен NetBios используются порты 137, 138 ,139 — без них обращение к ресурсу возможно только по IP-адресу.
В Windows клиент и сервер встроены в операционную систему. В Linux протокол может быть реализован с помощью samba.
Подготовка
Для монтирования общей папки необходимо установить набор утилит для работы с CIFS.
yum install cifs-utils
Синтаксис
mount.cifs <папка на сервере> <во что монтируем> <-o опции>
* вместо mount.cifs можно написать mount -t cifs.
Пример:
mount.cifs //192.168.1.1/public /mnt
* простой пример монтирования папки public на сервере 192.168.1.1 в локальный каталог /mnt.
Ручное монтирование
Теперь монтирование можно выполнить следующей командой:
mount.cifs //192.168.1.10/share /mnt -o user=andr
* в данном примере будет примонтирован каталог share на сервере 192.168.1.10 в локальную папку /mnt под учетной записью andr.
То же самое, с использованием домена:
mount.cifs //192.168.1.10/share /mnt -o user=andr,domain=andr.local
Автоматическое монтирование CIFS через fstab
Для начала создаем файл, в котором будем хранить данные авторизации при подключении к общей папке:
vi /root/.smbclient
И добавляем в него данные следующего вида:
username=andr
password=dPassw0rd
domain=andr.local
* в этом примере создана пара логин/пароль — andr/dPassw0rd; domain указывать не обязательно, если аутентификация выполняется без него.
Теперь открываем конфигурационный файл fstab:
vi /etc/fstab
и добавляем в него следующее:
//192.168.1.10/share /mnt cifs user,rw,credentials=/root/.smbclient 0 0
* в данном примере выполняется монтирование общей папки share на сервере с IP-адресом 192.168.1.10 в каталог /mnt. Параметры для подключения — user: позволяет выполнить монтирование любому пользователю, rw: с правом на чтение и запись, credentials: файл, который мы создали на предыдущем шаге.
Чтобы проверить правильность настроек, вводим следующую команду:
mount -a
Примеры использования опций
Версии SMB
Если на стороне Windows используется старая или слишком новая версия протокола SMB, при попытке монтирования мы можем получить ошибку mount error(112): Host is down. Чтобы это исправить, указываем версию:
mount.cifs //192.168.1.10/share /mnt/ -o vers=1.0
* монтирование по протоколу SMB1.0
Монтирование от гостевой учетной записи
Если сервер принимает запросы без логина и пароля, то клиент подключается, как гость:
mount.cifs //192.168.1.10/share /mnt -o guest
или в fstab:
//192.168.1.10/share /mnt cifs guest 0 0
Права на примонтированные каталоги
При монтировании папки мы можем указать определенные права:
mount.cifs //192.168.1.10/share /mnt -o file_mode=0777,dir_mode=0777
Overview
In this tutorial, you will learn how to mount SMB shares on CentOS 7. You will be guided through the process for both desktop and server installations of the operating system.
CentOS provides support for mounting Microsoft CIFS or SMB shares. Not just limited to shares hosted from Microsoft Windows, we can also mount shares from any network device that uses the SMB protocol. This includes just about any NAS device on the market.
If you understand how to mount SMB shares on earlier versions of Red Hat Enterprise Linux or CentOS, the instructions are identical.
Share Configuration
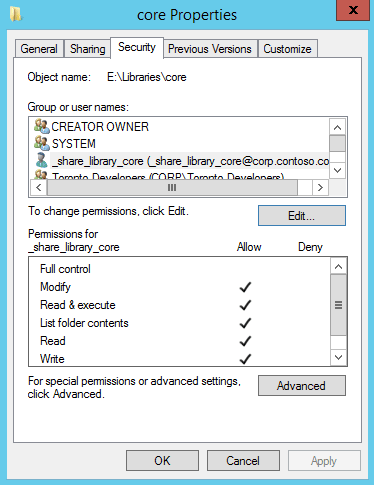
For this tutorial, I prepared a share named Core Library on a Windows Server 2012 R2 server that is a member of an Active Directory domain.
| Hostname | Operating System | Share Path | SMB Version |
|---|---|---|---|
| WS12FS01 | Windows Server 2012 R2 | \WS12FS01librariescore | 2.0 |
For the share permission on WS12FS01, we grant Full Control to Everyone. Don’t be fooled into thinking this is insecure. Although everyone has access to the share, the NTFS permissions on the volume hosting the share overrule the share permissions. By leaving Everyone and granting full control, we save our selves work by only having to manage permissions on the file system itself.

For the NTFS permissions, we created an Active Directory account named _share_library_core and granted it Modify, Read & Execute, List folder contents, Read, and Write. The account will be used when we mount the share onto CentOS 7.
We use an Active Directory account in this tutorial as an example of how someone would accomplish this in an enterprise environment.
However, an Active Directory account is not required. As long as the CentOS server has an account that can authenticate successfully on the host publishing the share, it doesn’t matter where the account actually exists – in Active Directory or locally on the file server itself.
Preparing CentOS 7 for Mounting SMB Shares
A default CentOS 7 build will not be able to mount SMBCIFS shares, unless you customized the install. We’ll need to install a package onto the server that allows it to understand the SMB protocol.
- Install the cifs-utils package from the default CentOS yum repository.
yum install cifs-utils
- Next, we need an account on the CentOS server that will map to the Windows account granted permission to the SMB share, _share_library_core. We’ll create a service account named svc_library_core with a user id (UID) of 5000.
useradd -u 5000 svc_library_core
- We also want a group on the CentOS server that will map to the share. This group will contain all of the Linux accounts that will need access to the share. Our account will be called share_library_core and it will have a group id (gid) of 6000.
groupadd -g 6000 share_library_core
- Finally, add any Linux accounts that require access to the SMB share to the newly created Linux group. I have an existing account named user1 that I will add to the share_library_core group.
usermod -G share_library_core -a user1
Mounting an SMB Share
We are now ready to mount our SMB share. In the example below, we temporarily mount the SMB share onto our CentOS server. The share will remain mounted until the server is rebooted.
- Create a directory to mount the SMB share into. We’ll mount the share in a directory called lib_core.
mkdir /lib_core
- Using the mount.cifs command, mount the SMB share into lib_core using the Active Directory user account _share_library_core. We need to map the UID of our svc_library_core account (5000) and the gid of our share_library_core group (6000) to the SMB share.
mount.cifs \\WS12FS01\libraries\core /lib_core -o user=_share_library_core,pass="secret",uid=5000,gid=6000
The extra backslashes () are not typos. Backslashes are used to escape certain characters. Because of this, we have to double up on them when accessing Microsoft shares.
- If no errors appeared, the share should successfully be mounted. The verify this, use the df command or the mount.
Hiding SMB USer Credentials
In the example above, we’re forced to enter the username and password into the command-line. This is a major security issue, as someone could browse your bash history to obtain the credentials, or they can see them while you type them in. Thankfully, there’s a way to address this problem by using a credentials file.
- If not Root, SU into the Root account.
su - root
- Create a credentials file in Root’s home directory. I typically create this file in a sub-directory in Root’s home, for organizational reasons. But for this example, I will place it in /root.
touch /root/creds_smb_library_core
- Modify the file’s permissions so that only the Root account is granted read permissions. No groups or other users should have access to the file.
chmod 0600 /root/creds_smb_library_core
- Open the file in a text editor. I like using VI, but you can use whichever you prefer.
vi /etc/root/creds_smb_library_core
- Add the following lines to the file. Remember to replace the username and password values so that they match your environment.
username=_share_library_core
password=secret
TABLE2 – Credential file options
username The Windows or Active Directory username granted permissions to the share on the Windows file server. password The password given to the username - Save your changes to the credential file and exit the text editor.
- Mount the SMB share. However, instead of using the user and pass options, we instead use the credentials option and point to our credentials file.
mount.cifs \\WS12FS01\libraries\core /lib_core -o credentials=/root/creds_smb_library_core,uid=5000,gid=6000
Persistent SMB Mounts using FSTAB
The downfall of the examples above is that the mounts are only temporary – the will not remount at system boot. The make the mount permanent we need to add it the fstab.
- Open /etc/fstab into a text editor.
vi /etc/fstab
- Add the following line to your fstab. Remember to replace the values with those that match your environment.
\\WS12FS01libraries\core /lib_core cifs credentials=/root/creds_smb_library_core,uid=5000,gid=6000 0 0
- Save your changes and exit the text editor.
- The SMB share will mount the next time the CentOS server is rebooted. To mount the share immediately, use the mount command.
mount -a
-

-
July 20 2016, 10:54

Будем монтировать общую папку на запись в Centos 6 через cifs
yum install cifs-utils
Для Centos 5
yum install samba-client samba-common cifs-utils ntfs-3g
Ручками в версии Centos 6
mount.cifs //192.168.1.128/Zvonki_H_NS /mnt/win -o iocharset=utf8,codepage=cp866,uid=100,gid=101,rw,user=admin%paSSword1 0 0
Ручками в версии Centos 7
mount.cifs \\192.168.1.128\Zvonki_H_NS /mnt/win -o user=admin,domain=DOMEN.LOCAL,pass=paSSword1
;
Разшифровка параметров для варианта Centos 6
192.168.1.128 — адрес машины с windows
Zvonki_H_NS — имя разшаренно папки на windows
/mnt/win — куда монтируем
rw — справа на запись и чтение
admin — имя пользователя в windows (под кем заходим для монтирования)
paSSword1 — пароль для windows пользователя
А вот теперь сложно: uid=100,gid=101 — над необходимо что бы права на файлы были от пределенного пользователя Linux
для примера пускай будет пользователь asterisk
Делаем раз:
id asterisk
uid=100(asterisk) gid=101(asterisk) groups=101(asterisk)
И вот наши заветные цифры uid и gid
;
скрипт
Время от времени компьютер с windows все равно перезагружают, нам необходимо проверять раз в 10 минут, на месте ли смонтированный каталог
в crontab добавили строчку — */10 * * * * root /etc/mont-share.sh
И сам скрипт
;
#!/bin/sh
if mountpoint -q /mnt/win
then
echo «mounted»
else
echo «no mounted»
umount /mnt/win
mount.cifs //192.168.1.128/Zvonki_H_NS /mnt/win -o iocharset=utf8,codepage=cp866,uid=100,gid=101,rw,user=admin%paSSword1 0 0
mountpoint -q /mnt/win && echo «mounted» || echo «not mounted»
fi
;
Так же необходимо иметь строку в fstab — что бы при старте Linux машины папка сразу монтировалась
добвлять в самый конец
;
//192.168.1.128/Zvonki_H_NS /mnt/win -o iocharset=utf8,codepage=cp866,uid=100,gid=101,rw,user=admin%paSSword1 0 0
 Обновлено: 14.07.2021
Опубликовано: 18.07.2016
Что такое Linux и CIFS простыми словами.
Работа с общими папками Windows происходит с использованием протокола CIFS (SMB). Все примеры в данном руководстве выполняются на Linux Ubuntu и CentOS.
Подготовительная работа
Синтаксис mount
Ручное монтирование
Автоматическое монтирование
Примеры
Подготовка
Установка пакетов
Для монтирования общей папки необходимо установить набор утилит для работы с CIFS.
CentOS:
yum install cifs-utils
Ubuntu:
apt-get install cifs-utils
Сетевые порты
Если мы будем монтировать сетевую папку, сервер которой находится за брандмауэром, необходимо открыть следующие порты:
- 137/UDP
- 138/UDP
- 139/TCP
- 445/TCP
Синтаксис
mount.cifs <папка на сервере> <во что монтируем> <-o опции>
* вместо mount.cifs можно написать mount -t cifs.
Пример:
mount.cifs //192.168.1.1/public /mnt
* простой пример монтирования папки public на сервере 192.168.1.1 в локальный каталог /mnt.
Ручное монтирование
Теперь монтирование можно выполнить следующей командой:
mount.cifs //192.168.1.10/share /mnt -o user=dmosk
* в данном примере будет примонтирован каталог share на сервере 192.168.1.10 в локальную папку /mnt под учетной записью dmosk.
То же самое, с использованием домена:
mount.cifs //192.168.1.10/share /mnt -o user=dmosk,domain=dmosk.local
Автоматическое монтирование CIFS через fstab
Для начала создаем файл, в котором будем хранить данные авторизации при подключении к общей папке:
vi /root/.smbclient
И добавляем в него данные следующего вида:
username=dmosk
password=dPassw0rd
domain=dmosk.local
* в этом примере создана пара логин/пароль — dmosk/dPassw0rd; domain указывать не обязательно, если аутентификация выполняется без него.
Теперь открываем конфигурационный файл fstab:
vi /etc/fstab
и добавляем в него следующее:
//192.168.1.10/share /mnt cifs user,rw,credentials=/root/.smbclient 0 0
* в данном примере выполняется монтирование общей папки share на сервере с IP-адресом 192.168.1.10 в каталог /mnt. Параметры для подключения — user: позволяет выполнить монтирование любому пользователю, rw: с правом на чтение и запись, credentials: файл, который мы создали на предыдущем шаге.
Чтобы проверить правильность настроек, вводим следующую команду:
mount -a
Примеры использования опций
Версии SMB
Если на стороне Windows используется старая или слишком новая версия протокола SMB, при попытке монтирования мы можем получить ошибку mount error(112): Host is down. Чтобы это исправить, указываем версию:
mount.cifs //192.168.1.10/share /mnt/ -o vers=1.0
* монтирование по протоколу SMB1.0
Монтирование от гостевой учетной записи
Если сервер принимает запросы без логина и пароля, то клиент подключается, как гость:
mount.cifs //192.168.1.10/share /mnt -o guest
или в fstab:
//192.168.1.10/share /mnt cifs guest 0 0
Права на примонтированные каталоги
При монтировании папки мы можем указать определенные права:
mount.cifs //192.168.1.10/share /mnt -o file_mode=0777,dir_mode=0777
Для указания владельца, который будет назначен для примонтированного каталога, используем:
mount.cifs //192.168.1.10/share /mnt -o uid=33,gid=33
* чтобы посмотреть идентификаторы пользователя, вводим id -u <имя пользователя> и id -g <имя группы>.
In this article, we’ll learn about how to mount CIFS share in CentOS 7. Server Message Block (SMB) of which the version SMB1 is also known as Common Internet File System (CIFS). It is a network file system protocol.
A network file system provides access to the local directories and files of the server remotely to a different server as if they were locally attached to the server.
The CIFS VFS was added to mainline Linux kernels in 2.5.42.
Most of the CIFS code is implemented as part of the Linux kernel. There are some userspace pieces that are maintained separately as part of the cifs-utils project.
Source: https://wiki.samba.org/index.php/LinuxCIFS
If you want to simply mount a CIFS share on a Linux platform you must able to mount it out of the box without any need for installation of any package. But for more options to mount CIFS share will require cifs-utils package to be installed which is recommended.
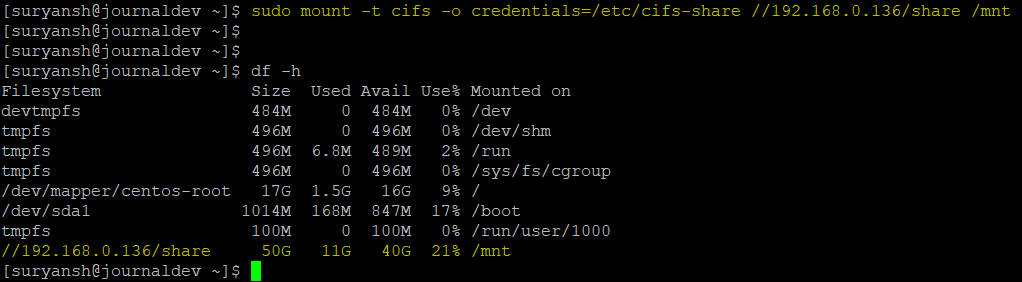
To simply mount CIFS share, execute mount command with sudo command:
sudo mount -t cifs -o username=shareusername,password=sharepassword //server/share /mnt
You can also execute df -h command check your mount.

Now you can simply go to your mount location (in our case it is /mnt) to access the remote files and directories.

For more options to mount cifs share, you’ll need to install cifs-utils package which can be easily installed using the yum command with sudo command:
sudo yum install cifs-utils
From here you’ll require cifs-utils package. Instead of mentioning credentials in the command, you can use a file containing credentials in the following format,
username=value
password=value
domain=value
You can leave domain=value as domain= if you don’t want to specify the domain. Like in our case we stored credentials in /etc/cifs-share and then you can execute the command:
sudo mount -t cifs -o credentials=/location/to/credentials //server/share /mnt
To make your credentials file only readable by the root user and not anyone else we can make use of chown and chmod command to set permissions:
sudo chown root:root /etc/cifs-share
sudo chmod 700 /etc/cifs-share
By default cifs share is mounted with full permissions in Linux, you can change these permissions by file_mode and dir_mode,
sudo mount -t cifs -o credentials=/location/to/credentials,file_mode=0777,dir_mode=0777 //server/share /mnt
You can read more about it’s options at https://linux.die.net/man/8/mount.cifs or, execute man mount.cifs in terminal.
Auto Mounting CIFS share
To mount cifs share automatically up on reboots, add the follow line with your own cifs share details in /etc/fstab file.
//server/share /mnt cifs credentials=/location/to/credentials,file_mode=0777,dir_mode=0777 0 0
To test it out execute:
It should automatically mount your cifs share.
Unmounting CIFS share
To unmount your CIFS share, simply execute:
You can also read more about umount at https://linux.die.net/man/8/umount or, simply execute man umount in terminal.
Conclusion
Since the Linux kernel has native support for cifs, you can directly mount the cifs share without any installation. But it is recommended to install cifs-utils for more options to mount cifs share (like using credentials file, setting modes, etc..) and, to automount your cifs share every time you boot or reboot, you can add it to the /etc/fstab file. We hope this article was helpful to you. Happy Learning!
Монтирование SMB не что иное как подключение сетевой папки WIndows в Linux. SMB (Server Message Block) — сетевой протокол удаленного доступа к сетевым ресурсам (файлы, папки, принтеры и т.п.). В первой версии протокола был известен также как CIFS (Common Internet File System). Протоком SMB повсеместно используется во всех ОС Microsoft Windows.
В современных дистрибутивах Linux уже можно совершенной спокойно путешествовать по сетевым дискам. Но куда удобнее если смонтировать сетевой диск сразу в папку, да еще и на рабочем столе, красота. Я создал папку с общим доступом на сервере Hyper-V, её и буду монтировать. Монтирование SMB буду делать под специально заведенным пользователем, дабы не светить пароль админа.
Монтируемая папка
Монтируемая директория доступна только администраторам и пользователю smb (создан специально для монтирования). Сделать общую папку на сервере Windows можно двумя способами: 1 — через свойства папки; 2 — через Powershell. Через свойства папки проще и быстрее как для новичка.
Но в моем случае с сервером HyperV 2019 сработал только второй способ, через Powershell.
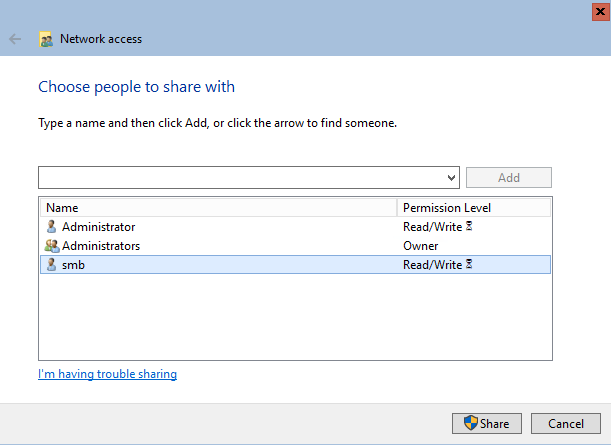
New-SmbShare -Name "smb_mount" -Path "F:smb_mount" -FullAccess "Administrator", "smb"

Данной командой я сделал общей папку расположенную по пути F:smb_mount и присвоил ей имя smb_mount. Права на доступ к папке выдал пользователю Administrator и smb.
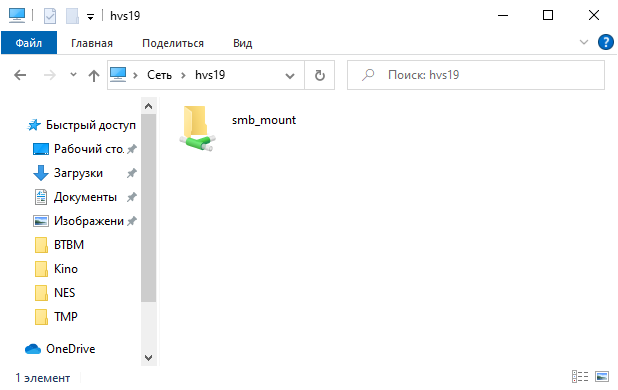
Общая папка у меня доступна по пути \hvs19smb_mount, но монтировать я буду ее по ip адресу. Принципиального вопроса как монтировать нет, просто не всегда есть возможность использовать имя.
С монтируемой папкой закончили, создадим папку куда будем монтировать. Я создал папку в /opt и назвал её F (по имени диска где лежит монтируемая папка) для удобства.
Установим набор утилит для монтирования SMB
Для Ubuntu (и прочих Debian`ов)
sudo apt-get install cifs-utils
Для Centos 8 (и прочих RPM дистрибутивов на YUM)
sudo yum install cifs-utils
Монтирование SMB
Все необходимые папки мы создали, теперь приступим к монтированию файловой системы.
sudo mount -t cifs -o username=smb,password=пароль //192.168.1.110/smb_mount /opt/F
Пройдемся по параметрам:
- -t cifs — тип файловой системы cifs (полностью совместим с SMB)
- username — пользователь у которого есть доступ к монтируемой папке (на сетевом диске). Если разрешено, можно использовать гостя, без пароля. В таком случае указываем username=guest
- password — пароль от учетной записи этого пользователя
- //192.168.1.110/smb_mount — общая папка на сервере которую монтируем
- /opt/F — папка куда монтируем.
Посмотрим что все получилось, проверим свободное место в сетевой папке
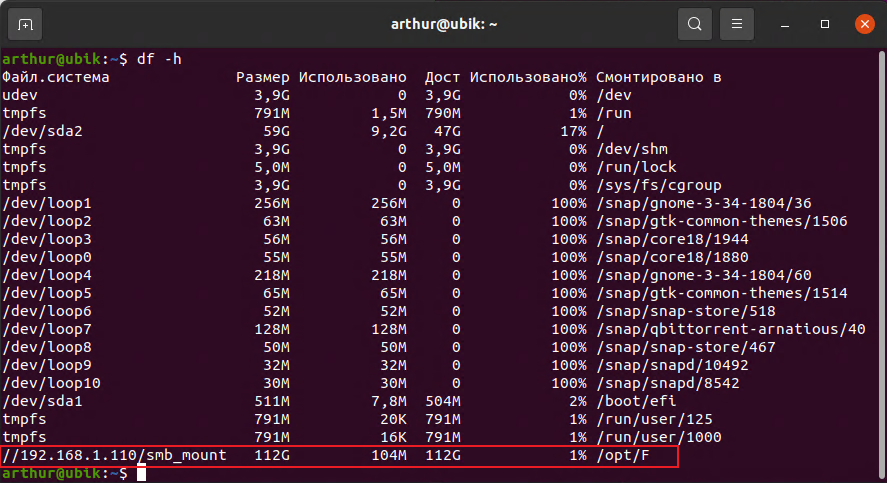
Можно использовать дополнительные возможности при монтировании, используя ключи после параметра -o. Вот некоторые из них
- rw — запись и чтение
- ro — только чтение
- iocharset=utf8 — в данной кодировке будет выводится информация;
- codepage=cp866 — кодировка используемая на сервере с общей папкой. Обычно Windows устанавливает кодировку cp866.
- vers=3.0 — принудительно указать версию подключения SMB протокола. Для безопасного подключения используйте последнюю версию.
Используя команду mount мы монтируем папку в ручном режиме и после перезагрузки монтирования не произойдет. Для автоматического монтирования папки читаем следующий раздел.
Автоматическое монтирование SMB
Для постоянного монтирования папке при старте системы необходимо внести изменения в файл /etc/fstab. При монтировании сетевого диска с SMB используется пароль. Для большей сохранности не будем указывать его в файле fstab, а сохраним в директории root.
Создадим файл с учетными данными
Добавим в файл строки: имя пользователя, пароль, домен (если используется). У меня домена нет, поэтому добавлю только имя и пароль
username=smb
password=пароль
domain=mydomain
Откроем файл /etc/fstab для редактирования
Добавим новую строку в конец файла
//192.168.1.110/smb_mount /opt/F cifs user,rw,credentials=/root/.cifsmnt 0 0
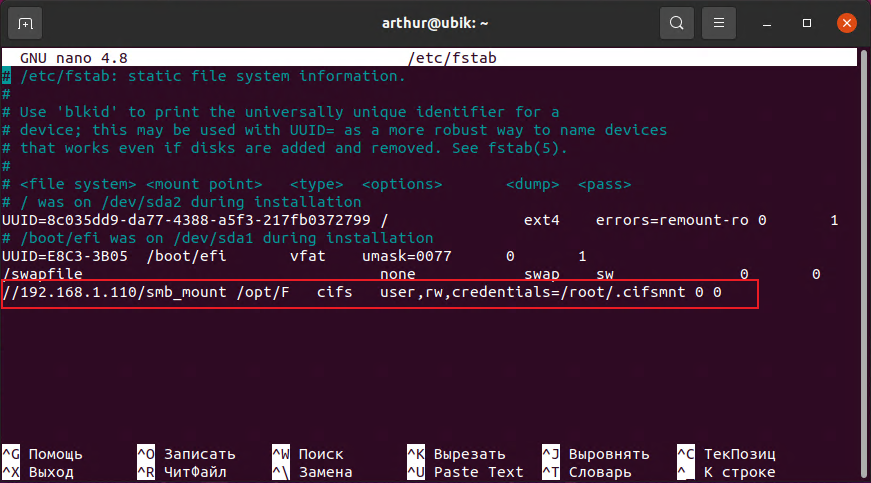
Сохраним файл и перезагрузим компьютер. После этого сетевая папка будет монтироваться автоматически.
Разберем указанные параметры
- //192.168.1.110 — ip адрес сервера где находится сетевая папка
- /smb_mount — сетевая папка на указанном выше сервере
- /opt/F — папка на локальном компьютере куда будем монтировать сетевую папку
- cifs — тип монтируемой файловой системы
- user — разрешение монтировать для любого пользователя
- rw — разрешения на чтение/запись на диск при монтировании
- credentials — путь к файлу с данными учетной записи используемых для подключения по SMB
- 0 — не использовать дамп
- 0 — не проверять файловую систему при старте программой fsck
Права на папки и файлы
Примонтированный диск по умолчанию монтируется от root и разрешает запись на диск только под ним. Рассмотрим опции позволяющие изменить доступ на примонтированные папки и файлы. Также рассмотрим настройки по смене владельца смонтированной папки.
- uid — задает владельца каталога. Узнать uid пользователей можно в файле /etc/passwd
- gid — задает группу владельца каталога. Узнать gid групп можно в файле /etc/passwd
- file_mode=0777 — права на доступ к файлам. 0777 — разрешено запись/чтение всем.
- dir_mode=0777 — права на доступ к папкам. 0777 — разрешено запись/чтение всем.
Пример записи в файле /etc/fstab монтирования от моего пользователя (не root) с полным доступом ко всем файлам и папкам
//192.168.1.110/smb_mount /opt/F cifs user,rw,credentials=/root/.cifsmnt,file_mode=0777,dir_mode=0777,uid=1000,gid=1000 0 0
Размонтирование SMB
Размонтировать сетевую папку SMB можно используя команду umount
В параметрах команды umount указываем директорию куда была смонтирована сетевая папка. В моем случае это /opt/F
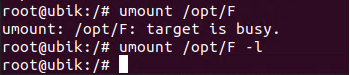
Если смонтированная файловая система сейчас занята, появится сообщение umount: target is busy . В таком случае размонтировать получиться с ключом -l
Решение проблем монтирования
Если по какой либо причине после ваших попыток папка все же не монтируется, необходимо смотреть системный журнал.
grep "cifs" /var/log/syslog

В системном журнале будет указана причина ошибки монтирования. Как пример не верный логин/пароль, не установленные утилиты cifs и т.п.