unix-linux:centos:join-centos-linux-7-4-to-active-directory-domain-with-sssd-and-realmd-for-authentication-and-configure-ad-domain-security-group-authorization-for-sudo-and-ssh-with-putty-sso
Содержание
CentOS Linux 7 — Присоединение к домену Active Directory средствами realmd/SSSD и настройка аутентификации и авторизации через доменные группы безопасности
 Процедура присоединения Linux-системы к домену Active Directory с помощью SSSD (System Security Services Daemon) и RealmD (Realm Discovery) подробно рассматривалась ранее на примере Debian GNU/Linux 8.6.
Данная статья является «выжимкой» основных этапов присоединения к домену Active Directory для системы на базе CentOS Linux 7.4.
Предварительные условия
На нашей Linux-системе, для успешного присоединения и членства в домене Active Directory, должно быть соблюдено как минимум два условия:
-
Настроено разрешение имён в доменной службе DNS, например через файл
/etc/resolv.conf, как это было описано ранее
Присоединение к домену Active Directory
Устанавливаем необходимые для работы пакеты:
# yum install realmd sssd adcli krb5-workstation
Проверяем успешность обнаружения домена:
# realm discover ad.holding.com --verbose
Настраиваем параметры системы, которые будут использованы при присоединении к домену для заполнения атрибутов operatingSystem и operatingSystemVersion.
# nano /etc/realmd.conf
- realmd.conf
-
[active-directory]
os-name = CentOS Linux
os-version = 7.4.1708 (Core)
Выполняем присоединение к домену (в ходе присоединения будет запрошен пароль доменного пользователя с правами на ввод в домен, указанного в опции –user):
# realm join --verbose --user=volodya
 --user-principal="host/kom-vm01.ad.holding.com@AD.HOLDING.COM"
 --computer-ou="OU=Linux Servers,OU-KOM,DC=ad,DC=holding,DC=com"
 kom-dc01.ad.holding.com
Настройка Kerberos-клиента
Настраиваем конфигурационный файл, ранее установленного клиента Kerberos.
Это может быть нужно в случае если мы захотим использовать удалённое Single sign-on (SSO) подключение через сервер SSHD (например через клиент Putty с Windows-системы, как это было описано ранее)
# nano -Y sh /etc/krb5.conf
Пример готовой конфигурации:
- krb5.conf
-
# Configuration snippets may be placed in this directory as well
includedir /etc/krb5.conf.d/
includedir /var/lib/sss/pubconf/krb5.include.d/

[logging]
 default = FILE:/var/log/krb5libs.log
 kdc = FILE:/var/log/krb5kdc.log
 admin_server = FILE:/var/log/kadmind.log

[libdefaults]
     dns_lookup_kdc = no
     dns_lookup_realm = false
     ticket_lifetime = 24h
     renew_lifetime = 7d
     forwardable = true
     rdns = false
     default_ccache_name = KEYRING:persistent:%{uid}
     default_realm = AD.HOLDING.COM

[realms]
    AD.HOLDING.COM = {
        kdc = kom-dc01.ad.holding.com
        kdc = kom-dc02.ad.holding.com
        admin_server = kom-dc01.ad.holding.com
        default_domain = ad.holding.com
    }

[domain_realm]
    ad.holding.com = AD.HOLDING.COM
    .ad.holding.com = AD.HOLDING.COM
Настройка SSSD
Настраиваем конфигурацию службы sssd
# nano -Y sh /etc/sssd/sssd.conf
Пример готовой конфигурации:
- sssd.conf
-
[sssd]
domains = ad.holding.com
config_file_version = 2
services = nss, pam
default_domain_suffix = ad.holding.com

[domain/ad.holding.com]
ad_server = kom-dc01.ad.holding.com, kom-dc02.ad.holding.com
ad_backup_server = msk-dc01.ad.holding.com, spb-dc01.ad.holding.com
ad_domain = ad.holding.com
krb5_realm = AD.HOLDING.COM
realmd_tags = manages-system joined-with-adcli
cache_credentials = True
id_provider = ad
krb5_store_password_if_offline = True
default_shell = /bin/bash
ldap_id_mapping = True
ldap_idmap_default_domain_sid = S-1-5-21-2955347524-3617349964-1548486448
ldap_idmap_range_size = 2000000
ldap_use_tokengroups = False
use_fully_qualified_names = True
fallback_homedir = /home/%u@%d
access_provider = ad
subdomains_provider = none
Очищаем кэш sss и перезапускаем службу sssd:
# systemctl stop sssd
# ( rm -f /var/lib/sss/db/* ) && ( rm -f /var/lib/sss/mc/* )
# systemctl start sssd
Проверка взаимодействия с AD
Проверяем то, что в системе успешно зарегистрированы модули работы SSSD с PAM/NSS:
# cat /etc/nsswitch.conf | grep sss

passwd:     files sss
shadow:     files sss
group:      files sss
services:   files sss
netgroup:   files sss
# cat /etc/pam.d/system-auth | grep sss

auth        sufficient    pam_sss.so forward_pass
account     [default=bad success=ok user_unknown=ignore] pam_sss.so
password    sufficient    pam_sss.so use_authtok
session     optional      pam_sss.so
Проверяем успешность получения информации о пользователе из AD по логину:
# getent passwd petya

petya@ad.holding.com:*:398447:200613:Петя Резинкин:/home/petya@ad.holding.com:/bin/bash
Проверяем успешность получения информации о пользователе из AD по UPN:
# getent passwd petya@ad.holding.com

petya@ad.holding.com:*:398447:200613:Петя Резинкин:/home/petya@ad.holding.com:/bin/bash
Проверяем успешность получения информации из AD о членах доменной группы безопасности:
# getent group KOM-Linux-Admins@ad.holding.com

kom-linux-admins@ad.holding.com:*:396844:petya@ad.holding.com,vova@ad.holding.com
Пробуем войти в сессию доменного пользователя:
# su - petya@ad.holding.com
Успешно войдя в сессию доменного пользователя пробуем получить информацию о текущем пользователе (должен быть возвращён набор доменных групп, в которые входит пользователь):
$ id


uid=398447(petya@ad.holding.com) gid=200613(domain users@ad.holding.com)
groups=200613(domain users@ad.holding.com),445177(internet-users@ad.holding.com),
396844(kom-linux-admins@ad.holding.com)
Доступ к SUDO
Настроим доступ к возможности вызывать команду sudo, основанный на членстве в доменной группе безопасности:
Создадим в каталоге /etc/sudoers.d/ новый файл, в котором будут перчислены группы безопасности:
# nano -Y sh /etc/sudoers.d/kom-linux-admins
Наполним файл (каждая отдельная группа с правилами доступа в отдельной строчке. в нашем примере используется одна группа с полным доступом):
- kom-linux-admins
-
%KOM-Linux-Admins@ad.holding.com ALL=(ALL) ALL
Войдём в сесcию доменного пользователя, входящего в группу, которой мы разрешили выполять sudo:
# su - petya@ad.holding.com
Успешно войдя в сессию доменного пользователя пробуем выполнить любую команду с правами администратора системы используя sudo:
$ sudo whoami

[sudo] password for petya@ad.holding.com: ******
root
Как видим, работает. Осталось ограничить доступ на редактирование файла, в котором описаны правила предоставления доступа к sudo:
# chmod 0440 /etc/sudoers.d/kom-linux-admins
Настройка SSHD
Насстроим службу sshd для того, чтобы можно было использовать SSO-подключение.
# nano -Y sh /etc/ssh/sshd_config
Включим опции конфигурационного файла:
- sshd_config (фрагмент)
-
...
GSSAPIAuthentication yes
GSSAPICleanupCredentials yes
...
Перезапустим службу:
# systemctl restart sshd
Ограничение доступа к системе через PAM
Чтобы ограничить доступ к CentOS Linux 7 на базе доменных групп безопасности, создадим новый конфигурационный файл, в котором будут перечислены группы (как локальные так и доменные), которым нужно обеспечить вход в систему:
# nano -Y sh /etc/security/access-groups-to-login
- access-groups-to-login
-
sudo
root
KOM-Linux-Admins@ad.holding.com
Обратите внимание на то, что настраивая ограничение локального входа лучше не забыть добавить локальные группы root и sudo, иначе с дальнейшем вход в систему под локальными административными учётными записями может стать невозможен.
Ограничим доступ к файлу:
# chown root:root /etc/security/access-groups-to-login
# chmod 600 /etc/security/access-groups-to-login
Настроим в системном конфиге /etc/pam.d/login правила PAM таким образом, чтобы в ходе авторизации при локальном входе на консоль нашей Linux-системы использдвался созданный нами выше файл со списком разрешённых групп:
# nano -Y sh /etc/pam.d/login
Вставляем перед строкой «account include system-auth» вызов проверки нашего файла с группами:
- login (фрагмент)
-
#
# Restricted access to service from local and domain groups
account required pam_listfile.so onerr=fail item=group sense=allow file=/etc/security/access-groups-to-login
#
Внимание! Невнимательное редактирование данного файла может привести в невозможности локального входа в систему, поэтому в ходе дальнейших проверок не закрывайте текущую сесиию, чтобы была возможность исправить возможные ошибки.
Теперь попробуем подключиться на консоль нашей Linux-системы, используя доменные учётные записи (те, которым разрешен вход через группу безопасности и те, которым не разрешён вход). В процессе проверки в отдельной сессии запустим наблюдение за логом безопасности, чтобы видеть то, что происходит в ходе авторизации для разрешённых и неразрешённых для входа пользователей.
# tail -f /var/log/secure
Теперь аналогичным образом настроим в конфиге, относящемся к обработке авторизации в SSHD (/etc/pam.d/sshd) правила PAM таким образом, чтобы в ходе авторизации при удалённом входе через SSH-сервер использовался созданный нами выше файл со списком разрешённых групп (в нашем примере используется тот же файл, что и для локального входа, хотя это могут быть разные файлы и группы доступа):
# nano -Y sh /etc/pam.d/sshd
Вставляем перед строкой «account include password-auth» вызов проверки нашего файла с группами:
- sshd (фрагмент)
-
#
# Restricted access to service from local and domain groups
account required pam_listfile.so onerr=fail item=group sense=allow file=/etc/security/access-groups-to-login
#
Внимание! Невнимательное редактирование данного файла может привести в невозможности входа в систему через SSH-сервер, поэтому в ходе дальнейших проверок не закрывайте текущую сесиию, чтобы была возможность исправить возможные ошибки
Теперь попробуем удалённо подключиться к SSH-серверу нашей Linux-системы, используя доменные учётные записи (те, которым разрешен вход через группу безопасности и те, которым не разрешён вход). В процессе проверки в отдельной сессии запустим наблюдение за логом безопасности, чтобы видеть то, что происходит в ходе авторизации для разрешённых и неразрешённых для входа пользователей.
# tail -f /var/log/secure
Если дополнительно требуется доменная аутентификация/авторизация в других сервисах CentOS Linux, например в веб-сервере Apache то, в качестве примера можно использовать статью Настройка Kerberos аутентификации с SSO на веб-сервере Apache с помощью SSSD
Проверено на следующих конфигурациях:
| Версия ОС |
|---|
| CentOS Linux release 7.4.1708 (Core) |
| CentOS Linux release 7.5.1804 (Core) |
 Автор первичной редакции:
Алексей Максимов
Время публикации: 22.03.2018 10:34
2017-11-13 16:53:18 15243 3
В развитой инфраструктуре, где имеется большое количество рабочих станций и серверов, управлением учетными записями обычно осуществляется посредством Windows Active Directory. Поэтому управление линукс серверами так же удобнее осуществлять через централизованное хранение учетных записей. Рассмотрим пример добавления линуксовой машины с операционной системой CentOs7 в домен Windows.
Отключаем SELINUX
sed -i «s/SELINUX=enforcing/SELINUX=disabled/» /etc/selinux/config
Установка iptables
systemctl stop firewalld
systemctl disable firewalld
yum install -y iptables-services
После установки запускаем iptables
systemctl start iptables
systemctl enable iptables
Устанавливаем необходимые пакеты:
yum install -y authconfig samba samba-winbind samba-client
pam_krb5 krb5-workstation vim net-tools bind-utils samba-winbind-clients
Настройка DNS
Указываем в качестве DNS сервера наш контроллер домена
cat /etc/resolv.conf
# Generated by NetworkManager
search test.un
nameserver 172.20.1.56
Если на сервере настроен DHCP, то убедитесь что сервер получает правильные настройки dns-сервера и домена
Проверяем что имя домена резолвится
nslookup test.un
Получаем следующее:
Server:		172.20.1.56
Address:	172.20.1.56#53

Name:	test.un
Address: 172.20.1.56
Присоединение сервера к домену
Запускаем утилиту authconfig-tui

Указываем:
Информация пользователя — Использовать Winbind
Аутентификация — Использовать Kerberos
Жмем далее

Заполняем следующие поля:
- Область — область kerberos, совпадает с именем домена в верхнем регистре;
- KDC(Key Distribution Center ) — kerberos сервер, выступает как сервер по управлению и хранению билетов;
- Сервер администратор — совпадает с KDC;
- Остальные два пункта говорят нам использовать DNS для определения имен серверов и KDC для областей.
Жмем далее

Заполняем следующие поля:
- Модель защиты — выбираем ads(означает, что используются протоколы, совместимые со службами ADS Windows 2008R2);
- Домен — вводим NetBios имя домена, без конечно части;
- Контроллеры домена — указываем адреса контроллеров домена;
- Область ADS — совпадает с именем домена;
- Оболочка шаблона — указывает какую оболочку будут иметь доменные пользователи на linux машине.
Жмем ОК
Запускаем демон Winbind
systemctl start winbind
systemctl enable winbind
Далее производим присоединение к домену
net ads join -U Administrator
Указываем пользователя под которым будем присоединять сервер и вводим его пароль, должны увидеть следующее:
Using short domain name -- TEST
Joined "CENTOS7-TEST" to dns domain "test.un"
No DNS domain configured for centos7-test. Unable to perform DNS Update.
DNS update failed: NT_STATUS_INVALID_PARAMETER
Машина в домене

Для того чтобы пользователи и группы домена отображались на сервере и вы могли получать доступ к ним, необходимо в файле /etc/samba/smb.conf добавить строки
winbind enum users = yes
winbind enum groups = yes
Для проверки можно использовать утилиту wbinfo и getent
wbinfo -u
Покажет пользователей домена:
TESTadministrator
TESTguest
TESTkrbtgt
TESTtest1
TESTtest2
wbinfo -g
Покажет группы домена:
TESTwinrmremotewmiusers__
TESTdomain computers
TESTdomain controllers
TESTschema admins
TESTenterprise admins
TESTcert publishers
TESTdomain admins
TESTdomain users
TESTdomain guests
TESTgroup policy creator owners
TESTras and ias servers
TESTallowed rodc password replication group
TESTdenied rodc password replication group
TESTread-only domain controllers
TESTenterprise read-only domain controllers
TESTcloneable domain controllers
TESTprotected users
TESTdnsadmins
TESTdnsupdateproxy
TESTsamba
Команда «getent passwd» и «getent group» отобразит локальные учетные записи + доменные и точно так же группы соответственно
getent passwd
....
test:x:1000:1000:test:/home/test:/bin/bash
TESTadministrator:*:16777216:16777218::/home/TEST/administrator:/bin/bash
TESTguest:*:16777217:16777218::/home/TEST/guest:/bin/bash
TESTkrbtgt:*:16777218:16777218::/home/TEST/krbtgt:/bin/bash
TESTtest1:*:16777219:16777218::/home/TEST/test1:/bin/bash
TESTtest2:*:16777220:16777218::/home/TEST/test2:/bin/bash
Для использования доменных учетных записей необходимо сделать следующее:
-
Изменить значение директивы «winbind use default domain» в файле /etc/samba/smb.conf с false на true, что говорит использовать домен winbind по-умолчанию. И мы можем указывать доменных пользователей без приставки домена.
[root@centos7-test test]# su test1
bash-4.2$ id
uid=16777219(test1) gid=16777218(domain users)
группы=16777218(domain users),16777217(BUILTINusers)
- Добавить директиву «winbind separator» в файл /etc/samba/smb.conf
winbind separator = ^
Что указывает символ отделения имени домена от имени пользователя.
Microsoft has its Identity Management suite to build around the Active Directory, and Red Hat has its identity management directory server. In this article I will share the steps to add Linux to Windows Active Directory Domain. The steps are validated by adding RHEL/CentOS 7 and 8 Linux to Windows Active Directory configured on Windows Server 2012 R2.
Some more articles on similar topic:
- How to join Linux client to Windows AD Domain using realmd with SSSD (CentOS/RHEL 7/8)
- How to join Linux client to Windows AD Domain using adcli with SSSD (CentOS/RHEL 7/8)
- How to join Linux client to Windows AD Domain using winbind (CentOS/RHEL 7/8)
ALSO READ: Remove Directory in Linux PROPERLY & SAFELY
1. Overview on realmd tool
RealmD is a tool that will easily configure network authentication and domain membership. With RHEL/CentOS 7, RealmD is fully supported and can be used to join IdM, AD, or Kerberos realms. The main advantage of using realmd is the ability to provide a simple one-line command to enroll into a domain as well as configure network authentication.
For example, realmd can easily configure:
- PAM Stack
- NSS Layer
- Kerberos
- SSSD
- Winbind
The realmd system supports the following domain types:
- Microsoft Active Directory
- Red Hat Enterprise Linux Identity Management
The following domain clients are supported by realmd:
- SSSD for both RHEL/CentOS Identity Management and Microsoft Active Directory
- Winbind for Microsoft Active Directory
Following table lists some of the most used realm commands:
| Command | Description |
|---|---|
| realm discover | Run a discovery scan for domains on the network. |
| realm join | Add the system to the specified domain. |
| realm leave | Remove the system from the specified domain. |
| realm list | List all configured domains for the system or all discovered and configured domains. |
| realm permit | Enable access for specified users or for all users within a configured domain to access the local system |
| realm deny | Restrict access for specified users or for all users within a configured domain to access the local system |
ALSO READ: Solved: Error populating transaction, retrying RHEL/CentOS 7/8
2. Lab Environment
For demonstrations in this article to add Linux to Windows AD Domain on RHEL/CentOS 7/8, we will use two virtual machines running in an Oracle VirtualBox installed on my Linux Server virtualization environment.
I have written another article with the steps to add Linux to Windows AD Domain on RHEL/CentOS 8 setup using Samba winbind.
We have a Microsoft Server 2012R2 Active Directory Domain Controller with the IP address 192.168.0.107 and the CentOS 8 host with the IP address 192.168.0.117. In this article I will only cover the part to add Linux to Windows AD Domain on the client side. So this article to add Linux to Windows AD Domain requires a pre-configured Windows Active Directory.
3. Pre-requisites to add Linux to Windows AD Domain
3.1 Update /etc/resolv.conf
Make sure RHEL/CentOS client machine is able to resolve Active Directory servers. To do this update your /etc/resolv.conf with the IP address of your Domain Controller on your RHEL / CentOS 7/8 client host.
[root@adcli-client ~]# cat /etc/resolv.conf
search golinuxcloud.com
nameserver 192.168.0.107
ALSO READ: How to check security updates list & perform linux patch management RHEL 6/7/8
3.2 Verify Domain Name Resolution
Verify if the client is able to resolve the domain name:
[root@centos8 ~]# nslookup golinuxcloud.com
Server:         192.168.0.107
Address:        192.168.0.107#53

Name:   golinuxcloud.com
Address: 192.168.0.107
Verify the configuration for name resolution. In particular, verify the DNS SRV records.
 ~]# host -t SRV _kerberos._udp.golinuxcloud.com.
_kerberos._udp.golinuxcloud.com has SRV record 0 100 88 win-71humtros3m.golinuxcloud.com.

 ~]# host -t SRV _ldap._tcp.golinuxcloud.com.
_ldap._tcp.golinuxcloud.com has SRV record 0 100 389 win-71humtros3m.golinuxcloud.com.

~]# host -t SRV _ldap._tcp.dc._msdcs.golinuxcloud.com
_ldap._tcp.dc._msdcs.golinuxcloud.com has SRV record 0 100 389 win-71humtros3m.golinuxcloud.com.
3.3 Install packages (RHEL/CentOS 7)
For minimal install servers, you need to install krb5-workstation package , which provides klist command. Install adcli package along with sssd:
Here,
- sssd: The System Security Services daemon can be used to divert client authentication as required
- adcli: These are the tools for joining and managing AD domains
[root@adcli-client ~]# yum install adcli sssd authconfig realmd krb5-workstation oddjob oddjob-mkhomedir
3.4 Install packages (RHEL/CentOS 
Following list of packages are required for integrating Linux client to Windows domain using realm. We need oddjob oddjob-mkhomedir to make sure the home directory is automatically created for domain users.
[root@centos8 ~]# dnf -y install realmd adcli sssd oddjob oddjob-mkhomedir samba-common-tools krb5-workstation authselect-compat
ALSO READ: How to add Windows Workstation to Samba AD DC (with screenshots)
4. Using realm to join Linux to Windows Domain
With all the packages installed, we can use the realm command to add Linux to Windows AD Domain and manage our enrolments. This command is part of the realmd package that we added.
4.1 List configured domains
We can use the list subcommand to ensure that we are not currently part of a domain:
[root@realm-client ~]# realm list
The output should be blank.
4.2 Discover available domains in the network
Now, we are ready to proceed with the next step i.e. to add Linux to Windows AD Domain. With a simple environment, you will know the domain that you want to join; at least we certainly hope that you do. In our case, we do know it and this is golinuxcloud.com.
The realm discover command returns complete domain configuration and a list of packages that must be installed for the system to be enrolled in the domain.
[root@realm-client ~]# realm discover golinuxcloud.com
GOLINUXCLOUD.COM
  type: kerberos
  realm-name: GOLINUXCLOUD.COM
  domain-name: GOLINUXCLOUD.COM
  configured: no
  server-software: active-directory
  client-software: sssd
  required-package: oddjob
  required-package: oddjob-mkhomedir
  required-package: sssd
  required-package: adcli
  required-package: samba-common-tools
golinuxcloud.com
  type: kerberos
  realm-name: GOLINUXCLOUD.COM
  domain-name: golinuxcloud.com
  configured: no
4.3 Join Linux client to Windows domain
The realm join command then sets up the local machine for use with a specified domain by configuring both the local system services and the entries in the identity domain. The process run by realm join follows these steps:
- Running a discovery scan for the specified domain.
- Automatic installation of the packages required to join the system to the domain.
- Joining the domain by creating an account entry for the system in the directory.
- Creating the
/etc/krb5.keytabhost keytab file. - Configuring the domain in SSSD and restarting the service.
- Enabling domain users for the system services in PAM configuration and the
/etc/nsswitch.conffile.
[root@realm-client ~]# realm join --user=Administrator golinuxcloud.com
Password for Administrator:
Initially I was getting following error while trying to join my Linux client to Windows domain using realm:
 ~]# realm join  --user=Administrator golinuxcloud.com
Password for Administrator:
See: journalctl REALMD_OPERATION=r597.2528
realm: Couldn't join realm: Failed to join the domain
In the journalctl logs I could find the following logs:
Mar 04 12:11:21 centos8 realmd[2314]:  ! Couldn't authenticate as: Administrator@GOLINUXCLOUD.COM: KDC has no support for encryption type
Mar 04 12:11:21 centos8 realmd[2314]:  ! Couldn't authenticate as: Administrator@GOLINUXCLOUD.COM: KDC has no support for encryption type
Mar 04 12:11:21 centos8 realmd[2314]: adcli: couldn't connect to GOLINUXCLOUD.COM domain: Couldn't authenticate as: Administrator@GOLINUXCLOUD.COM: KDC has no support for encryption type
Mar 04 12:11:21 centos8 realmd[2314]: adcli: couldn't connect to GOLINUXCLOUD.COM domain: Couldn't authenticate as: Administrator@GOLINUXCLOUD.COM: KDC has no support for encryption type
Mar 04 12:11:21 centos8 realmd[2314]: process exited: 2534
Mar 04 12:11:21 centos8 realmd[2314]:  ! Failed to join the domain
Mar 04 12:11:21 centos8 realmd[2314]:  ! Failed to join the domain
ALSO READ: How to run shell scripts in parallel & collect exit status of process in Linux
4.4 How to fix “KDC has no support for encryption type”?
Method-1
With RHEL/CentOS 8, rc4 is not in the DEFAULT crypto policy anymore, see man crypto-policies for details. Unfortunately it is still the common fallback in AD.
So we can add rc4-hmac in /etc/krb5.conf.d/crypto-policies as permitted_enctypes as shown below.
[libdefaults]
permitted_enctypes = aes256-cts-hmac-sha1-96 aes256-cts-hmac-sha384-192 camellia256-cts-cmac aes128-cts-hmac-sha1-96 aes128-cts-hmac-sha256-128 camellia128-cts-cmac rc4-hmac
Now you can re-try to join Linux client to windows domain using realm:
[root@realm-client ~]# realm join --user=Administrator golinuxcloud.com
Password for Administrator:
Method-2
Here also we add rc4 encryption policy but instead of using /etc/krb5.conf.d/crypto-policies, we will add following content in a new file under /etc/krb5.conf.d/
~]# cat /etc/krb5.conf.d/enctypes
[libdefaults]
   default_tgs_enctypes = aes256-cts-hmac-sha1-96 aes256-cts-hmac-sha384-192 camellia256-cts-cmac aes128-cts-hmac-sha1-96 aes128-cts-hmac-sha256-128 camellia128-cts-cmac rc4-hmac
   default_tkt_enctypes = aes256-cts-hmac-sha1-96 aes256-cts-hmac-sha384-192 camellia256-cts-cmac aes128-cts-hmac-sha1-96 aes128-cts-hmac-sha256-128 camellia128-cts-cmac rc4-hmac
Now you can try to join Linux client to the windows domain using realm:
[root@realm-client ~]# realm join --user=Administrator golinuxcloud.com
Password for Administrator:
Method-3
You can allow weak encryption by defining the following under [libdefaults] in /etc/krb5.conf file:
allow_weak_crypto = true
default_tgs_enctypes = arcfour-hmac-md5 des-cbc-crc des-cbc-md5
default_tkt_enctypes = arcfour-hmac-md5 des-cbc-crc des-cbc-md5
Now you can try to join Linux client to the windows domain using realm:
[root@realm-client ~]# realm join --user=Administrator golinuxcloud.com
Password for Administrator:
For more information you can follow Ensuring support for common encryption types in AD and RHEL
ALSO READ: How to properly check if file exists in Bash or Shell (with examples)
5. Verify if Linux client is integrated to windows domain
As a standard user, you can then list the domain you have joined using the realm list command again. We should note that the output at first may seem similar to the realm discover golinuxcloud.com command that we ran earlier; however, on closer examination, we will see that we are now a member server, as shown by configured: kerberos-member in the following command:
")
6. Configure NSS for SSSD service
Next we need to configure NSS to authenticate the users in the Linux client and create home directories for AD users:
6.1 On RHEL/CentOS 7
You can use authconfig on RHEL/CentOS 7 server to configure PAM and make sure the home directories of AD users are automatically created:
# authconfig --enablesssd --enablesssdauth --enablemkhomedir --update
Next enable and start/restart oddjobd.service
~]# systemctl enable --now oddjobd.service
6.2 On RHEL/CentOS 8
We will use authselect which is the new version of authconfig in RHEL/CentOS 8 for configuring PAM files and making sure that home directories of AD users are automatically created when they login to the Linux client:
~]# authselect select sssd with-mkhomedir
Profile "sssd" was selected.
The following nsswitch maps are overwritten by the profile:
- passwd
- group
- netgroup
- automount
- services

Make sure that SSSD service is configured and enabled. See SSSD documentation for more information.

- with-mkhomedir is selected, make sure pam_oddjob_mkhomedir module
  is present and oddjobd service is enabled and active
  - systemctl enable --now oddjobd.service
Next enable and start/restart oddjobd.service
~]# systemctl enable --now oddjobd.service
ALSO READ: DVWA SQL Injection Exploitation Explained (Step-by-Step)
7. Login as Active Directory User on Linux Client
Let us try to login to our Linux client using Windows AD user and verify if the home directory is automatically created. But first we need to check if our Linux client is able to get the user details of AD users:
~]# id GOLINUXCLOUD\Administrator
uid=111800500(administrator@GOLINUXCLOUD.COM) gid=111800513(domain users@GOLINUXCLOUD.COM) groups=111800513(domain users@GOLINUXCLOUD.COM),111800520(group policy creator owners@GOLINUXCLOUD.COM),111800512(domain admins@GOLINUXCLOUD.COM),111800572(denied rodc password replication group@GOLINUXCLOUD.COM),111800518(schema admins@GOLINUXCLOUD.COM),111800519(enterprise admins@GOLINUXCLOUD.COM)
So our Administrator user from the AD is detected by the Linux client, so let’ try to switch user to Administrator:
")
As expected the home directory for our AD user was automatically created.
8. Leaving Active Directory domain
There will be occurrences where the Linux server needs to be removed from active directory domain. Often, this is the case where it is removed from one active directory domain before being added to another active directory domain. Should this be required, the realm command makes the process easy.
The additional option: --remove will ensure that the computer account is also deleted from the domain; otherwise, it should be deleted separately.
[root@realm-client ~]# realm leave golinuxcloud.com --remove
Password for Administrator:
Summary
In this article we learned how we can join a Linux client (CentOS/RHEL 7/8) to Windows AD Domain using realmd tool. The realmd system provides a clear and simple way to discover and join identity domains. It does not connect to the domain itself but configures underlying Linux system services, such as SSSD or Winbind, to connect to the domain.
ALSO READ: Steps to join/add CentOS 8 to Windows Domain Controller (RHEL 
It can run a discovery search to identify available AD and Identity Management domains and then join the system to the domain, as well as set up the required client services used to connect to the given identity domain and manage user access. Additionally, because SSSD as an underlying service supports multiple domains, realmd can discover and support multiple domains as well.
Further Reading
You can go through the following articles to learn more about integrating Linux client to Windows domain using realmd
Using realmd to Connect to an Active Directory Domain
man page of krb5.conf [libdefaults]
Related Searches: linux login with active directory, join linux server to active directory, add linux server to windows domain, linux active directory authentication, how to add a linux system to a windows domain, linux windows domain authentication, linux ad integration
В большинстве сред домен Active Directory является центральным центром информации для пользователя, а это значит, что для систем Linux необходимо каким-то образом получить доступ к этой пользовательской информации для запросов на аутентификацию.
В этой статье мы покажем вам, как присоединить системы CentOS 7 / RHEL 7 в домен Active Directory.
Прежде чем присоединиться к домену AD, нам необходимо убедиться, что мы установили службы времени (NTP) и DNS.
При наличии этих инфраструктурных служб нам понадобятся следующие пакеты, установленные на сервере CentOS / RHEL:
- realmd: управляет регистрацией и членством в доменах Active Directory
- samba: служба samba
- samba-common: общие инструменты для серверов и клиентов
- oddjob: Это служба D-bus, которая запускает odds задания для клиентов
- oddjob-mkhomedir: используется odds службами задания для создания домашних каталогов для учетных записей AD, если это необходимо
- sssd: демон System Security Services
- adcli: : Это инструменты для присоединения и управления доменами AD
– Используйте следующую команду для установки необходимых пакетов:
# sudo yum install oddjob realmd samba samba-common oddjob-mkhomedir sssd adcli
– Чтобы обнаружить идентификатор домена, мы будем использовать команду обнаружения области, которая вернет полную конфигурацию домена и список пакетов, которые должны быть установлены для системы, которая будет зарегистрирована в домене.
# realm discover yallalabs.local
YALLALABS.LOCAL
  type: kerberos
  realm-name: YALLALABS.LOCAL
  domain-name: YALLALABS.LOCAL
  configured: no
  server-software: active-directory
  client-software: sssd
  required-package: oddjob
  required-package: oddjob-mkhomedir
  required-package: sssd
  required-package: adcli
  required-package: samba-common-tools
yallalabs.local
  type: kerberos
  realm-name: YALLALABS.LOCAL
  domain-name: yallalabs.local
  configured: no
– Чтобы присоединиться к домену AD, добавьте компьютер в папку по умолчанию в домене AD, используя следующую команду:
sudo realm join --user=administrator@yallalabs.local yallalabs.local
Password for administrator@yallalabs.local:
– Если вы хотите добавить его в назначенный организационный блок в Active Directory, вам сначала необходимо создать подразделение или, по крайней мере, обеспечить его существование.
Следующей командой мы присоединяем сервер к домену AD и добавим учетную запись компьютера в подразделение Linux:
# sudo realm join --user=administrator@yallalabs.local --computer-ou=OU=Linux,OU=Servers,DC=YALLALABS,DC=LOCAL yallalabs.local
Password for administrator@yallalabs.local:
Если у вас есть эта ошибка:
” realm: Couldn’t join realm: Joining the domain YALLALABS.LOCAL failed“
просто перезапустите realmd и повторите попытку
– Для тестирования системы успешно присоединился домен, используя следующую команду:
# realm list
YALLALABS.LOCAL
  type: kerberos
  realm-name: YALLALABS.LOCAL
  domain-name: yallalabs.local
  configured: kerberos-member
  server-software: active-directory
  client-software: sssd
  required-package: oddjob
  required-package: oddjob-mkhomedir
  required-package: sssd
  required-package: adcli
  required-package: samba-common-tools
  login-formats: %U@yallalabs.local
  login-policy: allow-realm-logins
– Чтобы отобразить информацию о пользователе из домена, выполните следующую команду:
# id yl01@yallalabs.local
uid=344601106(yl01@YALLALABS.LOCAL) gid=344600513(domain users@YALLALABS.LOCAL) groups=344600513(domain users@YALLALABS.LOCAL),344601107(linuxadmins@YALLALABS.LOCAL)
– Чтобы разрешить вход в систему только определенным учетным записям из домена, используйте следующую команду:
эта команда изменит режим, чтобы разрешить доступ только к учетным записям по определенным учетным записям, а затем добавить указанные учетные записи в список разрешенных
# realm permit User1@yallalabs.local User2@yallalabs.local
– Чтобы разрешить только одной группе Active Directory используйте следующую команду: в этом примере мы разрешим группе ADAD LinuxAdmins войти в систему
# realm permit -g LinuxAdmins@yallalabs.local
– Чтобы предоставить разрешения sudo для группы Active Directory, в этом примере мы добавим группу ADAddins ActiveWorks в sudoers, запустив команду visudo и добавив следующую строку:
# visudo
%LinuxAdmins@yallalabs.local        ALL=(ALL)       ALL
– Чтобы покинуть домен Active Directory, вы можете использовать следующую команду:
# realm leave --user=--user=administrator@yallalabs.local yallalabs.local
– Если вы хотите покинуть домен и удалить учетную запись компьютера, вы можете использовать дополнительный параметр -remove в конце команды
# realm leave --user=--user=administrator@yallalabs.local yallalabs.local --remove
Password for administrator@yallalabs.local:
In Most of the Organizations users and groups are created and managed on Windows Active Directory. We can integrate our RHEL 7 and CentOS 7 servers with AD(Active Directory) for authenticate purpose. In other words we can join our CentOS 7 and RHEL 7 Server on Windows Domain so that system admins can login to these Linux servers with AD credentials. While creating UNIX users on AD we can map these users to a specific group so that level of access is controlled centrally from AD.
In this article we discuss how to integrate CentOS 7.x & RHEL 7.x with AD(Windows Server 2008 R2 & Windows Server 2012 R2). Following steps are applicable for both CentOS 7 and RHEL 7.
Step:1 Install the required packages using yum command
Use the yum command to install following packages from the command line.
[[email protected] ~]# yum install sssd realmd oddjob oddjob-mkhomedir adcli samba-common samba-common-tools krb5-workstation openldap-clients policycoreutils-python
Update the /etc/hosts file and /etc/resolv.conf so that dns name or hostname of AD server gets resolved correctly. In my case AD server hostname is “adserver.example.com“, so place the below line in /etc/hosts file
192.168.0.151 adserver.example.com adserver
Contents of resolv.conf should be something like below. Just replace the domain name and ip address of dns server as per your setup
[[email protected] ~]# cat /etc/resolv.conf
search example.com
nameserver 192.168.0.151
[[email protected] ~]#
Step:2 Now Join Windows Domain or Integrate with AD using realm command
When we install above required packages then realm command will be available. We will use beneath realm command to integrate CentOS 7 or RHEL 7 with AD via the user “tech”. tech is a bind user which have required privileges on AD or we can also administrator user of AD Server for integration purpose.
[[email protected] ~]# realm join --user=tech adserver.example.com
Password for tech:
[[email protected] ~]#
Now verify whether our server has joined the Windows domain or not. Simply run the command ‘realm list‘
 [[email protected] ~]# realm list
example.com
  type: kerberos
  realm-name: EXAMPLE.COM
  domain-name: example.com
  configured: kerberos-member
  server-software: active-directory
  client-software: sssd
  required-package: oddjob
  required-package: oddjob-mkhomedir
  required-package: sssd
  required-package: adcli
  required-package: samba-common-tools
  login-formats: %[email protected]
  login-policy: allow-realm-logins
[[email protected] ~]#
Whenever we run ‘realm join’ command it will automatically configure ‘/etc/sssd/sssd.conf‘ file.
Step:3 Check and Verify AD users on REHL 7 or CentOS 7 Servers
With ‘id‘ command on Linux we can verify the user’s uid and gid and their group information. At this point of time our server is now the part of windows domain. Use below command to verify AD users details.
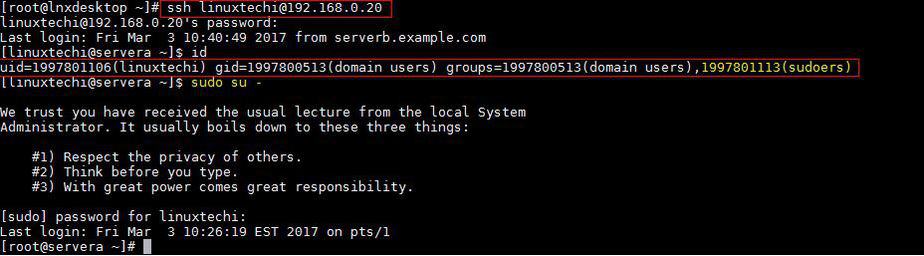
[[email protected] ~]# id [email protected]
uid=1997801106([email protected]) gid=1997800513(domain [email protected]) groups=1997800513(domain [email protected])
[[email protected] ~]#
You might have noticed in above command that i have mentioned domain name as well along with user name because this is controlled by ‘/etc/sssd/sssd.conf’ file. If we execute id command without domain name then we will not get any details for user.
[[email protected] ~]# id linuxtechi
id: linuxtechi: no such user
[[email protected] ~]#
We can change this behavior by editing the file /etc/sssd/sssd.conf.
Change the following parameters from
use_fully_qualified_names = True
fallback_homedir = /home/%[email protected]%d
to
use_fully_qualified_names = False
fallback_homedir = /home/%u
Restart the sssd service using following systemctl command
[[email protected] ~]# systemctl restart sssd
[[email protected] ~]# systemctl daemon-reload
Now run the id command and see whether you are able get AD user details without mentioning domain name
[[email protected] ~]# id linuxtechi
uid=1997801106(linuxtechi) gid=1997800513(domain users) groups=1997800513(domain users)
[[email protected] ~]#
Let’s try ssh CentOS 7 or RHEL 7 Server with AD credentials
[[email protected] ~]# ssh [email protected]
[email protected]'s password:
Last login: Fri Mar  3 10:18:41 2017 from serverb.example.com
[[email protected] ~]$ id
uid=1997801106(linuxtechi) gid=1997800513(domain users) groups=1997800513(domain users)
[[email protected] ~]$ pwd
/home/linuxtechi
[[email protected] ~]$
Step:4 Sudo rights for AD users on CentOS 7 or RHEL 7
In case you want to configure sudo rights for AD users then the best way is to create a group on AD with name sudoers and add Linux/UNIX users in that group and on Linux Server create a file with name “sudoers” under the folder /etc/sudoers.d/
Put the following content in the file.
[[email protected] ~]# cat /etc/sudoers.d/sudoers
%sudoers    ALL=(ALL)       ALL
[[email protected] ~]#
In my case I have given all the rights to the users which are part of sudoers group. Once your done with these changes re-login to your server with AD credentials and see whether user is part of sudoers group.
That’s all from this article, Hope you guys got an idea how to join RHEL or CentOS server with Windows Domain. Please share your feedback and valuable comments.
Here we’ll show you how to add your Linux system to a Microsoft Windows Active Directory (AD) domain through the command line. This will allow us to SSH into the Linux server with user accounts in our AD domain, providing a central source of cross-platform authentication.
There are a number of ways to do this, however this is the easiest way that I’ve found to do it entirely through the command line.
In this example I am using CentOS 7 and Windows Server 2012 R2, however the version of Windows should not matter. We are assuming that our domain is already setup and configured, we’re simply joining our CentOS server to an existing domain.
Preparing CentOS
First we want to install all of the below packages in CentOS.
yum install sssd realmd oddjob oddjob-mkhomedir adcli samba-common samba-common-tools krb5-workstation openldap-clients policycoreutils-python -y
The CentOS server will need to be able to resolve the Active Directory domain in order to successfully join it. In this instance my DNS server in /etc/resolv.conf is set to one of the Active Directory servers hosting the example.com domain that I wish to join.
[[email protected] ~]# cat /etc/resolv.conf
search example.com
nameserver 192.168.1.2
Join CentOS To Windows Domain
Now that we’ve got that out of the way we can actually join the domain, this can be done with the ‘realm join’ command as shown below. You will need to specify the username of a user in the domain that has privileges to join a computer to the domain.
[[email protected] ~]# realm join --user=administrator example.com
Password for administrator:
Once you enter the password for your specific account, the /etc/sssd/sssd.conf and /etc/krb.conf files will be automatically configured. This is really great as editing these manually usually leads to all sorts of trivial problems when joining the domain. The /etc/krb5.keytab file is also created during this process.
If this fails, you can add -v to the end of the command for highly verbose output, which should give you more detailed information regarding the problem for further troubleshooting.
We can confirm that we’re in the realm (Linux terminology for the domain) by running the ‘realm list’ command, as shown below.
[[email protected] ~]# realm list
example.com
  type: kerberos
  realm-name: EXAMPLE.COM
  domain-name: example.com
  configured: kerberos-member
  server-software: active-directory
  client-software: sssd
  required-package: oddjob
  required-package: oddjob-mkhomedir
  required-package: sssd
  required-package: adcli
  required-package: samba-common-tools
  login-formats: %[email protected]
  login-policy: allow-realm-logins
Once this has completed successfully, a computer object will be created in Active Directory in the default computers container as shown below.
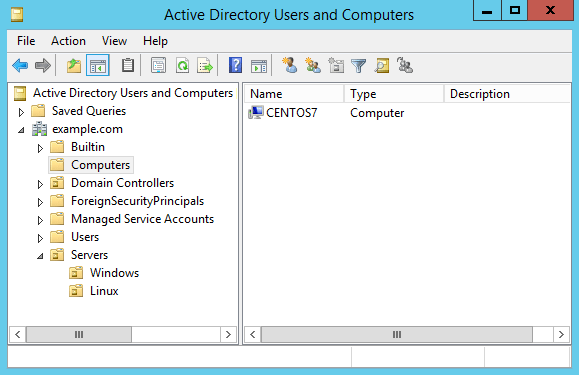
To keep things neat I like to move this into some other organizational unit (OU) for Linux servers rather than leaving things in the default computers container, however this doesn’t really matter for this exercise.
Now that our Linux server is a member of the Active Directory domain we can perform some tests. By default if we want to specify any users in the domain, we need to specify the domain name. For example with the ‘id’ command below, we get nothing back for ‘administrator’, however ‘[email protected]’ shows the UID for the account as well as all the groups the account is a member of in the Active Directory domain.
[[email protected] ~]# id administrator
id: administrator: no such user

[[email protected] ~]# id [email protected]
uid=1829600500([email protected]) gid=1829600513(domain [email protected]) groups=1829600513(domain [email protected]),1829600512(domain [email protected]),1829600572(denied rodc password replication [email protected]),1829600519(enterprise [email protected]),1829600518(schema [email protected]),1829600520(group policy creator [email protected])
We can change this behaviour by modifying the /etc/sssd/sssd.conf file, the following lines need to change from:
use_fully_qualified_names = True
fallback_homedir = /home/%[email protected]%d
To the below, which does not require the fully qualified domain name (FQDN) to be specified. This also modifies the user directory in /home from having the FQDN specified after the username.
use_fully_qualified_names = False
fallback_homedir = /home/%u
To apply these changes, restart sssd.
[[email protected] ~]# systemctl restart sssd
Now we should be able to find user accounts without specifying the domain, as shown below this now works where it did not previously.
[[email protected] ~]# id administrator
uid=1829600500(administrator) gid=1829600513(domain users) groups=1829600513(domain users),1829600512(domain admins),1829600572(denied rodc password replication group),1829600520(group policy creator owners),1829600519(enterprise admins),1829600518(schema admins)
If this is still not correctly working for you, I suggest that you take a look at flushing your sssd cache.
Configuring SSH and Sudo Access
Now that we have successfully joined our CentOS server to the example.com domain, we can SSH in as any domain user from Active Directory with default settings.
[[email protected] ~]# ssh [email protected]
[email protected]'s password:
Creating home directory for user1.
We can further restrict SSH access by modifying the /etc/ssh/sshd_config file and make use of things like AllowUsers or AllowGroups to only allow certain user or groups from AD to have access. See our guide to the sshd_config file for further information. Don’t forget to restart sshd if you make any changes to this file in order to apply them.
We can also modify our sudoers configuration to allow our user account from the domain the desired level of access. I usually create an Active Directory group called something like ‘sudoers’, put my user in it, then allow this group sudo access by creating a file in /etc/sudoers.d/ which allows root access to be centrally controlled by AD.
Below is an example of this, the ‘sudoers’ group will have full root access.
[[email protected] ~]# cat /etc/sudoers.d/sudoers
%sudoers    ALL=(ALL)       ALL
This group only exists in Active Directory, our Linux server can see that user1 is a member of the sudoers group in Active Directory, and respects this group configuration and allows user1 root privileges as per the above configuration.
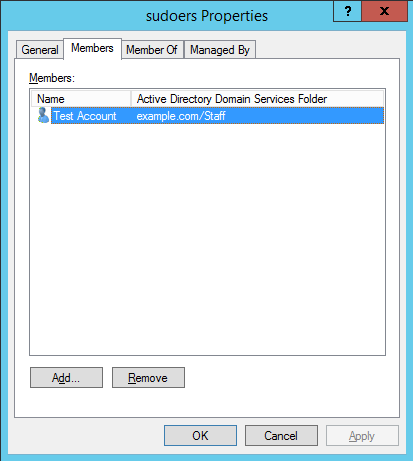
The username of Test Account is ‘user1’.
With this in place, our user1 account in the example.com Active Directory domain will now be able to use the sudo command to run commands with root privileges.
[[email protected] ~]$ sudo su
[sudo] password for user1:
[[email protected] user1]#
[[email protected] user1]# whoami
root
That’s all there is to it, we can now SSH to a Linux server with a user account from our Active Directory domain and even grant specific users or groups from AD specific levels of access.
Leaving The Domain
If you want to reverse the process and remove yourself from the domain, simply run the ‘realm leave’ command followed by the domain name, as shown below.
[[email protected] ~]# realm leave example.com
This will complete without any further user input. It will delete the computer object that was created in Active Directory, remove the keytab file, and set the sssd.conf and krb5.conf files back to default.
Summary
We have demonstrated how you can easily add your CentOS Linux system to a Microsoft Windows Active Directory domain, and then grant SSH or sudo access based on the user or group from the domain.
If you have a large number of Linux servers and an existing Windows domain you can easily use this process to add your Linux servers to the Windows domain, allowing for centralised user authentication which is far easier to manage when compared to having local user accounts spread out on every Linux server.
In most environments, the Active Directory domain is the central hub for user information, which means that there needs to be some way for Linux systems to access that user information for authentication requests. In this article we will show you how to join a CentOS 7 / RHEL 7 system to an Active Directory Domain.
Before we join the AD domain, we need to ensure that we have set up the time services (NTP) and DNS. With these infrastructure services in place, we will need the following packages installed on the CentOS / RHEL server:
- realmd: This manages enrolment and membership to the Active Directory domains
- samba: This denotes the Samba services
- samba-common: This denotes the shared tools for servers and clients
- oddjob: This is a D-bus service that runs the odd jobs for clients
- oddjob-mkhomedir: This is used with the odd job services to create home directories for AD accounts, if needed
- sssd: The System Security Services daemon can be used to divert client authentication as required
- adcli: These are the tools for joining and managing AD domains
Join CentOS 7/ RHEL 7 Servers to Active Directory Domain
01- First, use the following command to install the required packages:
[[email protected] ~]# sudo yum install oddjob realmd samba samba-common oddjob-mkhomedir sssd adcli
02- To discover a Domain Identity we will use the realm discover command, that will return a complete domain configuration and a list of packages that must be installed for the system to be enrolled in the domain.
[[email protected] ~]# realm discover yallalabs.local
YALLALABS.LOCAL
  type: kerberos
  realm-name: YALLALABS.LOCAL
  domain-name: YALLALABS.LOCAL
  configured: no
  server-software: active-directory
  client-software: sssd
  required-package: oddjob
  required-package: oddjob-mkhomedir
  required-package: sssd
  required-package: adcli
  required-package: samba-common-tools
yallalabs.local
  type: kerberos
  realm-name: YALLALABS.LOCAL
  domain-name: yallalabs.local
  configured: no
03- Now, to join the AD domain, add the computer to the default folder in the AD domain using the following command:
sudo realm join [email protected] yallalabs.local
Password for [email protected]:
– If you want to add it to a designated Organizational Unit within the Active Directory, you will first need to create the OU, or at least ensure that it exists. The following command we will join the server to AD Domain and add Computer Account to the Linux OU:
[[email protected] ~]# sudo realm join [email protected] --computer-ou=OU=Linux,OU=Servers,DC=YALLALABS,DC=LOCAL yallalabs.local
Password for [email protected]:
If you got this error ” realm: Couldn’t join realm: Joining the domain YALLALABS.LOCAL failed“, just restart the realmd and retry again
04- To test the system was successfully joined the domain use the below command:
[[email protected] ~]# realm list
YALLALABS.LOCAL
  type: kerberos
  realm-name: YALLALABS.LOCAL
  domain-name: yallalabs.local
  configured: kerberos-member
  server-software: active-directory
  client-software: sssd
  required-package: oddjob
  required-package: oddjob-mkhomedir
  required-package: sssd
  required-package: adcli
  required-package: samba-common-tools
  login-formats: %[email protected]
  login-policy: allow-realm-logins
05- To display information about a user from the domain, run the following command:
# id [email protected]
uid=344601106([email protected]) gid=344600513(domain [email protected]) groups=344600513(domain [email protected]),344601107([email protected])
06- To permit only specific accounts from the domain to log in, use the following command: this command will change the mode to only allow logins by specific accounts, and then add the specified accounts to the list of accounts to permit.
[[email protected] ~]# realm permit [email protected] [email protected]
07- To permit only one Active Directory group to logon use the following command: in this Example we will allow the LinuxAdmins AD group to logon to the system
[[email protected] ~]# realm permit -g [email protected]
08- To give sudo permissions to an Active Directory group, in this example we will add LinuxAdmins AD group to sudoers by running the visudo command and add the follwoing line:
# visudo
%[email protected]        ALL=(ALL)       ALL
09- To leave an Active Directory domain, you can use the below command:
# realm leave [email protected] yallalabs.local
– If you want to leave the domain and to delete the comuter Account you can use the additional option --remove in the end of the command
# realm leave [email protected] yallalabs.local --remove
Password for [email protected]:
Conclusion
you can reach join CentOS 7/ RHEL 7 Servers to Active Directory using Ansible
check out this article:
How to Join CentOS 7/ RHEL 7 Servers to Active Directory Domain using Ansible
We hope this tutorial was enough Helpful. If you need more information, or have any questions, just comment below and we will be glad to assist you!
If you like our content, please consider buying us a coffee. Thank you for your support!


Lotfi Waderni
I’m a technical writer with a background in Linux and windows server administration.
We can integrate a Linux host with Windows Active
Directory domain controller for authentication purpose. To complete the
scenario, we have Centos / RHEL 7 servers and existing Active Directory domain
controller. Also required AD administrator account or user has sufficient
rights to join AD.
To join RHEL/CentOS7 to Active
Directory, the following packages need to be installed on the system:
[root@linuxcnf ~]# yum install authconfig samba-client samba-winbind samba-winbind-clients ntp
pam_krb5 krb5-workstation
Configuration:
Sync the time with site NTP server and
add the below entry in /etc/ntp.conf:
[root@linuxcnf ~]#
ntpdate –u 192.168.43.14
[root@linuxcnf ~]#
vi /etc/ntp.conf
server 192.168.43.14
iburst
Start ntpd and enable it on boot:
[root@linuxcnf ~]#
service ntpd start
[root@linuxcnf ~]#
chkconfig ntpd on
[root@linuxcnf ~]#
ntpstat
Add the below entry in
/etc/resolve.conf file:
[root@linuxcnf ~]#
vi /etc/resolv.conf
nameserver 192.162.43.14
Add the below entry in /etc/hosts file:
[root@linuxcnf ~]#
vi /etc/hosts
127.0.0.1 localhost localhost.localdomain localhost4
localhost4.localdomain4
::1 localhost localhost.localdomain
localhost6 localhost6.localdomain6
192.162.43.14
adauth.linuxcnf.com
Add the below entry in last of
respective sections in /etc/krb5.conf file:
[root@linuxcnf ~]#
~]# vi /etc/krb5.conf
…
[libdefaults]
…
default_realm = LinuxCNF.com
[realms]
…
LinuxCNF.com = {
kdc = adauth.LinuxCNF.com
}
Add the below entry in
/etc/samba/smb.conf file:
|
[root@linuxcnf ~]# [global] … workgroup = LinuxCNF password server = adauth.linuxcnf.com realm = LinuxCNF.com security = ads |
|
idmap config * : range = 16777216-33554431 template homedir = /home/%U template shell = /bin/bash kerberos method = secrets only winbind use default domain = true winbind offline logon = false |
Join the domain, providing the name of
a user with admin rights:
[root@linuxcnf
~]# net ads join -U administrator
Enter administrator’s
password:
Start winbind and enable it on boot:
[root@linuxcnf ~]#
service winbind start
[root@linuxcnf ~]#
chkconfig winbind on
To
verify/test the active directory AD join status:
[root@linuxcnf ~]#
net ads testjoin
Join is OK
To verify the system can talk to
Active Directory:
[root@linuxcnf ~]#
wbinfo -t
checking the trust
secret for domain LinuxCNF via RPC calls succeeded
To
list all AD users:
[root@linuxcnf ~]#
wbinfo -u
administrator
guest
linuxcnf
To list all AD
groups:
[root@linuxcnf
~]# wbinfo -g
domain computers
domain users
domain guests
Use below command to configure the NSS
and PAM stack:
[root@linuxcnf ~]# authconfig —enablewinbindauth —enablemkhomedir —update
Ensure that /etc/nsswitch.conf has
the following passwd and group entries:
[root@linuxcnf
~]# cat /etc/nsswitch.conf
passwd: files sss winbind
group: files sss winbind
Test resolving AD users and groups and
authentication of AD users:
[root@linuxcnf ~]#
getent passwd aduser
aduser:*:16777220:16777216:AD
User:/home/aduser:/bin/bash
[root@linuxcnf ~]#
id aduser
uid=16777220(aduser)
gid=16777216(domain users) groups=16777216(domain users)
Test SSH authentication through AD user
and password:
[root@linuxcnf ~]#
ssh aduser@127.0.0.1
aduser@127.0.0.1’s
password:
Creating home directory
for aduser.
[aduser@linuxcnf ~]$
Posted: April 26, 2019 in Linux
Four years ago i wrote a post how to use SQUID in Active directory environment, in this one we’ll use SSSD service to log in to CentOS machine with Active Directory credentials.
The System Security Services Daemon (SSSD) provides access to remote identity and authentication providers.
Prerequistes:
DNS resolution:
Make sure domain name is resolved
cat /etc/resolv.conf
search test.com
nameserver 172.17.174.90
Install required packages:
yum install sssd realmd oddjob oddjob-mkhomedir adcli samba-common samba-common-tools krb5-workstation openldap-clients policycoreutils-python -y
Edit /etc/krb5.conf
# Configuration snippets may be placed in this directory as well
includedir /etc/krb5.conf.d/

includedir /var/lib/sss/pubconf/krb5.include.d/
[logging]
 default = FILE:/var/log/krb5libs.log
 kdc = FILE:/var/log/krb5kdc.log
 admin_server = FILE:/var/log/kadmind.log

[libdefaults]
 dns_lookup_realm = false
 ticket_lifetime = 24h
 renew_lifetime = 7d
 forwardable = true
 rdns = false
 pkinit_anchors = /etc/pki/tls/certs/ca-bundle.crt

 default_ccache_name = KEYRING:persistent:%{uid}

 default_realm = TEST.COM
[realms]
 TEST.COM = {
 }

[domain_realm]

 test.com = TEST.COM
 .test.com = TEST.COM
Edit /etc/nsswitch.conf
#
# /etc/nsswitch.conf
#
# An example Name Service Switch config file. This file should be
# sorted with the most-used services at the beginning.
#
# The entry '[NOTFOUND=return]' means that the search for an
# entry should stop if the search in the previous entry turned
# up nothing. Note that if the search failed due to some other reason
# (like no NIS server responding) then the search continues with the
# next entry.
#
# Valid entries include:
#
#       nisplus                 Use NIS+ (NIS version 3)
#       nis                     Use NIS (NIS version 2), also called YP
#       dns                     Use DNS (Domain Name Service)
#       files                   Use the local files
#       db                      Use the local database (.db) files
#       compat                  Use NIS on compat mode
#       hesiod                  Use Hesiod for user lookups
#       [NOTFOUND=return]       Stop searching if not found so far
#

# To use db, put the "db" in front of "files" for entries you want to be
# looked up first in the databases
#
# Example:
#passwd:    db files nisplus nis
#shadow:    db files nisplus nis
#group:     db files nisplus nis

passwd:     files sss
shadow:     files sss
group:      files sss
#initgroups: files sss

#hosts:     db files nisplus nis dns
hosts:      files dns myhostname

# Example - obey only what nisplus tells us...
#services:   nisplus [NOTFOUND=return] files
#networks:   nisplus [NOTFOUND=return] files
#protocols:  nisplus [NOTFOUND=return] files
#rpc:        nisplus [NOTFOUND=return] files
#ethers:     nisplus [NOTFOUND=return] files
#netmasks:   nisplus [NOTFOUND=return] files

bootparams: nisplus [NOTFOUND=return] files

ethers:     files
netmasks:   files
networks:   files
protocols:  files
rpc:        files
services:   files sss

netgroup:   nisplus sss

publickey:  nisplus

automount:  files nisplus sss
aliases:    files nisplus
Edit /etc/pam.d/system-auth
#%PAM-1.0
# This file is auto-generated.
# User changes will be destroyed the next time authconfig is run.
auth        required      pam_env.so
auth        required      pam_faildelay.so delay=2000000
auth        [default=1 ignore=ignore success=ok] pam_succeed_if.so uid >= 1000 quiet
auth        [default=1 ignore=ignore success=ok] pam_localuser.so
auth        sufficient    pam_unix.so nullok try_first_pass
auth        requisite     pam_succeed_if.so uid >= 1000 quiet_success
auth        sufficient    pam_sss.so forward_pass
auth        required      pam_deny.so

account     required      pam_unix.so
account     sufficient    pam_localuser.so
account     sufficient    pam_succeed_if.so uid < 1000 quiet
account     [default=bad success=ok user_unknown=ignore] pam_sss.so
account     required      pam_permit.so

password    requisite     pam_pwquality.so try_first_pass local_users_only retry=3 authtok_type=
password    sufficient    pam_unix.so sha512 shadow nullok try_first_pass use_authtok
password    sufficient    pam_sss.so use_authtok
password    required      pam_deny.so

session     optional      pam_keyinit.so revoke
session     required      pam_limits.so
-session     optional      pam_systemd.so
session     optional      pam_oddjob_mkhomedir.so umask=0077
session     [success=1 default=ignore] pam_succeed_if.so service in crond quiet use_uid
session     required      pam_unix.so
session     optional      pam_sss.so
In Active Directory i created 2 AD groups:
RootUser: users in this group will have root permissions on CentOS box
NonRootUser: users in this group won’t have sudo permissions.

Create file /etc/sssd/sssd.conf
Set valid permissions:
chmod 600 /etc/sssd/sssd.conf
edit sssd.conf
[sssd]

domains = test.com

config_file_version = 2

services = nss, pam

[domain/test.com]

ad_domain = test.com

krb5_realm = TEST.COM

realmd_tags = manages-system joined-with-samba

cache_credentials = True

id_provider = ad

krb5_store_password_if_offline = True

default_shell = /bin/bash

ldap_id_mapping = True

use_fully_qualified_names = False

fallback_homedir = /home/%u@%d

access_provider = simple

simple_allow_groups = RootUser,NonRootUser
Now it’s time to join CentOS to Active Directory domain:
realm join --user=Administrator test.com -v

[root@localhost sssd]# realm join --user=Administrator TEST.COM -v
* Resolving: _ldap._tcp.test.com
* Performing LDAP DSE lookup on: 172.17.174.90
* Successfully discovered: test.com
realm: Already joined to this domain
If you get above output (realm: Already joined to this domain) try leaving domain and joining again.
realm leave test.com
realm join --user=Administrator test.com -v
CentOS computer object should be visible in default Computers container in Active Directory users and computers.
Remove sudo command/permission:
Edit /etc/sudoers file in order to set following permissions:
RootUser: users in this group will have root permissions on CentOS box
NonRootUser:remove sudo rights
visudo
%test.com\RootUser    ALL=(ALL)    ALL
%test.com\NonRootUser    ALL=(ALL)    !/usr/bin/su
Log in to CentOS using Active directory credentials:
Username: testuser1
Password: AD password
Now, if user from NonRootUser group tries to execute sudo su, he’ll be denied.
