Как мне ввести в домен Windows Active Directory ОС линукс на базе CentOS 8 / RHEL 8? В этом руководстве мы обсудим, как использовать систему realmd для присоединения сервера или рабочей станции CentOS 8 / RHEL 8 к домену Active Directory. Realmd предоставляет ясный и простой способ обнаружения доменов идентификации и присоединения к ним для достижения прямой интеграции доменов.
В большинстве корпоративных сред домен Active Directory используется в качестве центрального концентратора для хранения информации о пользователях. В этой интеграции realmd настраивает базовые системные службы Linux, такие как SSSD или Winbind, для подключения к домену. Системы Linux подключены к Active Directory для получения информации о пользователях для запросов аутентификации.
В этом руководстве будет показано, как настроить SSSD для получения информации из доменов в одном лесу ресурсов Active Directory. Если вы работаете с несколькими лесами AD, это руководство может вам не подойти.
Шаг 1. Установите необходимые пакеты
Для интеграции CentOS 8 / RHEL 8 AD требуется ряд пакетов. Установите их в своей системе, выполнив следующие команды:
sudo dnf install realmd sssd oddjob oddjob-mkhomedir adcli samba-common samba-common-tools krb5-workstation authselect-compat
Подтвердите запрос на установку.
Last metadata expiration check: 0:19:18 ago on Fri 27 Sep 2019 09:45:40 PM EAT.
Package realmd-0.16.3-16.el8.x86_64 is already installed.
Package sssd-2.0.0-43.el8_0.3.x86_64 is already installed.
Package adcli-0.8.2-2.el8.x86_64 is already installed.
Package samba-common-4.9.1-8.el8.noarch is already installed.
Dependencies resolved.
===================================================================================================================================================
 Package                                  Arch                         Version                               Repository                       Size
===================================================================================================================================================
Installing:
 oddjob                                   x86_64                       0.34.4-7.el8                          AppStream                        83 k
 oddjob-mkhomedir                         x86_64                       0.34.4-7.el8                          AppStream                        52 k
 samba-common-tools                       x86_64                       4.9.1-8.el8                           BaseOS                          461 k
Installing dependencies:
 samba-libs                               x86_64                       4.9.1-8.el8                           BaseOS                          177 k

Transaction Summary
===================================================================================================================================================
Install  4 Packages

Total download size: 773 k
Installed size: 1.7 M
Is this ok [y/N]: y
На новом компьютере с RHEL 8 вам необходимо зарегистрировать его для установки пакетов.
$ sudo subscription-manager register

Registering to: subscription.rhsm.redhat.com:443/subscription

Username:

Password:

The system has been registered with ID: d39d60a7-3236-4287-b361-53264159f5d1

The registered system name is: master.example.com
$ sudo subscription-manager attach --auto

Installed Product Current Status:

Product Name: Red Hat Enterprise Linux for x86_64

Status:       Subscribed
Перед выполнением интеграции AD убедитесь, что компьютер CentOS / RHEL 8 может разрешить и обнаружить домен AD.
Проверьте настройки DNS.
$ cat /etc/resolv.conf
Убедитесь, что обнаружение домена AD прошло успешно.
$ realm discover example.com
example.com

type: kerberos

realm-name: EXAMPLE.COM

domain-name: example.com

configured: no

server-software: active-directory

client-software: sssd

required-package: oddjob

required-package: oddjob-mkhomedir

required-package: sssd

required-package: adcli

required-package: samba-common-tools
Шаг 3. Присоединитесь к Linux-машине CentOS 8 / RHEL 8 в домене Active Directory.
Учетная запись администратора AD требуется для интеграции компьютера CentOS 8 / RHEL 8 с доменом Windows Active Directory.
Убедитесь, что у вас есть имя пользователя и пароль администратора. Затем выполните приведенную ниже команду, чтобы присоединить систему CentOS 8 / RHEL 8 Linux к домену Active Directory.
$ realm join example.com -U Administrator

Password for Administrator:
Замените Administrator на свою учетную запись администратора AD и введите пароль, когда его попросят. Проверьте, чтобы соединение было успешным.
$ sudo realm list

example.com

type: kerberos

realm-name: EXAMPLE.COM

domain-name: example.com

configured: kerberos-member

server-software: active-directory

client-software: sssd

required-package: oddjob

required-package: oddjob-mkhomedir

required-package: sssd

required-package: adcli

required-package: samba-common-tools

login-formats: %U@example.com

login-policy: allow-realm-logins
Как только машина будет присоединена, выполните приведенные ниже команды.
sudo authselect select sssd

sudo authselect select sssd with-mkhomedir
Ваш файл конфигурации sssd.conf должен выглядеть, как показано ниже
$ cat /etc/sssd/sssd.conf
[sssd]
domains = example.com
config_file_version = 2
services = nss, pam
default_domain_suffix = example.com

[nss]
homedir_substring = /home

[pam]

[domain/example.com]
ad_domain = example.com
krb5_realm = EXAMPLE.COM
realmd_tags = manages-system joined-with-samba
cache_credentials = True
id_provider = ad
krb5_store_password_if_offline = True
default_shell = /bin/bash
ldap_id_mapping = True
use_fully_qualified_names = True
fallback_homedir = /home/%u@%d
access_provider = ad
Когда в конфигурационный файл вносятся изменения, требуется перезапуск службы.
sudo systemctl restart sssd
Статус должен быть запущен.
$ systemctl status sssd

● sssd.service - System Security Services Daemon

Loaded: loaded (/usr/lib/systemd/system/sssd.service; enabled; vendor preset: disabled)

Active: active (running) since Fri 2019-09-27 22:30:25 EAT; 37min ago

Main PID: 32474 (sssd)

CGroup: /system.slice/sssd.service

├─32474 /usr/sbin/sssd -i --logger=files

├─32478 /usr/libexec/sssd/sssd_be --domain example.com --uid 0 --gid 0 --logger=files

├─32479 /usr/libexec/sssd/sssd_nss --uid 0 --gid 0 --logger=files

└─32480 /usr/libexec/sssd/sssd_pam --uid 0 --gid 0 --logger=files

................................................................
Если интеграция работает, должна быть возможность получить информацию о пользователе AD.
$ id jmutai@example.com

uid=1783929917(jmutai@example.com) gid=1784800513(domain users@example.com) groups=1783870513(domain users@example.com)
Шаг 4. Контроль доступа – ограничение для пользователя / группы
Доступ к зарегистрированному серверу можно ограничить, разрешив только определенным пользователям / группам.
Ограничение для пользователей
Чтобы разрешить пользователю доступ через SSH и консоль, используйте команду:
$ realm permit user1@example.com

$ realm permit user2@example.com user3@example.com
Разрешить доступ к группе – Примеры
$ ream permit -g sysadmins

$ realm permit -g 'Security Users'

$ realm permit 'Domain Users' 'admin users'
Это изменит файл sssd.conf
Если вместо этого вы хотите разрешить доступ всем пользователям, запустите:
$ sudo realm permit --all
Чтобы запретить доступ всем пользователям домена, используйте:
$ sudo realm deny --all
Шаг 5. Настройте доступ Sudo
По умолчанию у пользователей домена не будет разрешения на повышение привилегий до root. Пользователям должен быть предоставлен доступ на основе имен пользователей или групп.
Давайте сначала создадим файл разрешений sudo.
$ sudo vi /etc/sudoers.d/domain_admins
Добавить одного пользователя:
user1@example.com ALL=(ALL) ALL
Добавить еще одного пользователя:
user1@example.com     ALL=(ALL)   ALL

user2@example.com     ALL=(ALL)   ALL
Добавить группу
%group1@example.com ALL=(ALL) ALL
Добавить группу с пробелами в имени
%security users@example.com       ALL=(ALL)       ALL

%system super admins@example.com ALL=(ALL)       ALL
Шаг 6. Проверьте доступ по SSH.
Получите доступ к серверу удаленно, поскольку пользователю AD разрешено входить в систему.
$ ssh jmutai@localhost

The authenticity of host 'localhost (::1)' can't be established.

ECDSA key fingerprint is SHA256:wmWcLi/lijm4zWbQ/Uf6uLMYzM7g1AnBwxzooqpB5CU.

ECDSA key fingerprint is MD5:10:0c:cb:22:fd:28:34:c6:3e:d7:68:15:02:f9:b4:e9.

Are you sure you want to continue connecting (yes/no)? yes

Warning: Permanently added 'localhost' (ECDSA) to the list of known hosts.
Это подтверждение того, что наша конфигурация прошла успешно.
Посетите вики-страницы realmd и sssd, чтобы узнать больше.
Оригинал статьи на английском здесь.
How to join RHEL 8 system to an Active Directory server using Samba Winbind. How to authenticate RHEL 8 server against to a Windows 2003 R2 / 2008 / 2008 R2 / 2012 AD domain. How to add CentOS 8 to Windows Domain Controller. Step by Step Guide to add CentOS 8 to Windows Domain Controller. Steps to join RHEL 8 to Active Directory. How to join CentOS 8 to Active Directory on Windows Server. Steps to join CentOS 8 to Windows Domain Controller running on WIndows Server 2012. Steps to join linux to windows active directory.
")
The winbind service is part of the Samba suite. It enables a Linux server to become a full member in Windows domains and to use Windows users and group accounts in Linux.
Some more articles on similar topic:
- How to join Linux client to Windows AD Domain using realmd with SSSD (CentOS/RHEL 7/8)
- How to join Linux client to Windows AD Domain using adcli with SSSD (CentOS/RHEL 7/8)
- How to join Linux client to Windows AD Domain using winbind (CentOS/RHEL 7/8)
ALSO READ: Configure FTP server and pam.d to authenticate users with AD (CentOS/RHEL 7/8)
1. An overview of the lab environment
For demonstrations of this article to add CentOS 8 to Windows Domain Controller (Active Directory), we will use virtual machines running in an Oracle VirtualBox installed on my Linux Server virtualization environment.
We have a Microsoft Server 2012R2 Active Directory Domain Controller with the IP address 192.168.0.107, CentOS 8 host with the IP address 192.168.0.117 and RHEL 8 with IP Address 192.168.0.106. In this article I will only cover the part to add CentOS 8 to Windows Domain Controller on the client side. So this article requires a pre-configured Windows Active Directory.
I have only used snippets from my CentOS 8 Server but I have verified the steps on both RHEL 8 and CentOS 8.
2. Preparing the Linux Client to join Windows Active Directory
To add CentOS 8 to Windows Domain Controller, we need to change the DNS settings so that the Active Directory domain DNS server is queried first:
[root@centos-8 ~]# cat /etc/resolv.conf
# Generated by NetworkManager
search golinuxcloud.com
nameserver 192.168.0.107
Here 192.168.0.107 is the IP Address of my Windows Active Directory which is also configured as DNS Server.
ALSO READ: Install & Configure FreeIPA Server in RHEL/CentOS 8
To make sure that our server can resolve hostname, either through queries to the DNS server or to the internal /etc/hosts file, we can use the getent command.
[root@centos-8 ~]# getent hosts golinuxcloud.com
192.168.0.107   golinuxcloud.com
3. Install WInbind Package(s)
To add CentOS 8 to Windows Domain Controller we will install the required samba packages on our client host
[root@centos-8 ~]# dnf install samba samba-client samba-winbind samba-winbind-clients oddjob oddjob-mkhomedir
4. Configure Winbind with smb.conf
Configure /etc/samba/smb.conf by replacing the existing content under [global] section with the following content to add Linux to windows active directory. Modify the realm and workgroup value as per your environment.
You can also use Red Hat’s AD Integration Helper to help generate optimal configuration values for connecting to your organizations Active Directory.
[global]
        workgroup = GOLINUXCLOUD
        realm = GOLINUXCLOUD.COM
        security = ads
        idmap config * : backend = autorid
        idmap config * : range = 100000-19999999
        idmap config * : rangesize = 1000000
        template homedir = /home/%D/%U
        template shell = /bin/bash
        winbind use default domain = false
        winbind offline logon = true
        log file = /var/log/samba/log.%m
        max log size = 50
        log level = 0
security=ads describes the membership in an Active Directory domain.
ALSO READ: How to disable ICMP timestamp responses in Linux
The parameters idmap* and winbind enum* map Windows users and groups to Unix users and groups.
Usually system users and groups are assigned IDs in the range from 0 to 999, and local users and groups are assigned IDs starting from 1000. With this in mind, it seems pretty reasonable to start assigning IDs to domain users and groups starting from 1000000. We should also differentiate between the domain users and groups and the local built-in accounts existing on a member server, such as the local administrator, the local guest, and so on. These two groups must not overlap, so we assign the range 1000000 to 19999999 to domain built-in user and group accounts
Run the following command to verify that you can resolve the standard SRV records:
[root@centos8 ~]# host -t SRV _kerberos._udp.golinuxcloud.com.
_kerberos._udp.golinuxcloud.com has SRV record 0 100 88 win-71humtros3m.golinuxcloud.com.


[root@centos8 ~]# host -t SRV _ldap._tcp.golinuxcloud.com.
_ldap._tcp.golinuxcloud.com has SRV record 0 100 389 win-71humtros3m.golinuxcloud.com.
Stop the winbind service if it is in running state:
[root@centos8 ~]# systemctl stop winbind
5. Join/Add CentOS 8 to Windows Domain Controller
We join the Linux client with Windows Active Directory by executing net ads join -U Administrator on the client host:
")
It is possible that you may get the following ERROR while joining Linux client to Windows AD using Samba Winbind.
Joined 'centos-8' to dns domain 'GOLINUXCLOUD.COM'
DNS Update for centos-8.golinuxcloud.com failed: ERROR_DNS_UPDATE_FAILED
DNS update failed: NT_STATUS_UNSUCCESSFUL
5.1 How to fix “DNS Update for DOMAIN failed. ERROR_DNS_UPDATE_FAILED”?
You can either choose to avoid doing any DNS updates while you add CentOS 8 to Windows Domain Controller by using
# net ads join -U Administrator --no-dns-updates golinuxcloud.com
Or to fix ERROR_DNS_UPDATE_FAILED error observed above, perform the following steps
ALSO READ: Integrate Samba with Active Directory (Linux & Windows)
Add following information to /etc/hosts.
# echo "127.0.0.1 `hostname` `hostname -a`" >> /etc/hosts
Make sure that the IP address of the DNS server is in /etc/resolv.conf. The IP address should be the DNS server you want to update the new DNS ‘A’ record.
# cat /etc/resolv.conf
search golinuxcloud.com
nameserver 192.168.0.107
On your Windows Domain Controller, select «DNS Manager» for your server. Select your server in the Forward Lookup Zone and right click to open Properties. Select the Dynamic updates to «Secure only» or «Nonsecure and secure» on the Windows DNS server.
")
Next restart the DNS service to activate the changes and re-try to add CentOS 8 to Windows Domain Controller
[root@centos-8 ~]# net ads join -U Administrator golinuxcloud.com
Enter Administrator's password:
Using short domain name -- GOLINUXCLOUD
Joined 'centos-8' to dns domain 'GOLINUXCLOUD.COM'
6. Verify connectivity between Linux client and Windows AD
We can easily check that the server is a member of the domain with the testparm command.
[root@centos-8 ~]# testparm
Load smb config files from /etc/samba/smb.conf
Loaded services file OK.
Server role: ROLE_DOMAIN_MEMBER

Press enter to see a dump of your service definitions

# Global parameters
[global]
        log file = /var/log/samba/log.%m
        max log size = 50
        realm = GOLINUXCLOUD.COM
        security = ADS
        template shell = /bin/bash
        winbind offline logon = Yes
        workgroup = GOLINUXCLOUD
        idmap config * : rangesize = 1000000
        idmap config * : range = 100000-19999999
        idmap config * : backend = autorid


[homes]
        browseable = No
        comment = Home Directories
        inherit acls = Yes
        read only = No
        valid users = %S %D%w%S


[printers]
        browseable = No
        comment = All Printers
        create mask = 0600
        path = /var/tmp
        printable = Yes


[print$]
        comment = Printer Drivers
        create mask = 0664
        directory mask = 0775
        force group = @printadmin
        path = /var/lib/samba/drivers
        write list = @printadmin root
After successfully joining Linux server to Windows Active Directory, it is essential that you restart Winbind and enable the service to auto start at boot:
[root@centos-8 ~]# systemctl enable winbind --now
Created symlink /etc/systemd/system/multi-user.target.wants/winbind.service → /usr/lib/systemd/system/winbind.service.
Check the status of Winbind service
[root@centos-8 ~]# systemctl status winbind
● winbind.service - Samba Winbind Daemon
   Loaded: loaded (/usr/lib/systemd/system/winbind.service; enabled; vendor preset: disabled)
   Active: active (running) since Fri 2019-10-18 14:48:25 IST; 20s ago
     Docs: man:winbindd(8)
           man:samba(7)
           man:smb.conf(5)
 Main PID: 1756 (winbindd)
   Status: "winbindd: ready to serve connections..."
    Tasks: 2 (limit: 11506)
   Memory: 6.6M
   CGroup: /system.slice/winbind.service
           ├─1756 /usr/sbin/winbindd --foreground --no-process-group
           └─1758 /usr/sbin/winbindd --foreground --no-process-group

Oct 18 14:48:25 centos-8.golinuxcloud.com systemd[1]: Starting Samba Winbind Daemon...
ALSO READ: Setup Hacking Lab with Metasploitable [7 Easy Steps]
7. Client Validation
After you add CentOS 8 to Windows Domain Controller it is necessary that you run some checks on the client host i.e. CentOS 8 to make sure it is able to reach Active Directory properly.
You can test whether everything is working properly with wbinfo -t. The command runs an encrypted RPC call, which is only possible if the server really is a member in the domain:
[root@centos-8 ~]# wbinfo -t
checking the trust secret for domain GOLINUXCLOUD via RPC calls succeeded
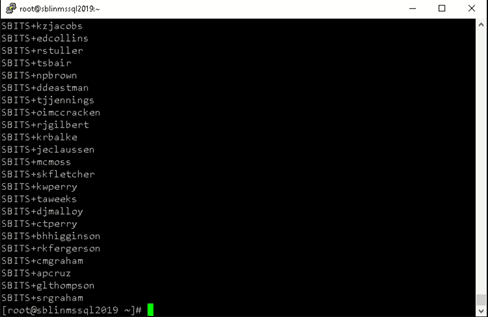
List AD users.
[root@centos-8 ~]# wbinfo -u
GOLINUXCLOUDadministrator
GOLINUXCLOUDguest
GOLINUXCLOUDkrbtgt
List AD groups.
[root@centos-8 ~]# wbinfo -g
GOLINUXCLOUDwinrmremotewmiusers__
GOLINUXCLOUDdomain computers
GOLINUXCLOUDdomain controllers
GOLINUXCLOUDschema admins
GOLINUXCLOUDenterprise admins
GOLINUXCLOUDcert publishers
GOLINUXCLOUDdomain admins
GOLINUXCLOUDdomain users
GOLINUXCLOUDdomain guests
GOLINUXCLOUDgroup policy creator owners
GOLINUXCLOUDras and ias servers
GOLINUXCLOUDallowed rodc password replication group
GOLINUXCLOUDdenied rodc password replication group
GOLINUXCLOUDread-only domain controllers
GOLINUXCLOUDenterprise read-only domain controllers
GOLINUXCLOUDcloneable domain controllers
GOLINUXCLOUDprotected users
GOLINUXCLOUDdnsadmins
GOLINUXCLOUDdnsupdateproxy
8. Configure the NSS and PAM stack for authentication
Execute the following command to configure NSS and PAM stack. We use with-mkhomedir to make sure the home directory for active directory users are automatically created when they login.
[root@centos8 ~]# authselect select winbind with-mkhomedir --force
Backup stored at /var/lib/authselect/backups/2021-03-03-19-16-20.jS4CgG
Profile "winbind" was selected.
The following nsswitch maps are overwritten by the profile:
- passwd
- group

Make sure that winbind service is configured and enabled. See winbind documentation for more information.

- with-mkhomedir is selected, make sure pam_oddjob_mkhomedir module
  is present and oddjobd service is enabled
  - systemctl enable oddjobd.service
  - systemctl start oddjobd.service
Ensure that /etc/nsswitch.conf has the following passwd and group entries. In this file, you have to tell Linux that it should use Winbind before trying to authenticate locally on Linux.
passwd:     files winbind
group:      files winbind
Enable and start/restart oddjobd service:
[root@centos8 ~]# systemctl enable oddjobd --now
Test resolving AD users and groups and authentication of users.
[root@centos8 ~]# getent passwd GOLINUXCLOUD\administrator
GOLINUXCLOUDadministrator:*:1100500:1100513::/home/GOLINUXCLOUD/administrator:/bin/bash

[root@centos8 ~]# id GOLINUXCLOUD\administrator
uid=1100500(GOLINUXCLOUDadministrator) gid=1100513(GOLINUXCLOUDdomain users) groups=1100513(GOLINUXCLOUDdomain users),1100500(GOLINUXCLOUDadministrator),1100572(GOLINUXCLOUDdenied rodc password replication group),1100518(GOLINUXCLOUDschema admins),1100519(GOLINUXCLOUDenterprise admins),1100520(GOLINUXCLOUDgroup policy creator owners),1100512(GOLINUXCLOUDdomain admins),100001(BUILTINusers),100000(BUILTINadministrators)
ALSO READ: Install & configure FreeIPA Server & Client (RHEL/CentOS 7)
9. Login as Active Directory User on Linux Client
Now you can try to login as any of the Active Directory user on this CentOS 8 client. You don’t need to manually create home directory for the domain users as that would be handled by /usr/lib64/security/pam_oddjob_mkhomedir.so module provided by oddjob-mkhomedir rpm.
[root@centos8 ~]# su - GOLINUXCLOUD\Administrator
Creating home directory for GOLINUXCLOUDadministrator.
Last login: Thu Mar  4 00:46:12 IST 2021 on pts/0

[GOLINUXCLOUDadministrator@centos8 ~]$ pwd
/home/GOLINUXCLOUD/administrator
As you see the the home directory for our Administrator user was automatically created at the first login.
In the next article I will share the steps to Integrate Samba Shares with Active Directory (Linux & Windows)
Summary
Winbind can be used with different idmap backends idmap_tdb, idmap_ldap, idmap_rid, idmap_sss and idmap_ad. These backends will help the Red Hat Enterprise Linux system figure out the SID to uid/gid mappings. If you are using winbind, you will need to choose most appropriate backend for your environment. i.e. If this is for a single system, where keeping the uid/gid info the same across multiple systems is not important. The default tdb backend may be appropriate. If you need uid/gid info to be consistent across many systems, one of the other backends will be more appropriate. i.e: autorid or rid.
Lastly I hope the steps from the article to join/add CentOS 8 to Windows Domain Controller on Linux was helpful. So, let me know your suggestions and feedback using the comment section.
ALSO READ: Top 15 tools to monitor disk IO performance with examples
Related Searches: join centos 8 to windows domain. rhel 8 active directory authentication. rhel 8 oddjob. centos 8 samba active directory. realm join. join centos to windows domain. how to join domain in redhat linux. centos 8 samba active directory. join centos 8 to windows domain
Во многих мануалах в Интернете для присоединения Linux к домену Active Directory используется Samba и Winbind. В этой статье мы покажем альтернативный способ добавления в домен с помощью пакета realmd (Realm Discovery) и службы SSSD (System Security Services Daemon). В этой статье мы покажем, как добавить сервер CentOS 8.1 в ваш домен Active Directory (на базе Windows Server 2016).
Realmd позволяет произвести настройку сетевой аутентификации и членства в домене (AD или IPA/FreeIPA) без сложных настроек. Информация о домене обнаруживается автоматически. Realmd использует SSSD для аутентификации и проверки учетных записей.
Для успешного присоединения и членства в домене Active Directory вам нужно выполнить следующие требования:
- Настроить синхронизацию времени с контроллером домена Active Directory. Иначе SSSD не сможет корректно работать, т.к. эта служба поддерживает только Kerberos (не может использовать NTLM для аутентификации в домене). Соответственно разница во времени между DC и Linux клиентом не должна быть больше 5 минут.
- Необходимо изменить настройки DNS на клиенте Linux CentOS. Он должен указывать на DNS сервер на контроллерах домена AD.
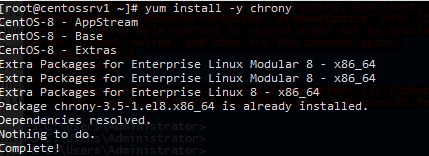
Установите в CentOS клиент ntp chrony:
# yum install -y chrony
Затем в конфигурационном файле /etc/chrony.conf укажите адреса NTP серверов для синхронизации времени (это могут быть ваши контроллеры домена AD).
# nano /etc/chrony.conf
server dc01.test.com iburst
Запустите службу NTP и добавьте ее в автозагрузку
# systemctl start chronyd
# systemctl enable chronyd
Теперь в файл /etc/resolv.conf добавьте адреса DNS-серверов, которые отвечают за разрешение имён в вашем домене Active Directory:
# nano /etc/resolv.conf
search vmblog.ru
nameserver 192.168.1.201
nameserver 192.168.1.200

Теперь нужно установить необходимые пакеты из репозитория CentOS:
# yum install adcli krb5-workstation realmd sssd

Совет. Если у вас другой дистрибутив CentOS или старая версия Linux, убедитесь, что версия пакет SSSD новее, чем 1.9.0. Полноценная поддержка AD в SSDD появилась, начиная с этой версии. В моем примере используется sssd-2.2.
Проверьте, что утилита rearm может обнаружить ваш домен:
# realm discover vmblog.ru –verbos
Если утилита успешно обнаружит ваш домен AD, появится примерно такой лог:
* Resolving: _ldap._tcp.vmblog.ru
* Performing LDAP DSE lookup on: 192.168.1.201
* Successfully discovered: vmblog.ru
vmblog.ru
type: kerberos
realm-name: VMBLOG.RU
domain-name: vmblog.ru
configured: no
server-software: active-directory
client-software: sssd
required-package: oddjob
required-package: oddjob-mkhomedir
required-package: sssd
required-package: adcli
required-package: samba-common-tools

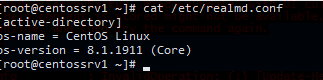
Теперь в конфигурационном файле /etc/realmd.conf нужно указать значения атрибутов operatingSystem и operatingSystemVersion.
# nano /etc/realmd.conf
[active-directory]
os-name = CentOS Linux
os-version = 8.1.1911 (Core)
Теперь можно добавить ваш сервер CentOS в Active Directory. Для этого используется команда realm join. В следующей команде мы указали имя пользователя с правами добавления в домен и OU, в который нужно поместить учетную запись вашего компьютера Linux.
# realm join --user=aivanov --computer-ou="OU=Servers,OU=MSK,DC=vmblog,DC=ru" vmblog.ru
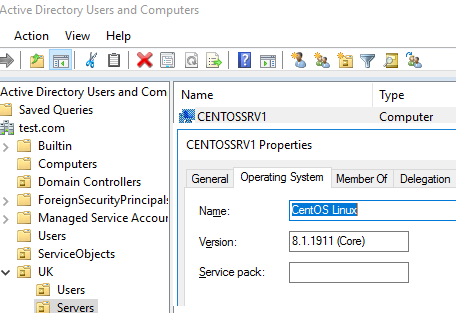
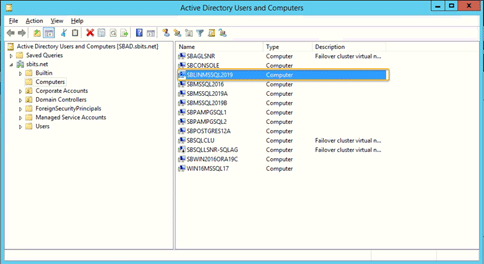
Утилита запросит пароль пользователя AD. После выполнения команды откройте консоль Active Directory Users and Computers (dsa.msc), и убедитесь, что в указанном контейнере AD появилась учетная запись для вашего сервера CentOS.

Выполните команду realm list и убедитесь, что появилась строка
server-software: active-directory
Это означает что данный сервер является членом домена Active Directory.
Чтобы не вводить полное имя домена при входе пользователей, можете добавить в файл /etc/sssd/sssd.conf строку:
use_fully_qualified_names = False
Многие онлайн-руководства показывают, как использовать Samba и Winbind для присоединения Linux к домену Active Directory.
В этой статье мы покажем альтернативный способ добавления компьютера или сервера Linux в домен с использованием realmd (Realm Discovery) и SSSD (System Security Services Daemon).
В этой статье мы покажем, как присоединить сервер CentOS 8.1 к вашему домену Active Directory (на основе Windows Server 2016).
Realmd позволяет настраивать аутентификацию и членство в домене (в AD или IPA / FreeIPA) без сложных настроек.
Информация о домене обнаруживается автоматически.
Realmd использует SSSD для аутентификации и проверки учетных записей пользователей.
Чтобы успешно присоединиться к домену Active Directory, вам необходимо выполнить следующие требования на вашем сервере CentOS:
- Настройте синхронизацию времени с контроллером домена Active Directory (и ваш DC с ролью PDC должен синхронизировать время с внешним NTP-сервером). В противном случае SSSD не сможет работать правильно. Этот сервис поддерживает только Kerberos (и не может использоваться для аутентификации с использованием NTLM). Соответственно, разница во времени между DC и Linux-клиентом не должна превышать 5 минут.
- В Linux Centos необходимо настроить DNS-клиент для использования службы DNS на контроллерах домена.
Установите клиент NTP (chrony) на CentOS:
# yum install -y chrony
Затем в файле конфигурации /etc/chrony.conf укажите полные доменные имена или IP-адреса серверов NTP для синхронизации (это могут быть контроллеры домена AD):
# nano /etc/chrony.conf

server dc01.test.com iburst
Запустите службу NTP и добавьте ее в автозапуск:
# systemctl start chronyd

# systemctl enable chronyd
Теперь добавьте адреса DNS-серверов, которые отвечают за разрешение имен в вашем домене Active Directory, в ваш файл /etc/resolv.conf:
# nano /etc/resolv.conf

search test.com

nameserver 192.168.1.201

nameserver 192.168.1.200
Теперь установите необходимые пакеты из репозитория CentOS:
# yum install adcli krb5-workstation realmd sssd
Заметка. Если вы используете другой дистрибутив Linux или более старую версию CentOS, убедитесь, что версия пакета SSSD новее 1.9.0. Полная поддержка AD в SSDD появилась только с этой версии. В нашем примере используется sssd-2.2.
Убедитесь, что инструмент realm может обнаружить ваш домен AD:
# realm discover test.com --verbos
Если утилита успешно обнаружит ваш домен AD, появится следующий ответ:
* Resolving: _ldap._tcp.test.com

* Performing LDAP DSE lookup on: 192.168.1.201

* Successfully discovered: test.com

test.com

type: kerberos

realm-name: TEST.COM

domain-name: test.com

configured: no

server-software: active-directory

client-software: sssd

required-package: oddjob

required-package: oddjob-mkhomedir

required-package: sssd

required-package: adcli

required-package: samba-common-tools
Теперь укажите значения атрибутов AD operatingSystem и operatingSystemVersion в файле конфигурации /etc/realmd.conf:
# nano /etc/realmd.conf

[active-directory]

os-name = CentOS Linux

os-version = 8.1.1911 (Core)
Теперь вы можете присоединить свой сервер CentOS к домену Active Directory.
Для этого используйте команду realm join.
В следующей команде мы указали имя пользователя с разрешениями для добавления компьютера в домен и Organizational Unit , в который мы хотим поместить учетную запись своего компьютера Linux.
# realm join --user=jbrion --computer-ou="OU=Servers,OU=UK,DC=test,DC=com" test.com
Утилита предложит вам ввести пароль пользователя AD.
После выполнения команды откройте консоль Active Directory – пользователи и компьютеры (dsa.msc) и убедитесь, что учетная запись вашего сервера CentOS отображается в указанном контейнере AD.
Выполните команду realm list и убедитесь, что отображается строка server-software: active-directory.
Это означает, что этот сервер является членом домена Active Directory.
Чтобы не указывать полное доменное имя при входе пользователей в систему, вы можете добавить строку в файл /etc/sssd/sssd.conf:
use_fully_qualified_names = False
Шаг 1. Установите необходимые пакеты
Для интеграции CentOS 8 / RHEL 8 AD требуется ряд пакетов. Установите их в своей системе, выполнив следующие команды:
sudo dnf install realmd sssd oddjob oddjob-mkhomedir adcli samba-common samba-common-tools krb5-workstation authselect-compat
На новом компьютере с RHEL 8 вам необходимо зарегистрировать его для установки пакетов.
$ sudo subscription-manager register

Registering to: subscription.rhsm.redhat.com:443/subscription

Username:

Password:

The system has been registered with ID: d39d60a7-3236-4287-b361-53264159f5d1

The registered system name is: master.example.com
$ sudo subscription-manager attach --auto

Installed Product Current Status:

Product Name: Red Hat Enterprise Linux for x86_64

Status:       Subscribed
Перед выполнением интеграции AD убедитесь, что компьютер CentOS / RHEL 8 может разрешить и обнаружить домен AD.
Проверьте настройки DNS.
$ cat /etc/resolv.conf
Убедитесь, что обнаружение домена AD прошло успешно.
$ realm discover example.com
example.com

type: kerberos

realm-name: EXAMPLE.COM

domain-name: example.com

configured: no

server-software: active-directory

client-software: sssd

required-package: oddjob

required-package: oddjob-mkhomedir

required-package: sssd

required-package: adcli

required-package: samba-common-tools
Шаг 3. Присоединитесь к Linux-машине CentOS 8 / RHEL 8 в домене Active Directory.
Учетная запись администратора AD требуется для интеграции компьютера CentOS 8 / RHEL 8 с доменом Windows Active Directory.
Убедитесь, что у вас есть имя пользователя и пароль администратора. Затем выполните приведенную ниже команду, чтобы присоединить систему CentOS 8 / RHEL 8 Linux к домену Active Directory.
$ realm join example.com -U Administrator

Password for Administrator:
Замените Administrator на свою учетную запись администратора AD и введите пароль, когда его попросят. Проверьте, чтобы соединение было успешным.
$ sudo realm list

example.com

type: kerberos

realm-name: EXAMPLE.COM

domain-name: example.com

configured: kerberos-member

server-software: active-directory

client-software: sssd

required-package: oddjob

required-package: oddjob-mkhomedir

required-package: sssd

required-package: adcli

required-package: samba-common-tools

login-formats: %U@example.com

login-policy: allow-realm-logins
Как только машина будет присоединена, выполните приведенные ниже команды.
sudo authselect select sssd

sudo authselect select sssd with-mkhomedir
Ваш файл конфигурации sssd.conf должен выглядеть, как показано ниже
$ cat /etc/sssd/sssd.conf
|
1 2 3 4 5 6 7 8 9 10 11 12 13 14 15 16 17 18 19 20 21 22 23 |
[sssd] domains = example.com config_file_version = 2 services = nss, pam default_domain_suffix = example.com [nss] homedir_substring = /home [pam] [domain/example.com] ad_domain = example.com krb5_realm = EXAMPLE.COM realmd_tags = manages-system joined-with-samba cache_credentials = True id_provider = ad krb5_store_password_if_offline = True default_shell = /bin/bash ldap_id_mapping = True use_fully_qualified_names = True fallback_homedir = /home/%u@%d access_provider = ad |
Когда в конфигурационный файл вносятся изменения, требуется перезапуск службы.
sudo systemctl restart sssd
Статус должен быть запущен.
|
1 2 3 4 5 6 7 8 9 10 11 12 13 14 15 16 17 18 19 20 21 |
$ systemctl status sssd ● sssd.service — System Security Services Daemon Loaded: loaded (/usr/lib/systemd/system/sssd.service; enabled; vendor preset: disabled) Active: active (running) since Fri 2019-09-27 22:30:25 EAT; 37min ago Main PID: 32474 (sssd) CGroup: /system.slice/sssd.service ├─32474 /usr/sbin/sssd -i —logger=files ├─32478 /usr/libexec/sssd/sssd_be —domain example.com —uid 0 —gid 0 —logger=files ├─32479 /usr/libexec/sssd/sssd_nss —uid 0 —gid 0 —logger=files └─32480 /usr/libexec/sssd/sssd_pam —uid 0 —gid 0 —logger=files ................................................................ |
Если интеграция работает, должна быть возможность получить информацию о пользователе AD.
$ id jmutai@example.com

uid=1783929917(jmutai@example.com) gid=1784800513(domain users@example.com) groups=1783870513(domain users@example.com)
Шаг 4. Контроль доступа — ограничение для пользователя / группы
Доступ к зарегистрированному серверу можно ограничить, разрешив только определенным пользователям / группам.
Ограничение для пользователей
Чтобы разрешить пользователю доступ через SSH и консоль, используйте команду:
$ realm permit user1@example.com

$ realm permit user2@example.com user3@example.com
Разрешить доступ к группе — Примеры
$ ream permit -g sysadmins

$ realm permit -g 'Security Users'

$ realm permit 'Domain Users' 'admin users'
Это изменит файл sssd.conf
Если вместо этого вы хотите разрешить доступ всем пользователям, запустите:
$ sudo realm permit --all
Чтобы запретить доступ всем пользователям домена, используйте:
$ sudo realm deny --all
Шаг 5. Настройте доступ Sudo
По умолчанию у пользователей домена не будет разрешения на повышение привилегий до root. Пользователям должен быть предоставлен доступ на основе имен пользователей или групп.
Давайте сначала создадим файл разрешений sudo.
$ sudo vi /etc/sudoers.d/domain_admins
Добавить одного пользователя:
user1@example.com ALL=(ALL) ALL
Добавить еще одного пользователя:
user1@example.com     ALL=(ALL)   ALL

user2@example.com     ALL=(ALL)   ALL
Добавить группу
%group1@example.com ALL=(ALL) ALL
Добавить группу с пробелами в имени
%security users@example.com       ALL=(ALL)       ALL

%system super admins@example.com ALL=(ALL)       ALL
Шаг 6. Проверьте доступ по SSH.
Получите доступ к серверу удаленно, поскольку пользователю AD разрешено входить в систему.
$ ssh jmutai@localhost

The authenticity of host 'localhost (::1)' can't be established.

ECDSA key fingerprint is SHA256:wmWcLi/lijm4zWbQ/Uf6uLMYzM7g1AnBwxzooqpB5CU.

ECDSA key fingerprint is MD5:10:0c:cb:22:fd:28:34:c6:3e:d7:68:15:02:f9:b4:e9.

Are you sure you want to continue connecting (yes/no)? yes

Warning: Permanently added 'localhost' (ECDSA) to the list of known hosts.
Это подтверждение того, что наша конфигурация прошла успешно.
The Linux operating system has come a long way since 1991 when it was first introduced by Linux Torvalds as a free operating system. Today, some form of Linux is used in devices ranging from high-end servers to IoT devices. More often than not, common database platforms such as Oracle, PostgreSQL, MySQL, and MongoDB, are deployed on servers running Linux. One notable exception was the Microsoft SQL Server. That changed recently after Microsoft announced support for Linux starting with SQL Server 2017. Unlike the Windows hosts, Microsoft does not provide a straightforward way to integrate Linux hosts into Active Directory, making it harder to manage them.
In this blog, I will walk you through the steps of integrating a Linux host running on CentOS 8 into a Windows Active Directory (AD) domain configured on Windows 2012 R2 Server Standard Edition. The reason I specify the versions and types of the Linux distribution and the Windows AD Domain Controller is because there are subtle differences between versions of Linux and Windows that you must be aware of. For example, in CentOS/RHEL 8, Network Time Protocol (NTP) client and server activities were managed using the ntp daemon. In CentOS/RHEL 8, it has been replaced with chrony daemon.
Step 1) Ensure that the hostname along with the fully qualified domain name (FQDN) is specified in the /etc/hosts file. The hostname cannot be localhost as it is mapped to the loop-back adapter 127.0.0.1. If you need to change the existing hostname, use the following command to change it to the desired name. There is no need to specify the FQDN as part of the hostname.
[root@oldhostname ~]# hostnamectl set-hostname <new_host_name>
[root@newhostname~]# echo 192.168.44.9 sblinmssql2019 >> /etc/hosts
Step 2) Specify the AD domain controller in the /etc/hosts file using the following command.
[root@newhostname~]# echo 192.168.xx.x sbad.sbits.net sbad >> /etc/hosts
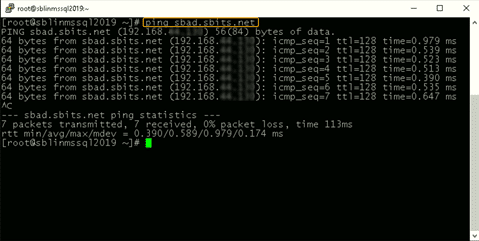
[root@newhostname~]# ping sbad.sbits.net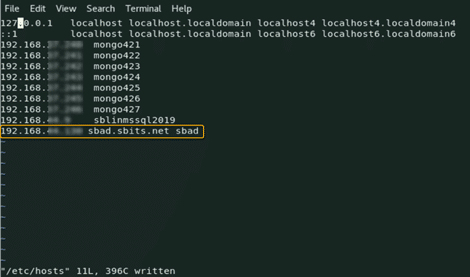
Step 3) Ping the AD domain controller that was specified in Step 2 and ensure that you get a ping response.
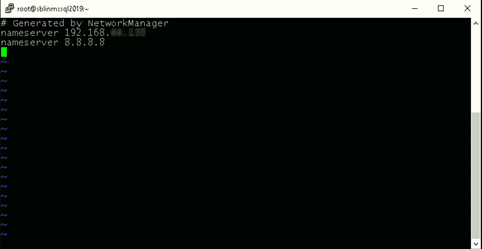
Step 4) The DNS server needs to be pointed to the AD domain controller, at least in my case, as my domain controller is also the DNS server for my domain, sbits.net.
Step 5) If the primary domain controller that you are planning to use as the NTP server does not have the NTP server configured, follow the steps in the screenshot to configure and enable the NTP sever on the primary domain controller prior to proceeding to Step 6.
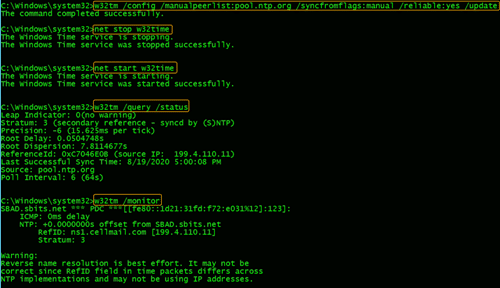
Step 6) The Linux host needs to synchronize time with one of the domain controllers that is part of the AD domain. In my case, there is only one domain controller and the Linux host will be synchronizing the time with the only domain controller in my AD domain. Install chrony if it is not already installed and configure it to use the domain controller to synchronize the time. It may already be installed, resulting in a message reporting a preexisting installation.
 [root@newhostname~]# vi /etc/resolv.conf
[root@newhostname~]# systemctl restart NetworkManager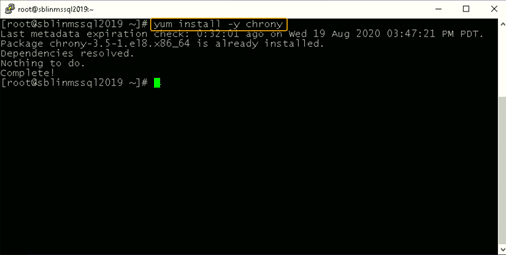
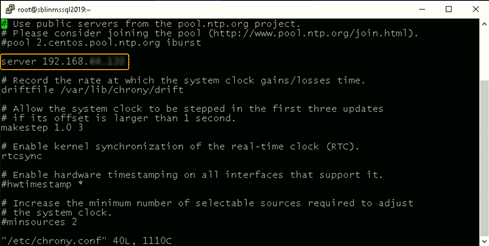
  [root@sblinmssql2019~]# vi /etc/chrony.conf
  [root@sblinmssql2019~]# systemctl enable chronyd
  [root@sblinmssql2019~]# systemctl restart chronyd
  [root@sblinmssql2019~]# systemctl enable chronyd
If it is already installed, we need to edit the chrony.conf file and set the time server to the AD domain controller and restart the chronyd service. If it was not preinstalled, enable the service to startup on reboot and ensure that firewall is configured to allow NTP traffic after ensuring the successful installation.
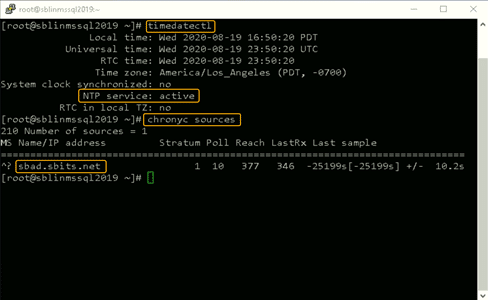
Once chronyd is configured and enabled, the timedatectl command will show if the NTP service is active. After confirming that NTP service is active, run the chronyc sources command to ensure that it is using the domain controllers as the time server as shown below.
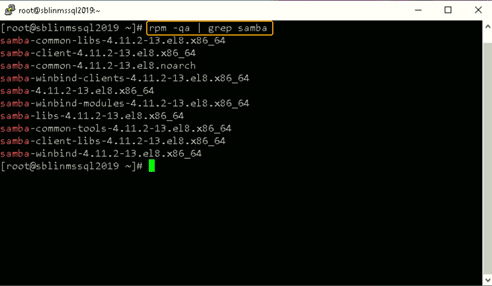
Step 7) Next the samba suite including winbind needs to be installed on the Linux host. The winbind service enables the Linux host to interact with AD domain like a Windows host. After the installation is complete ensure the packages shown in the screenshot below are installed.
Step  Next modify the /etc/samba/smb.conf file to reflect the realm value to the fully qualified domain name and also the workgroup value to the name of the domain as shown in the screenshot below.
[root@sblinmssql2019~]# yum -y install samba samba-client
[root@sblinmssql2019~]# yum -y install samba-winbind samba-winbind-clients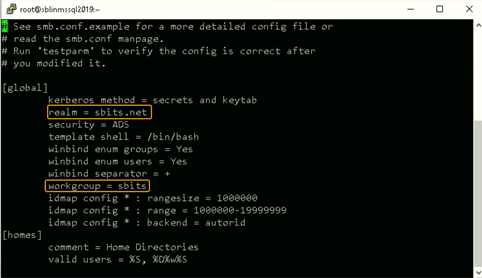
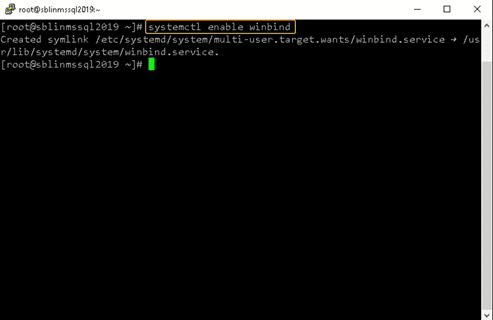
Step 9) Enable winbind daemon on system reboot using the systemctl command as shown in the screenshot below. Please note that there is no reason to reboot the Linux host, unlike Windows hosts.
NOTE – The realm parameter is the name of your domain, in my case it is sbits.net and the workgroup parameter is set to sbits. It can also be set to Windows default WORKGROUP if you prefer. The security = ADS designates that this host is part of the AD domain. The winbind separator =+ specifies that the + will be used to separate the domain name and username. The traditional Windows separator is not compatible with Linux and an escape character has to be used every time a username is specified with the domain prefix.
Step 10) Install the Kerberos package using yum as in the below command:
[root@sblinmssql2019~]# yum -y install krb5-workstation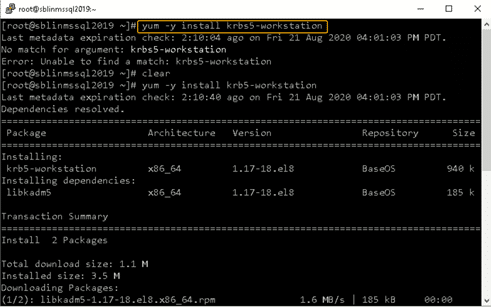
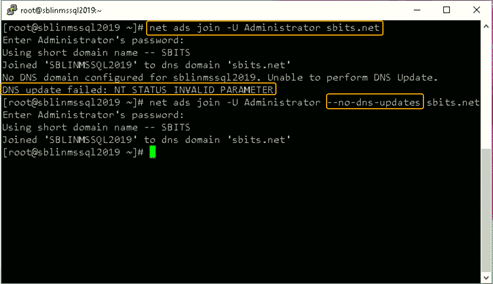
Step 11) Now, add the Linux host to the AD domain using the command below. It is highly likely that you will get the DNS update failed: NT_STATUS_INVALID_PARAMETER error. In my case even though I got the error, the Linux host was added to the AD domain. I reissued the command with the –no-dns-updates flag and the error did not pop-up.
Step 12) If you do not want to encounter the error and would like to have the DNS update the information about the new Linux hosts, change the security setting using DNS Manager as shown in the screenshot below.
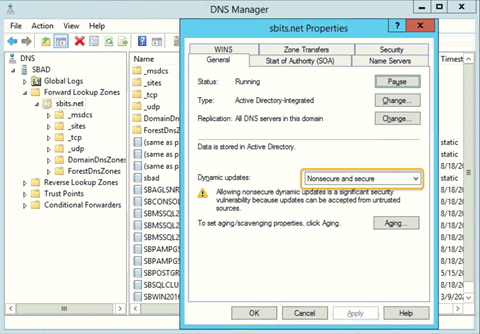
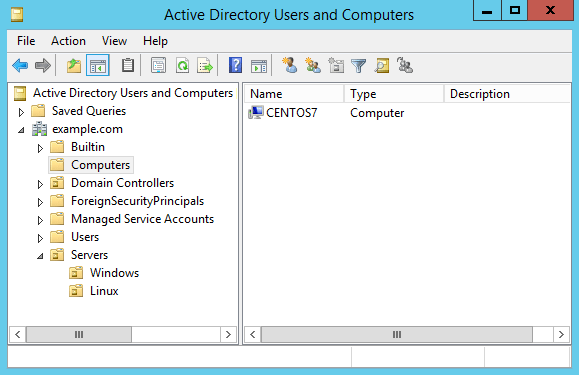
Step 13) On the primary domain controller, verify that the Linux computer object was added using the Active Directory Users and Computers tool.
Step 14) Ensure that the winbind service is running on the Linux host.

Step 15) Let us validate that the Linux host is actually part of the AD domain and is able to communicate with the domain controller by running a couple of validation commands as follows. We will use the wbinfo package to run encrypted RPC calls to the domain controller.
[root@sblinmssql2019~]# wbinfo -t    # verifies if encrypted RPC are supported
[root@sblinmssql2019~]# wbinfo – u  # enumerates AD the list of users
[root@sblinmssql2019~]# wbinfo – g  # enumerates AD the list of groups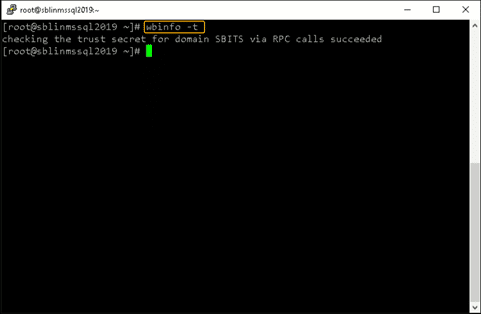

Step 16) Next, we need to ensure that winbind is selected as the authorization provider by using the authselect select winbind –force command as shown in the screenshot below. The –force flag will overwrite the entries in the /etc/nsswitch. conf file.
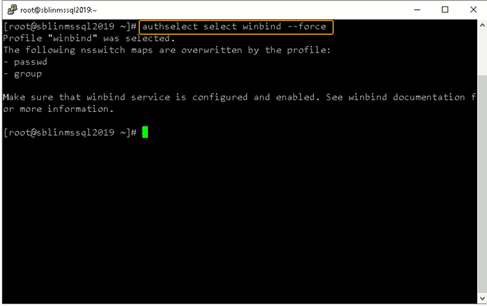
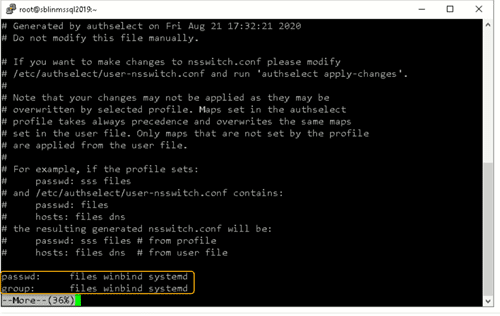
Step 17) To ensure that Linux will winbind for user authentication prior to local Linux authentication make sure the passwd and group entries are listed to use winbind in the /etc/nsswitch.conf file.
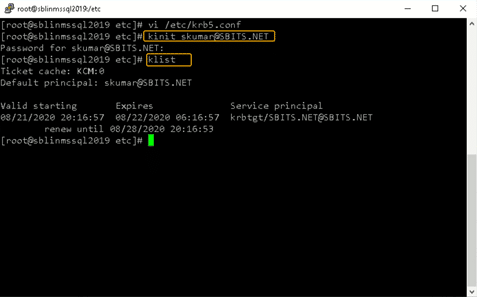
Step 18) Finally, let us try to get Kerberos Ticket Granting Ticket (TGT) using kinit.
[root@sblinmssql2019~]# wbinfo -t    # kinit skumar@sbits.net
[root@sblinmssql2019~]# wbinfo – u  # klist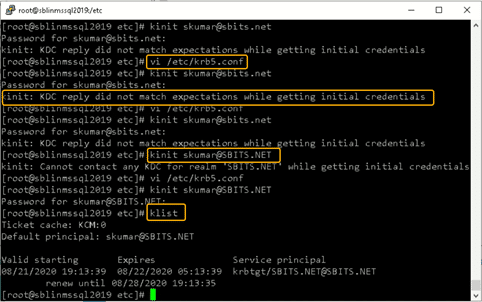
Chances are you will encounter the kinit error shown in the screenshot above. If you do encounter it, edit the /etc/krb5.conf file and change the setting as shown in the screenshot below.
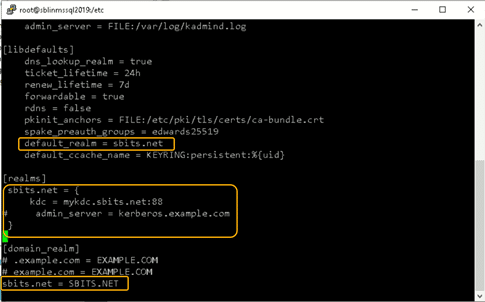
Once the file is modified, there is no reason to start any services on the Linux host and the ticket request should work fine.
You can verify it on the AD domain controller as well as shown in the screenshot below.

That was the final step in adding a Linux host to a Windows AD domain. Stay tuned for my next blog, where I will be installing SQL Server 2019 for Linux on the same host and setup SQL Server Mixed Authentication mode.
Active Directory literally holds the keys to the kingdom, while it makes perfect sense to add Linux hosts to an AD domain, one need to mindful of the security aspect of doing so. StealthAUDIT is an AD auditing and reporting tool that can help address any vulnerabilities, misconfiguration and excessive permissions related to AD joined computer objects. To learn more about how StealthAUDIT can help in effectively managing and securing Active Directory at all levels to mitigate the risks of advanced attacks, compliance failure, and operational outage please visit our website at: https://www.stealthbits.com/active-directory-security-solutions
Here we’ll show you how to add your Linux system to a Microsoft Windows Active Directory (AD) domain through the command line. This will allow us to SSH into the Linux server with user accounts in our AD domain, providing a central source of cross-platform authentication.
There are a number of ways to do this, however this is the easiest way that I’ve found to do it entirely through the command line.
In this example I am using CentOS 7 and Windows Server 2012 R2, however the version of Windows should not matter. We are assuming that our domain is already setup and configured, we’re simply joining our CentOS server to an existing domain.
Preparing CentOS
First we want to install all of the below packages in CentOS.
yum install sssd realmd oddjob oddjob-mkhomedir adcli samba-common samba-common-tools krb5-workstation openldap-clients policycoreutils-python -y
The CentOS server will need to be able to resolve the Active Directory domain in order to successfully join it. In this instance my DNS server in /etc/resolv.conf is set to one of the Active Directory servers hosting the example.com domain that I wish to join.
[[email protected] ~]# cat /etc/resolv.conf
search example.com
nameserver 192.168.1.2
Join CentOS To Windows Domain
Now that we’ve got that out of the way we can actually join the domain, this can be done with the ‘realm join’ command as shown below. You will need to specify the username of a user in the domain that has privileges to join a computer to the domain.
[[email protected] ~]# realm join --user=administrator example.com
Password for administrator:
Once you enter the password for your specific account, the /etc/sssd/sssd.conf and /etc/krb.conf files will be automatically configured. This is really great as editing these manually usually leads to all sorts of trivial problems when joining the domain. The /etc/krb5.keytab file is also created during this process.
If this fails, you can add -v to the end of the command for highly verbose output, which should give you more detailed information regarding the problem for further troubleshooting.
We can confirm that we’re in the realm (Linux terminology for the domain) by running the ‘realm list’ command, as shown below.
[[email protected] ~]# realm list
example.com
  type: kerberos
  realm-name: EXAMPLE.COM
  domain-name: example.com
  configured: kerberos-member
  server-software: active-directory
  client-software: sssd
  required-package: oddjob
  required-package: oddjob-mkhomedir
  required-package: sssd
  required-package: adcli
  required-package: samba-common-tools
  login-formats: %[email protected]
  login-policy: allow-realm-logins
Once this has completed successfully, a computer object will be created in Active Directory in the default computers container as shown below.
To keep things neat I like to move this into some other organizational unit (OU) for Linux servers rather than leaving things in the default computers container, however this doesn’t really matter for this exercise.
Now that our Linux server is a member of the Active Directory domain we can perform some tests. By default if we want to specify any users in the domain, we need to specify the domain name. For example with the ‘id’ command below, we get nothing back for ‘administrator’, however ‘[email protected]’ shows the UID for the account as well as all the groups the account is a member of in the Active Directory domain.
[[email protected] ~]# id administrator
id: administrator: no such user

[[email protected] ~]# id [email protected]
uid=1829600500([email protected]) gid=1829600513(domain [email protected]) groups=1829600513(domain [email protected]),1829600512(domain [email protected]),1829600572(denied rodc password replication [email protected]),1829600519(enterprise [email protected]),1829600518(schema [email protected]),1829600520(group policy creator [email protected])
We can change this behaviour by modifying the /etc/sssd/sssd.conf file, the following lines need to change from:
use_fully_qualified_names = True
fallback_homedir = /home/%[email protected]%d
To the below, which does not require the fully qualified domain name (FQDN) to be specified. This also modifies the user directory in /home from having the FQDN specified after the username.
use_fully_qualified_names = False
fallback_homedir = /home/%u
To apply these changes, restart sssd.
[[email protected] ~]# systemctl restart sssd
Now we should be able to find user accounts without specifying the domain, as shown below this now works where it did not previously.
[[email protected] ~]# id administrator
uid=1829600500(administrator) gid=1829600513(domain users) groups=1829600513(domain users),1829600512(domain admins),1829600572(denied rodc password replication group),1829600520(group policy creator owners),1829600519(enterprise admins),1829600518(schema admins)
If this is still not correctly working for you, I suggest that you take a look at flushing your sssd cache.
Configuring SSH and Sudo Access
Now that we have successfully joined our CentOS server to the example.com domain, we can SSH in as any domain user from Active Directory with default settings.
[[email protected] ~]# ssh [email protected]
[email protected]'s password:
Creating home directory for user1.
We can further restrict SSH access by modifying the /etc/ssh/sshd_config file and make use of things like AllowUsers or AllowGroups to only allow certain user or groups from AD to have access. See our guide to the sshd_config file for further information. Don’t forget to restart sshd if you make any changes to this file in order to apply them.
We can also modify our sudoers configuration to allow our user account from the domain the desired level of access. I usually create an Active Directory group called something like ‘sudoers’, put my user in it, then allow this group sudo access by creating a file in /etc/sudoers.d/ which allows root access to be centrally controlled by AD.
Below is an example of this, the ‘sudoers’ group will have full root access.
[[email protected] ~]# cat /etc/sudoers.d/sudoers
%sudoers    ALL=(ALL)       ALL
This group only exists in Active Directory, our Linux server can see that user1 is a member of the sudoers group in Active Directory, and respects this group configuration and allows user1 root privileges as per the above configuration.
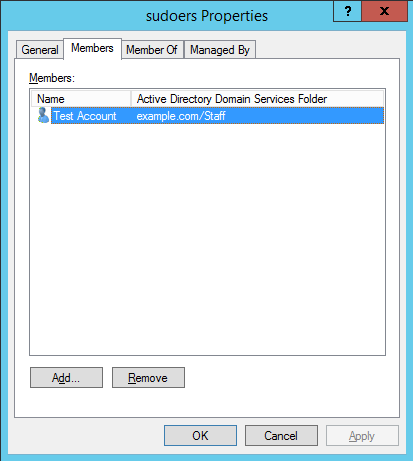
The username of Test Account is ‘user1’.
With this in place, our user1 account in the example.com Active Directory domain will now be able to use the sudo command to run commands with root privileges.
[[email protected] ~]$ sudo su
[sudo] password for user1:
[[email protected] user1]#
[[email protected] user1]# whoami
root
That’s all there is to it, we can now SSH to a Linux server with a user account from our Active Directory domain and even grant specific users or groups from AD specific levels of access.
Leaving The Domain
If you want to reverse the process and remove yourself from the domain, simply run the ‘realm leave’ command followed by the domain name, as shown below.
[[email protected] ~]# realm leave example.com
This will complete without any further user input. It will delete the computer object that was created in Active Directory, remove the keytab file, and set the sssd.conf and krb5.conf files back to default.
Summary
We have demonstrated how you can easily add your CentOS Linux system to a Microsoft Windows Active Directory domain, and then grant SSH or sudo access based on the user or group from the domain.
If you have a large number of Linux servers and an existing Windows domain you can easily use this process to add your Linux servers to the Windows domain, allowing for centralised user authentication which is far easier to manage when compared to having local user accounts spread out on every Linux server.