To manage all aspects of the input and display language settings on your Windows 11 PC, use the following methods.
To switch the keyboard layout you’re using, press and hold the Windows key and then repeatedly press the Spacebar to cycle through all your installed keyboards. (If this doesn’t do anything, it means you have only one installed.)
You can also select the language abbreviation in your taskbar then choose the language or input method you want to use.
Note: In the input field, press the Windows logo key + period (.) to access the Emoji & more keyboard, if your language supports it.
If you can’t find the keyboard layout you want, you may have to add a new keyboard.
Adding an input language lets you set a language-preference order for websites and apps, as well as change your keyboard language.
-
Select the Start > Settings > Time & language > Language & region.
-
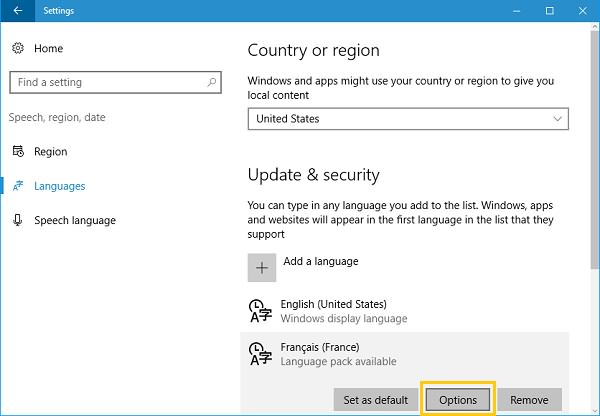
Select the language that has the keyboard you want, then select Options.
-
Select Add a keyboard and choose the keyboard you want to add. If you don’t see the keyboard you want, you may have to add a new language to get additional options. If this is the case, go on to step 4.
-
Return to the Language settings page, go to Preferred languages, then select Add a language.
-
Choose the language you want to use from the list, then select Next.
-
Review any language features you want to set up or install, and select Install.
«Add a keyboard» shortcut
The display language you select changes the default language used by Windows features like Settings and File Explorer.
-
Select Start > Settings > Time & language > Language & region.
-
Choose a language from the Windows display language menu.
«Change your display language» shortcut
If a language is listed under Preferred languages but doesn’t appear on the Windows display language list, you’ll first need to install its language pack (if it’s available).
-
Select Start > Settings > Time & language > Language & region.
-
In Preferred languages, select Add a language, enter the language you want, then select Next.
-
Select Download from the Download language pack option.
-
After the language pack is installed, select Back.
-
Choose a language from the Windows display language menu.
«Install a language pack» shortcut
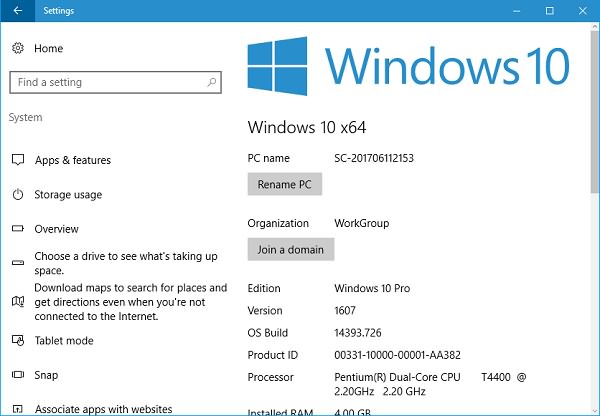
If you receive an «Only one language pack allowed» or «Your Windows license supports only one display language» message, you have a single language edition of Windows 10. Here’s how to check your Windows 10 language edition:
-
Select Start > Settings > About, and then go to the Windows specification section.
-
If you see Windows 11 Home Single Language next to Edition, you have a single language edition of Window 11, and you can’t add a new language unless you purchase an upgrade to either Windows 11 Home or Windows 11 Pro.
Upgrade to Windows 11 Home or Windows 11 Pro
-
Select Start > Settings > Time & language > Language & region.
-
Under Preferred languages, select the language you want to remove, and then select Remove.
-
To remove an individual keyboard, select the language (see step 2), select Options, scroll down to the Keyboards section, select the keyboard you want to remove, and select Remove.
To manage all aspects of the input and display language settings on your Windows 10 device, use the following methods.
To switch the keyboard layout you’re using in Windows 10, press and hold the Windows key and then repeatedly press the Spacebar to cycle through all your installed keyboards. (If this doesn’t do anything, it means you have only one installed.)
You can also select the language abbreviation on the far right of the taskbar and then choose the language or input method you want to use.
Note: In the input field, press Windows +period (.) to access the emoji keyboard, if your language supports this.
If you can’t find the keyboard layout you want, you may have to add a new keyboard.
Adding an input language lets you set a language-preference order for websites and apps, as well as change your keyboard language.
-
Select the Start button, then select Settings > Time & Language > Language.
-
Under Preferred languages, select the language that contains the keyboard you want, and then select Options.
-
Select Add a keyboard and choose the keyboard you want to add. If you don’t see the keyboard you want, you may have to add a new language to get additional options. If this is the case, go on to step 4.
-
Return to the Language settings page, and select Add a language.
-
Choose the language you want to use from the list, and then select Next.
-
Review any language features you want to set up or install, and select Install.
«Add a keyboard» shortcut
Some languages require additional language features
For some languages to work properly, you need an admin on your PC to install the language features. Here’s a list of the languages that are affected:
-
Microsoft IME – Primary keyboard of Japanese
-
Microsoft Pinyin – Primary keyboard of Chinese (Simplified, China), Primary keyboard of Chinese (Simplified, Singapore)
-
Microsoft Wubi – Secondary keyboard of Chinese (Simplified, China), Secondary keyboard of Chinese (Simplified, Singapore)
-
Microsoft Bopomofo – Primary keyboard of Chinese (Traditional, Taiwan), Secondary keyboard of Chinese (Traditional, Hong Kong SAR), Secondary keyboard of Chinese (Traditional, Macao SAR)
-
Microsoft ChangJie – Secondary keyboard of Chinese (Traditional, Taiwan), Secondary keyboard of Chinese (Traditional, Hong Kong SAR), Secondary keyboard of Chinese (Traditional, Macao SAR)
-
Microsoft Quick – Secondary keyboard of Chinese (Traditional, Taiwan), Primary keyboard of Chinese (Traditional, Hong Kong SAR), Primary keyboard of Chinese (Traditional, Macao SAR)
-
Bangla Phonetic – Secondary keyboard of Bengali (India)
-
Gujarati Phonetic – Secondary keyboard of Gujarati
-
Hindi Phonetic – Secondary keyboard of Hindi
-
Kannada Phonetic – Secondary keyboard of Kannada
-
Malayalam Phonetic – Secondary keyboard of Malayalam
-
Marathi Phonetic – Secondary keyboard of Marathi
-
Odia Phonetic – Secondary keyboard of Odia
-
Punjabi Phonetic – Secondary keyboard of Punjabi (Gurmukhi)
-
Tamil Phonetic – Secondary keyboard of Tamil (India)
-
Telugu Phonetic – Secondary keyboard of Telugu
The display language you select changes the default language used by Windows features like Settings and File Explorer.
-
Select the Start button, then select Settings > Time & Language > Language.
-
Choose a language from the Windows display language menu.
«Change your display language» shortcut
If a language is listed under Preferred languages but doesn’t appear on the Windows display language list, you’ll first need to install its language pack (if it’s available).
-
Select the Start button, then select Settings > Time & Language > Language.
-
Choose a language from the Add a language list under Preferred languages, and then select Options.
-
Select Download from the Download language pack option.
-
After the language pack is installed, select Back .
-
Choose a language from the Windows display language menu.
«Install a language pack» shortcut
If you receive an «Only one language pack allowed» or «Your Windows license supports only one display language» message, you have a single language edition of Windows 10. Here’s how to check your Windows 10 language edition:
-
Select the Start button, select Settings > About, and then scroll down to the Windows specification section.
-
If you see Windows 10 Home Single Language next to Edition, you have a single language edition of Window 10, and you can’t add a new language unless you purchase an upgrade to either Windows 10 Home or Windows 10 Pro.
Upgrade to Windows 10 Home or Windows 10 Pro
-
Select the Start button, then select Settings > Time & Language > Language.
-
Under Preferred languages, select the language you want to remove, and then click Remove.
-
To remove an individual keyboard, select the language in question (see step 2), select Options, scroll down to the Keyboards section, select the keyboard you want to remove, and click Remove.
Need more help?
Worked for me:
-
Download package (see links below), name it lp.cab and place it to your
C:drive -
Run the following commands as Administrator:
2.1 installing new language
dism /Online /Add-Package /PackagePath:C:lp.cab
2.2 get installed packages
dism /Online /Get-Packages
2.3 remove original package
dism /Online /Remove-Package
/PackageName:Microsoft-Windows-Client-LanguagePack-Package~31bf3856ad364e35~amd64~ru-RU~10.0.10240.16384
If you don’t know which is your original package you can check your installed packages with this line
dism /Online /Get-Packages | findstr /c:»LanguagePack»
- Enjoy your new system language
List of MUI for Windows 10:
For LPs for Windows 10 version 1607 build 14393, follow this link.
Windows 10 x64 (Build 10240):
zh-CN: Chinese download.windowsupdate.com/d/msdownload/update/software/updt/2015/07/lp_9949b0581789e2fc205f0eb005606ad1df12745b.cab
hr-HR: Croatian download.windowsupdate.com/d/msdownload/update/software/updt/2015/07/lp_c3bde55e2405874ec8eeaf6dc15a295c183b071f.cab
cs-CZ: Czech download.windowsupdate.com/d/msdownload/update/software/updt/2015/07/lp_d0b2a69faa33d1ea1edc0789fdbb581f5a35ce2d.cab
da-DK: Danish download.windowsupdate.com/d/msdownload/update/software/updt/2015/07/lp_15e50641cef50330959c89c2629de30ef8fd2ef6.cab
nl-NL: Dutch download.windowsupdate.com/d/msdownload/update/software/updt/2015/07/lp_8658b909525f49ab9f3ea9386a0914563ffc762d.cab
en-us: English download.windowsupdate.com/d/msdownload/update/software/updt/2015/07/lp_75d67444a5fc444dbef8ace5fed4cfa4fb3602f0.cab
fr-FR: French download.windowsupdate.com/d/msdownload/update/software/updt/2015/07/lp_206d29867210e84c4ea1ff4d2a2c3851b91b7274.cab
de-DE: German download.windowsupdate.com/d/msdownload/update/software/updt/2015/07/lp_3bb20dd5abc8df218b4146db73f21da05678cf44.cab
hi-IN: Hindi download.windowsupdate.com/d/msdownload/update/software/updt/2015/07/lp_e9deaa6a8d8f9dfab3cb90986d320ff24ab7431f.cab
it-IT: Italian download.windowsupdate.com/d/msdownload/update/software/updt/2015/07/lp_42c622dc6957875eab4be9d57f25e20e297227d1.cab
ja-JP: Japanese download.windowsupdate.com/d/msdownload/update/software/updt/2015/07/lp_adc2ec900dd1c5e94fc0dbd8e010f9baabae665f.cab
kk-KZ: Kazakh download.windowsupdate.com/d/msdownload/update/software/updt/2015/07/lp_a03ed475983edadd3eb73069c4873966c6b65daf.cab
ko-KR: Korean download.windowsupdate.com/d/msdownload/update/software/updt/2015/07/lp_24411100afa82ede1521337a07485c65d1a14c1d.cab
pt-BR: Portuguese download.windowsupdate.com/d/msdownload/update/software/updt/2015/07/lp_894199ed72fdf98e4564833f117380e45b31d19f.cab
ru-RU: Russian download.windowsupdate.com/d/msdownload/update/software/updt/2015/07/lp_d85bb9f00b5ee0b1ea3256b6e05c9ec4029398f0.cab
es-ES: Spanish download.windowsupdate.com/c/msdownload/update/software/updt/2015/07/lp_7b21648a1df6476b39e02476c2319d21fb708c7d.cab
uk-UA: Ukrainian download.windowsupdate.com/d/msdownload/update/software/updt/2015/07/lp_131991188afe0ef668d77c8a9a568cb71b57f09f.cab
Windows 10 x86 (Build 10240):
zh-CN: Chinese download.windowsupdate.com/d/msdownload/update/software/updt/2015/07/lp_e7d13432345bcf589877cd3f0b0dad4479785f60.cab
hr-HR: Croatian download.windowsupdate.com/d/msdownload/update/software/updt/2015/07/lp_60856d8b4d643835b30d8524f467d4d352395204.cab
cs-CZ: Czech download.windowsupdate.com/d/msdownload/update/software/updt/2015/07/lp_dfa71b93a76b4500578b67fd3bf6b9f10bf5beaa.cab
da-DK: Danish download.windowsupdate.com/d/msdownload/update/software/updt/2015/07/lp_af0ea4318f43d9cb30bcfa5ce7279647f10bc3b3.cab
nl-NL: Dutch download.windowsupdate.com/d/msdownload/update/software/updt/2015/07/lp_cbcdf4818eac2a15cfda81e37595f8ffeb037fd7.cab
en-us: English download.windowsupdate.com/d/msdownload/update/software/updt/2015/07/lp_41877260829bb5f57a52d3310e326c6828d8ce8f.cab
fr-FR: French download.windowsupdate.com/d/msdownload/update/software/updt/2015/07/lp_80fa697f051a3a949258797a0635a4313a448c29.cab
de-DE: German download.windowsupdate.com/d/msdownload/update/software/updt/2015/07/lp_7ea2648033099f99f87642e47e6d959172c6cab8.cab
hi-IN: Hindi download.windowsupdate.com/d/msdownload/update/software/updt/2015/07/lp_78a11997f4e4bf73bbdb1da8011ebfb218bd1bac.cab
it-IT: Italian download.windowsupdate.com/d/msdownload/update/software/updt/2015/07/lp_9e62d9a8b141e0eb6434af5a44c4f9468b60a075.cab
ja-JP: Japanese download.windowsupdate.com/d/msdownload/update/software/updt/2015/07/lp_79bd099ac811cb1771e6d9b03d640e5eca636b23.cab
kk-KZ: Kazakh download.windowsupdate.com/d/msdownload/update/software/updt/2015/07/lp_59e690df497799cacb96ab579a706250e5a0c8b6.cab
ko-KR: Korean download.windowsupdate.com/d/msdownload/update/software/updt/2015/07/lp_a88379b0461479ab8b5b47f65c4c3241ef048c04.cab
pt-BR: Portuguese download.windowsupdate.com/d/msdownload/update/software/updt/2015/07/lp_bb9f192068fe42fde8787591197a53c174dce880.cab
ru-RU: Russian download.windowsupdate.com/d/msdownload/update/software/updt/2015/07/lp_280bf97bbe34cec1b0da620fa1b2dfe5bdb3ea07.cab
es-ES: Spanish download.windowsupdate.com/c/msdownload/update/software/updt/2015/07/lp_31400c38ffea2f0a44bb2dfbd80086aa3cad54a9.cab
uk-UA: Ukrainian download.windowsupdate.com/d/msdownload/update/software/updt/2015/07/lp_41cd48aa22d21f09fbcedc69197609c1f05f433d.cab
Some Windows users report that they cannot change the system language on their Windows 10. Have you met the same problem on your Windows 10? Actually, Windows 10 has its default language for the entire system. But that doesn’t mean your PC is stuck in only one language.
Users can also change display language by using the built-in Settings and Control Panel without re-installing the entire system, even though you find that you’ve installed the wrong language version.
So, how to do that? If you are also curious about how to change display language on Windows 10, here are two solutions for your reference. Why not have a shot?
How to Change Display Language on Windows 10
Before you change the system language, you need to check whether the system language is in sync or not. If you are using a Microsoft account, the language probably syncs for all the devices you use. Follow the steps below to disable the language syncing:
- Open Settings > Accounts.
- Click on «Sync your settings».
- Turn off the switch of «Language preferences».
Having disabled the language syncing, now you can change the system language within the built-in Settings app:
- Head to Settings > Time & Language > Region & Language.
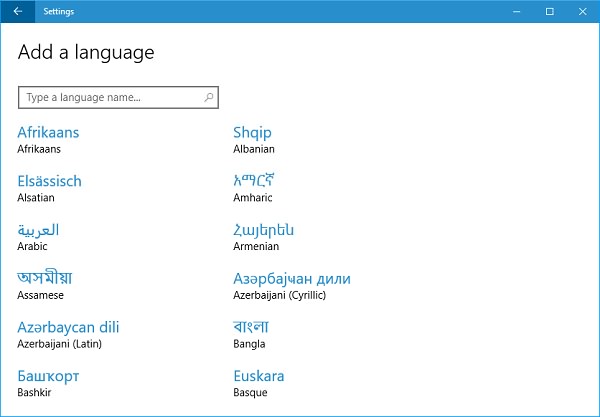
- In the Languages > Preferred languages section, click on «Add a language».
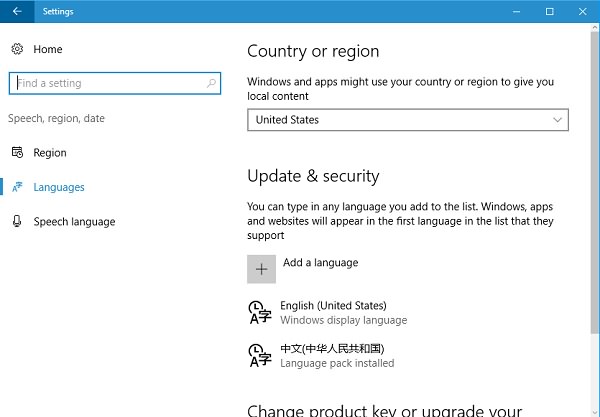
- A new window will pop up, select the language you want and click Next.
- Tick «Set as my Windows display language» and then click Install.
(If any additional feature you want, just tick it) - In the Languages > Windows display language section, select the newly added language.
(If the language doesn’t match your current region, you have to change the location in the Country or region section) - On the right side, there is a Related settings section, click on «Administrative language settings».

- In the new window, click on Administrative tab.
- Click on «Copy settings».
- Tick both «Welcome screen and system accounts» and «New user accounts» and then click OK.
- Click OK again and restart your PC.

After these steps, you’ll be surprised to find that the new language has covered your entire system, from the welcome screen to all the applications and websites. Of course, you can still revert the language settings at any time with the same steps.
Cannot Change Display Language on Windows 10, What to Do?
If the solution above still cannot help you fix the problem, you may consider the following one. But remind you that certain Windows versions do not support downloading language packs. So you have to check which Windows version you are using first.
1.Check if you are using Windows 10 Home
Head to Settings > About to check which Windows 10 version you’ve installed. If unfortunately you are using Windows 10 Home or the Single language Chinese Edition, you have no choice to change the system language until you upgrade to Pro version.
2.Override for Windows Language on Advanced Settings
Another workaround to change display language on Windows 10 is to override for its display language, which requires downloading the language pack. Follow just three steps; you can easily change the display language on your Windows 10.
Step One: Download the Language Pack
- Open Settings on your PC.
- Click on Time & Language and then head into Region and Language menu.
- Click «Add a language» to search for you desired language and download it.
Step Two: Install the Available Resources of That Language
- In the same menu (Settings > Time & Language > Region & Language), click on the newly added language.
- Click «Options» and install all the available resources for that language.
Step Three: Override for Windows Display Language
- In the same menu (Settings > Time & Language > Region & Language), click on «Additional date, time & regional settings» under the Related settings section.
- A new window will pop up. Click on «Language» menu.
- In the window of «Language», click «Advanced settings».
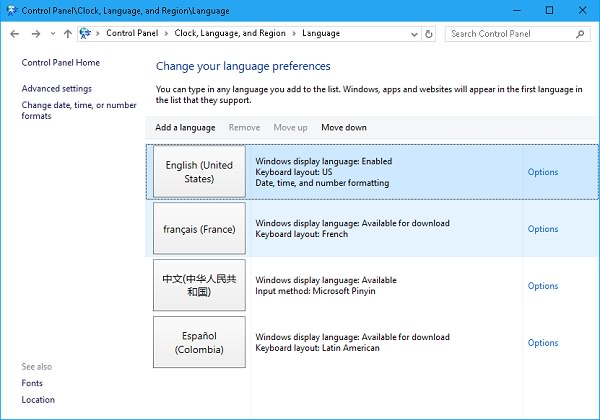
- In the window of «Advanced settings», refer to the «Override for Windows display language» section. Select the language you want.
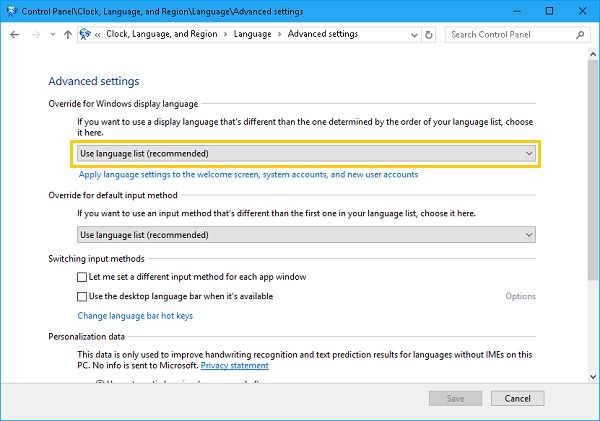
- Click on Save at the bottom right corner.
- Restart your PC and you’ll find the display language on your system has been changed.
Have you successfully changed the display language on your Windows 10 through the workarounds introduced above? If you find this article useful, please feel free to share it to your friends!
I’m working on a computer which has Windows 10 Home Single Language.
The language cannot normally be changed on Settings since its Single Language version.
So how do I change the interface language for Windows without reinstalling Windows?
![]()
Ramhound
40.3k34 gold badges100 silver badges127 bronze badges
asked Mar 31, 2020 at 10:29
![]()
Okay this is how I handle this situation.
First you should setup the language pack of the desired language to use.
-
If you haven’t done already, download your desired language pack. This usually can be done from Windows 10 Settings > Time & Language > Language tab and then clicking on Add language.
-
Check the language packs on your computer to confirm it was installed. Press
Win+Rand typecmd, then pressCtrl+Shift+Enterto open Command Prompt with Administrator rights. -
Type
dism /online /get-packagesand pressEnter.
We are looking for Microsoft-Windows-Client-LanguagePack-Package as a start for Package Identity. And its State should be Installed
Check screenshot
You can see next 5 characters after ~ for understand which language it is. In this example, we are seeing tr-TR. If you are looking for English for example, you should look for en-US. -
If you found the desired language in the step above, skip this step. Otherwise, continue reading.
You will have to manually download and install the language pack you want. To do that, go to this link for Windows 10 1909 (UPDATE: Go to this link for Windows 10 2004). Then select language pack you want to download. Then go to Command Prompt (Admin rights) again and typeDism /online /Add-Package /PackagePath:C:lp.cab. Don’t forget to changePackagePathto your downloaded .cab file’s path before you type! Then pressEnterto install downloaded language pack -
Press
Win+Rand typeregedit, then pressCtrl+Shift+Enterto open Regedit with Administrator rights. Then go toHKEY_LOCAL_MACHINESYSTEMCurrentControlSetControlNlsLanguage
Default entry shows that language id of your system. Check this link to look your desired language id from list. Copy the part after 0x part. For example for en-US, get 0409 Check screenshot -
Double click to Default (In some cases you might need to change InstallLanguage‘s id as well) to edit this entry and paste the language id you copied. Save and restart your computer.
![]()
answered Mar 31, 2020 at 11:17
![]()
tatolinetatoline
5431 gold badge3 silver badges10 bronze badges
6
While the accepted answer can work, it’s also possible that the .cab file listed in those links doesn’t work for your version of Win10. If that happens, you can find the language pack for your version by:
- Visiting https://uupdump.ml/
- Searching for keywords of your Win10 build. For example, System Information showed my Win10 was at version 10.0.18363, build 18363, so I entered «18363 amd64»
- Clicking on a Cumulative update of your build in the search results
- In Search files, search for «languagepack»
- Downloading the .esd file of the language pack you wish to use
- Converting the .esd file into a .cab file. You can use this tool for example https://github.com/abbodi1406/WHD/blob/master/scripts/ESD2CAB-CAB2ESD.zip . It has a readme explaining how to use it
- Then following steps 4, 5 and 6 of the accepted answer
It might be a bit longer, but it’s what I ended up doing since the .cab files listed there were not compatible with my build
answered Oct 31, 2020 at 18:44
![]()
EricmoirEricmoir
811 silver badge1 bronze badge
2
While installing or setup Windows 10 you are asked to choose your system language and you can change the same later. If you are looking to change the current system language on Windows 10 here is this post we have listed the steps to add remove or change the system language from English to one of 140 other languages on Windows 10.
Change System Language Windows 10
Pro tip: If you’re using a Microsoft account, the language settings will sync across devices. That’s why we recommend disabling the option to sync these settings before making any changes.
To disable language syncing on Windows 10,
- Open settings app using windows + I keyboard shortcut,
- Click on Accounts then Sync your settings.
- Here Under the “Individual sync settings” section, turn off the “Language preferences” toggle switch.
— Advertisement —
Now follow the steps below, to add and change the system language on Windows 10.
- Right-click on windows 10 start menu select settings,
- Click on Time & Language then Click on Language.
- Now click + add preferred language button,
Pro Tip: With the latest Windows 10 version you can click add a windows display language link to get download language pack from the Microsoft store as well.
— Advertisement —
Now Search for the language that you want to use on Windows 10 and select the language package from the result.
— Advertisement —
Click the next button, then checkmark on Set as my display language option, Then click on the Install language pack option.
This will take a few minutes to download the language pack and apply it.
- Once done Windows ask signout to fully apply the new language, click yes sign out now.
When you sign in back you will notice the change across the entire Windows 10 experience.
Switch default language on Windows 10
In case you want to change the default language and want to revert back to English follow the steps below.
- Open settings then Time & Language,
- click language on left-hand side,
- Then under Windows display language select your preferred language.
Remove a Language From Windows 10
If you have added more than one language and may not want to keep all of them on your computer then you can remove languages following the steps below.
Before removing a language, you must select a different language as the default. You cannot remove the current system language. All you need to do is select another language as the default.
- Open settings then Time & language,
- select language on the left-hand pane,
- Now under preferred languages select the language you don’t want to keep there,
- Then click the remove option and follow on-screen instructions.
- Once done you need to restart your PC
Also, you can remove the language pack using the command prompt as well. To do this
- Open the command prompt as administrator,
- Then type command Lpksetup /u and press enter key.
- The Install or uninstall display languages dialog box displays.
- Check the box for the language you want to uninstall, click Next and follow on-screen instructions.
Windows 10 won’t change the language
Solution – 01
If you receive an “Only one language pack allowed” or “Your Windows license supports only one display language” message, you have a single language edition of Windows 10. And you need an upgrade to either Windows 10 Home or Windows 10 Pro.
Here’s how to check your Windows 10 language edition:
- Select the Start button, select Settings > About, and then scroll down to the Windows specification section.
- If you see Windows 10 Home Single Language next to Edition, you have a single language edition of Windows 10, and you can’t add a new language unless you purchase an upgrade to either Windows 10 Home or Windows 10 Pro.
Solution – 02
- After the language pack is installed:
- Move to the administrative tab then click copy settings,
- Here Checkmark on “Welcome screen and system accounts” and “New User Accounts” if you desire.
- Click ok to make save changes.
That’s all about, Add or remove and change system language on Windows 10. Still need help feel free to discuss in the comments below.
Also read:
- Solved: The current active partition is compressed on Windows 10, 8.1 and 7
- Solved: Your windows license will expire soon on Windows 10
- How to disable automatic updates on windows 10 Home
- How To well Optimize Windows 10 Performance For Gaming
- Solved: Wi-Fi Icon Missing From System tray Windows 10 Laptop

Contents
- 1 How to Change Language Preferences in Windows 10
- 2 How to Install a New Language in Windows 10
- 3 How to Change Display Language For Your Account
- 4 How to Change the Global Display Language
- 5 How to Change Keyboard Language in Windows 10
- 6 Change Narrator Language in Windows 10
- 7 How to Adjust Speech Recognition Language
Microsoft is an American company, but that doesn’t mean its OS is English-only. The Windows 10 change language pack setting lets you choose between a total of 38 dialects to meet your preferences. You can also change keyboard language and speech recognition for a full-fat experience.
Occasionally, something goes wrong and users notice that they have the wrong language in Windows 10. This can be due to incorrect configuration during setup, a pesky bug, or a prankster friend.
We’re going to show you exactly how to change a language pack or set it back to the default. First, you should know that the keyboard language, speech language, and voice language settings are independent. This means you can have a German keyboard language but an English OS, for example, but it also takes a bit longer to get everything configured. Let’s start with how to change Windows 10’s language preferences:
How to Change Language Preferences in Windows 10
Time needed: 1 minute.
The Windows 10 change language functionality lets you quickly order them by preference in a few clicks.
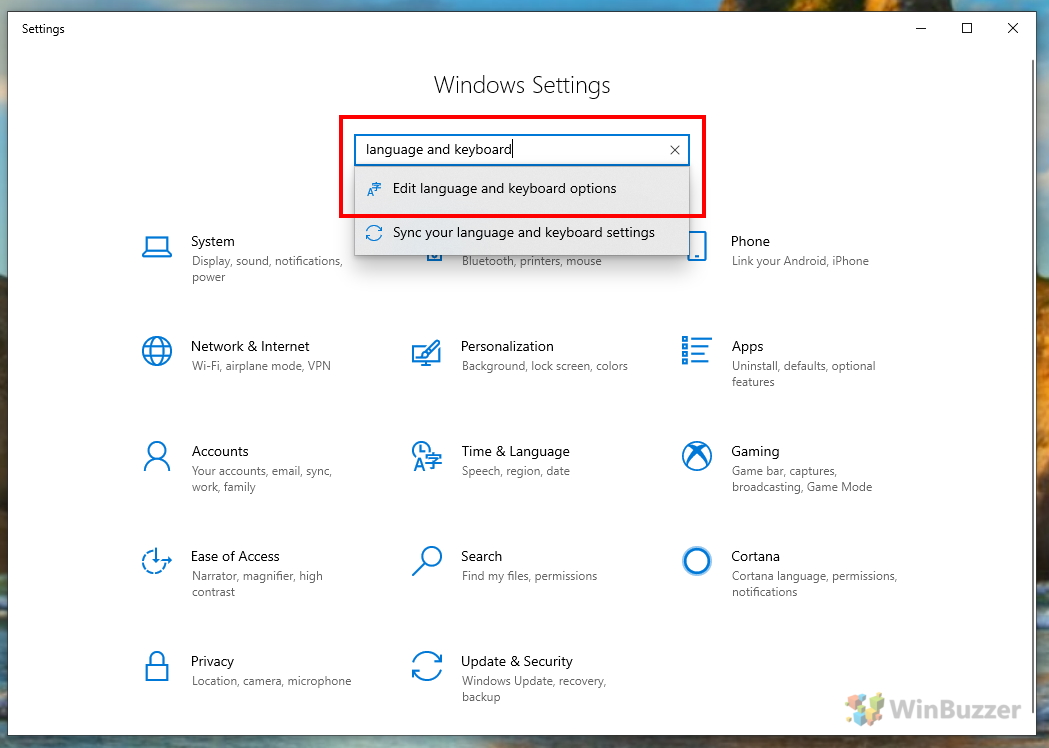
- Open Language and Keyboard Settings
You can open settings with “Windows + I”. Search for language and keyboard and click on the “Edit language and keyboard options” setting.

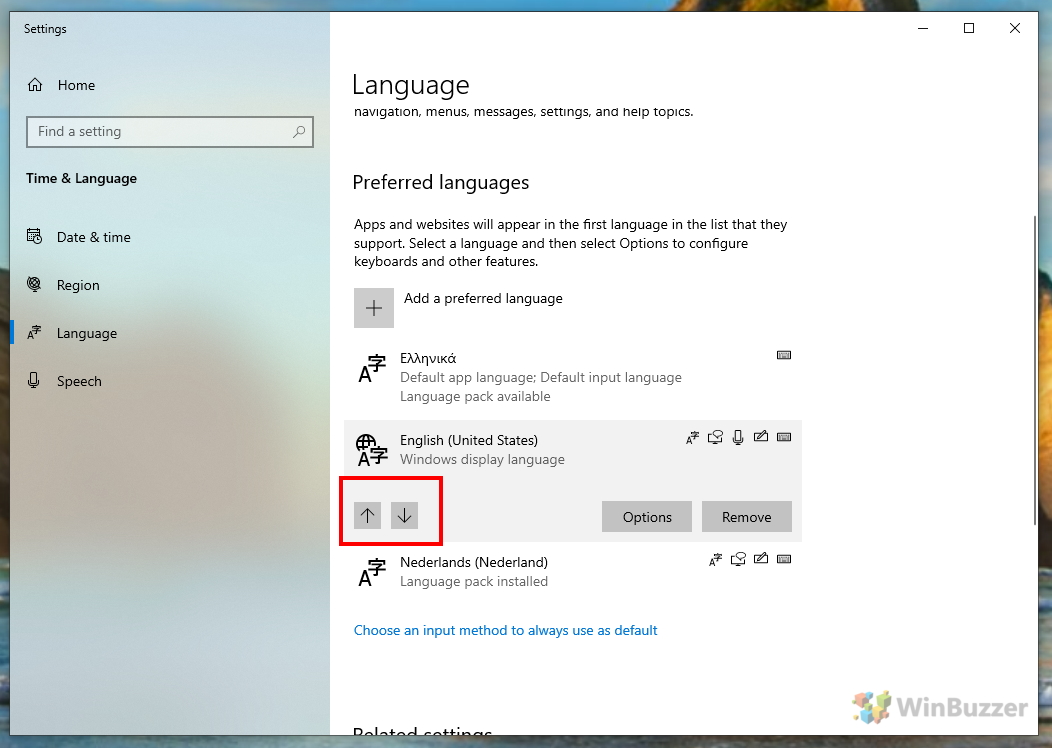
- Arrange your preferred languages
You may already have the correct language pack installed on your system. Windows will now show you your “Preferred Languages”, under which you can see a list and move your native tongue to the top with the arrow icons.

- Check the language’s possible uses
If your language is behaving unexpectedly, you can also check this window to see what it supports. The icons next to language signify whether it can be used for keyboard, speed, handwriting, text-to-speech, and more.


How to Install a New Language in Windows 10
Time needed: 2 minutes.
To save space, Windows 10 doesn’t keep all languages in its library by default. As a result, you may have to download and install your language pack via the settings menu.
- Open the add language dialog
In the previously mentioned language options, press the plus next to “Add a preferred language”.

- Select your language
Windows will now return a long list of all its languages. You can search for yours via the bar at the top and select the regional or national version. Again, the icons signify which aspects of the OS it can be used for. Click “Next”.

- Change your Windows 10 language features
The Windows 10 change language settings will now let you choose what features you wish to install for that dialect. Tick the relevant boxes and hit “Install”. Your language will then be added to order as you wish.


How to Change Display Language For Your Account
Time needed: 1 minute.
- Select the relevant Windows 10 language pack in the drop down
Now that the language pack is installed, you can change the display language via the drop-down menu at the top of the settings page.


Time needed: 2 minutes.
Changing the Windows 10 language pack on your account is useful, but sometimes you want to toggle it for all accounts. This requires a bit more fiddling.
- Open the classic control panel
Press Start and type “Control Panel” to search for the classic version. Click the relevant entry to open it.

- Search for region settings
In the top-right corner, type “Region” in the search bar. Then, click the heading to get to the settings page.

- Open the copy settings window
Switch to the “Administrative” tab and click “Copy settings…” approve any administrator dialogs that appear.

- Copy your language settings to other users
You’ll now be presented with a list of hour current languages for various aspects of the OS and two tick boxes. Choose “Welcome screen and system accounts” and “New user accounts” depending on your preferences.


How to Change Keyboard Language in Windows 10
Time needed: 1 minute.
Now that your options are set up, you can change your keyboard language in Windows 10.
- Press the language button in the taskbar
Now that your system has multiple languages, letters representing the active one will show next to the clock in the taskbar. Click it or press “Windows + Space” to quickly switch.


Change Narrator Language in Windows 10
Time needed: 1 minute.
Narrator is a feature that isn’t utilized by most people, but is a godsend for those who need it. You can change the Windows 10 narrator language independently to the other settings.
- Open Narrator voice settings
Press “Windows + I” to open settings and search for “Narrator”. Select “Change Narrator voice” from the search dropdown.

- Choose a voice
Under the “Choose a voice” dropdown, select one with your language next to it in parentheses. While you’re there, you can adjust the speed and pitch to sound more natural.


How to Adjust Speech Recognition Language
Time needed: 1 minute.
The OS now speaks in your language, but what about when you want to talk to it back? Windows 10 lets you change speech recognition language in much the same way.
- Open speech recognition settings
Press “Windows + I” to open settings and search for “Narrator”. Select “Turn on Speech Recognition” from the search dropdown.

- Select your speech language
Under “Choose the language you want to speak with your device”, select the relevant language from the dropdown.


