Windows supports many different languages allowing you to run your applications and browse the web in your own language. This guide will explain how to configure that on your Cloud SSD or Dedicated server plan.
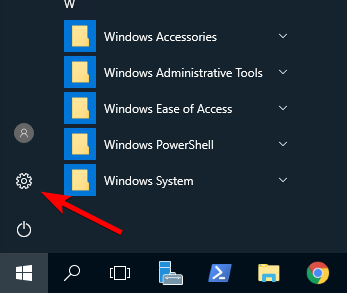
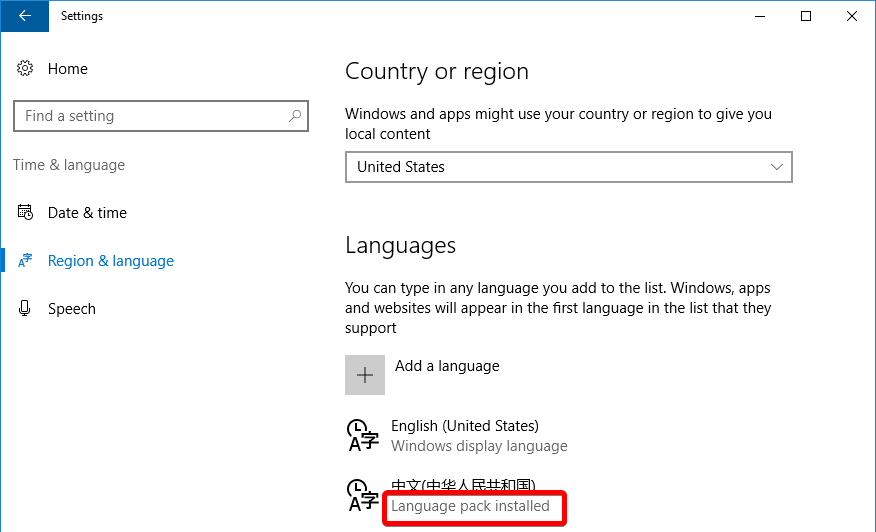
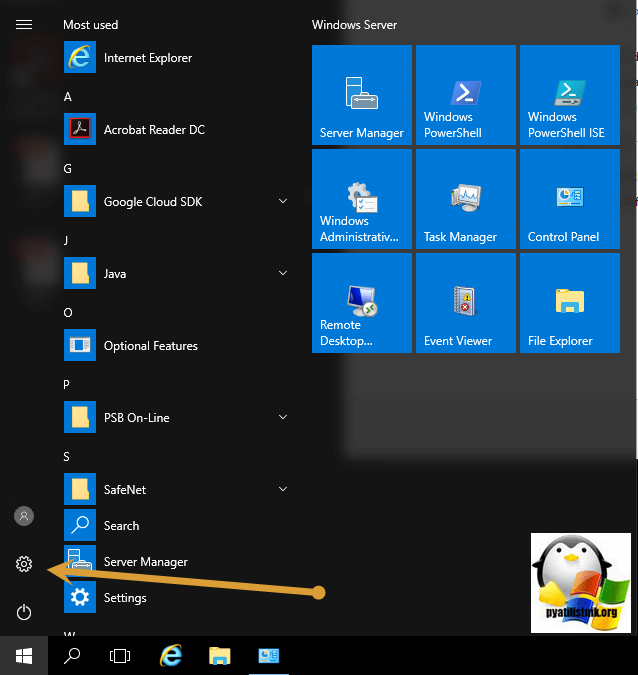
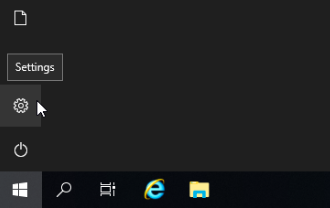
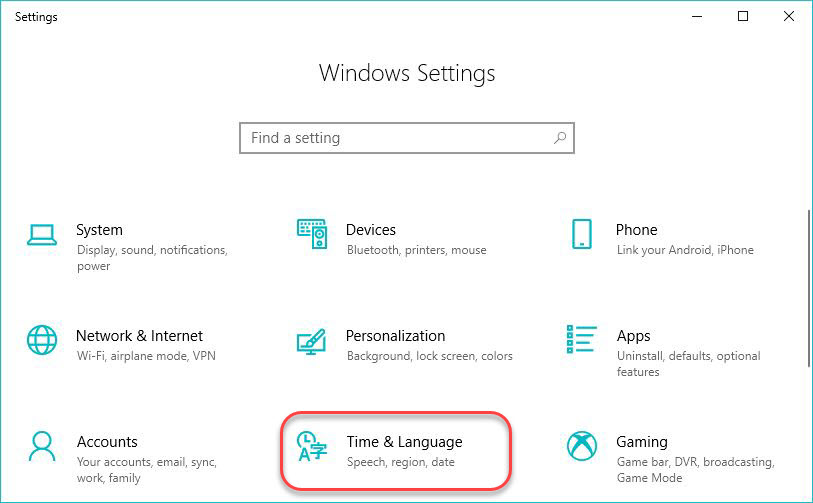
First, click on the Windows start button and open the Settings window, shown as a gear icon in the image below.
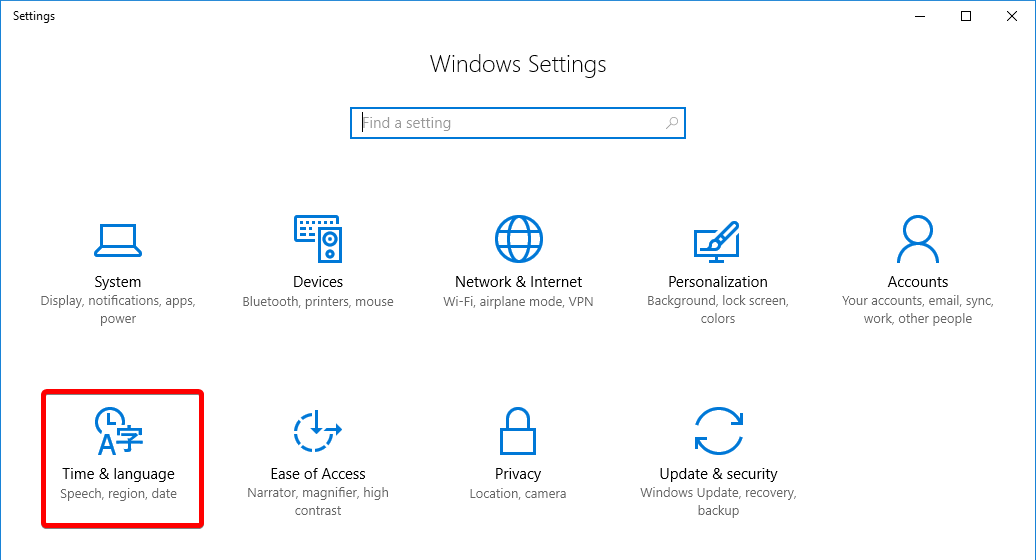
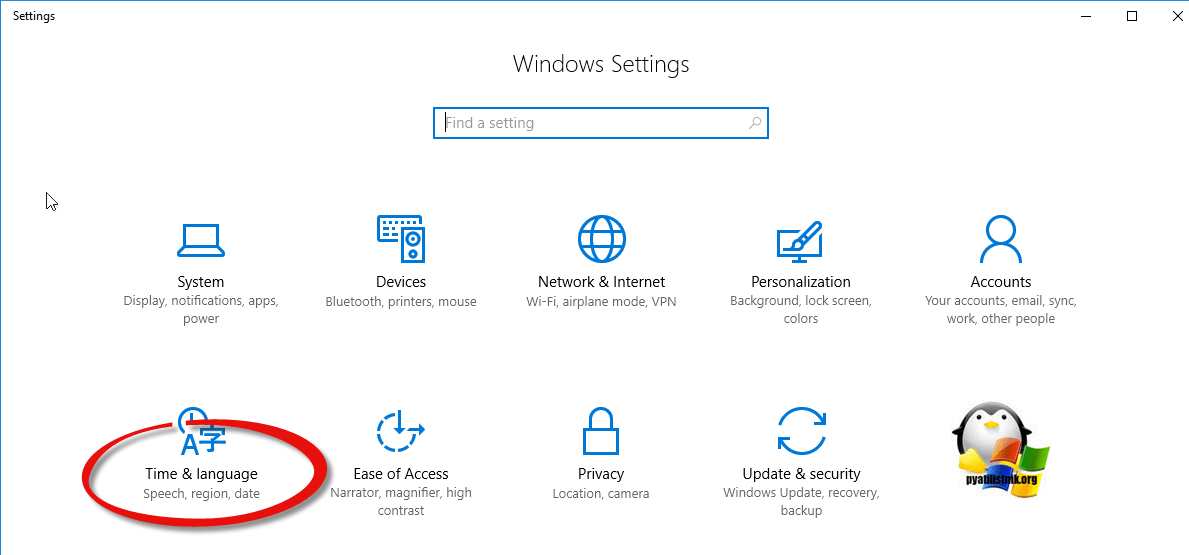
Now open Time & Language
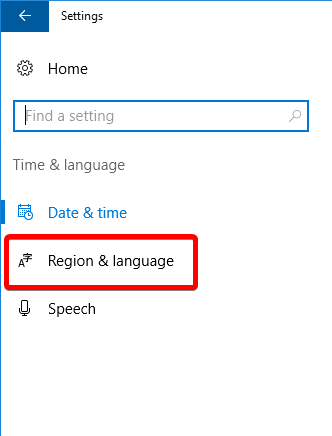
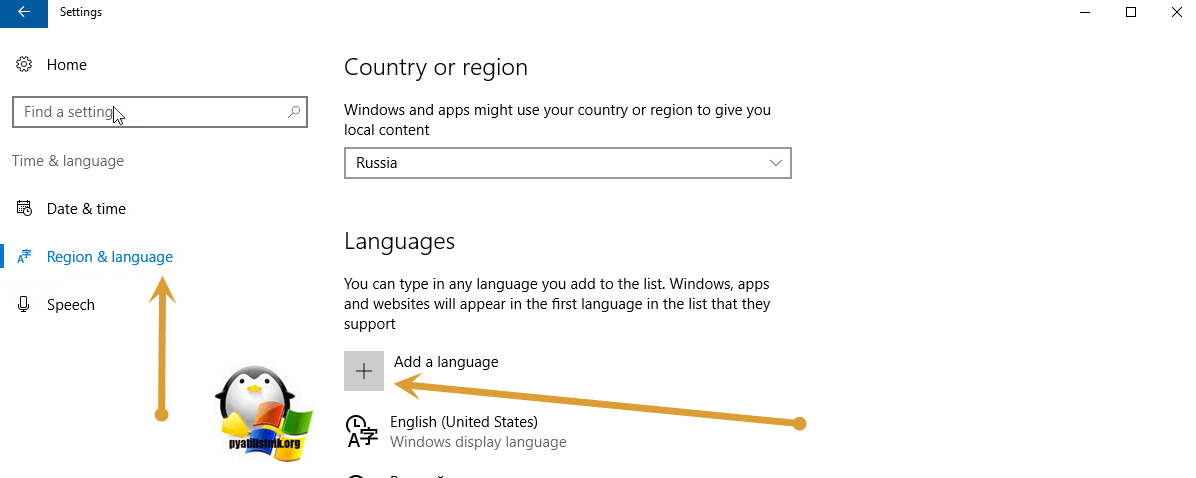
Then Region & Language
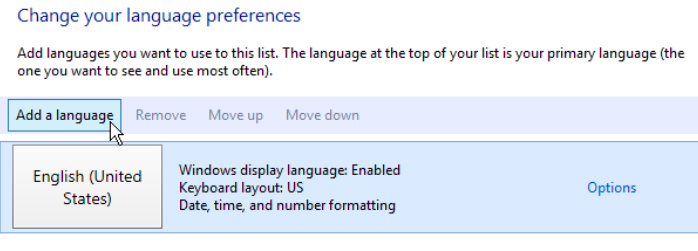
Click Add a language.
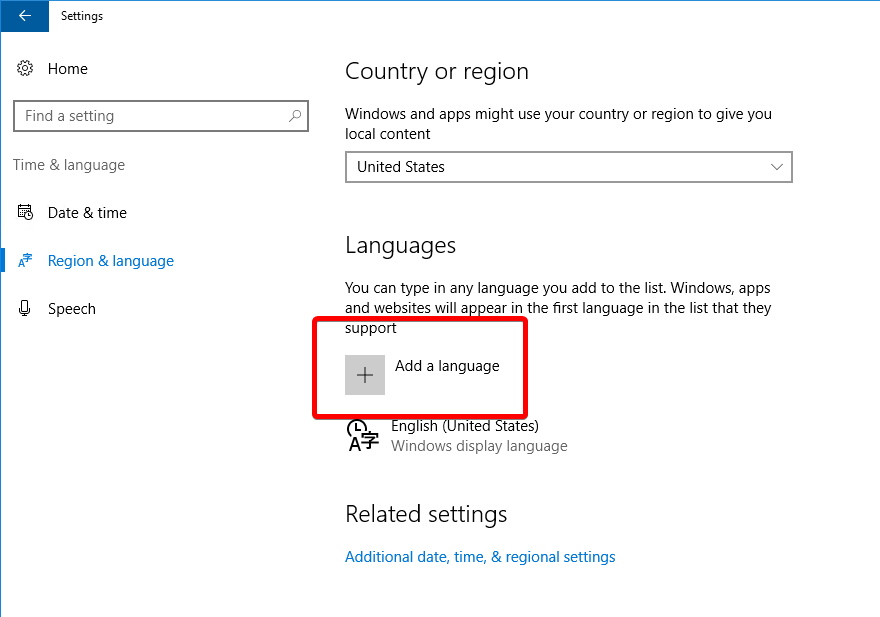
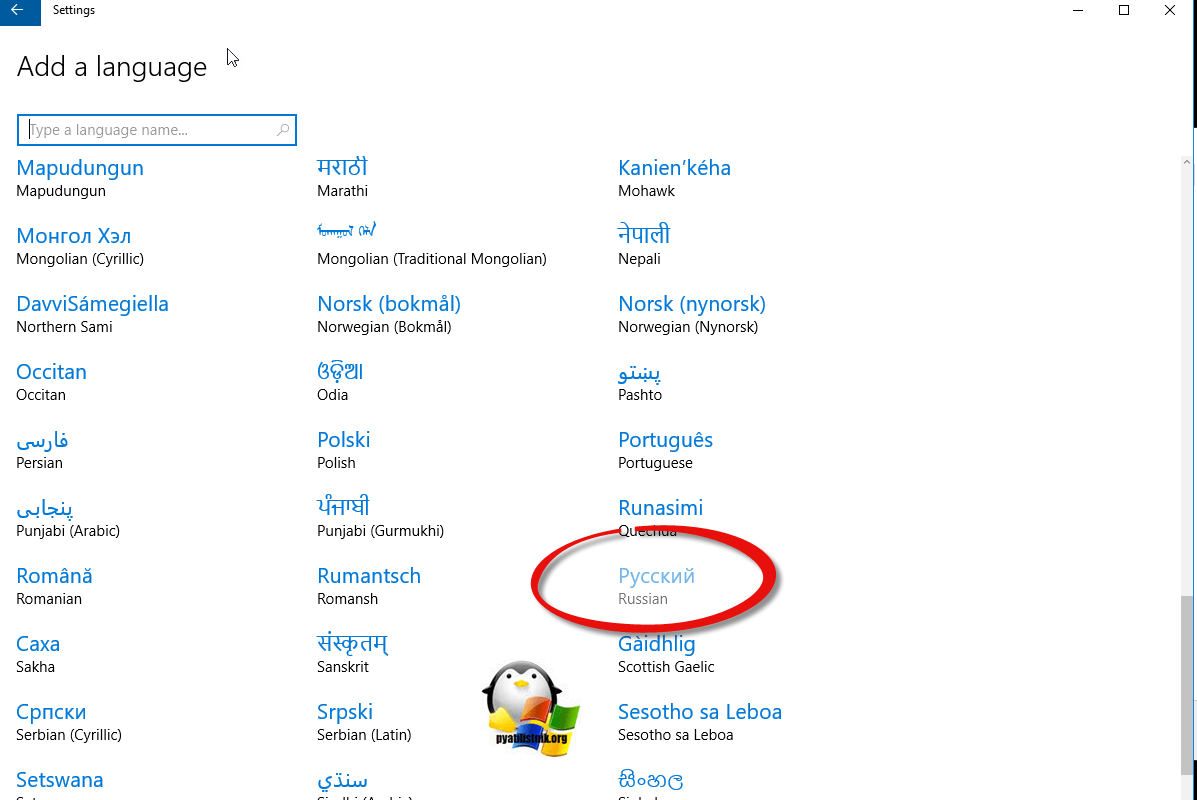
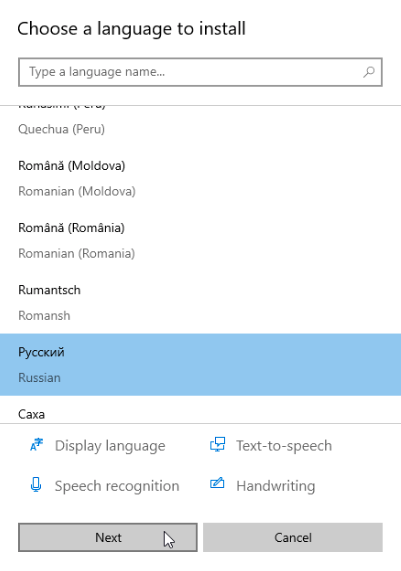
And from the list displayed, select the language you wish to use
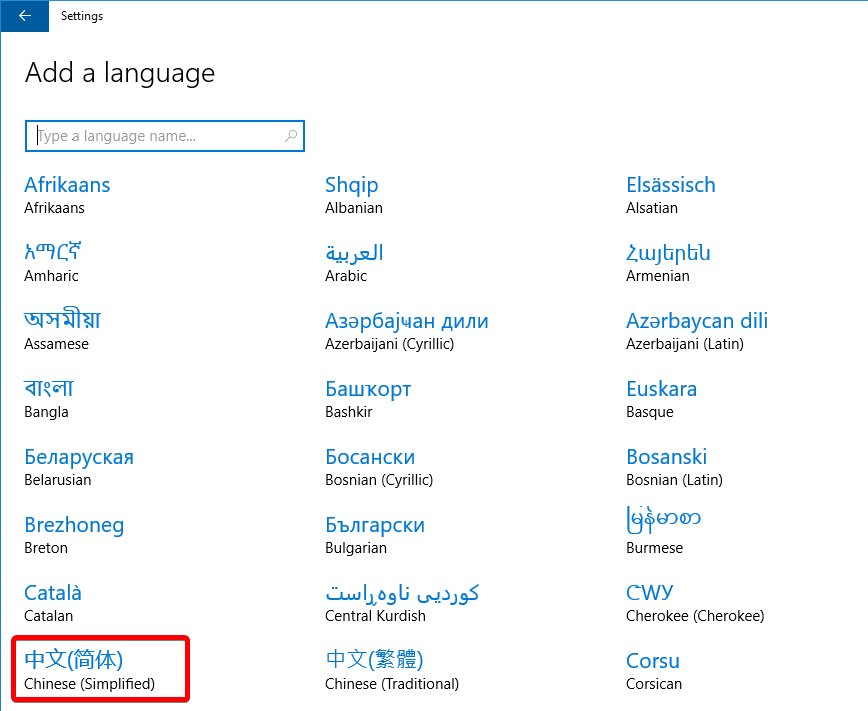
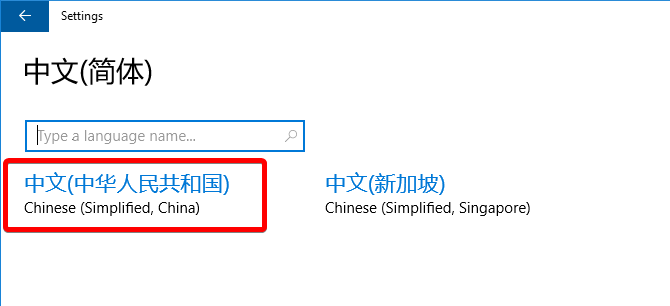
Select the region or country if asked
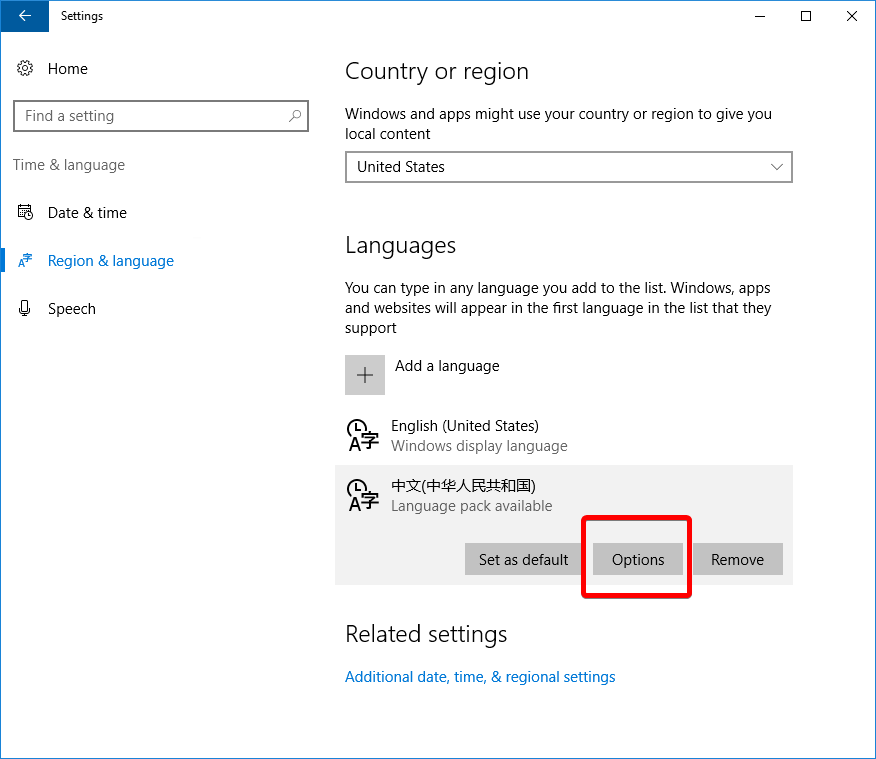
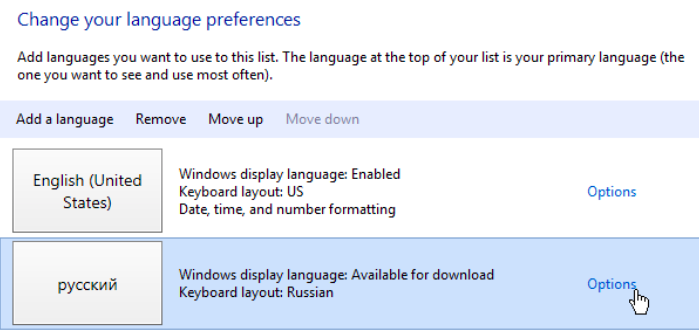
After you select this, it should take to back to the Settings you were at earlier.
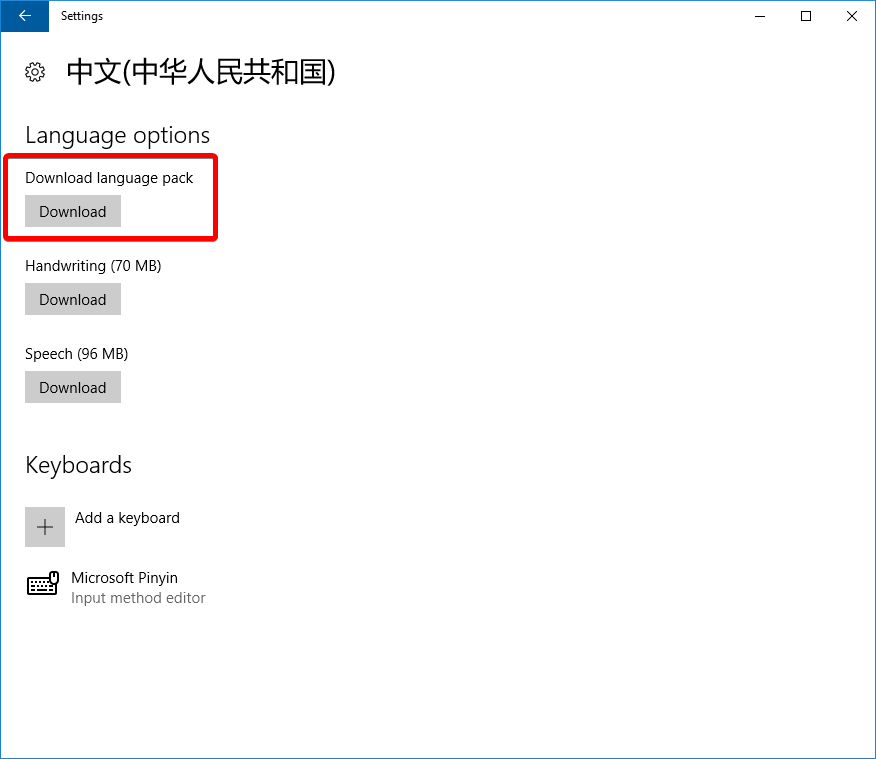
Click on the language you selected, then Options.
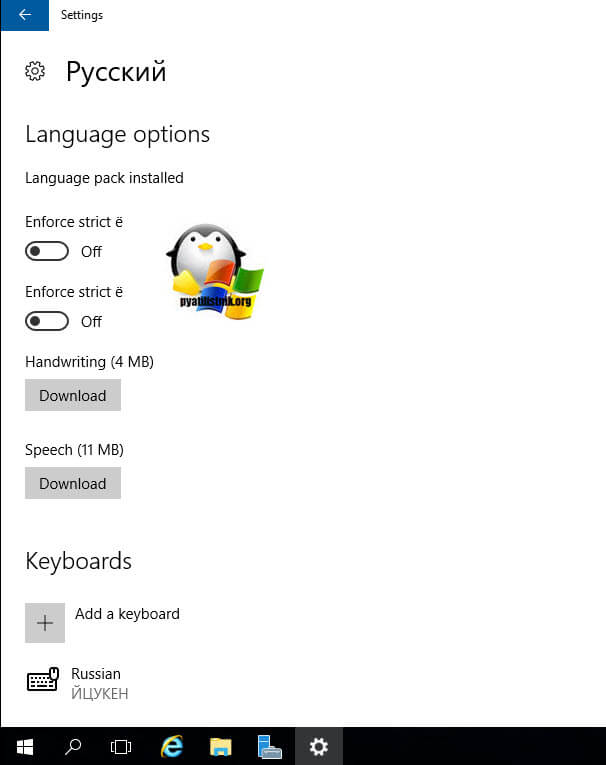
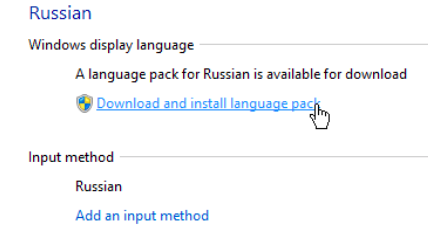
Click Download language pack, and once it finishes, click the back arrow button at the top left corner.
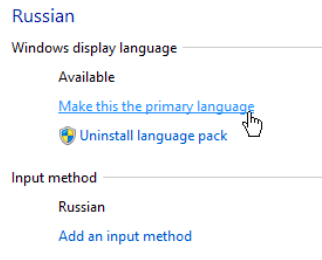
It should now say installed.
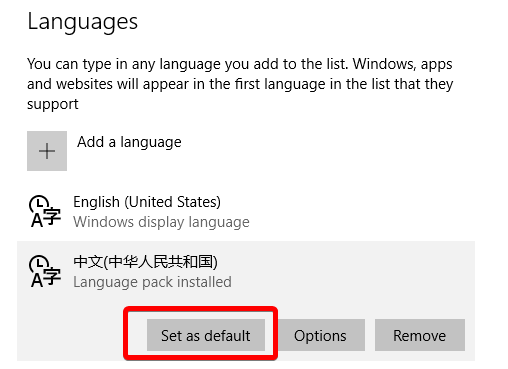
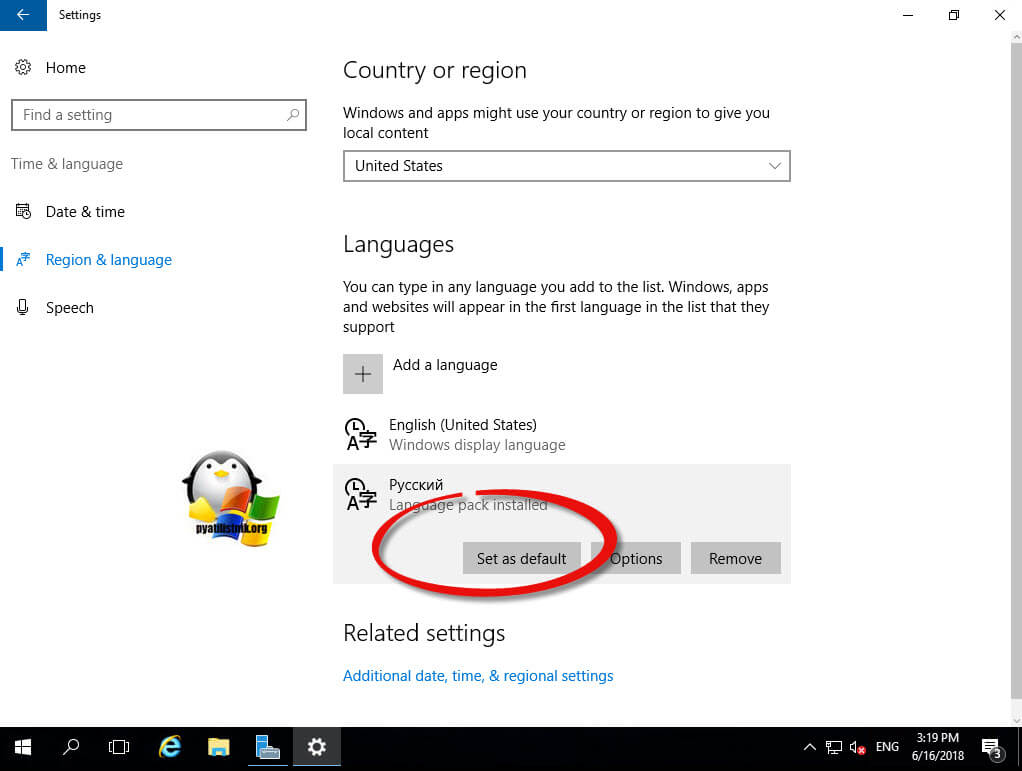
Click the language again and then Set as Default.
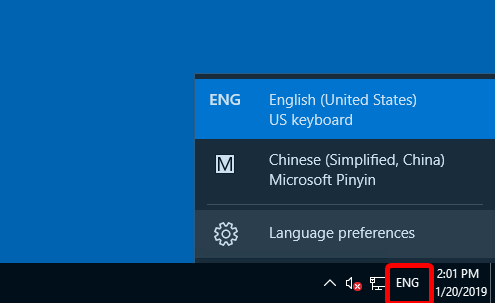
Close that Settings windows and select the correct keyboard input to use on the taskbar at the bottom right.
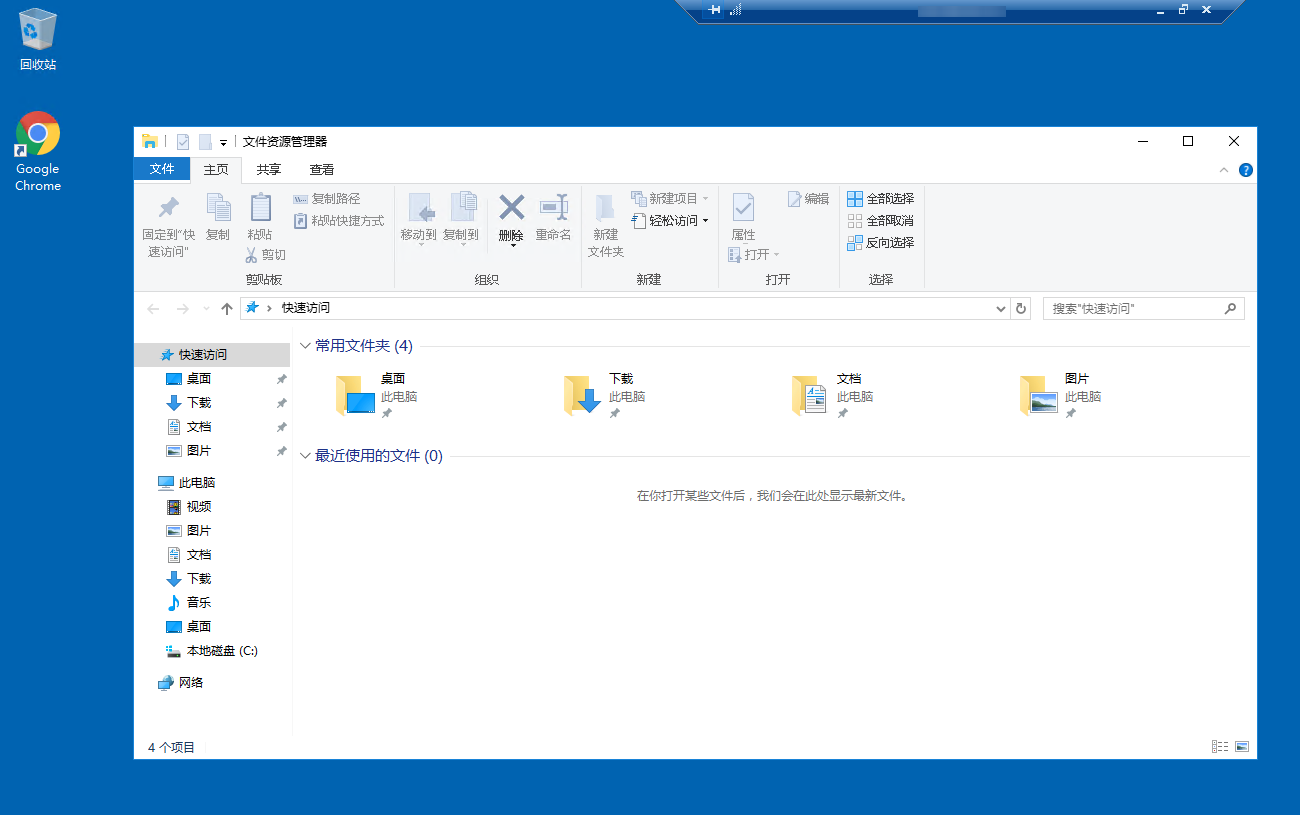
Now reboot the server to complete the configuration and enable the new language.
You should now see Windows using the language you have chosen.
Step 1: Please log in to your server via RDP (Remote Desktop Protocol), enter the control panel, and click on „Add a language“.
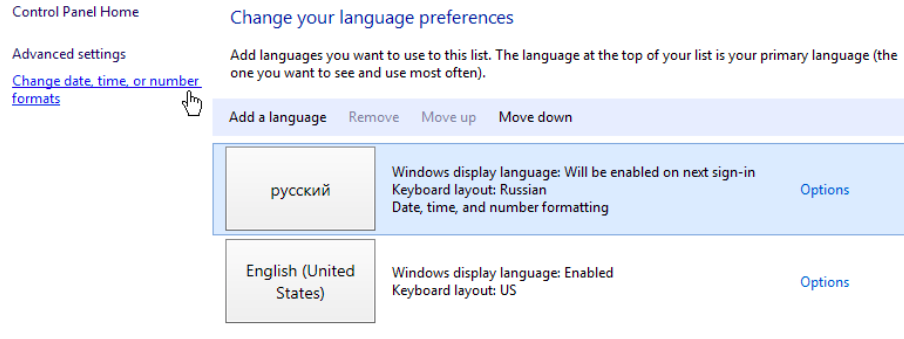
Step 2: An overview of currently installed languages appears.
Step 3: By clicking on „Add a language“, you will be redirected to the full list of available languages.
Step 4: Choose the desired display language and click on „Add“. The chosen language will be shown in your language overview now. In our example German has been added.
Step 5: The language on top of this list will be the default one. Move your desired display language to the top position and click on „Options“. Windows will check the availability of the language pack automatically and afterwards you can click „Download and install language pack“. Once the installation has finished, you will see the message “Installation complete”.
Step 6: You can now reboot your server to activate the changes for your local user or you can apply the language changes for the welcome screen and new user accounts as well.
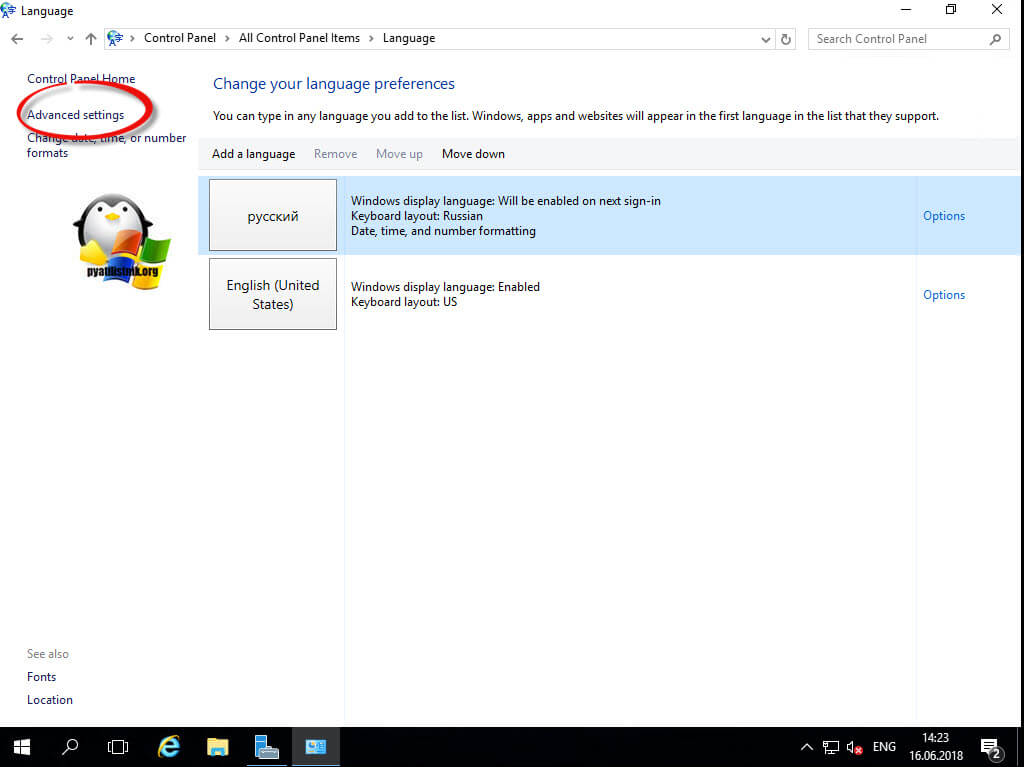
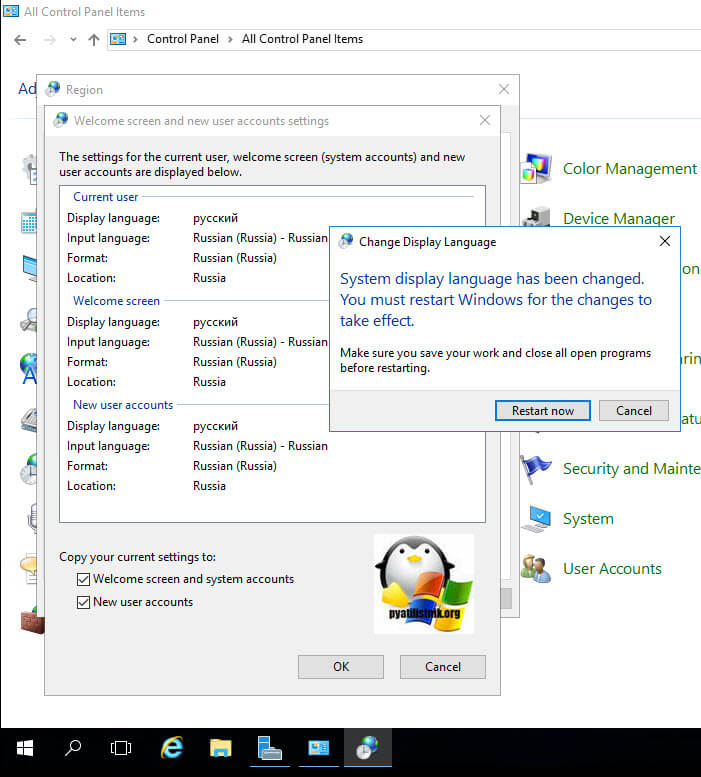
Step 7: In order to apply the language changes system-wide for your welcome screen and new user accounts, please switch to the language overview again and click on „Advanced settings“. Now select „Apply language settings to the welcome screen, system accounts, and new user accounts“.
Step 8: In the menu which will open up next, please click on “Copy settings” and activate the checkboxes for copying your language settings to „Welcome screen and system account“ and / or to „New user accounts“:
Step 9: After saving these settings, Windows will ask for a reboot which will complete the process of changing the language system-wide.
Хотя, в большинстве случав, я предпочитаю использовать английские версии любых продуктов, иногда, чтобы угодить пользователям, приходится задумываться о русификации интерфейса того или иного ПО. В этой статье я покажу, как русифицировать интерфейс Windows Server 2016, установив на него русский пакет локализации (Language Pack). Необходимость русификации интерфейса сервера возникла на одном из терминальных RDS серверов, на котором одно из используемых приложений при отсутствии русского интерфейса Windows, генерировало необходимые отчеты только на английском языке, что крайне неудобно.
Содержание:
- Установка языкового пакета через Windows Update
- Офлайн установка Language Pack с помощью Lpksetup
- Русификация интерфейса Windows Server 2016
Установка языкового пакета через Windows Update
Самый простой вариант установки Language Pack при наличии подключения к Интернету – установить нужный пакет локализации встроенными средствами через сервера Windows Update.
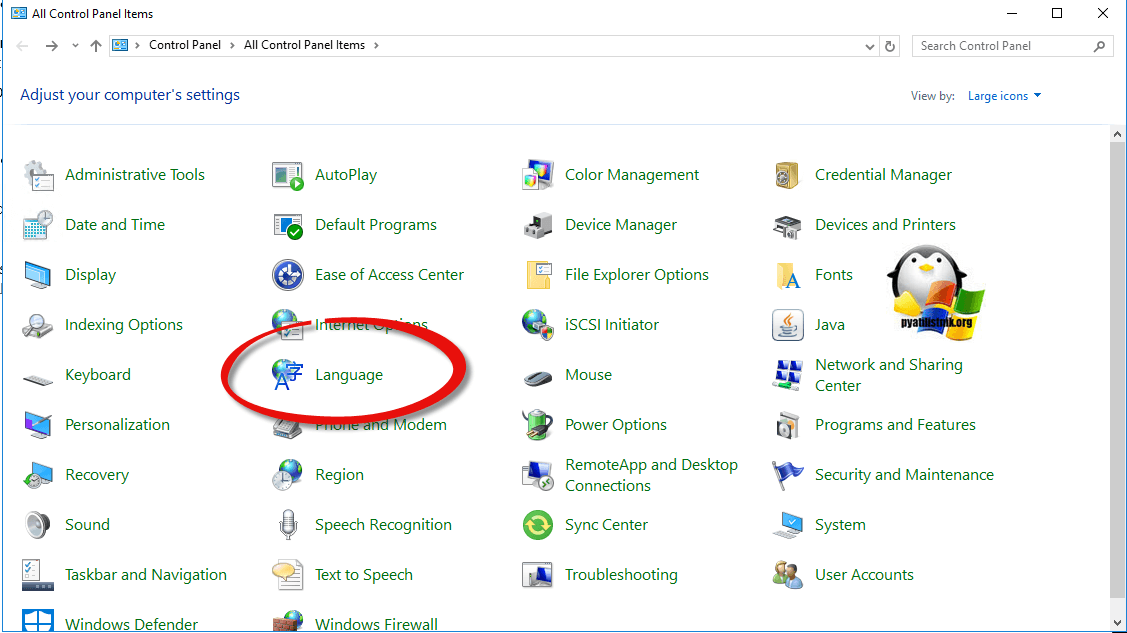
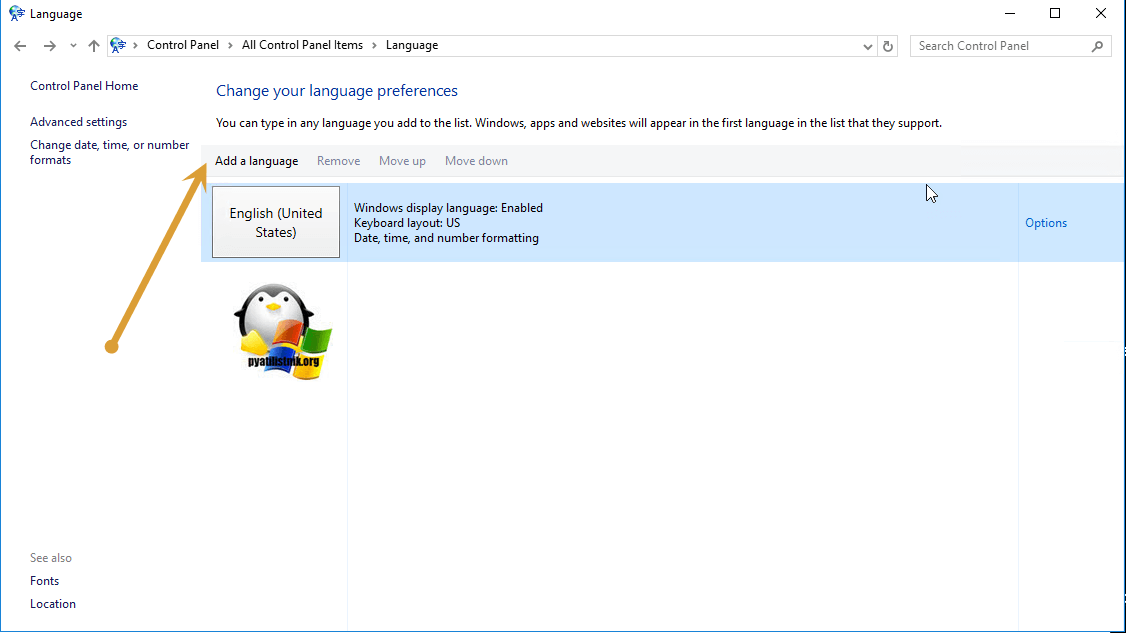
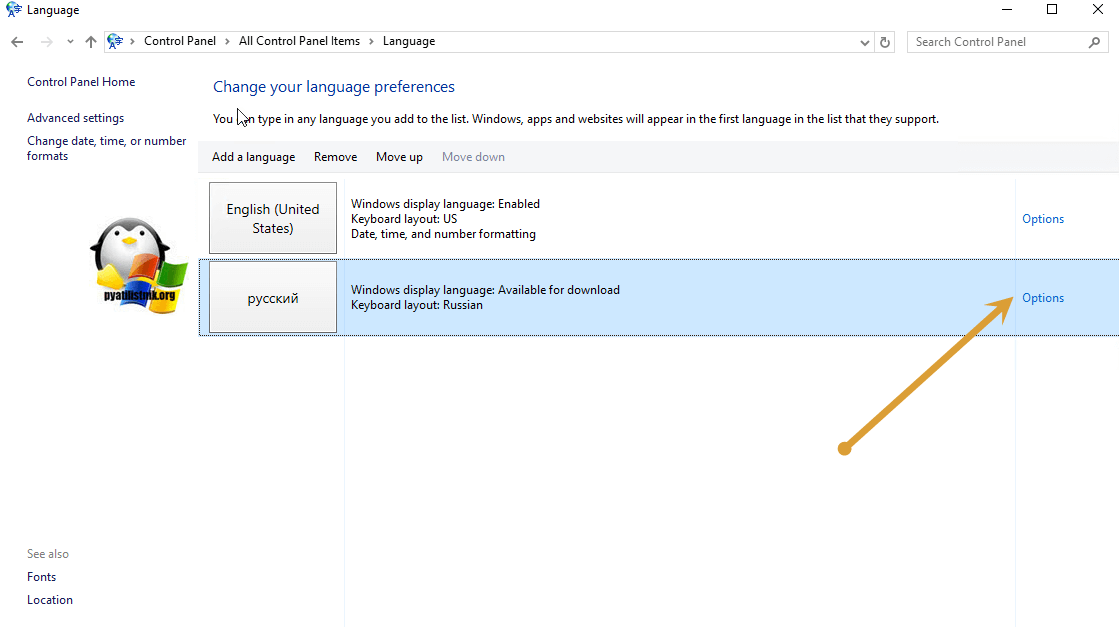
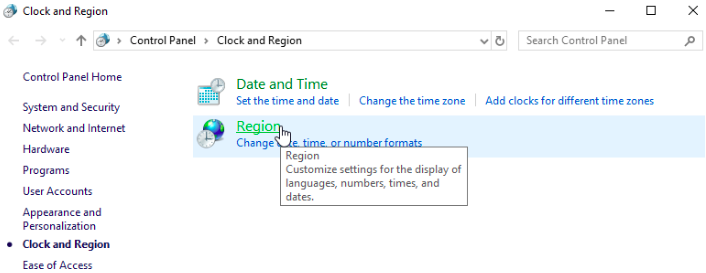
Для этого, откройте панель управления и перейдите в раздел: Control Panel –> Clock, Language and Region -> Language. В открывшемся списке будет перечислен список установленных языков интерфейса Windows.
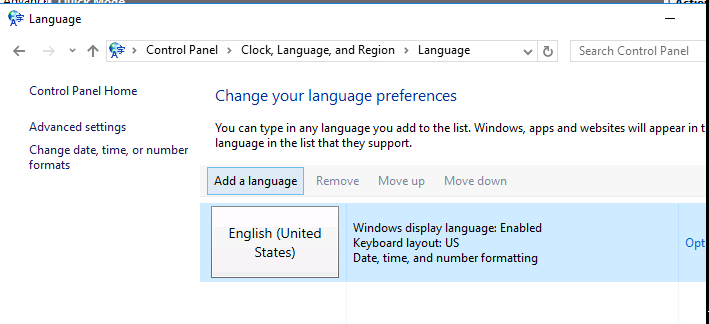
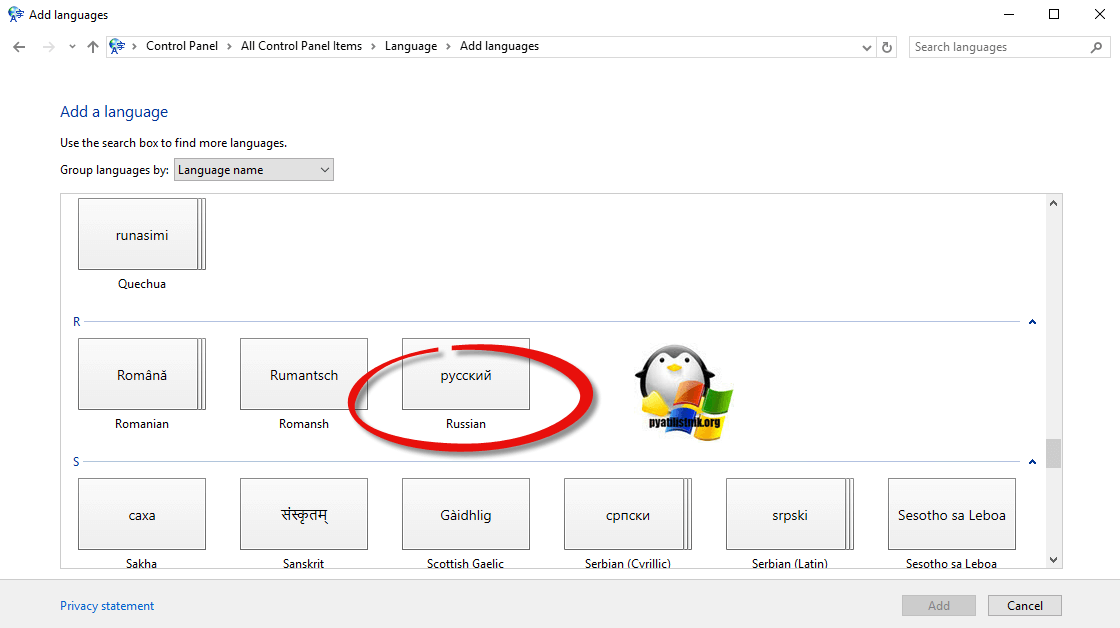
Нажмите кнопку Add Language, и в открывшемся списке найдите русский язык. Нажмите кнопку Add.
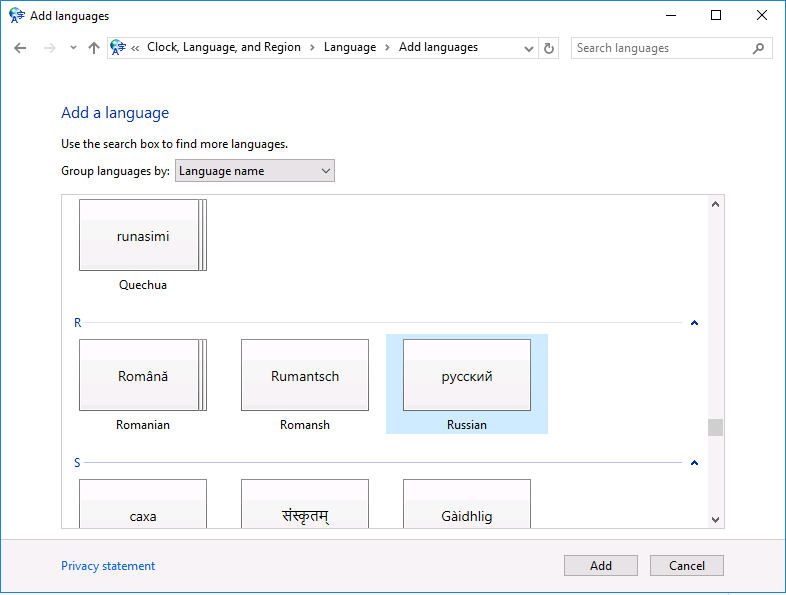
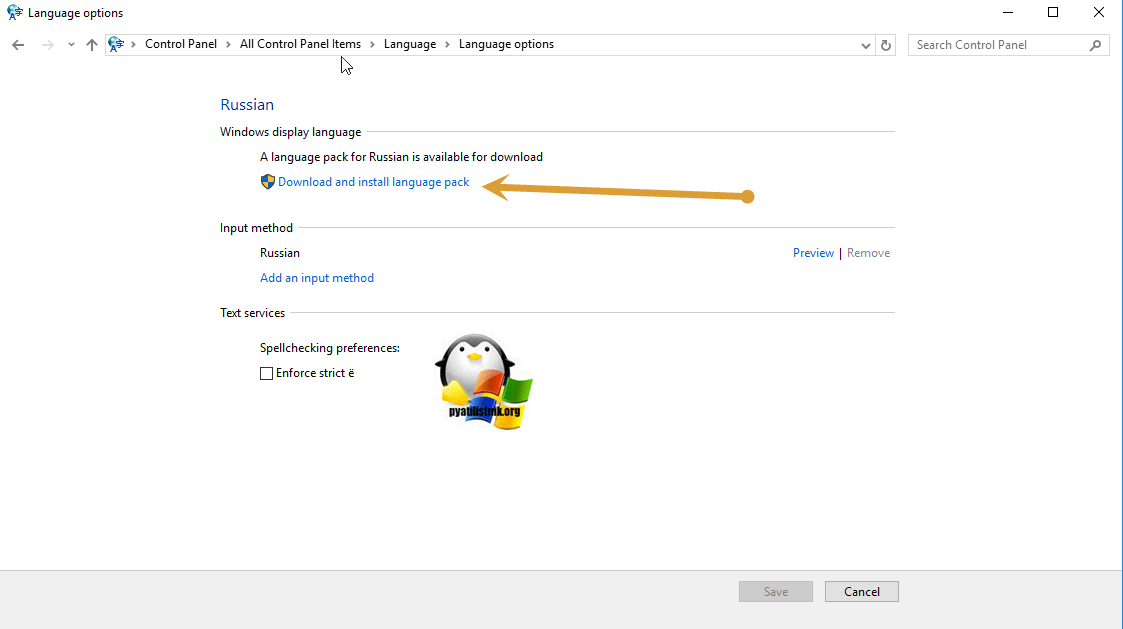
Русский язык появится в списке доступных языков, однако на самом деле он еще не установлен, а лишь доступен к загрузке (статус: Available for download). Откройте свойства языка (Options).
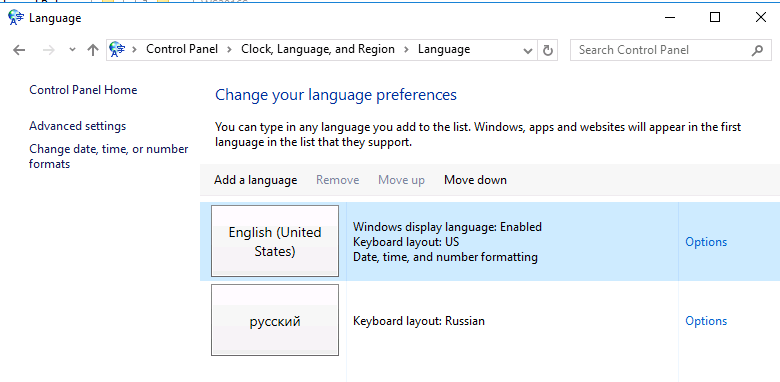
В открывшемся окне можно запустить загрузку и установку пакета русификации для Windows Server 2016, нажав на кнопку Download and install language pack.
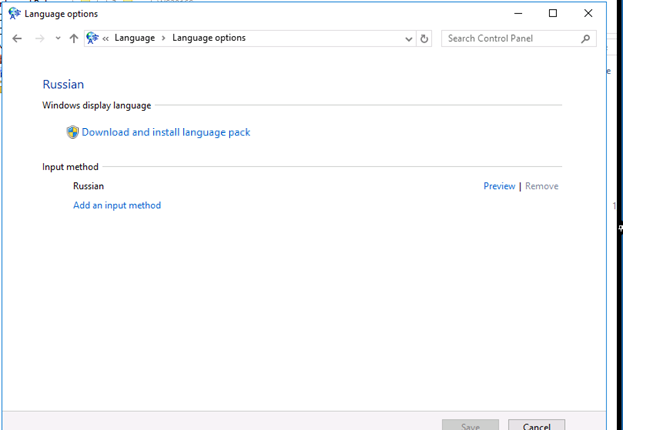
Совет. В процесс загрузки файл языкового пакета будет закачан в каталог C:WindowsSoftwareDistribution. После окончания загрузки, поиском найдите файл lp.cab и скопируйте его в сетевой каталог с вашими любимыми дистрибутивами. В дальнейшем это файл локализации можно устанавливать на любом аналогичном сервере в офлайн режиме (без необходимости подключаться к Windows Update) с помощью утилиты
lpksetup.exe
(о ней далее).
Офлайн установка Language Pack с помощью Lpksetup
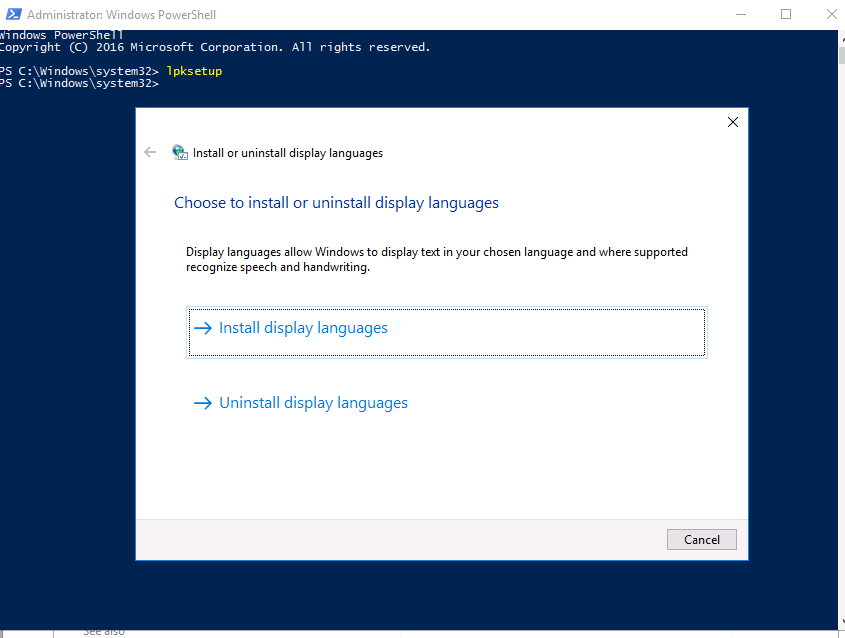
На изолированных от внешней сети серверах, установить пакет локализации можно в офлайн режиме с помощью утилиты lpksetup.exe. Но для этого понадобится загруженный файл языкового пакета. Файл lp.cab можно получить как описано выше (забрав с одного из серверов, подключенных к Интернету), либо скачав с сайта Microsoft (это возможность есть у владельцев корпоративной лицензии, подписчиков MSDN и OEM партнеров Microsoft).
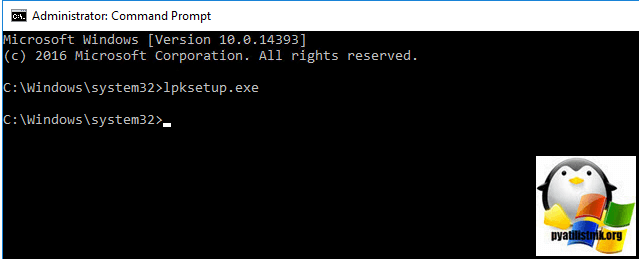
В том случае, если вы получили файл локализации, запустите команду
lpksetup
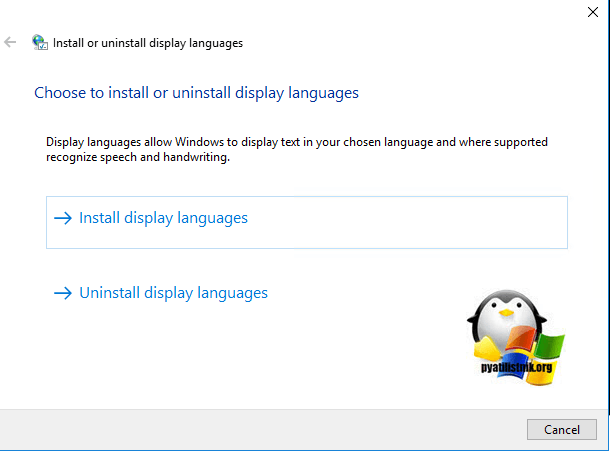
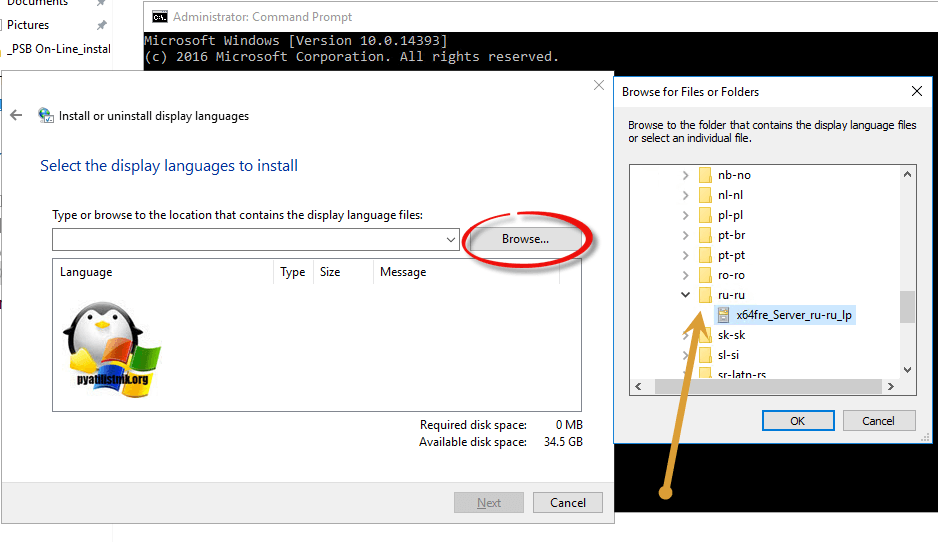
с правами администратора. В открывшемся диалоге нужно выбрать пункт Install display Languages.
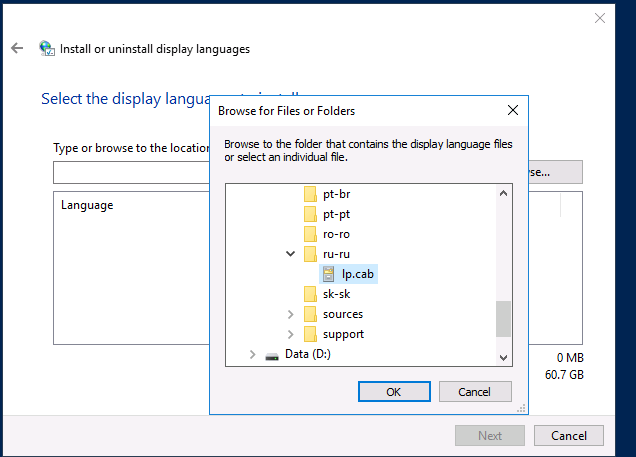
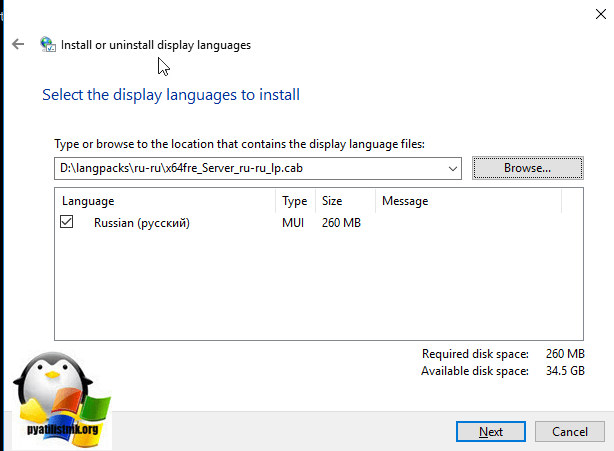
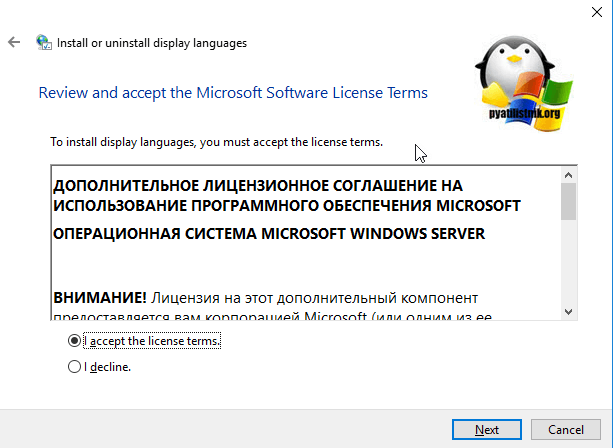
Укажите путь к файлу lp.cab (если вы cкачали целиком ISO образ TRL_Win_Svr_Language_Pack, файл русского языкового пакета находится в каталоге ru-ru) и запустите установку, согласившись с лицензионным соглашением.
Утилиту Lpksetup.exe можно использовать и в консольном режиме, так, например, для установки пакета русификации в тихом режиме, нужно воспользоваться командой:
lpksetup /i ru_RU /r /s /p ″F:langpacks″
(ключ /s – означает установку без взаимодействия с пользователем, ключ /r откладывает перезагрузку системы).
Русификация интерфейса Windows Server 2016
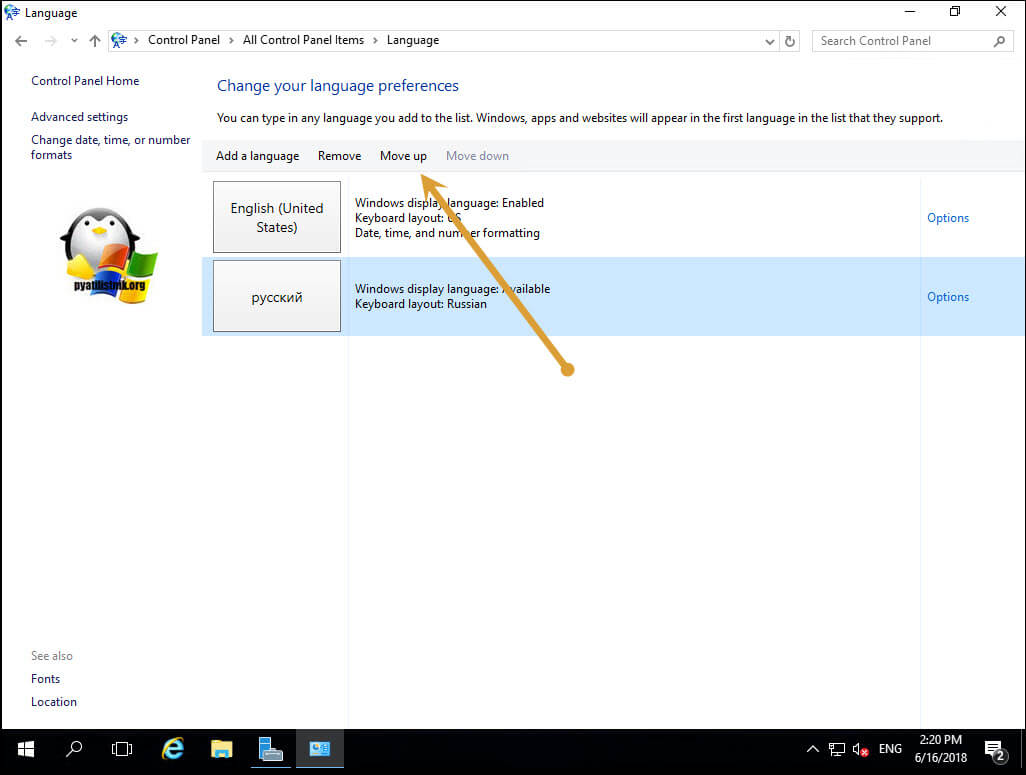
После установки Language pack, статус русского языка в панели управления изменится на Available. Теперь с помощью кнопки Move up его нужно переместить вверх. После логофа, язык интерфейса текущего пользователя сменится на русский.
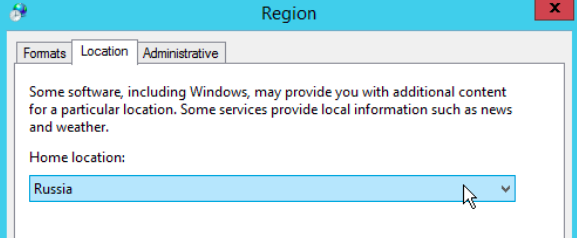
Для полноценной локализации нужно дополнительно нажать на кнопку Location и сменить местоположение на Russia (если вы этого еще не сделали).

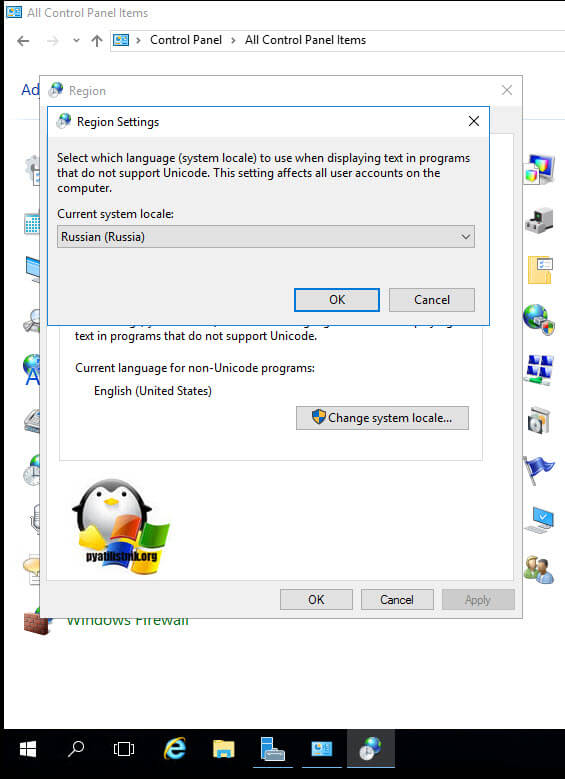
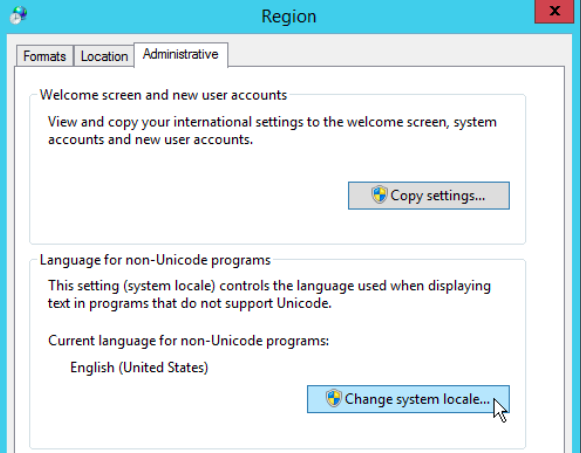
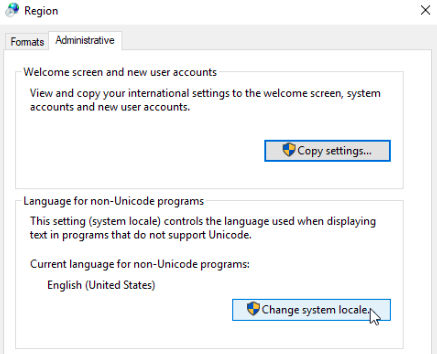
Затем на вкладке Administrative нужно изменить язык системной локали (Change system locale) для программ, не поддерживающих Юникод, на Russia.
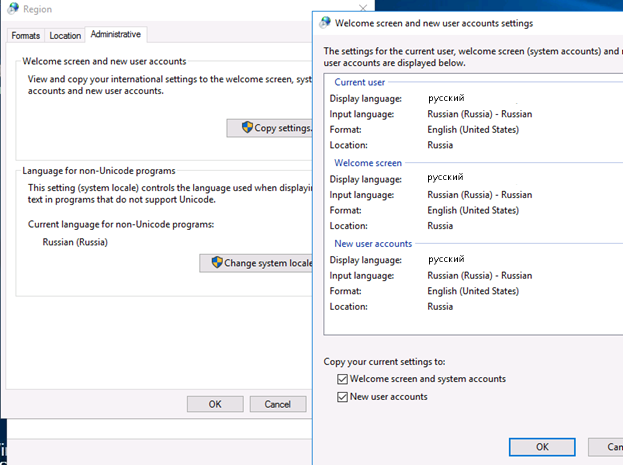
Чтобы применить данные настройки для новых учетных записей пользователей (еще не существующих на сервере профилей!!!), нужно нажать на кнопку Copy settings (Копировать параметры).
Укажите, что языковые настройки текущего пользователя нужно применить для новых учетных записей, системной учетной записи и окна приветствия.
На этом русификация интерфейса Windows Server 2016 завершена.
Обновлено 25.01.2019
Доброго времени суток! Уважаемые читатели и гости IT блога №1 pyatilistnik.org. Так уж завелось в России, что своих популярных операционных систем мы не имеем и полностью используем сторонние продукты, от зарубежных компаний. Изначально данные продукты заточены под англоязычных пользователей и имеют соответствующий язык. Так если вы арендуете в зарубежном цоде, сервер, то он будет установлен с английским языком, так как это некий стандарт в мире IT. Хотя я в текущее время не вижу проблем с родной локализацией, в виду того, что и сообщество решающее проблемы стало не чуть не меньше чем на западе, да и всегда приятно видеть родной язык. В таких случаях, когда вы хотите на серверных продуктах изменить язык, то вам придется ее русифицировать, удобным для вас методом. Сегодня я расскажу, как установить русский язык в Windows Server 2016, мы рассмотрим несколько методов, в том числе и с Language pack.
Методы установки русского языка в Windows Server 2016
Прежде, чем мы с вами начнем подробный разбор полетов по русификации нашей серверной операционной системы, я бы хотел выделить тем методы которые нам с вами помогут достичь поставленной задачи.
- Первый метод превращения Windows Server 2016 в русскую версию заключается в установке отдельного обновления, через «Центр обновления Windows», там будет скачана дополнительная KB, удобно, что делается по сути одним кликом мыши, из недостатков, то что необходим интернет, где он может быть не везде.
- Второй подход заключается в скачивании отдельного ISO образа с языковыми пакетами, называется он Language pack. Далее вы этот ISO монтируете в вашу операционную систему и производите установку. Этот метод еще называют Offline установкой.
Установка языкового пакета через Windows Update
Давайте рассмотрим классический метод русификации серверной ОС. Для того, чтобы у вас Windows Server 2016 получила русский язык, открываем меню «Пуск» и нажимаем значок шестеренки, чтобы у вас открылся пункт «Windows Settings». Кстати данный пункт можно открыть через сочетание клавиш WIN и I, эффект будет таким же.
В Windows Settings найдите пункт Time & language (Время и языковые настройки)
В открывшемся окне выбираем пункт Region & language и нажимаем плюсик на против «Add a language», что позволит вам выбрать дополнительный язык Windows Server 2016.
Из списка языков вам необходимо выбрать, то что вам нужен, так как я локализовываю Windows Server 2016 на русский язык, то выбираю его.
Задаем русский язык как основной, для этого нажмите «Set as default», после чего вам нужно произвести дополнительные настройки, для этого выберите «Options»

В пункте Language options, для загрузки вашего русского языкового пакета, нажмите кнопку Download,

У вас начнется загрузка русского Language pack, это KB3193497.
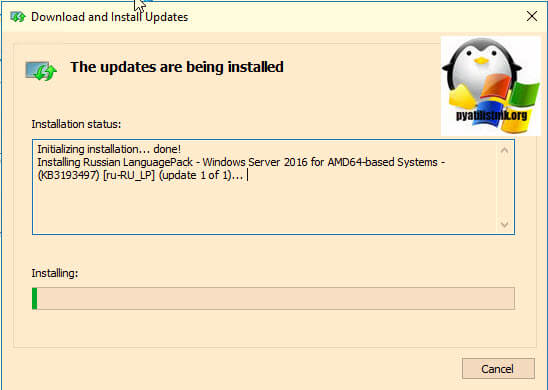
Далее вы увидите, что язык установлен, нажимаем стрелку назад.
Далее задаем, чтобы русский язык был основным, через кнопку «Set as default» и переходим к настройке интерфейса, описано ниже.
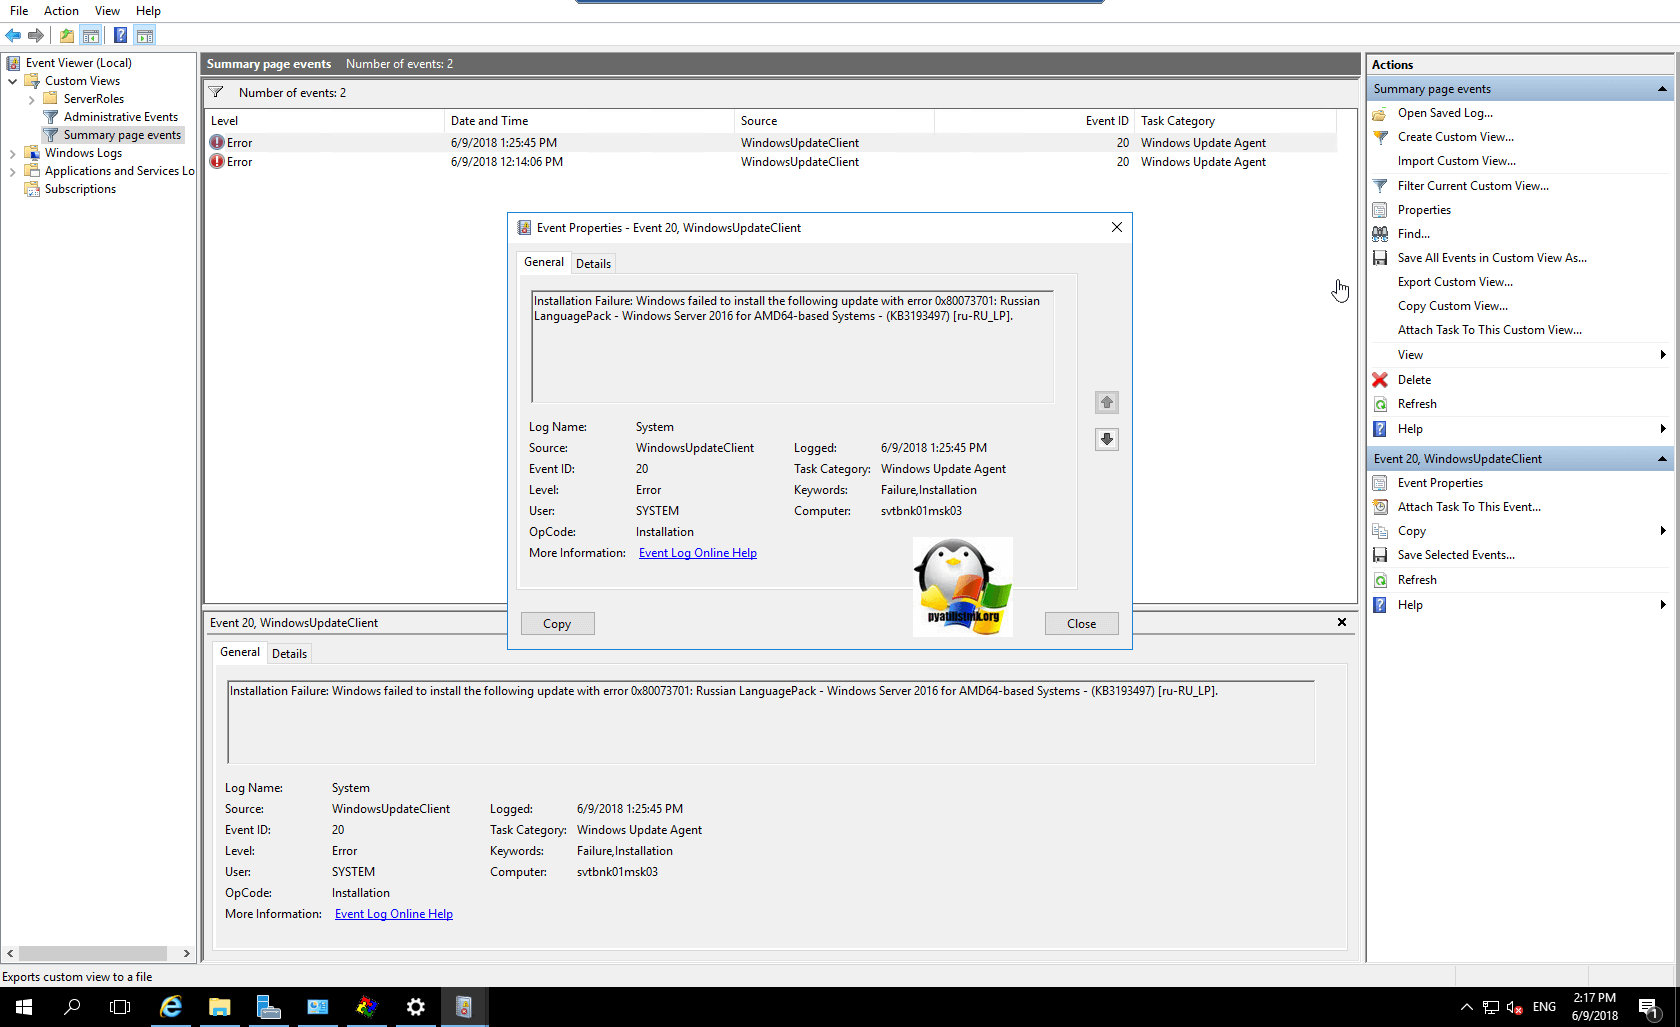
В некоторых случаях ,когда в Windows Server 2016 есть проблемы, вы можете поймать ошибку:
Some updates were not installed. Russian LanguagePack — Windows Server 2016 for AMD64 based System — (KB3193497)
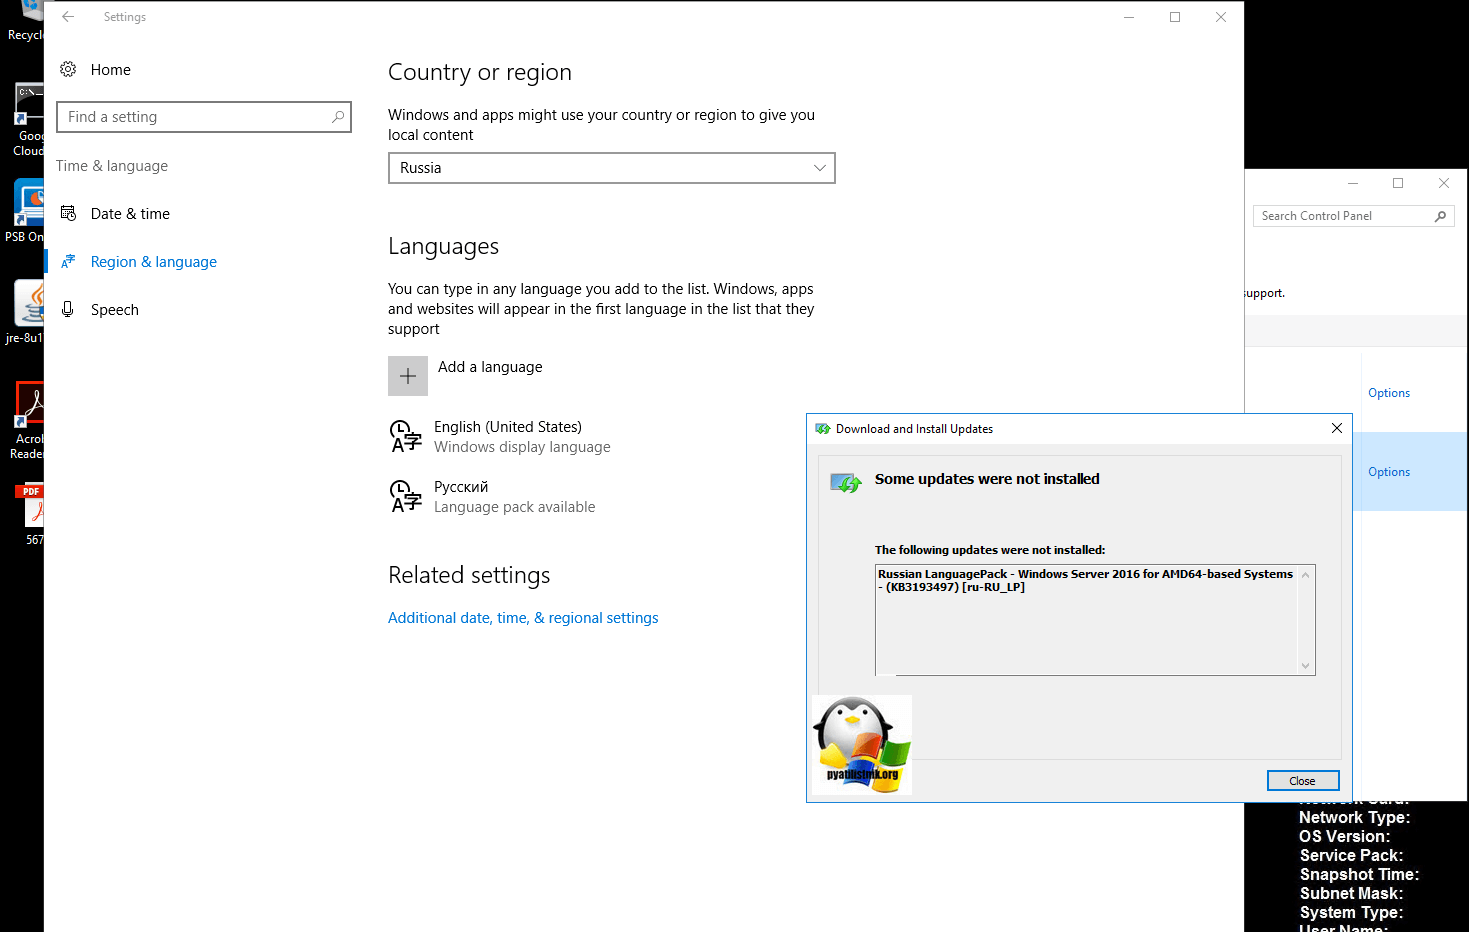
Если посмотреть журнал ошибок в Windows Server 2016, то вы обнаружите там ошибку с кодом 0x80073701,
Installation Failure: Windows failed to install the following update with error 0x80073701: Russian Language pack — Windows Server 2016 for AMD64-based System — KB3193497)
Но не спешите расстраиваться, ошибка с кодом 0x80073701 решаема, в этом вы можете убедиться по ссылке слева
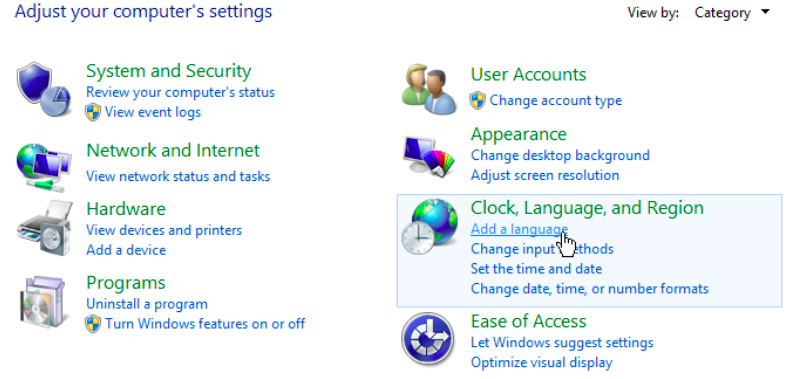
Кстати все действия по скачиванию и установке языкового пакета через Windows Update, вы можете сделать и через классический метод, для этого откройте панель управления (Control Panel). Полный путь Control Panel –> Clock, Language and Region -> Language
Чтобы скачать языковой пакет через центр обновления, вам необходимо нажать кнопку «Add a language»
Находим в списке русский язык и нажимаем кнопку «Add» для его добавления на скачивание.
Теперь, чтобы его установить в Windows Server 2016, нажмите «Options»
У вас будет ссылка на загрузку языкового пакета, нажимаем «Download and install Language pack»
У вас откроется знакомое окно с загрузкой KB3193497. Далее когда языковой пакет установится, нужно будет его применить.

В процесс загрузки файл языкового пакета будет закачан в каталог C:WindowsSoftwareDistribution. Там будет файл lp.cab его можно потом будет использовать для таких вещей, но проще стянуть у меня диск с Language pack, там есть все ip.cab.

Далее вам нужно будет настроить русский интерфейс.
Русификация интерфейса Windows Server 2016
Установки языкового пакета будет не достаточно, для того, чтобы ваша операционная система поменяла язык, нужно еще выполнить ряд действий. Теперь находясь в окне Language (Панели управления), поднимите русский язык на первый пункт, с помощью кнопки Move up.
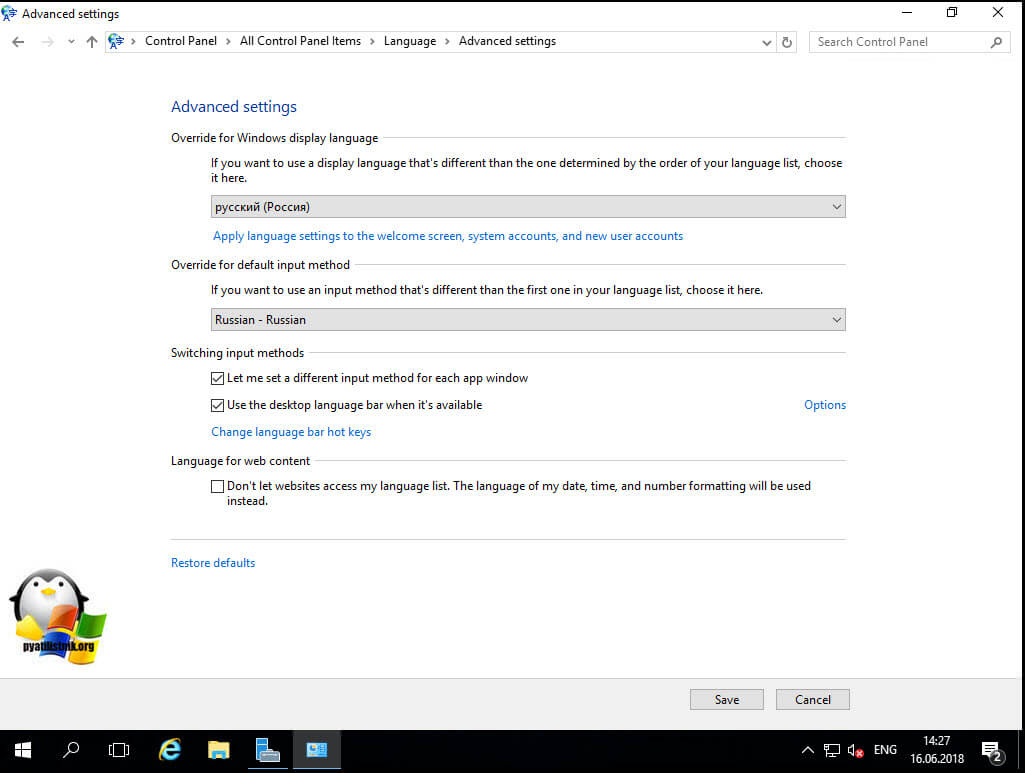
Далее переходите в пункт «Advanced settings».
Выставляем русский язык в пунктах:
- Override for Windows display language
- Override for default input method
Сохраняем настройки кнопкой Save.
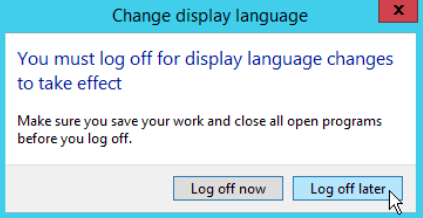
Вам предложат произвести перезагрузку, пока ее отложим, нажмем Log off latter.

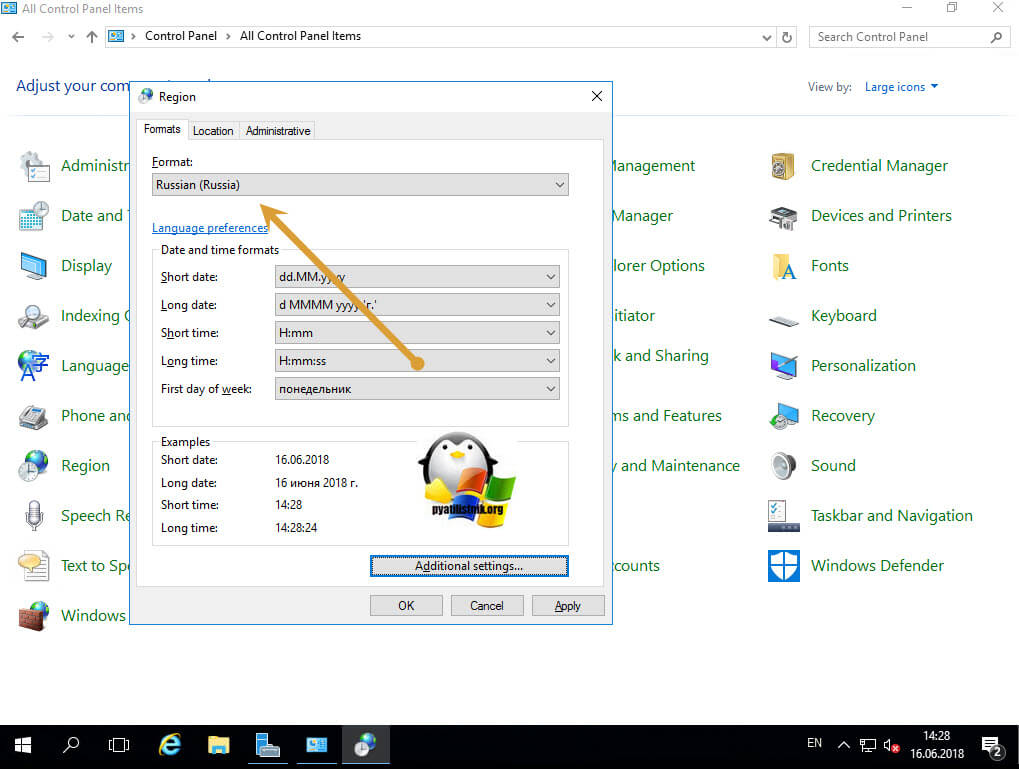
Откроем еще региональные настройки в панели управления «Region»

Во вкладке Formats выставите русский язык.
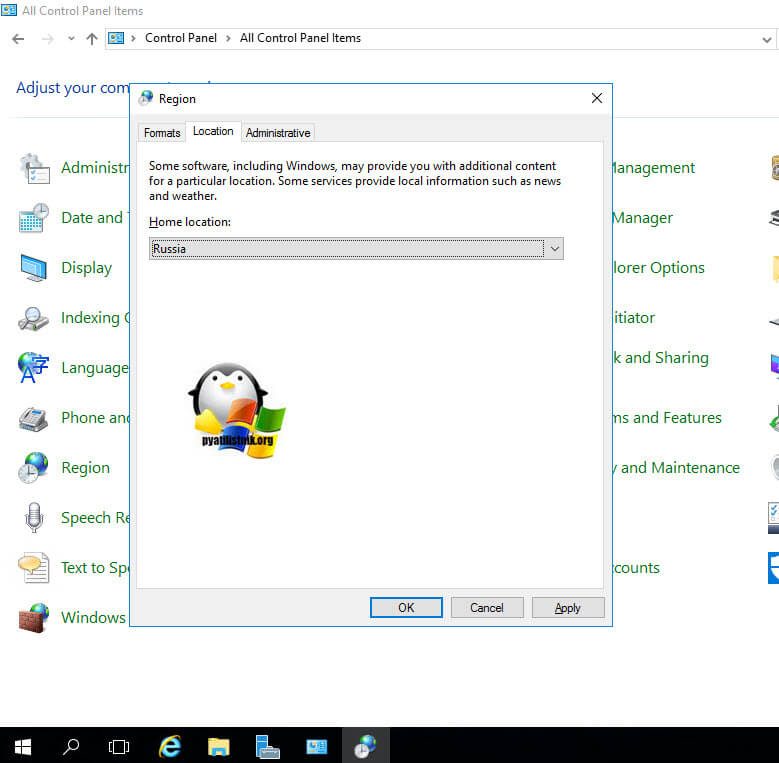
На вкладке Location выставите русский язык для Windows Server 2016
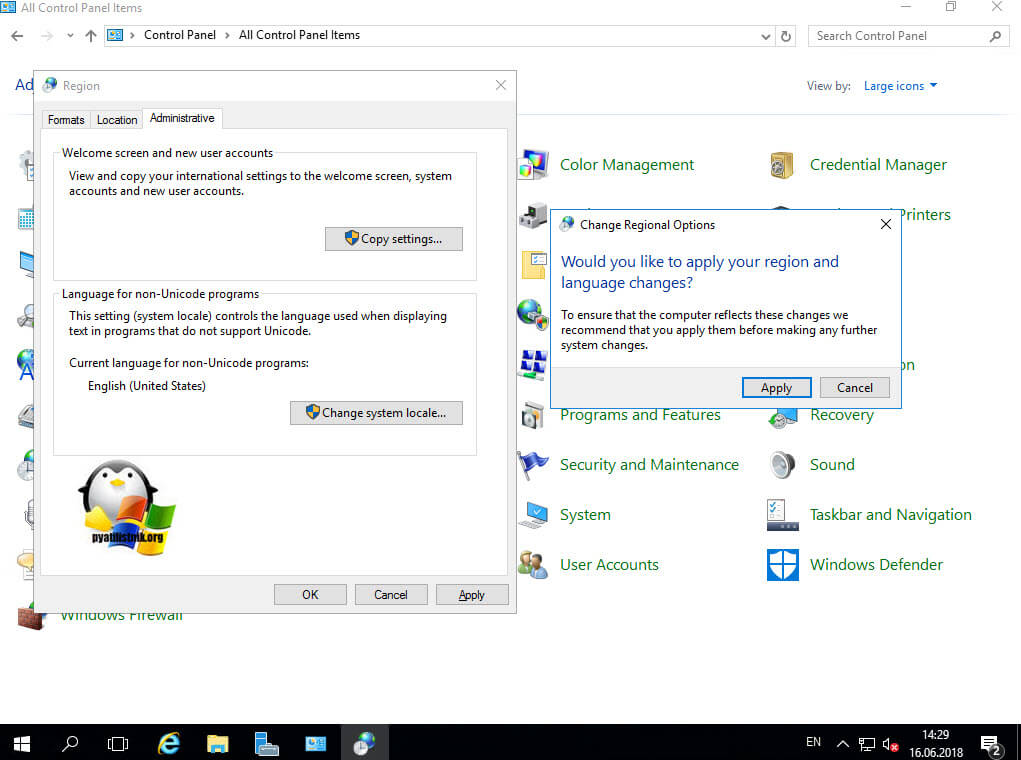
переходим на вкладку Administrative и нажимаем кнопку «Copy Settings», для копирование настроек для всех пользователей. Применяем настройки, нажимая Apply.
Выставляем везде русский интерфейс. В самом низу выставите две галки:
- Welcome screen and system accounts — Чтобы руссифицировать начальное окно приветствия
- New user accounts — чтобы настройки были и для новых пользователей.

Для применения установки русского интерфейса вас попросят перезагрузить сервер, отложите это кнопкой «Cancel».
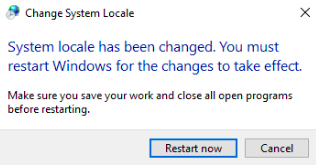
Осталось еще применить один пункт, через кнопку «Change system locate», выберите русский язык и перезагрузите ваш сервер.
После загрузки вы получите сервер с русским интерфейсом.

Как установить русский язык через утилиту lpksetup.exe
И так второй метод русификации Windows Server 2016 заключается в установке автономного пакета lp.cab с помощью утилиты командной строки lpksetup.exe, которая идет в комплекте с операционной системой. Для оффлайн установки вам потребуется скачать ISO с Language pack для Windows Server 2016, сделать это можете по ссылке слева. Далее щелкаете по нему два раза и ваш диск будет смонтирован в виде виртуального DVD-rom.
Производите открытие командной строки от имени администратора и далее вбиваете команду lpksetup.exe.
У вас откроется окно мастера, которое поможет установить русский язык в Windows Server 2016, через автономный пакет lp.cab. Обратите внимание, что с помощью данного мастера вы сможете и удалить языковой пакет. Выбираем пункт «Install display languages»
Через кнопку «Browse» переходим на ваш смонтированный ISO диск с Language pack, и находим папку ru-ru, в которой будет пакет x64fre_Server_ru-ru_lp. Выбираем его и нажимаем кнопку «Ok».
Для продолжения установки русского языка в Windows Server 2016 нажимаем кнопку «Next», обратите снимание MUI пакет весит всего 260 мегабайт.
На следующем шаге по локализации операционной системы, вам нужно принять лицензионное соглашение, через пункт «I accept the license terms»
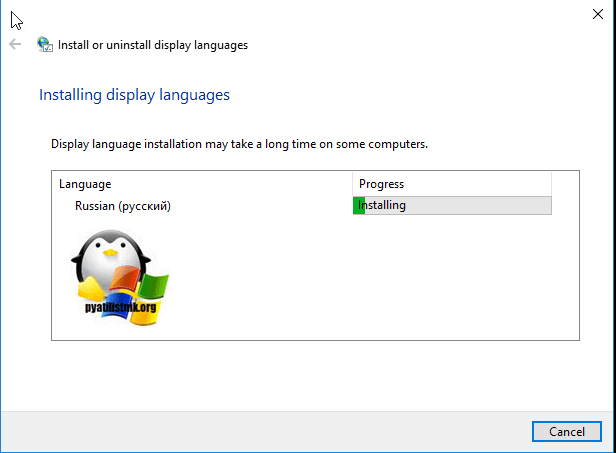
У вас начнется интеграция русского языка в Windows Server 2016.
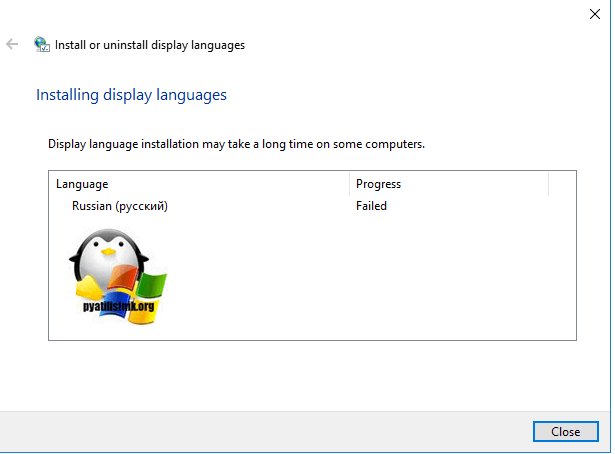
Если у вас возник статус Failed, то это все та же ошибка 0x80073701, как ее решать я рассказал выше.
Далее после установки, вам потребуется перезагрузить ваш сервер и произвести дополнительные настройки описанные выше.
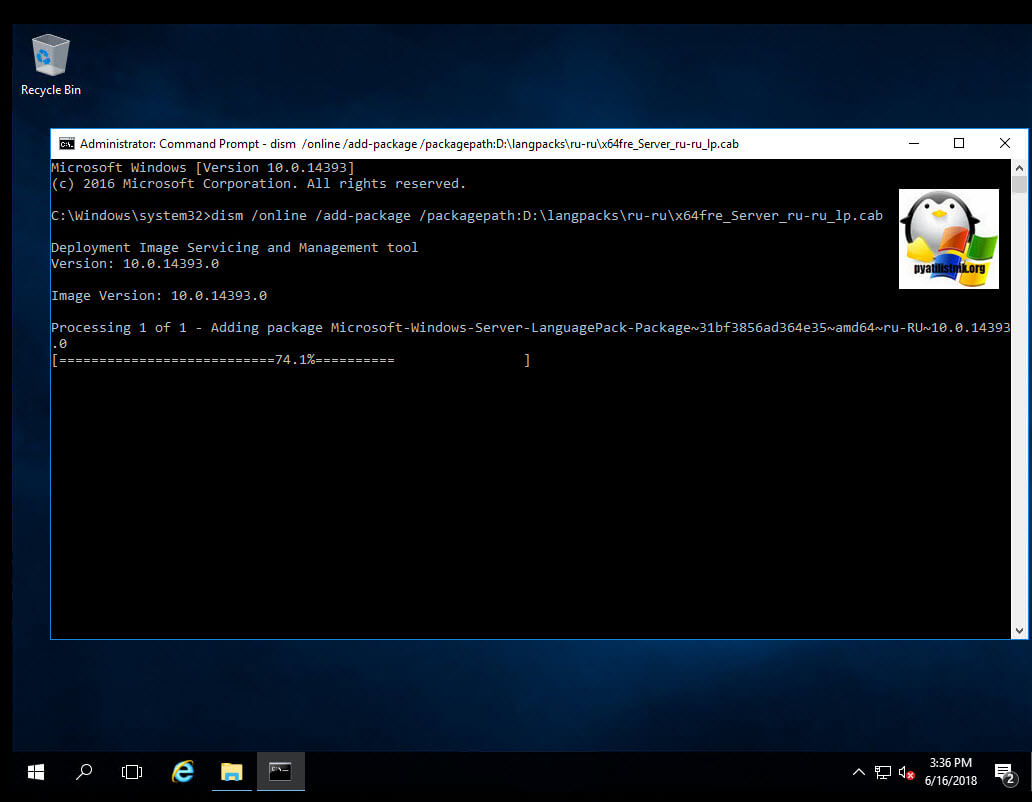
Кстати установить русский язык на windows Server 2016 можно и с помощью команды DISM и вашего диска с языковыми пакетами (Language pack). Для этого в командной строке от имени администратора введите команду:
dism /online /add-package /packagepath:D:langpacksru-rux64fre_Server_ru-ru_lp.cab
Как видите сделать русский интерфейс у Windows Server 2016 очень просто, и на мой взгляд я очень подробно об этом написал, если будут вопросы, то пишите их в комментариях, рад буду ответить.
Введение
На серверах с операционной системой Windows по умолчанию установлен английский язык. При необходимости вы можете изменить язык на русский.
Для Windows Server 2012/2016
1. Подключитесь к серверу по RDP. Если не знаете, как это сделать, поможет наша статья в базе знаний.
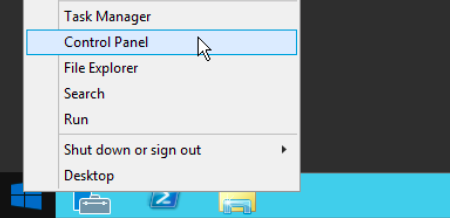
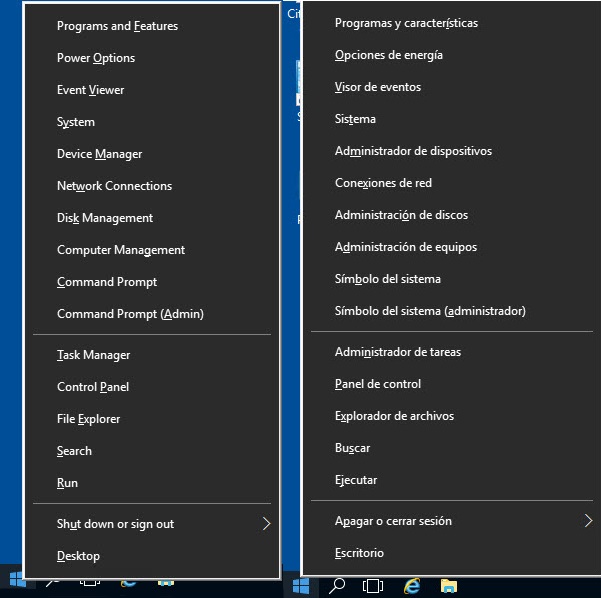
2. Нажмите правой кнопкой мыши на Пуск и перейдите в Control panel.
3. В блоке Clock, Language, and Region нажмите Add a language.
4. В открывшемся окне нажмите Add a language.
5. В появившемся списке выберите Russian (русский) и нажмите Add.

6. Русский язык появится в списке доступных. Нажмите Options напротив русского языка, чтобы его установить.
7. Нажмите Download and install language pack. Начнется установка языкового пакета.
8. После того как установка завершится, снова нажмите Options напротив русского языка. Затем нажмите Make this the primary language — русский язык станет языком по умолчанию.
9. При появлении диалогового окна нажмите кнопку Log off later, чтобы перезагрузить систему позже.
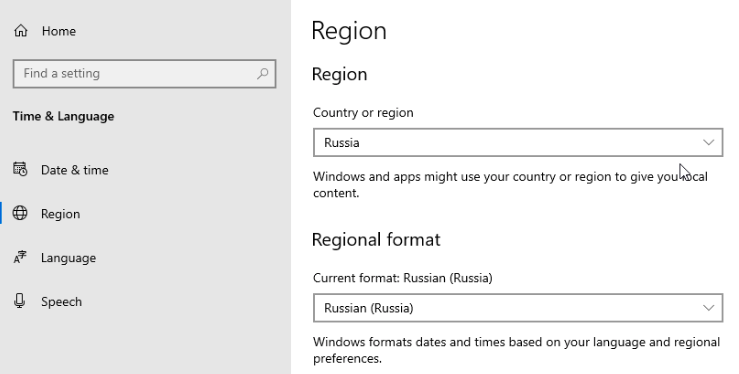
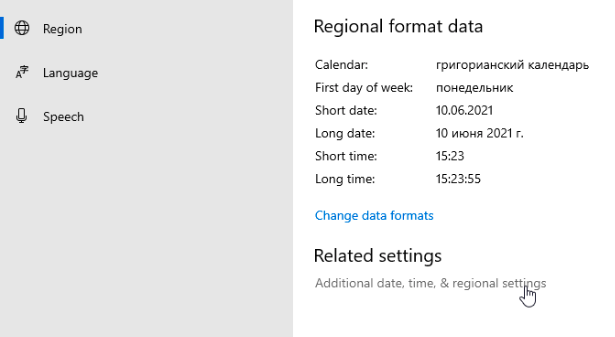
10. Измените региональные настройки. Для этого нажмите Change date, time, or number formats.
11. В открывшемся окне откройте вкладку Location, в списке Home location выберите Russia.
12. Откройте вкладку Administrative, нажмите Change system locale… В появившемся списке выберите Russian (Russia) и нажмите OK.
13. В открывшемся диалоговом окне нажмите Restart now, чтобы перезагрузить систему.

1. Подключитесь к серверу по RDP. Если не знаете, как это сделать, поможет наша статья в базе знаний.
2. Нажмите Пуск, затем нажмите Settings (значок шестеренки).
3. В открывшемся окне нажмите Update & Security.

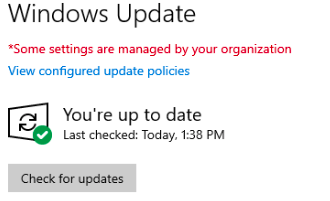
4. Нажмите кнопку Check for updates, чтобы установить обновления системы.
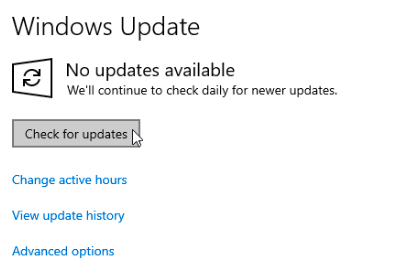
5. После того как установка обновлений завершится, проверьте, что появилась надпись You’re up to date. Если она не появилась, повторите установку обновлений.
6. Снова перейдите в Settings и нажмите Time & Language.

7. Откройте вкладку Language и нажмите Add a language.
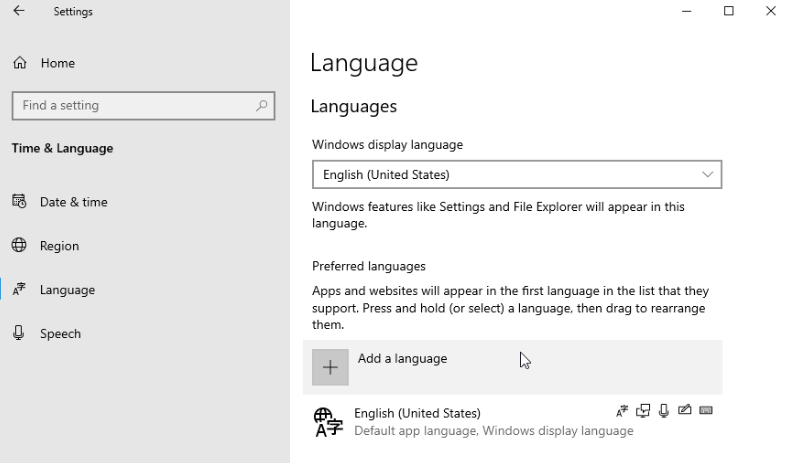
8. Выберите в списке Русский (Russian) и нажмите Next.
9. Проверьте, что в открывшемся окне отмечен чекбокс Install language pack and set as my Windows display language, и нажмите Install. Начнется установка языкового пакета. Если такого пункта нет, устраните ошибку по инструкции от Windows и продолжите далее.
10. После того как установка завершится, в списке Windows display language выберите Русский.
11. Откройте вкладку Region. В списке Country or region выберите Russia, в списке Current format выберите Russian (Russia).
12. Нажмите Additional date, time & regional settings.
13. В открывшемся окне нажмите Region.
14. Откройте вкладку Administrative и нажмите Change system locale… В появившемся списке выберите Russian (Russia) и нажмите OK.
15. В открывшемся диалоговом окне нажмите Restart now, чтобы перезагрузить систему.
Заключение
В этой инструкции мы рассмотрели, как поменять язык на русский в Windows Server 2012/2016 и 2019.
Managing Windows languages and language packs on Windows 10 and Server 2016 can be a bit of a daunting task. This article aims to clarify most issues.
Change Log
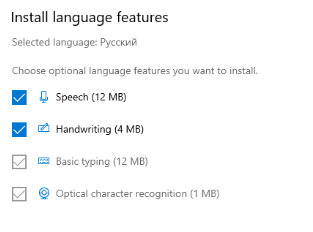
01.09.2018: added information on Features on Demand (languages for handwriting, speech, etc.).
27.12.2018: small error correction in the installation directory of language packs (I wrote %SystemDrive% instead of %SystemRoot%). Added clarification that changing the language for Windows Apps, Edge and Internet Explorer concerns the language displayed within the application and not the language of the application itself.
Table of Contents
- An introduction to language packs
- How to obtain a language pack (for offline deployment)
- Windows Server 2016 Language Pack
- Windows 10 version 1803 Language Pack
- Windows 10 version 1803 Features on Demand
- Adding a language pack to Windows
- Complete installation script
- How to change the Windows display language
- Change the display language manually (Windows Server 2016)
- Change the display language manually (Windows 10)
- Change the display language using Microsoft Group Policy
- Change the display language using a Group Policy Preference item
- Using a logon script
- How to change the display language for Windows Apps and Store, Edge and Internet Explorer
- Manually (Windows Server 2016)
- Manually (Windows 10)
- Group Policy Preference
- Using a logon script
- How to prevent users from changing language settings
- How to change the system code page for non unicode programs
An introduction to language packs
A language pack allows you to display Windows in a different language besides English. All windows and menus are displayed in your locale language.
This is not the same as configuring local settings such as keyboard layout, date, time and number formatting. You can configure these locale settings without changing the Windows language. See also some of my other articles:
- Configuring Regional Settings and Windows locales with Group Policy
- Configuring the time zone and code page with Group Policy
As far as I can tell, language packs are available for all editions of Windows 10 and Windows Server 2016. To help you reduce the size of your image, language packs in Windows 10 are split into the following language components and Features On Demand:
- Language (interface) pack
- UI Text (this includes language packs, language interface packs and WinPE language packs which are all available in one download source)
- Features on Demand (additional language packs)
- Basic (spell check, typing)
- Fonts
- Handwriting (for devices with pen inputs)
- Optical character recognition
- Text-to-speech (required for Cortana)
- Speech (required for Cortana)
- Retail Demo experience
Reference: Language Packs in Windows 10 (microsoft.com)
A language (interface) pack, named UI Text in the above list, changes the display language for the following components:
- The operating system (all text in windows and menus)
- Windows apps and Windows Store
- Internet Explorer
- Edge (applies to Windows 10 only since Windows server has no Edge)
- WinPE (included in the same download source, but has to be used in a WinPE image)
Additional language packs, the so-called Features on Demand, are available for example for spelling, handwriting and speech recognition (Cortana) and more. These have to be downloaded separately and are available for Windows 10 only. They are NOT included within the source files of a language pack. More details are provided later on in this section.
Besides language packs for the operating system, Microsoft offer language packs for applications such as Microsoft Office. These have to be downloaded separately. The availability of language packs for third-party software depends on the vendor. Acrobat Reader for example support more than 30 languages. These are not within the scope of this article. In this article I only deal with language packs and the Features on Demand.
Please be aware that the list of available languages can differ for individual components. For example, the available language packs for Windows and for Office do not have to match. The same goes for third-party software. When planning your language strategy you should count with the fact that you will not find all languages for all products.
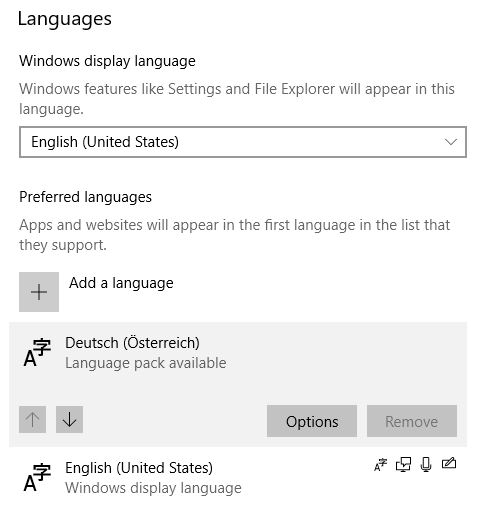
By default, when you add a language in Windows, only the keyboard layout is added. The actual Windows display language (the language (interface) pack) has to be downloaded separately. The same goes for additional language packs for handwriting, speech and so forth.
Take a look at the following screenshot. For English and German, the Windows display languages are available (English is currently enabled). For French however, only the keyboard layout is available, not the Windows display language.
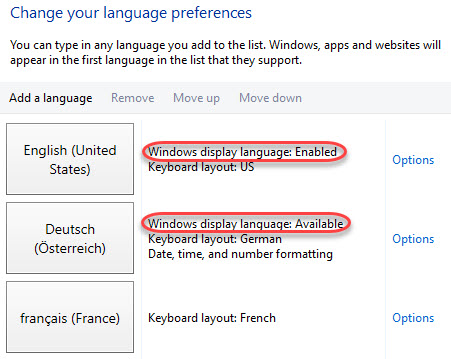
Note: the screenshot above was taken from a Windows Server 2016 version 1607 machine. In Windows 10 version 1803, the menu and windows to manage languages look completely different (see the section Change the display language manually (Windows 10) for more information and screenshots).
Microsoft separates between a language pack (LP) and a language interface pack (LIP). As per Microsoft, a LIP is a «high-quality, localized «skin» for emerging or minority language markets. […] A LIP provides the desktop user with an approximately 80% localized user experience by translating a reduced set of user interface (UI) elements. A LIP […] has a dependency on a base language pack of Windows.
The difference between an LP and a LIP is «the level of localization in comparison to language pack (LP) packages: LIP packages provide the desktop user with the most frequently accessed user interface and basic user assistance support (help files). In addition, a LIP is installed as a language add-on on top of an existing LP with base language dependency (Catalan LIP can only be installed on top of the Spanish or French LP, Welsh LIP can only be installed on top of the English LP). In addition, once a LIP is installed, switching the user interface between the LIP language and the LP base language is possible for users on all versions of Windows.
Also, as per Microsoft; «Windows Server and Windows 10 language packs are not interchangeable. Windows Server language packs cannot be used on Windows 10, and Windows 10 language packs cannot be used on Windows Server.»
In total, there are 38 language packs available for Windows 10 and Windows Server 2016. In comparison, for Windows Server 2012 R2, only 18 language packs are available.
In total, there are 72 language interface packs (LIPs) available for Windows 10. LIPs are not supported on Windows Server. So keep this in mind when you have both notebooks/desktops and for example Microsoft Remote Desktop Services or Citrix Virtual Apps and Desktops (previously known as XenApp or XenDesktop) in your organization. You may not be able to install the same languages on all your workers!
A language pack is installed in the directory %SystemRoot%System32%Language-ID%, so for example C:WindowsSystem32es-ES. The size of a language pack is about 50 MB. In case you want to install all 38 language packs, you increase the size of you image with about 2 GB. Language interface packs only use up around 10 MB of space. Features on Demand are between 5 and 70 MB in size. Most of them are around 10 to 20 MB though.
For a complete list of available LPs and LIPs for Windows Server 2012 R2, Windows 10 and Windows Server 2016 see the Microsoft article Available Language Packs for Windows.
How to obtain a language pack
There are four ways how to get a language (interface) pack and the Features on Demand:
- For offline use:
- OEMs and system builders with Microsoft Software License Terms can download language packs and LIPs from the Microsoft OEM site or the OEM Partner Center.
- IT professionals can download language packs from the Microsoft Volume Licensing Site.
- IT professionals can download language packs from Visual Studio Subscriptions (previously MSDN).
- Manually:
- After Windows is installed, end users can download and install additional language packs in Settings > Time & language > Region and language > Add a language (under Options).
Reference: Where to get language packs and LIPs (microsoft.com)
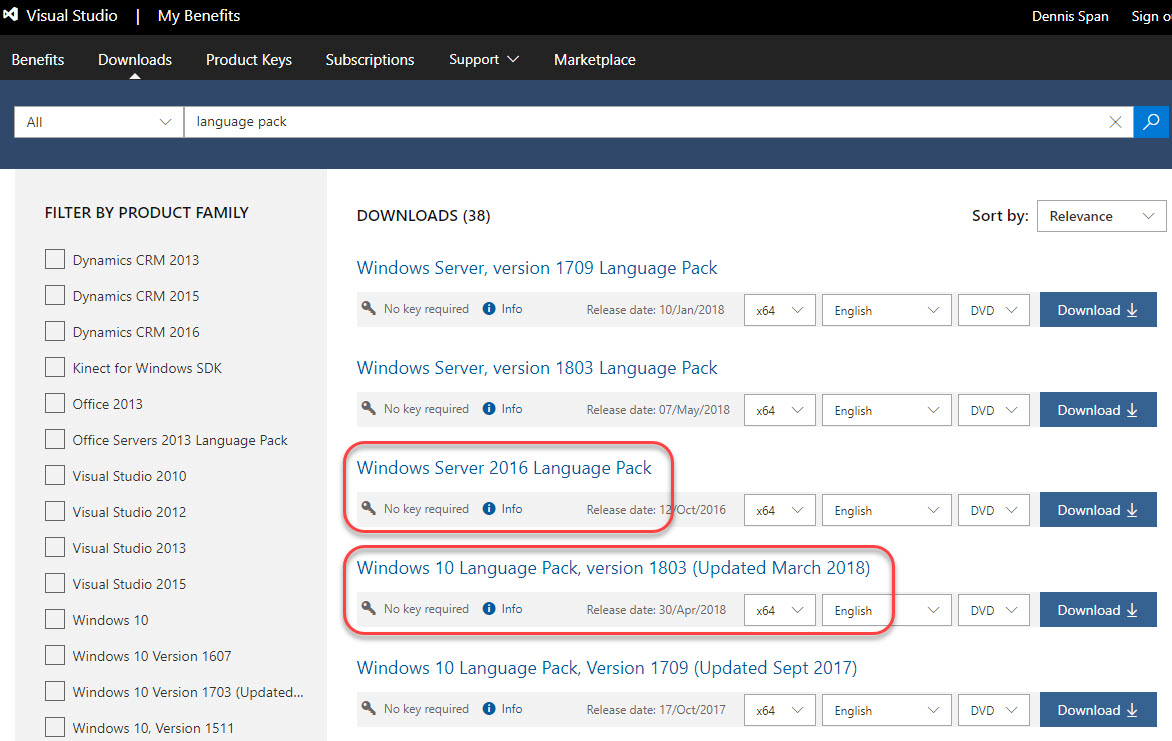
IT professionals require the offline installation sources to be able to deploy the language packs using the software deployment tool of their choice (e.g. MDT, SCCM, Citrix App Layering). To download the language packs I used my Visual Studio Subscription (MSDN). Select one of the links below for more details:
- Windows Server 2016 Language Pack
- Windows 10 version 1803 Language Pack
- Windows 10 version 1803 Features on Demand
Windows Server 2016 Language Pack
The download for Windows Server 2016 Language Pack is a single ISO file (about 2,6 GB in size) that contains all 38 languages. On the Microsoft Volume License Site or on the Microsoft Visual Studio Subscription website, search for language pack and you will find all language packs for all supported operating systems.
To extract the ISO file, use your favorite file archiving tool (e.g. 7-ZIP).
The ISO file for Windows Server 2016 contains two root folders:
- langpacks
- Windows Preinstallation Environment
The folder langpacks contains the language packs that need to be installed on Windows. The language files in the folder Windows Preinstallation Environment are used to localize your WinPE image. Within the folder langpacks, each language has its own subfolder.
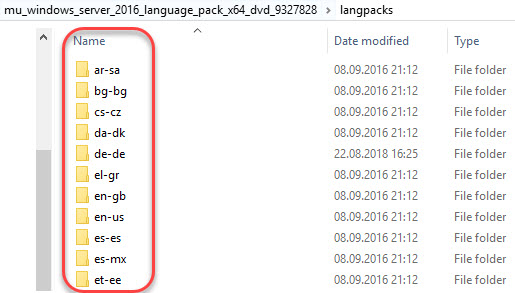
These subfolders contain the source files we need for the unattended installation (deployment) of the language packs. The file name for each language pack is:
x64fre_Server_%language%_lp.cab
For example: x64fre_Server_de-de_lp.cab
Note: for past operating systems the name of a language pack file was lp.cab. This name is no longer used for Windows 10 and Windows Server 2016, except for the WinPE language packs.
Windows 10 version 1803 Language Pack
The language pack for Windows 10 is also a single ISO file, but much larger (more than 7 GB) compared to the one for Windows Server 2016. The reason for this is that the download for Windows 10 includes more source files. Besides the 38 language packs (LPs) also included in the ISO file for Windows Server 2016, the Windows 10 ISO file also includes 72 language interface packs (LIPs) and includes both 32-bit and 64-bit source files.
On the Microsoft Volume License Site or on the Microsoft Visual Studio Subscription website, search for language pack and you will find all language packs for all supported operating systems.
To extract the ISO file, use your favorite file archiving tool (e.g. 7-ZIP).
The folder structure for the Windows 10 language packs is slightly different compared to the one for Windows Server 2016:
- arm64
- Windows Preinstallation Environment
- x64
- x86
Each architecture has its own langpacks folder containing both the language packs and language interface packs. The file name for each language pack is:
Microsoft-Windows-Client-Language-Pack_%architecture%_%language%.cab
For example: Microsoft-Windows-Client-Language-Pack_x64_de-de.cab
The file name for each language interface pack is:
Microsoft-Windows-Client-Language-Interface-Pack_%architecture%_%language%.cab
For example: Microsoft-Windows-Client-Language-Interface-Pack_x64_ca-es.cab
Note: for past operating systems the name of a language pack file was lp.cab. This name is no longer used for Windows 10 and Windows Server 2016, except for the WinPE language packs.
Windows 10 version 1803 Features on Demand
The Features on Demand consists of two ISO files (between 3,5 and 4,5 GB in size). You can download either the 32-bit or 64-bit source files. For each version of Windows 10, the download consists of two parts (one ISO file per part). The languages for handwriting, speech, etc. are included in Part 1.
On the Microsoft Volume License Site or on the Microsoft Visual Studio Subscription website, search for features on demand and you will find the available downloads for all Windows 10 versions.
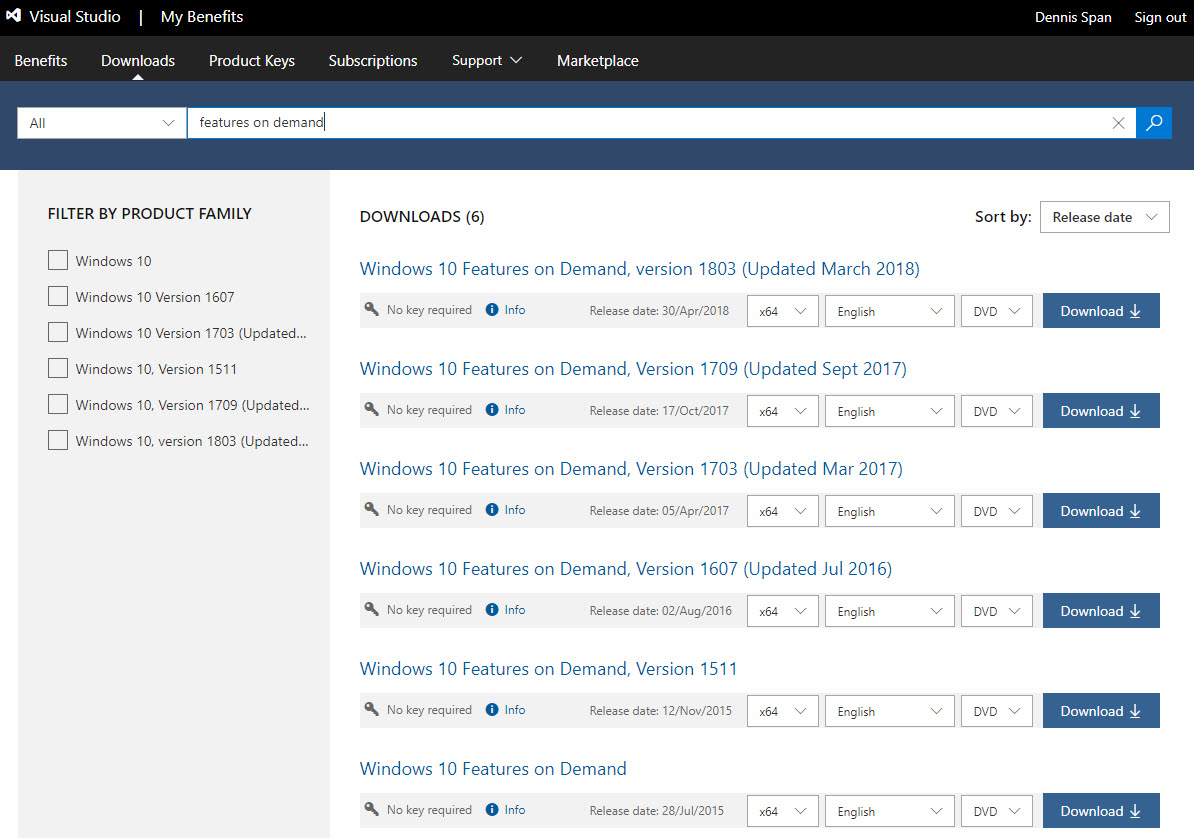
To obtain the language files you only need to download Part 1.

To extract the ISO file, use your favorite file archiving tool (e.g. 7-ZIP).
Within the folder structure you find multiple CAB files that represent a Feature on Demand. The name of the CAB files that contain language specific features start with Microsoft-Windows-LanguageFeatures. The following categories exist:
- Microsoft-Windows-LanguageFeatures-Basic…..cab
- Microsoft-Windows-LanguageFeatures-Fonts…..cab
- Microsoft-Windows-LanguageFeatures-Handwriting…..cab
- Microsoft-Windows-LanguageFeatures-OCR…..cab
- Microsoft-Windows-LanguageFeatures-Speech…..cab
- Microsoft-Windows-LanguageFeatures-TextToSpeech…..cab
Select the feature(s) in the language(s) that you require. The next section explains how to install (add) a language pack to the operating system.
Adding a language pack to Windows
There are a couple of different ways how to install a language (interface) pack:
- You can add a language pack to Windows by using the DISM / Add-WindowsPackage tool. Add-WindowsPackage is the PowerShell equivalent of the DISM executable. How to use DISM / Add-WindowsPackage is described in detail in this article. Just keep on reading. I also recommend you to check out the following Microsoft articles on this matter:
- Add and Remove Language Packs on a Running Windows Installation
- Add and Remove Language Packs Offline Using DISM
- To deploy a multilingual version of Windows by using Windows Setup (for example, a corporate image Windows DVD or a set of images available on a corporate network), you can add language resources to the installation program. See Add Multilingual Support to a Windows Distribution. For corporate or network-based deployments, you may also need to update the Windows Preinstallation Environment (Windows PE) that users see when they choose how and where to install Windows to their PC. For more information, see WinPE: Mount and Customize.
- After Windows is installed, end users can download and install additional language packs and LIPs from the Language Control Panel. For more information, see one of the following sections in this article:
- Change the display language manually (Windows Server 2016)
- Change the display language manually (Windows 10)
Reference: Section Add languages to Windows in the article Language Packs (microsoft.com)
My preferred silent installation method is to use DISM or the PowerShell equivalent Add-WindowsPackage (used in the installation script below).
The basic DISM command to install a language pack is:
dism.exe /online /add-package /packagepath:»C:LPde-dex64fre_Server_de-de_lp.cab» /quiet /norestart /logpath:»C:LogsMUI-de-de.log»
Also Features on Demand can be installed like that. Take for example the German handwriting package:
dism.exe /online /add-package /packagepath:»C:LPde-deMicrosoft-Windows-LanguageFeatures-Handwriting-de-de-Package~31bf3856ad364e35~amd64~~.cab» /quiet /norestart /logpath:»C:LogsMUI-de-de_Handwriting.log»
Note: the parameter /online refers to the currently active Windows machine, as opposed to «slip streaming» source files in an offline Windows image file (WIM). The term «online» has nothing to do with being online on the Internet.
On operating systems from Windows 8.1/Windows Server 2012 R2 and newer with PowerShell 5.0 and higher installed, the cmdlet Add-WindowsPackage can be used instead of using DISM.exe:
Add-WindowsPackage -Online -PackagePath «C:LPde-dex64fre_Server_de-de_lp.cab» -LogPath «C:LogsMUI-de-de.log» -NoRestart
Please be aware that both DISM and the PowerShell equivalent Add-WindowsPackage always generate a log file. If you do not specify a custom log file and log file location, the default log path C:WindowsLogsDISM is used.
In the following section, Complete Installation Script, you find a custom PowerShell script to install language packs including logging and error handling.
Complete installation script
The script below installs the Windows language pack using my installation template, which includes detailed logging and error handling. Also, the functions used in the scripts require my PowerShell Functions Library to be present on the local system. This means that before you can use the script, you need to copy the PowerShell module file DS_PowerShell_Function_Library.psm1 to the local system first.
In order to use this script, please follow these steps:
- Create an installation directory on the local computer or on a file share (UNC path). For example: C:TempMicrosoftLanguage Pack Spanish.
- Create a subdirectory called Files.
- Download the language pack to the folder Files in the installation directory. Include the subfolder for the language pack. The structure should be Files%LanguagePackDir%, for example Fileses-es. The CAB file, in this case for the Spanish language, is located in the directory es-es.
- Download and copy the PowerShell module file DS_PowerShell_Function_Library.psm1 to a directory on your local system.
- Copy the complete PowerShell script below to a new PS1 file (e.g. Install_Microsoft_Windows_MUI_Spanish.ps1) and add this file to the root of the installation directory (not in the subdirectory Files).
- Optional: modify the location of the log directory and log file name in lines 43 and 44.
- Enter the correct path to the PowerShell module file in line 60.
- Modify the file name in line 70. In case you want to use a different directory name instead of Files, change it in line 71.
- Execute the PowerShell script as follows:
powershell.exe -executionpolicy bypass -file «C:TempMicrosoftLanguage Pack SpanishInstall_Microsoft_Windows_MUI_Spanish.ps1»
|
1 2 3 4 5 6 7 8 9 10 11 12 13 14 15 16 17 18 19 20 21 22 23 24 25 26 27 28 29 30 31 32 33 34 35 36 37 38 39 40 41 42 43 44 45 46 47 48 49 50 51 52 53 54 55 56 57 58 59 60 61 62 63 64 65 66 67 68 69 70 71 72 73 74 75 76 77 78 79 80 81 82 83 84 85 86 87 88 89 90 91 92 93 94 95 96 97 98 99 |
#========================================================================== # # Install a Microsoft Language Pack # # AUTHOR: Dennis Span # DATE : 27.08.2018 # # COMMENT: This script installs a Microsoft language pack (MUI) on the local machine # # Note: see the article ‘https://dennisspan.com/powershell-scripting-template-for-sccm-packages/’ for a detailed description how to use this template # # Note: for an overview of all functions in the PowerShell function library ‘DS_PowerShell_Function_Library.psm1’ see: # -Windows functions: https://dennisspan.com/powershell-function-library/powershell-functions-for-windows/ # -Citrix functions: https://dennisspan.com/powershell-function-library/powershell-functions-for-citrix/ # # Change log: # ———— # <DATE> <NAME>: <CHANGE DESCRIPTION> #========================================================================== # Get the script parameters if there are any param ( # The only parameter which is really required is ‘Uninstall’ # If no parameters are present or if the parameter is not # ‘uninstall’, an installation process is triggered [string]$Installationtype ) # define Error handling # note: do not change these values $global:ErrorActionPreference = «Stop» if($verbose){ $global:VerbosePreference = «Continue» } ############################ # Preparation # ############################ # Disable File Security $env:SEE_MASK_NOZONECHECKS = 1 # Custom variables [edit] $BaseLogDir = «C:Logs» # [edit] add the location of your log directory here $PackageName = «Microsoft Language Pack Spanish» # [edit] enter the display name of the software (e.g. ‘Microsoft Language Pack Spanish’ or ‘Microsoft MUI German’) # Global variables $StartDir = $PSScriptRoot # the directory path of the script currently being executed if (!($Installationtype -eq «Uninstall»)) { $Installationtype = «Install» } $LogDir = (Join-Path $BaseLogDir $PackageName).Replace(» «,«_») $LogFileName = «$($Installationtype)_$($PackageName).log» $LogFile = Join-path $LogDir $LogFileName # Create the log directory if it does not exist if (!(Test-Path $LogDir)) { New-Item -Path $LogDir -ItemType directory | Out-Null } # Create new log file (overwrite existing one) New-Item $LogFile -ItemType «file» -force | Out-Null # Import the Dennis Span PowerShell Function Library Import-Module «C:ScriptsDS_PowerShell_Function_Library.psm1» DS_WriteLog «I» «START SCRIPT — $Installationtype $PackageName» $LogFile DS_WriteLog «-« «» $LogFile ############################ # Installation # ############################ # Set variables $FileName = «x64fre_Server_es-es_lp.cab» # [edit] enter the name of the installation file (e.g. ‘x64fre_Server_de-de_lp.cab’) $FileSubfolder = «Files» # [edit] enter the name of the subfolder which contains the installation file # Install the language pack (using the log file defined in the variable $LogFile) $Language = $FileName.Substring(14,5) # Retrieve the language code from the Windows Language Pack file name (e.g. ‘de-de’ for Germany/German) $FileSubfolder = «Files$($Language)» # Add the name of the language folder (e.g. ‘es-es’ or ‘de-de’) to the file subfolder path (the result will be something like ‘Fileses-es’ or ‘Filesde-de’) $FullPath = Join-Path $StartDir $FileSubfolder # Concatenate the two directories $StartDir and $InstallFileFolder $FileFullPath = Join-Path $FullPath $FileName # Concatenate the two directories $StartDir and $InstallFileFolder $LogFileMUI = Join-Path $LogDir «DISM_Log_LanguagePack_$($Language.ToUpper()).log» DS_WriteLog «I» «Install the Windows Language Pack $($Language.ToUpper())» $LogFile DS_WriteLog «I» «-File full path: $($FileFullPath)» $LogFile DS_WriteLog «I» «-DISM log file: $($LogFileMUI)» $LogFile Try { DS_WriteLog «I» «-Command: Add-WindowsPackage -Online -PackagePath ««$FileFullPath»» -LogPath ««$LogFileMUI»» -NoRestart» $LogFile Add-WindowsPackage -Online -PackagePath $FileFullPath -LogPath $LogFileMUI -NoRestart DS_WriteLog «S» «The language pack $($Language.ToUpper()) was installed successfully» $LogFile } Catch { DS_WriteLog «E» «Failed to install the language pack $($Language.ToUpper())» $LogFile Exit 1 } ############################ # Finalize # ############################ # Enable File Security Remove-Item env:SEE_MASK_NOZONECHECKS DS_WriteLog «-« «» $LogFile DS_WriteLog «I» «End of script» $LogFile |
If you want to go one step further and create an SCCM package as well, please follow the step-by-step explanation in the article Deep dive creating SCCM packages for Citrix.
How to change the Windows display language
The Windows display language is configured per user, not per machine. There are a couple of methods how to change the display language. You can choose one of the following options:
- Change the display language manually (Windows Server 2016)
- Change the display language manually (Windows 10)
- Change the display language using Microsoft Group Policy
- Change the display language using a Group Policy Preference item
Most methods apply to both Windows 10 and Windows Server 2016 unless stated otherwise.
Change the display language manually (Windows Server 2016)
Note: in an enterprise environment, I strongly recommend installing the required language packs unattended during the initial installation. This goes for both client and server operating systems.
To manually change the Windows display language on a machine with Windows Server 2016 version 1607, go to Control Panel Language. In the menu the entry Add a language adds the keyboard layout for a particular language. Under Options you can enable the Windows display language if it has been installed.
Change the display language manually (Windows 10)
In Windows 10 version 1803, changing languages is handled differently. Go to Settings Time & Language.

On the left side select Region & Language.

In this window you can add a language. After adding a language, Windows checks if there is a language pack available for it. In case a language pack is found, you have the option to download and install it. Click the Options button.
Select the Download button beneath the language options to start the download.
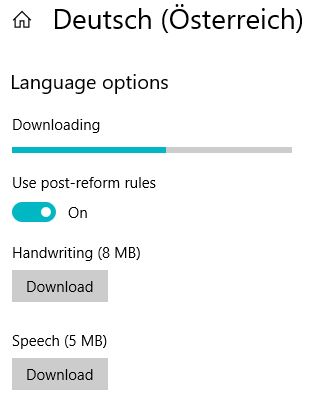
After installing the language pack, Windows will automatically install it.

After installing the language pack, a new popup box is available where you can select the preferred Windows display language. As mentioned before, this is for the current user only.

After changing the Windows display language you have to sign-out (and sign-in again) for the changes to apply.
Change the display language using Microsoft Group Policy
The Windows display language for a specific user or group can be forced by enabling the Group Policy setting Restricts the UI language Windows should use for the selected user in the Group Policy User Configuration Policies Administrative Templates Control Panel Regional and Language Options.
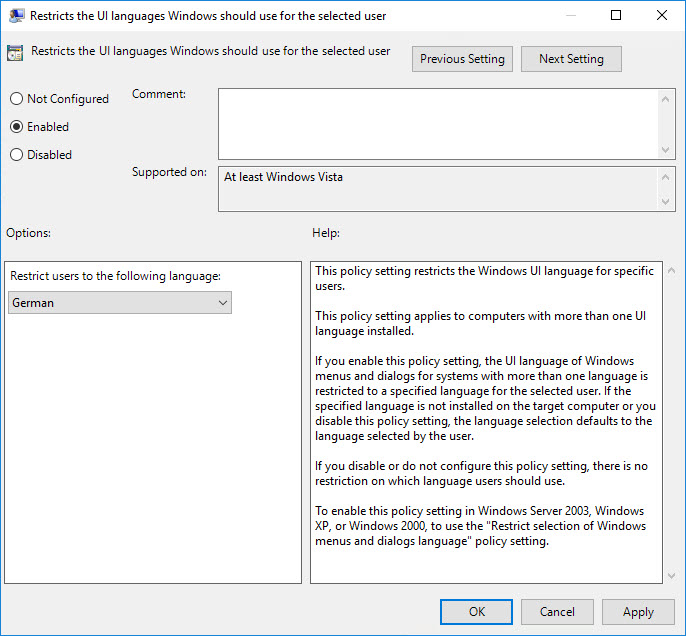
It is important to be aware that this setting prevents a user from selecting a different display language, even if more languages are installed on the local system. In case you want to be less restrictive towards your users, use a Group Policy Preference item instead of a Group Policy item. How to use a Group Policy Preference item is explained in the section below.
Change the display language using a Group Policy Preference item
In case you want users to be able to change their Windows display language, you cannot use a Group Policy setting. As mentioned in the previous paragraph, configuring a Group Policy setting to define the user’s display language results in the user not being able to change the Windows language. The solution is to use a Group Policy Preference item instead.
The preferred Windows display language is stored in the registry value PreferredUILanguages in the registry key HKEY_CURRENT_USERControl PanelDesktop. The value PreferredUILanguagesPending is only used to store the language that will be active at next logon in case the user changed it manually and did not sign-out yet.

Changing the language in this multi-string registry value accomplishes the same result as when changing the language manually using the GUI. Of course, for everything to work the language pack has to already be installed on the local system.
This solution applies to both Windows 10 and Windows Server 2016 (and higher).
Using a Group Policy Preference registry item allows an administrator to configure the preferred Windows display language while still allowing a user to change the language manually.

Configuring the option «run one time» ensures that the preference item is not enforced at next logon.
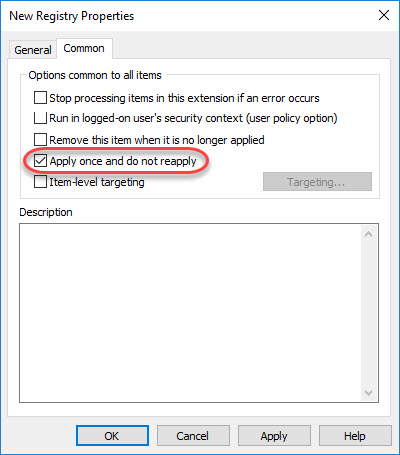
Applying the preference item only once ensures that the display language is never overwritten should the user decide to change it.
Using Item-level Targeting (ILT) you can assign preferred Windows languages to different users based on a number of criteria (see the section Configuring regional settings using Group Policy in my article Configure Regional Settings and Windows locales with Group Policy for an example how to use ILT).
Using a logon script
As explained in the previous paragraph, the setting to configure the Windows display language is a registry value. Therefore, it is possible to use a logon script to configure this setting.
In case you use a PowerShell script I invite you to use my PowerShell Function Library. You can configure the registry value using the function DS_SetRegistryValue.
To prevent a user from having to sign-out in order to apply the language settings, make sure to run your logon script synchronously. This means that your logon script needs to run before the user’s desktop is started (so before the initial explorer.exe process is stared). Enable the Group Policy item Run logon scripts synchronously in the Group Policy Computer or User Configuration Policies Administrative Templates System Scripts.
How to change the display language for Windows Apps and Store, Edge and Internet Explorer
As stated in the introduction of this article, the Windows display language is applied to all Windows components including Windows Apps and Store, Edge and Internet Explorer. However, it is possible to use a different language for the Windows Apps and Store, Edge and Internet Explorer.
Note: the language settings I am referring to here is the language used inside a Windows App, Edge or Internet Explorer, not the menu language of the actual application! For example, when the language of Internet Explorer is set to German and you visit Microsoft.com, the content is displayed in German.
This is possible by changing the order of the languages. You can choose one of the following options:
- Manually (Windows Server 2016)
- Manually (Windows 10)
- Group Policy Preference
Most methods apply to both Windows 10 and Windows Server 2016 unless stated otherwise.
Manually (Windows Server 2016)
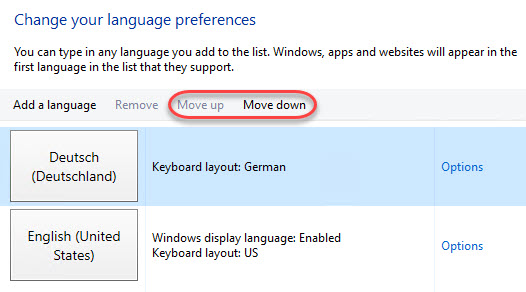
To manually change the Windows display language for Windows Apps and Store, Edge and Internet Explorer, on a machine with Windows Server 2016 version 1607 installed, go to Control Panel Language. In the menu, move the preferred language to the top of the list.
Manually (Windows 10)
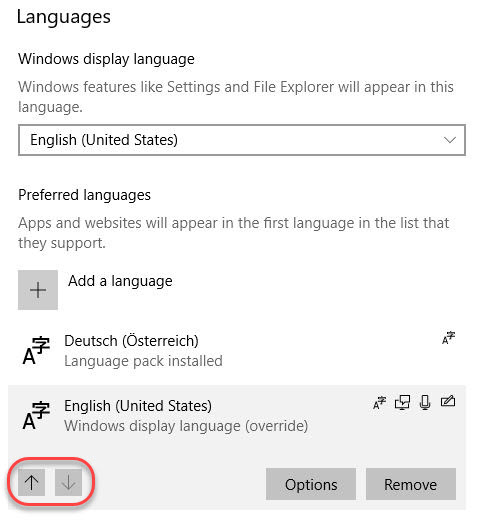
In Windows 10 version 1803, changing languages is handled differently. Go to Settings Time & Language Region and Language. Use the arrows to move the preferred language for Windows Apps and Store, Edge and Internet Explorer to the top of the list.
It is also possible to change the display language for Windows Apps and Store, Edge and Internet Explorer from within Internet Explorer. Go to Internet Options and on the tab General go to Languages.
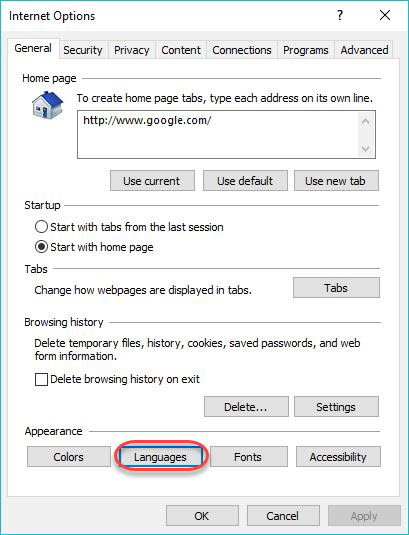
In the window Language Preference, click on the button Set Language Preferences.
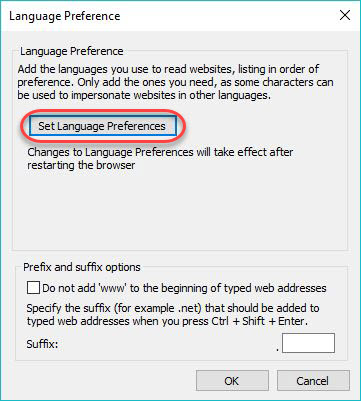
This will lead you to the Region and Language settings page.
Note: those of you who have experience with older operating systems will quickly realize that Microsoft made some significant changes concerning the language configuration in Internet Explorer.
Group Policy Preference
As far as I am aware, there is no Group Policy setting to configure the display language for Windows Apps and Store, Edge and Internet Explorer. But don’t worry; you can use a Group Policy Preference instead.
The preferred Windows display language for Windows Apps and Store, Edge and Internet Explorer is stored in the registry value Languages in the registry key HKEY_CURRENT_USERControl PanelInternationalUser Profile.
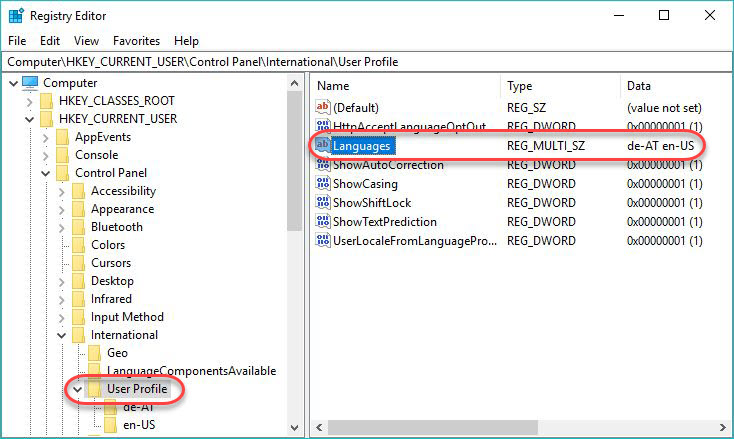
Changing the order of languages in this multi-string registry value accomplishes the same result as when changing the order using the GUI.
This solution applies to both Windows 10 and Windows Server 2016 (and higher).
See the section Change the display language using a Group Policy Preference item in this article for more information how to configure a preference item.
Using a logon script
As explained in the previous paragraph, the setting to configure the display language for Windows Apps and Store, Edge and Internet Explorer is a registry value. Therefore, it is possible to use a logon script to configure this setting.
In case you use a PowerShell script I invite you to use my PowerShell Function Library. You can configure the registry value using the function DS_SetRegistryValue.
To prevent a user from having to sign-out in order to apply the language settings, make sure to run your logon script synchronously. This means that your logon script needs to run before the user’s desktop is started (so before the initial explorer.exe process is stared). To accomplish this, enable the Group Policy item Run logon scripts synchronously in the Group Policy Computer or User Configuration Policies Administrative Templates System Scripts.
How to prevent users from changing language settings
By configuring the Windows display language using a Group Policy, you basically prevent a user from changing the language, at least until the next Group Policy refresh cycle (this will likely be every 30 to 90 minutes in most organizations).
In case this is not enough and you want to prevent users from changing language settings in any of the menus, the following policies are available:
- User Configuration Policies Administrative Templates Control Panel Regional and Language Options
Setting: Hide the select language group options - User Configuration Policies Administrative Templates Windows Components Internet Explorer Internet Control Panel
Setting: Disable the general page - User Configuration Policies Administrative Templates Windows Components Internet Explorer
Setting: Disable changing language setting
Please be aware that configuring the above settings does not prevent the user from changing these settings programmatically or by using tools such as regedit.exe. After all, language settings are user specific settings and by default, users have permission to change their own user-specific settings.
How to change the system code page for non-unicode programs
A Windows language (interface) pack does not modify the system specific code page for non-Unicode programs. Please see the article Configuring the time zone and code page with Group Policy for detailed information on how to change the system’s code page.
Conclusion
I honestly thought that writing this article would be simpler and less time consuming. There are still some smaller open issues I am working on and I will update this article when I am done. In the mean time, I hope the information in this article was of some help to you.

Dennis Span works as a Lead Sales Engineer at Citrix in Vienna, Austria. He holds multiple certifications such as CCE-V, CCIA and CCEA. In 2017, Dennis became a Citrix Technology Advocate (CTA). In 2019, he became a Citrix Technology Professional (CTP). Besides his interest in virtualization technologies and blogging, he loves spending time with his family as well as snowboarding, playing basketball and rowing. He is fluent in Dutch, English, German and Slovak and speaks some Spanish.
В таком случае в ОС Winows Server предусмотрена возможность загрузки и установки необходимого языка. В этой статье мы рассмотрим как можно будет установить другой язык на Вашу ОС Windows Server версий 2016 и 2019.
Перейдем сразу к установке из образа, так как при стандартной установке языка, можем наблюдать ошибку 0x00F0950.
Для этого необходимо скачать образ из официального сайта:
Для Windows Server 2019: Скачать
После скачивания, монтируем данный образ. Нажимаем на данный файл *.iso правой кнопкой мышки, и вбираем Mount.

В данном образе можно наблюдать список пакетов для локализации разных языков

Для того чтобы установить необходимый язык, можно воспользоваться комбинацией клавиш Win+R, или нажмите правой кнопкой мышки на меню Start и нажмите Run.
Введем в поле команду lpksetup и нажмите Ок.

В открывшемся окне установки языковых пакетов, нажмите Install display language

Выберите примонтированный диск через кнопку Brouse… и пройдите по пути x64 => langpacks и нажмите Ок.


После загрузки всех языковых пакетов, выберите из списка необходимый Вам язык, и нажмите Next
Принимаем лицензионное соглашение, и нажимаем Next.

Дожидаемся установки локализации.
Теперь необходимо настроить ОС для установленного языка.
Переходим в Settings.

Переходим в раздел Time & Language

С левой стороны, выберите Language

Чтобы добавить язык в систему, нажмите Add a language

Вы можете наблюдать список установленных/доступных языков. Выберите необходимый.

Устанавливаем необходимые галочки. Обязательно Install language pack and set as my Windows display language. И нажмите Install.

Дождитесь окончания установки локализации.
После удачного завершения установки пакета, можете наблюдать сообщение Will be display language after next sign-in
Где говорится, что язык будет изменен при следующем входе.
Следующие настойки языка можно сделать через PowerShell
Запустите консоль PowerShell, и выполните следующий код:
Set-Culture ru-RU; Set-WinSystemLocale -SystemLocale ru-RU; Set-WinUILanguageOverride -Language ru-RU; $list = Get-WinUserLanguageList; $list.Add("ru-RU"); Set-WinUserLanguageList $list -Force; Set-WinHomeLocation -GeoId 203;Для применения изменений, перезагрузите свой сервер.
Теперь Вы можете наблюдать Windows Server на своем языке.