This article shows how to fix the Cisco VPN Reason 442: Failed to enable Virtual Adapter error on the Windows 7 (32bit or 64bit) operating system. If you are a Windows 7 user, it’s most likely you’ve stumbled into the Cisco VPN Client error message «Reason 442: Failed to enable Virtual Adapter». We provide a way to quickly fix this error and get your VPN client working. We also cover Windows 8 and Windows 10 operating systems.
 Unfortunately the good old ‘remove and reinstall’ method won’t get you far in this case as the problem is not within the Cisco VPN client program, but Microsoft’s Internet Connection Sharing (ICS) service.
Windows 8 32bit & 64bit users dealing with the same problem can refer to our Cisco VPN Client & Windows 8 (32bit & 64Bit) — Reason 442: Failed To Enable Virtual Adaptor — How To Fix It article.
Windows 10 32bit & 64bit can read our article Install & Fix Cisco VPN Client on Windows 10 (32 & 64 Bit). Fix Reason 442: Failed to enable Virtual Adapter.
Windows 10 32bit & 64bit Anniversary Update 1607 users can read our Fix Cisco VPN Client Break After Windows 10 Anniversary Update 1607.
Following the steps outlined below will help resolve this error and save you a lot of time and frustration:
1. Hit the start button and type «services.msc‘ as shown:

2. Locate and stop Cisco Systems, Inc. VPN Service;
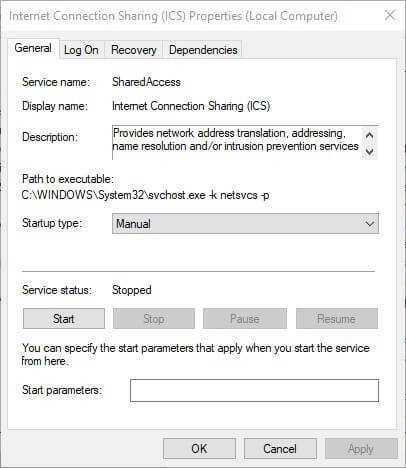
3. Stop and disable Internet Connection Sharing (ICS) Service;
4. Restart Cisco System, Inc. VPN Service.
Launch the Cisco VPN Client again, and the problem is now gone!
Keep in mind that we are running Cisco Systems VPN Client version 5.0.07.0440 on Windows 7 Ultimate 64-bit edition, but we faced the same problem with other versions as well.
Note: It’s always a great idea to have the latest Cisco VPN client installed. Users can download the Cisco VPN client for Windows, Linux and MacOS operating systems by visiting our Cisco Tools & Applications download section.
Back to Cisco Services & Technologies Section
by Matthew Adams
Matthew is a freelancer who has produced a variety of articles on various topics related to technology. His main focus is the Windows OS and all the things… read more
Updated on July 30, 2021
- The Failed to enable Virtual Adapter error in Cisco has a bunch of workarounds.
- More often than not it’s caused by a conflicting ICS setting on your PC.
- Our guide can teach you how to bypass this annoying Cisco issue in no time.
- A popular alternative is upgrading to a better enterprise VPN solution.

The Failed to enable Virtual Adapter error message is one that pops up for some Cisco VPN client software users. The exact error message states: Secure VPN Connection terminated locally by the Client. Reason 442: Failed to enable Virtual Adapter.
As a result, the Cisco VPN users can’t connect to the VPN server. There are, however, a few confirmed resolutions for that error message.
This is how you can fix virtual adapter errors
How to fix Cisco VPN client failed to enable virtual adapter
1. Turn Off the Internet Connection Sharing (ICS) Service
The Virtual Adapter error can be due to the Internet Connection Sharing (ICS) service. Some users have stated that they’ve fixed the error by turning that service off. This is how users can disable Internet Connection Sharing (ICS).
- Open Run by pressing the Windows key + R keys simultaneously.
- Enter services.msc in the Open text box, and press the Return key (or click OK).
- Double-click Cisco Systems, Inc. VPN Service on the Services window.
- Click the Stop button.
- Press the Apply and OK buttons to close the Cisco Systems, Inc.VPN Properties window.
- Double-click Internet Connection Sharing (ICS) to open the window shown directly below.

- Click the Stop button to terminate it.
- Select Disabled from the Startup type drop-down menu.
- Click the Apply button to apply the new settings.
- Select the OK option to close the window.
- Then right-click the Cisco System, Inc. VPN Service and select Start.
- Now try connecting with the Cisco VPN client.
Note: It is important to mention that the Cisco VPN Client is no longer supported by CISCO Systems since 2014 and that no updates were released for this product since 2012.
Running obsolete software can cause more damage than you might think, which is why we recommend a modern VPN client like Private Internet Access.

Switching to a world-leading VPN client like Kape Technologies owned PIA can significantly improve your online experience by streamlining your connection, reducing loading times, and enhancing your download speeds.
⇒ Install Private Internet Access
With an impressive network of global gateways, you will never have to worry about your connection to worldwide servers not being successful. Plus, your traffic data will be routed through secure VPN tunnels and protected by the best-in-class encryption technology.
Security-oriented features are complimented by PIA’s absolute privacy guarantee: between IP cloaking, anonymous browsing, and a strict no-log policy, your identity, location, and data including your online activity will never risk falling into the wrong hands.

Private Internet Access
Still using the Cisco VPN client? It’s time to explore the modern face of online privacy with PIA!
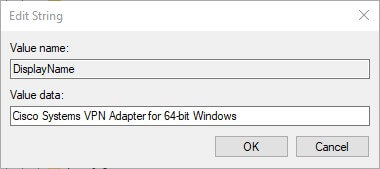
2. Edit the Registry
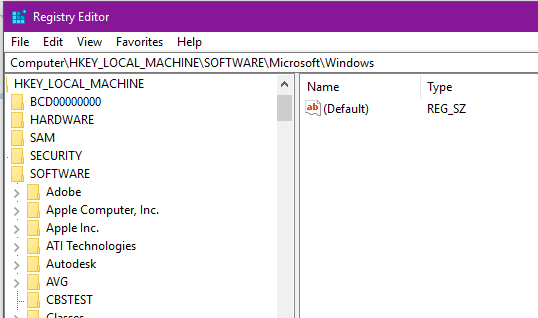
This resolution is more specifically for Windows 10, 8.1, and 8. Lots of Cisco VPN users have stated that editing the DisplayName string value for CVirtA with the Registry Editor fixed the Virtual Adapter error for them. Cisco VPN users should edit the registry as follows.
- First, open the Registry Editor by entering regedit in Run and clicking OK.
- Copy this registry path with the Ctrl + C hotkey:
HKEY_LOCAL_MACHINESYSTEMCurrentControlSetServicesCVirtA.Then paste the path into the Registry Editor’s address bar with the Ctrl + V hotkey, and press the Return key.
- Right-click DisplayName and select Modify to open its Edit String window.

- Next, erase
@oem8.inf,%CVirtA_Desc%from the Value data box. Then the Value data box should include either Cisco Systems VPN Adapter for 64-bit Windows or Cisco Systems VPN Adapter depending on whether Windows is a 32 or 64-bit platform. - Press the OK button to close the Edit String window.
- Close the Registry Editor.
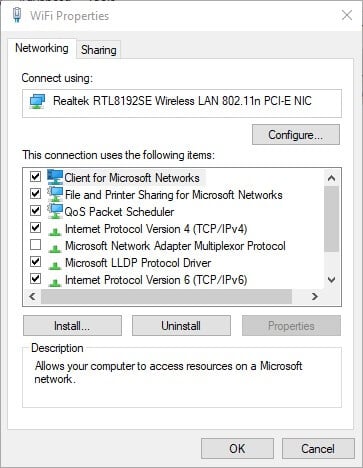
3. Turn Off Internet Connection Sharing
- Some users have also confirmed that turning internet sharing off for the network adapter that provides internet for Cisco VPN fixes the issue. To do that, enter ncpa.cpl in Run and click OK.

- Right-click the internet network adapter and select Properties to open the window below.
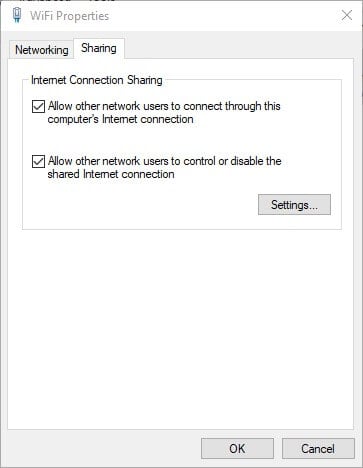
- Click the Sharing tab shown directly below.
- Deselect the Allow other network users to connect through this computer’s Internet connection option on the Sharing tab.
- Press the OK button to close the properties window.
Those are three confirmed resolutions that fix the Failed to enable Virtual Adapter error in Windows 10, 8.1, 8, and 7.
Note that Windows 10 doesn’t officially support Cisco VPN, so it’s fairly essential to edit the registry as outlined above to get the client up and running on that platform. Ready to tackle this issue? Let us know how it worked in the comments section.
Your connection is not secure — websites you visit can find out your details:

- Your IP Address:
loading

Companies can sell this information, alongside your location and internet provider name, and profit from it by serving targeted ads or monitoring your data usage.
We recommend Private Internet Access, a VPN with a no-log policy, open source code, ad blocking and much more; now 79% off.
![]()
Newsletter
Здравствуйте!
Несмотря на то, что Windows 8 compatibility center заявляет о полной совместимости Cisco VPN Client с новой операционкой, заставить работать этот клиент удалось только нетривиальными действиями и, увы, для многих случаев, кроме моего.
Надеюсь, однако, что информация будет полезна и, возможно, коллективный разум поможет решить проблему до конца.
Итак, дано: VPN, построенный на оборудовании Cisco и необходимость подключаться к нему под 64-битной Windows 8 Professional. Для начала устанавливаем последнюю доступную версию Cisco VPN Client 5.0.07.0440. Установка происходит без каких-то осложнений. Импортируем свой любимый .pcf с настройками подключения и пробуем подключиться. Дальше имеем проблемы:
Проблема номер один: ошибка «Reason 442: Failed to enable Virtual Adapter»
Решается эта проблема исправлением значения ключа в реестре, для этого:
- Открываем редактор реестра (набираем «regedit» в строке поиска, запускаем найденное приложение);
- Находим ветку HKEY_LOCAL_MACHINESYSTEMCurrentControlSetServicesCVirtA;
- Находим параметр DisplayName;
- Значение этого параметра содержит что-то вроде «oem4.inf,%CVirtA_Desc%;Cisco Systems VPN Adapter for 64-bit Windows». Необходимо изменить это значение, оставив только «Cisco Systems VPN Adapter for 64-bit Windows».
После корректировки реестра перезагрузка не требуется. Итак, виртуальный адаптер теперь благополучно находится, и, если аутентификация осуществляется по Shared Key (не требует сертификата клиента), проблемы на этом исчерпаны.
Если же аутентификация осуществляется по сертификату, имеем следующее:
Проблема номер два: «Reason 403: Unable to contact security gateway»
Подразумевается, что сертификат (не требующий private key на отдельном устройстве типа eToken) по обыкновению загружен в пользовательское хранилище сертификатов (User Storage). При этом в логе клиента имеем следующее сообщение: «Could not load certificate [описание сертификата] from store Microsoft User Certificate. Reason: store empty». То есть, несмотря на наличие сертификата в хранилище, VPN Client его не видит.
Нашлось два пути решения этой проблемы:
- Переместить сертификат из User Store в Local Computer Store;
- Изменить настройки службы «Cisco Systems, Inc. VPN Service» на закладке «Log On», заставив службу запускаться под пользовательским аккаунтом (тем же самым аккаунтом, под которым вошли в систему сами и пытаемся подключиться).
Переходим на следующий уровень: теперь у нас аутентификация по ключу с использованием e-token (Alladin). Имеем программу, поставляемую с ключом (eToken PKI Client), которая при подключении USB-токена к машине автоматически помещает находящийся на токене сертификат в пользовательское хранилище сертификатов (именно поэтому проблему номер два я решил вторым методом). При попытке подключения к VPN в такой конфигурации получаем следующую ошибку:
Проблема номер три (не решенная): «Reason 401: An unrecognized error occured while establishing the VPN connection»
В логе клиента можно увидеть сообщение «Failed to generate signature: signature generation failed» и прочие еще менее информативные формулировки. Здесь, к сожалению, тупик: сообщения лога не проливают свет на суть проблемы, в какую сторону копать дальше — не известно.
Надеюсь, не одинок в этом вопросе и кто-то окажется более сообразителен и удачлив.
UPD: В качестве альтернативного варианта для подключения можно использовать Shrew Soft VPN Client, который не имеет проблем при запуске в Windows 8 (статья про установку и настройку этой программы уже проскакивала на хабре). У программы один минус — не умеет работать с сертификатами из хранилищ сертификатов Windows (сертификаты нужно загружать из файла при настройке соединения), что для случая с ключом на eToken тоже не подходит.
Обновлено 2023 января: перестаньте получать сообщения об ошибках и замедлите работу вашей системы с помощью нашего инструмента оптимизации. Получить сейчас в эту ссылку
- Скачайте и установите инструмент для ремонта здесь.
- Пусть он просканирует ваш компьютер.
- Затем инструмент почини свой компьютер.
Cisco VPN Client является одним из самых популярных инструментов Cisco, используемых администраторами, инженерами и конечными пользователями для подключения к своим удаленным сетям и доступа к ресурсам. В этой статье показано, как устранить неполадки Cisco VPN Client. Причина ошибки 442: не удалось включить виртуальный адаптер при попытке подключения к удаленному VPN-шлюзу или маршрутизатору из операционной системы Windows 8 (бит 32 и бит 64).

С введением Windows 8 пользователи Cisco VPN столкнулись с проблемой: программное обеспечение Cisco VPN установлено правильно, но невозможно подключиться к удаленной сети VPN. При попытке подключиться к сети VPN с помощью операционной системы Windows 8 (32 или 64-bit) клиент Cisco VPN не может подключиться. Как только пользователь дважды щелкает по выбранной записи соединения, VPN-клиент начинает согласование и запрашивает имя пользователя и пароль.
Эта проблема обычно возникает из-за того, что адаптер Cisco VPN не включен должным образом при попытке подключения к концентратору.
Отключить службу ICS

К сожалению, старый добрый метод удаления и повторной установки в данном случае не уведет вас слишком далеко, потому что проблема не в программе клиента Cisco VPN, а в сервисе Microsoft Internet Connection Sharing (ICS).
Обновление за январь 2023 года:
Теперь вы можете предотвратить проблемы с ПК с помощью этого инструмента, например, защитить вас от потери файлов и вредоносных программ. Кроме того, это отличный способ оптимизировать ваш компьютер для достижения максимальной производительности. Программа с легкостью исправляет типичные ошибки, которые могут возникнуть в системах Windows — нет необходимости часами искать и устранять неполадки, если у вас под рукой есть идеальное решение:
- Шаг 1: Скачать PC Repair & Optimizer Tool (Windows 10, 8, 7, XP, Vista — Microsoft Gold Certified).
- Шаг 2: Нажмите «Начать сканирование”, Чтобы найти проблемы реестра Windows, которые могут вызывать проблемы с ПК.
- Шаг 3: Нажмите «Починить все», Чтобы исправить все проблемы.

Чтобы исправить эту ошибку, выполните следующие действия:
1. Нажмите кнопку «Пуск» и введите «services.msc», как показано:
2 Найдите и остановите службу Cisco Systems, Inc. VPN;
3 Остановить и отключить службу общего доступа к Интернету (ICS);
4. перезапустите Cisco System, Inc. VPN-сервис.
Перезапустите клиент Cisco VPN, и проблема решена!
Это относится, по крайней мере, к версии клиента Cisco Systems VPN 5.0.07.0290 в Windows 7 Pro 64-Bit Edition.
Удалите VPN-клиент и обновите его до версии 5.0.07.0240-k9-BETA.
1. щелкните Пуск> Компьютер.
2. дважды щелкните на вашем диске C :.
3. Дважды щелкните Program Files> Cisco Systems> VPN Client.
4. Щелкните правой кнопкой мыши файл cvpnd.exe и выберите «Свойства».
5. нажмите на вкладку «Совместимость».
6. Установите флажок рядом с параметром, запустите эту программу в режиме совместимости для:.
7. Убедитесь, что выбран Windows XP Service Pack 2.
8. нажмите Применить, затем нажмите ОК.
9. Щелкните правой кнопкой мыши vpngui.exe и выберите «Свойства».
10. Установите флажок рядом с параметром, Запустите эту программу в режиме совместимости для:.
11. Убедитесь, что выбран Windows XP Service Pack 2.
12. Нажмите Применить, затем нажмите ОК.
13. Перезагрузите компьютер.
Оптимизация реестра
- Нажмите Пуск, введите regedit в поле поиска, затем нажмите Enter.
- Перейдите к HKEY_LOCAL_MACHINE SYSTEM CurrentControlSet Services CVirtA
- Найдите значение строки с именем DisplayName.
- Щелкните правой кнопкой мыши и выберите «Изменить» в контекстном меню.
- В данных значения удалите @ oemX.inf,% CVirtA_Desc% ;. Данные значения должны содержать только адаптеры Cisco Systems VPN для 64-битной Windows.
- Нажмите на ОК.
- Закройте редактор реестра.
- Попробуйте снова подключиться к клиенту Cisco VPN.
Если у вас есть другие проблемы с вашим VPN, это может быть признаком большей проблемы. Если отключение программы не работает, попробуйте перезагрузить систему и повторить шаги.
https://community.cisco.com/t5/vpn-and-anyconnect/reason-442-failed-to-enable-virtual-adapter-windows-7-64-bit/td-p/1782751
Совет экспертов: Этот инструмент восстановления сканирует репозитории и заменяет поврежденные или отсутствующие файлы, если ни один из этих методов не сработал. Это хорошо работает в большинстве случаев, когда проблема связана с повреждением системы. Этот инструмент также оптимизирует вашу систему, чтобы максимизировать производительность. Его можно скачать по Щелчок Здесь

CCNA, веб-разработчик, ПК для устранения неполадок
Я компьютерный энтузиаст и практикующий ИТ-специалист. У меня за плечами многолетний опыт работы в области компьютерного программирования, устранения неисправностей и ремонта оборудования. Я специализируюсь на веб-разработке и дизайне баз данных. У меня также есть сертификат CCNA для проектирования сетей и устранения неполадок.
Сообщение Просмотров: 71
Join
- Home
- Networking
- Cisco
- How-tos

1 Minute Read
-
Spice
-
Reply (18)
-
Subscribe
-
Share
Opens a new window
-
Facebook
Opens a new window -
Twitter
Opens a new window -
Reddit
Opens a new window -
LinkedIn
Opens a new window
-

- Spiceworks General Support |
- IT Programming |
- General Windows |
- Active Directory & GPO |
- Freeware
Sign Up
Load More