Если вы ищете бесплатное онлайн-приложение для создания и редактирования видео для Windows 11, вы можете попробовать Clipchamp . Как уже упоминалось, это бесплатно, поставляется с неограниченным экспортом, записью с веб-камеры и экрана, а также многими другими опциями. Если вы хотите создать видео для Facebook, Twitter или своего канала YouTube, вы можете использовать этот инструмент для создания профессиональных видеороликов в считанные секунды.
Редактировать видео не так уж и сложно, если у вас под рукой есть подходящий инструмент. Хотя для понимания всех основных и стандартных функций и параметров различных инструментов требуется некоторое время, вы можете многое сделать в автоматизации. Clipchamp — один из тех инструментов для редактирования видео, которые вы можете использовать для применения различных эффектов без специальных знаний.
Возможности Clipchamp
Clipchamp имеет множество опций и функций, которые вы можете использовать для создания видео. Некоторые из основных функций:
- Слои: Clipchamp имеет многоуровневую временную шкалу, позволяющую редактировать более одного элемента видео одновременно.
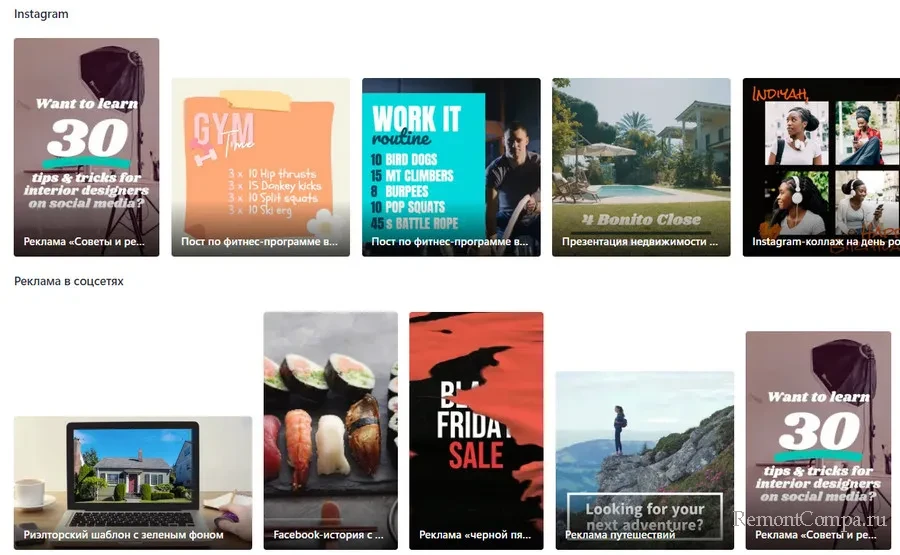
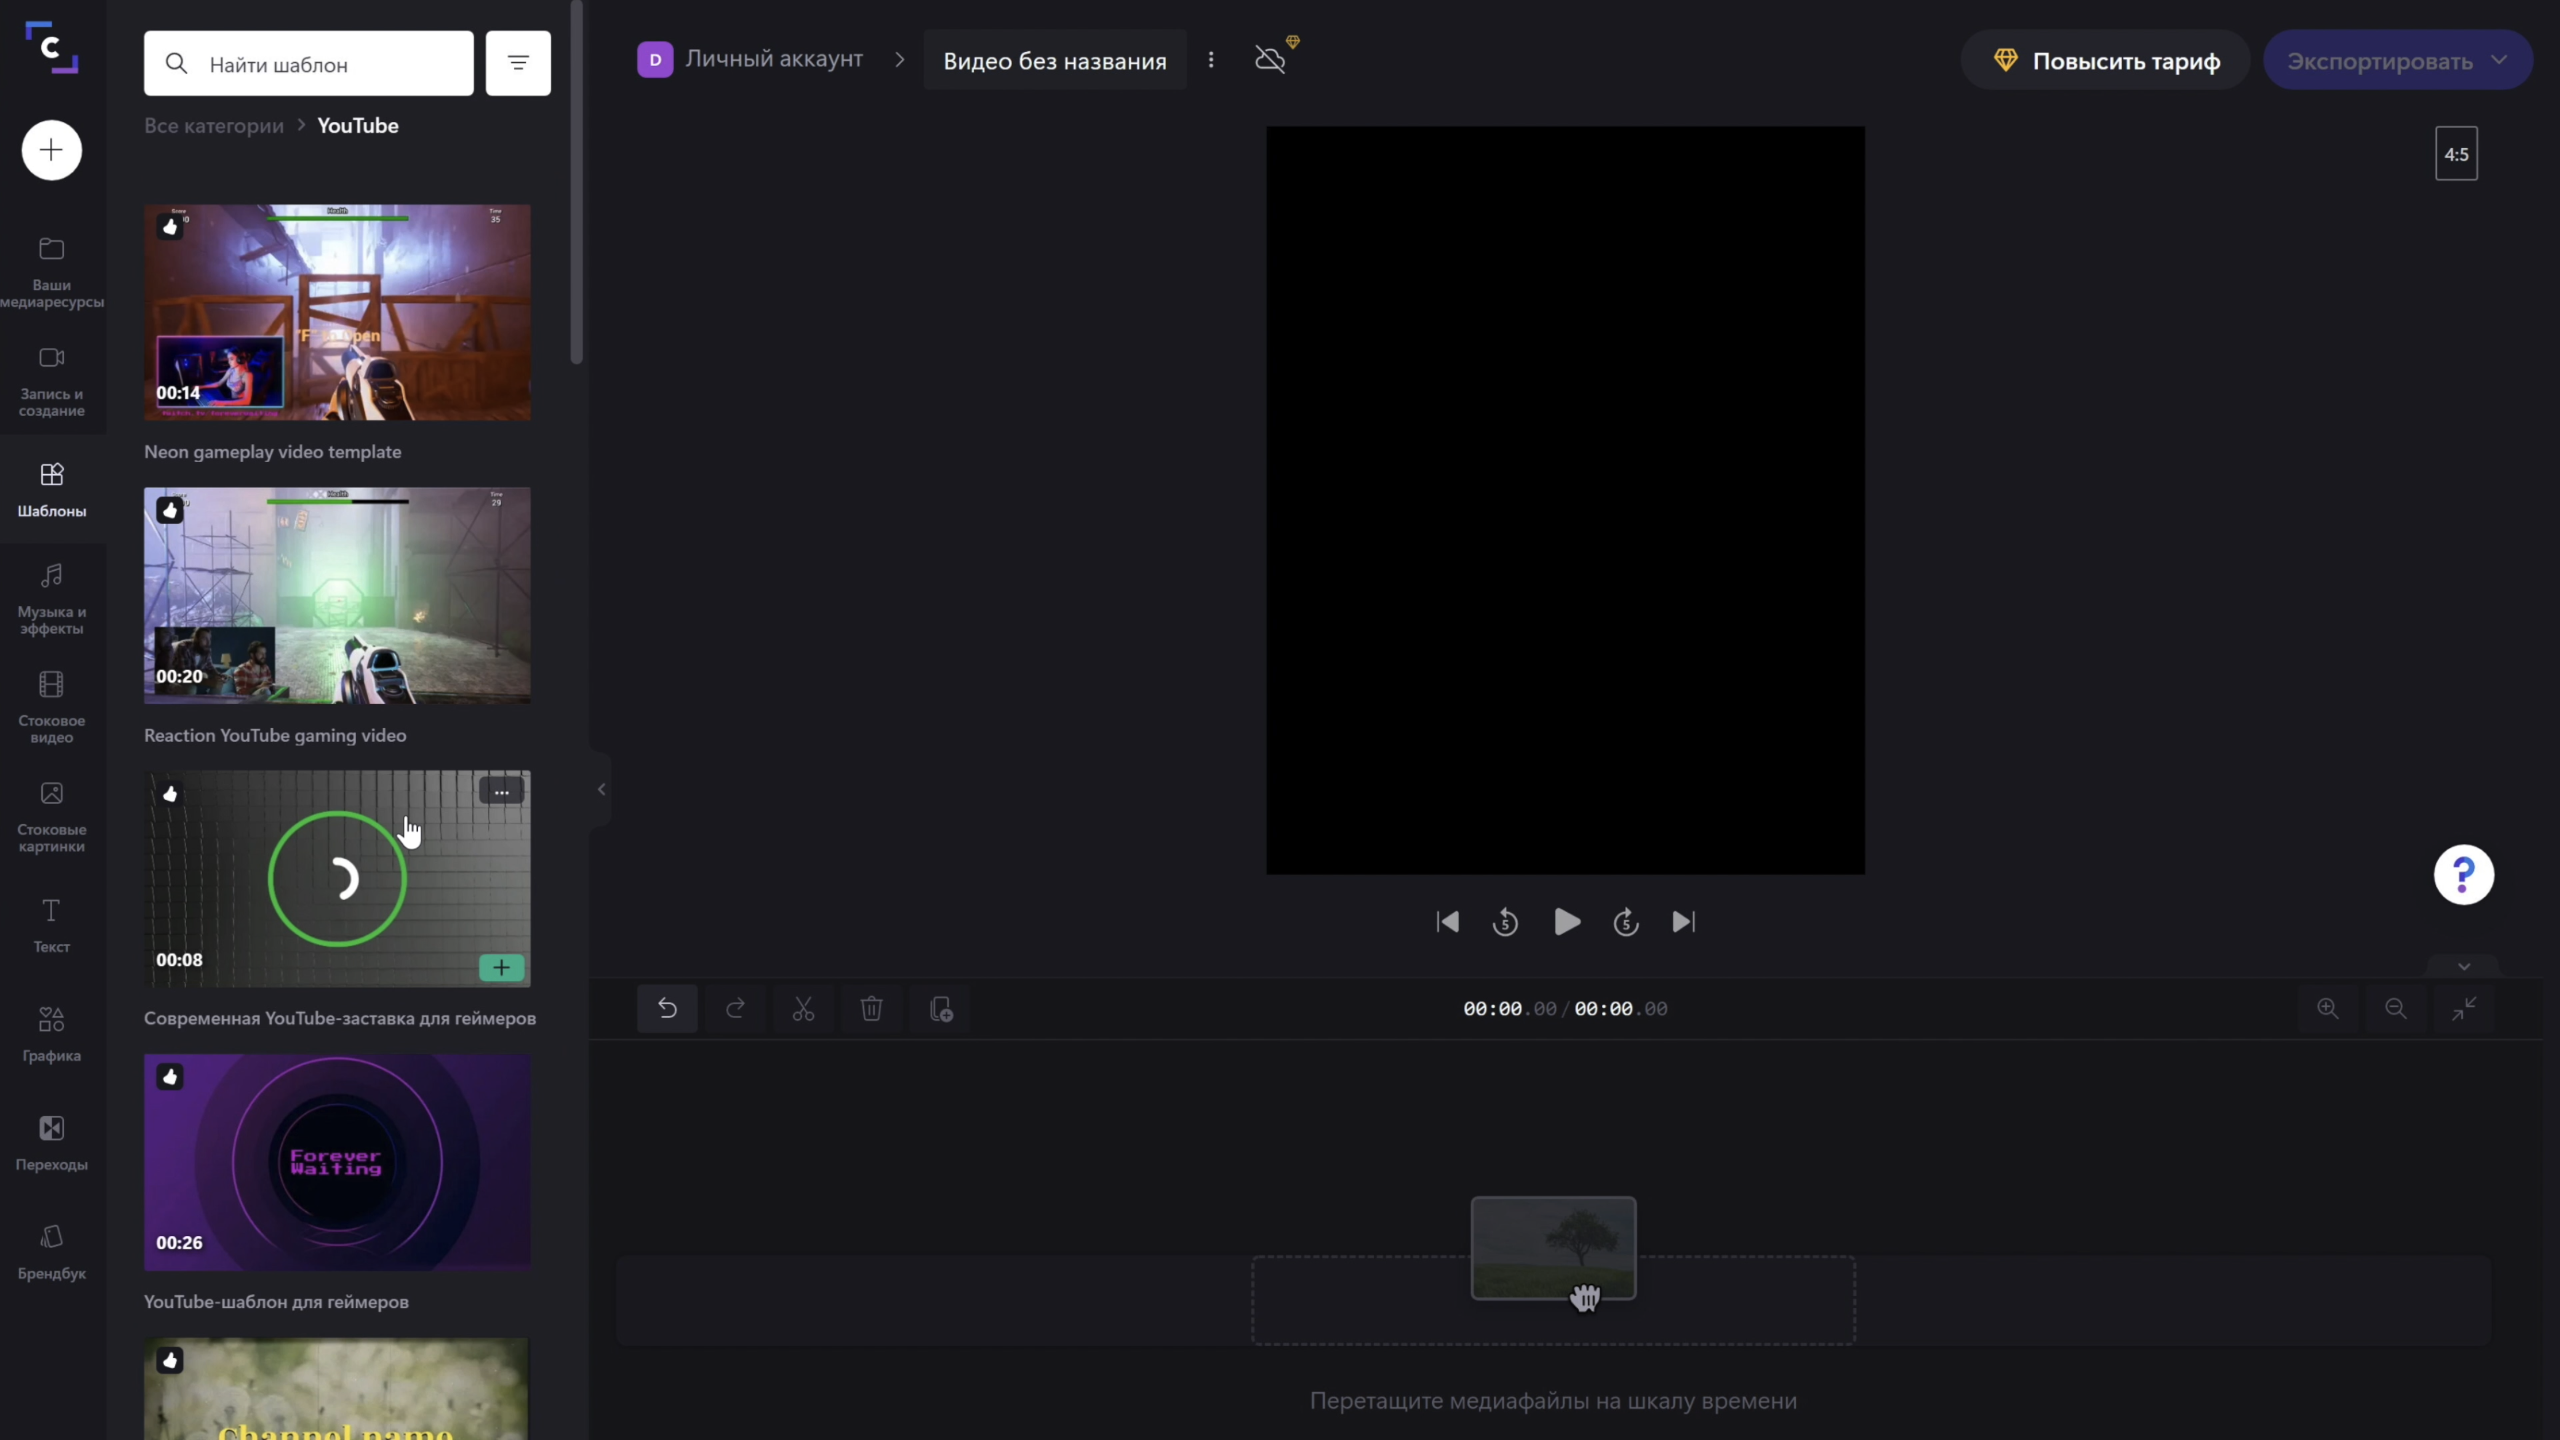
- Шаблоны: он предлагает так много шаблонов для различных целей. Если вы хотите создать видео для TikTok, рекламы в Facebook, YouTube или чего-то еще, вы можете найти подходящий шаблон на веб-сайте.
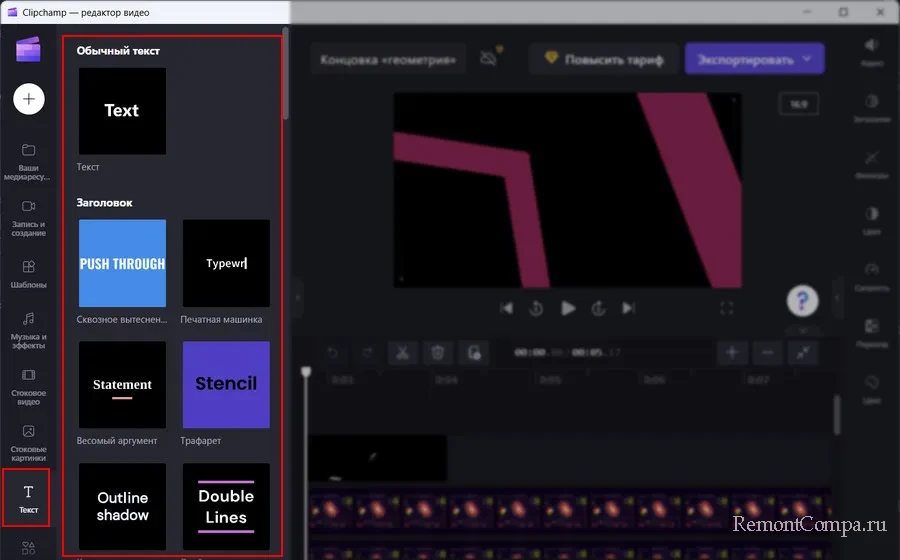
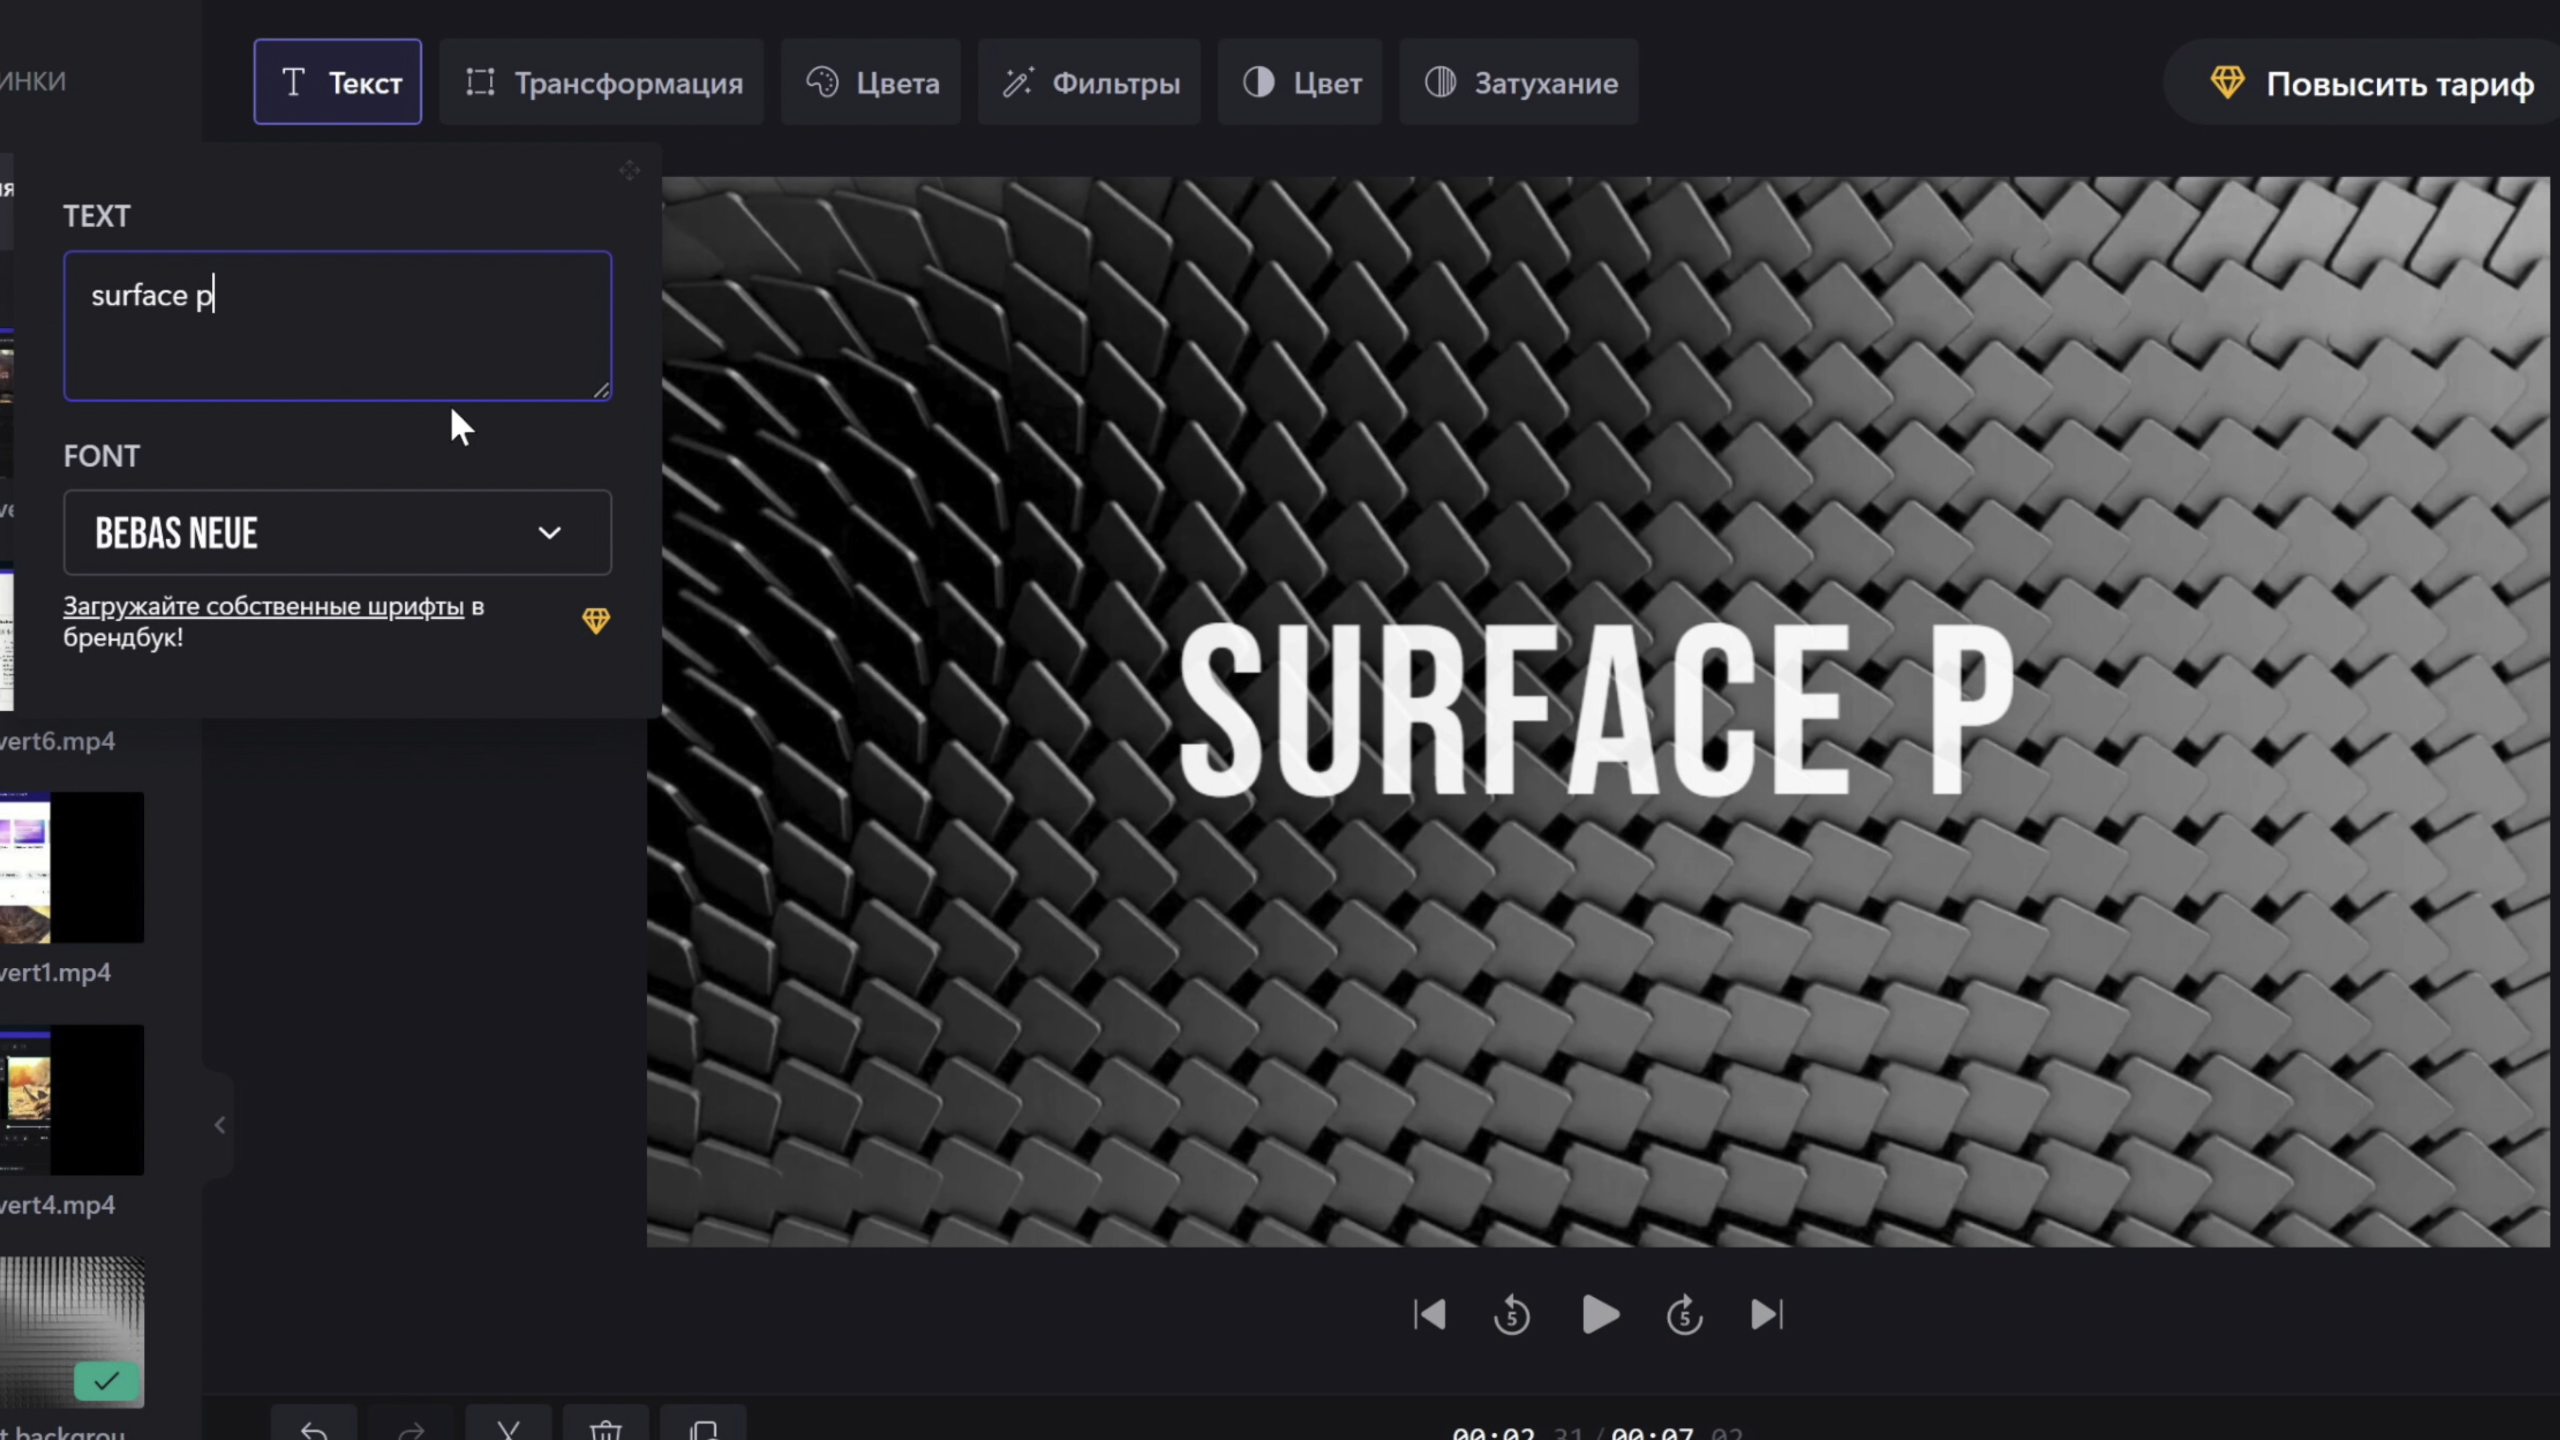
- Легко редактировать: не имеет значения, хотите ли вы включить в видео текст, объекты, переходы, эффекты или что-нибудь еще; все на расстоянии одного клика.
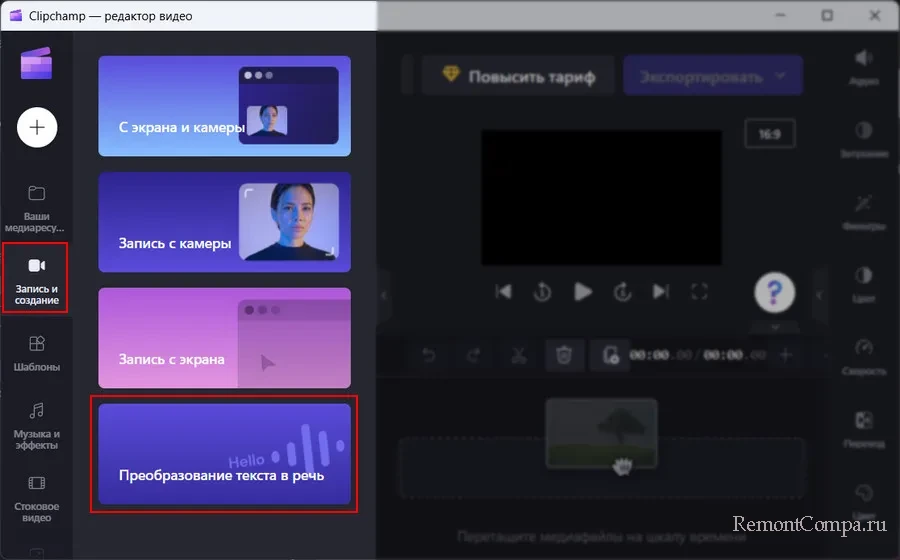
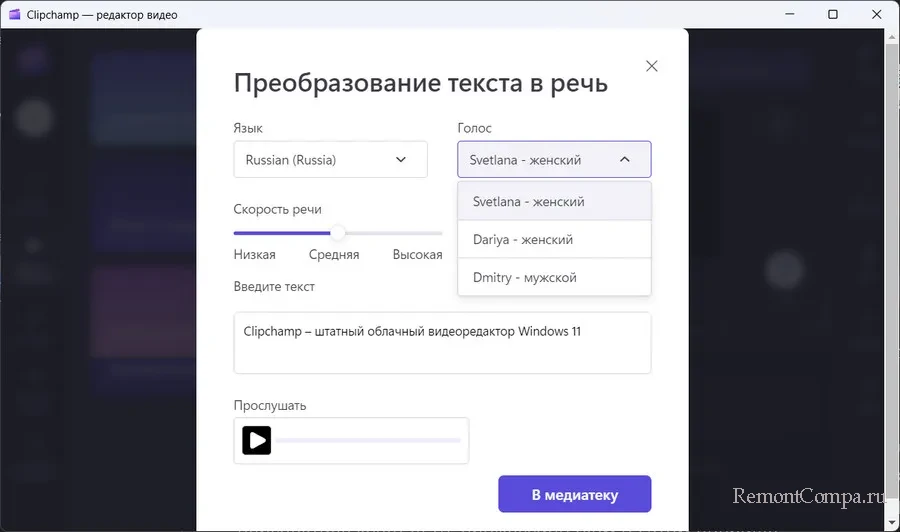
- Запись: это, наверное, самая важная вещь при создании обучающего видео для вашего канала YouTube. Clipchamp позволяет записывать данные с экрана, камеры и т. Д. Лучше всего, что у него есть функция преобразования текста в речь.
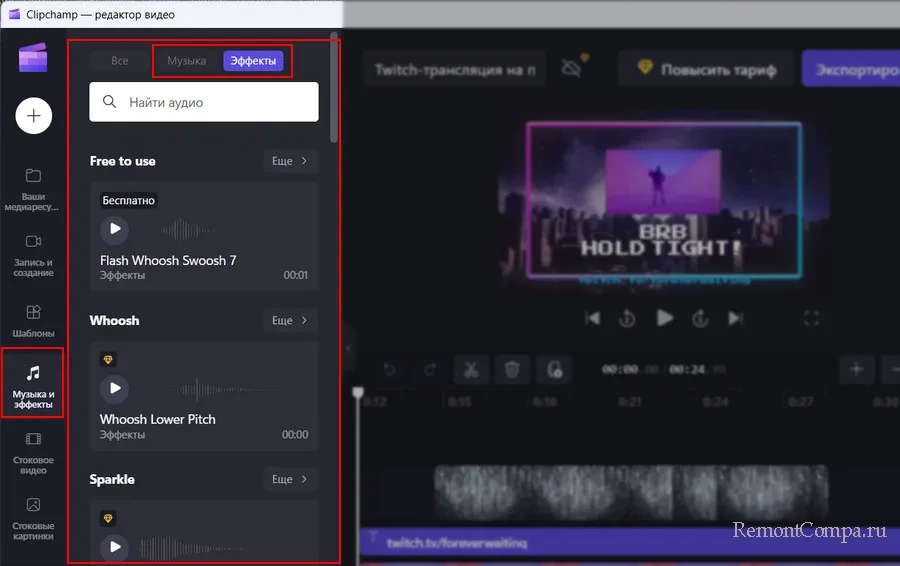
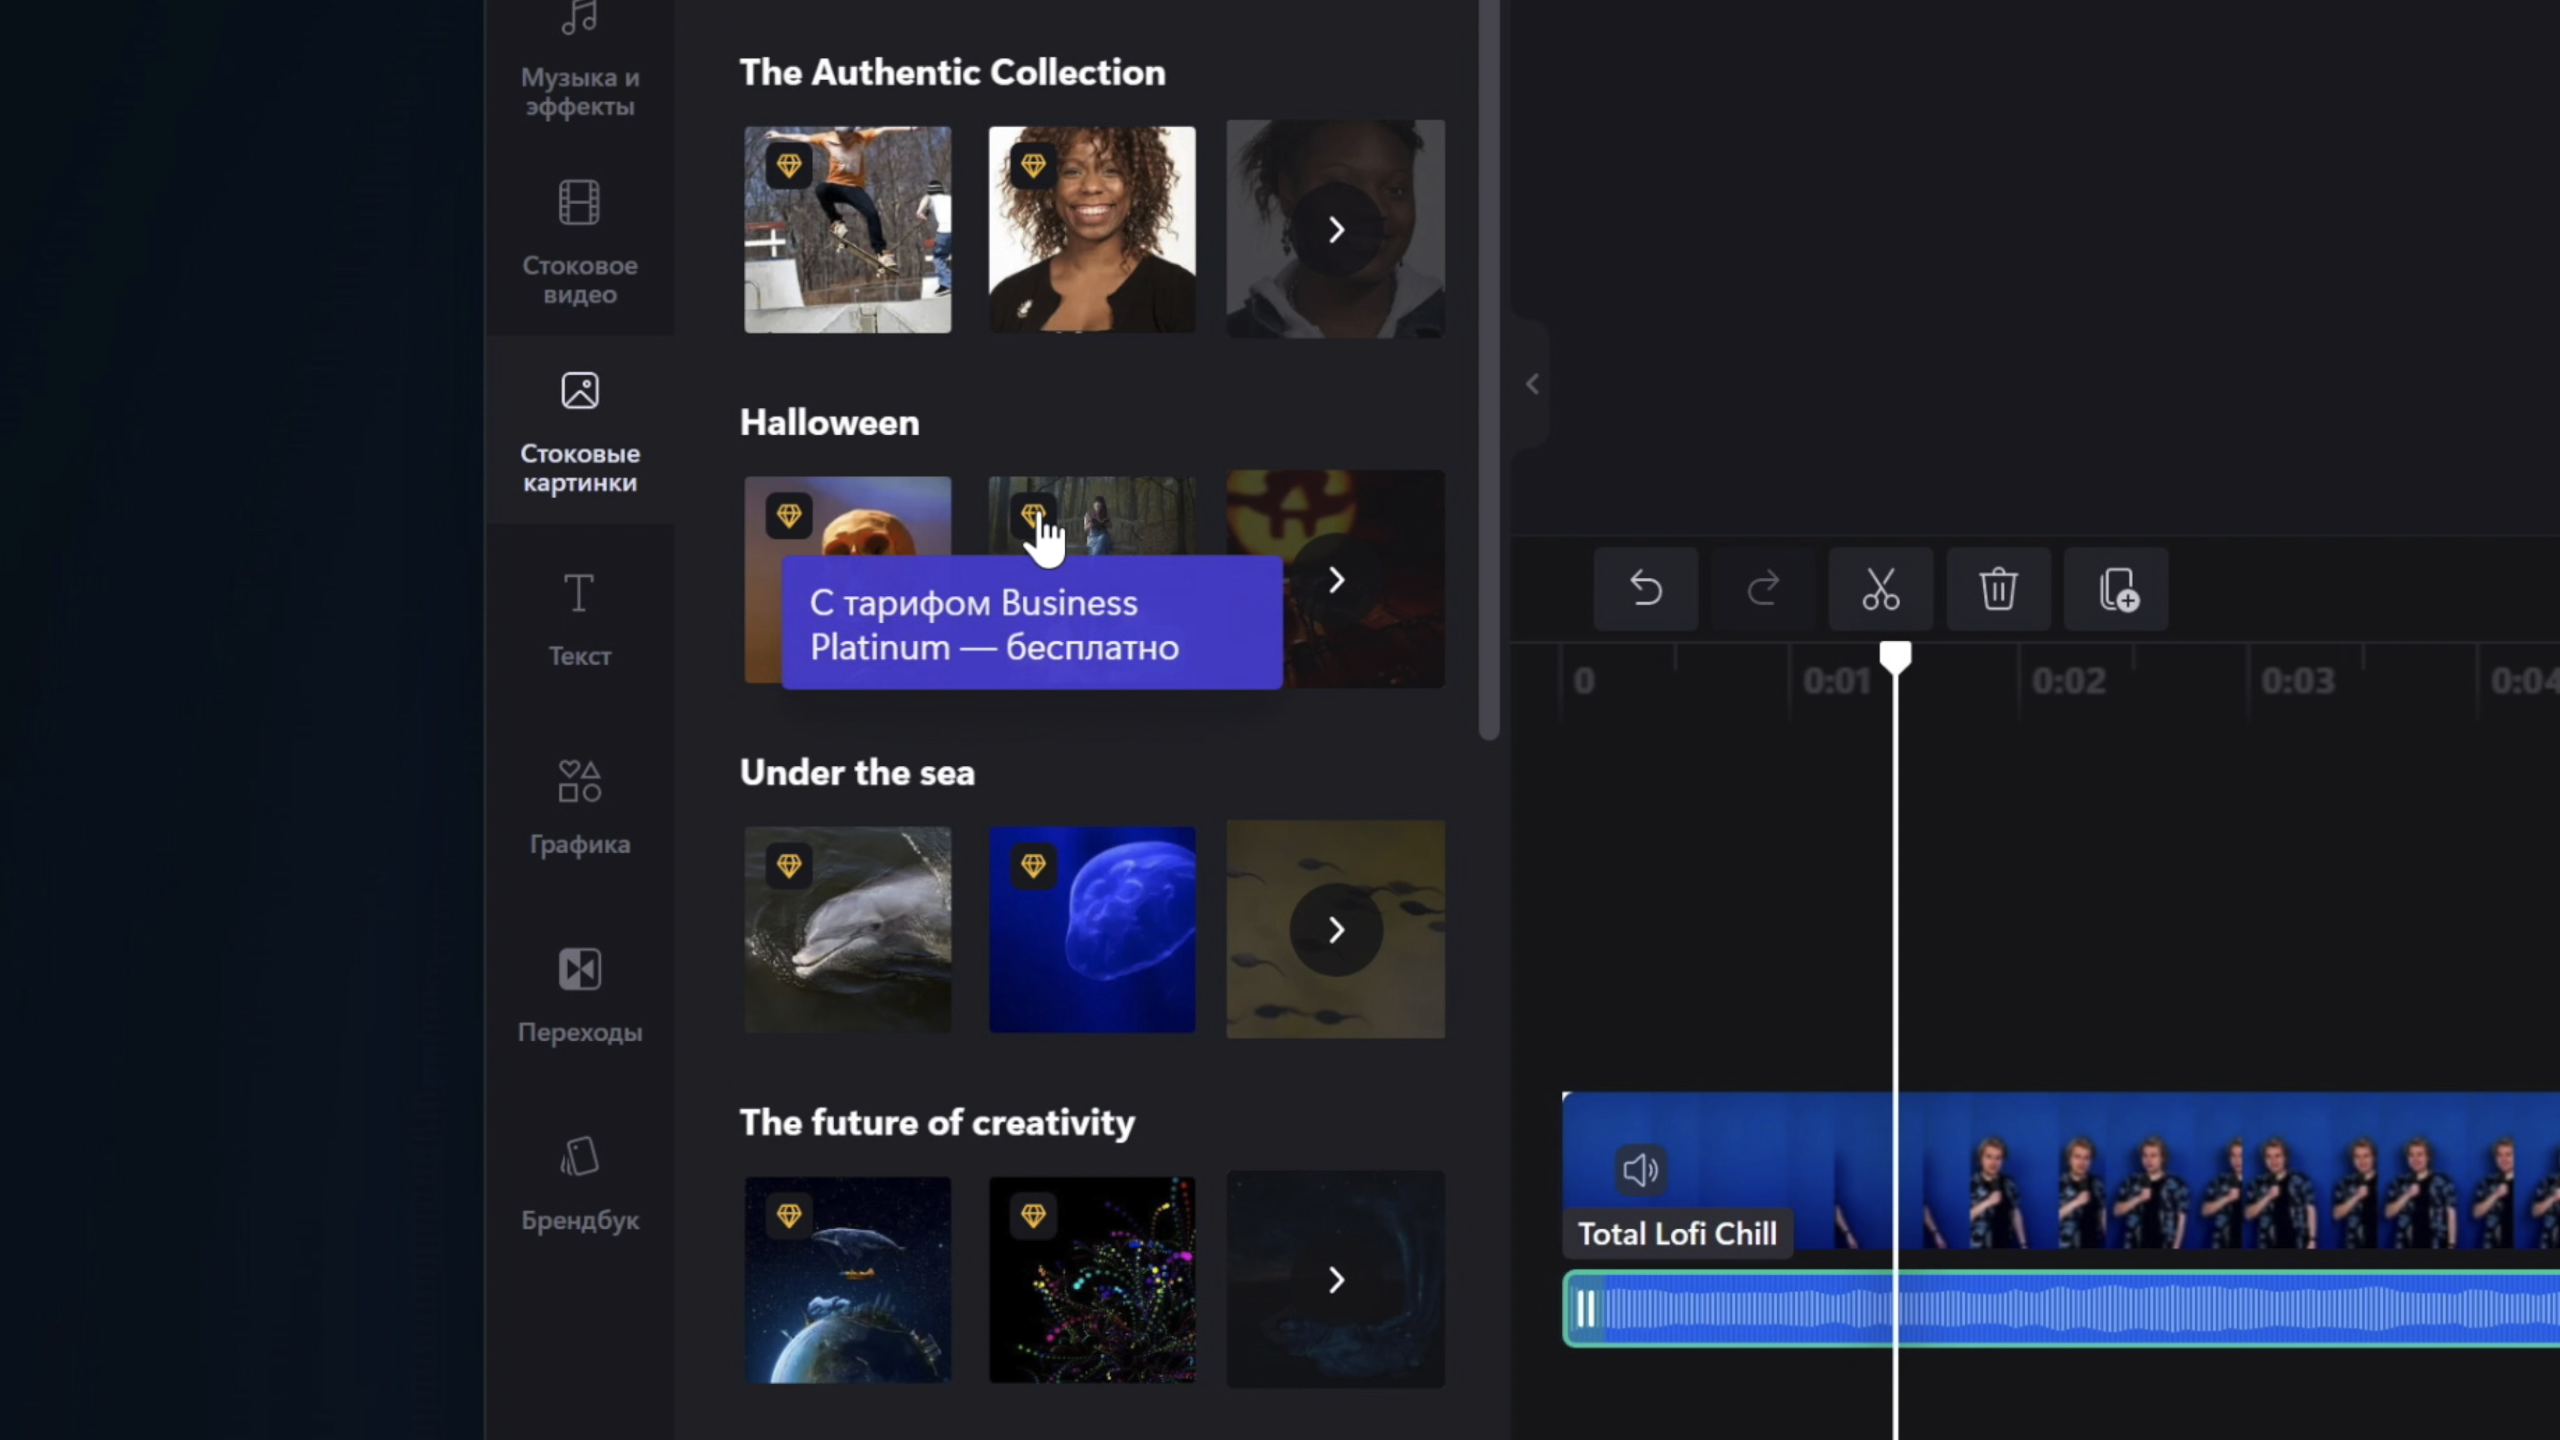
- Музыка без лицензионных отчислений: этот инструмент содержит множество бесплатных звуков для вашего видео. Если вам сложно найти музыку без лицензионных отчислений, воспользуйтесь этим преимуществом.
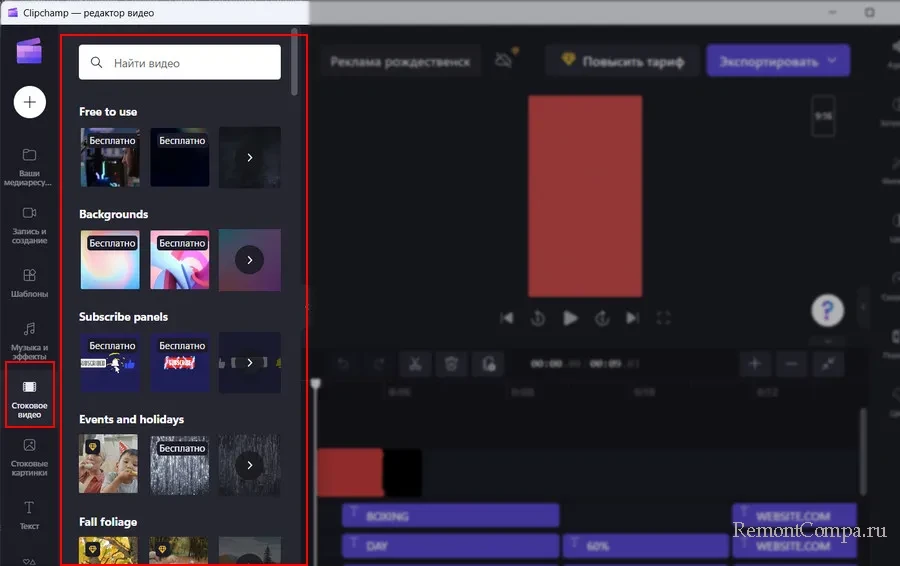
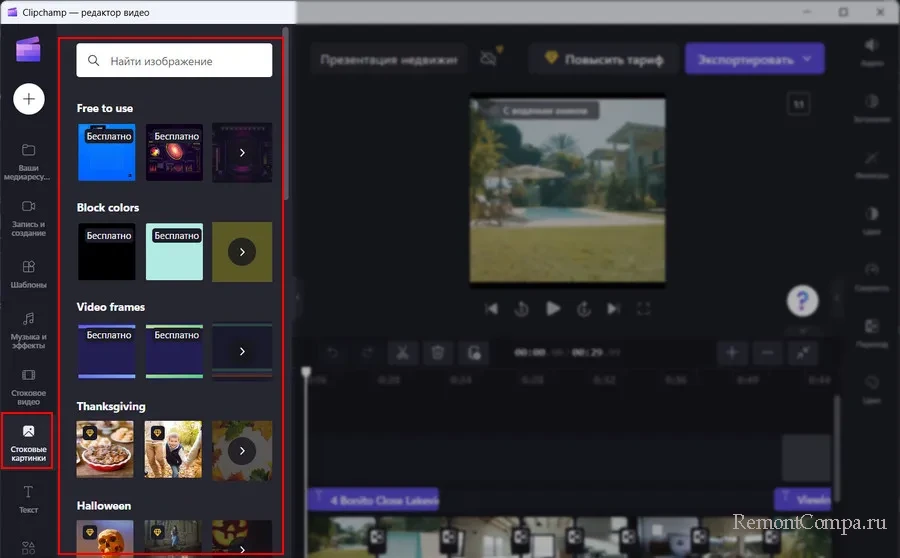
- Сток-видео / фото: при создании рекламного видео вы можете выбрать что-нибудь из данного списка, если требуется включить стоковое видео / изображение.
- Включите GIF: можно получать GIF-файлы прямо из GIPHY и отображать их в своем видео.
- Неограниченный экспорт: это, вероятно, самая важная вещь, поскольку вы можете не ждать 24 часа, чтобы экспортировать видео (некоторые инструменты имеют такое ограничение по времени).
- Экспорт в GIF.
Вы можете использовать и другие варианты и функции. Однако вам нужно начать использовать его, чтобы получить их все.
Чтобы использовать бесплатное онлайн-приложение для создания и редактирования видео Clipchamp в Windows 11, выполните следующие действия:
- Откройте официальный сайт и нажмите кнопку « Зарегистрироваться» .
- Создайте учетную запись на этом сайте.
- Нажмите на опцию « Создать свое первое личное видео» .
- Выберите шаблон для вашего видео.
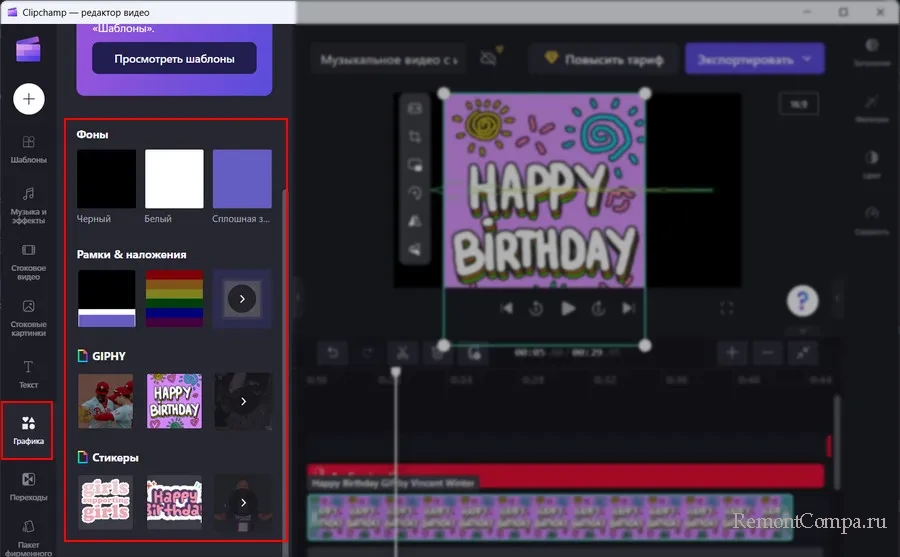
- Начните добавлять объекты, щелкнув параметр « Графика» .
- Перейдите в Фильтры и переходы, чтобы добавить переход и эффекты.
- Щелкните кнопку Экспорт .
- Введите имя для вашего видео и нажмите кнопку « Продолжить» .
Чтобы узнать больше об этих шагах, продолжайте читать.
Сначала вам нужно открыть официальный сайт и нажать кнопку «Зарегистрироваться», чтобы создать учетную запись. Завершите процесс регистрации с вашим существующим идентификатором электронной почты. После этого вы увидите такое окно:

Нажмите кнопку «Создать свое первое личное видео», чтобы начать создание видео. На следующем экране вам нужно выбрать шаблон. Как упоминалось ранее, существует множество категорий, и вы можете выбрать любую из них в соответствии с вашими требованиями.

После этого вы можете делать все, что хотите. Например, если вы хотите записать экран или создать текстовый файл, перейдите в раздел «Запись и создание» слева.
Точно так же, если вы хотите добавить фоновый звук, вы можете выбрать опцию «Музыка и звуковые эффекты». С другой стороны, вы можете отобразить текст, щелкнув опцию «Текст».
Каждый раз, когда вы хотите добавить новый элемент к видео, вам нужно перетащить его на временную шкалу, которая видна в нижней части экрана.
Если редактирование завершено и вы хотите загрузить видео, нажмите кнопку «Экспорт» в правом верхнем углу.

Выберите, хотите ли вы загрузить его в формате MP4 или GIF. Если вы выберете опцию «Видео», вы можете ввести имя для своего видео и нажать кнопку «Продолжить».

Однако, если вы выберете вариант GIF, вам нужно переключиться на эту вкладку и нажать кнопку «Продолжить» .
Рендеринг и загрузка видео на ваш компьютер не займет много времени. Однако это полностью зависит от вашего интернет-соединения.
Преимущества и недостатки Clipchamp
Как и любой другой инструмент, Clipchamp имеет ряд преимуществ и недостатков. Вот исчерпывающий список вещей, которые вам нужно учитывать.
Преимущества:
- Это очень простой в использовании и бесплатный инструмент для редактирования видео.
- Это онлайн-приложение. Вы можете использовать его на любом устройстве и платформе.
- Функция преобразования текста в речь — спасение для многих.
- Вы можете одновременно записывать экран и веб-камеру и включать их в видео.
- Шаблоны предназначены для создания профессионального видео для ваших учетных записей в социальных сетях.
- Музыка без лицензионных отчислений — это плюс.
- Неограниченный экспорт даже в бесплатной версии.
Недостатки:
- Отсутствие вариантов. В этом приложении для редактирования и создания видео отсутствуют некоторые стандартные параметры.
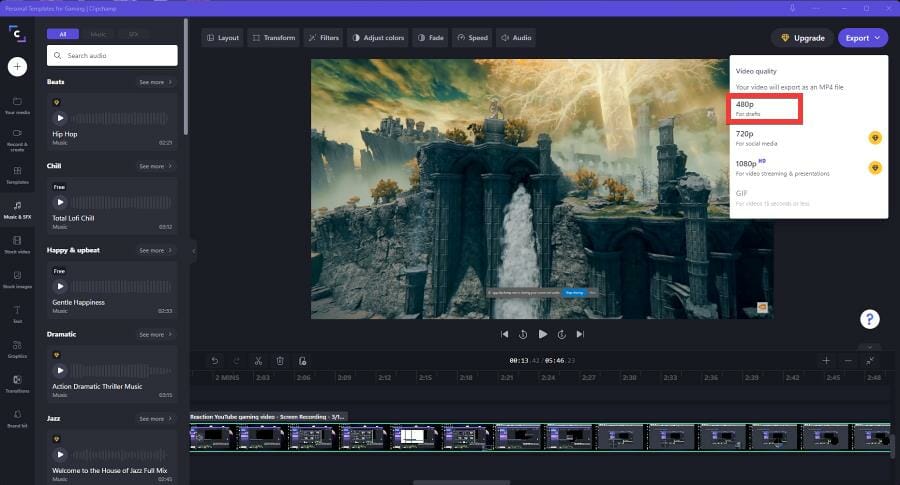
- Низкое разрешение видео. Он позволяет экспортировать видео в разрешении 480p, что в наши дни не так популярно.
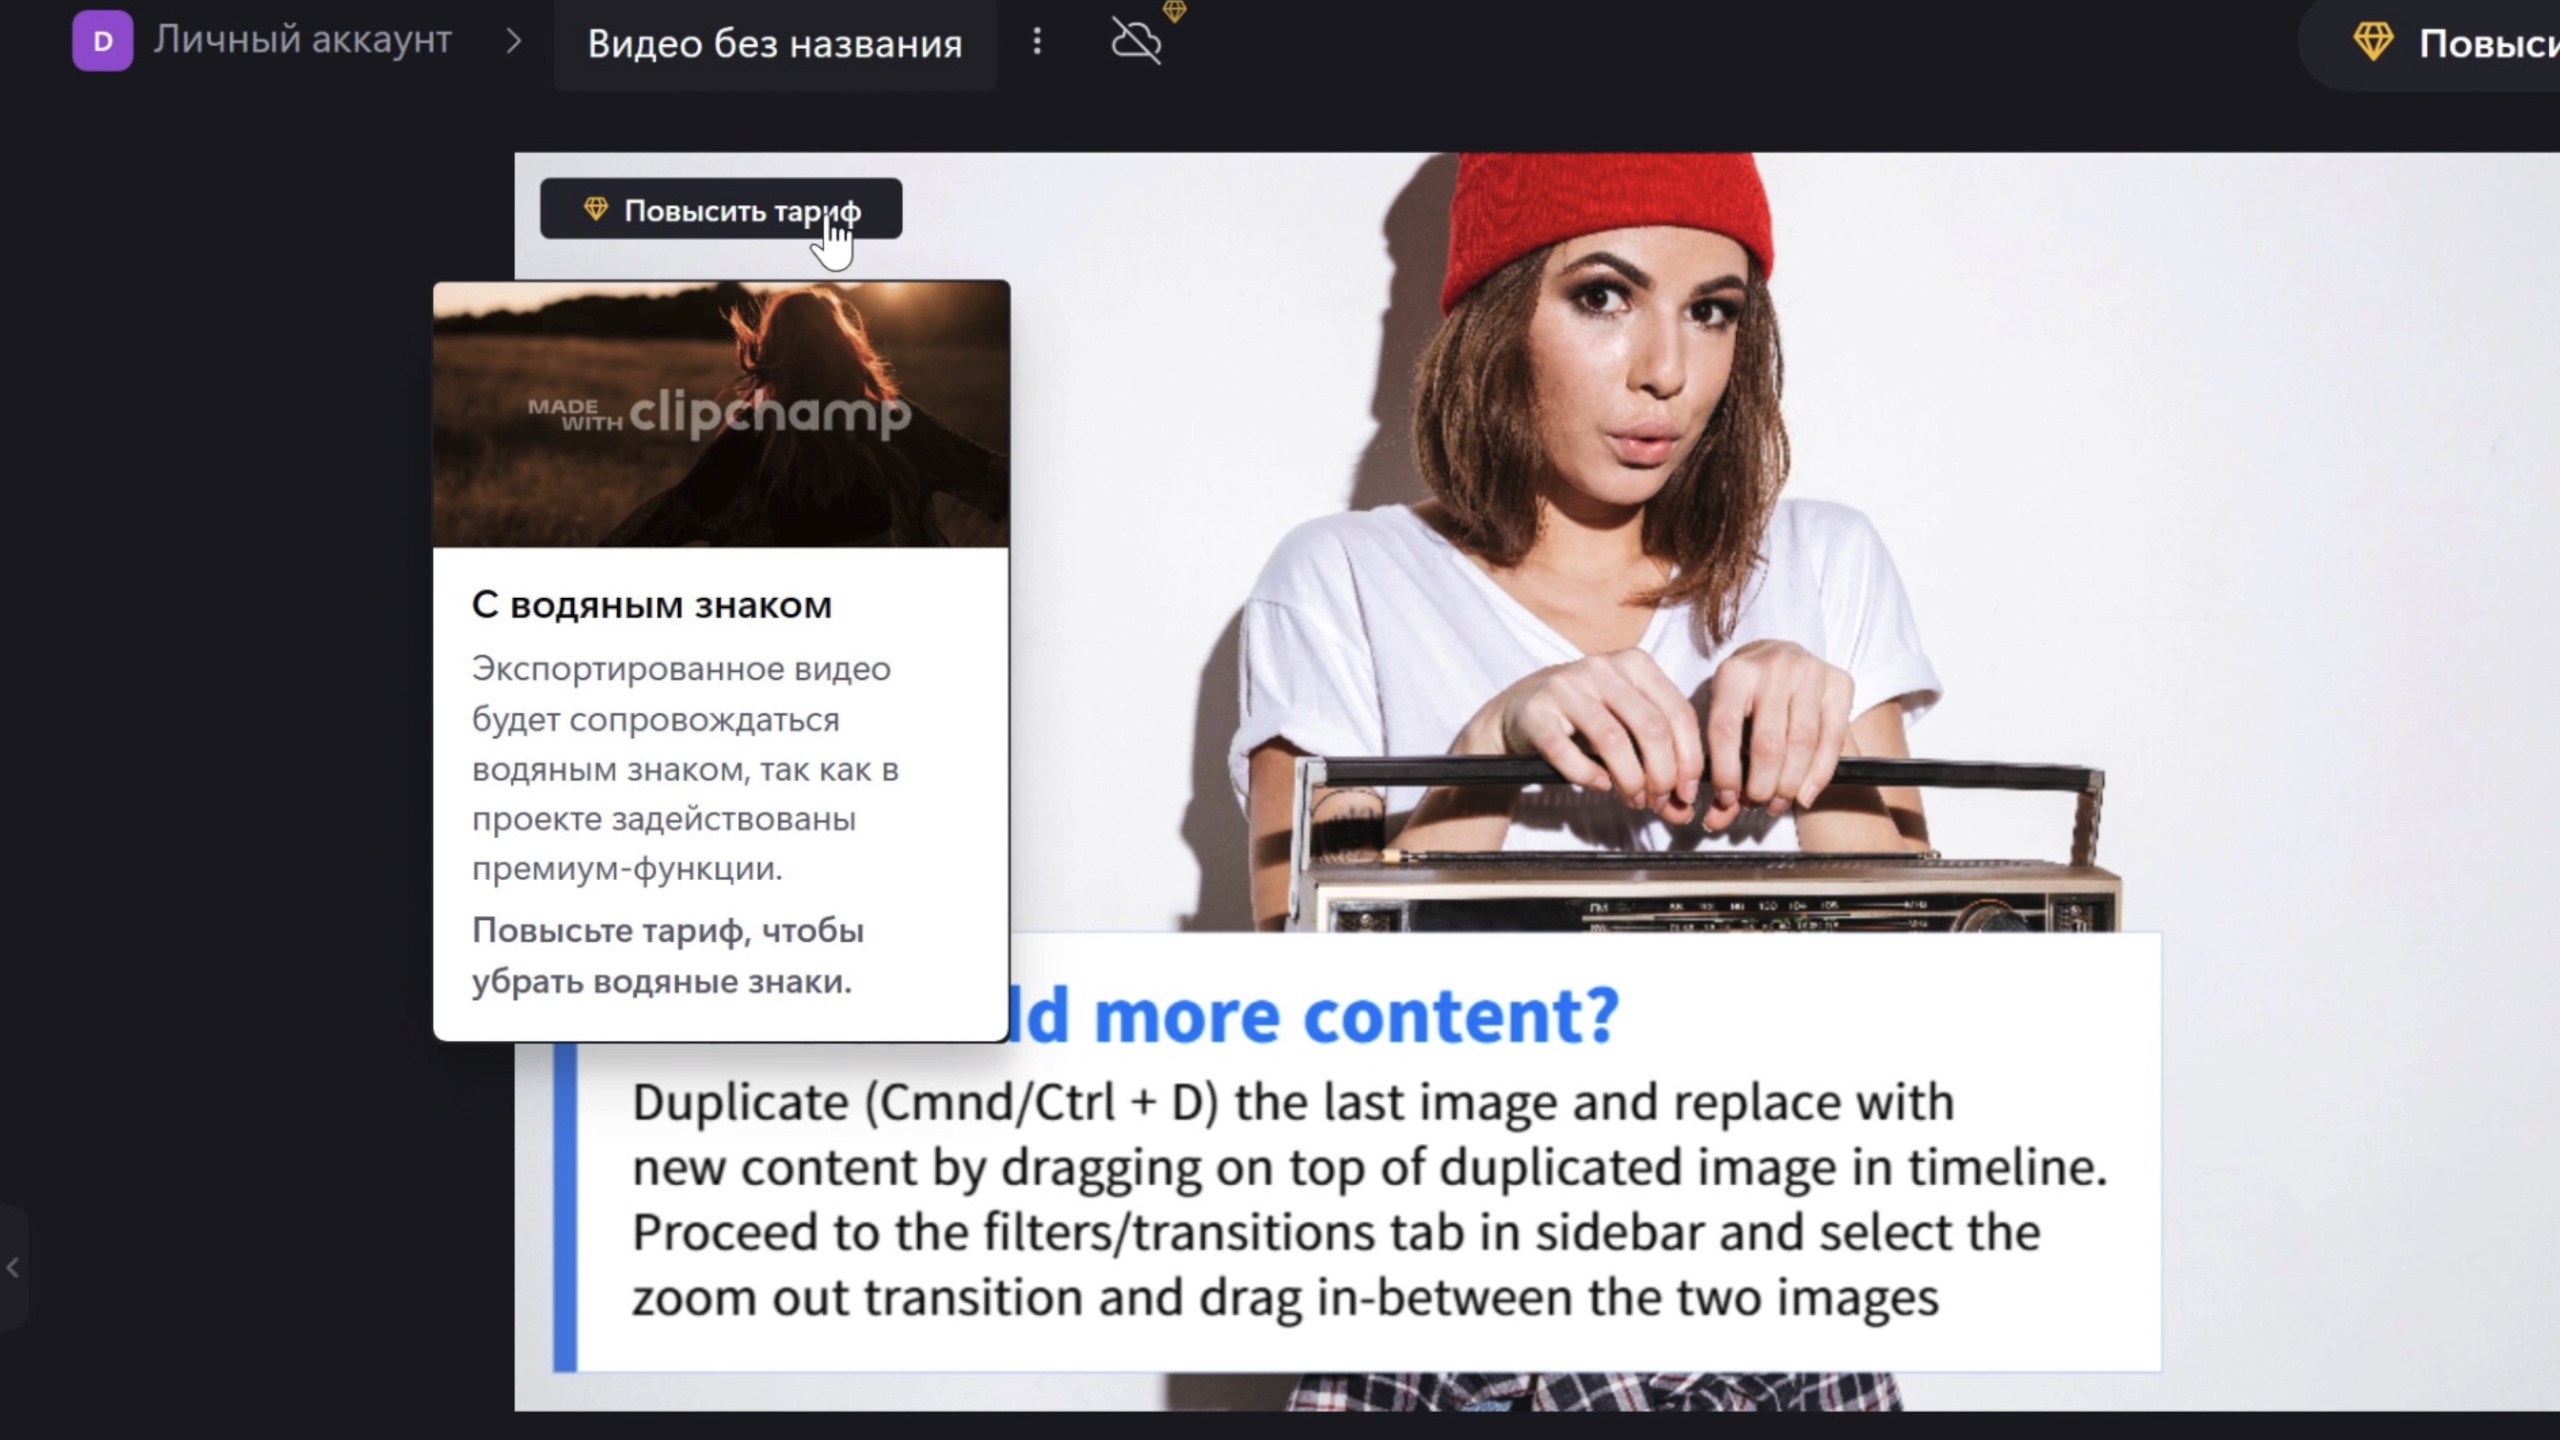
- Водяной знак — включает водяной знак в ваше видео.
Как отредактировать видео Clipchamp?
Редактировать видео в Clipchamp или видео в Clipchamp не так уж и сложно. Вы можете открыть веб-сайт в своем браузере и щелкнуть заголовок видео на главном экране. Затем вы можете найти все параметры, доступные для конкретного видео. Оттуда вы можете добавить или удалить конкретную деталь, объект и т. Д.
Есть ли у Clipchamp приложение?
Да, вы можете загрузить приложение Clipchamp для Windows из Microsoft Store. Он доступен бесплатно. Пользовательский интерфейс веб-сайта и приложения Clipchamp абсолютно одинаков.
Видеоредактор Clipchamp бесплатный?
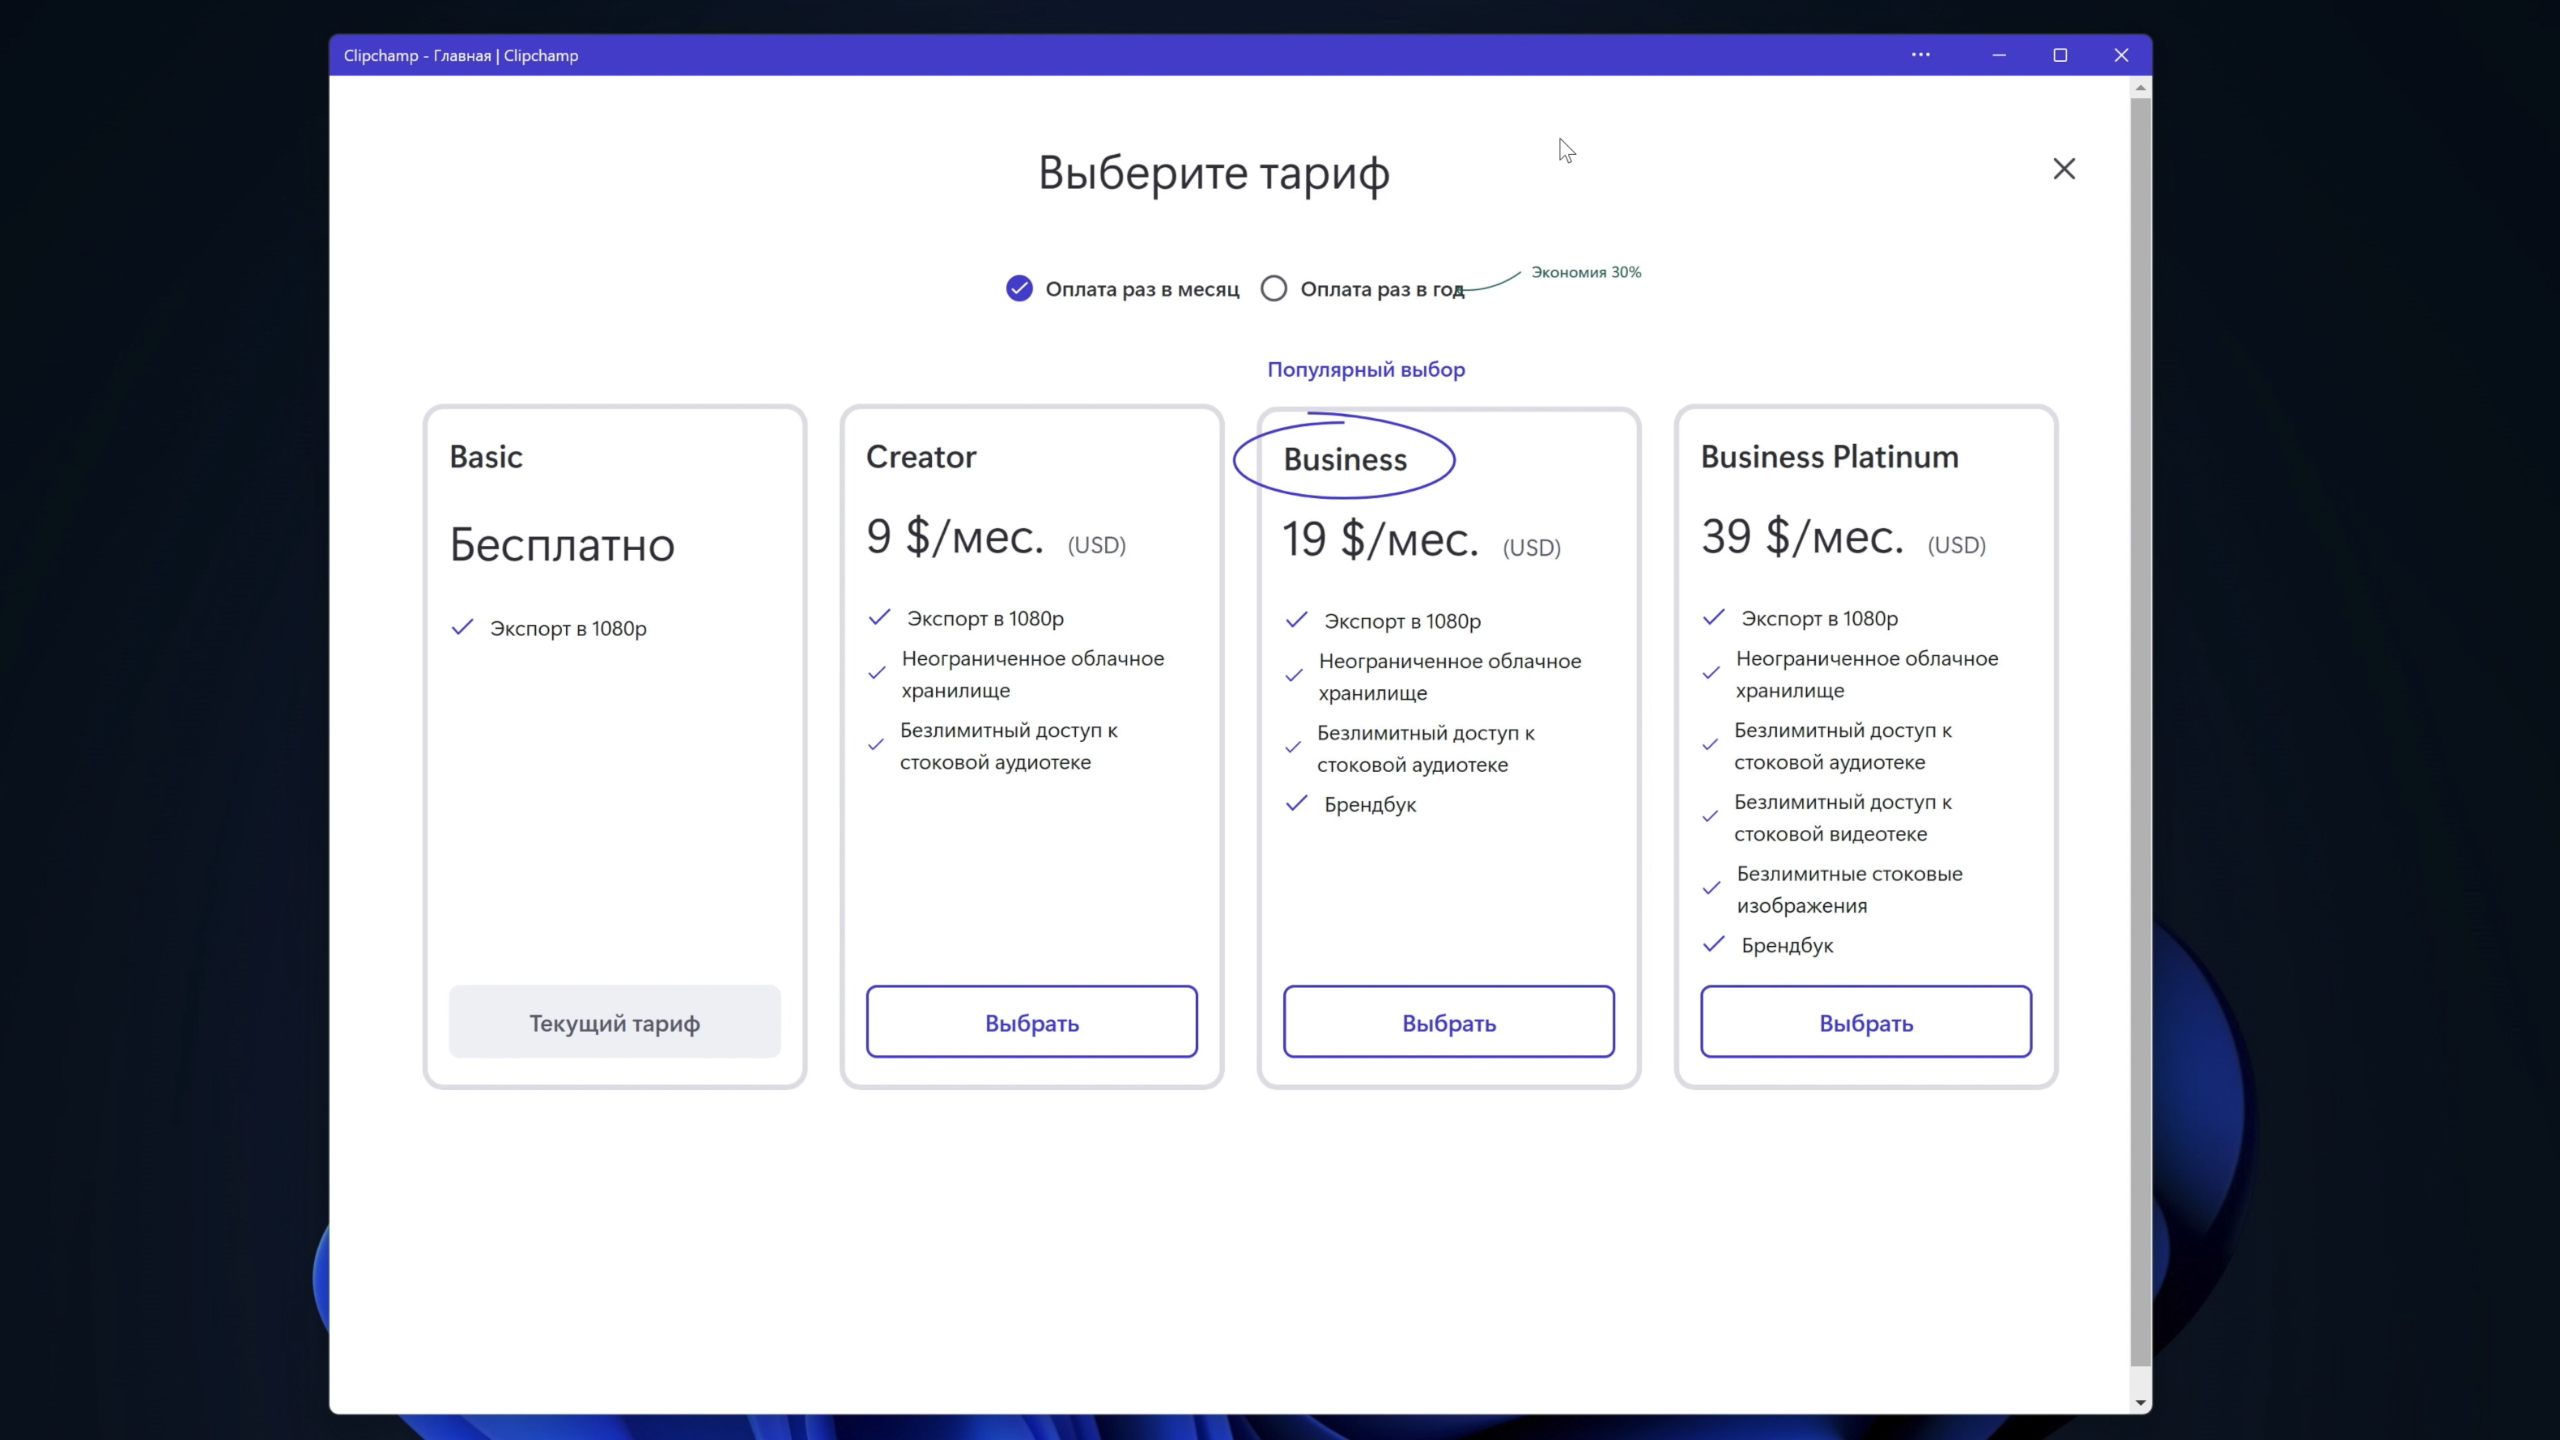
Да, у Clipchamp есть бесплатная (базовая) учетная запись, и вы можете использовать ее для создания или редактирования видео. Тем не менее, они также предлагают некоторые платные варианты с гораздо большим количеством функций, опций и т. Д. Их платная учетная запись начинается от 9 долларов в месяц при ежемесячной оплате.
![]() Чуть более года назад Microsoft приобрела сторонний видеоредактор Clipchamp — тогда я уже писал его краткий обзор, но сейчас этот редактор поставляется с Windows 11 и 10 по умолчанию, приобрел русский язык интерфейса, в бесплатной версии стал доступен экспорт без ограничений в 1080p Full HD (ранее — только 480p), а потому предлагаю взглянуть на него ещё раз.
Чуть более года назад Microsoft приобрела сторонний видеоредактор Clipchamp — тогда я уже писал его краткий обзор, но сейчас этот редактор поставляется с Windows 11 и 10 по умолчанию, приобрел русский язык интерфейса, в бесплатной версии стал доступен экспорт без ограничений в 1080p Full HD (ранее — только 480p), а потому предлагаю взглянуть на него ещё раз.
В этом кратком обзоре об интерфейсе и возможностях редактора видео Clipchamp и собственное мнение о целесообразности его использования. Также может быть интересным: Лучшие бесплатные редакторы видео.
Запуск и особенности Clipchamp
В последних версиях Windows 11 и Windows 10 вы, с большой вероятностью, обнаружите Clipchamp в списке «Все приложения». Если его там нет, то бесплатно «скачать» редактор можно в магазине приложений Microsoft Store.
Почему кавычки? — причина в том, что несмотря на то, что Clipchamp можно установить в видео приложения, это — онлайн видеоредактор, доступный и просто в браузере по адресу https://clipchamp.com/ru/, и вам не обязательно работать с ним именно из Windows. А вот без Интернета даже скачанное Windows-приложение работать не будет.
При первом запуске Clipchamp вам будет предложено зайти с учетной записью Майкрософт, Google или зарегистрироваться с собственной электронной почтой, а также ответить на вопрос о том, для чего планируется использовать редактор (ни на что не влияет).
Использование Clipchamp и доступные возможности
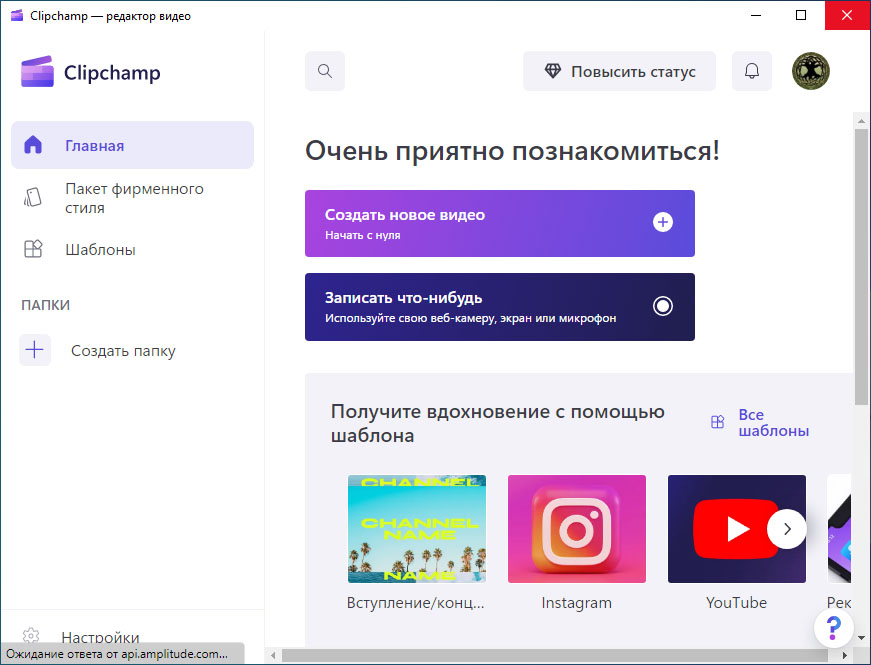
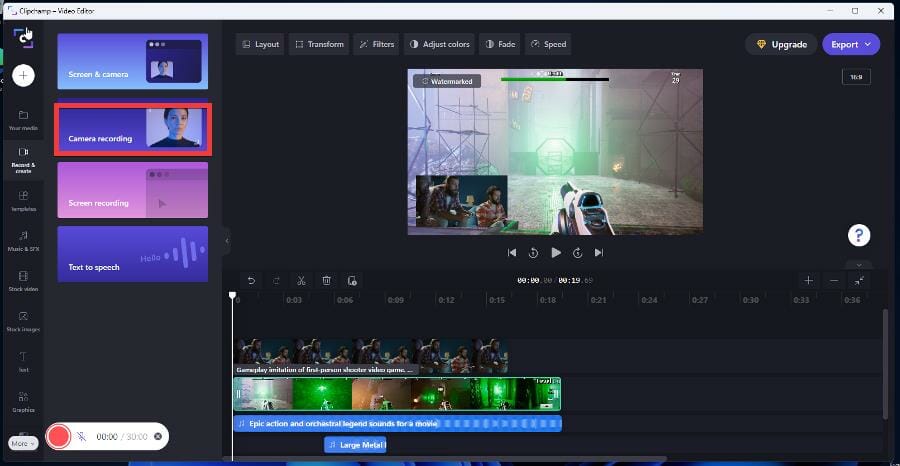
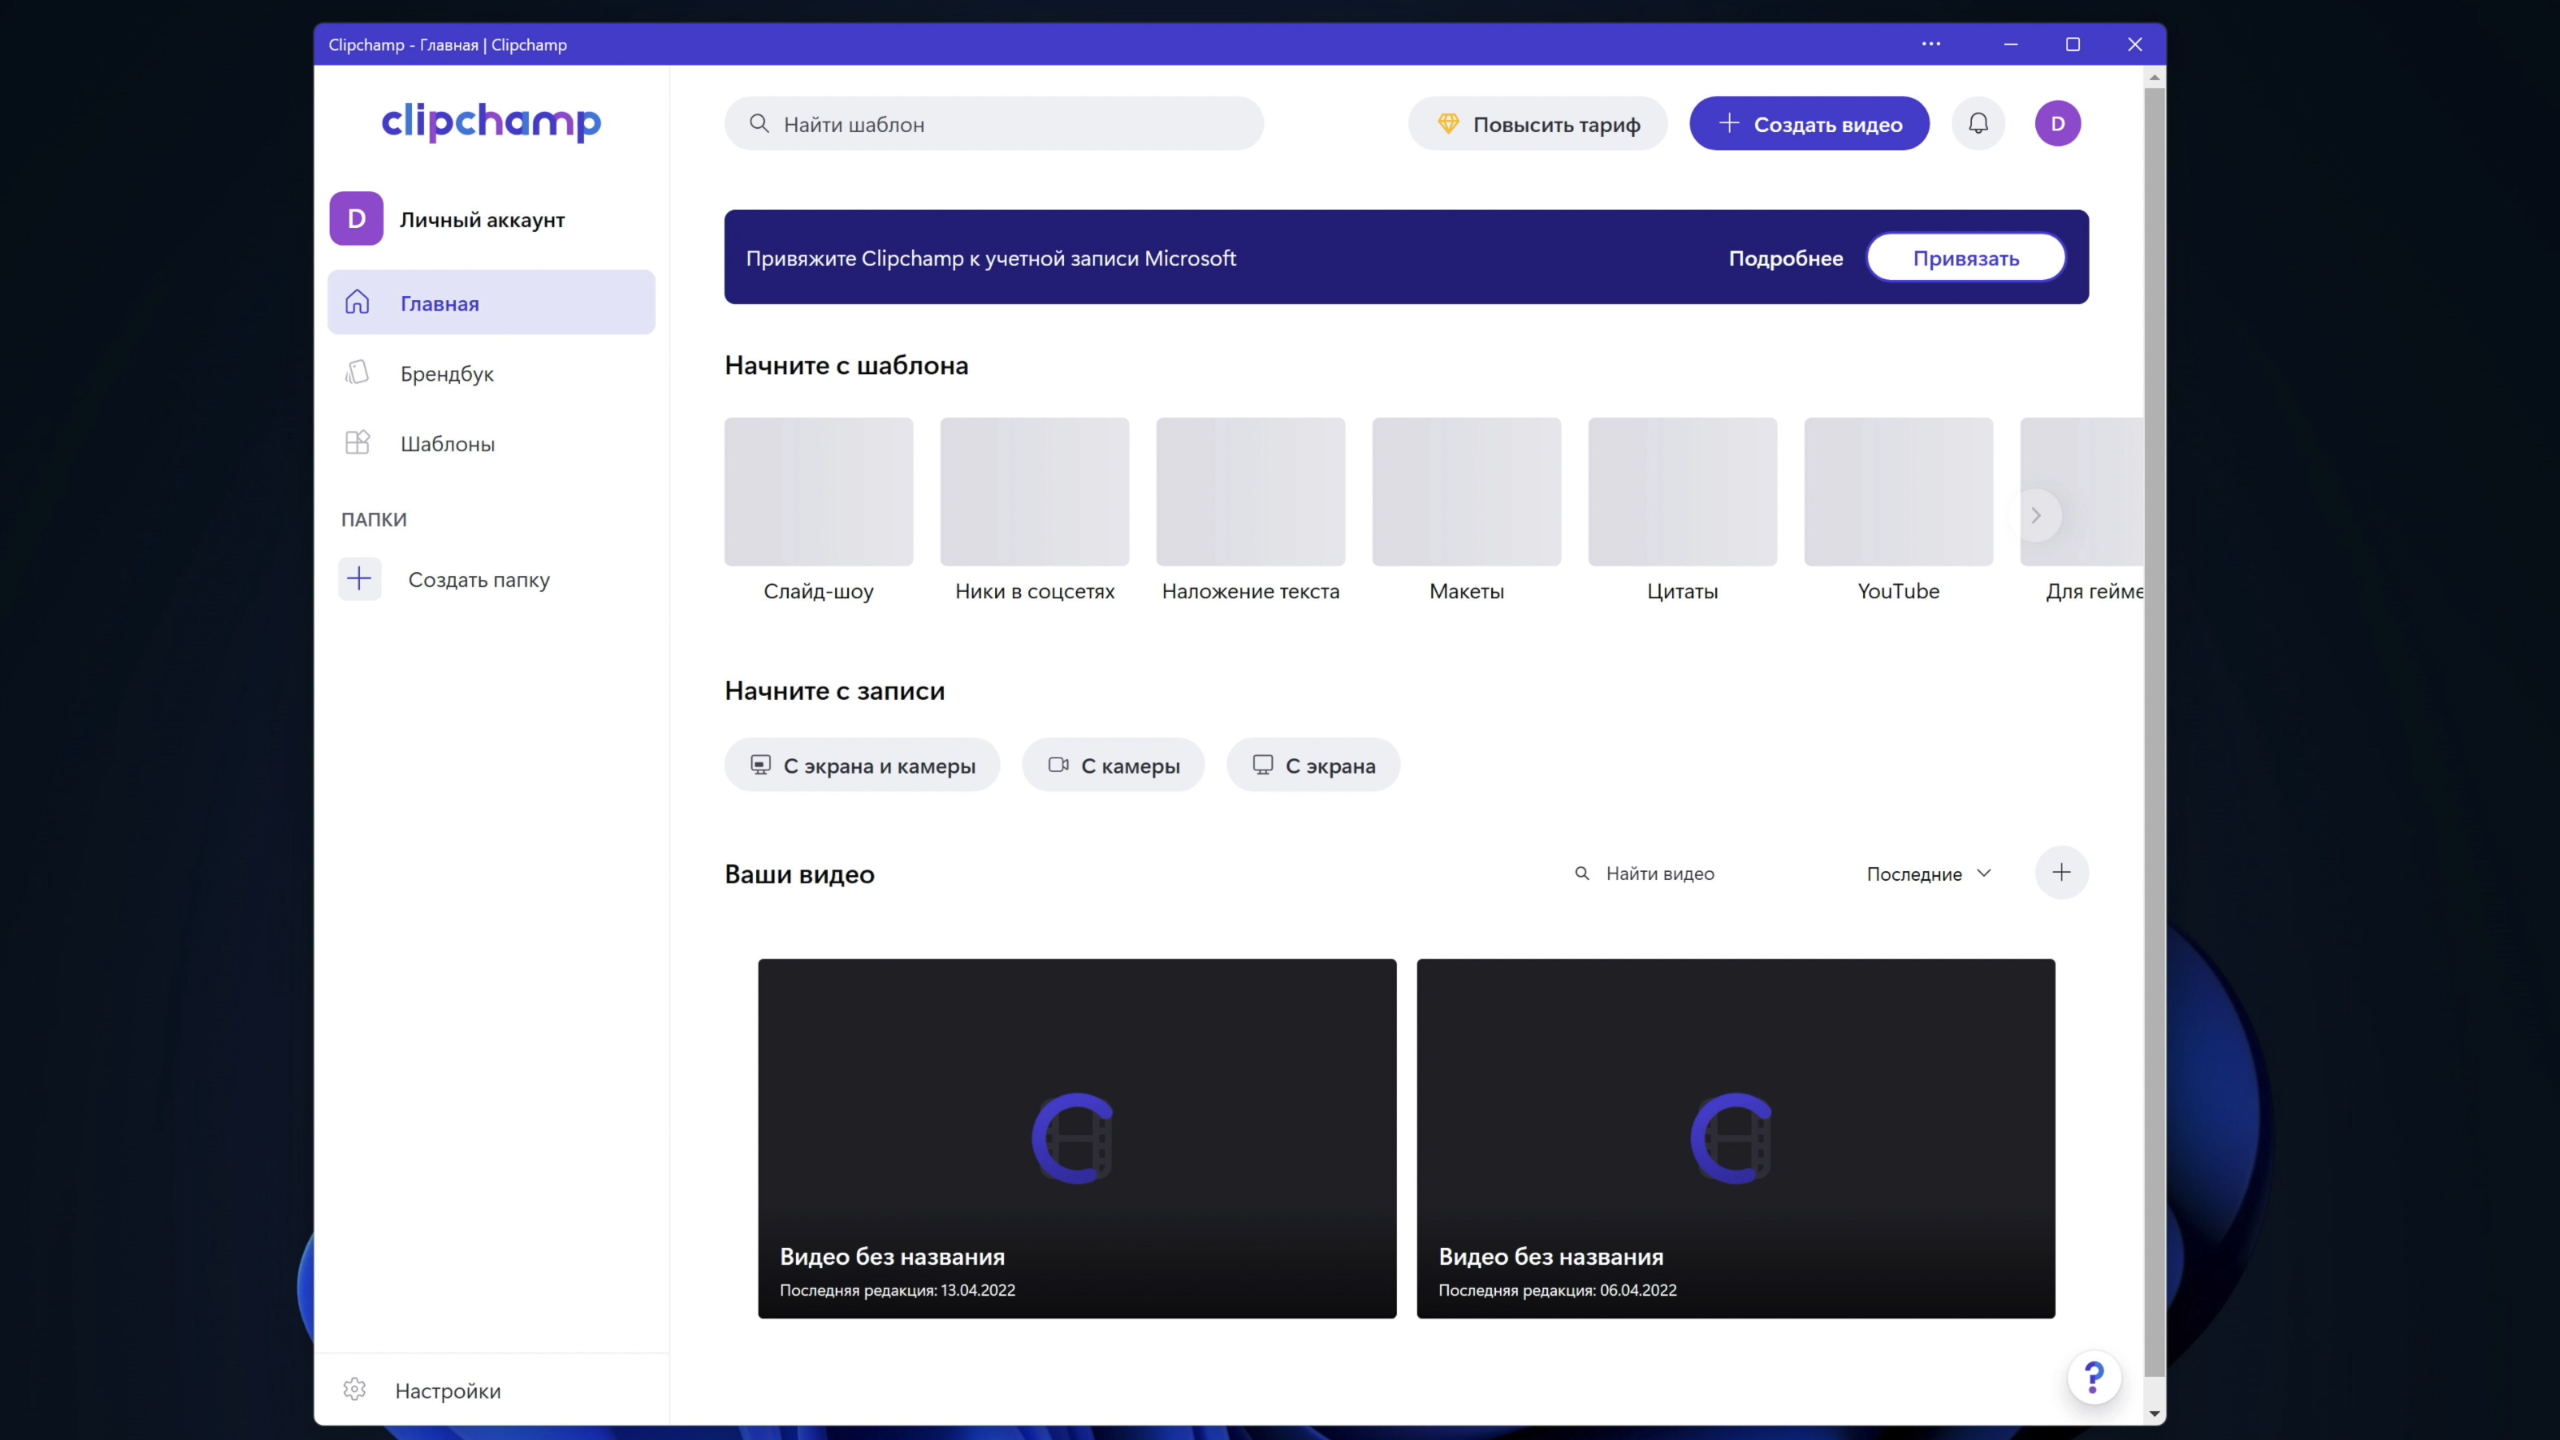
Главное окно Clipchamp в текущей версии выглядит как на изображении ниже:

Здесь представлены следующие возможности:
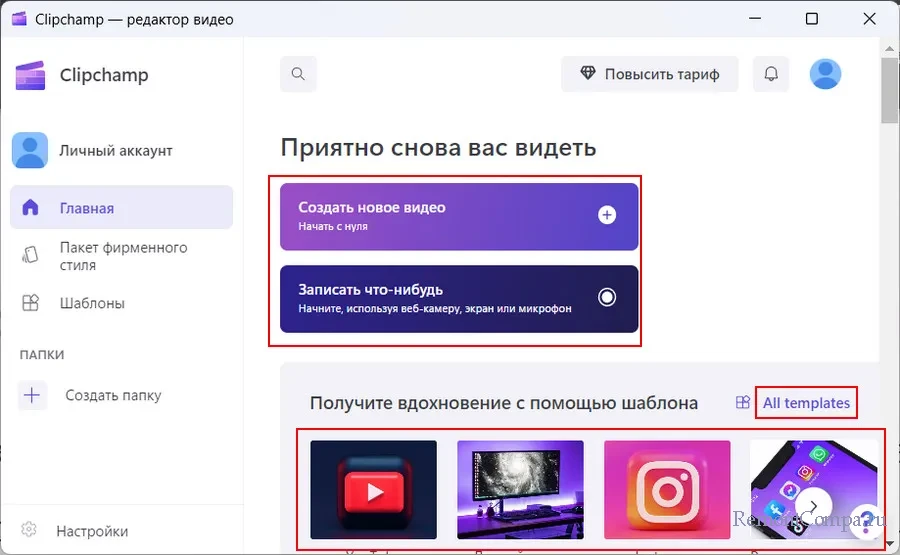
- Создать новое видео — создание нового видео из собственных роликов и изображений, аудиофайлов и других элементов, то есть открытие непосредственно интерфейса для монтажа видео.
- Записать что-нибудь — запись видео с экрана, камеры, запись системного звука и звука с микрофона с последующим редактированием. Эта возможность будет доступна и при выборе первого пункта: в интерфейсе для монтажа она отображается как отдельная вкладка.
- Шаблоны — готовые шаблоны для заставок и видео, где достаточно просто поменять текст или используемые ролики.
- Ваши видео — список проектов, над которыми вы ранее работали в Clipchamp.
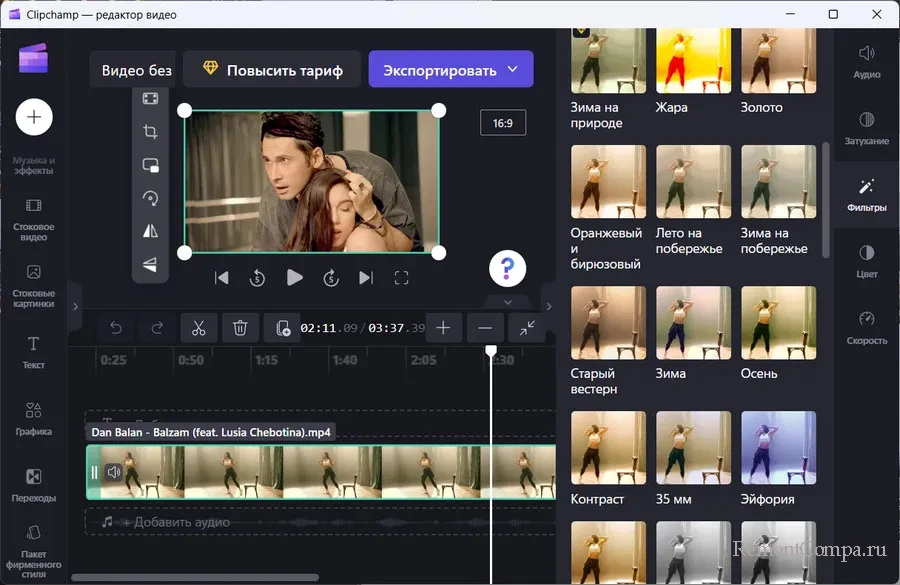
Если ранее вы использовали какие-либо популярные редакторы нелинейного монтажа, работа в Clipchamp должна оказаться интуитивно понятной:
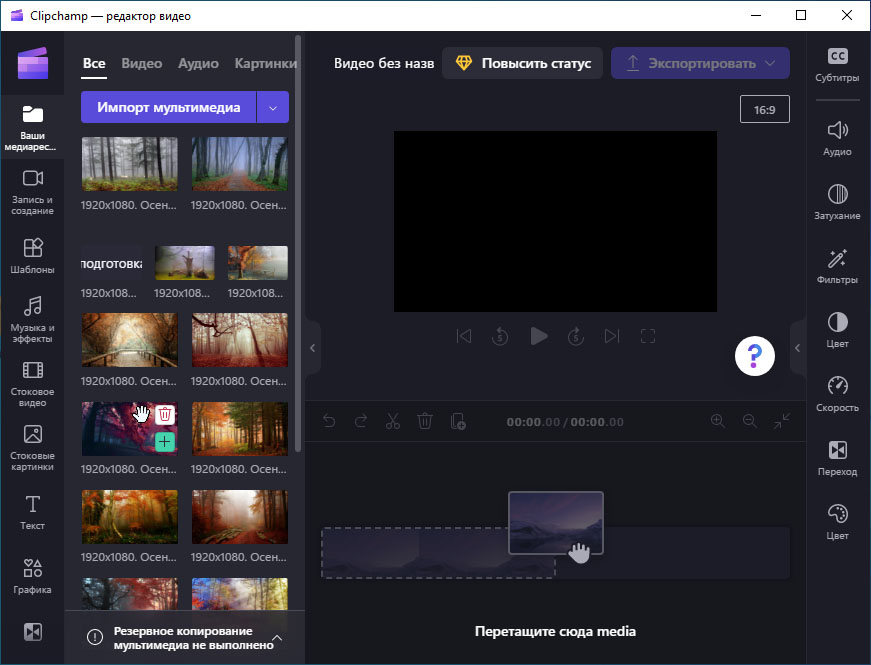
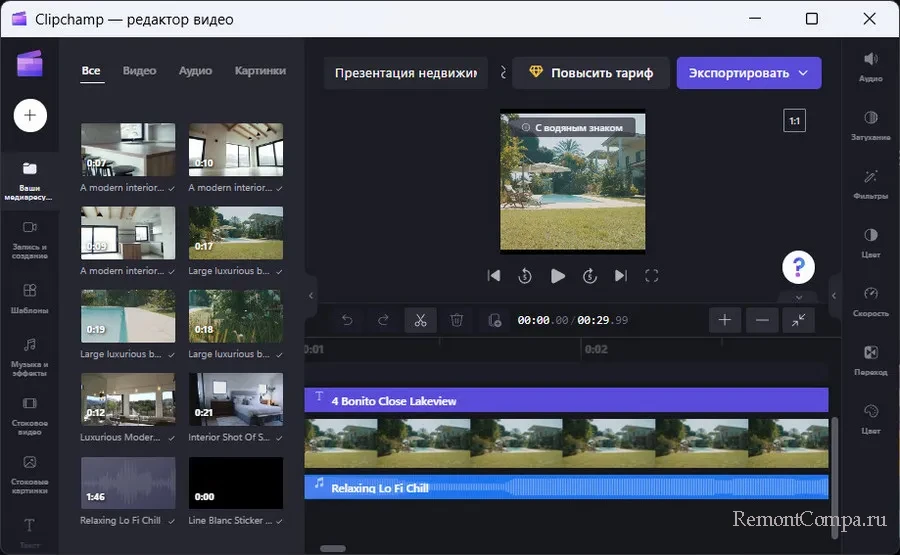
- Нажмем «Создать новое видео», окно редактора откроется на вкладке «Ваши медиаресурсы», где можно добавить свои видео, музыку, изображения и другие элементы для дальнейшего использования их в проекте. Сделать это можно простым перетаскиванием с рабочего стола или из проводника или используя соответствующую кнопку.

- Для использования конкретных ресурсов в видео просто перетащите их на таймлайн (дорожки на временной шкале) в нужном порядке. Размещать их можно по порядку, либо создавать новые дорожки, размещая один элемент над другим (в этом случае он будет перекрывать то, что будет под ним).

- Для любого выбранного элемента на таймлайне через контекстные меню и кнопки в интерфейсе доступны стандартные действия: обрезка, отключение звука.

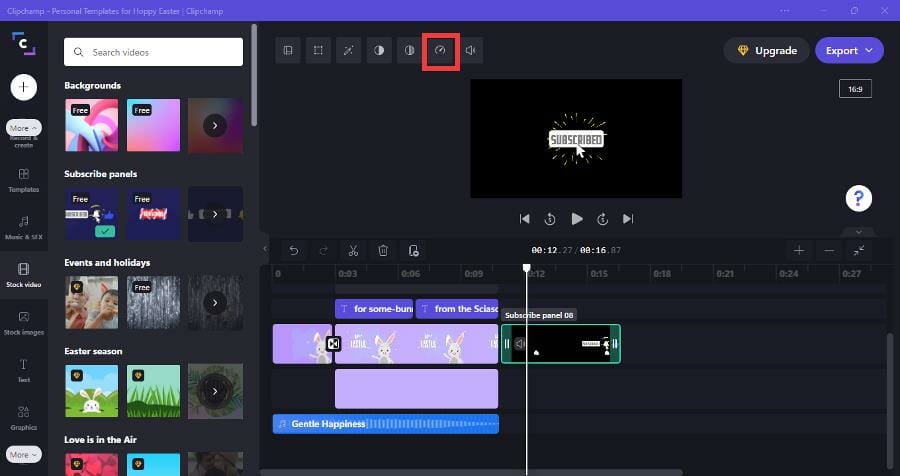
- Выбрав элемент и нажав в правой панели по кнопкам «Фильтры», «Скорость», «Затухание», «Цвет», «Аудио» можно настроить соответствующие аспекты ролика: добавить графический эффект, выполнить коррекцию цвета, изменить громкость и подобные.

- Кнопки в левой панели позволяют добавить новые элементы в ваше видео: создать запись экрана, текстовые заголовки, графику, использовать стоковые элементы.

- Для добавления переходов между отрывками видео вы можете использовать кнопку «Переход» слева и перетащить нужный переход между соприкасающимися элементами в таймлайне, либо просто поднести указатель мыши к месту их стыковки и нажать по появляющейся при этом кнопке с изображением знака «плюс».
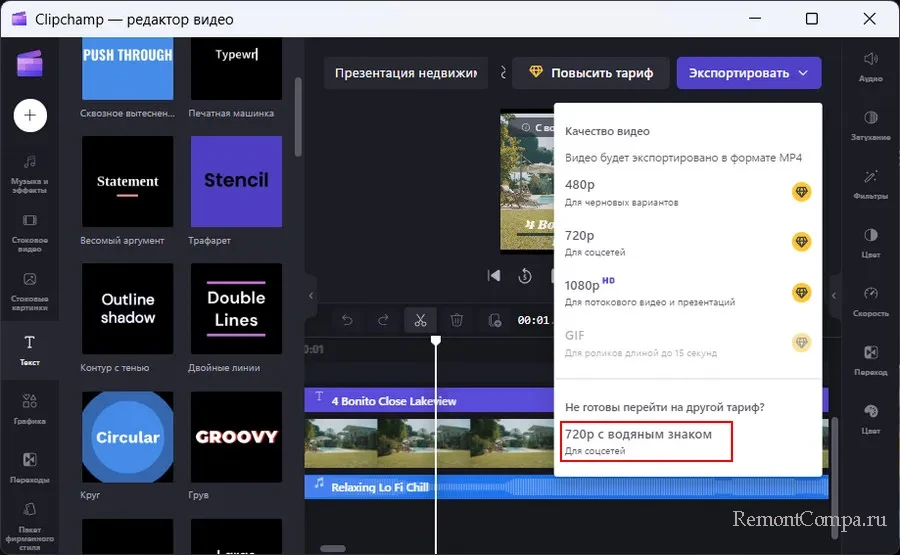
- После завершения работы над проектом достаточно нажать кнопку «Экспортировать» и выполнить экспорт в нужном разрешении, готовый файл сохраняется в «Загрузки» (напоминаю, это — онлайн редактор видео). Максимально доступный — 1080p при 30 кадрах в секунду, а для роликов продолжительность менее 15 секунд доступен экспорт в GIF.

- Какие-либо водяные знаки добавляться не будут при условии, что вы не использовали эффекты, переходы и другие элементы, доступные только после использования кнопки «Повысить статус» (такие элементы отмечены изображением бриллианта). Бесплатных переходов и эффектов в Clipchamp вполне достаточно для большинства целей.


Во время написания обзора Clipchamp сразу после приобретения редактора Майкрософтом осенью прошлого года, я закончил статью следующим абзацем:
Видеоредактор простой в использовании, но отсутствие русского языка и ограничения бесплатной версии (экспорт только в 480p) всё портят. Если же в будущем Майкрософт «внедрит» его в Windows, добавит русский язык и сделает бесплатным (ну а вдруг?) то это будет один из лучших онлайн редакторов для начинающих пользователей, которым вполне можно пользоваться.
Как видим, сегодня почти все пункты выполнены, кроме «сделает бесплатным». Но, если сравнивать с другими редакторами видео, имеющими платные планы использования, ограничений здесь значительно меньше: ни водяных знаков, ни сильного ухудшения качества видео, ни отключения части необходимых функций. А потому — смело могу рекомендовать Clipchamp начинающим пользователям для личного домашнего использования.
Не секрет, что возможности встроенного в Windows видеоредактора оставляют желать лучшего, и в Microsoft это прекрасно понимают, поэтому решили интегрировать в систему более функциональный редактор. Создавать очередное приложение в Microsoft с нуля не стали, вместо этого они приобрели уже готовый программный продукт Clipchamp, созданный одноименной австралийской компанией.
Новый видеоредактор доступен в инсайдерской сборке 22572, желающие опробовать его в стабильных версиях Windows 10 и 11 могут установить продукт из Магазина Windows.
Пока только сервис
Clipchamp, хотя скачивается и устанавливается как все универсальные приложения, на деле является лишь оболочкой, так как все основные операции по обработке видео выполняются на удаленном сервере. По сути, программа Clipchamp является онлайновым сервисом, дублирующим интерфейс официального ресурса app.clipchamp.com.
А еще для работы с приложением вам нужно будет создать учетную запись, причем независимо о того, станете ли вы использовать Clipchamp из среды Windows или из браузера.
Ключевые возможности Clipchamp
Главное окно приложения представляет собой приветственную страницу, на которой можно выбрать нужное действие: перейти непосредственно в окно редактора, выбрать во встроенной библиотеке готовый шаблон для будущего клипа, просмотреть список ранее созданный проектов и записать экранное видео или звук. Да, Clipchamp умеет и это.
Интерфейс видеоредактора имеет много общего с интерфейсом таких программ как AVS Video Editor, ВидеоМОНТАЖ и Movavi Video Editor, так что если вы уже имели дело с этими приложениями, то без труда разберетесь и с Clipchamp. Добавление мультимедийных файлов в проект осуществляется путем их перетаскивания на рабочую область слева, из которой затем перетаскиванием можно добавлять импортированные файлы непосредственно на временную шкалу.
Программа поддерживает работу с популярными форматами видео, аудио и изображений, в клипы можно добавлять произвольный текст, клипарт и субтитры. Функциональные возможности видеоредактора включают обрезку, применение фильтров и эффектов, добавление переходов, цветокоррекцию, управление громкостью и скоростью воспроизведения. Завершенный проект можно сохранить в формате MP4 с максимальным качеством 1080p и 30 кадров в секунду, доступна также опция экспорта коротких, не более 15 секундных роликов, в GIF-анимацию.
Как и прочие штатные приложения Windows, Clipchamp бесплатно, однако в нем имеется и платный контент – эффекты и переходы, которые станут доступными после повышения статуса пользователя.
![]() Загрузка…
Загрузка…
by Cesar Cadenas
Cesar has been writing for and about technology going on for 6 years when he first started writing tech articles for his university paper. Since then, his passion… read more
Published on March 17, 2022
- Clipchamp is Microsoft’s new successor to its famous Windows Movie Maker app from years past.
- The app is a great video editor for first-timer and very user friendly.
- Unfortunately, it’s limited in what it can do as it caps resolution off at 1080p.
Get the right software to support your ideas!Creative Cloud is all you need to bring your imagination to life. Use all the Adobe apps and combine them for amazing results. Using Creative Cloud you can make, edit, and render in different formats:
- Photos
- Videos
- Songs
- 3D models & infographics
- Many other artworks
Get all apps at a special price!
On March 9, Microsoft began to roll out the latest build for the Dev Channel of the Windows 11 Insider Program: Build 22572. In the update, some features and updates were released like the new Microsoft Defender Preview.
Microsoft Defender Preview is a standalone app that serves as a central hub for the Windows Security system. Some new features have been added to Windows 11, the most notable of which is Clipchamp.
Clipchamp is the new video editing app for Windows 11 that Microsoft says has a focus on “making video creation easy, fast, and fun.” It comes equipped with a lot of the basic tools a video editor requires like trimming and splitting.
It also has professional-level features like transitions and animated text. Clipchamp also has a webcam and screen recording functionality.
The app also comes with a video timeline, which is new to Windows video editors and functionality usually reserved for professional-grade editing apps. Clipchamp has access to a massive stock library filled with over a million assets.
These assets include royalty-free videos, audio files, and images. The app has a text-to-speech generator powered by Microsoft Azure and supports over 70 different languages.
Clipchamp also integrates with several Windows apps and connects to OneDrive for easy file transport. Needless to say, Clipchamp is packed to the brim with features and has a lot going for it.
The company behind Clipchamp was acquired by Microsoft in September 2021, and it looks like the app will be the replacement for the iconic Windows Movie Maker program from years past.
What does Microsoft intend to do with Clipchamp?
For almost 20 years, Windows Movie Maker was the premiere video editing tool for Windows computers up until 2017 when Microsoft officially discontinued it. It was a pretty simple and easy-to-use software that any amateur filmmaker could pick up.
But like a lot of native apps on Windows, it is criticized for oversimplification and lack of any meaningful features. It was just too bare-bones and eventually, Microsoft moved on.
Since then, Microsoft has been working on the next generation of its native apps. Typically, the apps that came on Windows computers were criticized and even mocked for how poor they were in comparison to third-party apps.
People in the past made the joke that Internet Explorer was only good for downloading a better web browser. From this, Microsoft listened to what people were saying and made major changes to its native apps.
Native apps like Calendar and Email got a much-needed revamp with new features and redesign aligned with Windows 11. Movie Maker had a spiritual successor in the form of a Video Editor feature in the Photos app.
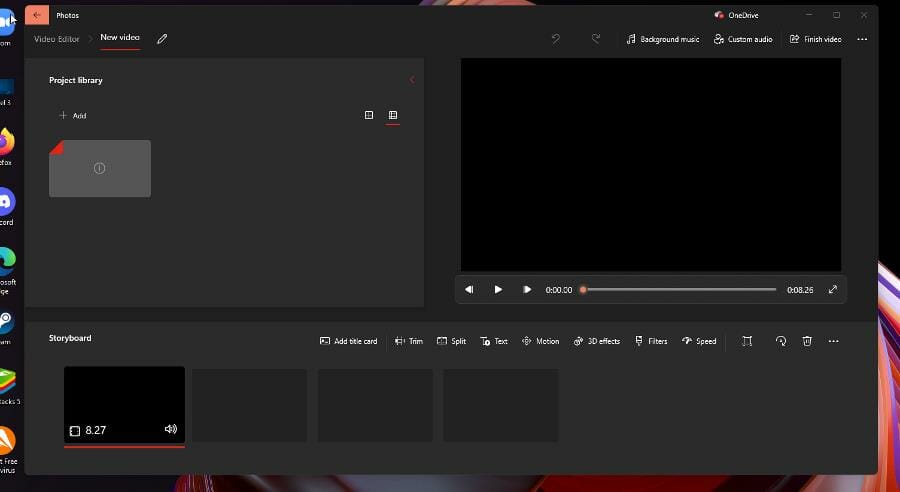
However, the Video Editor is still basic and barebones. It doesn’t have a timeline, but instead a Storyboard, which you can split up and add text. It’s fine, but you wouldn’t consider it to be a great video editor.
And so, this brings everything back to Clipchamp, a web-based video editor that Microsoft is turning into a proper app on Windows 11. Here is how you can download and use Clipchamp.
What are some noteworthy features for Clipchamp?
What’s unique about Clipchamp is that it uses a PC’s GPU to process video. It does this to free up your CPU of processing power, an important resource for programs to use.
➡ Low impact on your CPU
A computer’s CPU only can support a certain amount of tasks and apps. When resources get strained, that causes performance issues and your computer starts to slow down immensely.
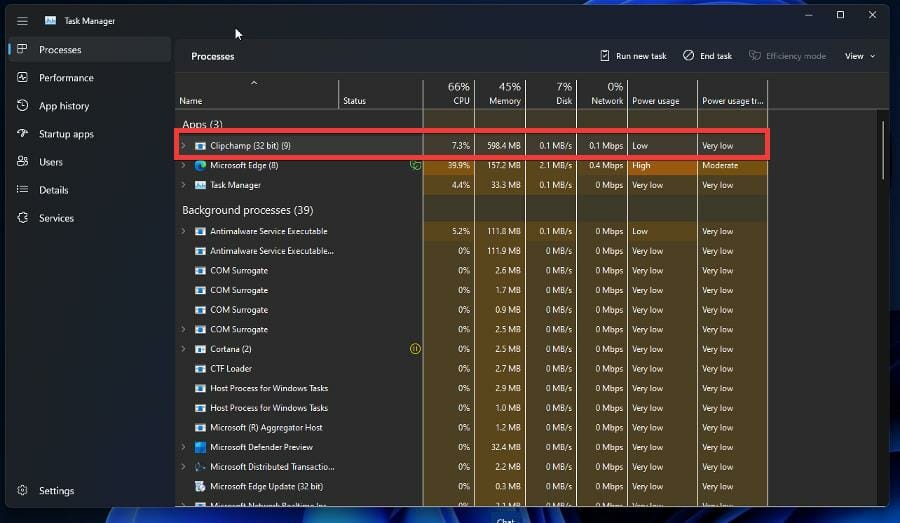
As you can see in the image of the Task Manager, Clipchamp is taking up very little of the CPU, but a large portion of the RAM which is directly from the GPU usage.
If your Windows 11 computer has a good enough GPU, the Clipchamp will save you a lot of CPU resources. But if your GPU isn’t up to snuff, then rendering videos will take a long time to complete.
That said, moving resource management to the GPU is a great solution to resource hogs like Google Chrome. While you render your video, you can surf the internet or whatever else is on your itinerary.
➡ Large stock content library
The stock library available is pretty extensive. The company did not cheap out in this regard. You have a wide selection of choices from base backgrounds to neon lights for stock video.

There are tons of free stock images from various LGBT pride flags and outer space, although more specific stocks images are locked behind a paywall. You’ll know which ones you’ll have to buy if they have an orange diamond in the corner.
Music options run the gamut from lo-fi chill music to hip hop to acoustic guitars. Sound effects stuff like fake police radio transmissions to creepy ghost/zombie sounds for Halloween videos.
If you select the Graphics tab, you will see the entire GIPHY library at your disposal, meaning you add your favorite internet onto your video for no extra charge.
The amount of GIFs you have at your disposal is very impressive. , and stickers from GIPHY are part of that package. Speaking of free content, all of the text and transition options are free on Clipchamp.
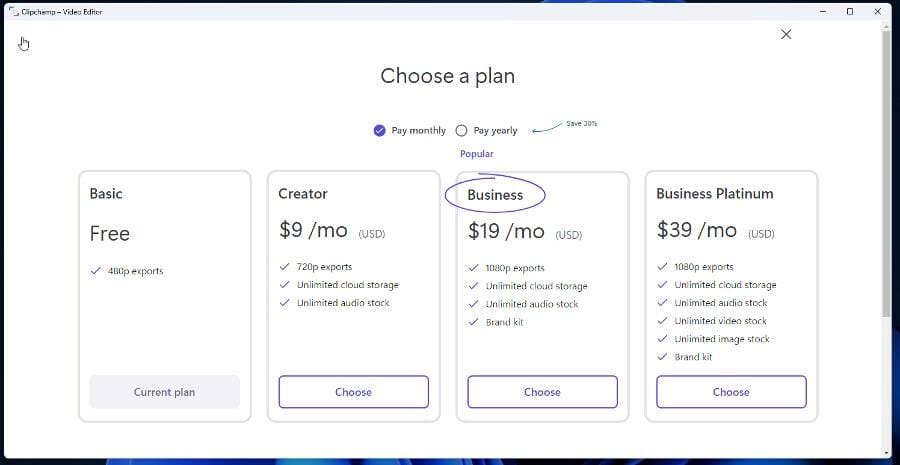
➡ Paid plans and what they offer
Clipchamp also has several paid plans that you can choose from that add on features and capabilities. The more expensive the plan, the higher the quality videos you can create.
Some PC issues are hard to tackle, especially when it comes to corrupted repositories or missing Windows files. If you are having troubles fixing an error, your system may be partially broken.
We recommend installing Restoro, a tool that will scan your machine and identify what the fault is.
Click here to download and start repairing.
The base plan limits you to videos at 480p, which is a little disappointing to see. This option offers a fairly low-quality resolution and would have liked to see 720p set as the standard. Honestly, 720p doesn’t look that good anymore.
Video resolution has made leaps and bounds in the last several years that devices and platforms can now output video at 4K resolution, and in some cases, even more. Having the 1080p option as the maximum is also disappointing to see.
And certain parts of the stock library are locked behind a particular level. The Business Platinum level gives you access to absolutely everything while the creator limits you to music and sound effects.
It would have been better if the paid plans offered more than what they’re giving its customers. Below is a demonstration of how you can create a video with Clipchamp using the Basic plan.
How can I create a video on Clipchamp?
For this example, the instructions will create a video based on what is available on the Basic plan. The process is the same for every plan. But with higher-paid plans, you’ll have more tools at your disposal, and thus the results could be better.
That being said, to be able to set up and use Clipchamp with ease, you will need to follow some steps. Below you can observe the entire process.
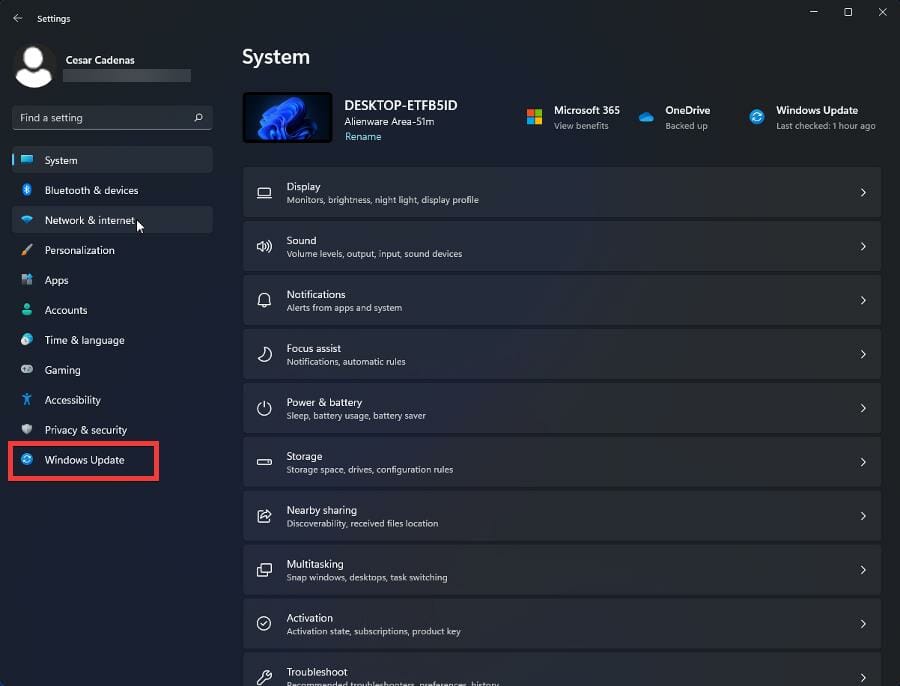
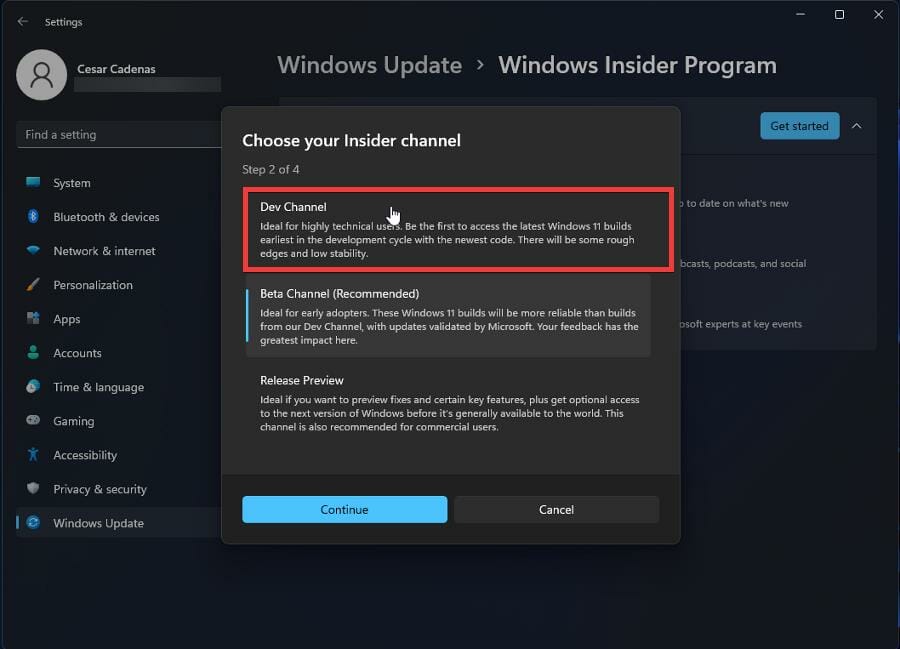
1. Join the Windows Insider Program
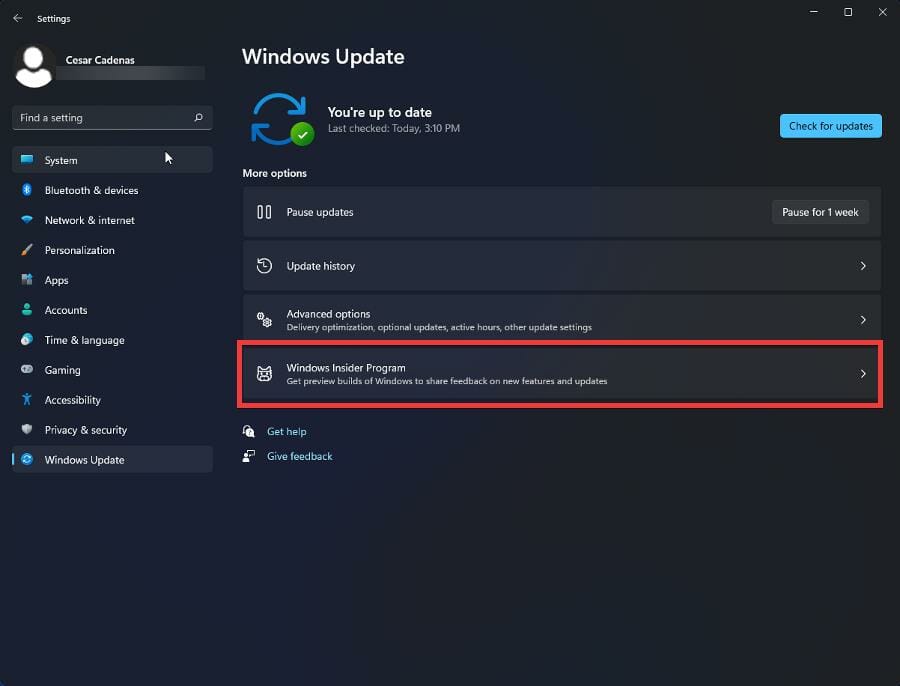
- Open the Settings menu on your Windows 11 computer.
- Click the Windows Update tab on the left hand side.

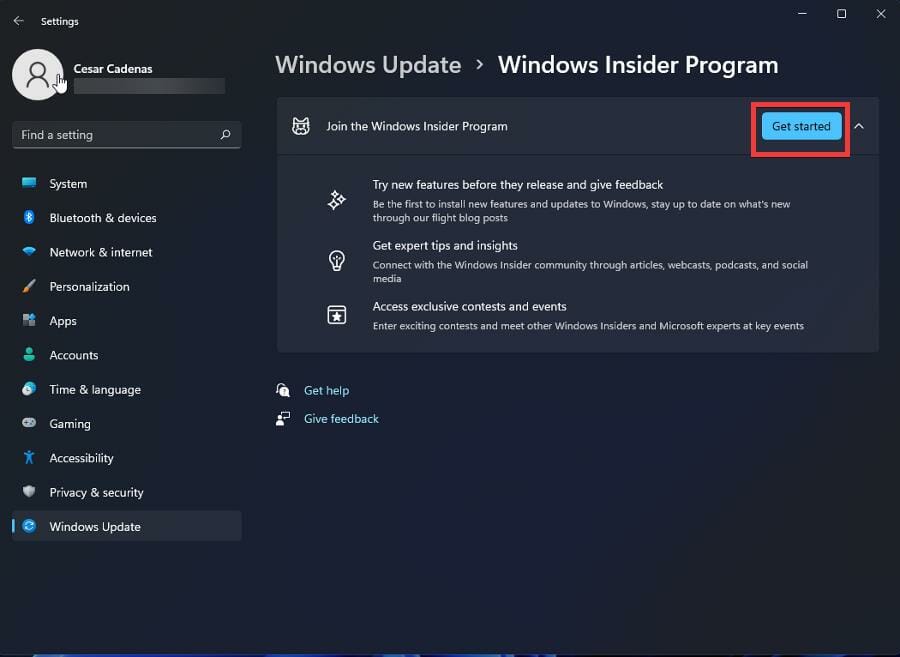
- In this section, click Windows Insider Program.
- Click the Get started button in the upper right corner.

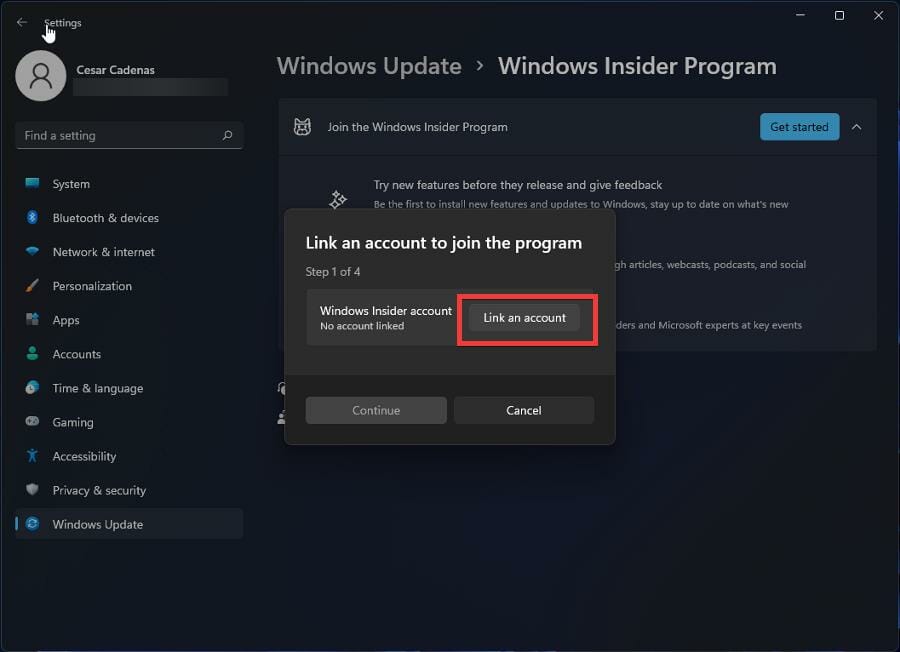
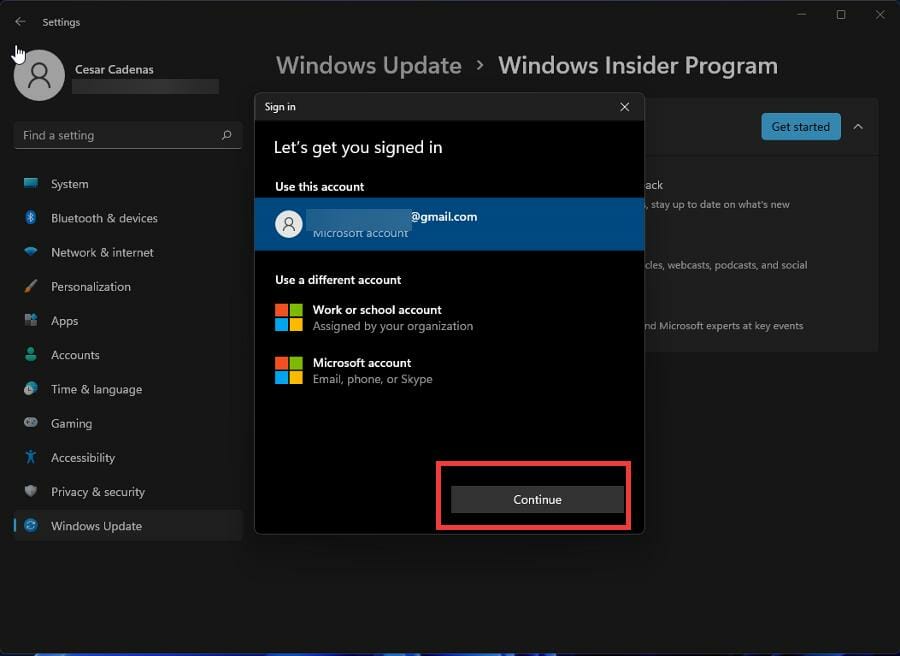
- Click Link an account to connect your account to the Insider Program.

- Select your account and click Continue.

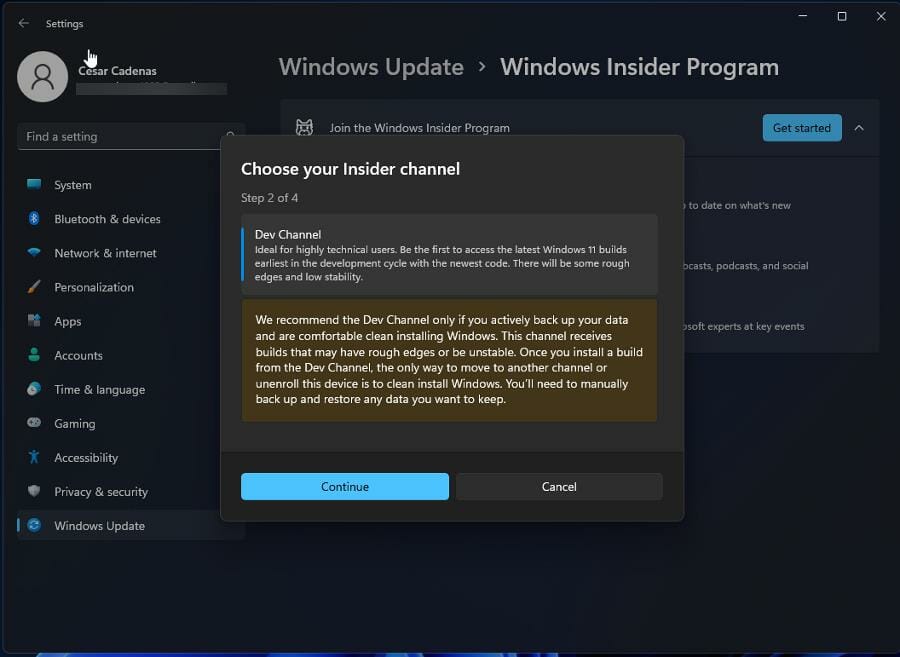
- Select Dev Channel so you can try out the preview build.

- Click the Continue button. You may receive a notice that states it is recommended that you only use the Dev Channel if you back up your data. After backing it up, you’ll need manually restore your data.
- Click Continue.
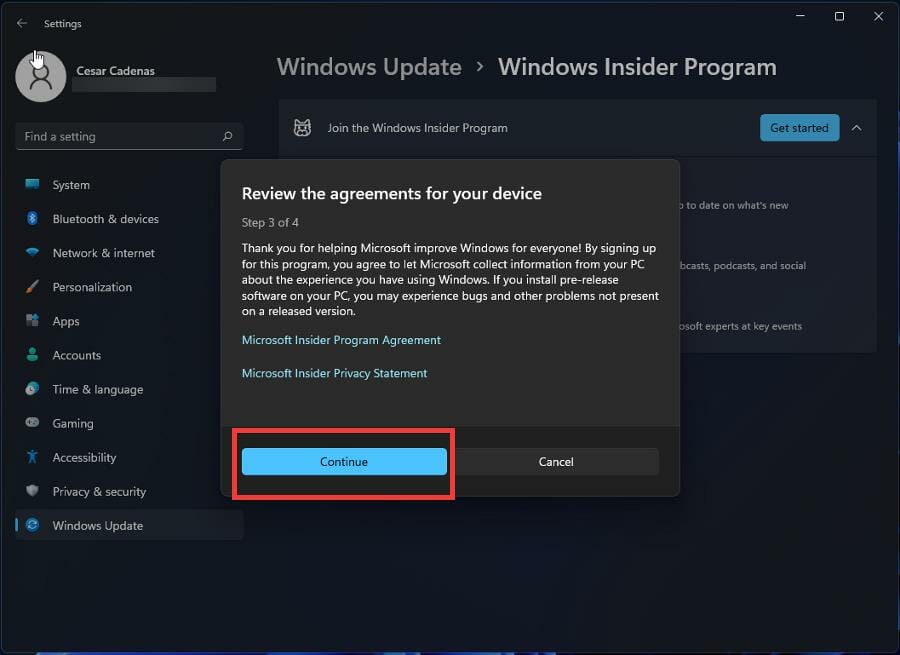
- You’ll be given the opportunity to read the Insider Program’s agreement and privacy statement. Click Continue.

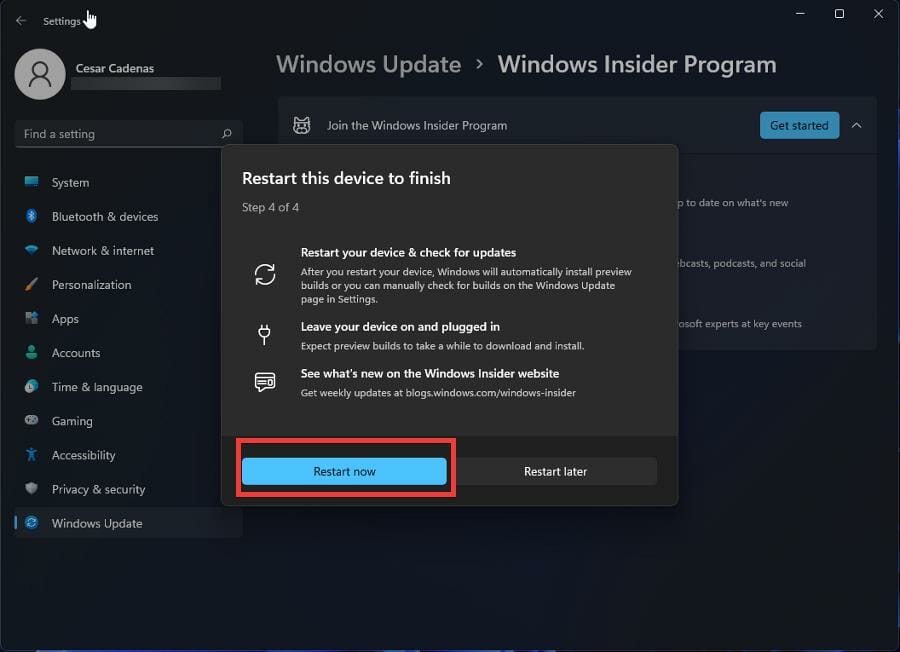
- To start the Insider Program, click Restart now.
- Give your computer some time to restart and enter the Insider Program.
2. Download the latest Windows Insider preview build
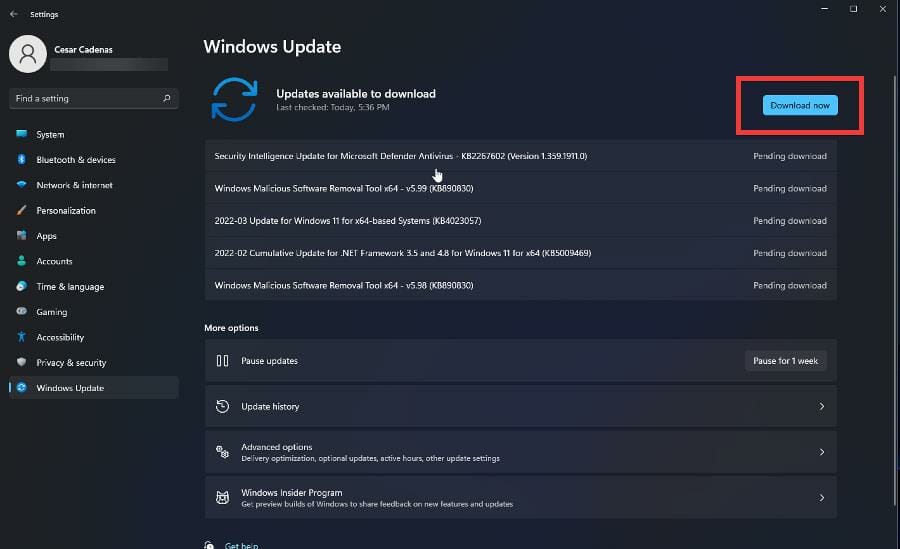
- Go back to the Windows Update section. You will see everything that is going to be added to the Preview Build.
- Click Download now in the top right corner.

- Give your computer time to download the build.
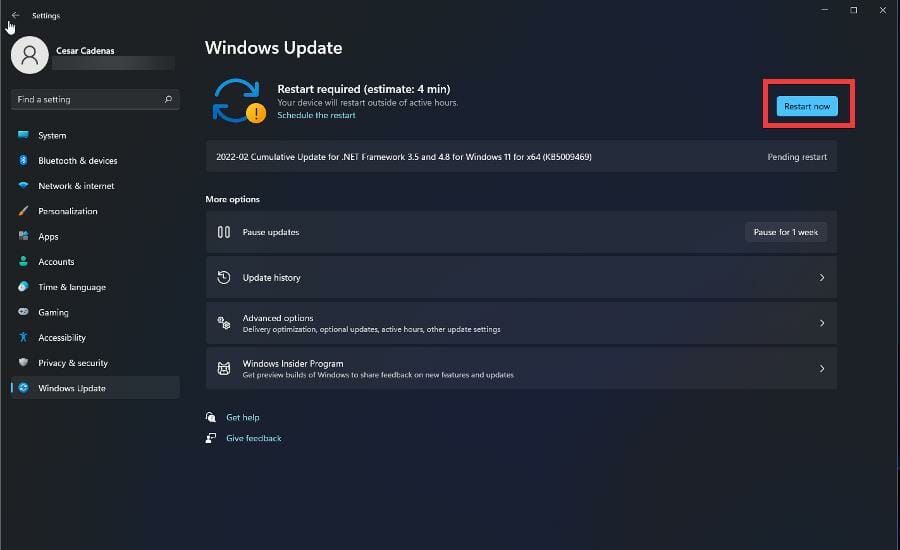
- After downloading, click Restart now to finalize the installation.

- Like before, give your computer a short amount of time to install the update.
- Restart your computer again to add these updates.
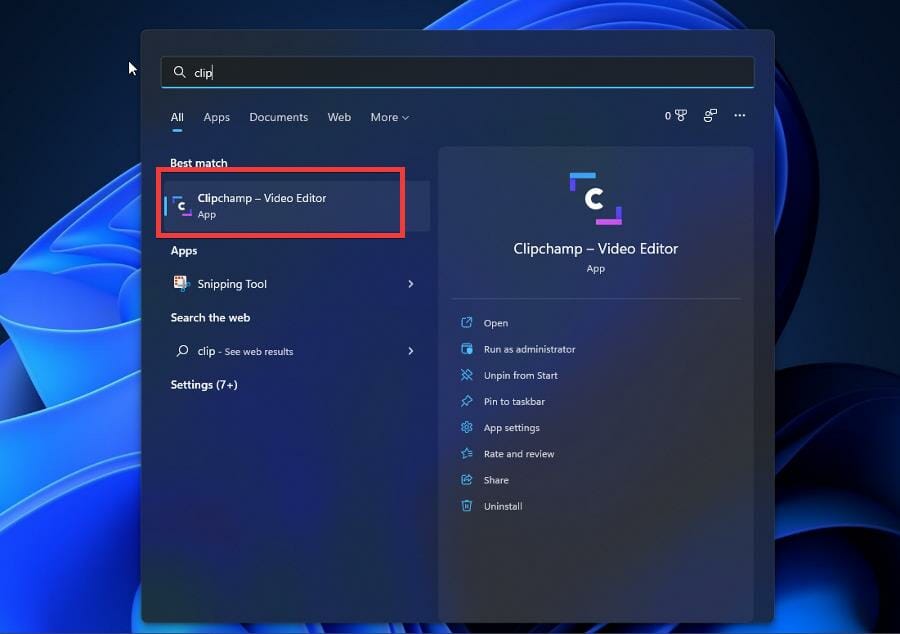
- After restarting, your Windows 11 computer will have the app. Open the search bar and search for Clipchamp.
- Open it to begin configuration.

3. Configure Clipchamp
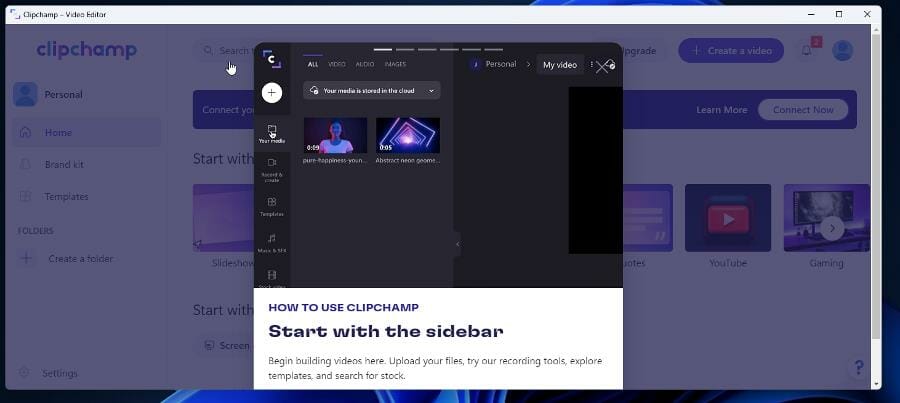
- Upon launching the app, sign in by creating a new account or use a Gmail account.
- Clipchamp will then ask you about what you intend to use the app for, but you can skip it. For this example, Personal will be chosen.

- Clipchamp will take you through a tutorial showing you the various features of the app.

- From there, you can start making your own videos on Clipchamp.
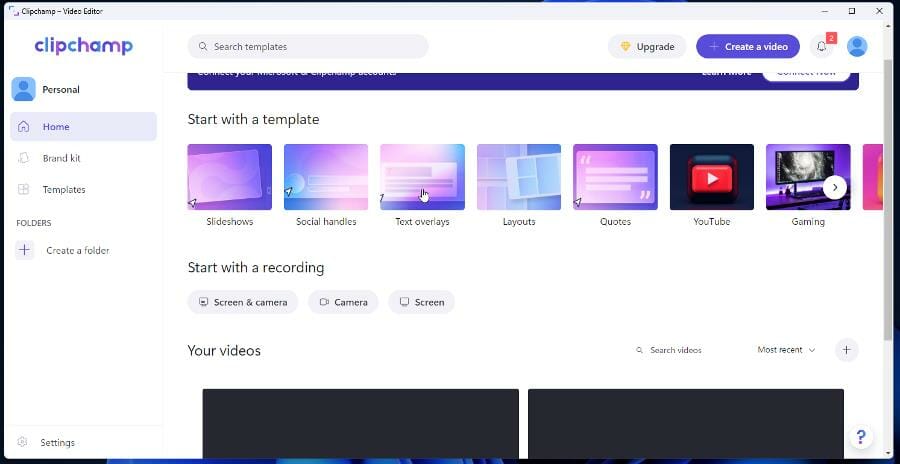
- The Home is where you can start making videos, by starting with a templete or a recording. Or click Create a video in the corner to get started.

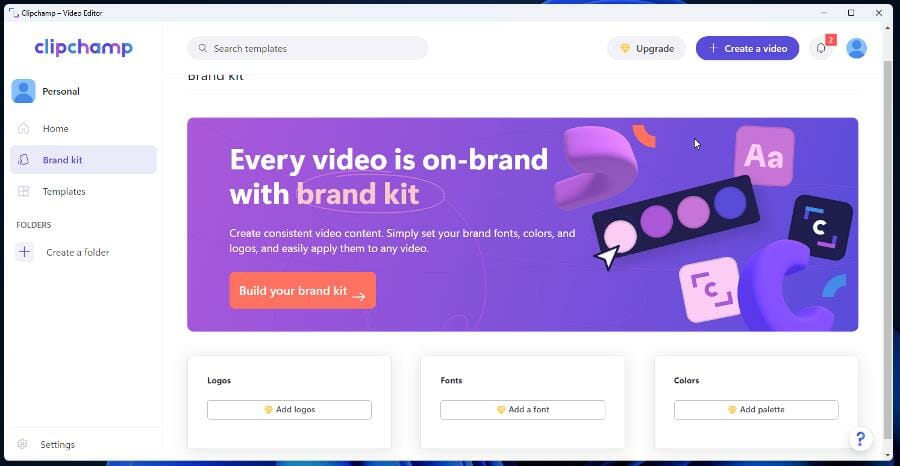
- The Brand kit tab is a part of the paid aspect portion of Clipchamp, where you can create your own logo, fonts, and color for your business.

- The Templates tab show a bigger selection of the templates that you can choose from when starting a video.
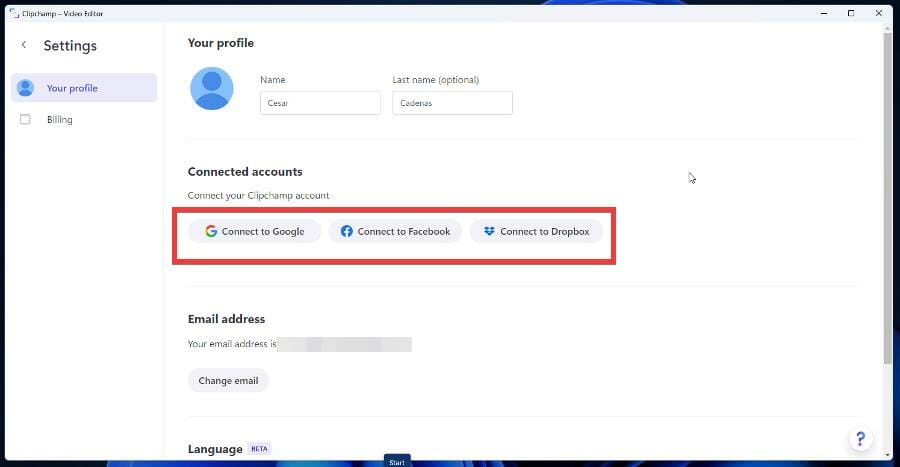
- If you click on the Settings in the bottom left corner, you’ll be taken to the Settings menu where you can directly connect your app to your Google, Facebook, and Dropbox accounts to save and share your videos.


- Browser Not Working on Windows 11: How to Fix This
- Fix: Your Account Doesn’t Match Your Dev Environment
4. Record video
- Open the Clipchamp app on your Windows 11 computer.
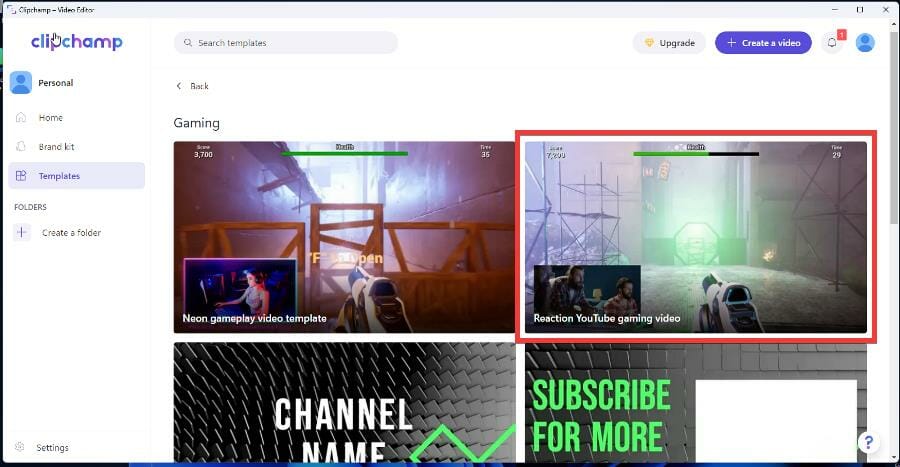
- You can start by clicking the Create a video button in the top right corner or select a template.
- This guide will select a gaming template to start off with.
- Here you will see a variety of templates you can choose from for your YouTube channel or Twitch livestream.
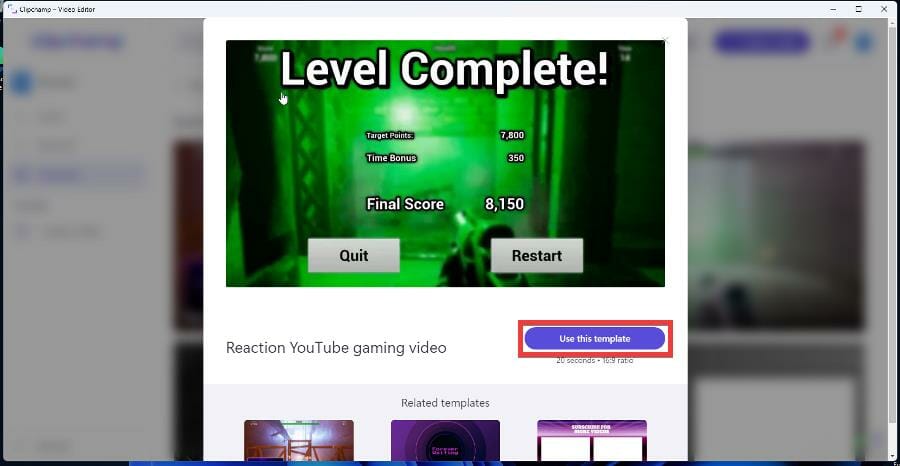
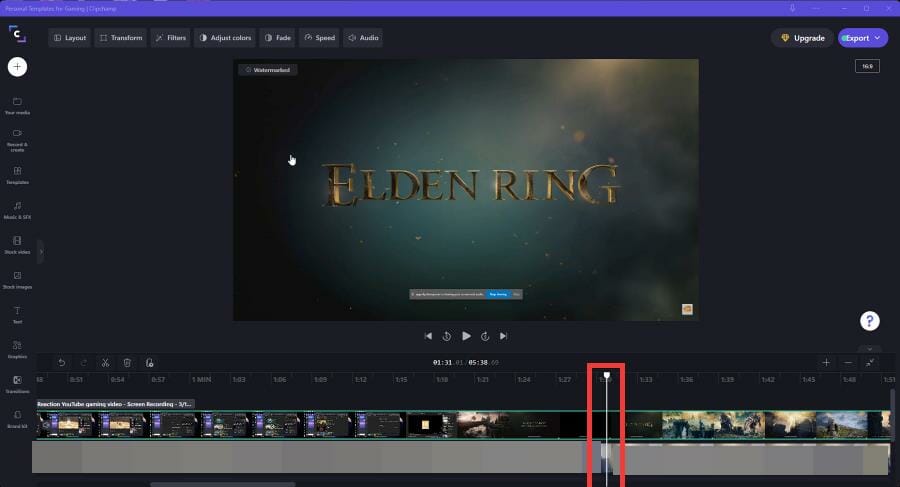
- The guide will select Reaction YouTube gaming video.
- Select the Use this template button.
- A sample video will render.
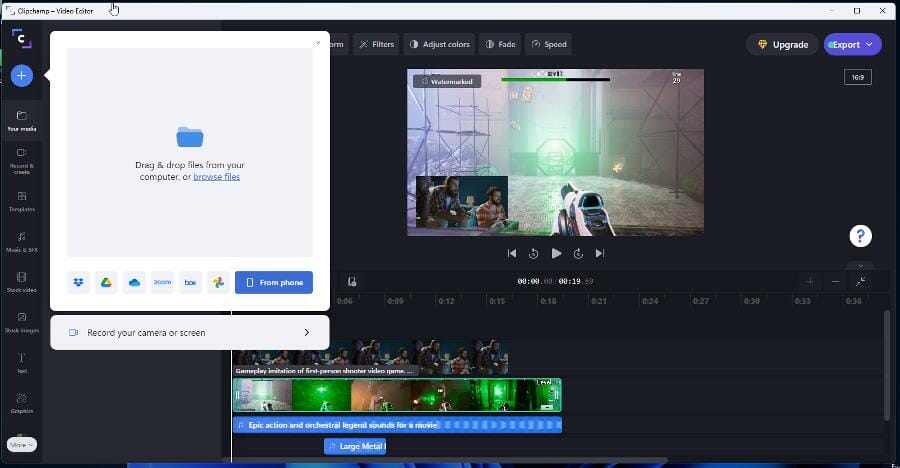
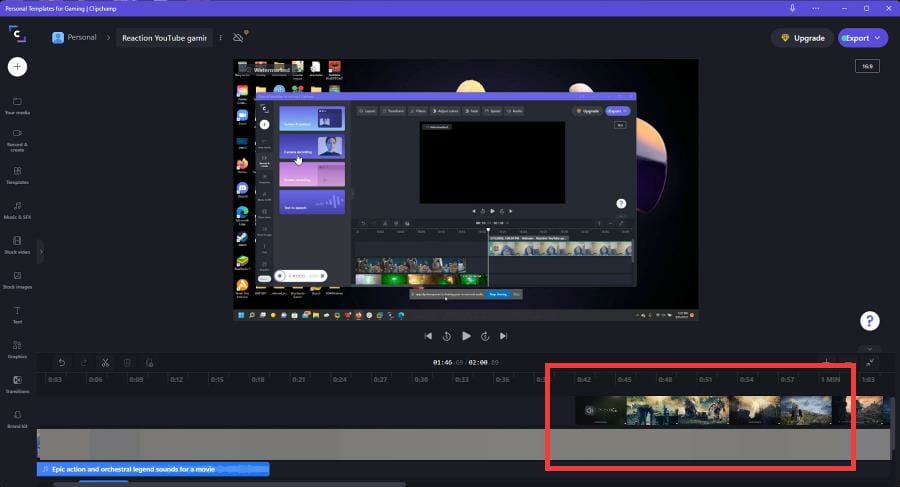
- Click on the Plus sign in the upper left hand corner.
- A new window will appear where you can drag and drop files or upload them from a Google Drive, Zoom, OneDrive, Dropbox account.

- In this example, the video will be gaming reaction video and will need a recording.
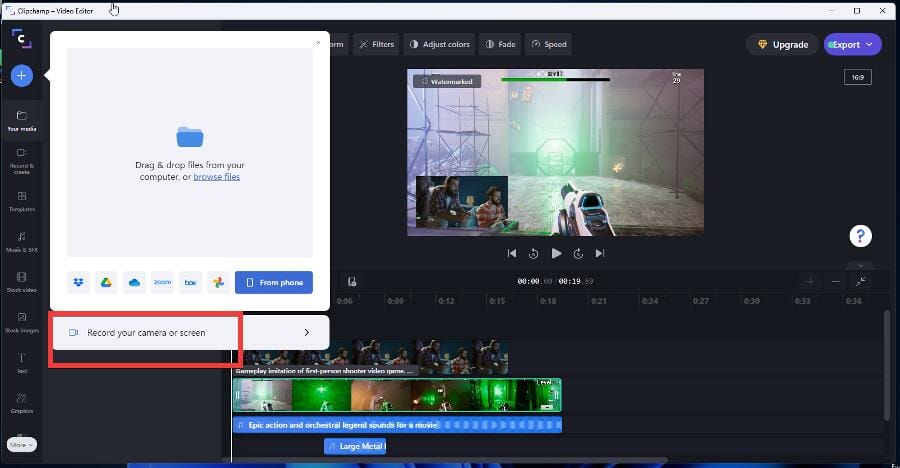
- You can record your screen by selecting Record your camera or screen.
- A recording button will appear from the bottom. If it doesn’t appear, select Screen recording.
- Click the Record button and make sure your mic is on so audio can be recorded as well.
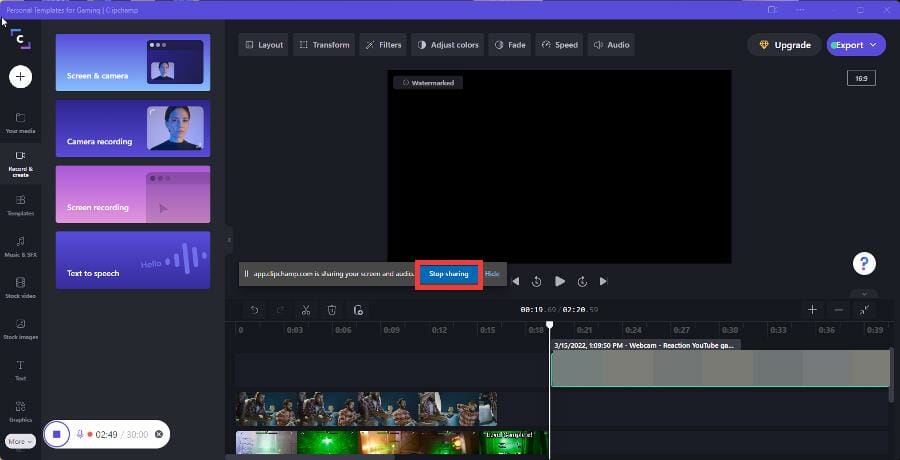
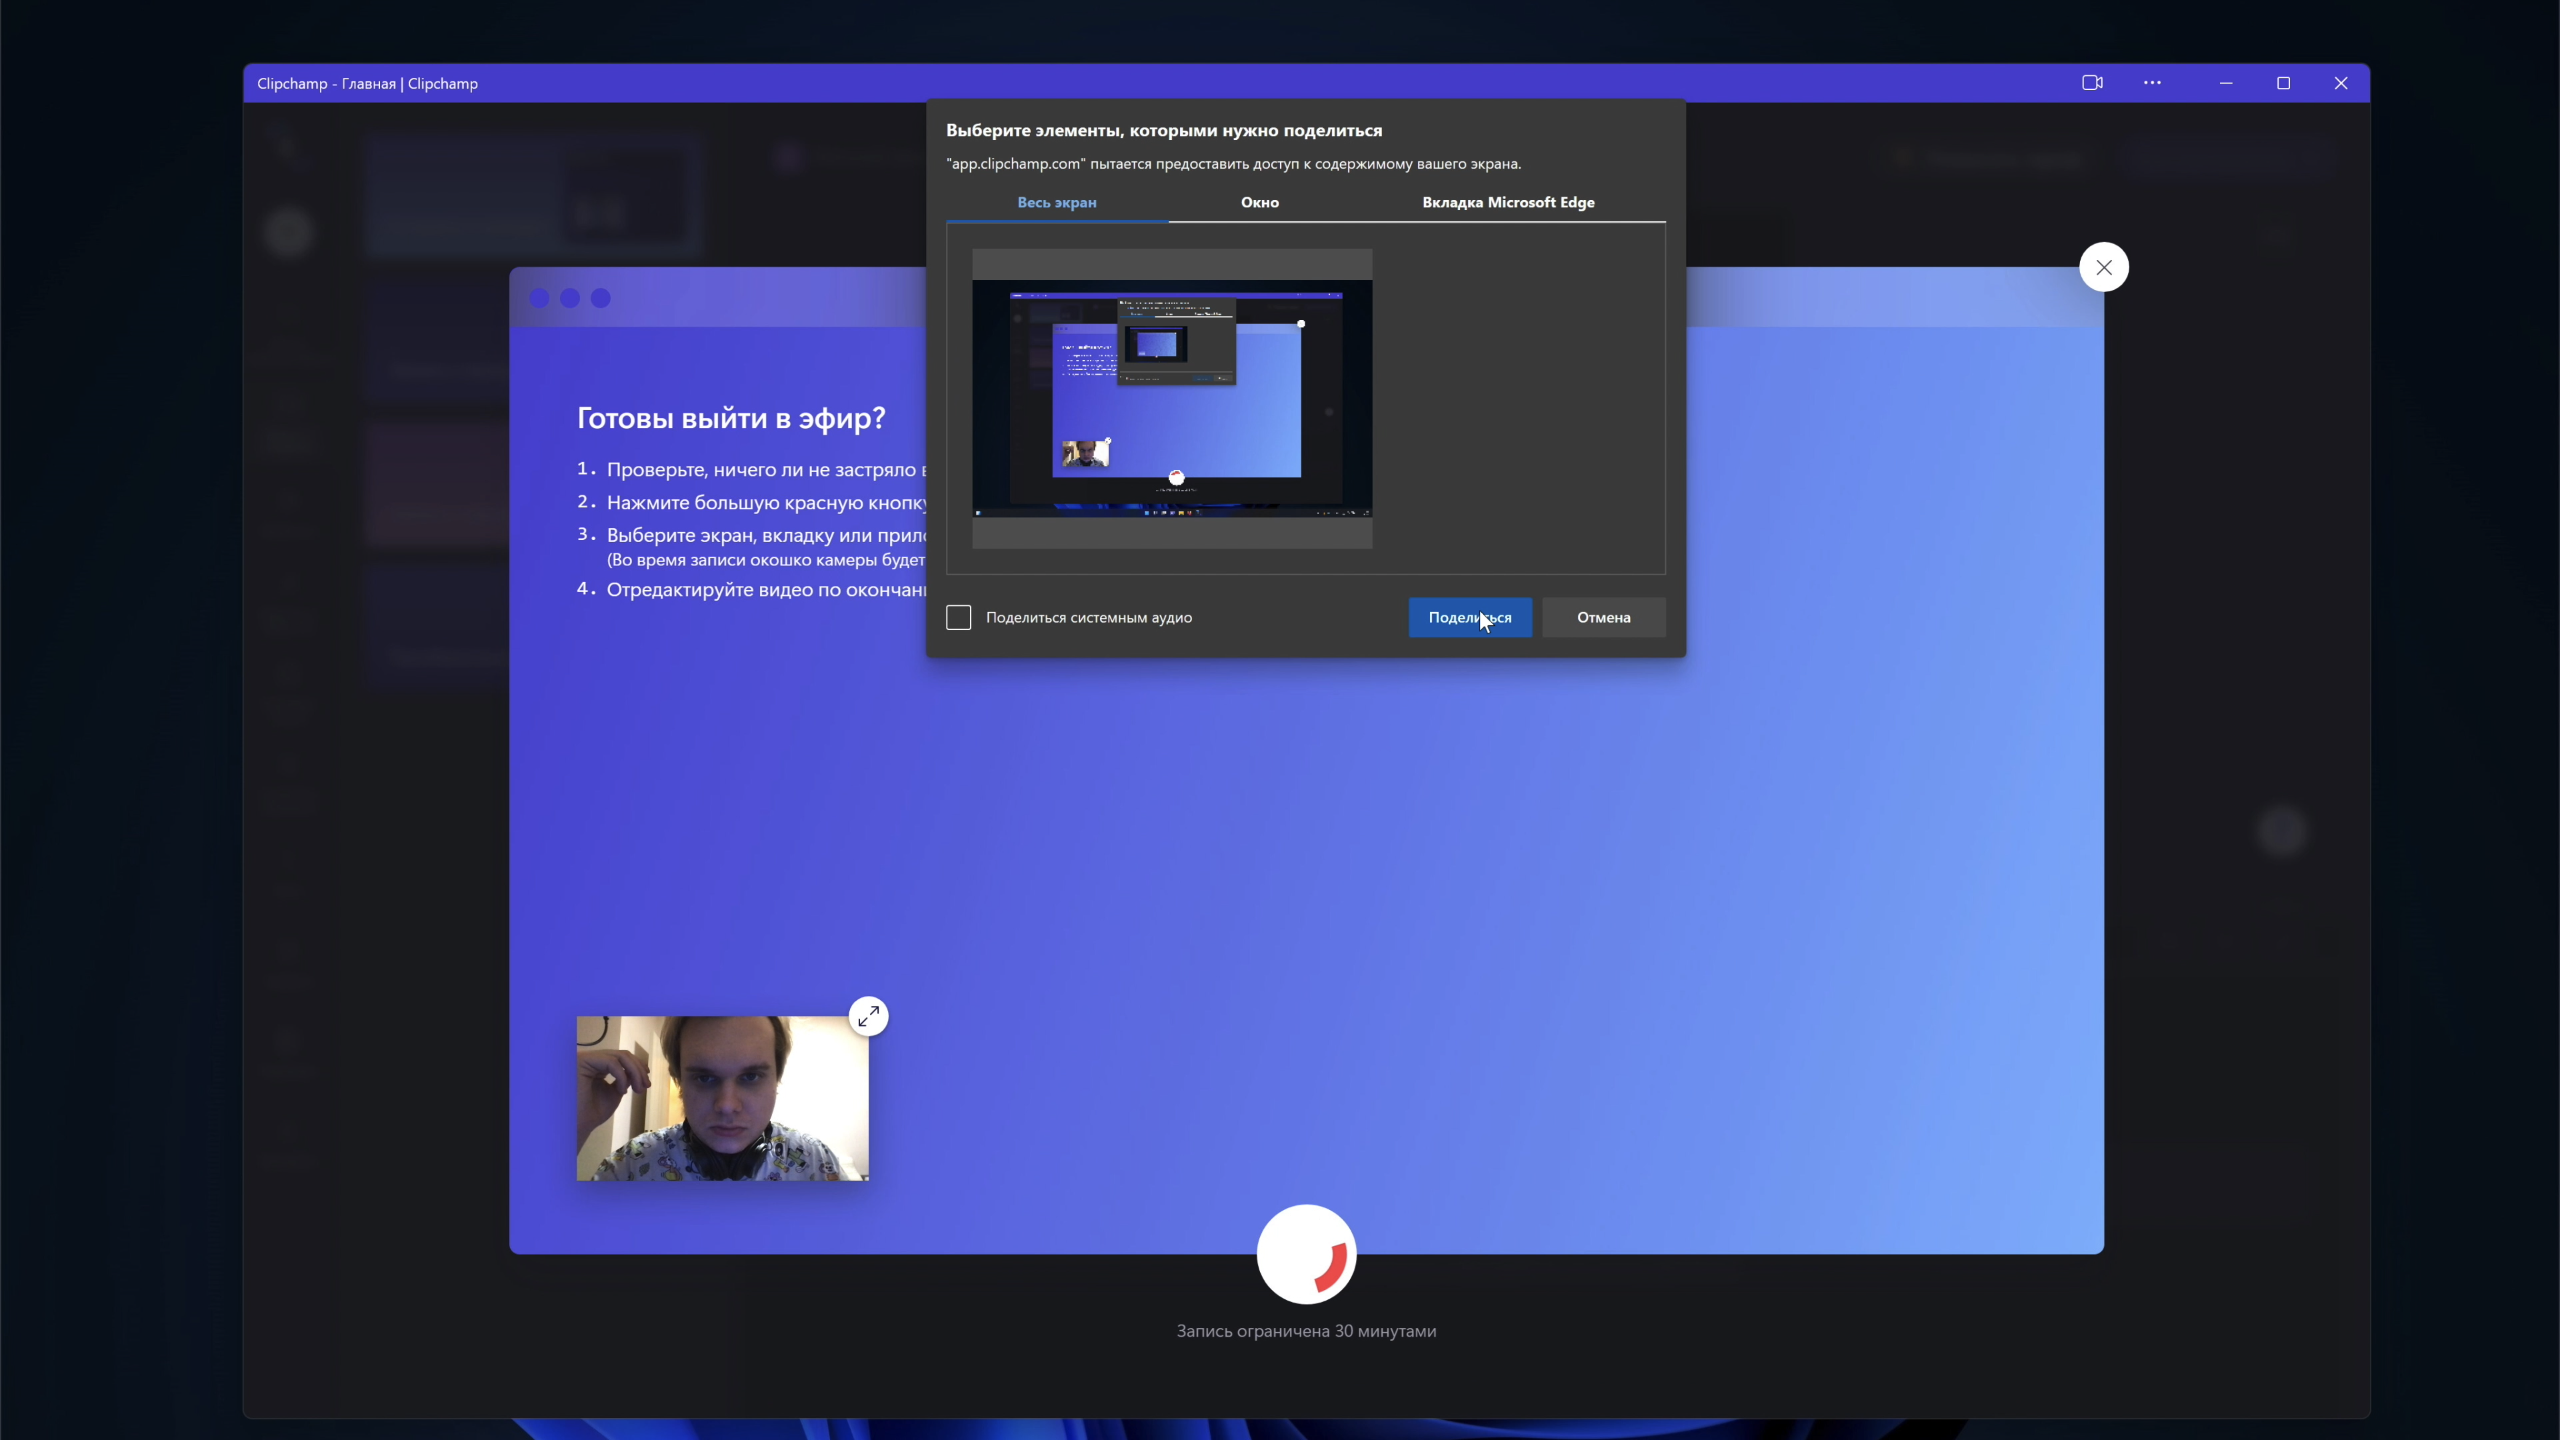
- If you have multiple monitors, Clipchamp will ask you what you want to share.
- Select an option, then click Share system audio to get the audio file.

- Click Share.
- Clipchamp will start recording your screen. Proceed to record your gaming reaction video as you planned.
- Once you’re done, press the Stop sharing button that appeared when you first started to record.
- The recording will play back in a preview window. You can either retake the video or select Save and edit.
- The recording will be saved to your computer and be automatically uploaded to Clipchamp.
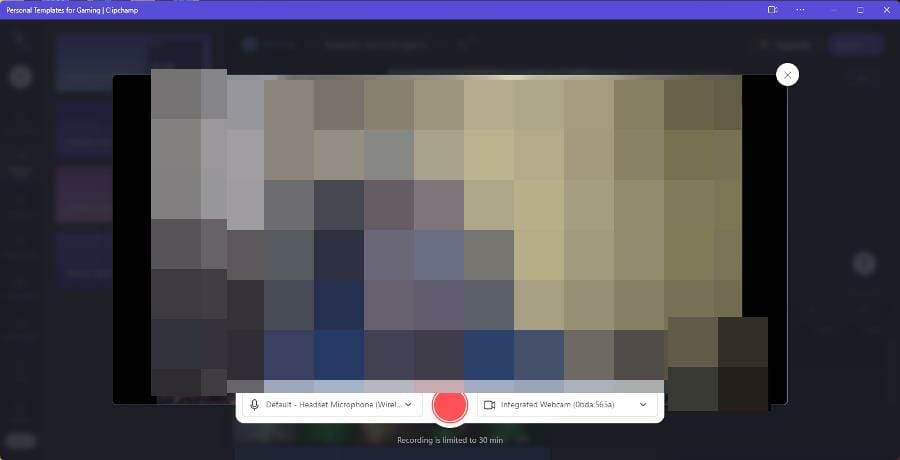
- To record yourself, select Camera recording.
- A preview of yourself from your computer’s webcam will appear showing you the webcam being used and which microphone your using.
- You change the mic and camera being used by clicking on their respective popup menus and selecting something else.
- Once you’re done setting up, click the red Record button. Be aware that you’re limited to 30 minutes max.
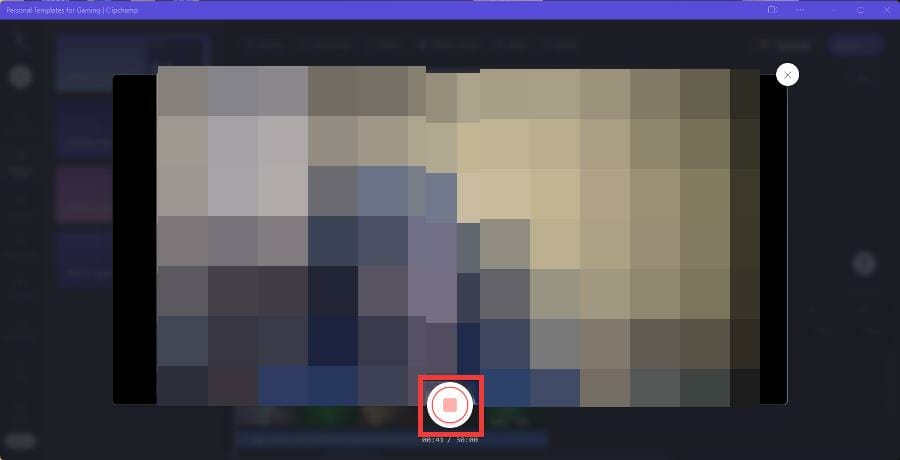
- After you’re done recording yourself, click the Stop button to end and save the video.
- The recording will play back as a preview. You can either select to retake the recording or Save and edit.
- The file will be saved to your computer and uploaded to Clipchamp automatically.


5. Edit the video
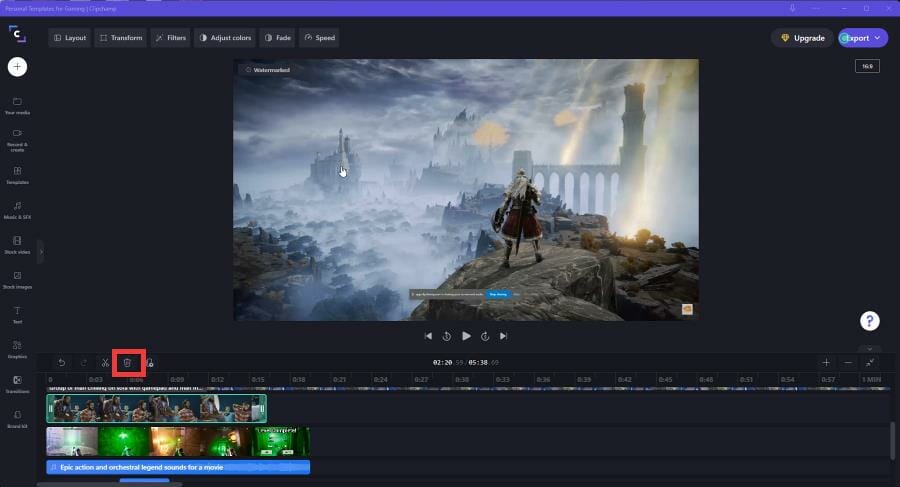
- In the timeline, you can get rid of something by clicking it to highlighting it and select the trash can icon.

- If you want to cut up your recording, go to where you want the recording to start and double click that point to place the playhead there.
- Click the Split button which is the scissors icon to cut the video at that point.
- Highlight the part you want to get rid of and click the trash icon to delete it.
- Drag the newly edited video portion to where you would like it to be on the timeline, like the beginning of the reaction.
- You can add an outro by clicking Templates on the left and choosing an option. Keeping in the tune with the video, the guide will select Gaming.
- Clipchamp has a dedicated gaming outro card that you can add. Hovering over it will reveal a green Plus sign that lets you add the template to the timeline.
- It’s recommended that you add the outro card at the beginning or after the video has been created, but during editing as Clipchamp will create a new video and you’ll have to start from scratch.

- Clicking Music & SFX tab lets you add music to your video.
- Hover over it and you will see the same green Plus sign from before to add to timeline.
- You can edit the music track like videos. You can speed up or slow down audio, clip it, or trash it.
- Once you’re done with editing, click the Export button and a drop down menu will appear with options on which resolution you would like. The Basic plan only allows you to export in 480p.
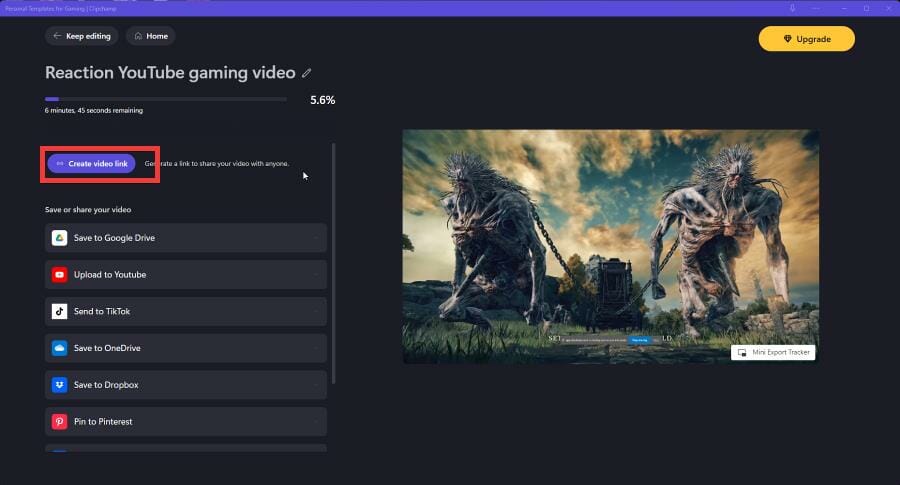
- A preview of the video will. You can create a video link where you can share your video or save to Google Drive/whatever cloud service you have.
- You can also directly upload to YouTube.


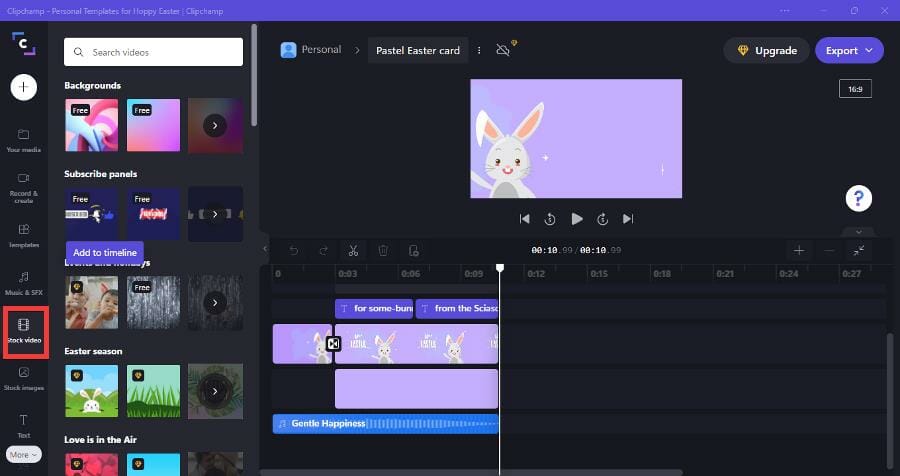
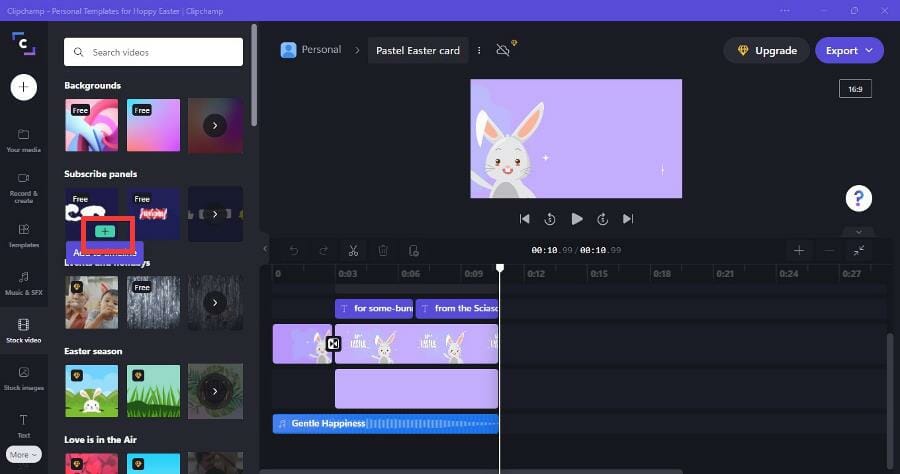
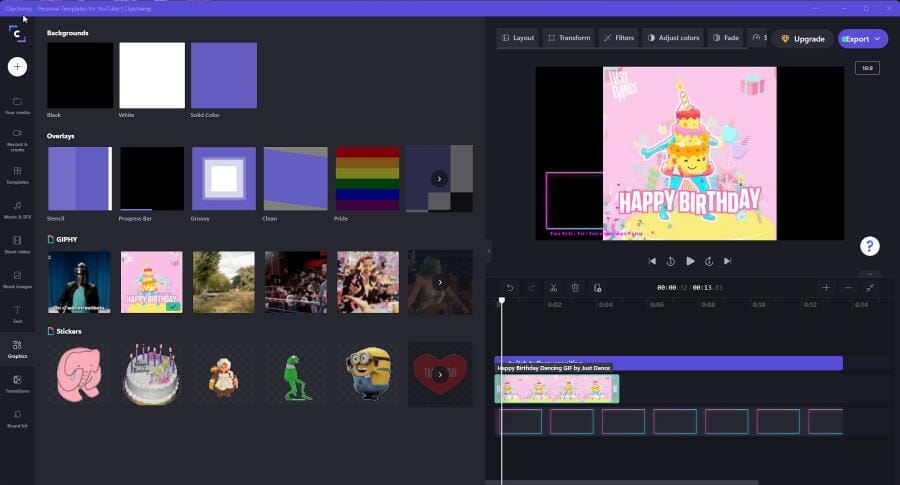
6. Add stock video, music, and graphics
- If you add certain flourishes, click on their respective tab.
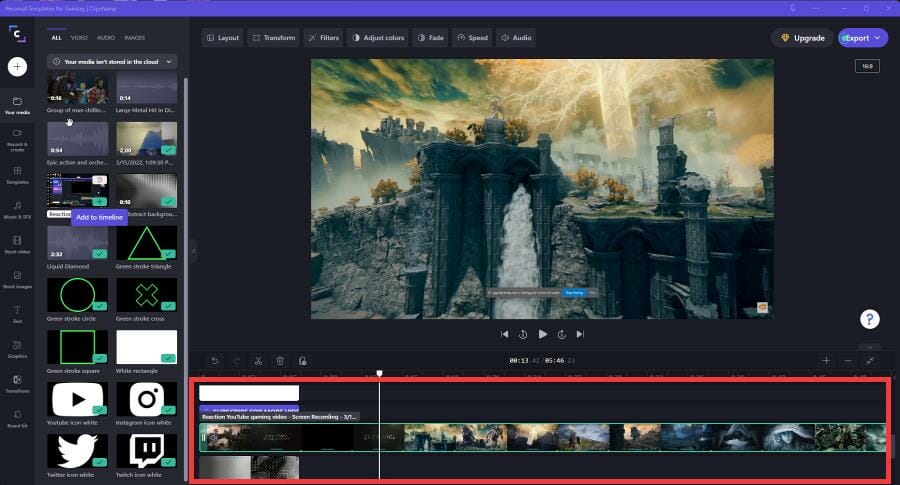
- Clicking on Stock video opens all the stocks video available.

- Hover over the video you want to add and click the green Plus sign to add to your video.

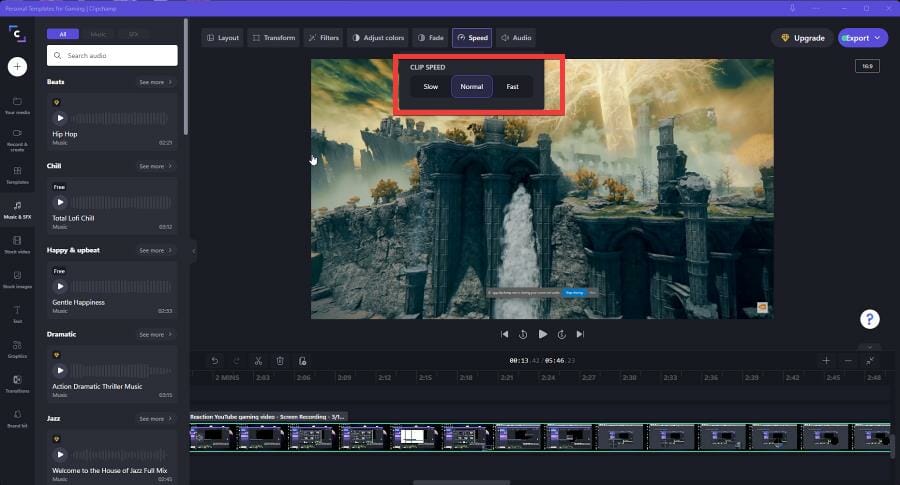
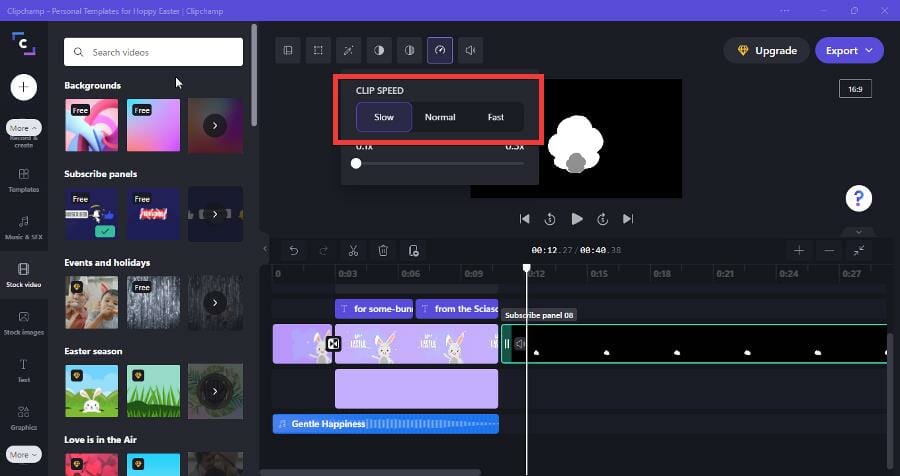
- If you want to stretch out or shorten the length the clip, highlight it and click the Speed icon.
- Clicking Slow stretches out the length and clicking Fast shortens it.
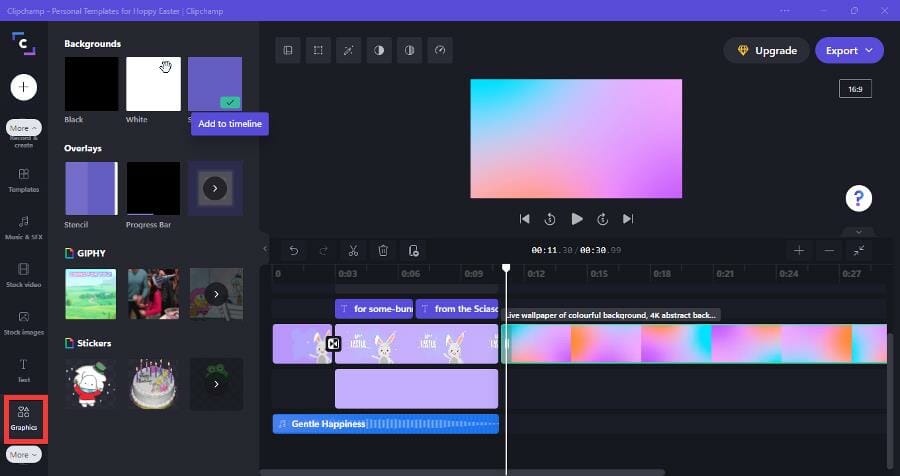
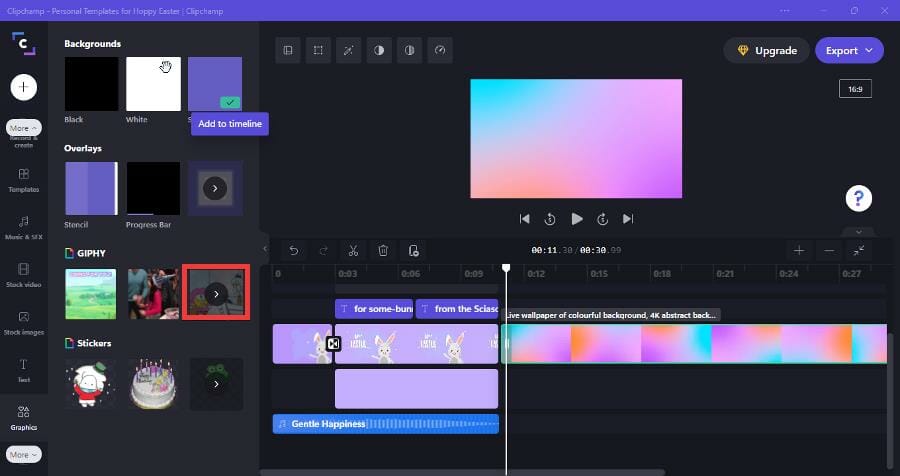
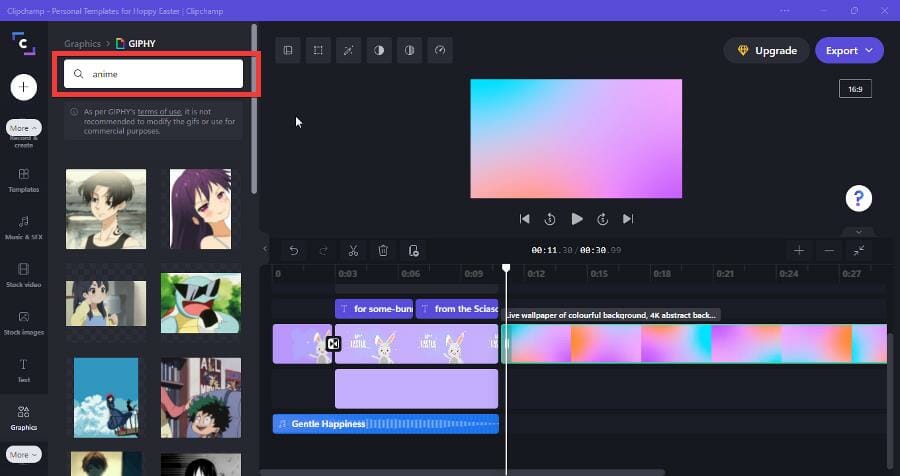
- To add GIFs, click on Graphics on the left.
- Select the right facing arrow under GIPHY.
- In the search bar, look for whatever GIF you want to add. GIPHY has a pretty extensive service.
- Over the GIF you want to add and click the green Plus sign to throw it onto the timeline.
- You can place the GIF in the corner by clicking Layout then select Picture in picture.
- You adjust the GIF’s place by making a selection in the Position arrangement and the size by dragging the slider.
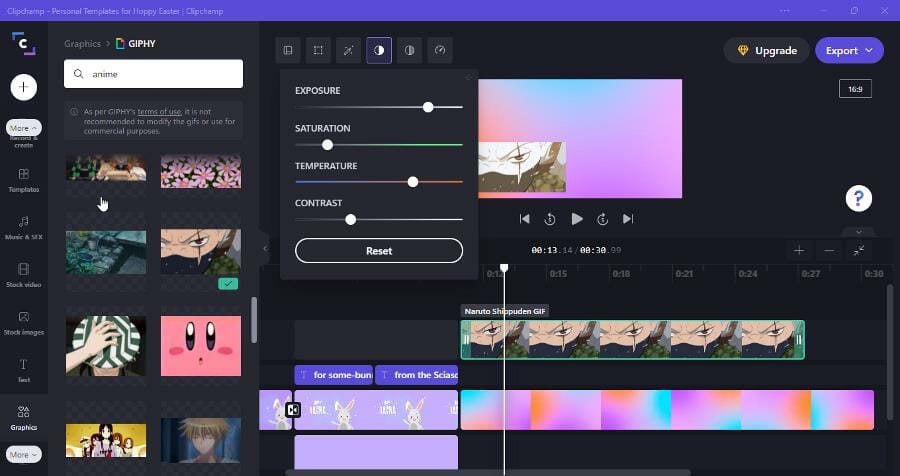
- Clicking Color allows you to adjust the Exposure, Saturation, Temperature, and Contrast of the highlighted section.
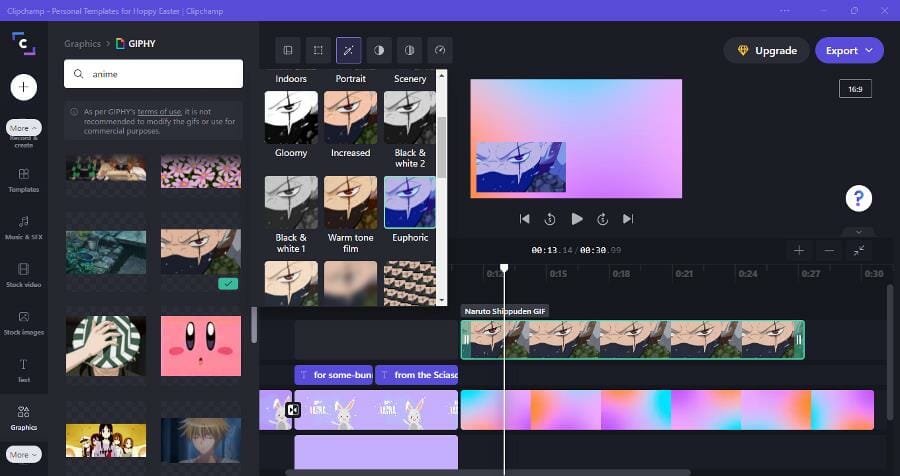
- Clicking Filters lets you add a filter.


This is was a brief rundown of what Clipchamp is capable of. The purpose was to show how easy and simple it is to record videos on Clipchamp and how easy it is to edit them.
Editing can be a complex procedure that takes a long time, but this app cuts the process down. The amount of time saved using this app cannot be overstated.
Is Clipchamp a good video editing app?
Clipchamp is a pretty good video editor, although there are some weak points in the software. First, it’s incredibly easy to use that even someone who’s never edited a video before can use.
It is so beginner-friendly that anyone looking to venture out into the world of video editing should try out Clipchamp first. The app gives you so many tools to start with. You can create pretty decent videos with it.
Not shown in the step-by-step guide were hints and the tutorial that Clipchamp runs you through to teach you what you have at your disposal. The user interface is clean and marked. Nothing is hidden.
Everything is just a few clicks away. Templates support various types of videos like YouTube, Instagram, Facebook ads, TikTok, holidays, sales videos, and more.
The support for GIPHY is amazing with an almost limitless amount of GIFs at your hands. The stock library alone feels like more should be behind a paywall, but a large portion is free.
It is such a great beginner’s tool, but don’t get it confused with better apps. Clipchamp pales in comparison to software like Vegas Pro or Adobe Premiere which are industry-level video editors.
Third-party apps like that are much more powerful in terms of features, capabilities, and tools. Those set the standard, but Clipchamp is meant for people who are starting, not professionals.
That said, it’s disappointing to see no 4K or even Quad HD resolution as a part of Clipchamp and this is something that pertains to the web browser version as well.

The web browser version and app are identical in every way and are only available on Chrome and Edge. Because of this, Clipchamp on web browser uses CPU resources instead of the GPU which can lead to performance issues.
Just a side note, but important to point out. Also, not supporting 4K resolution is a weird decision since so many websites like YouTube and Twitch allow people to upload videos and stream at that high quality.
People who want to upload to those sites probably won’t be using Clipchamp since it restricts people to such a low resolution. Regardless of what it can’t do, Clipchamp is still a great app.
What else can I look forward to in the latest Insider Preview build?
One of the big new additions is a Microsoft Defender app. It’s only available as a preview for users in the United States, but it’s a security app that brings a Windows 11 security standard to mobile devices and a hub for all your machines.
There’s also Microsoft Family which is a parental control app that establishes barriers of what children can and can’t access. It’ll make sure that children can only access family-friendly websites and keep them safe.
And if you ever run into any issues concerning this latest update, it’s recommended that you uninstall it. You can also try disabling your antivirus software which has been known to clash with Windows in the past.
- Pros
- Low impact on CPU
- User-friendly interface
- Large stock of library content
- No learning curve
- Cons
- The base plan limits you to videos at 480p
- Maximum quality rate is 1080p
Final Verdict: 4/5
While the low resolution for videos made from Clipchamp is disappointing, the app is pretty good. You have to look at what the purpose of the app is and who is it for? Not for the filmmaker or the tech-savvy person.
Clipchamp is meant for the common layperson who doesn’t want the most high-quality videos or amazing editing tricks. It’s also meant for small businesses who want a simple video editor with some neat tools.
It has succeeded in being Movie Maker 2.0, in that it’s a video editing app that is easy to use, fun, and teaches you how to make videos along the way.
That said, it’s disappointing to see to see the video resolution cap off at 1080p when so many video streaming sites that can do 4K videos. And this isn’t something that Clipchamp is incapable of.
It’s baffling to see this feature not transfer over to the Windows 11 app version, especially when it focuses so heavily on gaming.
Clipchamp has a lot of tools and templates with a focus on YouTube gaming videos and Twitch streams. This is a community that demands high-quality videos and gaming.
Low-resolution videos that won’t allow a game’s quality to shine through are a confusing move on the behalf of Microsoft. Hopefully, Clipchamp adds Full HD and 4K support soon.
Feel free to leave a comment below if you have any questions on other Windows 11 apps. Also, leave comments about reviews that you’d like to see or information on other Windows 11 features.
Still having issues? Fix them with this tool:
SPONSORED
If the advices above haven’t solved your issue, your PC may experience deeper Windows problems. We recommend downloading this PC Repair tool (rated Great on TrustPilot.com) to easily address them. After installation, simply click the Start Scan button and then press on Repair All.
![]()
Newsletter
by Cesar Cadenas
Cesar has been writing for and about technology going on for 6 years when he first started writing tech articles for his university paper. Since then, his passion… read more
Published on March 17, 2022
- Clipchamp is Microsoft’s new successor to its famous Windows Movie Maker app from years past.
- The app is a great video editor for first-timer and very user friendly.
- Unfortunately, it’s limited in what it can do as it caps resolution off at 1080p.
Get the right software to support your ideas!Creative Cloud is all you need to bring your imagination to life. Use all the Adobe apps and combine them for amazing results. Using Creative Cloud you can make, edit, and render in different formats:
- Photos
- Videos
- Songs
- 3D models & infographics
- Many other artworks
Get all apps at a special price!
On March 9, Microsoft began to roll out the latest build for the Dev Channel of the Windows 11 Insider Program: Build 22572. In the update, some features and updates were released like the new Microsoft Defender Preview.
Microsoft Defender Preview is a standalone app that serves as a central hub for the Windows Security system. Some new features have been added to Windows 11, the most notable of which is Clipchamp.
Clipchamp is the new video editing app for Windows 11 that Microsoft says has a focus on “making video creation easy, fast, and fun.” It comes equipped with a lot of the basic tools a video editor requires like trimming and splitting.
It also has professional-level features like transitions and animated text. Clipchamp also has a webcam and screen recording functionality.
The app also comes with a video timeline, which is new to Windows video editors and functionality usually reserved for professional-grade editing apps. Clipchamp has access to a massive stock library filled with over a million assets.
These assets include royalty-free videos, audio files, and images. The app has a text-to-speech generator powered by Microsoft Azure and supports over 70 different languages.
Clipchamp also integrates with several Windows apps and connects to OneDrive for easy file transport. Needless to say, Clipchamp is packed to the brim with features and has a lot going for it.
The company behind Clipchamp was acquired by Microsoft in September 2021, and it looks like the app will be the replacement for the iconic Windows Movie Maker program from years past.
What does Microsoft intend to do with Clipchamp?
For almost 20 years, Windows Movie Maker was the premiere video editing tool for Windows computers up until 2017 when Microsoft officially discontinued it. It was a pretty simple and easy-to-use software that any amateur filmmaker could pick up.
But like a lot of native apps on Windows, it is criticized for oversimplification and lack of any meaningful features. It was just too bare-bones and eventually, Microsoft moved on.
Since then, Microsoft has been working on the next generation of its native apps. Typically, the apps that came on Windows computers were criticized and even mocked for how poor they were in comparison to third-party apps.
People in the past made the joke that Internet Explorer was only good for downloading a better web browser. From this, Microsoft listened to what people were saying and made major changes to its native apps.
Native apps like Calendar and Email got a much-needed revamp with new features and redesign aligned with Windows 11. Movie Maker had a spiritual successor in the form of a Video Editor feature in the Photos app.
However, the Video Editor is still basic and barebones. It doesn’t have a timeline, but instead a Storyboard, which you can split up and add text. It’s fine, but you wouldn’t consider it to be a great video editor.
And so, this brings everything back to Clipchamp, a web-based video editor that Microsoft is turning into a proper app on Windows 11. Here is how you can download and use Clipchamp.
What are some noteworthy features for Clipchamp?
What’s unique about Clipchamp is that it uses a PC’s GPU to process video. It does this to free up your CPU of processing power, an important resource for programs to use.
➡ Low impact on your CPU
A computer’s CPU only can support a certain amount of tasks and apps. When resources get strained, that causes performance issues and your computer starts to slow down immensely.
As you can see in the image of the Task Manager, Clipchamp is taking up very little of the CPU, but a large portion of the RAM which is directly from the GPU usage.
If your Windows 11 computer has a good enough GPU, the Clipchamp will save you a lot of CPU resources. But if your GPU isn’t up to snuff, then rendering videos will take a long time to complete.
That said, moving resource management to the GPU is a great solution to resource hogs like Google Chrome. While you render your video, you can surf the internet or whatever else is on your itinerary.
➡ Large stock content library
The stock library available is pretty extensive. The company did not cheap out in this regard. You have a wide selection of choices from base backgrounds to neon lights for stock video.
There are tons of free stock images from various LGBT pride flags and outer space, although more specific stocks images are locked behind a paywall. You’ll know which ones you’ll have to buy if they have an orange diamond in the corner.
Music options run the gamut from lo-fi chill music to hip hop to acoustic guitars. Sound effects stuff like fake police radio transmissions to creepy ghost/zombie sounds for Halloween videos.
If you select the Graphics tab, you will see the entire GIPHY library at your disposal, meaning you add your favorite internet onto your video for no extra charge.
The amount of GIFs you have at your disposal is very impressive. , and stickers from GIPHY are part of that package. Speaking of free content, all of the text and transition options are free on Clipchamp.
➡ Paid plans and what they offer
Clipchamp also has several paid plans that you can choose from that add on features and capabilities. The more expensive the plan, the higher the quality videos you can create.
Some PC issues are hard to tackle, especially when it comes to corrupted repositories or missing Windows files. If you are having troubles fixing an error, your system may be partially broken.
We recommend installing Restoro, a tool that will scan your machine and identify what the fault is.
Click here to download and start repairing.
The base plan limits you to videos at 480p, which is a little disappointing to see. This option offers a fairly low-quality resolution and would have liked to see 720p set as the standard. Honestly, 720p doesn’t look that good anymore.
Video resolution has made leaps and bounds in the last several years that devices and platforms can now output video at 4K resolution, and in some cases, even more. Having the 1080p option as the maximum is also disappointing to see.
And certain parts of the stock library are locked behind a particular level. The Business Platinum level gives you access to absolutely everything while the creator limits you to music and sound effects.
It would have been better if the paid plans offered more than what they’re giving its customers. Below is a demonstration of how you can create a video with Clipchamp using the Basic plan.
How can I create a video on Clipchamp?
For this example, the instructions will create a video based on what is available on the Basic plan. The process is the same for every plan. But with higher-paid plans, you’ll have more tools at your disposal, and thus the results could be better.
That being said, to be able to set up and use Clipchamp with ease, you will need to follow some steps. Below you can observe the entire process.
1. Join the Windows Insider Program
- Open the Settings menu on your Windows 11 computer.
- Click the Windows Update tab on the left hand side.
- In this section, click Windows Insider Program.
- Click the Get started button in the upper right corner.
- Click Link an account to connect your account to the Insider Program.
- Select your account and click Continue.
- Select Dev Channel so you can try out the preview build.
- Click the Continue button. You may receive a notice that states it is recommended that you only use the Dev Channel if you back up your data. After backing it up, you’ll need manually restore your data.
- Click Continue.
- You’ll be given the opportunity to read the Insider Program’s agreement and privacy statement. Click Continue.
- To start the Insider Program, click Restart now.
- Give your computer some time to restart and enter the Insider Program.
2. Download the latest Windows Insider preview build
- Go back to the Windows Update section. You will see everything that is going to be added to the Preview Build.
- Click Download now in the top right corner.
- Give your computer time to download the build.
- After downloading, click Restart now to finalize the installation.
- Like before, give your computer a short amount of time to install the update.
- Restart your computer again to add these updates.
- After restarting, your Windows 11 computer will have the app. Open the search bar and search for Clipchamp.
- Open it to begin configuration.
3. Configure Clipchamp
- Upon launching the app, sign in by creating a new account or use a Gmail account.
- Clipchamp will then ask you about what you intend to use the app for, but you can skip it. For this example, Personal will be chosen.
- Clipchamp will take you through a tutorial showing you the various features of the app.
- From there, you can start making your own videos on Clipchamp.
- The Home is where you can start making videos, by starting with a templete or a recording. Or click Create a video in the corner to get started.
- The Brand kit tab is a part of the paid aspect portion of Clipchamp, where you can create your own logo, fonts, and color for your business.
- The Templates tab show a bigger selection of the templates that you can choose from when starting a video.
- If you click on the Settings in the bottom left corner, you’ll be taken to the Settings menu where you can directly connect your app to your Google, Facebook, and Dropbox accounts to save and share your videos.
- Browser Not Working on Windows 11: How to Fix This
- Fix: Your Account Doesn’t Match Your Dev Environment
- How to Password Protect Zip Files in Windows 11 [3 Tips]
- How to Install Software Without Admin Rights on Windows 11?
4. Record video
- Open the Clipchamp app on your Windows 11 computer.
- You can start by clicking the Create a video button in the top right corner or select a template.
- This guide will select a gaming template to start off with.
- Here you will see a variety of templates you can choose from for your YouTube channel or Twitch livestream.
- The guide will select Reaction YouTube gaming video.
- Select the Use this template button.
- A sample video will render.
- Click on the Plus sign in the upper left hand corner.
- A new window will appear where you can drag and drop files or upload them from a Google Drive, Zoom, OneDrive, Dropbox account.
- In this example, the video will be gaming reaction video and will need a recording.
- You can record your screen by selecting Record your camera or screen.
- A recording button will appear from the bottom. If it doesn’t appear, select Screen recording.
- Click the Record button and make sure your mic is on so audio can be recorded as well.
- If you have multiple monitors, Clipchamp will ask you what you want to share.
- Select an option, then click Share system audio to get the audio file.
- Click Share.
- Clipchamp will start recording your screen. Proceed to record your gaming reaction video as you planned.
- Once you’re done, press the Stop sharing button that appeared when you first started to record.
- The recording will play back in a preview window. You can either retake the video or select Save and edit.
- The recording will be saved to your computer and be automatically uploaded to Clipchamp.
- To record yourself, select Camera recording.
- A preview of yourself from your computer’s webcam will appear showing you the webcam being used and which microphone your using.
- You change the mic and camera being used by clicking on their respective popup menus and selecting something else.
- Once you’re done setting up, click the red Record button. Be aware that you’re limited to 30 minutes max.
- After you’re done recording yourself, click the Stop button to end and save the video.
- The recording will play back as a preview. You can either select to retake the recording or Save and edit.
- The file will be saved to your computer and uploaded to Clipchamp automatically.
5. Edit the video
- In the timeline, you can get rid of something by clicking it to highlighting it and select the trash can icon.
- If you want to cut up your recording, go to where you want the recording to start and double click that point to place the playhead there.
- Click the Split button which is the scissors icon to cut the video at that point.
- Highlight the part you want to get rid of and click the trash icon to delete it.
- Drag the newly edited video portion to where you would like it to be on the timeline, like the beginning of the reaction.
- You can add an outro by clicking Templates on the left and choosing an option. Keeping in the tune with the video, the guide will select Gaming.
- Clipchamp has a dedicated gaming outro card that you can add. Hovering over it will reveal a green Plus sign that lets you add the template to the timeline.
- It’s recommended that you add the outro card at the beginning or after the video has been created, but during editing as Clipchamp will create a new video and you’ll have to start from scratch.
- Clicking Music & SFX tab lets you add music to your video.
- Hover over it and you will see the same green Plus sign from before to add to timeline.
- You can edit the music track like videos. You can speed up or slow down audio, clip it, or trash it.
- Once you’re done with editing, click the Export button and a drop down menu will appear with options on which resolution you would like. The Basic plan only allows you to export in 480p.
- A preview of the video will. You can create a video link where you can share your video or save to Google Drive/whatever cloud service you have.
- You can also directly upload to YouTube.
6. Add stock video, music, and graphics
- If you add certain flourishes, click on their respective tab.
- Clicking on Stock video opens all the stocks video available.
- Hover over the video you want to add and click the green Plus sign to add to your video.
- If you want to stretch out or shorten the length the clip, highlight it and click the Speed icon.
- Clicking Slow stretches out the length and clicking Fast shortens it.
- To add GIFs, click on Graphics on the left.
- Select the right facing arrow under GIPHY.
- In the search bar, look for whatever GIF you want to add. GIPHY has a pretty extensive service.
- Over the GIF you want to add and click the green Plus sign to throw it onto the timeline.
- You can place the GIF in the corner by clicking Layout then select Picture in picture.
- You adjust the GIF’s place by making a selection in the Position arrangement and the size by dragging the slider.
- Clicking Color allows you to adjust the Exposure, Saturation, Temperature, and Contrast of the highlighted section.
- Clicking Filters lets you add a filter.
This is was a brief rundown of what Clipchamp is capable of. The purpose was to show how easy and simple it is to record videos on Clipchamp and how easy it is to edit them.
Editing can be a complex procedure that takes a long time, but this app cuts the process down. The amount of time saved using this app cannot be overstated.
Is Clipchamp a good video editing app?
Clipchamp is a pretty good video editor, although there are some weak points in the software. First, it’s incredibly easy to use that even someone who’s never edited a video before can use.
It is so beginner-friendly that anyone looking to venture out into the world of video editing should try out Clipchamp first. The app gives you so many tools to start with. You can create pretty decent videos with it.
Not shown in the step-by-step guide were hints and the tutorial that Clipchamp runs you through to teach you what you have at your disposal. The user interface is clean and marked. Nothing is hidden.
Everything is just a few clicks away. Templates support various types of videos like YouTube, Instagram, Facebook ads, TikTok, holidays, sales videos, and more.
The support for GIPHY is amazing with an almost limitless amount of GIFs at your hands. The stock library alone feels like more should be behind a paywall, but a large portion is free.
It is such a great beginner’s tool, but don’t get it confused with better apps. Clipchamp pales in comparison to software like Vegas Pro or Adobe Premiere which are industry-level video editors.
Third-party apps like that are much more powerful in terms of features, capabilities, and tools. Those set the standard, but Clipchamp is meant for people who are starting, not professionals.
That said, it’s disappointing to see no 4K or even Quad HD resolution as a part of Clipchamp and this is something that pertains to the web browser version as well.
The web browser version and app are identical in every way and are only available on Chrome and Edge. Because of this, Clipchamp on web browser uses CPU resources instead of the GPU which can lead to performance issues.
Just a side note, but important to point out. Also, not supporting 4K resolution is a weird decision since so many websites like YouTube and Twitch allow people to upload videos and stream at that high quality.
People who want to upload to those sites probably won’t be using Clipchamp since it restricts people to such a low resolution. Regardless of what it can’t do, Clipchamp is still a great app.
What else can I look forward to in the latest Insider Preview build?
One of the big new additions is a Microsoft Defender app. It’s only available as a preview for users in the United States, but it’s a security app that brings a Windows 11 security standard to mobile devices and a hub for all your machines.
There’s also Microsoft Family which is a parental control app that establishes barriers of what children can and can’t access. It’ll make sure that children can only access family-friendly websites and keep them safe.
And if you ever run into any issues concerning this latest update, it’s recommended that you uninstall it. You can also try disabling your antivirus software which has been known to clash with Windows in the past.
- Pros
- Low impact on CPU
- User-friendly interface
- Large stock of library content
- No learning curve
- Cons
- The base plan limits you to videos at 480p
- Maximum quality rate is 1080p
Final Verdict: 4/5
While the low resolution for videos made from Clipchamp is disappointing, the app is pretty good. You have to look at what the purpose of the app is and who is it for? Not for the filmmaker or the tech-savvy person.
Clipchamp is meant for the common layperson who doesn’t want the most high-quality videos or amazing editing tricks. It’s also meant for small businesses who want a simple video editor with some neat tools.
It has succeeded in being Movie Maker 2.0, in that it’s a video editing app that is easy to use, fun, and teaches you how to make videos along the way.
That said, it’s disappointing to see to see the video resolution cap off at 1080p when so many video streaming sites that can do 4K videos. And this isn’t something that Clipchamp is incapable of.
It’s baffling to see this feature not transfer over to the Windows 11 app version, especially when it focuses so heavily on gaming.
Clipchamp has a lot of tools and templates with a focus on YouTube gaming videos and Twitch streams. This is a community that demands high-quality videos and gaming.
Low-resolution videos that won’t allow a game’s quality to shine through are a confusing move on the behalf of Microsoft. Hopefully, Clipchamp adds Full HD and 4K support soon.
Feel free to leave a comment below if you have any questions on other Windows 11 apps. Also, leave comments about reviews that you’d like to see or information on other Windows 11 features.
Still having issues? Fix them with this tool:
SPONSORED
If the advices above haven’t solved your issue, your PC may experience deeper Windows problems. We recommend downloading this PC Repair tool (rated Great on TrustPilot.com) to easily address them. After installation, simply click the Start Scan button and then press on Repair All.
![]()
Newsletter
В этой публикации, друзья, рассмотрим относительно новое штатное приложение Windows 11 – Clipchamp. Это облачный условно-бесплатный видеоредактор. Этот сервис Microsoft приобрела в 2021 году, и его клиентское приложение стало появляться в Windows 11. А начиная с версии 22H2 это приложение входит в состав дистрибутива операционной системы. Clipchamp – первый полноценный видеоредактор в составе Windows, с типичным для функциональных видеоредакторов монтажным столом и обширными возможностями для видеомонтажа. Давайте посмотрим на возможности нового видеоредактора Windows 11.
Итак, новый видеоредактор Clipchamp. Будучи облачным продуктом, работает только при наличии Интернета. С Clipchamp можно работать в окне браузера на сайте видеоредактора. Для работы нужна авторизация с помощью интернет-аккаунта Microsoft, Google или самого сервиса видеоредактора.
Clipchamp – это современный, функциональный, юзабильный видеоредактор. Рассчитанный на обывателя, предлагающий современному пользователю готовые решения и инструменты для стильного оформления видео. Будет интересен для активных пользователей социальных сетей. Хороший старт для тех, кто в перспективе хочет стать профессионалом в искусстве видеомонтажа.
У него больше возможностей, чем у старого видеоредактора Windows 10 и 11, входящего в состав приложения «Фотографии». Его Clipchamp в скором времени вытеснит из Windows 11. И старый видеоредактор, и всё старое приложение «Фотографии» после интеграции нового приложения «Фотографии» более не будут поставляться в штате Windows 11. Их при необходимости можно будет установить из Microsoft Store.
Для редактирования видео Clipchamp предусматривает монтажный стол с множеством дорожек для аудио и видео. Видео на выходе могут быть сохранены максимум в 1080р (HD-видео).
Основные возможности Clipchamp доступны бесплатно. Все возможности можем получить по премиум-подписке, стоит такая $11.99 в месяц или $119.99 в год. При бесплатном использовании мы будем ограничены выбором контента и эффектов. В некоторых шаблонах нам могут предоставляться возможности премиум-подписки, но такие видео на выходе могут быть экспортированы только в 720р и с наложением водяного знака.
На старте работы с новым видеоредактором нам предлагается на выбор:
- Создать новое видео, т.е. запустить проект на монтажном столе;
- Сделать запись с камеры, экрана, с них обоих, либо преобразовать текст в речь;
- Запустить шаблон.
Ну и далее мы уже работаем с монтажным столом. А по итогу экспортируем отредактированное видео.
Какие возможности редактирования видео предлагает нам новый видеоредактор?
В числе базовых операций по редактированию видео Clipchamp:
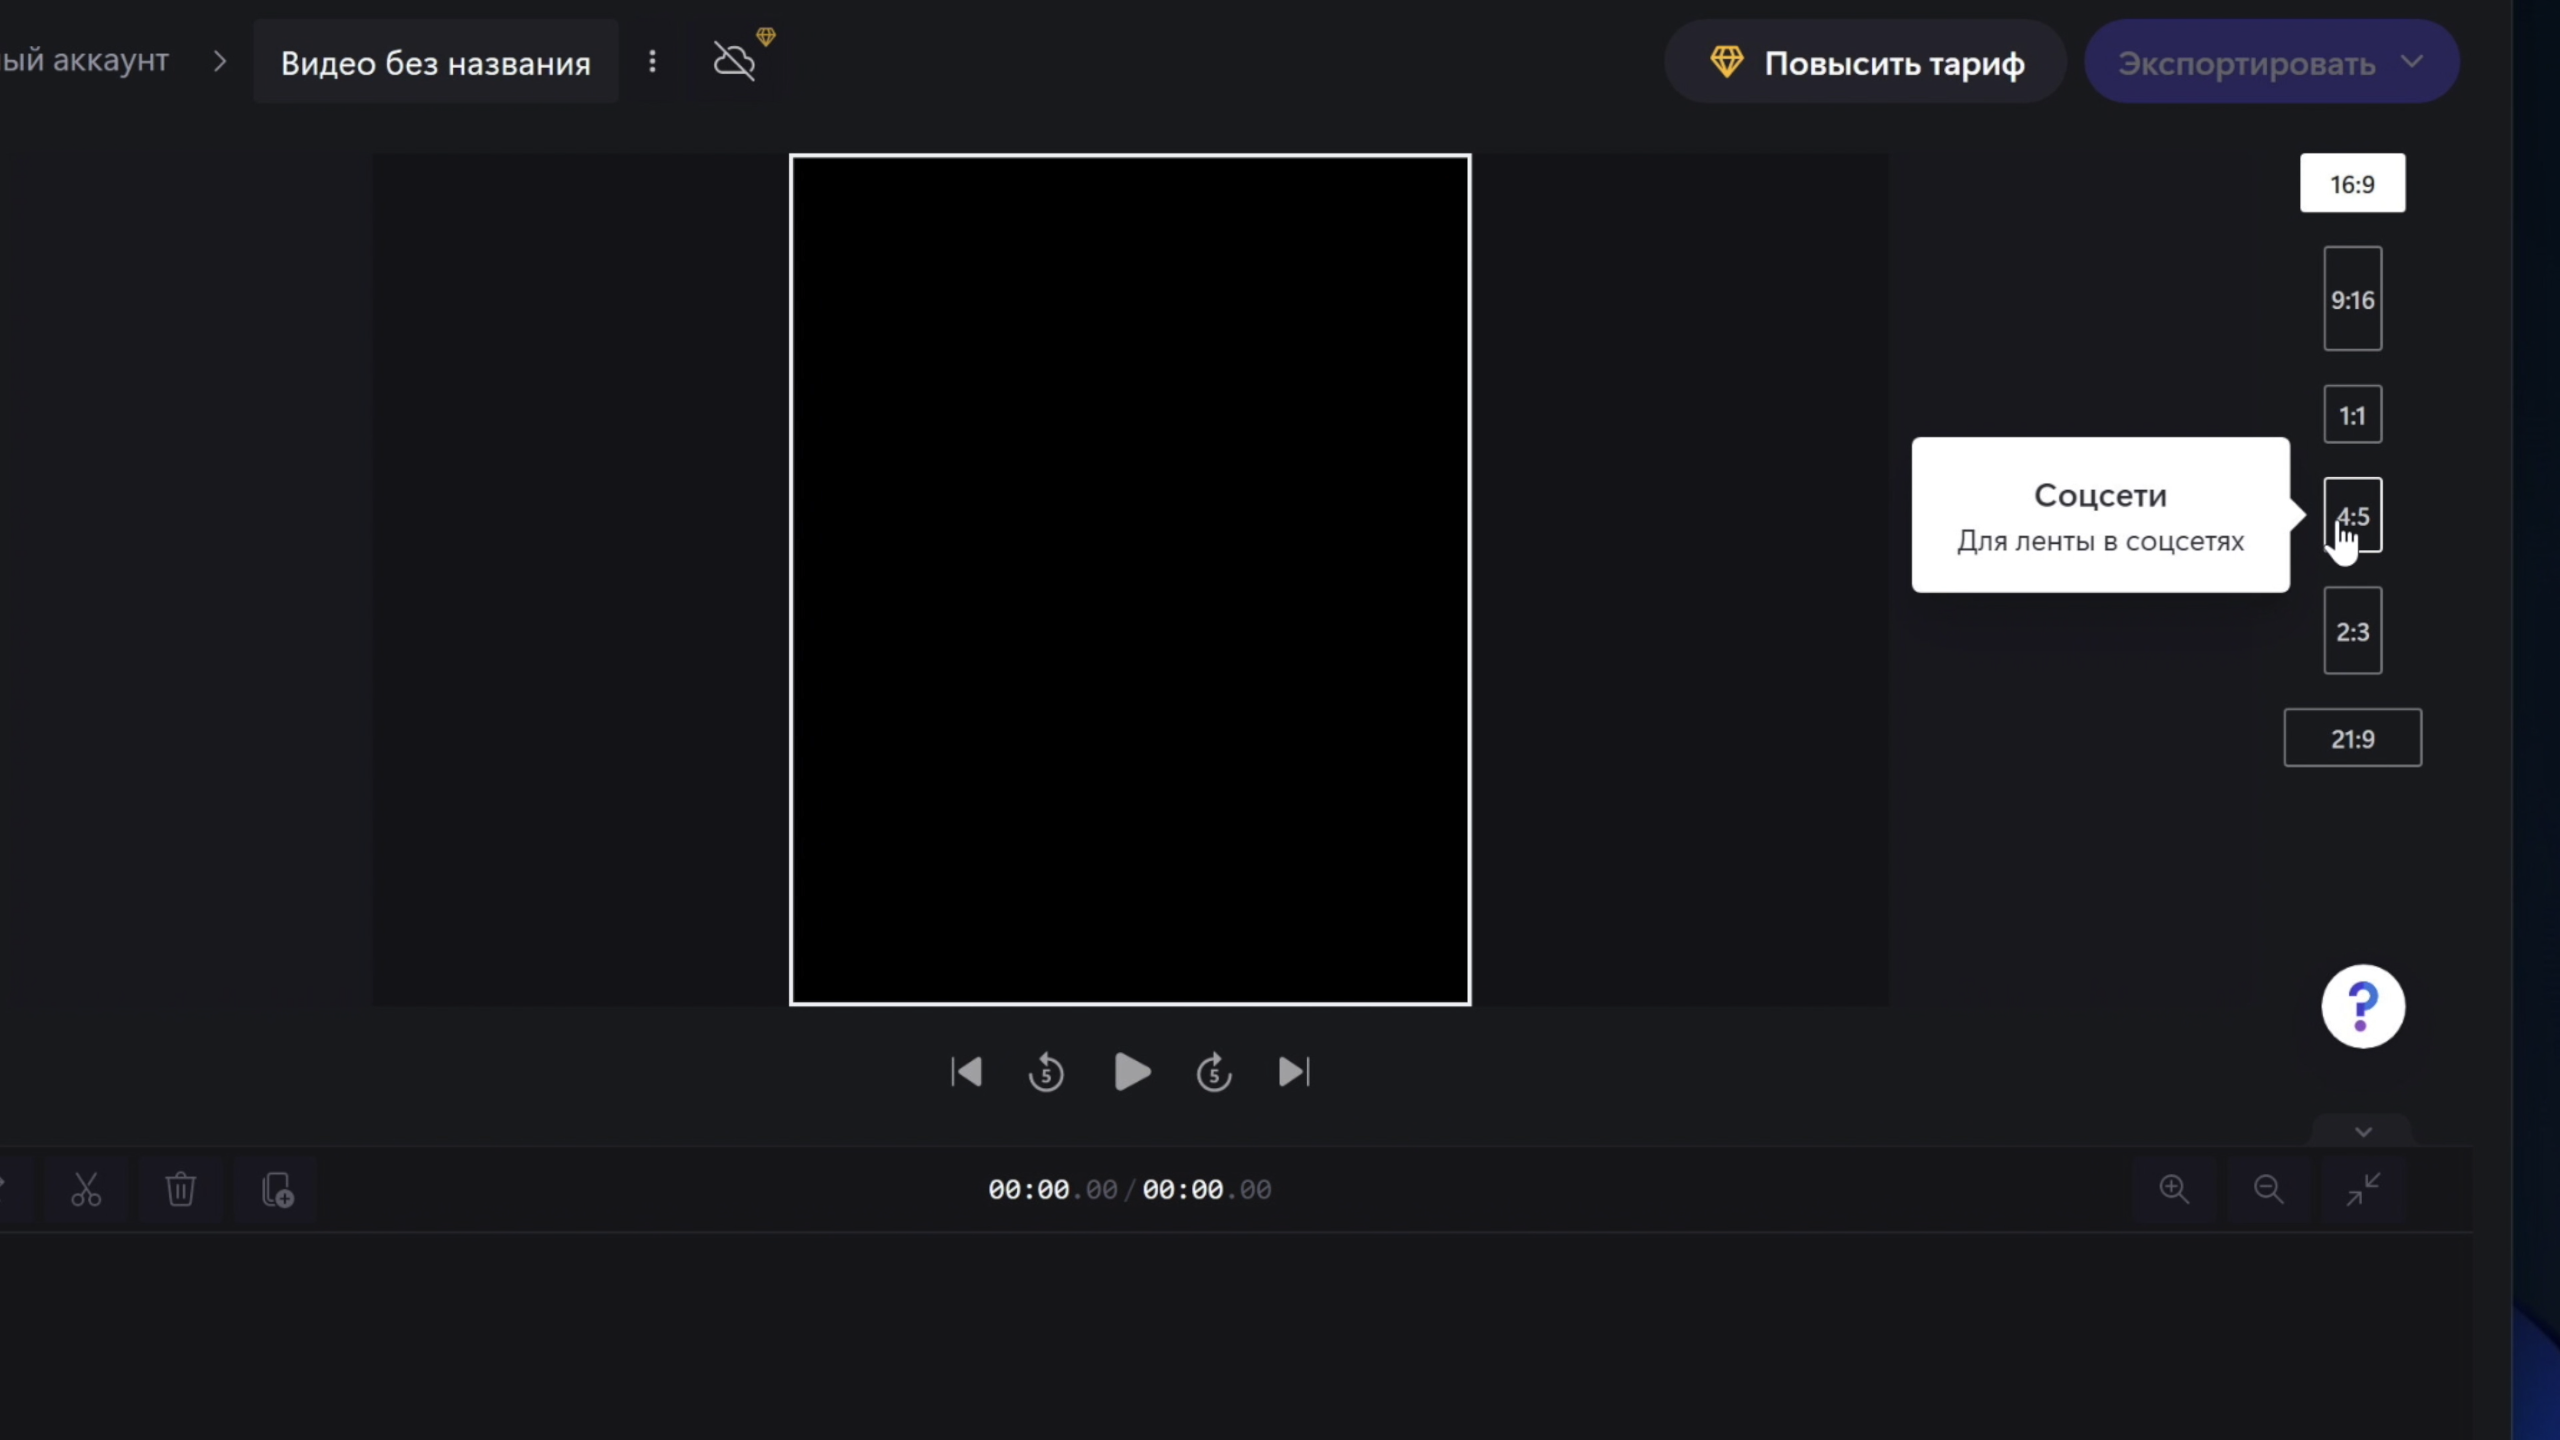
- Разрезка, обрезка видео;
- Повороты изображения, отражение по горизонтали и вертикали, дублирование;
- Форматы изображения видео – 16:9, 9:16, 1:1, 2:3, 21:9;
- Цветовые фильтры;
- Обычная, низкая и высокая скорость воспроизведения видео;
- Эффект затухания видео;
- Эффекты переходов;
- Цветокоррекция, цветовые фильтры.
Шаблоны – фишка Clipchamp. Они созданы с учётом современных трендов, в частности, трендов создания видео для социальных площадок. Шаблоны включают нужную ориентацию экрана (вертикальное или горизонтальное видео), текстовые и графические наложения, эффекты, видеовставки, звук. Всё это заточено либо под определённую тематику, либо под сервис.
Есть шаблоны для YouTube с анимацией, призывающей подписаться на канал и включить уведомления. Есть шаблоны вертикального видео для Instagram, TikTok, Pinterest. Есть шаблоны для видеорекламы в Facebook и прочих соцсетях. Есть шаблоны для геймеров, стримеров, праздничные, для коммерческих проектов.
Помимо своего медиаконтента – видео, аудио и фото, мы можем добавлять на монтажный стол стоковый медиаконтент. Такой, за использование которого нас не забанят за нарушение авторских прав. У Clipchamp есть подборка стоковой фоновой музыки и звуковых эффектов.
Есть подборка стокового видео.
И есть подборка стоковых изображений.
В рамках бесплатного использования Clipchamp выбор стокового контента ограничен.
Возможности текстовых наложений на видео скромны. Для текста можем выбрать шрифт и цвет фона. Но есть подборка готовых эффектных стилей.
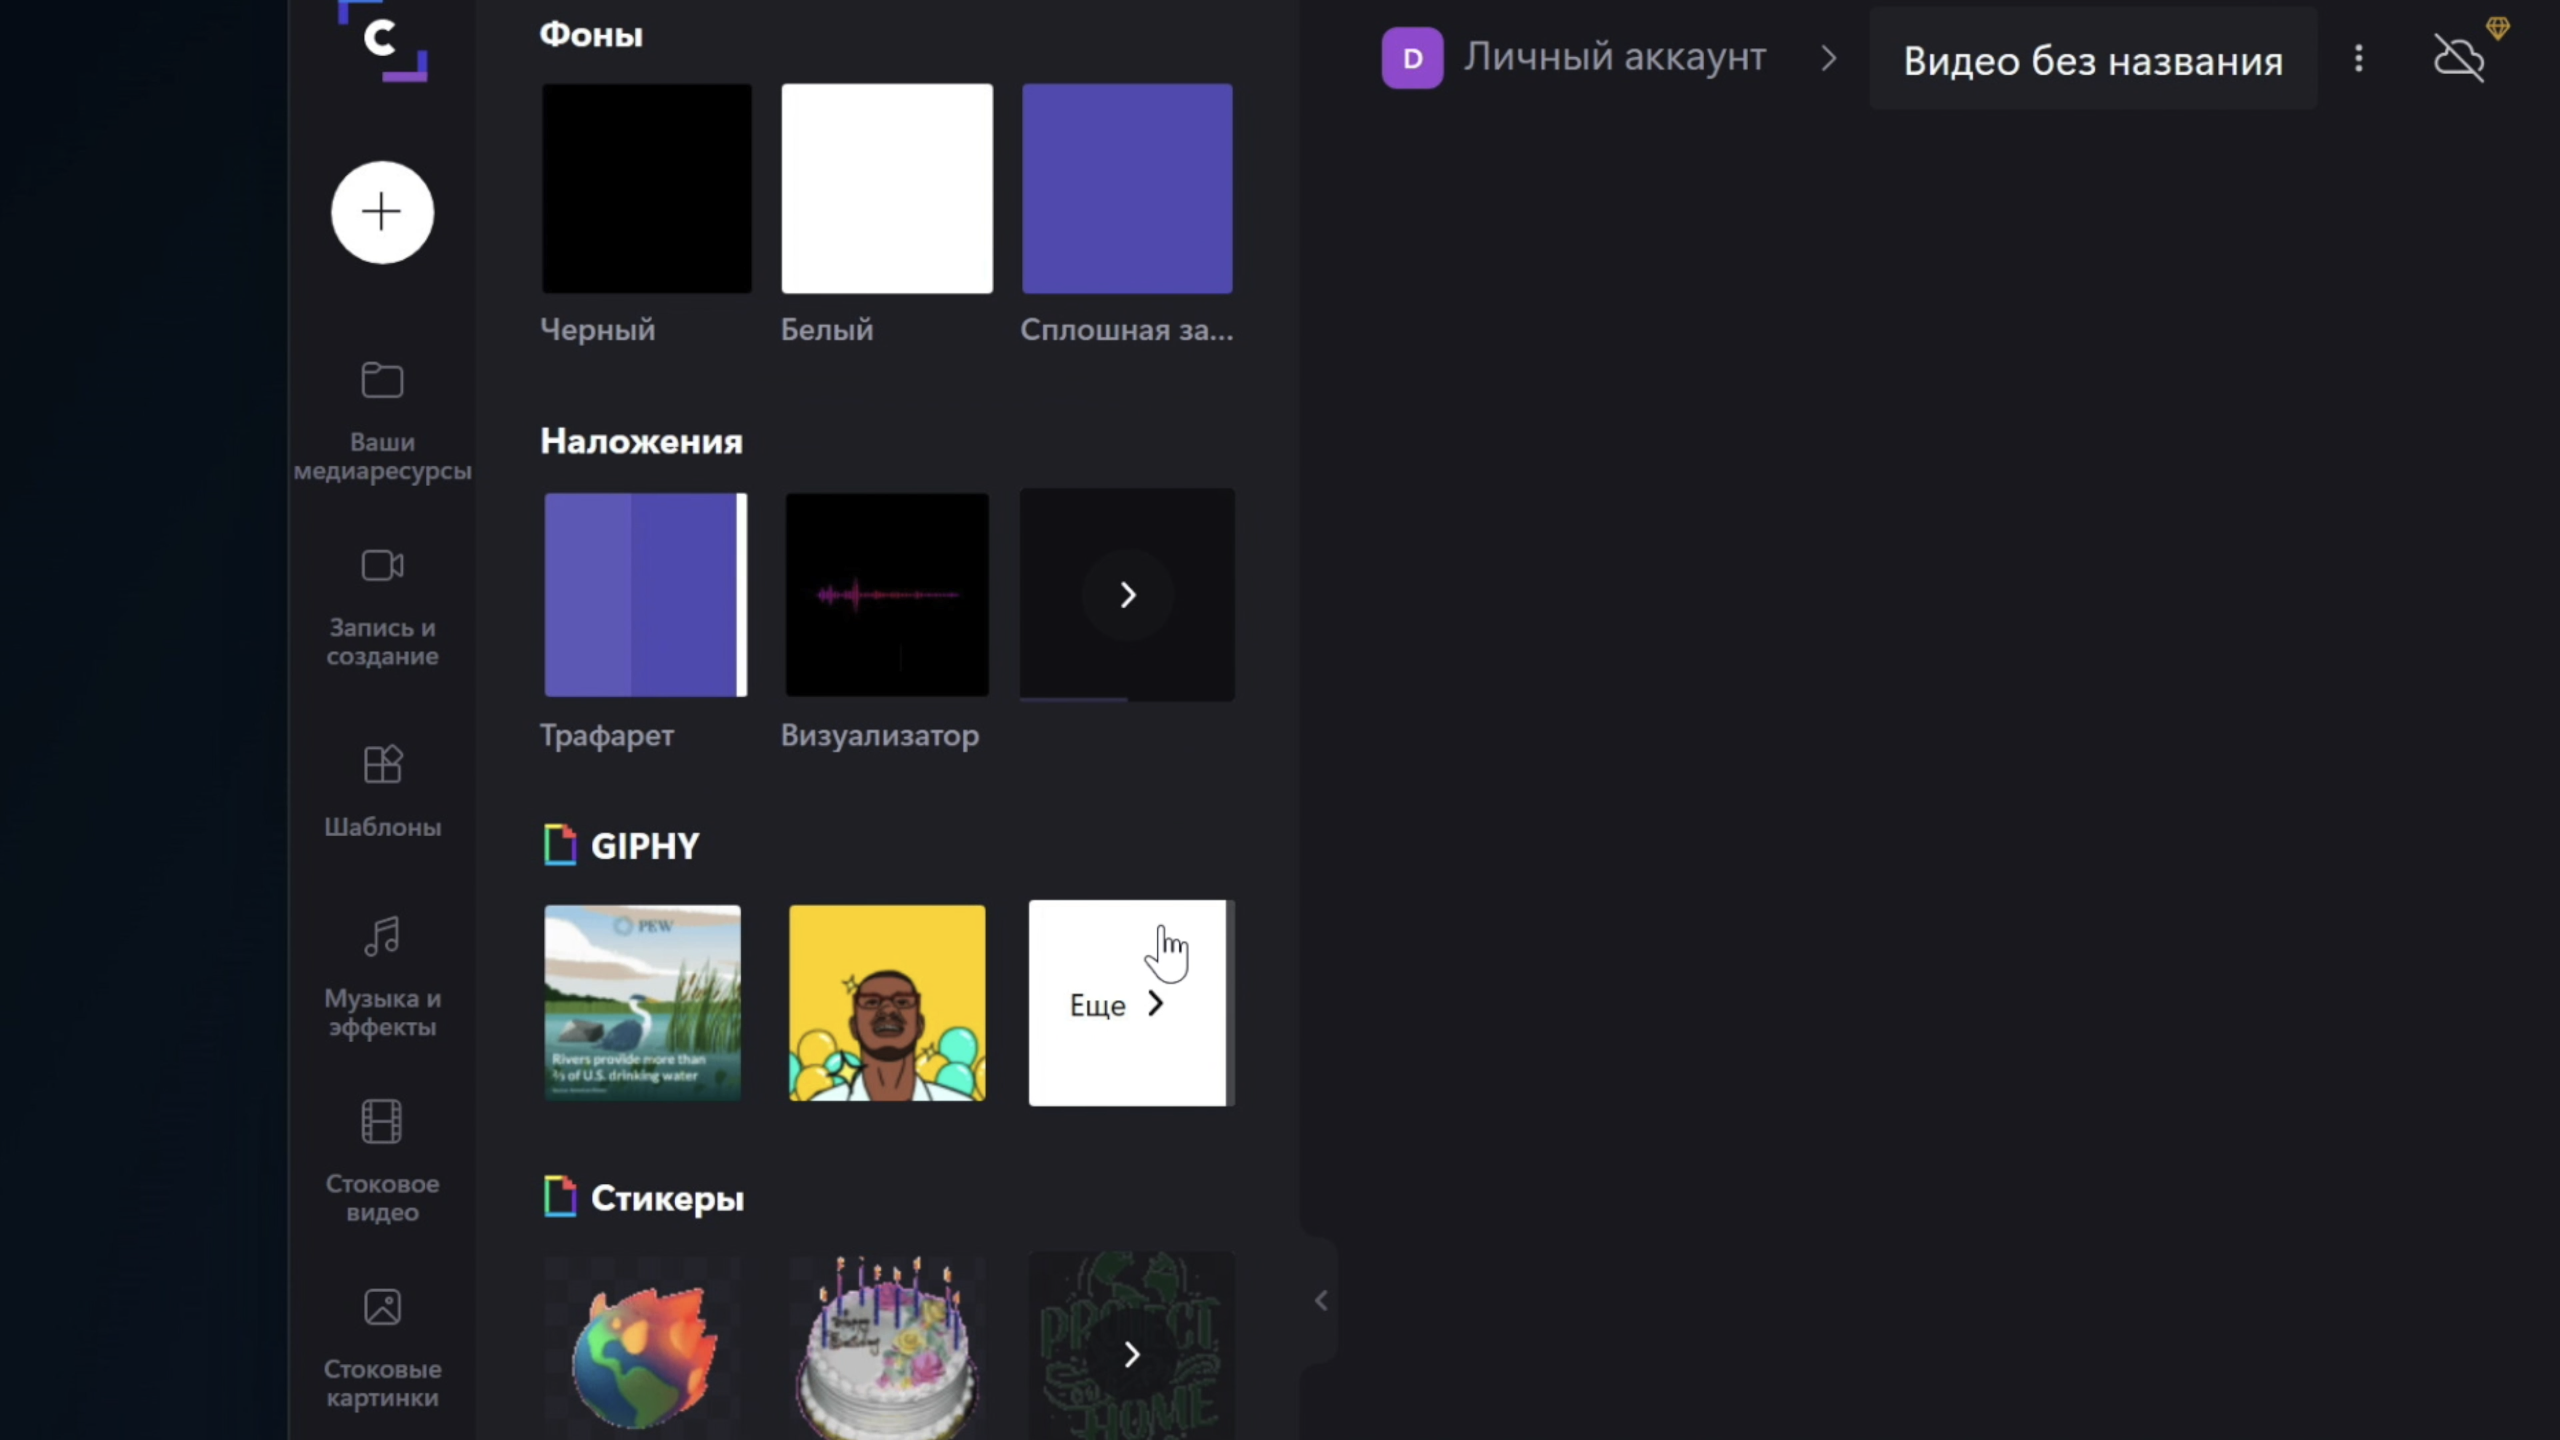
У Clipchamp есть ещё один тип контента для использования в видео – графика. Это видеофоны, стикеры, гифки, рамки и наложения.
Одна из передовых возможностей Clipchamp, не каждый видеоредактор такую имеет – преобразование текста в речь. Не хотим записывать свой голос для видео — не проблема. Можем использовать голос профессионального диктора. Пусть даже местами и с кривым произношением.
Clipchamp обустроен синтезатором речи и предусматривает качественные голосовые движки для 70 языков. Для русского есть три движка. Для синтезированной речи можно настроить скорость воспроизведения.
При бесплатном использовании Clipchamp он данные проектов хранит локально. Премиум-подписка открывает нам возможности облачного резервного копирования. Все наши проекты будут сохранены в облаке. И мы сможем работать с ними с любого компьютера.
Вот такой, друзья, у Windows 11 новый видеоредактор – Clipchamp.
В этом обзоре мы познакомимся с программой для обработки и монтажа видео Clipchamp, которую в скором времени можно будет увидеть на всех устройствах под управлением Windows 11.
С 2017 года в системе Windows присутствует стандартный видео-редактор. Окей, так зачем тогда Microsoft Clipchamp? В попытке ответить на этот вопрос мы вкратце ознакомились с программой и выяснили, что в ней даже нет нормального таймлайна для роликов. Значит решение компании приобрести более качественный сторонний софт для интеграции в систему было верным. Но насколько качественный?
Есть одна неприятная, но неизбежная деталь: Clipchamp — это в первую очередь веб-сервис. Сама программа для Windows — не что иное, как просто оболочка для сайта сервиса. То есть, Clipchamp не будет загружаться и работать без нормального интернета. Совсем. Никак.
Поскольку компанию купил Microsoft, то, возможно, в будущем это изменится, но почему? Разве Windows Movie Maker был веб-сервисом? Разве стандартный редактор iMovie на MacOS требует подключения к сети для работы? Странное, короче, решение, ну да ладно.
Ну и вытекающий из этого нюанс при начале работы с редактором — вам придется зарегистрироваться или привязать свою учетную запись Microsoft.
При запуске нас встречает приветственная страница, где мы можем создать видео-ролик с нуля или выбрать один из готовых шаблонов.
Clipchamp, как и подобает веб-сервису, а не самостоятельной утилите, предлагает пользователю платную подписку.
В принципе, платить за нее смысла особого нет (да и скорее всего из России точно не получится), но, просто вдумайтесь: еще месяц назад экспорт видео на бесплатном тарифе был ограничен качеством 480p, но после жалоб Microsoft кому-то, видимо, раздали пинков, и настройку подняли до полноценного Full HD.
При создании видео мы попадаем на достаточно аккуратно организованное рабочее пространство редактора. Слева у нас находится панель инструментов, по центру — окно проигрывателя, а внизу — классический для любого подобного софта таймлайн.

Понимание целевой аудитории Clipchamp приходит в момент, когда обнаруживаешь кнопку быстрого выбора соотношения сторон видеоролика — приложение простым языком объясняет, для какой социальной сети лучше всего подходит тот или иной формат.
Еще ниже находится кнопка справки, но, увы, без поддержки великого и могучего.

Впрочем, сомневаемся, что она может понадобиться, поскольку интерфейс в целом ну очень простой и интуитивный — здесь разработчики постарались, молодцы.
Пройдемся по ключевым функциям Clipchamp.
Начнем с импорта файлов. Опций — целый вагон. Можно выбрать файл с компьютера или онлайн-хранилищ.

А также перенести его с телефона, на экране компьютера появится QR-код, при считывании которого на телефоне откроется браузер с возможностью загрузки.
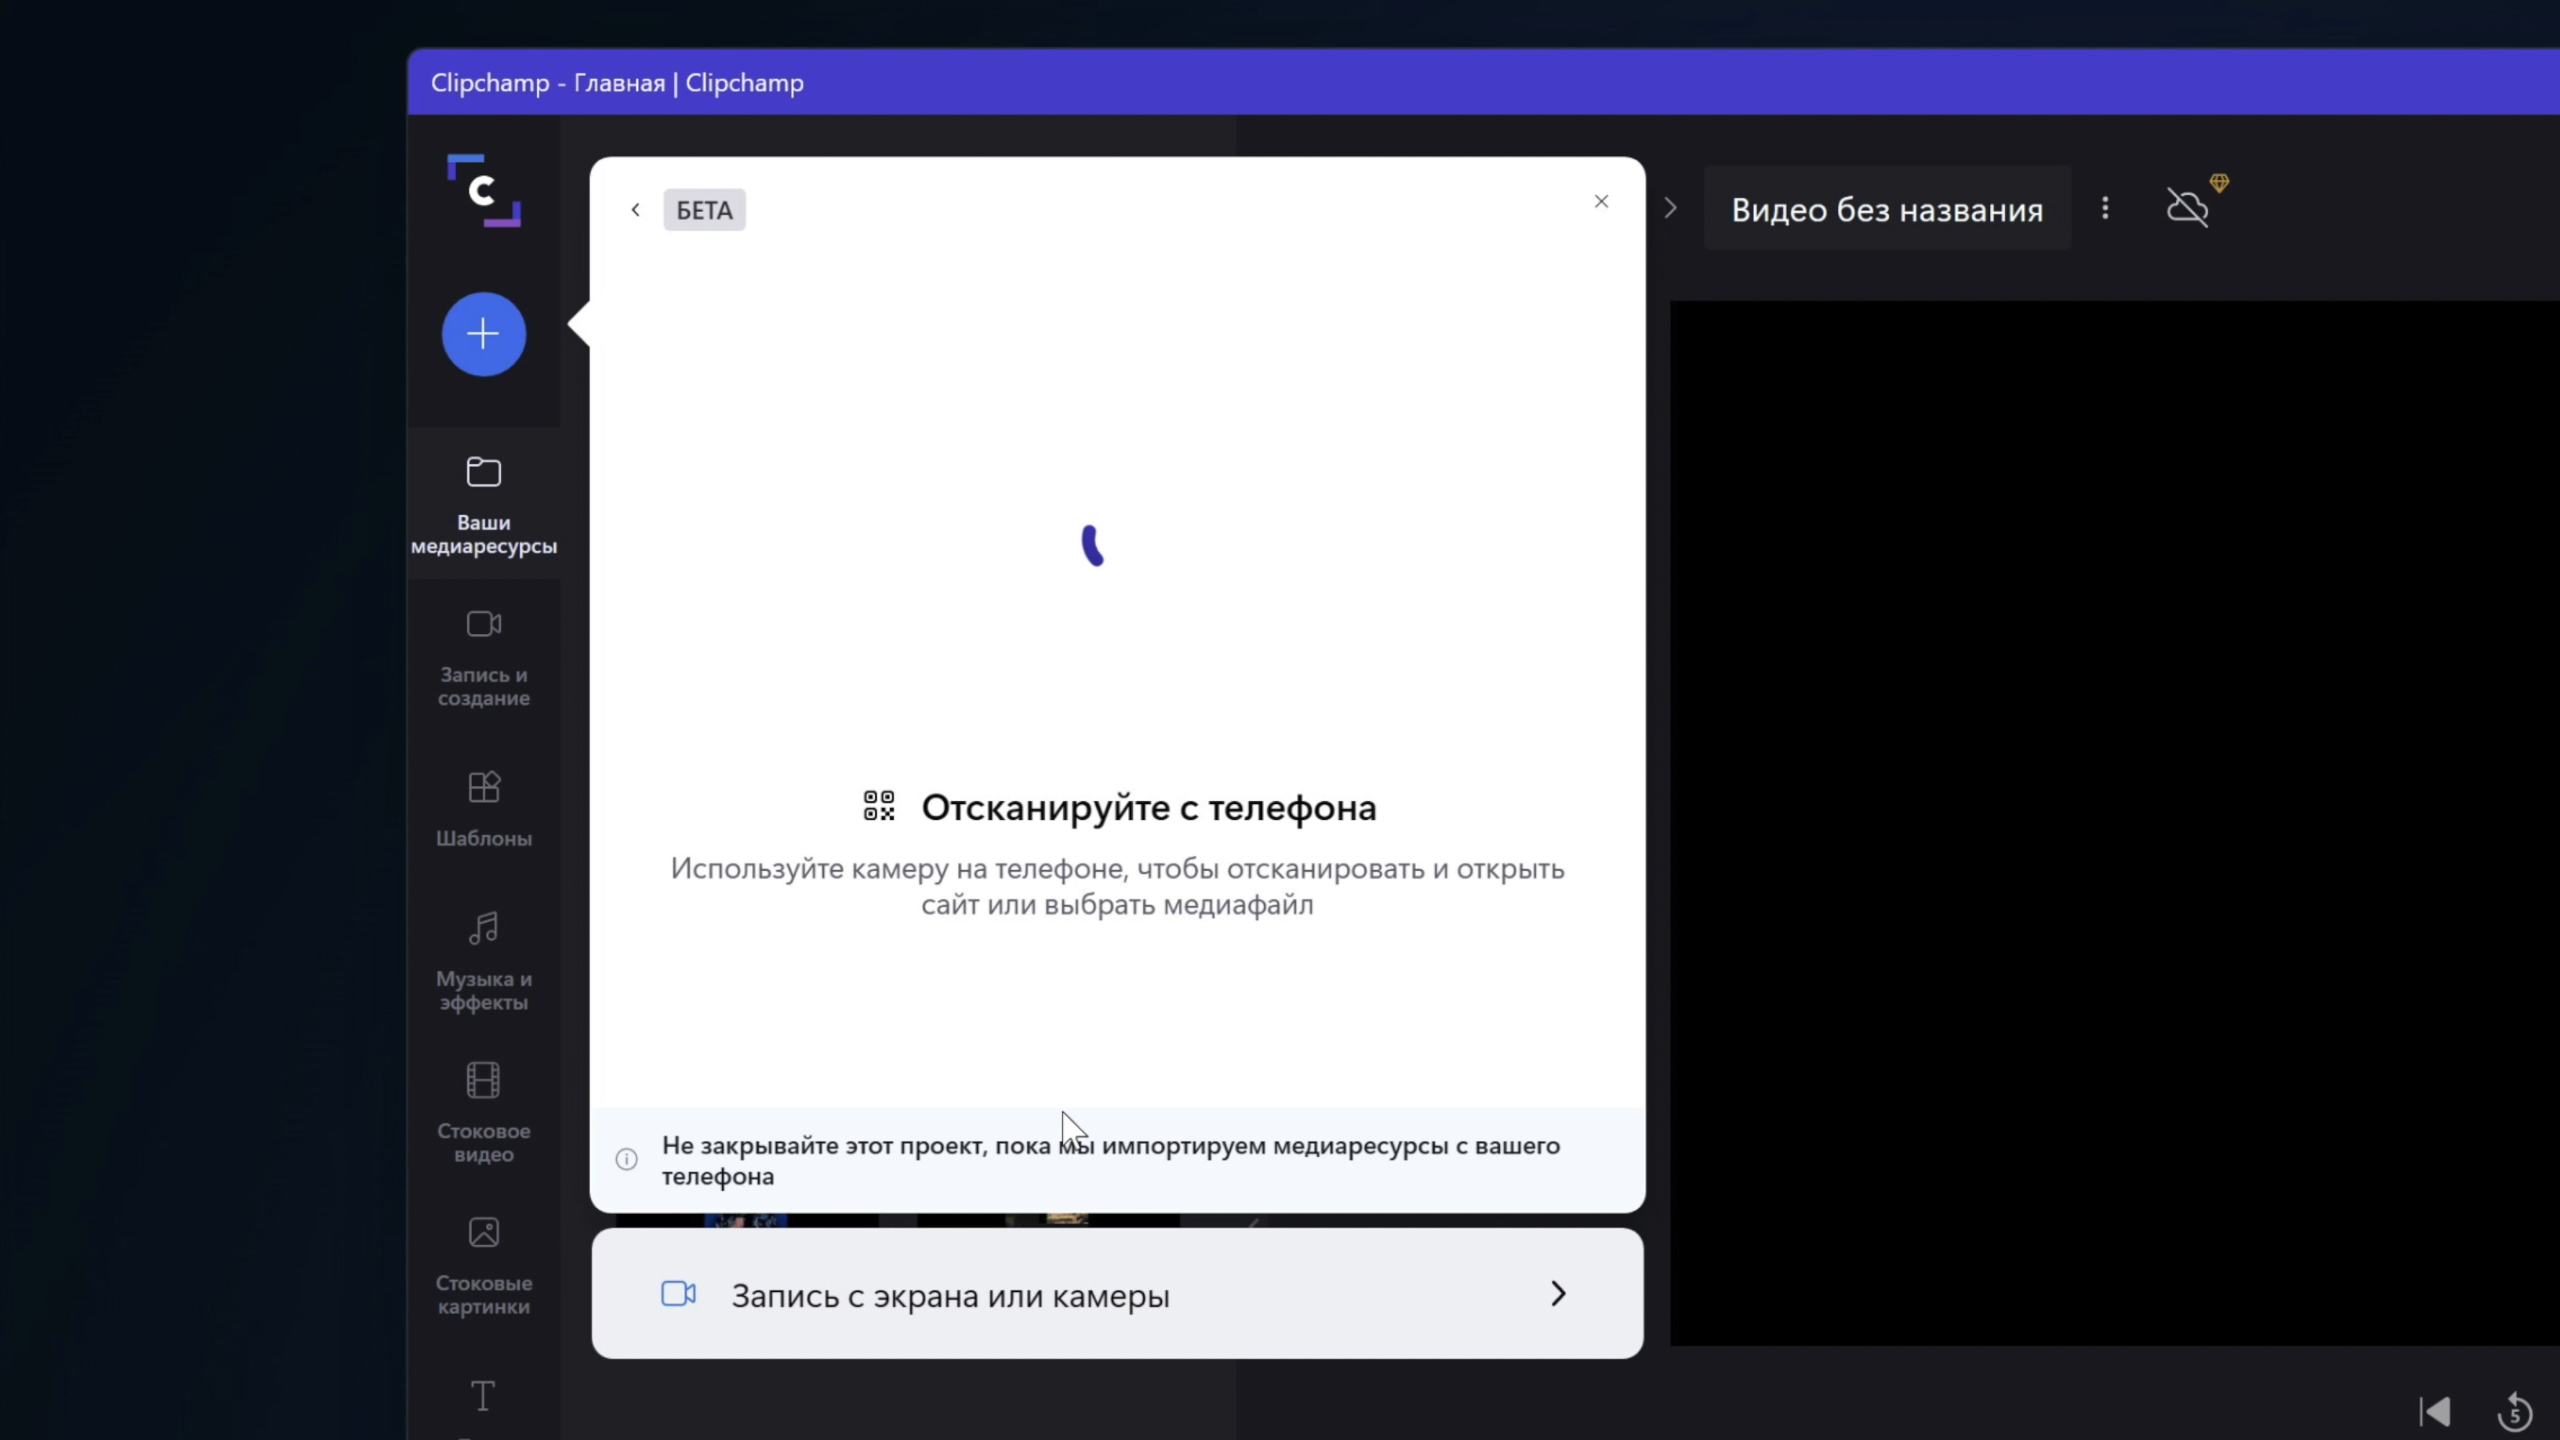
Но и это не все — отдельная вкладка посвящена записи напрямую с компьютера — тут можно одновременно записать ваше видео с веб-камеры вместе с захватом экрана.
В шаблонах Clipchamp можно обнаружить еще одно подтверждение тому, что данный видеоредактор прежде всего для блогеров и пользователей соцсетей — здесь есть все, начиная от готовых заставок для YouTube и заканчивая рекламными шаблонами для TikTok, например.
Везде можно поменять и текст, и, наверное, если уж прямо лень создавать что-то с нуля, то это адекватная опция.
Правда, некоторые шаблоны будут с вотермаркой — убрать ее можно, только заплатив за подписку.
Сильно сэкономить время помогут также вкладки с музыкой, видео и картинками — но, опять-таки, при наличии подписки — количество бесплатного контента очень ограничено.
Наверное, такая возможность быстро набирать стоковый материал — единственное, ради чего и стоило бы заплатить Clipchamp. Но, с другой стороны, гуглить и скачивать просто из интернета тоже можно достаточно быстро.
Довольно неплоха вкладка с текстом — здесь есть много вариантов с разными анимациями. Есть даже… Текстовый блок «Мем». Ну, вы поняли. Мем.
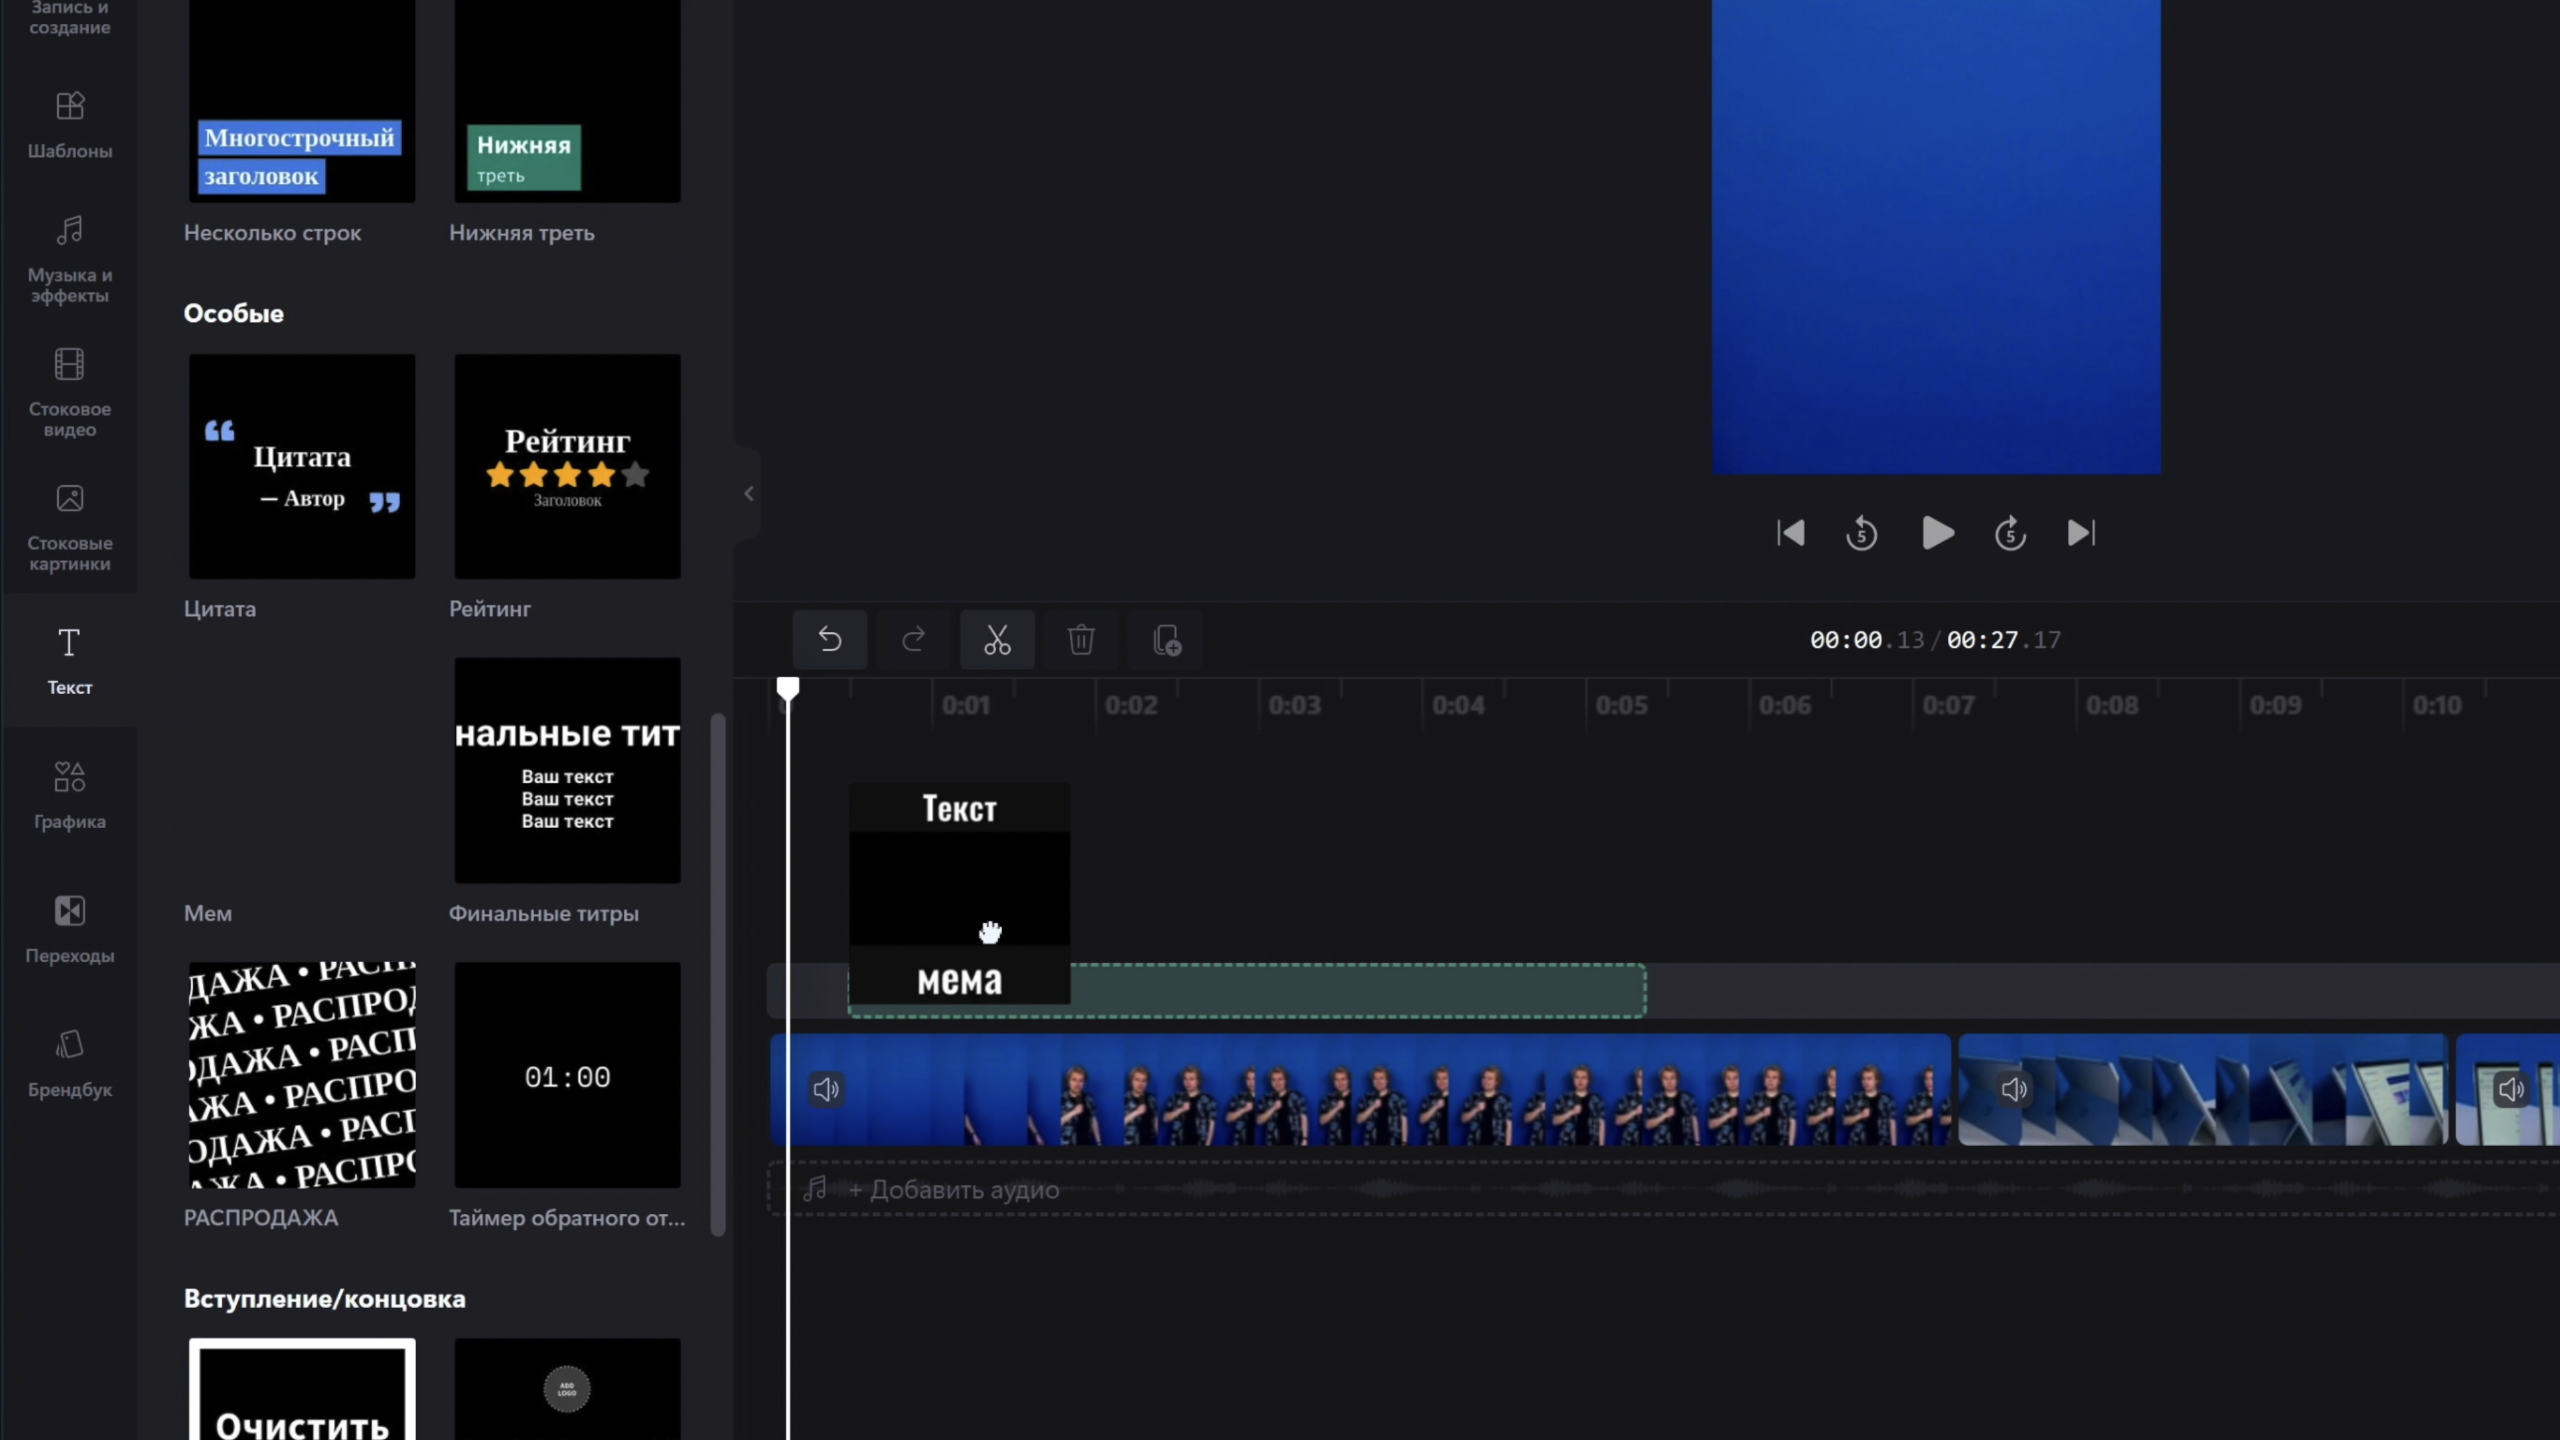
Во вкладке «Графика» можно выбрать блок с цветом фона и отсюда же в пару кликов прикрепить к видео любую гифку или стикер с Giphy.
Наконец, переходов, надо сказать, не очень много, но основные вроде размытия, наплывов и наездов присутствуют.

Есть еще вкладка брендбука, где можно собрать набор шрифтов, цветов и логотипов для последующего использования, но, увы, это тоже только за подписку.

На что годится Clipchamp? Ну, если следовать логике приложения и его предлагаемым функциям, то редактор вполне подойдет для создания тех же YouTube Shorts и прочих коротких роликов.
Видеоредактор подойдет для нетребовательных пользователей соцсетей и с натяжечкой, но все же для блогеров, которые не хотят заморачиваться с более серьезными утилитами для видеопродакшна. Все это, конечно, с двумя поправками: вам достаточно качества в 1080р и у вас хорошая скорость интернета, потому что все вычисления и обработки ваших видеофайлов происходят на серверах Clipchamp.
Мы не знаем, какой план у Microsoft на развитие Clipchamp — но если компания хочет видеть данный софт в качестве стандартного видео-редактора для платформы Windows, то ей явно стоит задуматься о том, чтобы хотя бы базовая часть функций, включая простой монтаж и экспорт роликов, стала доступной при отсутствии интернета. Насколько наши ожидания оправдаются или нет — покажет время.
Пока что как полноценную программу для монтажа рекомендовать Clipchamp определенно нельзя. Но попробовать поиграться с редактором никто не мешает — загрузить приложение можно в Microsoft Store.