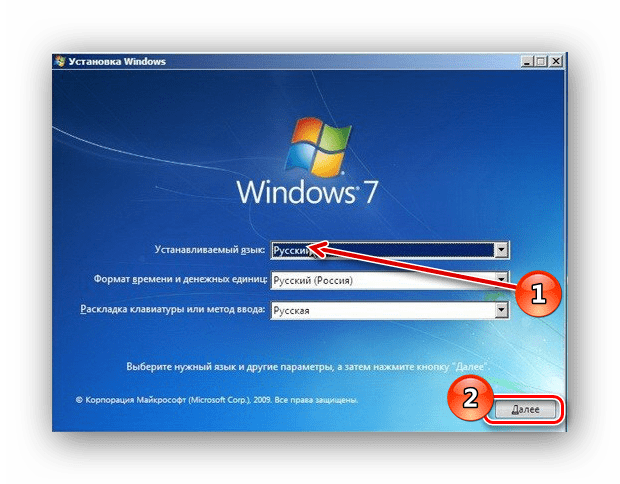
-
Partition Wizard
-
Clone Disk
- How to Perform a System Restore from Command Prompt Windows 10/7?
By Ariel | Follow |
Last Updated June 27, 2022
Do you know how to start a system restore from command prompt? If you are trying to figure it out, come to this post. MiniTool will walk you through a full guide to perform a system restore from command prompt on Windows 10 and Windows 7.
As you know, the system restore feature can help you restore operating system to an earlier working state. Besides, you can use this feature when some ransomware attacks your computer and damage the system files.
So, when you encounter the ransomware attacks, you may need to restore system. However, performing a system restore is not an easy operation. This is because, as you know, the fake antivirus programs and ransomware infections may block the Safe Mode of your operating system.
At this time, you have to run system restore from command prompt. Now, let’s see how to perform sys restore command on Windows 10 and Windows 7.
How to Perform a System Restore from Command Prompt Windows 7
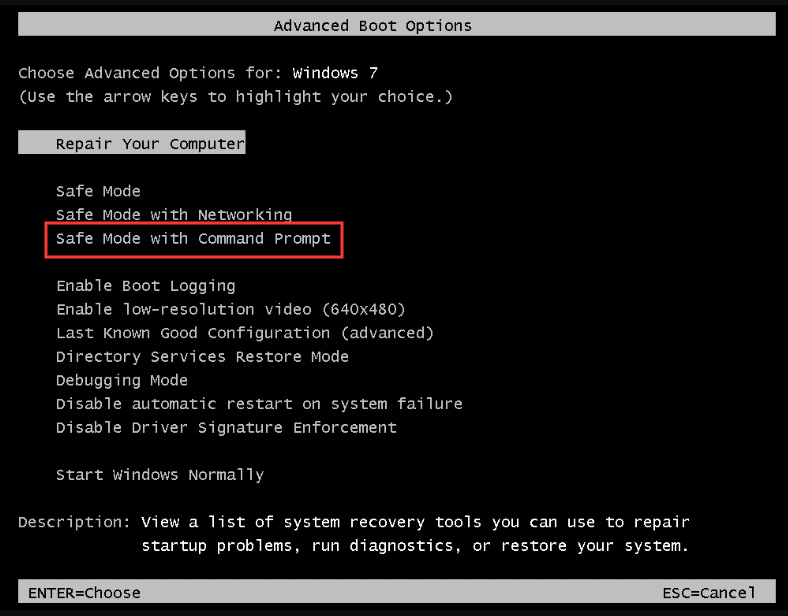
Step 1. Press the Power button to turn on your PC. During the start process, press F8 key to open the Advanced Boot Options screen.
Step 2. Select the Safe Mode with Command Prompt by pressing the arrow keys. After that, press Enter.
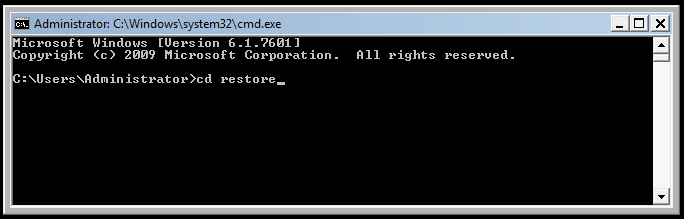
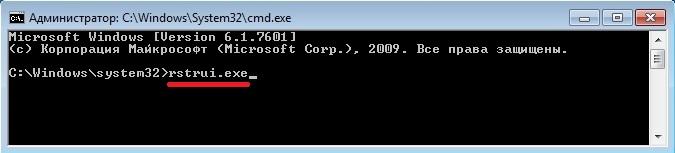
Step 3. In the command prompt, type cd restore command ad hit Enter.
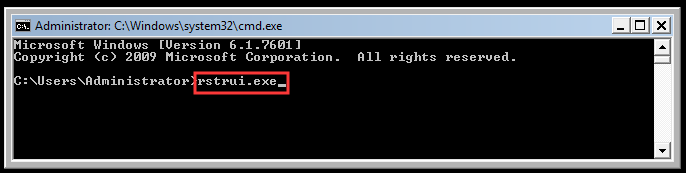
Step 4. Then type rstrui.exe command and hit Enter
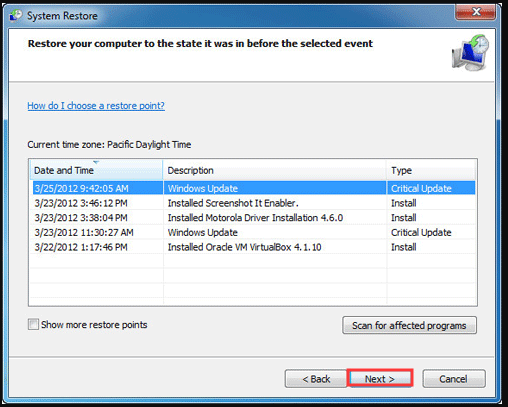
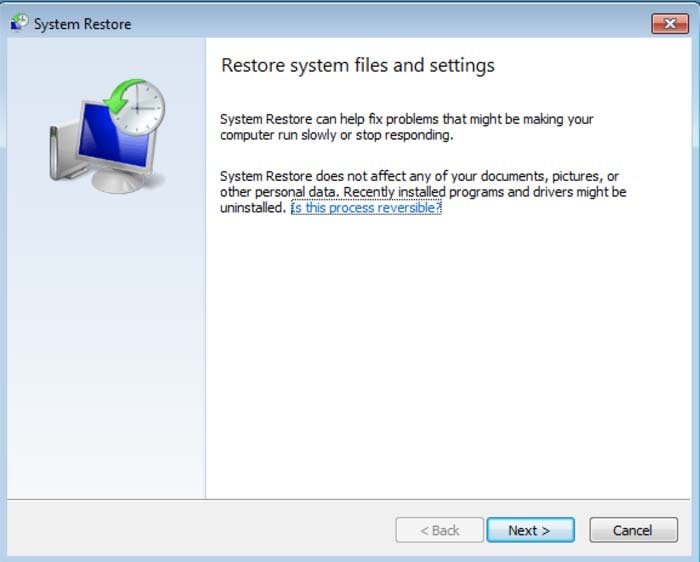
Step 5. Now, a System Restore window pops up. Click Next to continue.
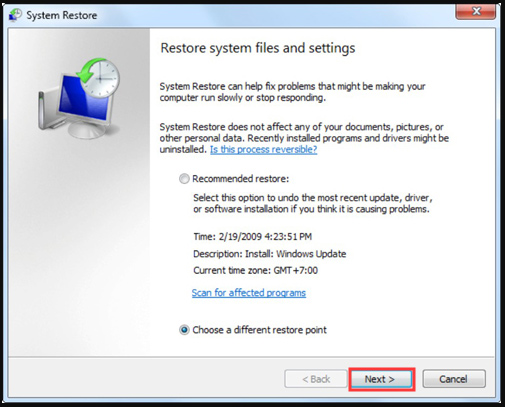
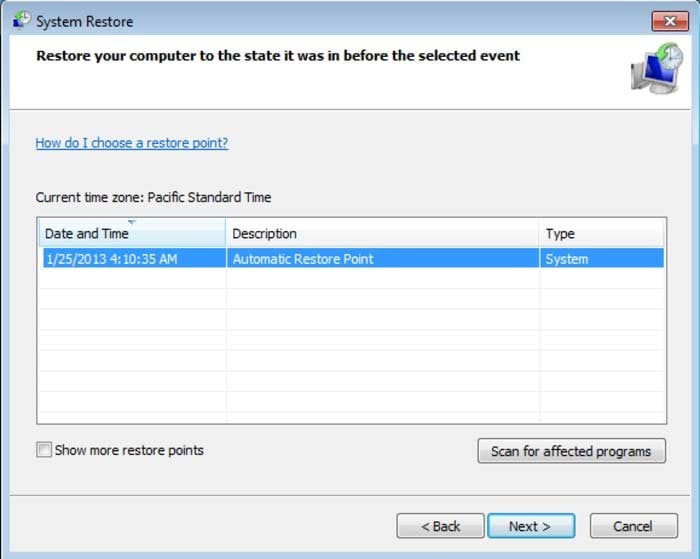
Step 6. In the list of restore points, select a restore point that you want to restore and click Next.
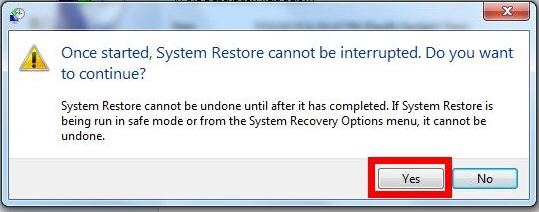
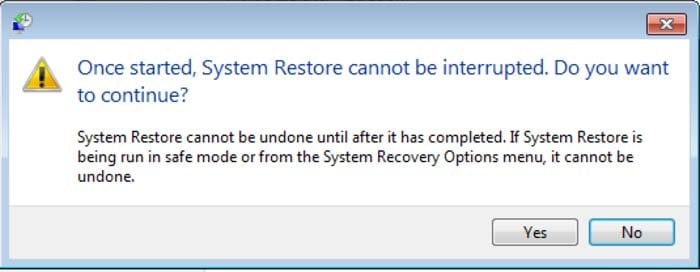
Step 7. Then you will receive a confirmation message: Once started, System Restore cannot be interrupted. Do you want to continue? Just click Yes.
Now, your system should be restored to an earlier working state. Next. Let’s see how to perform a Windows 10 system restore from command prompt.
How to Perform System Restore from Command Prompt Windows 10
This process is similar to do on Windows 7. Before you do, you can read this post to boot your Windows 10 PC from Safe Mode. After that, you can follow the steps below to perform the Windows 10 system restore from command prompt.
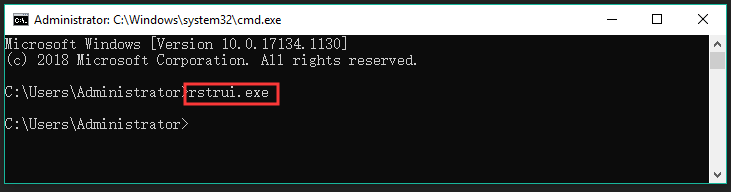
Step 1. Press Win + R keys to open the Run dialog box, and then type cmd in it and press Ctrl + Shift + Enter keys to open the elevated command prompt that will grant you an administrator privilege.
Step 2. In the pop-up window, type rstrui.exe command and hit Enter.
Step 3. The system restores window will pop up immediately, click Next to continue.
Step 4. In the list of all system restore points, select the Restore point that you prefer to and click the Next button.
Step 5. Then confirm your restore point by clicking the Finish button. After that, your computer should be restored to an earlier state and fix this issue.
Now, I believe you already have known how to perform a system restore from command prompt Windows 10/7.
Tips & Tricks for the Problems When Performing System Restore from Command Prompt
In addition to the above question, many users encounter new problems when running system restore from command prompt. For example, a user received the error message “not enough memory resources are available to process this command”. For this problem, you can try freeing up your PC’s storage space.
There are some users complained that their PC won’t boot and cannot access the Safe Mode. Don’t be alarmed. You can read this post, in which we provide detailed steps for entering Safe Mode when your PC won’t boot.
About The Author

Position: Columnist
Ariel is an enthusiastic IT columnist focusing on partition management, data recovery, and Windows issues. She has helped users fix various problems like PS4 corrupted disk, unexpected store exception error, the green screen of death error, etc. If you are searching for methods to optimize your storage device and restore lost data from different storage devices, then Ariel can provide reliable solutions for these issues.
Open the System Restore utility from the command line
What to Know
- Open Command Prompt.
- Type rstrui.exe in the window, and then press Enter.
- Follow the on-screen instructions to complete the system restore.
This article explains how to start System Restore from the Command Prompt. The System Restore command is the same in all modern versions of Windows. The article also includes information on the dangers of fake rstrui.exe files.
How to Start System Restore From the Command Prompt
As long as you can start your computer in Safe Mode to access Command Prompt, you can still use System Restore by executing a simple command. Even if you’re only looking for a quick way to start this utility from the Run dialog box, this knowledge might come in handy.
It’ll take you less than a minute to execute the right command, and probably less than 30 minutes for the whole process to complete.
-
Open Command Prompt, if it’s not already open.
You’re more than welcome to use another command line tool, like the Run box, to execute the System Restore command. In Windows 11/10/8, open Run from the Start menu or Power User Menu. In Windows 7 and Windows Vista, select the Start button. In Windows XP and earlier, choose Run from the Start menu.
-
Type the following command in the text box or Command Prompt window:
rstrui.exe…and then press Enter or choose the OK button, depending on where you executed the System Restore command from.
At least in some versions of Windows, you don’t need to add the .EXE suffix to the end of the command.
-
The System Restore wizard will open immediately. Follow the instructions on the screen to complete the restore process.
If you need help, see our tutorial on how to use System Restore in Windows for a complete walkthrough. The first parts of those steps, where we explain how to open System Restore, won’t apply to you since it’s already running, but the rest should be identical.
Be Cautious of Fake rstrui.exe Files
As we already mentioned, this tool is called rstrui.exe. It’s included with a Windows installation and is located in the System32 folder:
C:WindowsSystem32
If you find another file on your computer that’s called rstrui.exe, it’s more than likely a malicious program that’s trying to trick you into thinking it’s the utility provided by Windows. Such a scenario may take place if the computer has a virus.
Do not use any program that’s pretending to be System Restore. Even if it looks like the real thing, it’s probably going to demand that you pay to restore your files or prompt you with an offer to purchase something else to even open the program.
If you’re digging around folders on your computer to find the System Restore program (which you shouldn’t have to do), and end up seeing more than one rstrui.exe file, always use the one in the System32 location mentioned above.
Also take note of the filename. Fake System Restore programs might use slight misspellings to make you think they’re the real thing. One example would be replacing the letter i with a lowercase L, like rstrul.exe, or adding/removing a letter (e.g., restrui.exe or rstri.exe).
Since there shouldn’t be random files named rstrui.exe masquerading as the System Restore utility, it’d also be wise to make sure your antivirus software is updated. Also, see these free on-demand virus scanners if you’re looking for a quick way to run a scan.
Again, you shouldn’t really be peaking around in folders looking for the System Restore utility because you can just open it normally and quickly through the rstrui.exe command, Control Panel, or Start menu, depending on your version of Windows.
Thanks for letting us know!
Get the Latest Tech News Delivered Every Day
Subscribe
Windows 7 Starter Windows 7 Starter N Windows 7 Home Basic Windows 7 Home Premium Windows 7 Professional Windows 7 Professional N Windows 7 Enterprise Windows 7 Enterprise N Windows 7 Ultimate Windows 7 Ultimate N Windows Vista Ultimate Windows Vista Enterprise Windows Vista Business Windows Vista Home Premium Windows Vista Home Basic Windows Vista Business 64-bit Edition Windows Vista Enterprise 64-bit Edition Windows Vista Home Premium 64-bit Edition Windows Vista Home Basic 64-bit Edition Windows Vista Ultimate 64-bit Edition More…Less
Summary
When you use the Recovery Environment (Windows RE) to troubleshoot startup issues, first try the Startup Repair option in the System Recovery Options dialog box. If this does not resolve the issue, or if you have to manually troubleshoot additional issues, use the Bootrec.exe tool. This article talks about how to use the Bootrec.exe tool in the Windows RE to troubleshoot and repair the following items in Windows Vista or Windows 7:
-
A master boot record (MBR)
-
A boot sector
-
A Boot Configuration Data (BCD) store
You can also use the Bootrec.exe tool to troubleshoot a Windows Boot Configuration Data file is missing required information error.
How to run the Bootrec.exe tool
To run the Bootrec.exe tool, first start the Windows RE:
-
Put the Windows Vista or Windows 7 media in the DVD drive, and then start the computer.
-
Press a key when you are prompted.
-
Select a language, a time, a currency, a keyboard, or an input method, and then click Next.
-
Click Repair your computer.
-
Select the operating system that you want to repair, and then click Next.
-
In the System Recovery Options dialog box, click Command Prompt.
-
Type Bootrec.exe, and then press Enter.
 Note To start the computer from the Windows Vista or Windows 7 DVD, the computer must be configured to start from the DVD drive. For information about how to do this, see the documentation that was included with the computer, or contact the computer manufacturer.
The Bootrec.exe tool supports the following options. Use the option that’s appropriate for your situation.
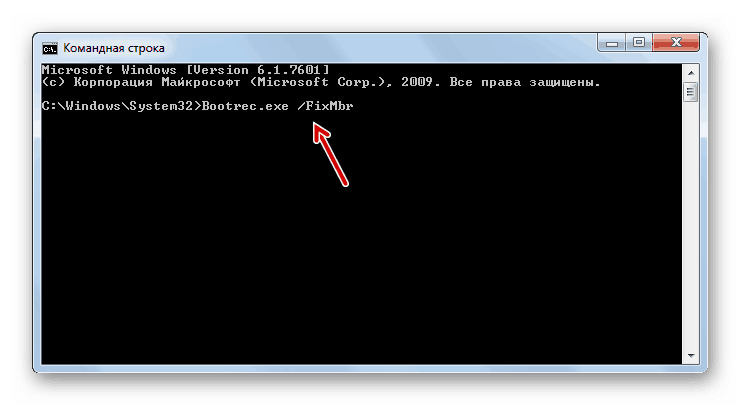
/FixMbr
This option writes a Windows 7 or Windows Vista-compatible MBR to the system partition. It does not overwrite the existing partition table. Use this option when you must resolve MBR corruption issues, or when you have to remove nonstandard code from the MBR.
/FixBoot
This option writes a new boot sector to the system partition by using a boot sector that’s compatible with Windows Vista or Windows 7. Use this option if one of the following conditions is true:
-
The boot sector was replaced with a nonstandard Windows Vista or Windows 7 boot sector.
-
The boot sector is damaged.
-
An earlier Windows operating system was installed after Windows Vista or Windows 7 was installed. In this situation, the computer starts by using Windows NT Loader (NTLDR) instead of Windows Boot Manager (Bootmgr.exe).
/ScanOs
This option scans all disks for installations that are compatible with Windows Vista or Windows 7. It also displays the entries that are currently not in the BCD store. Use this option when there are Windows Vista or Windows 7 installations that the Boot Manager menu does not list.
/RebuildBcd
This option scans all disks for installations that are compatible with Windows Vista or Windows 7. Additionally, it lets you select the installations that you want to add to the BCD store. Use this option when you must completely rebuild the BCD store.
Note Use the Bootrec.exe tool to troubleshoot a «Bootmgr Is Missing» error. If rebuilding the BCD store doesn’t resolve the startup issue, you can export and delete the BCD store and then run this option again. By doing this, you make sure that the BCD store is completely rebuilt.
To do this, type the following commands at the Windows RE command prompt:
-
bcdedit /export C:BCD_Backup
-
c:
-
cd boot
-
attrib bcd -s -h -r
-
ren c:bootbcd bcd.old
-
bootrec /RebuildBcd
Need more help?
Содержание
- 1 Запуск восстановления системы в консоли при нормальной загрузке ОС
- 2 Восстановление через консоль в безопасном режиме
- 3 Запуск восстановления системы в консоли при помощи установочного диска Windows 7
- 4 Восстановление загрузочной записи Windows с помощью консоли
- 5 Утилита BCDboot
- 6 Консольная утилита MBRFix
- 7 Подводим итог
- 8 Видео по теме
Используя ноутбук или стационарный ПК на операционной системе Windows 7, пользователи часто встречаются с проблемой его загрузки, зависанием системы или «синим экраном». Основными причинами этих проблем могут быть вирусы, удаление системных файлов и некачественное ПО. Чтобы решить эти проблемы, достаточно воспользоваться точками восстановления системы.
Эти точки восстановления предназначены для восстановления состояния ОС на момент времени, когда она стабильно работала. Каждая точка восстановления создается автоматически при каких-то изменениях в системе. Например, при установке драйвера или программного обеспечения.
В этом материале мы уделим особое внимание командной строке, с помощью которой будем производить восстановление Windows 7. Восстанавливая ОС через консоль, вы значительно ускорите процесс. Наша статья будет особенно интересна начинающим системным администраторам и продвинутым пользователям ПК.
Запуск восстановления системы в консоли при нормальной загрузке ОС
Если в Windows 7 после загрузки наблюдается нестабильная работа, не открываются программы, зависают и не работают компоненты системы, то в этом случае необходимо откатиться к предыдущей сохраненной точке. Запустим консоль от имени Администратора. Для этого перейдем в меню «Пуск» и в поиске наберем «CMD». Затем кликнем по найденному результату правой кнопкой мыши и выберем в контекстном меню пункт «Запуск от имени администратора».

После проделанных действий консоль запустится в режиме Администратора. В запущенном окне консоли введите команду rstrui.exe
После выполнения команды откроется мастер восстановления системы. Нажмем в появившемся окне кнопку Далее >, чтобы перейти к выбору точек восстановления.

Выберем подходящую точку восстановления, при которой Windows 7 нормально функционировала и продолжим.

В открывшемся окне нажмем кнопку Готово и подтвердим сообщение. Подтвердив сообщение, мы запустим откат системы к выбранной точке восстановления. Если восстановление пройдет успешно, то вы увидите соответствующее сообщение.
Как видите, запустить восстановление через консоль совсем несложно.
Восстановление через консоль в безопасном режиме
Описываемый далее способ восстановления необходим, если Windows 7 не удается запустить обычным способом. Чтобы перейти в меню альтернативной загрузки Windows, при старте системы нажмите клавишу F8 (могут быть иные варианты, например, Del или другие). В этом меню необходимо выбрать пункт, показанный на изображении ниже.
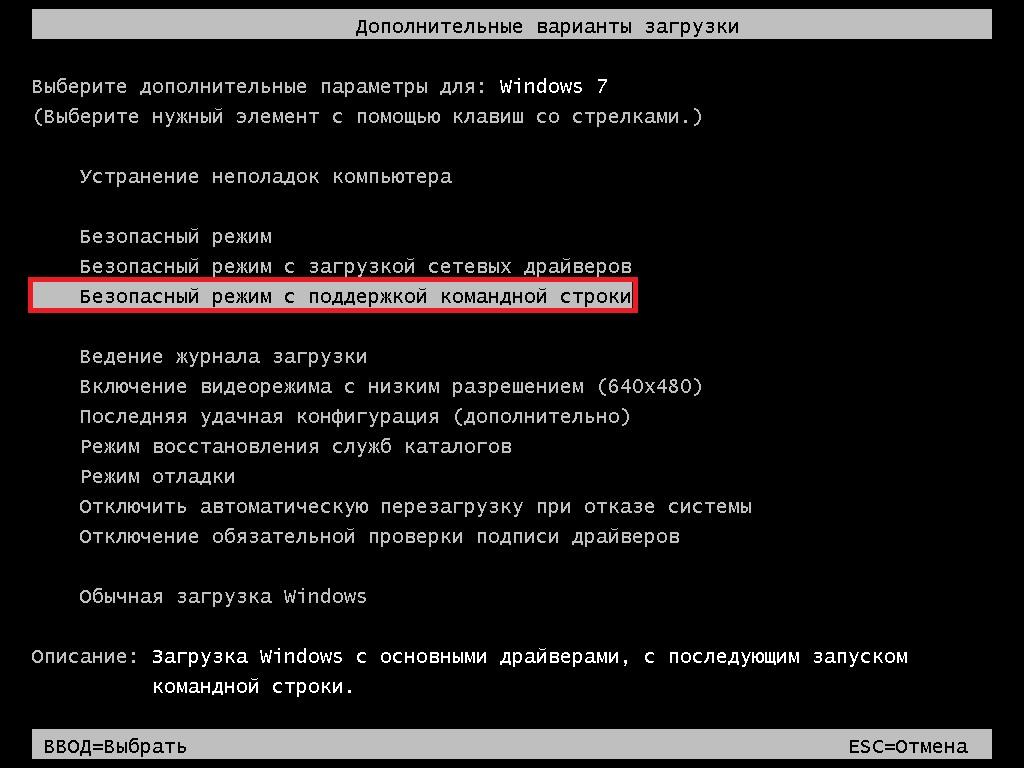
Выбрав этот пункт, операционная система загрузится без графического интерфейса, а единственным средством, через которое можно управлять системой, будет консоль. В окне консоли введем уже знакомую нам команду rstrui.exe
Выполнив эту команду, мы откроем мастер восстановления системы. Выберем подходящую точку доступа в мастере.

И нажмем кнопку Далее >. После чего запустим восстановление системы.
Из примера видно, что он идентичен с предыдущим. Единственным отличием является запуск Windows в безопасном режиме с поддержкой консоли. Обычно этот способ срабатывает практически всегда, даже если система сильно повреждена вирусами, так как при запуске ОС загружает только основные драйверы, и нет доступа к Интернету.
Запуск восстановления системы в консоли при помощи установочного диска Windows 7
Если второй способ не поможет восстановить систему, то единственным вариантом запустить восстановление с помощью консоли является установочный диск или загрузочная флешка. Включим наш ПК и загрузимся с установочного диска Windows 7.
Теперь перейдем непосредственно к самой консоли. Для этого нажмем гиперссылку «Восстановление системы», что запустит поиск установленных систем.

Выберем необходимую нам операционную систему и перейдем к следующему окну.

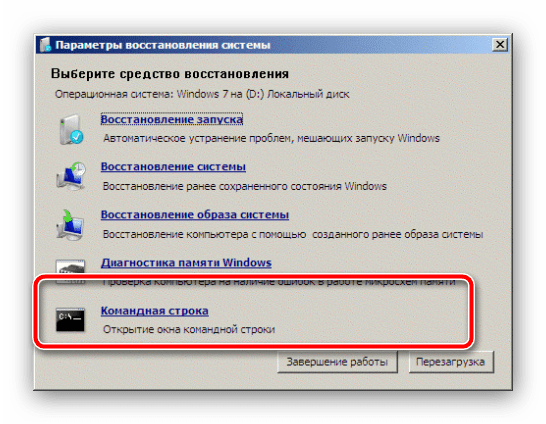
В этом окне выберем пункт «Командная строка», после чего она обязательно должна запуститься.

В консоли наберем уже знакомую нам команду rstrui.exe После выполнения этой команды запустится мастер восстановления. Работа мастера идентична вышеописанным примерам. Поэтому мы пропустим дальнейшее описание работы мастера восстановления.
Восстановление загрузочной записи Windows с помощью консоли
Используя ПК с операционной системой Windows 7, пользователи часто встречаются с проблемой его загрузки и получают при старте ОС сообщения такого типа.

Или такое.

Главным виновником данной проблемы является поврежденная загрузочная запись MBR или нарушенная конфигурация загрузки BCD. Решить эту проблему можно с помощью утилиты Bootrec.exe. С помощью команд «/FixMbr» и «/FixBoot» утилита может создавать новую загрузочную запись и исправлять ее.
Чтобы воспользоваться этими командами, нам необходимо загрузиться с установочного диска и запустить командную строку, как в предыдущем примере. Воспользуемся первой командой «/FixMbr» утилиты Bootrec.exe.
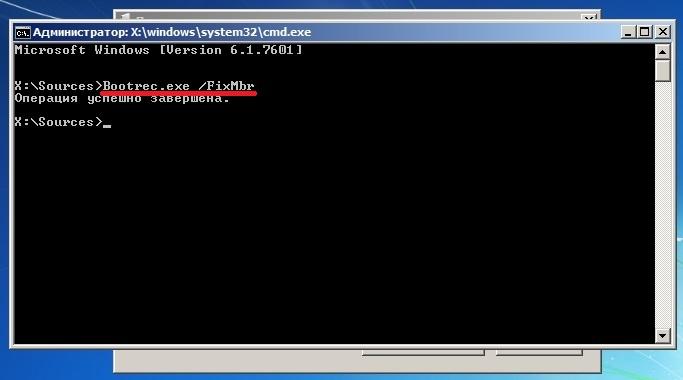
Выполнив эту команду, мы исправили нашу загрузочную запись MBR. Если эта команда не поможет, то воспользуемся второй командой «/FixBoot» утилиты Bootrec.exe.
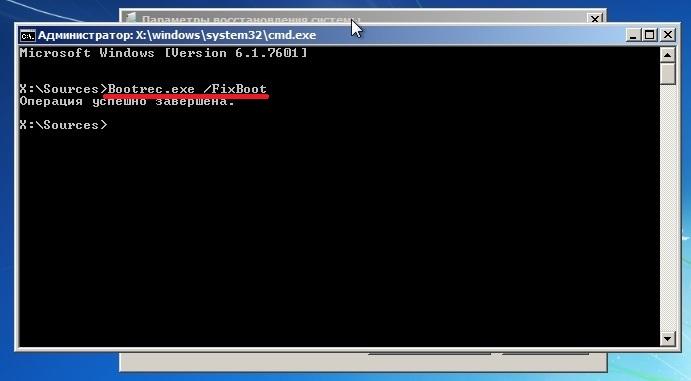
Выполнив эту команду, мы создадим новую загрузочную запись, которая позволит запустить Windows 7.
Из примера видно, что используя Bootrec.exe в большинстве случаев, вы сможете восстановить или исправить загрузочную запись в Windows 7. Также хочется отметить, что главными причинами, которые повреждают или затирают загрузочную запись, являются:
- Изменение размера локального диска с операционной системой с помощью специального ПО;
- Установка старых ОС Windows поверх новых. Например, установка Windows XP на том же ПК с установленной семеркой;
- Запись стороннего загрузочного сектора, который не поддерживает Windows. Например, linux загрузчик GRUB;
- Различные вирусы и вредоносное программное обеспечение.
Обращая внимание на причины, которые повреждают или затирают загрузочную запись, вы сможете сохранить рабочее состояние своего ПК.
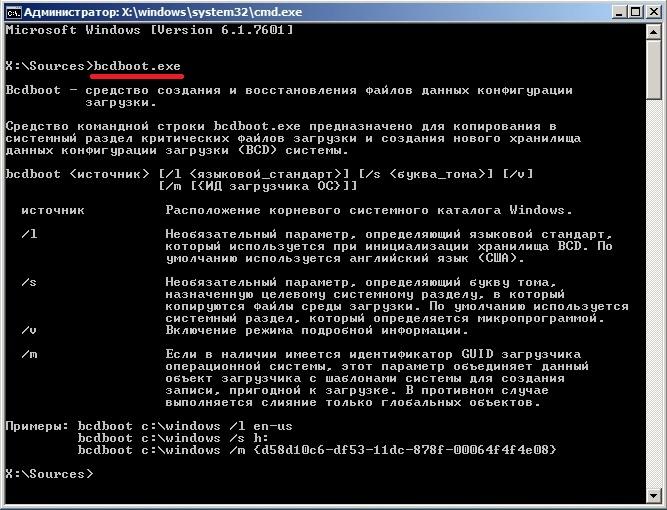
Утилита BCDboot
В составе установочного диска Windows 7 есть еще одна замечательная утилита, с помощью которой можно восстановить ОС. Загрузимся также с установочного диска в командную строку. После чего введем команду, изображенную ниже.
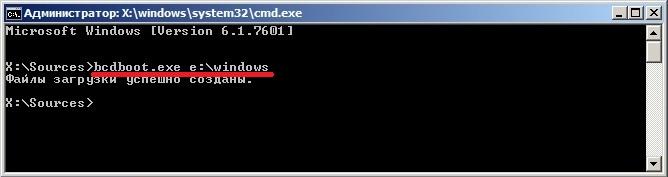
В нашем случае Windows установлена на диске «E:», поэтому мы указали путь в команде «E:windows». Выполнив эту команду, мы восстановим файлы конфигурации BCD, а также файл загрузчика bootmgr.
Введя команду bcdboot.exe в консоли, вы сможете увидеть описание утилиты, а также список дополнительных ключей, которые можно использовать при ее запуске.
Консольная утилита MBRFix
Эта консольная утилита идет в комплекте с мультизагрузочным диском Hiren’s Boot CD.
Hiren’s Boot CD это диск с десятками программ, которые помогают многим компьютерщикам и системным администраторам. Главной задачей MBRFix является восстановление загрузчика Windows. Образ диска Hiren’s Boot CD можно загрузить на официальном сайте www.hirensbootcd.org. Загрузившись с Hiren’s Boot CD, мы попадем в его меню загрузки.
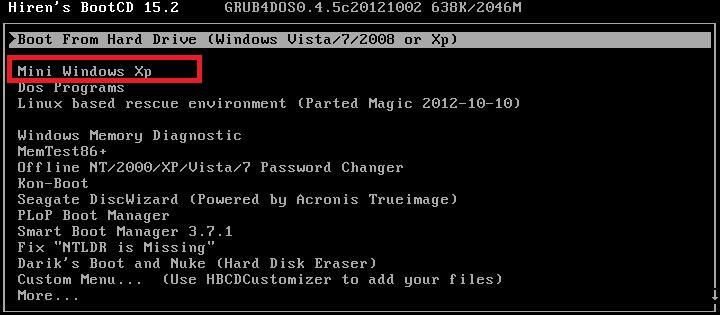
В этом меню необходимо выбрать пункт «Mini Windows XP» и нажать Enter. Выполнив это действие, мы загрузим портативную версию Windows XP с необходимыми утилитами для диагностики и ремонта системы, включая нашу утилиту MBRFix. Теперь перейдем в «HBCD Menu» c ярлыка на Рабочем столе. Затем в меню «Programs» перейдем к пунктам «Partition/Boot/MBR/Commandline/MBRFix».

Это позволит нам открыть консольную утилиту MBRFix. В окне консоли вводим команду MBRFix.exe /drive 0 fixmbr /win7 /yes
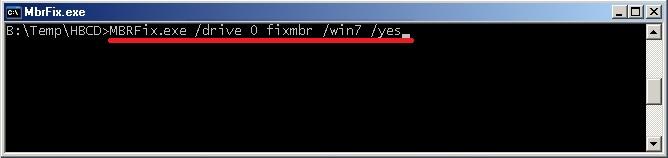
Эта команда восстановит загрузочную запись и загрузчик, что позволит запустить Windows 7.
Использовать диск Hiren’s Boot CD с утилитой MBRFix особенно удобно, если нет оригинального диска с семеркой.
Подводим итог
В этом материале мы постарались рассмотреть все способы восстановления Windows 7 с помощью командной строки. Поэтому ознакомившись с этой статьей, вы сможете без труда восстановить работоспособность компьютера под управлением Windows 7.
Также хочется отметить, что если системные файлы ОС сильно поврежденные или стерты, то восстановить систему или ее загрузчик не удастся. Поэтому если у вас именно этот случай, то сделайте бекап всей важной информации на винчестере и переустановите Windows.
Надеемся, что наш материал поможет вам восстановить систему или ее загрузочную запись, а также позволит вам в будущем избегать подобных проблем или быстро их решать.
Видео по теме
![]()
Download Article
![]()
Download Article
When you come across a problem on your computer and you cannot seem to fix the issue, using System Restore is probably your best bet. The System Restore function on Windows 7 allows you to roll back your computer to a previous time before the problem or issue occurred. There are a number of reasons why you might want to use System Restore, including if you’ve had problems installing a new operating system, driver, or piece of software.
-

1
Understand what System Restore does. Whenever a change is made to your computer, Windows will create a System Restore point. The is essentially a snapshot of your computer before the change was made (program installation or uninstallation, driver update, etc.). If something goes wrong because of the change you made, you can use the System Restore point to roll your system back without losing your files.
- System Restore can’t help you recover lost text documents, but it could be helpful if a driver or software update isn’t working on your computer.
- While a system restore shouldn’t affect your personal files, it never hurts to have a recent backup in case something goes wrong. Click here for tips on quickly backing up your important files.
- If your computer will not boot into Windows, see the troubleshooting section.
-
2
Create a password reset disk (optional). This is recommended if you recently changed your Windows password, as the restore process may revert your password change. Click here for instructions on creating a password reset disk.
Advertisement
-
3
Click the Start menu and type «system restore». Select «System Restore» from the list of search results.
-
4
Select the restore point you want to use. Windows will suggest a restore point, which will usually be the most recent one. If you need to select an older restore point, click Next >.
- Check the «Show more restore points» box to see all the available restore points. There may not be many to choose from, as Windows automatically deletes older restore points to save space.
- Each restore point will have a short description of what occurred to cause the restore point to be created.
-
5
Click the .Scan for affected programs button after selecting a restore point. This will show you all of the programs and drivers that will be uninstalled or reinstalled by performing the restore with that restore point.
- Any programs installed after the restore point was created will be uninstalled, while any programs uninstalled after the restore point was created will be reinstalled.
-
6
Review the restore point before restoring. Before proceeding with the system restore, review the changes one last time. Click Finish to begin the restore process.
-
7
Wait for the restore process to complete. After confirming that you want to restore, the computer will reboot and the restore process will begin. This will likely take a few minutes.
-
8
Confirm that the restore was successful. Once the restore is complete, Windows will boot and a message will appear indicating that the restore was successful. Test your computer to see if the restore fixed your problem. If it didn’t you can try restoring to an earlier restore point.[1]
- If the System Restore made things worse, or you want to go back to how your computer was, you can undo the most recent restore by launching the System Restore tool again and selecting «Undo System Restore».


Advertisement
Troubleshooting
-
1
Ensure that System Restore is enabled. In order to use System Restore, it must be enabled for your computer. If System Restore isn’t starting, check to make sure that it’s turned on.
- Click the Start menu, right-click on Computer, and select «Properties».
- Click the «System protection» link, and then select the drive you are trying to run System Restore on.
- Click Configure… and then ensure that «Turn on system protection» is enabled.
-
2
Run System Restore from the Command Prompt if Windows won’t boot. You can run the System Restore tool from the Command Prompt if something has gone wrong and you can’t start Windows normally.
- Reboot your computer and hold the F8 key. This will open the Advanced Boot Options menu.
- Select «Safe Mode with Command Prompt» from the Advanced Boot Options menu. Windows will load essential files and then take you to the Command Prompt.
- Type rstrui.exe and press Enter. This will start the System Restore utility. Follow the instructions in the section above to restore your computer. When performing a system restore from Safe Mode, you won’t be able to undo it.
-
3
Run the Check Disk utility to check for problems with the hard drive. A failing hard drive could be causing System Restore to malfunction. Check Disk can potentially repair these issues.
- Click Start, right-click on Command Prompt, and select «Run as administrator».
- Type chkdisk /r and press Enter.
- Confirm that you want to reboot your computer. Check Disk will run before Windows starts and scan for errors. It will attempt to fix any errors that it finds.
-
4
Perform virus and malware scans. Viruses may infect your restore points, or disable System Restore from starting. Removing these viruses will be the only way to get System Restore working again, short of reinstalling Windows completely.
- Click here for detailed instructions on removing viruses.
-
5
Consider reinstalling Windows if the System Restore doesn’t work. If all else fails, reinstalling Windows may be the only way to fix your problems. If you have your important files backed up already, the reinstallation process will likely go faster than you think, and will typically improve your computer’s performance.
- Click here for detail instructions on reinstalling Windows 7.


Advertisement
-
1
Click the Start menu, right-click «Computer», and then click «Properties». You can manually create System Restore points, which is very useful if you have your system working well and want to have a reference point you can revert back to in case things go wrong.
-
2
Click the «System protection» link in the left frame. This will open the System Properties window to the System Protection tab.
-
3
Click the .Create… button. You’ll be asked to enter in a brief description to help you identify it later.
-
4
Wait for the restore point to be created. This will likely take a few minutes.
- Restore points vary in size, but by default Windows reserves 5% of the hard drive or restore points. Older restore points are deleted automatically to make room for new ones.
-
5
Delete old restore points manually. If you’re looking to free up some disk space, or are worried that your system restore points are corrupted, you can delete all of your system restore points.
- Open the System Protection of the «System Properties» window (see Step 1 of this section).
- Click Configure… and then click Delete to delete all of the system restore points. Note that any space you free up will be used up again when new system restore points are created.


Advertisement
Troubleshooting
-
1
Disable your antivirus if you aren’t able to create restore points. Antivirus software may be conflicting with the restore point creation process. If you aren’t able to create restore points, disabling your antivirus is the easiest fix to try first.[2]
- You can usually disable your antivirus by right-clicking on the icon in your System Tray and selecting «Disable» or «Stop».
-
2
Try creating a restore point in Safe Mode. Something in Windows may be causing your problem, and you may be able to get around it by creating the restore point in Safe Mode.
- To access Safe Mode, reboot your computer and hold F8. Select «Safe Mode» from the Advanced Boot Options menu.
- Follow the steps above to attempt creating a restore point in Safe Mode.
-
3
Make sure you have enough disk space to create restore points. If you don’t have enough free space on your computer, you won’t be able to create restore points. Windows will not create restore points on hard drives smaller than 1 GB.
- Click Start and select «Computer».
- Right-click the disk that Windows is installed on (usually C:) and select Properties.
- Ensure that you have at least 300 MB of free space on the disk. Ideally you’ll want at least 2-3 GB free.
-
4
Try resetting your Windows Repository. This may help fix problems with creating system restore points.
- Reboot your computer and hold F8. Select «Safe Mode» from the Advanced Boot Options menu.
- Click the Start menu, right-click on Command Prompt, and select «Run as administrator».
- Type net stop winmgmt and press Enter.
- Click Start and select «Computer». Navigate to C:WindowsSystem32wbem and rename repository to repositoryold.
- Reboot your computer to enter Windows normally. Click the Start menu, right-click on Command Prompt, and select «Run as administrator».
- Type net stop winmgmt and press Enter. Then type winmgmt /resetRepository and press Enter.
- Reboot your computer one last time and then try to create a restore point.


Advertisement
Add New Question
-
Question
When turning on the computer, what number key do I need to press to get restore option?

WikiHowUser20180704181044
Community Answer
On a lot of computers, f2 is bios options, f10 is boot priority and f8 is boot type options.
-
Question
What do I do if Windows does not start?
tageneislover
Community Answer
If Windows opens normally and stops in the middle, then remove your hard drive or any unnecessary additional devices. If it doesn’t start up at all but the PC works, then you should probably try installing Windows again. If your PC doesn’t start up at all, but still lights up, then the problem could be your GPU, RAM, PSU or even your motherboard. If you’re trying to open it but it doesn’t do anything, then check if your computer is connected properly. After that, check if your PSU is dead or not.
-
Question
What do I do if the keyboard and touchpad don’t work when starting Windows?
You are either missing a driver or they are not plugged in properly to your computer. You should first try to restart your computer, and if this does not work, try searching for your keyboard and touchpad’s drivers on the manufacturer’s website.
Ask a Question
200 characters left
Include your email address to get a message when this question is answered.
Submit
Advertisement
Video
Thanks for submitting a tip for review!
-
Make sure to save all your open files and close all programs. The System Restore process cannot be interrupted.
Advertisement
About This Article
Thanks to all authors for creating a page that has been read 443,407 times.
Is this article up to date?
Содержание
- Этапы восстановления Windows 7 через «Командную строку»
- Способ 1: Восстановление работоспособности диска
- Способ 2: Восстановление загрузочной записи
- Способ 3: Исправление повреждённых системных файлов
- Способ 4: Исправление проблем с системным реестром
- Заключение
- Вопросы и ответы

Многие современные пользователи недооценивают «Командную строку» Windows, считая её ненужным пережитком прошлого. На самом деле она представляет собой мощный инструмент, с помощью которого можно добиться большего, чем с помощью графического интерфейса. Одна из основных задач, решить которую поможет «Командная строка» — восстановление работоспособности операционной системы. Сегодня мы хотим познакомить вас с методами восстановления Windows 7 с использованием этого компонента.
Причин, по которым «семёрка» может перестать запускаться, существует множество, но «Командную строку» следует задействовать в таких случаях:
- Восстановление работоспособности жесткого диска;
- Повреждение загрузочной записи (MBR);
- Нарушение целостности системных файлов;
- Сбои в системном реестре.
В остальных ситуациях (например, неполадками из-за вирусной активности) лучше воспользоваться более специализированным средством.
Разберём все случаи, от самого тяжелого до самого простого.
Способ 1: Восстановление работоспособности диска
Один из самых трудных вариантов ошибки запуска не только Windows 7, но и любой другой ОС – проблемы с жестким диском. Само собой, оптимальным решением будет немедленно заменить сбойный HDD, но свободный накопитель есть под рукой далеко не всегда. Частично восстановить винчестер можно с помощью «Командной строки», однако если система не запускается – придётся воспользоваться установочным DVD или флешкой. Дальнейшая инструкция предполагает, что таковые есть в распоряжении пользователя, но на всякий случай предоставляем ссылку на руководство по созданию установочного накопителя.
Подробнее: Инструкция по созданию загрузочной флешки на Windows
- Перед началом процедуры нужно соответствующим образом подготовить BIOS компьютера. Этим действиям посвящена отдельная статья на нашем сайте – приводим её, чтобы не повторяться.
- Подключите флешку к компьютеру или вставьте диск в дисковод, после чего перезагрузите устройство. Нажмите любую клавишу для начала загрузки файлов.
- Выберите предпочитаемые языковые настройки и жмите «Далее».
- На данном этапе кликните по пункту «Восстановление запуска».

Здесь несколько слов об особенностях распознавания жестких дисков средой восстановления. Дело в том, что среда иначе определяет логические разделы и физические тома HDD — диском C: в ней обозначен зарезервированный системный раздел, а непосредственно раздел с операционной системой по умолчанию будет D:. Для более точного определения нам и необходимо выбрать «Восстановление запуска», так как в нём обозначена буква нужного раздела. - После того, как вы узнали искомые данные, отменяйте средство восстановления запуска и возвращайтесь к главному окну среды, в которой на этот раз выберите опцию «Командная строка».
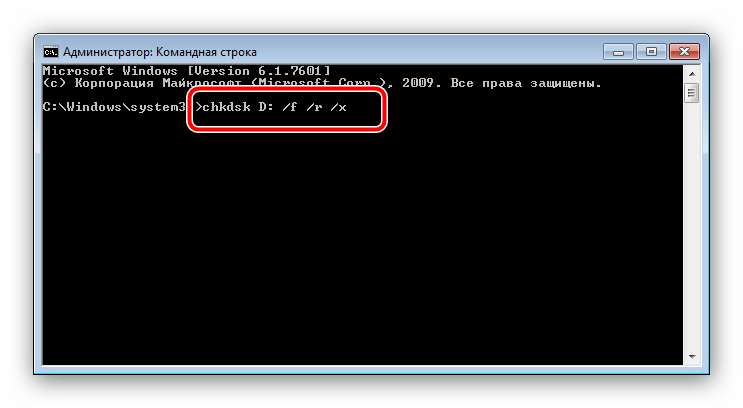
- Далее введите в окошко следующую команду (может понадобится переключить язык на английский, по умолчанию это делается комбинацией клавиш Alt + Shift) и нажмите Enter:
chkdsk D: /f /r /xОбратите внимание – если система установлена на диск D:, то в команде следует прописать
chkdsk E:, если на E: — то chkdsk F:, и так далее. Флаг/fозначает запуск поиска ошибок, флаг/r– поиск повреждённых секторов, а/x– размонтирование раздела для облегчения работы утилиты. - Теперь компьютер нужно оставить в покое – дальнейшая работа происходит без участия пользователя. На некоторых этапах может показаться, что выполнение команды зависло, однако на самом деле утилита наткнулась на трудночитаемый сектор и пытается исправить его ошибки или пометить как сбойный. Вследствие подобных особенностей процедура иногда занимает продолжительное время, вплоть до суток и более.
Подробнее: Как выставить загрузку с флешки в БИОСе


Таким образом диск, конечно же, не получится вернуть в заводское состояние, но эти действия позволят загрузить систему и сделать резервные копии важных данных, после чего уже можно будет приступить к полноценному лечению винчестера.
Читайте также: Восстановление жесткого диска

Способ 2: Восстановление загрузочной записи
Загрузочная запись, иначе называемая MBR, представляет собой небольшой раздел на жестком диске, на котором присутствует таблица разделов и утилита для управления загрузкой системы. В большинстве случаев MBR повреждается при неполадках HDD, но эту проблему также могут вызывать некоторые опасные вирусы.
Восстановление загрузочного раздела возможно исключительно через установочный диск или флешку, отчего не слишком отличается от приведения HDD в работоспособный вид. Впрочем, имеется несколько важных нюансов, поэтому мы рекомендуем вам обратится к подробным руководствам далее.
Подробнее:
Восстановление загрузочной записи MBR в Windows 7
Восстановление загрузчика в Windows 7
Способ 3: Исправление повреждённых системных файлов
Подавляющее большинство ситуаций, когда требуется восстановление системы, связаны с неполадками в системных файлах Виндовс. Причин сбоев существует масса: активность зловредного ПО, неаккуратные действия пользователя, некоторые сторонние программы и так далее. Но независимо от источника возникновения проблемы, решение будет одинаковое – утилита SFC, с которой проще всего взаимодействовать посредством «Командной строки». Ниже мы предоставляем вам ссылки на детальные инструкции по проверке системных файлов на целостность, а также восстановлению в почти любых условиях.
Подробнее:
Проверяем целостность системных файлов в Windows 7
Восстановление системных файлов в Windows 7
Способ 4: Исправление проблем с системным реестром
Последний вариант, при котором желательно задействовать «Командную строку» — наличие критических повреждений в реестре. Как правило, при подобных неполадках Виндовс запускается, но с работоспособностью возникают большие проблемы. К счастью, системные компоненты вроде «Командной строки» ошибкам не подвергаются, потому через неё можно привести установленную Windows 7 в рабочий вид. Этот способ подробно рассмотрен нашими авторами, поэтому обращайтесь к следующему руководству.

Подробнее: Восстановление системного реестра Windows 7
Заключение
Мы разобрали основные варианты сбоев в Виндовс седьмой версии, которые можно исправить использованием «Командной строки». Напоследок отметим, что существуют ещё частные случаи вроде неполадок с DLL-файлами или особо неприятными вирусами, однако создать подходящую для всех пользователей инструкцию не представляется возможным.
How to Perform a System Restore from Command Prompt Windows 7
- Press the Power button to turn on your PC.
- Select the Safe Mode with Command Prompt by pressing the arrow keys.
- In the command prompt, type cd restore command ad hit Enter.
- Then type rstrui.exe command and hit Enter.
- Now, a System Restore window pops up.
Contents
- 1 How do I run System Restore from command prompt?
- 2 How do I restore my Windows 7 operating system?
- 3 How do I restore my computer to factory settings windows 7 without CD?
- 4 How do I reinstall Windows 7 without a disk?
- 5 How do I repair Windows 7 without a disk?
- 6 Why can’t I factory reset my PC Windows 7?
- 7 How do you restore a computer to its factory settings?
- 8 What does Rstrui EXE do?
- 9 How do I reinstall Windows 7 from Windows 7?
- 10 How do I reinstall Windows 7 with recovery disk?
- 11 How do I run System Restore from BIOS?
- 12 How do I find my Windows 7 product key using command prompt?
- 13 How do I reinstall Windows with the same product key?
- 14 Can I install Windows 7 without CD or USB?
- 15 How do I restore my Windows laptop to factory settings?
- 16 How do I install Windows 7 from command prompt?
- 17 How do I reinstall Windows 7 without a product key?
- 18 How do I reinstall Windows operating system?
How do I run System Restore from command prompt?
What to Know
- Open Command Prompt.
- Type this command in the Command Prompt window: rstrui.exe.
- Press Enter to open the System Restore wizard. Follow the instructions on the screen to complete the System Restore.
How do I restore my Windows 7 operating system?
Follow these steps:
- Restart your computer.
- Press F8 before the Windows 7 logo appears.
- At the Advanced Boot Options menu, select the Repair your computer option.
- Press Enter.
- System Recovery Options should now be available.
How do I restore my computer to factory settings windows 7 without CD?
Method 1: Reset your computer from your recovery partition
- 2) Right-click Computer, then select Manage.
- 3) Click Storage, then Disk Management.
- 3) On your keyboard, press the Windows logo key and type recovery.
- 4) Click Advanced recovery methods.
- 5) Select Reinstall Windows.
- 6) Click Yes.
- 7) Click Back up now.
How do I reinstall Windows 7 without a disk?
If you don’t have a Windows 7 installation disc, however, you can simply create a Windows 7 installation DVD or USB that you can boot your computer from use to reinstall Windows 7. Create a bootable Windows 7 installation medium.
How do I repair Windows 7 without a disk?
How can I repair Windows 7 Professional without a disc?
- Try Repairing The Windows 7 Installation.
- 1a.
- 1b.
- Choose your language and click Next.
- Click Repair Your Computer and then select the operating system you want to repair.
- Click on the Startup Repair link from list of recovery tools in System Recovery Options.
Why can’t I factory reset my PC Windows 7?
The recovery partition has been damaged, and also wouldn’t go into the factory reset. If the factory restore partition is no longer on your hard drive, and you do not have HP recovery disks, you can NOT do a factory restore. The best thing to do is to do a clean install. It is called “custom” in the install process.
How do you restore a computer to its factory settings?
Navigate to Settings > Update & Security > Recovery. You should see a title that says “Reset this PC.” Click Get Started. You can either select Keep My Files or Remove Everything. The former resets your options to default and removes uninstalled apps, like browsers, but keeps your data intact.
What does Rstrui EXE do?
The file “rstrui.exe” is a part of Microsoft Windows; it is a command-line utility for running System Restore. That is, rstrui.exe does not pose a threat to the computer, but on the contrary, allows users to return the state of their computer to a previous point in time.
How do I reinstall Windows 7 from Windows 7?
Make sure your new Windows installation disc or USB drive is inserted into your PC, then restart your system. While your PC is booting, you’ll get a prompt to hit any key to boot from the disk or flash drive. Do so. Once you’re in the Windows 7 setup program, click Install.
How do I reinstall Windows 7 with recovery disk?
To use the system repair disc
- Insert the system repair disc into your CD or DVD drive.
- Restart your computer using the computer’s power button.
- If prompted, press any key to start the computer from the system repair disc.
- Choose your language settings, and then click Next.
- Select a recovery option, and then click Next.
How do I run System Restore from BIOS?
To perform system recovery from the BIOS:
- Enter the BIOS.
- On the Advanced tab, use the arrow keys to select Special Configuration, and then press Enter.
- Select Factory Recovery, and then press Enter.
- Select Enabled, and then press Enter.
How do I find my Windows 7 product key using command prompt?
Launch command prompt by searching CMD from the Windows search bar. Do right-click on the shown CMD and click on “Run as administrator“. Make sure you are using the Admin A/C. Then type “wmic path softwarelicensingservice get OA3xOriginalProductKey” following command then press enter to retrieve license key.
How do I reinstall Windows with the same product key?
Anytime you need to reinstall Windows 10 on that machine, just proceed to reinstall Windows 10. It will automatically reactivate. So, there is no need to know or get a product key, if you need to reinstall Windows 10, you can use your Windows 7 or Windows 8 product key or use the reset function in Windows 10.
Can I install Windows 7 without CD or USB?
So is it possible to reinstall Windows 7 without CD? Well, the answer is Yes. The bootable USB can help you make it.
How do I restore my Windows laptop to factory settings?
How to factory reset on Windows 10
- Select Settings from the Start Menu.
- Select Updates and Security from the Setting Menu.
- Select Recovery from the Updates and Security Menu.
- Click Get Started under Reset this PC.
- Chosen to remove everything or keep files.
How do I install Windows 7 from command prompt?
Here’s how:
- Step 1: Open a command prompt with administrator privileges by clicking on the Start button, then type cmd in the search box and press Ctrl+Shift+Enter.
- Step 2: At the command prompt, type diskpart to enter the diskpart utility.
- Step 3: At the DISKPART> prompt, type list disk.
How do I reinstall Windows 7 without a product key?
Simply open System Properties using Windows + Pause/Break key or right-clicking on Computer icon and then clicking Properties, scroll down, click Activate Windows to activate your Windows 7. In other words, you don’t need to enter the product key. Yes, you don’t need to type the product key!
How do I reinstall Windows operating system?
The simplest way to reinstall Windows 10 is through Windows itself. Click ‘Start > Settings > Update & security > Recovery’ and then choose ‘Get started’ under ‘Reset this PC’. A full reinstall wipes your entire drive, so select ‘Remove everything’ to ensure a clean reinstall is performed.
How to perform a System Restore using Command Prompt? (ransomware or virus is blocking Safe Mode)
The System Restore function restores operating system files to an earlier point in time. System Restore is useful when malicious software infiltrates a computer and damages the system files. Moreover, this function important when dealing with variants of ransomware infections that block computer screens. This tutorial describes the process of performing a System Restore using Command Prompt. In some cases, especially when dealing with ransomware infections, performing a System Restore is a complicated task, since modern fake antivirus programs and ransomware infections are capable of blocking an operating system’s Safe Mode and Safe Mode with networking. This leaves one solution: performing a System Restore using Command Prompt.
To perform a System Restore using Command Prompt:
1. Start your computer in Safe Mode with Command Prompt. During the computer start process, press F8 key on your keyboard multiple times until the Windows Advanced Options menu appears, then select Safe mode with Command Prompt from the list and press ENTER.

2. When Command Prompt Mode loads, enter the following line: cd restore and press ENTER.

3. Next, type this line: rstrui.exe and press ENTER.

4. In the opened window, click ‘Next’.
5. Select one of the available restore points and click ‘Next’ (this will restore your computer system to an earlier time and date).
6. In the opened window, click ‘Yes’.
7. If you are dealing with a ransomware infection, download and scan your PC with recommended malware removal software after restoring your computer to a previous date.
Note that in some cases, System Restore does not eliminate security infections — malicious programs can hide within restore points. After performing a System Restore, scan your computer with legitimate anti-spyware software.