Обновлено 21.10.2020

Добрый день! Уважаемые читатели и гости IT блога Pyatilistnik.org. В прошлый раз мы с вами успешно решили проблему, когда система не обнаружила VCRUNTIME140.dll, движемся дальше. Сегодня у меня на работе появилась задача, в массовом порядке для определенной группы людей настроить ассоциацию файлов через групповую политику, так чтобы она задала открытие файлов с расширением doc, docx, xls, xlsx с помощью браузера Google Chrome. Я вам расскажу с какими подводными камнями я столкнулся и, как я их смог обойти.
Постановка задачи
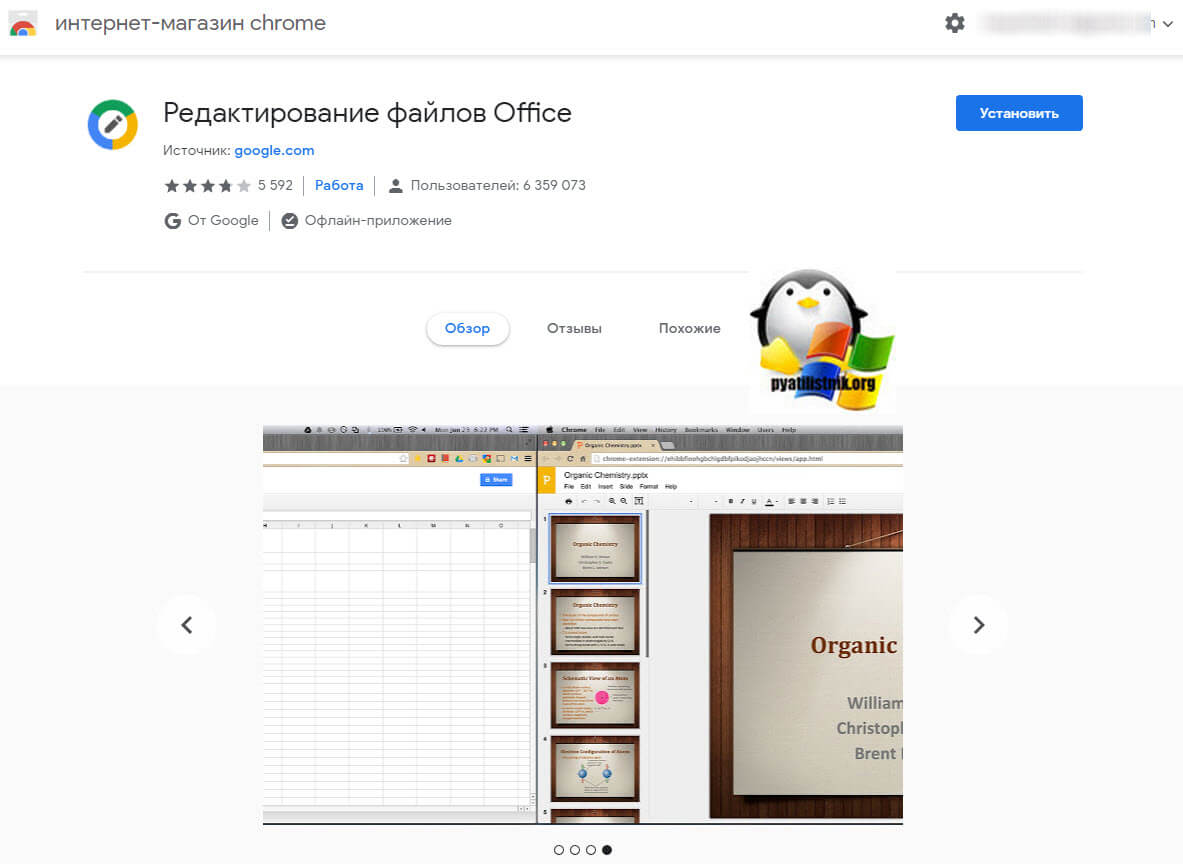
В виду перехода в облачные сервисы и переходу от локальных офисных продуктов Microsoft Office, необходимо настроить ассоциации файлов на рабочих станциях, так чтобы файлы Woed, Ecxel, Power Point и другие стали открываться в браузере Google Chrome, через специальное расширение «Редактирование файлов Office».
https://chrome.google.com/webstore/detail/office-editing-for-docs-s/gbkeegbaiigmenfmjfclcdgdpimamgkj
Редактирование файлов Office — это бесплатное расширение для Google Chrome в задачи которого входит оффлайн редактирование файлов из офисного набора Microsoft Office. Я уже заранее его распространил, через групповую политику. Так как у меня в организации свыше 1000 рабочих станций в домене Active Directory, то сами можете представить масштабы работы, которая ложится на плечи технической поддержки, и чтобы выполнить задачу максимально быстро и централизовано, было принято решение сделать политику GPO, что правильно в рамках домена. Хочу отметить, что в Windows 7, Windows 8,.1 и Windows 10 есть свои нюансы и своя конфигурация выполнения данной задачи.
Настройка ассоциации файлов в GPO для Windows 7
По статистике самой популярной операционной системой в мире является Windows 7, у меня в организации она занимает процентов 20-25 от общей массы. Я помнил как выглядела политика, поэтому решил начать именно с нее. Про ручную настройку ассоциаций файлов Windows я рассказывал и понимал какая, это монотонная работа, приятно что она решается буквально за минуту.
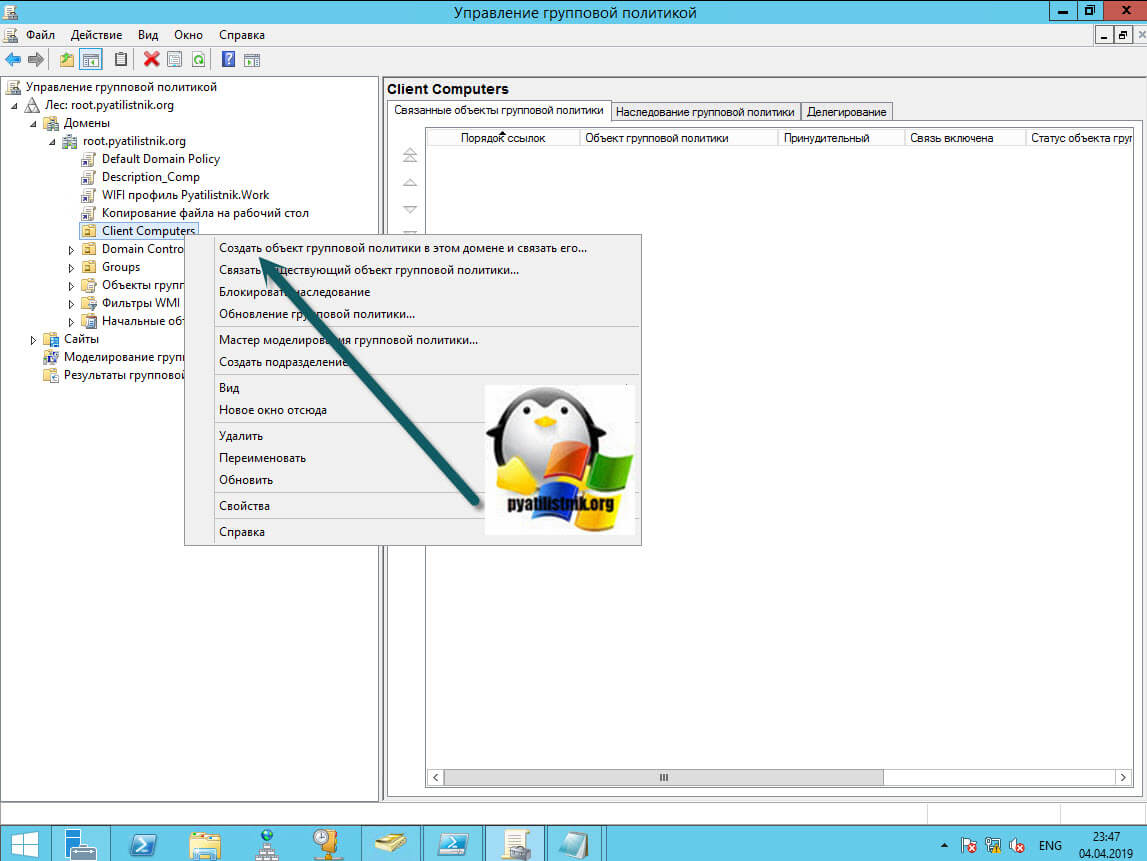
И так откройте оснастку «Управление групповой политикой» и создаете новую политику на нужном вам организационном подразделении. В моем случае, это OU «Client Computers». Щелкаем по ней правым кликом и выбираем «Создать объект групповой политики в этом домене и связать его с текущим подразделением»
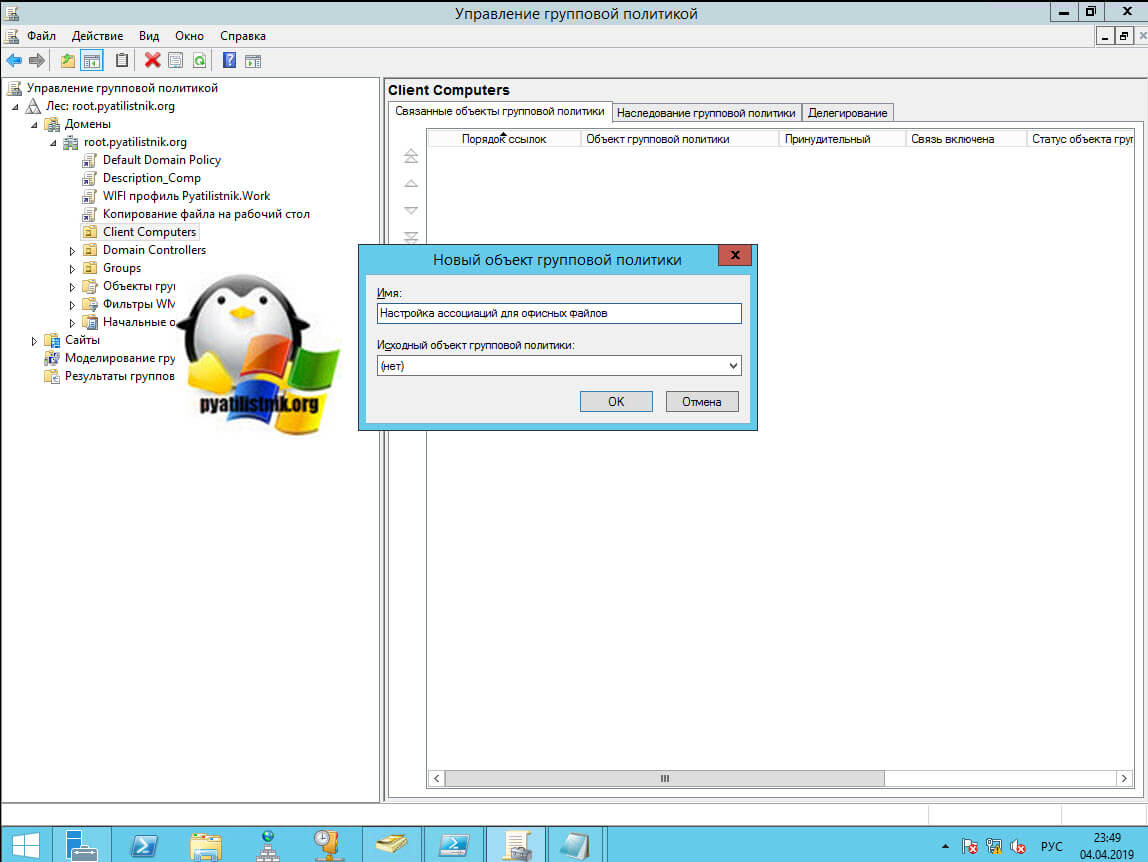
Задаем название для GPO объекта в соответствии с правилами именования присущими вашему домену. Я задам имя «Настройка ассоциаций для офисных файлов».
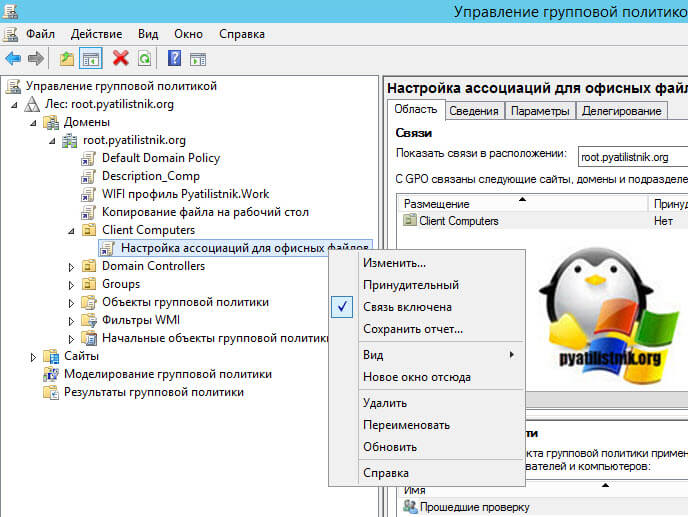
Через правый клик по политике приступаем к ее редактированию.
Тут все настройки ассоциаций применимы, как к компьютерам так и на пользователей, все зависит от вашей структуры Active Directory. Лично я хочу, чтобы у меня настройки GPO были реализованы для пользователя, но применялись, только на определенных компьютерах, где пользователи работаю и данные настройки не применялись, когда человек заходит на терминальный сервер или другой сервер. В таких ситуациях применяется замыкание групповой политики, об этом я писал, в двух словах данная функциональность либо объединяет настройки компьютера и пользователя, или же компьютерными настройками пере затирает настройки пользователя в виду большей приоритетности.
Для Windows 7 ваша политика будет выглядеть вот так, вы раскрываете раздел для пользователя и переходите по пути:
Конфигурация пользователя — Настройка — Параметры панели управления — Параметры папок (User Configuration -> Preferences -> Control Panel Settings -> Folder Options)
Далее кликаете по пункту «Параметры папок» и из контекстного меню пройдите в меню «Создать — Открыть с помощью»
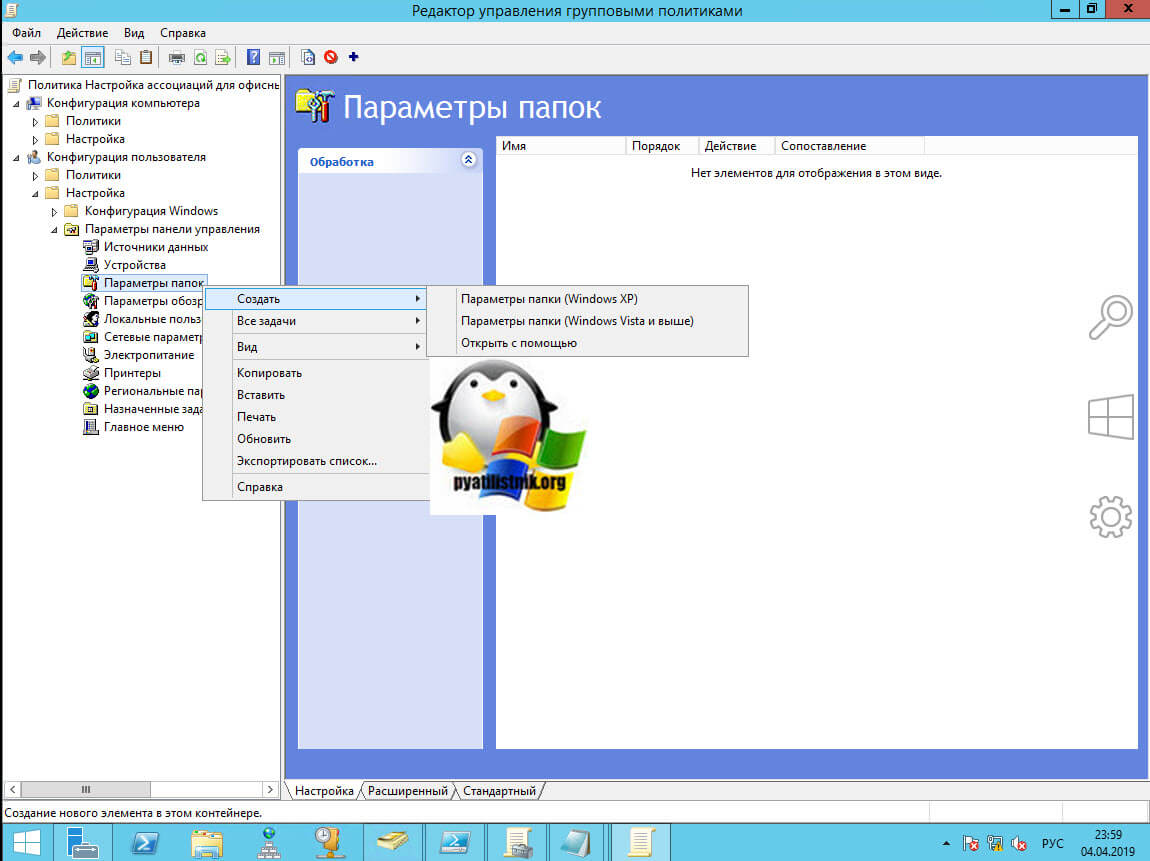
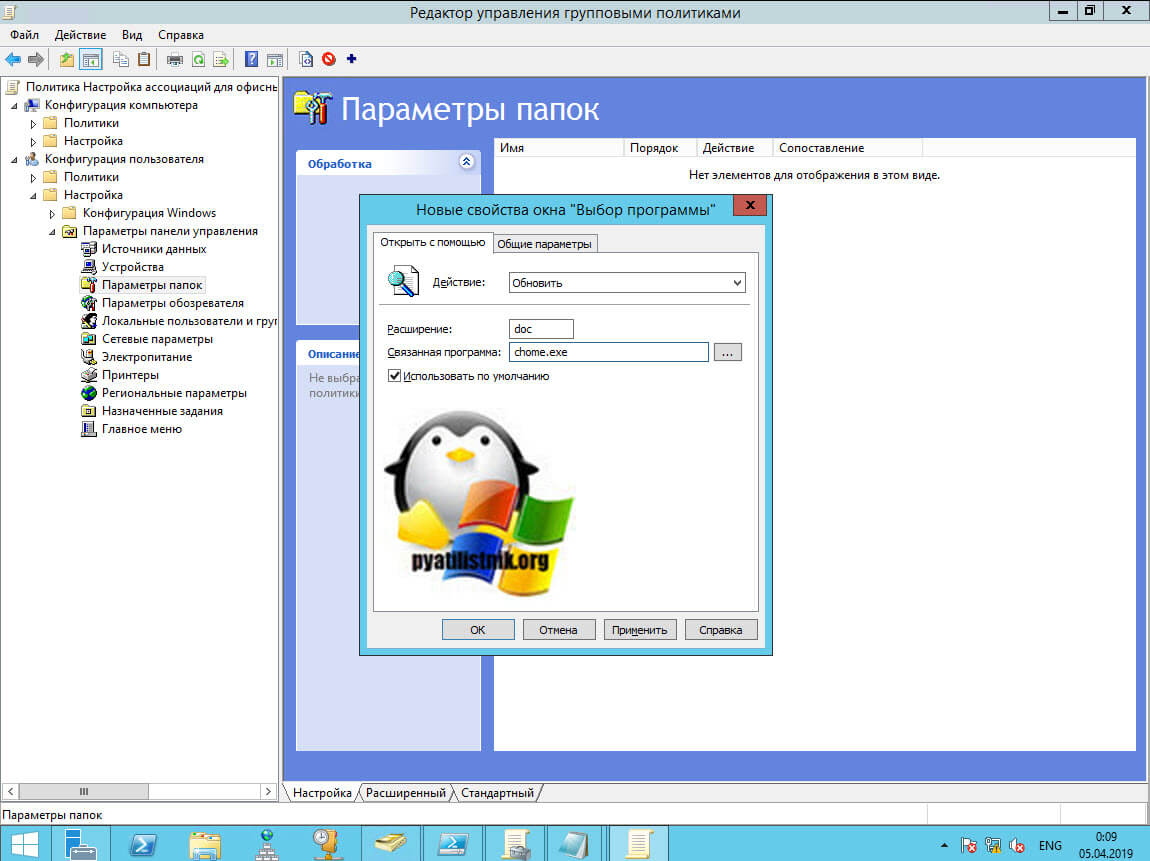
У вас откроется окно выбора программы. Произведите настройки:
- Пункт действие — Выставите «Обновить»
- Расширение — задайте нужное вам расширение, для которого вы хотите изменить программу по умолчанию в ассоциациях Windows
- Связанная программ — тут прописываем короткое имя программы или полный точный путь, у меня например, это chrome.exe или могло быть «C:Program Files (x86)GoogleChromeApplicationchrome.exe», без кавычек. Короткое имя и полный путь вы можете посмотреть в свойствах вашей программы, которую вы хотите использовать для определенного расширения файлов.
- Установите галку «Использовать по умолчанию»
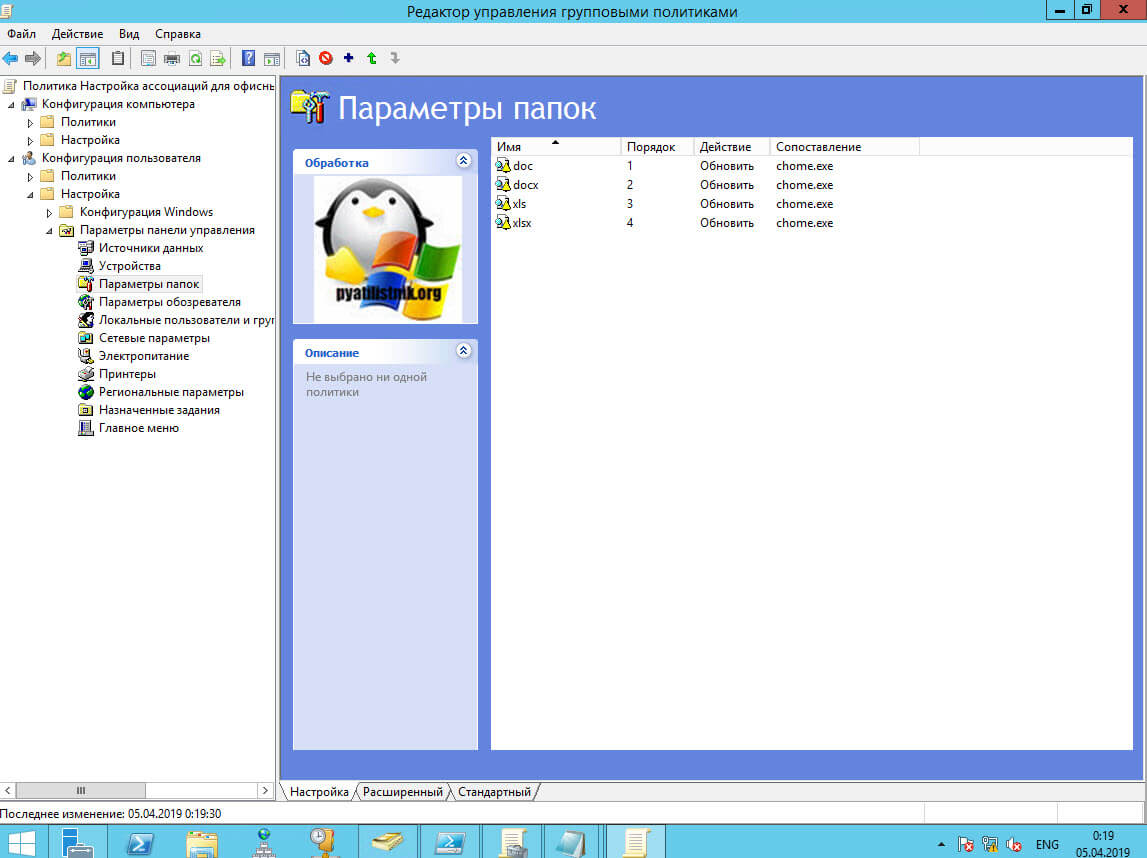
Сохраняем настройку и повторяем для других расширений, напоминаю в моем случае, это офисные форматы MS Word (doc, docx) и MS Excel (xls, xlsx).
В итоге у меня получилась такая картина. Если вы планируете применять политику с распространениями ассоциаций файлов через GPO на пользовательские учетные записи, то политика готова, если она предназначается на OU с компьютерами, то вам нужно еще включить политику замыкания.
Для этого раскройте уже раздел:
Конфигурация компьютера- Административные шаблоны — Система — Групповая политика (Computer ConfigurationAdministrative TemplateSystemGroup Policy)
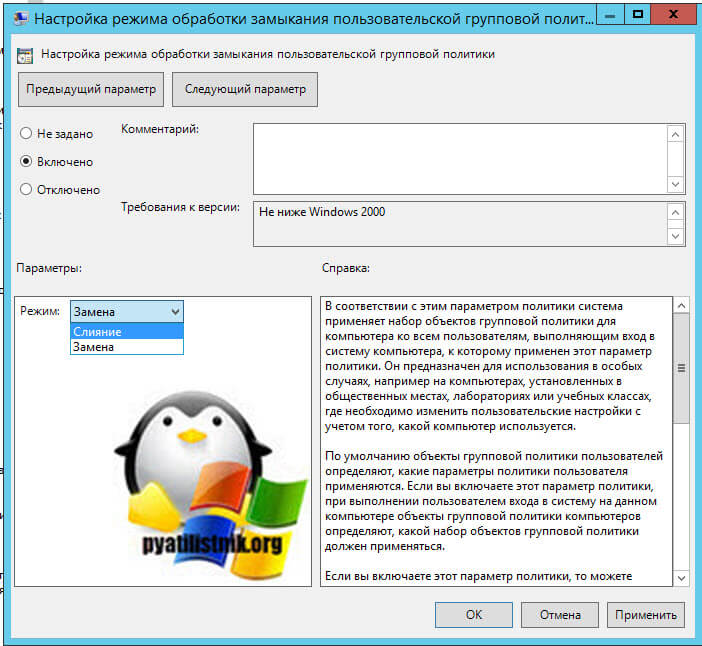
Находим тут параметр «Настройка режима обработки замыкания пользовательской групповой политики (Configure user Group Policy Loopback Processing mode)»

Переходим в политику. Вам нужно выбрать режим слияния в политике замыкания.Напоминаю:
- Режим слияния (Merge) — объединяет компьютерные настройки с пользовательскими. Политики компьютера добавляются в самом конце в список пользовательских, и если они не конфликтую, то они совмещаются. Если конфликтуют, то компьютерные настройки полностью перезаписывают конфликтные пункту в пользовательской части.
- Режим замены (Replace) — тут все проще, в данном режиме настройки пользователя полностью игнорируются и заменяются компьютерными.
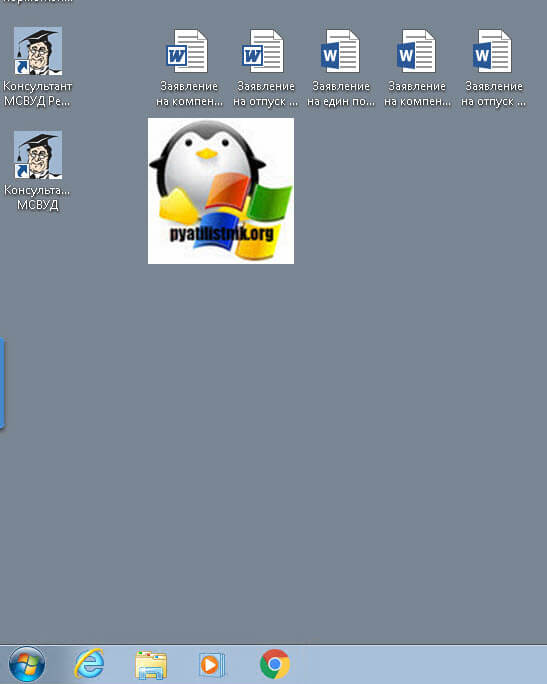
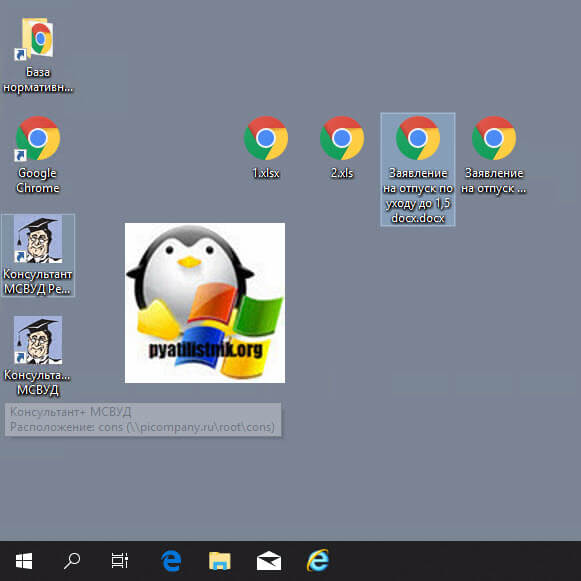
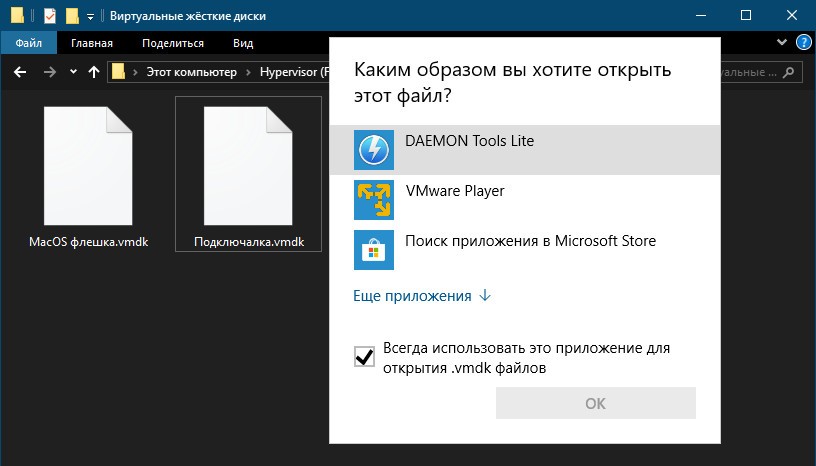
Все выбрав режим слияния мы закончили создание групповой политики, которая перезапишет ассоциации файлов формата doc, docx, xls, xlsx и будет их открывать Google Chrome. У меня есть виртуальная машина ESXI с операционной системой Windows 7, где я недавно вылечил ошибку бесконечного обновления. На рабочем столе вы видите у меня 2 файла doc, 2 файла docx и два файла xls.
Чтобы на пользователя применилась политика ему нужно сделать выход из системы (Log Off) или перезагрузится. Для тестирования я принудительно через командную строку обновлю групповую политику.
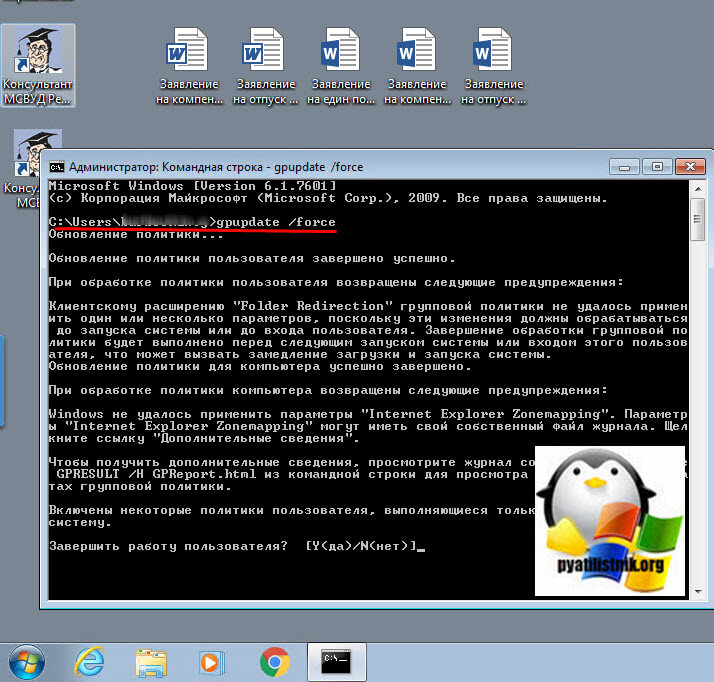
Заново входим на компьютер с Windows 7 и видим, что все значки поменяли свой значок. Иногда у docx могут отсутствовать значки, но открываться они будут через Google Chrome.
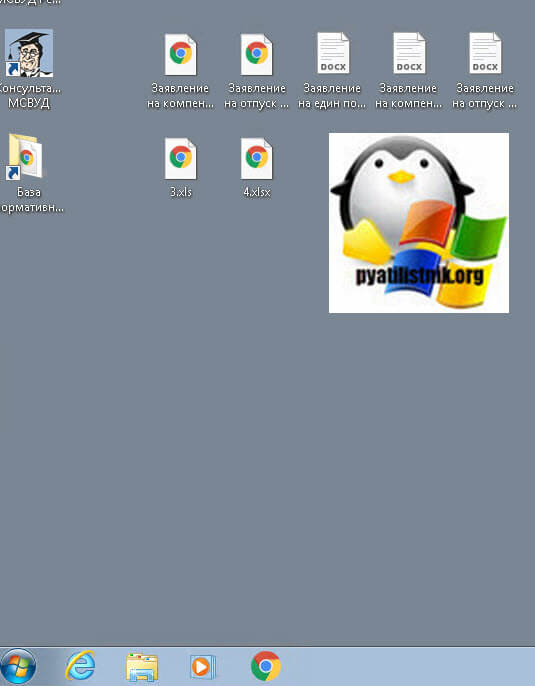
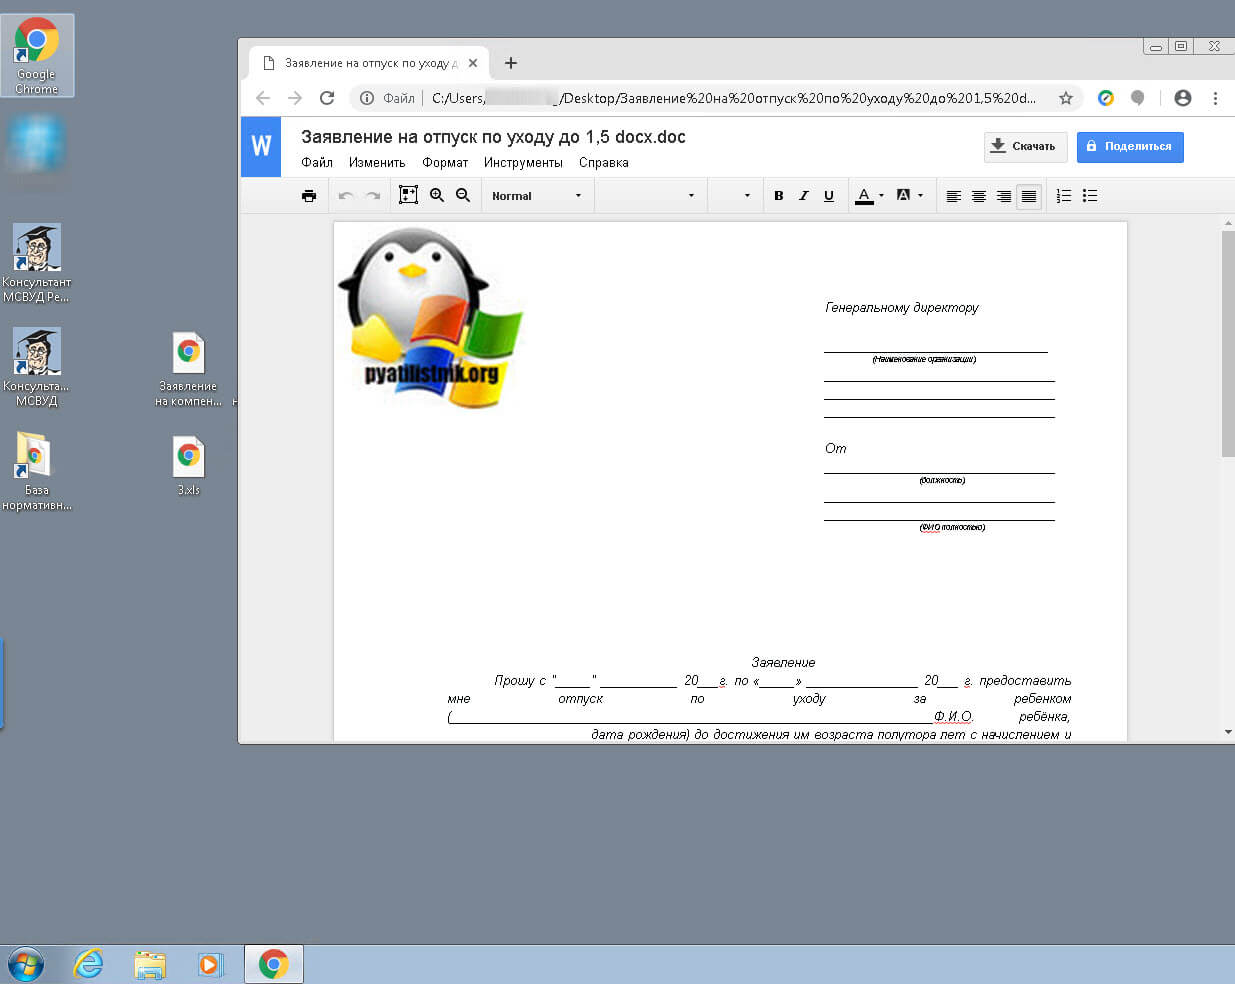
Пробуем открыть любой из файлов и видим, что у нас открылся браузер Google Chrome с нужным расширением «Редактирование файлов Office»
Если политика не применилась, то выполните три пункта для диагностики:
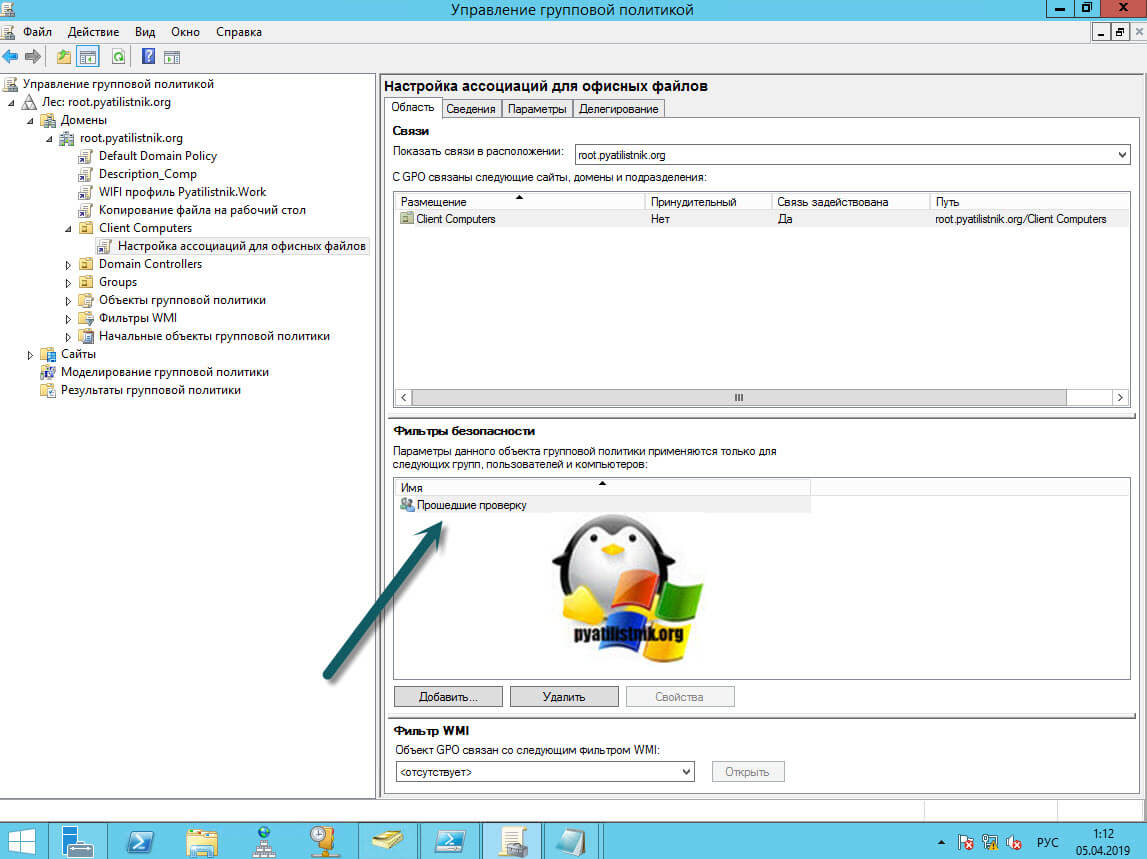
- Через утилиту gpresult /r /scope:computer и потом gpresult /r /scope:user. Проверьте, что применилась политика
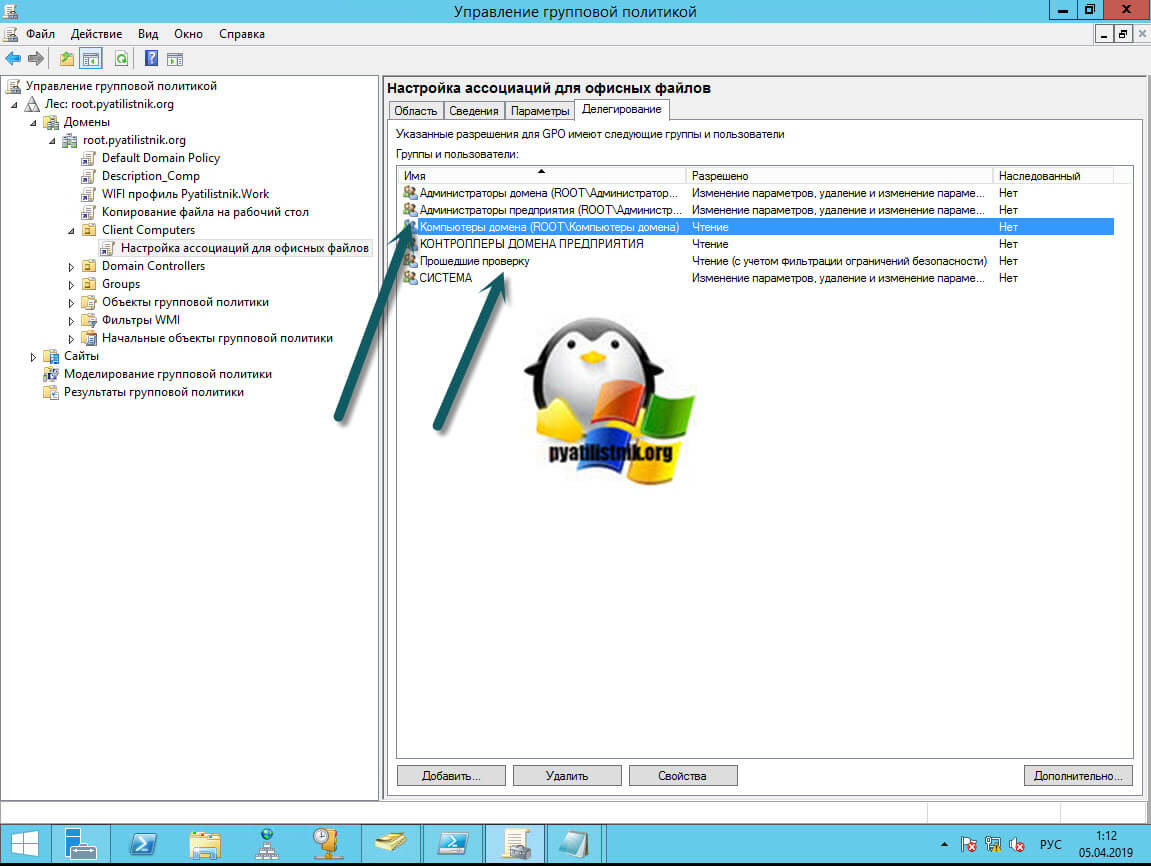
- Если политика не применилась, проверьте, что у вас в фильтрах GPO указана нудная группа со списком пользователей, к которым должна применяться политика, или это может быть группа «Прошедшие проверку», так же убедитесь, что у вас на вкладке «Делегирование» у группы «Компьютеры домена» или прошедшие проверку пользователи, имеют права на чтение политики.
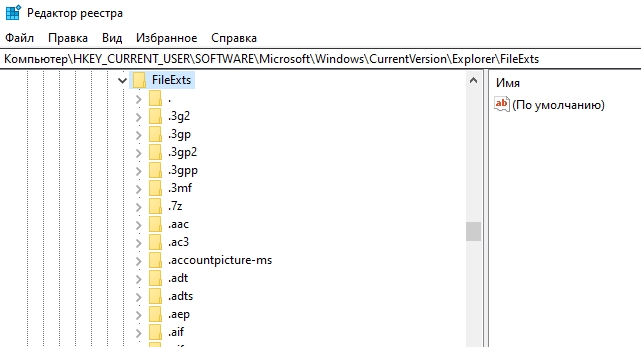
- Если политика применилась, но ассоциации файлов не поменялись через политику, то попробуйте в нее еще добавить удаление двух веток реестра, которые потом пересоздадутся автоматически. Переходим по пути:
Конфигурация пользователя — Настройка — Конфигурация Windows — Реестр
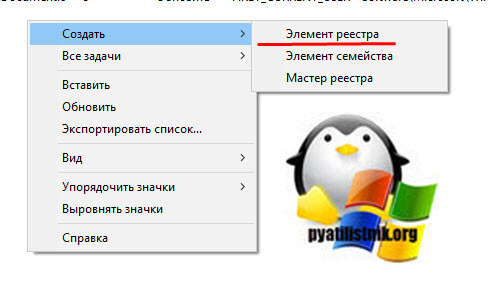
Щелкаем правым кликом и из контекстного меню выберите пункт создать элемент реестра.
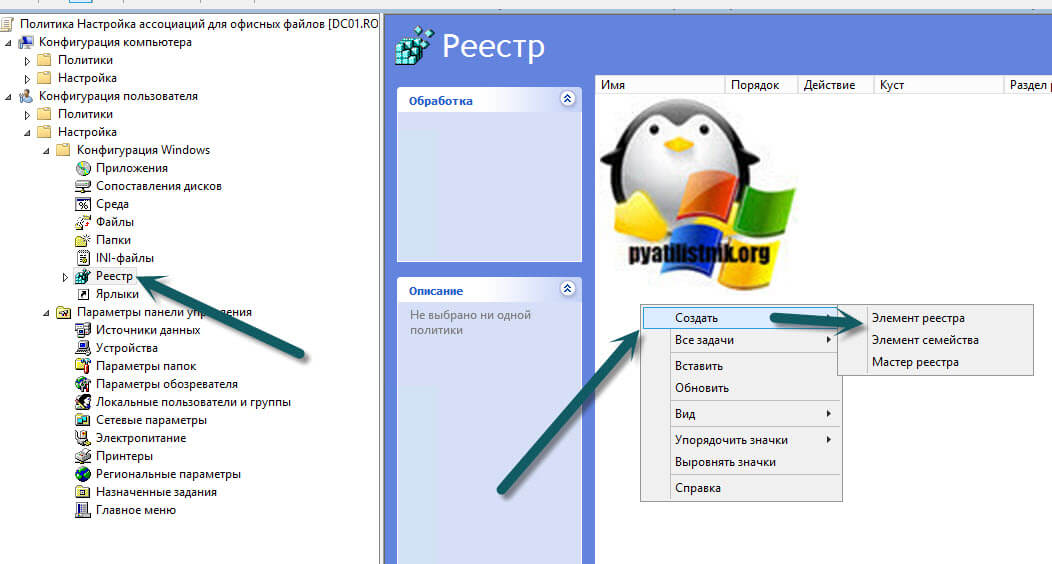
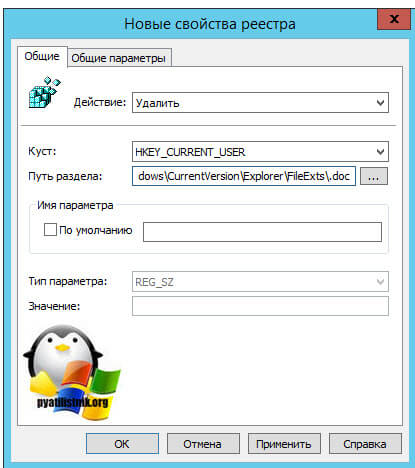
В окне свойств реестра, выберите в действии «Удалить» и в пути введите по одной строке и списка ниже.
SoftwareMicrosoftWindowsCurrentVersionExplorerFileExts.doc
SoftwareMicrosoftWindowsCurrentVersionExplorerFileExts.docx
SoftwareMicrosoftWindowsCurrentVersionExplorerFileExts.xls
SoftwareMicrosoftWindowsCurrentVersionExplorerFileExts.xlsx
В итоге вам так нужно создать удаление для четырех веток. После этого политика изменения ассоциации файлов и программы по умолчанию для определенных расширений файлов будут применены в вашей Windows 7.

Настройка ассоциации файлов в GPO для Windows 10
В Windows 10 данный метод работать не будет, тут необходимо слегка поправить политику. Вы полностью создаете политику, как и в Windows 7:
- Создаете ключи реестра которые удалят нужные ветки реестра для определенных расширений
- Создаете в параметрах папок для определенных расширений файлов, сопоставление программы по умолчанию на ту, что вам нужна
- Создаете нужную настройку фильтрации и назначаете политику на нужную OU
Дополнительные настройки для Windows 10
В вашей политике перейдите в раздел, где мы создавали ключи реестра для удаления веток.
Конфигурация пользователя — Настройка — Конфигурация Windows — Реестр
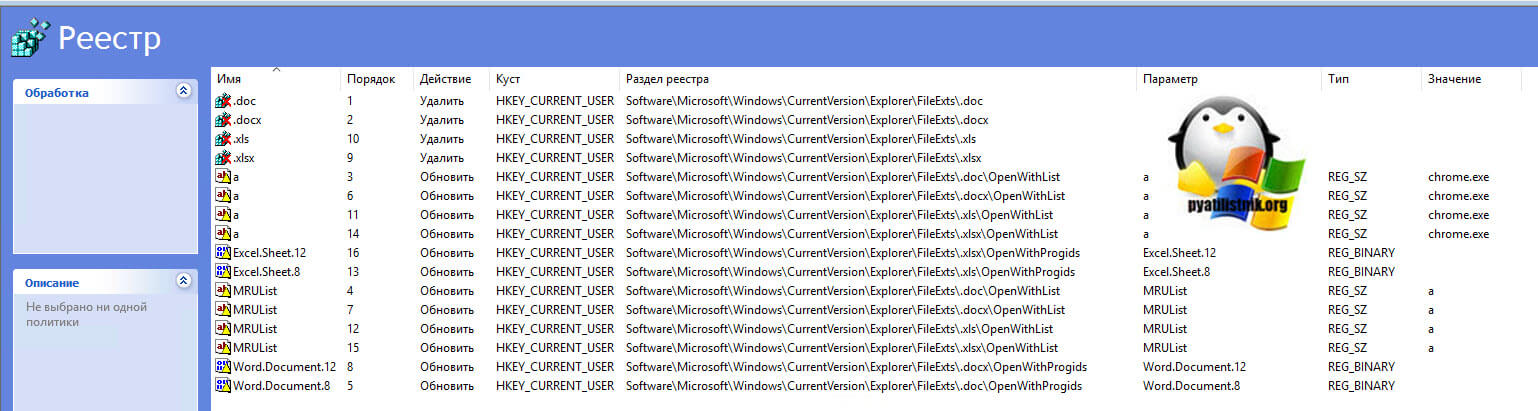
Нам нужно после этих четырех заданий на удаление, создать задание на создание нужных веток и ключей. Я приведу примеры для расширений doc, docx, xls, xlsx, вам главное понять принцип. Через правый клик создаете новый элемент реестра
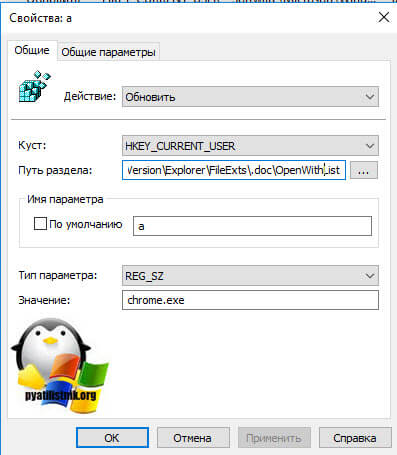
Первый ключ будет для расширения doc:
- Действие — Обновить
- Куст — HKEY_CURRENT_USER
- Путь раздела — SoftwareMicrosoftWindowsCurrentVersionExplorerFileExts.docOpenWithList
- Имя параметра — a
- Тип параметра REG_SZ
- Значение — chrome
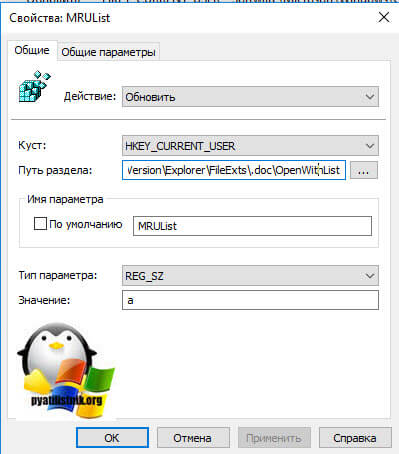
Создаем второй элемент реестра.
- Действие — Обновить
- Куст — HKEY_CURRENT_USER
- Путь раздела — SoftwareMicrosoftWindowsCurrentVersionExplorerFileExts.docOpenWithList
- Имя параметра — MRUList
- Тип параметра — REG_SZ
- Значение — a
Создаем третий элемент реестра:
- Действие — Обновить
- Куст — HKEY_CURRENT_USER
- Путь раздела — SoftwareMicrosoftWindowsCurrentVersionExplorerFileExts.docOpenWithProgids
- Имя параметра — Word.Document.8
- Тип параметра — REG_BINARY
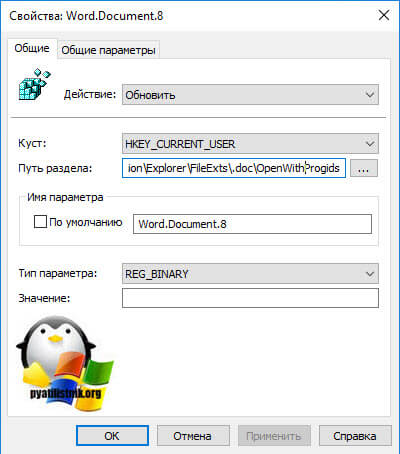
В итоге вы создали для расширения doc три ключа реестра, повторяем все эти шаги, лишь с той разницей, что меняем в первом примере doc на другие форматы и Word.Document.8 на другое значение из таблицы ниже:
- doc Имя параметра — Word.Document.8
- docx Имя параметра — Word.Document.12
- xls Имя параметра — Excel.Sheet.8
- xlsx Имя параметра — Excel.Sheet.12
- PowerPoint 2003 Имя параметра — PowerPoint.Show.8
- PowerPoint.2007 и выше Имя параметра — PowerPoint.Show.12
В итоге у меня получилось вот так.
Все теперь политика готова, ее можно применять. Данная GPO пропишет по данным веткам реестра нужные ключи, это персональные настройки программ по умолчанию для пользователя. Они более приоритетнее ветки компьютера.Проверьте добавление ключей по пути:
HKCUSOFTWAREMicrosoftWindowsCurrentVersionExplorerFileExts(.имя расширения)
.
В итоге параметры для операционных систем Windows 10, для заданных ассоциаций файлов будут переопределены.
Хочу отметить, что данный префиренции (Раздел настройка) пользователь может перезаписать, выбрав локально другую программу для открытия файлов, но при следующем входе на свою рабочую станцию, политика вновь все поменяет на нужные вам настройки.
Задание ассоциаций через XML файл в Windows 10
Данный метод применим к операционным системам Windows 8.1 и выше, я вам его уже рассказывал, когда делал Google Chrome браузером по умолчанию. Суть метода такова:
-
- Вы берете любой компьютер, например с Windows 10. В ручном режиме настраиваете у него ассоциации файлов с нужной программой
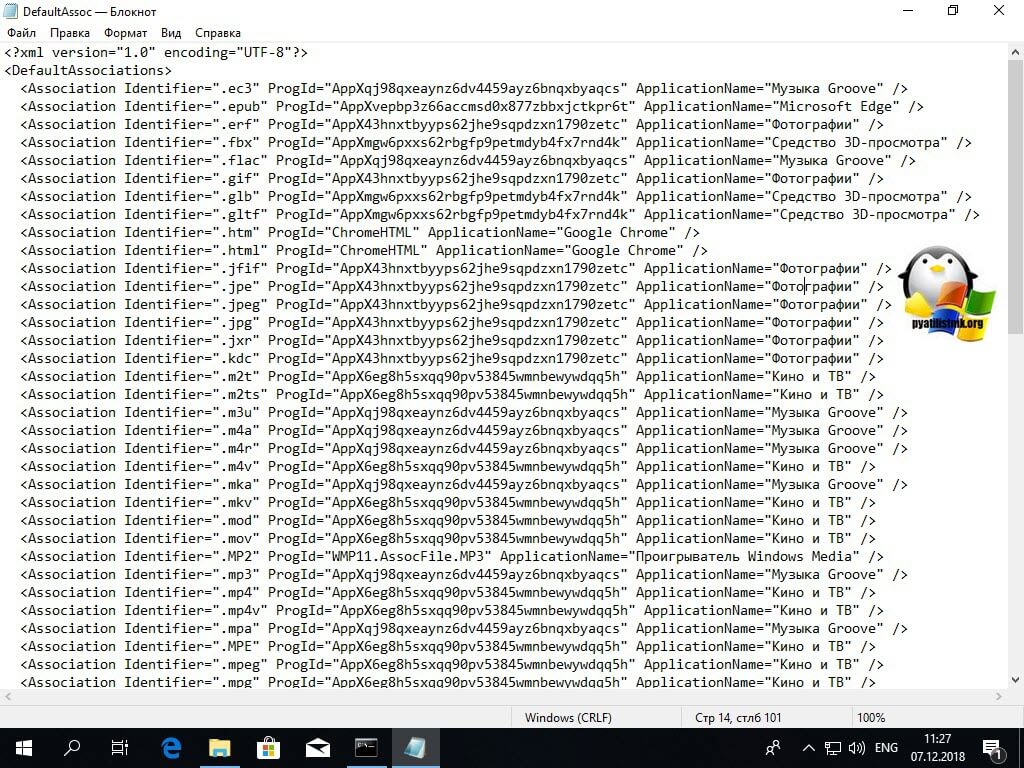
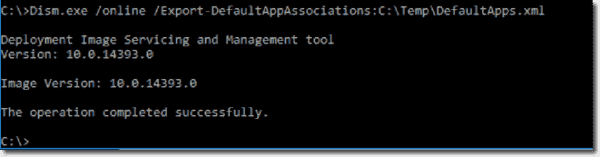
- Далее выгружаете специальный XML файл с настройками и редактируете его, удаляя лишние расширения из него. Делается выгрузка через утилиту командной строки DISM. Для этого выполните команду:
Dism /Online /Export-DefaultAppAssociations:C:TempDefAppAssoc.xml
Дополнительно почитайте про ключи выгрузки и импорта XML по ссылке — https://docs.microsoft.com/en-us/windows-hardware/manufacture/desktop/dism-default-application-association-servicing-command-line-options

- Полученный файл вы выкладываете на сетевой ресурс, откуда его могут все загрузить. Я обычно его кладу в папку SYSVOL, где лежат групповые политики, напоминаю, это путь \имя вашего доменаSYSVOLroot.pyatilistnik.orgscripts

- Создаете групповую политику и применяете данный файл на нужные компьютеры, в итоге все они получают нужную ассоциацию файлов с утилитами, которые будут их открывать. Сам параметр находится по пути:

Конфигурация компьютера — Административные шаблоны — Компоненты Windows — Проводник (Computer Configuration — Administrative Templates — Windows Components — File Explorer)
Находите там параметр «Задать файл конфигурации сопоставлений по умолчанию» и активируете его. Далее вам нужно добавить путь в таком формате:
\root.pyatilistnik.orgSYSVOLroot.pyatilistnik.orgscriptsDefAppAssoc.xml

Таким образом можно централизованно назначать программы по умолчанию. При использовании групповых политик ассоциации файлов будут изменены но только для новых пользователей. Кроме того, пользователи не смогут свободно управлять файловыми ассоциациями, т.к. каждый раз при входе в компьютер настройки, произведенные пользователем, будут переназначены настройками из файла конфигурации.
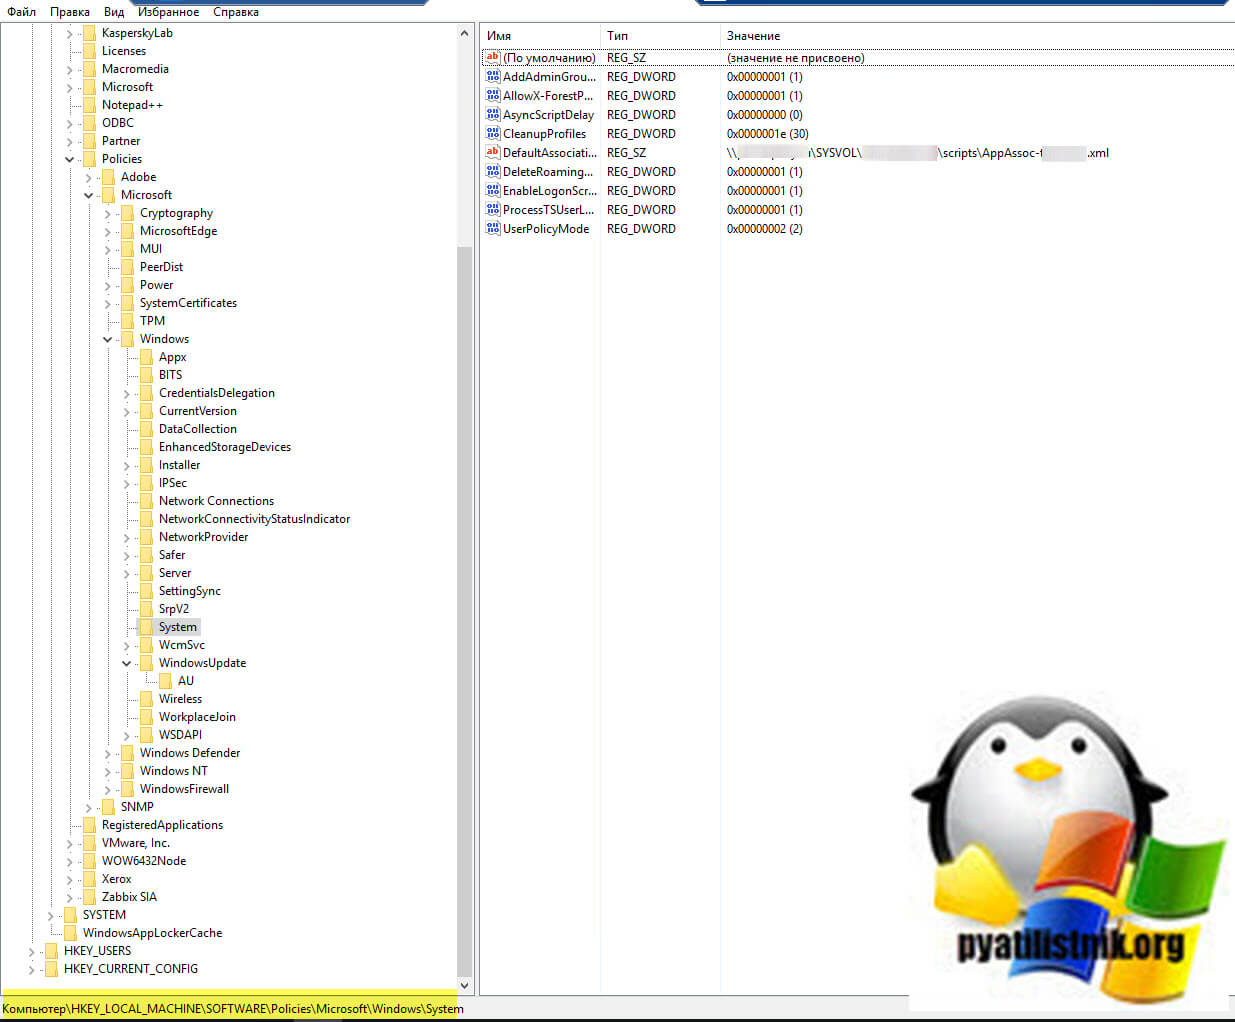
Еще хочу добавить, что данный файл прописывается в ветку реестра:
HKEY_LOCAL_MACHINESoftwarePolicies MicrosoftWindowsSystemDefaultAssociationsConfiguration
Надеюсь, что данная статья оказалась для вас полезной и вы поняли принцип настройки сопоставления нужных ассоциаций файлов с нужной программой. С вами был Иван Семин, автор и создатель IT блога Pyatilistnik.org.
В этой заметке разбираемся как средствами GPO задать необходимый набор ассоциаций для всех пользователей компьютера
Сначала необходимо определить xml файл, с нужными вам ассоциациями, которые будете распространять средствами GPO.
Подготовка файла с ассоциациями
Для этого нужно пойти по одному из двух вариантов(суть один и тот же):
- экспортировать файл с «эталонного» компьютера
- задать для профиля вашего пользователя нужные ассоциации, а затем экспортировать файл
Экспорт выполняется следующей командой:
Dism.exe /online /Export-DefaultAppAssociations:C:tempDefaultAssoc.xml
После получения файла, удаляем из него все строки с неактуальными для нас ассоциациями.
При добавление групповой политикой ассоциации будут добавлены к уже имеющимися на компьютере.
Так же будет работать применение к одному компьютеру нескольких политик, определяющих файлы ассоциаций — они будут применены последовательно
А для ручного импорта сформированного файла можно использовать команду:
Dism.exe /online /Import-DefaultAppAssociations:C:tempDefaultAssoc.xml
Настройка GPO
Далее идем в Group Policy Management и создаем новый объект GPO с нужным вам названием. Например у меня это «Set Photo Viewer Associations».
В нем идем по пути:
Computer Configuration — Policies — Administrative Templates — Windows Components/File Explorer — Set a default associations configuration file
И для данной политики задаем путь к xml файлу с выбранными ассоциациями.
Что бы политика применялась к каждому пользователю на ПК, она нацелена на объект компьютера.
Поэтому для ее применения потребуется перезагрузка.
Проверка результата
Для проверки корректного применения идем на целевой ПК и выполняем перезагрузку. Команды gpupdate /force будет недостаточно, т.к. она только выполнит выход из текущей сессии пользователя.
После перезагрузки можно проверить корректность применения политики и собственно назначения файла с ассоциациями в реестре:
HKEY_LOCAL_MACHINESOFTWAREPoliciesMicrosoftWindowsSystem DefaultAssociationsConfiguration
Посмотреть содержимое данного ключа:
Get-ItemProperty registry::HKEY_LOCAL_MACHINESOFTWAREPoliciesMicrosoftWindowsSystem -Name DefaultAssociationsConfiguration
Или же можно сразу открыть целевой файл, например в моей случае «.jpg» и убедиться что он открывается нужной программой
Записки администратора

Любой современный компьютер обладает огромным набором функций, о которых не подозревает рядовой пользователь. В частности, существует ассоциация файлов в операционной системе Windows 10. Об этой опции слышали многие люди, но далеко не все понимают, что она собой представляет. Далее разберемся, в чем заключается принцип работы ассоциации, и как назначить ее для отдельных типов файлов.
Что это такое
Каждый файл, с которым взаимодействует владелец компьютера, представлен в определенном формате. Так, за подавляющим большинством изображений закреплено расширение «.jpg», а за текстовыми документами – «.doc» («.docx»).

Всего насчитывается больше тысячи различных форматов, для каждого из которых предназначена программа. Иногда пользователя не устраивает стандартное ПО, и он, к примеру, запускает воспроизведение видео через сторонний плеер. Чтобы каждый раз не пользоваться диалоговым окном «Открыть с помощью», владелец ПК может настроить ассоциацию. То есть заставить файлы одного или нескольких форматов открываться в одном приложении.
Восстановление ассоциаций файлов в Windows 10
Порой, когда на компьютере установлено множество программ, и для каждой из них настроена ассоциация, файлы открываются не всегда корректно. Например, вместо просмотрщика фото для JPG ПК выбирает Adobe Photoshop, а вместо текстового редактора для DOC – интернет-браузер. Очевидно, что с таким сбоем настроек работать становится некомфортно, и требуется восстановить сопоставление файлов по умолчанию. Сделать это можно несколькими способами.
В настройках
Восстановить значения по умолчанию помогает раздел «Параметры». В нем представлены настройки практически всех компонентов компьютера, включая ассоциацию файлов. Для возврата заводских настроек нужно обратиться к инструкции:
- Щелкните ЛКМ по иконке «Пуск» для перехода в соответствующее меню.
- Нажмите на логотип шестеренки, чтобы открыть «Параметры».

- Перейдите в раздел «Приложения», а затем – в «Приложения по умолчанию».

- Пролистайте страницу вниз и нажмите на кнопку «Сбросить».

На заметку. Если вы желаете оставить пользовательское сопоставление для некоторых приложений, то вручную измените программы для запуска отдельных файлов во вкладке «Приложения по умолчанию».
При нажатии на кнопку сброса все настройки, связанные с ассоциацией, вернутся к начальным параметрам. То есть вы будете пользоваться стандартной программой для взаимодействия с теми или иными файлами.
Редактор реестра
Если через стандартные настройки сопоставление не поменялось, придется пользоваться обходными путями. Например, Редактором реестра:
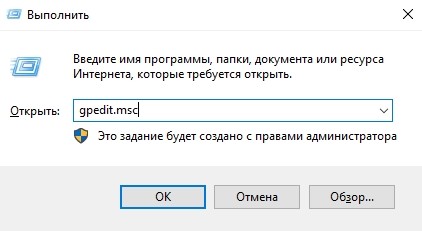
- Зажмите клавиши «Win» + «R» для запуска окна «Выполнить».
- Введите запрос «regedit» и нажмите на клавишу «Enter», чтобы открыть Редактор.

- Перейдите по пути: «HKEY_CURRENT_USERSoftwareMicrosoftWindowsCurrentVersionExplorerFileExts».
- В конечной директории вы увидите папки. Каждая из них отвечает за определенный формат файлов.
- Откройте каталог, соответствующий расширению, для которого нужно вернуть стандартную ассоциацию.
- Удалите подпапку «UserChoice».

Неудобство данного метода заключается в том, что пользователю приходится вручную удалять настройки сопоставления для каждого отдельного формата. Поэтому, по возможности, рекомендуется обращаться к первому способу, представленному в материале.
С помощью групповой политики
Еще один альтернативный способ, позволяющий изменить пользовательскую ассоциацию на заводскую:
- Откройте окно «Выполнить».
- Введите и подтвердите запрос «gpedit.msc».
- Перейдите по пути: «Computer Configuration/Administrative Templates/Windows Components/File Explorer».
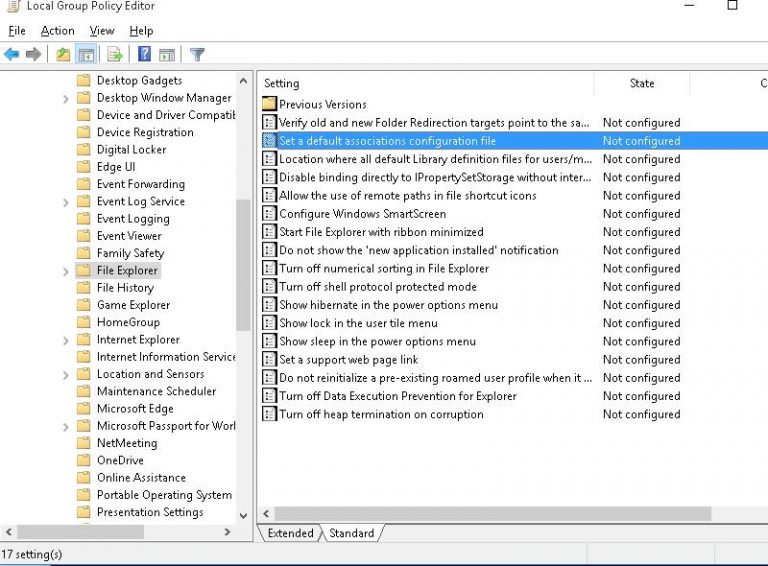
- Откройте настройки политики «Set a default associations configuration file».
- Укажите путь к файлу ассоциаций и установите значение «Включено».
- Сохраните изменения.
Таким образом, вы одновременно вернете сопоставление всех файлов к начальным параметрам. Вручную изменять ассоциацию не придется.
Перенос ассоциаций файлов и импорт на другом компьютере
Также вы можете самостоятельно ассоциировать файлы, а затем сохранить настройки для дальнейшей передачи на другое устройство или для восстановления на текущем ПК:
- Настройте сопоставление через «Параметры» по своему усмотрению.
- Запустите Командную строку.

- Введите запрос «dism /online /Export-DefaultAppAssociations:»%UserProfile%DesktopFileAssociations.xml»».

- Нажмите на клавишу «Enter».
Указанные выше действия создадут файл с настройками сопоставления на Рабочем столе. Далее его нужно перенести на компьютер, где требуется выполнить импорт. Сама процедура подгрузки параметров осуществляется как при помощи групповой политики (способ описан выше), так и через Командную строку, где потребуется ввести запрос «dism /online /Import-DefaultAppAssociations:»%UserProfile%DesktopFileAssociations.xml»».

Как убрать
Если требуется вернуть настройки ассоциации к заводским значениям, то достаточно нажать на кнопку «Сбросить» в разделе параметров «Приложения по умолчанию». Для подгрузки пользовательских настроек нужно обратиться к предыдущей инструкции или вручную выставить сопоставление в указанном выше пункте настроек.
И снова о выборе программ по умолчанию в Windows 10. В третьей, завершающей статье речь пойдет об альтернативных способах управления файловыми ассоциациями.
Поскольку в механизм управления ассоциациями файлов в Windows 10 включена функция проверки (вычисление хэша), просто перенести настройки с одного компьютера на другой с помощью импорта параметров реестра не получится. Конечно, при большом желании проверку можно обойти, но есть способ лучше.
Выгрузить ассоциации файлов для текущего пользователя можно с помощью утилиты DISM, например:
dism /online /Export-DefaultAppAssociations:C:Filesfileassoc.xml

Результат выгрузки — обычный xml-файл, который можно открыть в любом текстовом редакторе.

При необходимости файл можно отредактировать вручную. Если вы не хотите сохранять все файловые ассоциации, то можно оставить в нем настройки только для определенного типа файлов. В качестве примера сделаем IrfanView редактором по умолчанию для наиболее популярных графических форматов.

Полученный файл с ассоциациями можно перенести на другой компьютер и импортировать командой:
dism /online /Import-DefaultAppAssociations:C:Filesfileassoc.xml
Импортированные таким образом настройки применяются к каждому новому пользователю, при его первом входе в систему. На уже созданных пользователей они не повлияют.

Отменить изменения и вернуться к дефолтным настройкам системы можно такой командой:
dism /online /Remove-DefaultAppAssociations
Сброс настроек также подействует только на новых пользователей, для текущего пользователя ничего не изменится.
Конфигурационный файл можно использовать не только на живой системе, его можно импортировать в WIM или VHD образ, чтобы настройки применялись при развертывании операционной системы. Для этого монтируем образ:
dism /Mount-Image /ImageFile:C:filesinstall.wim /Index:1 /MountDir:C:filesImage

Затем импортируем настройки из xml-файла:
dism /Image:C:filesImage /Import-DefaultAppAssociations:C:filesfileassoc.xml

При необходимости можно просмотреть получившиеся настройки ассоциаций файлов в образе:
Dism /Image:C:filesimage /Get-DefaultAppAssociations
И в завершение сохраняем изменения и отмонтируем образ:
dism /UnMount-Image /MountDir:C:filesImage /commit

Для применения настроек из файла не обязательно импортировать их. Применить файл конфигурации можно с помощью локальных или доменных групповых политик. Необходимая политика находится в разделе Конфигурация компьютераАдминистративные шаблоныКомпоненты WindowsПроводник (Computer ConfigurationAdministrative TemplatesWindows ComponentsFile Explorer)

и называется «Задать файл конфигурации сопоставлений по умолчанию» (Set a default associations configuration file). Для применения настроек необходимо включить данную политику, указать путь к xml-файлу и настройки применятся при следующем входе в систему.

Таким образом можно централизованно назначать программы по умолчанию. При использовании групповых политик ассоциации файлов будут изменены для всех пользователей компьютера, как новых так и уже имеющихся. Кроме того, пользователи не смогут свободно управлять файловыми ассоциациями, т.к. каждый раз при входе в компьютер настройки, произведенные пользователем, будут переназначены настройками из файла конфигурации.
Описанные настройки работают на клиентских ОС начиная с Windows 8 и на серверных, начиная с Windows Server 2012.
All steps described in this blog post have been tested on following Windows 10 versions:
- Windows 10 1709
- Windows 10 1703
- Windows 10 1607
Configuring file association prior Windows 10
There were different ways and guidance to set default program prior to Windows 10 (see Managing Default Applications).
Before Windows 10, an application could check default apps, ask for user consent and set default app programmatically using Windows API.

But some programs skip the user consent and set the app defaults into the registry. The main requirement for default file association is often forgotten: the end-user is in control.
Now in Windows 10 checks if registry file extension keys have not been modified to prevent file association hijacking.
File association changes in Windows 10
The way that default file associations work changed in Windows 10.
There is a new UI for the end-user. This new way puts the user in control with a new file association notification.
This notification will be displayed:

- On the first launch of a file extension, if multiples programs are registered for handling that file extension.
- Each time a new application registers a file extension, except if the Always use this app to open .xxx files is checked.
If an application used Windows API to set default apps, the user will receive the following notification:

For more information about these changes : https://blogs.windows.com/windowsexperience/2015/05/20/announcing-windows-10-insider-preview-build-1…
You will find some explanation on The Old New Thing blog: Why do my PDF file associations get reset every time I restart?
Windows 10: An app default was reset
But what happens if an application is not using Windows API and writes some stuff and hijacks user preferences?
Now,Windows 10 detects that the registry is corrupted and will reset the default program for this file extension. Additionally, the end-user will receive this notification: An App default was reset. These change is documented in KB4001770: Reset app default when a registry setting is deleted or corrupted and streamlined notification about the corruption.

How to configure file association in Windows 10?
It’s possible for IT Pro to configure or force default association using supported methods.
The best way to do it is to set up a reference computer, install applications, configure default programs and use Dism to export/import the custom default app associations or use a group policy.
-
Set up a reference computer
-
Install applications
-
Go to Control PanelAll Control Panel ItemsDefault Programs and configure default apps associations. In Windows 10 1709, this control panel item is now in Settings app.
Let’s try to configure Internet Explorer as the default browser

Choose Internet Explorer

Internet Explorer is now the default web browser
-
Export/import the custom default app association with dism.exe
Note that you need administrator rights to use dism.exe. And to export properly the associations use the same account used in step 3, otherwise you will get a malformed XML file.
- Dism.exe /online /export-defaultappassociations:C:tempCustomFileAssoc.xml
PS C:Windowssystem32> dism /online /export-defaultappassociations:»C:TempIE-DefaultBrowser.xml»
- Open the xml file and check if everything looks good.

Usually at this step you will be tempted to delete other lines because you simply don’t care about them and get a file like this:

FTA-IE-Only.xml
VERY IMPORTANT: If you want to import your file with DISM.exe, DO NOT delete any file associations entries!
A missing entry will trigger the App default reset notification and you will get a notification storm at the first logon.

Refresh your XML on a regular basis
As some recommended applications can manage more extensions with each new Windows 10 version available, it’s a good practice to refresh your XML. For example, in Windows 10 1703, Microsoft Edge registers the epub extension. If you’re using an XML file from Windows 10 1607, epub is missing. As a result, you will get an app reset notification for epub.
Tips for building your XML file
- Manually editing the file could result in a non-valid XML file. Ensure that your XML file is valid. Opening XML file in the old Internet Explorer is a good idea to check if the XML is valid. You can try XML Notepad to edit/validate XML files.
- If you do not see your file extension in XML file, go back to Control PanelAll Control Panel ItemsDefault Programs and configure default apps associations, select file extension, click on Change Program and confirm the program in the dialog box. Then, export again you’re XML file.
Deploy your custom XML
Now it’s time to apply your XML file. You have two options:
- Set up file association in your Windows 10 image. File associations will be configured for new users’ profiles. Existing profiles are untouched. Users can change file associations.
- Configure a policy for your domain-joined computer: file association will be configured at each logon. User will be able to change file association, but at the next logon file association will be configured using XML file. This policy works only for domain-joined computer.
Configure the XML file for your Windows 10 reference image:
Dism.exe /online /import-defaultappassociations:c:tempCustomFileAssoc.xml
Your file will be copied in WindowsSystem32 with the following name OEMDefaultAssociations.xml
Configure the XML file for your domain-joined computer
Configure the following policy Set a default associations configuration file located in ComputerPoliciesAdministrative TemplatesWindows ComponentsFile Explorer.
If this group policy is enabled and the client machine is domain-joined, the file will be processed, and default associations will be applied at logon time.

Note: this policy will not prevent user to change the file association. But at each logon the default association configured in XML file will be applied.
How to force only a set of file associations?
Some IT Pros want to force only some file associations and let users in control for others file associations. For example, they want to configure Internet Explorer as default for HTTP/HTTPS only for HR people.
So, they removed everything in the XML file except Internet Explorer entries. As previously seen, removing entries in XML file could result in app reset notifications.
But don’t panic, there is a solution to do it in your Windows 10 reference image.
You just need to have two XML files, one for configuring the defaults and another one to force file association.
The main XML, CustomDefaultAssoc.xml must contain all extensions. You need to import this file using:
Dism /online /import-defaultappassociations:C:CustomDefaultAssoc.xml
The second XML, FTA-IE-Only.xml will contain only a set of file extensions. You need to use this XML file with the group policy Set a default associations configuration file.

At the first logon, Explorer.exe will apply both XML.

The end user will have this results without any app reset notifications:
- PDF files associated with Microsoft Reader.
- HTM/HTML files associated with Internet Explorer.

OEMDefaultAssociations.xml contains the following lines:

IEOnly.xml contains the following lines:

Why I’m getting an app reset notification?
Raymond Chen talked about this problem. If a program is trying to set some registry keys, Explorer will detect it and the file association will be reset.
Stop using script or other pre-Windows 10 ways for configuring file association.
You can check the Microsoft-Windows-Shell-Core/AppDefaults event log for clues about file associations reset.

If you want to troubleshoot this, keep calm and run Procmon


You should be able to track which application is hijacking your file associations. Once you identified the bad application, the best way to solve this, is to use a more recent version, or contact your vendor.
Why I’m getting the User Choice notification even if I used an XML file?
You could get the following notification starting Windows 10 1703 when you choose an application as the default viewer instead using Microsoft Edge.


These notification windows are displayed only once if you’re clicking on OK. It’s because Microsoft Edge is detected as a new application.
If a new app is installed and is registered to an existing file extension or protocol you will get this notification.
If you want to get rid of these notifications, there is a group policy to hide these notifications:
Do not show the ‘new application installed’ notification
This policy removes the end-user notification for new application associations. These associations are based on file types (e.g. *.txt) or protocols (e.g. http:) If this group policy is enabled, no notifications will be shown
You can find in the table below some group policies related to default file associations settings:
Bonus for Adobe Reader XI users
If you are still using Adobe Reader XI, you should get a new application to open PDF, as Adobe Reader XI is out of support.
With Adobe XI installer, you can get an app reset notification for PDF extensions and it will be reset to Microsoft Edge.
You should look at Adobe Reader documentation and launch the Adobe Reader 11 installation with the following command line:
AdbeRdr11010_en_US.exe /rs /sAll /msi EULA_ACCEPT=YES OWNERSHIP_STATE=0
With OWNERSHIP_STATE=0 Adobe Reader stops to change file association for PDF with an unsupported way.
Resources:
- http://www.adobe.com/devnet-docs/acrobatetk/tools/AdminGuide/pdfviewer.html
- https://www.adobe.com/devnet-docs/acrobatetk/tools/AdminGuide/properties.html#props
- Remove From My Forums
-
Question
-
Hi,
I need to make IE11 as default browser in windows 10 via GPO for this I have figured out the below option
Computer ConfigurationAdministrative TemplatesWindows ComponentsFile ExplorerSet a default associations configuration
file setting. (https://docs.microsoft.com/en-us/internet-explorer/ie11-deploy-guide/set-the-default-browser-using-group-policy)I have found the option of file explorer in local group policy editor but the same is not present in GPMC.
Can somebody share me customized .admx and .adml file to enable this option.
-
Edited by
Tuesday, March 26, 2019 10:07 AM
-
Edited by
Answers
-
Hi,
You could try downloading the latest administrative template (.admx) from the link below:
Administrative Templates (.admx)for Windows 10 October 2018 Update (1809)
https://www.microsoft.com/en-us/download/details.aspx?id=57576After installing the file above, they will be installed here by default:
C:Program Files (x86)Microsoft Group PolicyWindows 10 October 2018 Update (1809) v2PolicyDefinitions
Inside the PolciyDefinitions folder, you should find the file WindowsExplorer.admx that contains the GPO:
Best regards,
Leon
Blog:
https://thesystemcenterblog.com
LinkedIn:-
Proposed as answer by
Daisy ZhouMicrosoft contingent staff
Friday, March 29, 2019 1:32 AM -
Marked as answer by
Warriorhigh
Friday, March 29, 2019 5:05 AM
-
Proposed as answer by
-
Hello,
Thank you for posting in our TechNet forum.According to «I have found the option of file explorer in local group policy editor but the same is not present in GPMC», do we mean we have
found the option of file explorer in local group policy editor but the same is not present in GPMC
on DC?If so, in my Windows server 2012 R2 DC and 2016 DC, by default, there is the following group policy setting as we mentioned:
Computer ConfigurationAdministrative TemplatesWindows ComponentsFile ExplorerSet a default associations configuration file setting
1. We can download the corresponding ADMX files and AMDL folders based on
Administrative Templates (.admx) for Windows 10 April 2018 Update (1803)
(The default location in my environment is C:Program Files (x86)Microsoft Group PolicyWindows 10 April 2018 Update (1803)PolicyDefinitions).2.
Copy all .ADMX files and ADML folders to our local Administrative Templates store
or Central Store on domain controller:
C:WindowsPolicyDefinitions
3. When done open Group Policy Editor and we will find all the settings.
For details we can refer to Install Windows 10 And Windows Server 2016 Administrative TemplatesTip: This answer contains the content of a third-party website. Microsoft makes no representations about the content of these websites. We provide this content only for your convenience.Best Regards,
Daisy Zhou
Please remember to mark the replies as answers if they help.
If you have feedback for TechNet Subscriber Support, contact
tnmff@microsoft.com.-
Edited by
Daisy ZhouMicrosoft contingent staff
Thursday, March 28, 2019 7:40 AM -
Proposed as answer by
Daisy ZhouMicrosoft contingent staff
Friday, March 29, 2019 1:33 AM -
Marked as answer by
Warriorhigh
Friday, March 29, 2019 5:04 AM
-
Edited by
-
Hi,
I have added defaultassociationconfiguration policy in old windowsexplorer.admx file and replaced only windowsexplorer.adml file, It worked.
-
Marked as answer by
Warriorhigh
Friday, March 29, 2019 5:09 AM
-
Marked as answer by
One of the most frequent questions people ask me is about managing default file associations in Windows 10. I will demonstrate how to set Adobe Reader DC as the default PDF reader and then show you how you can deploy the configuration with Configuration Manager or Group Policy.
Contents
- Exporting default file associations
- Deploying default file associations with SCCM
- Deploying default file associations using Group Policy
- Changing default browser to Internet Explorer
- Wrap-up
In Windows 10, we can no longer use Group Policy Preferences to control file associations, because these settings are now user-based, instead of system-based as they were in Windows 7. To deploy the default file associations, you first have to configure the settings on a reference machine and then export the configuration in an XML file that you can deploy in your network.
Exporting default file associations
When Adobe Reader DC starts for the first time, the program prompts you to set it as the default program for PDF files. You also can configure the settings in the Control Panel under Programs > Default Programs > Set Default Program. There you have to select Adobe Reader and «set this program as default.»

Set Adobe Reader as default program
You can verify that .pdf is associated with Adobe Reader DC in the Control Panel under Programs > Default Programs > Set Association. Note that you can sort the list by the Current Default column.
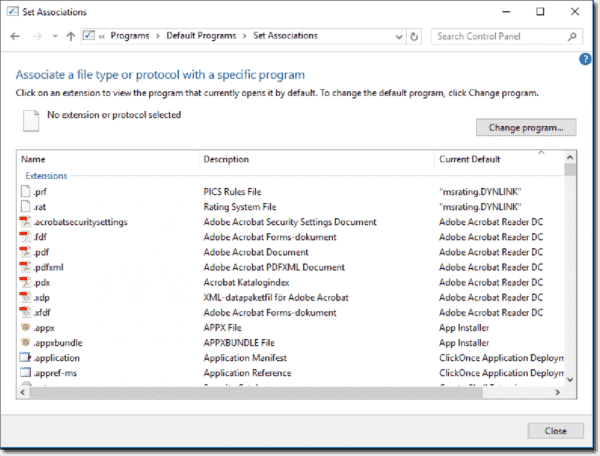
Verifying default file associations
Once you do that, you have to open a command prompt with the user account from above and use the DISM tool to export the current settings to an .XML file, as shown below.
Dism.exe /online /Export-DefaultAppAssociations:C:TempDefaultApps.xml
Exporting default file associations
Now you have a .XML file with all the file associations from that user. People often ask me if it is possible to deploy just one file association or if they must use the entire file, which also contains all the default settings. The answer is, yes, you can import just the association you need.
In my example below, I removed everything that is not associated with Adobe Reader DC, so we end up with the following XML file:
<?xml version="1.0" encoding="UTF-8"?>
<DefaultAssociations>
  <Association Identifier=".acrobatsecuritysettings" ProgId="AcroExch.acrobatsecuritysettings" ApplicationName="Adobe Acrobat Reader DC" />
  <Association Identifier=".fdf" ProgId="AcroExch.FDFDoc" ApplicationName="Adobe Acrobat Reader DC" />
  <Association Identifier=".pdf" ProgId="AcroExch.Document.DC" ApplicationName="Adobe Acrobat Reader DC" />
  <Association Identifier=".pdfxml" ProgId="AcroExch.pdfxml" ApplicationName="Adobe Acrobat Reader DC" />
  <Association Identifier=".pdx" ProgId="PDXFileType" ApplicationName="Adobe Acrobat Reader DC" />
  <Association Identifier=".xdp" ProgId="AcroExch.XDPDoc" ApplicationName="Adobe Acrobat Reader DC" />
  <Association Identifier=".xfdf" ProgId="AcroExch.XFDFDoc" ApplicationName="Adobe Acrobat Reader DC" />
  <Association Identifier="acrobat" ProgId="acrobat" ApplicationName="Adobe Acrobat Reader DC" />
</DefaultAssociations>
Now you can deploy the default file associations with one of the following methods.
Deploying default file associations with SCCM
You can import the default file associations during OS deployment in Configuration Manager using a Run Command Line step in the Task Sequence, either using DISM /Online when the OS is installed or with DISM /Offline when the Windows image is applied and the computer has not yet started the newly installed OS. I usually work with the /Online method.
First, create a package in Configuration Manager that contains the defaultapps.xml file and then create a .cmd file in that directory with the following content:
@ECHO OFF
dism.exe /online /Import-DefaultAppAssociations:"%~dp0defaultapps.xml"
We then add this file to our OS deployment Task Sequence after installing and restarting Windows.
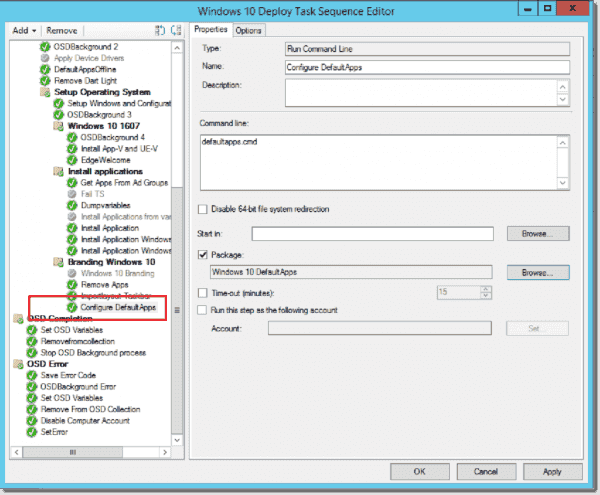
Windows 10 Task Sequence
Deploying default file associations using Group Policy
You can also deploy the default file associations using Group Policy: Computer Configuration > Administrative Templates > Windows Components > File Explorer. The documentation on Technet states that the user can change the settings afterward, but that is only partially true. You can configure the Group Policy as shown below to deploy the default file associations:
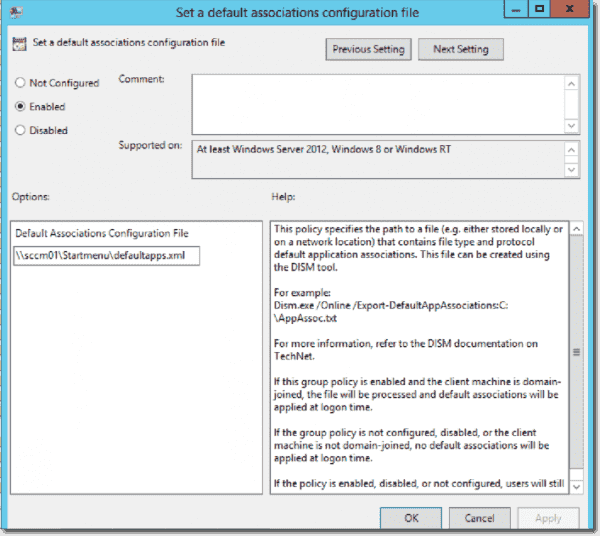
Set a default associations configuration
I used a file share in the example above. Make sure that domain computers can read both from the share and from NTFS. You could also copy the .XML file to the machines and apply it from there.
If the file is updated with a new file association, the client will check the content every time someone applies Group Policies. Thus, there is no need to do anything more than update the XML file with new file associations, and they also apply to the clients.
The user can change the file associations after logon, because the corresponding UI is not locked down. However, the next time the user logs on, the file associations that are included in the .XML file will be applied again.
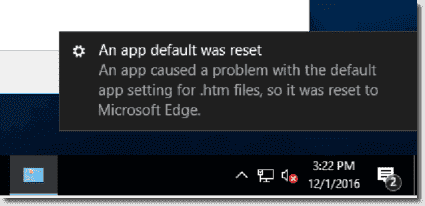
Changing default browser to Internet Explorer
At the moment, the only way to set Internet Explorer as the default browser in Windows 10 is to use the Group Policy option. Windows 10 will revert to Microsoft Edge if we change it to Internet Explorer using the DISM tool during OS deployment, showing the following systray message: «An app default was reset.»
Subscribe to 4sysops newsletter!
App defaults reset
Wrap-up
- If we want to set default file associations for end-users, we must do it during OS deployment using Dism.exe or with a script before the user logs on the first time.
- We can set the default file association for just a specific extension, so there is no need to include everything in the file we import.
- If we configure the default file associations using a Group Policy, the users can change it, but it will revert to our configuration.
- If we want to enforce the default browser to Internet Explorer, we must use the Group Policy option.
![]()
In this article, we’ll look at how to manage the default File Type Associations (FTA) on Windows 10/11 and Windows Server 2022/2019/2016. As an example, we will show how to assign a default program to open *.PDF files in Windows, export these settings into an XML configuration file, and deploy the resulting file with file association settings to other computers manually or using Group Policy (GPO).
The main difference between Windows 10/11 and previous Windows versions is that you can’t manage file association settings through the Registry or the “Open With” feature of the Group Policy Preferences. However, there is a new opportunity to export the current settings of file associations from the “reference” computer to an XML file and apply this file to other computers. You can also import a file associations file into a Windows image deployed on your computers (manually, via WDS or SCCM).
Contents:
- How to Change Default Program to Open a File Type on Windows 10 and 11?
- How to Set File Assertions from the Command Prompt?
- Export and Import Default App Associations on Windows to the XML file
- Configure Default File Associations with Group Policy
- Changing File Association via the Windows Registry
- How to Reset All File Associations to Default in Windows 10 and 11?
How to Change Default Program to Open a File Type on Windows 10 and 11?
Let’s say you want to use Adobe Reader DC to open *.PDF files on your computer. This means you need to associate this file extension with the application. In this example, I’m using a reference computer with Windows 10 22H1 and Acrobat Reader DC installed.
Note that Windows 10 and 11 now have the Microsoft Edge browser installed by default as the default PDF viewer.
To manually create a mapping between a file extension and a program, go to the Settings -> Default Apps (or run the Settings URI command -> ms-settings:defaultapps) and click the Choose default apps by file type button.
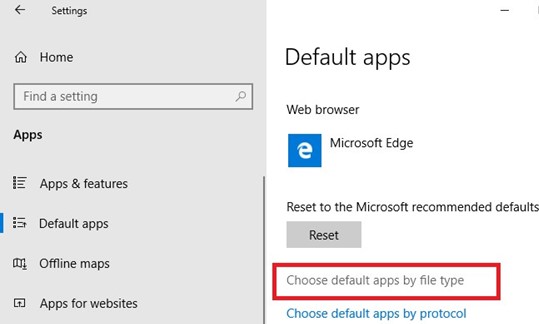
Find the .PDF file type in the list of extensions. Then click on the icon of the program associated with this extension and change the default PDF viewer from Microsoft Edge to Acrobat Reader.

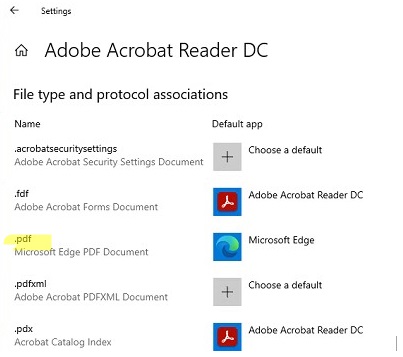
You can automatically assign a specific app with the file extension for which it is registered. To do this, select Set default by apps in the Default Apps section, find your program in the list and click the Manage button.
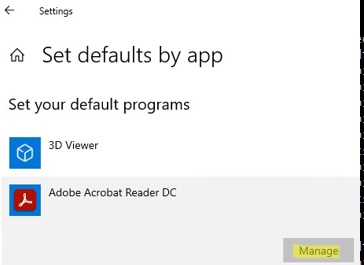
The next screen contains a list of file types supported by the application. Select the file extensions you want to open with Acrobat Reader.
How to Set File Assertions from the Command Prompt?
On Windows, you can use the assoc command line tool to configure file associations for applications. For example, to check the program that should be used to open PDF files, run the command:
assoc .pdf
In this example, you can see that the AcroExch.Document.DC file type is associated with the PDF file extension:
.pdf=AcroExch.Document.DC
![]()
Show all extension associations with file types:
assoc|more
To understand which program the AcroExch.Document.DC file type is associated with:
ftype AcroExch.Document.DC
![]()
You can set the type for a specific file type with the command:
ASSOC .csv=txtfile
In this example, we have specified that all CSV files should be opened as plain text files (using notepad.exe by default).
You can create or change the association of a file extension with a program from the command prompt. For example, you want all files with the .tx1 extension to open with notepad++.exe. First, you need to associate the .tx1 extension with the new tx1file file type.
assoc .tx1=tx1file
Now let’s specify the program that should be used by default to open files with the tx1 extension.
ftype tx1file="%programfiles(x86)%"Notepad++notepad++.exe" "%1"
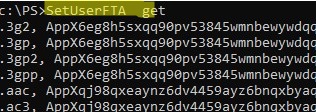
You can also use the third-party SetUserFTA tool to assign file associations in Windows. SetUserFTA is a command line utility for quickly setting up file associations (often used on Windows Server 2019/2022 RDS farms to configure file associations with apps).
You can list the current file associations and the ProgID set for them in Windows like this:
SetUserFTA get
To set an association for a specific file extension, use the command:
SetUserFTA.exe extension progid
For example, set Chrome as the default browser for HTML files:
SetUserFTA .http ChromeHTML

SetUserFTA .https ChromeHTML

SetUserFTA .htm ChromeHTML

SetUserFTA .html ChromeHTML
If the application doesn’t have a registered file class or Progid, you can specify its executable. For example:
SetUserFTA .txt applicationsnotepad++.exe
This is possible for apps registered in the registry key HKEY_CLASSES_ROOTApplications.
Export and Import Default App Associations on Windows to the XML file
The current file association settings for programs configured under the current user can be exported to an .XML file using DISM:
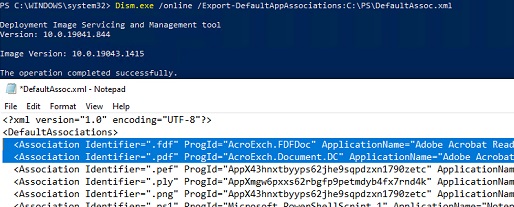
Dism.exe /online /Export-DefaultAppAssociations:C:PSDefaultAssoc.xml
The command exports to an XML file all of your configured program associations. You can open the DefaultAssoc.xml file with any text editor, and see the full list of file associations exported. If you need to use only a part of associations from this list (in order not to override the existing user associations), you can manually edit the XML file. Leave only the lines with the file extensions you need. For example, we’ll leave the following lines for PDF and FDF extensions:
<?xml version="1.0" encoding="UTF-8"?>
<DefaultAssociations>
<Association Identifier=".fdf" ProgId="AcroExch.FDFDoc" ApplicationName="Adobe Acrobat Reader DC" />
<Association Identifier=".pdf" ProgId="AcroExch.Document.DC" ApplicationName="Adobe Acrobat Reader DC" />
</DefaultAssociations>
The resulting XML file can be imported into a Windows on other computers using the DISM tool:
Dism.exe /Online /Import-DefaultAppAssociations:C:PSDefaultAssoc.xml
Important. These settings to map file extensions to apps will be applied only to new user profiles during at first logon. If you receive an App default reset notification error during the import, check the syntax of the XML file.
You can also import association settings to an offline Windows image in a WIM file (which you use to deploy Windows to new computers). First, you have to mount the image:
Dism /Mount-Image /ImageFile:C:mntimagesinstall.wim /MountDir:C:mntoffline
Then import the XML file:
Dism.exe /Image:C:mntoffline /Import-DefaultAppAssociations:\Server1ShareDefaultAssoc.xml
Tip. The current file association settings in an offline Windows image can be obtained using this command:
Dism.exe /Image:C:mntoffline /Get-DefaultAppAssociations
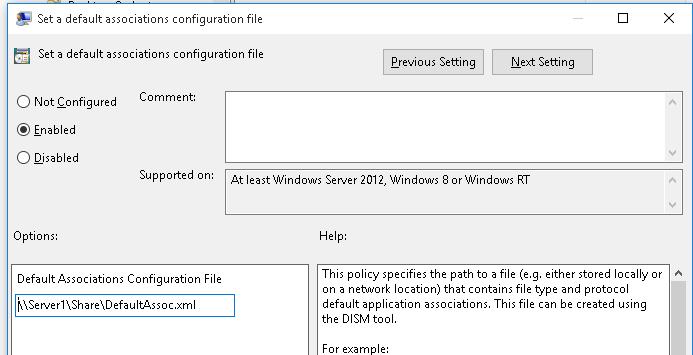
Configure Default File Associations with Group Policy
In modern versions of Windows, you can use a Group Policy (GPO) option that allows you to apply an XML file with file association settings to all current users of a computer.
For example, you want to apply a group policy with file association settings to all computers in a specific OU (Organizational Unit) of Active Directory.
- Open the Group Policy Management console (
gpmc.msc); - Find the OU with computers for which you want to apply file associations and create a new GPO;
- Switch to GPO editing mode and go to the section Computer Configuration -> Administrative Templates -> Windows Components -> File Explorer;
- Find the option Set a default associations configuration file;
- Enable the policy and specify the UNC path to your XML file (make sure the path doesn’t contain quotes or spaces) It can be located on a shared network folder, SYSVOL directory on the domain controller, or pre-copied to the computers using GPP or SCCM;

- Restart your computer to apply the new file associations.

The new file association settings will be applied to all users of the computer the next time they sign in.
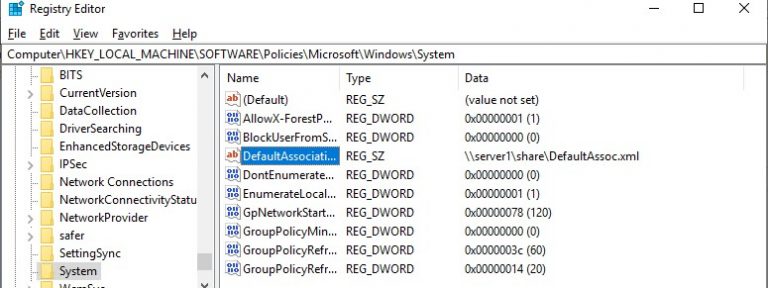
The path to the XML file with the new file association settings is contained in the DefaultAssociationsConfiguration registry parameter under the key HKEY_LOCAL_MACHINESOFTWAREPoliciesMicrosoftWindowsSystem.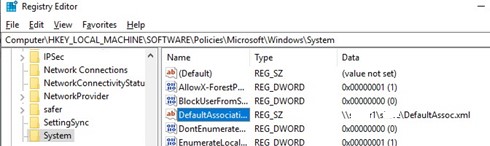
Since Windows 10 tracks changes in the file association settings, the first time you try to open a PDF file, a window may appear confirming the use of Acrobat Reader to open this file type (the prompt appears only once). Such a request will always appear after installing a new application that is registered to open an existing file type or protocol. You can hide these notifications by enabling the policy “Do not show the ‘new application installed’ notification” under the same GPO section.
When working in Windows, a user can reassign these file associations. However, the next time the Group Policy settings are updated at the next logon, the user’s file associations will be overwritten with the settings from the XML file.
Changing File Association via the Windows Registry
As we said above, in Windows 10 /11the way to set file association options has changed. In the previous section, we showed you how to configure the association for the .pdf file type with an Acrobat Reader through an XML file and Group Policy. Now let’s see how it looks in the Windows registry.
Run the Registry Editor (regedit.exe) and go to the registry key HKEY_CURRENT_USERSoftwareMicrosoftWindowsCurrentVersion ExplorerFileExts.pdfUserChoice. This registry key contains the association settings for the PDF file extension.
Please note the following registry parameters:
- ProgId – this is the identifier of the registered app to open this file type. This app ID is specified in the XML file. If a long identifier is specified instead of the application name, then the file association with the modern UWP (Metro-style) application is configured. Make sure this UWP app has not been removed from the Windows image;
- Hash – a hash value that is automatically generated to validate the file association with the program. The presence of this hash ensures that the user or administrator (via the GPO) has configured this file mapping. This security mechanism is needed to protect users from malware that can change file associations without the user’s approval.
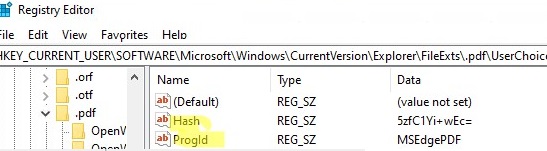
If you try to manually change the ProgId registry value and assign another program, the Hash value will no longer be valid. In this case, Windows will automatically reset the file association settings to the default state and the user will see a notification:
An app default was reset.
An app caused a problem with the default app setting for .html files, so it was reset to Microsoft Edge.

Accordingly, in Windows 10/11 and Windows Server 2022/2019/2016 you won’t be able to configure file associations through the registry, as it worked in Windows 7 and Windows Server 2008R2.
There is a third-party SetUserFTA.exe tool (mentioned earlier) that allows you to calculate the hash and assign a file extension to a program directly through the registry.
How to Reset All File Associations to Default in Windows 10 and 11?
You can reset the previously imported file association settings using the command:
Dism.exe /Online /Remove-DefaultAppAssociations
After running this command, all new users will be logged in with the default file association settings (the reset has no effect on the existing user profiles).
In order to reset the file associations configured manually by the user to the default ones, you need to click on the Reset button in Settings -> Apps -> Default Applications.

This will revert all file associations to a clean Windows 10 state.