С помощью аудита событий безопасности администратор может получать достоверную информацию обо всех событиях в системе, контролировать действия пользователей, и использовать информацию для выявления уязвимых мест в системе безопасности сервера или AD. В Windows такие события записываются в журнал Security операционной системы. В этой статье мы покажем, как настраивать политики аудита безопасности в Windows на примере настройки аудит доступа к файлам и папкам.
Для настройки политик аудита в Windows используется консоль настройки групповых политик. Если вы настраиваете политики для компьютеров/серверов домена, используйте Group Policy Management Console (gpmc.msc). При настройке политики аудита на отдельном сервере можно использовать консоль Local Group Policy Editor (gpedit.msc).
В консоли GPO есть две секции, в которых находятся политики аудита базовая и расширенная.
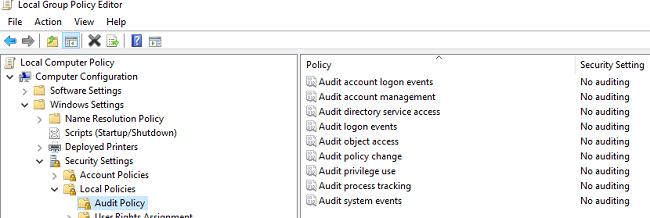
Базовая политика аудита находится в разделе Computer Configuration –> Windows Settings -> Security Settings -> Local Policies -> Audit Policy. В ней доступны следующие категории событий:
- Audit account logon events
- Audit account management
- Audit directory service access
- Audit logon events
- Audit object access
- Audit policy change
- Audit privilege use
- Audit process tracking
- Audit system events
Расширенные политики аудита находятся в секции: Computer Configuration -> Windows Settings -> Security Settings -> Advanced Audit Policy Configuration. Здесь находится 60 различных политик аудита, разделенные на 10 категорий:
- Account Logon
- Account Management
- Detailed Tracking
- DS Access
- Logon/Logoff
- Object Access
- Policy Change
- Privilege Use
- System
- Global Object Access Auditing
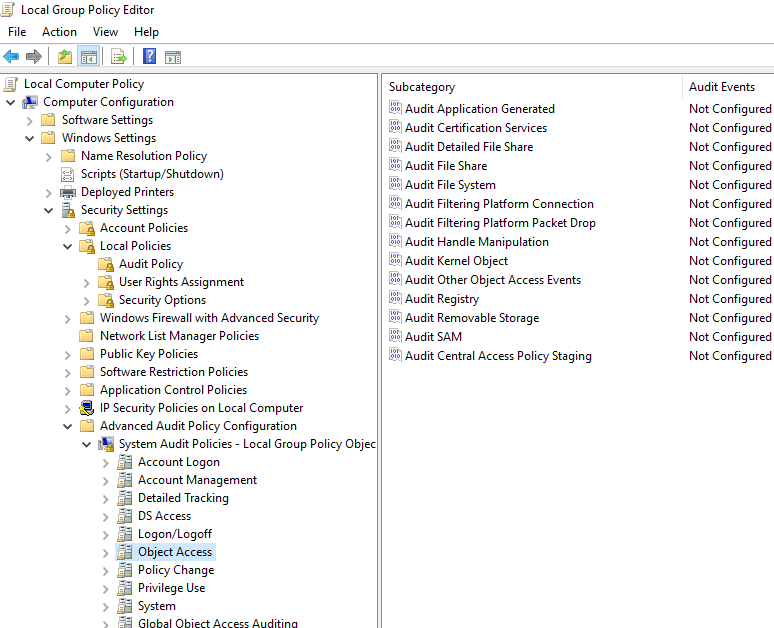
В большинстве случаев нужно использовать политики аудита из секции Advanced Audit Policy Configuration. Они позволяют настроить аудит более тонко и исключить ненужные события безопасности.
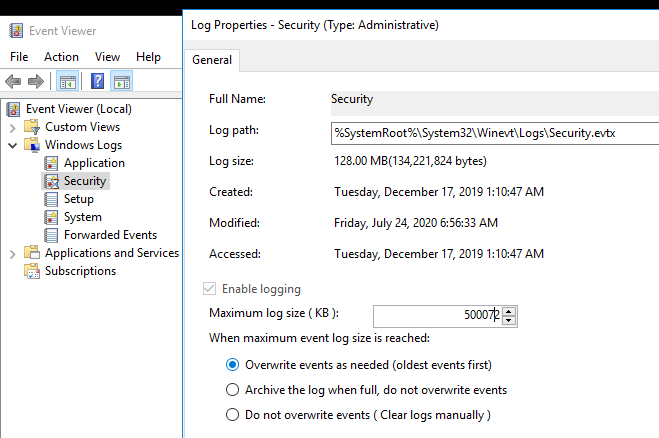
Прежде чем включать политики аудита в Windows рекомендуем увеличить максимальный размер журнала Security со 128 Mb (по-умолчанию в Windows Server)
Запустите консоль Event Viewer (eventvwr.msc), разверните Windows Logs и откройте свойства журнала Security. Увеличьте значение в поле Maximum log size (KB).
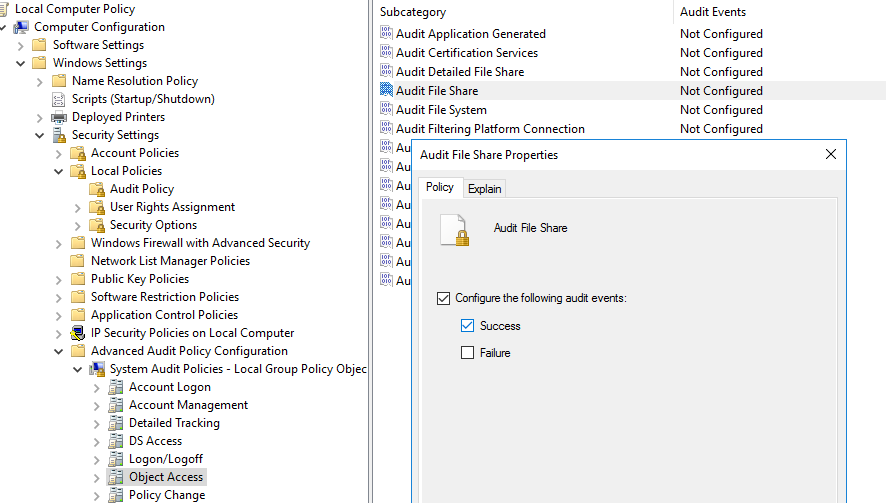
Теперь нужно настроить политику аудита доступа пользователей к файлам и папкам в сетевой папке. Перейдите в секцию Advanced Audit Policy -> Object Access. Откройте свойства подкатегории Audit File Share и Audit File System.
Включите политику: Configure the following audit events.
Укажите, какие события нужно записывать в журнал Security:
- Success – успешный доступ пользователя к объектам в сетевой папке
- Failure – события неуспешного доступа к папкам.
В нашем случае достаточно вести аудит только Success событий.
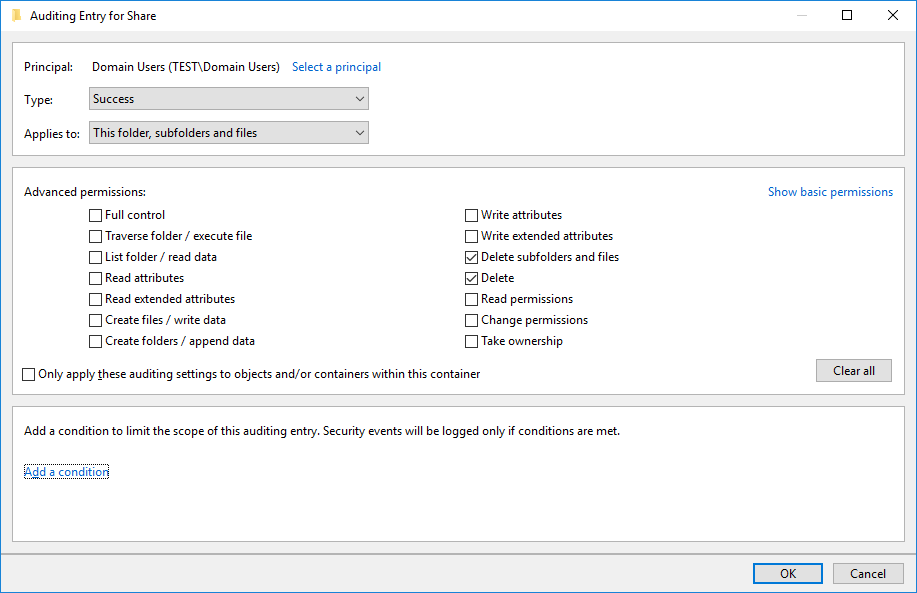
Теперь нужно назначить политику аудита к сетевой папке (создать системные списки управления доступом – SACL).
Откройте свойства сетевой папки, перейдите на вкладку Security -> Advanced -> Auditing tab -> Continue.
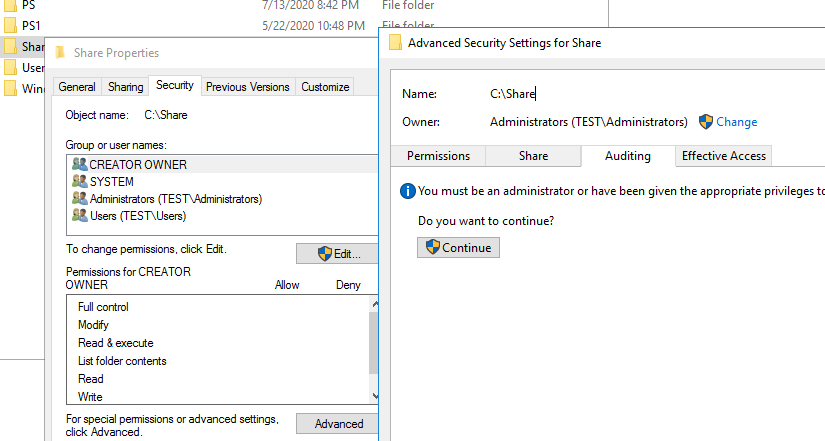
Нажмите кнопку Add -> Select a principal и добавьте субъекты – это пользователи или группы (локальные или из Active Directory), чьи действия нужно аудировать. Я добавил группы Domain Users или Everyone (это значит, я буду вести аудит доступа к сетевой папке для всех пользователей).
Далее в секции Permissions укажите, какие действия пользователей нужно записывать в журнал. Я выбрал события из категории Delete.
Сохраните изменения и обновите политики на компьютере с помощью команды:
gpupdate /force
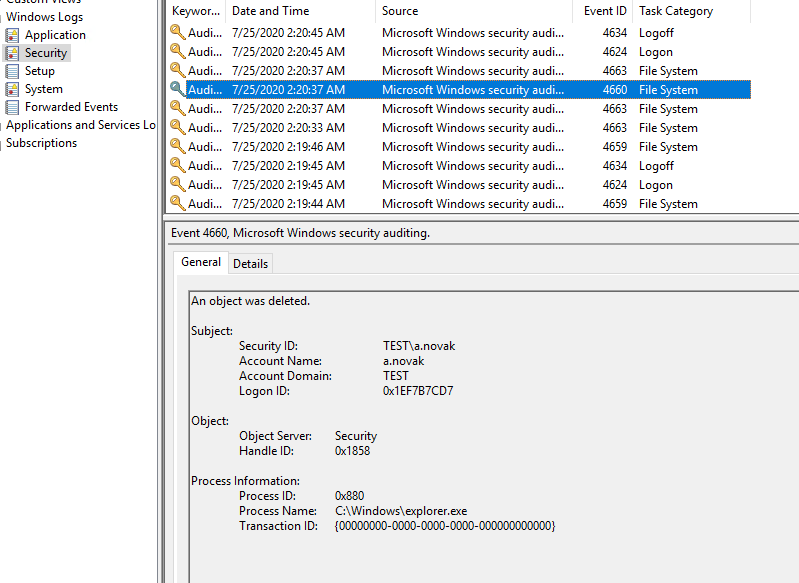
Теперь, если любой пользователь удалит файл или папку в вашей сетевой папке, в журнале Security появится событие c EventID 4660 от источника Microsoft Windows security с Task Сategory File System: An object was deleted.
В событии указан пользователь, который удалил файл (Account Name).
Не рекомендуется включать много событий аудита сразу – это может вызвать повышенную нагрузку на компьютер. Кроме того, в большом количестве событий безопасности сложно искать.
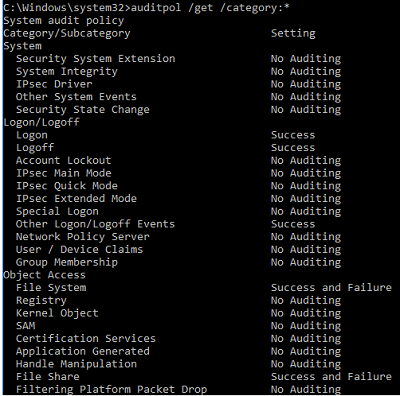
Также вы можете управлять политиками аудита через утилиту командной строки auditpol.exe.
Чтобы вывести информацию о всех включенных политиках аудита, выполните:
auditpol /get /category:*
Чтобы включить определенную политику аудита, используется такой синтаксис:
auditpol /set /subcategory:"Registry" /success:enable
Для сброса политик аудита в исходное состояние, используется команда:
AuditPol /clear
Среда, 31 — Август — 2011
Иногда случаются события, которые требуют от нас ответить на вопрос «кто это сделал?» Такое может происходить «редко, но метко», поэтому к ответу на вопрос следует готовиться заранее.
Практически повсеместно существуют проектные отделы, бухгалтерия, разработчики и другие категории сотрудников, совместно работающие над группами документов, хранящихся в общедоступной (Shared) папке на файловом сервере или на одной из рабочих станций. Может случиться так, что кто-то удалит важный документ или директорию из этой папки, в результате чего труд целого коллектива может быть потерян. В таком случае, перед системным администратором возникает несколько вопросов:
-
Когда и во сколько произошла проблема?
-
Из какой наиболее близкой к этому времени резервной копии следует восстановить данные?
-
Это случилось непреднамеренно, или же кто-то действовал с умыслом?
-
Может, имел место системный сбой, который может повториться ещё раз?
В Windows имеется система Аудита, позволяющая отслеживать и журналировать информацию о том, когда, кем и с помощью какой программы были удалены документы. По умолчанию, Аудит не задействован — слежение само по себе требует определённый процент мощности системы, а если записывать всё подряд, то нагрузка станет слишком большой. Тем более, далеко не все действия пользователей могут нас интересовать, поэтому политики Аудита позволяют включить отслеживание только тех событий, что для нас действительно важны.
Система Аудита встроена во все операционные системы Microsoft Windows NT: Windows XP/Vista/7, Windows Server 2000/2003/2008. К сожалению, в системах серии Windows Home аудит спрятан глубоко, и его настраивать слишком сложно.
Что нужно настроить?
Для включения аудита зайдите с правами администратора в компьютер, предоставляющий доступ к общим документам, и выполните команду Start → Run → gpedit.msc. В разделе Computer Configuration раскройте папку Windows Settings → Security Settings → Local Policies → Audit Policies:

Дважды щёлкните по политике Audit object access (Аудит доступа к объектам) и выберите галочку Success. Этот параметр включает механизм слежения за успешным доступом к файлам и реестру. Действительно, ведь нас интересуют только удавшиеся попытки удаления файлов или папок. Включите Аудит только на компьютерах, непосредственно на которых хранятся отслеживаемые объекты.
Простого включения политики Аудита недостаточно, мы также должны указать, доступ к каким именно папкам требуется отслеживать. Обычно такими объектами являются папки общих (разделяемых) документов и папки с производственными программами или базами данных (бухгалтерия, склад и т.п.) — то есть, ресурсы, с которыми работают несколько человек.
Заранее угадать, кто именно удалит файл, невозможно, поэтому слежение и указывается за Всеми (Everyone). Удавшиеся попытки удаления отслеживаемых объектов любым пользователем будут заноситься в журнал. Вызовите свойства требуемой папки (если таких папок несколько, то всех их по очереди) и на закладке Security (Безопасность) → Advanced (Дополнительно) → Auditing (Аудит) добавьте слежение за субъектом Everyone (Все), его успешными попытками доступа Delete (Удаление) и Delete Subfolders and Files (Удаление подкаталогов и файлов):

Событий может журналироваться довольно много, поэтому также следует отрегулировать размер журнала Security (Безопасность), в который они будут записываться. Для
этого выполните команду Start → Run → eventvwr.msc. В появившемся окне вызовите свойства журнала Security и укажите следующие параметры:
-
Maximum Log Size = 65536 KB (для рабочих станций) или 262144 KB (для серверов)
-
Overwrite events as needed.
На самом деле, указанные цифры не являются гарантированно точными, а подбираются опытным путём для каждого конкретного случая.
Итак, кто же удалил документы (Windows 2003/XP)?
Нажмите Start → Run → eventvwr.msc и откройте для просмотра журнал Security (Безопасность). Журнал может быть заполнен событиями, прямого отношения к проблеме не имеющими. Щёлкнув правой кнопкой по журналу Security, выберите команду View → Filter и отфильтруйте просмотр по следующим критериям:
- Event Source:Security;
- Category: Object Access;
- Event Types: Success Audit;
- Event ID: 560;

Просмотрите список отфильтрованных событий, обращая внимание на следующие поля внутри каждой записи:
- Object Name. Название искомой папки или файла;
- Image File Name. Имя программы, с помощью которой удалили файл;
- Accesses. Набор запрашиваемых прав.
Программа может запрашивать у системы сразу несколько типов доступа — например, Delete+Synchronize или Delete+Read_Control. Значимым для нас правом является Delete.

Итак, кто же удалил документы (Windows 2008/Vista)?
Нажмите Start → Run → eventvwr.msc и откройте для просмотра журнал Security (Безопасность). Журнал может быть заполнен событиями, прямого отношения к проблеме не имеющими. Щёлкнув правой кнопкой по журналу Security, выберите команду View → Filter и отфильтруйте просмотр по следующим критериям:
- Event Source: Security;
- Category: Object Access;
- Event Types: Success Audit;
- Event ID: 4663;

Не спешите интерпретировать все удаления как злонамеренные. Эта функция зачастую используется при обычной работе программ — например, исполненяя команду Save (Сохранить), программы пакета Microsoft Office сначала создают новый временный файл, сохраняют в него документ, после чего удаляют предыдущую версию файла. Аналогично, многие приложения баз данных при запуске сначала создают временный файл блокировок (.lck), затем удаляют его при выходе из программы.
Мне приходилось на практике сталкиваться и со злонамеренными действиями пользователей. Например, конфликтный сотрудник некоей компании при увольнении с места работы решил уничтожить все результаты своего труда, удалив файлы и папки, к которым он имел отношение. События такого рода хорошо заметны — они генерируют десятки, сотни записей в секунду в журнале безопасности. Конечно, восстановление документов из Shadow Copies (Теневых Копий) или ежесуточно автоматически создаваемого архива не составляет особого труда, но при этом я мог ответить на вопросы «Кто это сделал?» и «Когда это произошло?».
Last Content Update: 05-Oct-2010
How to implement audit policy
There are two methods of setting up your audit policy:
- Basic security audit policy in Windows (also referred as local Windows security settings) allows you to set auditing by on a per-event-type basis. Basic policies can be found under Computer Configuration -> Windows Settings -> Security Settings -> Local Policies -> Audit Policy.
- Advanced security audit policy address same issues, as basic audit policies, but let you to set up auditing granularly within each event category. These settings are found in Computer Configuration -> Policies -> Windows Security Settings -> Advanced Audit Policy Configuration -> System Audit Policies. They appear to overlap (not override) basic security audit policies.
Microsoft advises organizations not to use both the basic audit policy settings and the advanced settings simultaneously for same category, because when advanced audit policy is configured, it will always override basic audit policies, which in result can cause “unexpected results in audit reporting”.
You can view the Security log with the Event Viewer.
Before changing any settings, you should:
- Determine which types of events you want to audit from the list below, and specify the settings for each one. The settings you specify constitute your audit policy. Note that some event types are audited by default.
- Decide how you will collect, store and analyze the data. There is little value in amassing large volumes of audit data if there is no underlying plan to manage and use it.
- Specify the maximum size and other attributes of the Security log using the Event Logging policy settings. An important consideration is the amount of storage space that you can allocate to storing the data collected by auditing. Depending on the setting you choose, audit data can quickly fill up available disk space.
- Remember that audit settings can affect computer performance. Therefore, you should perform performance tests before you deploy new audit settings in your production environment.
- If you want to audit directory service access or object access, configure the Audit directory service access and Audit object access policy settings.
Types of events you can audit
Here are the basic security audit policy categories:
- Audit account logon events. User logon auditing is the only way to detect all unauthorized attempts to log in to a domain. It is vital to audit logon events — both successful and failed — to detect intrusion attempts. Logoff events are not tracked on domain controllers.
- Audit account management. Carefully monitoring all user account changes helps minimize the risk of business disruption and system unavailability.
- Audit directory service access. Monitor this only when you need to see when someone accesses an AD object that has its own system access control list (for example, an OU).
- Audit logon events. Seeing successful and failed attempts to log on or off a local computer is useful for intruder detection and post-incident forensics.
- Audit object access. Audit this only when you need to see when someone used privileges to access, copy, distribute, modify or delete files on file servers.
- Audit policy change. Improper changes to a GPO can greatly damage the security of your environment. Monitor all GPO modifications to reduce the risk of data exposure.
- Audit privilege use. Turn this policy on when you want to track each instance of userprivileges being used. It is recommended to setup this function granularly in Sensitive Privilege Use of the advanced audit policies.
- Audit process tracking. Auditing process-related events, such as process creation, process termination, handle duplication and indirect object access, can be useful for incident investigations.
- Audit system events. Configuring the system audit policy to log startups, shutdowns and restarts of the computer, and attempts by a process or program to do something that it does not have permission to do, is valuable because all such events are very significant. For example, if malicious software tries to change a setting on your computer without your permission, system event auditing would record that action.
Recommended Windows Auditing Settings
The following advanced security audit policy settings are recommended:
Account Logon
- Audit Credential Validation: Success and Failure
Account Management
- Audit Computer Account Management: Success and Failure
- Audit Other Account Management Events: Success and Failure
- Audit Security Group Management: Success and Failure
- Audit User Account Management: Success and Failure
DS Access (Directory Service Access)
- Audit DirectoryService Access: Success and Failure on DC
- Audit Directory Service Changes: Success and Failure on DC
Logon/Logoff
- Audit Account Lockout: Success
- Audit Logoff: Success
- Audit Logon: Success and Failure
- Audit Special Logon: Success and Failure
Object Access
- Enable these settings only if you have a specific use for the data that will be logged, because they can cause a large volume of entries to be generated in your Security logs.
Policy Change
- Audit Audit Policy Change: Success and Failure
- Audit Authentication Policy Change: Success and Failure
Privilege Use
- Enable these settings only if you have a specific use for the data that will be logged, because they can cause a large volume of entries to be generated in your Security logs.
Process Tracking
- Audit Process Creation: Success
Enable these settings only if you have a specific use for the information that will be logged, because they can cause a large volume of entries to be generated in your Security logs.
System
- Audit Security State Change: Success and Failure
- Audit Other System Events: Success and Failure
- Audit System Integrity: Success and Failure
What is audit policy in Windows?
Windows audit policy defines what types of events are written to the Security logs of your Windows servers. Establishing an effective audit policy helps you spot potential security problems, ensure user accountability and provide evidence in the event of a security breach.
The recommended audit policy settings provided here are intended as a baseline for system administrators starting to define AD audit policies. You should be sure to consider the cybersecurity risks and compliance requirements of your organization. In addition, test and refine your policies before implementing them in your production environment.

A Windows system’s audit policy determines which type of
information about the system you’ll find in the Security log. Windows uses nine audit policy categories and 50 audit policy subcategories
to give you more-granular control over which information is logged.
By default, if you define a value for a policy in one of
the top-level categories—either in the computer’s Local Security Policy or in
an applicable GPO—then that top-level policy will usually override any
configurations that you make at the subcategory level. Under Windows’ default behavior,
subcategory policies take effect only when you leave the related
top-level category undefined in the Local Security Policy and in all applicable
GPOs. If a category policy is defined, then all subcategory policies under that
policy will be defined. We stress usually and default behavior
because the new Group Policy Object Editor (GPE)
Audit: Force audit policy
subcategory settings (Windows Vista or later) to override audit policy category
settings
setting (under Computer ConfigurationWindows SettingsSecurity
SettingsLocal PoliciesSecurity Options) reverses that behavior. If you enable
this setting, then your subcategory configurations will override how the
applied Group Policy sets the top-level policies.
Audit Policy Categories
Each Windows system on your network
has nine audit policy categories and 50 policy subcategories, which you can
enable or disable. (Windows NT has only seven categories; Windows 2003 has nine
categories but no subcategories.) Look at the Local Security Policy. You will
see policy settings for only the main categories:
- Audit account logon events
- Audit logon events
- Audit account management
- Audit directory service access
- Audit object access
- Audit policy change
- Audit privilege use
- Audit process tracking
- Audit system events
An event in the Windows Security log has a keyword
for either Audit Success or Audit Failure. When you enable an audit policy
(each of which corresponds to a top-level audit category), you can enable the
policy to log Success events, Failure events, or both, depending on the policy.
All nine audit policies generate Success events, but only some policies
generate Failure events.
Don’t fall
for the recommendation to enable only Failure events for each category. A
common misconception is that a Failure-only audit policy will alert you to all
suspicious events. In reality, many of the most important events in the
Security log—events such as changes to critical user accounts and groups,
account lockouts, and changes to security settings—are Success events.
To view a system’s audit policy settings, you can open the
MMC Local Security Policy console on the system and drill down to Security
SettingsLocal PoliciesAudit Policy as shown below.
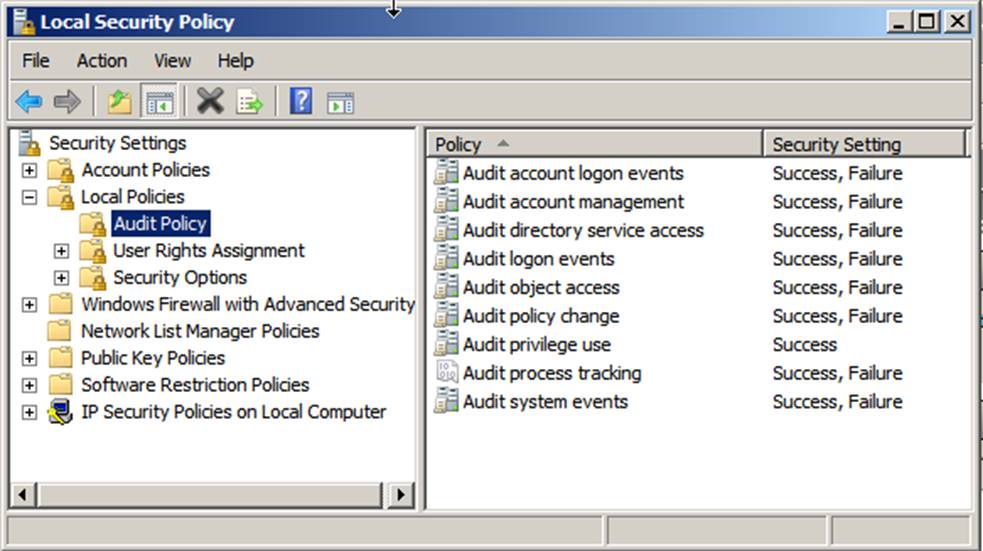
When you
open an audit policy, you may or may not be able to modify it, depending on
whether the policy has been defined in a GPO that has been applied to the local
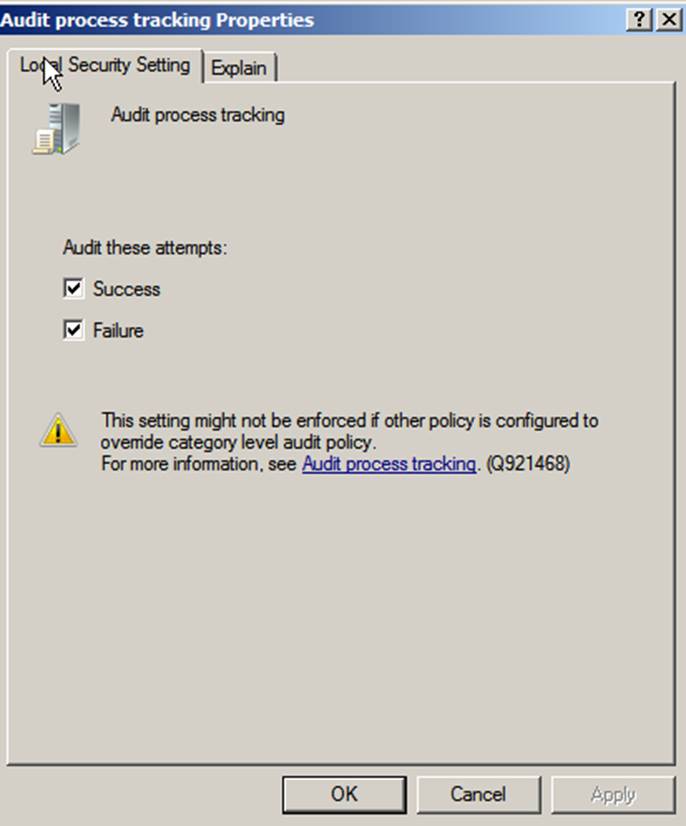
system. In the example below, only Audit process tracking
can be changed. The other policies have been set by a group policy. If the
computer is a member of an AD domain, then the computer automatically applies
appropriate GPOs from the domain. Any policy that is defined in a GPO overrides
policies that are defined in the system’s Local Security Policy object and
becomes the effective setting.
Windows always displays the effective settings
in the MMC Local Security Policy console. (If you can modify a setting, then
you know that the policy hasn’t been defined in any applicable GPOs that are
defined in AD. When set by Group Policy, a scroll icon appears next to the
setting.) We recommend that you use the Local Security Policy console only to view
a system’s audit policy—not to configure it.
As with all security settings, the best practice is to use
Group Policy to centrally manage your audit policy. Using local settings can be
risky: A group policy could override the local policy settings. Microsoft warns
you of this behavior on each policy’s Local Security Setting tab shown below.
Audit Policy Subcategories
What about subcategory settings? The big advantage of
using subcategories is the ability to limit the number of events that result
from the related category, thus reducing (though not eliminating) unnecessary
noise.
You can control these policies in Group Policy under Advanced Audit Policy Configuration.
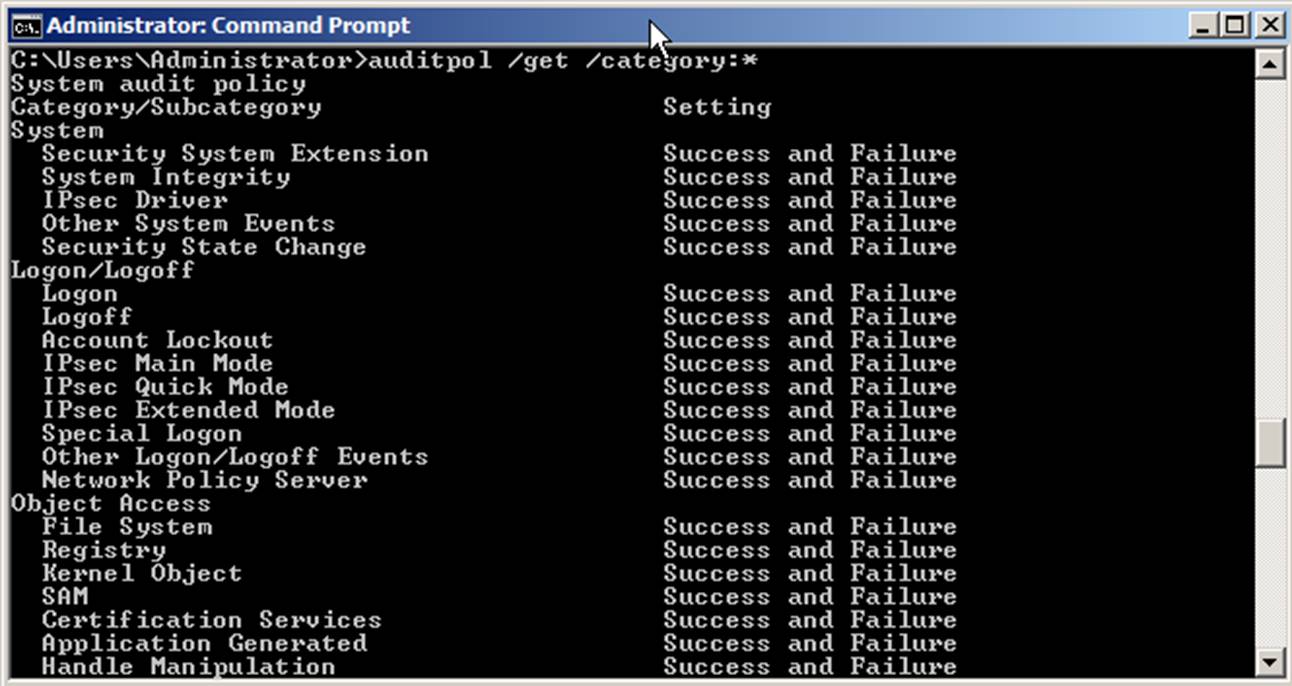
You can
also use Auditpol to determine which subcategories are being audited. If you
are performing a baseline of a system, Auditpol gives you the ability to see
what is really happening. Take a look at an example of what you will see when
you use the auditpol /get /category:* command.
But by default, subcategory settings will take effect only
if the top-level policy is undefined. However, you can reverse this behavior by
enabling the Audit: Force audit policy subcategory settings (Windows Vista
or later) to override audit policy category settings security option as shown below.
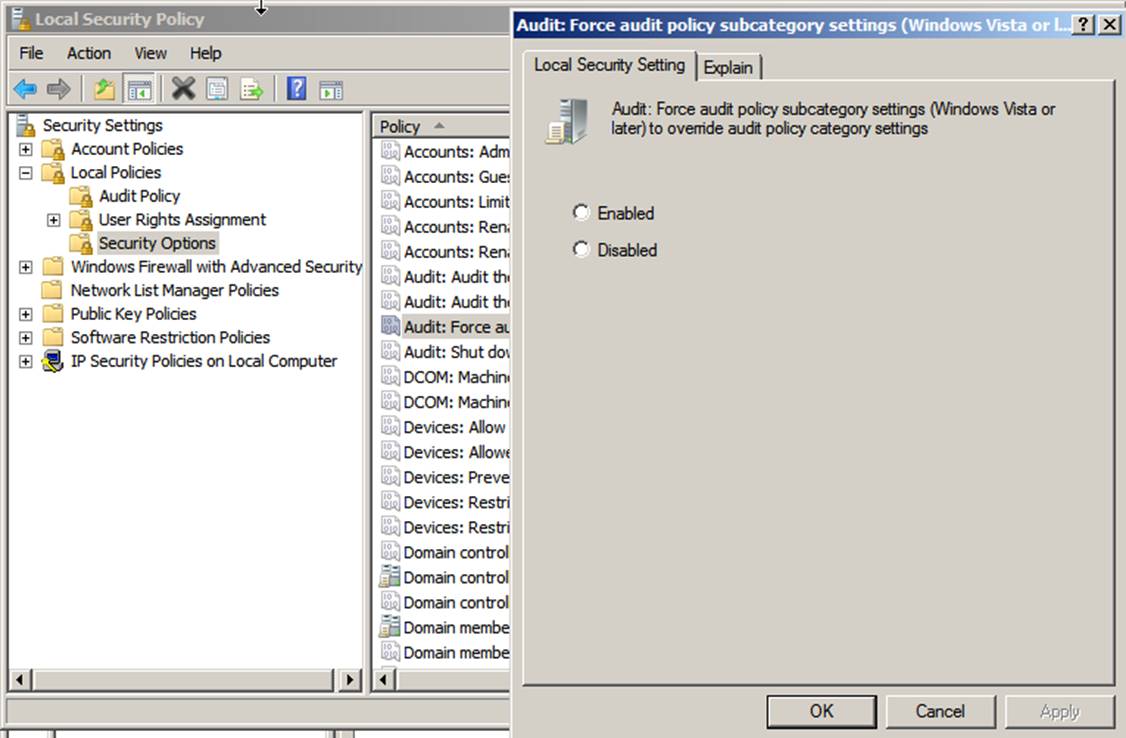
Note that the default installation of this option is
actually Not defined rather than Disabled, as the option’s Explain tab
states. We strongly recommend that you set this option to be either Enabled or Disabled,
for consistent auditing across your enterprise. If this option is enabled and
you set a policy subcategory, then no category policy will override it. The
subcategory setting will take over on Windows
systems. (Subcategories cannot be set on earlier Windows versions, so only
policy categories are effective on legacy systems.) If this option is enabled but
you haven’t specifically configured any subcategory settings for a policy,
those subcategories will follow the main category policy. This complex
hierarchy of setting priorities can yield unintended results.
Don’t rely on the Local Security Policy console or GPMC
alone to determine what is being audited. The Auditpol command will tell you
exactly what’s happening. Just make sure that Group Policy has already been
applied when you use Auditpol. (Group Policy might take some time to replicate
and to be applied after a change).
Top-Level Auditing
For the moment, let’s suppose that you have disabled the
Audit:
Force audit policy subcategory settings (Windows Vista or later) to override
audit policy category settings
option, and let’s examine the nine top-level
audit policy settings one by one. We’ll delve into the granular subcategory
settings later.
Audit Account Logon Events
Microsoft should have named the
Audit account logon
events
policy Audit authentication events. On DCs, this policy
tracks all attempts to log on with a domain user account, regardless of the
attempt’s origination. On a workstation or member server, the policy records
any logon attempt that uses a local account that is stored in the computer’s
Security Account Manager (SAM).
The policy has four
subcategories:
- Credential Validation
- Kerberos Authentication Service
- Kerberos Service Ticket Operations
- Other Account Logon Events
We’ll discuss this policy and its subcategories in detail
in Chapter 4.
Audit Logon Events
The Audit logon events audit policy actually
controls the Logon/Logoff category. The policy’s main objective is to record
all attempts to use either a domain account or a local account to log on to or
off of the local computer. On DCs, this policy records attempts to access the
DC only. The policy does not, for example, track a user who uses a domain
account to log on at a workstation. (In that case, the user isn’t logging on to
the DC; the DC is simply authenticating the user.) In such an instance, a
network logon event (event ID 4624) would appear in the DC’s Security log
because to apply Group Policy for the user, the workstation must log on as the
user to the DC. But to track all domain account authentication, you should use the
Audit account logon events policy.
The policy has nine subcategories:
- Logon
- Logoff
- Account Lockout
- IPsec Main Mode
- IPsec Quick Mode
- IPsec Extended Mode
- Special Logon
- Other Logon/Logoff Events
- Network Policy Server
As you can see, some of these subcategories have nothing
to do with logons or logoffs. We’ll discuss this policy and its subcategories in
detail in Chapter 5.
Audit Process Tracking
The Audit process tracking policy records events in
the Detailed Tracking category. This policy’s primary purpose is to track each
program that is executed by either the system or by end users. You can even
determine how long the program was open. You can tie this policy, the
Audit
logon events
policy, and Audit object access policy together by
using the Logon ID, Process ID, and Handle ID fields within various event
descriptions, thereby painting a detailed picture of a user’s activities.
The policy has four
subcategories:
- Process Creation
- Process Termination
- DPAPI Activity
- RPC Events
We’ll discuss this policy and its subcategories in detail
in Chapter 6.
Audit Object Access
The Audit object access policy handles auditing
access to all objects that reside outside of AD. The first use you might think
of for this policy is file and folder auditing. You can also use the policy to
audit access to any type of Windows object, including registry keys, printers,
and services.
Furthermore, to audit access to an object such as a
crucial file, you must enable more than just this policy; you must also enable
auditing for the specific objects that you want to track. To configure an
object’s audit policy:
- Open the object’s Properties dialog box.
- Select the Security tab
- Click Advanced.
- Select the Auditing tab as shown below
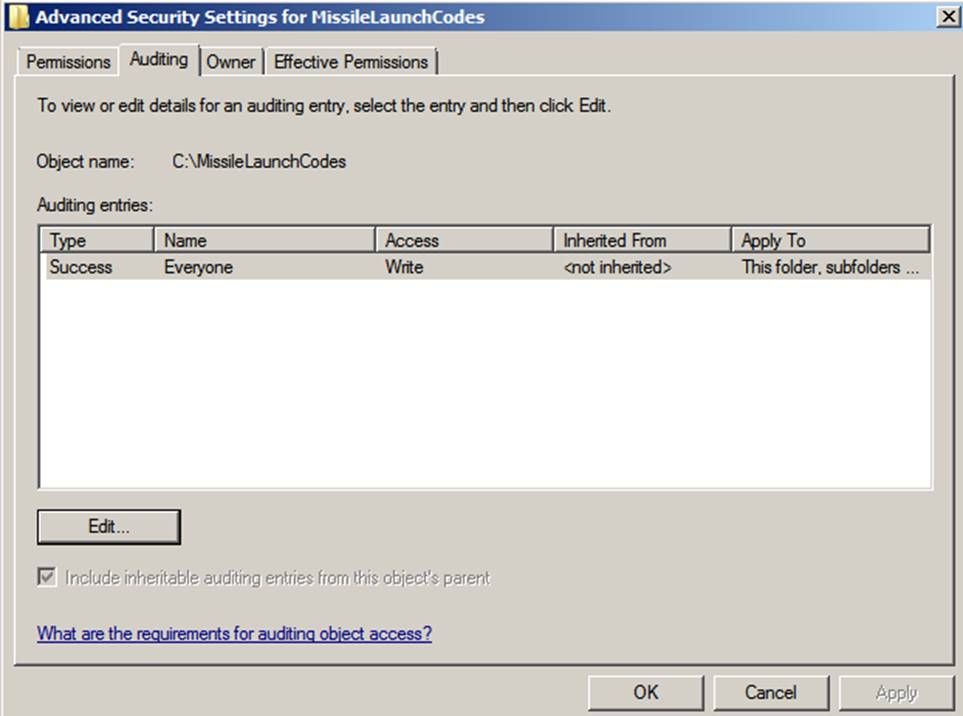
However, be warned: This policy can bog down servers.
Audit only crucial objects and audit only for crucial access (e.g., Write
access).
The policy has 11
subcategories:
- File System
- Registry
- Kernel Object
- SAM
- Certification Services
- Application Generated
- Handle Manipulation
- File Share
- Filtering Platform Packet Drop
- Filtering Platform Connection
- Other Object Access Events
We’ll discuss this policy and its subcategories in detail
in Chapter 7.
Audit Account Management
The Audit account management policy, which you can
use to monitor changes to user accounts and groups, is valuable for auditing
the activity of administrators and Help desk staff. This policy logs password
resets, newly created accounts, and changes to group membership; one of the Account
Management category’s subcategories, Other Account Management Events, logs
changes to lockout and password policy. On DCs, the policy logs changes to
domain users, domain groups, and computer accounts. On member servers, the
policy logs changes to local users and groups.
The policy has six subcategories:
- User Account Management
- Computer Account Management
- Security Group Management
- Distribution Group Management
- Application Group Management
- Other Account Management Events
We’ll discuss this policy and its subcategories in detail
in Chapter 8.
Audit Directory Service Access
The primary purpose of the
Audit directory service
access
policy is to provide a low-level audit trail of changes to objects in
AD. By using this policy, you can identify exactly which fields of a user
account, or any other AD object, were accessed.
The policy tracks the same activity as does the
Audit
account management
policy, but at a much lower level. The information that
Audit
account management
provides is better used for monitoring the maintenance
of user accounts and groups. Using the Audit directory service access policy
is the only way to track changes to OUs and GPOs—an important task for
change-control purposes.
The policy has four subcategories:
- Directory Service Access
- Directory Service Changes
- Directory Service Replication
- Detailed Directory Services Replication
We’ll discuss this policy and its subcategories in detail
in Chapter 9.
Audit Privilege Use
The Audit privilege use policy tracks the exercise
of user rights. Microsoft uses the terms privilege, right, and permission
inconsistently. In this policy’s case, privilege refers to the user
rights that you find in the Local Security Policy (under Security SettingsLocal
PoliciesUser Right Assignment). This policy generates a lot of noise; we
usually recommend that you leave it disabled.
The policy has three subcategories:
- Sensitive Privilege Use
- Non Sensitive Privilege Use
- Other Privilege Use Events
We’ll discuss this policy and its subcategories in detail
in Chapter 10.
Audit Policy Change
The primary purpose of the Audit policy change policy
is to notify you of changes to important security policies on the local system.
Such changes include changes to the system’s audit policy or, if the local
system is a DC, changes to trust relationships.
The policy has six subcategories (one of which has the
same name as the top-level policy):
- Audit Policy Change
- Authentication Policy Change
- Authorization Policy Change
- MPSSVC Rule Level Policy Change
- Filtering Platform Policy Change
- Other Policy Change Events
We’ll discuss this policy and its subcategories in detail
in Chapter 11.
Audit System Events
The Audit system events
policy logs several miscellaneous security events. The policy has five
subcategories:
- Security State Change
- Security System Extension
- Security Integrity Events
- IPsec Driver Events
- Other System Events
We’ll discuss this policy and its subcategories in detail
in Chapter 12.
Using Event Viewer to View Events
The preceding audit policies allow you to fire up the
Windows auditing function. But when Windows starts sending events to the
Security log, you need a way to view them. The only built-in tool for accessing
the Security log is the MMC Event Viewer snap-in as seen below.
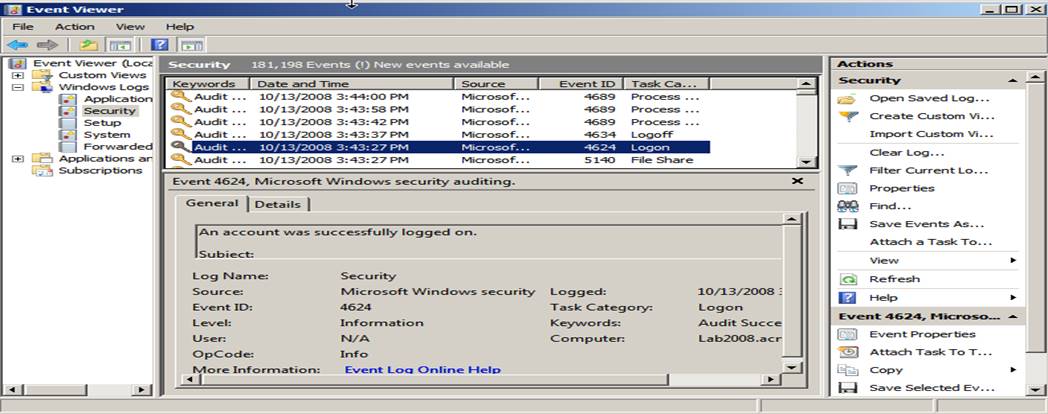
By default, Event Viewer
displays the local computer’s event logs, but you can easily use the console to
view the logs of other computers on the network. (You must have Manage
auditing and security log
and Access this computer from the network user rights on the target system.) To view
another computer’s logs, right-click the root in the left pane, and select
Connect
to another computer
.
On the preview pane’s General tab, Event Viewer shows more
information about each event; select the Details tab to see all of the
information. You might also want to open the event’s Properties for a different
view of the information as shown below.
You’ll see standard fields (called System fields) and a Details field in the upper
scroll box of the Properties General tab. System fields in the lower section of
the tab display the event ID, the date and time that the event occurred,
whether the event is a Success or Failure (look in the Keywords field), the
event’s source, and the event’s category (in the Task Category field).
All events in the Security log list the source as
Security, with the exception of events That have to do with the logging
mechanism itself (the source for those tasks is Eventlog). Security events fall
into 50 task categories, which correspond to the 50 audit policy subcategories.
The User field isn’t typically of much value because many events simply list N/A.
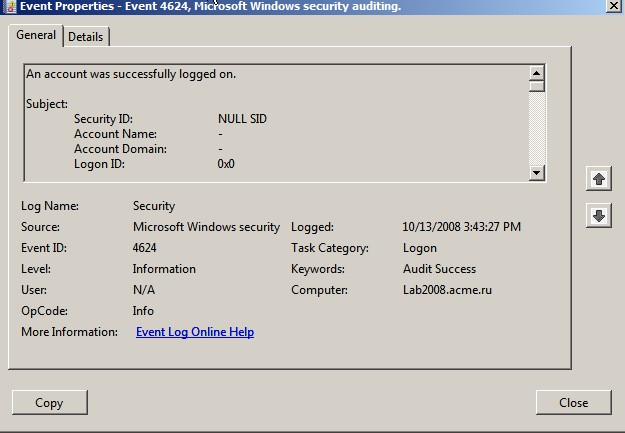
Select the Details tab for a different view of the
information. This is where you’ll find the valuable information about the
event. You can choose a “friendly” view or you can see the data in
XML format as displayed below.

When you view an event’s details, you are actually seeing
two types of information that have been merged. Each event ID has a static
description that contains defined placeholders; dynamic strings of information
that are connected with a particular instance of the event are merged into
these placeholders. Take a look at the information for an instance of event ID
4624. This is the output that you’ll see when you use the Details
tab’s Copy button. The information appears twice, first in the “friendly”
format and then in XML format. Note that the fields offer a combination of
static information that appears in every event and dynamic information that is
inserted as the event is constructed.
Microsoft attempts to explain some of these event fields, but for a much more detailed
(and clear) explanation, see our wiki.
The EventData section appears toward the end of this
output. You need to understand how this section works because it is in this
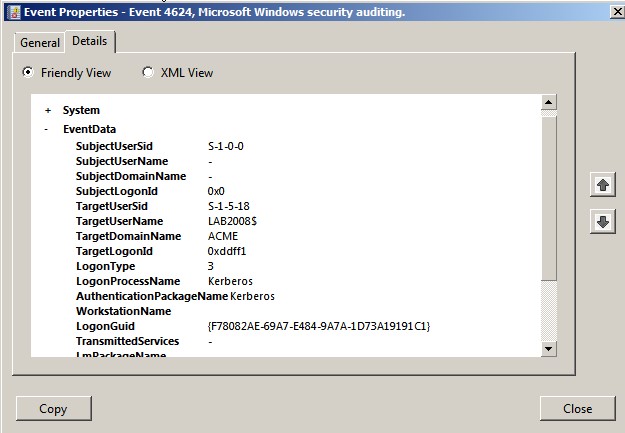
section that the important event details reside. In the case of event ID 4624,
you must look at string 6 to determine the name of the user who logged on
(LAB2008$). String 9 tells you the type of logon that was attempted (type 3—a
network logon). These dynamic strings are also important when you have a
Security log–management solution or want to use a utility, such as Microsoft
LogParser, to analyze the log. Many of the typical alerts that such solutions
let you define require criteria that are based in part on one or more strings
from an event’s description. In most cases, filtering based on event ID alone
isn’t sufficient. When designing a report that is based on the Security log,
you’ll often find that you need to parse one of the report columns from a
string in the event’s description. If you are shopping for a Security
log–management product, make sure that it provides the flexibility to create
alert criteria and reports that are based on specific string numbers within the
description.
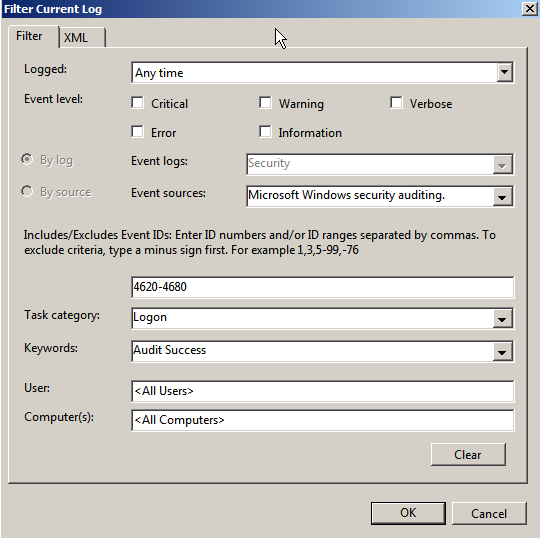
Event Viewer Filter
The filter in the new Event Viewer is also a big
improvement as shown in the screenshot below. In the action pane on the right of Event Viewer, click Filter current event log to access the filter. For the
Security log, the only event source available is
Microsoft Windows security
auditing
. You must choose this source in the Event sources drop-down box
before you can see and choose which subcategories (called task categories in
this GUI) to filter.
You can use a filtered view to save a subset of event logs
for further analysis. You can save a filtered view for later use as a custom
view.
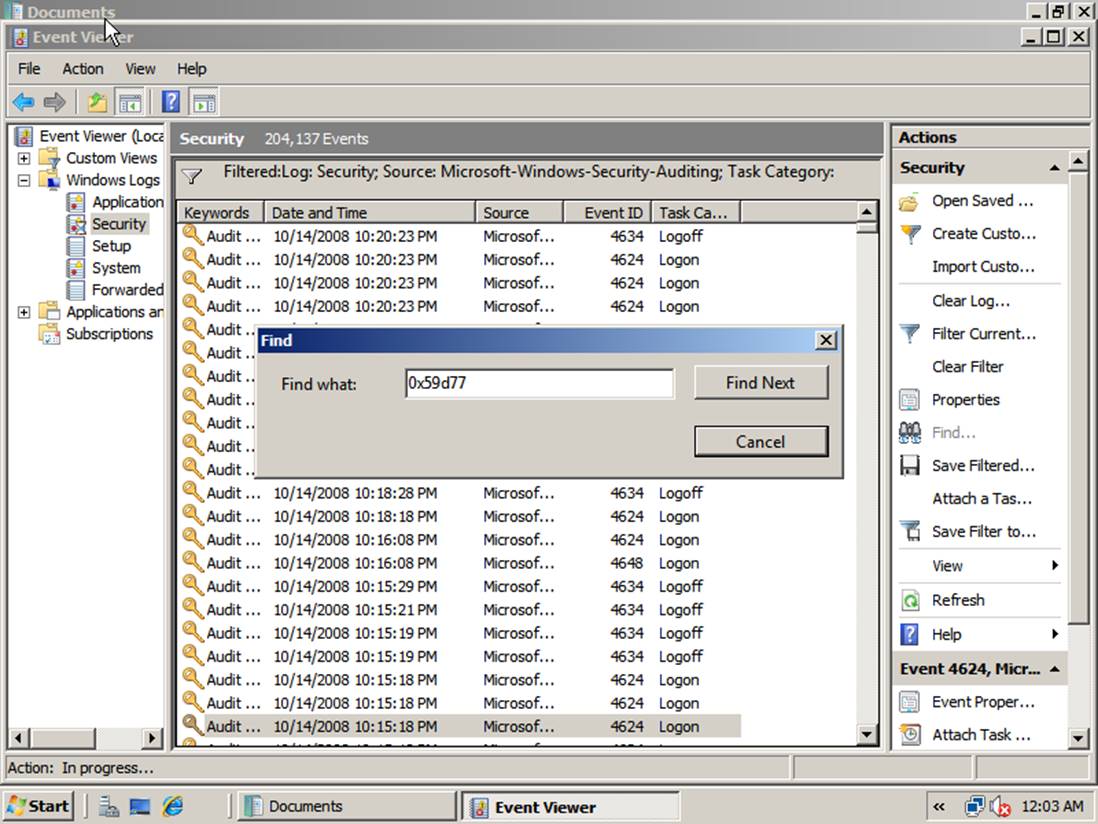
Searching for Events
The Find feature provides a useful way to correlate
events. In the action pane on the right of Event Viewer, click
Find to access this feature. For example, you can search for a logon ID to find
when a user logged on, the audited objects that the user accessed, and when the
user logged off as shown below. If the filter or Find functions are slow, try
limiting the time period that is specified in the Logged drop-down box to
reduce the number of events that must be processed.
Attach Task
The ability to attach a task to
an event is a handy feature in Windows.
The
simplest method is to select the desired event in Event Viewer and then click
the Attach Task To This Event option in the actions pane. This action starts
the Create Basic Task wizard. The wizard asks you to name the task and prompts
you to define the program, email message, or display message that you want to occur when that event ID is
logged. After you complete the wizard, you can view the event, its properties,
and its history by opening the MMC Task Scheduler snap-in, which you can fine
on the Start Menu under All ProgramsAccessoriesSystem Tools.
Often, though, you’ll need to be a little more specific
with your trigger criteria than simply specifying an event ID. The good news? Any
criteria that you can specify in a custom view filter, including advanced XML
filters, can also be specified in an event trigger. The bad news? You can’t use
Event Viewer to create the trigger—you must use Task Scheduler instead:
- Open Task Scheduler
- Click Create Task
- On the General tab, specify the name and description of the event, as well as which account the task should execute under
Using Event Viewer to Configure the Security Log
Aside from using Event Viewer to view security events, you
use it to configure the maximum size of the Security log. Right-click Security
in the left pane, then select Properties to open the Log Properties
dialog box shown below.
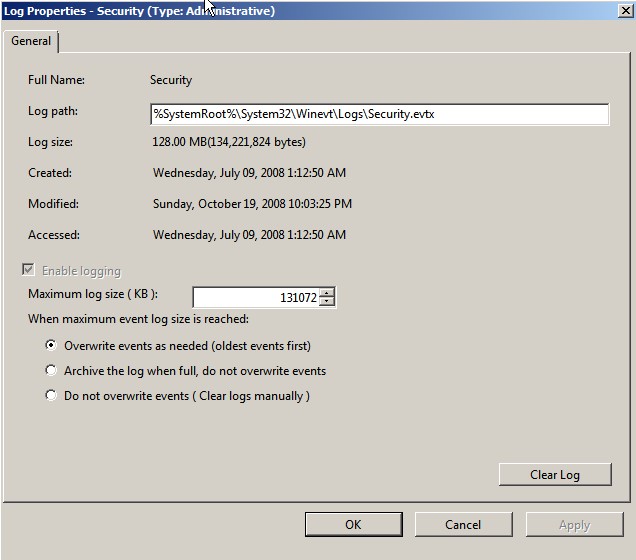
Windows will not grow the log beyond the size you specify. Nowadays you can set log sizes very large — even in gigabytes.
No matter which maximum size you configure, the log will
eventually reach it. You can configure Windows to do one of three things at
that point. Don’t choose the Do not overwrite events (Clear logs manually)option; if you do, Windows will just stop
logging events when the log reaches its maximum size. (Although you can use the
CrashOnAuditFail option to configure Windows to crash when logging stops, we
don’t recommend this approach for most commercial scenarios. See http://support.microsoft.com/kb/823659 for details
about CrashOnAuditFail.)
The Archive the log when full, do not overwrite
events
option is also useful, perhaps for a small group of servers, but you
will need to attend to it periodically so that the logs don’t fill the storage
location to capacity. However, this feature is no substitute for a full log-management
solution that moves logs to separate and secured archive.
That leaves the
Overwrite events as needed (oldest
events first)
option, which we select for nearly every project. (This is
where log-management applications come into play: You’ll need one if you want
to store a large quantity of events from multiple servers. You can learn about
good log-management applications during the sponsor presentations in our
monthly Security log webinars, which you can find at www.ultimatewindowssecurity.com/securitylog.)
Note that the Log Properties dialog box also displays the
log file’s location and current size, as well as various dates and times that
are associated with the log. From this dialog box, you can also clear the log.
When you clear the Security log, Windows immediately logs event ID 1102.
Although this event falls under the Audit system events category,
Windows always logs the event, regardless of your audit policy. When you clear
the log, Event Viewer gives you the option of saving a copy first.
You can use Event Viewer to dump the Security log to a
file, either in the process of clearing the log or independently. Right-click Security
in the left pane and select Save As to choose the format in which to
save the log. If you specify event file (EVTX) format, Event Viewer will save a
copy of the log in the same EVTX format that the live log uses. If you use this
format, you’ll need to use a tool that supports EVTX files, such as LogParser
or the Event Viewer itself. You can also specify comma-separate value (CSV) or
tab-delimited (TXT) format.
Note that when you save the Security log, Windows requires
you to save it to a local volume of the server. You can subsequently copy the
file elsewhere on the network, but the dump application programming interface API
that Event Viewer uses can save the log only to a local volume. By default,
Event Viewer stores the Security log as %systemroot%System32WinevtLogsSecurity.evtx,
but you can change the location by editing the registry.
Microsoft usually warns against editing the registry
and encourages you to back up the system first.
That being said,
here’s the procedure:
- Open a registry editor
- Navigate to the HKEY_LOCAL_MACHINESYSTEMCurrentControlSetServicesEventlogSecurity subkey
- Set the File value to any path name on the local system. (The File value is data type REG_EXPAND_SZ, so you can include environment variables in the path name.)
Why would you want to change the location of the log file?
Perhaps you want to offload the file I/O that is associated with the Security
log to a different volume.
Event Viewer occasionally will report that the Security
log is corrupt and will refuse to display it. Usually, all you need to do to
make the problem go away is close and re-open Event Viewer.
Security Log Integrity
The Security log is fairly secure. To erase events or
otherwise tamper with the Security log or audit policy, you need physical
access to the target system, Administrator authority to that system, or Write
access to a GPO that applies to that system.
Larger IT departments should implement separation of duty
between operations and security-monitoring staff. To protect the integrity of
Security logs from rogue administrators, you must export events from the
Security log, as frequently as possible, to a separate server that is both
physically and logically out of reach of the local server’s administrator and
other operations staff. Security-monitoring staff then can monitor the security
activity that the servers report and can review the activity of operations
staff, as needed.
Subscriptions
You can use subscriptions to forward events from another
computer to a collector system. This method is no match for log-management
software but can be useful if you need to watch for only a few events. Windows
Event Collector and subscriptions can be set up using the Wevtutil program.
Subscriptions can also be set up in Event Viewer.
A Powerful New Utility: Wevtutil
Microsoft introduced Wevtutil in Windows
Server 2008. This utility allows control over nearly every aspect of the event
logs. You can also use Wevtutil to reveal the event-log schema. As with many
tools, Wevtutil doesn’t come with enough documentation, but don’t be afraid to
dive in.
You will likely be surprised by just how many logs exist.
To enumerate logs, use the wevtutil el command; to enumerate publishers, use wevtutil ep. To learn about the Security
log, try this command:
wevtutil gp Microsoft-Windows-Security-Auditing /ge:true
/gm:true /f:xml > junk.xml
You’ll get a ton of information about the log and every
possible event. (Keep in mind that not every event works like it was designed
to do.) You can also use this tool can to run queries, export logs, archive logs,
modify the configuration of logging, and clear the Security log. You’ll find
Wevtutil much easier to use and more powerful than the unsupported LogParser,
which was needed for Windows Server 2003.
Bottom Line
To prevent a lot of unwanted noise
events from being dumped into your Security log you must configure audit policy
at the subcategory level.
Event Viewer is much improved compared to the version back in
Windows Server 2003. You can now analyze the merged data from multiple logs in
one view and take advantage of much more flexible filtering. Although Event
Viewer provides new features for automatic archival and attachment of actions
to events, it is no replacement for a real log-management system. Anyone with
more than a few systems or the need for a high-integrity audit trail should
consider the latter.
Содержание
- Аудит события входа Audit logon events
- Настройка этого параметра аудита Configure this audit setting
- Аудит системы при помощи «родных» приложений ОС Windows
- Аудит отслеживания процессов Audit process tracking
- Настройка этого параметра безопасности Configure this security setting
- Управление журналом аудита и безопасности Manage auditing and security log
- Справочные материалы Reference
- Возможные значения Possible values
- Рекомендации Best practices
- Location Location
- Значения по умолчанию Default values
- Управление политикой Policy management
- Групповая политика Group Policy
- Вопросы безопасности Security considerations
- Уязвимость Vulnerability
- Противодействие Countermeasure
- Возможное влияние Potential impact
Аудит события входа Audit logon events
Область применения Applies to
Определяет, следует ли проверять каждый экземпляр пользователя, войдя в систему или выйдя из нее с устройства. Determines whether to audit each instance of a user logging on to or logging off from a device.
События для регистрации учетной записи создаются на контроллерах домена для действий с учетной записью домена и на локальных устройствах для действий с локальной учетной записью. Account logon events are generated on domain controllers for domain account activity and on local devices for local account activity. Если включены обе категории политики аудита входа и входа, входы в систему, которые используют учетную запись домена, создают событие входа или входа в систему на рабочей станции или сервере, а также создают событие входа в учетную запись на контроллере домена. If both account logon and logon audit policy categories are enabled, logons that use a domain account generate a logon or logoff event on the workstation or server, and they generate an account logon event on the domain controller. Кроме того, интерактивные входы в систему на рядовом сервере или рабочей станции, которые используют учетную запись домена, создают событие входа на контроллере домена при извлечении скриптов и политик входа при входе пользователя в систему. Additionally, interactive logons to a member server or workstation that use a domain account generate a logon event on the domain controller as the logon scripts and policies are retrieved when a user logs on. Дополнительные сведения о событиях для учетной записи для учетной записи см. в записи аудита событий. For more info about account logon events, see Audit account logon events.
Если вы определяете этот параметр политики, вы можете указать, следует ли проверять успехи, сбои аудита или вообще не проверять тип события. If you define this policy setting, you can specify whether to audit successes, audit failures, or not audit the event type at all. Аудит успешности создает запись аудита при успешной попытке входа. Success audits generate an audit entry when a logon attempt succeeds. Аудит сбоев создает запись аудита при неудачной попытке входа. Failure audits generate an audit entry when a logon attempt fails.
Чтобы установить для этого параметра значение «Нетаудита», в **** диалоговом окне «Свойства» **** для этого параметра политики установите флажок «Определить эти параметры политики» и установите флажки «Успешно» и «Сбой». **** To set this value to No auditing, in the Properties dialog box for this policy setting, select the Define these policy settings check box and clear the Success and Failure check boxes.
Дополнительные сведения о дополнительных параметрах политики безопасности для событий входа см. в разделе «Вход и выйдите» в разделе «Дополнительные параметры политики аудита безопасности». For information about advanced security policy settings for logon events, see the Logon/logoff section in Advanced security audit policy settings.
Настройка этого параметра аудита Configure this audit setting
Этот параметр безопасности можно настроить, открыв соответствующую политику в области «Конфигурация компьютераПараметры WindowsПараметры безопасностиЛокальные политикиПолитика аудита». You can configure this security setting by opening the appropriate policy under Computer ConfigurationWindows SettingsSecurity SettingsLocal PoliciesAudit Policy.
| События для логотипа Logon events | Описание Description |
|---|---|
| 4624 4624 | Пользователь успешно выполнил вход на компьютер. A user successfully logged on to a computer. Сведения о типе логоса см. в таблице «Типы для логотипа» ниже. For information about the type of logon, see the Logon Types table below. |
| 4625 4625 | Ошибка при работе с логотипом. Logon failure. Была предпринята попытка вводить данные с неизвестным именем пользователя или с неизвестным именем пользователя с некаленным паролем. A logon attempt was made with an unknown user name or a known user name with a bad password. |
| 4634 4634 | Для пользователя завершен процесс выйдите из сети. The logoff process was completed for a user. |
| 4647 4647 | Пользователь инициировал процесс выйдите из сети. A user initiated the logoff process. |
| 4648 4648 | Пользователь успешно выполнил вход на компьютер с использованием явных учетных данных, а уже вошел как другой пользователь. A user successfully logged on to a computer using explicit credentials while already logged on as a different user. |
| 4779 4779 | Пользователь отключил сеанс сервера терминалов, не выйдя из системы. A user disconnected a terminal server session without logging off. |
При регистрации события 528 в журнале событий также регистрируется тип входа. When event 528 is logged, a logon type is also listed in the event log. В следующей таблице описаны все типы для логотипа. The following table describes each logon type.
Аудит системы при помощи «родных» приложений ОС Windows
В ОС Windows есть несколько встроенных приложений, которые можно использовать для сбора информации о вашей системе. Используя эти инструменты в сочетании с методами пакетной обработки, вы сможете собрать много полезной информации.

Существует множество инструментов от сторонних разработчиков, позволяющих проводить аудит безопасности вашей Window-системы. Некоторые из таких инструментов представляют собой отдельные приложения, некоторые – фреймворки (есть платные и бесплатные варианты). Однако представим себе такую ситуацию, что у вас под рукой нет этих инструментов, а нужно провести аудит Windows-серверов. По сути, в вашем распоряжении находятся только инструменты, которые идут в комплекте операционной системы. В этой статье как раз и будут рассмотрены подобные утилиты, которые можно использовать для проведения аудита служб Windows.
В ОС Windows есть несколько встроенных приложений, которые можно использовать для сбора информации о вашей системе, например:
Используя эти инструменты в сочетании с методами пакетной обработки, вы сможете собрать много полезной информации. Конкретно в этой статье мы рассмотрим аудит служб Windows при помощи WMIC и CACLS.
Windows Management Instrumentation Command-Line (WMIC) – расширение для WMI, где вы можете, используя командную строку, получать и модифицировать информацию о Windows-системе. Чтобы выполнять эти действия, вы должны обладать правами локального администратора (состоять в группе локальных администраторов).
Детальную информацию о запущенных службах можно получить в разделе «Настройки»-> «Панель управления»-> «Администрирование»-> «Службы» (речь идет о Windows XP) или запустив приложение «services.msc». Для доступа к информации о службах при помощи WMIC, вы должны зайти в систему как администратор и в консоли ввести следующую команду:
C:> wmic service get /all
Также можно вывести только определенную информацию, задав соответствующие параметры при запуске команды:
C:> wmic service get DisplayName, Name
C:> wmic service get Name, ProcessID, StartName
C:> wmic service get Name, PathName /format: csv.xsl
Далее приводится справочная информация по использованию команды:
Property get operations.
USAGE:
The following properties are available:
Property Type Operation
======== ==== =========
AcceptPause N/A N/A
AcceptStop N/A N/A
Caption N/A N/A
CheckPoint N/A N/A
CreationClassName N/A N/A
Description N/A N/A
DesktopInteract N/A N/A
DisplayName N/A N/A
ErrorControl N/A N/A
ExitCode N/A N/A
InstallDate N/A N/A
Name N/A N/A
PathName N/A N/A
ProcessId N/A N/A
ServiceSpecificExitCode N/A N/A
ServiceType N/A N/A
StartMode N/A N/A
StartName N/A N/A
Started N/A N/A
State N/A N/A
Status N/A N/A
SystemCreationClassName N/A N/A
SystemName N/A N/A
TagId N/A N/A
WaitHint N/A N/A
The following GET switches are available:
/VALUE — Return value.
/ALL(default) — Return the data and metadata for the attribute.
/TRANSLATE:
— Translate output via values from
Аудит отслеживания процессов Audit process tracking
Область применения Applies to
Определяет, следует ли проверять подробные сведения об отслеживании таких событий, как активация программы, выход из процесса, обработка дублирования и косвенный доступ к объектам. Determines whether to audit detailed tracking information for events such as program activation, process exit, handle duplication, and indirect object access.
Если вы определяете этот параметр политики, вы можете указать, следует ли проверять успехи, сбои аудита или вообще не проверять тип события. If you define this policy setting, you can specify whether to audit successes, audit failures, or not audit the event type at all. Аудит успешности создает запись аудита при успешном отслеживании процесса. Success audits generate an audit entry when the process being tracked succeeds. Аудиты сбоев создают запись аудита при сбое отслеживаемой процедуры. Failure audits generate an audit entry when the process being tracked fails.
Чтобы установить для этого параметра значение «Нетаудита», в диалоговом окне «Свойства» **** для этого параметра политики установите флажок «Определить эти параметры политики» и установите флажки «Успешно» и «Сбой». **** To set this value to No auditing, in the Properties dialog box for this policy setting, select the Define these policy settings check box and clear the Success and Failure check boxes.
По умолчанию: Аудит не проводится. Default: No auditing.
Настройка этого параметра безопасности Configure this security setting
Этот параметр безопасности можно настроить в области Конфигурация компьютераПараметры WindowsПараметры безопасностиЛокальные политикиПолитика аудита. You can configure this security setting under Computer ConfigurationWindows SettingsSecurity SettingsLocal PoliciesAudit Policy.
Управление журналом аудита и безопасности Manage auditing and security log
Область применения Applies to
В этой статье описываются лучшие методики, расположение, значения, управление политиками и вопросы безопасности для параметра политики безопасности «Управление аудитом и журналом безопасности». Describes the best practices, location, values, policy management, and security considerations for the Manage auditing and security log security policy setting.
Справочные материалы Reference
Этот параметр политики определяет, какие пользователи могут указывать параметры аудита доступа к объектам для отдельных ресурсов, таких как файлы, объекты Active Directory и ключи реестра. This policy setting determines which users can specify object access audit options for individual resources such as files, Active Directory objects, and registry keys. Эти объекты указывают свои системные списки управления доступом (SACL). These objects specify their system access control lists (SACL). Пользователь, которому назначено это право, также может просмотреть и очистить журнал безопасности в окне просмотра событий. A user who is assigned this user right can also view and clear the Security log in Event Viewer. Дополнительные сведения о политике аудита доступа к объектам см. в этой теме. For more info about the Object Access audit policy, see Audit object access.
Константа: SeSecurityPrivilege Constant: SeSecurityPrivilege
Возможные значения Possible values
- Определяемый пользователей список учетных записей User-defined list of accounts
- Администраторы Administrators
- Не определено Not Defined
Рекомендации Best practices
- Перед удалением этого права из группы необходимо выяснить, зависят ли приложения от этого права. Before removing this right from a group, investigate whether applications are dependent on this right.
- Как правило, назначать это право пользователю группам, кроме администраторов, не требуется. Generally, assigning this user right to groups other than Administrators is not necessary.
Location Location
Computer ConfigurationWindows SettingsSecurity SettingsLocal PoliciesUser Rights Assignment Computer ConfigurationWindows SettingsSecurity SettingsLocal PoliciesUser Rights Assignment
Значения по умолчанию Default values
По умолчанию этот параметр является администратором на контроллерах домена и на автономных серверах. By default this setting is Administrators on domain controllers and on stand-alone servers.
В следующей таблице перечислены фактические и эффективные значения политики по умолчанию для последних поддерживаемых версий Windows. The following table lists the actual and effective default policy values for the most recent supported versions of Windows. Значения по умолчанию также можно найти на странице свойств политики. Default values are also listed on the policy’s property page.
. /EVERY: [/REPEAT: ] — Returns value every (X interval) seconds, If /REPEAT specified the command is executed times. /FORMAT:
| Тип сервера или объект групповой политики Server type or GPO | Значение по умолчанию Default value |
|---|---|
| Default Domain Policy Default Domain Policy | Не определено Not defined |
| Политика контроллера домена по умолчанию Default Domain Controller Policy | Администраторы Administrators |
| Параметры по умолчанию для автономного сервера Stand-Alone Server Default Settings | Администраторы Administrators |
| Действующие параметры по умолчанию для контроллера домена Domain Controller Effective Default Settings | Администраторы Administrators |
| Действующие параметры по умолчанию для рядового сервера Member Server Effective Default Settings | Администраторы Administrators |
| Действующие параметры по умолчанию для клиентского компьютера Client Computer Effective Default Settings | Администраторы Administrators |
Управление политикой Policy management
В этом разделе описаны компоненты, средства и рекомендации, которые помогут в управлении этой политикой. This section describes features, tools, and guidance to help you manage this policy.
Для активации этого параметра политики не требуется перезагрузка компьютера. A restart of the computer is not required for this policy setting to be effective.
Изменения прав пользователя вступают в силу при его следующем входе в учетную запись. Any change to the user rights assignment for an account becomes effective the next time the owner of the account logs on.
Аудит доступа к объектам не выполняется, если их не включить с помощью редактора локальных групповых политик, консоли управления групповыми политиками (GPMC) или средства командной строки Auditpol. Audits for object access are not performed unless you enable them by using the Local Group Policy Editor, the Group Policy Management Console (GPMC), or the Auditpol command-line tool.
Дополнительные сведения о политике аудита доступа к объектам см. в этой теме. For more information about the Object Access audit policy, see Audit object access.
Групповая политика Group Policy
Параметры применяются в следующем порядке с помощью объекта групповой политики (GPO), который будет перезаписывать параметры на локальном компьютере при следующем обновлении групповой политики: Settings are applied in the following order through a Group Policy Object (GPO), which will overwrite settings on the local computer at the next Group Policy update:
- Параметры локальной политики Local policy settings
- Параметры политики сайта Site policy settings
- Параметры политики домена Domain policy settings
- Параметры политики подразделения OU policy settings
Если локальный параметр затеняется, это означает, что в настоящее время этот параметр контролируется GPO. When a local setting is greyed out, it indicates that a GPO currently controls that setting.
Вопросы безопасности Security considerations
В этом разделе описывается, каким образом злоумышленник может использовать компонент или его конфигурацию, как реализовать меры противодействия, а также рассматриваются возможные отрицательные последствия их реализации. This section describes how an attacker might exploit a feature or its configuration, how to implement the countermeasure, and the possible negative consequences of countermeasure implementation.
Уязвимость Vulnerability
Любой пользователь с правом на управление аудитом и журналом безопасности может очистить журнал безопасности, чтобы удалить важные признаки несанкционированной деятельности. Anyone with the Manage auditing and security log user right can clear the Security log to erase important evidence of unauthorized activity.
Противодействие Countermeasure
Убедитесь, что только у локальной группы администраторов есть право на управление аудитом и журналом безопасности. Ensure that only the local Administrators group has the Manage auditing and security log user right.
Возможное влияние Potential impact
Настройка по умолчанию ограничивает права пользователя журнала аудита и безопасности только локальной группой администраторов. Restricting the Manage auditing and security log user right to the local Administrators group is the default configuration.
Предупреждение: Если группе, кроме локальной группы администраторов, назначено это право пользователя, удаление этого права пользователя может привести к проблеме производительности в других приложениях. Warning: If groups other than the local Administrators group have been assigned this user right, removing this user right might cause performance issues with other applications. Перед удалением этого права из группы необходимо выяснить, зависят ли приложения от этого права. Before removing this right from a group, investigate whether applications are dependent on this right.