Обновлено 22.06.2019

Добрый день! Уважаемые читатели и гости крупного IT блога России Pyatilistnik.org. В прошлый раз я вас научил делать резервную копию файлов и папок с помощью утилиты Robocopy. Сегодня я хочу вам рассказать еще об одной ситуации, которая случилась в моей административной практике, а именно по какой то причине скрипты и сценарии настроенные на вход пользователя в систему не отрабатывают сразу, а выполняются с задержкой в 5 минут. Мне стало интересно разобраться в данной ситуации и естественно поправить время выполнения моих скриптов. Думаю, что найдутся люди, кто так же зададутся данным вопросом.
Описание ситуации
Есть терминальная RDS ферма построенная на базе операционной системы Windows Server 2012 R2, состоящая из 15 RDSH хостов. Для удобства пользователей использующих программу 1С, был настроен через групповую политику скрипт, который при входе пользователя в систему должен был подтянуть конфигурационный файл с необходимым списком баз 1С. Но получилась такая ситуация, что пользователь заходит, видит свой рабочий стол, открывает программу 1С и баз там нет, через 5 минут, перезапустив 1С они магическим образом появляются. Давайте разбираться, что это за задержка и как от нее избавится.
Откуда берется 5-ти минутная задержка
Оказывается с выходом операционных систем Windows Server 2012 R2 и Windows 8.1 компания Microsoft ввела некоторое изменение с применением сценариев и скриптов при входе пользователя в систему. После входа пользователя на компьютер под управлением Windows 8.1 и Windows Server 2012 R2 сценарии входа не запускаются в течение пяти минут. Такое поведение вызывает следующие симптомы:
- Операции, выполняемые сценариями входа в систему, могут не отображаться на компьютерах под управлением Windows 8.1 и Windows Server 2012 R2 в течение пяти минут после входа пользователя в систему.
- Ресурсы, предоставляемые сценариями входа в систему, могут быть недоступны пользователям на компьютерах под управлением Windows 8.1 и Windows Server 2012 R2 в течение примерно пяти минут после входа пользователей.
https://support.microsoft.com/en-gb/help/2895815/logon-scripts-do-not-run-for-five-minutes-after-a-user-logs-on-to-a-wi
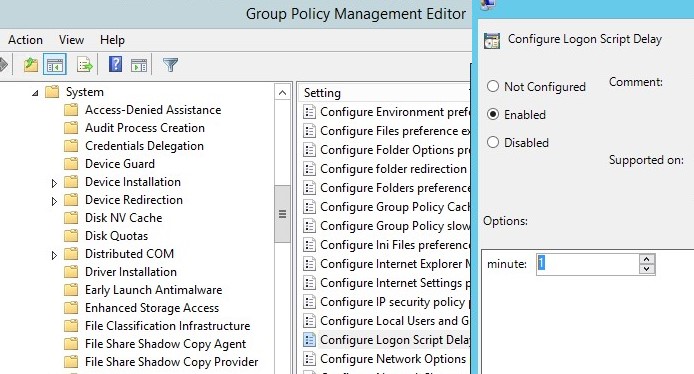
Microsoft ввела данную задержку из-за того, чтобы улучшить ситуацию, когда большое количество скриптов, сценариев, выполняемых при логине пользователя в систему вступают в конфликтную ситуацию, что он даже не может попасть на свой рабочий стол. Данная настройка называется » Настроить задержку сценария входа (Configure Logon Script Delay)». По умолчанию она имеет значение в 5 минут, этого достаточно, чтобы пользователь вошел в систему, которая успела прогрузить все из автозагрузки, после чего к нему можно применять сценарии.
Как убрать 5-ти минутную задержку выполнения сценариев при входе в систему
Так как у вас есть домен Active Directory и вы все настройки выполняете через групповую политику, то откройте редактор групповой политики, найдите нужное вам организационное подразделение, создайте там политику или измените существующую. Нужная нам настройка находится в разделе компьютера, переходим по пути:
Конфигурация компьютера — Политики — Административные шаблоны — Система — Групповая политика — Настроить задержку сценария входа (Computer Configuration — Administrative Templates — System — Group Policy — Configure Logon Script Delay)
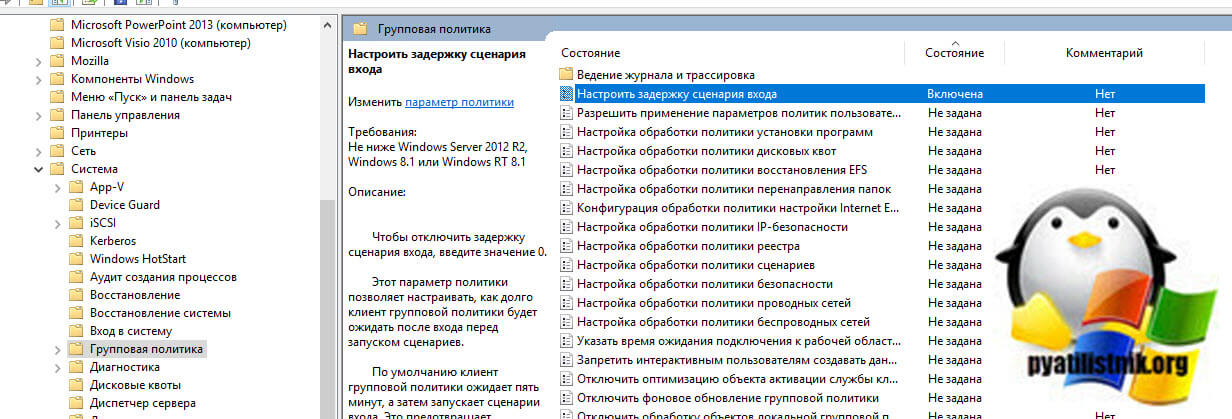
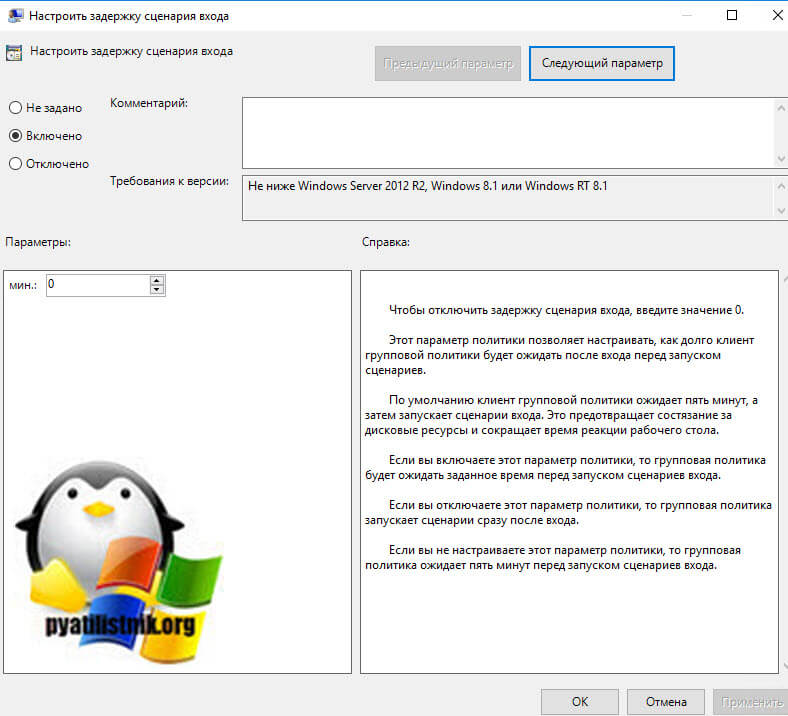
Открываем политику «Настроить задержку сценария входа». Режимы работы:
- Если стоит значение по умолчанию, то будет отложенное выполнение скриптов через 5 минут
- Если выставлено значение отключено, то сценарии входа будут выполнятся сразу
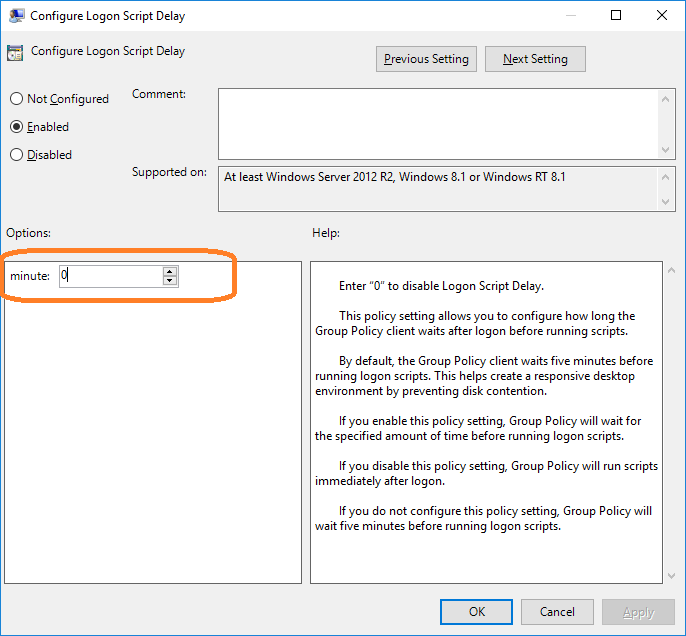
- Если поставите 0, то так же политика будет отключена и все будет выполняться сразу при входе, именно данный вариант и советует сама Microsoft
- Так же вы можете выставить другое значение, вплоть до 1000 минут.
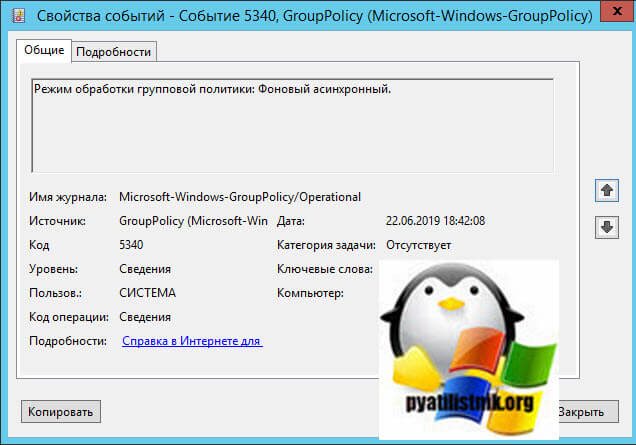
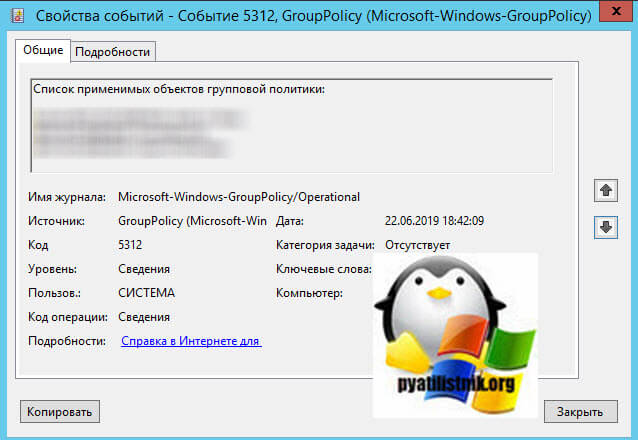
Сохраняем настройку и давайте посмотрим как будет применяться политика при входе пользователя Барбоскина на терминальную ферму. Для этого откройте журналы логов Windows. Нас будет интересовать журнал Microsoft-Windows-GroupPolicy/Operational. Зашел я на терминальный сервер в 18-42 минуты.
Событие 5324: Групповая политика получила уведомление Вход в систему от Winlogon для сеанса 11.

Событие с кодом ID 5351: Сеанс групповой политики возвращается к WinLogon

Событие с кодом ID 4117: Начат сеанс групповой политики
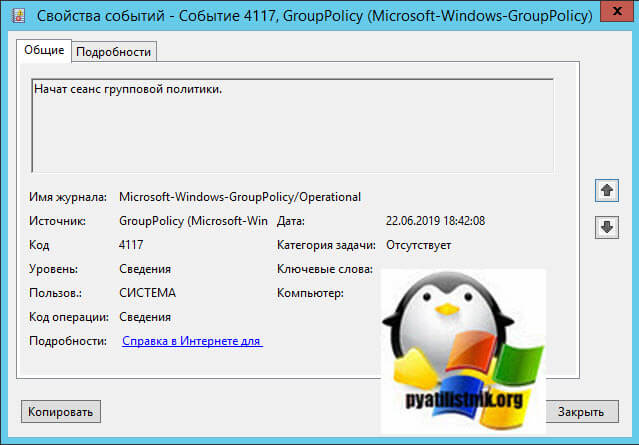
Событие с кодом ID 4117: Запуск обработки политики входа пользователя в систему для rootbarboskin.g. Идентификатор операции: {f61f8549-f12f-4306-a957-83000600000000}
/wp-content/uploads/2019/06/ID-4117-1.jpg»>
Событие с кодом ID 5340: Режим обработки групповой политики: Фоновый асинхронный
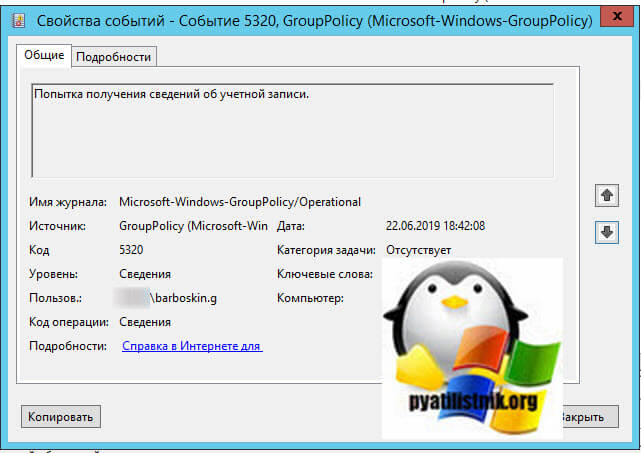
Событие с кодом ID: Попытка получения сведений об учетной записи
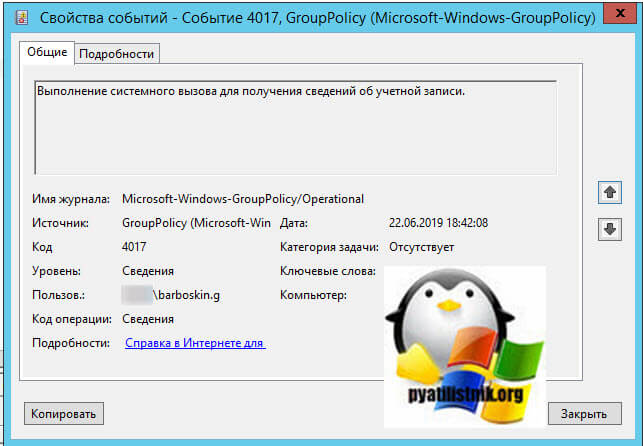
Событие с кодом ID 4017: Выполнение системного вызова для получения сведений об учетной записи
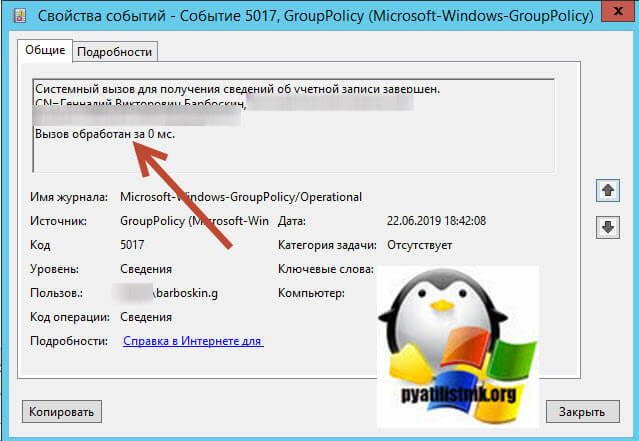
Событие с кодом ID 5017: Системный вызов для получения сведений об учетной записи завершен. Вызов обработан за 0 мс.
Событие с кодом ID 5320: Полученные сведения об учетной записи

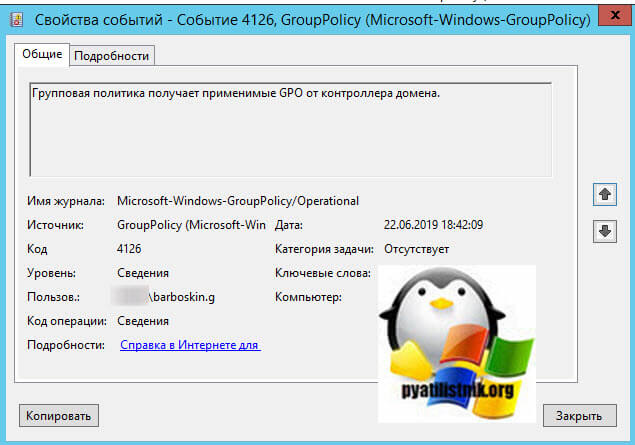
Событие с кодом ID 4126: Групповая политика получает применимые GPO от контроллера домена.
Событие с кодом ID 4257: Начинается скачивание политик

Событие с кодом ID 5257: Политики успешно скачаны

Событие с кодом ID 5216: Политики успешно сохранены в локальное хранилище данных

Событие с кодом ID 5126: Групповая политика успешно получила применимые GPO от контроллера домена

Событие с кодом ID 5312: Список применимых объектов групповой политики
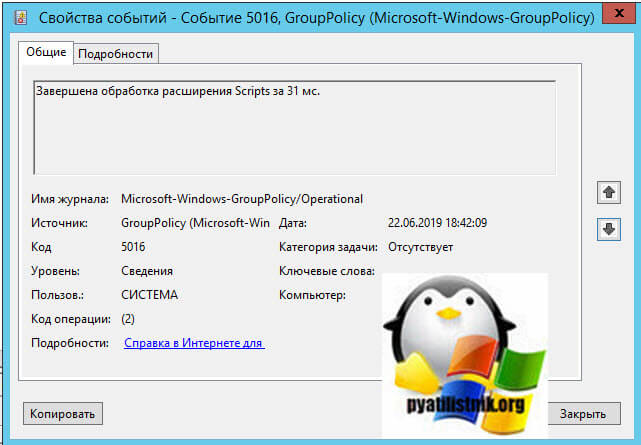
Событие с кодом ID 5016: Завершена обработка расширения Scripts
Событие с кодом ID 8001: Завершена обработка политики входа пользователя для barboskin.g за 1 с

Событие с кодом ID 5117: Сеанс групповой политики успешно завершен

Вот такой набор событий, который показывает вам, как применяются групповые политики к вашему пользователю, уверен, что благодаря данным событиям вы легко сможете отслеживать, есть ли у вас задержки при обработке сценариев входа пользователя в систему. Теперь у вас не должно быть 5-ти минутных задержек. На этом у меня все, с вами был Иван Семин, автор и создатель IT портала Pyatilistnik.org,
Вы можете использовать групповые политики Windows для выполнения файлов различных скриптов при загрузке/выключении компьютера или входе/выходе пользователя. С помощью GPO вы можете исполнять на компьютерах домена не только классические файлы скриптов (.bat, .cmd, ,vbs), но и Startup/Shutdown/Logon/Logoff скрипты PowerShell (.ps1)
В современных версиях Windows вы можете настроить запуск логон/логоф скриптов PowerShell напрямую из редактора групповых политик (ранее приходилось вызывать ps1 скрипты из bat файлов через параметр исполняемого файла powershell.exe).
Содержание:
- Запуск PowerShell скрипта при загрузке компьютера с помощью групповой политики
- Выполнить PowerShell скрипт при входе пользователя в Windows
Запустите консоль управления доменными политиками GPMC.msc (Group Policy Management сonsole). Создайте новую политику (GPO) и назначьте ее на нужный контейнер с пользователями или компьютерами (можно использовать WMI фильтры GPO для более тонкого нацеливания политики). Перейдите в режим редактирования политики.
Вы должны выбрать раздел GPO для запуска PowerShell скрипта в зависимости от того, когда вы хотите выполнить ваш скрипт.
- Если PS скрипт должен быть запущен при входе пользователя на компьютер (настройка параметров окружения пользователя, программ, например: вы хотите при входе пользователя автоматическое создавать подпись в Outlook на основе данных из пользователя AD, настроить параметры экранной заставки или стартового экрана) или при выходе пользователя, вам нужно перейти в раздел GPO: User Configuration -> Policies -> Windows Settings -> Scripts (Logon / Logoff);
- Если вы хотите запускать скрипт PowerShell при загрузке компьютера (отключение устаревших протоколов: NetBIOS, SMBv1, настройка параметров безопасности компьютера и т.д.) или перед корректным выключением компьютера, вам нужно перейти в секцию GPO с настройками компьютера: Computer Configuration -> Policies -> Windows Settings -> Scripts (Startup / Shutdown).
Запуск PowerShell скрипта при загрузке компьютера с помощью групповой политики
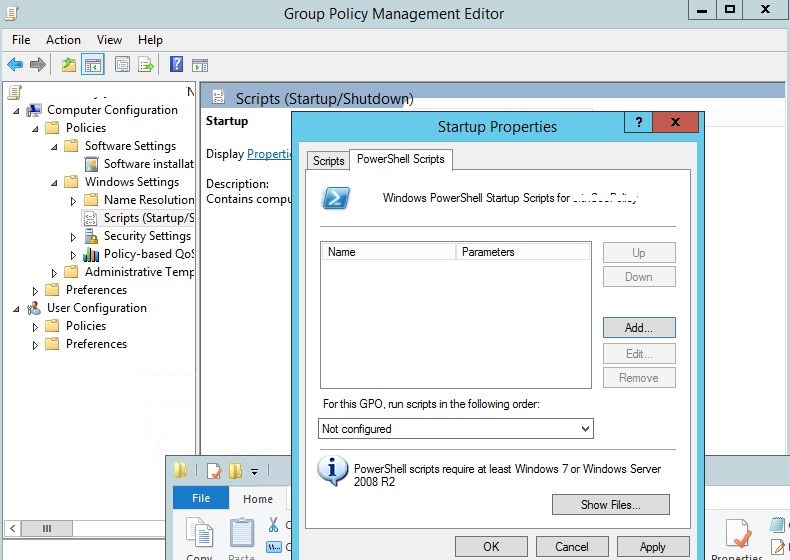
Допустим, нам нужно запускать PowerShell скрипт при загрузке Windows. Для этого нужно выбрать Startup и в открывшемся окне перейди на вкладку PowerShell Scripts.
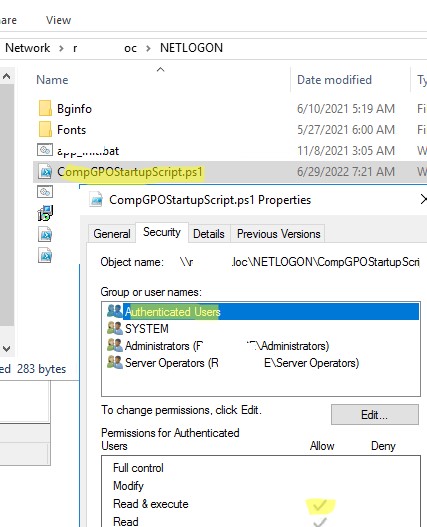
Теперь нужно скопировать файл с вашим PowerShell скриптом на контроллер домена. Скопируйте ваш файл ps1 в каталог Netlogon на контроллере домена (например,
\winitpro.runetlogon
).
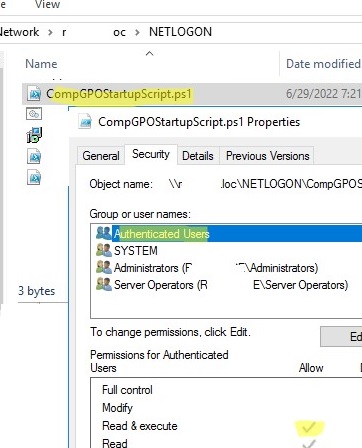
Т.к. мы настраиваем запуск Startup скрипта PowerShell, нужно в разрешениях ps1 файла (или всего каталога MachineScriptsStartup) проверить NTFS права доступа на чтение и выполнение (Read & Execute) для группы Domain Computers и/или Authenticated Users .
Теперь нужно нажать кнопку Add и укажите UNC путь к вашему файлу скрипта ps1 в Netlogon.
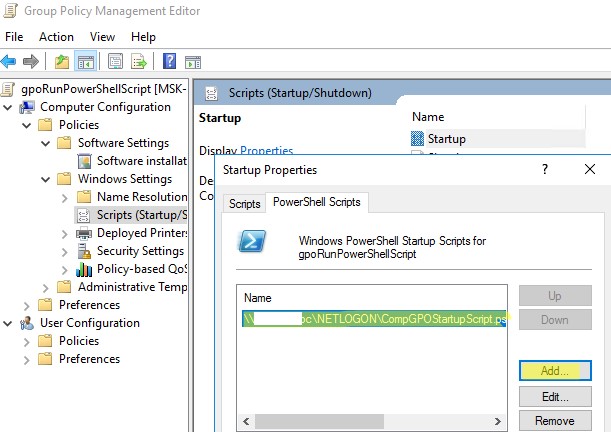
Если вы запускаете несколько PowerShell скриптов через GPO, вы можете управлять порядком из запуска с помощью кнопок Up/Down.
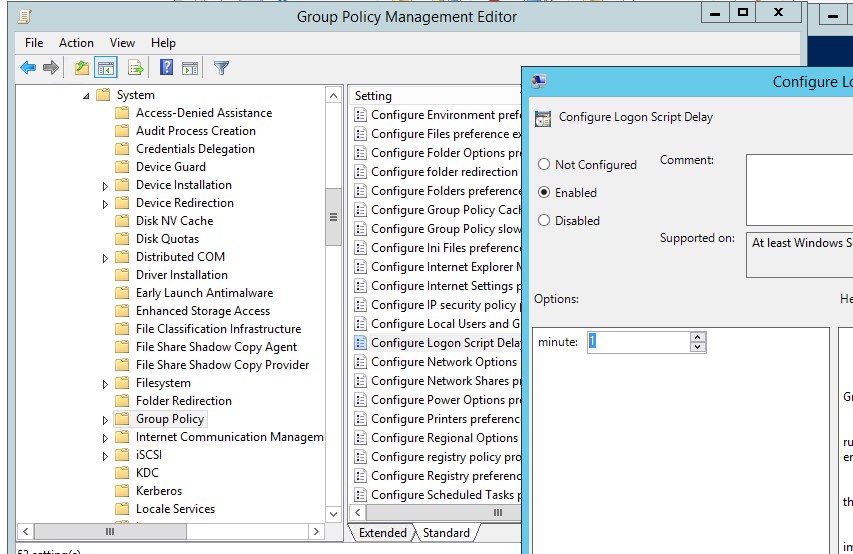
Для корректного выполнения скриптов PowerShell при загрузке компьютера нужно настроить время задержки перед запуском с помощью политики в разделе Computer Configuration -> Administrative Templates -> System -> Group Policy. Включите политику Configure Logon Script Delay (Настроить задержку сценария входа в систему) и укажите задержку в минутах перед запуском логон-скриптов (достаточное для окончания инициализации и загрузки всех необходимых служб). Обычно достаточно поставить здесь 1-2 минуты.
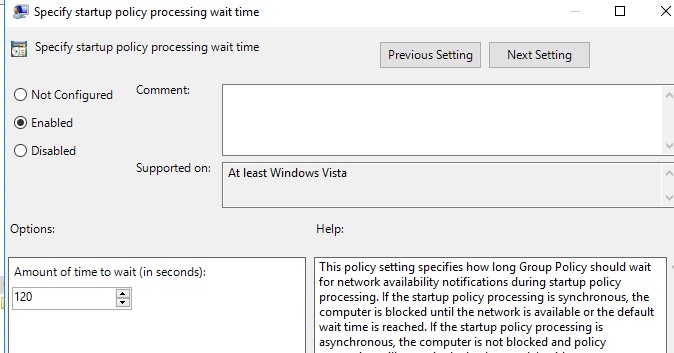
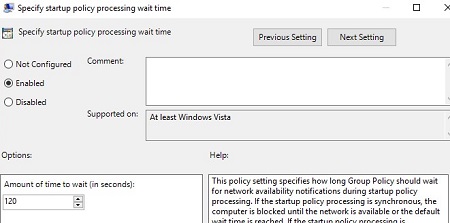
Если в вашем PowerShell скрипте используются сетевые инструменты Windows, для некоторых GPO нужно включить политику “Specify startup policy processing wait time” в разделе Computer Configuration -> Policies -> Administrative Templates -> System -> Group Policy. Попробуйте начать со значения 60 сек. После включения этой политики компьютер будет ждать 60 секунд прежде, чем начать применять стартап скрипты. Обычно этого достаточно для инициализации сетевой подсистемы Windows.
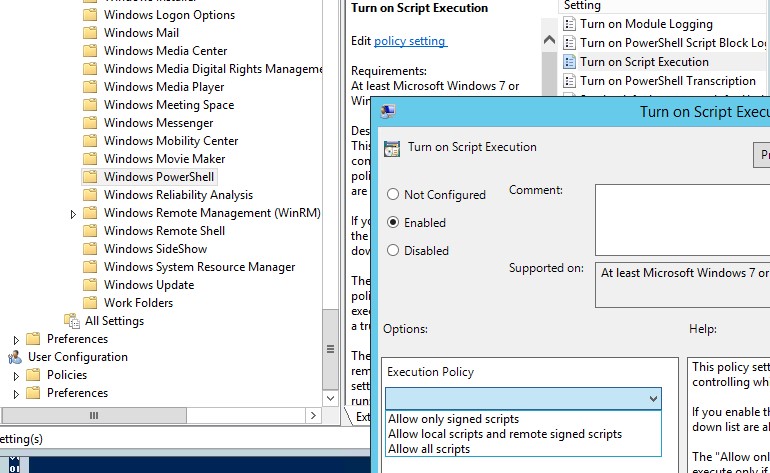
В Windows Server 2012R2 и Windows 8.1 и выше PowerShell скрипты в GPO запускаются из каталога NetLogon в режиме Bypass. Это означает, что настройки политики запуска сценариев PowerShell игнорируются. Если вы хотите запустить скрипт из другого каталога, или в вашей сети остались клиенты с Windows 7 или Windows Server 2008R2, вам нужно настроить политику выполнения PowerShell скриптов.
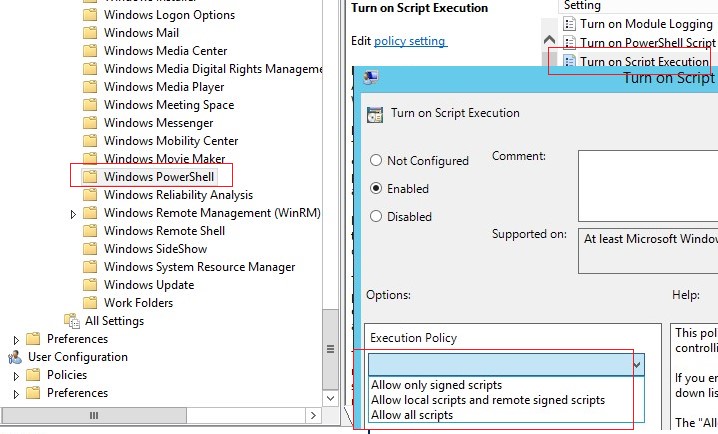
По умолчанию в настройках безопасности Windows запрещен запуск PowerShell скриптов. Значение текущей настройки политики запуска сценариев PowerShell можно получить командой Get-ExecutionPolicy. Если политика не настроена, команда вернет Restricted (блокируются любые скрипты). Параметры безопасности запуска PowerShell скриптов можно настроить через политику “Включить выполнение сценариев” / “Turn On Script Execution” (в разделе GPO Computer Configuration -> Administrative Templates -> Windows Components -> Windows PowerShell). Возможные значения политики:
- Allow only signed scripts (AllSigned)– можно запускать только подписанные скрипты PowerShell (“Как подписать скрипт PowerShell?”) –самый лучший сценарий с точки зрения безопасности;
- Allow local scripts and remote signed scripts (RemoteSigned)– можно запускать любые локальные и подписанные удаленные скрипты;
- Allow all scripts (unrestricted) – самый небезопасный вариант, т.к. разрешает запуск любых PowerShell скриптов.
Если вам не подходит не один из предложенных сценариев настройки политики запуска PowerShell скриптов, вы можете запускать PowerShell скрипты в режиме Bypass (скрипты не блокируются, предупреждения не появляются).
Для этого PowerShell скрипт нужно запускать из секции Startup -> Scripts. В этой секции вы можете настроить запуск ps1 сценария с помощью создания обычного Startup скрипта, запускающего исполняемый файл powershell.exe (по аналогии со сценарием, описанным в статье). Укажите:
- Script name:
%windir%System32WindowsPowerShellv1.0powershell.exe - Script Parameters:
-Noninteractive -ExecutionPolicy Bypass –Noprofile -file %~dp0MyPSScript.ps1

Символы
%~dp0
при запуске на клиенте автоматически преобразуются в UNC путь до каталога со скриптом на SYSVOL.
В данном случае вы принудительно разрешили запуск любого (даже ненадежного) скрипта PowerShell с помощью параметра Bypass.
Перезагрузите компьютер, чтобы обновить настройки GPO и проверьте, что ваш PowerShell скрипт запустился после загрузки.
Выполнить PowerShell скрипт при входе пользователя в Windows
Рассмотрим сценарий автоматического запуска PowerShell скрипта при входе пользователя в Windows (или при выходе).
Если вам нужно запустить скрипт не при загрузке компьютера, а после входа пользователя в Windows (для каждого пользователя компьютера), вам нужно привязать GPO к OU Active Directory с пользователями. В этом случае PowerShell нужно настроить в следующем разделе User Configuration вашей GPO
Если вы хотите, чтобы политика выполнялась для всех пользователей определенного компьютера, нужно привязать политику к OU с компьютерами и включить режим замыкания групповой политики (параметр Configure User Group Policy Loopback Processing mode в разделе Computer Configuration -> Administrative Templates -> System -> Group Policy). Если не включать режим замыкания, то параметры из раздела User Configuration не будут применены к пользователю. Подробнее об этом в статье Почему GPO не применяется к пользователю или компьютеру?
В этом примере для теста я буду использовать простой PowerShell скрипт, который пишет в текстовый лог файл время входа пользователя.
- Скопируйте файл скрипта PowerShell в каталог
\winitpro.ruNETLOGON
на контроллере домена AD - Перейдите в раздел User Configuration -> Policies -> Windows Settings -> Scripts -> Logon;
- Перейдите на вкладку PowerShell Scripts и добавьте ваш PS1 файл скрипта (используйте UNC путь, например
\winitpro.ruNETLOGONUserLog.ps1
);
- Выполните логофф пользователя на целевом компьютере и выполните вход;
- Ваш PowerShell скрипт будет запущен автоматически через GPO при входе пользователя;
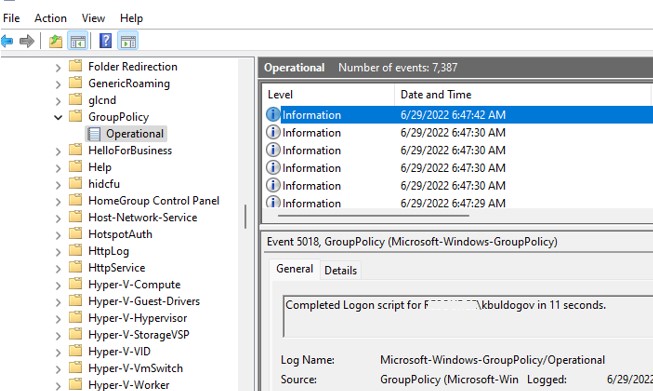
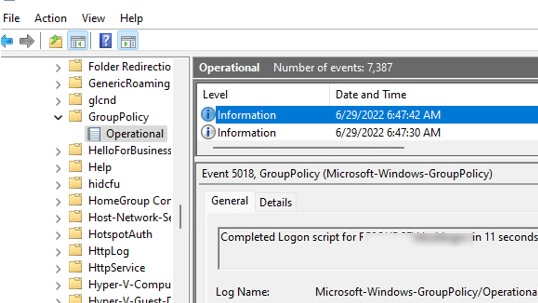
- Вы можете убедится, что логон скрипт выполнен успешно под пользователем по событию с Event ID 5018 в журнале Microsoft-Windows-GroupPolicy/Operational Event Viewer:
Completed Logon script for winitprokbuldogov in 11 seconds.


Если вы хотите, чтобы пользователь не мог получить доступ к своему рабочему столу до окончания работы скрипта, нужно включить параметр Run logon scripts synchronously = Enable (Computer ConfigurationAdministrative TemplatesSystemLogon). В этом случае explorer не закончится, пока не отработают все политики и логон скрипты (это увеличивает время входа!).
Обратите внимание, что скрипт выполняется с правами текущего пользователя. Если у пользователя есть права администратора на компьютере и на него действуют политики User Account Control (UAC), PowerShell скрипт не сможет внести изменения, требующие повышенных привилегий.
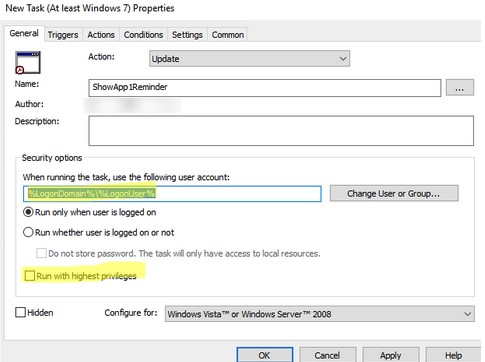
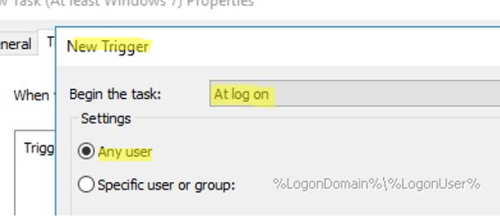
Для запуска PowerShell скриптов с привилегированными правами при входе простых пользователей, можно использовать назначенные задания планировщика. Для этого нужно:
- Создать задание Task Scheduler в разделе User Configuration -> Preferences -> Control Panel Settings -> Scheduled Task;
- На вкладке General указать что задание запускается от имени пользователя
%LogonDomain%%LogonUser
и включите опцию
Run with highest privileges
;
- На вкладке Trigger укажите, что задание должно запускаться At log on;

- И на вкладке Actions укажите путь к вашему PowerShell скрипту:
Action: Start a program
Program/Script:
C:WINDOWSsystem32WindowsPowerShellv1.0powershell.exe
Add Arguments (optional):
-ExecutionPolicy Bypass -command "& \winitpro.ruNetlogonyourscript.ps1"
Такой PowerShell скрипт будет запускаться с правами администратора (если пользователь добавлен в группу локальных администраторов Windows).
Некоторые скрипты нужно запускать для каждого пользователя только один раз при первом входе на компьютер (инициализация рабочего окружения, копирование папок или конфигурационных файлов, создание ярлыков и т.д.). В одной из статей мы рассматривали cпособ запуска логон скрипт через GPO только один раз.
 Опубликовано: 13.06.2017
Инструкция представляет шпаргалку по настройке автозапуска сценария при выполнении входа в систему Windows (login).
Настройка имеет некоторые нюансы, из-за которых, даже опытные системные администраторы не сразу могут понять причину неработоспособности сценария.
И так, запускаем консоль управления групповыми политиками и создаем новый объект GPO.
1. Разрешаем запуск скриптов.
Конфигурация компьютера Административные шаблоны Компоненты Windows Windows Powershell
(Computer Configuration Administrative Templates Windows Components Windows PowerShell)
Находим параметр Включить выполнение сценариев (Turn On Script Execution) и выставляем значение Включить и в выпадающем списке Разрешить все сценарии.
2. Настраиваем время задержки для выполнения скриптов.
Конфигурация компьютера Административные шаблоны Система Групповая политика
(Computer Configuration Administrative Templates System Group Policy)
Находим параметр Настроить задержку сценария входа в систему (Configure Logon Script Delay) и выставляем значение Включить и время задержки в минутах, например 1.
* как показала практика, лучше ставить хоть какую-то задержку.
3. Настраиваем автозапуск скрипта при входе.
Конфигурация компьютера (или Конфигурация пользователя) Политики Конфигурация Windows Сценарии
(Computer Configuration или User Configuration Policies Windows Settings Scripts)
В данной ветке мы увидим параметры для настройки сценария при входе или выходе из системы (включении или выключении компьютера). Дважды кликаем по нужному параметру и переходим на вкладку Сценарии Powershell (Powershell Scripts).
Нажимаем по Добавить и выбираем заранее написанный скрипт.
Если необходимо задать приоритет сценариям перед обычными сценариями, в выпадающем списке «Для этого объекта групповой политики выполните сценарии в следующем порядке» выбираем нужный пункт.
![]()
Была ли полезна вам эта инструкция?
Да Нет
Logon scripts do not run for five minutes after a user logs on to a Windows 8.1/10-based computer
After a user logs on to a Windows 8.1/10-based computer, the logon scripts do not run for five minutes. This behavior causes the following symptoms to occur:
- Operations that are performed by the logon scripts may not be visible on Windows 8.1/10-based computers until five minutes after the user logs on.
- Resources that are made available by the logon scripts may not be available to users on Windows 8.1-based computers until about five minutes after users log on.
This behavior occurs because Windows 8.1 includes a new Group Policy setting, “Configure Logon Script Delay,” that controls the behavior of logon scripts. This script is stored in the following location:
Computer ConfigurationAdministrative TemplatesSystemGroup Policy
The default value setting for the “Configure Logon Script Delay” (DE: Anmeldeskriptverzögerung) policy is Not Configured. However, the default behavior of a Group Policy client is to wait five minutes before it runs logon scripts. The goal of the five-minute delay is to speed up the loading of the user’s desktop on Windows 8.1-based computers.
If you want the logon scripts to run at user logon without any delay, you should configure the setting to Disabled:
Computer ConfigurationAdministrative TemplatesSystemGroup Policy: Configure Logon Script Delay ==> Disabled
If you want to change the time that the Group Policy client waits until it runs the logon scripts, you can set the time in minutes:
Computer ConfigurationAdministrative TemplatesSystemGroup Policy: Configure Logon Script Delay ==> Enabled
Then, in the options section, set minute to the desired value. The maximum value that you can enter is 1,000 minutes.
After you set the policy to Enabled and set the time in minutes, the Group Policy client waits for the specified time before it runs logon scripts at user logon. If you enter the time in minutes as zero (0), the setting is disabled, and the Group Policy client runs the logon scripts at user logon without any delay.
When booting I am getting the message: “Could not reconnect all network drives”
Its seems the computer wants to connect before the network is up. It is not a credential issue, but boot order. Is there anyway to make the network come up before the computer wants to map to it. Multiple possible solutions exist out there:
Disconnect network drive before log off/reboot
Disconnect your network drives before you log off/reboot to avoid the error message appearing.
net use Y: \storageshare/persistent:no

net use Z: \storageshare /USER:username [password] /persistent:no
Delay your loginscript
You can tell your system to run a simple batch file with a delay of 10 seconds or more (depending on your system boot times) on logon using the scheduler or other techniques. A sample vb-script with a 10 seconds delay:
' Map network drive script - 10000 = 10 seconds

WScript.Sleep(10000)

Set objNetwork = CreateObject("WScript.Network")

objNetwork.MapNetworkDrive "F:" , "\serverfiles"

objNetwork.MapNetworkDrive "M:" , "\servermusic"

objNetwork.MapNetworkDrive "P:" , "\serverPictures"

objNetwork.MapNetworkDrive "S:" , "\serverdisks"

objNetwork.MapNetworkDrive "V:" , "\servervideos"
EnableLinkedConnections in Registry
To configure the EnableLinkedConnections registry value, follow these steps:
- Locate and then right-click the following registry subkey:HKEY_LOCAL_MACHINESOFTWAREMicrosoftWindowsCurrentVersionPoliciesSystem
- Point to New , and then click DWORD Value .
- Type EnableLinkedConnections , and then press ENTER.
- Right-click EnableLinkedConnections , and then click Modify .
- In the Value data box, type 1 , and then click OK .
- Exit Registry Editor, and then restart the computer.”
Download REG File: EnableLinkedConnections


Настроим автозапуск BAT скрипта при логине юзера на сервер. Сделаем так, чтобы скрипт запускался только один раз, а при последующих входах запускаться не будет.
Пишем BAT скрипт
У меня BAT файл называется install_sbis.bat.
@echo off
IF EXIST C:Users%UserName%AppDataSysadminflag.txt GOTO END
IF EXIST C:Users%UserName%AppDataSysadmin GOTO SYSADMIN
md C:Users%UserName%AppDataSysadmin
:SYSADMIN
set h=%time:~0,2%
set h=%h: =0%
set fn=%date% %h%:%time:~3,2%:%time:~6,2%
echo %fn% > C:Users%UserName%AppDataSysadminflag.txt

Здесь код вашего скрипта

:END
Скрипт создаёт файлик flag.txt в папке пользователя с датой и временем запуска. При повторном логине скрипт увидит этот файл и не выполнит повторно ваш код.
Автозапуск скрипта при логине пользователя
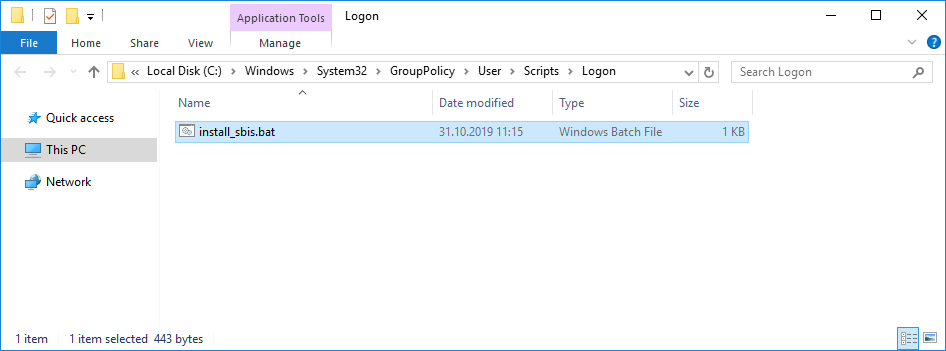
Скрипт install_sbis.bat копируем в папку C:WindowsSystem32GroupPolicyUserScriptsLogon.
Открываем редактор локальных политик на сервере.
gpedit.msc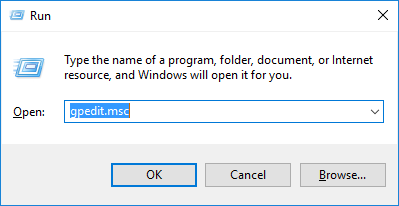
Local Computer Policy > User Configuration > Windows Settings > Scripts (Logon/Logoff)
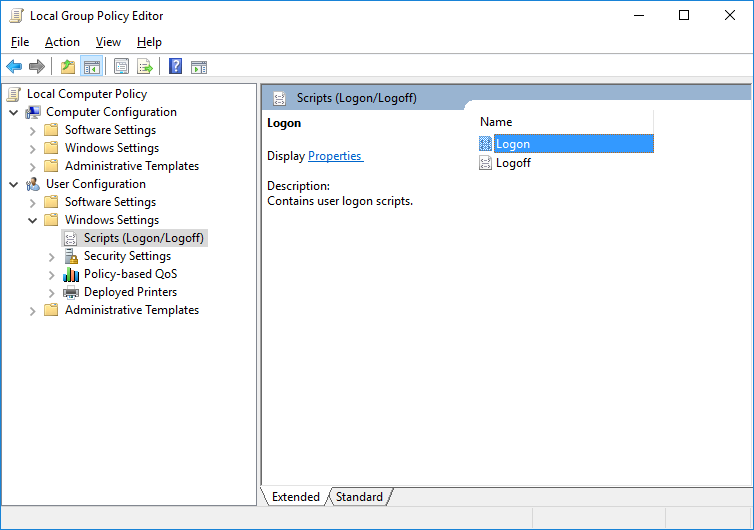
Редактируем параметр Logon.
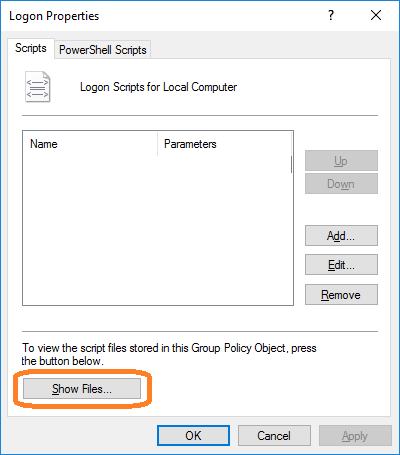
Кнопка Show Files открывает папку со скриптами групповых политик, в нашем случае C:WindowsSystem32GroupPolicyUserScriptsLogon.
Нажимаем Add..
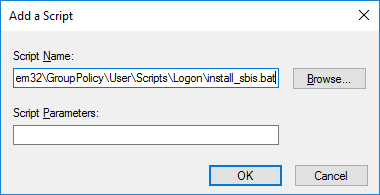
В Script Name указываем ссылку на наш скрипт C:WindowsSystem32GroupPolicyUserScriptsLogoninstall_sbis.bat. ОК. Сохраняем изменения.
В локальных политиках находим параметр Local Computer Policy > Computer Configuration > Administrative Templates > System > Group Policy > Configure Logon Script Delay

Редактируем, Enabled, указываем 0 минут.
Этот параметр есть не во всех операционных системах, он по умолчанию откладывает запуск скриптов при логине на 5 минут, это для нас неприемлемо.
Обновляем политики из командной строки от администратора:
gpupdate /force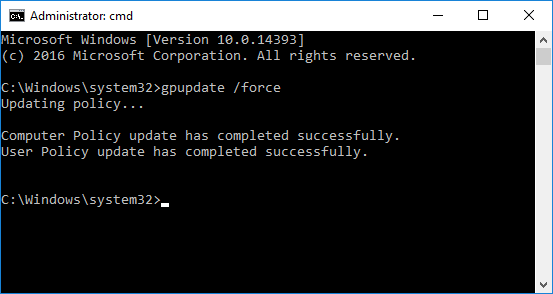
Теперь скрипт запустится при логине пользователя на сервер.
If you deal with computers at reception desks, in call centers, or in lab environments where users log in and never log off, computers can get really slow because of the applications left running by idle users. In this article, I’ll show you how you can force those users to automatically log out with a few settings in Group Policy.
Contents
- Non-recommended solutions
- Computer-side Group Policy settings
- User-side Group Policy settings
- Testing on the client
- Gotchas
- Author
- Recent Posts

Kyle Beckman works as a systems administrator in Atlanta, GA supporting Office 365 in higher education. He has 17+ years of systems administration experience.
Shared computer systems in areas such as reception desks, computer labs, and call centers can be brought to their knees very quickly if users lock the workstation and walk away when their shift ends. The next person sits down, clicks Switch User, logs in, and repeats the process all over. After enough users, there are enough random applications running in the background to slow the system to a crawl. So, how do you log off the idle sessions? Actually, it’s pretty easy with a free utility and a little Group Policy!
Non-recommended solutions
Before we get started, I’d like to address two of the ways I’ve seen suggested as a way to handle logging off idle user sessions. One solution that used to be popular is the winexit.scr screensaver included in the Windows NT Server 4.0 Resource Kit. A systems administrator can set the workstation’s screensaver to winexit.scr, and the user would be logged off when the screensaver activated.
This solution doesn’t take into account newer operating systems that include Fast User Switching. It also requires you to lengthen your screensaver activation time so you don’t accidentally log off a user who has gone on a break or lunch period. And, last but not least, getting this old utility to work correctly on newer OSs is just a pain. Do you really want to run something this old on your network if you don’t have to? Another is a Group Policy setting that a lot of people point to as a solution to this problem. The setting is located in Computer Configuration > Policies > Administrative Templates > Windows Components > Remote Desktop Services > Remote Desktop Session Host > Session Time Limits > Set time limit for disconnected sessions.
")
“Set time limit for disconnected sessions” policy (for RDS sessions only)
I’ve seen this setting recommended—a LOT—as a solution for logging off idle users. You can use it for logging off idle users on Remote Desktop Services (RDS, formerly Terminal Services). This session doesn’t work for physical computers that people are using at the console.
Computer-side Group Policy settings
To set up our solution, we’ll need to create a new Group Policy Object (GPO) in the Group Policy Management Console (GPMC). For multiuser computers, I usually like to create a new sub-Organizational Unit (OU) inside the original OU that contains all the other non-multiuser computers. This lets the multiuser computers get the same Group Policy as all of the other computers without forcing the “idle logoff” on every single computer.

Create new GPO in the Group Policy Management Console
Next, we’ll need to right-click the new GPO and choose Edit. Once you’re in the Group Policy Management Editor, you’ll need to go to Computer Configuration > Policies > Administrative Templates > System > Group Policy > Configure user Group Policy loopback processing mode. Enable the policy and set it to Merge. This will let us apply a user-side policy to computer objects in Active Directory. (I’ve written articles on loopback processing in Group Policy and common usage scenarios if you’d like more information.)

Configure user Group Policy loopback processing mode to Merge
Next, we’ll need to copy a small utility to the multiuser computers. Go and download idlelogoff.exe.
UPDATE: We removed the link to the website that hosts idlelogoff.exe is because the site is infected with malware. See comments below.
For demo purposes in this article, I’m going to put my copy into Active Directory’s Sysvol folder. For a production environment, you’ll probably want to do this from a file share. Just make sure that domain computers have at least read-only access to both the share and the file system.

IdleLogoff executable in the Sysvol folder
Go back to your GPO and go to Computer Configuration > Preferences > Windows Settings > Files. Right-click Files and choose New > File. In the Source File(s) section, select the IdleLogoff.exe that we put into \domain.localsysvoldomain.localfilesIdleLogoffIdleLogoff.exe. Set the Destination File value to C:Program FilesIdleLogoffIdleLogoff.exe.

New File Properties to copy IdleLogoff.exe to computers
User-side Group Policy settings
Next, we’ll need to set our user-side Group Policy settings. Go to User Configuration > Policies > Windows Settings > Scripts (Logon/Logoff). Double-click Logon on the right side of the window.

Logon/Logoff scripts in the Group Policy Management Editor
Click the Show Files button to open a new window where you can place the Logon script we’ll use.

Create a new batch file for a Logon script
Create a new text file named IdleLogoff.bat in the folder, with the following text:
Echo off
"c:Program FilesIdleLogoffIdleLogoff.exe" 1800 logoff

IdleLogoff.bat example
The IdleLogoff.exe utility takes two arguments. The first argument is the time, in seconds, before taking action. In this case, I’m using 1800, which translates to 30 minutes. The second argument is the action to take. The valid actions are logoff, lock, restart, and shutdown. We want to log off idle sessions, so I’m using logoff.
Last, we need to add the Logon script to the GPO. Click the Add button on the Logon Properties window, then click the Browse button on the Add a Script window, select the script (IdleLogoff.bat), and click Open. This will take you back to the Add a Script window where you can click OK. The Logon script will show up on the Logon Properties window; click OK.

Adding the Logon script to the Group Policy Object
Testing on the client
On a test client, I’m going to run a manual Group Policy update by running gpupdate.exe at a command prompt just to ensure the system gets the settings in the GPO. Next, I’m going to go to C:Program FilesIdleLogoff and make sure that IdleLogoff.exe is copied to the computer.

IdleLogoff.exe copied to a Windows 8.1 client
Next, we can run Task Manager and see that the IdleLogoff.exe executable is running in the background in the user’s session.

IdleLogoff.exe running on Windows 7

IdleLogoff.exe running on Windows 8.1
Gotchas
A word of warning about Windows 8: Windows 8 includes a number of changes to make the system startup and user logon process faster. One of these changes is to delay the running of logon scripts for five minutes, by default, to make the logon process faster for the end user. Keep this in mind when deploying this solution to computers. You can change this setting in Computer Configuration > Policies > Administrative Templates > System > Group Policy > Configure Logon Script Delay.

Configure Logon Script Delay policy
You might also ask, “If I can see the process, won’t the user be able to see the process?” The short answer here is, yes. The user will be able to run the Task Manager and see this process running in his/her list of processes and can stop it from running. I’ve found that 99 percent of my users logging into a workstation with this configured never know it is there. You can do things like try to hide the process from Task Manager or even rename the file to something like “explorer.exe.”
The only problem with those solutions is that those are the same things malware can do to a system. And, you probably don’t want to implement a solution that looks a lot like malware, or you run the risk of your antivirus/antimalware kicking in and killing it. You can disable the Task Manager by going to User Configuration > Administrative Templates > System > Ctrl+Alt+Del Options > Remote Task Manager. Set the policy to Enabled and click OK.

Disable the Task Manager with the Remove Task Manager policy
Lastly, communicate this new policy to people who may be impacted by the change. Some reception desk computers may need the idle logoff time set anywhere from 45 to 90 minutes so the primary user isn’t kicked out of his/her session while on a lunch break. Other locations, such as computer labs, may need it set to something lower—maybe 15 to 20 minutes. If you have any thoughts on how long it should take, we’d love to hear them in the comments!
![]()
If you deal with computers at reception desks, in call centers, or in lab environments where users log in and never log off, computers can get really slow because of the applications left running by idle users. In this article, I’ll show you how you can force those users to automatically log out with a few settings in Group Policy.
Shared computer systems in areas such as reception desks, computer labs, and call centers can be brought to their knees very quickly if users lock the workstation and walk away when their shift ends. The next person sits down, clicks Switch User, logs in, and repeats the process all over. After enough users, there are enough random applications running in the background to slow the system to a crawl. So, how do you log off the idle sessions? Actually, it’s pretty easy with a free utility and a little Group Policy!
Non-recommended solutions ^
Before we get started, I’d like to address two of the ways I’ve seen suggested as a way to handle logging off idle user sessions. One solution that used to be popular is the winexit.scr screensaver included in the Windows NT Server 4.0 Resource Kit. A systems administrator can set the workstation’s screensaver to winexit.scr, and the user would be logged off when the screensaver activated.
This solution doesn’t take into account newer operating systems that include Fast User Switching. It also requires you to lengthen your screensaver activation time so you don’t accidentally log off a user who has gone on a break or lunch period. And, last but not least, getting this old utility to work correctly on newer OSs is just a pain. Do you really want to run something this old on your network if you don’t have to? Another is a Group Policy setting that a lot of people point to as a solution to this problem. The setting is located in Computer Configuration > Policies > Administrative Templates > Windows Components > Remote Desktop Services > Remote Desktop Session Host > Session Time Limits > Set time limit for disconnected sessions.
“Set time limit for disconnected sessions” policy (for RDS sessions only)
Cloud to cloud backup for Microsoft Office 365: Automated, encryption, version control
Try SpinBackup for Microsoft Office 365!Ad
I’ve seen this setting recommended—a LOT—as a solution for logging off idle users. You can use it for logging off idle users on Remote Desktop Services (RDS, formerly Terminal Services). This session doesn’t work for physical computers that people are using at the console.
Computer-side Group Policy settings ^
To set up our solution, we’ll need to create a new Group Policy Object (GPO) in the Group Policy Management Console (GPMC). For multiuser computers, I usually like to create a new sub-Organizational Unit (OU) inside the original OU that contains all the other non-multiuser computers. This lets the multiuser computers get the same Group Policy as all of the other computers without forcing the “idle logoff” on every single computer.
Create new GPO in the Group Policy Management Console
Next, we’ll need to right-click the new GPO and choose Edit. Once you’re in the Group Policy Management Editor, you’ll need to go to Computer Configuration > Policies > Administrative Templates > System > Group Policy > Configure user Group Policy loopback processing mode. Enable the policy and set it to Merge. This will let us apply a user-side policy to computer objects in Active Directory. (I’ve written articles on loopback processing in Group Policy and common usage scenarios if you’d like more information.)
Configure user Group Policy loopback processing mode to Merge
Next, we’ll need to copy a small utility to the multiuser computers. Go and download idlelogoff.exe.
UPDATE: We removed the link to the website that hosts idlelogoff.exe is because the site is infected with malware. See comments below.
For demo purposes in this article, I’m going to put my copy into Active Directory’s Sysvol folder. For a production environment, you’ll probably want to do this from a file share. Just make sure that domain computers have at least read-only access to both the share and the file system.
IdleLogoff executable in the Sysvol folder
Go back to your GPO and go to Computer Configuration > Preferences > Windows Settings > Files.Right-click Files and choose New > File. In the Source File(s) section, select the IdleLogoff.exe that we put into \domain.localsysvoldomain.localfilesIdleLogoffIdleLogoff.exe. Set the Destination File value to C:Program FilesIdleLogoffIdleLogoff.exe.
New File Properties to copy IdleLogoff.exe to computers
User-side Group Policy settings ^
Next, we’ll need to set our user-side Group Policy settings. Go to User Configuration > Policies > Windows Settings > Scripts (Logon/Logoff). Double-click Logon on the right side of the window.
Logon/Logoff scripts in the Group Policy Management Editor
Click the Show Files button to open a new window where you can place the Logon script we’ll use.
Create a new batch file for a Logon script
Create a new text file named IdleLogoff.bat in the folder, with the following text:
| 12 | Echo off”c:Program FilesIdleLogoffIdleLogoff.exe” 1800 logoff |
IdleLogoff.bat example
The IdleLogoff.exe utility takes two arguments. The first argument is the time, in seconds, before taking action. In this case, I’m using 1800, which translates to 30 minutes. The second argument is the action to take. The valid actions are logoff, lock, restart, and shutdown. We want to log off idle sessions, so I’m using logoff.
Last, we need to add the Logon script to the GPO. Click the Add button on the Logon Properties window, then click the Browse button on the Add a Script window, select the script (IdleLogoff.bat), and click Open. This will take you back to the Add a Script window where you can click OK. The Logon script will show up on the Logon Properties window; click OK.
Adding the Logon script to the Group Policy Object
Testing on the client ^
On a test client, I’m going to run a manual Group Policy update by running gpupdate.exe at a command prompt just to ensure the system gets the settings in the GPO. Next, I’m going to go to C:Program FilesIdleLogoff and make sure that IdleLogoff.exe is copied to the computer.
IdleLogoff.exe copied to a Windows 8.1 client
Next, we can run Task Manager and see that the IdleLogoff.exe executable is running in the background in the user’s session.
IdleLogoff.exe running on Windows 7
IdleLogoff.exe running on Windows 8.1
Gotchas ^
A word of warning about Windows 8: Windows 8 includes a number of changes to make the system startup and user logon process faster. One of these changes is to delay the running of logon scripts for five minutes, by default, to make the logon process faster for the end user. Keep this in mind when deploying this solution to computers. You can change this setting in Computer Configuration > Policies > Administrative Templates > System > Group Policy > Configure Logon Script Delay.
Configure Logon Script Delay policy
You might also ask, “If I can see the process, won’t the user be able to see the process?” The short answer here is, yes. The user will be able to run the Task Manager and see this process running in his/her list of processes and can stop it from running. I’ve found that 99 percent of my users logging into a workstation with this configured never know it is there. You can do things like try to hide the process from Task Manager or even rename the file to something like “explorer.exe.”
The only problem with those solutions is that those are the same things malware can do to a system. And, you probably don’t want to implement a solution that looks a lot like malware, or you run the risk of your antivirus/antimalware kicking in and killing it. You can disable the Task Manager by going to User Configuration > Administrative Templates > System > Ctrl+Alt+Del Options > Remote Task Manager. Set the policy to Enabled and click OK.
Disable the Task Manager with the Remove Task Manager policy
Lastly, communicate this new policy to people who may be impacted by the change. Some reception desk computers may need the idle logoff time set anywhere from 45 to 90 minutes so the primary user isn’t kicked out of his/her session while on a lunch break. Other locations, such as computer labs, may need it set to something lower—maybe 15 to 20 minutes. If you have any thoughts on how long it should take, we’d love to hear them in the comments!
Windows Group Policy allows you to run various script files at a computer startup/shutdown or during user logon/logoff. You can use GPOs not only to run classic batch logon scripts on domain computers (.bat, .cmd, .vbs), but also to execute PowerShell scripts (.ps1) during Startup/Shutdown/Logon/Logoff.
In modern versions of Windows, you can directly run logon/logoff PowerShell scripts from a GPO editor (previously it was necessary to call the .ps1 file from the .bat batch file as a parameter of the powershell.exe executable).
Contents:
- How to Run PowerShell Scripts on Windows Startup with Group Policy?
- Run Windows PowerShell Script at User Logon/Logoff
Run the Domain Group Policy Management console (GPMC.msc), create a new policy (GPO), and assign it to the target Active Directory container (OU) with users or computers (you can use WMI GPO filters for fine policy targeting). Switch to policy Edit mode.
You must select a GPO section to run the PowerShell script, depending on when you want to execute your PS1 script:
- If you want to run a PS script when a user logon (logoff) to a computer (to configure the user’s environment settings, or programs: for example, you want to automatically generate an Outlook signature based on the AD user properties, customize screensaver or Start screen settings), you need to go to the GPO section: User Configuration -> Policies -> Windows Settings -> Scripts (Logon / Logoff);
- If you want to run the PowerShell script at a computer startup (to disable legacy protocols: NetBIOS and LLMNR, SMBv1, configure computer security settings, etc.) or prior to the computer shutdown, you need to go to the GPO section with the computer settings: Computer Configuration -> Policies -> Windows Settings -> Scripts (Startup / Shutdown).
How to Run PowerShell Scripts on Windows Startup with Group Policy?
Suppose, we have to run the PowerShell script at a computer startup. Select the Startup policy, and go to the PowerShell Scripts tab.

Now you need to copy the file with your PowerShell script to the domain controller. Copy your ps1 file to the Netlogon directory on the domain controller (for example, \woshub.comnetlogon).
Since we configure the Startup PowerShell script, you need to check the NTFS “Read&Execute” permissions for the Domain Computers and/or Authenticated Users groups in the ps1 file permissions.
Now click Add and specify the UNC path to your ps1 script file in Netlogon.
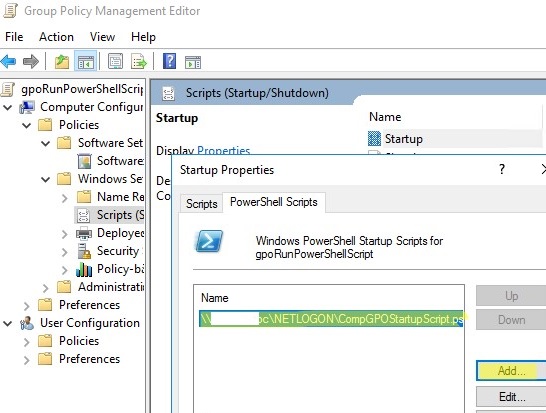
If you run multiple PowerShell scripts through a GPO, you can control the order in which the scripts are executed using the Up/Down buttons.
To correctly run PowerShell scripts during computer startup, you need to configure the delay time before scripts launch using the policy in the Computer Configuration -> Administrative Templates -> System -> Group Policy section. Enable the “Configure Logon Script Delay” policy and specify a delay in minutes before starting the logon scripts (sufficient to complete the initialization and load all necessary services). Usually, it is enough to put here 1 or 2 minutes.
If your PowerShell script uses Windows networking, you need to enable the “Specify startup policy processing wait time” option for some GPOs (Computer Configuration -> Policies -> Administrative Templates -> System -> Group Policy). You can try starting from 60 seconds here. After enabling this policy, your computer will wait 60 seconds for network availability notifications before running your startup scripts. This is usually enough time to initialize the Windows networking stack.
On Windows Server 2012R2 and Windows 8.1 and newer, PowerShell scripts in GPO are run from the NetLogon directory in the Bypass mode. This means that PowerShell Script Execution Policy settings are ignored. If you want to run a script from a different shared folder, or if you still have Windows 7 or Windows Server 2008R2 clients on your network, you need to configure the PowerShell script execution policy.
By default, Windows security settings do not allow running PowerShell scripts. The current value of the PowerShell script execution policy setting can be obtained using the Get-ExecutionPolicy cmdlet. If the policy is not configured, the command will return Restricted (any scripts are blocked). The security settings for running the PowerShell script can be configured via the “Turn On Script Execution” policy (in the GPO Computer Configuration section -> Administrative Templates -> Windows Components -> Windows PowerShell). Possible policy values:
- Allow only signed scripts (AllSigned) – you can run only signed PowerShell scripts (“How to digitally sign a PowerShell script?”) — this is the best option from a security perspective;
- Allow local scripts and remote signed scripts (RemoteSigned) – you can run any local and signed remote scripts;
- Allow all scripts (unrestricted) – the most insecure option, because allows running any PowerShell scripts.
If not one of the settings of the PowerShell scripts execution policy is suitable for you, you can run PowerShell scripts in the Bypass mode (scripts are not blocked, and warnings do not appear).
To do this, run the PowerShell script from the Startup -> Scripts section. In this section, you can run your PS1 script by calling the powershell.exe executable (similar to the script described in the article). Set:
- Script Name:
%windir%System32WindowsPowerShellv1.0powershell.exe - Script Parameters:
-Noninteractive -ExecutionPolicy Bypass -Noprofile -file %~dp0MyPSScript.ps1

The term %~dp0 is an environment variable that is automatically converted to a UNC path to the script directory (in this case, NETLOGON).
In this case, you are forced to allow any (even untrusted) PowerShell script to run using the Bypass parameter.
Reboot your computer to update the GPO settings and check that your PowerShell script runs after Windows boots.
Run Windows PowerShell Script at User Logon/Logoff
Let’s look at how to automatically run a PowerShell script when a user logs into (or logs out) Windows.
If you need to run the script not at computer startup, but after the user logs into Windows (for each user on the computer), you need to link the GPO to the Active Directory OU with users. In this case, the PowerShell script needs to be configured in the User Configuration section of your GPO.
If you want the policy to be applied to all users of a specific computer, you need to link the policy to the OU with computers and enable the Configure User Group Policy Loopback Processing mode parameter in Computer Configuration -> Administrative Templates -> System -> Group Policy). If you do not enable the loopback processing, then the parameters from the User Configuration section will not be applied to the user. For more information, check the post Group Policy Not Applying To User or Computer.
In this example, I will use a simple PowerShell script that writes the user’s login time to a text log file.
- Copy your PowerShell script file to the
\woshub.comNETLOGONfolder on the Active Directory domain controller; - Go to User Configuration -> Policies -> Windows Settings -> Scripts -> Logon;
- Go to the PowerShell Scripts tab and add your PS1 script file (use the UNC path, for example
\woshub.comNETLOGONUserLog.ps1);
- Re-login the user on the target computer;
- Your PowerShell script will be launched automatically via GPO when the user logs in;
- You can verify that the user logon script was executed successfully by the Event ID 5018u nder Microsoft-Windows-GroupPolicy/Operational section of Event Viewer:
Completed Logon script for woshubjsmith in 11 seconds.


If you want the user not to be able to access his desktop until the script is finished, you must enable the GPO parameter Run logon scripts synchronously (Computer Configuration –> Administrative Templates -> System -> Logon). In this case, the explorer.exe process will not start until all policies and logon scripts have been completed (this increases the user logon time!).
Note that the script runs with the current user permissions. If the user has administrative privileges on the computer and the User Account Control (UAC) settings are enabled, the PowerShell script cannot make changes that require elevated privileges.
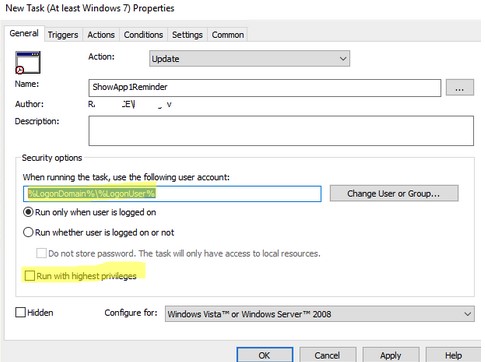
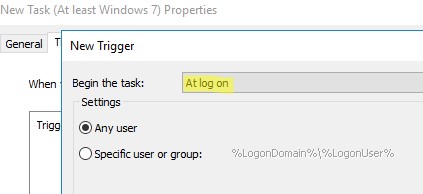
In order to run PowerShell logon scripts with elevated user permissions, you can use the Scheduler Tasks.
- Create a new Task Scheduler job under User Configuration -> Preferences -> Control Panel Settings -> Scheduled Task;
- On the General tab, specify that the task will be started on behalf of the current user
%LogonDomain%%LogonUserand enable theRun with highest privilegesoption; - On the Trigger tab, specify that the task should be started At log on;

- Specify the path to your PowerShell script file on the Actions tab:
Action: Start a program
Program/Script: C:WINDOWSsystem32WindowsPowerShellv1.0powershell.exe
Add Arguments (optional): -ExecutionPolicy Bypass -command "& \woshub.comNetlogonYour_PS_Script.ps1"
Learn more about configuring Windows Scheduler tasks via GPO.
Such a PowerShell script will run as an administrator (if the domain user is added to the local Administrators group).
Some logon scripts need to be run for each user only once at the first login to the computer (initialization of the working environment, copying folders or configuration files, creating shortcuts, etc.). Here is a simple trick that allows you to run a script only once using GPO.

- Remove From My Forums
-
Question
-
Hi everyone, I am just wondering if there is any way to delay the autologon process by x seconds.
Thanks.
All replies
-
I believe if you go to start > run > msconfig
Then go to the boot tab. And change the timeout there to how long you want it to wait.
What is this computer being used for anyways? I’m assuming you want to give the wireless time to connect before it starts up?
OR is this more of a kiosk machine…
And if this doesn’t work do you have the option of running scripts at startup?
-
Thanks for the quick reply!
If I am not mistaking, the timeout you set here in Boot is how long it shows the boot menu with all installed operating systems on the screen, before loading the default OS. It has nothing to do with the autologon to Windows. Also, if there is only one OS
installed, it has no effect whatsoever.I needed to delay the autologon because this machine is accessed through a remote tool, not directly. The remote tool is installed as service, so starts with Windows, but it takes a few seconds to establish the connection. By the time it’s established, the
autologon already took place, and the auto user is logged in. More so, if I make a log off, the computer is set up to force autologon back. My remote session will disconnect and reconnect at log off, which doesn’t give me the chance to hold down shift to stop
the autologon. That’s why I need a delay for the autologon. -
The only way i can think of is the logon script for a user.
Save this a Script.vbs and assign it to the user as logon script.
VBScript ExampleWScript.Sleep 2000 'sleep for 2 seconds
-
Proposed as answer by
Wednesday, January 25, 2012 8:06 AM
-
Proposed as answer by
-
Ya thats the only way to do it then is to do a startup script
-
Thanks for the reply Brano.
I considered scripting as well as last resort, but was kind of hoping there would be a delay setting (key in the registry maybe, under HKLMSoftwareMicrosoftWindows NTCurrent VersionWinlogon) that I overlooked.
I will have to figure out how to make the script idea work, since a login script for a user will come into effect AFTER the login (in my case autologin) so it really doesn’t help much, it will just delay maybe the desktop from appearing.. any thoughts
are much appreciated, I am no scripting expert, but I know some basic programming concepts to help along the way. -
Maybe something like this would benefit you. It’s not free, but seems to cover just about any autologon scenario.
http://www.logonexpert.com/
(I have not used it.)
SC Tom
-
Edited by
SC Tom
Monday, January 23, 2012 4:29 PM -
Proposed as answer by
Oleg V. Korzhukov
Wednesday, March 19, 2014 9:49 AM
-
Edited by
-
Thanks Tom, unfortunately no 3rd party software will be allowed
 tough with big companies..
 tough with big companies..