
Having reliable remote access is a vital tool for a wide array of business needs- whether that be facilitating remote work options for employees, or providing more efficient customer support.
Remote desktop access has even become a daily necessity for numerous IT professionals who need control over remote devices, or the ability to troubleshoot from afar. Here we will talk about connecting remote desktop Linux to Windows machines and vice versa. Keep reading to get all possible options.
Connect To Linux From Windows
A remote connection is more commonly defined by using software that allows someone to remotely control another machine (like a remote desktop to Linux from Windows, or a remote desktop from Linux to Windows). Remote connections also allow users to access software, applications, and files, as well as to conduct system maintenance and troubleshooting resolution.
The methods outlined below work well for all Linux systems other than Ubuntu- which already has a built-in remote desktop tool that supports both RDP and VNC.
For the initial connection, ensure this feature is set up on the physical Ubuntu machine. After following the installation steps for the built-in Ubuntu-compatible remote desktop option, further installation of any additional software won’t be necessary.
Linux Remote Desktop
We are going to focus on the specifics of using Remote Desktop Protocol (RDP) on Linux-based servers, i.a., client apps you get to choose from, and some nuances of using remote access tools for Linux in cross-platform environments.
Every user of Debian-derived Linux distribution knows that setting up Kali Linux remote access and successful use of remote desktop clients like TeamViewer or AnyDesk can be tricky at times. Mind that, for starters, you’ll need to download and install all the packages required to enable remote desktop Kali capabilities and update the ones you already have to the latest versions.
After that, you can either use a script to enable XFCE and RDP or do it manually (that takes more time but gives you much more control over the process). This will be enough to access your Kali machine from any other device connected to your local network.
Accessing a remote desktop from Linux Mint machines, especially the configuration of the protocols, may seem overly complicated, but in reality, it’s nothing to be stressed about. For one, Linux Mint has a built-in desktop sharing tool available from the Main Menu. Enable remote access to a machine, and it will be available for connections via SSH terminal for everyone who knows this machine’s IP address. If the toolset provided by a standard remote access client isn’t enough, you can install a third-party client tool, like Vinagre or others, and enjoy localized GUIs, SSH tunneling, request listening option, and many more.
Accessing a remote Linux desktop from a Windows machine sharing a network can be done with just a few simple commands, or by installing easy-to-use software like RDP, Xrdp, Xfce4, TeamViewer, Gnome, Remmina, etc.
Note: Some remote access tools even allow you to access a remote printer or scanner.
Here’re some options to access a remote Linux desktop from a local Windows machine:
- • The “Obtain the IP Address” Method
- • The “RDP” Method
- • The “VNC” Method
- • The “SSH” Method
For those using devices that function over the same network, there are multiple open-source options that help users with remote desktop from Windows to Linux access.
The IP Address Method
Before initiating a Windows to Linux remote desktop connection, users will need to obtain the host machine’s IP address before doing anything else.
To find the IP address of the Linux host, log into the Linux machine, open Terminal, and type the following:
ifconfig
This command will display the Linux machine’s IP address. Users can also locate the IP address by connecting to the network’s router, then browsing the devices by their hostname. Use this information while operating your Windows computer to establish a remote connection.
The “RDP” Method
The simplest option to enable remote connections to Linux desktops is by using the remote access tool built directly into the Windows OS: Remote Desktop Protocol (RDP).
Users must install Xrdp software on their Linux machine to use RDP. Complete installation in person, or with the SSH command. Enter the command as shown below:
sudo apt install xrdp
After that, type “rdp” into the search function, then run the Remote Desktop software on the Windows computer.
From within the Remote Desktop Connection pop-up window, type the Linux computer’s IP address, then click connect.
Note: to manage advanced parameters configuration, click “Show Options”.
The “VNC” Method
Another remote desktop option to try is VNC (Virtual Network Connection). Access a remote device using VNC by installing the dedicated software on both computers. One of the most beloved VNC remote access tools is TightVNC, which is also open-source.
How to use TightVNC to access Linux from Windows
Installing TightVNC can also be done in person or by using the SSH command.
-
Step 1: Enter the following command:
sudo apt install tightvncserver -
Step 2: Users should then run using the command:
sudo tightvncserver - Step 3: Users must then set the desired password.
- Step 4: Once the above steps are complete, start the client app on Windows (which can be downloaded from the TightVNC website).
- Step 5: Type the IP address and port number in the TightVNC window on the Windows OS device.
- Step 6: Hit “Connect”, then enter the password that was defined in the SSH command section above.
Use SSH
Even though Secure Shell won’t permit remote desktop connections, it’s still an excellent option for remotely installing the software needed to access a Linux desktop remotely. See below to learn how to do it.
Step 1: From the Windows computer, open the Power Menu.
Step 2: Choose “Windows PowerShell”.
Step 3: Type the following command:
ssh [IP_ADDRESS]
Step 4: After accepting the certificate, enter the appropriate username and password.
The connection is now established.
The options described above are excellent for small businesses, anyone working on a smaller network, or those who don’t need frequent access to a remote device.
Using RDP Clients To Create A Linux to Windows Remote Desktop Connection
This section will help anyone interested in protocols to connect a remote desktop to Windows from Linux.
To start, we’ll begin with using the Windows app, Remote Desktop Connection.
Utilizing the Remote Desktop Protocol (RDP), the Remote Desktop Connection app is included with all Windows OS. RDC allows users to access a Windows PC, or Windows Server remotely.
This is very convenient and cost-effective because organizations can install apps onto one central server, instead of multiple computer systems. Employees can then use those programs by accessing the remote server. This centralization also ensures that maintenance and troubleshooting are much easier processes.
This technology was originally called Terminal Services (TS). In modern times, web systems are far more commonplace- but situations remain where Windows remote applications are still required.
During those instances, Linux users can access Windows computers and servers remotely from their preferred system via RDP client.
There are numerous linux remote desktop clients, and we’ll cover three of them below:
- • Remmina
- • FreeRDP & rdesktop
After reading the features below, users can select the option that suits their unique needs.
Note: there are some instances where users may prefer to use a VPN for their remote access needs, but this article will solely focus on dedicated remote access software.
Enabling remote desktop on Windows
Users must first set up the machine that they wish to connect with remotely.
While operating the Windows computer that will be remotely connected to, follow the steps below:
Step 1: Login as Administrator;
Step 2: Open the Start menu;
Step 3: Click Settings;
Step 4: When the Settings window opens, open the System category > Remote Desktop;
Step 5: Now enable it;

Please note: users can’t connect with computers running Windows Home edition (like Windows 10 Home). This screen details the information, if that is the case:

Remmina
Remmina supports numerous remote access protocols like RDP, VNC, NX, XDMCP, and SSH. Remmina’s main goal is to help system administrators and travelers that work with multiple remote desktops and/or servers. Remmina is included in the Ubuntu Linux distribution as a default remote desktop client.
FreeRDP and rdesktop
Not only was rdesktop the very first Linux RDP client, but it was also the most popular for many years. However, as of November 2019, the project is searching for a new maintainer.
Alternatively, FreeRDP was initially released in 2009 as a fork of rdesktop. This occurred when Microsoft opened the RDP specifications. As time went on, and FreeRDP grew, it became the standard RDP client on systems lacking native Microsoft clients.
Simply double-click on the computer you want remote access to from the list.
Following the Microsoft Open Specifications, FreeRDP is a free implementation of Remote Desktop Protocol. Said implementation offers the server and client applications, as well as a library that permits other applications to utilize RDP protocol. FreeRDP is both an app and a library, providing reusable features for alternative applications. Aside from rdesktop, the clients listed above utilize FreeRDP’s library.
Please note: The inclusion of rdesktop on this list was intended for informational purposes only, and unless users have a specific scenario in mind, we advise another client that is compatible with the FreeRDP library.
How to Use Remote Desktop Connection in Ubuntu Linux: Complete Walkthrough
Remote desktop protocol is a popular network protocol that is widely used for connecting to computers remotely in Windows environments to manage them. This protocol can be used for connecting to physical and virtual machines that are running on Windows. However, if Linux with a graphical user interface (GUI) is installed on your machine, you can use the remote desktop protocol and configure remote desktop connection from Linux machines to Windows machines via RDP as well as configuring access from Windows machines to your Linux machines by using this protocol. You can also use RDP to connect from Linux machines to Linux machines if needed. It is convenient to use RDP for Ubuntu so as to connect to virtual machines running in public clouds such as Azure, Amazon EC2, and Google Cloud.
There are three the most used network protocols to manage Ubuntu remotely:
- SSH (Secure Shell)
- RDP (Remote Desktop Protocol)
- VNC (Virtual Network Computing)
Today’s blog post explains Ubuntu remote desktop configuration which can also be applied to other Linux distributions.
Data Protection with NAKIVO Backup & Replication
NAKIVO Backup & Replication delivers high-end data protection for SMBs and enterprises with multiple backup, replication and recovery features, including VMware Backup, Hyper-V Backup, Office 365 Backup and more. Get the Free Trial now!
How to Use Remote Desktop Connection in Ubuntu
In the majority of cases, you need to install the Ubuntu remote desktop client manually on your Ubuntu Linux. In today’s blog post, Ubuntu 18.04.2 is installed on the VMware virtual machine. Some packages are already installed in our Ubuntu before going to configuring Ubuntu remote desktop: the text editor vim, net-tools and the SSH server (which allows you to connect via SSH to the Linux console remotely). These packages can be installed with the single command:
sudo apt-get install -y vim net-tools openssh-server
In order to configure Ubuntu RDP connections, you need to install the RDP client or/and the RDP server, depending on the connection direction.
Note: In Windows systems, the remote desktop client is known as Remote Desktop Connection or Terminal Services Client. Windows XP uses RDP version 5.1, Windows Server 2003 – version 5.2, Windows Server 2008 — version 6.1, Windows 7 – version 7, Windows 8 and Windows Server 2012 – version 8, Windows 8.1, Windows 10 — RDP version 10, and Windows Server 2012R2 – version 8.1.
Using Remmina – Ubuntu Remote Desktop Client
Remmina is a free open-source software that is intended to make life easier for system administrators who need to establish Ubuntu remote desktop connections. Remmina supports not only RDP for Ubuntu but also other remote desktop protocols such as VNC, SSH and SPICE. You can learn how to install and configure Remmina as the Ubuntu remote desktop client in this remote desktop protocol tutorial. You can install Remmina using one of two methods below.
How to install Remmina in the GUI
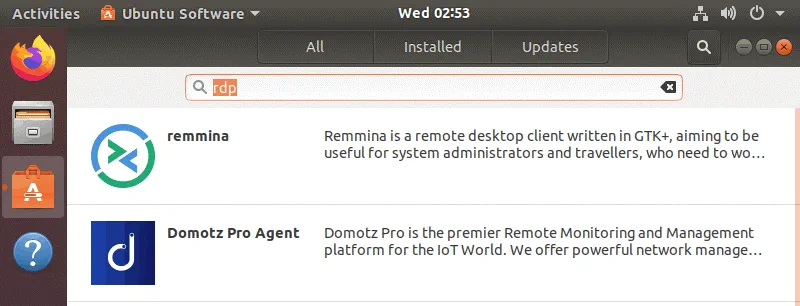
Click the button in the left bottom corner of the Ubuntu Desktop to open the Main Menu (Show Applications).

Type rdp in the search bar.
You can see that Remmina has been found as the remote desktop client.
Click Remmina on this screen.

You are redirected to the Ubuntu software page. Click Remmina to see details about this software.
Click Install to install Remmina the remote desktop client.
Enter your password which is required to install packages.
Wait until the necessary packages are installed.

How to install Remmina in the console
As an alternative, you can install Remmina in the Ubuntu console with just a few commands.
First, add the necessary software repository to the repository list of your Ubuntu system:
sudo add-apt-repository ppa:remmina-ppa-team/remmina-next
Update the repositories and available packages list:
sudo apt-get update
Install Remmina and related plugins:
sudo apt-get install remmina
sudo apt-get install remmina-plugin-*
sudo apt-get install libfreerdp-plugins-standard
Post-installation configuration
After installation is finished, launch Remmina.
Click the Main Menu button in the GNOME interface of Ubuntu, find the Remmina icon in the menu or type Remmina to locate the application. You can also open the console (terminal) and enter remmina to execute the application.
Once you launch Remmina for the first time, the application will ask you to install certain packages; install the packages with these commands:
sudo snap connect remmina:avahi-observe :avahi-observe
sudo snap connect remmina:cups-control :cups-control
sudo snap connect remmina:mount-observe :mount-observe
sudo snap connect remmina:password-manager-service :password-manager-service
Let’s connect to the remote Windows machine running on another VM from the Ubuntu machine on which Remmina is installed. Make sure that Remote Desktop is enabled on the remote machine you are going to connect to. In the current example, Windows Server 2008 R2 is installed on the remote Windows virtual machine.
Right click My Computer and in the context menu, select Properties. In the System Properties, hit Advanced system settings. In the System Properties window, select the Remote tab and click Allow connections from computers running any version of Remote Desktop. Hit OK to save settings. Notice that Windows Firewall will be tuned automatically to allow inbound connections (TCP port 3389 by default).

Run CMD and execute the ipconfig command to check the IP address of your Windows system on which you have enabled remote desktop connections. In this example, the IP address of the Windows machine is 192.168.101.21.
Now go back to your Linux machine where you have installed Remmina as the remote desktop client.
In the opened Remmina window, select RDP in the drop-down list.
Enter the IP address of the remote host (192.168.101.21 in this case) and hit Enter.

If the certificate details are displayed, hit Yes to accept the certificate and connect to the remote host. Enter the RDP authentication credentials and click OK to log in to the remote host via RDP. Make sure that a user on a Windows machine has permissions to use RDP.

The RDP session is established. However, by default, resolution is about 640×480, and that is too low.

You can set the custom resolution for your Ubuntu RDP session when using Remmina for connecting to remote Windows or Linux machines. Click the + icon in the top left corner of the Remmina window to create a new connection preset.

In the opened window, enter the name of your remote desktop Linux to Windows connection and select RDP as the protocol. In the Basic tab, enter the IP address of the remote host (192.168.101.21 in this case), the username (user must be allowed to connect remotely on the target host) and the password of the selected user. Below in the Resolution section, expand the drop-down menu and select the custom resolution, for example, 800×600. When you have configured all necessary connection options, hit Save.

Now in the main window of Remmina, you can see the added connection preset named Windows Server 2008. Double click the preset for connecting to the selected remote host from Ubuntu via RDP. Notice that you don’t need to enter credentials because they are saved in the preset.

Now your remote desktop Linux to Windows session has been established with the selected resolution.
Using Xrdp — Ubuntu Remote Desktop Server
You can also configure a Remote Desktop server on your Linux system and connect to that Linux remotely from Windows machines by using a standard Windows Remote Desktop client. Popular Linux distributions don’t have the Remote Desktop server installed but it is possible to install and configure the Remote Desktop server on Linux manually, so as to enable managing a Linux machine remotely in the graphical mode. In this section, we will explain how to configure access via Remote Desktop Protocol to Ubuntu 18.04.2. The main component you need for this purpose is xrdp.
Xrdp is an implementation of Microsoft RDP that allows non-Windows operating systems to provide functionality of the RDP server. Xrdp is free and open source software. The X Window system is required to use xrdp. Let’s find out how to configure a remote desktop server on Ubuntu.
First, update the software repository tree:
sudo apt-get update
Install xrdp from online software repositories:
sudo apt-get install xrdp
You need to install the XFCE desktop environment. By default, Ubuntu 18 is installed with GNOME 3 but xrdp works better with XFCE, which is a lightweight desktop environment. After installing XFCE and configuring RDP for Ubuntu, you will still have the ability to log in to your Ubuntu Linux locally by using GNOME.
Hence, install XFCE:
sudo apt-get install xfce4
In the home directory of your user, create the .xsession file and write the xfce4-session string into that file. Thus, you configure the xrdp server to use xfce as the default graphical environment.
echo xfce4-session > ~/.xsession
Make xrdp start automatically when your Linux is booted.
sudo systemctl enable xrdp
Restart the xrdp service to make changes take effect.
sudo service xrdp restart
Clear the configuration stored in the startwm.sh shell script file that is needed to start xrdp:
sudo sh -c ‘cat /dev/null > /etc/xrdp/startwm.sh’
(Before running the command above, you may create a copy of that file if needed by using the command cp /etc/xrdp/startwm.sh /etc/xrdp/startwm.sh1 )
Edit the startwm.sh shell script configuration file with vim:
sudo vim /etc/xrdp/startwm.sh
The startwm.sh shell script file must contain the following lines:
#!/bin/sh
if [ -r /etc/default/locale ]; then
. /etc/default/locale
export LANG LANGUAGE
fi
startxfce4
Keep one empty line in the end of file.

Save the startwm.sh configuration file and quit: Press Esc and type :wq
Restart the xrdp service:
sudo service xrdp restart
Check the IP address of your Ubuntu Linux:
ifconfig
or
hostname -I
In this example, the IP address of the Linux machine is 192.168.101.208.
By default, the firewall in Ubuntu is disabled. If the firewall is enabled, allow inbound connections to the TCP port 3389.
sudo ufw allow 3389
For more security, you can specify the allowed IP addresses or custom networks:
sudo ufw allow from 192.168.101.0/24 to any port 3389
Note: If a remote Linux machine on a remote site is in the local network behind the NAT and you need to access that machine via RDP from an external IP address, you can configure port forwarding or VPN connection on a router/firewall on a remote site.
Try to connect to your Ubuntu Linux from Windows via RDP.
Open CMD in Windows (Start > Run > CMD).
Run the command to open the Remote Desktop client and connect to the required host:
mstsc /v:192.168.101.208
Select Xorg as the session type and enter your login and password.

If you see an empty blue screen and after a few minutes of waiting, the error is displayed, it means that something is not configured properly. Let’s find out how to fix the empty blue screen issue for xrdp.

This issue is related to the xorgxrdp package and certain changes implemented to Ubuntu 18.04 compared to the previous Ubuntu versions that have broken the xrdp capability. As you recall, Ubuntu 18.04.2 is used in the current example for configuring xrdp. In order to fix an empty blue screen, run the command and install the actual version of xorgxrdp-hwe:
sudo apt-get install xorgxrdp-hwe-18.04
You can check the Ubuntu version with the command:
lsb_release -a
Restart the xrdp service (daemon):
sudo /etc/init.d/xrdp restart
After installing the necessary package, open the RDP client and try to connect to your Ubuntu via RDP once again.
In Windows CMD run:
mstsc /v:192.168.101.208
In the login window select Xorg and enter your login and password.

Now you have connected successfully. In the dialog window that is displayed after connecting to Ubuntu RDP (Welcome to the first start of the panel), select Use default config.

If you need to set the custom resolution in the Windows CMD, run:
mstsc
Enter the IP address of the remote Ubuntu machine manually.
Click Show Options and select the needed resolution on the Display tab.

Now you can connect to Ubuntu from Windows via RDP and use the needed remote desktop screen resolution. This means that RDP for Ubuntu has been configured successfully and is, thus, the end of today’s remote desktop protocol tutorial.
Conclusion
Today’s blog post has explained how to use remote desktop connection in Ubuntu Linux. Configuring inbound and outbound remote desktop connections in Ubuntu is affordable for the majority of users. You need to install a remote desktop client for connecting from Ubuntu to Windows machines and other machines. To connect to your Ubuntu Linux machine, you need to install and configure a remote desktop server on your Linux machine. Xrdp and XFCE must be installed for this purpose.
If for some reason you cannot use RDP for Ubuntu, consider using VNC, which is the protocol alternative to RDP. Using RDP and VNC allows you to connect to your physical and virtual machines remotely with the graphical user interface. Don’t forget to back up your Linux servers and virtual machines to protect your data. Download NAKIVO Backup & Replication and back up your virtual machines and physical servers.

Set up a Linux server? Perhaps you’ve configured it as the solution to network storage. Or maybe you have a Linux work PC, media center, or simply keep a secondary PC in another room. Whatever the case, at some point, you’ll need to remotely access the Linux device from a Windows PC or laptop. So, what is the solution?
Windows users have several tools that enable simple remote desktop from Windows to Linux. Want to know how remote desktop from Windows to Linux? Read on!
You’ll Need the Linux Device’s IP Address
Before you can remote into Linux from Windows, you’ll need the device’s IP address. It’s useful for all remote connection options, although in some cases, the hostname (the device’s network name) will do.
The simplest way to check the IP address is to log in to you your Linux device and open the terminal. Enter:
hostname -I
The IP address of the device will be displayed. For more details, you can also use:
ip address
If your Linux system has multiple connections, these will be listed with prefixes. For example, an Ethernet connection will be listed alongside eth0. If it’s connected wirelessly, look for the IP address listed against wlan0.
If this isn’t easy or convenient, there is another method that is almost as simple. In your browser window, connect to your router. This is usually an address like 192.168.0.1 or 192.168.0.100. Check this by looking at the router itself or the documentation that came with it.
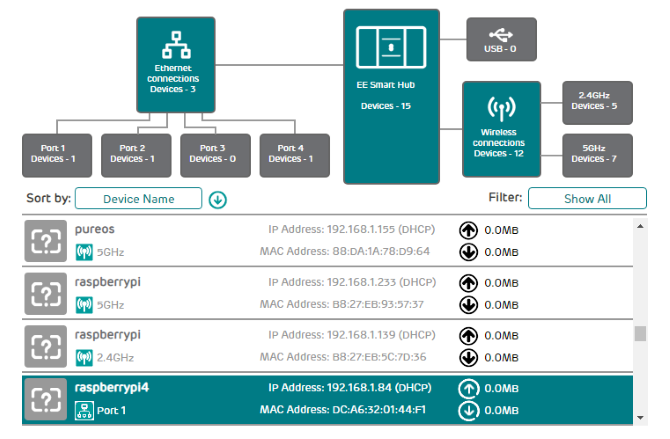
Once signed in to the router, look for an option that lists connected devices. Browse through the IP addresses to find your Linux device by hostname. Some routers can even display the device’s operating system. You’ll find the IP address listed alongside, which you should note down for later.
How to RDP From Windows to Linux
The first and easiest option is RDP, Remote Desktop Protocol, which is built into Windows.
Before starting, you’ll need to install the xrdp software on your Linux box. You can do this in person or using SSH (see below) with a single command:
sudo apt install xrdp
To RDP to Linux, run the Remote Desktop software on your Windows machine. In Windows 8 and later, you can find it via Search simply by inputting the letters «rdp».
With the Remote Desktop Connection window open:
- Input the IP address
- Use Show Options for any advanced connection requirements
- Click Connect
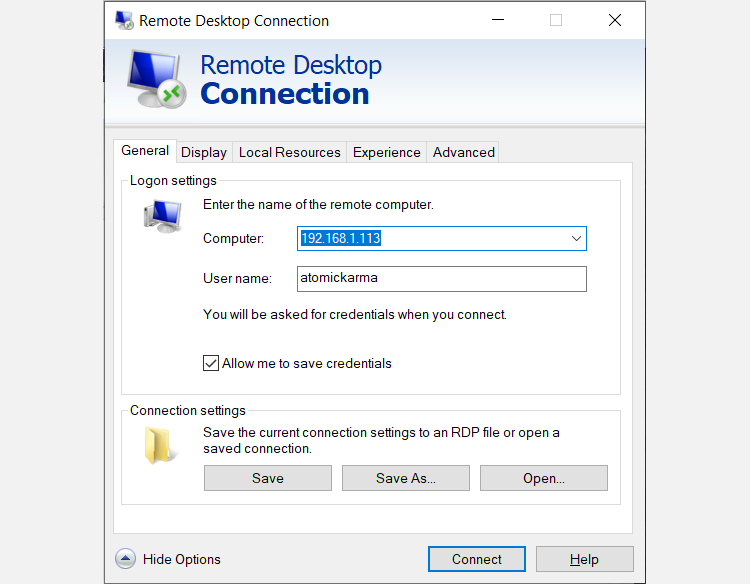
It’s as simple as that.
Benefits of RDP: while it might take a bit longer to set up, using RDP provides great reliability and remote desktop access to Linux. This makes it an ideal tool for remote working with Linux machines.
If you use plan to use RDP regularly, you can save some time by creating these custom configurations for Windows RDP.
Connect to Linux From Windows With VNC
A Virtual Network Connection (VNC) also affords remote access to your Linux desktop. As with RDP, however, you’ll need to install some dedicated software. On the Linux box, the VNC server software is required; on Windows, a client app.
One of the most popular options for connecting to Linux over VNC is TightVNC. You’ll find the Windows client software on the website, but make sure you choose the right version.
Download: VNC for Windows
Once you’ve done that, install tightvncserver on your Linux box. This might be via SSH (see the next section) or with physical access to the computer.
First, in Linux, check for updates:
sudo apt update
Next, install TightVNC Server:
sudo apt install tightvncserver
Once installed, run tightvncserver, and set a password when prompted.
sudo tightvncserver
There is an eight-character limit for passwords. With tightvncserver now running, you’ll see a notification displaying the port number—make a note of it.
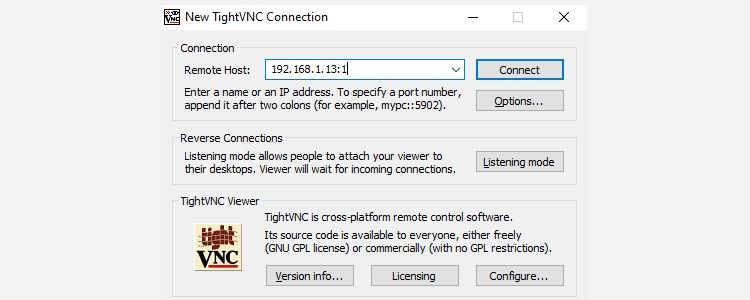
Once you’ve done that, here’s how to connect to the Linux machine from Windows:
- Run the TightVNC Viewer app on Windows
- Input the IP address and port number
- Click Connect
- Input the password you set when prompted
The remote desktop will then open, and you can start using the app of your choice—within reason. Certain applications with heavy graphical demands are unlikely to run reliably, if at all.
Benefits of VNC: offering fast access to the remote PC, TightVNC has its limits. You can perform standard computing tasks, but media-related activities are severely limited.
Remote Into Linux via SSH
SSH (Secure Shell) is a great way to gain remote access to your Linux device. You’re not limited to Windows with this option, either, as SSH can be used from almost any device. It’s also very secure.
You have two options for SSH on Windows:
- SSH in Windows PowerShell
- Download the PuTTY SSH tool
Let’s look at both.
Remote Access Linux With SSH in Windows PowerShell
Windows PowerShell is the new command line tool in Windows 10 and 11, replacing the old Command Prompt app. Find it by right-clicking Start to access the Power Menu and selecting Windows PowerShell. To SSH, enter:
ssh [IP_ADDRESS]
So if the Linux device has an IP address of 192.168.13.123, enter:
- ssh 192.168.13.123
- When prompted, accept the certificate.
- Input the username and password.
You now have remote SSH access to Linux.
Connect to Linux Remotely Using SSH in PuTTY
Although not natively available in Windows, you can easily download the PuTTY application. You don’t need to install PuTTY, however. Instead, you simply run the downloaded EXE file.
Download: PuTTY (Free)
For convenience, it’s a good idea to create a desktop shortcut.
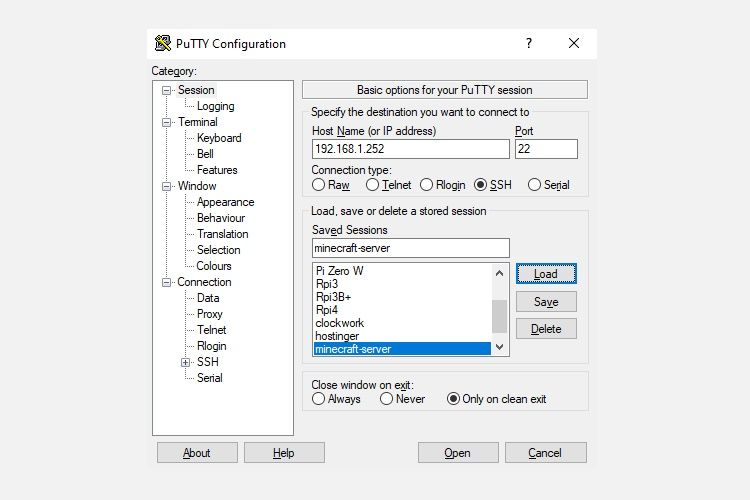
To use PuTTY for SSH:
- Select Session > Host Name
- Input the Linux computer’s network name, or enter the IP address you noted earlier.
- Select SSH, then Open.
- When prompted to accept the certificate for the connection, do so.
- Enter the username and password to sign in to your Linux device.
Benefits of SSH: using this method lets you make quick changes to Linux without getting your hands dirty. Particularly suited to software installation and admin changes. It’s also useful for setting up the previous option, VNC! SSH is also perfect for servers without a desktop environment installed.
However, if you need a remote connection to the Linux desktop from Windows, try VNC or RDP.
Three Windows Remote Desktop Methods for Connecting to Linux
Whatever your purpose, there is a suitable option to connect to a Linux machine from Windows. These methods work whether the device is a server, desktop PC at work, media center, or even a Raspberry Pi.
So, if you are wondering which of the following tools you can use to get a remote session on a UNIX/Linux system, here they are from easiest to toughest:
- RDP (Remote Desktop Protocol)
- VNC (Virtual Network Connection)
- SSH (Secure Shell)
If your Linux distro happens to be Ubuntu, you already have a built-in VNC-compatible remote desktop tool with which you can easily create a Linux remote desktop server, or Linux RDP, for short.
Looking for a way to connect Windows RDP to Linux Mint? You’ve come to the right place, in this article, we are going to discuss the basics of RDP, and how to use RDP of Linux Mint as well as Windows.
RDP stands for remote desktop protocol and is responsible for providing the user full access to another system or PC available on the internet or other local network from a remote location. Microsoft developed this network communication protocol standardized by the international telecommunication union (ITU).
Contents
- RDP Basics
- What is the Process to enable RDP connections on Windows?
- Can You RDP into Linux?
- How do I RDP from Windows to Linux Mint Operating System?
- The “RDP” Method
- Obtain the IP Address Method
- Take Away Tip
RDP Basics
Most of the systems can connect to another desktop by using RDP installed and enabled. However, only some specific windows versions allow RDP connections. RDP is the window-only protocol which means that only those systems can avail of the connection that has windows server installation to support it.
Two main components essential for developing RDP connections are an RDP server and an RDP client. RDP server is the PC or system which will fully access and control the RDP client device having the RDP client’s app installed.
What is the Process to enable RDP connections on Windows?
As you know, to develop an RDP connection to any remote server, you’ll need to enable it on your system first. Here we will mention a fairly straightforward process to enable RDP on your Linux host device.
- All you need to do is open your windows settings menu by clicking on the start button.
- Here you will see the Settings icon, click on it and then select System from the options.
- Once you have clicked on the system, you have to click on the Remote desktop option from the list.
- Here you will see an Enable Remote Desktop option with a slider giving you the option to turn on or off the remote desktop setting. Simply move the slider to the On position to enable the remote desktop connection.
Now you have enabled the connection, all you need to do is allow additional users to connect. In the remote desktop settings, Select press users that can remotely access this PC option. Once the remote desktop user window is open, click on the ADD button and continue to search for the user account you wish to add.
- All You Need to Know About sudo rm -rf
- How to install the Dissenter browser on Linux Mint?
- Install WordPress using Bitnami on Linux Mint
Can You RDP into Linux?
Linux Mint is an Ubuntu-based distribution that strives to be a modern and comfortable operating system that is both powerful, full, and easy interface for its user. Having reliable remote access makes it very easy for you to work from anywhere in the world, providing more efficient customer support or facilitating remote work options for employees and others.
To remotely control another machine like a remote desktop to Linux from Windows, you’ll need to download and install all the packages required to enable remote desktop Linux capabilities. Don’t forget to update the ones you already have to the latest versions.
You can RDP into Linux with just a few simple commands. Another way is installing easy-to-use software that includes RDP, Xrdp, Xfce4, Gnome, AnyDesk, TeamViewer, and Remmina.
How do I RDP from Windows to Linux Mint Operating System?
Now, if you are confused and want to know, how do you RDP from windows into your Linux mint system? Then you are in the right section. Here we will guide you on how to do remote desktop sharing to your Linux in an easy way.
Once you know how to share Linux mint for remote desktop access, you will open up a new world of convenience, efficiency, and productivity in a way like never before.
So, to enable remote access to Linux Mint from Windows machines or Mac operating systems, follow the easy methods mentioned below.
The “RDP” Method

Since Linux Mint offers built-in desktop sharing capabilities, the RDP method is the simplest way to enable remote connections to Linux mint operating systems. Just simply use the built-in tool RDP from the windows operating system and develop a connection by following the simple steps mentioned below.
- From your Linux machines, click on Start Menu and find the Preferences option.
- In the preferences menu, you will see the option Desktop Sharing.
- The Desktop Sharing Preferences screen will open. Allow desktop sharing of your Linux by keeping this setting to On Mode.
- This will enable other users to connect to your Linux system.
Ensure that you have control over your remote desktop Linux Mint machine when providing access to another user. If you desire to prevent any unauthorized access,
Check the “Require the user to enter this password” option in the security section.
Now enter a secured password from your remote desktop Linux mint machine and then close the window. If you are not able to alter default settings, download conf editor to change the settings.
Obtain the IP Address Method
Another easy way to establish a remote desktop connection in Linux mint is by using a Linux machine IP address. Every operating system has an IP (internet protocol) address that is a unique address to identify a device on the internet or a local network.
To handle the remote desktop connection with Linux Mint Device to send and receive information, users will need to obtain the Linux machine’s IP address before doing anything else.
To find the IP address of the host Linux machine, follow these commands that will get you to the private IP address of your interface.
- Type the “ifconfig” command, which will display the IP address of the Linux machine IP address.
- Once you know the IP address, enter the IP address of the Linux machine in the Remote Desktop Connection window and click Connect.
- Click “Show Options” to select advanced limitations.
The methods described above are excellent and easiest for small businesses, for those who don’t need frequent access to a remote device, or for anyone working on a smaller network; however other methods also used are the “VNC” Method and the “SSH” Method.
Take Away Tip
At one time, you can establish a single connection with the system that has enabled remote desktop. But if you want multiple users connected at once, you will need a remote desktop services component installed and enabled on your windows server.
RDP is the simplest way on Windows to connect to another Windows operating system. However, we can also use it to access remote Linux systems. And here we know how?
RDP – short for Remote Desktop – lets us control computers remotely over the network. Mouse and keyboard inputs are transferred to the target device, and the screen is mirrored. System administrators often use it in larger companies to install or resolve software issues or settings on other computers without physical access. You can only control your PC remotely via RDP if you have Windows 7, 8, 8.1, or 10 in the Pro version.
How to connect remote desktop of Linux VM or desktop from Windows via RDP
Here we are using Linux Mint 20.2, but you can follow the steps for earlier versions and Ubuntu 21.04, 20.04, 18.04, including Elementary OS, MX Linux, and POP!OS and other similar Linux systems.
1. Open a command terminal
Go to Linux Mint “Start” menu and search for the Terminal app to run or press Ctrl+Alt+T to access the same.
2. Run system update
Now, let’s run the system update command to ensure all the packages 0f the system is up to date. This will also refresh the system repository cache as well.
sudo apt update
3. Install XRDP on Linux Mint
The XRDP is an open-source Remote Desktop Protocol server for Linux that allows Windows users to access remote Linux machines over RDP. It offers two-way clipboard transfer (text, bitmap, file), audio redirection, and drive redirection, while all this is transferred over an encrypted connection using TLS by default. The best thing is that it is already available in the base repository of Linux Mint; thus no need to add any third-party repo. Just follow the below-given command:
sudo apt install xrdp
Check the status:
sudo systemctl status xrdp
4. Find the IP address of your machine
In the Linux mint where you have installed the XRDP, you must know the IP address of the same machine to access it remotely over RDP using Windows OS. To get the Ip type-
ip a
Note: Once you know the IP address, log out of your system.
5. Access Linux Mint from Windows over RDP
Finally, on your Windows OS 11/10/8/7, open the Remote Desktop App and enter the IP address of the Linux Mint machine that you want to access remotely.

Click the Yes button to accept the incoming connection.

6. Login XRDP Xorg Session
Now, enter the username and password of the remote Linux system you want to manage remotely and hit the OK button.

Finally, you will have the display to control a remote Linux system with GUI.

Note: If you are getting any problems accessing the system then try first log-out of your local system that you want to log in remotely.
- Как настроить удаленный доступ к Ubuntu из Windows
- Шаг 1. Установите для Ubuntu Xrdp и Xfce
- Шаг 2. Подключитесь через Windows-терминал
Читайте нашу статью, если хотите узнать, как настроить подключение к Ubuntu из Windows через удаленный рабочий стол. Мы расскажем о способах удаленного подключения и подробно рассмотрим вариант подключения по RDP.
Как настроить удаленный доступ к Ubuntu из Windows
Существует три основных способа удалённого подключения:
- по SSH (Secure Shell),
- через VNC (Virtual Network Computing),
- по RDP (Remote Desktop Protocol).
Первые два способа хорошо подойдут, чтобы подключиться к Ubuntu из Linux. Самый оптимальный вариант удалённого подключения к Ubuntu из Windows — по протоколу RDP. Этот протокол удаленного управления, который разработала компания Microsoft, позволяет подключаться только к тем к устройствам (компьютерам, серверам, а также виртуальным серверам), на которых установлен сервис терминальных подключений. В Windows сервис терминальных подключений встроен по умолчанию. Подключение к устройствам всегда происходит по порту TCP 3389.
Чтобы настроить удаленное подключение к Ubuntu этим способом, сначала нужно установить на компьютер или сервер пакет Xrdp и графическое окружение Xfce.
Шаг 1. Установите для Ubuntu Xrdp и Xfce
1. Обновите пакеты командой:
sudo apt update
2. Откройте TCP-порт 3389:
sudo ufw allow 3389
3. Установите Хrdp с помощью команды:
sudo apt install xrdp
4. Активируйте Хrdp командой:
sudo systemctl enable xrdp
5. Проверьте статус установки Хrdp:
sudo systemctl status xrdp
Если установка прошла успешно, статус будет active:
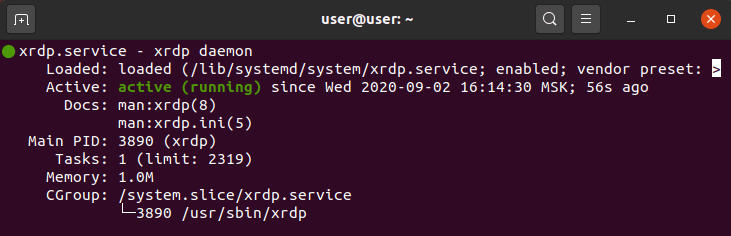
Как установить Ubuntu RDP
6. Затем установите графическое окружение рабочего стола Xfce:
sudo apt install xfce4
7. Запустите Хrdp командой:
sudo systemctl start xrdp
Совет: если вы хотите остановить работу xrdp, введите команду:
sudo systemctl stop xrdp
Готово, вы установили в Ubuntu Xfce и Хrdp. Теперь к Ubuntu можно подключиться через удалённый рабочий стол.
Шаг 2. Подключитесь через Windows-терминал
Обратите внимание: Для работы через удалённый рабочий стол вам понадобятся данные учётной записи Ubuntu, а также IP-адрес устройства, к которому вы планируете подключиться. IP-адрес сервера указан в информационном письме, которое пришло на контактный email при заказе услуги, а также в карточке услуги на вкладке “Управление”.
1. Откройте меню терминала RDP сочетанием клавиш Win+R. Затем в поисковую строку введите “mstsc”:

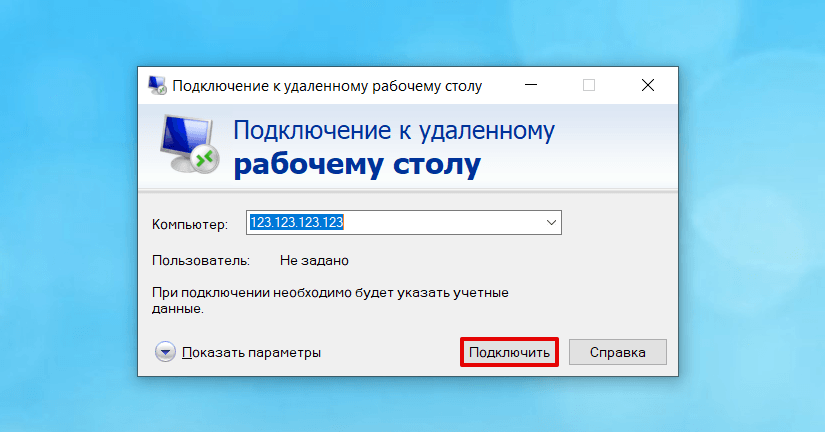
Настройка Ubuntu RDP
2. Укажите IP-адрес устройства, к которому планируете подключиться, и кликните Подключить:
3. Введите данные учётной записи Ubuntu, в которой хотите работать, и нажмите ОК:
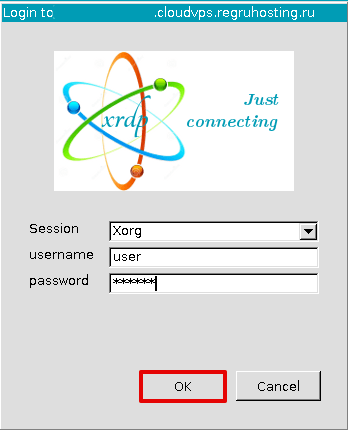
Подключение к рабочему столу Ubuntu
Готово, вы подключились к Ubuntu из Windows.Теперь вы можете работать в операционной системе через удаленный рабочий стол.