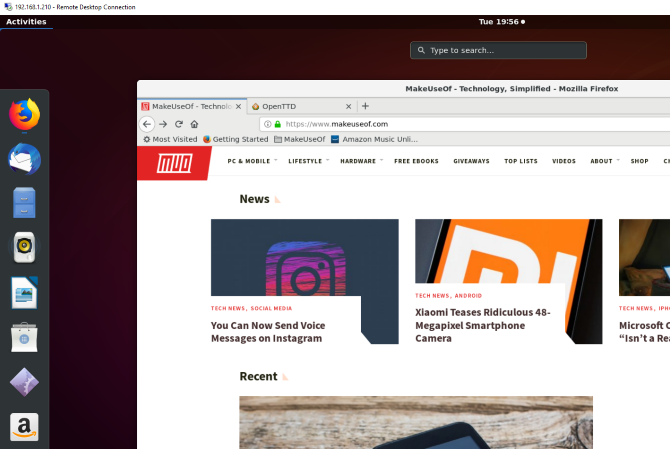
You’re in one room, sitting at a PC; the data you want is in another, on a computer running Ubuntu. If both computers are in the same house, no problem, but what if they’re in different offices? It might be a bit of a walk!
The answer, therefore, is setting up a remote desktop connection. Learn how to set up a remote desktop from Windows to Ubuntu.
Why Remote Connect to Ubuntu From Windows?
There are several reasons why you might want to remote connect to your Ubuntu computer. Perhaps you’re at work and need to log into your home computer. Alternatively, you might have an Ubuntu PC in one room and your Windows PC in another. Maybe you want to run updates on Ubuntu or access files.
Alternatively, you might be running an Ubuntu server for data, a website, or even a game. Either way, a method of setting up a remote connection will save a lot of time and effort.
You have three key options for establishing a remote connection with an Ubuntu machine running the default desktop environment:
- Remote Desktop (RDP)
- Virtual Network Computing (VNC)
- Third-party remote desktop software
First, however, you need to make some preparations:
- Enable port forwarding on the remote device’s router
- Find the IP address
- Install SSH
Let’s look at these in turn.
Prepare Windows RDP to Ubuntu Connections
Remote access solutions are simple to set up and manage across the same network. However, if you’re working from home, this instantly complicates things.
To use VNC and RDP with a PC on a different network, you’ll need to enable access to the remote computer via its router. You can do so by using «port forwarding.» However, you’ll need the IP address before you set this up.
Find Your Ubuntu PC’s IP Address
Before you can establish remote access to your Ubuntu device from Windows over RDP or VNC, you’ll need the IP address.
The first way is the easiest. Physically go to the Ubuntu machine, press Ctrl + Alt + T to open the Terminal, and input the command:
ifconfig
Look for the «inet addr» against the connection you’re currently using. For instance, if you’re on Wi-Fi, look for wlan0. If the computer is connected to the network via Ethernet, look for eth0.
Another way to find the IP address is to find the network connection icon in the panel, right-click, and select Connection Information. You’ll find the IP address listed here.
Is neither of these options open? You can also connect to your router directly via your computer’s browser.
Once signed into the router’s admin console, you’ll be able to see which devices are connected. Just look for your Ubuntu device name, find the IP address, and make a note of it for later.
Enable Port Forwarding
To access a computer on another network (e.g., your work network), you need to enable port forwarding on the router where your Ubuntu PC is located.
Start by establishing the IP address of the router. You can use the ip r command for this, with grep to specify the default:
ip r | grep default
Make a note of the IP address, then open it in your browser to display the router’s admin console. Enabling port forwarding is simple:
- Look for the Port Forwarding settings
- Create a New Rule labeled Remote Desktop
- Set the Internal Port number to 3389
- Set the External Port number to 3389
- Input the IP address of the Ubuntu PC
- Click Save
Note that these steps are generic and will differ depending on your router. For detailed steps, check your router documentation.
Once saved, you should be able to RDP into the Ubuntu PC remotely via your organization’s static IP address. If your employer does not use a static IP (unlikely, but it happens), use a dynamic DNS provider instead.
Your organization’s system admin can set up port forwarding if you’re not using commercial remote desktop tools.
Set Up Access Using SSH
To save time, you might want to install PuTTY on your PC (or just try the built-in Windows SSH function). It enables you to set up an SSH connection, which gives remote access to the Ubuntu command line.
To be clear: this isn’t a remote desktop option; there is no mouse control. But it is helpful to install the tools you’ll be using remotely. SSH is often disabled by default, however, so if it is not installed, you’ll need to fix it.
In short, it depends on which Ubuntu version you’re using and whether you’ve used SSH previously.
Once installed via the terminal (sudo apt install openssh-server), you’ll be able to make a remote connection to the Ubuntu desktop. Simply enter the IP address and the Ubuntu username and password. You can then use the terminal to install the tools you need for RDP and VNC.
1. Remote Access Using Remote Desktop Protocol
The easiest option is to use Remote Desktop Protocol or RDP. Built into Windows, this tool can establish a remote desktop connection across your home network. All you need is the IP address of the Ubuntu device to establish a remote desktop connection to Ubuntu from Windows.
While the necessary software is pre-installed on Windows, you’ll need to install the xrdp tool on Ubuntu. To do this, open a terminal (Ctrl + Alt + T) and enter:
sudo apt install xrdp
Follow this with:
sudo systemctl enable xrdp
Wait for this to install, then run the Remote Desktop application in Windows using the Start Menu or Search. Type rdp, then click on Remote Desktop Connection. With the app open, input the IP address in the Computer field.
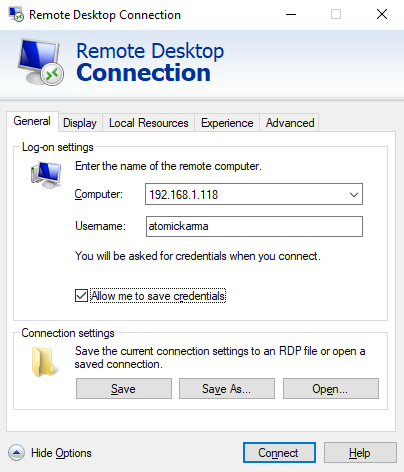
Next, click Show Options and add the Username for the Ubuntu PC. You can click Save to keep these settings for reuse on another occasion.
Click Connect to start the connection and input the Ubuntu account password when prompted. The connection will then be established, giving you full mouse and keyboard access to your remote Ubuntu computer. If you plan to use this connection often, you can create a configuration file to save time.
Troubleshooting RDP to Ubuntu
While RDP is an excellent option for remote connecting to your Ubuntu PC, it’s unreliable on some Ubuntu versions, like 18.04 LTS. There appears to be an issue establishing a remote connection while already logged into the same account on Ubuntu.
As such, the simple way around this is to log out of the Ubuntu computer.
If this isn’t possible, try switching the RDP connection from the Xorg server to X11rdp. Wait for that to fail, then try Xorg again.
You might also attempt a connection after restarting the Linux machine.
Ubuntu 22.04 LTS should include a fix to make RDP to Ubuntu smoother.
2. Connect to Ubuntu From Windows With VNC
Another option with full remote desktop functionality is VNC (Virtual Network Computing). It requires a client application on the Windows PC and a server on Ubuntu.
On the remote PC, install the TightVNC Server component after checking for updates:
sudo apt update
Then install the server utility:
sudo apt install tightvncserver
You’ll then need to run it:
sudo tightvncserver
At this point, you’ll be prompted to set a password for the connection. Make a note of the desktop number, usually :1.
Now that TightVNC Server is set up on Ubuntu, you’ll need to install the client on Windows. You can download it from the official website—make sure you choose the correct version, as it is available in 32-bit and 64-bit flavors.
Download: TightVNC
TightVNC tools are only available as a bundle, so once installed, look for TightVNC Viewer in Windows search.
Once you’ve launched the viewer, input the IP address of the Ubuntu box in Remote Host, followed by the desktop number. So, it might look like this:
192.168.0.99:1

Input the password when prompted and commence your remote desktop activity!
Making TightVNC More Secure
By default, TightVNC will encrypt your password but nothing else. It makes it insecure to connect over the internet. Fortunately, you can enhance security with SSH and Xming.
Download and install the Xming tool for Windows from SourceForge to use this. Once this is done, look for the desktop shortcut, right-click, and choose Properties.
Look for the Shortcut tab, and in the Target field, enter the following:
"C:Program Files (x86)XmingXming.exe" :0 -clipboard -multiwindow
Click Apply to save the change, then OK. Double-click the icon to run Xming, then open PuTTY. Here, expand the menu on the left to Connection > SSH > X11.
Check Enable X11 Forwarding, then return to Session at the top of the menu.
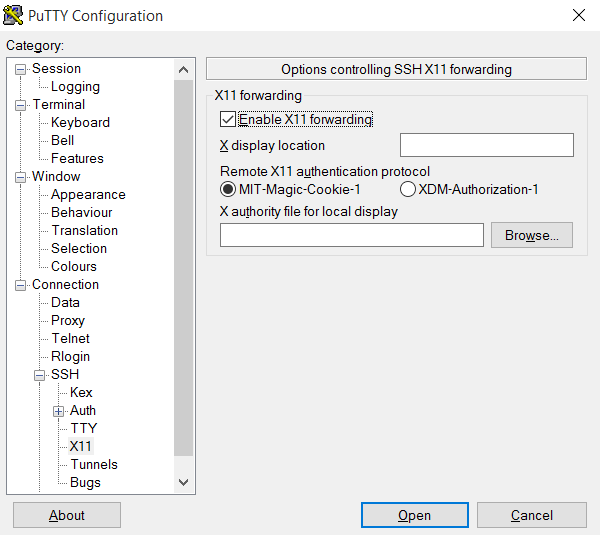
Enter the IP address for the remote device and click Open. Moments later, a secure connection to the remote Ubuntu desktop will be available.
Everything you’ve learned so far is standard if you need to access a Linux PC on your local network remotely. If you need to go beyond that, the steps to enable port forwarding will help.
But what if you have no intention of accessing your router? If this seems too complicated, third-party commercial software designed to facilitate remote desktops is required. Several are available, but not all support Linux.
We suggest you try out:
- NoMachine: Initially released as a Linux remote desktop tool, this is now available across all major platforms. Install on the target computer, then on your local machine, and set up a remote connection.
- Chrome Remote Desktop: Uses your Google account to manage remote access via the Chrome browser.
- TeamViewer: A well-known commercial remote desktop solution. Simply install the client and host software beforehand. It also provides a host app for remotely accessing Raspberry Pi devices.
These tools require setting up before use. If you have a colleague near the remote PC, they might be able to help. See our list of remote access tools for more suggestions.
Choosing the Right Ubuntu Remote Desktop Solution
Which remote desktop tool for connections between Ubuntu and Windows should you use?
Three main options are available:
- RDP: Uses the Windows Remote Desktop Protocol via the open-source xrdp implementation.
- VNC: Virtual Network Computing is an alternative to RDP but less secure.
- Commercial remote software: Most of these require minimal setup and support Linux.
You can also use SSH to issue remote instructions to your Ubuntu PC.
We’ve shown you three ways to establish a remote connection to your Ubuntu computer or server from Windows. Each has its advantages and disadvantages. But if you just want to dip into Ubuntu, try the Windows Subsystem for Linux on Windows 10.
This beginner’s guide helps you remotely connect to Ubuntu from Windows. We show you the easy steps with an example.
If you work in a networked environment at your work or set up a small network at home (wired or wireless), you are often required to remotely connect to your Ubuntu machine (or any Linux machine).
The following steps ideally should work for any Linux distribution which supports Xrdp for remote connection. We have tested it in Ubuntu 22.04 with Windows 11 & 10 and it works fine.
In theory, there are many ways of connecting to any system over the network (internet or intranet). You can use any RDP client, such as Remmina (which is an excellent client), to connect via VNC and RDP protocol. Moreover, you can even connect via ssh with X forwarding as well. You can also check out the list of RDP clients if you want something specific.
In this basic guide, I have used the Xrdp, a free and open-source utility server for Microsoft RDP protocol available in Windows.
Connect to Ubuntu from Windows via remote desktop
Step 1: Install xrdp in Ubuntu
The following steps do not require any installation or configuration in Windows. Although, you must have enough privileges to run the Microsoft RDP client (mstsc).
In Ubuntu 22.04 (or any Ubuntu version or other similar distributions), install the Xrdp via the terminal using the below commands.
sudo apt install xrdp
If you are using Fedora – use the command below.
sudo dnf install xrdp
And for Arch, use –
pacman -S xrdp
This should install the xrdp server in your Linux system.
Step 2: Enable xrdp service
The next step is to enable the xrdp service. The service must always be running to listen to incoming remote desktop requests. So to do that, run the below command in Ubuntu (and other systemd-based Linux distributions).
systemctl enable xrdp
This systemctl command enables your system to start the service immediately and ensure that it runs automatically the next time you boot.

You might want to check whether the service is running via the below command:
systemctl status xrdp
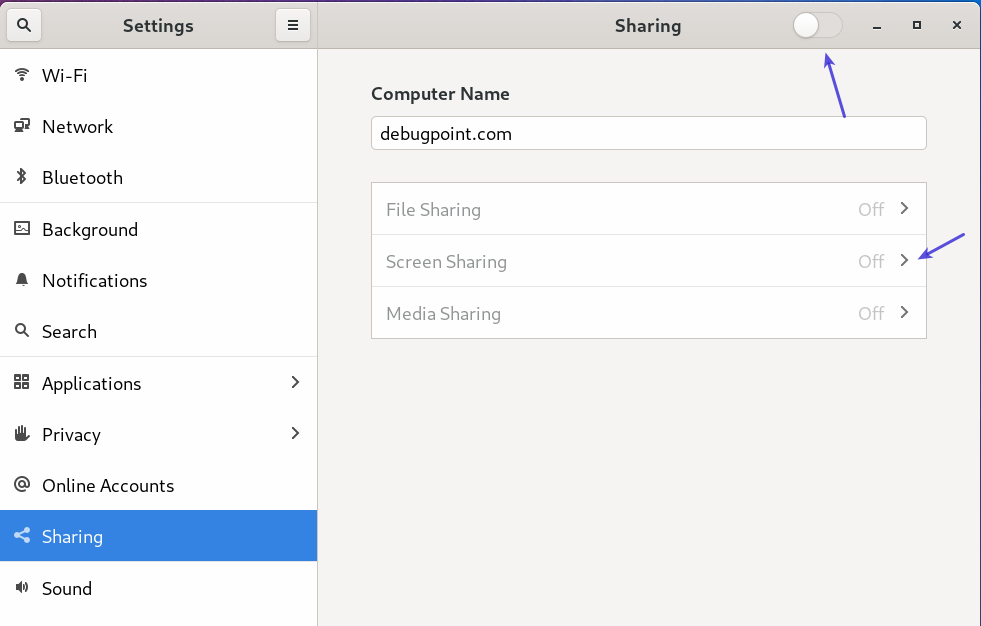
Also, open the Ubuntu settings and Enable Sharing and Enable Screen Sharing. Follow the below screenshots.

Step 3: Connect to Ubuntu
Open the Windows Start menu and type Remote to open the remote connection dialog. You can also press CTRL+R and type mstsc to open the following dialog.

On the above window, give the IP address of the target Ubuntu system (where the xrdp server is running). You can get the IP address from the Settings -> Wifi or Network Section.
Alternatively, you can run ifconfig or ip a to get the IPV4 address of the system.
ifconfig
Or –
ip a
Finally, click connect. You should see the below Xrdp prompt.

Choose the session as xrdp or xvnc. Give the username and password of the Ubuntu system and press OK.
You should be connected to the Ubuntu system.

Usage notes and troubleshooting
- Slow rdp session
The response of the remote session is dependent on your network speed. So you might feel a little bit of slowness on actions (click, scroll, etc.) on the desktop.
- Blank screen on rdp session
Ensure the user has logged off from the target Ubuntu session – which you use for remote connection. If the user logged on and you are connecting – you might see a blank screen (or black screen) in Windows rdp session. This has happened on my test, and I am yet to find out why.
- No customization in rdp session
Ideally, when you log on, a default Xorg profile will be created for the same user. That means you might not see any customizations done by the user. A basic GNOME Shell with all options will be available.
- Repeated Authentication Required popup
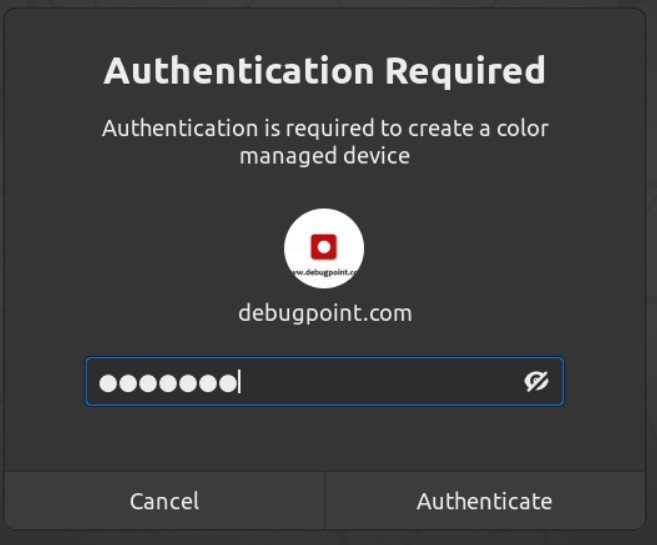
There is a chance that you may see multiple popups (like above) asking for a username and password. The main reason is the implementation of Polkit (a component for controlling system-wide privileges) within Ubuntu. When you log in, Polkit rules check whether the user has certain privileges to perform actions (active or passive). The Polkit rules are more restrictive when connecting via RDP. Hence the popup for Authentication. Fixing this requires a complex Polkit rule setup for the remote RDP users. I am still testing this and am not quite able to fix it.
Wrapping Up
I hope this guide helps you to set up basic RDP from Windows 10 to Ubuntu 20.04. This guide does not require any additional software installation in Windows 10.
How to Use Remote Desktop Connection in Ubuntu Linux: Complete Walkthrough
Remote desktop protocol is a popular network protocol that is widely used for connecting to computers remotely in Windows environments to manage them. This protocol can be used for connecting to physical and virtual machines that are running on Windows. However, if Linux with a graphical user interface (GUI) is installed on your machine, you can use the remote desktop protocol and configure remote desktop connection from Linux machines to Windows machines via RDP as well as configuring access from Windows machines to your Linux machines by using this protocol. You can also use RDP to connect from Linux machines to Linux machines if needed. It is convenient to use RDP for Ubuntu so as to connect to virtual machines running in public clouds such as Azure, Amazon EC2, and Google Cloud.
There are three the most used network protocols to manage Ubuntu remotely:
- SSH (Secure Shell)
- RDP (Remote Desktop Protocol)
- VNC (Virtual Network Computing)
Today’s blog post explains Ubuntu remote desktop configuration which can also be applied to other Linux distributions.
Data Protection with NAKIVO Backup & Replication
NAKIVO Backup & Replication delivers high-end data protection for SMBs and enterprises with multiple backup, replication and recovery features, including VMware Backup, Hyper-V Backup, Office 365 Backup and more. Get the Free Trial now!
How to Use Remote Desktop Connection in Ubuntu
In the majority of cases, you need to install the Ubuntu remote desktop client manually on your Ubuntu Linux. In today’s blog post, Ubuntu 18.04.2 is installed on the VMware virtual machine. Some packages are already installed in our Ubuntu before going to configuring Ubuntu remote desktop: the text editor vim, net-tools and the SSH server (which allows you to connect via SSH to the Linux console remotely). These packages can be installed with the single command:
sudo apt-get install -y vim net-tools openssh-server
In order to configure Ubuntu RDP connections, you need to install the RDP client or/and the RDP server, depending on the connection direction.
Note: In Windows systems, the remote desktop client is known as Remote Desktop Connection or Terminal Services Client. Windows XP uses RDP version 5.1, Windows Server 2003 – version 5.2, Windows Server 2008 — version 6.1, Windows 7 – version 7, Windows 8 and Windows Server 2012 – version 8, Windows 8.1, Windows 10 — RDP version 10, and Windows Server 2012R2 – version 8.1.
Using Remmina – Ubuntu Remote Desktop Client
Remmina is a free open-source software that is intended to make life easier for system administrators who need to establish Ubuntu remote desktop connections. Remmina supports not only RDP for Ubuntu but also other remote desktop protocols such as VNC, SSH and SPICE. You can learn how to install and configure Remmina as the Ubuntu remote desktop client in this remote desktop protocol tutorial. You can install Remmina using one of two methods below.
How to install Remmina in the GUI
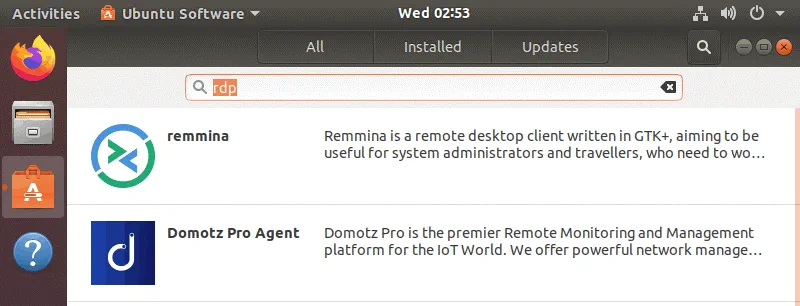
Click the button in the left bottom corner of the Ubuntu Desktop to open the Main Menu (Show Applications).

Type rdp in the search bar.
You can see that Remmina has been found as the remote desktop client.
Click Remmina on this screen.

You are redirected to the Ubuntu software page. Click Remmina to see details about this software.
Click Install to install Remmina the remote desktop client.
Enter your password which is required to install packages.
Wait until the necessary packages are installed.

How to install Remmina in the console
As an alternative, you can install Remmina in the Ubuntu console with just a few commands.
First, add the necessary software repository to the repository list of your Ubuntu system:
sudo add-apt-repository ppa:remmina-ppa-team/remmina-next
Update the repositories and available packages list:
sudo apt-get update
Install Remmina and related plugins:
sudo apt-get install remmina
sudo apt-get install remmina-plugin-*
sudo apt-get install libfreerdp-plugins-standard
Post-installation configuration
After installation is finished, launch Remmina.
Click the Main Menu button in the GNOME interface of Ubuntu, find the Remmina icon in the menu or type Remmina to locate the application. You can also open the console (terminal) and enter remmina to execute the application.
Once you launch Remmina for the first time, the application will ask you to install certain packages; install the packages with these commands:
sudo snap connect remmina:avahi-observe :avahi-observe
sudo snap connect remmina:cups-control :cups-control
sudo snap connect remmina:mount-observe :mount-observe
sudo snap connect remmina:password-manager-service :password-manager-service
Let’s connect to the remote Windows machine running on another VM from the Ubuntu machine on which Remmina is installed. Make sure that Remote Desktop is enabled on the remote machine you are going to connect to. In the current example, Windows Server 2008 R2 is installed on the remote Windows virtual machine.
Right click My Computer and in the context menu, select Properties. In the System Properties, hit Advanced system settings. In the System Properties window, select the Remote tab and click Allow connections from computers running any version of Remote Desktop. Hit OK to save settings. Notice that Windows Firewall will be tuned automatically to allow inbound connections (TCP port 3389 by default).

Run CMD and execute the ipconfig command to check the IP address of your Windows system on which you have enabled remote desktop connections. In this example, the IP address of the Windows machine is 192.168.101.21.
Now go back to your Linux machine where you have installed Remmina as the remote desktop client.
In the opened Remmina window, select RDP in the drop-down list.
Enter the IP address of the remote host (192.168.101.21 in this case) and hit Enter.

If the certificate details are displayed, hit Yes to accept the certificate and connect to the remote host. Enter the RDP authentication credentials and click OK to log in to the remote host via RDP. Make sure that a user on a Windows machine has permissions to use RDP.

The RDP session is established. However, by default, resolution is about 640×480, and that is too low.

You can set the custom resolution for your Ubuntu RDP session when using Remmina for connecting to remote Windows or Linux machines. Click the + icon in the top left corner of the Remmina window to create a new connection preset.

In the opened window, enter the name of your remote desktop Linux to Windows connection and select RDP as the protocol. In the Basic tab, enter the IP address of the remote host (192.168.101.21 in this case), the username (user must be allowed to connect remotely on the target host) and the password of the selected user. Below in the Resolution section, expand the drop-down menu and select the custom resolution, for example, 800×600. When you have configured all necessary connection options, hit Save.

Now in the main window of Remmina, you can see the added connection preset named Windows Server 2008. Double click the preset for connecting to the selected remote host from Ubuntu via RDP. Notice that you don’t need to enter credentials because they are saved in the preset.

Now your remote desktop Linux to Windows session has been established with the selected resolution.
Using Xrdp — Ubuntu Remote Desktop Server
You can also configure a Remote Desktop server on your Linux system and connect to that Linux remotely from Windows machines by using a standard Windows Remote Desktop client. Popular Linux distributions don’t have the Remote Desktop server installed but it is possible to install and configure the Remote Desktop server on Linux manually, so as to enable managing a Linux machine remotely in the graphical mode. In this section, we will explain how to configure access via Remote Desktop Protocol to Ubuntu 18.04.2. The main component you need for this purpose is xrdp.
Xrdp is an implementation of Microsoft RDP that allows non-Windows operating systems to provide functionality of the RDP server. Xrdp is free and open source software. The X Window system is required to use xrdp. Let’s find out how to configure a remote desktop server on Ubuntu.
First, update the software repository tree:
sudo apt-get update
Install xrdp from online software repositories:
sudo apt-get install xrdp
You need to install the XFCE desktop environment. By default, Ubuntu 18 is installed with GNOME 3 but xrdp works better with XFCE, which is a lightweight desktop environment. After installing XFCE and configuring RDP for Ubuntu, you will still have the ability to log in to your Ubuntu Linux locally by using GNOME.
Hence, install XFCE:
sudo apt-get install xfce4
In the home directory of your user, create the .xsession file and write the xfce4-session string into that file. Thus, you configure the xrdp server to use xfce as the default graphical environment.
echo xfce4-session > ~/.xsession
Make xrdp start automatically when your Linux is booted.
sudo systemctl enable xrdp
Restart the xrdp service to make changes take effect.
sudo service xrdp restart
Clear the configuration stored in the startwm.sh shell script file that is needed to start xrdp:
sudo sh -c ‘cat /dev/null > /etc/xrdp/startwm.sh’
(Before running the command above, you may create a copy of that file if needed by using the command cp /etc/xrdp/startwm.sh /etc/xrdp/startwm.sh1 )
Edit the startwm.sh shell script configuration file with vim:
sudo vim /etc/xrdp/startwm.sh
The startwm.sh shell script file must contain the following lines:
#!/bin/sh
if [ -r /etc/default/locale ]; then
. /etc/default/locale
export LANG LANGUAGE
fi
startxfce4
Keep one empty line in the end of file.

Save the startwm.sh configuration file and quit: Press Esc and type :wq
Restart the xrdp service:
sudo service xrdp restart
Check the IP address of your Ubuntu Linux:
ifconfig
or
hostname -I
In this example, the IP address of the Linux machine is 192.168.101.208.
By default, the firewall in Ubuntu is disabled. If the firewall is enabled, allow inbound connections to the TCP port 3389.
sudo ufw allow 3389
For more security, you can specify the allowed IP addresses or custom networks:
sudo ufw allow from 192.168.101.0/24 to any port 3389
Note: If a remote Linux machine on a remote site is in the local network behind the NAT and you need to access that machine via RDP from an external IP address, you can configure port forwarding or VPN connection on a router/firewall on a remote site.
Try to connect to your Ubuntu Linux from Windows via RDP.
Open CMD in Windows (Start > Run > CMD).
Run the command to open the Remote Desktop client and connect to the required host:
mstsc /v:192.168.101.208
Select Xorg as the session type and enter your login and password.

If you see an empty blue screen and after a few minutes of waiting, the error is displayed, it means that something is not configured properly. Let’s find out how to fix the empty blue screen issue for xrdp.

This issue is related to the xorgxrdp package and certain changes implemented to Ubuntu 18.04 compared to the previous Ubuntu versions that have broken the xrdp capability. As you recall, Ubuntu 18.04.2 is used in the current example for configuring xrdp. In order to fix an empty blue screen, run the command and install the actual version of xorgxrdp-hwe:
sudo apt-get install xorgxrdp-hwe-18.04
You can check the Ubuntu version with the command:
lsb_release -a
Restart the xrdp service (daemon):
sudo /etc/init.d/xrdp restart
After installing the necessary package, open the RDP client and try to connect to your Ubuntu via RDP once again.
In Windows CMD run:
mstsc /v:192.168.101.208
In the login window select Xorg and enter your login and password.

Now you have connected successfully. In the dialog window that is displayed after connecting to Ubuntu RDP (Welcome to the first start of the panel), select Use default config.

If you need to set the custom resolution in the Windows CMD, run:
mstsc
Enter the IP address of the remote Ubuntu machine manually.
Click Show Options and select the needed resolution on the Display tab.

Now you can connect to Ubuntu from Windows via RDP and use the needed remote desktop screen resolution. This means that RDP for Ubuntu has been configured successfully and is, thus, the end of today’s remote desktop protocol tutorial.
Conclusion
Today’s blog post has explained how to use remote desktop connection in Ubuntu Linux. Configuring inbound and outbound remote desktop connections in Ubuntu is affordable for the majority of users. You need to install a remote desktop client for connecting from Ubuntu to Windows machines and other machines. To connect to your Ubuntu Linux machine, you need to install and configure a remote desktop server on your Linux machine. Xrdp and XFCE must be installed for this purpose.
If for some reason you cannot use RDP for Ubuntu, consider using VNC, which is the protocol alternative to RDP. Using RDP and VNC allows you to connect to your physical and virtual machines remotely with the graphical user interface. Don’t forget to back up your Linux servers and virtual machines to protect your data. Download NAKIVO Backup & Replication and back up your virtual machines and physical servers.


Having reliable remote access is a vital tool for a wide array of business needs- whether that be facilitating remote work options for employees, or providing more efficient customer support.
Remote desktop access has even become a daily necessity for numerous IT professionals who need control over remote devices, or the ability to troubleshoot from afar. Here we will talk about connecting remote desktop Linux to Windows machines and vice versa. Keep reading to get all possible options.
Connect To Linux From Windows
A remote connection is more commonly defined by using software that allows someone to remotely control another machine (like a remote desktop to Linux from Windows, or a remote desktop from Linux to Windows). Remote connections also allow users to access software, applications, and files, as well as to conduct system maintenance and troubleshooting resolution.
The methods outlined below work well for all Linux systems other than Ubuntu- which already has a built-in remote desktop tool that supports both RDP and VNC.
For the initial connection, ensure this feature is set up on the physical Ubuntu machine. After following the installation steps for the built-in Ubuntu-compatible remote desktop option, further installation of any additional software won’t be necessary.
Linux Remote Desktop
We are going to focus on the specifics of using Remote Desktop Protocol (RDP) on Linux-based servers, i.a., client apps you get to choose from, and some nuances of using remote access tools for Linux in cross-platform environments.
Every user of Debian-derived Linux distribution knows that setting up Kali Linux remote access and successful use of remote desktop clients like TeamViewer or AnyDesk can be tricky at times. Mind that, for starters, you’ll need to download and install all the packages required to enable remote desktop Kali capabilities and update the ones you already have to the latest versions.
After that, you can either use a script to enable XFCE and RDP or do it manually (that takes more time but gives you much more control over the process). This will be enough to access your Kali machine from any other device connected to your local network.
Accessing a remote desktop from Linux Mint machines, especially the configuration of the protocols, may seem overly complicated, but in reality, it’s nothing to be stressed about. For one, Linux Mint has a built-in desktop sharing tool available from the Main Menu. Enable remote access to a machine, and it will be available for connections via SSH terminal for everyone who knows this machine’s IP address. If the toolset provided by a standard remote access client isn’t enough, you can install a third-party client tool, like Vinagre or others, and enjoy localized GUIs, SSH tunneling, request listening option, and many more.
Accessing a remote Linux desktop from a Windows machine sharing a network can be done with just a few simple commands, or by installing easy-to-use software like RDP, Xrdp, Xfce4, TeamViewer, Gnome, Remmina, etc.
Note: Some remote access tools even allow you to access a remote printer or scanner.
Here’re some options to access a remote Linux desktop from a local Windows machine:
- • The “Obtain the IP Address” Method
- • The “RDP” Method
- • The “VNC” Method
- • The “SSH” Method
For those using devices that function over the same network, there are multiple open-source options that help users with remote desktop from Windows to Linux access.
The IP Address Method
Before initiating a Windows to Linux remote desktop connection, users will need to obtain the host machine’s IP address before doing anything else.
To find the IP address of the Linux host, log into the Linux machine, open Terminal, and type the following:
ifconfig
This command will display the Linux machine’s IP address. Users can also locate the IP address by connecting to the network’s router, then browsing the devices by their hostname. Use this information while operating your Windows computer to establish a remote connection.
The “RDP” Method
The simplest option to enable remote connections to Linux desktops is by using the remote access tool built directly into the Windows OS: Remote Desktop Protocol (RDP).
Users must install Xrdp software on their Linux machine to use RDP. Complete installation in person, or with the SSH command. Enter the command as shown below:
sudo apt install xrdp
After that, type “rdp” into the search function, then run the Remote Desktop software on the Windows computer.
From within the Remote Desktop Connection pop-up window, type the Linux computer’s IP address, then click connect.
Note: to manage advanced parameters configuration, click “Show Options”.
The “VNC” Method
Another remote desktop option to try is VNC (Virtual Network Connection). Access a remote device using VNC by installing the dedicated software on both computers. One of the most beloved VNC remote access tools is TightVNC, which is also open-source.
How to use TightVNC to access Linux from Windows
Installing TightVNC can also be done in person or by using the SSH command.
-
Step 1: Enter the following command:
sudo apt install tightvncserver -
Step 2: Users should then run using the command:
sudo tightvncserver - Step 3: Users must then set the desired password.
- Step 4: Once the above steps are complete, start the client app on Windows (which can be downloaded from the TightVNC website).
- Step 5: Type the IP address and port number in the TightVNC window on the Windows OS device.
- Step 6: Hit “Connect”, then enter the password that was defined in the SSH command section above.
Use SSH
Even though Secure Shell won’t permit remote desktop connections, it’s still an excellent option for remotely installing the software needed to access a Linux desktop remotely. See below to learn how to do it.
Step 1: From the Windows computer, open the Power Menu.
Step 2: Choose “Windows PowerShell”.
Step 3: Type the following command:
ssh [IP_ADDRESS]
Step 4: After accepting the certificate, enter the appropriate username and password.
The connection is now established.
The options described above are excellent for small businesses, anyone working on a smaller network, or those who don’t need frequent access to a remote device.
Using RDP Clients To Create A Linux to Windows Remote Desktop Connection
This section will help anyone interested in protocols to connect a remote desktop to Windows from Linux.
To start, we’ll begin with using the Windows app, Remote Desktop Connection.
Utilizing the Remote Desktop Protocol (RDP), the Remote Desktop Connection app is included with all Windows OS. RDC allows users to access a Windows PC, or Windows Server remotely.
This is very convenient and cost-effective because organizations can install apps onto one central server, instead of multiple computer systems. Employees can then use those programs by accessing the remote server. This centralization also ensures that maintenance and troubleshooting are much easier processes.
This technology was originally called Terminal Services (TS). In modern times, web systems are far more commonplace- but situations remain where Windows remote applications are still required.
During those instances, Linux users can access Windows computers and servers remotely from their preferred system via RDP client.
There are numerous linux remote desktop clients, and we’ll cover three of them below:
- • Remmina
- • FreeRDP & rdesktop
After reading the features below, users can select the option that suits their unique needs.
Note: there are some instances where users may prefer to use a VPN for their remote access needs, but this article will solely focus on dedicated remote access software.
Enabling remote desktop on Windows
Users must first set up the machine that they wish to connect with remotely.
While operating the Windows computer that will be remotely connected to, follow the steps below:
Step 1: Login as Administrator;
Step 2: Open the Start menu;
Step 3: Click Settings;
Step 4: When the Settings window opens, open the System category > Remote Desktop;
Step 5: Now enable it;

Please note: users can’t connect with computers running Windows Home edition (like Windows 10 Home). This screen details the information, if that is the case:

Remmina
Remmina supports numerous remote access protocols like RDP, VNC, NX, XDMCP, and SSH. Remmina’s main goal is to help system administrators and travelers that work with multiple remote desktops and/or servers. Remmina is included in the Ubuntu Linux distribution as a default remote desktop client.
FreeRDP and rdesktop
Not only was rdesktop the very first Linux RDP client, but it was also the most popular for many years. However, as of November 2019, the project is searching for a new maintainer.
Alternatively, FreeRDP was initially released in 2009 as a fork of rdesktop. This occurred when Microsoft opened the RDP specifications. As time went on, and FreeRDP grew, it became the standard RDP client on systems lacking native Microsoft clients.
Simply double-click on the computer you want remote access to from the list.
Following the Microsoft Open Specifications, FreeRDP is a free implementation of Remote Desktop Protocol. Said implementation offers the server and client applications, as well as a library that permits other applications to utilize RDP protocol. FreeRDP is both an app and a library, providing reusable features for alternative applications. Aside from rdesktop, the clients listed above utilize FreeRDP’s library.
Please note: The inclusion of rdesktop on this list was intended for informational purposes only, and unless users have a specific scenario in mind, we advise another client that is compatible with the FreeRDP library.
MobaXterm
http://mobaxterm.mobatek.net/
Freeware implementation the X server on Windows.
This method qequires minimal setup, and is very reliable.
You must first install the SSH server on Ubuntu e.g. by physically accessing a keyboard on the machine:
sudo apt install openssh-server
Then, on Windows within MobaXterm, you go:
- Sessions
- New session
- SSH
which gives you an SSH shell.
Now, if you start a program from that shell, e.g.:
sudo apt install x11-apps
xeyes
xeyes opens as a separate native Windows window.
One annoyance is that if you opened the window at work, and then you get home, you have to start a new instance of the app, and you can’t see the already opened window. This is made further annoying by applications that work in single window mode, e.g. browsers: you will have to search for how to force a new instance, and then you will have two instances running.
Tested in Windows 10 and Ubuntu 19.10 on a local network with MobaXterm v12.4:
- xeyes 7.7: move pretty fast, but you have to be hovering the window itself
- Firefox 74.0: page scrolls were pretty sluggish nearing unsability, I would not be a happy user
- Eclipse 2020-03: works surprisingly well, I can see a bit of lag, but pretty small, even when scrolling, and trying to watch a video on YouTube makes it unresponsive
- Chromium 79: can’t open it, error message: «MoTTY X11 proxy: Unsupported authorisation protocol» asked at: https://superuser.com/questions/1111900/how-to-fix-mobaxterm-x11-proxy-unsupported-authorisation-protocol
Here is a Windows screenshot showing MobaXterm running on top left, and two program (xeyes and firefox) running on the Ubuntu remote but showing as separate native Windows windows!

MobaXterm X server alternatives
I haven’t tried those yet, but behavior should be similar to MoabXterm? Hopefully we can find a good open source one then:
- Cygwin/X https://x.cygwin.com/ demo video: https://youtu.be/ENkOEknSLv4?t=105
- Xephyr: https://en.wikipedia.org/wiki/Xephyr MIT licensed. I can’t find out how to download a prebuilt in 5 minutes.
- Xming: https://en.wikipedia.org/wiki/Xming another proprietary one
xrdp
Mentioned at: https://askubuntu.com/a/592544/52975
I just want to confirm that it does not work without touching some configuration files as mentioned in that answer from Windows 10 into Ubuntu 19.10, you just get a black screen in that case: Blank desktop when logging in via xrdp
Also RDP is a proprietary Microsoft protocol which is saddening: https://en.wikipedia.org/wiki/Remote_Desktop_Protocol But it does appear to send only minimal information unlike VNC which sends images: https://superuser.com/questions/32495/whats-the-difference-between-rdp-vs-vnc
VNC
I’ve tried the following programs, but they were sending the desktop as video, which incurred unacceptable screen resolution loss / mouse inaccuracy / network bandwidth if you are offsite.
Servers (run on Ubuntu):
- Vino. Ships pre-installed, but there are compatibility issues with some available Windows clients: Gnome 3.10 sharing desktop — how to configure the security type for VNC?
Clients (run on Windows):
- TigerVNC
PuTTY
https://www.chiark.greenend.org.uk/~sgtatham/putty/
The go-to solution if all you want is a text terminal via SSH.
First you have to install PuTTY on Windows, usually by downloading it from its website.
On Ubuntu, install the SSH server:
sudo apt install openssh-server
and then you just open PuTTY, tell it the Ubuntu IP and connect via SSH, and that gives you a terminal inside Ubuntu.
PuTTY is very convenient as it integrates both an xterm emulator and SSH / telnet and other protocols in a single package.
Then you also want to install and use tmux on Ubuntu and use tmux attach when connecting from Windows from within PuTTY as mentioned at https://unix.stackexchange.com/questions/22781/how-to-recover-a-shell-after-a-disconnection, this way you can:
- use the exact same terminals on work and at home. Yes, terminal windows get updated in real time on both machines if you type anything in either! The magic of servers!
- not lose any sessions if the connection breaks
which is amazing!!! There are however some annoying glitches with environment variables, particularly DISPLAY: https://unix.stackexchange.com/questions/75681/why-do-i-have-to-re-set-env-vars-in-tmux-when-i-re-attach
You will also want to reduce the default huge default font size: Increase font size of putty
How to copy paste in PuTTY: https://superuser.com/questions/180043/how-do-i-paste-the-windows-clipboard-into-my-putty-session-using-only-the-keybo
Then, you can just open webpages you need directly on the native Windows browser. If all you need to get your work done is Vim and and a browser, PuTTY is definitely the way to go. The only thing I miss on my development day-to-day with this setup is Eclipse.
Настраивайте удаленное подключение к Ubuntu вместе с REG.RU! В статье мы опишем варианты удалённого подключения, расскажем, что такое RDP и как настроить удаленный рабочий стол для подключения к Ubuntu из Windows.
Облачные серверы с Ubuntu
Заказывайте Облачный сервер с чистой ОС или стеком LAMP/LEMP. Почасовая оплата, первый платёж — 100 рублей.
Выбрать тариф

Способы удалённо подключиться к Ubuntu из Windows
Есть три основных способа удалённого подключения — через SSH, через VNC (Virtual Network Computing) и c помощью RDP (Remote Desktop Protocol). Для удалённого подключения к Ubuntu лучше всего подойдёт RDP.
RDP — это протокол удалённого управления, который разработала компания Microsoft. Он подходит для удалённой работы пользователя с компьютером или сервером (в том числе с виртуальным сервером), на котором установлен сервис терминальных подключений. С помощью этого встроенного в Windows инструмента можно удалённо подключиться к другим устройствам внутри сети.
Чтобы настроить удаленный доступ к Ubuntu через RDP, нужно знать IP-адрес компьютера или сервера, к которому вы хотите подключиться. Также на Ubuntu нужно установить пакет xrdp и графическое окружение Xfce. После этого вы сможете зайти в Ubuntu из Windows через удалённый рабочий стол.
Установка на Ubuntu xrdp и Xfce
- 1.
- 2.
- 3.
-
4.
Установите пакет xorgxrdp:
sudo apt install xorgxrdp -
5.
Активируйте xrdp:
sudo systemctl enable xrdp -
6.
Проверьте статус xrdp:
sudo systemctl status xrdpСтатус должен быть active:
Установить Ubuntu RDP
-
7.
Установите графическое окружение рабочего стола Xfce:
-
8.
Запустите xrdp командой:
sudo systemctl start xrdpСовет
Остановить работу xrdp можно командой sudo systemctl stop xrdp
Готово, вы установили xrdp и Xfce на Ubuntu. Теперь к Ubuntu можно подключиться через удалённый рабочий стол.
Подключение к рабочему столу Ubuntu из Windows
Обратите внимание
Для работы через удалённый рабочий стол вам понадобятся данные учётной записи Ubuntu, а также IP-адрес устройства, к которому вы планируете подключиться. IP-адрес сервера указан в информационном письме, которое пришло на контактный email при заказе услуги, а также в карточке услуги на вкладке «Управление».
-
1.
Откройте меню RDP. Для этого нажмите сочетание клавиш Win+R и введите в строку mstsc:
Настройка Ubuntu RDP
-
2.
Введите IP-адрес машины, к которой хотите подключиться, и нажмите Подключить:
-
3.
Укажите данные учётной записи Ubuntu, в которой планируете работать, и кликните ОК:
Готово, вы удалённо подключились к Ubuntu из Windows.
Learn the steps to connect remote Ubuntu 22.04 LTS Jammy JellyFish desktop from Windows 11 or 10 using RDP (remote desktop protocol).
Windows comes with a very handy feature called Remote Desktop Connection, which uses RDP protocol to connect a PC remotely. Although it is very easy to use when it comes to establishing a remote desktop connection from Windows to Windows systems, not the same goes for the Linux system. It is because the RDP protocol has not been installed in Linux by default. In such a situation we have to use manually perform some configuration on the Linux system to enable RDP, here in this guide we know how to do that.
What is XRDP?
XRDP is a free and open-source program and an implementation of Microsoft RDP (Remote Desktop Protocol) to easily access Linux systems remotely with GUI. With XRDP, it is possible to log on to the remote Linux computer and create a real desktop session as if you had logged on to a local computer.
Steps to access Ubuntu 22.04 remotely from Windows 10 or 11
The steps given here can be used on other versions of Ubuntu such as 20.0/18.04 including Linux Mint, MX Linux, and more…
1. Perform a System update
Here in this tutorial, we are going to use the system’s default repository and APT package manager. Hence, to rebuild the APT cache run the system update command once.
sudo apt update
2. Install XRDP on Ubuntu 22.04
As we know Ubuntu doesn’t have RDP installed like Windows OS, hence, we need to install XRDP, the open-source implementation of RDP on our Linux system. The good thing, we don’t need to add any third-party repository because it can be installed using the system’s default one.
sudo apt install xrdp
3. Start & Enable XRDP Service
To start and also make the service of XRDP enable automatically with system boot use the given commands:
To start it:
sudo systemctl start xrdp
Enable it:
sudo systemctl enable xrdp
Check the status:
systemctl status xrdp

4. Open port 3389 in the firewall
To let the other systems in the network access Ubuntu 22.04 Jammy remotely over RDP, open the port number 3389 on your system’s firewall.
sudo ufw allow from any to any port 3389 proto tcp
Next, find the Ip-address of your Ubuntu system and note it down, somewhere. For that on your terminal run:
ip a
5. Log out Ubuntu 22.04
Once the installation is completed, simply log out your Ubuntu 22.04 system otherwise you will get a black screen issue on Windows while connecting Ubuntu remotely using XRDP.
To log out, click on the Power-off icon and select the logout option.

6. Connect Ubuntu 22.o4 remotely using Windows 10 or 11
Finally, go to the Windows 10 or 11 system you are using and click on the Search icon. There type “Remote Desktop Connection” as its icon appears, and click to open the same.

Enter the Ip-address of your Ubuntu system noted down by you, in the “Remote Desktop Connection” app of Windows and click on the “Connect” button.
For example, our Ubuntu 22.04 IP address was 192.168.17.133

When the message appears “The identity of the remote computer cannot be verified. Do you want to connect anyway?”
Click the Yes button.

The XORG window will open, enter the username and password of your remote Ubuntu 22.04 that you want to connect over RDP to control it graphically.

The system will again ask for your system’s password.

Finally, the remote Ubuntu 22.04 LTS graphical screen will be on your Windows system using the Remote desktop protocol.

Ubuntu remote desktop black screen- issue
The issue of getting a black screen or automatically shutting down the Remote desktop connection application on Windows appears if you have not logged out of your remote Ubuntu 22.04 system that you want to connect to. Because using RDP, here we can only open a single session.
Other Articles:
• Commands to Install Xrdp Server on Debian 11 Bullseye Linux
• How to Install 7-Zip on Ubuntu 22.04 LTS
• How to Download Youtube videos on Ubuntu 22.04
• Install VMware Workstation Player on Ubuntu 22.04 LTS