- Introduction
- Connect to Oracle
- Setup ODBC
- Troubleshooting
- More Information
Introduction
This article explains how to connect to Oracle with ODBC when using Windows 10.
It covers the following topics:
- How to connect to Oracle (with code samples).
- How to setup ODBC:
- Configure ODBC using the ODBC Data Source Manager:
We recommend using system DSNs (available to all users).
- Configure ODBC using the ODBC Data Source Manager:
Connect to Oracle [top]
We strongly recommend using connection objects to connect to databases, and this is what we demonstrate in the code samples.
Follow these steps to connect:
- Create a new channel to try out the code:
- Create a channel like this:
- Name: DB Oracle Connection (or similar)
- Source: From Translator
- Destination: To Channel
- Alternatively use an existing channel:
Your channel will need a From/To Translator or a Filter component.
- Create a channel like this:
- Connect to a database using ODBC:
- Paste this code into the Translator:
If your script uses connection object methods
conn:query{}orconn:execute{}to connect to a remote Oracle database, the location of the remote host is specified as part of the name parameter in thedb.connect{ }command. If you useconn:merge{}to connect the remote host is specified as part of the name parameter in theconn:merge{}command itself.function main() local conn = db.connect{ api=db.ORACLE_ODBC, name='your_odbc_server_name', user='your_login', password='secret', use_unicode = true, live = true } conn:execute{sql='SELECT * FROM <your table>', live=true} end - The name is the name of an ODBC source that you create using the ODBC Administrator.
- Paste this code into the Translator:
- Adapt the code to your requirements.
Setup ODBC [top]
Note: Iguana may not always support the very latest version of Oracle drivers, so you can simply download an earlier version if necessary. This is particularly true if you are not able to use the the latest version of Iguana.
If you need to know which versions of Oracle drivers are supported by the version of Iguana you are using please contact us at support@interfaceware.com.
To set up a new ODBC data source for Oracle Server:
- Setup the Oracle instant client OCI drivers:
The Oracle ODBC package depends on the OCI drivers — so you need to set them up first.
- Follow the same procedure used for Oracle Easy Connect: Setup the Windows Oracle OCI drivers.
- Install the latest Oracle ODBC drivers:
- Download the latest ODBC zip package from the Oracle instant client download site:
- Choose the latest Development and Runtime – optional packages > ODBC Package
- Unzip the ODBC zip package into the instantclient_X_Y folder where you installed the OCI drivers:
- Select the file in Explorer and choose Extract All:

- Browse and choose the folder containing the instantclient_X_Y folder where you installed the OCI drivers and click Extract:

- You should see the ODBC driver files in the instantclient_X_Y folder, something like this:

- Select the file in Explorer and choose Extract All:
- Open a command prompt as administrator:
- Search for “cmd”.
- Right click Command Prompt and Choose Run as administrator:

- Terminal Command: Install ODBC:
cd c:Oracleinstantclient*
odbc_install.exe
- Download the latest ODBC zip package from the Oracle instant client download site:
- Open the 64 bit ODBC Administrator:
Windows 10 (64 bit version) supports 32 and 64 bit ODBC sources — always use the 64 bit ODBC Administrator.
- Open the System DSN tab and click Add:

- Choose the latest Oracle ODBC driver and click Finish:

- Enter the ODBC credentials:
- Use any Data Source Name and Description you prefer.
- Enter the Network Name (or IP) of the Oracle Server in the TCP/IP Server field:
Note: If you are unsure of this ask your DBA (database administrator). - Enter the Oracle service name in TNS Service Name:
Note: If you are unsure of this ask your DBA (database administrator). - Enter the user login in the User ID field:
Note: If you are unsure of this ask your DBA (database administrator). - Optional: Choose your default Database:

- Test the data source connection:
- If the connection does not work speak to your DBA (database administrator) about how to login to the database (user authentication).


Troubleshooting [top]
- Problems with connection settings:
Speak to your DBA (database administrator) for general connection issues like: User name and password, Database Server network name etc.
- Iguana may not always support the very latest version of the ODBC drivers:
Please contact us at support@interfaceware.com if you need to know the latest supported version of the ODBC drivers.
Login authentication errors:
Authentication errors usually relate to how the Oracle Server you are connecting to is setup. You will need to talk to the DBA (database administrator) that manages the Oracle server.
- Using integrated security:
If you wish to use Windows integrated security speak to your DBA (database administrator).
If you need more help please contact us at support@interfaceware.com.
More Information [top]
- Using Database Connection Objects
- Connect to Oracle with Easy Connect
- Connect to Oracle with OCI
- Connect to Oracle from Linux or Mac with ODBC
<- Windows
Overview
Configuration of ODBC on Oracle systems can be very confusing. The following is designed to navigate you quickly through this maze. In many cases that means using the 32-bit driver on a 64 bit system. There are two separate Microsoft ODBC Administrators on a 64-bit Windows OS. While the location of the ODBC Administrators are different, the names of the executables are exactly the same!
- 64-bit Microsoft ODBC Administrator (C:WindowsSystem32odbcad32.exe)
- 32-bit Microsoft ODBC Administrator (C:WindowsSysWOW64odbcad32.exe)
Configure ODBC Session 🠈 Quick and dirty steps.
ODBC Configuration Errors
If you run the ODBC DNS tool and it has errors trying to create an entry (cant find SQORAS32.DLL etc.) these steps may fix it:
- Manually purge the ODBC invalid entries from the registry.
- Ensure your TNS_ADMIN is set correctly.
- Reinstall the Oracle ODBC components:
- Custom -> Available Product Components
- [x] Oracle ODBC Driver nn.n.n.n.n (matching your version number)
The Oracle MS ODBC Administrator (under the Oracle menu) runs the 64-bit version on a 64-bit OS.
Start | Oracle | Configuration and Migration Tools | MS ODBC Administrator
The Microsoft OS Data Sources (ODBC) runs the 64-bit version:
Start | All Programs | Control Panel | Administrative Tools | Data Sources (ODBC)
Installing Oracle 32-bit ODBC Driver (11g)
Seeing all the ODBC issues that have existed, Oracle has embraced the installation of the 32-bit client along side your 64-bit database or client software. Download and install the Oracle 11g 32-bit client with these options:
- (x) Custom
- (x) Skip software updates
- Language: <Use Default>
- Software Location
Name: OraClient3211g_home1 (if prompted)
Path: c:apporacleproduct11.2.0.3client32 (for 32-bit)
Path: c:apporacleproduct11.2.0.3client64 (for 64-bit)It is important is to make these different from other Oracle software on this system so as not to conflict. Thus the client32 etc.
- Components
[x] Oracle ODBC Driver [x] Oracle Provider for OLE DB
[x] Oracle Provider for .NET (if used)* Install
- Close
Post Install Comments
- Make sure to set the environment variable TNS_ADMIN to the directory where your tnsnames.ora file is.
- If you use the 32-bit Oracle recommends that you create a shortcut on your desktop and label it «32-Bit ODBC Admin»
for future use.Target: C:WindowsSysWOW64odbcad32.exe - In some environments «Add» does not work right in the ODBC Administrator. The work around is to use «Add» to create a bogus
entry (with say the DSN name «X») then use «Configure» to create one with the DSN name you need. This fixes the dreaded
ORA-12557 «protocol adapter not loadable» error. - If you are still having Oracle ODBC issues this Oracle support page document is useful: 741033.1
APPENDIX
Configure ODBC Session
- Download and install an Oracle client (ex: winx64_12102_client.zip) with ODBC.
- This will install the corresponding Oracle ODBC driver.
- Make sure to set the install path to use oracle not current user you are logged in as!
- Install using the Administrator option will give you useful debugging tools.
- Create a tnsnames.ora file and entry for your database.
Example: C:apporacleproduct12.1.0.2client_1networkadmintnsnames.ora - Set the TNS_ADMIN environment variable.
- Run Env Var Editor (Win10):
rundll32.exe sysdm.cpl,EditEnvironmentVariables - Select New.
- Variable Name: TNS_ADMIN
- Variable value: C:apporacleproduct12.1.0.2client_1networkadmin
- Select: OK
- Run Env Var Editor (Win10):
- Launch the ODBC Admin tool and create an entry for your database.
- Run:
C:WindowsSystem32odbcad32.exe(this is the 64-bit ODBC) - Select System DSN tab then Add.
- Select Oracle driver: Oracle in OraClient12Home1 then Finish.
- Data Source Name: <Name Your Application Will Use for ODBC Database>
- Description: Leave Blank
- TNS Service Name: <Your tnsnames.ora Service Name>
- UserID: <Your Oracle Database UserName>
- Select OK to save.
- Run:
- In many ODBC Oracle drivers you can also Test Connection from here too.
by Matthew Adams
Matthew is a freelancer who has produced a variety of articles on various topics related to technology. His main focus is the Windows OS and all the things… read more
Updated on March 7, 2022
- When you install an Oracle ODBC driver in Windows 10, you can connect to an Oracle database with Access and other ODBC-compliant database applications.
- Users can download and install an ODBC driver for Oracle 19c, which is the current release with a high level of stability.
- You can establish an Oracle ODBC connection in Windows 10 by setting up an ODBC data source after installing the ODBC driver.
- You’ll also need to have installed certain Visual C++ packages for the Oracle setup.

XINSTALL BY CLICKING THE DOWNLOAD FILE
This software will repair common computer errors, protect you from file loss, malware, hardware failure and optimize your PC for maximum performance. Fix PC issues and remove viruses now in 3 easy steps:
- Download Restoro PC Repair Tool that comes with Patented Technologies (patent available here).
- Click Start Scan to find Windows issues that could be causing PC problems.
- Click Repair All to fix issues affecting your computer’s security and performance
- Restoro has been downloaded by 0 readers this month.
Oracle Database is one of the foremost DBMS (Database Management Systems) for Windows. However, Windows 10 doesn’t include any built-in Oracle ODBC connection tool.
So, you’ll need to install an Oracle ODBC driver to connect to an Oracle database with an ODBC-compliant application.
You basically have to do a bit more than simply download and install an ODBC package to connect to an Oracle database with an application.
On top of that, you’ll also need to add new environment variables and set up a DSN for the driver before you can connect with the Oracle database.
How can I install an Oracle ODBC driver in Windows 10?
1. Download and extract the Oracle packages
- First, open the Oracle Instant Client page in your browser.

- Next, click the Instant Client for Microsoft Windows 32 or 64-bit link (or an alternative one that matches your PC’s platform).
- Click the Basic package download link.
- Scroll down and click the SDK package hyperlink to download that archive.
- In addition, click the download link for the ODBC package.
- Open the File Explorer window by clicking the folder taskbar button for it.
- Click the C: root drive in File Explorer.
- Then right-click a space within the C: drive and select New > Folder.

- Enter Oracle as the new folder name. Then you should have a new folder with this path:
C:Oracle - Move all three of the downloaded Oracle ZIP archives into the Oracle folder. You can do that by selecting the ZIP files, clicking the Move to button, and selecting Choose location within File Explorer.
- Next, extract all three of the ZIP archives into the Oracle folder. To extract a ZIP, select it and click the Extract all button on File Explorer’s Compressed Folder Tools tab.
 folders window")
- Then you can click the Browse button in the Extract Compressed window to select the Oracle folder. Click the Extract button.
- Open the extracted instantclient-basic-windows.x64-19.11.0.0.0dbru folder.
- Move the instantclient_19_11 subfolder from there into the Oracle folder.
- Then erase the now empty instantclient-basic-windows.x64-19.11.0.0.0dbru folder that previously included the instantclient_19_11 subfolder by right-clicking it and selecting Delete. Thereafter, you’ll have a single instantclient_19_11 folder within the Oracle directory.


 folders window")
The ODBC and basic ZIP archives must be unzipped to exactly the same folder. Select to extract the ODBC ZIP to the path of your unzipped Basic package.
Delete instantclient_19_11 at the end of the path in the Extract Compressed window so that an additional subfolder isn’t included.
The SDK package is a non-essential optional one. However, it’s recommended you download that package too.
The SDK ZIP archive should also be extracted to the same instantclient_19_11 folder that includes the Basic and ODBC package files. In case that did not help, you can give a try to DriverFix that has a big database of drivers and might have the right ones for Oracle, besides that, updating your drivers is a common good practice of maintaining a functional PC.
2. Add an Oracle Client directory environment variable
- Press the Windows and S keys simultaneously to open a search box.
- Type the keyword system environment variables with the search text box.
- Click Edit the system environment variables to open the window in the screenshot directly below.

- Press the Environment Variables button.

- Click the New button for system variables.
- Next, input OCI_LIB32 within the Variable name box.
- Input your Oracle folder path in the Variable value box. If you followed the guidelines above, that folder path would be this:
C:Oracleinstantclient_19_11.
- Next, Double-click Path in system variables to open the window in the snapshot directly below.

- Click the New button, and enter the same folder path you input within the Variable value box.
- Press the OK button.


NOTE
To get the list of TNS services when establishing ODBC connections, you’ll also need to set up a TNS_NAMES system environment variable that points to the directory that includes the tnsnames.ora file.
3. Install your ODBC Oracle client package
Some PC issues are hard to tackle, especially when it comes to corrupted repositories or missing Windows files. If you are having troubles fixing an error, your system may be partially broken.
We recommend installing Restoro, a tool that will scan your machine and identify what the fault is.
Click here to download and start repairing.
To install the ODBC client, open the instantclient_19_11 folder you extracted the ODBC package to in File Explorer. Then right-click odbc_install.exe and select the Run as administrator option.
Note that there isn’t any kind of GUI installation wizard for that file. So, that’s all you need to do here.

4. Set up the DSN for Oracle driver
- Bring up the search tool within Windows.
- Enter ODBC Data Sources in the search box.
- Click ODBC Data Sources to open the window in the screenshot directly below.
 window")
- Next, click the Add button on the User DSN (or System) tab to open the Create New Data Source window.

- Select your Oracle ODBC driver, and press the Finish button.
- Fill out the required details on the ODBC configuration window.
- Click Test Connection to check your Oracle Database Server connection.
- Press the OK button to exit.
 window")

5. Install missing Visual C++ libraries
You can’t set up data sources for an Oracle driver with the ODBC Data Source Administration if a required Visual C++ package for it is not installed on your PC.
If an error message pops up when your try to set up an Oracle driver data source, you might be missing a required Visual C++ package.
You’ll need to have Visual Studio 17 installed for the current Oracle 19 client. You can download Visual Studio 2017, and older redistributable packages, via the C++ downloads page.
Then click the VC EXE file you downloaded to the install Visual Studio package. So, that’s how you can install the Oracle ODBC driver on Windows 10.
When you’ve installed the current Oracle ODBC driver, you’ll be able to connect to Oracle Database DBMS versions from 11.2 up to 19.1 with the 19c client.
Moreover, if you need to fix Windows 10 ODBC issues, just check out our dedicated article. As for your opinion, the comments area is waiting for you.
![]()
Newsletter

Hello everyone, welcome to my blog. In this article, I am going to show you how to install Oracle ODBC Driver on Windows 10. I have a working Oracle Database 12c on another computer on my home network. I am trying to connect to my Oracle database from Microsoft Access using ODBC connection. By default, Windows 10 does not shipped with Oracle ODBC connection utility. In other word, I was unable to connect to my Oracle database from MS Access.
Installing Oracle ODBC Driver on Windows 10 is a bit tricky. It’s not as simple as installing PostgreSQL ODBC driver or MySQL ODBC Driver. I was struggling to get it works. The following method works very well on my home network. So let’s dig inside.
My Setup
- I have a Windows 10 running Oracle Database 12.2
- I am going to connect to my Oracle Database via ODBC from another computer, running Windows 10 as well.
Step 1. Install Oracle Instant Client Basic
Oracle ODBC Driver needs this Instant Client package to run. So, we need to download this package from the official download website of Oracle.
https://www.oracle.com/technetwork/database/database-technologies/instant-client/downloads/index.html

Select the correct architecture of your system either 32 bit or 64 bit. In this example I am going to install the 32 bit version since I have MS Office 32 bit version.

Next, download the Instant Client Basic package as shown on the picture above. Also, you will need to download the Instant Client SDK and Instant Client ODBC as shown below

So now we have three packages:
- instantclient-basic-nt-12.2.0.1.0.zip
- instantclient-sdk-nt-12.2.0.1.0.zip
- instantclient-odbc-nt-12.2.0.1.0-2.zip
Now Create a new folder for the Oracle client. For example, in this case I created a new folder : C:OracleProductclient. Put all those three zip packages in that new directory. Next, extract them all. It will produce a new directory called: instantclient_12_2. If you download the different version, for example version 18.3, it will create new directory instantclient_18_3.
Step 2. Add the Oracle Client directory to the PATH environment
Now we need to add our Oracle Client directory to the Windows PATH environment. Right-click My Computer >> Advanced System Settings >> Environment Variables

On the System Variables, click New and then enter the following details:

- Variable name: OCI_LIB32
- Variable Value: C:OracleProductclientinstantclient_12_2
Change C:OracleProductclientinstantclient_12_2 with your actual Oracle Client folder.
Next step is to add the Oracle Client directory to system path. Double click the path and create a new entry as follow

Step 3. Install the Oracle ODBC Client
Now open the folder instantclient_12_2, in your Oracle Client folder created on the Step 1 and double click the file odbc_install.

Please note that there is no GUI installation wizard when you open this file.
Step 4. Create a new ODBC Data Source on Windows 10
To create a new Oracle ODBC Data Source, open Control Panel >> Administrative Tools >> ODBC Data Sources (32bit). If you are using 64 bit version, choose the ODBC Data Sources (64bit).
Click Add to add a new DSN. Select “Oracle in instantclient_12_2” from the list. Click Finish. Next, enter the Oracle ODBC Driver Configuration. Give the new Data Source Name, select TNS Service Name and User ID. Click Test Connection to validate the connection to the Oracle Database Server.


Troubleshooting
On my first attempt, I cannot get the list of the TNS Service when creating a new ODBC Connection. To solve this, we need to copy or create the tnsnames.ora in the Oracle Client Directory. Open Notepad and then copy and paste these lines and then save it as tnsname.ora. Save the file in the Oracle Client directory (C:OracleProductclientinstantclient_12_2).
This is the content of my tnsnames.ora which is works well
LISTENER_ORCL =
   (ADDRESS = (PROTOCOL = TCP)(HOST = localhost)(PORT = 1521))
ORACLR_CONNECTION_DATA =
   (DESCRIPTION =
     (ADDRESS_LIST =
       (ADDRESS = (PROTOCOL = IPC)(KEY = EXTPROC1521))
     )
     (CONNECT_DATA =
       (SID = CLRExtProc)
       (PRESENTATION = RO)
     )
   )
ORCL =
   (DESCRIPTION =
     (ADDRESS = (PROTOCOL = TCP)(HOST = 192.168.100.51)(PORT = 1521))
     (CONNECT_DATA =
       (SERVER = DEDICATED)
       (SERVICE_NAME = orcl)
     )
   )
MYDB01 =
   (DESCRIPTION =
     (ADDRESS = (PROTOCOL = TCP)(HOST = 192.168.100.51)(PORT = 1521))
     (CONNECT_DATA =
       (SERVER = DEDICATED)
       (SERVICE_NAME = mydb01)
     )
   )
After that, we need to tell the system to use this tnsnames.ora config file. Open the Environment Variable again and add a new entry with the following value:
- Variable Name: TNS_ADMIN
- Variable Value: C:OracleProductclientinstantclient_12_2
Don’t forget to change the variable value with your Oracle Client Directory.

Now you should be able to pick or select the TNS service. Thanks for reading this how to install Oracle ODBC driver on Windows 10. Cheers
Summary: in this tutorial, you will learn how to connect to Oracle database server using SQL*plus and SQL developer tools.
Connect to Oracle Database Server using SQL*Plus
SQL*Plus is an interactive query tool installed automatically when you install Oracle Database Server or Client. SQL*Plus has a command-line interface that allows you to connect to Oracle Database server and execute statements interactively.
If you have worked with MySQL or PostgreSQL, SQL*plus is similar to mysql program in MySQL or psql in PostgreSQL.
To launch the SQL*Plus program, from the Linux or Window terminal, you enter the sqlplus command:
Code language: SQL (Structured Query Language) (sql)
sqlplus
You can also find the SQL*Plus program in the Program folder of the Start Menu on Windows as shown below:

When you launch the SQLPlus icon, it will prompt for username and password. Enter your username and password that you chose during the installation of the Oracle Database Server. If you don’t know which account to use, ask your Database Administrator.
Suppose you want to connect to the local Oracle Database Server using the sys account, you enter the following information:
Code language: SQL (Structured Query Language) (sql)
Enter user-name: sys as sysdba Enter password:
After pressing enter, you should see a message followed by the SQL> command line as follows:
Code language: SQL (Structured Query Language) (sql)
SQL>_
It means that you have connected to the Oracle Database Server.
In Oracle 12c, when you connect to the Database Server, the default database is the ROOT container database with the name CDB$ROOT. To display database name, you use the SHOW command:
Code language: SQL (Structured Query Language) (sql)
SQL> SHOW con_name; CON_NAME ------------------------------ CDB$ROOT
If you want to switch to a pluggable database, use the ALTER SESSION statement to set the current database to the pluggable database e.g., PDBORDL as follows:
Code language: SQL (Structured Query Language) (sql)
SQL> ALTER SESSION SET CONTAINER = PDBORCL; Session altered.
Now, you connected to the PDBORCL database.
To disconnect a user from the Oracle Database Server, you use the EXIT command:
Code language: SQL (Structured Query Language) (sql)
SQL> EXIT
To connect the OT user to the sample database located in the PDBORCL pluggable database, you enter the following command:
Code language: SQL (Structured Query Language) (sql)
>sqlplus OT@PDBORCL
SQL*Plus prompts for the password of the OT user. Enter the password and you will be connected to the PDBORCL database in the Oracle Database Server.
Connect to Oracle Database Server using SQL Developer
SQL Developer is a free GUI tool for working with SQL in Oracle Databases. Like the SQL*Plus program, SQL Developer is installed automatically when you install the Oracle Database Server or Client.
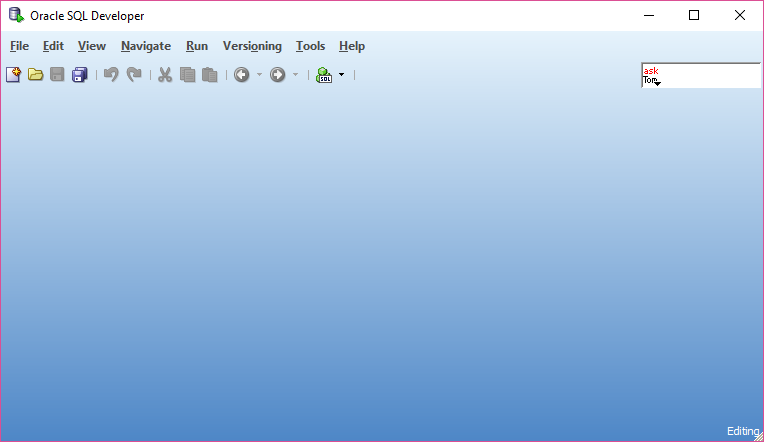
To launch the SQL Developer program, you click the SQL Developer icon in the Oracle Program folder in Start Menu as shown in the following picture:

The following shows the SQL Developer program:
To create a new database connection, (1) first, click the New button or press Ctrl-N, and then (2) choose Database Connection option and click the OK button.
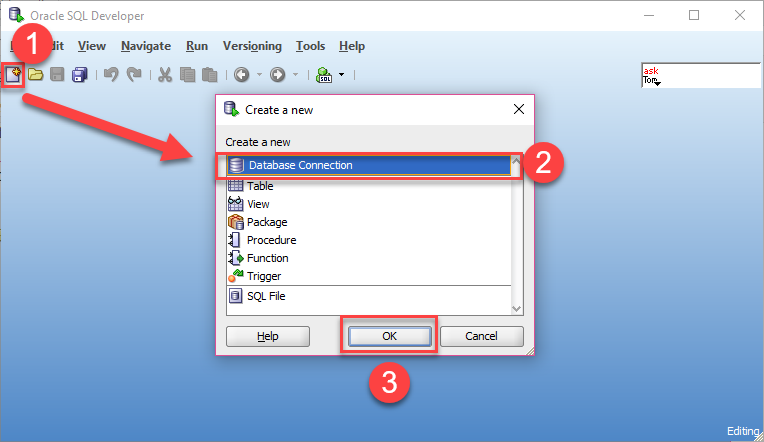
The following New / Select Database Connection dialog will display:

In this dialog, you need to enter the following information:
First, enter the following information:
- A connection name. It can be any name you like, we used OT as shown in the dialog.
- Username and its password, which is
ot/Orcl1234in this case. - Save password by checking the
Save Passwordcheckbox.
Second, choose TNS as the connection type.
Third, the Network Alias list will be displayed after you choose the TNS connection type. Just select the PDBORCL as the network alias. By doing this, you explicitly specify the pluggable database PDBORCL to which you want to connect.
Fourth, click the Test button to test the database connection. If you see status: Success message, you are ready to connect to the Oracle Database Server.
To save time re-entering all the connection parameters again, click the Save button. The connection will be saved and displayed on the left side of the dialog. Whenever you want to reconnect, you just need to click the saved connection, all the parameters will be filled out automatically.

Now, you can click the Connect button to connect to the Oracle Database Server.
Double click the Connections > OT > Tables, you will see all tables in the OT sample database.
In this tutorial, you have learned how to connect to the Oracle Database Server using SQL*Plus and SQL Developer.
Was this tutorial helpful?