In this article which is related to Windows Server 2012 R2 Core configuration, I’m going to show you how to convert Server Core to Full GUI and Convert from Gui to Windows Core? Before doing the conversion to full GUI and vice versa, you must know the basic configuration of Windows Server 2012 R2 Core. The preview article was about essential Configuration of Windows Server 2012 R2 Core?“.
This is the capability of Windows Server 2012 R2 that allows administrators to install servers with the full Gui, use the graphical tools to perform the initial setup and then convert them to Server Core to conserve system resources. In case of needed any changes, it is possible to reinstall the Gui components or remove them again. We can do it this conversion with Powershell and DISM command line utility.
Method 1: Convert Server Core to Gui using PowerShell
Get ready to convert Server Core to Full Gui using Windows PowerShell. In order to do this, log in to Server core with an administrator account and open the PowerShell through opened command prompt.
1. To open PowerShell type “start PowerShell” on command prompt and press Enter. The PowerShell will open in a new window. See the screenshot.
Now convert server core to full Gui using with the following “install-WindowsFeature” PowerShell command.
2. First of all gets the name of GUI features with “Get-WindowsFeature *GUI*” command.
You see the two Graphical Management Tools and Infrastructure and Server Graphical Shell which we need to install it.
3. Type the command “Install-WindowsFeature -Name Server-Gui-Mgmt-Infra, Server-Gui-Shell –Source:E:sourcesinstall.wim” to install the GUI on Server core.
The “E:” is the DVD ROM of my computer and the Windows Server 2012 R2 is already in.
4. OK, when the installing features have finished successfully, restart the server core using “Shutdown -r -t 0” command.
After rebooting the system, you will see the Windows Server with full Gui and all necessary graphical management tools.
Finally, Windows Server with full Gui is here.
Method 2: Convert Windows Server Full Gui to Server Core
OK, let’s convert Server from full Gui back to Server Core using “Uninstall-WindowsFeature” PowerShell command. We can do it with graphical as well, but the command is easy and you must learn for the exam.
Uninstall-WindowsFeature -Name Name Server-Gui-Mgmt-Infra, Server-Gui-Shell -Restart
The command will uninstall and remove features and convert Server GUI to Server Core. After restarting the system, you will see your old Server core with only one opened a command prompt.
Method #2: Convert Server Core to Full Gui using DISM
Deployment Image Servicing and Management (DISM.exe) is a command-line tool that can be used to service a Windows image or to prepare a Windows Preinstallation Environment (Windows PE) image. DISM can be used to service a Windows image (.wim) or a virtual hard disk (.vhd or .vhdx). But here we are using DISM to Install Windows Features or convert Server Core to full Gui with DISM.
Dism /online /enable-feature /featurename:ServerCore-FullServer /featurename:Server-Gui-Shell /featurename:Server-Gui-Mgmt /Source:E:sourcesinstall.wim
After installing Windows features with DISM, type “Y” to restart the system.
Remove Windows Features with DISM
To remove the Gui features or Convert Server full Gui back to Server Core, do with the following command.
Dism /online /Disable-feature /featurename:ServerCore-FullServer /featurename:Server-Gui-Shell /featurename:Server-Gui-Mgmt
OK, that’s all you need to know to convert Server core to full Gui and vice versa. For the exam 70-410, you don’t need to know all of these, but you shout ready to involve with such questions about the conversion of Windows Server to full Gui and back to Core.
Hope this has been informative for you.
In this post, we’gonna explain if it’s possible to Switch from Windows Server 2016 Core to GUI (Desktop Experience).

You may be also interested to check Windows Server 2016: Expand Virtual Machine Hard Disk & Extend the Operating System Drive.
Switch from Windows Server 2016 Core to Desktop Experience
-
1
Switch from Windows Server 2016 Core to Desktop Experience-
1.1
How to Convert from Windows Server 2016 Core to GUI? -
1.2
Is there any workaround to Switch from Windows Server 2016 Core to GUI Without Performing a Fresh Installation?
-
1.1
-
2
Install Windows Server 2016 Step by Step-
2.1
Windows Server 2016 Hardware Requirements -
2.2
Download Windows Server 2016 -
2.3
Windows Server 2016 Installation Steps
-
2.1
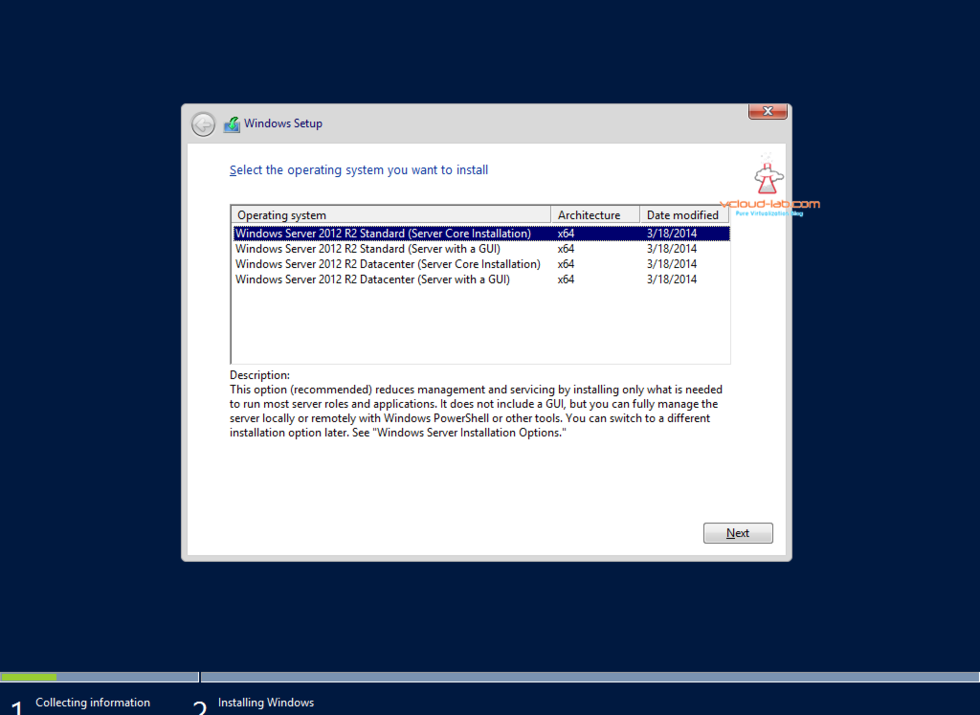
When I tried to install Windows Server 2016, I got the below dialog that ask me to select the operating system that I would like to install as shown below:
Actually, I have confused which option should I use
- Windows Server 2016 Standard or,
- Windows Server 2016 Standard (Desktop Experience).
Unfortunately, I selected the first option “Windows Server 2016 Standard“, after taking a long time to install the windows server 2016, it was the shock, I got the Windows Server 2016 console interface, not the normal Windows Server 2016 GUI Desktop Experience interface as shown below:

You might also like to read Convert from Windows Server 2019 Core to GUI
How to Convert from Windows Server 2016 Core to GUI?
Actually, In previous Windows Server releases like Windows Server 2012, 2008, we were able to add the Windows Server GUI functionality to the Windows Server core without performing a fresh installation.
But, In Windows Server 2016 and later, it’s no longer doable to convert from Windows Server 2016 core to Windows Server 2016 with Desktop experience and vice versa!
Is there any workaround to Switch from Windows Server 2016 Core to GUI Without Performing a Fresh Installation?
Unfortunately, there is no workaround to convert from Windows Server 2016 Core to GUI, the only available solution is performing a fresh installation from scratch again!
Install Windows Server 2016 Step by Step
In this section, we’ll explain how to install Windows Server 2016 Standard with GUI by doing the following:
- Exploring Windows Server 2016 Hardware Requirements.
- Download Windows Server 2016.
- Install Windows Server 2016.
Windows Server 2016 Hardware Requirements
The hardware requirements for Windows Server 2016 with desktop experience is differ from Windows Server 2016 Core.
Below is the minimum hardware requirements for Windows Server 2016 with desktop experience:
- CPU: 1.4 GHz 64-bit processor.
- RAM: 2 GB, (512 for core)
- Disk: 32 GB as absolute minimum value, (4 GB for core).
Download Windows Server 2016
Below are the official links to download Windows Server 2016 as well as Windows Server 2019.
- Download Windows Server 2016 Evaluation ISO.
- Download Windows Server 2019 Evaluation ISO.
The Windows Server 2016 Evaluation Period is 180 days that can be extended 6 times for additional 180 days.
To extend Windows Server 2016 Evaluation Period, please check Evaluation Period expired for Windows Server 2016, How to extend it?
Windows Server 2016 Installation Steps
- Mount your Windows Server 2016 ISO image.
- Run the Setup file.
- Select your language, time, currency format, and input method.

- Click on “Install now” button to start Windows Server 2016 installation.

- Select, “Windows Server 2016 Standard (Desktop Experience)“, then click “Next”.

Note: Windows Server 2016 Standard option refers to the core!
- Accept the license terms and click “Next”.

- Select “Install Windows Only“.

It’s strongly recommended to perform a clean installation for Windows Server 2016.
- The Windows Server 2016 installation will start!

- Finally, the Windows Server 2016 GUI has been installed with desktop experience as shown below!

Conclusion
Unlike previous Windows Server releases, you can’t convert from Windows Server 2016 core to GUI and vice versa, the only solution is performing a fresh installation!
So in this post, we have learned how to download and install Windows Server 2016 and Which option should we select during Windows Server installation to install Windows Server 2016 with Desktop Experience instead of Windows Server 2016 Core.
Applies To
- Windows Server 2019.
- Windows Server 2016.
You might also like to read
- Extend Volume option is disabled within Disk Management in Windows Server 2012.
- Error extending volume: Size Not Supported, During extending Operating System partition In Windows Server 2012.
- Windows failed to start: The Boot Configuration Data for your PC is missing or contains errors.
- Extend SQL Server Evaluation Period.
Have a Question?
If you have any related questions, please don’t hesitate to ask it at deBUG.to Community.
CONVERTING FROM SERVER 2012 CORE INSTALL TO FULL GUI
December 13, 2016 10:26PM
There might be a chance while installation of Microsoft Windows Server setup, You might have overlooked the operating systems menus while setup installation and selected default Windows Server 2012 R2 standard (Server Core installation), first option from the list and click next or press enter. This installs windows 2012 R2 standard core OS by default, and no GUI available. It might be hard some guys who use only GUI to manage and configure Windows severs. Rerunning complete setup again takes time, instead with few commands we can switch from Windows 2012 R2 core to GUI easily even after complete installation. Same steps can be run on Windows Server 2016, I didn’t find any difference.
Once logged into the Microsoft Windows 2012 R2 Core, by default CMD.exe will be open and visible, run below command to open another powershell console on the core.
start powershell
I have Windows 2012 R2 OS DVD or ISO already mounted on the server, to know which drive is of the CDROM, run below command.
Get-PSDrive -PSProvider FileSystem
It shows all the available local drives on the server, here is my D drive is 4.24 GB, and for sure it is the OS DVD/ISO. to check and confirm run dir command on D: and verify the contents. In most cases in fresh installations D drive is always CDROM Drive.

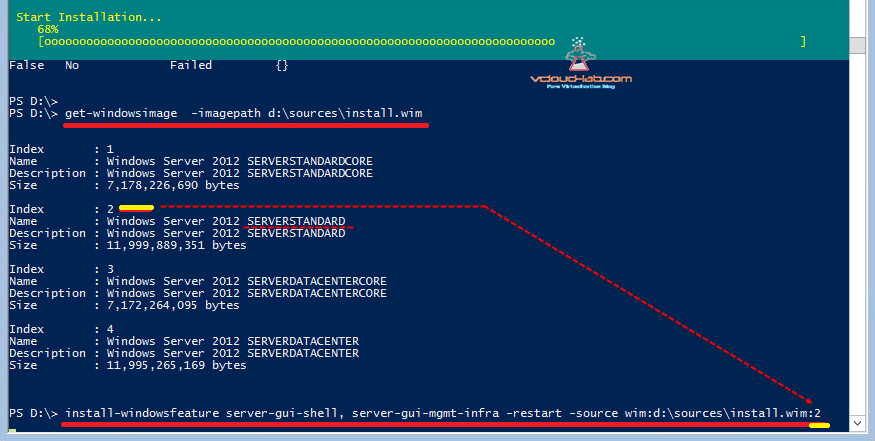
Running Get-WindowsImage -Imagepath D:sourcesInstall.wim will show the Images inside the OS ISO, As I have installed Standard version of core, I will use Index 2 to convert it by running below command.
Install-WindowsFeature server-gui-shell, server-gui-mgmt-infra -restart -source wim:D:sourcesinstall.wim:2
Setup will start installing 2 new features, Graphical Management Tools infrastructure and Server Graphical Shell. Once they are completed server will restart automatically, and you will see GUI based Windows 2012 R2 Operating system once rebooted.
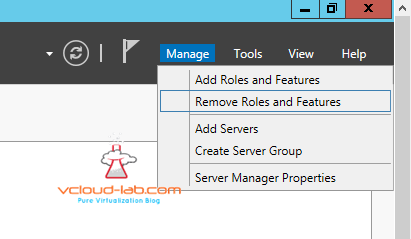
On contrary to Converting from Core to GUI, Here in this another tutorial I will switch from GUI to Core, Open Server Manager, under Manage tab, click Remove Roles and Features,
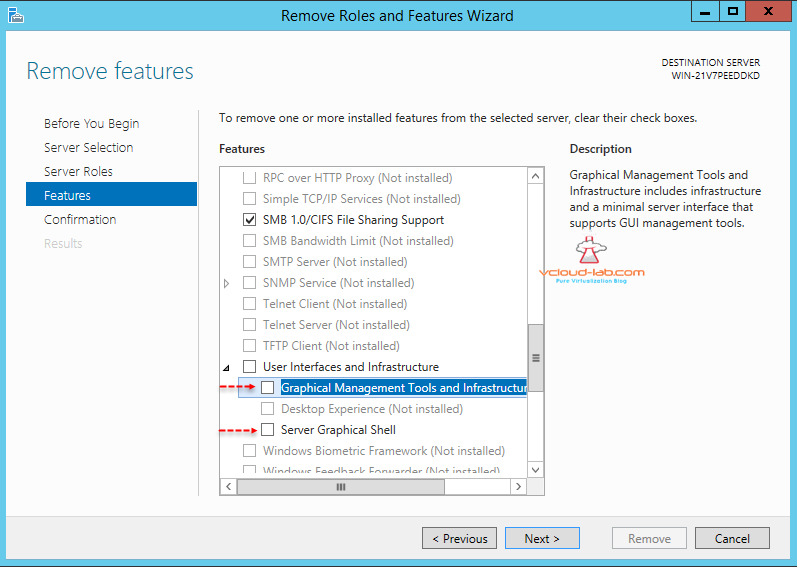
De-Select check box for two features Graphical Management Tools infrastructure and Server Graphical Shell under User interfaces and Infrastructure. click Next.
Confirm the role removal, you can click restart server automatically if required and press button remove. Once server is restarted GUI is gone and only Windows Core exist.

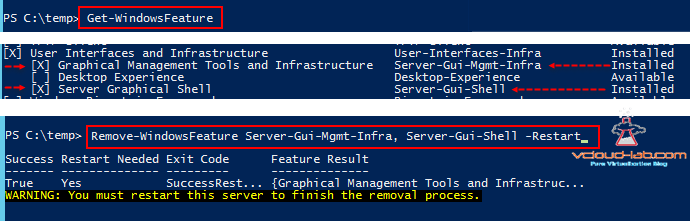
Same process can be achieved from Powershell as well, by running Get-WindowsFeature cmdlet, Once run It show entire features list by which are installed, by scrolling down find the User-Interfaces-Infra and subfeatures. run below one-liner command, to remove them.
Remove-WindowsFeature Server-Gui-Mgmt-Infra, Server-Gui-Shell -Restart
Go Back
I already blogged about how to convert Server 2012 R2 GUI to Server Core, but this time, lets go through the step how to convert Server Core to GUI in Windows Server 2012 R2…
** i have 1 Windows Server 2012 R2 Server Core which fresh installation from the installer, so now i wanted to convert this Server Core to GUI interface for easy maintenance…
1 – Make sure you mount / insert Windows Server 2012 R2 installer to the server itself and then, on the cmd interface, type :
mkdir C:OSIwin2012R2image
** this command is to create new folder called OSIwin2012R2image
next, type :
copy D:sourcesinstall.wim C:OSIwin2012R2image
** this command is to copy install.win file from Windows installer…

2 – wait for few minutes for the process to copy the install.wim…

3 – Next, type mkdir C:OSIwin2012R2MountPoint
** this command is to create a folder called OSIwin2012R2MountPoint in your server C: drive…
Then type :
Dism /Mount-Image /ImageFile:C:OSIwin2012R2imageinstall.wim /index:2 /MountDir:C:OSIwin2012R2MountPoint /ReadOnly
** this command is to mount the offline Windows image from windows installer with index no.2 which Windows Server 2012 R2 Standard Edition…
wait until the mounting image completed 100%…

4 – Lastly, on the cmd interface, type :
Dism /online /enable-feature /featurename:Server-Gui-Mgmt /featurename:Server-Gui-Shell /featurename:ServerCore-FullServer /source:c:OSIwin2012R2MountPointwindowswinsxs
** this command is to upgrade your Server Core to Full GUI of Windows Server 2012 R2 Standard Edition…
wait until the DISM process complete and it will prompt you to restart the Server, and then type Y..


5 – After your server restart, you will get Windows Server 2012 R2 Standard Edition with Full GUI…

Server Core – особый режим установки Windows Server, это среда, в которой отсутствует графический интерфейс и средства управления, а также некоторые серверные роли и компоненты. Управление Windows Server Core предполагается из командной строки, с помощью PowerShell, или же с других серверов/рабочих станций с установленным RSAT (RSAT для Windows 7, RSAT для Windows 10). Впервые Core-режим работы серверной ОС Microsoft появился еще в Windows Server 2008. Основные преимущества Server Core перед полными инсталляциями Windows Server: экономия системных ресурсов, повышенная стабильность и безопасность за счет меньшего количества компонентов, упрощение обслуживания, меньший даунтайм при установке обновлений, сокращение поверхности атаки злоумышленниками.
Одним из главных недостатков в Windows Server 2008 Core являлась невозможность переключение в режим с графической оболочкой (GUI) или в обратную сторону (из GUI в Core режим). В случае возникновения такой необходимости приходилось целиком переустанавливать ОС.
В Windows Server 2012 Microsoft решила убрать это ограничение, кроме того появился еще один вариант работы сервера — минимальный интерфейс сервера (Minimal Server Interface). В этом режиме отсутствуют проводник, Internet Explorer, рабочий стол и начальный экран).
В Windows Server 2012 теперь можно установить и настроить сервер в знакомом администраторам GUI, после чего перевести сервер в Core режим. Этот подход упрощает процедуру настройки сервера, не вынуждая администраторов разбираться в подчас достаточно сложных консольных командах и командлетах PoSh.
Итак, в Windows Server 2012 возможна работа в нескольких режимах, между которыми в процессе эксплуатирования и настройки сервера может переключаться администратор.
- Full Server with GUI – полноценный сервер с GUI
- Server Core with GUI Management (Minimal Server Interface) – минимальная интерфейс сервера с Windows Server 2012, включающий графические утилитаты управления сервером
- Server Core – режим командной строки
Отметим, что в режиме Minimal Server Interface система занимает примерно на 400 мб меньше места, чем полноценная ОС с GUI. В случае с Server Core экономия достигает порядка 4Г дискового пространства.
Далее мы разберем способы переключения между данными режимами работа новой серверной платформы от Microsoft
Переключение из режима Server Core в GUI
В том случае, если сервер был установлен в режиме Windows Server 2012 Core, в установленных компонентах отсутствуют необходимые файлы для установки GUI (концепция минимизации занимаемого места на диске в Core режиме). По умолчанию, если нужные компоненты отсутствуют на диске, система пытается скачать их с сайта Windows Update. Если доступ в интернет у сервера отсутствует, нам придется указать альтернативные источник установки (с помощью команды powershell Install-WindowsFeature с параметром -Source).
Для установки графического интерфейса нам понадобится дистрибутив Windows Server 2012. Допустим, мы вставили (смонтировали iso образа) дистрибутив Windows Server 2012 в устройство, которому назначена буква D:.
Далее нужно определить индекс установленной версии Windows Server 2012 в установочном wim образе. Для этого наберите команду, отображающую информацию о содержимом установочного образа:
Dism /get-wiminfo /wimfile:D:sourcesinstall.wim
Т.к. на сервере установлен Windows Server 2012 Datacenter, нас интересует дистрибутив SERVERDATACENTER, индекс которого 4.
Далее нужно установить недостающие компоненты (Server GUI) из wim файла командой:
Install-WindowsFeature Server-Gui-Mgmt-Infra,Server-Gui-Shell –Restart -source:wim:d:sourcesinstall.wim:4
 Процедура установки займет порядка 5-10 минут. В том случае если при установке будут наблюдаться проблемы, попробуйте отключить сетевые карты, чтобы Windows не пыталась скачать файлы с сайта Windows Update.
После выполнения команды сервер автоматически перезагрузится и загрузится уже в графическом режиме.
Графические компоненты Windows Server 2012 можно также установить и с помощью DISM, ту же самую операцию выполним с помощью двух команд:
Dism /Online /Enable-Feature /FeatureName:Server-Gui-Mgmt /All /Source:wim:D:sourcesinstall.wim:4
Dism /Online /Enable-Feature /FeatureName:Server-Gui-Shell /Source:wim:D:sourcesinstall.wim:4
В том случае, если сервер изначально был установлен в GUI режиме, который затем отключили, его можно вернуть командой:
Install-WindowsFeature Server-Gui-Mgmt-Infra,Server-Gui-Shell –Restart
Переключение из GUI режима в Core
Удалить GUI режим в Win Server 2012 в Core можно несколькими способами:
- С помощью Powershell
- Из графического интерфейса консоли Server Manager
Запустите строку PoSh и выполните команду
remove-WindowsFeature Server-Gui-Shell,Server-Gui-Mgmt-Infra -restart
 После выполнения команды сервер автоматически перезагрузится и загрузили уже в Core-режиме.
Аналогом командлета remove-WindowsFeature является Uninstall-WindowsFeature команда, и чтобы перейти из режима Server with GUI в режим Server Core воспользуйтесь командами:
Import-Module ServerManager
Uninstall-WindowsFeature Server-Gui-Mgmt-Infra –restart
Если вам удобнее пользоваться графическими утилитами, откройте консоль Server Manager:
- Выберите пункт Remove Roles or Features
- Снимите флажки с Graphical Management Tools and Infrastructure и Server Graphical Shell
- После окончания работы мастера перезагрузите сервер


Переключение из Windows Server 2012 GUI в Minimal Server interface
В режиме работы Minimal Server Interface в системе присутствуют все базовые графические инструменты управления сервером (оснастки MMC, консоль Server Manager, элементы панели управления), однако такие компоненты как Windows Explorer, Internet Explorer 10, рабочий стол, начальный экран Start screen отсутствуют.
С помощью Powershell переключиться в режим Minimal Server Interface можно с помощью команды:
remove-WindowsFeature Server-Gui-Shell -restart
 Тоже самое в графической консоли Server Manager:
- Откройте консоль Server Manager
- Выберите Remove Roles or Features
- Снимите флажок с элемента Server Graphical Shell
- По окончании работы мастера перезагрузите сервер
Переключение из Core в Minimal Server Interface в Windows 2012
Откройте консоль Powershell и выполните команду:
Install-WindowsFeature Server-Gui-Mgmt-Infra -restart -source:wim:d:sourcesinstall.wim:4

Автоматическая установка Windows Server 2012 R2 (версии GUI и Server Core)
Переключение с версии Server Core на версию GUI (с графическим интерфейсом)
Привет друзья! Я Ro8 и в сегодняшней статье мы произведём автоматическую установку операционной системы Windows Server 2012 R2 (версии GUI и Server Core). В качестве рабочей машины будем использовать компьютер с предустановленной операционной системой Windows 10. На данном компьютере заранее был установлен комплект оценки и развертывания Windows 10, с помощью которого в данной статье мы создадим файл ответов и выполним автоматическую установку Windows Server 2012 r2.
Установленный комплект оценки и развертывания Windows 10 (ADK Windows 10)

Из комплекта ADK Windows 10 нам понадобятся два инструмента, которые входят в его состав, а именно: Диспетчер установки Windows и Среда средств развертывания и работы с образами.
Приступим к созданию файла ответов для автоматической установки Windows Server 2012 r2.

На нашей рабочей машине в виртуальный привод смонтирован установочный дистрибутив операционной системы Windows Server 2012 r2.
В папке sources вышеуказанного дистрибутива находится файл install.wim, который мы копируем в заранее созданную папку win2012r2.

Запускаем диспетчер установки Windows.

Откроется главное окно диспетчера установки Windows.

Выбираем Файл — Выбрать образ Windows.

Указываем файл install.wim, который скопировали с установочного дистрибутива Windows Server 2012 r2 и нажимаем Открыть.

Как видим, файл install.wim содержит несколько образов операционной системы Windows Server 2012 r2, в нашем случае мы выбираем Windows Server 2012 r2 Standard.

Соглашаемся на создание файл каталога нажав Да.

Процесс создания файла каталога.

Как только файл каталога будет создан, в левом нижнем углу мы увидим две папки, Components и Packages.
В папке Components, с которой мы будем работать, представлен набор связанных настроек, необходимых для создания файла ответов. Каждый компонент отвечает на один или несколько вопросов во время установки операционной системы.

Выбираем Файл-Новый файл ответов.

Перед нами откроется список этапов установки, которые мы будем конфигурировать добавляя в них параметры из папки components.

Находим в папке components строку amd64_Microsoft-Windows-International-Core-WinPE и добавляем ее в этап установки Windows PE.

Указываем значения параметров: InputLocate, SystemLocate, UILanguage, UserLocate (всем параметрам присваиваем значение en-us).

Указываем значения для параметров UILanguage (en-us) и WilShowUI (onerror).

В папке Components ищем строку amd64_Microsoft-Windows-Setup, разворачиваем ее, выделяем Disk и добавляем его в этап установки Windows PE.

Указыавем значения: DiskID 0, (операционная система будет установлена на диск под номером 0, нумерация дисков в Windows начинается с нуля), WillWpeDisk true (диск на который будет производится установка будет очищен).

Создадим на диске 0 новый раздел, выбрав CreatePartition-Вставить новый CreatePartition.

Заполним параметры первого раздела на диске 0: Extend true (раздел 1 будет занимать все пространство диска 0), Type Primary.

Создаем ModifyPartition выбрав ModifyPartitions-Вставить новый ModifyPartition.

Заполняем параметры ModifyPartition: раздел 1 будет активным, (Active true), отформатирован в файловую систему NTFS (format NTFS), название раздела 1 будет Windows server 2012 r2.

В папке Components ищем строку MetaData и добавляем ее в этап установки Windows PE.

Компонент MetaData предназначен для указания программе установки, какую именно редакцию операционной системы нужно установить, так как файл install.wim содержит в своем составе несколько редакций Windows Server 2012 r2. Для того, чтобы определить название нужной редакции и указать его в качестве параметра в компоненте MetaData, воспользуемся средой средств развертывания и работы с образами.

Запускаем Среду средств развертывания и работы с образами.

Выполняем команду imagex /info C:UsersRo8Documentswin2012r2install.wim, где C:UsersRo8Documentswin2012r2 путь к файлу install.wim.

Второй редакцией Windows Server 2012 r2 в файле install.wim является редакция Standard, а ее название определяется как Windows Server 2012 R2 SERVERSTANDARD. Именно данную редакцию мы будем устанавливать, указав ее в компоненте MetaData.

Заполняем параметры компонента Metadаta: Key /IMAGE/NAME, Value Windows Server 2012 R2 SERVERSTANDARD.

Заполняем параметры компонента InstallTo: операционная система будет установлена на диске 0 (DiskID 0) на разделе 1 (PartitionID 1).

Добавляем компонент UserData в этап установки Windows PE.

Заполняем параметры компонента Userdаta: AcceptEula true, FullName Fabricam, Organization Fabricam.

Переходим в компонент ProductKey, вводим ключ продукта устанавливаемой редакции Windows Server 2012 r2 в параметре Key.

Ищем строку amd_Microsoft-Windows-Shell-Setup и добавляем ее в 4 этап установки Specialize.

Заполняем два параметра: ComputerName Server01 (имя машины), и в параметре TimeZone указываем часовой пояс, например Eastern Standard Time.

Добавляем компонент OOBE в этап установки oobeSystem.

Заполняем параметры: HideEULAPage true, NetworkLocation Work, ProtectYouPC 1.

Удаляем неиспользованные компоненты, чтобы в процессе проверки файла ответов не было никаких ошибок и предупреждений.

Должно получиться следующее.

Выполняем проверку файла ответов, выбрав Сервис-Проверка файла ответов.

Файл ответов проверен, ошибок и предупреждений нет.

Сохраняем файл ответов, выбрав Сохранить файл ответов как…

Указываем место, где будет сохранен созданный файл ответов, в нашем случае это папка win2012r2, и обязательно!!! задаем имя файлу ответов, как autounattend. Если указать другое имя для данного файла, автоматическая установка не сработает.

Сохраненный файл ответов для автоматической установки Windows Server 2012 r2 в редакции Standard.

Для того, чтобы установить Windows Server 2012 r2 редакции Standard в режиме Server Core, в созданном файле ответов в компоненте MetaData изменяем значение параметра Value на Windows Server 2012 R2 SERVERSTANDARDCORE.

Сохраняем созданный файл ответов на флешку, подключаем ее к машине на которую необходимо установить Windows Server 2012 r2 и загружаемся с установочного дистрибутива. Установка проходит в автоматическом режиме.
Видео автоматической установки https://drive.google.com/open?id=0B5ZtD-mcT8eNelQ3dzJIX3JQbFE


Нажимаем ОК.

Вводим новый пароль.

Пароль успешно изменен. ОК.

Windows Server 2012 r2 (Server Core) успешно установлен.

Переключение с версии Server Core на версию GUI (с графическим интерфейсом)
На флешке у нас создана папка Windows2012r2, в которую скопирован установочный дистрибутив Windows Server 2012 r2
Переход от Server Core к графическому интерфейсу.
Видео https://drive.google.com/open?id=0B5ZtD-mcT8eNS0JJa0RIdkx4Tms

Так как мы хотим переключиться с версии Server core на версию GUI (с графическим интерфейсом) в редакции Standard, нам нужно определить, под каким номером в файле install.wim находится образ операционной системы Windows Server 2012 r2 Standard с графическим интерфейсом
Для этого на рабочей машине запускаем среду средств развертывания и работы с образами и выполняем команду:
imagex /info H:Windows2012r2sourcesinstall.wim
где H:Windows2012r2sourcesinstall.wim это путь к файлу install.wim.

Как видим, под номером два в файле install.wim идет образ Windows Server 2012 r2 в редакции Standard с графическим интерфейсом.

Переходим на машину с установленной Windows Server 2012 r2 (Server core), подключаем к ней флешку со скопированным на нее дистрибутивом Windows Server 2012 r2
Определим, под какой буквой определилась наша флешка
Вводим команды:
diskpart
list volume
Как видим, флешка определилась под буквой f
Выходим из diskpart, введя команду exit

Переходим на флешку, введя команду F:
Для просмотра содержимого флешки вводим команду dir.
На флешке под буквой F: видим папку Windows2012r2, в которой находится установочный дистрибутив Windows Server 2012 r2.

Перейдем в папку Windows2012r2 и посмотрим ее содержимое введя команды cd Windows2012r2 и dir.
Видим папку sources, в которой расположен нужный нам файл install.wim.

Возвращаемся на диск С, введя команду C:

Вводим команду powershell
После запуска powershell на сервер нужно загрузить модуль Диспетчер серверов, для этого нужно выполнить команду Import-Module Servermanager.

После загрузки модуля Диспетчер серверов выполняем команду
Install-WindowsFeature Server-Gui-Mgmt-Infra,Server-Gui-Shell -source wim:f:Windows2012r2sourcesinstall.wim:2
где :f:Windows2012r2sourcesistall.wim — это путь к файлу install.wim, 2 — порядковый номер нужной редакции Windows Server 2012 r2.

Установка необходимых компонентов.

Установка компонентов завершена.

Выполняем перезагрузку сервера.
Применение установленных компонентов

Вводим пароль пользователя, входим в систему.

После входа в систему видим, что вместо командной строки появился графический интерфейс.
