Do you need to transfer files from Mac to Windows and vice-versa? You can take a few different approaches, but you can easily do a Mac to Windows or PC to Mac file transfer using both operating systems’ native tools.
Alternatively, there are a few third-party solutions worth checking out. Below, we’ll explain how to transfer files from Mac to Windows and vice-versa.
How to Transfer Files From Mac to Windows PC
The most obvious way to transfer files from Mac to Windows is to use the built-in functions that both operating systems offer.
However, this has one significant drawback. The process will only work if both the Mac and Windows computers are on the same local network. If they aren’t, you can skip ahead to the section on third-party solutions below.
Set Up File Sharing on a Mac
You’ll need to tweak some settings to share files between a Mac and PC. First, you need to allow your Mac to share its files. Follow these steps to do this:
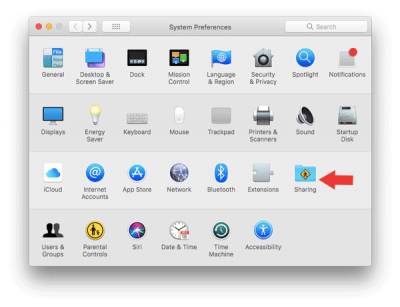
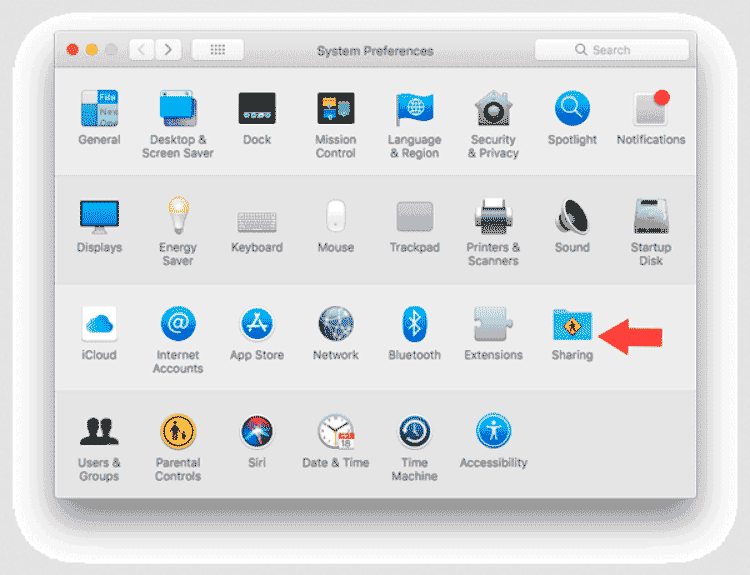
Click on the Apple icon in the upper-left corner of the screen. Choose System Preferences > Sharing. Then, enable the checkbox next to File Sharing in the left panel.
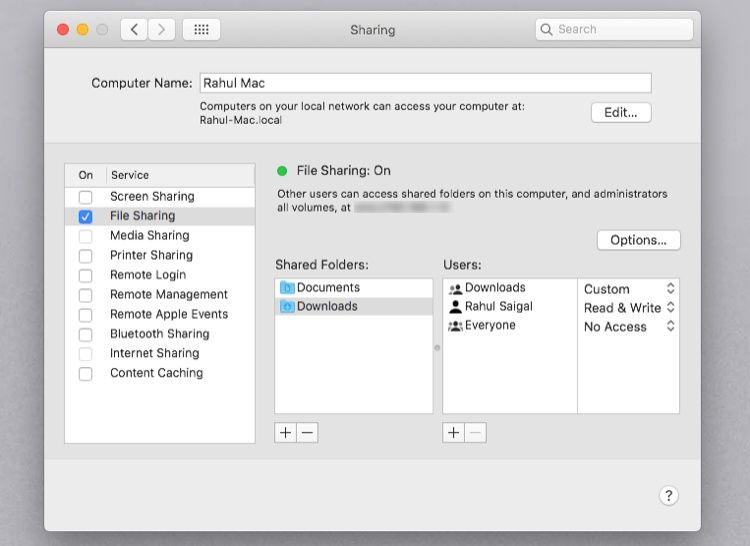
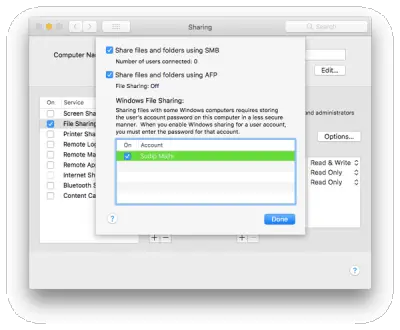
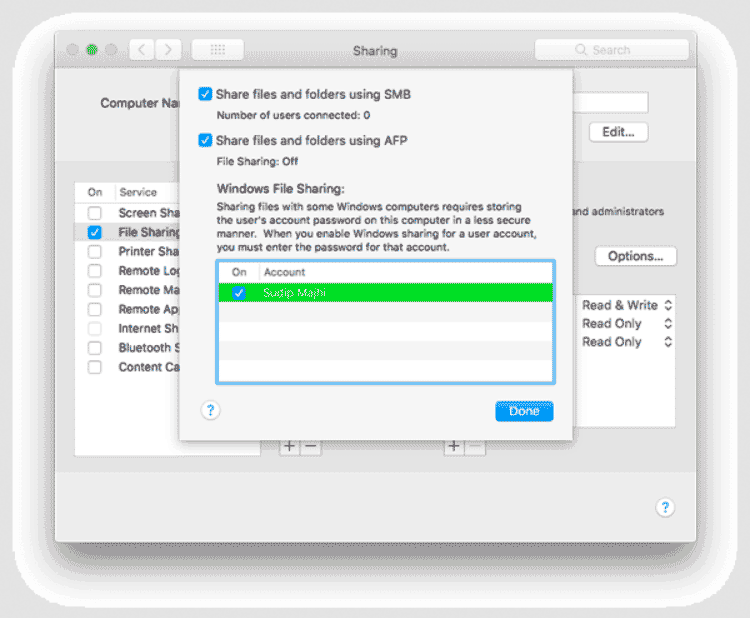
Click on the Options button and, from the window that appears, enable the checkbox next to Share files and folders using SMB. In macOS Big Sur, Apple dropped the ability to share volumes via AFP. Although Catalina retained this ability, you could not share APFS-formatted volumes over AFP.
In the Windows File Sharing section below, enable the checkbox alongside each user whose files you want to share. Enter the users’ passwords and click Done.
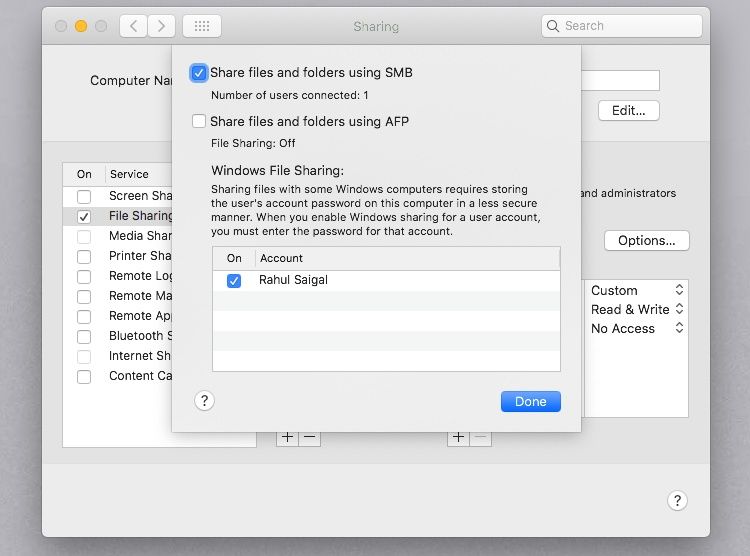
When you’re sharing files with Windows computers, your Mac stores the users’ passwords less securely. Upon completion, we recommend you deselect the user checkboxes.
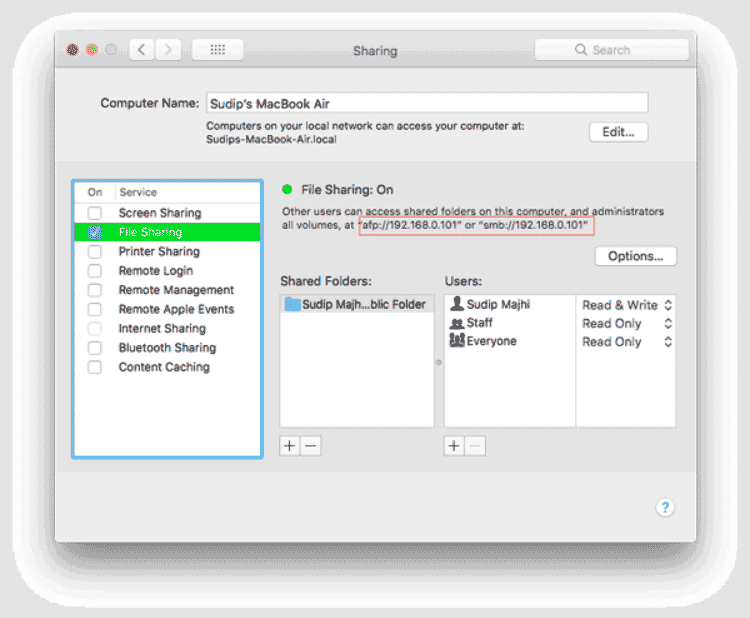
You’ll now be back on the Sharing window. Next, you need to choose which folders and users you’re going to share with your Windows computer. Click the Plus (+) and Minus (–) buttons below Shared Folders to adjust your preferences.
Once you have shared a folder, review the users’ permissions and groups that should have access to the data in the Shared Folders list.
Remember that all network access is controlled by the computer with the shared resources (in this case, it’s your Mac); therefore, you must understand what Mac permissions have been applied to a folder. Finally, you need to note your Mac’s IP address. You will see this below the File Sharing: On message.
Access Mac Files on Windows
Now it’s time to head to your Windows computer. Follow the instructions below to transfer files from Mac to Windows:
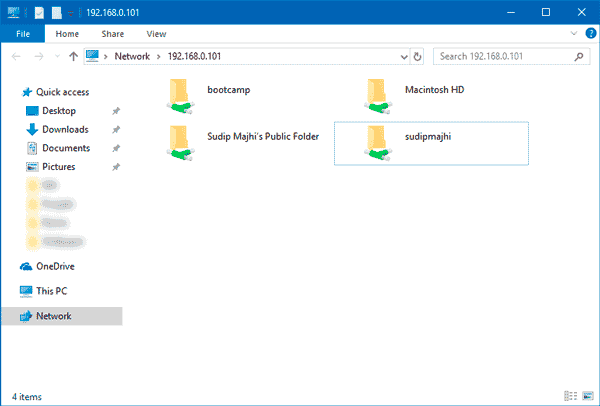
Open File Explorer. In the address bar at the top of the window, type \ followed by your Mac’s IP address. When you’re done, it should look something like this: \192.168.1.68. A new window will pop up asking for a username and password. Enter the user credentials exactly as they appear on your Mac.

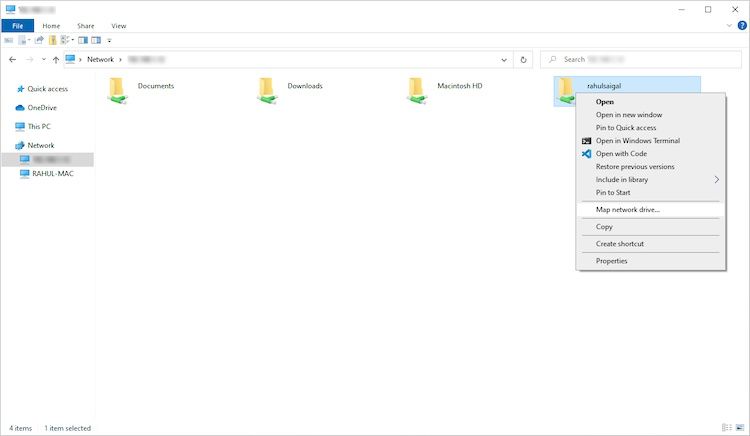
File Explorer will display any folders and users you’ve added to your Mac’s Shared Folders and Shared Users lists. You can map that folder as a network drive to move, edit, and copy folders like any other Windows folder.
Map Network Drive
Mapping a network folder makes it appear to other apps that the folder is part of your computer. Windows assigns a drive to the mapped folder, and you’ll see it as a drive in the File Explorer.
Right-click the shared folder and click Map network drive. Select a drive from the Drive list. You can choose any letter that’s not already in use.
The Folder box contains all the pre-filled information. Don’t forget to check Reconnect at sign-in if you want Windows to connect to this shared folder at the start of each login session automatically.

Once you’re done, drag-and-drop files into one of your local folders to transfer files from your Mac to your Windows PC.
How to Transfer Files From PC to Mac
That wasn’t too tough, right? Now let’s look at the reverse process: how to transfer files from Windows to Mac.
Set Up File Sharing on Windows
To begin, you need to make sure that Network Discovery is turned on in Windows. Fire up your Windows PC and work through the following steps:
Open the Settings app and go to Network & Internet. On the left panel, click on Ethernet or Wi-Fi and then Change advanced sharing options located under Related settings.
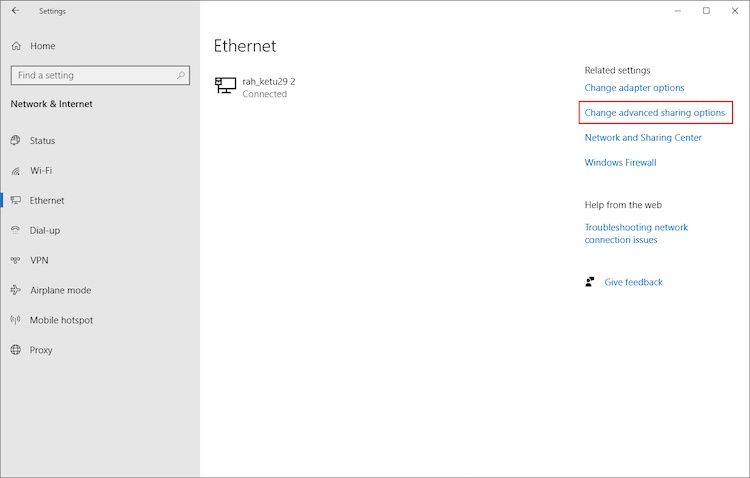
Expand the Private Network menu and enable the checkboxes next to Turn on network discovery and Turn on file and printer sharing. Then, click on Save changes. Follow these steps to fix network discovery-related issues in Windows 10.
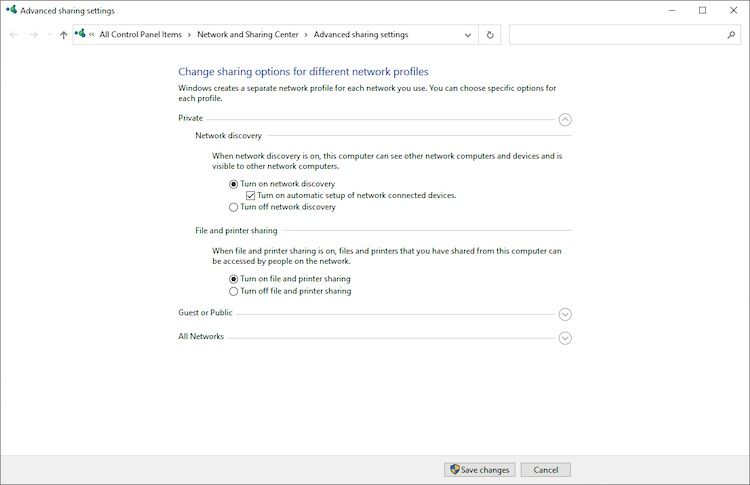
We don’t recommend enabling network discovery or file sharing on public networks. They are typically far less secure than private networks.
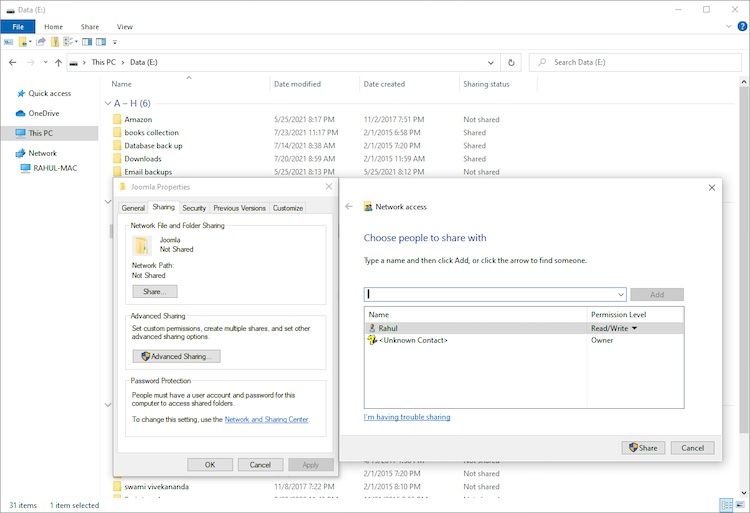
To share folders on a case-by-case basis, right-click on the folder’s name and go to Properties > Sharing > Network File and Folder Sharing > Share. Alternatively, you can use advanced sharing settings if you need to or if you prefer to have full control over sharing.
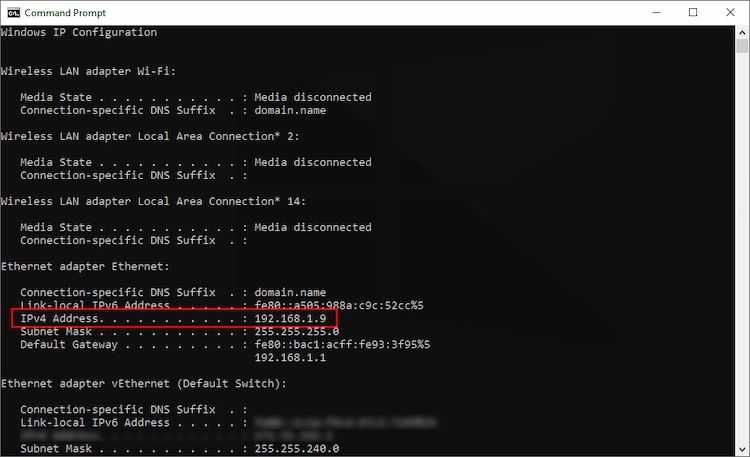
You’ll also need to note your Windows PC’s IP address. Press Win + X and choose Command Prompt or Windows Powershell. Type in ipconfig and note down the IPv4 address.
Access Windows Files on Mac
Once you’re happy with your sharing options, it’s time to transfer your files from Windows PC to Mac. Follow the steps below on your Mac to do this:
Open the Finder app. In the menu bar at the top of the screen, select Go > Connect to Server. Type either smb://[IP address] or smb://[computer name] and press Enter. You will be prompted to enter your Windows username and password. Click on Connect.
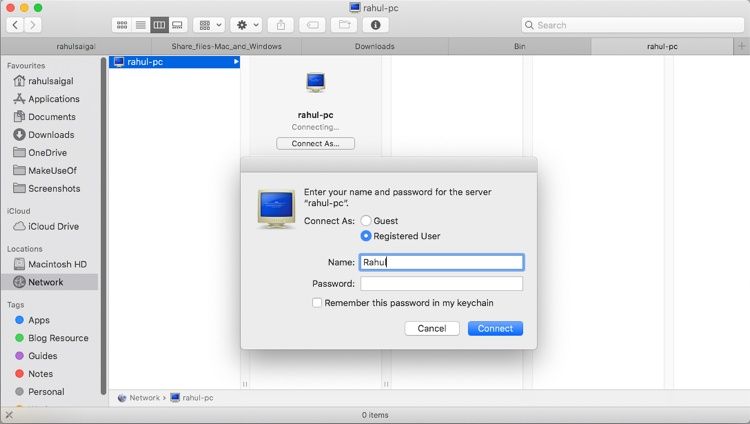
Your shared Windows content will be available in the Shared section of Finder. To transfer files from your PC to your Mac, just drag and drop as needed.
The above methods work great if both Mac and Windows PC are on the same network. However, if they’re not, try these methods and choose the ones that fit best for you.
1. Use a Cloud Storage Service
Dropbox, Google Drive, and OneDrive have dedicated apps available for Windows and macOS. Just install them on the two systems and upload or download your files as needed. Be aware of the space taken up by these apps, and if you’re running low on disk space, follow our guide on how to sync only specific files in Dropbox or Google Drive.
2. Use a USB Stick
A simple-but-effective solution for anyone who needs to transfer files from Mac to Windows quickly is to use a USB flash drive. Remember to choose the exFAT file format since it’s compatible with both operating systems and easily lets you share huge files. Here are our recommendations on the best USB 3.0 flash drives available online.
Resilio Sync and Syncthing are file-syncing apps that let you share files between Windows and Mac. They use an encrypted key to manage the connection between devices. All you have to do is set up a sync folder and create a key. Share the key with your other machine and nominate a folder. Both the apps allow you to set up the read/write permissions.
There are plenty of security challenges we face regarding cloud storage. This author has been using Resilio Sync for many years. If you set up permissions, configure sync to force LAN syncing, and use Archive for file versioning, you ensure that the data transfers happen through your network and save money.

Transfer Files Between Computer and Mobile
Hopefully, the various methods we’ve discussed will help you share files between a Mac and a PC with ease. If you also need to do this with your phone, check out the easiest ways to transfer files between computers and mobile devices.
Нужно перенести файлы с Mac на компьютер с Windows или наоборот? Не волнуйся, это простой процесс. Есть несколько разных способов сделать это, чему мы научились из информации.
Наиболее очевидный способ передачи файлов с Mac на Windows – это использование встроенных функций, предлагаемых обеими операционными системами. Однако этот метод имеет один существенный недостаток. Процесс будет работать, только если оба компьютера находятся в одной локальной сети. Если нет, вам нужно будет найти стороннее решение.
1. Позвольте вашему Mac обмениваться файлами
.png)
Вам нужно сделать некоторые настройки для обмена файлами между вашим Mac и ПК. Во-первых, вы должны разрешить вашему Mac делиться своими файлами. Выполните следующие шаги, чтобы сделать это:
1. Нажмите значок Apple в верхнем левом углу экрана.
2. Перейдите в Системные настройки -> Общий доступ.
3. Установите флажок «Общий доступ к файлам» на левой панели.
4. Нажмите кнопку «Параметры», и откроется новое окно.
5. Установите флажок «Обмен файлами и папками с помощью SMB».
6. Установите флажок «Обмен файлами и папками с помощью AFP».
7. В поле «Общий доступ к файлам» ниже установите флажок рядом с каждым пользователем, чьи файлы вы хотите отправить.
8. Введите пароли пользователей.
9. Нажмите Готово.
Вы вернетесь в окно обмена. Вам нужно выбрать, какие папки и пользователи будут делиться с вашим компьютером Windows. Нажмите кнопки «плюс» (+) и «минус» (-) в разделе «Общие папки» и «Общие пользователи», чтобы настроить параметры. Наконец, вам нужно сохранить IP-адрес вашего Mac. Вы найдете его под сообщением «Общий доступ к файлам: Вкл».
2. Доступ к файлам Mac на вашем ПК с Windows?
.png)
Теперь настало время для таргетинга на ПК с Windows. Следуйте инструкциям ниже для передачи файлов с Mac на Windows:
1. Откройте проводник.
2. В адресной строке вверху окна введите IP-адрес вашего Mac. Нечто подобное 192.168.1.68 должно быть получено.
3. Появится новое окно с запросом имени пользователя и пароля.
4. Введите свои учетные данные в точности так, как они отображаются на вашем Mac.
File Explorer покажет все папки и пользователей, которые вы добавили в списки «Общие папки» и «Общие пользователи» на вашем Mac. Вы можете перемещать, редактировать и копировать папки, как и любую другую папку Windows.
Как перенести файлы с компьютера Windows на Mac
Теперь давайте посмотрим на обратный процесс: как перенести файлы с Windows на Mac.
1. Настройте общий доступ к файлам в Windows
.png)
Во-первых, убедитесь, что сетевое обнаружение включено в Windows. Запустите компьютер Windows и выполните следующие действия:
1. Откройте приложение «Настройки» и перейдите в «Сеть и Интернет».
2. На левой панели щелкните Состояние.
3. В разделе «Изменить настройки сети» выберите «Параметры общего доступа».
4. Разверните меню «Частная сеть» или «Публичная сеть» в зависимости от текущего типа подключения.
5. Установите флажок «Включить обнаружение сети».
6. Установите флажок «Общий доступ к файлам и принтерам».
7. Нажмите «Сохранить изменения».
Чтобы открыть общий доступ к папкам, щелкните правой кнопкой мыши имя папки и выберите «Свойства» -> «Общий доступ» -> «Общий доступ к файлам и папкам» -> «Общий доступ». Вам также необходимо сохранить IP-адрес вашего компьютера с Windows (Настройки -> Сеть и Интернет -> Wi-Fi -> Свойства оборудования) или имя вашего компьютера (Настройки -> Система -> О программе).
2. Доступ к файлам Windows на Mac
.png)
Если вы довольны параметрами обмена, пришло время перенести файлы с ПК с Windows на компьютер Mac. Для этого выполните следующие действия:
1. Откройте приложение Finder.
2. В строке меню в верхней части экрана выберите «Перейти» -> «Подключиться к серверу».
3. Введите smb: // [IP-адрес] или smb: // [имя компьютера] и нажмите Enter.
4. Вам будет предложено ввести имя пользователя и пароль Windows.
5. Когда закончите, нажмите Connect.
Общий контент будет доступен в разделе Finder раздела Shared.
Другие способы обмена файлами между Mac и ПК
Вы не ограничены вышеупомянутыми встроенными методами. Есть и другие способы обмена файлами между Windows и Mac. Следующие методы работают, если оба компьютера не находятся в одной сети.
1. Используйте сервис облачного хранилища
Dropbox, Google Drive и OneDrive имеют приложения для Windows и MacOS. Установите их и загружайте / скачивайте файлы по мере необходимости. Если у вас есть резервная копия хранилища iCloud , вы также можете использовать ее для обмена файлами.
2. Используйте флешку
Простое, но эффективное решение для тех, кому нужно быстро перенести файлы с Mac на Windows.
3. Используйте свой собственный сервер
Если вы уже заплатили за веб-хостинг, вы можете загрузить файл с помощью FTP и загрузить его на другой компьютер. Одними из лучших услуг веб-хостинга являются WP Engine, InMotion и Bluehost.
Download PC Repair Tool to quickly find & fix Windows errors automatically
Although there are several methods like using Team Viewer, Cloud storage, etc. to transfer files between Mac OS X and Windows 10, you can send a file from Mac to Windows without any software. All you need to do is to turn on File Sharing on Mac OS X, and you are good to go. To get things done, follow the following steps, which are quite easy.
Send files from Mac to Windows PC
Before getting started, you should know that you can execute these following steps only when your Windows computer and MacBook are connected to the same network, i.e., Wi-Fi router.
To start, you need to connect both computers to the same network. After that, you need to enable File Sharing on MacBook. To do that, open System Preferences. You can d0 that using Spotlight search or go to the Apple logo in the navigation menu bar > System Preferences and click on Sharing option.
As you want to share files, you need to turn on File Sharing. Following that, click the Options button and select the following checkboxes-
- Share files and folders using SMB
- Share files and folders using AFP
You will find an IP address on the Sharing window, which looks like this-
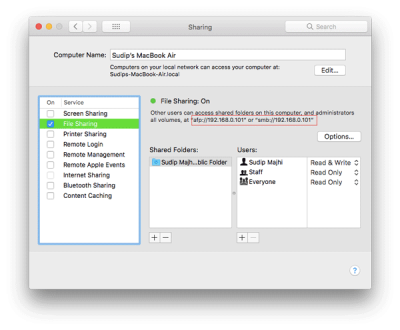
You need this IP address. So, copy it somewhere.
Following that, open up your Windows computer and press Win+R to open the Run prompt and enter the IP address like this-
\192.168.0.101
You will be asked for the username and password. Enter your MacBook’s username and password correctly, after which you will see this window.

From here, you can access all the MacBook’s files from Windows computer.
Hope this simple tutorial will be helpful for you.
This post shows you how to transfer data from Windows PC to Mac using Windows Migration Assistant Tool.

Sudip loves to engage with the latest technology & gadgets. Apart from writing about all things technology, he is a Photoshop junkie and a football enthusiast.
I know that , we can copy files from host to another from mac using finder/smb protocol.
But I would like to copy files from mac to windows machine using command line. so that, I can call the same pro-grammatically.
Could anyone please guide?
![]()
tshepang
11.9k21 gold badges90 silver badges134 bronze badges
asked Jul 1, 2013 at 19:21
![]()
If you can copy the files using the Finder then you have connected to the SMB share. Usually, you can see this from the command line by looking in the /Volumes folder; if it doesn’t look like it’s there, try running the mount command to see other places things might be connected. The following assumes the SMB is mounted in /Volumes, adjust as necessary for your particular case.
On the command line, issue the command:
ls /Volumes
You should see the SMB share listed along with some other names.
Then to copy files to it:
cp myfiles/* /Volumes/MySMBShare/mydirectory
If the name of the share has spaces in it you will need to escape them with backslashes like so:
cp myfiles/* /Volumes/My SMB Share/mydirectory
answered Jul 1, 2013 at 19:31
![]()
PerryPerry
1,1229 silver badges14 bronze badges
4
Перенести файлы с MAC на Windows можно разными способами, например используя специальные программы такие как Team Viewer, Cloud storage. Но есть способ при котором вам не придется устанавливать дополнительные программы. Все, что вам нужно сделать, это включить общий доступ к файлам в Mac OS X (расшарить папку) и зайти на нее с Windows. Вот как это сделать.
Прежде чем приступить к работе, вы должны знать, что вы можете выполнить следующие шаги только тогда, когда оба компьютера Windows и MacBook подключены к той же сети, то есть к локальной сети по проводу или через Wi-Fi.
Для начала вам необходимо подключить оба компьютера к одной и той же сети. После этого вам нужно включить общий доступ к файлам на MacBook. Для этого откройте «Системные настройки». Вы можете использовать d0, используя поиск Spotlight или перейти к логотипу Apple в панели меню навигации—> «Системные настройки» и нажать «Общий доступ».
Поскольку вы хотите поделиться файлами, вам необходимо включить общий доступ к файлам. После этого нажмите кнопку «Параметры» и выберите следующие флажки:
- Совместное использование файлов и папок с помощью SMB
- Совместное использование файлов и папок с использованием AFP
Вы найдете IP-адрес в окне совместного доступа, который выглядит следующим образом:
Вам нужен этот IP-адрес. Скопируйте его.
После этого откройте свой компьютер Windows и нажмите Win + R, чтобы открыть приглашение «Запустить» и введите IP-адрес,
192.168.0.101
Вас попросят ввести имя пользователя и пароль. Правильно введите имя пользователя и пароль MacBook, после чего вы увидите следующее окно.
Теперь вы можете перенести файлы с MAC на Windows и обратно.

 (8 оценок, среднее: 4,13 из 5)
![]() Загрузка…
Загрузка…
How do I switch from Mac to Windows?
Mac to Windows
- System Preferences. Click the System Preferences icon to open settings.
- Startup Disk. Click Startup Disk from the System Preferences panel.
- Restart in Windows. Click Windows. Click Restart…
- Success! You have successfully switched from Mac to Windows.
Can you transfer files from Mac to PC via USB?
You can use an external hard drive to transfer files from your Mac to a PC, or between any other types of computers. External hard drives are particularly useful for transferring a large amount of data that won’t fit on a smaller storage device, such as a USB flash drive or optical disc.
To let users connect to your Mac from a Windows computer, turn on file sharing and enable SMB sharing.
…
Share Mac files with Windows users
- On your Mac, choose Apple menu > System Preferences, then click Sharing. …
- Select the File Sharing checkbox, then click Options.
- Select “Share files and folders using SMB.”
How do I connect my Mac to Windows 10?
On the Windows computer, open File Explorer, click Network, and locate the Mac you want to connect to. Double-click the Mac, then enter the account name and password for the user account. It may take a moment for the Windows computer to show that the Mac is on the network.
Which is better Windows 10 or macOS?
Zero. The software available for macOS is just so much better than what’s available for Windows. Not only do most companies make and update their macOS software first (hello, GoPro), but the Mac versions by and large work better than their Windows counterparts. Some programs you can’t even get for Windows.
Can a Mac run Windows programs?
On a Mac, you have several options for installing software that allows you to run Windows and Windows applications: … To run Windows in a virtual machine within macOS, use Parallels Desktop , VMware Fusion , or VirtualBox .
Can you transfer files from Windows to Mac via USB?
Fortunately, using an external hard drive to move files is easy. Just plug the external drive’s USB cable into your PC and copy your files to the drive. … You can then copy everything to the Mac (make a folder for all the files first), or you can just copy the files you need and keep the rest on the external drive.
How to Copy Files From Android to Your Mac
- Connect your phone to your Mac with the included USB cable. …
- Download and install Android File Transfer. …
- Click Get started.
- Navigate through the directory to find the files you want on your Mac.
- Find the exact file and drag it to the desktop or your preferred folder.
Can not copy files to USB on Mac?
The main reason for this issue is macOS can only read NTFS format files but can not write files to NTFS disk. So if the USB disk is NTFS format, then the copy and paste operation can not be operated. So we should change the USB Disk file format to others such as FAT or ExFAT. And ExFat is a more good choice.
How do I airdrop from Mac to Windows?
How to share files between a Mac and a PC
- Open System Preferences on your Mac.
- Click Sharing.
- Click the checkbox next to File Sharing.
- Click Options…
- Click on the checkbox for the user account you’d like to share with a Windows machine under Windows Files Sharing. You might be asked to enter a password.
- Click Done.
How do I transfer files from Mac to Windows using Bluetooth?
On your Mac, click the Bluetooth status icon in the menu bar, select a device, then choose Send File to Device. If you don’t see the Bluetooth status icon, choose Apple menu > System Preferences, click Bluetooth, then select “Show Bluetooth in menu bar.” Select a file, then click Send.
How do I transfer files from Mac to Windows using bootcamp?
RELATED: How to Install Windows on a Mac With Boot Camp
You can’t copy files to your Mac partition, edit files on it, or delete files from within Windows. To get around this limitation, you’ll need a third-party tool like Paragon HFS+ for Windows or Mediafour’s MacDrive.
Once you switch from a PC to a MAC, you will likely want to transfer the files from one to the other. The easiest method to transfer these files is over WiFi. There is no need for additional cables or hardware required to transfer larger files between Mac and Windows as long as both computers are on the same network or have access to the internet.
This article describes the methods for transfer large files between Mac and Windows over WiFi using free Cloud Services, a WiFi network, and a Flash drive or Hard Disk.
Transfer Files between Windows and Mac with Cloud Drives
The best and free solution to transfer files as is to use a Cloud service. If you are not tech-savvy, rather than going through the network setup, these cloud apps are easy to use. Most of the cloud services like Dropbox, Google Drive, SkyDrive, etc., are available for both the MAC and PC. These Cloud Drive transfer is the most reliable method and does not require additional hardware.
When using the cloud services to transfer files, you can install the Windows and MAC applications in your system and copy files from your hard disk (Windows System hard disk) to the cloud drive. Once you drag or copy and paste the files onto the cloud drive, these files will then sync with your second system. In the second system (MAC), you can copy synced files from cloud drive to your system hard disk to make sure a local copy on your system hard disk.
Related: 6 Easy Methods to transfer files between Android and Windows
Dropbox is one of the best drive solutions available with multip platform support both for PCs and Smartphones. Dropbox is offering 2GB free space and most of the time you can delete the files after transferring to free up space on the cloud drive. You can earn up to 18GB by referral and available on almost all platforms, that can download from DropBox website.
Google Drive, direct from Google also supports and sync files between Windows PC and Mac. Google Drive store files up to 10GB size and offers 15GB free space. You need only a valid Gmail account, and you can install the applications on your PC and MAC system to share files. You can download the Google Drive Application from Google Drive website.
SkyDrive is a cloud service from Microsoft that offers the software for MAC and Windows to install and share files. You can share photos, documents, and other important files between MAC and PC using SkyDrive. This drive offers a 7GB free space and downloads from SkyDrive website.
Transfer Files between Windows and Mac through Network
The next solution as long as you have a home network is to transfer files between Windows and Mac through the network. Before you start, make sure both systems are on the same network. You can’t transfer files remotely from one machine to another one. Both machines should be on the same network to transfer files with each other.
The example below demonstrates Windows PC as the host and the first step is to Enable File Sharing on Windows. This process may be slightly different based on the Windows operating system you are using.
- Windows 10: Control Panel > Network and Internet > Network and Sharing Center > Advanced Sharing Settings > File and Printer Sharing > Turn on File and Printer Sharing.
- Windows 7: Control Panel > Network and Sharing Center > Choose Homegroup and Sharing options > Change Advanced Sharing Settings > click “Turn on File and Printer Sharing.”
- Windows Vista: Control Panel > Network and Sharing Center > Expand the File Sharing drop-down > click on “Turn on File and Printer Sharing.”
- Windows XP: Control Panel > double-click Network Setup Wizard and run it.
Once your Windows PC is ready for file sharing, then the next step is to connect Mac to Windows. Before you start, make sure that followed all the setting on Windows PC as we specified above. Also, please make sure both machines are connected to the same network.
Now open the Finder window on MAC, on the left pane under the “Shared” you can see shared machines. Select the name of the windows machine and click to open up the folder. You can drag and drop files into this folder to share between MAC and Windows.
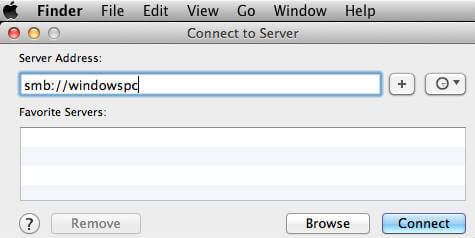
If you are unable to see the Windows machine on MAC finder, then Click on Finder > Go > Connect to Server (Command+K). Type in the prefix smb:// followed by the IP address or hostname of the windows machine. (like smb://192.168.1.101 or smb://windowspc ).
Related: How to Transfer Photos Without Losing Quality-A Complete Guide
USB Flash Drives to Transfer Files between Mac and Windows
Since USB drives are an easy and portable solution, we can start with the USB drives to transfer files. Flash drives are available in the range of 16GB to 256GB for a very low price. Please see the fast transfer USB 3 USB SanDisk flash drive from Amazon that supports to transfer up to 5 times faster (90MB/s) than standard USB 2.0 drives.
USB drives, by default formatted into FAT32, which is compatible with both Mac and Windows. Two drawbacks on this format are that FAT32 supports maximum file size into 4GB and FAT 32 format is more susceptible to disk errors and offers no security. We strongly recommend this method for a temporary purpose file transfer.
Use Portable Hard Disks to Transfer Files
Even though the hard drives are a one-time investment, you can rely upon these drives to transfer large files between PC and Mac. You can have portable Hard disks with a USB port to transfer files between Mac and Windows.
The portable drives are coming in different storage capacity in Terabytes as regular hard disk and also Solid State Drives. SSDs are fast compared to regular hard drives and we already listed a couple of best external SSDs. When you use a portable Hard Drive, please make sure to format hard disk FAT32 to get access for both Mac and Windows OS system.
The hard drives are readily available in the market that offers compatibility with both OS with some additional software. You can get a Seagate Slim USB 3 2TB hard drive from Amazon for $69.99.
NAS Enabled Hard Drives to Transfer Files
Now you can connect your external Hard Disk as a part of your Home Network. The Hard Disk price is coming down, and the storage capacity is growing in terabytes in the market. There are two smart solutions to use the hard disk to transfer filer. The first one is to depend on NAS (Network Attached Storage) devices that are a little bit expensive, but very reliable solution.
There is one WD 4TB My Cloud Personal Network Attached Storage from Amazon with 4TB size and can buy from Amazon for $167.00. Hard drives are coming with a built-in network card and directly connect to a home network and transfer files between all devices on the same network.
The second low-cost solution is to buy a WiFi router with USB Port (Asus Dual-Band Router with USB from Amazon for $69.00). This router USB port can be used to connect the external hard disk to the home network. You can use this guide to Connect External Hard Disk to Home Network over WiFi.
Transfer Files between Mac and Windows by Email
Email file transfer doesn’t need any additional setup or knowledge. However, we recommend this as the least solution to transfer files. You can send the email attachment from one machine and open the email in the second machine and download the attached file.
Emails are capable of attaching large files size in GBs. However, emails are still not offering large file transferring like cloud dives or SMTP transfer. Please refer to our solution to email LARGE file attachment for those who want to transfer large file attachments.
Smartphones as Flash Drives to Transfer Files
Even you can use your iPhone as a portable drive to transfer the files in between MAC and PC. Please see the post here iPhone as a portable hard disk for your Mac and for the PC please see iPhone as a portable hard disk for your Windows.
Transfer Files between Windows and MAC over WiFi
There are plenty of methods to transfer files between Mac and Windows. If you are not tech-savvy and don’t have large files, then the best choice is Cloud Drives or USB Flash Drives.
Use a Portable Hard Drive or USB drive to transfer your files, if you are ready to spend money on external discs. Transfer files via your network, if you have large size files to transfer. The alternative choice is to use NAS based drives and use as local cloud storage for the entire home network.
Disclosure: Mashtips is supported by its audience. As an Amazon Associate I earn from qualifying purchases.